FortiGate Secured East/West
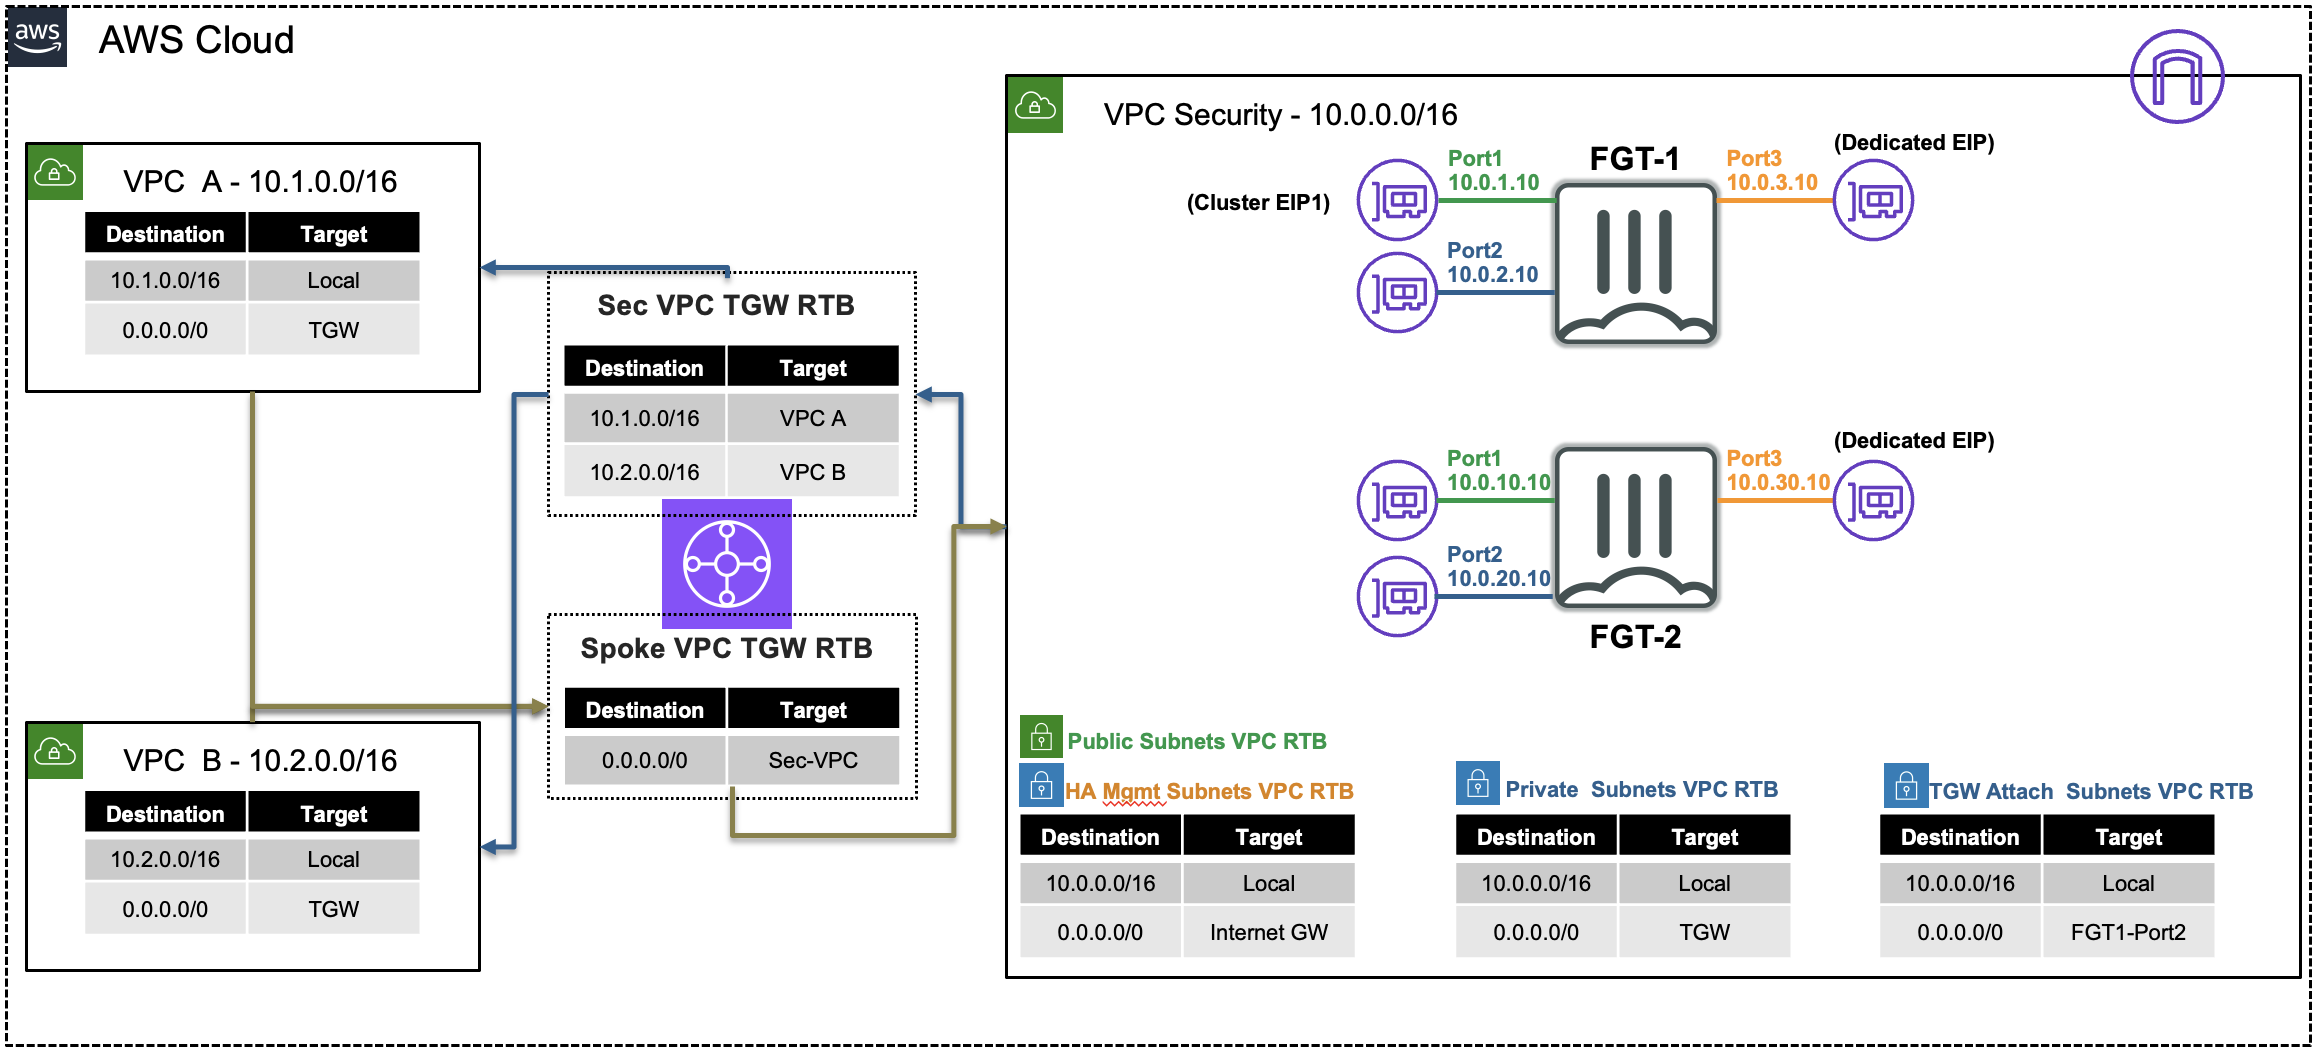
FortiGate Security VPC securing East/West Traffic
| Goal | Utilize the provisioned Security VPC and Transit gateway architecture to provide security for East/West (Inter-VPC) flows with FortiGate NGFW. |
| Task | Create FortiGate Policy objects and rules allowing East/West traffic to Acme Corp resources. |
| Verify task completion | Confirm east/west VPC connectivity from EC2 Instance in Spoke1 via Ping to EC2 instance in Spoke 2 |
Summarized Steps (click to expand each for details)
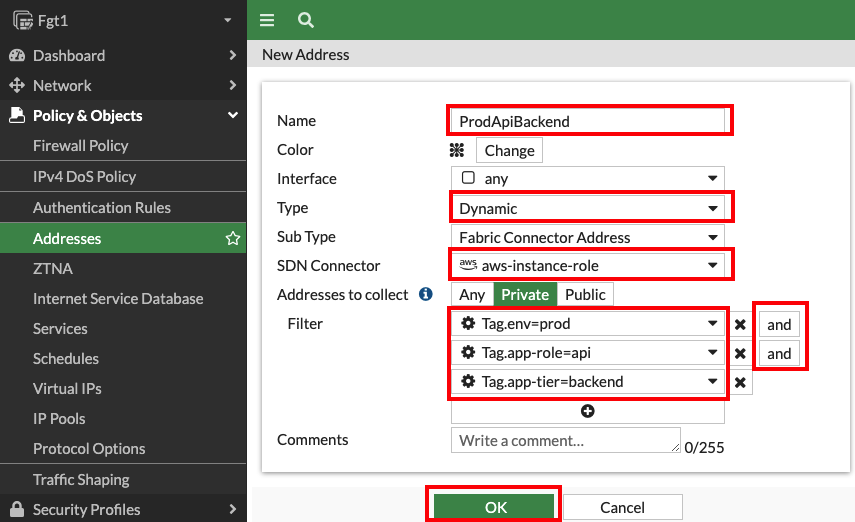
Create Dynamic Address Objects.
Detailed Steps…
- 1.1: In the FortiGate GUI, navigate to Policy & Objects > Addresses, and click Create new.
- 1.2: Create an address object with the settings shown below and click OK.
Tip
Dynamic address objects allows creating address objects based on resource metadata such as VPC ID, Auto Scale Group, EKS Cluster or Pod, and even Tag Name + Value pairs applied to the resource. FortiOS is using AWS API calls behind the scenes such as ec2:DescribeInstances, eks:ListClusters, eks:DescribeCluster, etc to find running resources to match based on metadata and pull their IP address information. This is done on a frequent basis to keep the dynamic address object up to date automatically. To learn more about all the public and private clouds this feature supports, check out our documentation.
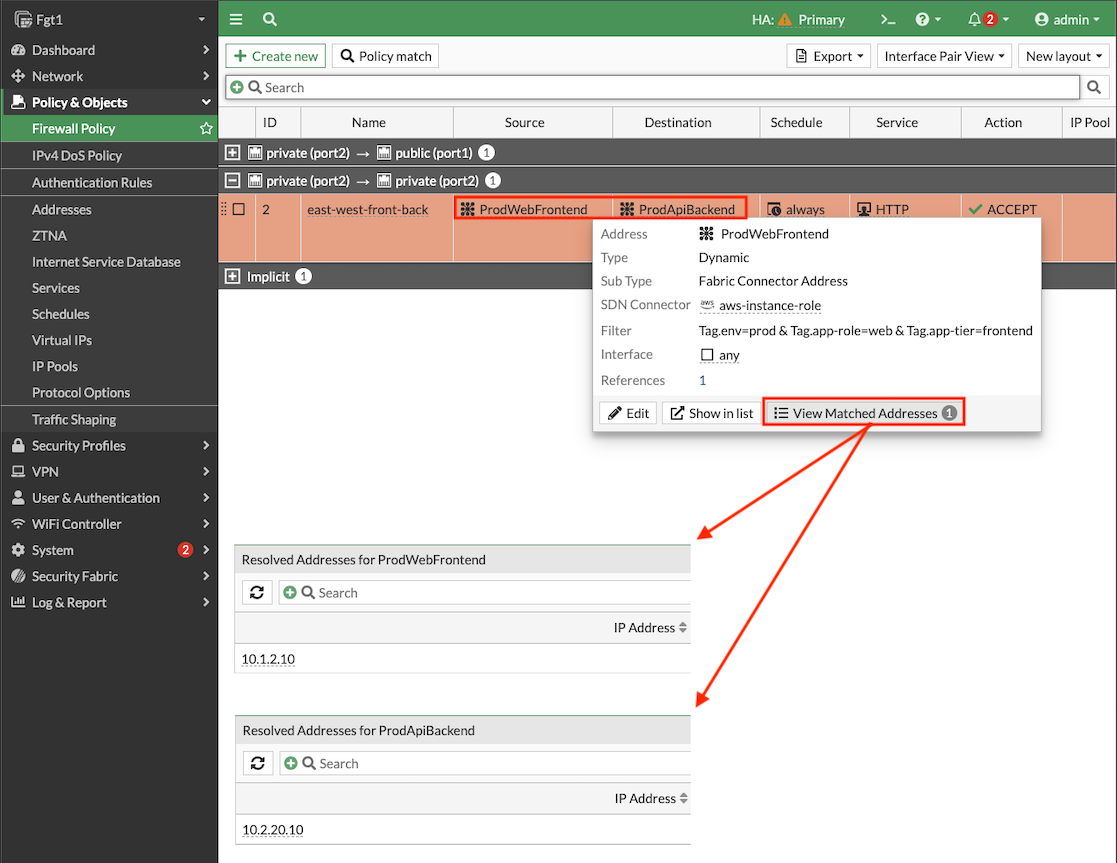
Name Type Sub Type SDN Connector Address Type Filter Value ProdWebFrontend Dynamic Fabric Connector Address aws-instance-role Private Tag.env=prod AND Tag.app-role=web AND Tag.app-tier=frontend ProdApiBackend Dynamic Fabric Connector Address aws-instance-role Private Tag.env=prod AND Tag.app-role=api AND Tag.app-tier=backend 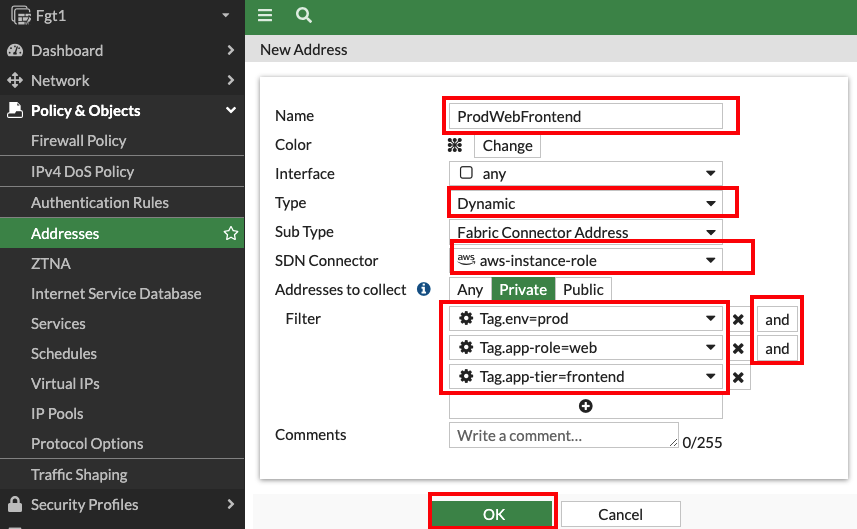
Create Firewall Policy permitting East/West Traffic.
Detailed Steps…
- 2.1: Navigate to Policy & Objects > Firewall Policy and click Create new.
- 2.2: Create a new policy with the settings shown below and click OK to allow east west traffic from Spoke1-Instance1 to Spoke2-Instance1.
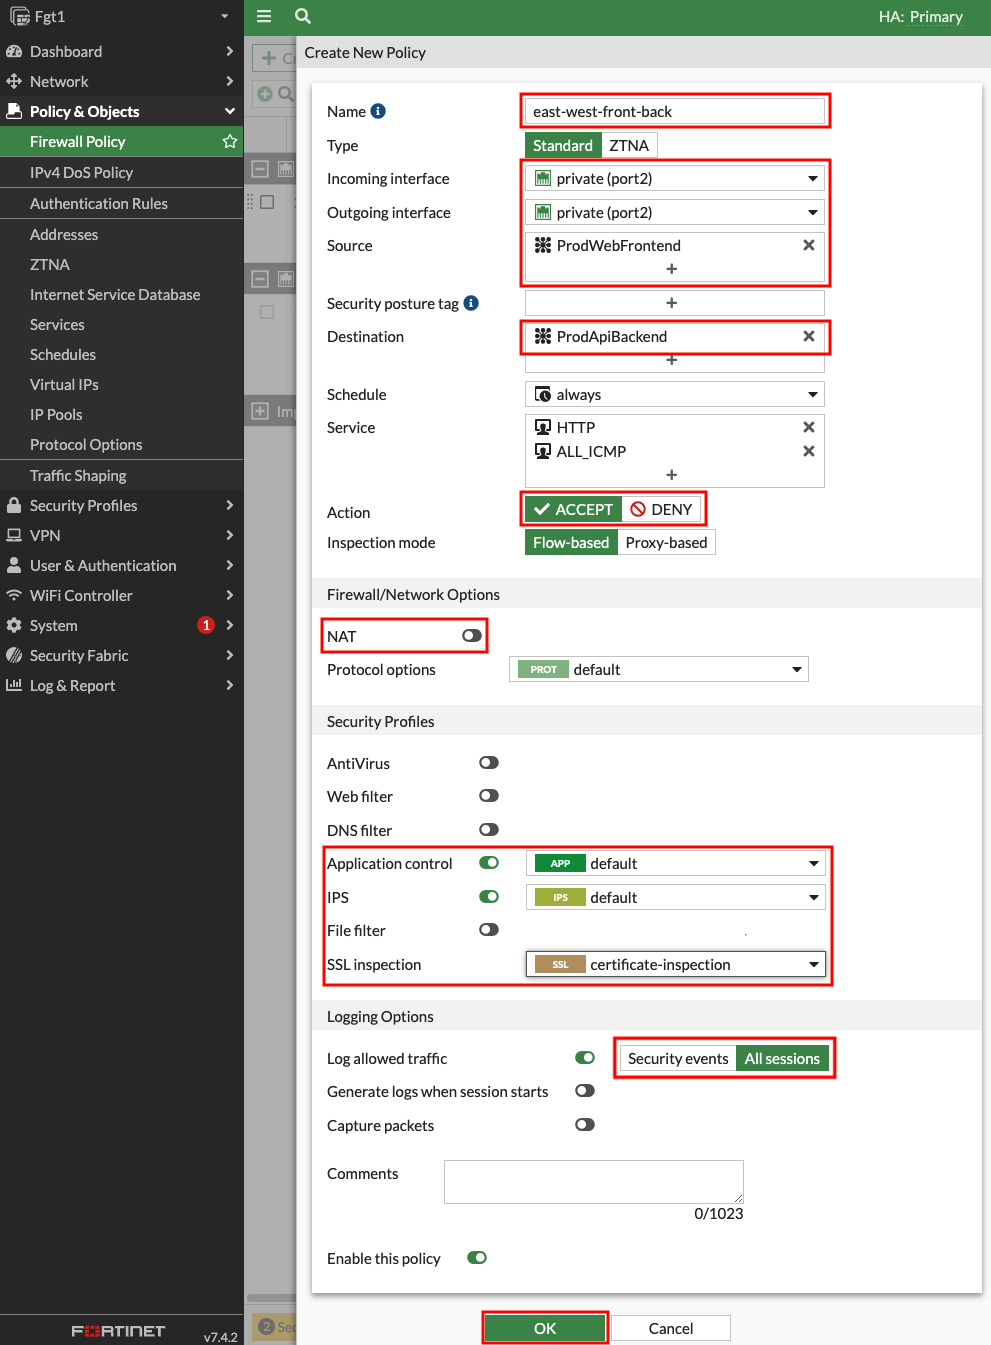
- 2.3: Validate that the dynamic address objects are automatically populated by hovering over both objects. In the popup menu, click View Matched Addresses button. ProdWebFrontend should have 10.1.2.10 and ProdApiBackend 10.2.20.10.
Verify connectivity from Spoke1-Instance1.
Detailed Steps…
3.1: Navigate to the EC2 Console and go to the Instances page (menu on the left).
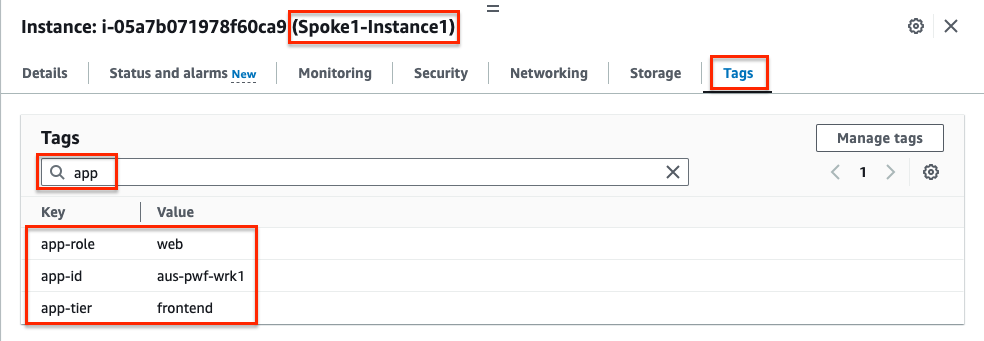
3.2: Find & Select the Spoke1-Instance1 instance and select the Tags tab (detail pane below) to view the tags applied to the instance. Notice the tags seen here are the metadata that the FortiOS dynamic address objects are matching against. Search for app or env to see just the relevant tag key and value pairs.
3.3: Find & Select the Spoke1-Instance1 instance and click Connect > EC2 serial console.
- Copy the instance ID as this will be the username and click connect.
3.4: Login to the EC2 instance:
- username:
<<copied Instance ID from above>> - Password:
FORTInet123!
- username:
3.5: Run the commands
ping -c5 10.2.20.10andcurl 10.2.20.10to connect to private resources, successfully.3.6: Run the command
ssh 10.2.20.10to be blocked by firewall policy.
Let’s dig deeper to understand how all of this works.
Detailed Steps…
- 4.1: Navigate to Log & Report > Forward Traffic and you should logs for the traffic you generated.
- 4.2: Double click a log entry to view the Log Details.
Info
In the Source and Destination sections of the log, we see the no NAT is applied and traffic comes in and goes out port2 of the Primary FortiGate. This is because of the VPC routes in the all VPCs (Spoke1, NGFW, and Spoke2) are working together with the Transit Gateway (TGW) and Transit Gateway route tables to route the east/west traffic through the primary FortiGate. This is a centralized design that is also commonly called an appliance, inspection, or security VPC.
We can also see denied traffic that is matching the Implicit Deny firewall policy. With adding granular firewall policies & objects including dynamic address objects and security profiles, you can securely control traffic as desired.
- 4.3 Below is a step by step of the packet handling for the east/west web traffic from Spoke1-Instance1.
Hop Component Description Packet 1 Spoke1-Instance1 -> 0.0.0.0/0 TGW Spoke1-Instance1 sends east/west traffic to the VPC router (its default gw) which routes traffic to TGW as configured in the Spoke1 VPC RTB. 10.1.2.10:src-port -> 10.2.20.10:80 2 Spoke1-TGW-Attachment -> 0.0.0.0/0 Sec-TGW-Attachment Spoke1-TGW-attachment is associated to the Spoke VPC TGW RTB. This TGW RTB has a default route to Sec-TGW-Attachment, so traffic is forwarded there. 10.1.2.10:src-port -> 10.2.20.10:80 3 Sec-TGW-Attachment -> 0.0.0.0/0 FGT1-Port2 Sec-TGW-Attachment is attached to the Security VPC TGW Attach Subnets which have a default route to primary FortiGate1 Port2, private interface. 10.1.2.10:src-port -> 10.2.20.10:80 4 FGT1-Port2 -> 0.0.0.0/0 TGW FGT1 sends inspected & allowed traffic to the VPC router (10.0.0.0/8 static route out port2) via Port2, which routes traffic to the TGW as configured in the Private Subnet VPC RTB. 10.1.2.10:src-port -> 10.2.20.10:80 5 Sec-TGW-Attachment -> 10.2.0.0/16 Spoke2-TGW-Attachment Sec-TGW-Attachment is associated to the Sec VPC TGW RTB. This TGW RTB has a route for Spoke2 VPC via Spoke2-TGW-Attachment, so traffic is forwarded there. 10.1.2.10:src-port -> 10.2.20.10:80 6 Spoke2-TGW-Attachment -> Spoke2-Instance1 Spoke2-TGW-Attachment is attached to subnets in Spoke2 VPC which have a local VPC route to reach Spoke2-Instance1. 10.1.2.10:src-port -> 10.2.20.10:80 7 Spoke2-Instance1 -> 0.0.0.0/0 TGW Spoke2-Instance1 sends reply traffic to the VPC router (its default gw) which routes traffic to TGW as configured in the Spoke1 VPC RTB. 10.2.20.10:80 -> 10.1.2.10:dst-port 8 Spoke2-TGW-Attachment -> 0.0.0.0/0 Sec-TGW-Attachment Spoke2-TGW-attachment is associated to the Spoke VPC TGW RTB. This TGW RTB has a default route to Sec-TGW-Attachment, so traffic is forwarded there. 10.2.20.10:80 -> 10.1.2.10:dst-port 9 Sec-TGW-Attachment -> 0.0.0.0/0 FGT1-Port2 Sec-TGW-Attachment is attached to the Security VPC TGW Attach Subnets which have a default route to primary FortiGate1 Port2, private interface. 10.2.20.10:80 -> 10.1.2.10:dst-port 10 FGT1-Port2 -> 0.0.0.0/0 TGW FGT1 sends inspected & allowed traffic to the VPC router (10.0.0.0/8 static route out port2) via Port2, which routes traffic to the TGW as configured in the Private Subnet VPC RTB. 10.2.20.10:80 -> 10.1.2.10:dst-port 11 Sec-TGW-Attachment -> 10.1.0.0/16 Spoke1-TGW-Attachment Sec-TGW-Attachment is associated to the Sec VPC TGW RTB. This TGW RTB has a route for Spoke1 VPC via Spoke1-TGW-Attachment, so traffic is forwarded there. 10.2.20.10:80 -> 10.1.2.10:dst-port 12 Spoke1-TGW-Attachment -> Spoke1-Instance1 Spoke1-TGW-Attachment is attached to subnets in Spoke1 VPC which have a local VPC route to reach Spoke1-Instance1. 10.2.20.10:80 -> 10.1.2.10:dst-port 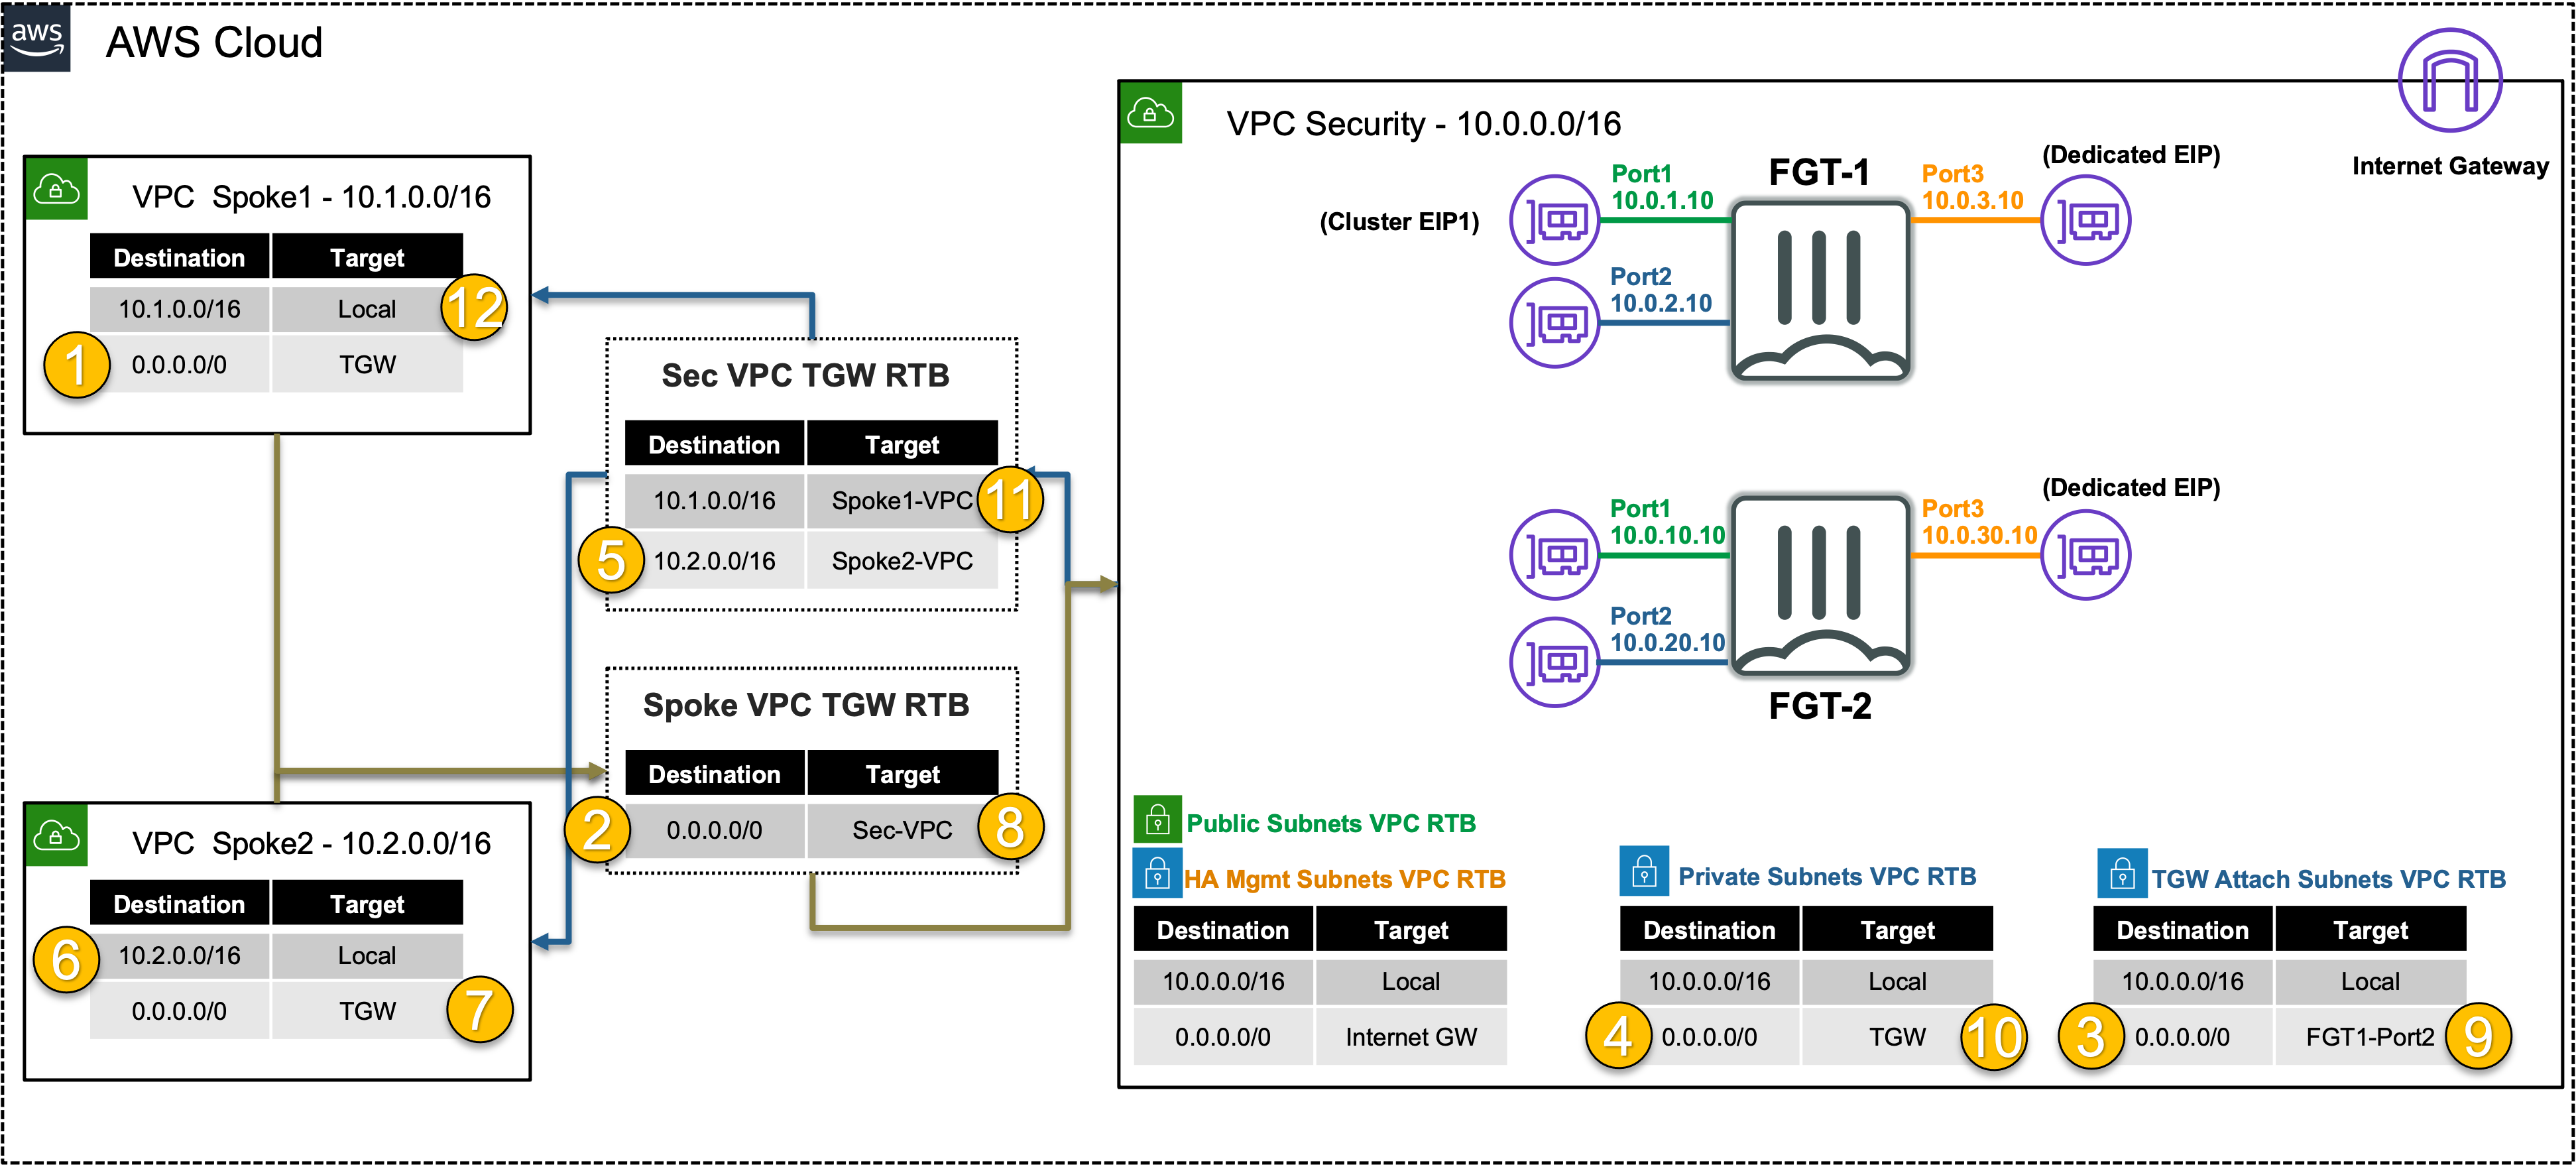
This concludes this task