VPC Peering
| Goal | Establish point to point access from VPC A to VPC B |
| Task | Create a peering connection and VPC routes so EC2 Instance-A can ping Instance-B |
| Validation | Confirm point to point VPC connectivity with ping from EC2 Instance-A to B and Instance-B to C |
Introduction
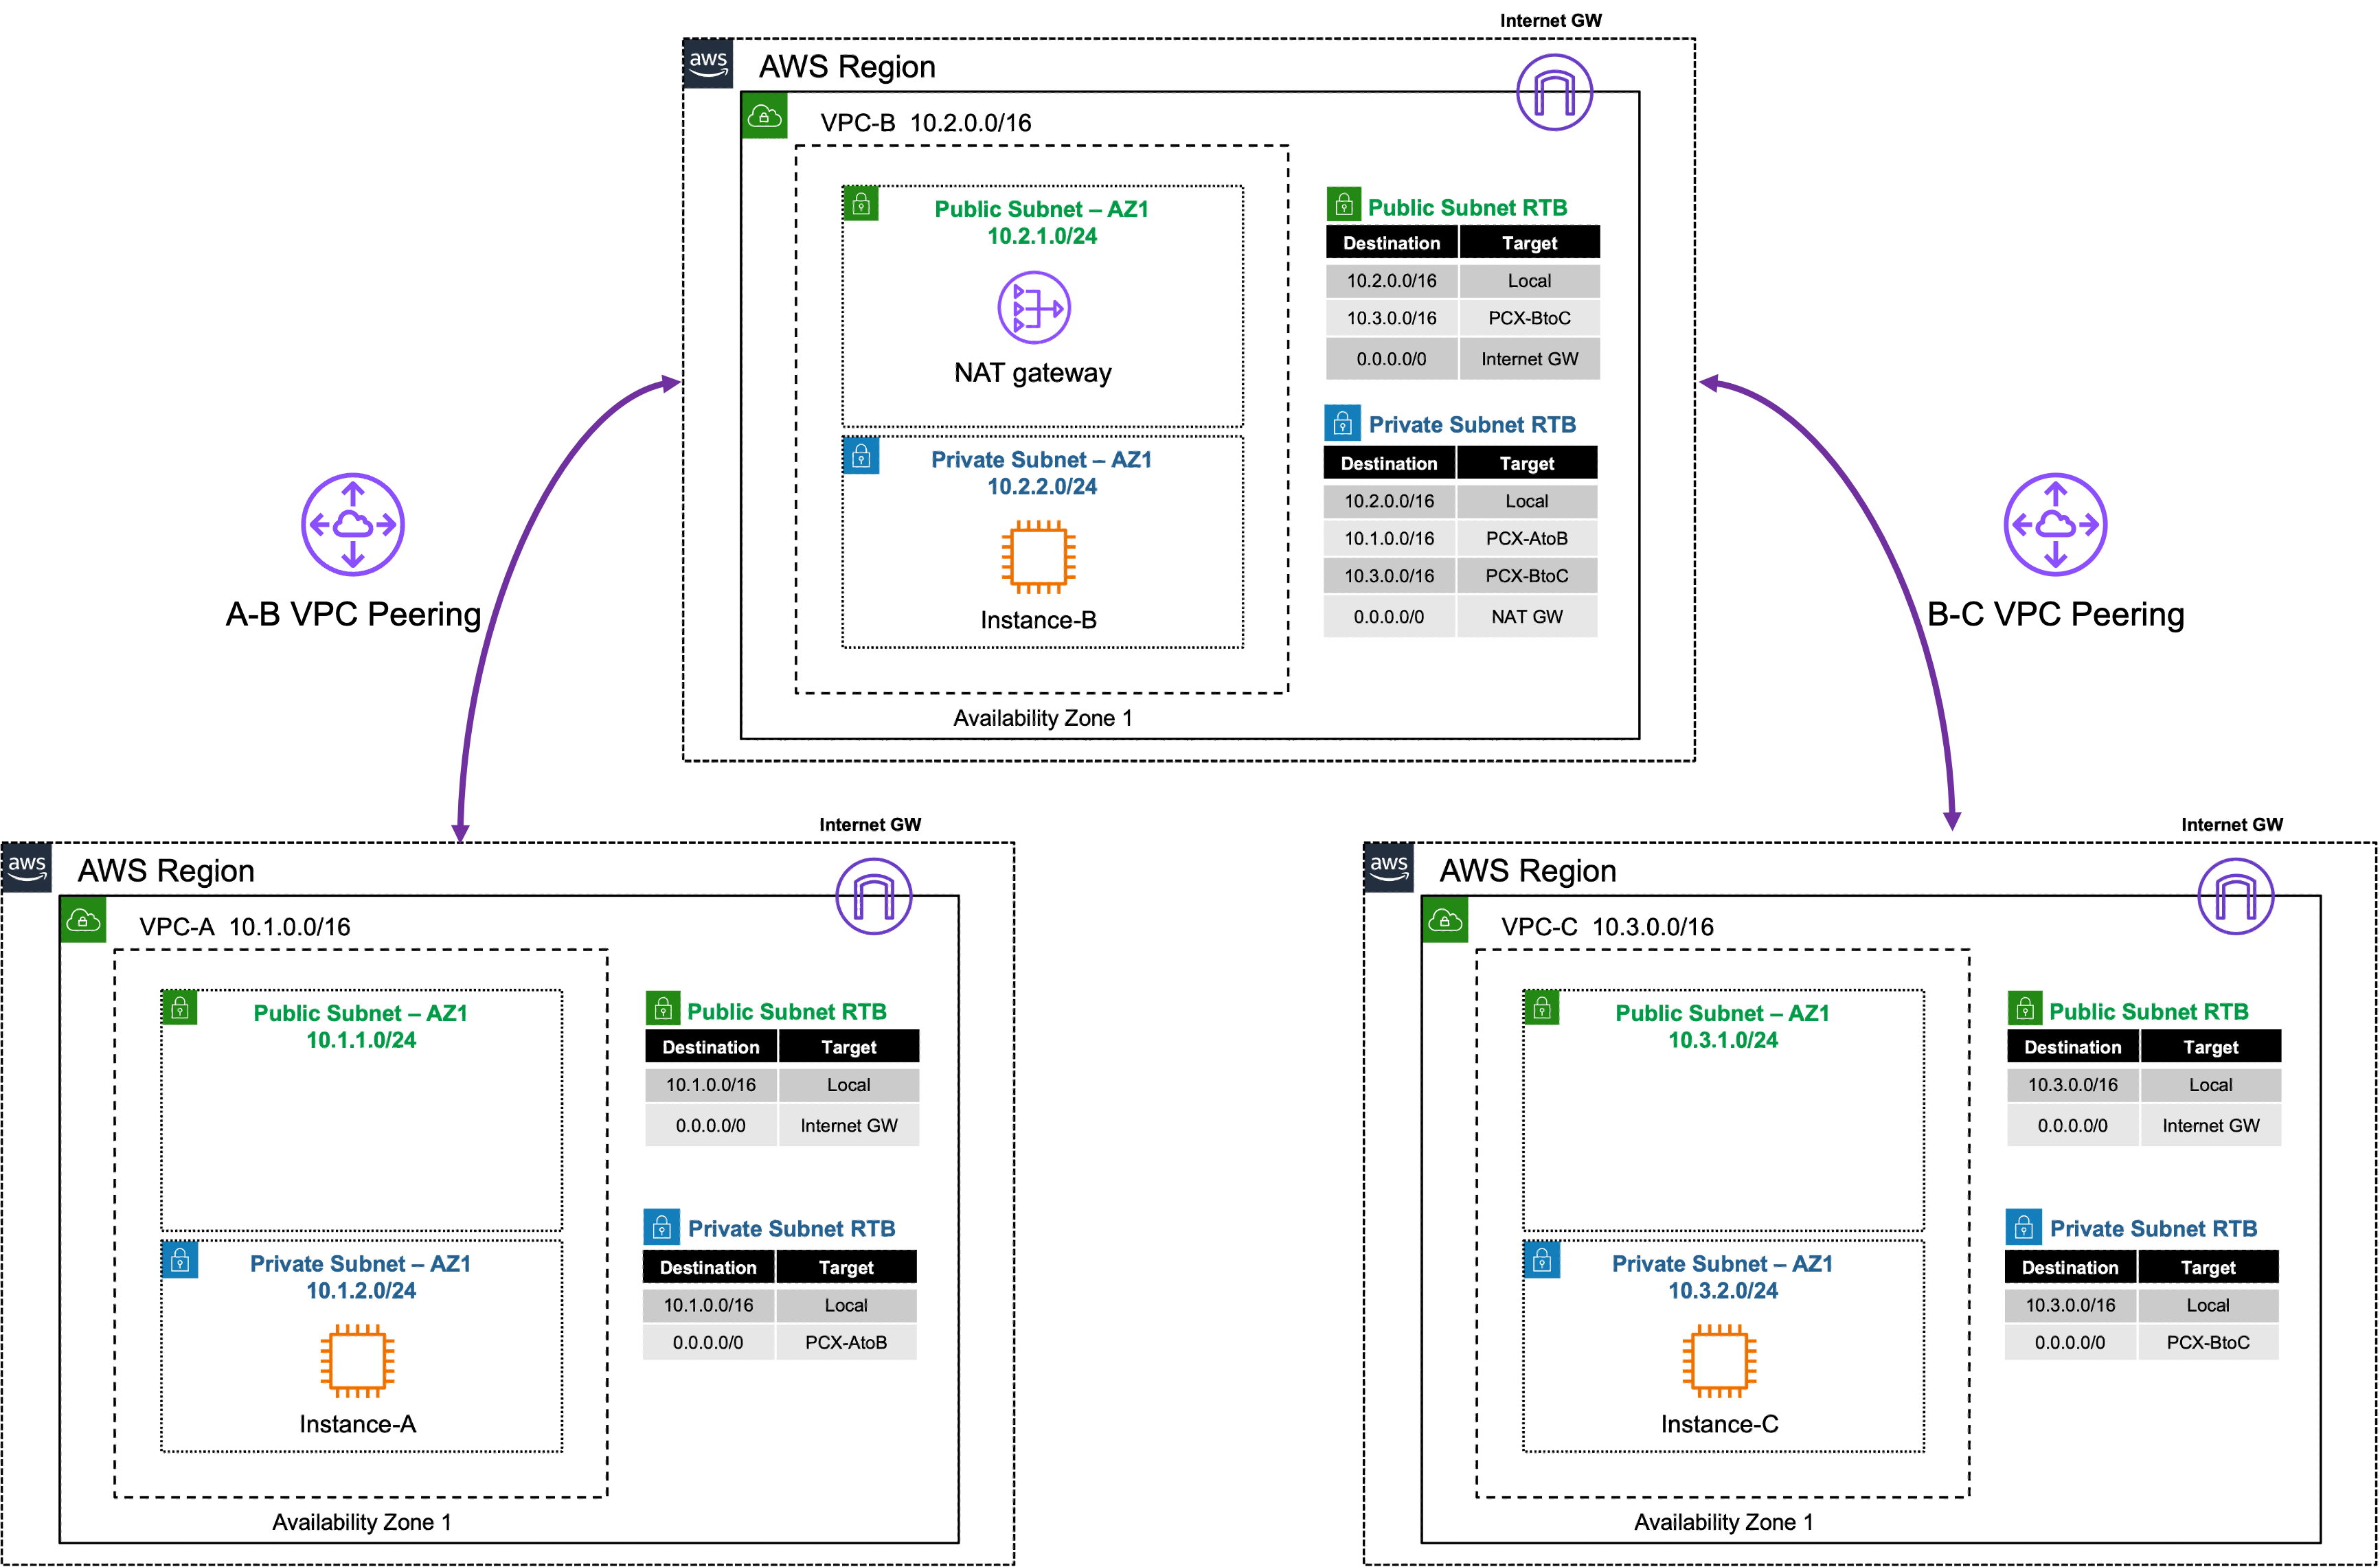
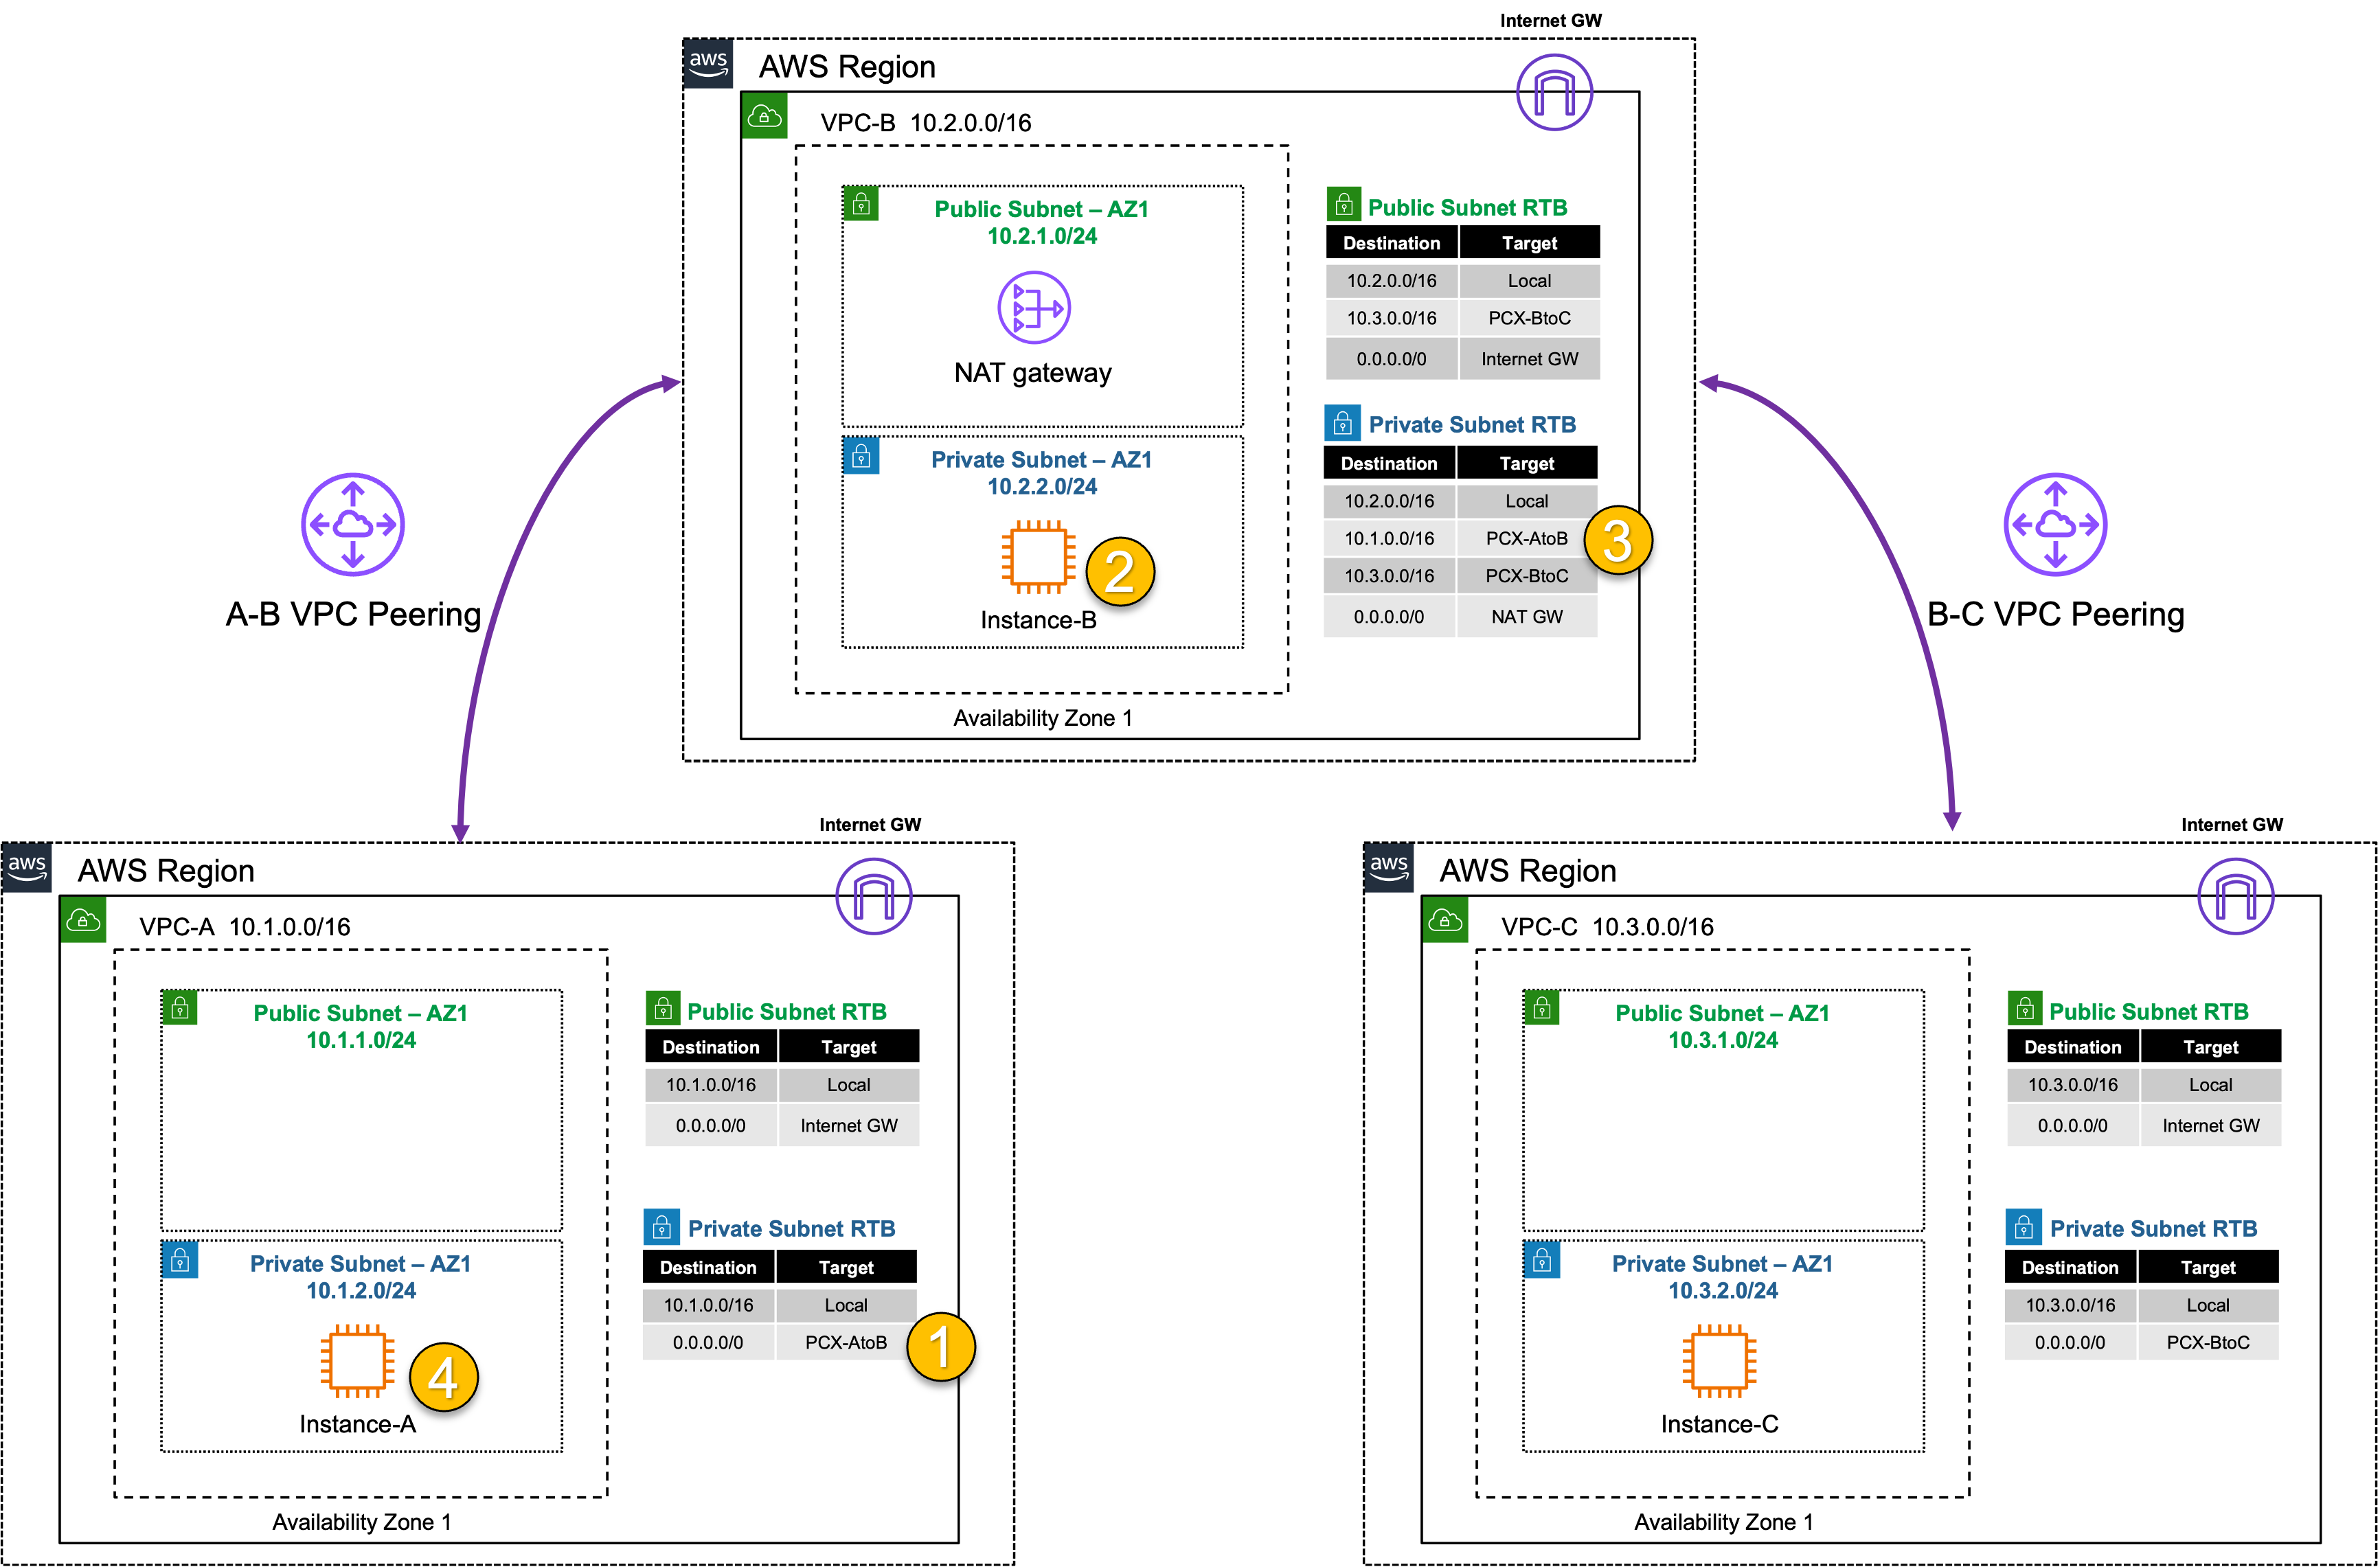
In this task, there are multiple VPCs in the same region that have one instance each. VPC peering and the appropriate VPC routes are already configured for VPC-B to VPC-C. VPC peering and VPC routes will need to be configured between VPC-A and VPC-B. Then traffic will be tested to confirm what traffic routing is and is not supported with VPC peering.
Warning
There are no security controls in this example. Instance-B can freely communicate with the Internet.
Summarized Steps (click to expand each for details)
0) Lab environment setup
Detailed Steps…
- 0.1: Login to your AWS account and navigate to the CloudFormation Console and toggle View Nested to off.
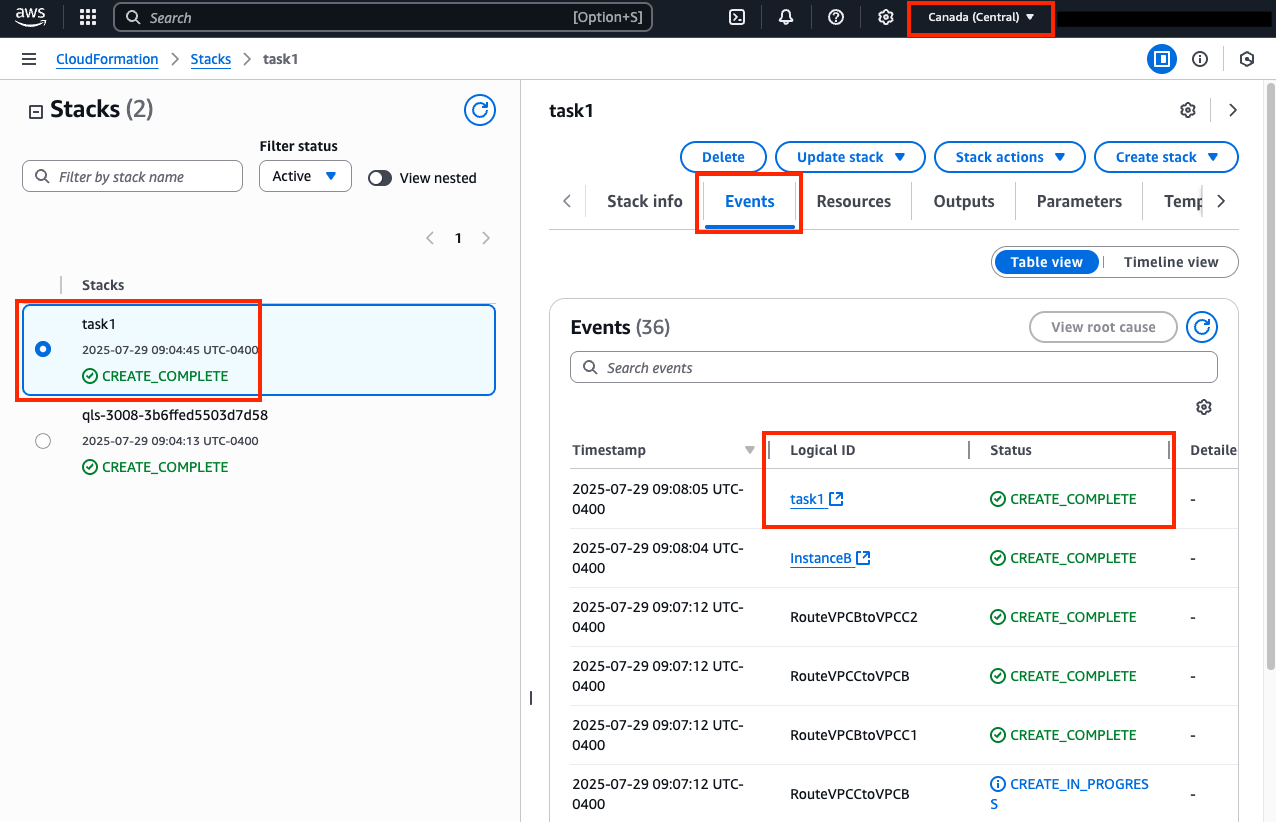
- 0.2: Make sure you are in the Canada (Central) region as this is where the stack should be deployed.
Expand for Screenshots


Info
All AWS resources for this lab will be deployed in the Canada (Central) region. Either switch the region for your existing browser tabs (using the region selector in the upper right corner of the AWS Console) to this region or close all other browser tabs. Otherwise, you might accidently configure the wrong AWS resources.
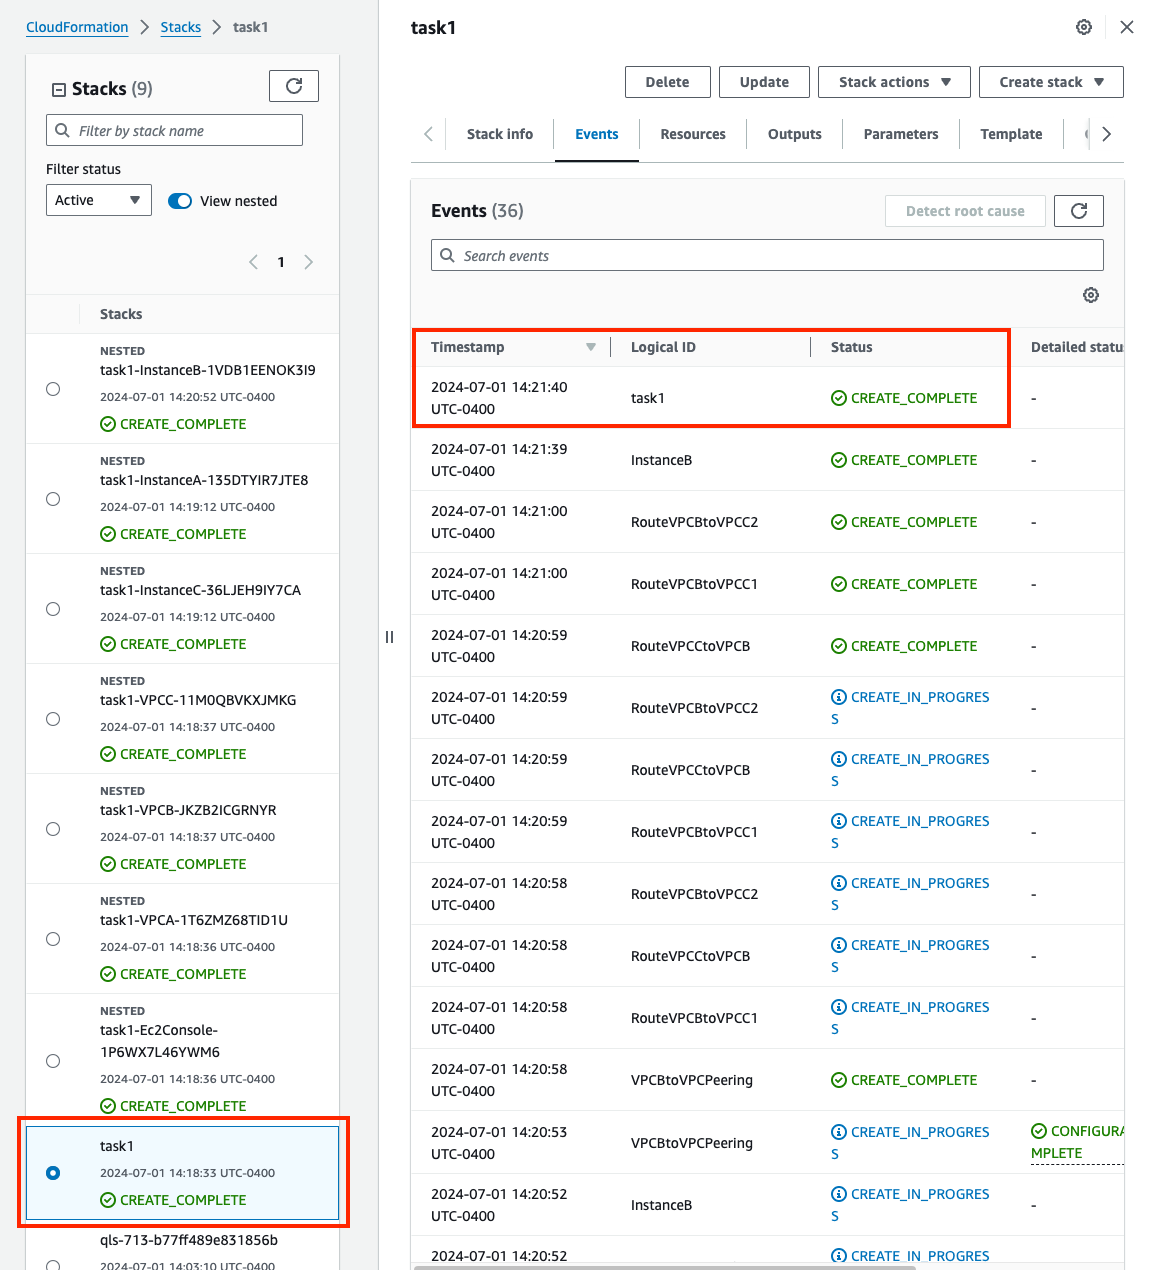
- 0.3: Select the main stack and confirm the stack has finished creating successfully by looking at the Events Tab.
Expand for Screenshot
- 0.4: You are now ready to proceed with the rest of the lab below starting in section 1. The remaining steps for this section are if the main stack failed to create successfully.
Warning
If the original stack failed to create, please notify those giving the workshop to review the root cause of the issue. Once that is done, please proceed with the remaining steps for this section.
0.5: Delete the previously failed main stack and wait till that has completed successfully. Please use the refresh buttons to refresh both the left and right portions of the CloudFormation Console.
0.6: Click the yellow Launch Stack button directly below this sentence to launch the CloudFormation Stack for Task 1

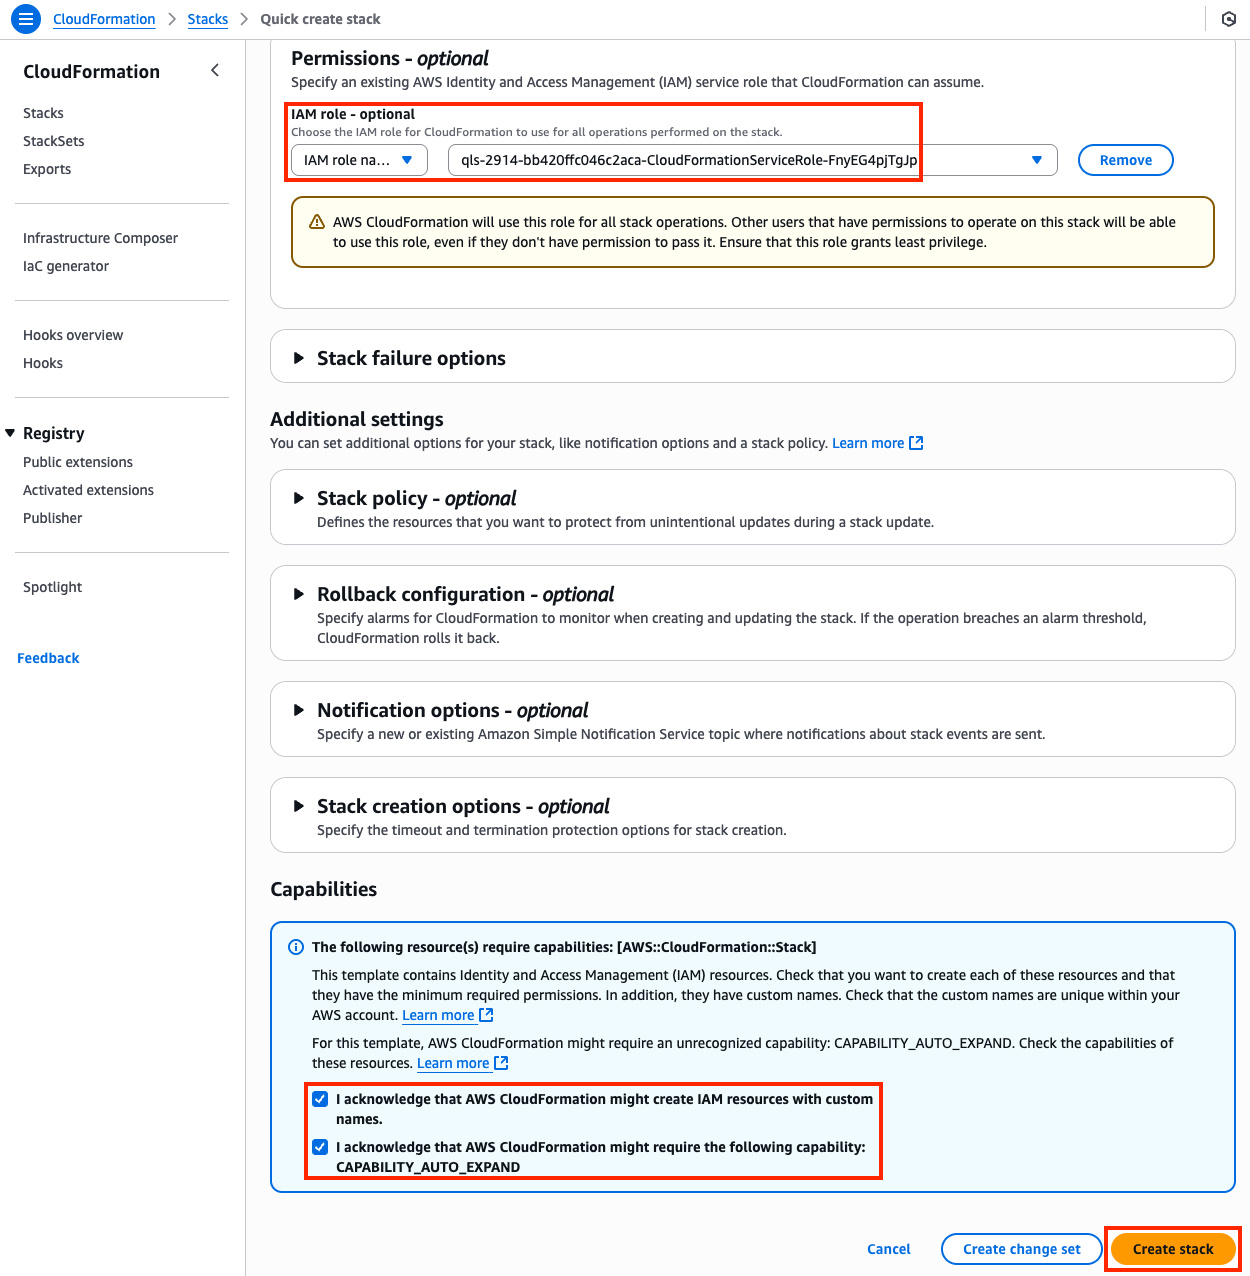
0.7: When creating this stack, ensure the following options are configured (See screenshots below for additional guidance):
- select the existing IAM role
qls-...CloudFormationServiceRole...in the Permissions section - check the boxes to acknowledge the warnings in the Capabilities section
- then scroll down and click Create stack
- select the existing IAM role
Warning
If you do not select the existing IAM role and continue with the stack creation, this will fail! If this occurred, simply create another stack with a different name and follow the steps closely for this section.
0.8: The CloudFormation stack will take ~5 minutes to finish deploying. Once the main/root CloudFormation stack shows as Create_Complete, proceed with the steps below for section 1.
1) Find EC2 Instance-A and verify it can’t access Instance-B or C
Detailed Steps…
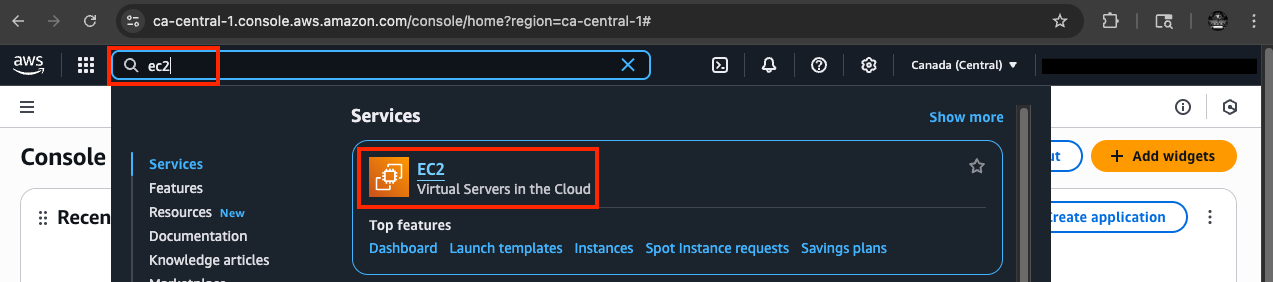
- 1.1: In your AWS account, navigate to the EC2 Console and go to the Instances page (menu on the left).
Expand for Screenshot
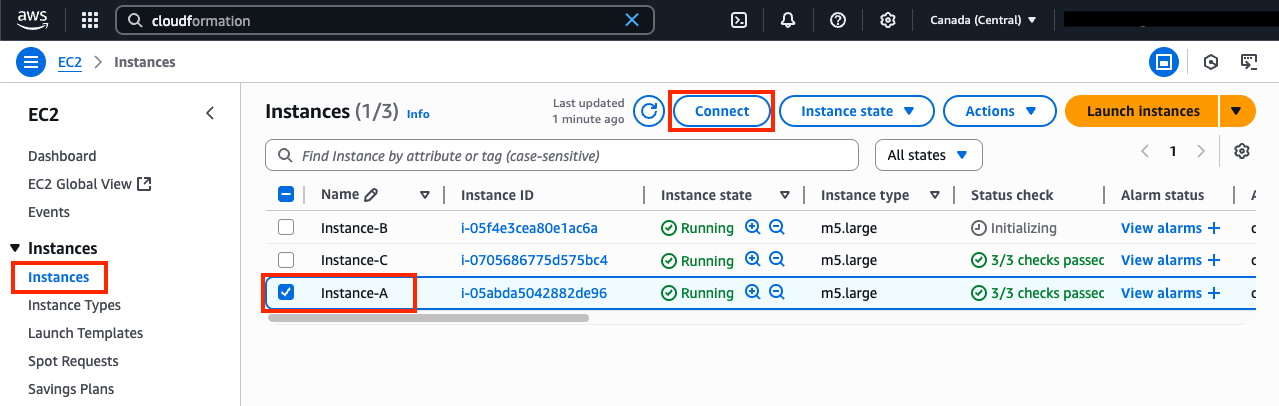
- 1.2: Find Instance-A and connect to it using the Serial Console directions
- Password:
FORTInet123!
- Password:
Expand for Screenshot
1.3: Run the following commands to test connectivity and make sure the results match expectations
SRC / DST VPC B VPC C Internet Instance A ping 10.2.2.10FAIL !!!ping 10.3.2.10FAIL !!!Instance A curl ipinfo.ioFAIL !!!1.4: Run the command
ifconfig ens5and take note of the instance IPv4 address.1.5: Run the command
route -nand take note of the default route and the gateway IP for that route.
Info
The instance has a default route going to the private IP of 10.1.2.1. This is the AWS VPC router (aka intrinsic router), which is the first host IP in any subnet within a VPC. Reference this AWS document to learn what other IPs in a subnet are always used by AWS.
2) Create a VPC peering connection and VPC routes to allow Instance-A in VPC-A to reach Instance-B in VPC-B
Detailed Steps…
- 2.1: Navigate to the VPC Console and go to the Peering connections page (menu on the left) and click Create peering connection.
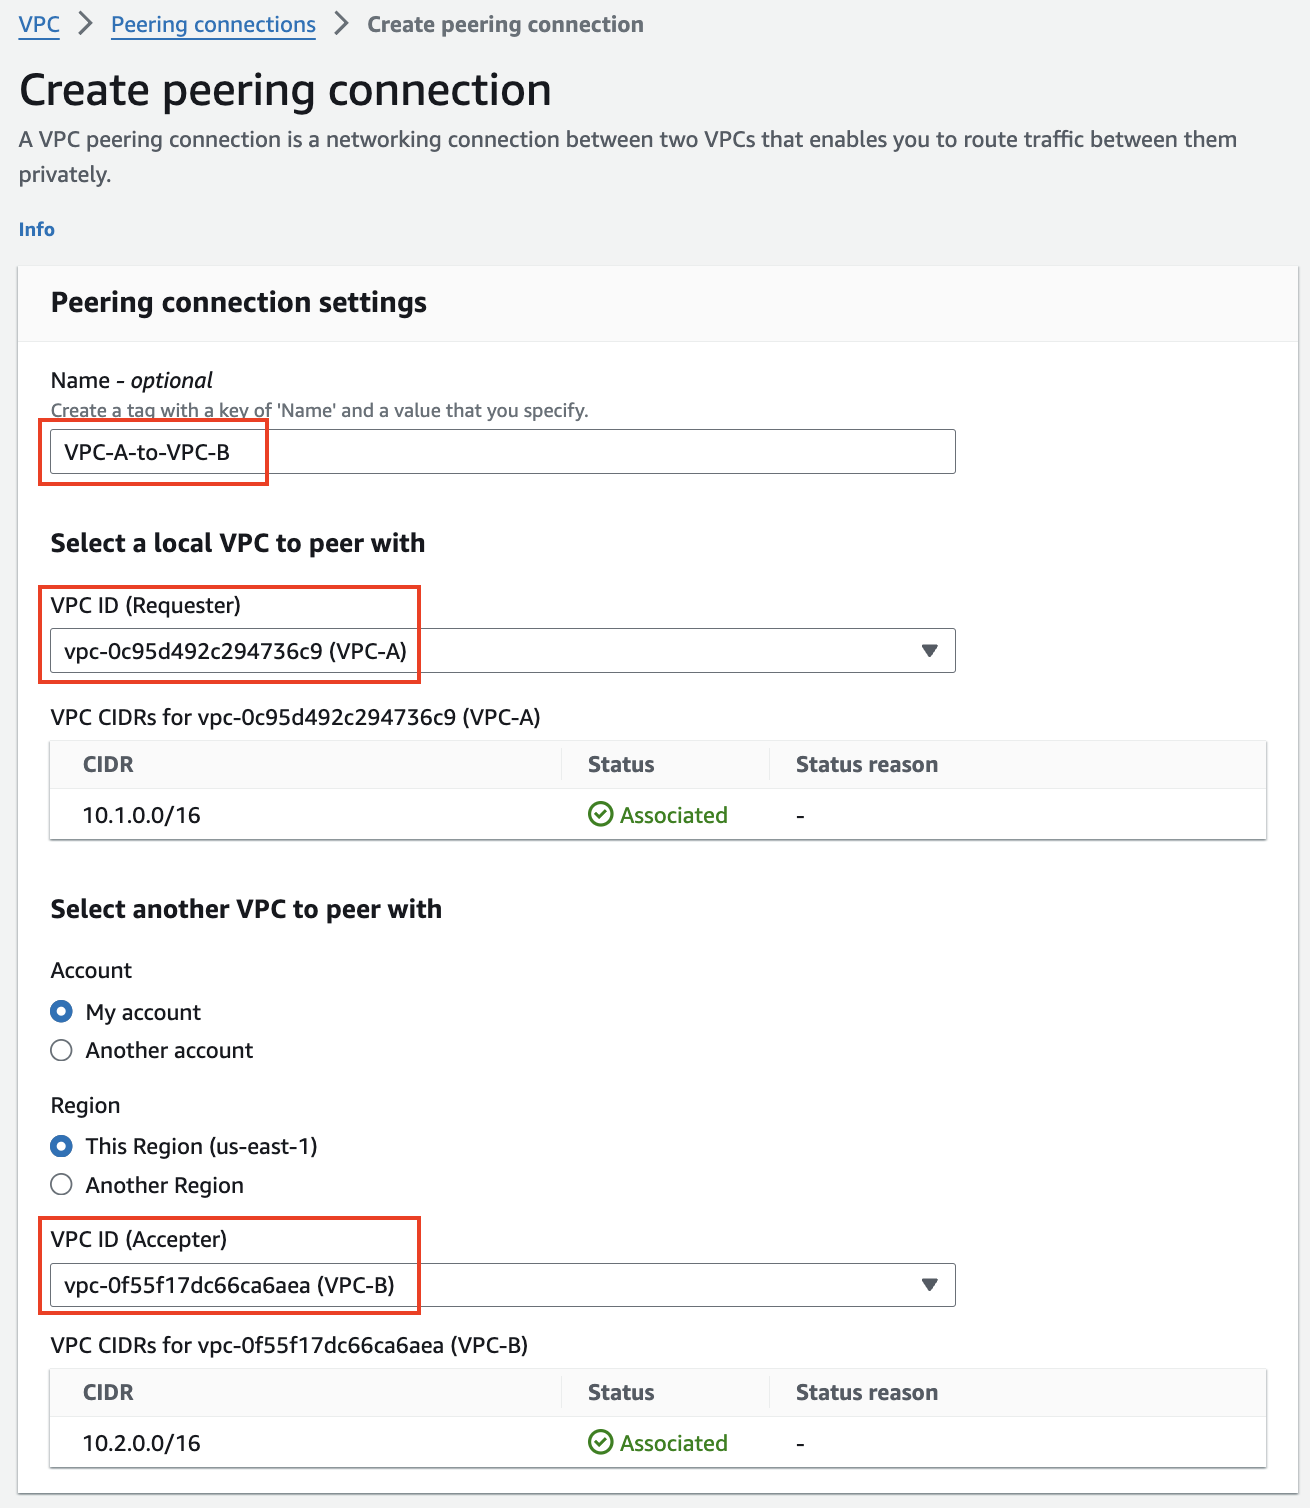
- 2.2: Provide a name then select VPC-A as the requester and VPC-B as the Accepter and click Create peering connection at the bottom of the page.
Expand for Screenshot
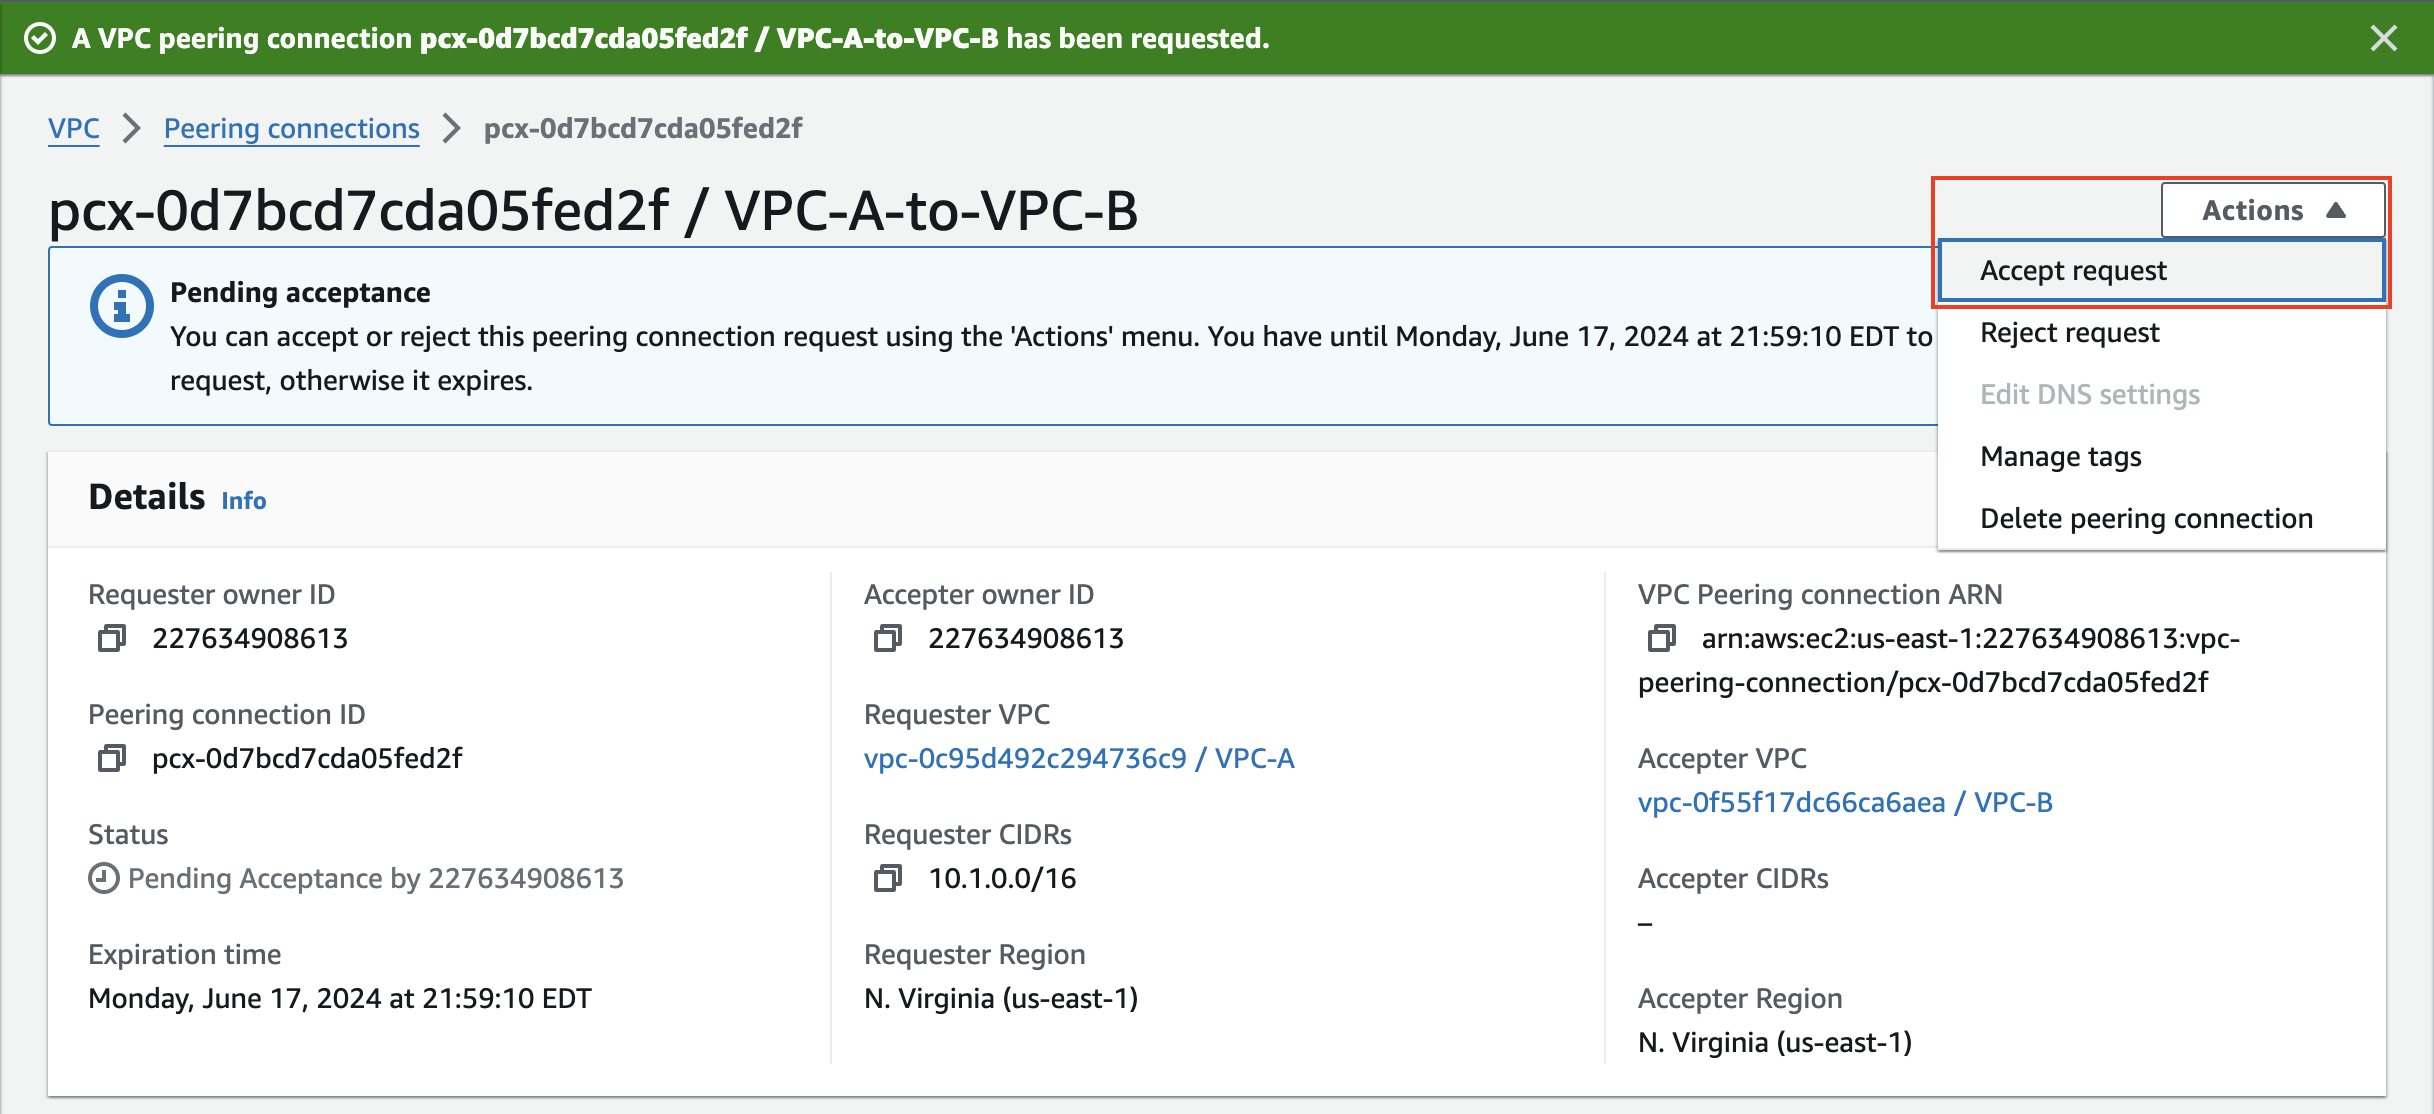
- 2.3: On the next page, click Actions and select Accept Request, and again on the pop-up window.
Expand for Screenshot
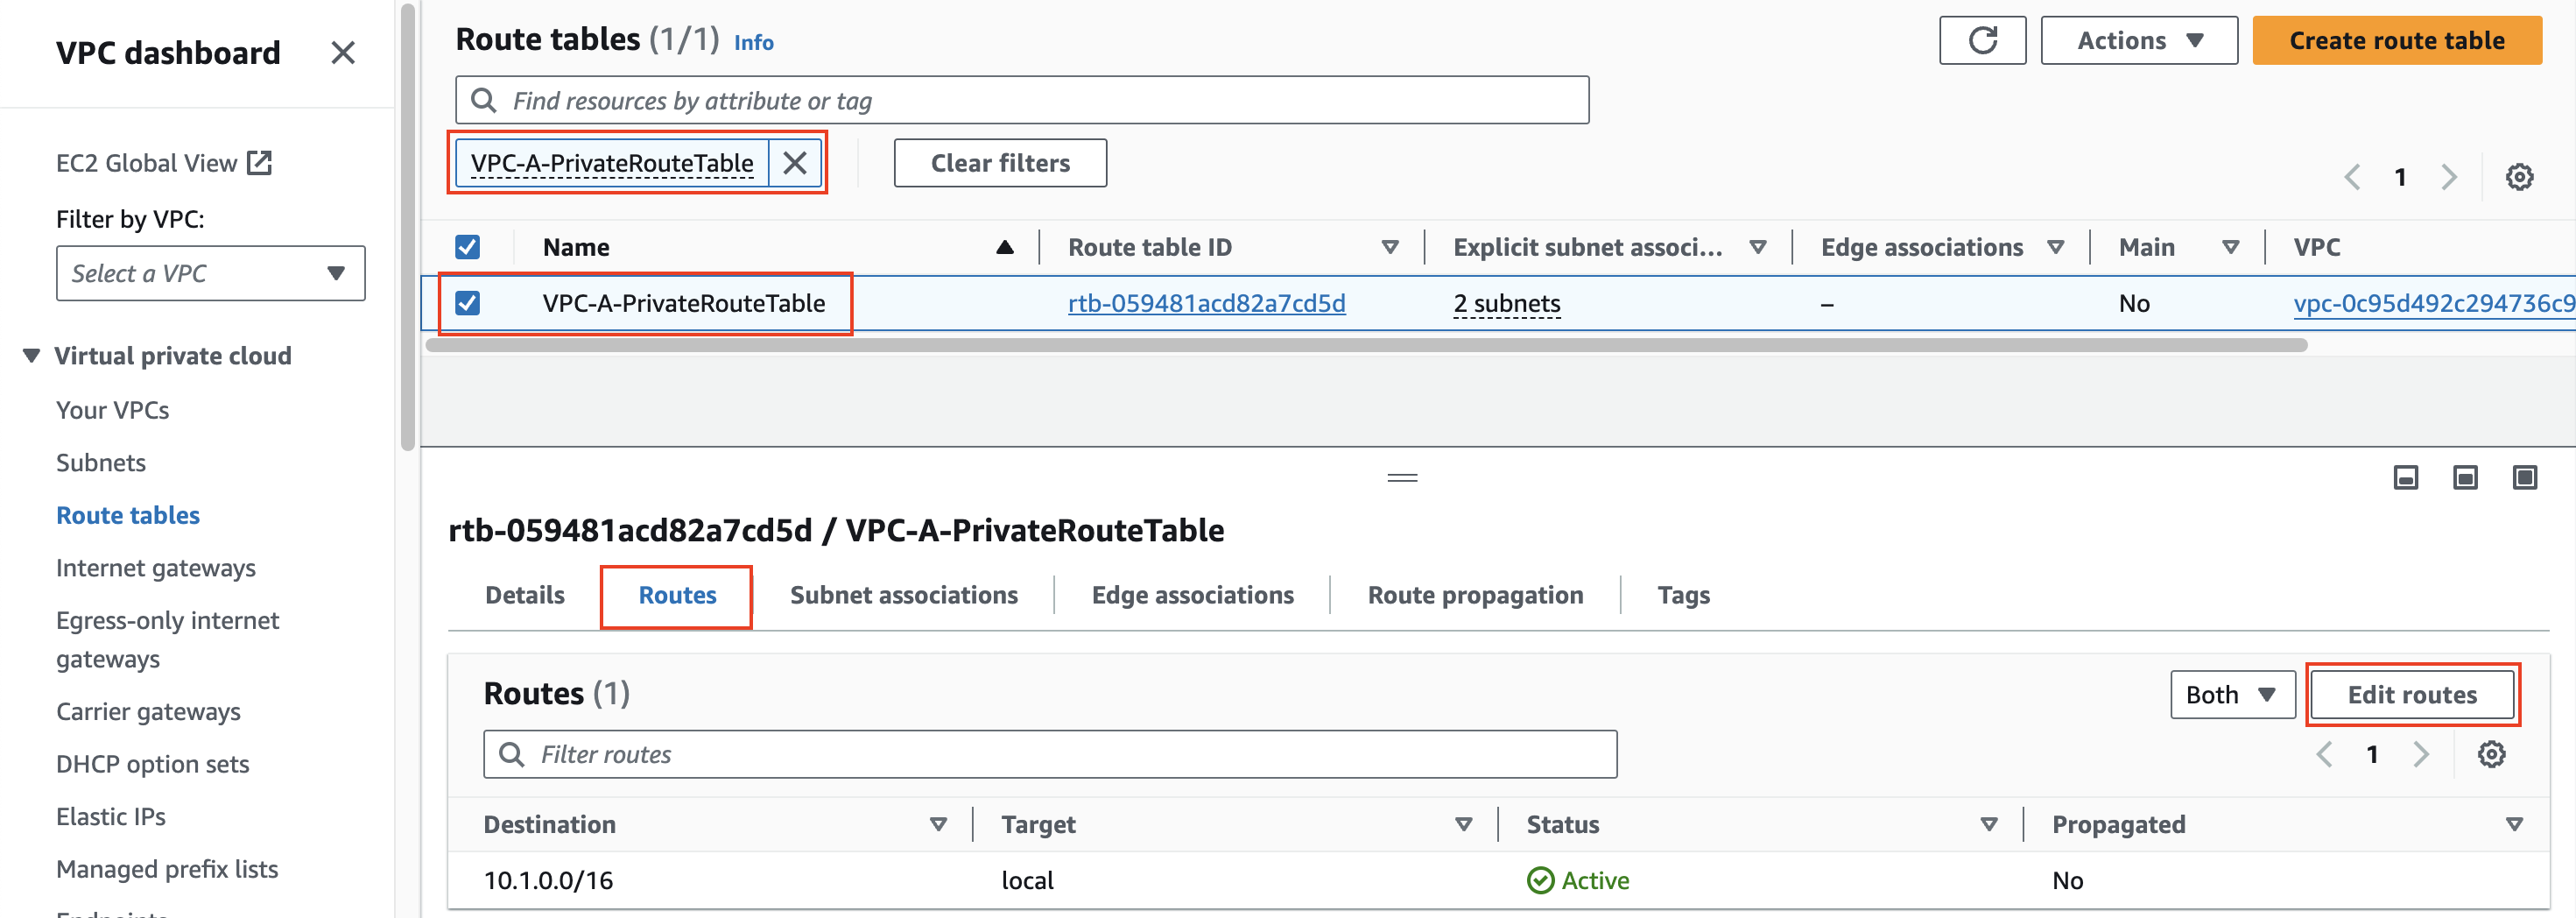
- 2.4: Go to the VPC Route tables page (menu on the left) and find VPC-A-PrivateRouteTable , select the Routes tab and click Edit Routes.
Expand for Screenshot
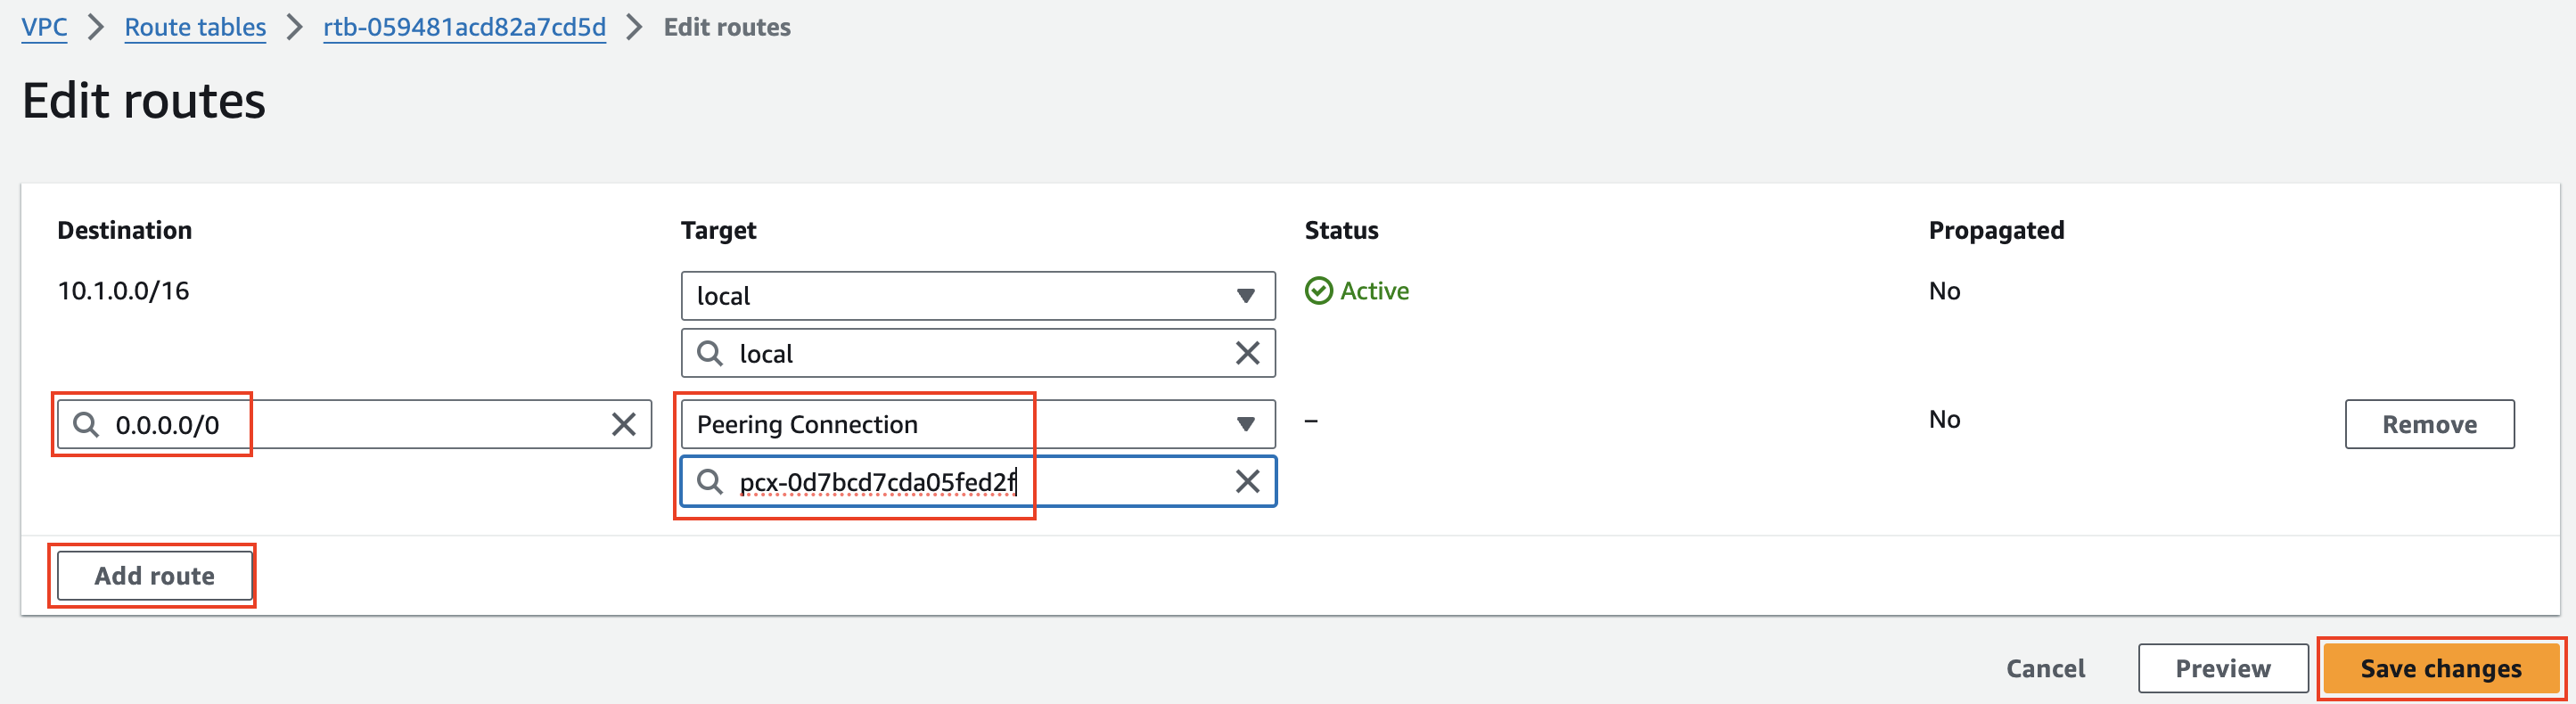
- 2.5: Create a route for 0.0.0.0/0 with the peering connection you just created as your target.
Expand for Screenshot
- 2.6: Repeat the same steps above (starting at step 2.4) to create a route for 10.1.0.0/16 in VPC-B-PrivateRouteTable to allow reply traffic.
3) Verify communication over the VPC Peering connection
4) Let’s dig deeper to understand how VPC Peering works
Detailed Steps…
Info
- VPC Peering permits point to point connectivity between resources in 2 directly peered VPC’s and nothing else
- Transitive peering or peering from VPC A through VPC B to VPC C is not permitted
- Accessing AWS Services (like NAT GW or Internet GW) via a peering connection does not work
4.1: In the EC2 Console go to the Instances page connect to Instance-B using the Serial Console directions
- Password:
FORTInet123!
- Password:
4.2: Run the following commands to verify connectivity and make sure results match expectations
SRC / DST Instance A Instance C Internet Instance B ping 10.1.2.10SUCCESS !!!ping 10.3.2.10SUCCESS !!!Instance B curl ipinfo.ioSUCCESS !!!4.3: In the EC2 Console go to the Instances page connect to Instance-C using the Serial Console directions
- Password:
FORTInet123!
- Password:
4.4: Run the following commands to verify connectivity and make sure results match expectations
SRC / DST Instance A Instance B Internet Instance C ping 10.1.2.10FAIL !!!ping 10.2.2.10SUCCESS !!!Instance C curl ipinfo.ioFAIL !!!- Instance-C should ping Instance-B but not be able to ping Instance-A or access the internet through VPC-B.
Info
The VPC peering connection is at the VPC level. This means the VPC peering connection is not directly tied to any VPC subnet or route table explicitly. AWS routing for VPC peering connections will only deliver traffic to an IP address that is within the destination VPC CIDR. The routes you created in both VPC-A and B’s private route tables only direct traffic out of the local VPC to the target destination VPC. Reference this AWS documentation to learn more about the limitations of VPC Peering.
- 4.5 Below is a step by step of the packet handling for the traffic from Instance-A to Instance-B.
| Hop | Component | Description | Packet |
|---|---|---|---|
| 1 | Instance-A -> 0.0.0.0/0 PCX | Outbound traffic destined to Instance-B is sent to the VPC router (its default gw) which routes traffic to the VPC peering connection as configured in the VPC-A-PrivateRouteTable. | 10.1.2.10:src-port -> 10.2.2.10:dst-port |
| 2 | VPC Router -> Instance-B | Inbound traffic leaves the VPC peering connection and is sent to the VPC router which delivers traffic directly to Instance-B. | 10.1.2.10:src-port -> 10.2.2.10:dst-port |
| 3 | Instance-B -> 10.1.0.0/16 PCX | Instance-B receives the traffic, seeing the original private source IP, and replies. This traffic is sent to the VPC router (its default gw) which routes the traffic to the VPC peering connection as configured in the VPC-B-PrivateRouteTable. | 10.2.2.10:src-port -> 10.1.2.10:dst-port |
| 4 | VPC Router -> Instance-A | Response traffic leaves the VPC peering connection and is sent to the VPC router which delivers traffic directly to Instance-A. | 10.2.2.10:src-port -> 10.1.2.10:dst-port |
Warning
When Instance-A attempts to ping Instance-C or access the Internet through VPC-B (using the default route), the VPC router at step 2 above would drop the traffic as the destination does not match the CIDR of VPC-B.
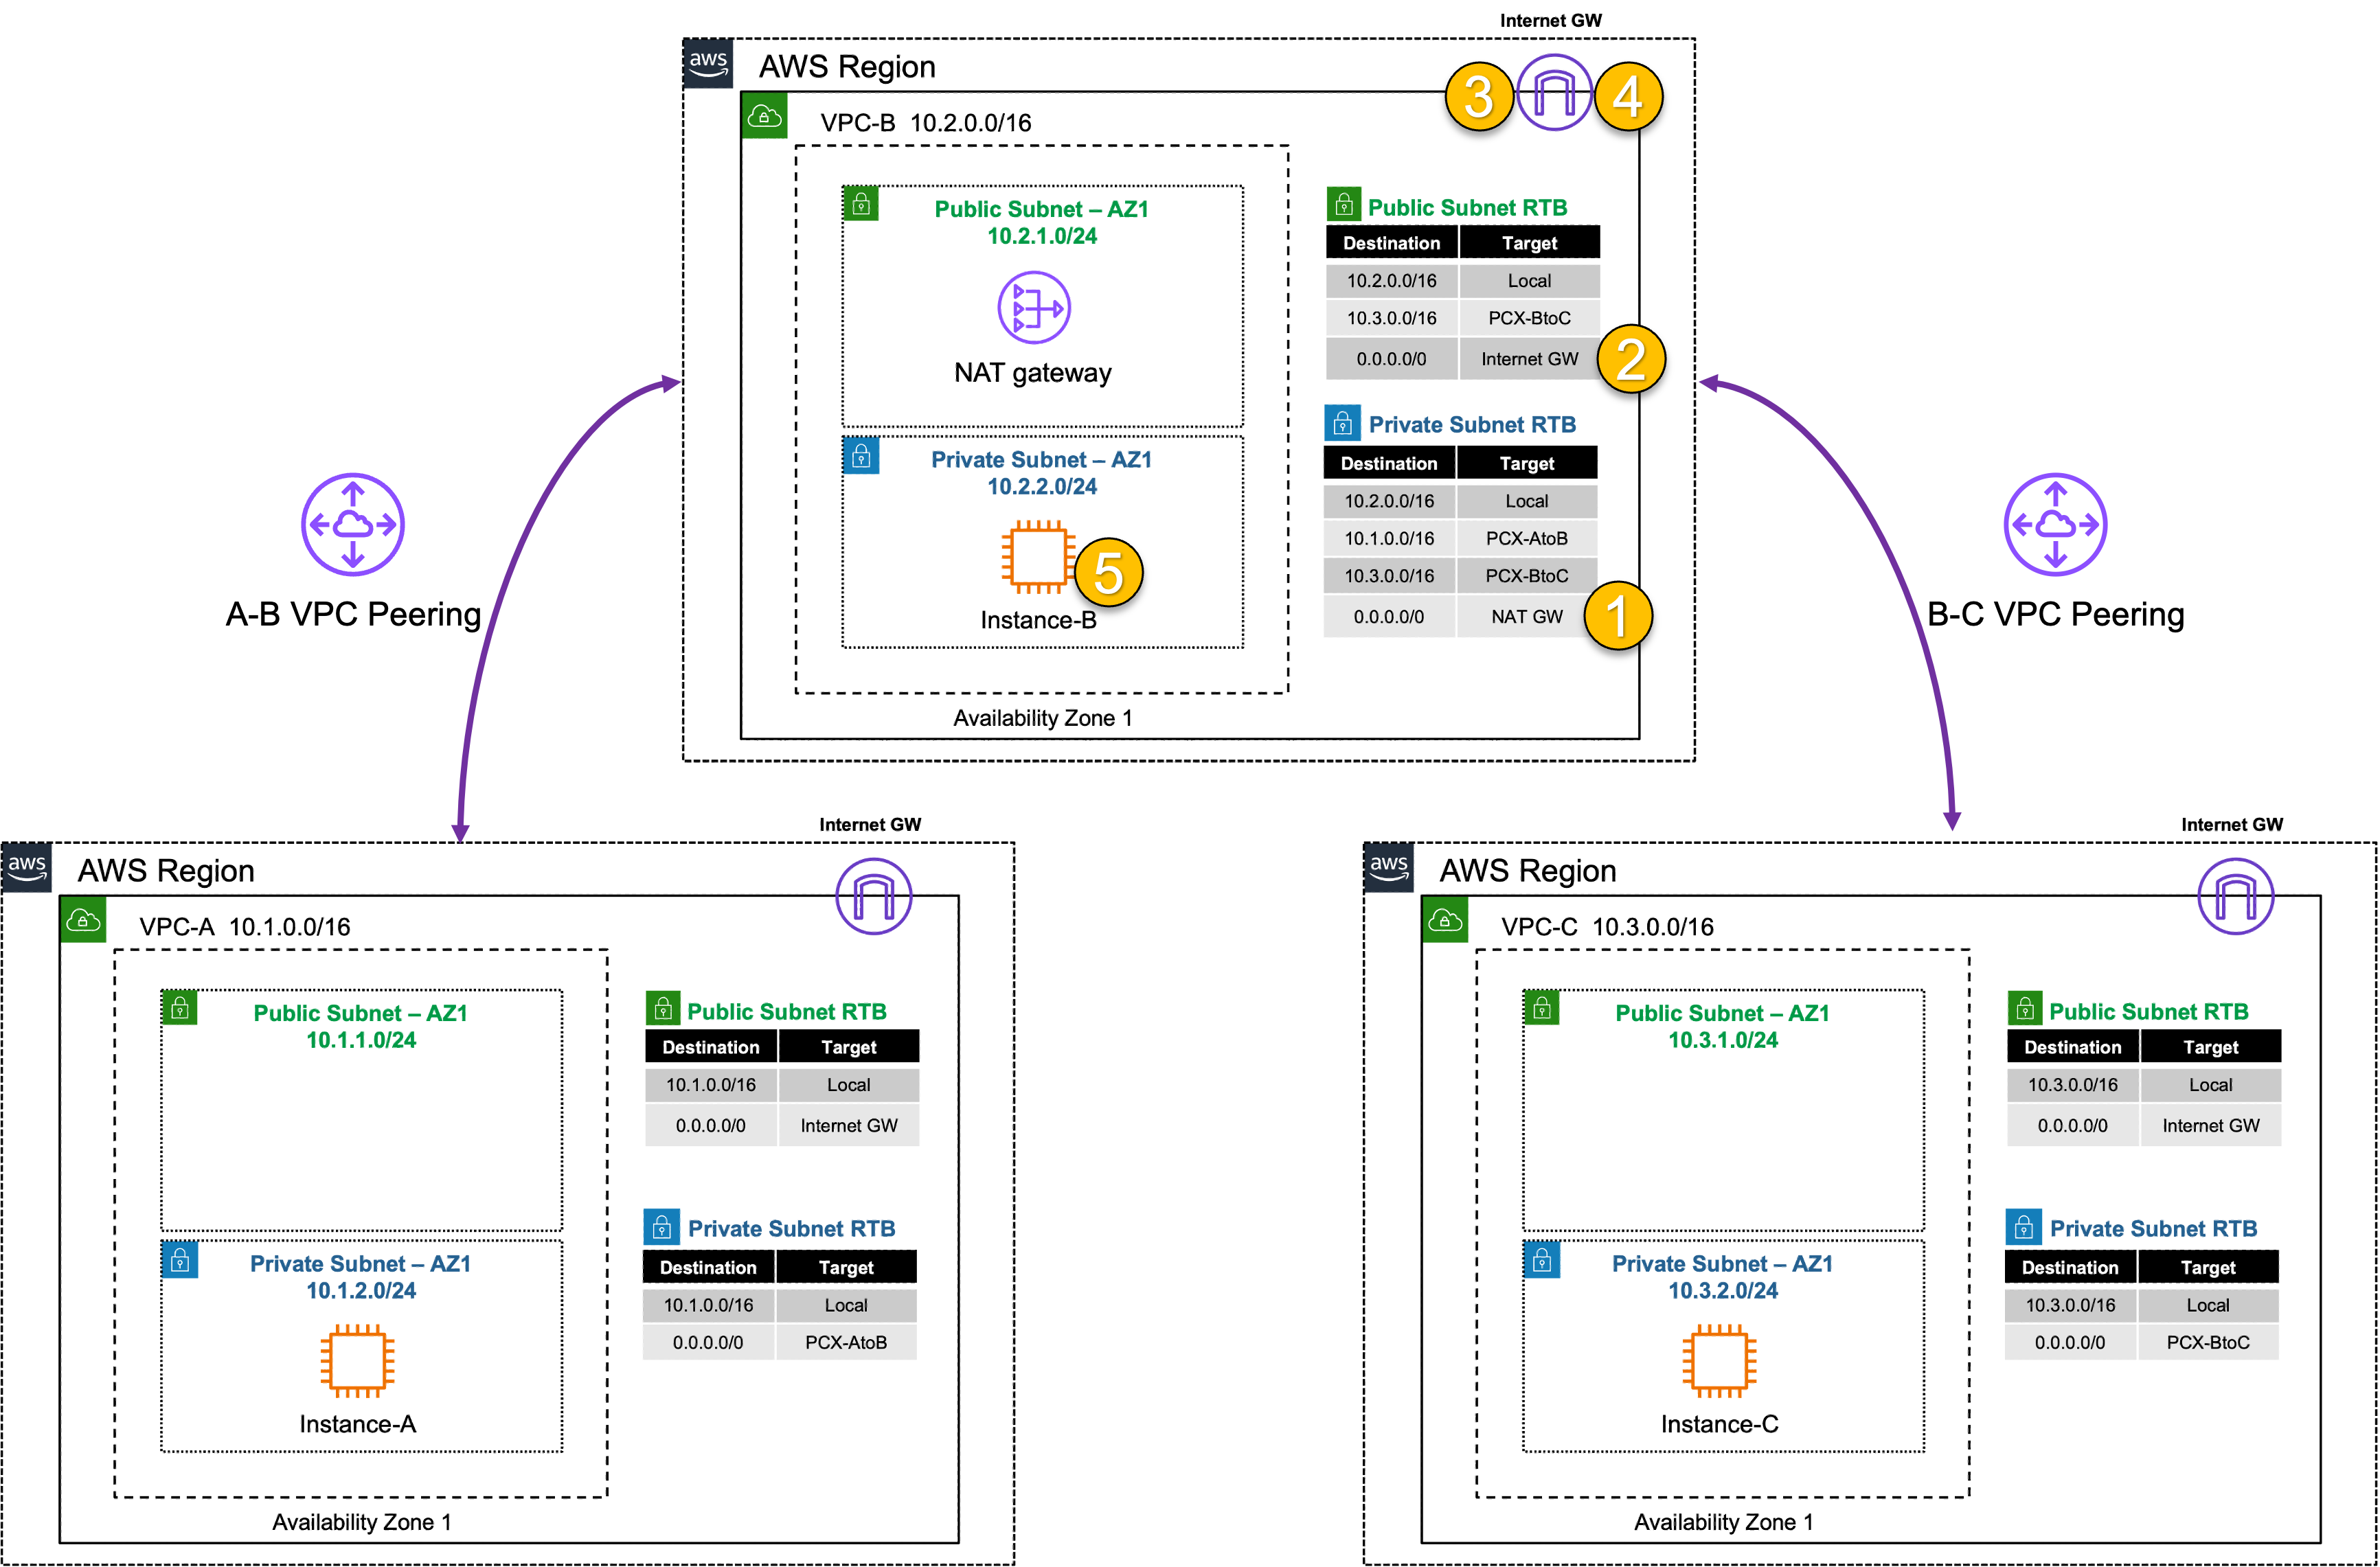
- 4.6 Below is a step by step of the packet handling for the traffic from Instance-B to the internet.
| Hop | Component | Description | Packet |
|---|---|---|---|
| 1 | Instance-B -> 0.0.0.0/0 NAT GW | Instance-B sends outbound traffic to the VPC router (it’s default gw) which routes the traffic to NAT GW as configured in the VPC-B-PrivateRouteTable. | 10.2.2.10:src-port -> x.x.x.x:80 |
| 2 | NAT GW -> 0.0.0.0/0 IGW | NAT GW changes the source IP to its own private IP and sends the traffic to VPC router. The VPC router routes traffic to IGW as configured in the VPC-B-PublicRouteTable. | y.y.y.y:src-port -> x.x.x.x:80 |
| 3 | IGW -> Internet | IGW changes the source IP to the associated EIP of NAT GW and routes the traffic to the internet. | z.z.z.z:src-port -> x.x.x.x:80 |
| 4 | Internet -> IGW | IGW receives reply traffic, changes the DEST IP to the private IP of NAT GW, and sends the traffic to VPC router. The VPC router routes traffic to the NAT GW. | x.x.x.x:80 -> y.y.y.y:dst-port |
| 5 | NAT GW -> Instance-B | NAT GW changes the DEST IP back to the private IP of Instance-B and routes the traffic to the VPC router which delivers the traffic to Instance-B. | x.x.x.x:80 -> 10.2.2.10:dst-port |
5) Lab environment teardown
Discussion Points
- VPC peering is a point-to-point connection only (no transitive routing)
- It is best used when a few trusted VPCs are transferring large amounts of data between each other (ie DB replication)
- Full mesh is required to connect all VPCs together
- For example connecting 16 VPCs in full mesh would require (16*15)/2 = 120 connections
- The max supported VPC peering connections per VPC is 125
- VPC peering supports connections between VPCs:
- In the same or different AWS Accounts
- In the same (intra) or across (inter) regions
- When using inter-region peering, AEAD encryption is used
- No Internet Gateway is required for VPC Peering (even when inter-region)
- Jumbo frames (9001 bytes) are only supported for intra-region connections, inter-region is limited to 1500 bytes
This concludes this task