AAG in FortiADC delivers secure and scalable remote access with the following capabilities:
Agentless Access – Eliminates the need for client-side agents, reducing endpoint dependency and administrative burden.
Federated Authentication Support – Supports SAML 2.0-based authentication using providers like Microsoft Entra ID and FortiAuthenticator.
Simplified Deployment – Requires no software installation, enabling rapid implementation in secure environments.
Real-Time Monitoring – Tracks user sessions and access logs for compliance and auditing.
Application-Layer Security Controls – Enforces IP reputation filtering and geolocation restrictions through the Application Profile attached to the AAG Virtual Server.
Supported Application Types in FortiADC AAG:
Web RDP – Provides full desktop access via Remote Desktop Protocol (RDP) through an HTML5 browser session. No RDP client is required on the endpoint.
Native RDP – Enables traditional RDP access using the native RDP client installed on the user’s device. Requires endpoint support for Microsoft RDP.
RemoteApp – Launches individual Windows applications published via Remote Desktop Services, rather than a full desktop session.
Web VNC – Offers browser-based access to VNC-enabled systems for remote control of graphical desktops.
Web SSH – Delivers secure command-line access to Linux and Unix systems through a browser-based SSH terminal.
Web Telnet – Enables text-based terminal sessions to legacy devices or servers using the Telnet protocol, directly within the browser.
Initial Configuration
Initial Configuration
In this section, we will review the steps needed to configure web application load balancing. The goal of deploying Application Delivery Controllers is to increase the availability of application servers, scale them to meet demand, and in some cases, modify content before sending the request to the origin server.
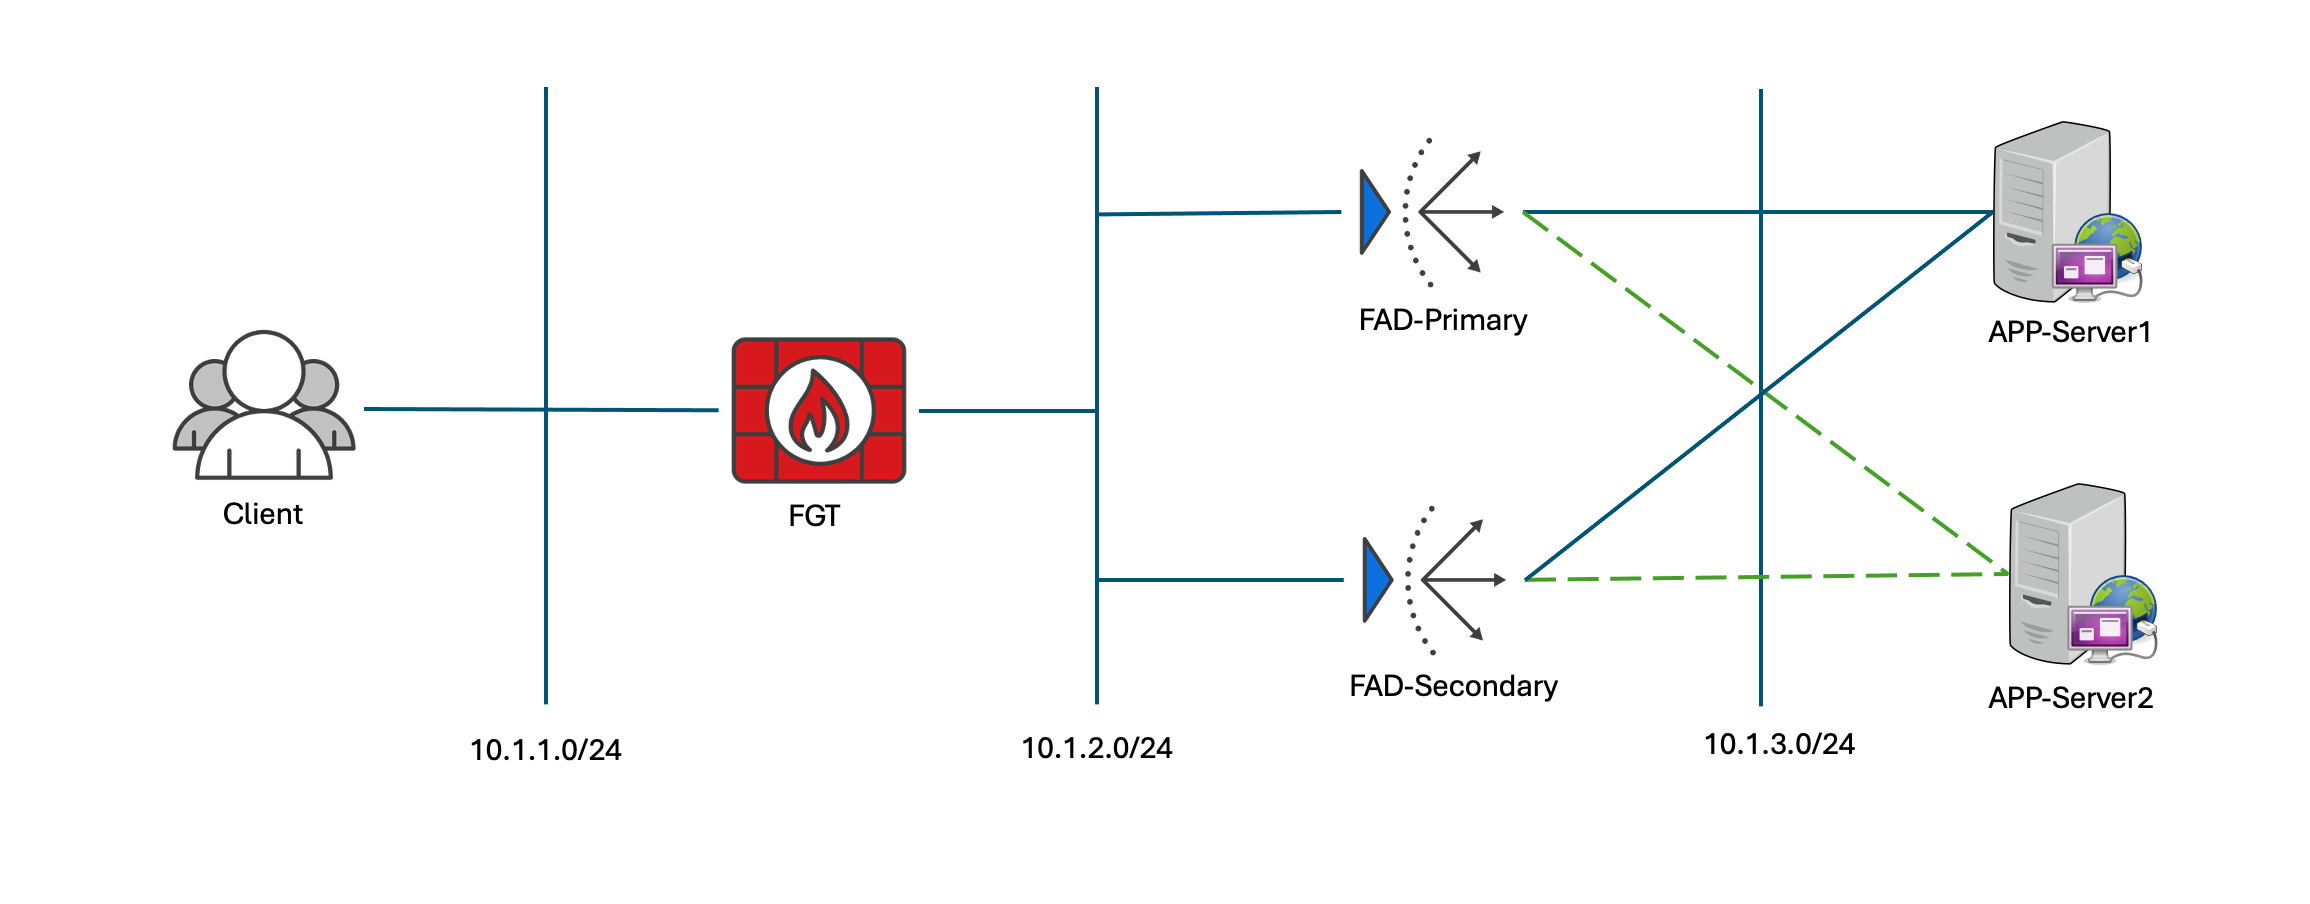
For this lab, we have set up an environment featuring two identical application servers positioned behind a pair of FortiADCs configured in High Availability (HA) mode. Additionally, we have included a FortiGate and a client workstation to simulate a typical client environment and facilitate testing.
The initial configuration steps, including network interface setup, admin settings, and HA configuration etc. , have already been completed.
HTTP load balancing
In this section, we will review the steps needed to configure web application load balancing. The goal of deploying Application Delivery Controllers is to increase the availability of application servers, scale them to meet demand, and, in some cases, modify content before sending the request to the origin server.
Subsections of Initial Configuration
Lab Info
Lab Network Diagram
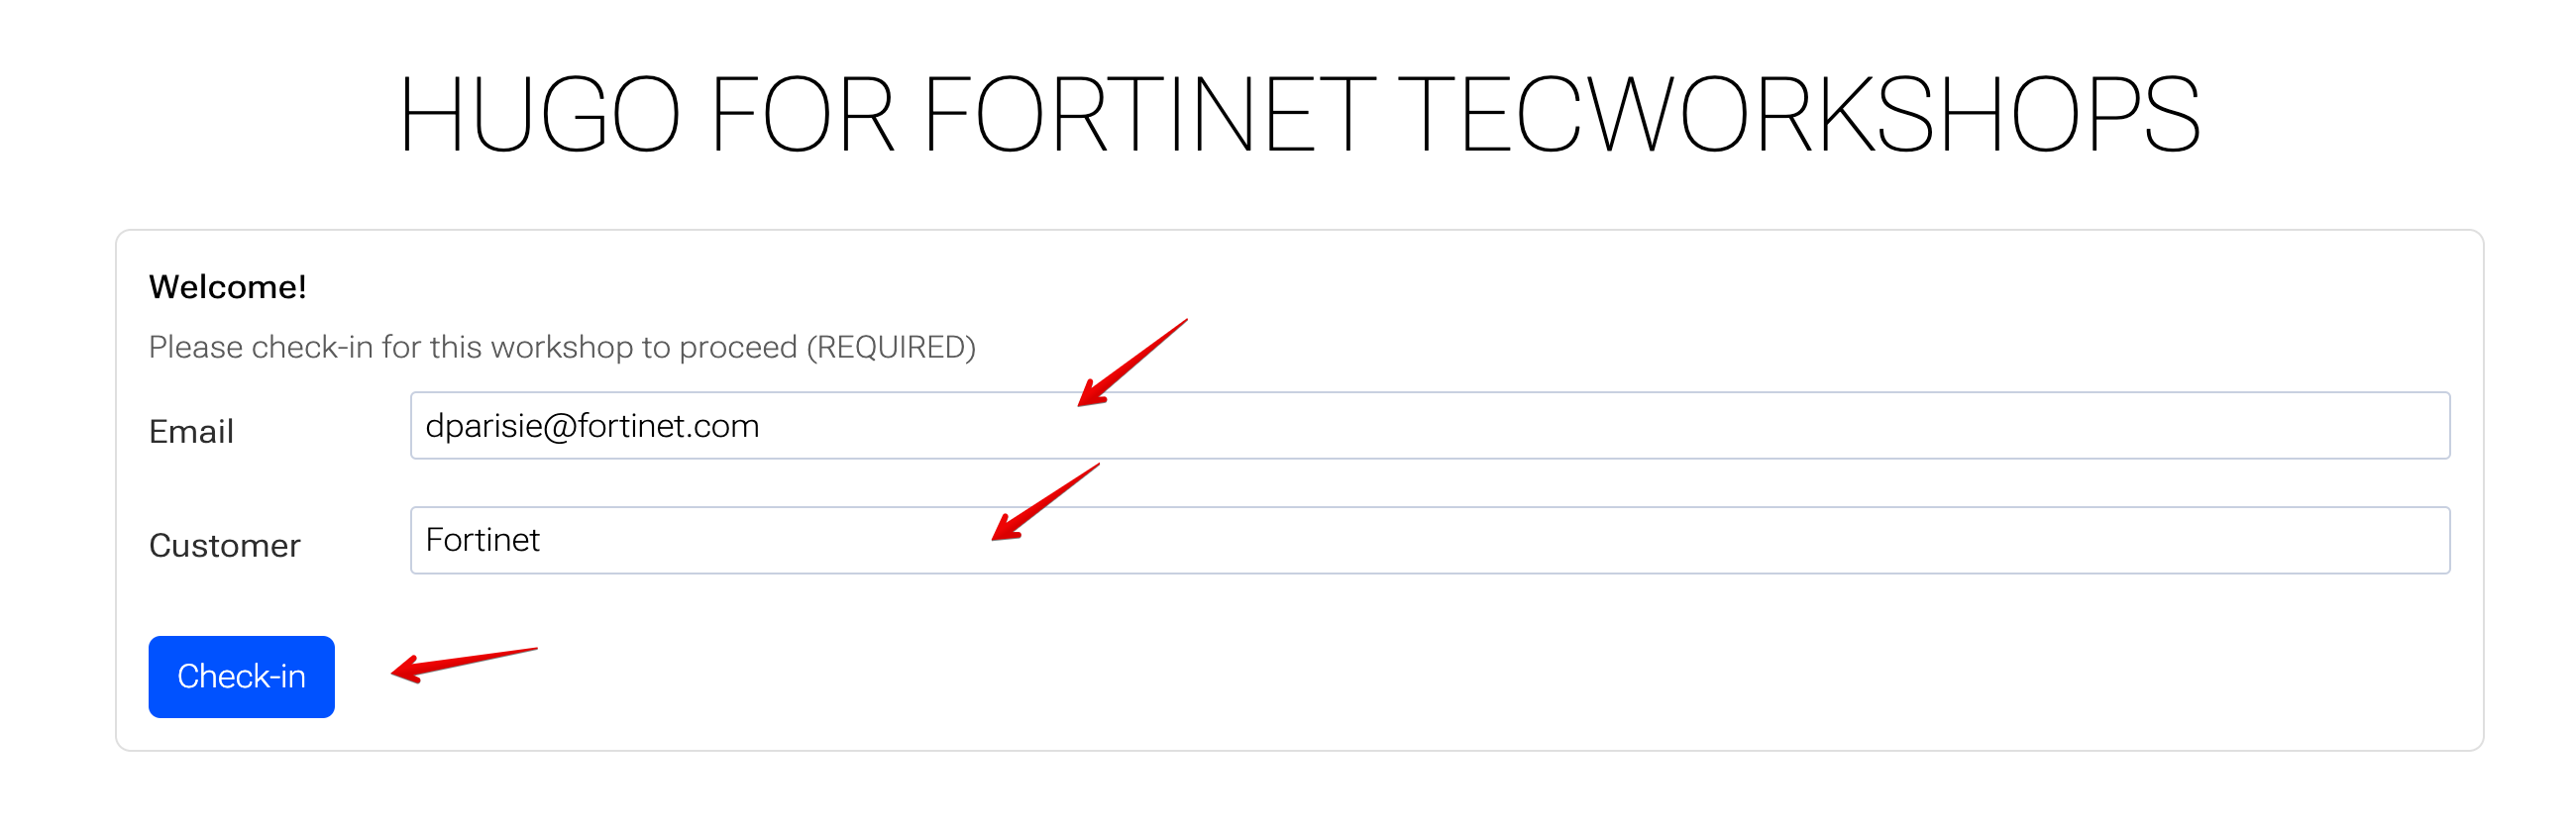
Lab Registration
To begin, enter your email address and customer name, and click Check-in.
Lab Access
There are two possible ways to access this lab. Depending on the environment you will use one, or the other, or both.
Azure Bastion Host
RDP or SSH access to public IP’s
Lab Access - Azure Bastion Host
Your instructor will give you a link at the start of the class that will give you access via RDP to the Linux Client. From the Linux Client you will have SSH or Web access to all devices in the lab. Switch the protocol from SSH to RDP to get started.
Log in with username xperts2025 and password AppSec-Xp3rts2025!
Lab Access - RDP
Most, if not all access will be done through an RDP connection to a Linux Client with a public IP. Your instructor will give you the public IP at the start of the lab.
Once you have the public IP to your Client you will log in with username: xperts2025 and password: AppSec-Xp3rts2025!. From the client you should have web or SSH access to all the devices in the lab. There are bookmarks and passwords pre-loaded into Firefox for easy access to FAD-Primary, FAD-Secondary, Juicshop, and DVWA.
Info
Note: The bookmarks for Juiceshop and DVWA won’t work until the FortiADC’s are configured.
Device Info
Device
Username
Password
Public
Proxy
APP
Client
xperts2025
AppSec-Xp3rts2025!
10.1.1.4
FAD-Primary
xperts2025
AppSec-Xp3rts2025!
10.1.2.50
10.1.3.100
admin
AppSec-Xp3rts2025!
FAD-Secondary
xperts2025
AppSec-Xp3rts2025!
10.1.2.51
10.1.3.101
admin
AppSec-Xp3rts2025!
FGT-1
xperts2025
AppSec-Xp3rts2025!
10.1.1.6
APP-Server1
xperts2025
AppSec-Xp3rts2025!
10.1.3.4
APP-Server2
xperts2025
AppSec-Xp3rts2025!
10.1.3.5
DVWA
admin
password
Info
The Juiceshop and DVWA applications need to be started on the application servers using the following commands. If we miss this step our health checks will fail.
APP-Server1
From the Client, SSH into APP-Server1 at 10.1.3.4.
ssh xperts2025@10.1.3.4
Password: AppSec-Xp3rts2025!
Start DVWA and Juiceshop
sudo /opt/lampp/lampp start
sudo docker run -d -p 10.1.3.4:80:3000 bkimminich/juice-shop
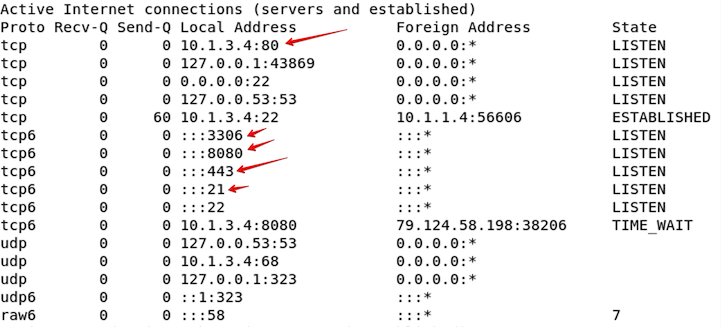
Run netstat to confirm the applications are running.
nestat -an | less
Your output should look like the image below. Now we see the server is listening on ports 80, 443, 8080, 21 and 3306. We could use any of these ports for our health checks.
To quit netstat type “q”.
To exit the application server type “exit”.
Info
Note: If you need to clear the ssh keys try:
ssh-keygen -f "/home/xperts2025/.ssh/known_hosts" -R "10.1.3.4"
or
ssh -o StrictHostKeychecking=no hostname
APP-Server2
From the Client, SSH into APP-Server2 at 10.1.3.5.
ssh xperts2025@10.1.3.5
Password: AppSec-Xp3rts2025!
Start DVWA and Juiceshop
sudo /opt/lampp/lampp start
sudo docker run -d -p 10.1.3.5:80:3000 bkimminich/juice-shop
Run netstat to confirm the applications are running.
nestat -an | less
Your output should look like the image below. Now we see the server is listening on ports 80, 443, 8080, 21 and 3306. We could use any of these ports for our health checks.
To quit netstat type “q”.
To exit the application server type “exit”.
Info
Note: If you need to clear the ssh keys try:
ssh-keygen -f "/home/xperts2025/.ssh/known_hosts" -R "10.1.3.5"
or
ssh -o StrictHostKeychecking=no hostname
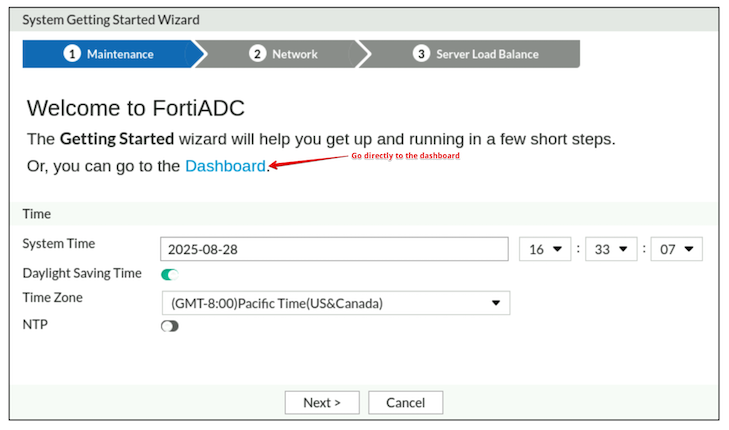
First Time Access to the FortiADC
If you see the Getting Started wizard click Dashboard. This will take you directly to the Dashboard, bypassing the wizard.
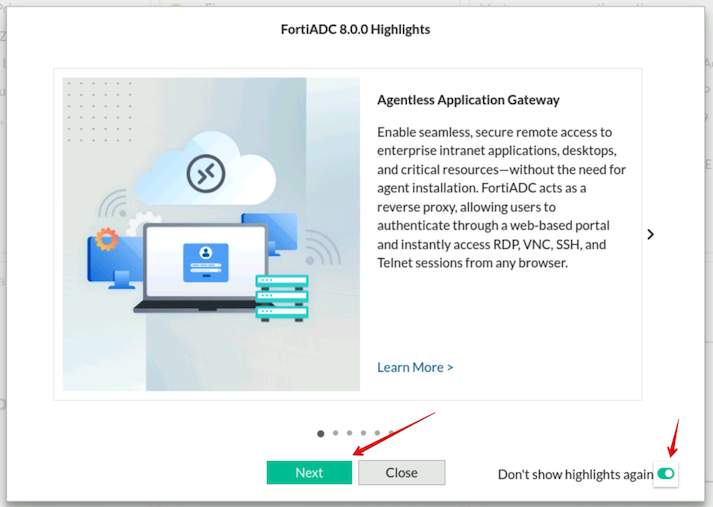
If you see the Highlights wizard click “Next” while scrolling through the latest highlights, toggle “Don’t show highlights again” and click “Close”.
Health Checks
Health Checks
In server load balancing deployments, the system uses health checks to poll the members of the real server pool to determine if an application is available. You can also configure additional health checks to poll related servers, and include results for both in the health check rule. For example, you can configure an HTTP health check test and a database server health check test. In a web application that requires access to a database to function, the web server is deemed available only if both the web server and the related database server pass the health check.
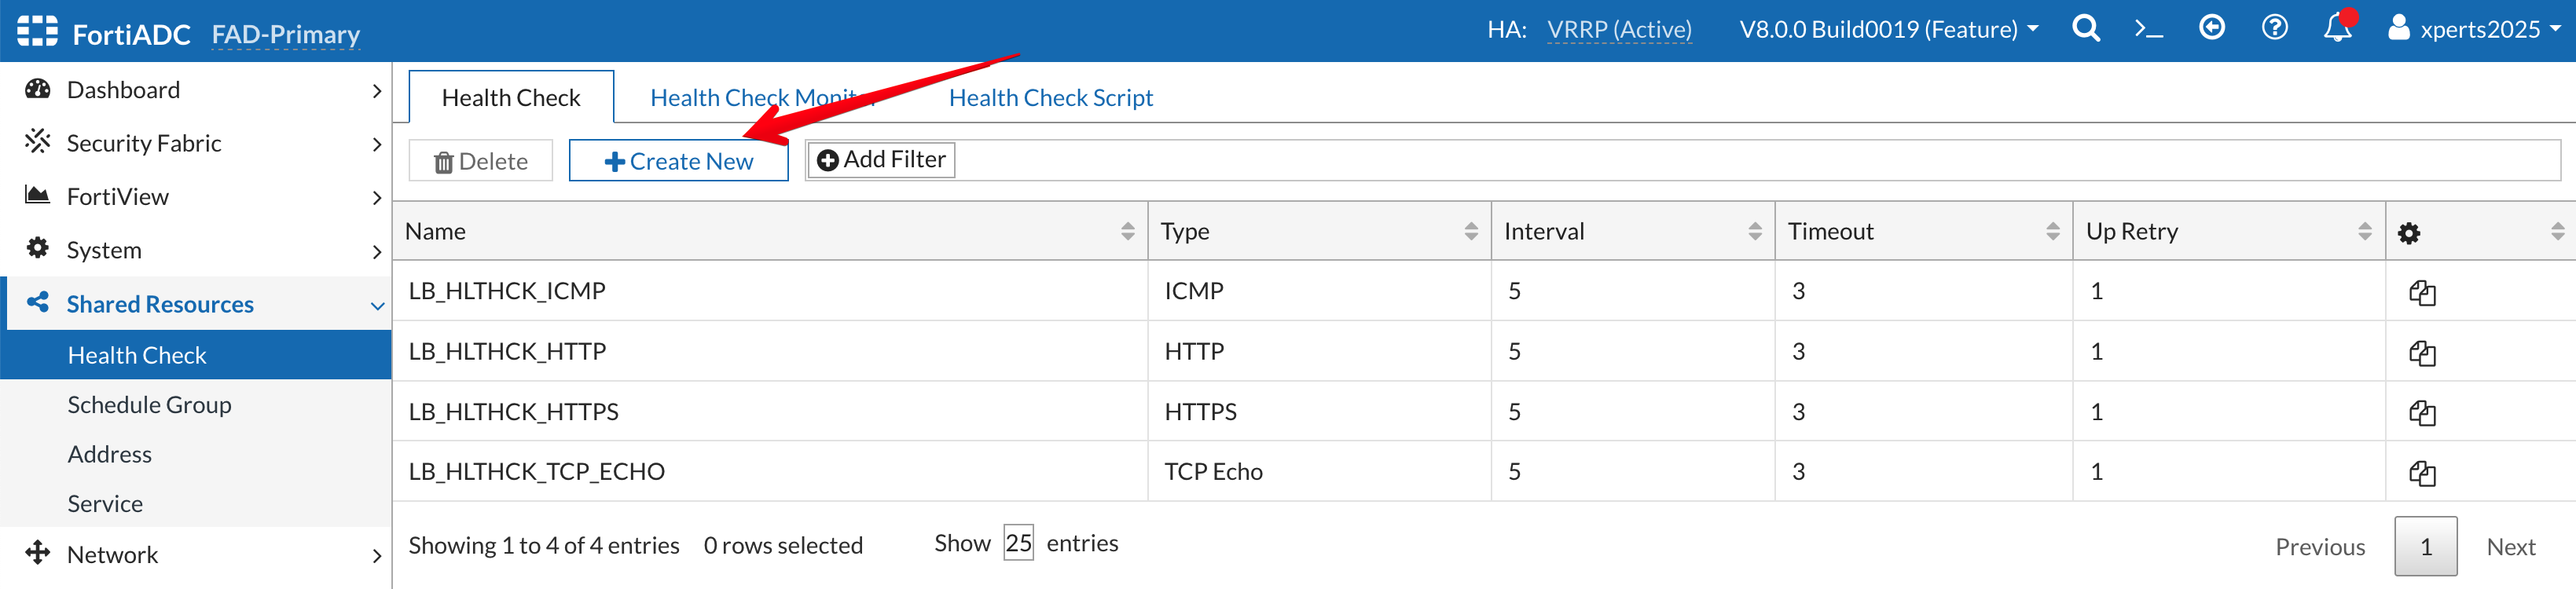
Configure a Health Check
Login to the FortiADC (FAD-Primary) with username xperts2025 and password AppSec-Xp3rts2025!
Go to Shared Resources → Health Check
Click on +Create New
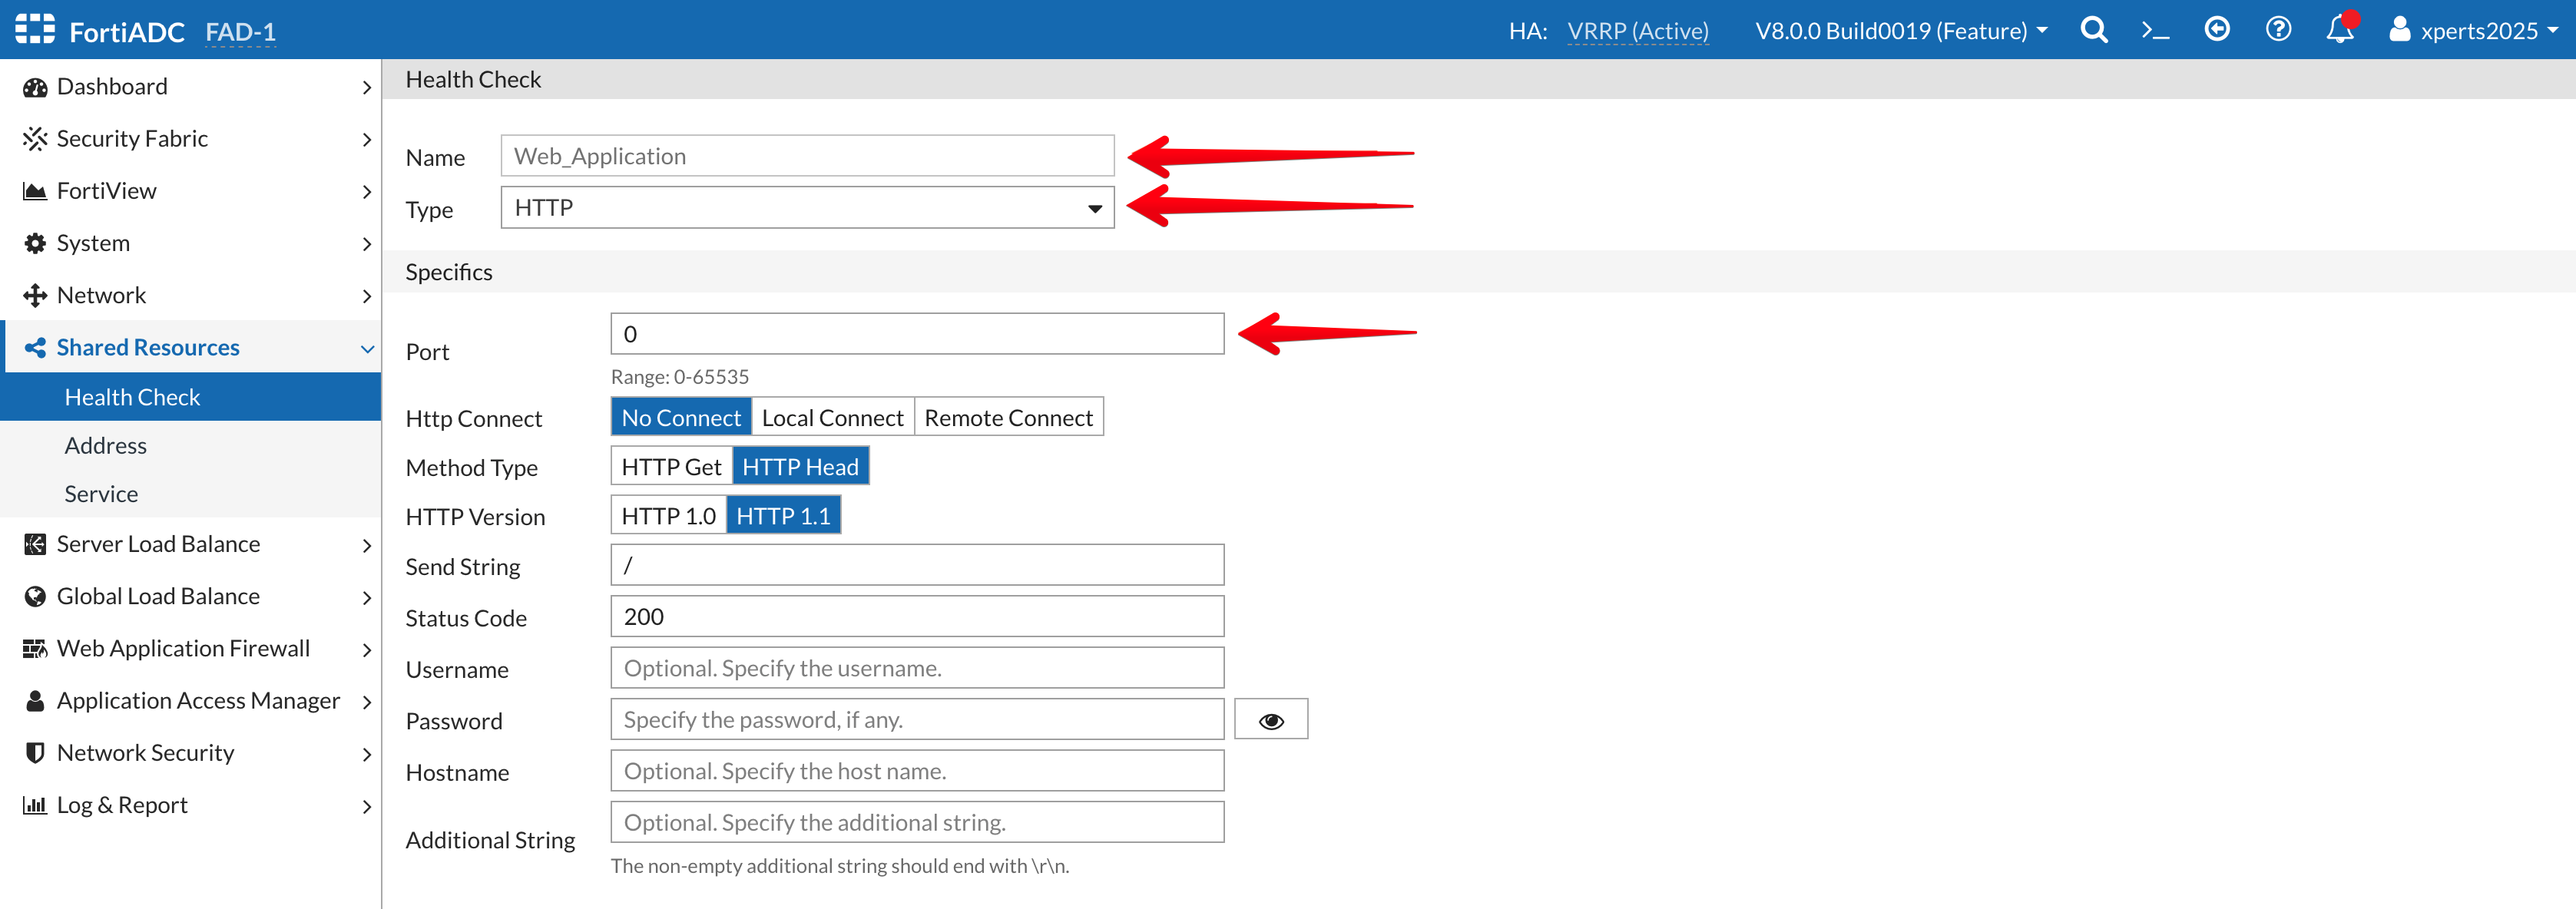
Name: Web_Application
Type: HTTP
Port: 0
Save
Info
Notice that when you change the Type to HTTP, additional options related to HTTP become available, such as method, version, response code, and authentication requirements. For this exercise, we will accept the default values for all other entries except those defined above.
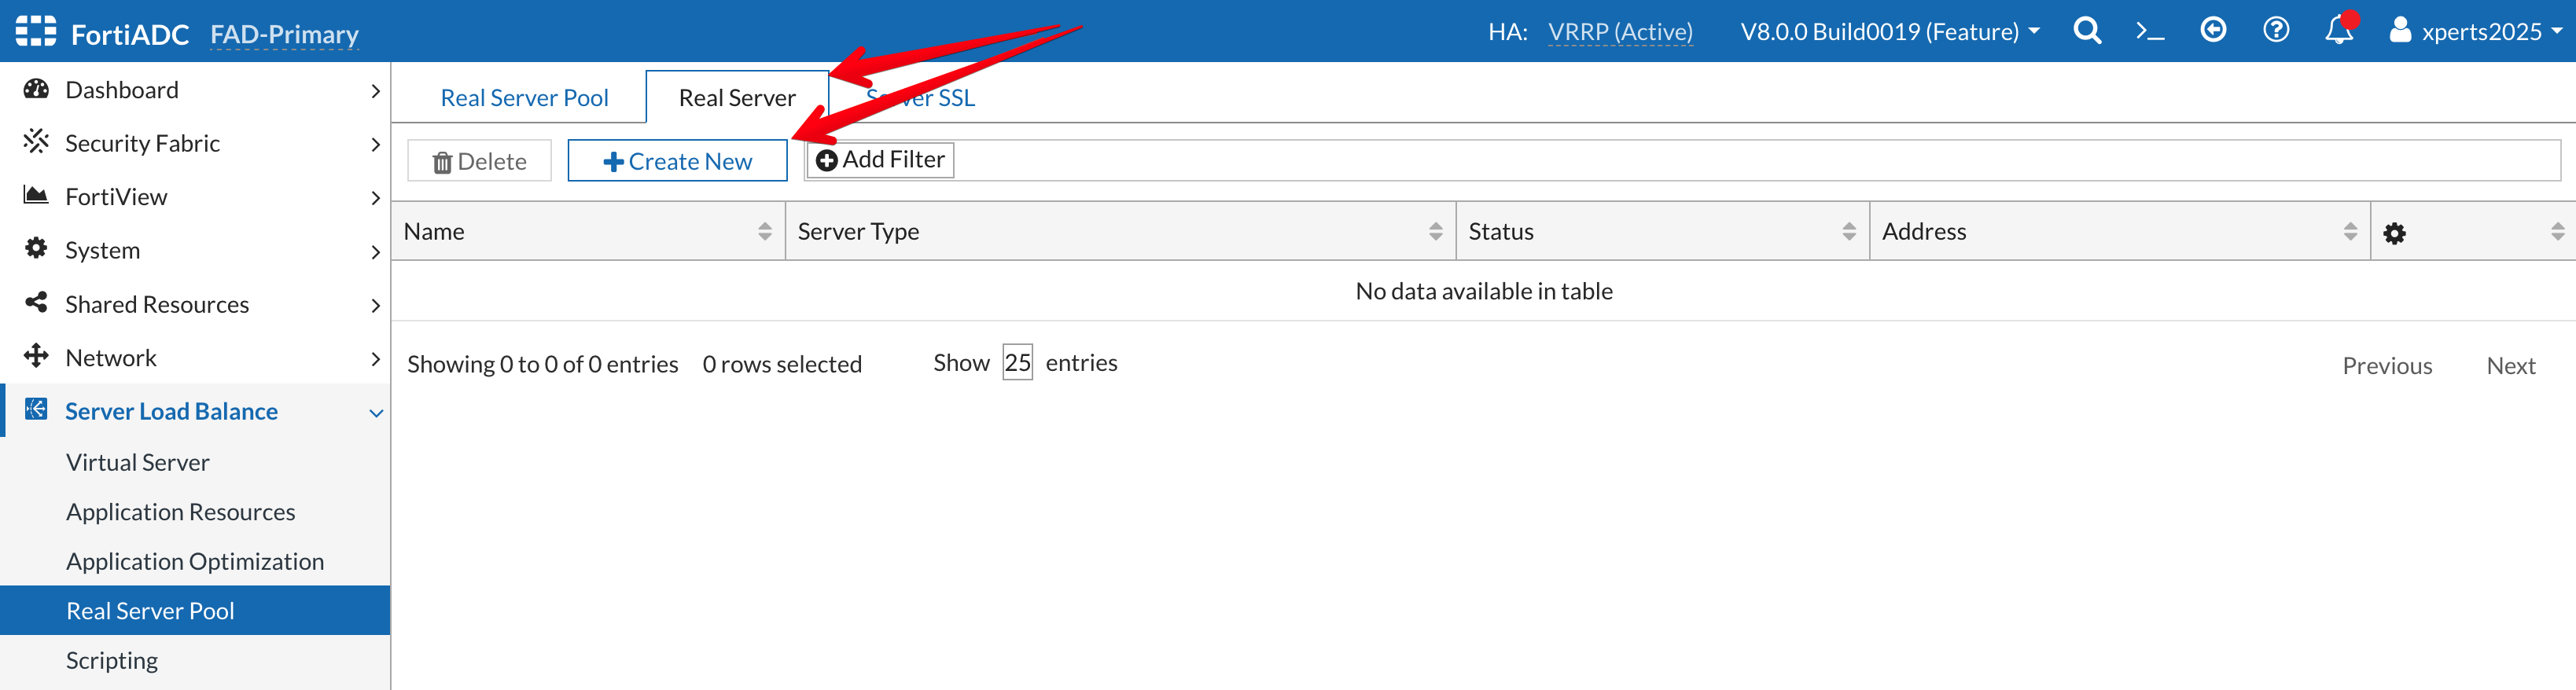
Real Servers
Real Servers
In this section we will define two application servers.
Login to the FortiADC (FAD-Primary) with username xperts2025 and password AppSec-Xp3rts2025!
Go to Server Load Balance → Real Server Pool
Click on the Real Server Tab
Click on +Create New
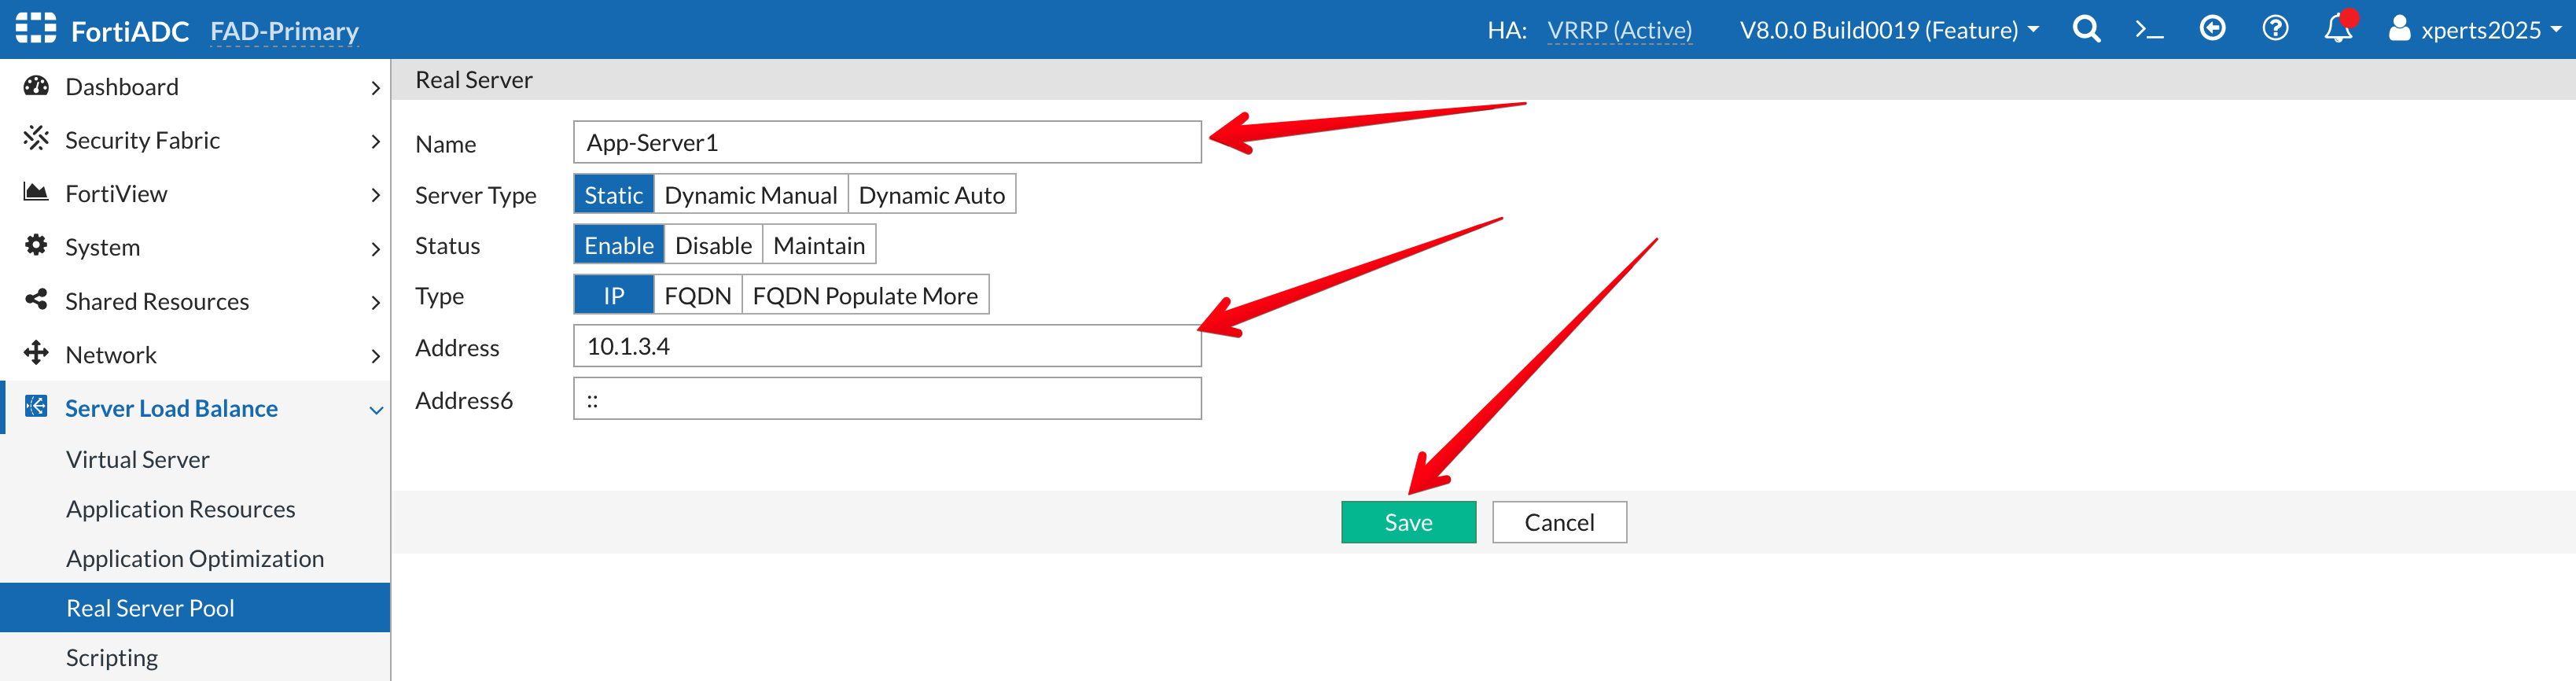
Name: APP-Server1
Server Type: Static
Status: Enable
Type: IP
Address: 10.1.3.4
Save
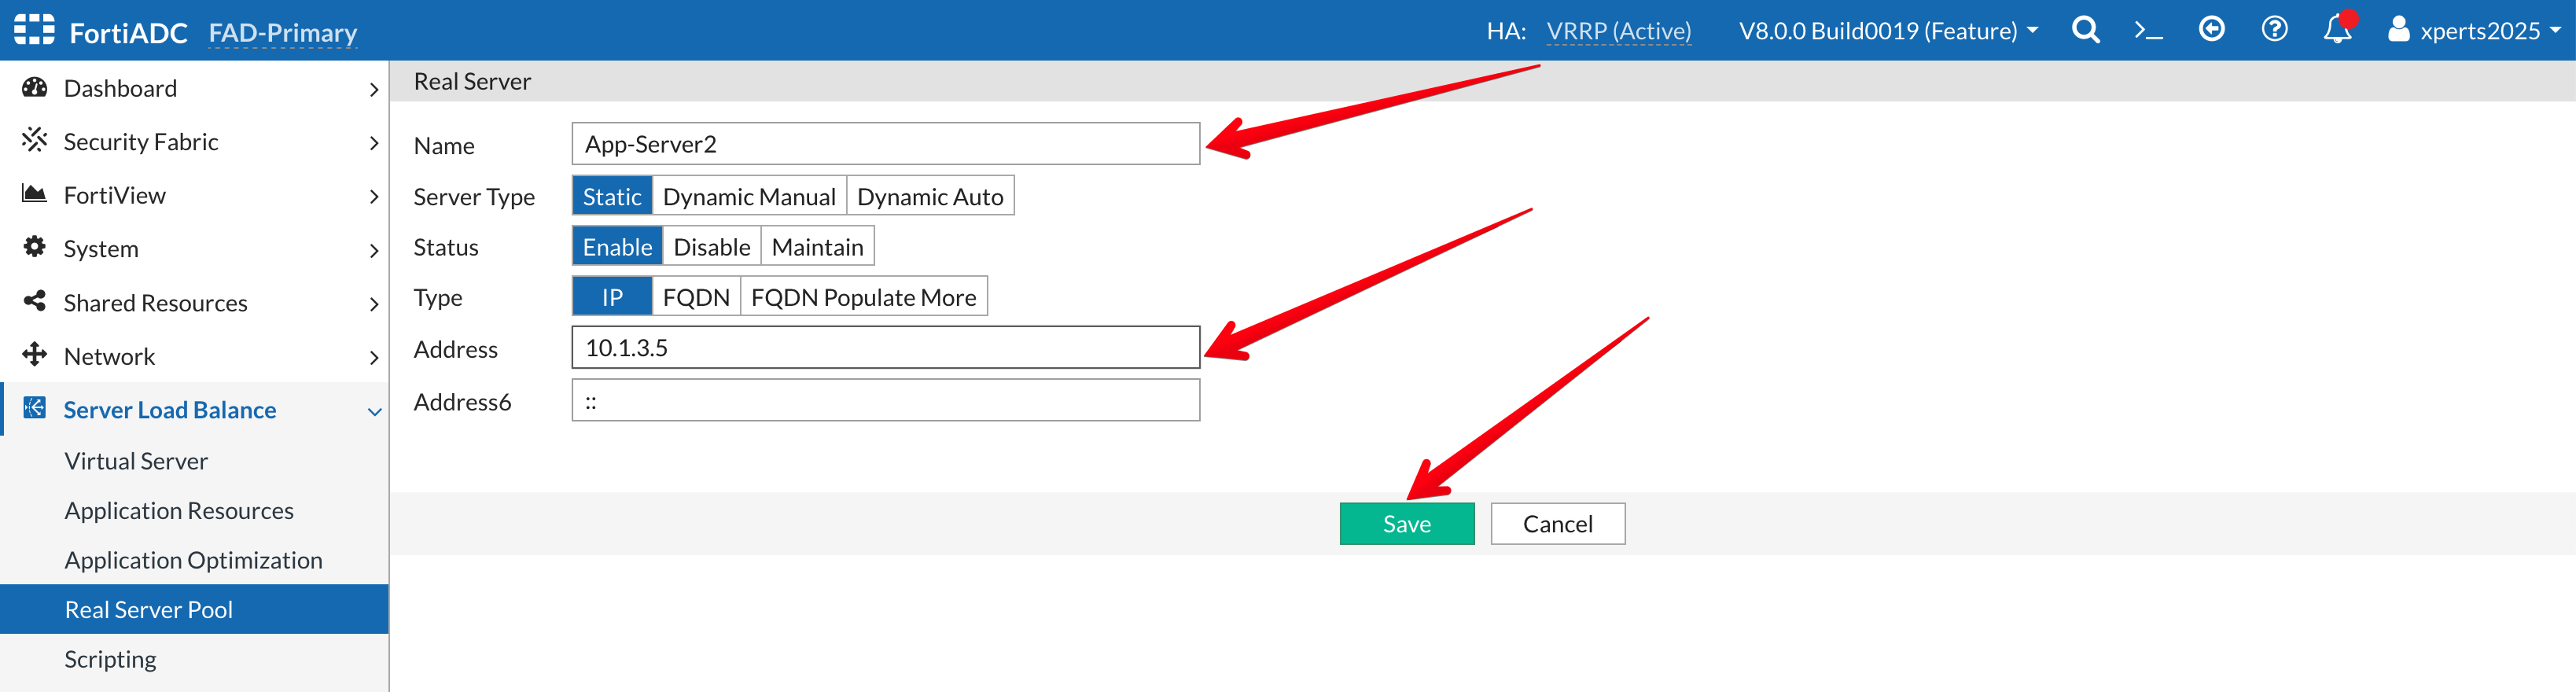
We will repeat the same steps as above to add the second application server.
Name: APP-Server2
Server Type: Static
Status: Enable
Type: IP
Address: 10.1.3.5
Save
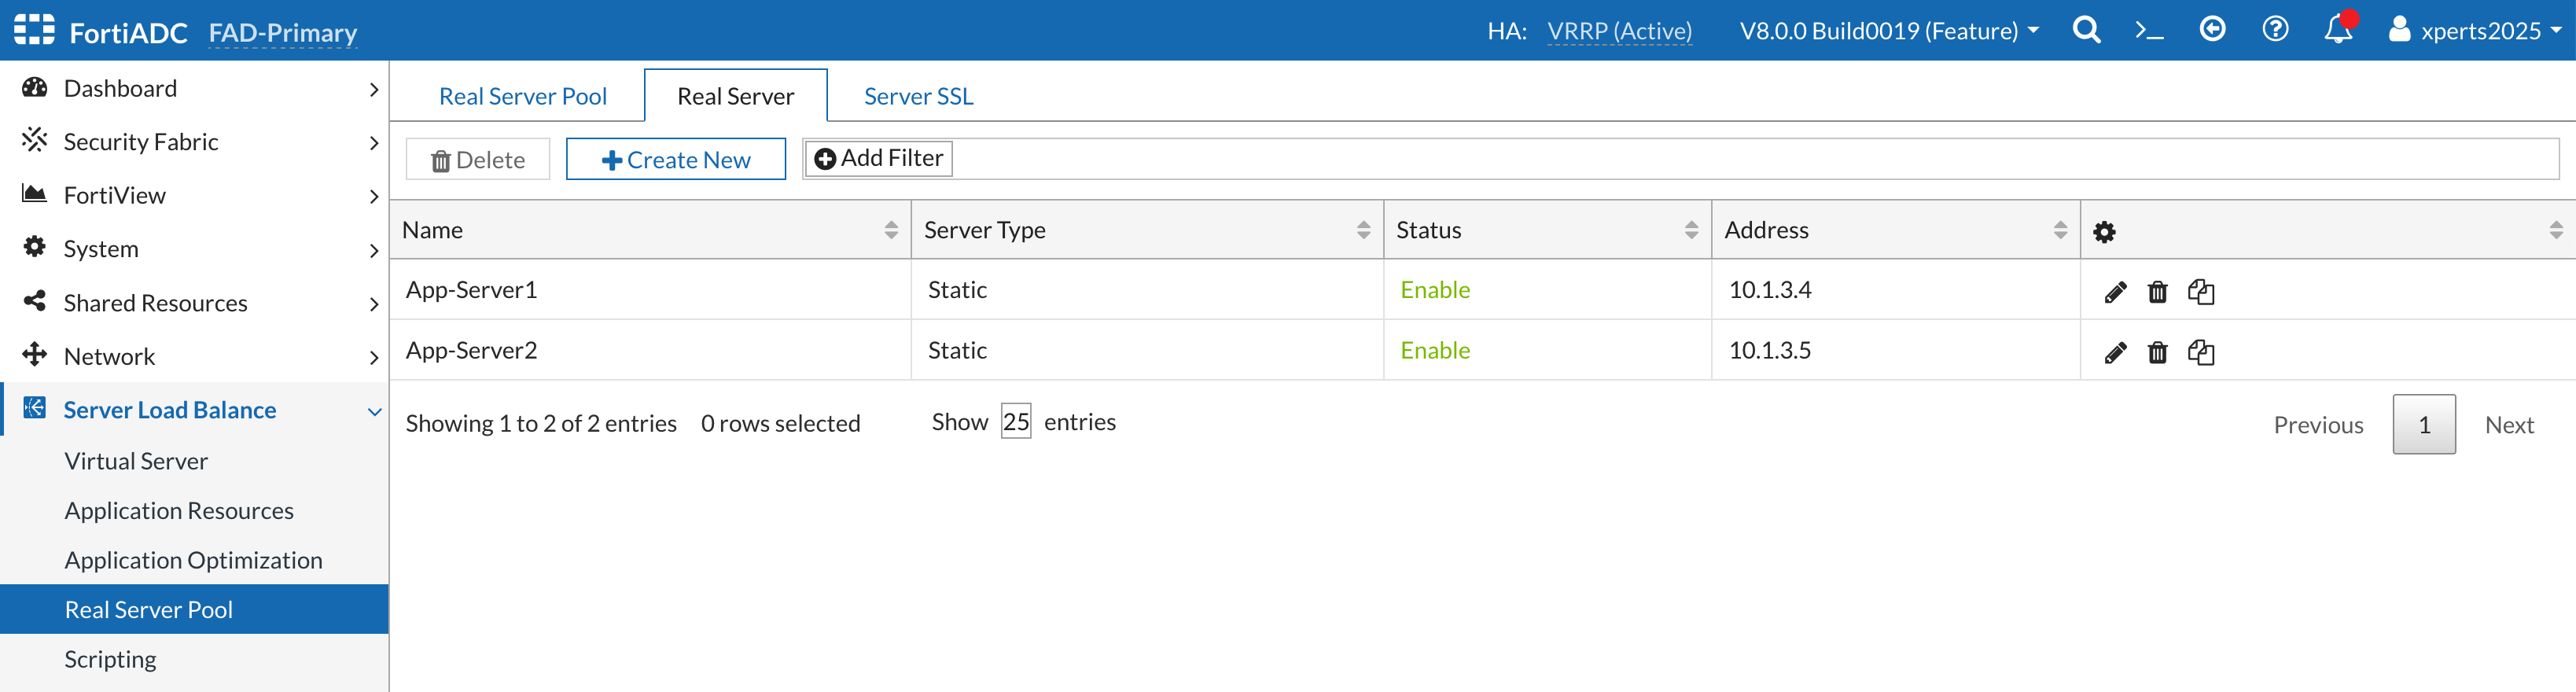
Your final result should look like the image below
In the above example, we used IP addresses to define the real servers. However, we also have additional mechanisms, such as FQDN, to define the real servers. Additionally, the server status can be set to “disabled” to ensure FortiADC will not send traffic to the server, or it can be put in “maintenance mode” to allow current sessions to continue while preventing new sessions from being sent to the server. Please refer to the user guide for additional details.
Server Pools
Server Pools
A server pool is a group of servers that work together to handle incoming requests. The servers in a pool share the load, ensuring that no single server becomes overwhelmed. The Application Delivery Controller distributes traffic among the servers in the pool based on predefined criteria such as server capacity, current load, and health status. This setup enhances the availability, scalability, and reliability of the applications and services being delivered.
Real servers are physical servers that form real server pools. The Real Server configuration object specifies the status, type, and IP address or FQDN of the physical server. This Real Server configuration object can then be used as a member to form a real server pool.
When the FortiADC is deployed in L7 mode (reverse proxy), a new TCP session is established from the FortiADC to the real server. A “Real Server SSL Profile” determines how SSL is negotiated between the FortiADC and the real server.
Once a server is added to the pool we will need to define a health check so the FortiADC can determine the status or availability of a server before forwarding a request to the server.
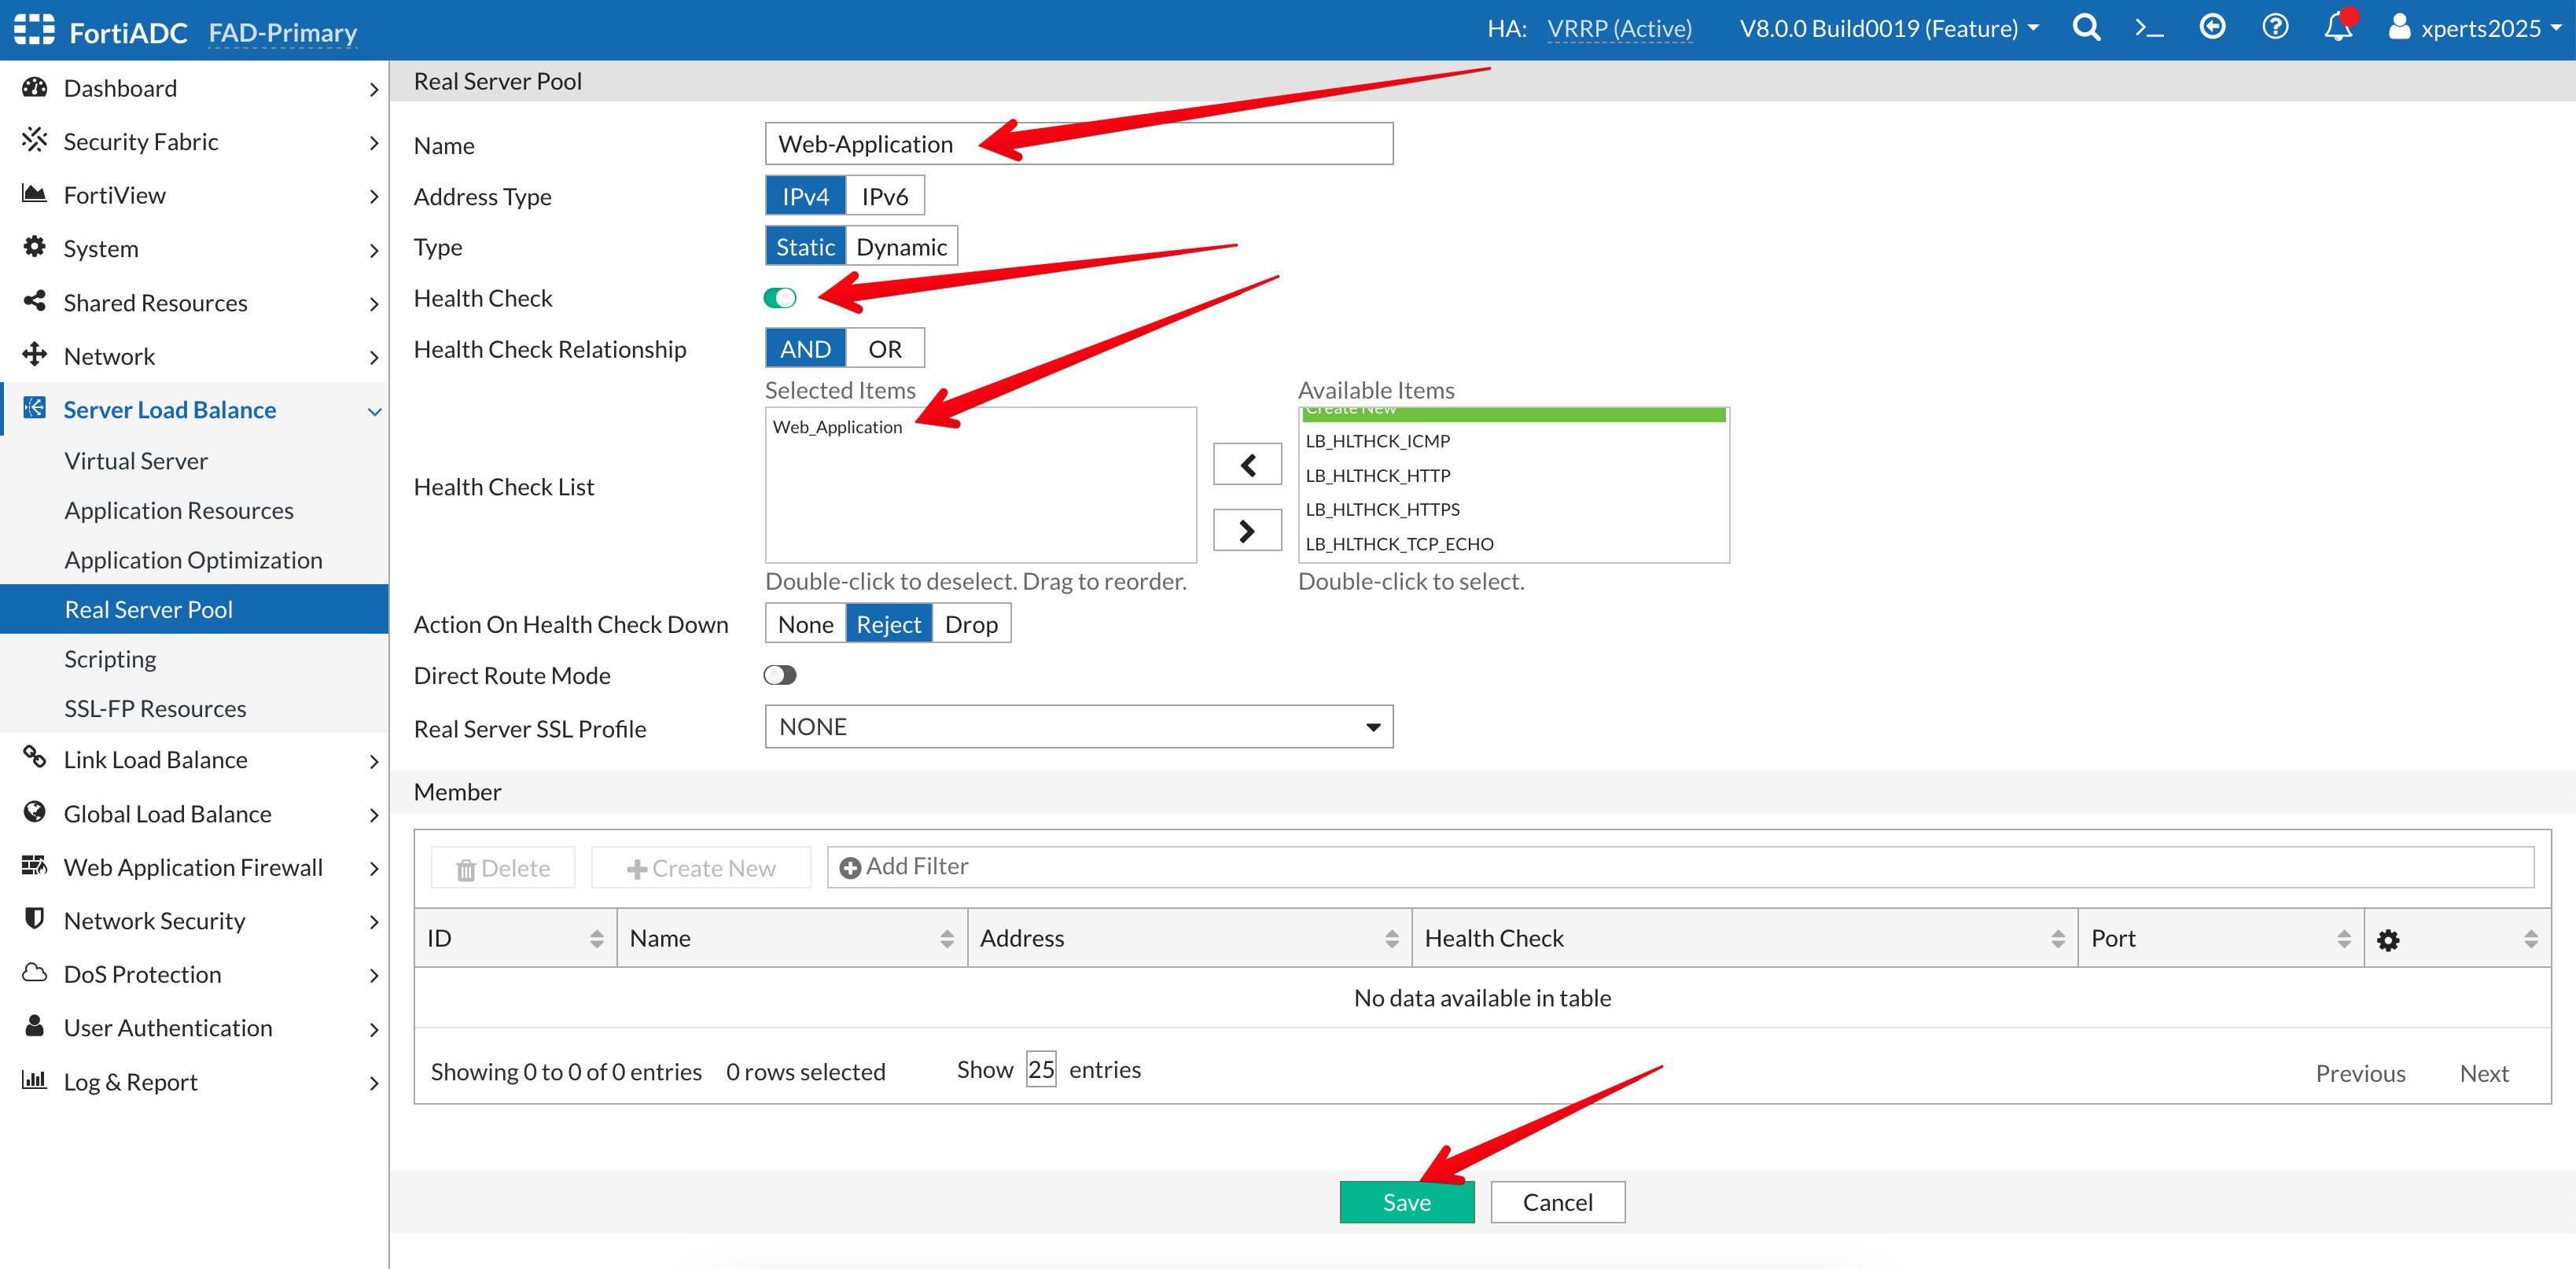
In the next few steps we will define Real Servers and use them to create a Real Server Pool. We will start the process by defining health checks.
Login to the FortiADC (FAD-Primary) with username xperts2025 and password AppSec-Xp3rts2025!
Go to Server Load Balance → Real Server Pool
Click on the Real Server Pool Tab
Click on +Create New
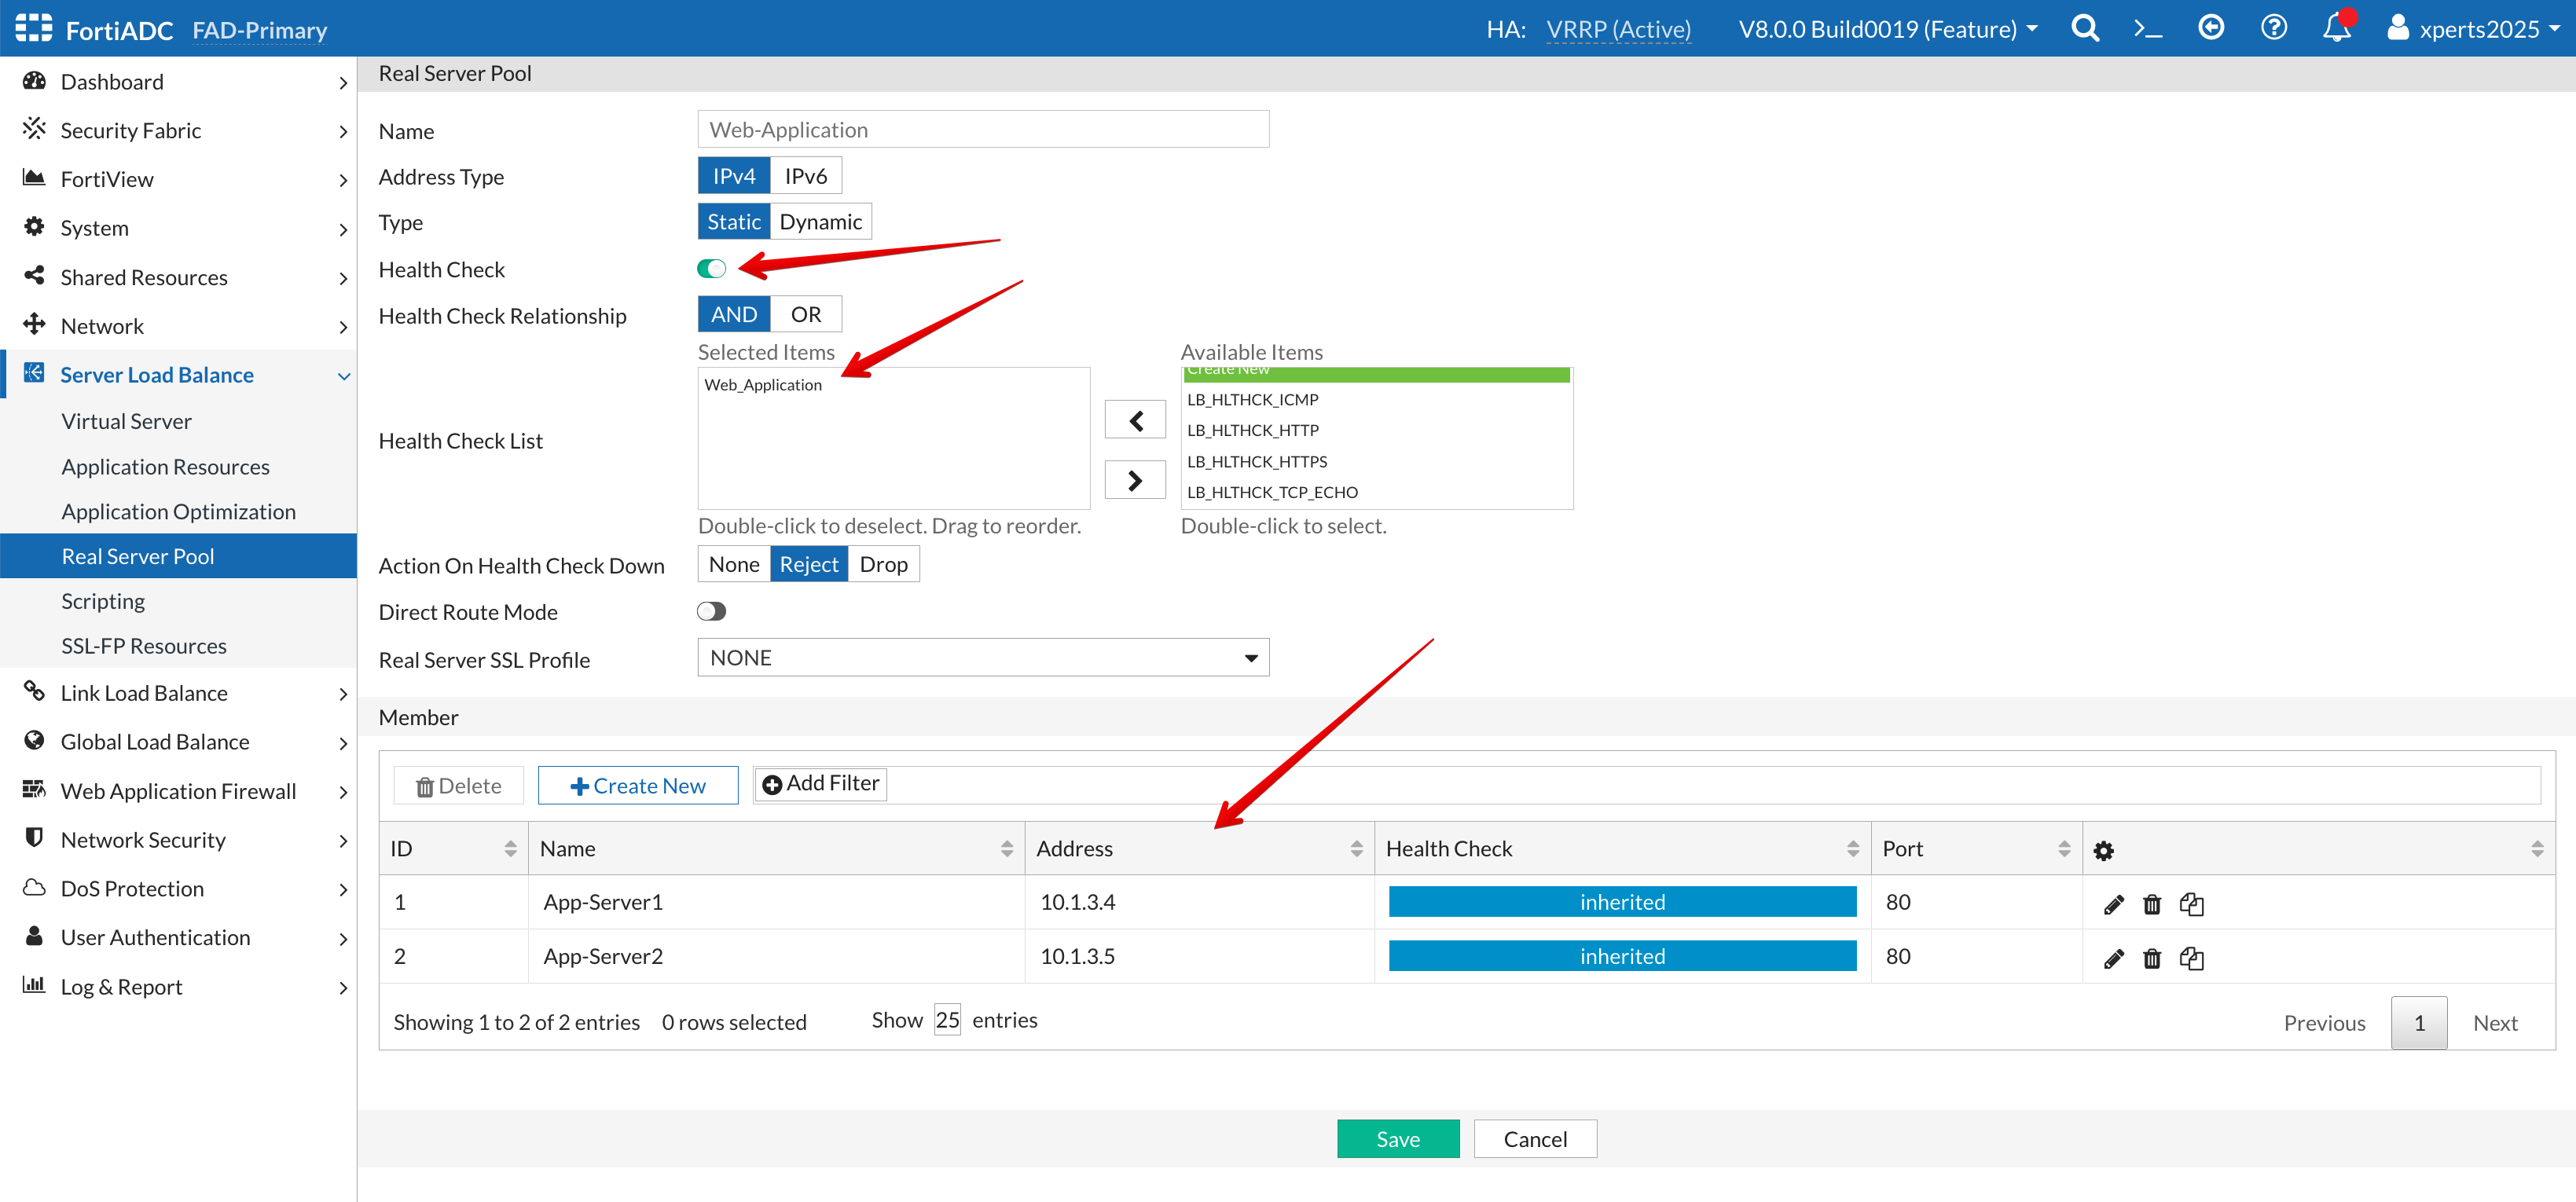
Name: Web-Application
Health Check: enable the toggle for Health Check and add the Web_Application Health Check we created earlier.
Save
Info
Please note that if there is a requirement to encrypt the traffic between FortiADC and the application servers, you must configure the Real Server SSL profile and enable it within the server pool definition.
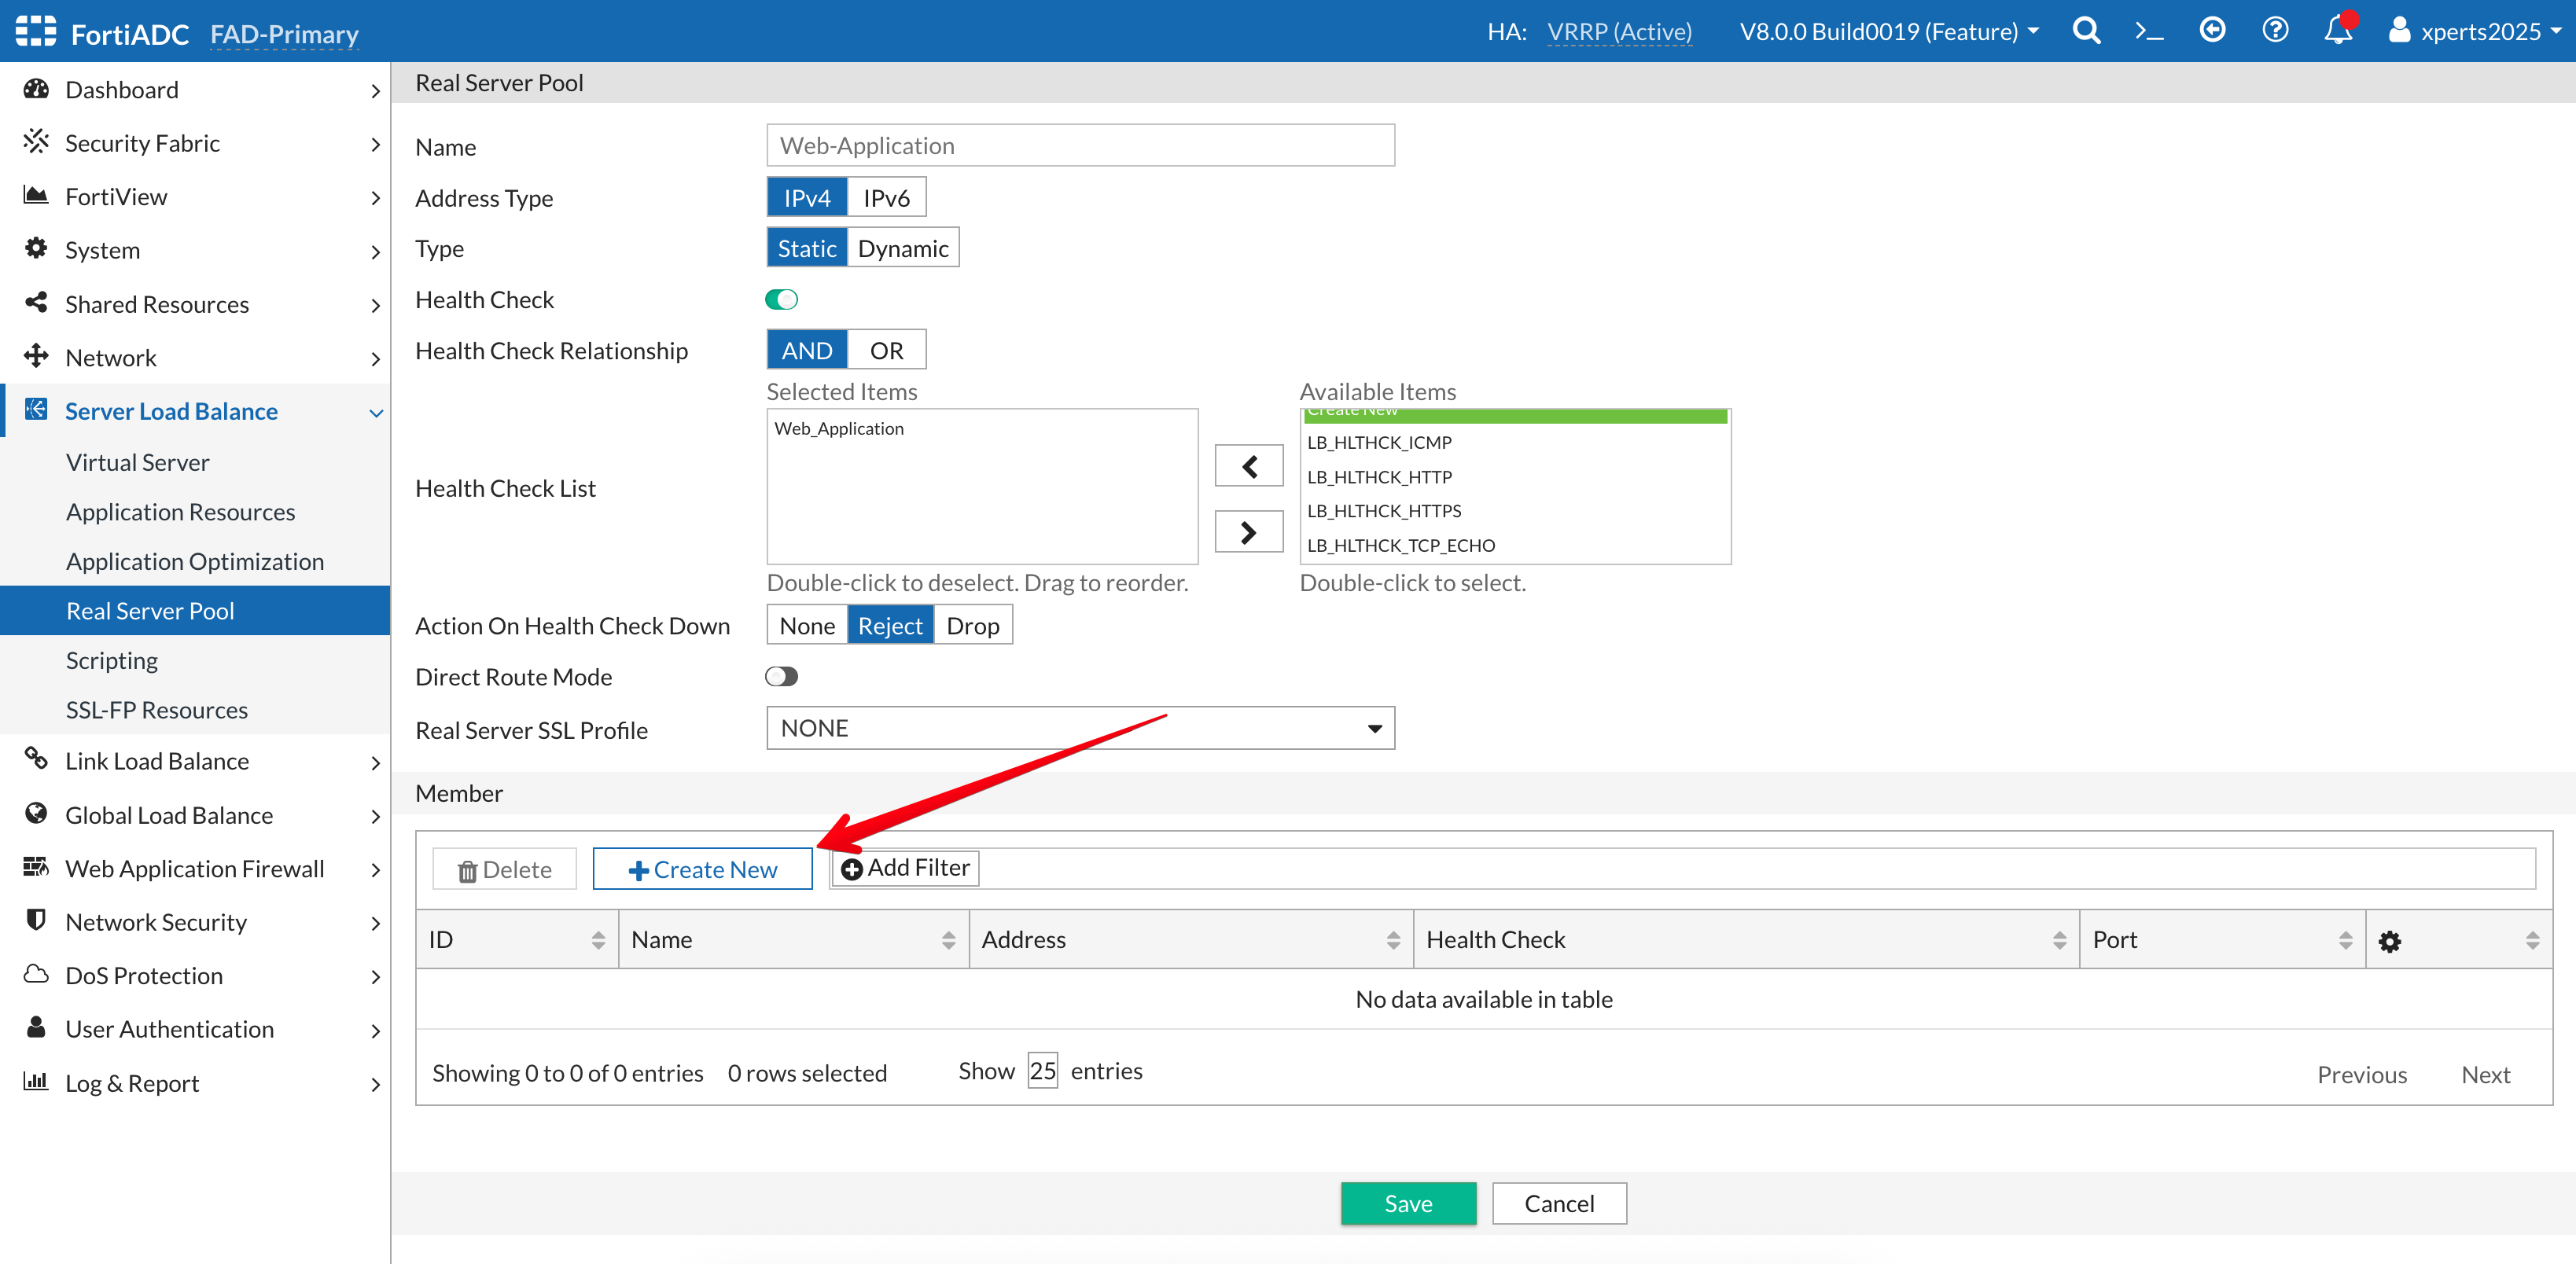
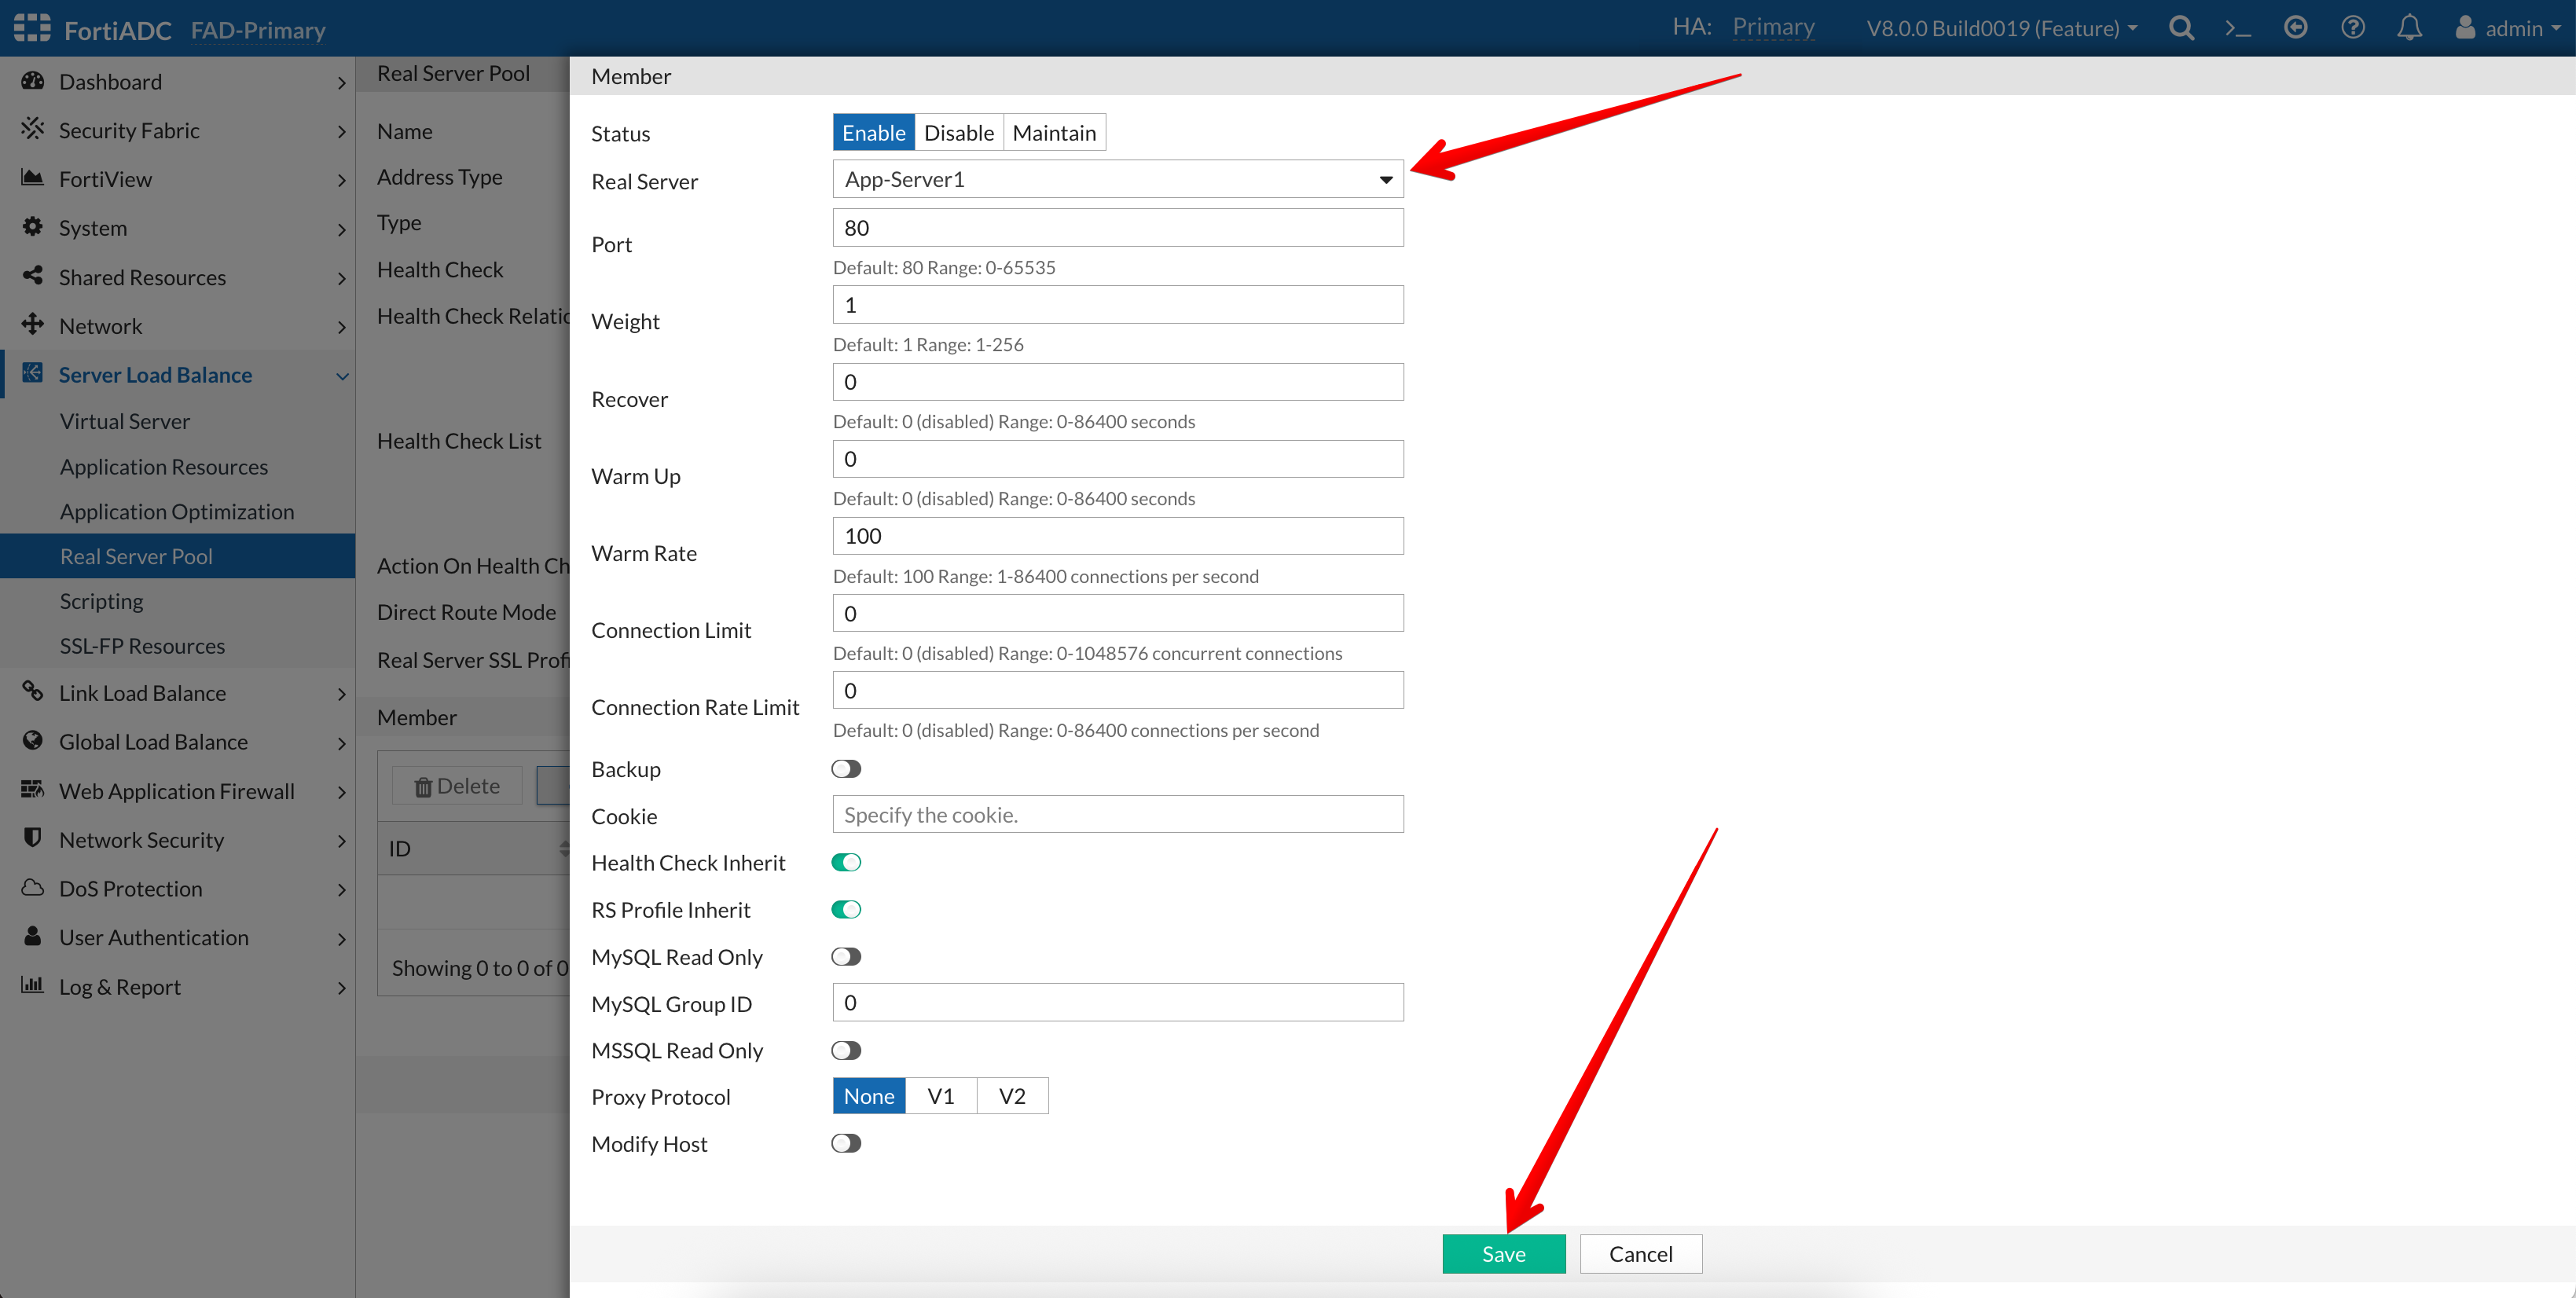
Click on the +Create New new button under Member
Real Server: APP-Server1 from the drop down menu
Accept default values for the other options
Save
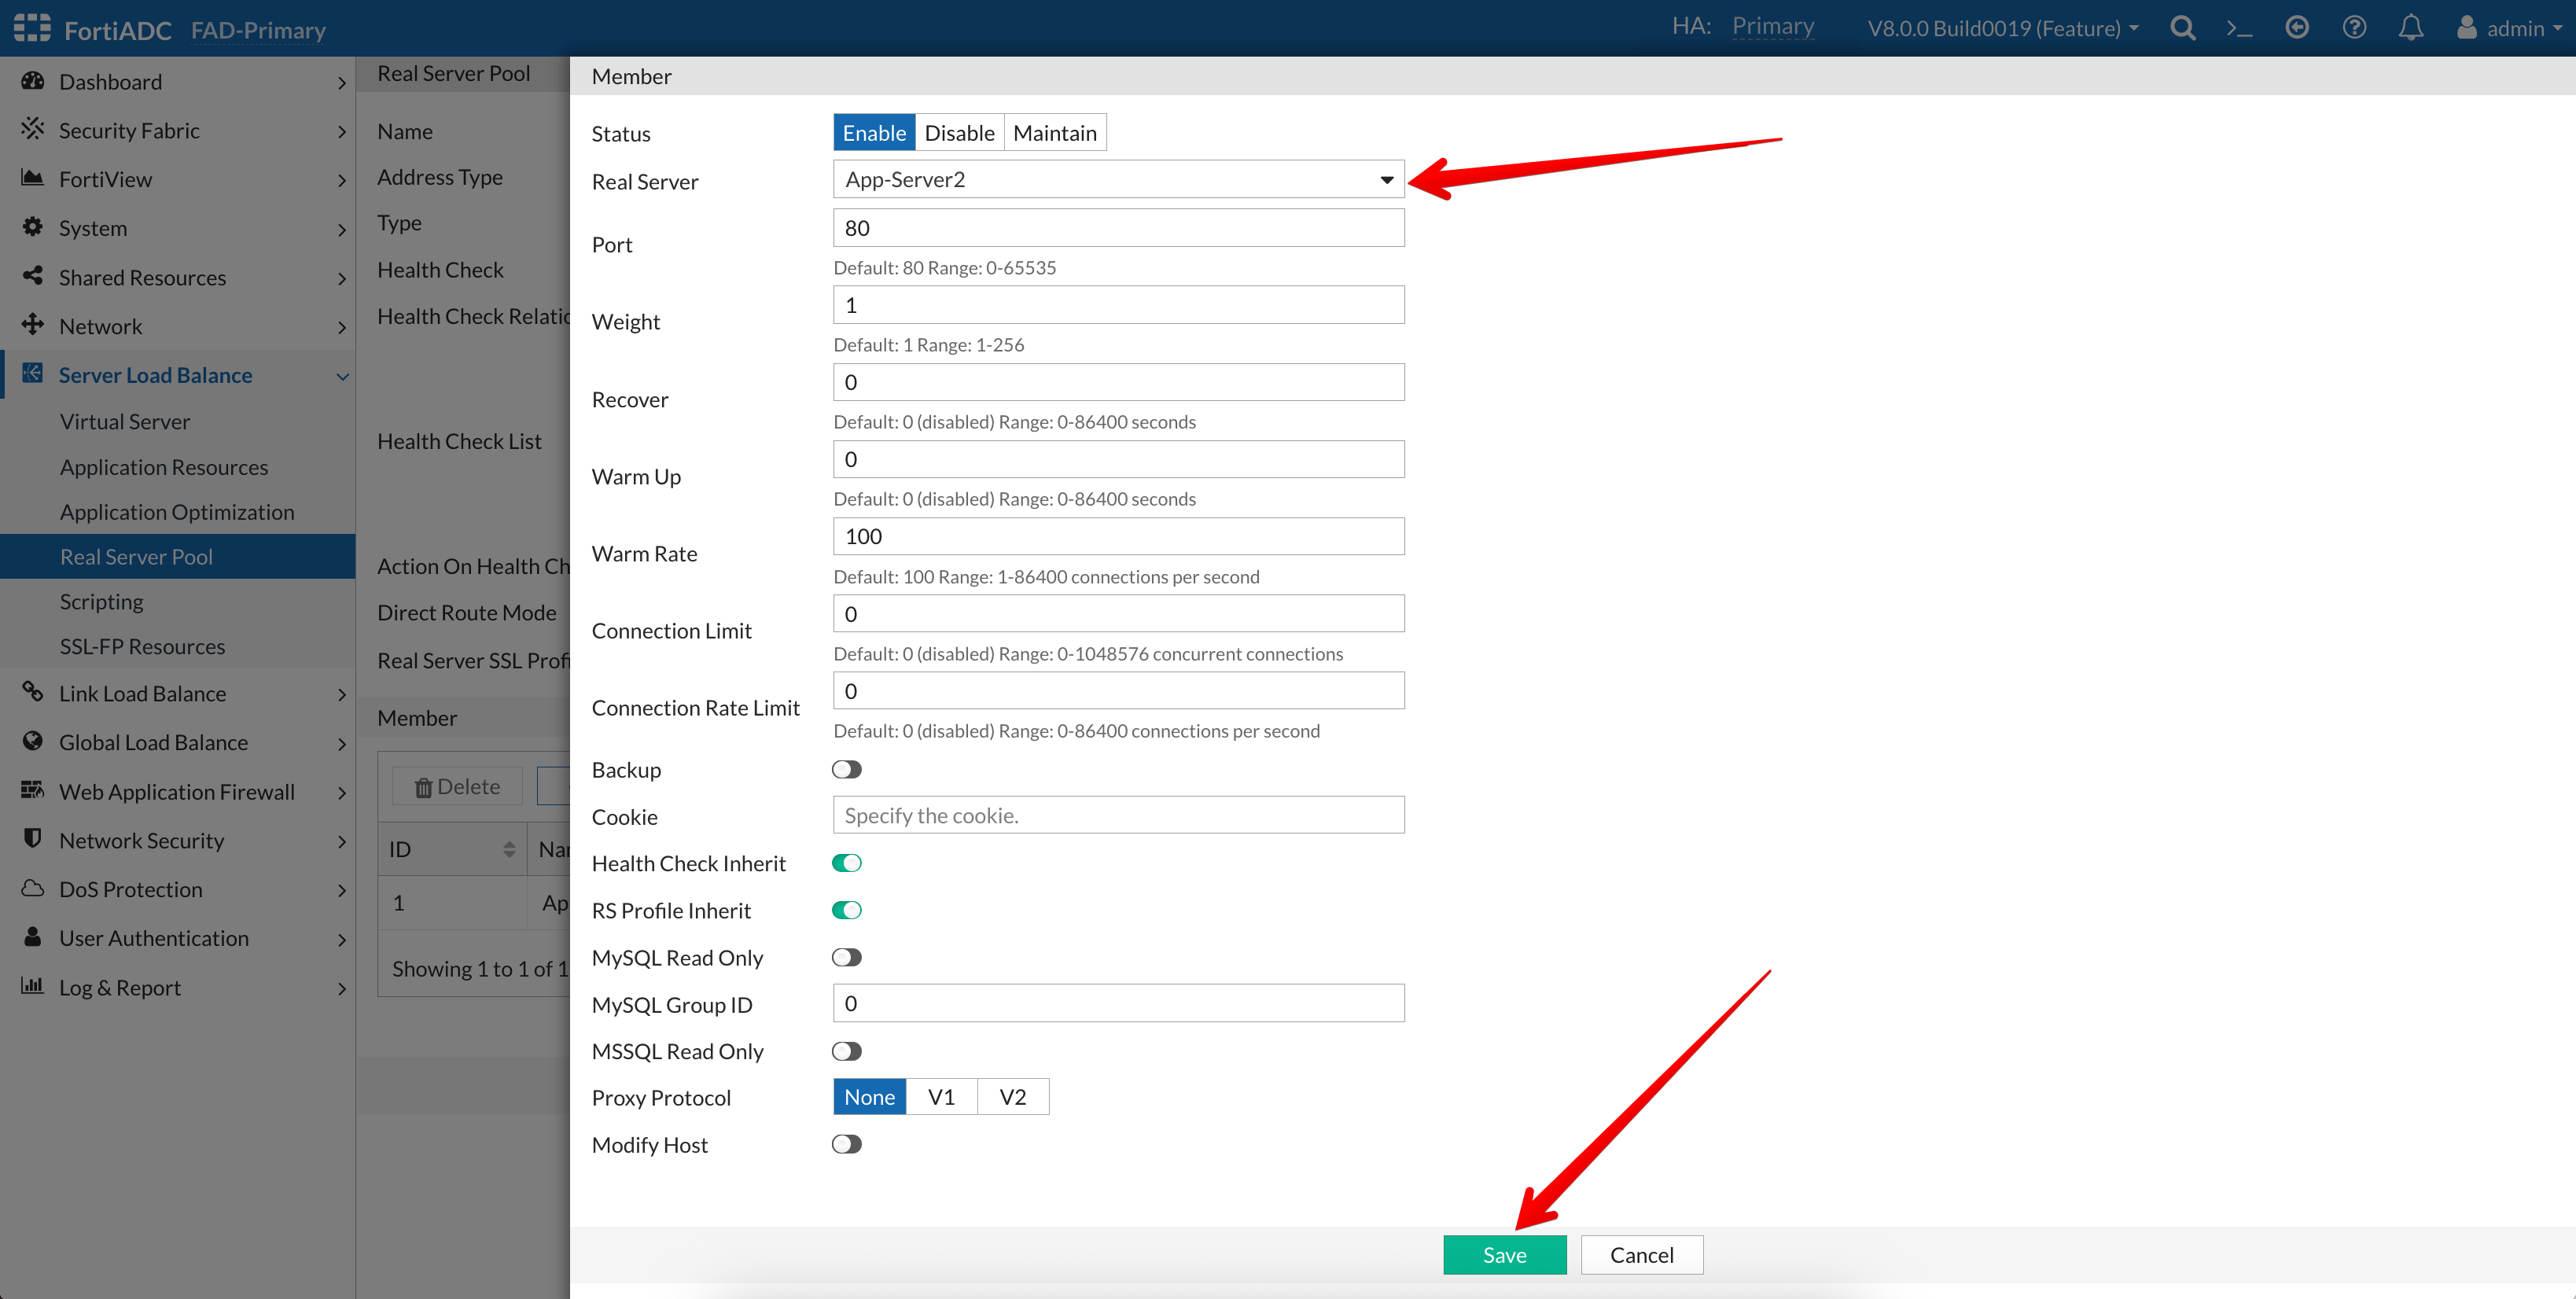
Real Server: APP-Server2 from the drop down menu
Accept default values for the other options
Save
Your finished server pool should look like this.
Because we will be using two applications to run our lab, we will repeat the above steps again to define our second Real Server Pool.
Create Real Servers for the 2nd Application
In this section we will define two application servers.
Login to the FortiADC (FAD-Primary) with username xperts2025 and password AppSec-Xp3rts2025!
Go to Server Load Balance → Real Server Pool
Click on the Real Server Tab
Click on +Create New
Save
Name: DVWA1
Server Type: Static
Status: Enable
Type: IP
Address: 10.1.3.4
Save
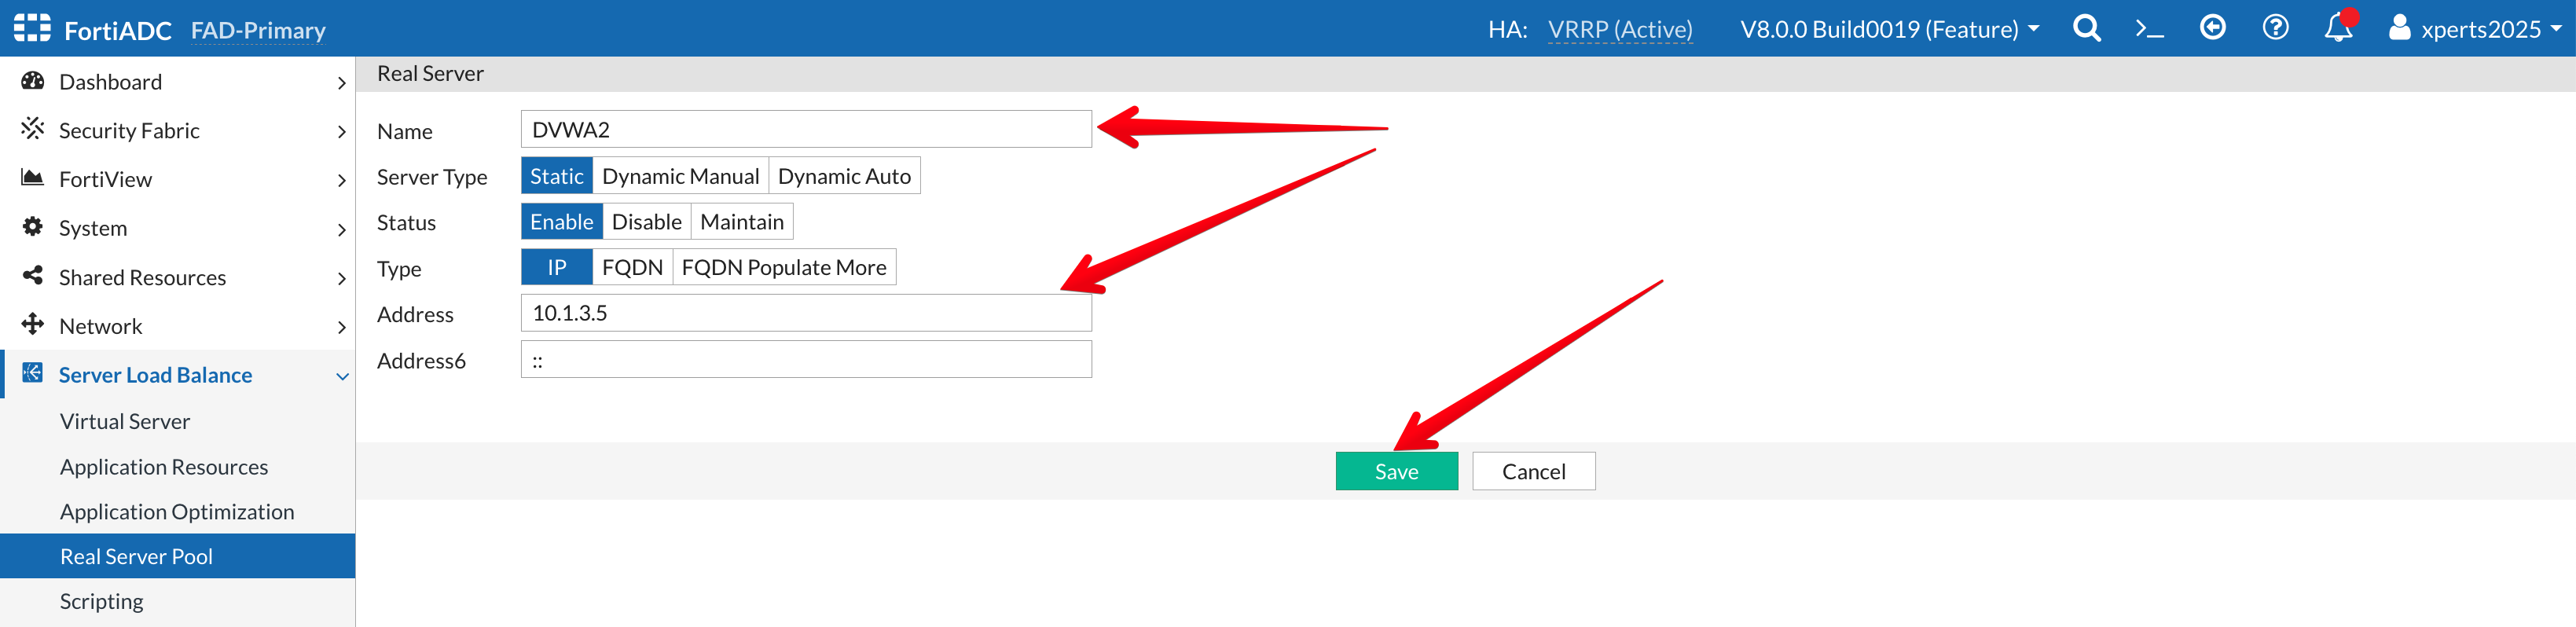
Name: DVWA2
Server Type: Static
Status: Enable
Type: IP
Address: 10.1.3.5
Save
Next we add the servers to a server pool.
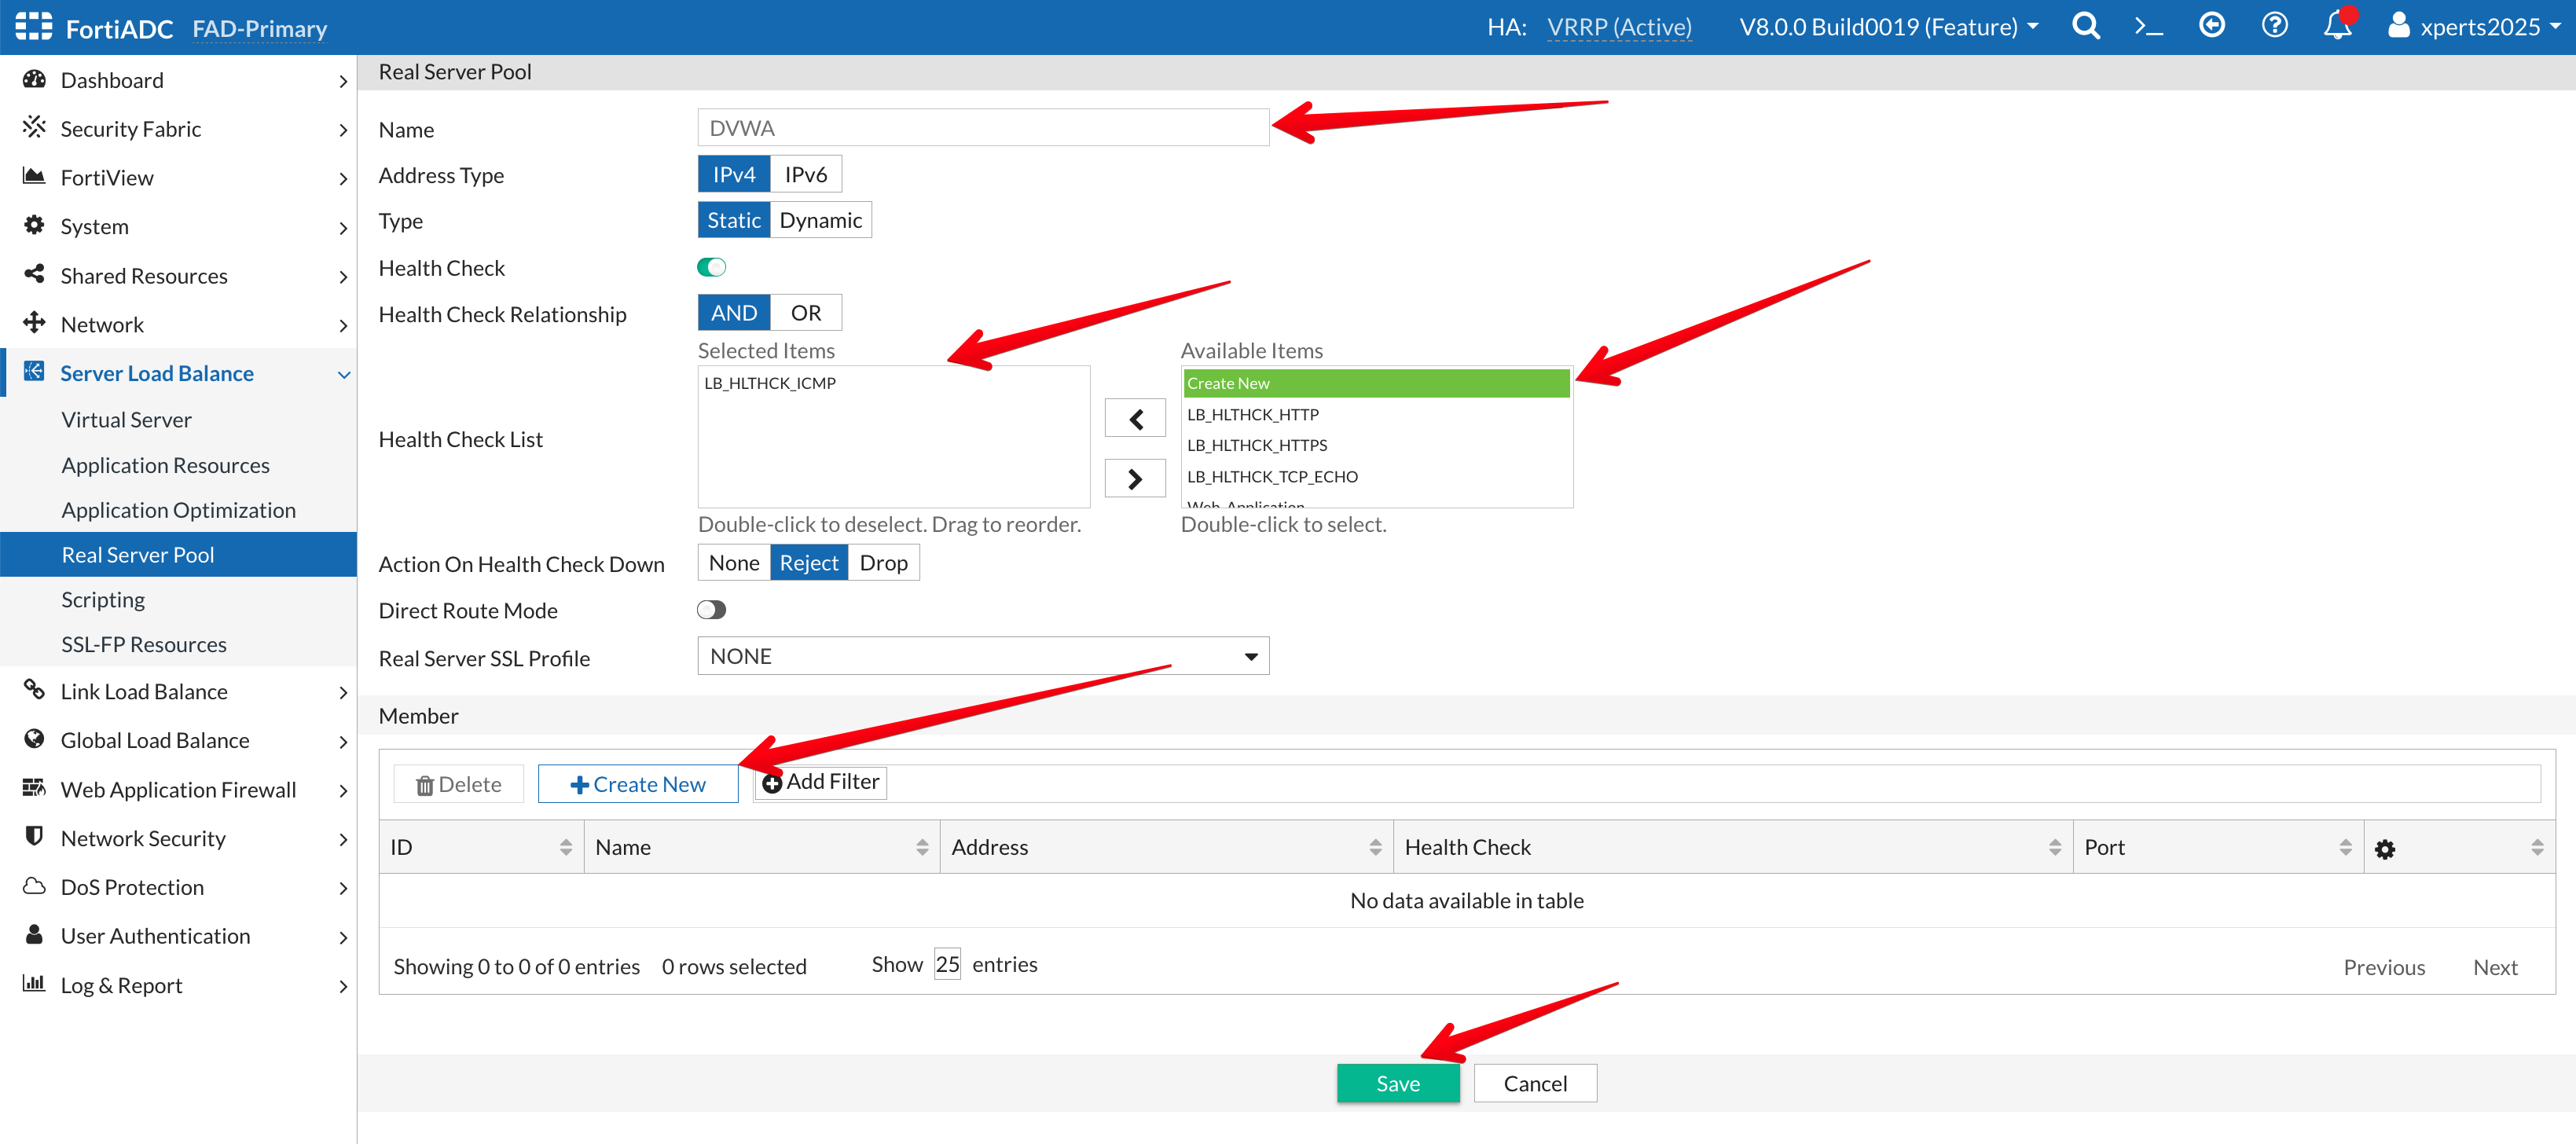
Go to Server Load Balance → Real Server Pool
Click on the Real Server Pool Tab
Click on +Create New
Name: DVWA
Health Check: enable the toggle for Health Check and add the builtin LB_HLTCHK_ICMP
Save
Click +Create New
Add the Real Servers defined in the previous step to the pool
While adding the servers, change the listening port to 8080
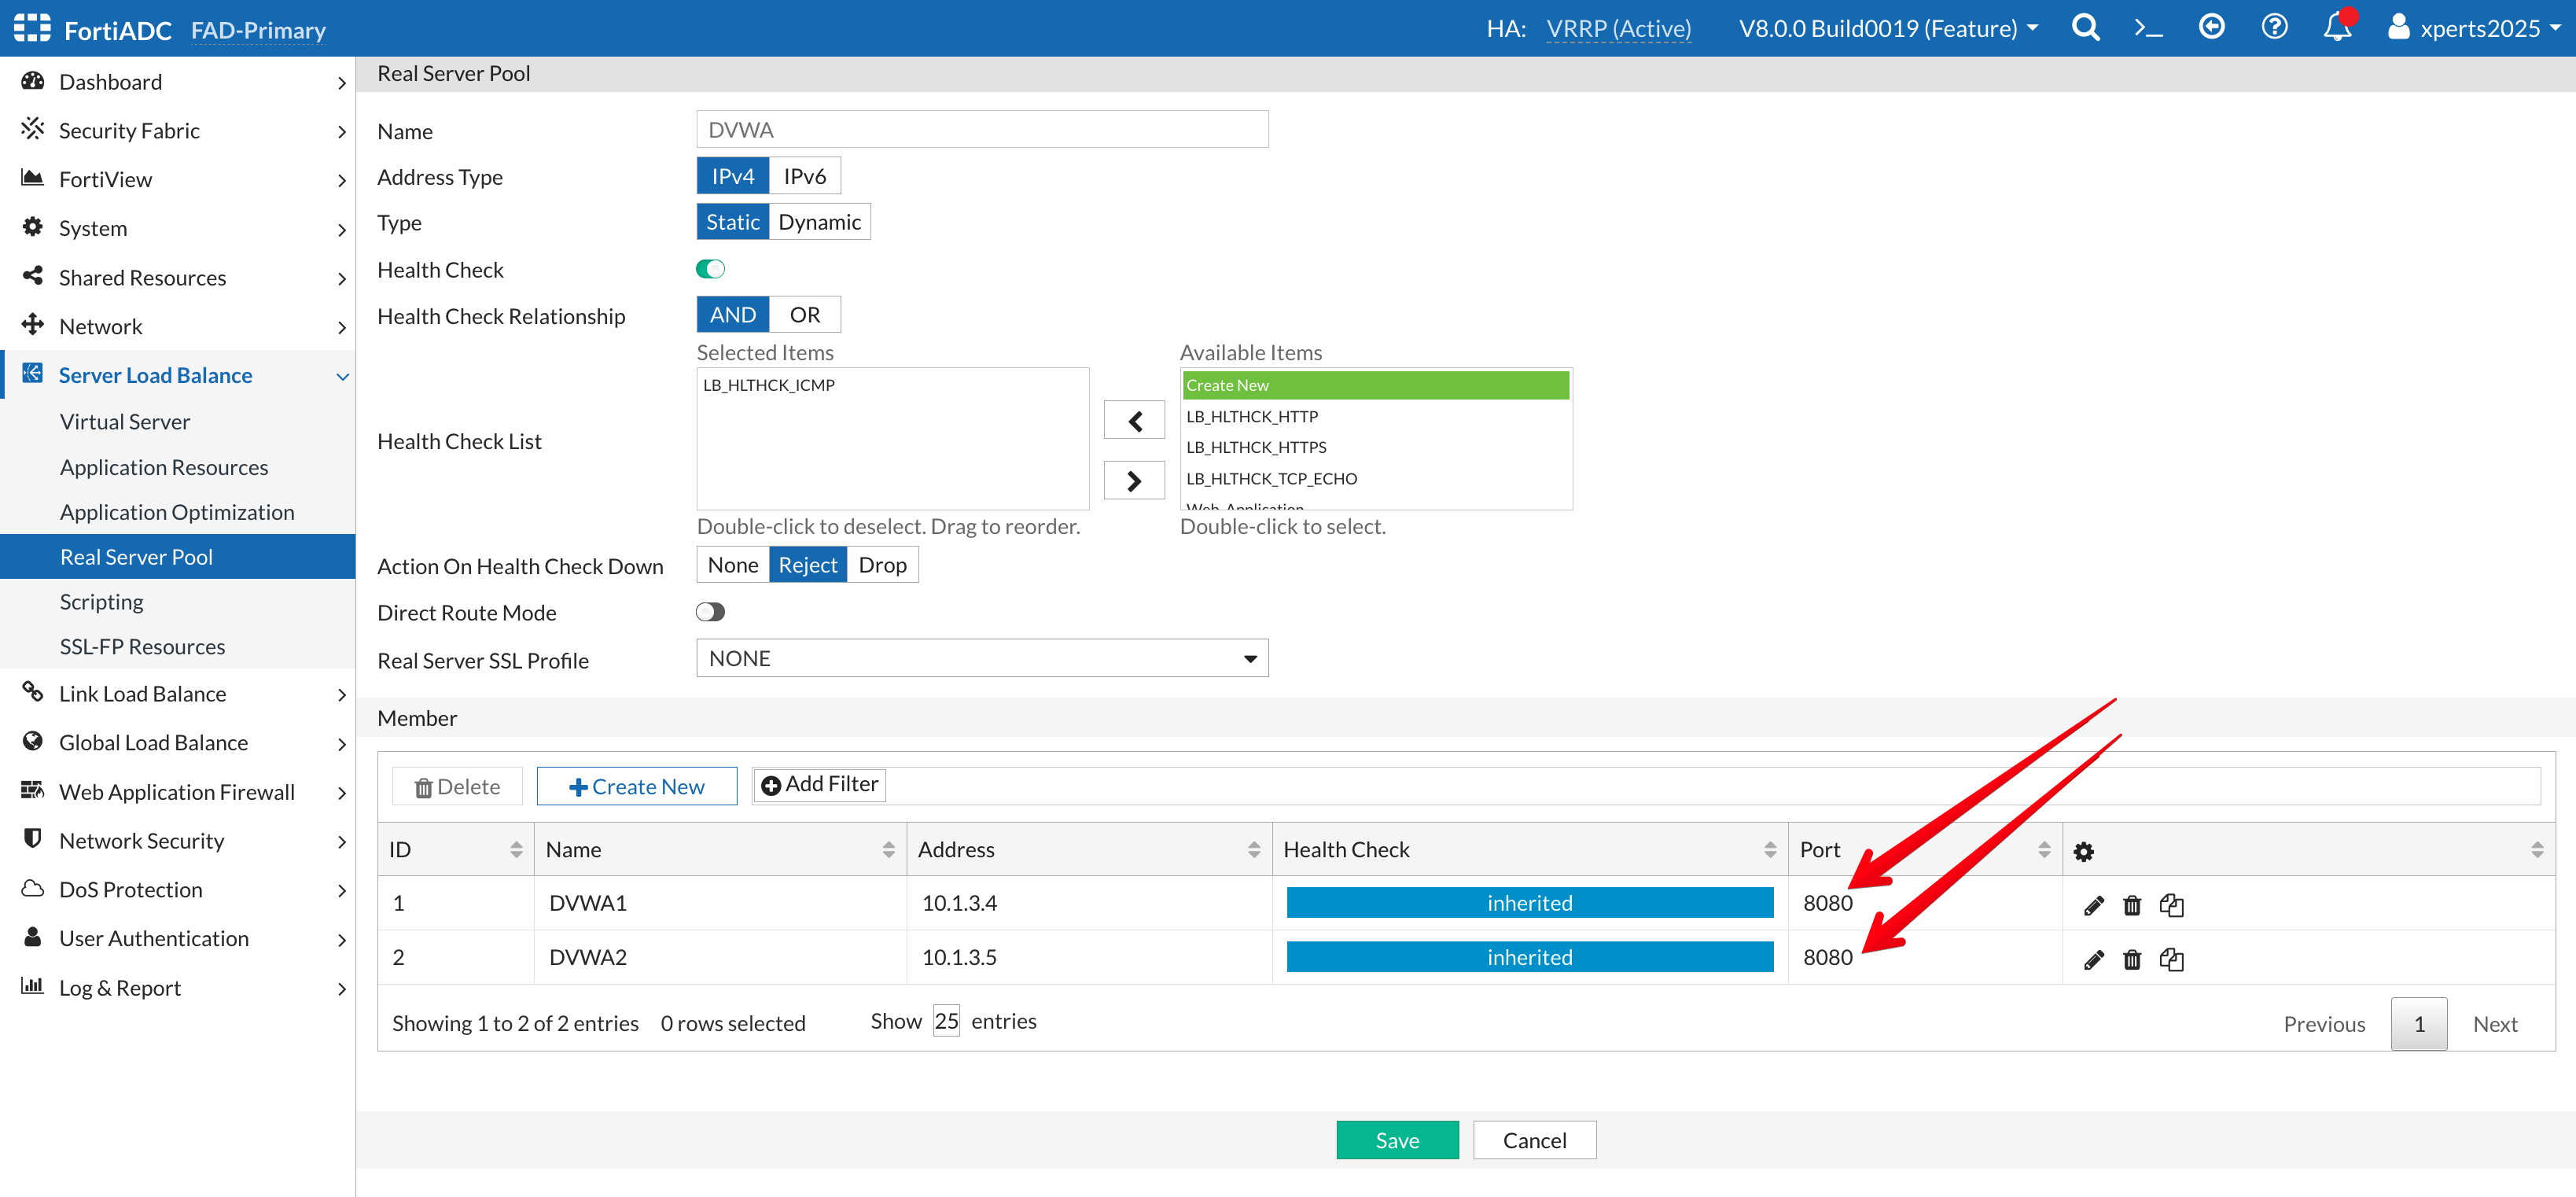
Your final result should look like the image below
Virtual Servers
Define Virtual Servers
The next step is to configure a virtual server, which defines the type of traffic FortiADC will manage and how it will be processed. For this exercise, we will create two virtual servers, one for each of our web applications, while using the default settings wherever possible.
Login to the FortiADC (FAD-Primary) with username xperts2025 and password AppSec-Xp3rts2025!
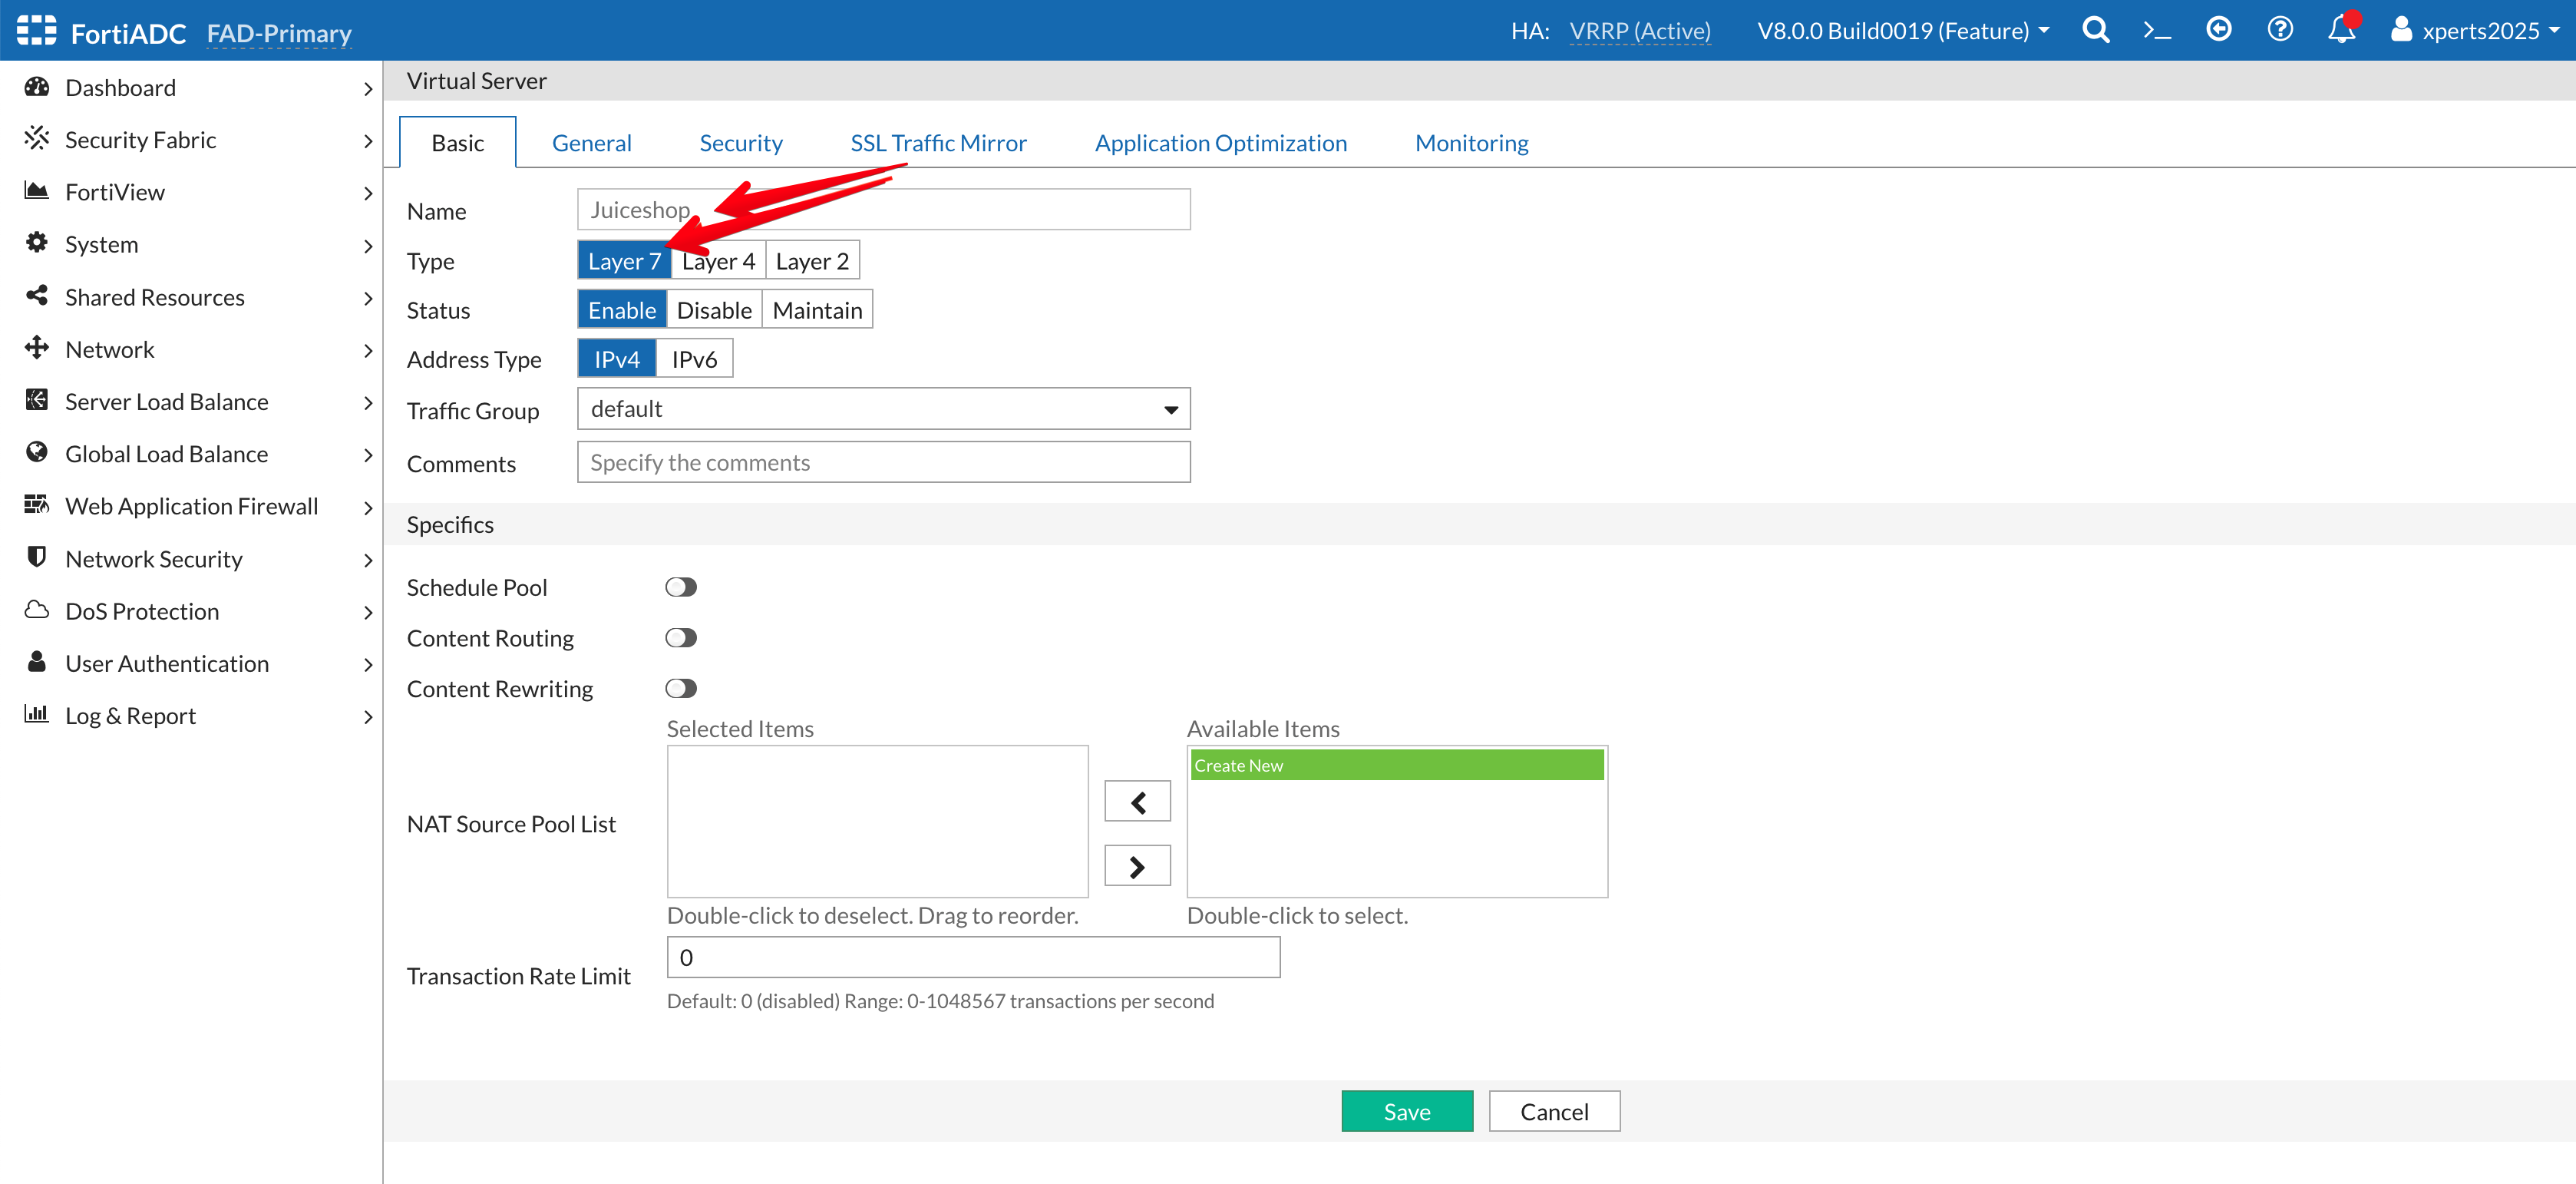
Go to Server Load Balance → Virtual Server
Click on +Create New then Advanced Mode
Name: Juiceshop
Type: Layer 7
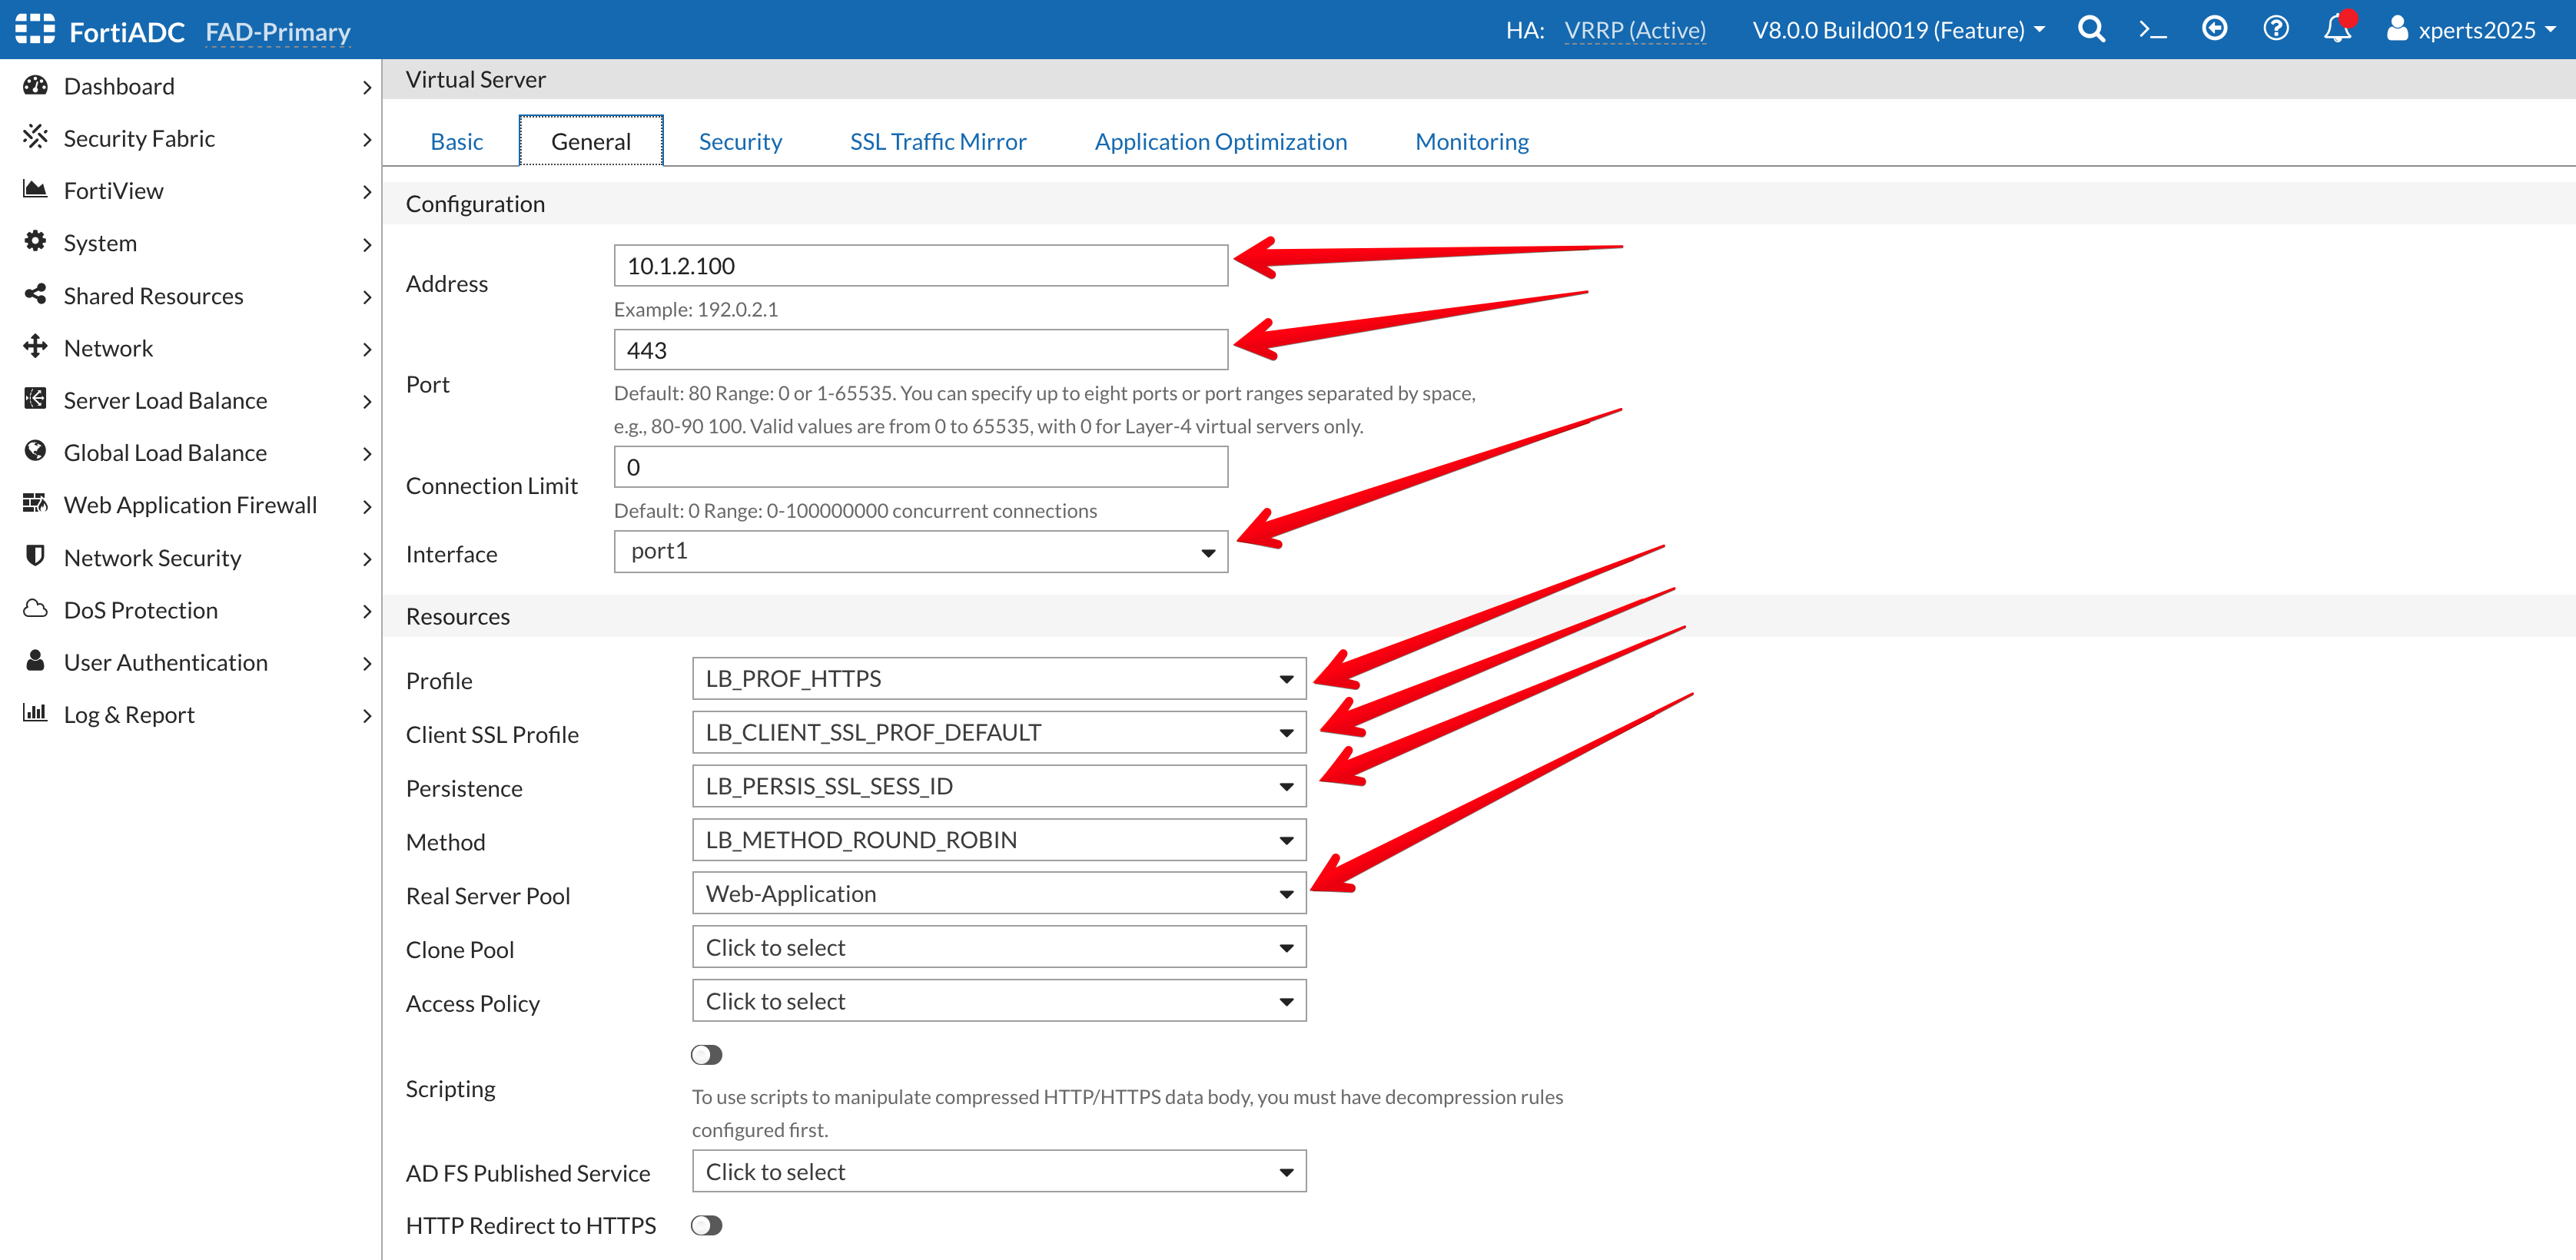
Go to the General Tab
Address: 10.1.2.100
Port: 443
Interface: Port1 ( from the dropdown Menu)
Profile: LB_PROF_HTTPS
Client SSL Profile: LB_CLIENT_SSL_PROF_DEFAULT
Persistence: LB_PERSIS_SSL_SESS_ID
Method: LB_METHOD_ROUND_ROBIN
Real Server Pool: Web-Application
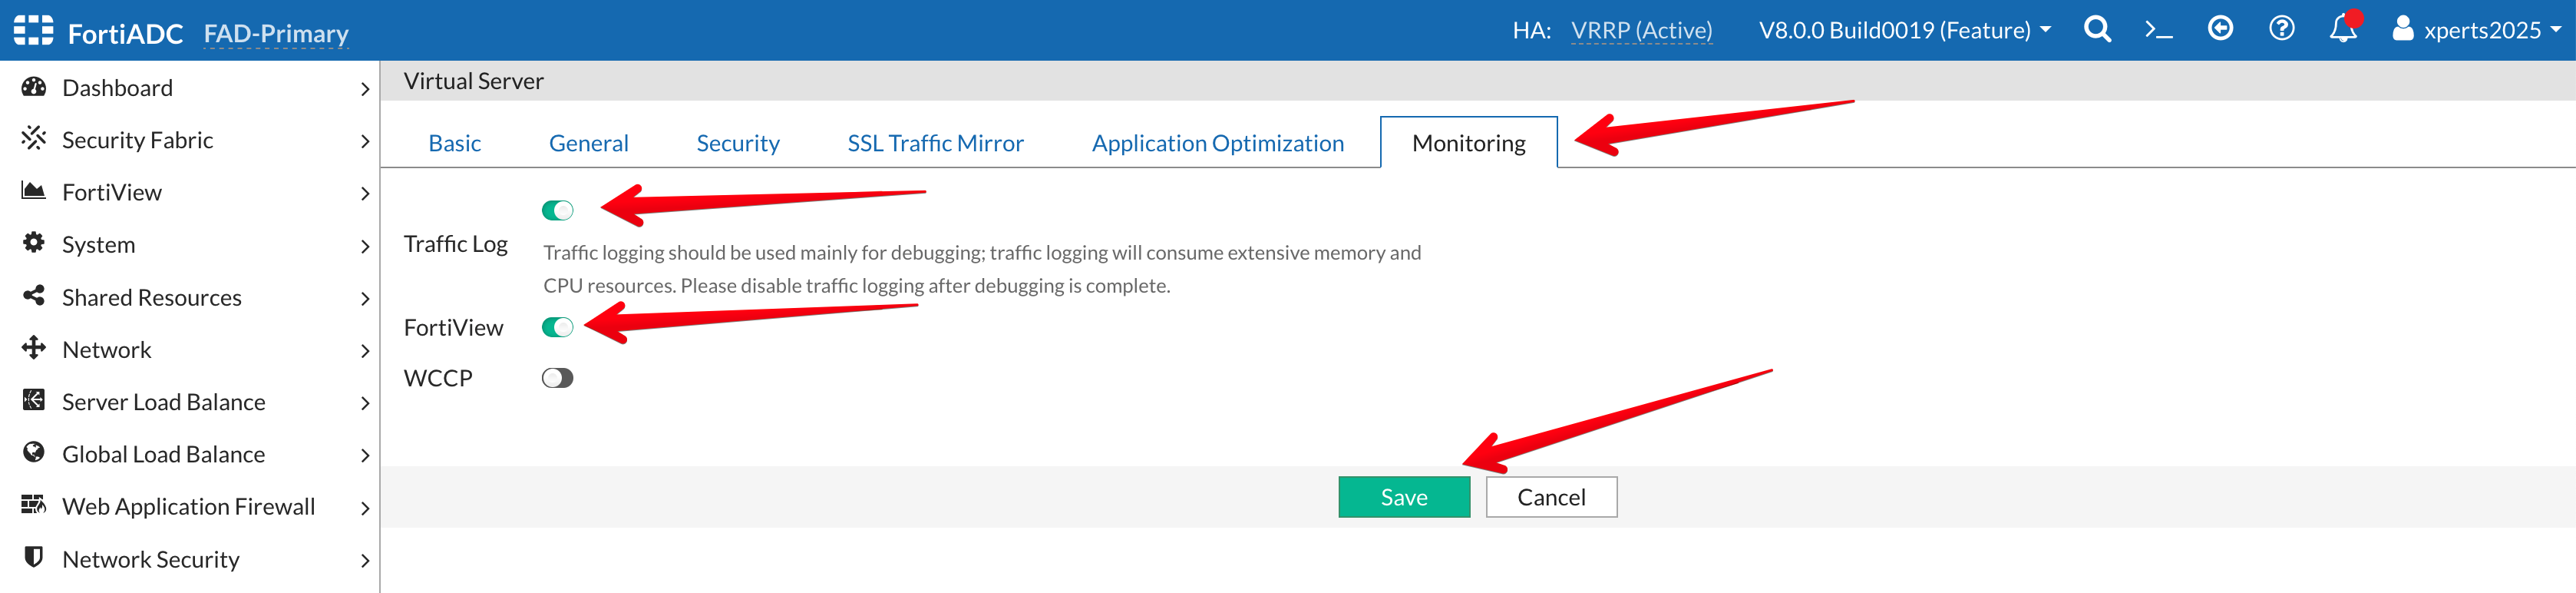
Go to the Monitoring Tab
Traffic Log: Enable the Toggle
FortiView: Enable the Toggle
Save
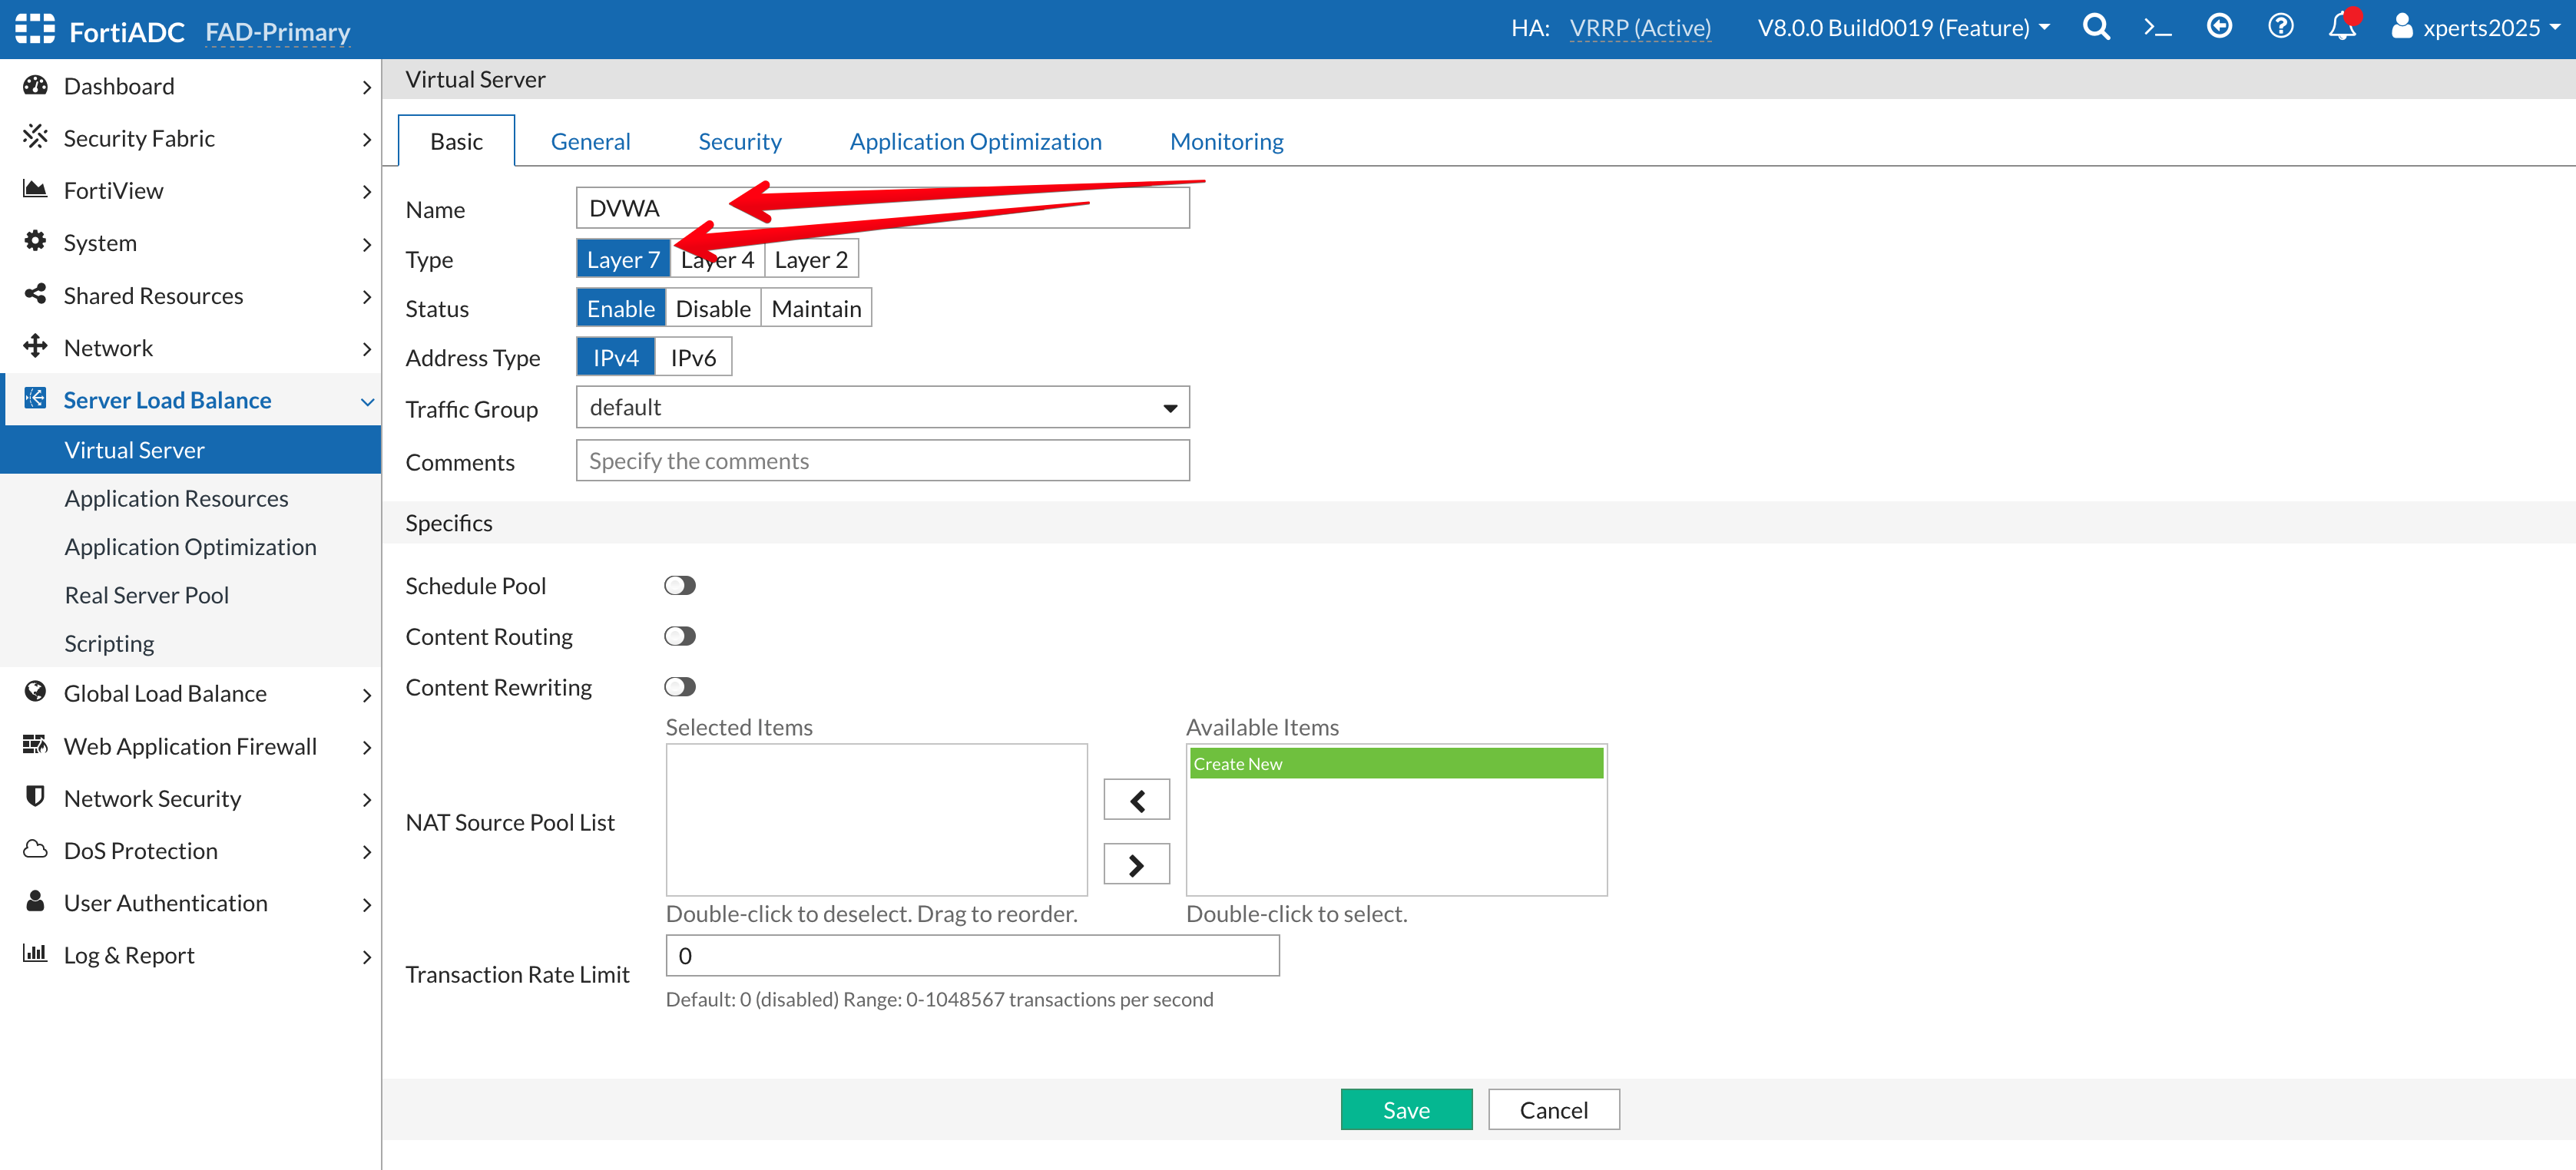
Go to Server Load Balance → Virtual Server
Click on +Create New then Advanced Mode
Name: DVWA
Type: Layer 7
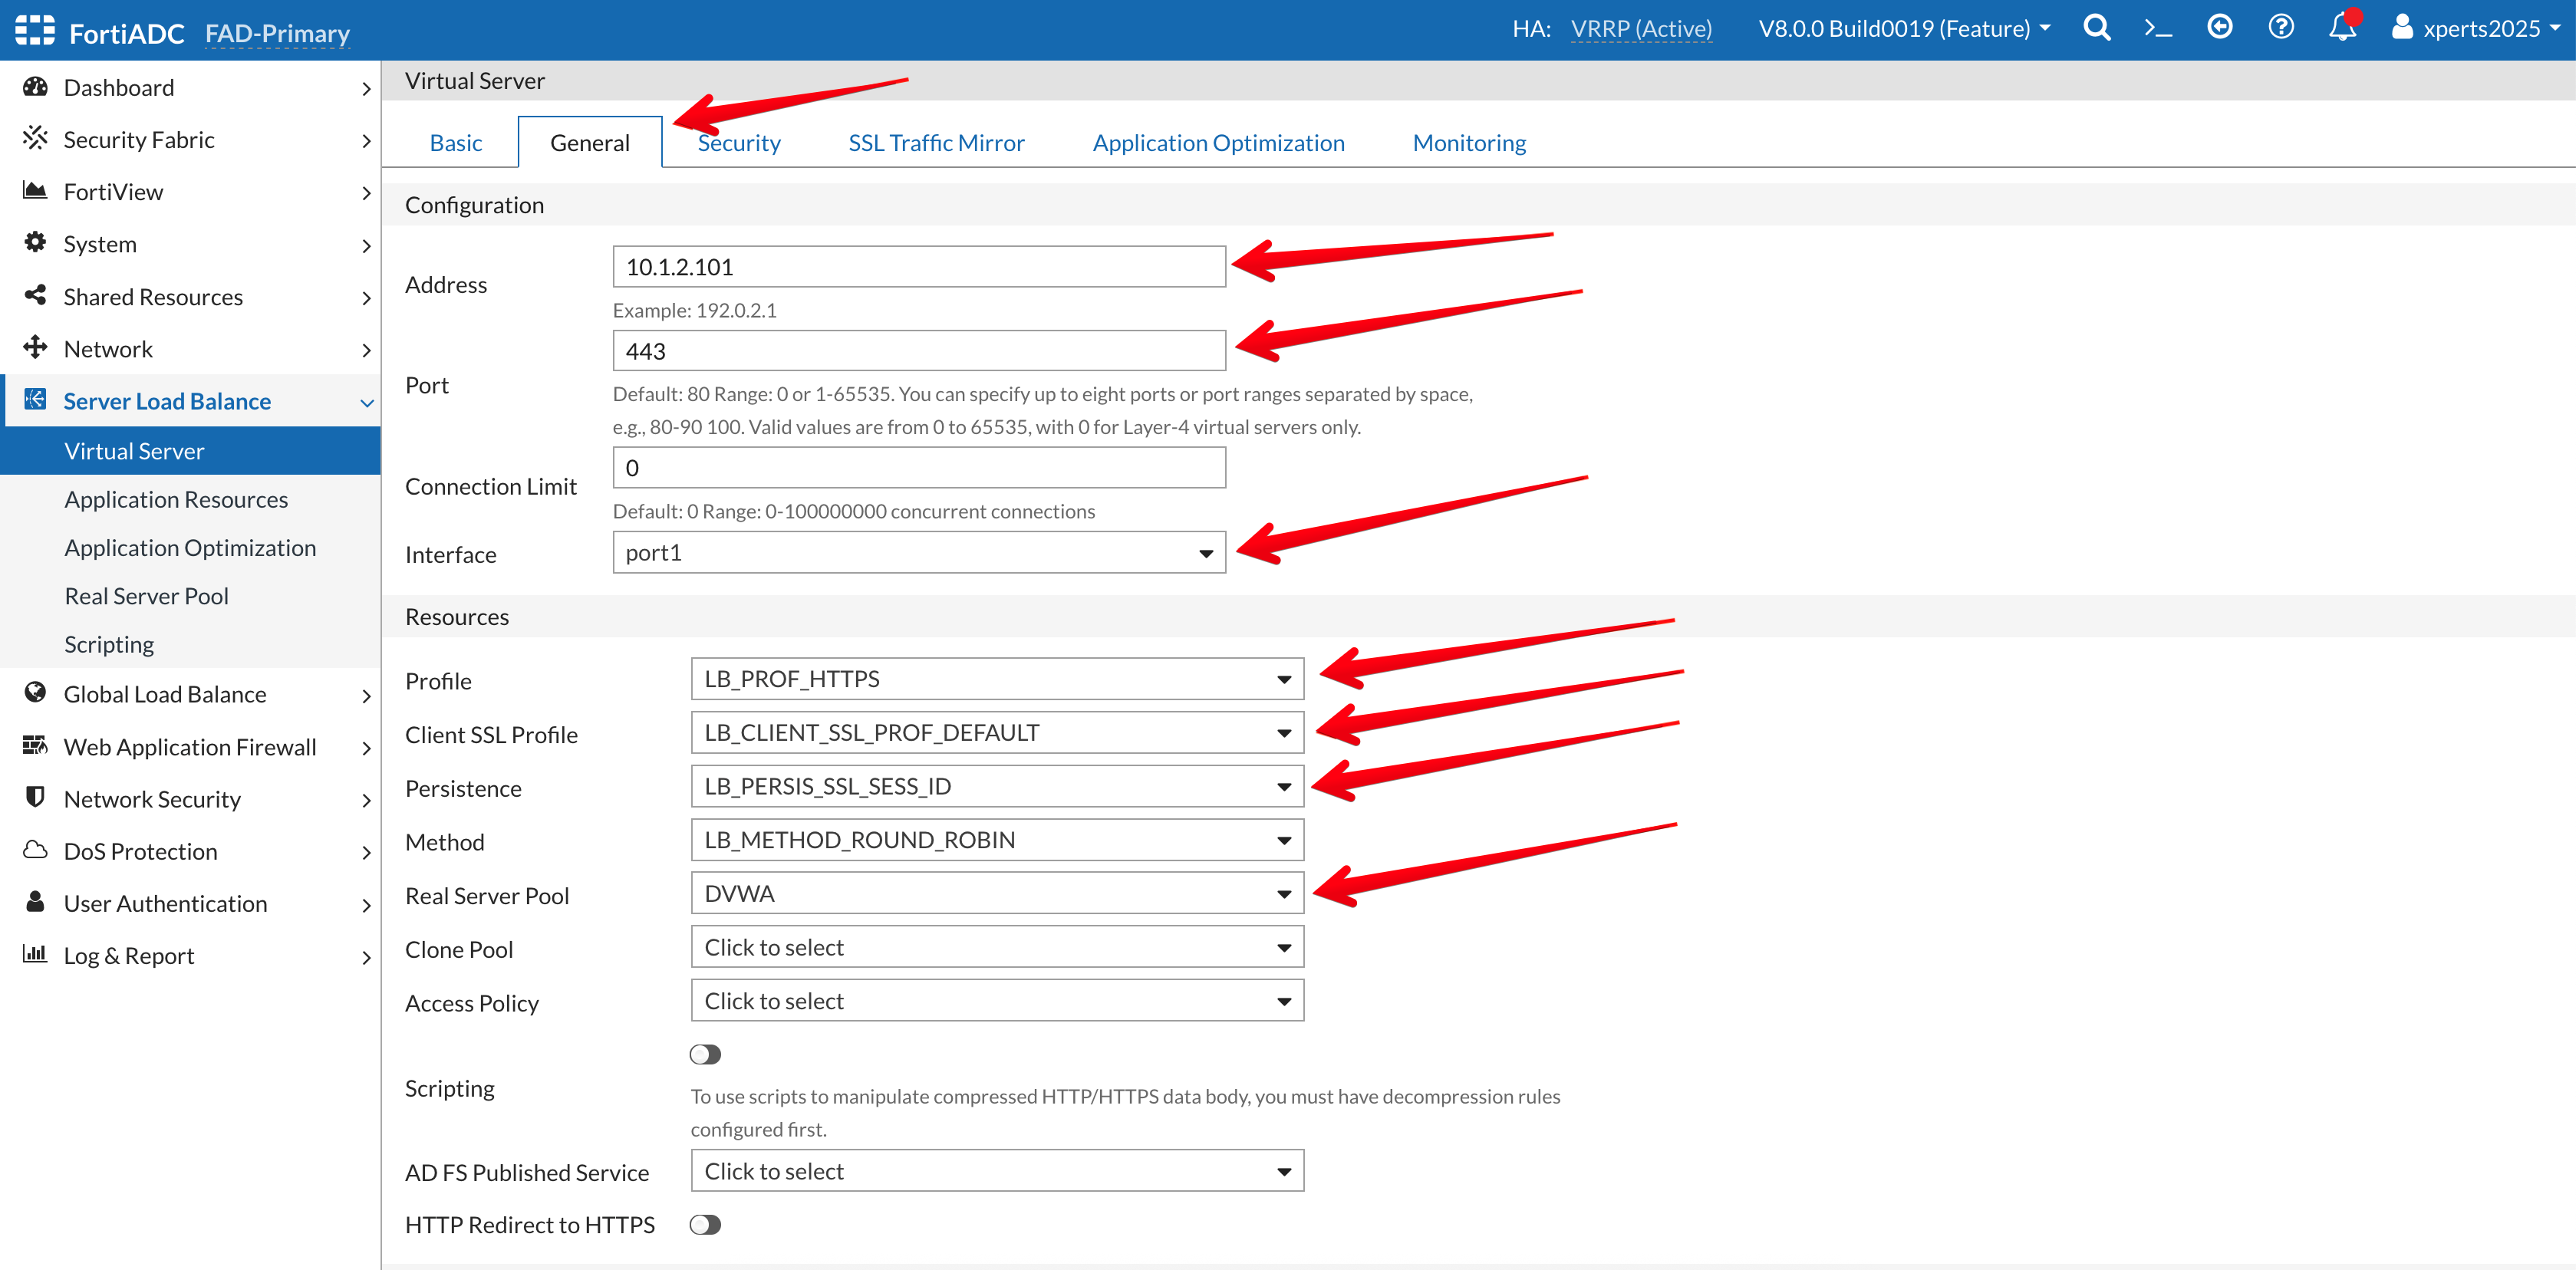
Go to the General Tab
Address: 10.1.2.101
Port: 443
Interface: Port1 (from the dropdown Menu)
Profile: LB_PROF_HTTPS
Client SSL Profile: LB_CLIENT_SSL_PROF_DEFAULT
Persistence: LB_PERSIS_SSL_SESS_ID
Method: LB_METHOD_ROUND_ROBIN
Real Server Pool: DVWA
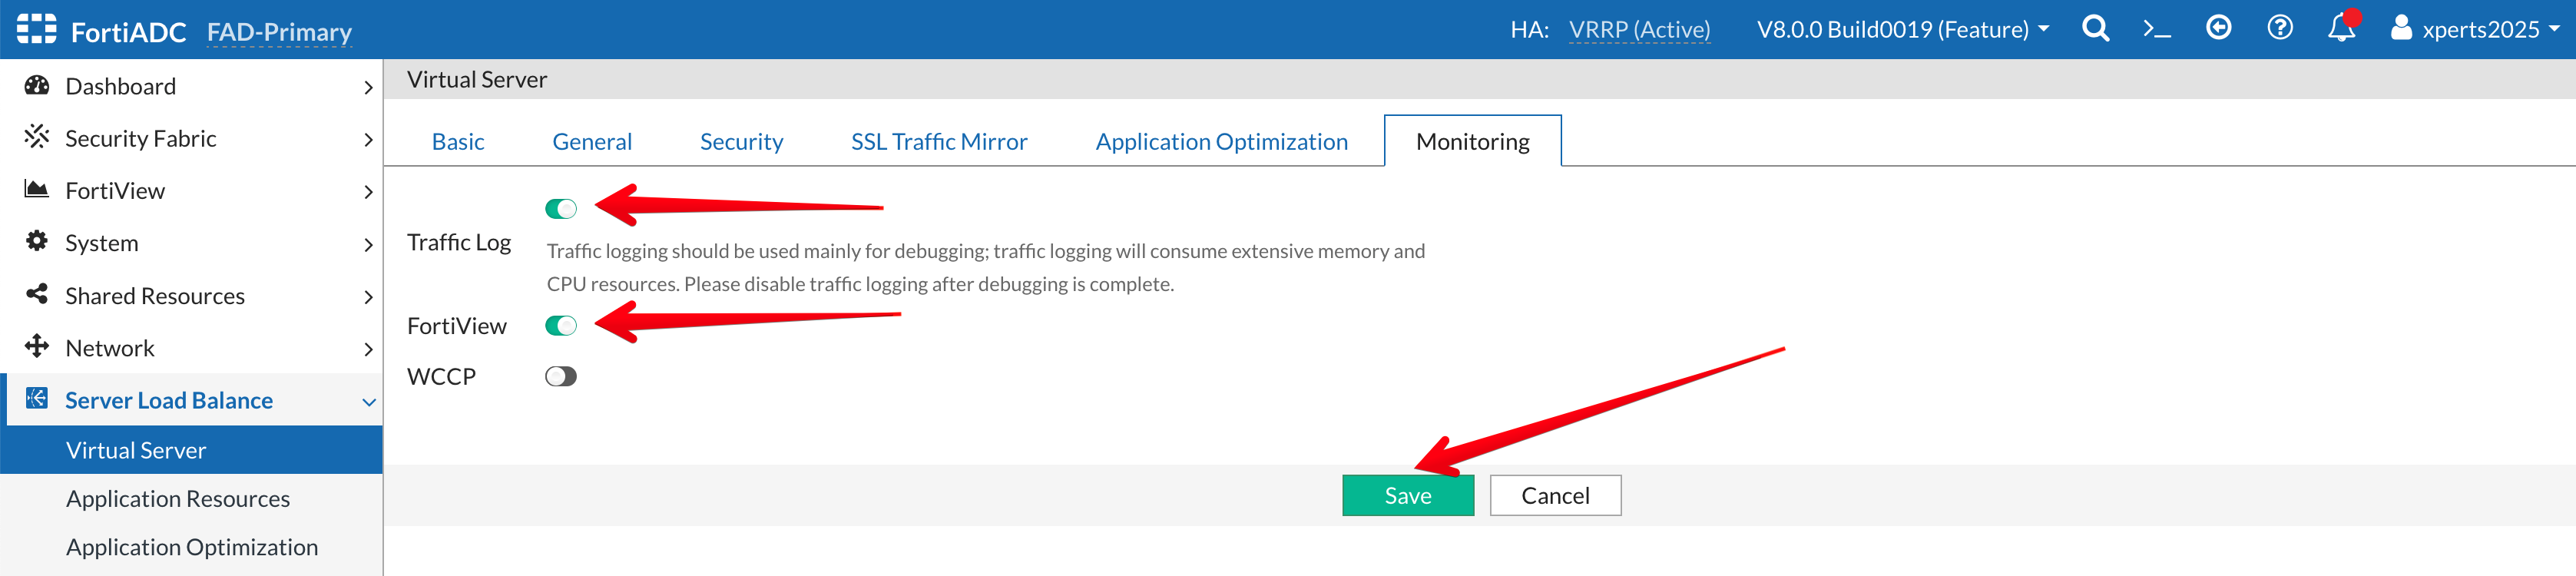
Go to the Monitoring Tab
Traffic Log: Enable the Toggle
FortiView: Enable the Toggle
Save
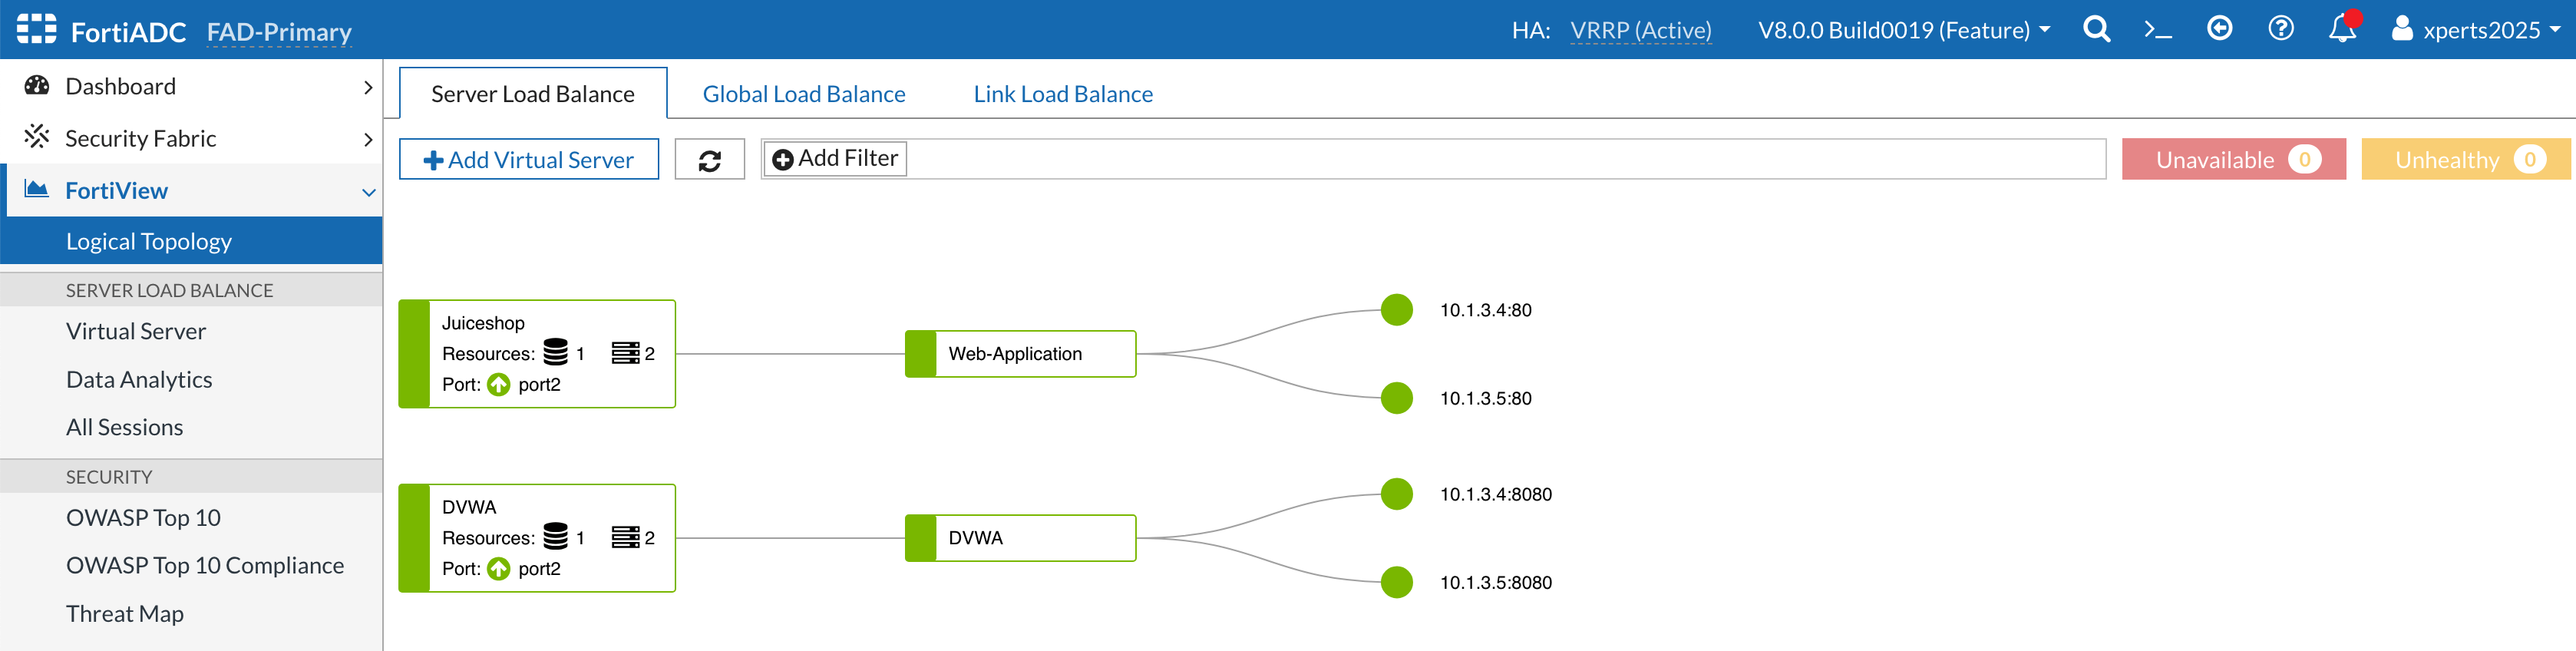
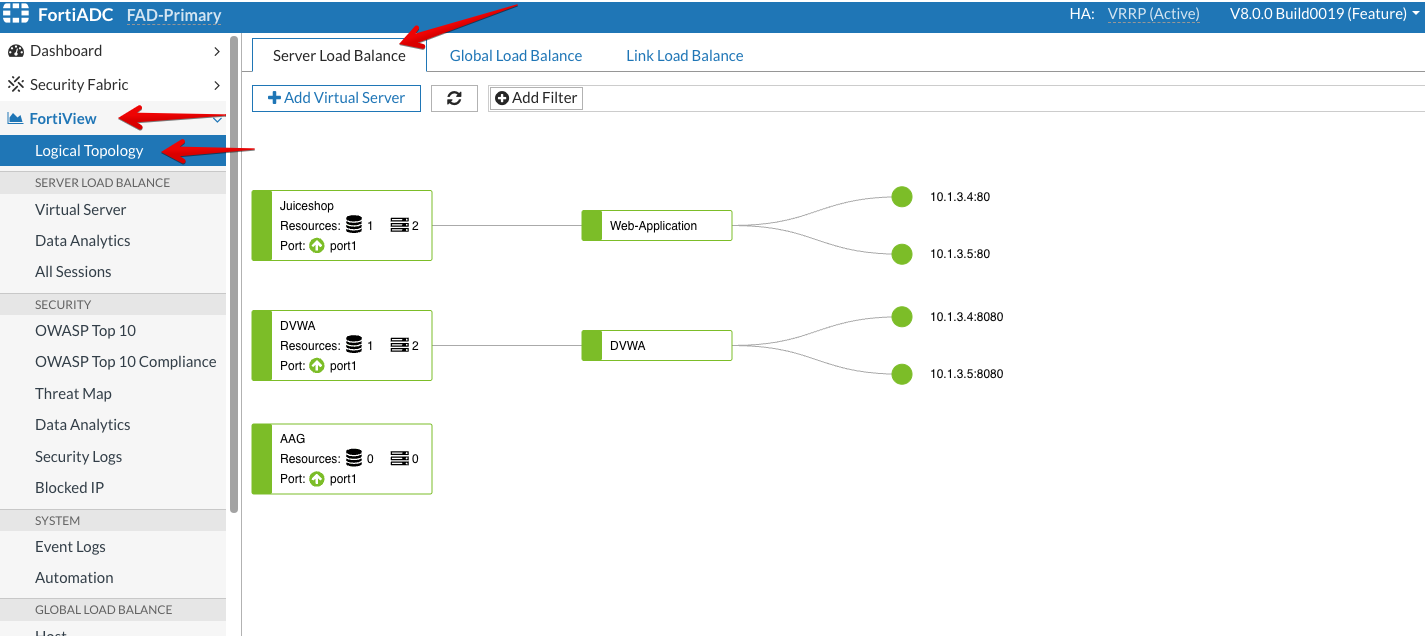
Go to FortiView → Logical Topology
Your topology should look like the image below
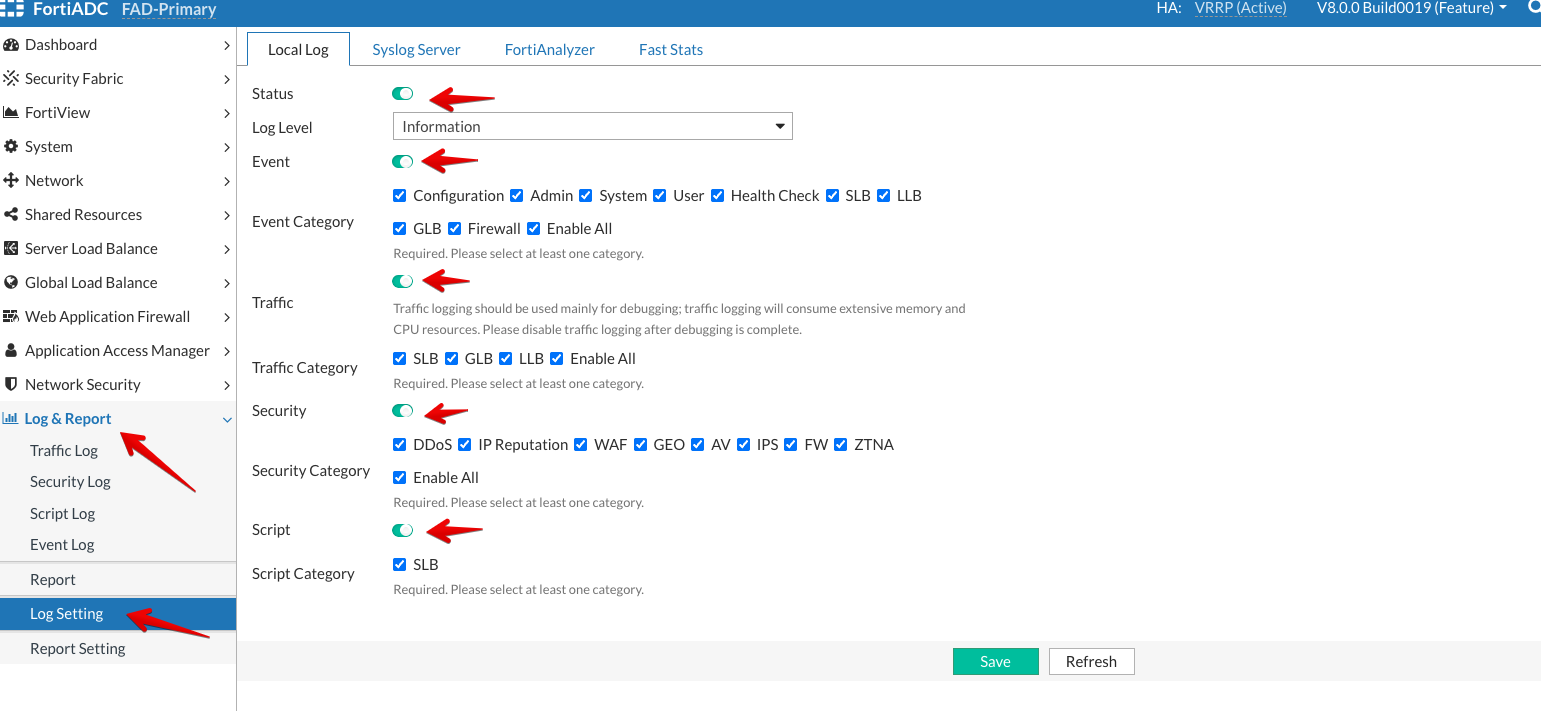
Log Settings
Log Settings
The local log is a datastore hosted on the FortiADC system. In this step, we are going to turn on all the Logs like Event logs, Traffic logs, Security logs and Script logs.
To configure local log settings:
Login to the FortiADC (FAD-Primary) with the username xperts2025 and password AppSec-Xp3rts2025!
Go to Log & Report → Log Setting
Select to enable local logging Status.
Then, select Enable All option under all the log categories.
Click Save
Test Your Configuration
Test Your Configuration
To test for the first time:
From the Client:
username: xperts2025 password: AppSec-Xp3rts2025!
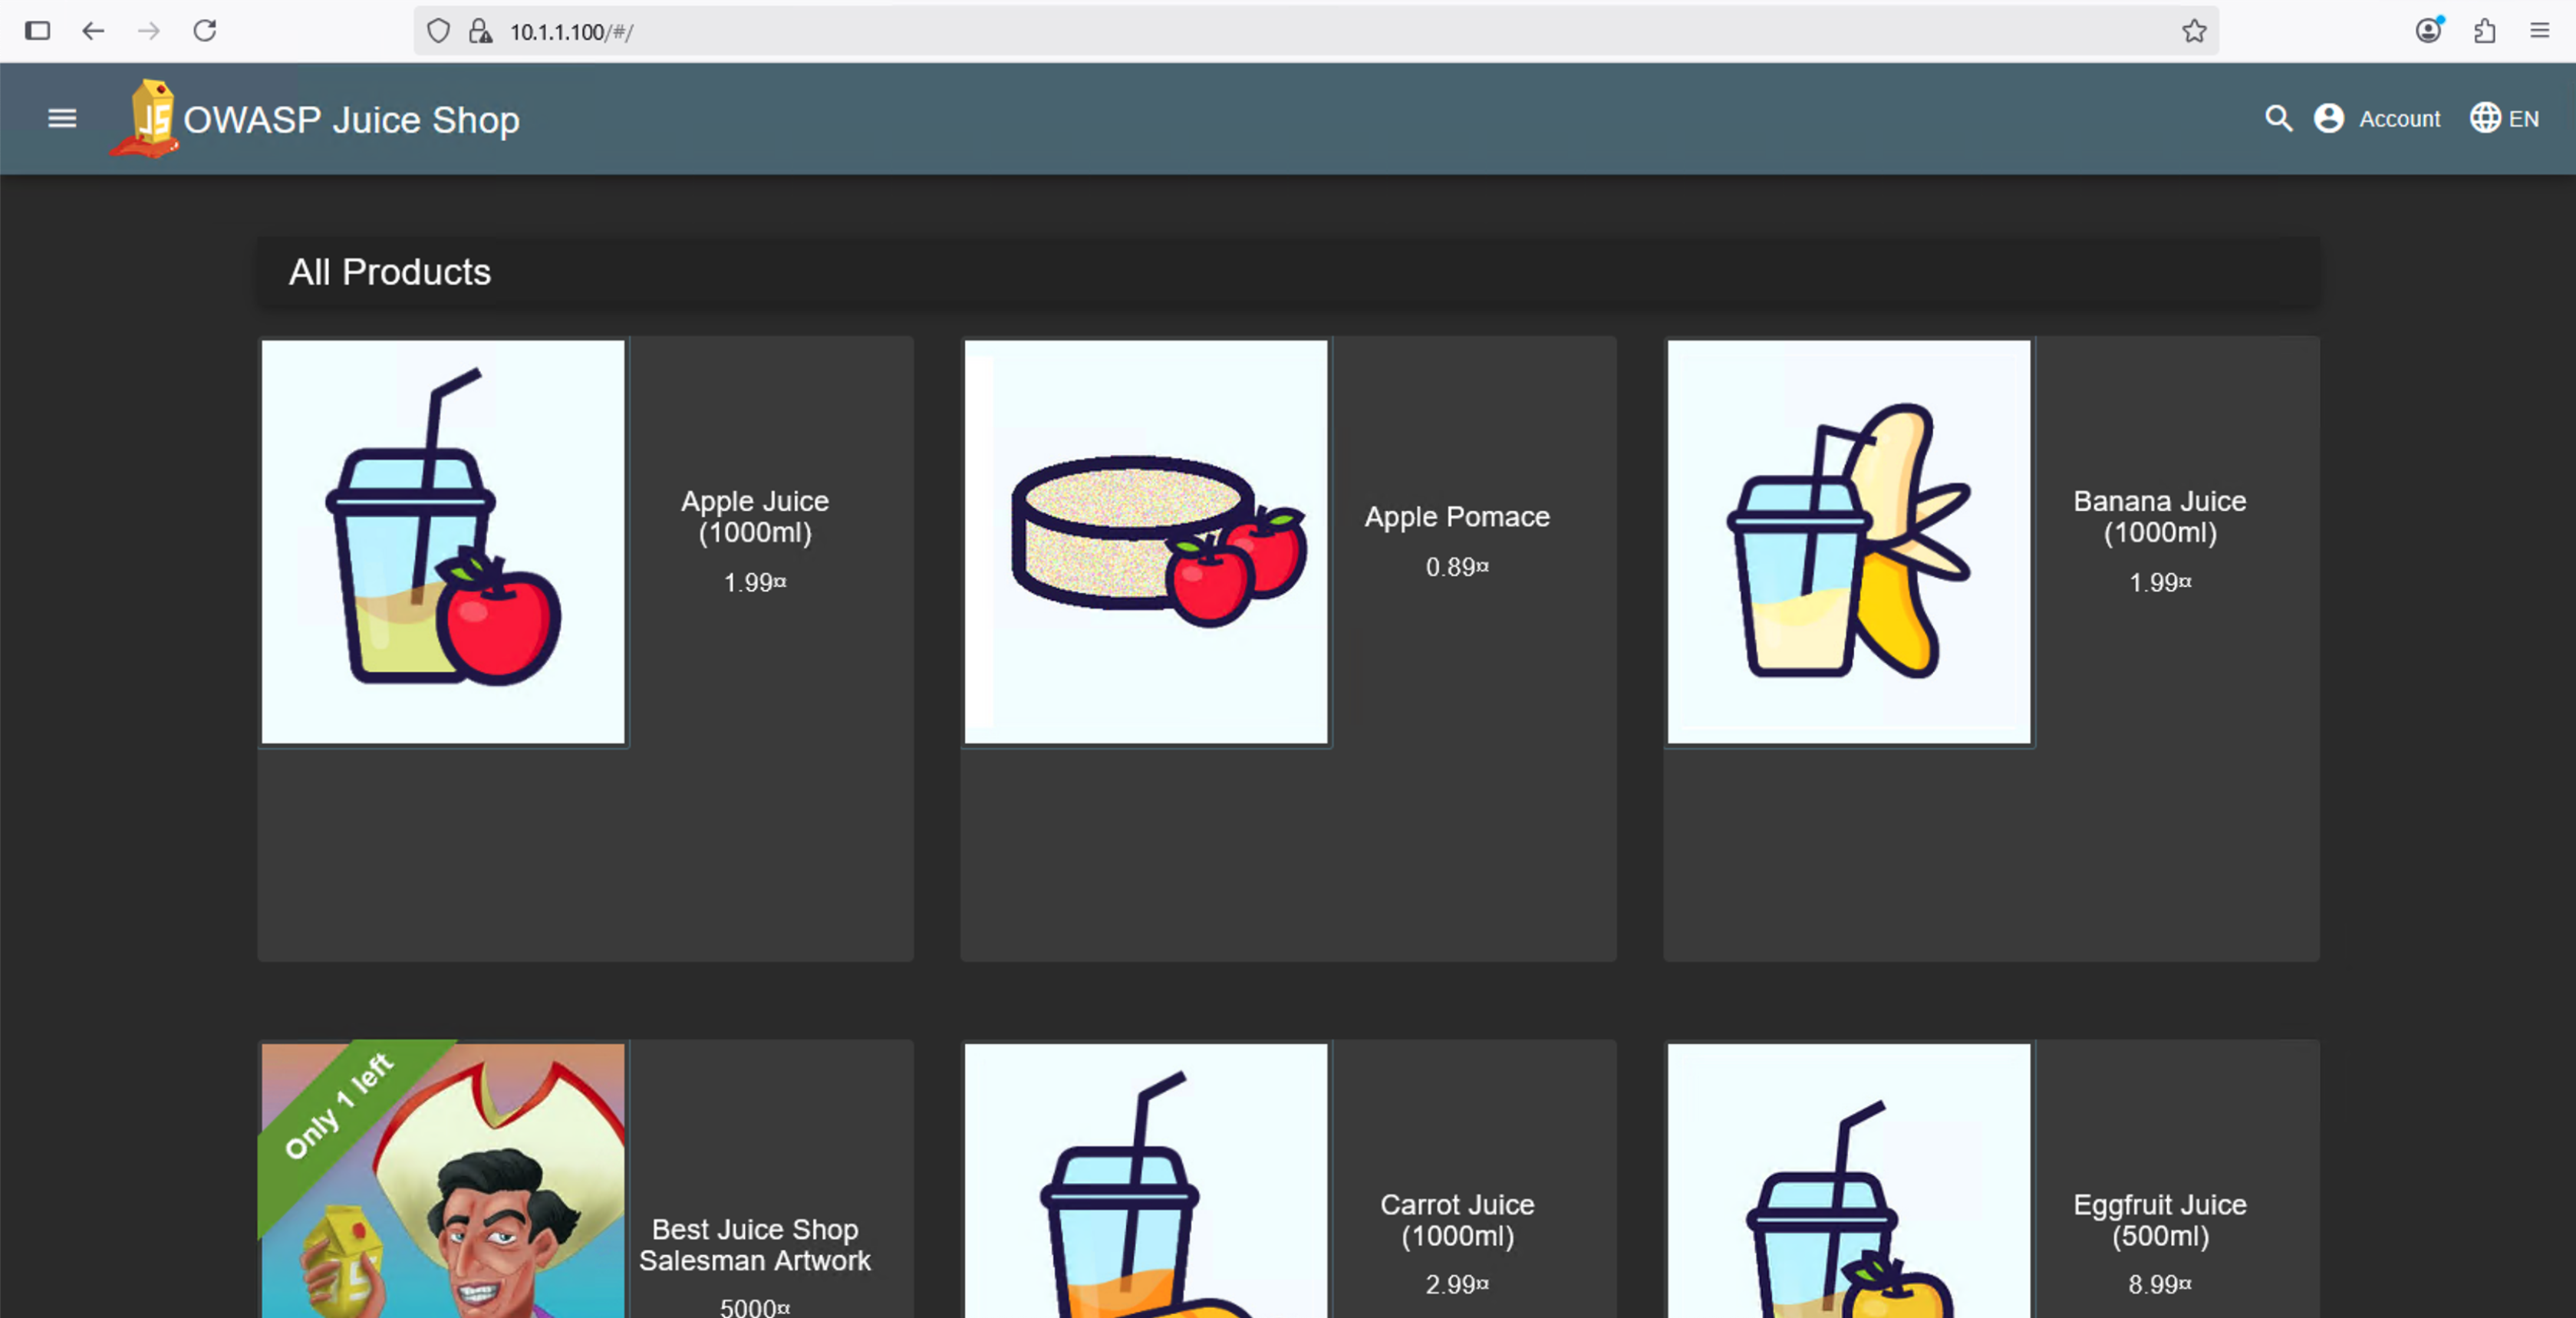
Open Firefox and go to the Juiceshop application: https://10.1.1.100
Loading the splash page is good enough. No need to log in or create an account. We just want to know we can reach the application.
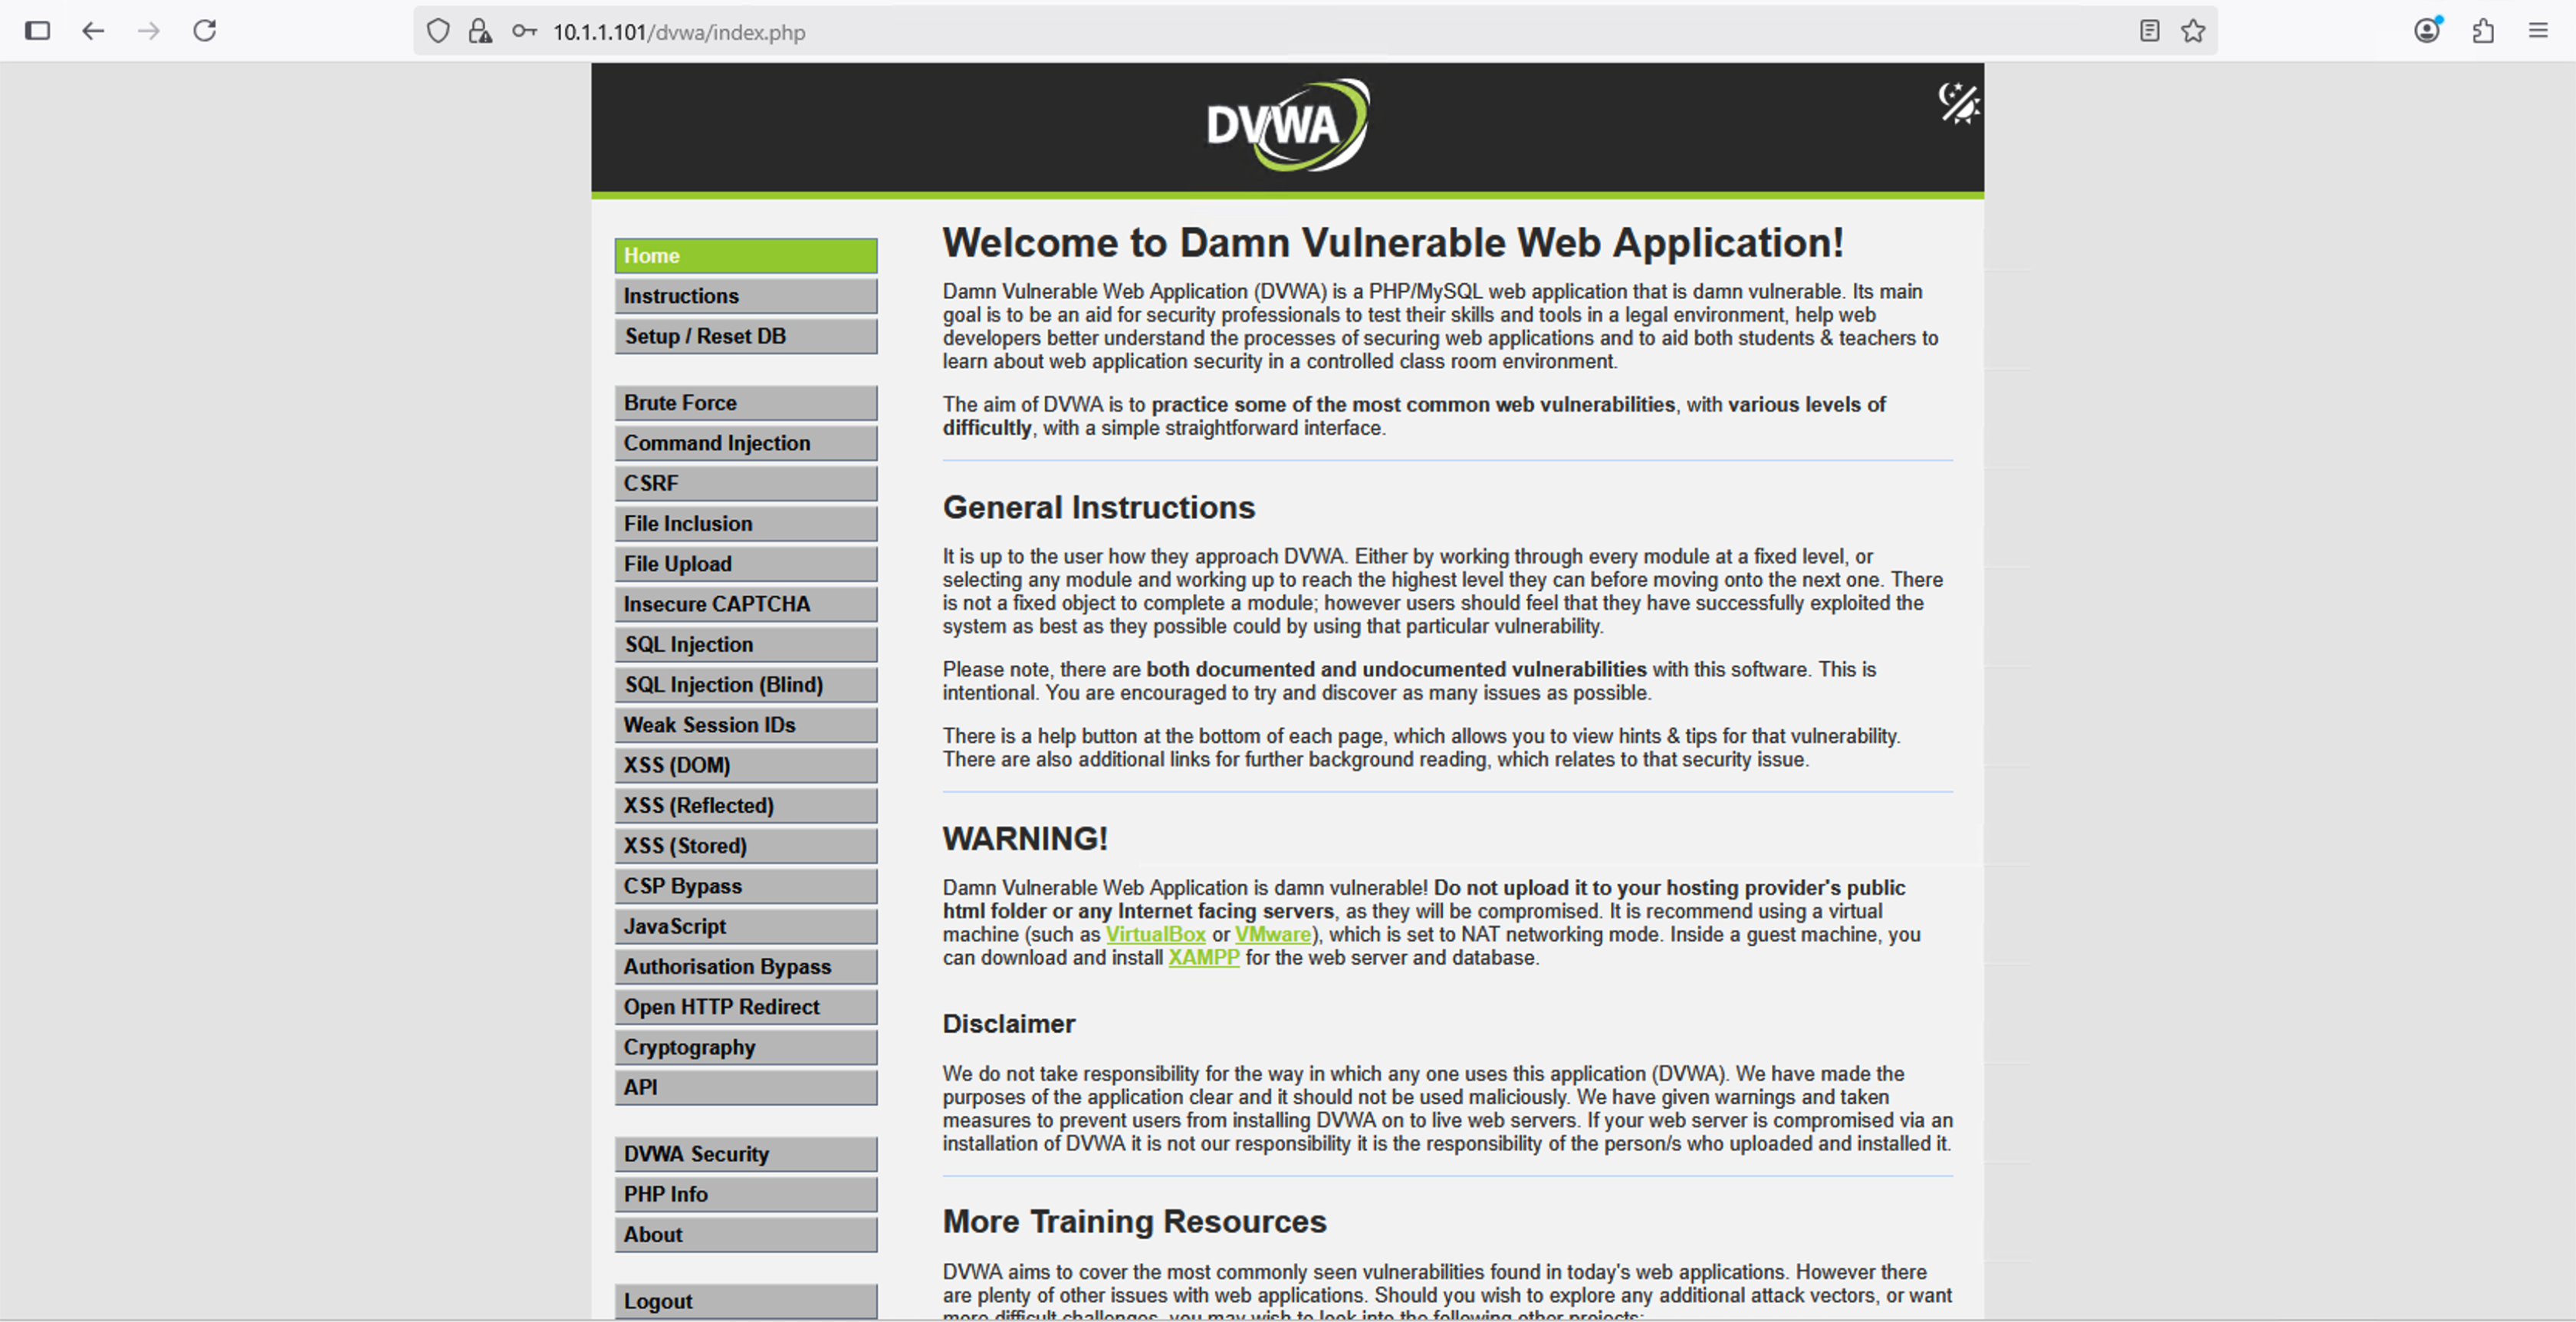
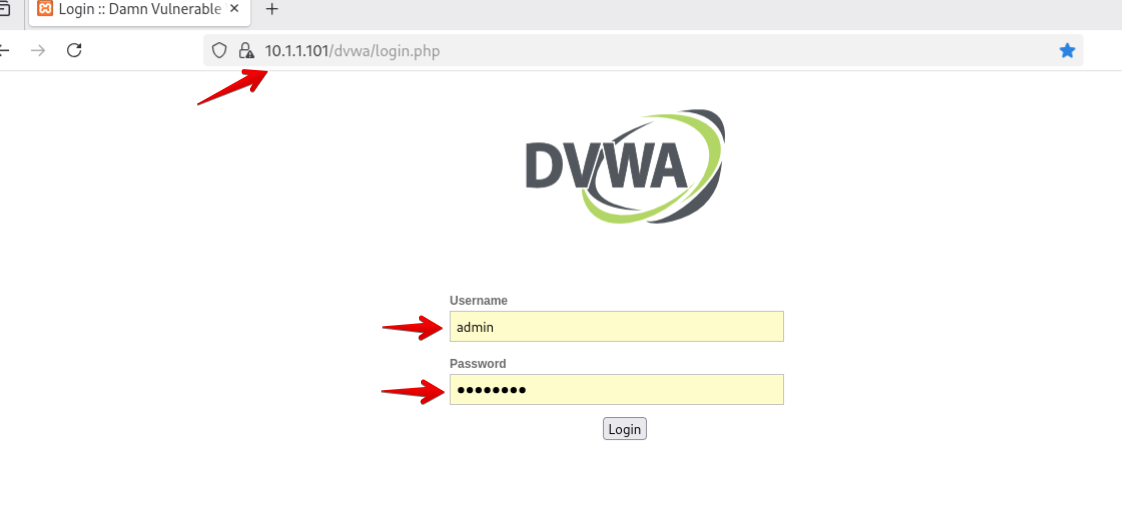
Open Firefox and go to the DVWA application: https://10.1.1.101/dvwa
Log in to DVWA with admin / password. The username and password are saved in the browser. We do want to make sure we can log in to DVWA as we will use this for other tests.
Juiceshop
Damn Vulnerable Web Application (DVWA)
This will complete the Initial Configuration Section
Application Security
FortiADC Security modules
The FortiADC provides a comprehensive list of security modules, divided into four main categories:
Network Security: This includes Intrusion Prevention System (IPS), Antivirus (AV), and IP address-based rules.
Application Security: Focuses on Web Application Firewall (WAF), including API protection and API gateway capabilities.
Bot Mitigation: Detects and mitigates traffic originating from automated sources.
Denial of Service (DoS) Mitigation: Provides protection against DoS attacks.
In this exercise, we will focus on Application Security. The other sections will be covered in future discussions.
Subsections of Application Security
Application Security
What is a WAF?
A Web Application Firewall (WAF) is a security solution designed to protect web applications by filtering, monitoring, and blocking malicious traffic based on predefined rules. Positioned between a client and a web application, a WAF primarily aims to prevent attacks on web servers by inspecting HTTP/HTTPS traffic and defending against threats like SQL injection, cross-site scripting (XSS), and cross-site request forgery (CSRF). Unlike traditional firewalls, which focus on network-level security, a WAF operates at the application layer (Layer 7) to analyze the behavior and content of web requests.
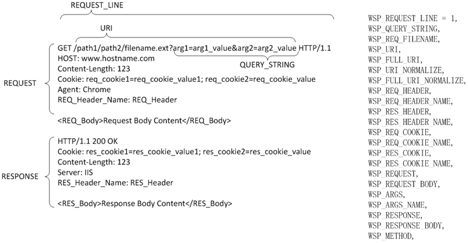
Deployed separately from the web application, a WAF offloads the resource-intensive process of security scanning from the web server, allowing centralized policy management across multiple servers. A WAF complements other perimeter security solutions, such as the FortiGate, the next-generation firewall. For example, the FortiADC WAF module applies security policies to different HTTP scanpoints, which represent various parsed elements of an HTTP transaction. Administrators can enable rules in the WAF policy settings to detect attacks at several points, including the request line, query string, filename, URI, request headers, request body, response code, and response body.
Components of FortiADC WAF
Web Attack Signature policy — The signature database includes signatures that can detect known attacks and exploits that can be found in 29 scanpoints. In your policy configuration, you choose classes of scanpoints to process: HTTP Headers, HTTP Request Body, and HTTP Response Body.
URL Protection policy — This policy enables you to create rules that detect patterns in the URI or the file extension.
HTTP Protocol Constraint policy — This policy enables you to create rules that restrict URI, header, and body length; HTTP method, or HTTP response code.
SQL/XSS Injection Detection policy — This policy includes rules to detect SQL/XSS injection in the HTTP Request URI, HTTP Referer Header, HTTP Cookie Header, or HTTP Request Body.
Cookie Security policy — This policy enables you to create rules that prevent cookie-based attacks and apply them in a protection profile.
Data Leak Prevention policy — This policy enables you to create rules that prevent information leaks, damages and loss.
HTTP Header Security policy — This policy enables you to create rules to prevent or mitigate known XSS, clickjacking, and MIME sniffing security vulnerabilities. These response headers define security policies to client browsers so that the browsers avoid exposure to known vulnerabilities when handling requests.
Input Validation Policy — This policy enables you to create rules to prevent suspicious HTTP requests by verifying the user input from scan points like URL parameter, HTML form, hidden fields, and upload file.
Brute Force Attack Detection policy — This policy enables you to create rules to prevent too many login tests.
Credential Stuffing Defense policy — This policy enables you to create rules to identify login attempts using username and password that have been compromised using an always up-to-date feed of stolen credentials.
JSON Detection policy — This policy enables you to create rules that enforce security checks that examine client HTTP requests for anomalies in JSON data in HTTP POST operations.
XML Detection policy — This policy enables you to create rules that examine client requests for anomalies in XML code.
OpenAPI Detection policy — This policy enables you to create rules through defining a standard, language-agnostic interface to RESTful APIs, which allows both humans and computers to discover and understand the capabilities of the service without access to source code, documentation, or through network traffic inspection.
API Gateway policy — This policy includes an API management tool that sits between a client and a collection of backend services. It acts as a reverse proxy to accept all API calls and return the appropriate result.
Bot Detection — This policy includes rules to detect Bots. A Bot is an application that runs automated tasks over the Internet. The WAF supports two methods for detecting bad Bots: signature detection and behavior detection. You can also use allowlists to exclude known trusted sources (good Bots) from detection.
Threshold Based Detection — This policy enables you to create rules to detect bad bots, such as web crawlers, content scraping, and attack bots.
Biometrics Based Detection — This policy enables you to create rules that detect bots using behavioral biometrics such as mouse movement, keyboard, screen touch, and scroll.
Advanced Protection policy — This policy enables you to create rules that detect web crawlers and content scraping.
CSRF Protection policy — This policy enables you to create rules that protect backend servers from CSRF attacks.
Adaptive Learning
What is Adaptive Learning?
The new FortiADC WAF Adaptive Learning feature enhances security by dynamically generating tailored recommendations to refine protection policies, allowing for quick and effective WAF configuration to counter evolving threats. By continuously performing deep packet inspection and traffic analysis, the Adaptive Learning engine builds comprehensive datasets from traffic patterns, enabling it to autonomously detect and mitigate threats with precision. These insights allow the engine to provide actionable recommendations for optimizing WAF policies, ensuring that security measures are adapted to the specific traffic characteristics of each web application. This results in an improved security posture and better operational performance through real-time adjustments and fine-tuning of security settings.
The WAF Adaptive Learning feature is part of both the FortiADC AI Security and Application Security bundles and can be added on to the Network Security bundle.
Here are some practical applications of the WAF Adaptive Learning functionality:
Creating new WAF policies: During the setup of a new virtual server, users can utilize the Adaptive Learning recommendation feature to automatically generate and apply basic WAF policies for a new WAF profile.
Enhancing existing WAF policies: Users can adjust policy settings based on Adaptive Learning recommendations, which identify changes in traffic patterns to enhance the security of current WAF policies.
Identifying and reducing false positives: The Adaptive Learning engine helps detect false positive triggers in WAF policies, allowing users to adjust settings and exclude unnecessary violations.
The Adaptive Learning engine has two key components:
Adaptive Learning policy - It defines the dataset
Adaptive Learning statistics - It contains the analytical results and actionable recommendations.
Adaptive Learning Configuration
Adaptive Learning - Configuration
The configuration steps will be as follows:
Create an Adaptive Learning Profile
Create a WAF Profile and add the Adaptive Learning Profile created in step 1
Associate the WAF Profile with the Virtual Server created in the “Initial Configuration” section of the lab.
Step 1 - Create an Adaptive Learning Profile
Login to the FortiADC (FAD-Primary) with the username xperts2025 and password AppSec-Xp3rts2025!
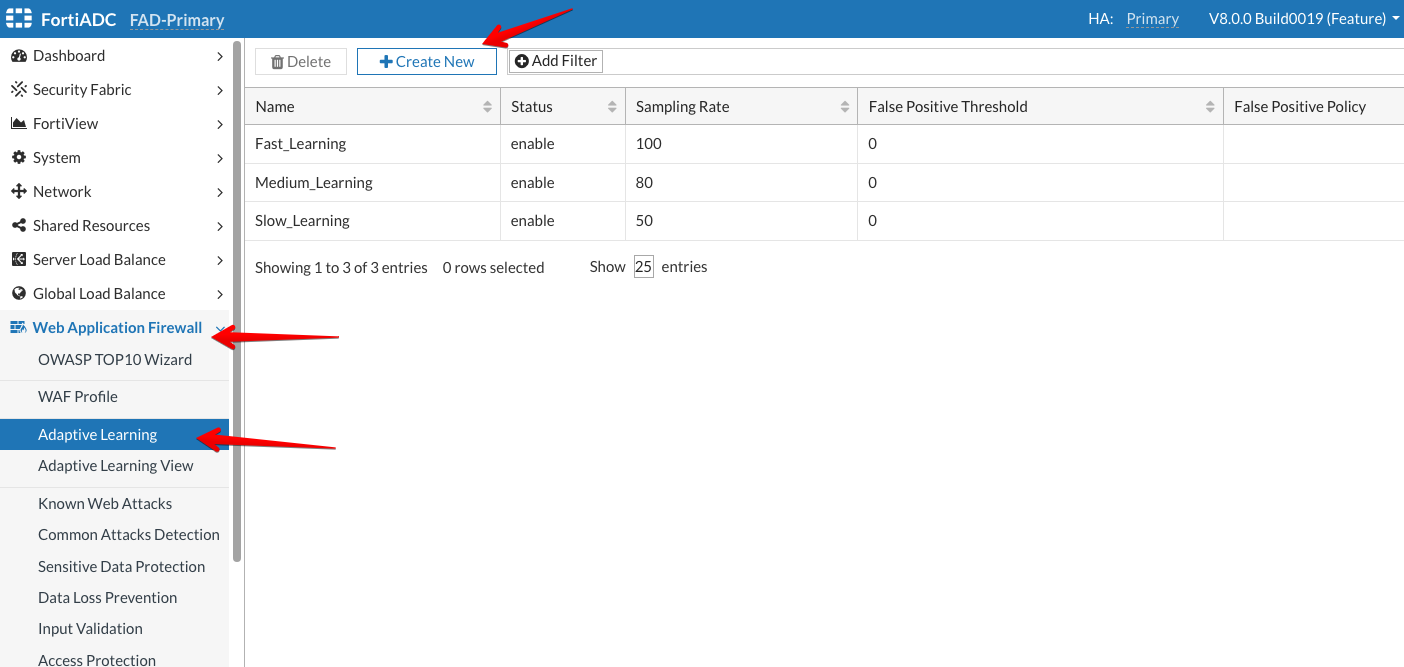
Go to Web Application FireWall → Adaptive Learning
Click on +Create New
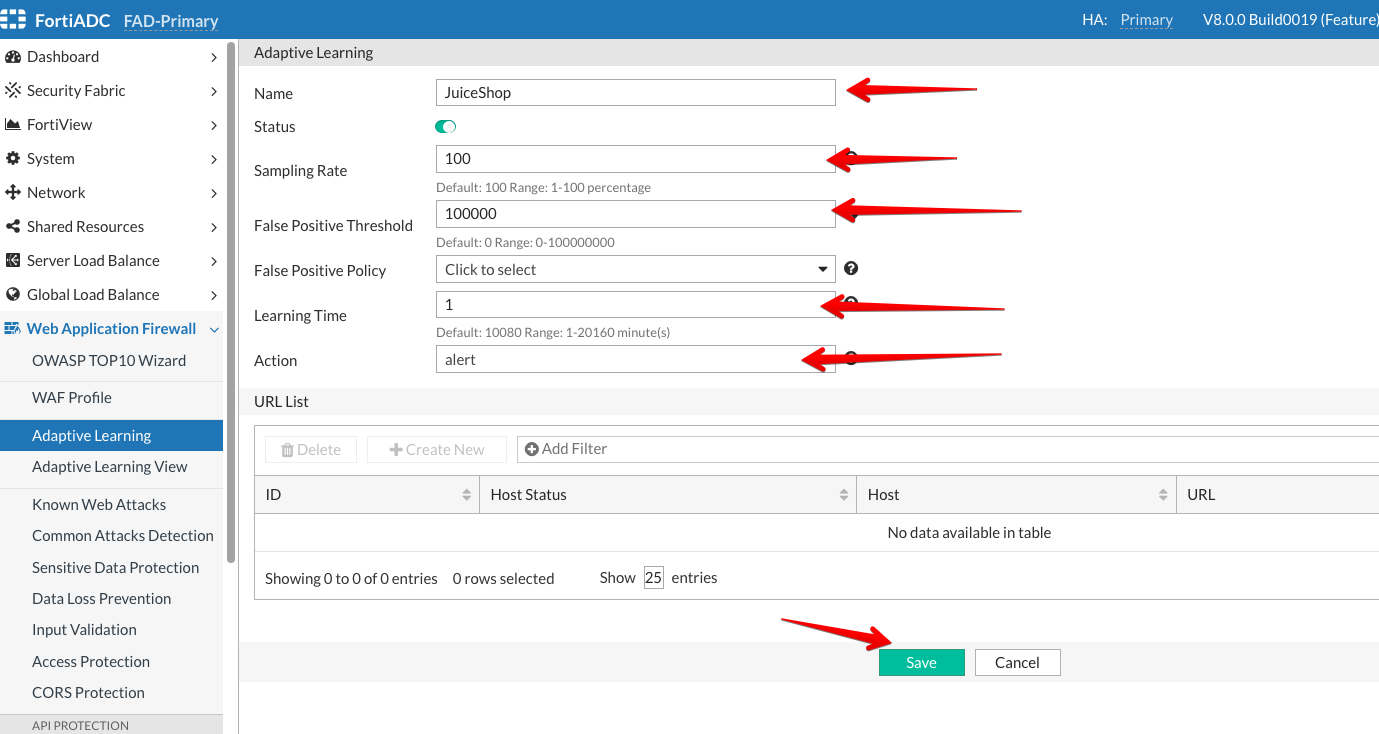
Name: JuiceShop
Status: Enable the toggle
Sampling Rate: 100
False Positive Threshold: 100000
Learning Time: 1
Click Save
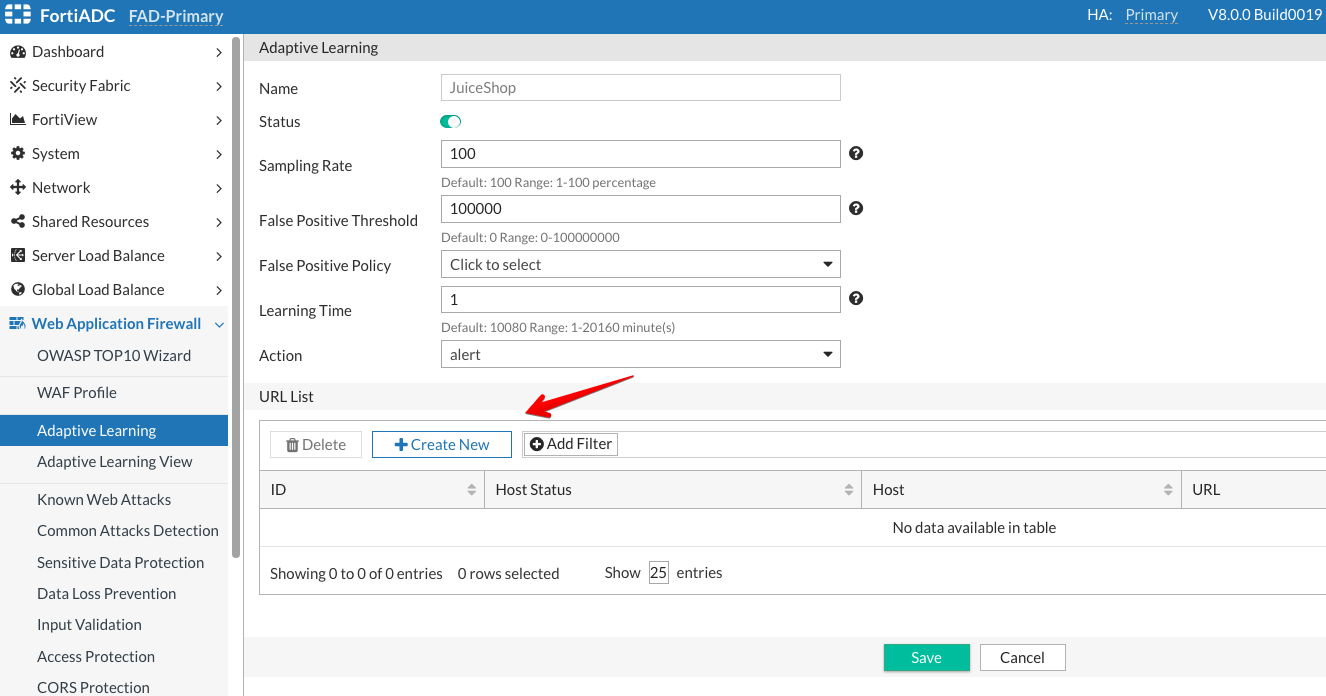
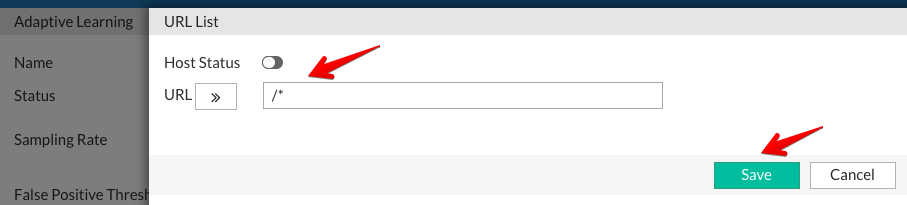
After that, click on the +Create New button to create a URL List
On the URL List page, type /* under URL textbox
Click Save
Click Save again
We will repeat the same steps for the second application
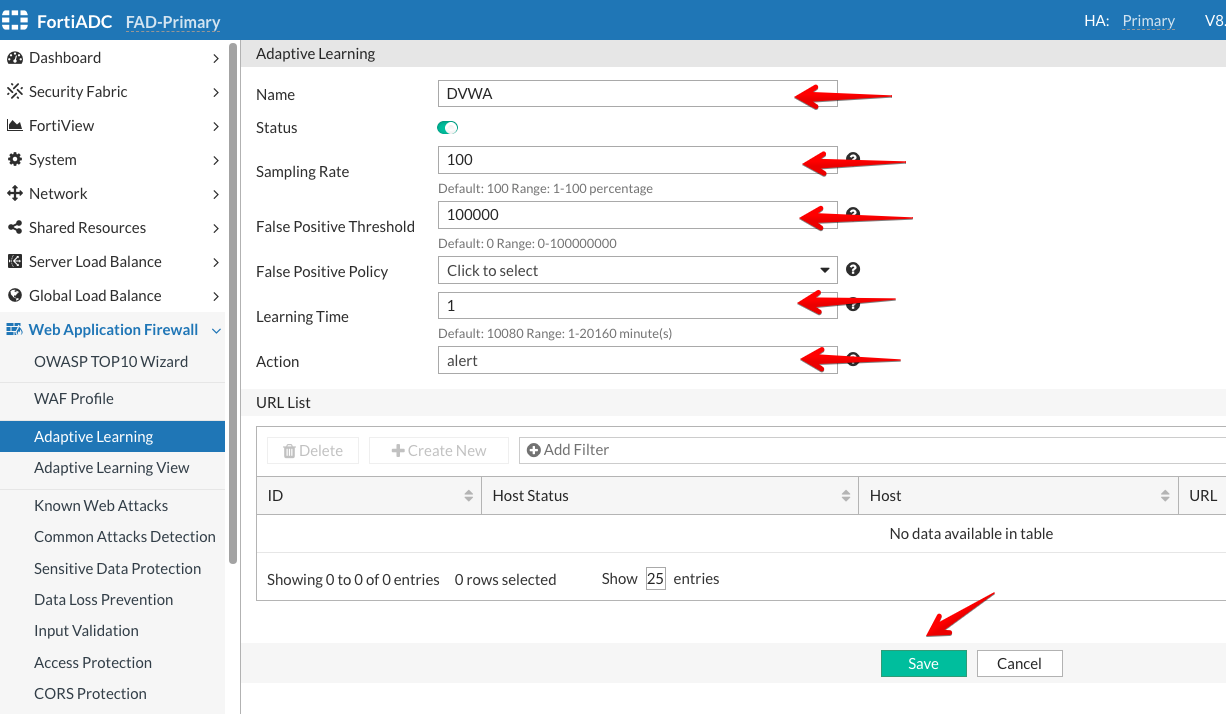
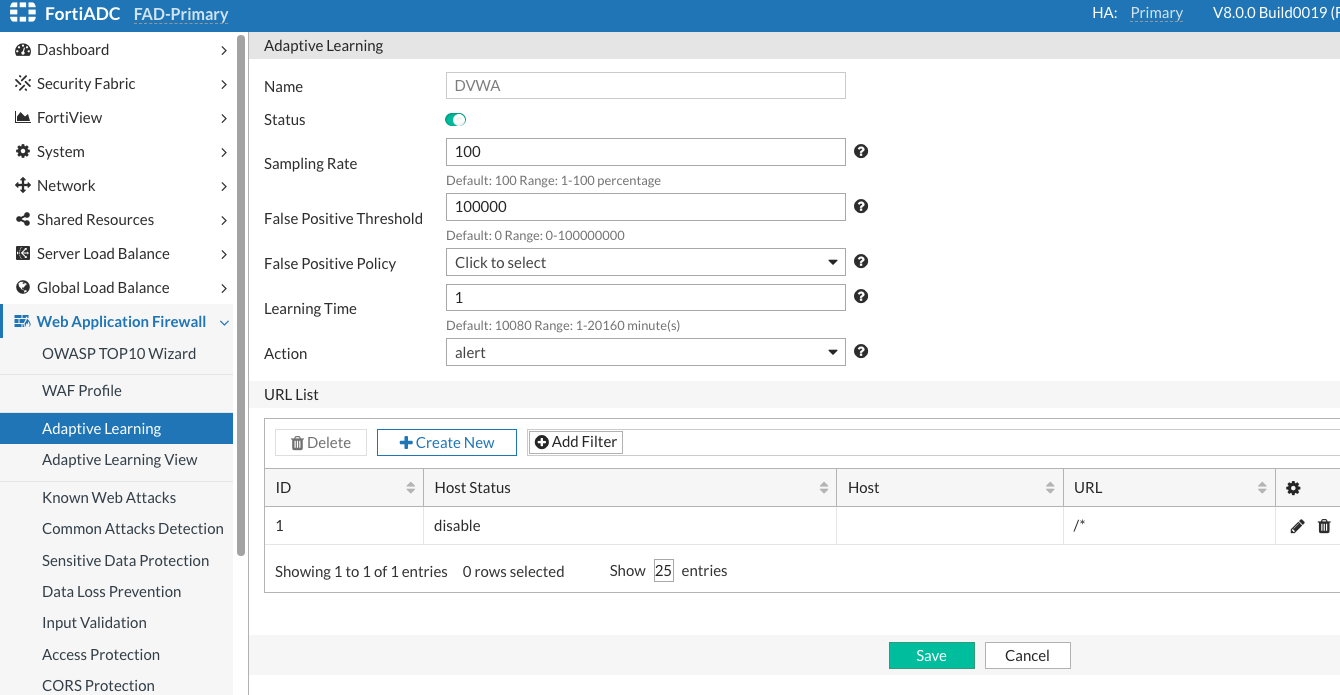
Name: DVWA
Status: Enable the toggle
Sampling Rate: 100
False Positive Threshold: 100000
Learning Time: 1
Click Save
After that, click on the +Create New button to create a URL List
On the URL List page, type /* under URL textbox
Click Save
Click Save again
After adding them, the Adaptive Learning page should look like this:
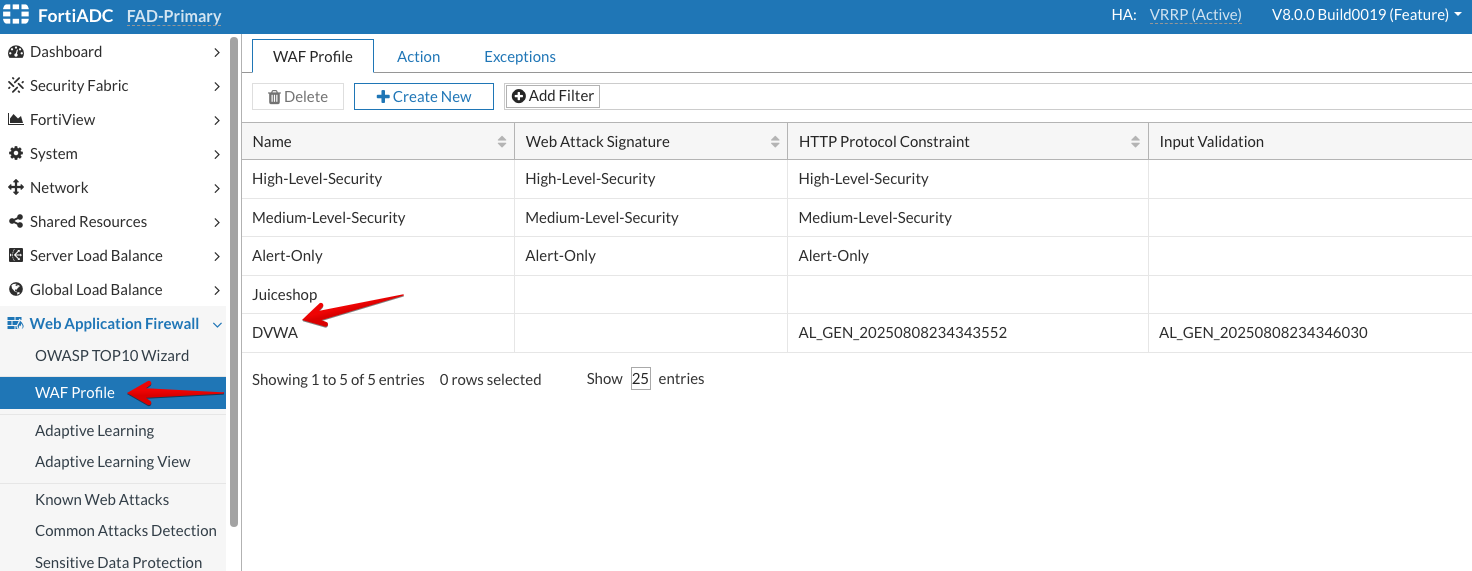
WAF Profile
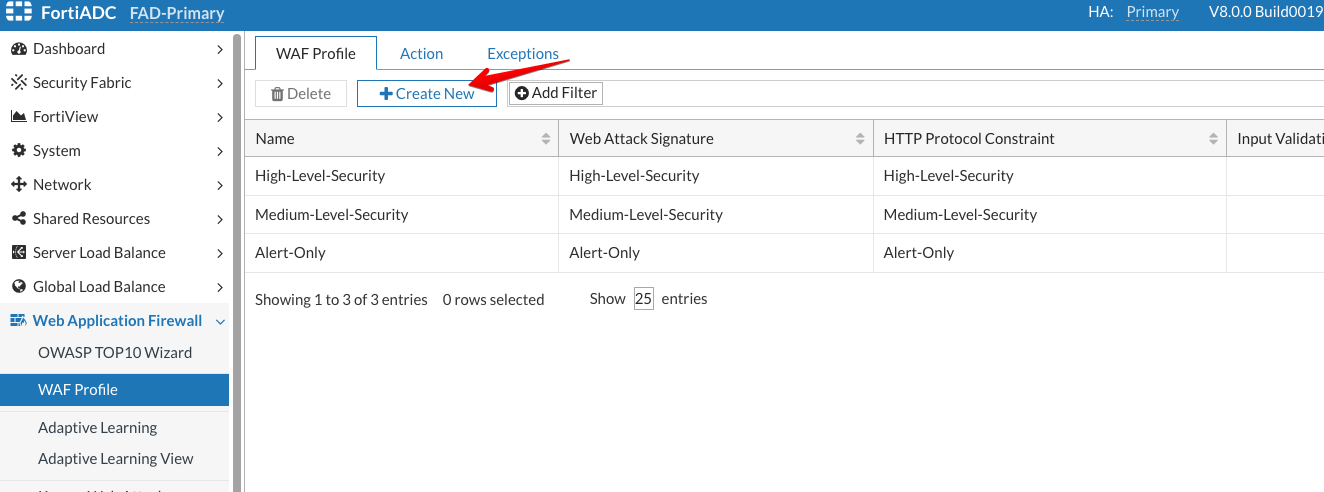
Step 2 - Create WAF profile
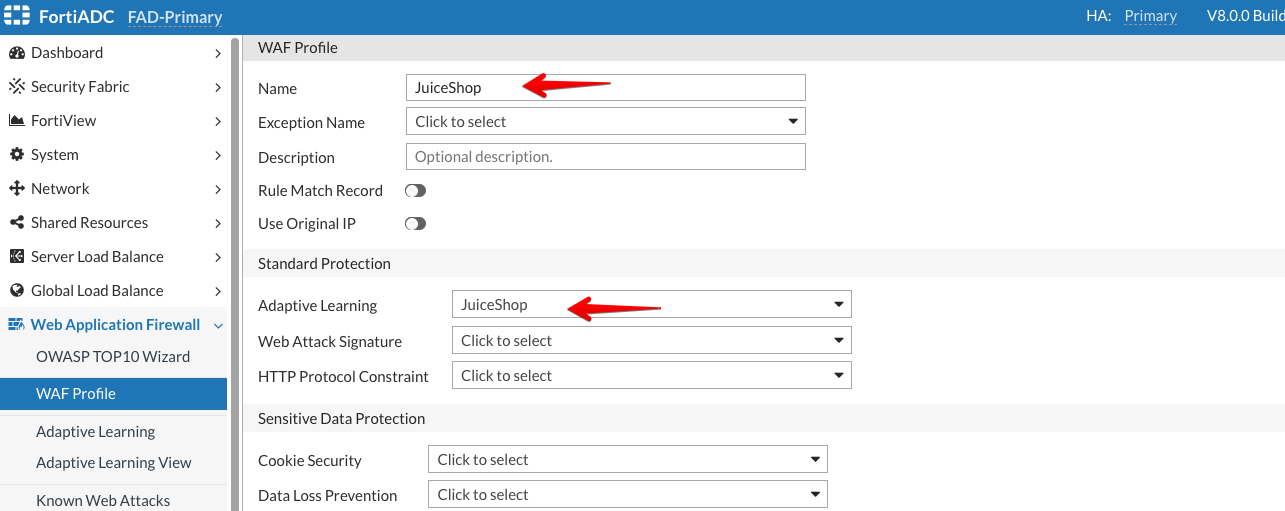
Now, we will create a WAF Profile and associate the Adaptive Learning profiles (JuiceShop & DVWA) we created earlier with the WAF Profile.
Login to the FortiADC (FAD-Primary) with the username xperts2025 and password AppSec-Xp3rts2025!
Go to Web Application FireWall → WAF Profile
Click on +Create New
Name: JuiceShop
Adaptive Learning: Select JuiceShop from the dropdown
Click Save
For this exercise, we will focus solely on configuring the Adaptive Learning module and will not configure the other WAF modules. In a production environment, however, all relevant WAF modules would be configured as needed to ensure comprehensive protection.
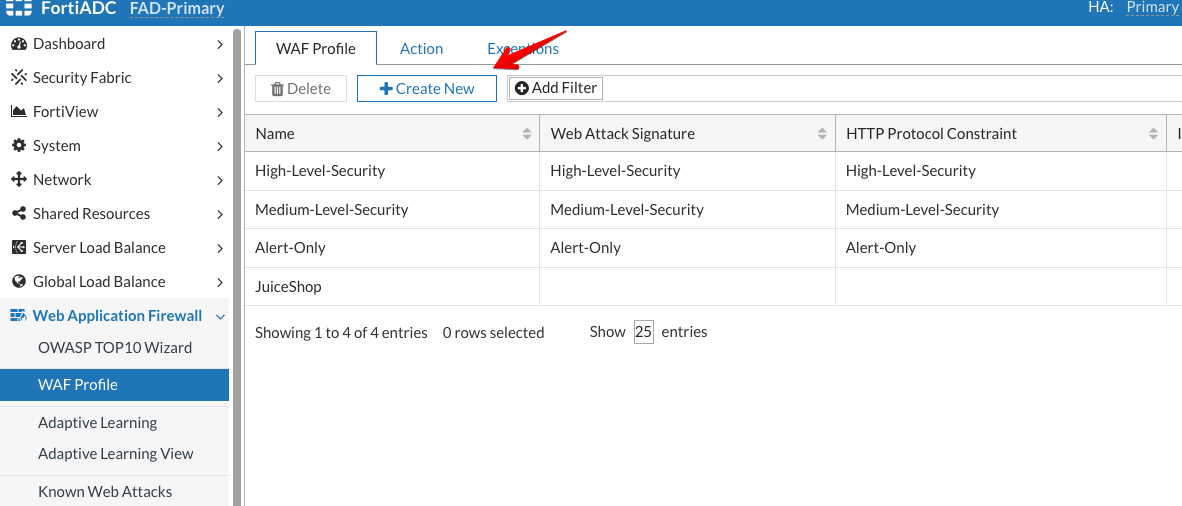
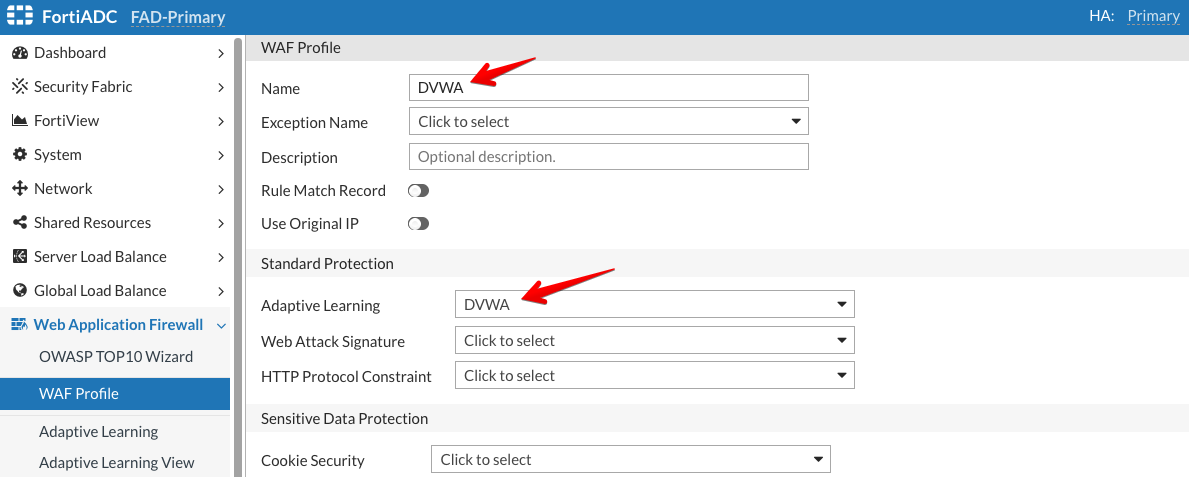
After that, we will create a second WAF Profile for the DVWA application
Go to Web Application FireWall → WAF Profile
Click on +Create New
Name: DVWA
Adaptive Learning: Select DVWA from the dropdown
Click Save
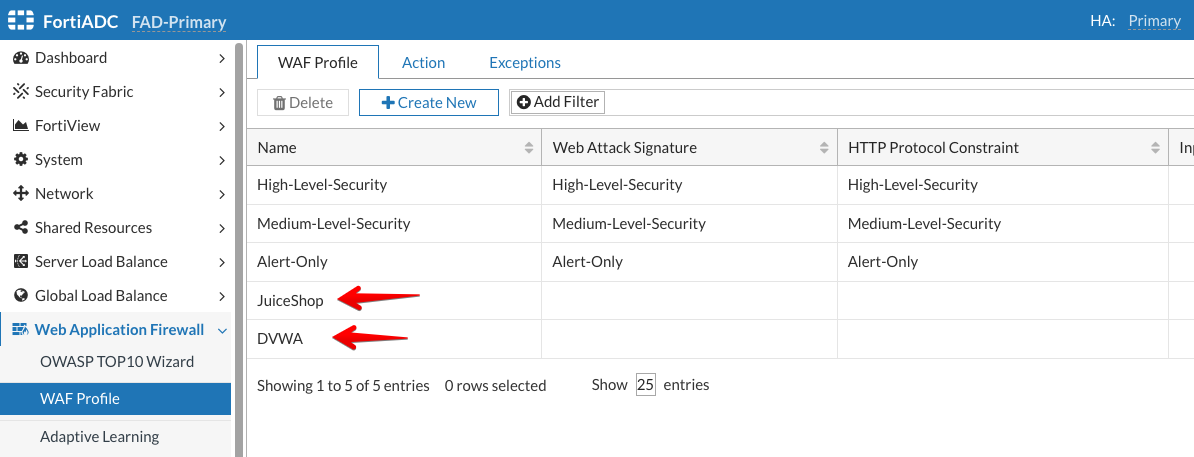
After adding them, the WAF Profile page should look like this:
Virtual Server
Step 3 - Associate the WAF profile with the Virtual Server created in Step 1
Now, we will associate the WAF profiles with a Virtual Server. Refer to the diagram in the traffic flow section to understand how traffic is processed through FortiADC for better context.
Login to the FortiADC (FAD-Primary) with the username xperts2025 and password AppSec-Xp3rts2025!
Go to Server Load Balance → Virtual Server
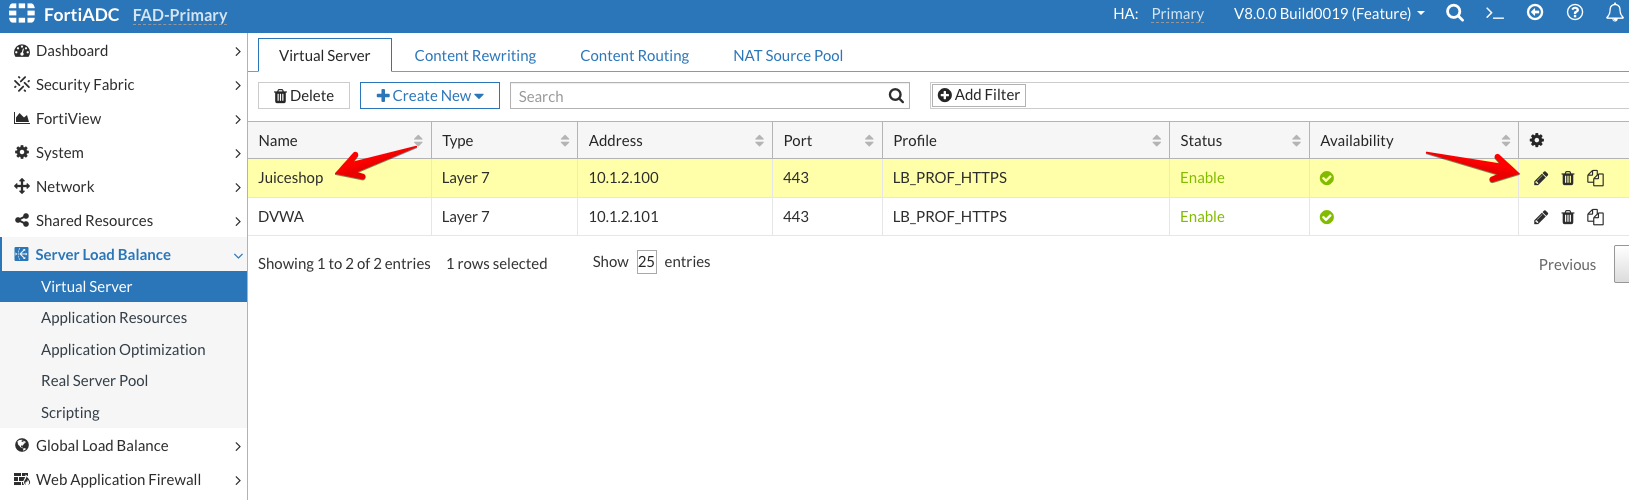
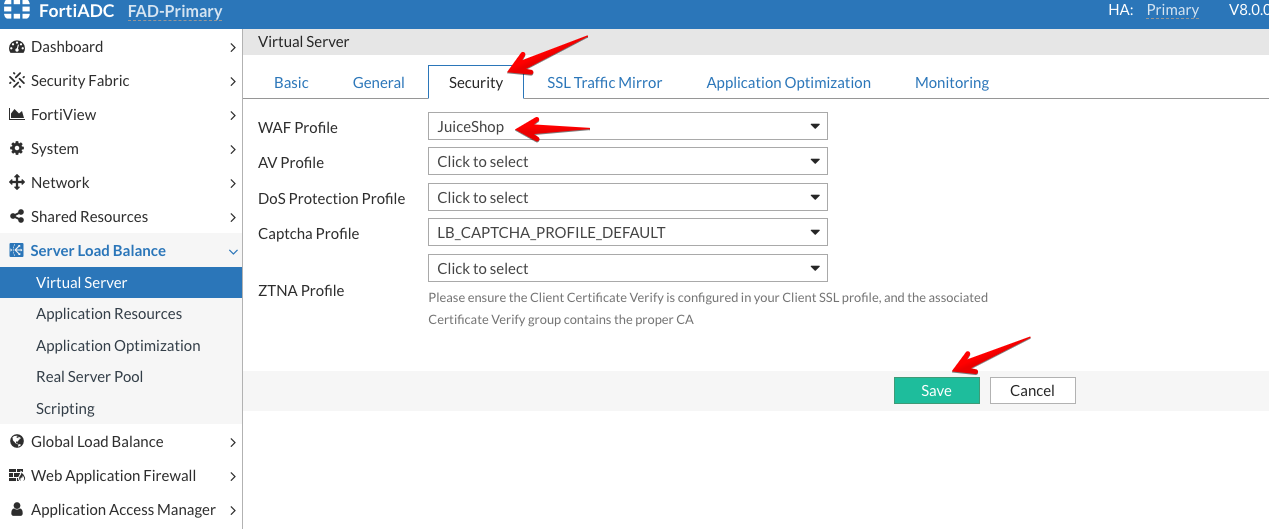
Double click Juiceshop or click on edit (pencil icon) on the right side of Juiceshop
Click on the Security tab
Select Juiceshop from the WAF Profile dropdown menu
Click Save
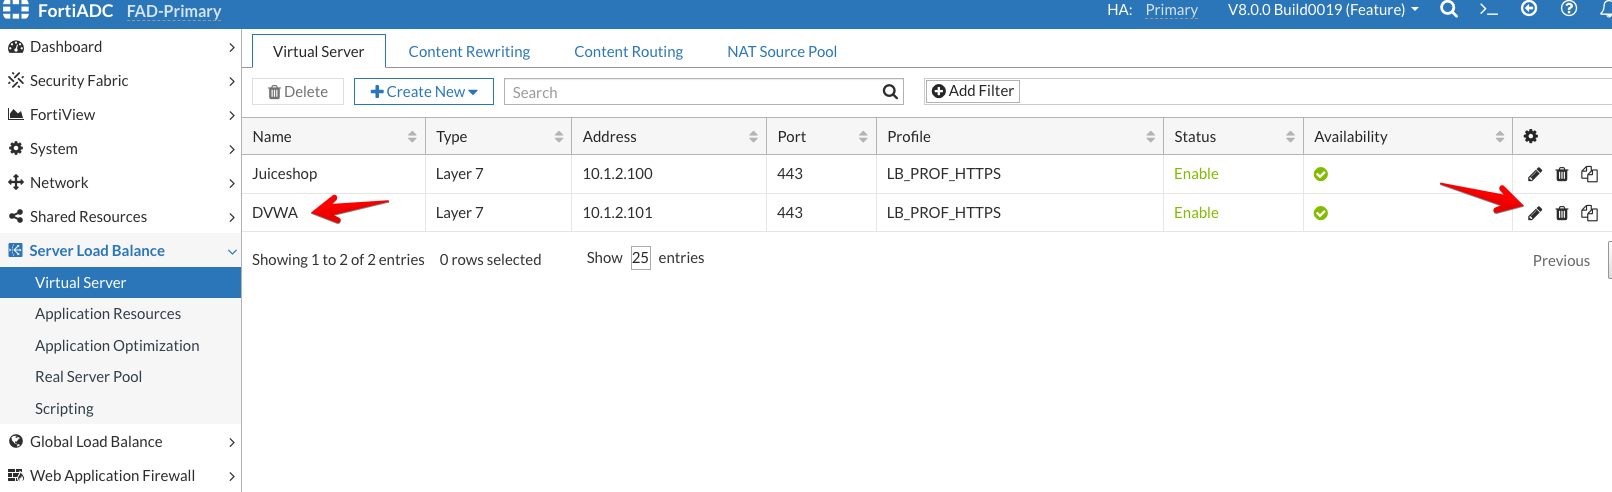
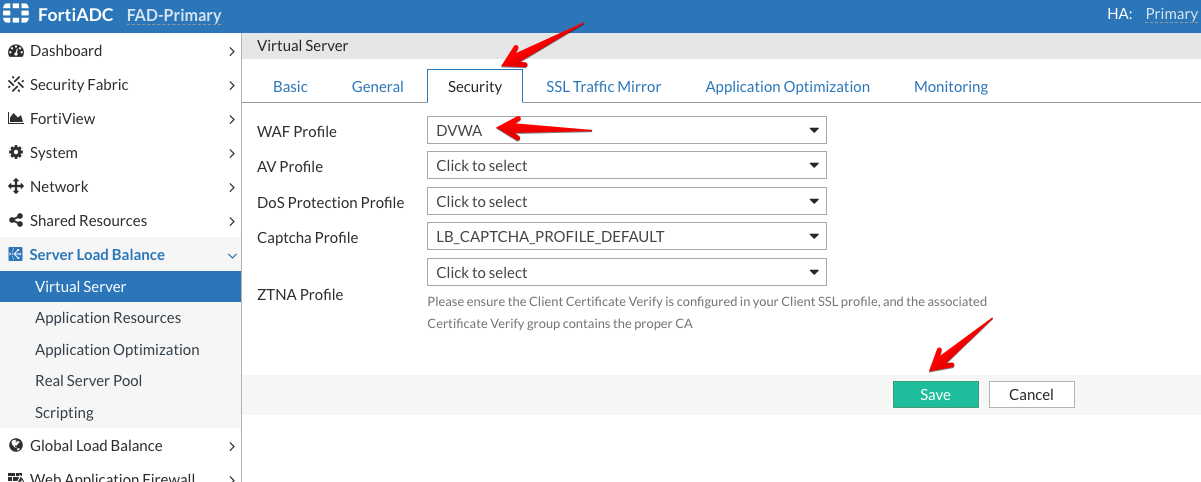
We will follow the same steps for configuring the DVWA application.
Go to Server Load Balance → Virtual Server
Double click DVWA or click on edit (pencil icon) on the right side of DVWA
Click on the Security tab
Select DVWA from the WAF Profile dropdown menu
Click Save
Testing Adaptive Learning
Testing Adaptive Learning
For this section, we will use scripts that we will run on the client machine to generate traffic.
Login to the FortiADC (FAD-Primary) with the username xperts2025 and password AppSec-Xp3rts2025!
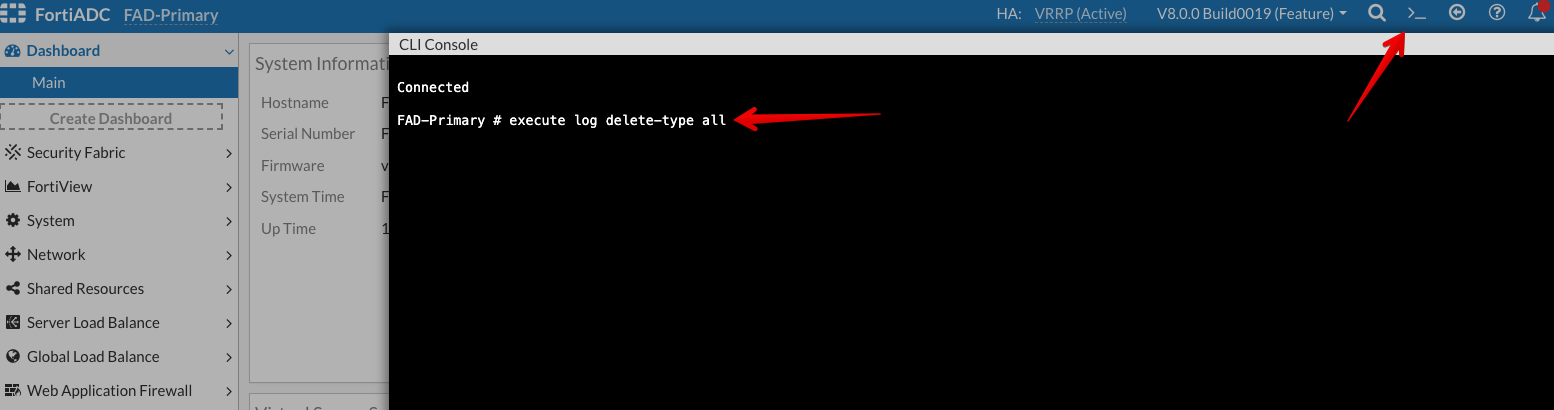
First, we need to clear all the logs from FortiADC.
To do that, go to FortiADC CLI by clicking “>_” towards the top right corner and type execute log delete-type all
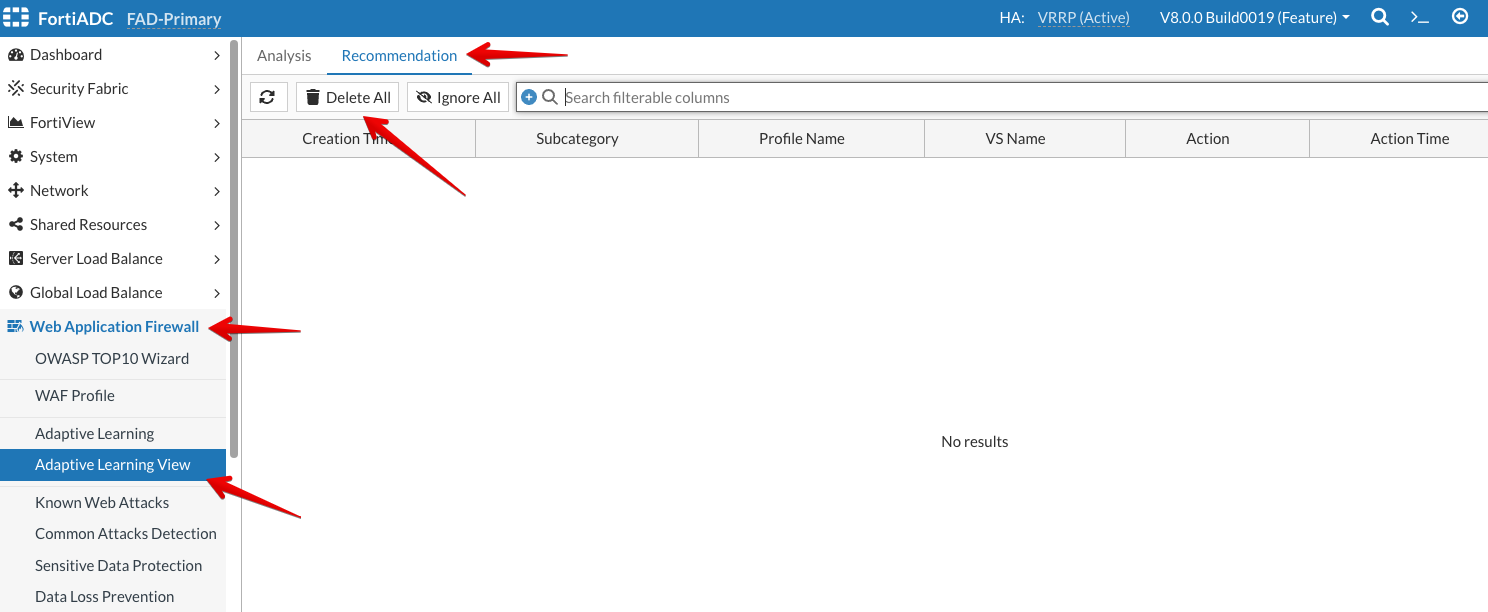
Go to Web Application Firewall → Adaptive Learning View and delete all Recommendations as shown below.
Go to Web Application Firewall → Adaptive Learning View and delete all Analysis data as shown below.
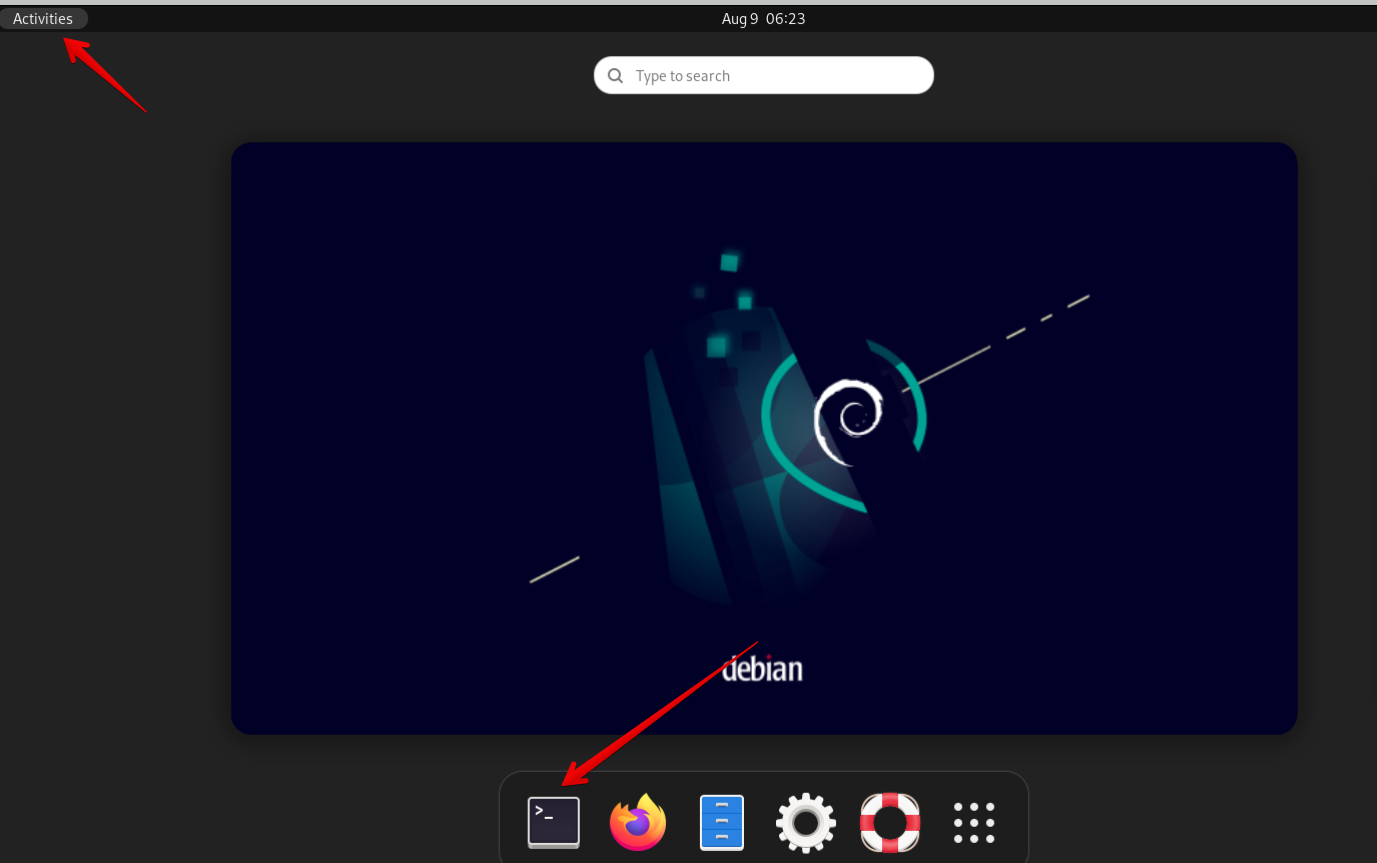
RDP to the client machine with the username xperts2025 and password AppSec-Xp3rts2025!
Click on Activities in the top left corner and open Terminal
Run sudo ./load-test.sh and let it run until it’s finished (about 2 minutes).
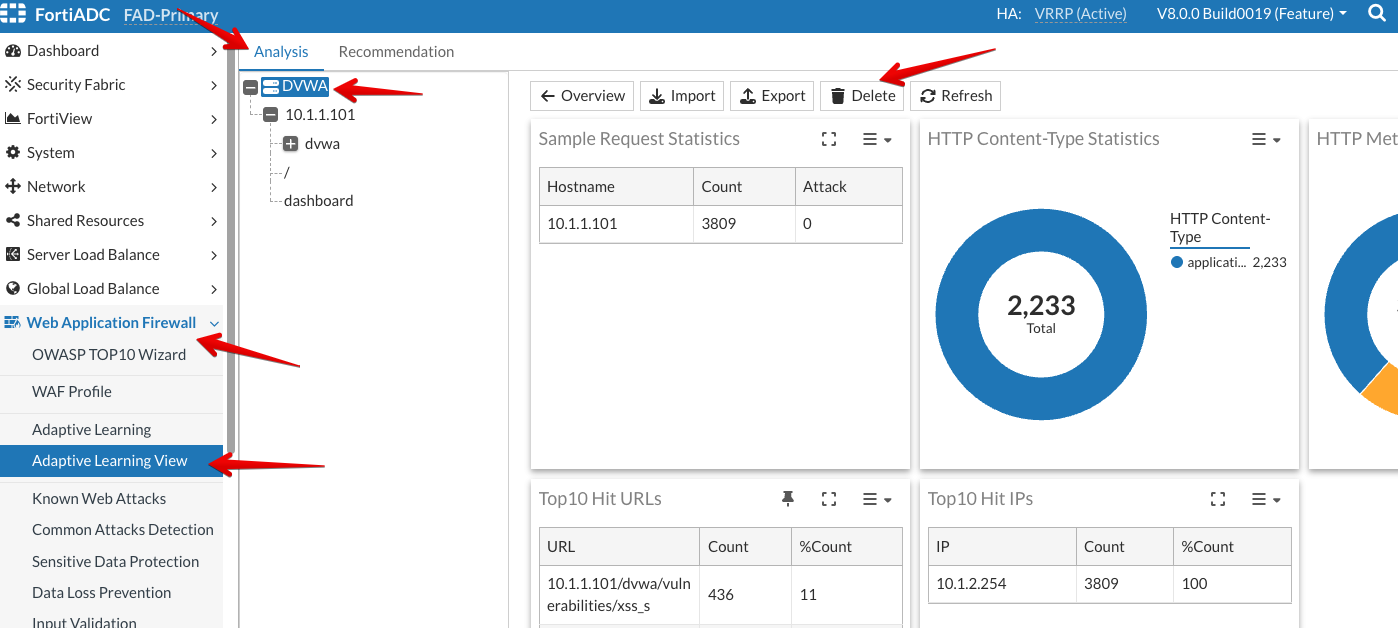
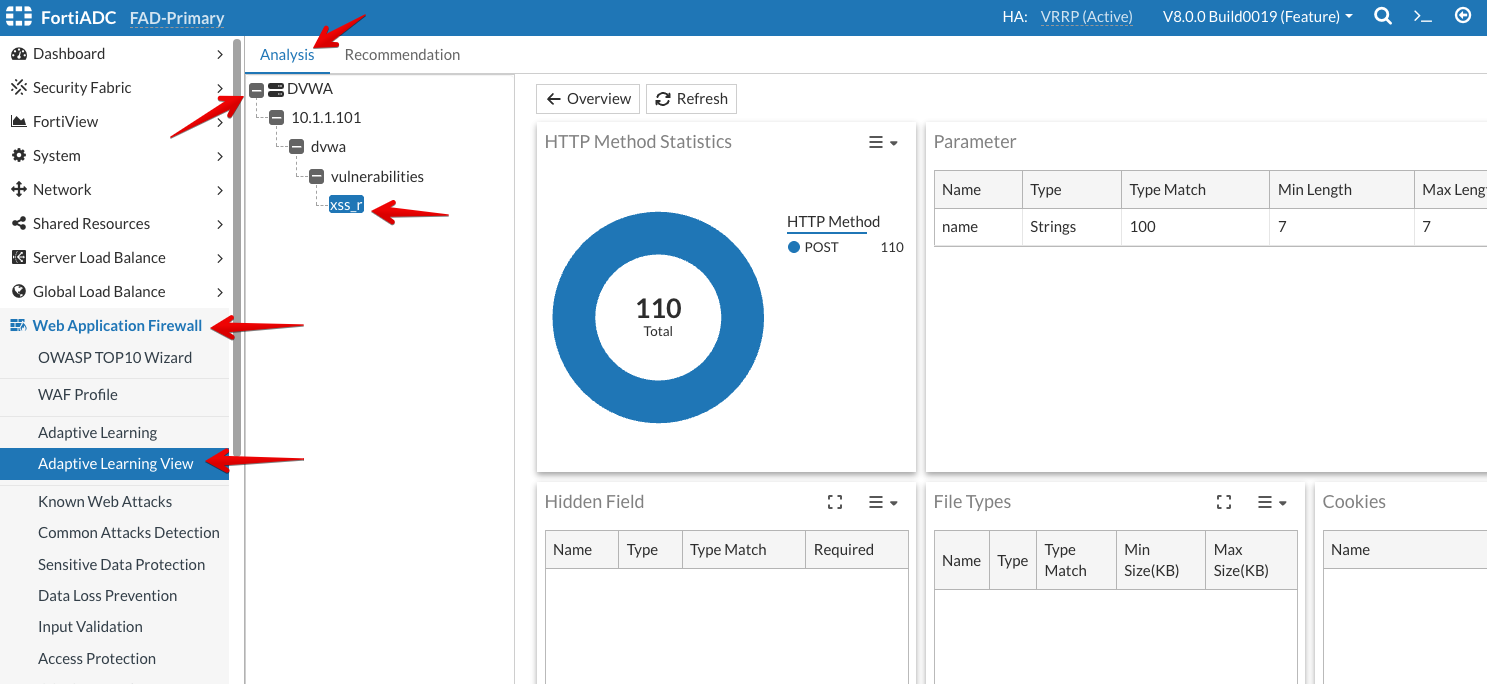
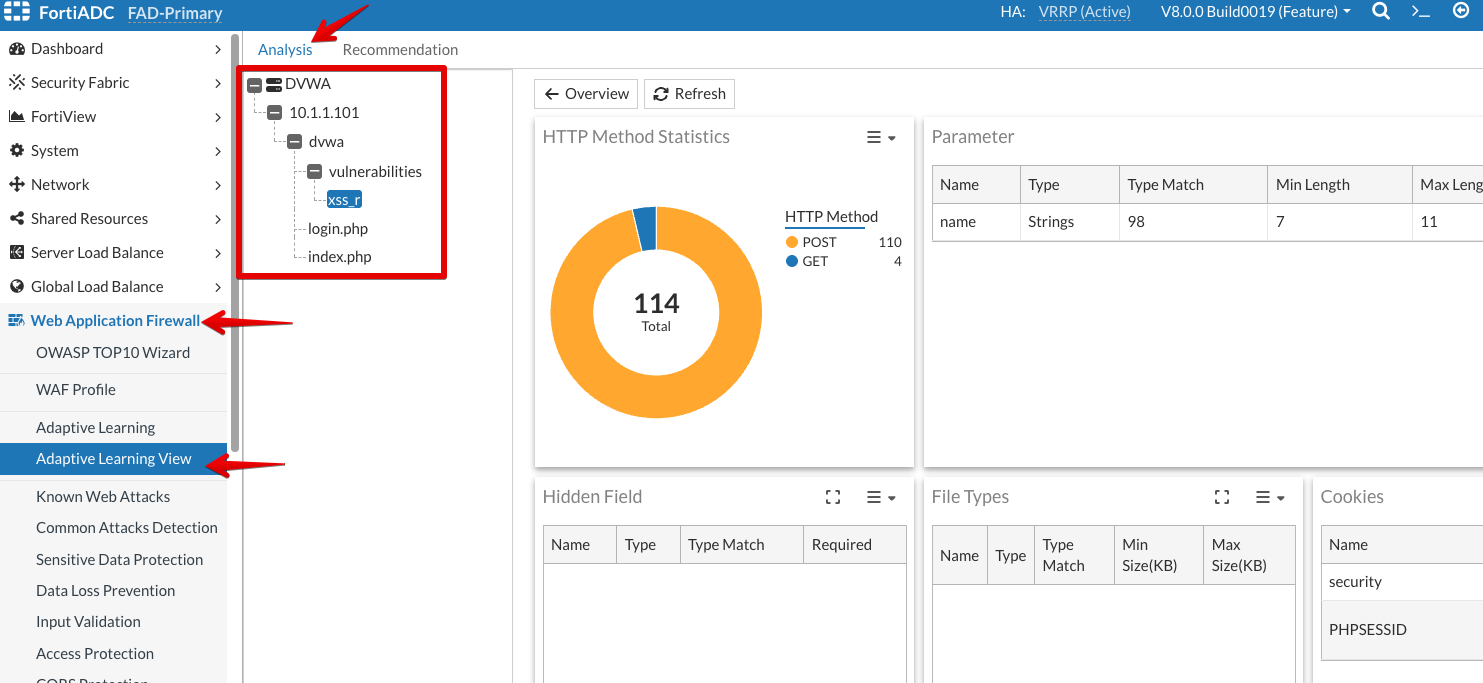
Go back to FortiADC console and click Web Application Firewall → Adaptive Learning View and observe the Adaptive Learning data under Analysis and Recommendation.
Expand the DVWA tab and observe the different directories detected by Adaptive Learning.
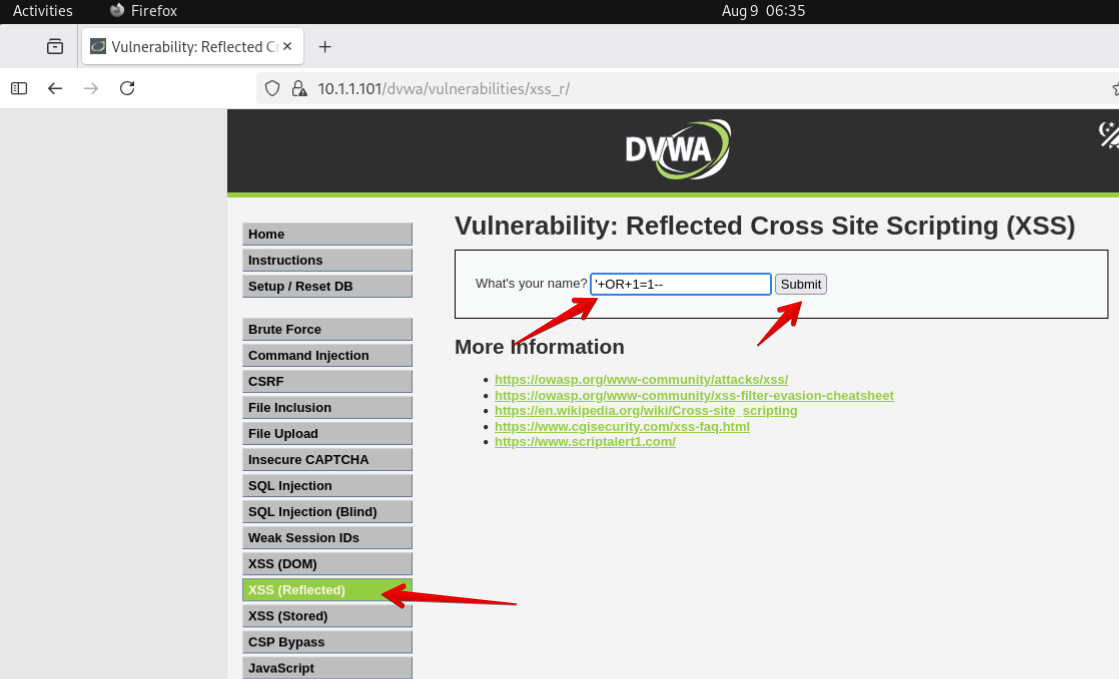
Go back to the RDP connection on the Client, click on Activities in the top left corner and open Firefox, using the bookmark go to DVWA
Login to the DVWA app with username admin and password password
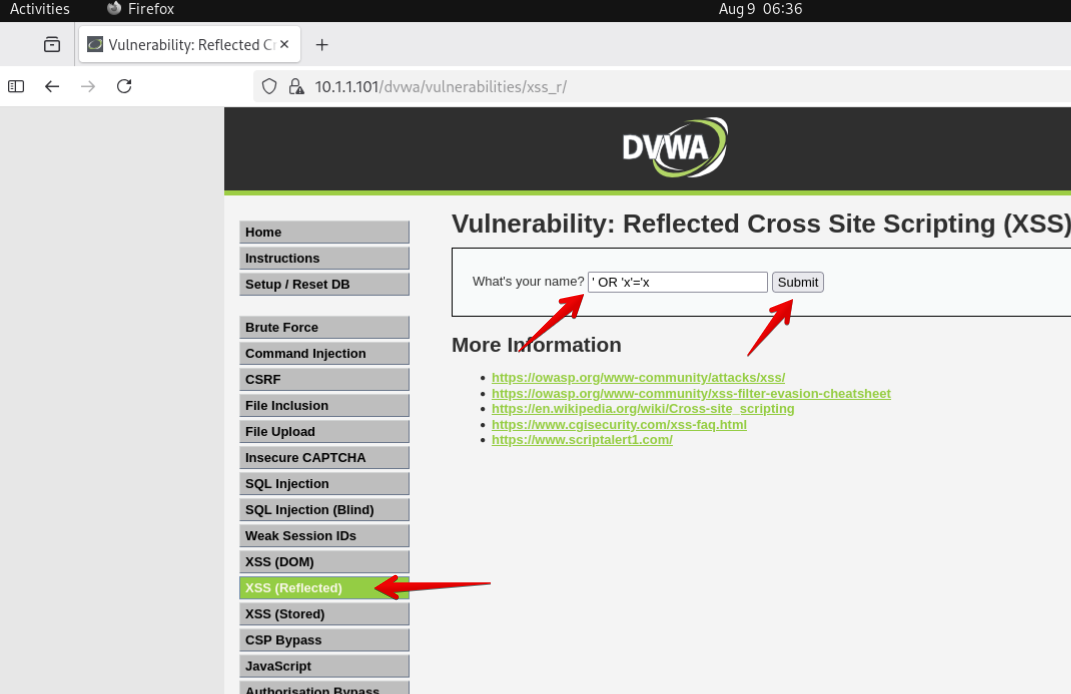
Go to XSS (Reflected) from the left menu and insert an SQL Injection twice, '+OR+1=1-- and ' OR 'x'='x
Give it a couple of minutes to run its analysis and log the new recommendations.
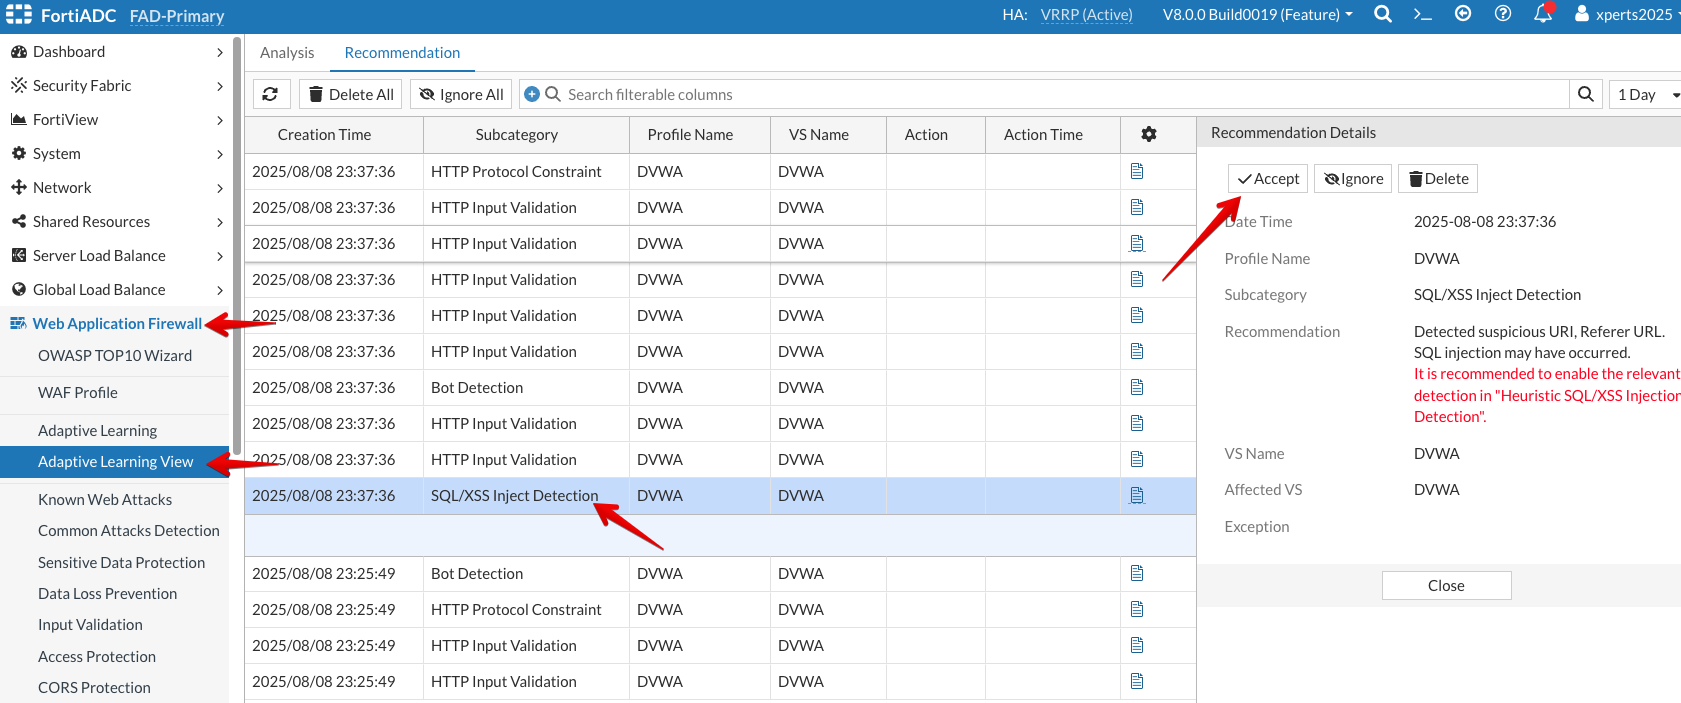
Go back to the FortiADC (FAD-Primary) console and click Web Application Firewall → Adaptive Learning View and observe the Adaptive Learning data under Analysis and Recommendation.
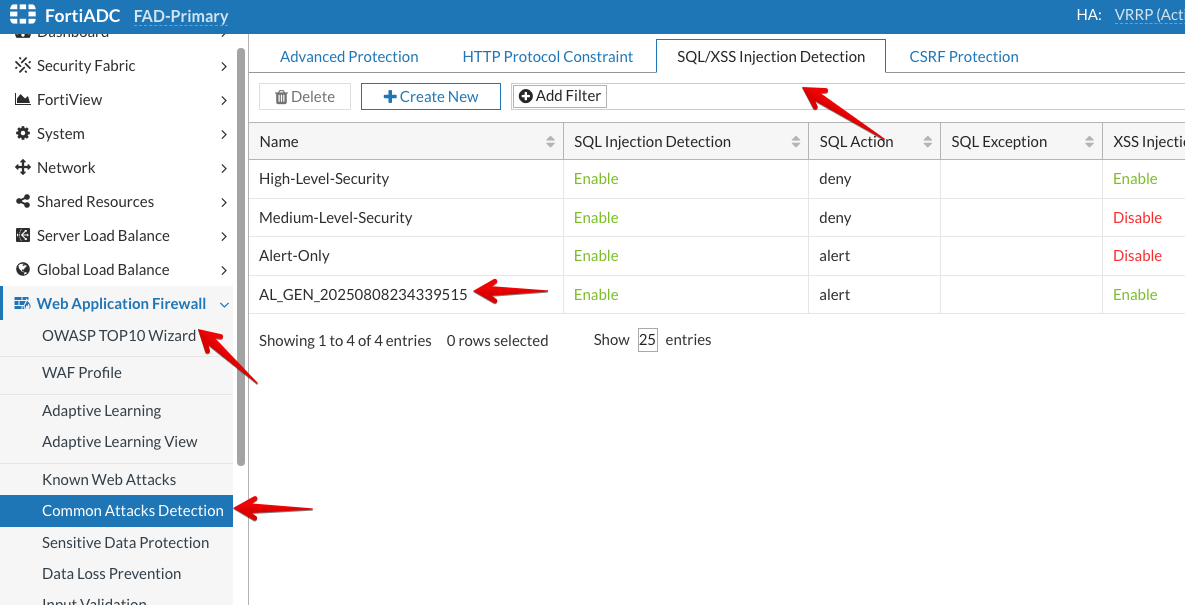
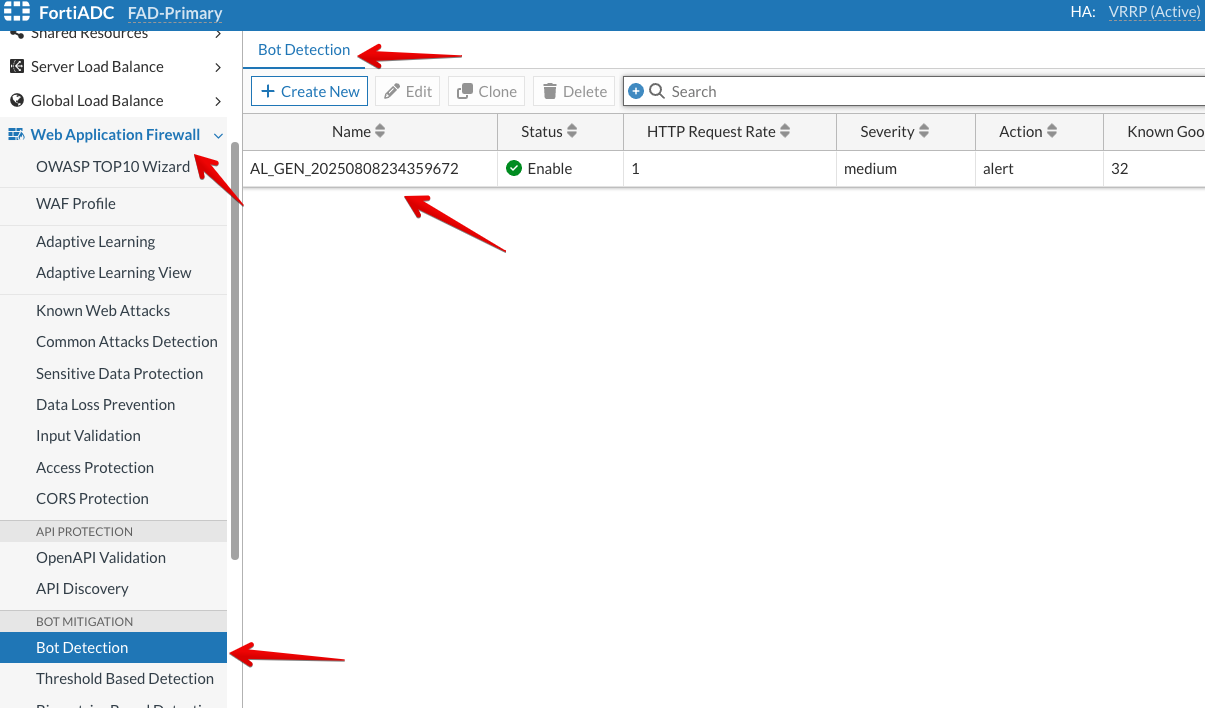
There should be various WAF Recommendations including HTTP Input Validation, HTTP Protocol Constraint, and SQL/XSS Inject Detection.
Accept the Recommendations and repeat the above step for all the recommendations.
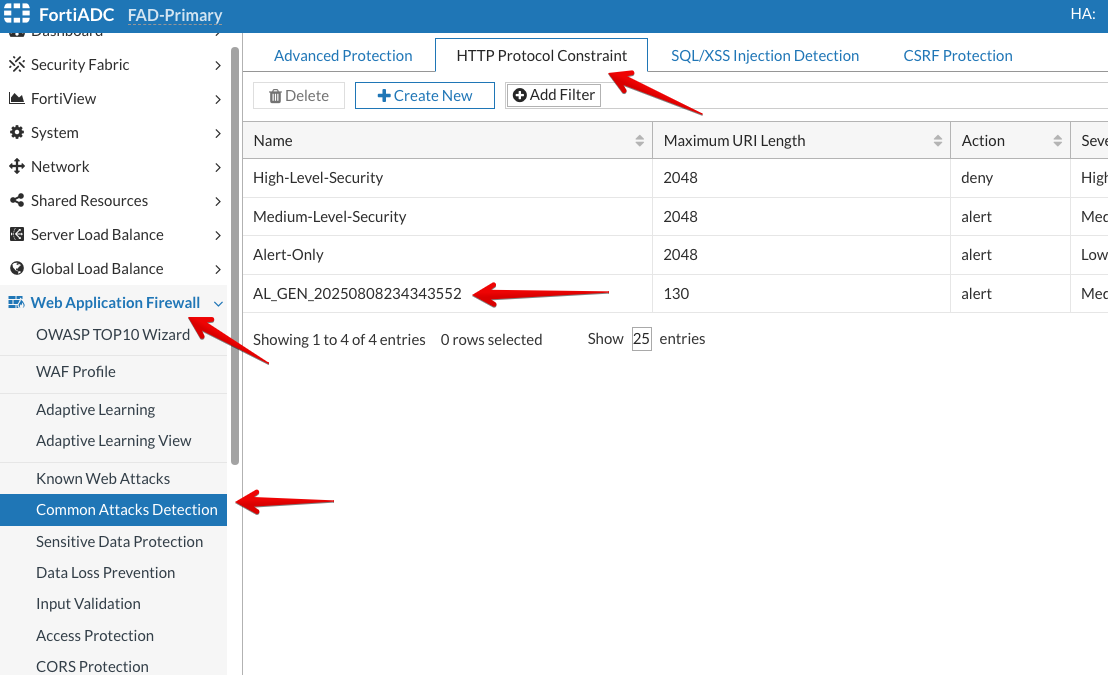
Review the configuration changes made by Adaptive Learning. We can see from the below screenshots, that once we accepted the recommendations from the Adaptive Learning engine, they were automatically added to WAF’s HTTP Protocol Constraints, SQL/XSS Injection Detection and Bot Detection modules.
Testing WAF
Testing WAF
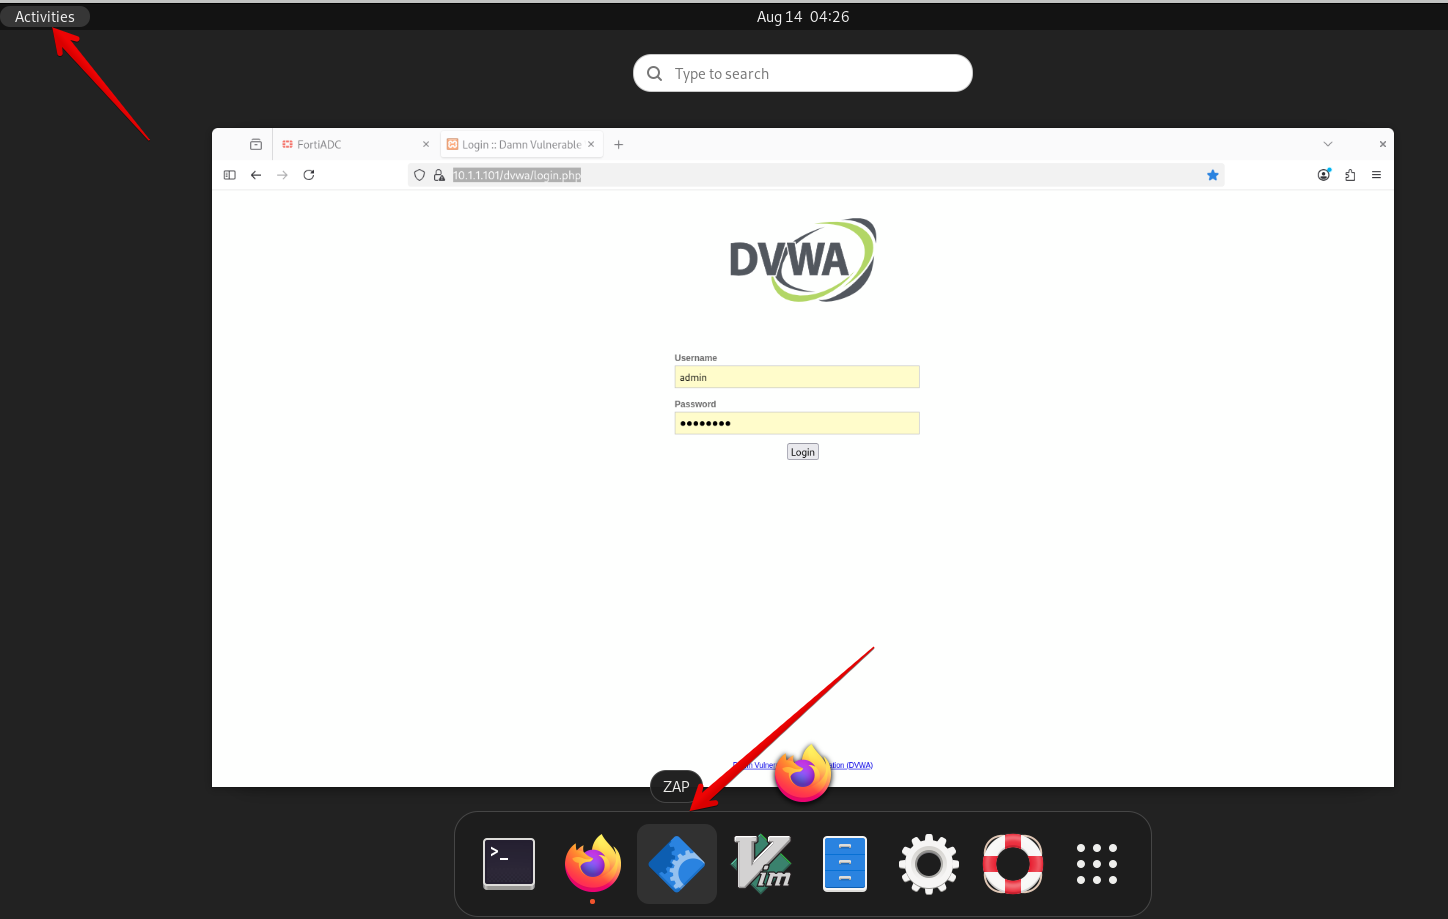
For this section, we will simulate attacks using the ZAP tool installed on the Client machine.
From the Client with the username xperts2025 and password AppSec-Xp3rts2025!
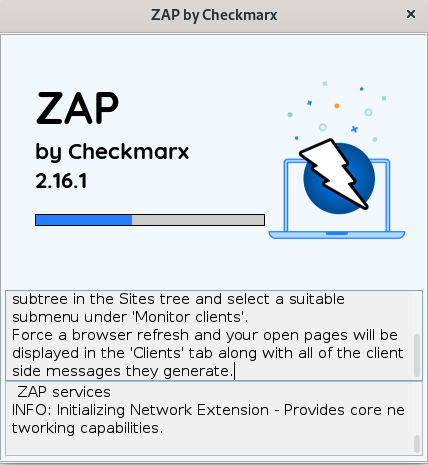
Click on Activities in the top left corner and open the ZAP tool.
It will take few seconds for it to load on the Client machine.
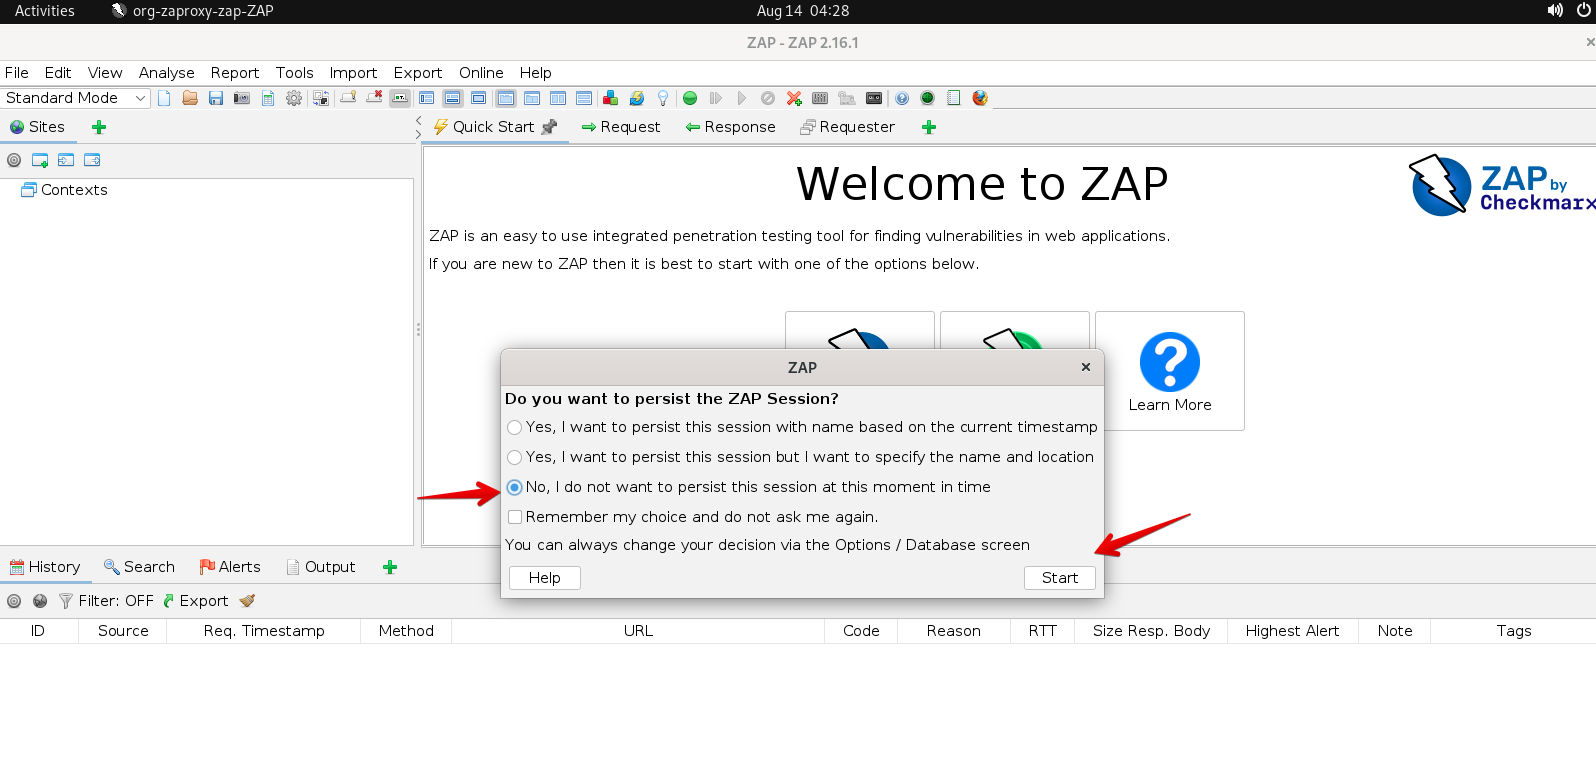
The ZAP tool will show a pop-up showing different options. Select the default one as shown below and click Start
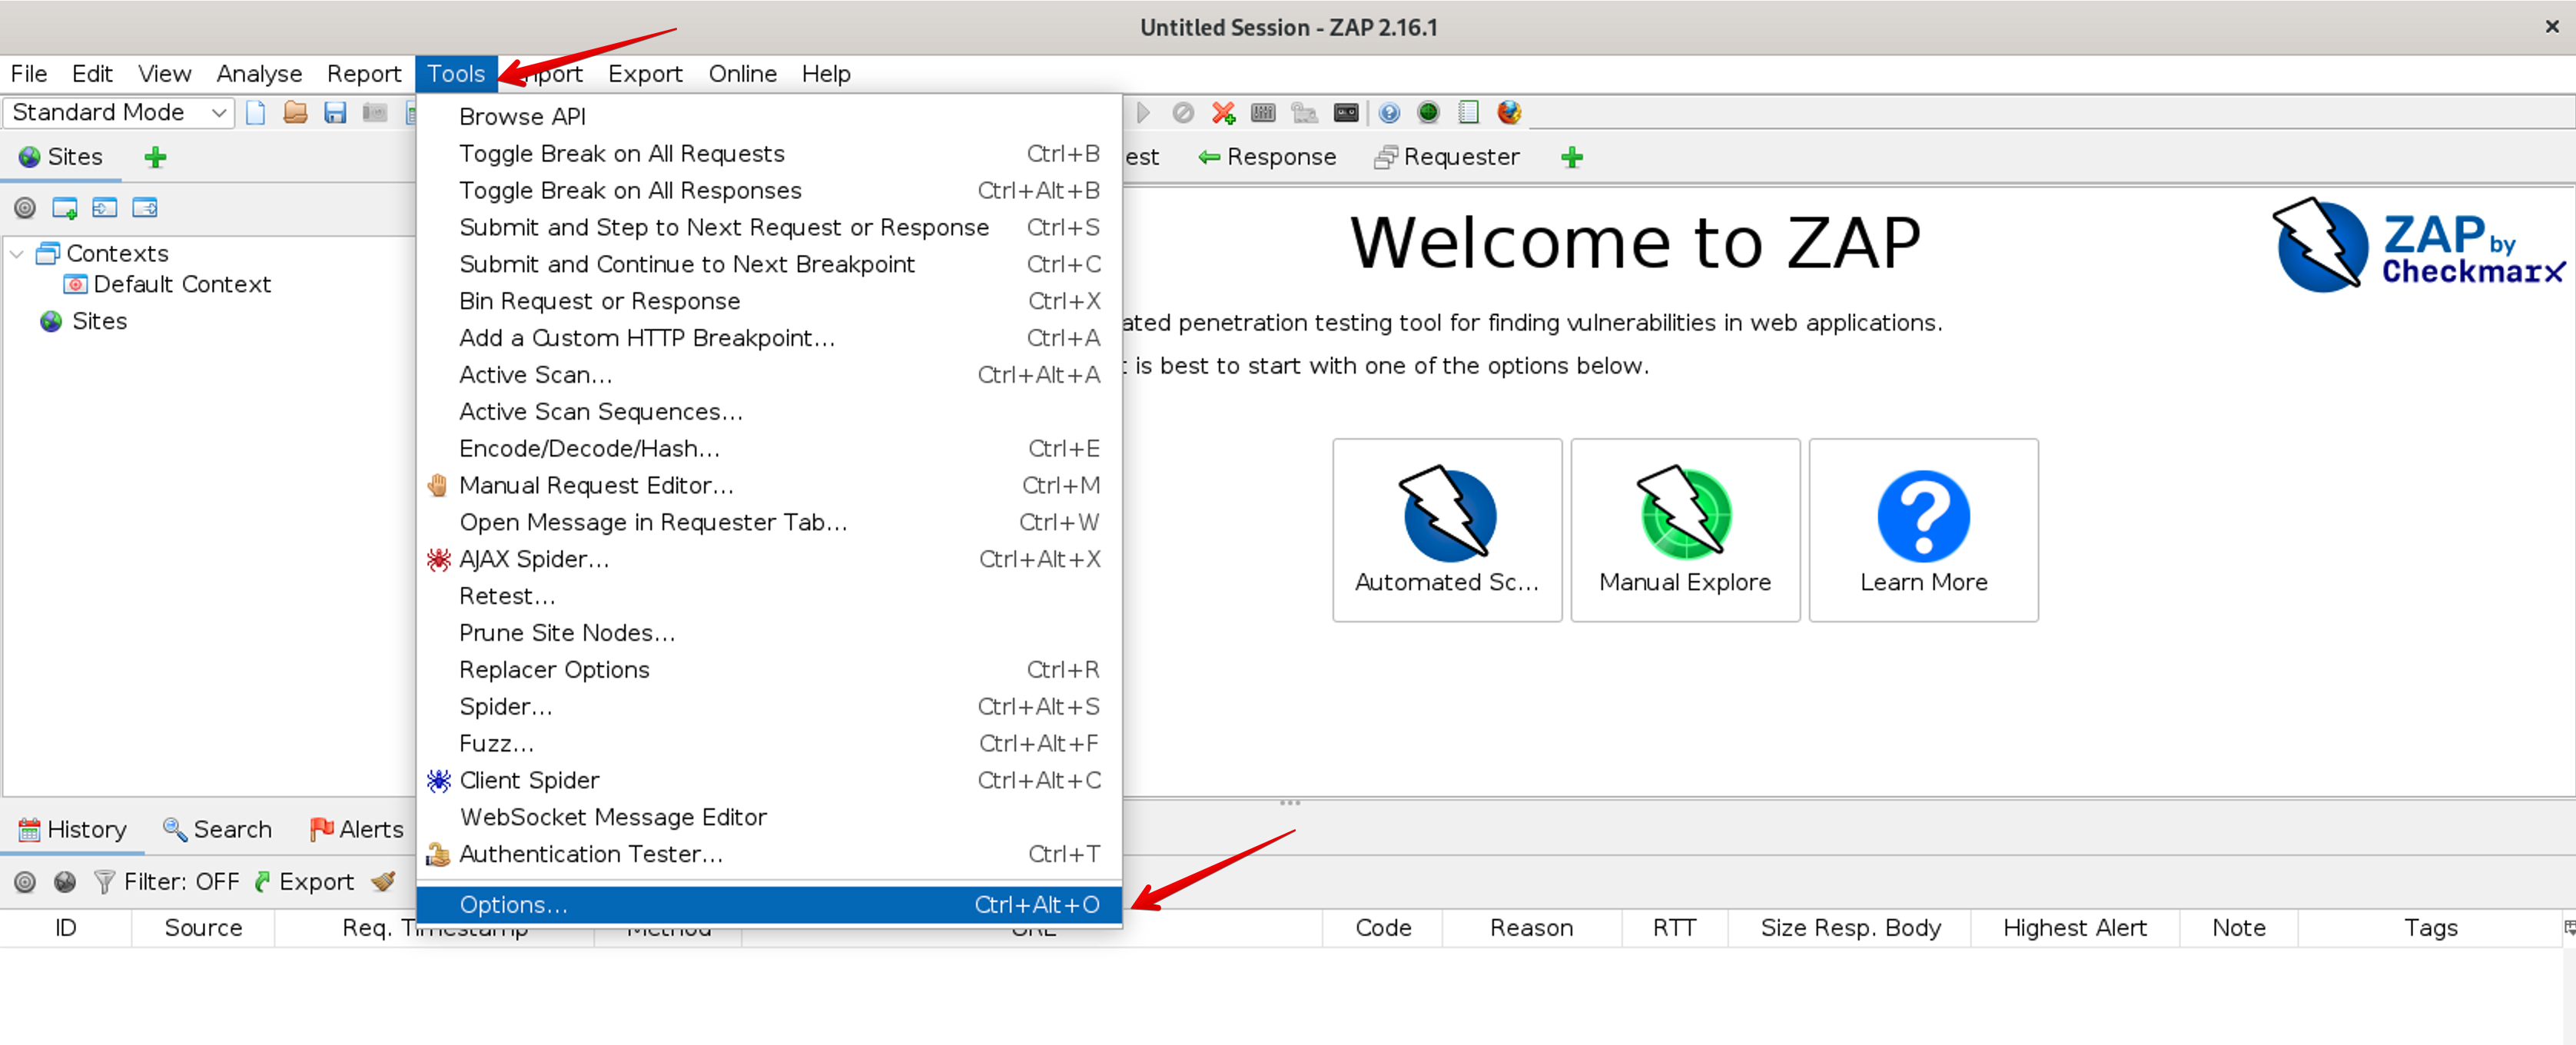
Go to the Dashboard and click Tools then Options
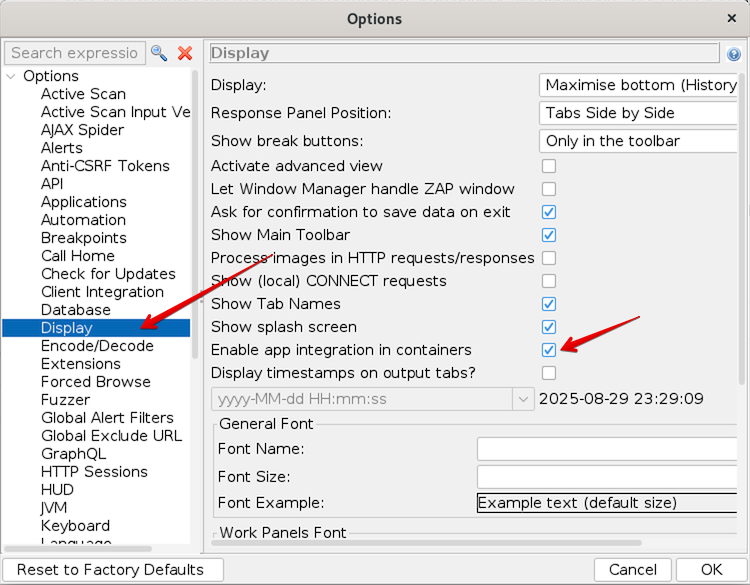
Once the Options page opens select Display and Enable app integration in containers
Scroll down in the list and select Selenium
Update the paths to the geckodriver and the Firefox Binary
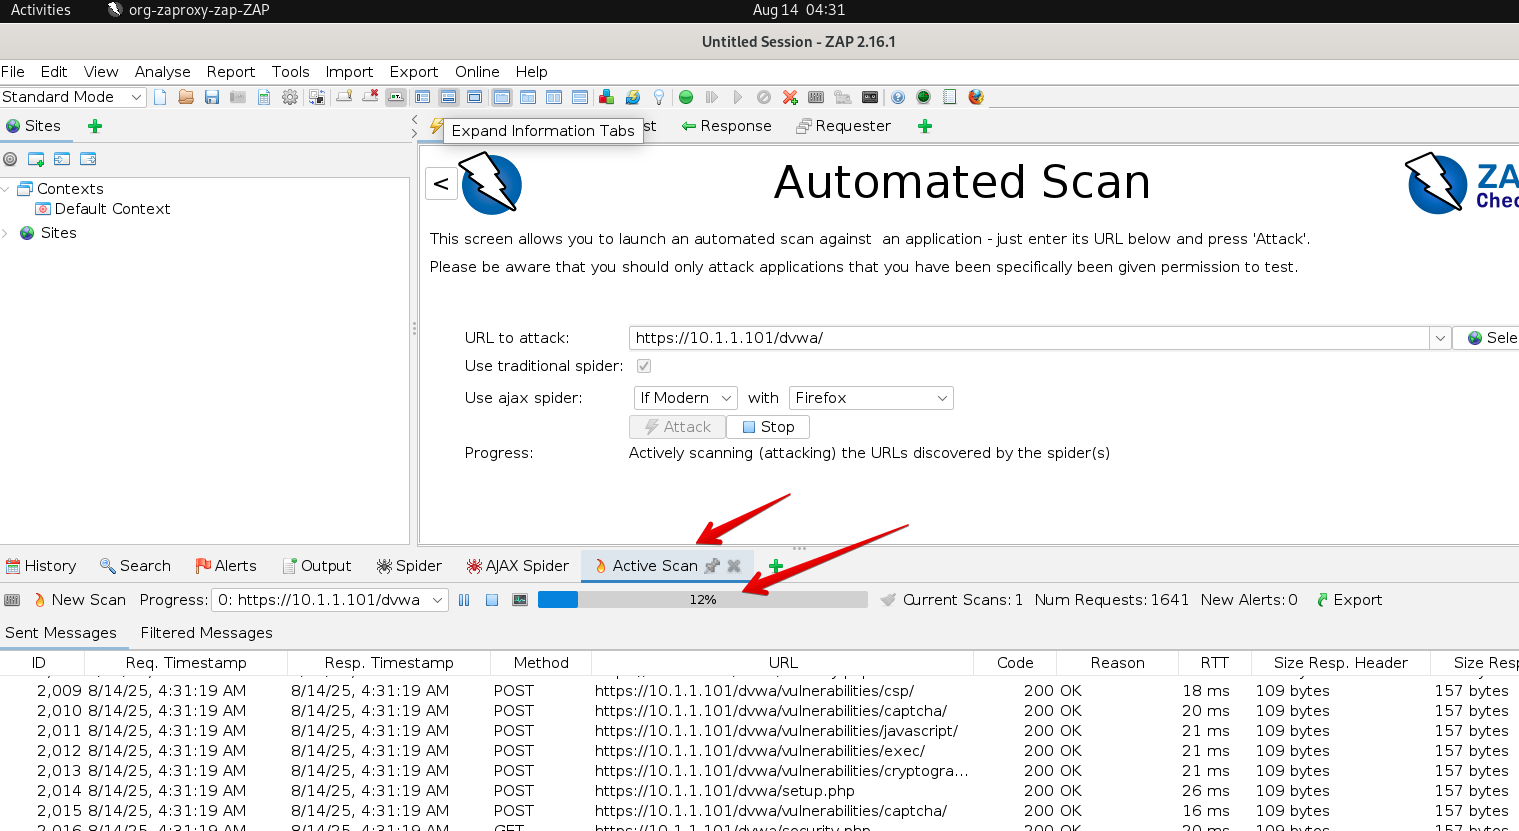
Enter https://10.1.1.101/dvwa/ under the URL to attack: textbox and keep everything else default, click Attack.
The ZAP tool will show the progress of the attack under the Active Scan tab as shown below. It shows all the requests ZAP is making to the various URL’s in DVWA, as shown below. Let it run until it’s finished (a few minutes).
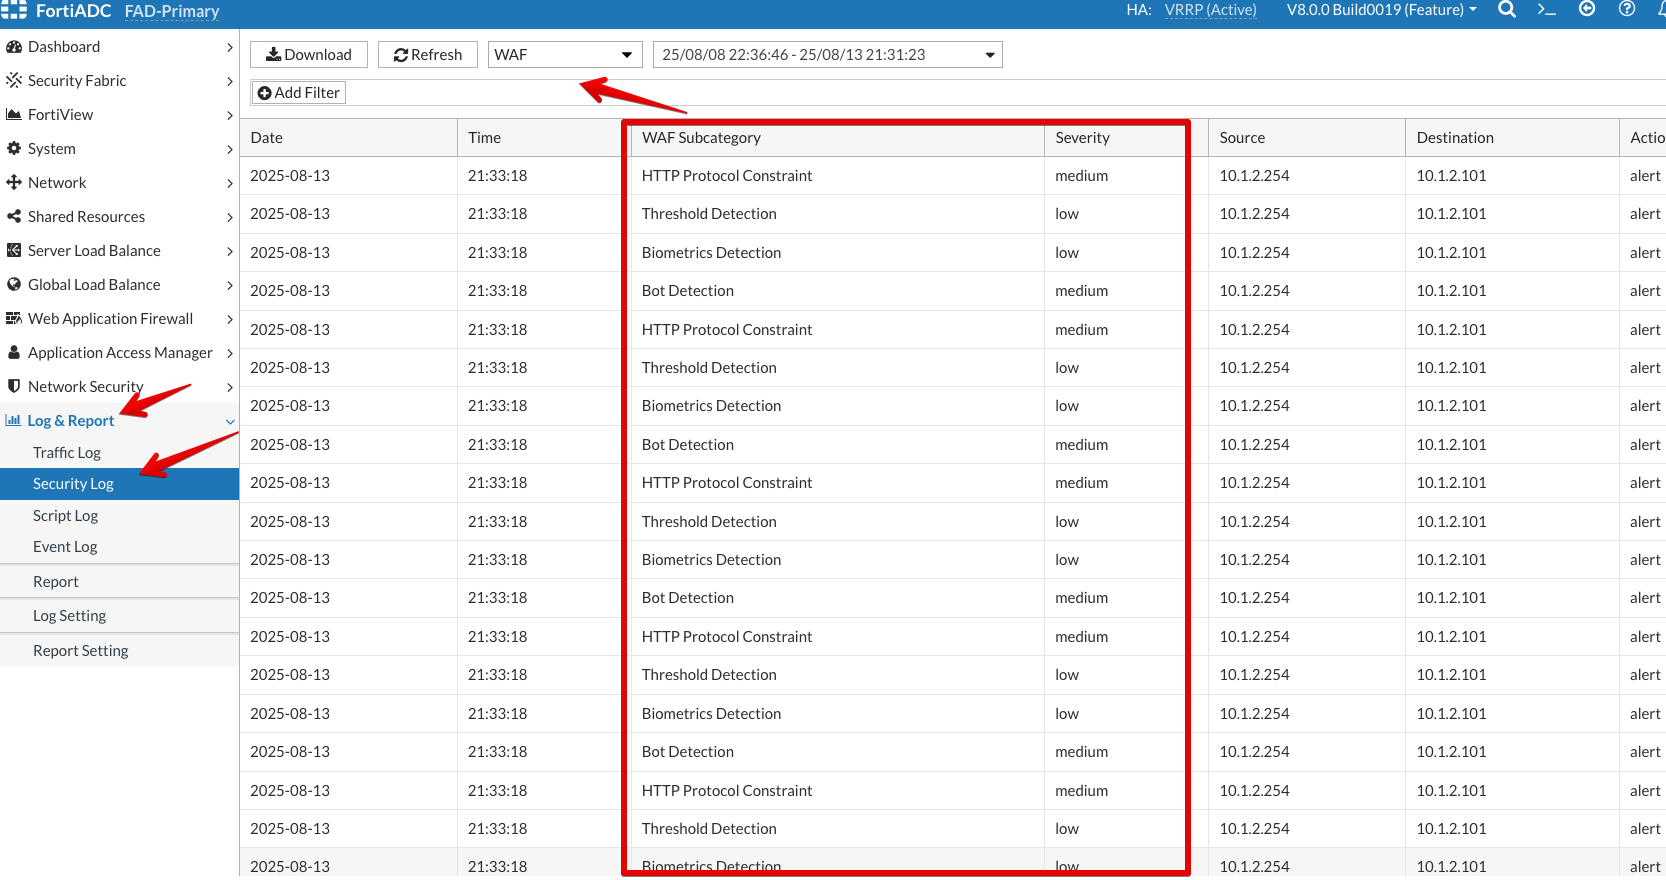
Login to the FortiADC (FAD-Primary) with the username xperts2025 and password AppSec-Xp3rts2025!
Go to Log & Report → Security Log. It will show all the Attacks coming in from the ZAP tool hitting the DVWA application behind the FortiADC.
Bot Mitigation
Bot Mitigation
For this section, we will focus on following Bot Mitigation modules of FortiADC’s Web Application Firewall to protect webservers from Bot automated attacks:
Configuring a Bot Detection Policy
Configuring a Threshold Based Detection Policy
Configuring a Biometrics Based Detection Policy
Configuring a Fingerprint Based Detection Policy
Configuring a Bot Detection Policy
Bot Detection policies employ signature based analysis and behavioral tracking to identify client traffic likely generated by automated bots rather than genuine human users. Legitimate bots, such as search engine crawlers, are classified as “good bots” because they perform essential search indexing operations, which can increase the visibility of your site to legitimate users.
Conversely, “bad bots” are known to generate malicious traffic that can compromise site availability and integrity. Examples of such activities include Distributed Denial of Service (DDoS) attacks and content scraping. To mitigate these threats, it is crucial to deploy effective bot mitigation strategies, such as IP reputation analysis, rate limiting, anomaly detection algorithms, and CAPTCHA challenges, to identify and block these harmful bots in real-time.
Login to the FortiADC (FAD-Primary) with the username xperts2025 and password AppSec-Xp3rts2025!
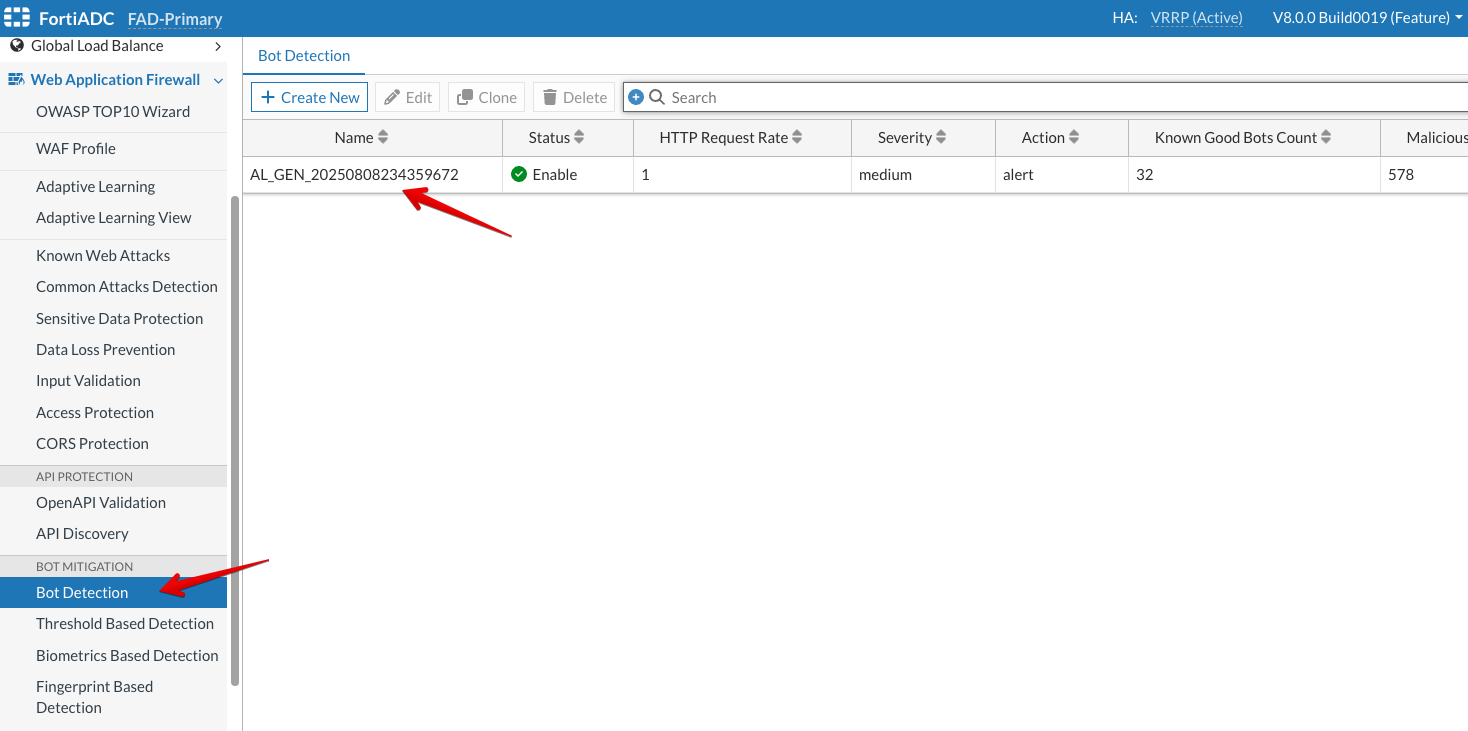
Go to Web Application Firewall → Bot Detection
You will notice that once we accepted the recommendations from Adaptive Learning, it was automatically added to Bot Detection module so we don’t need to create a new one.
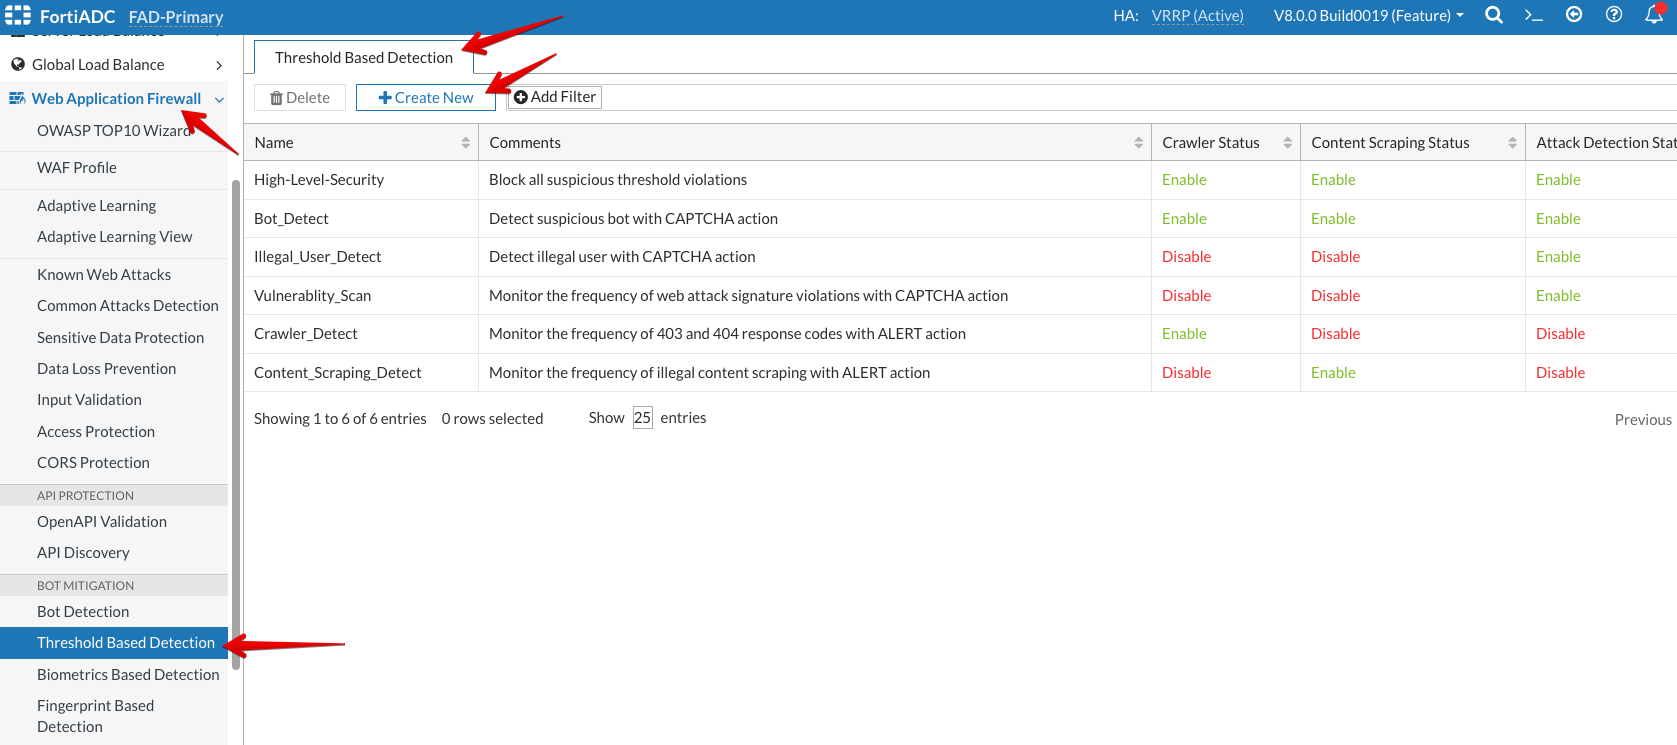
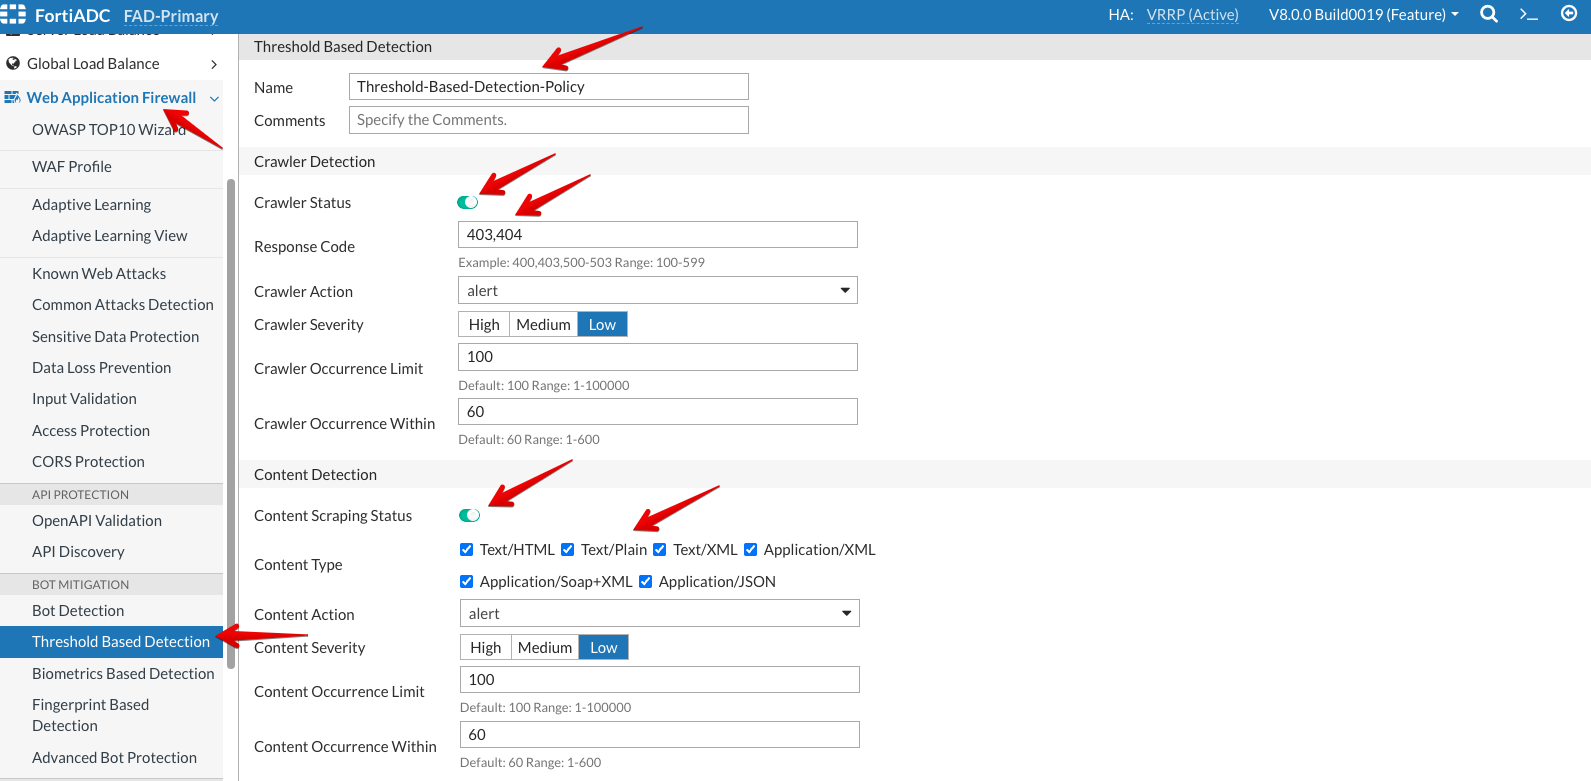
Configuring a Threshold Based Detection Policy
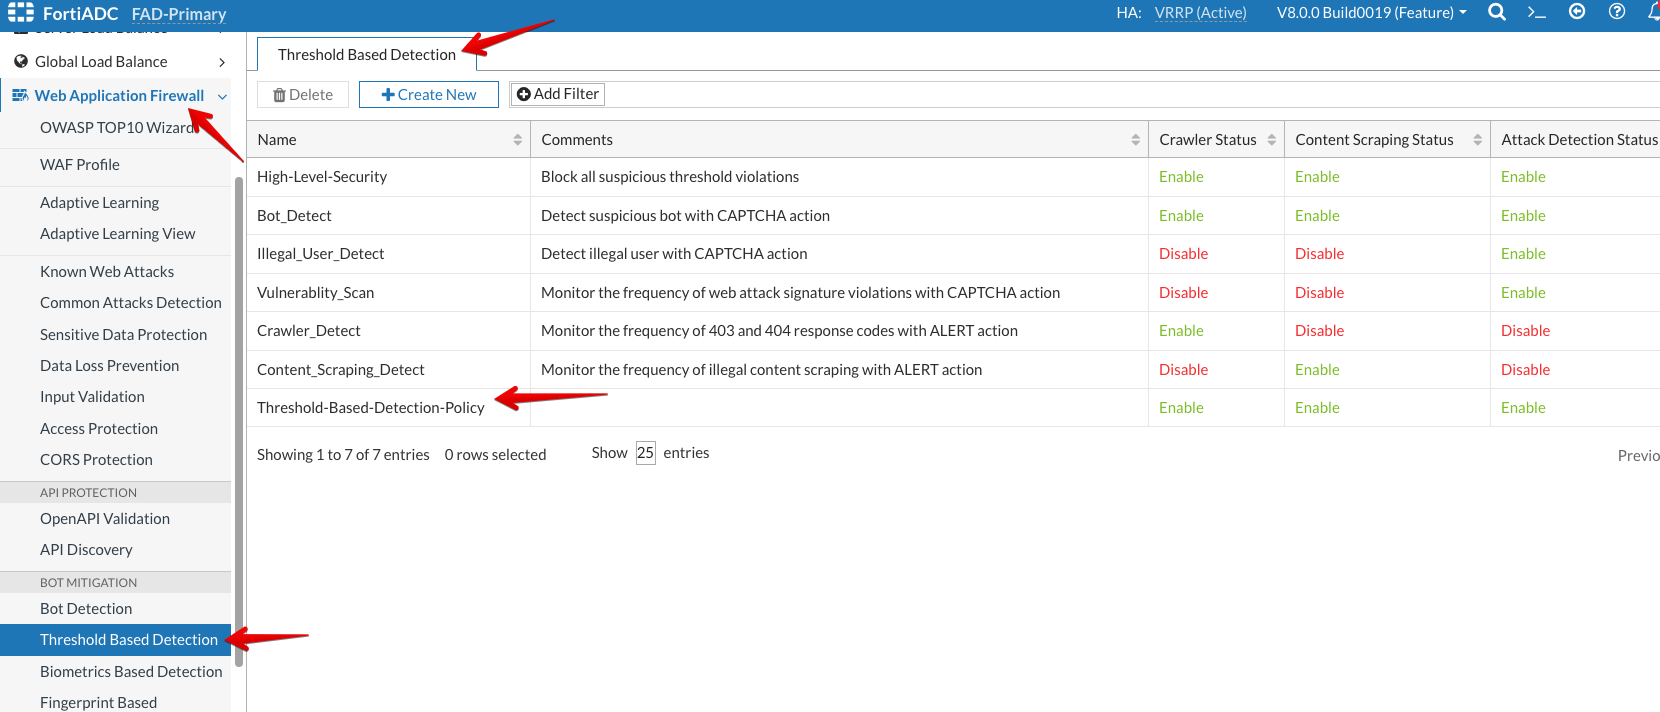
Go to Web Application Firewall → Threshold Based Detection policy
You will notice several policies which come default with the FortiADC. You can use these but you cannot customize them. So, we will create a new one below.
Click on +Create New
Name: Threshold-Based-Detection-Policy
Enable the toggle for Crawler Status
Response Code: 403,404
Keep everything default under Crawler Status
Enable the toggle for Content Scraping Status
Select all under Content Type
Keep everything default under Crawler Scraping Status
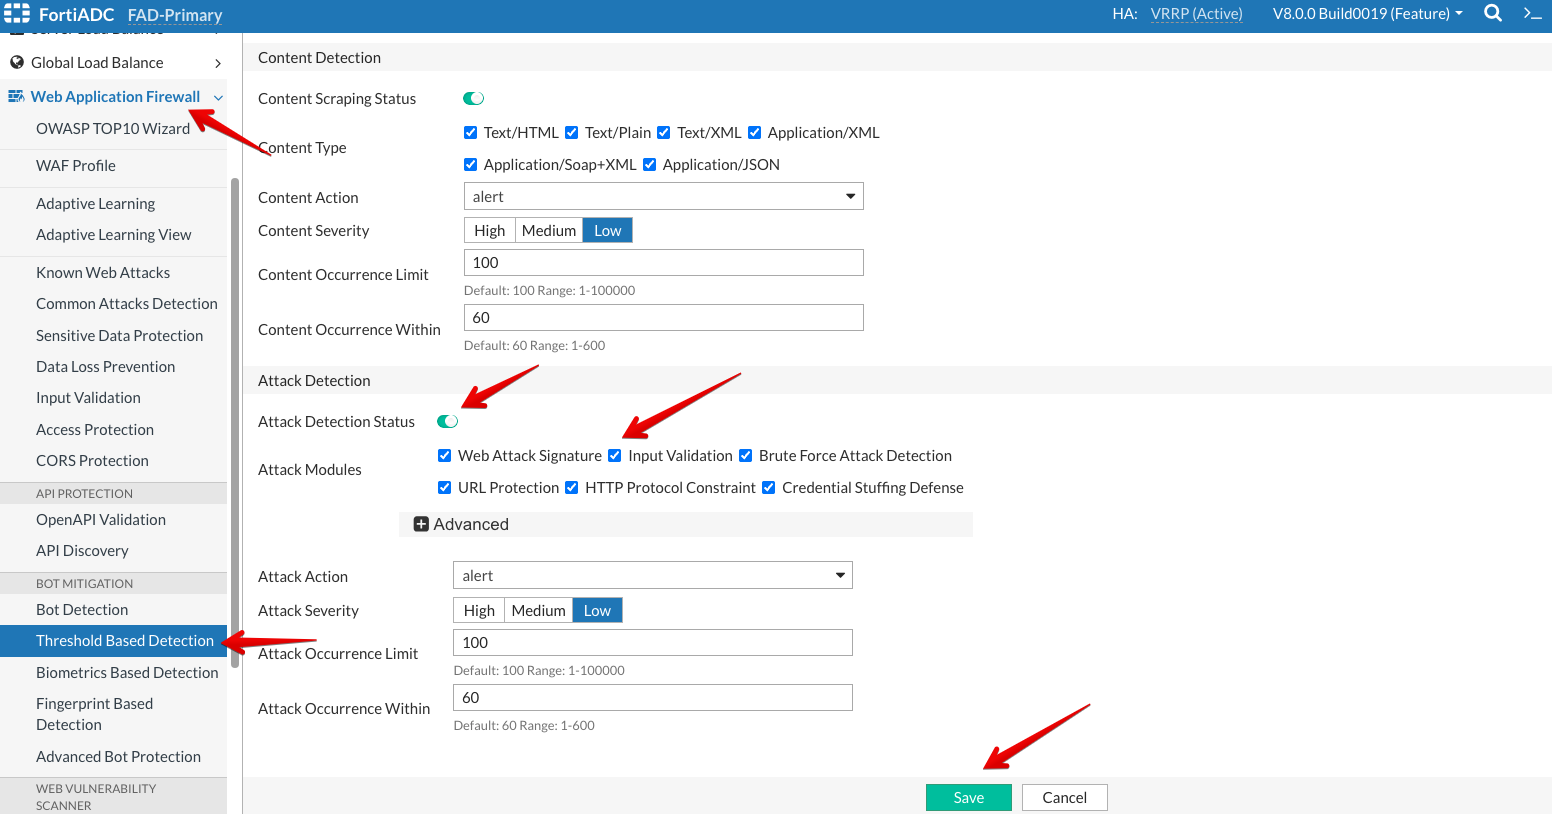
Enable the toggle for Attack Detection Status
Select all under Attack Modules
Keep everything default under Attack Detection
Click Save
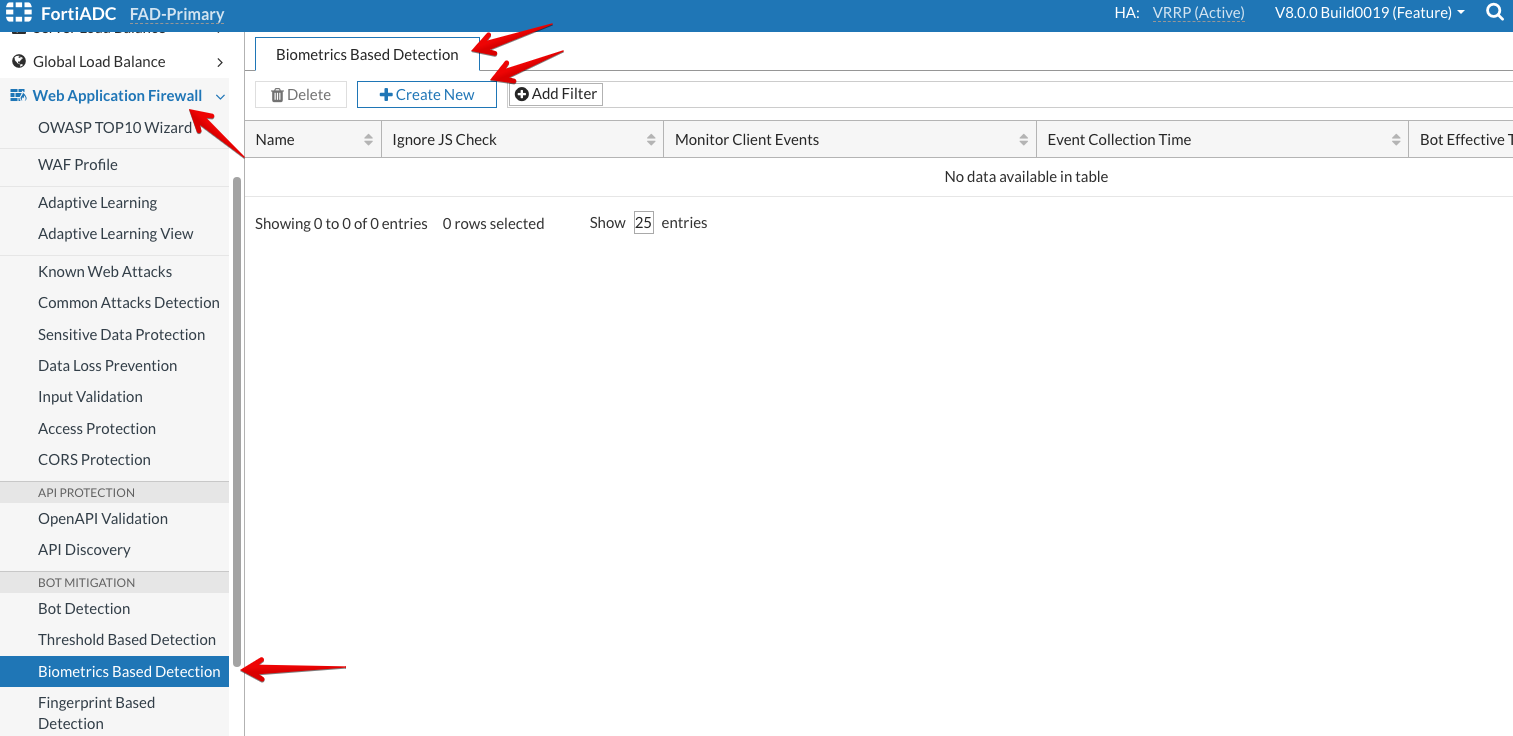
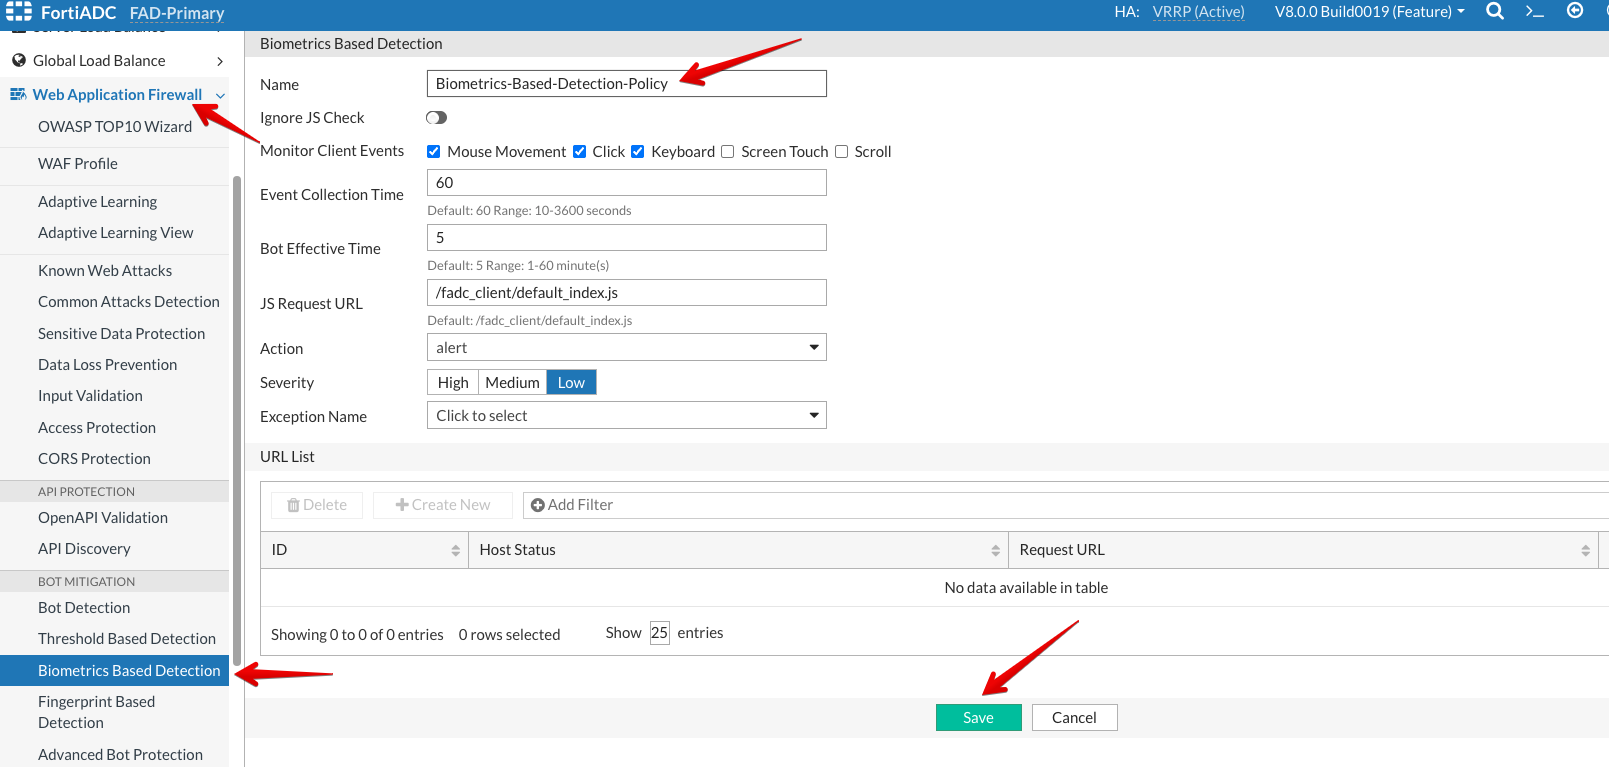
Configuring a Biometrics Based Detection Policy
Go to Web Application Firewall → Biometrics Based Detection
Click on +Create New
Name: Biometrics-Based-Detection-Policy
Keep everything default.
Click Save
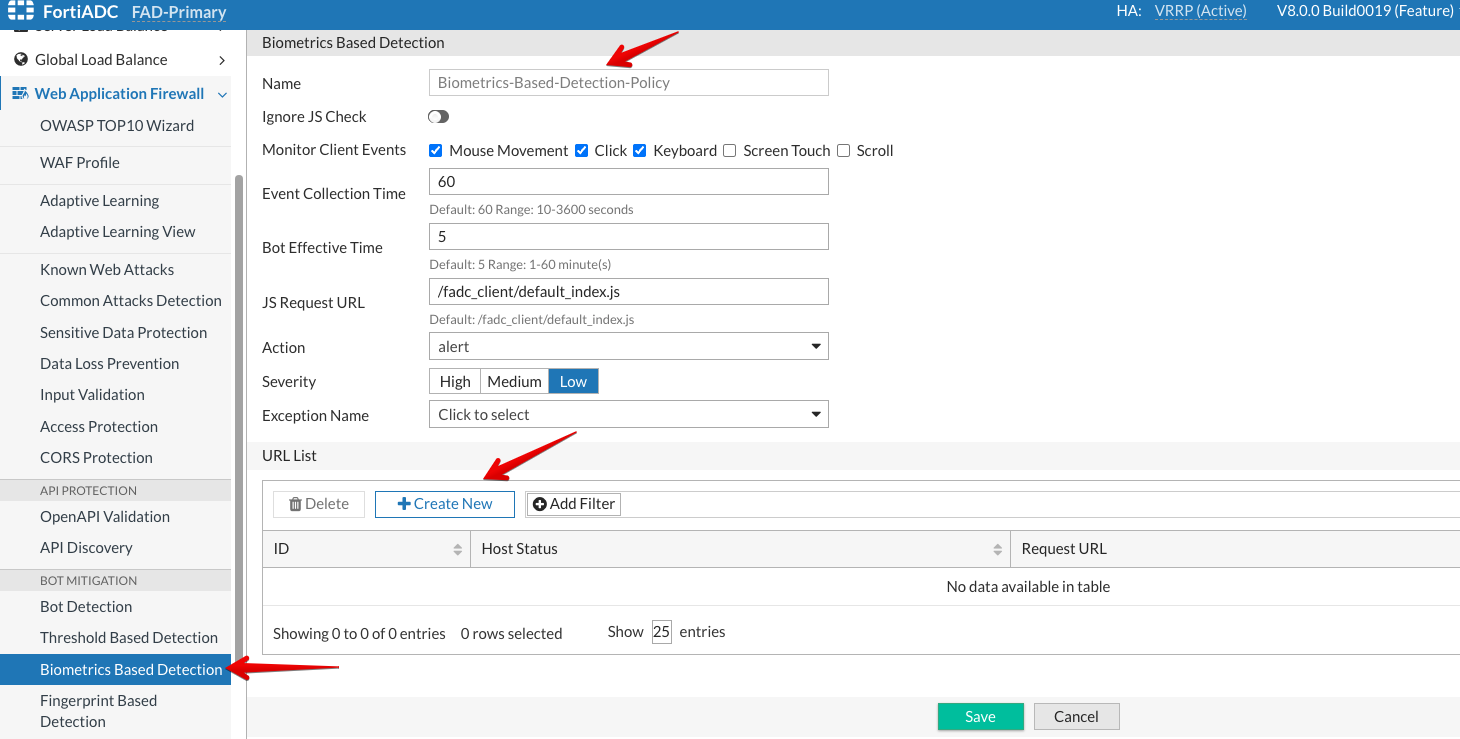
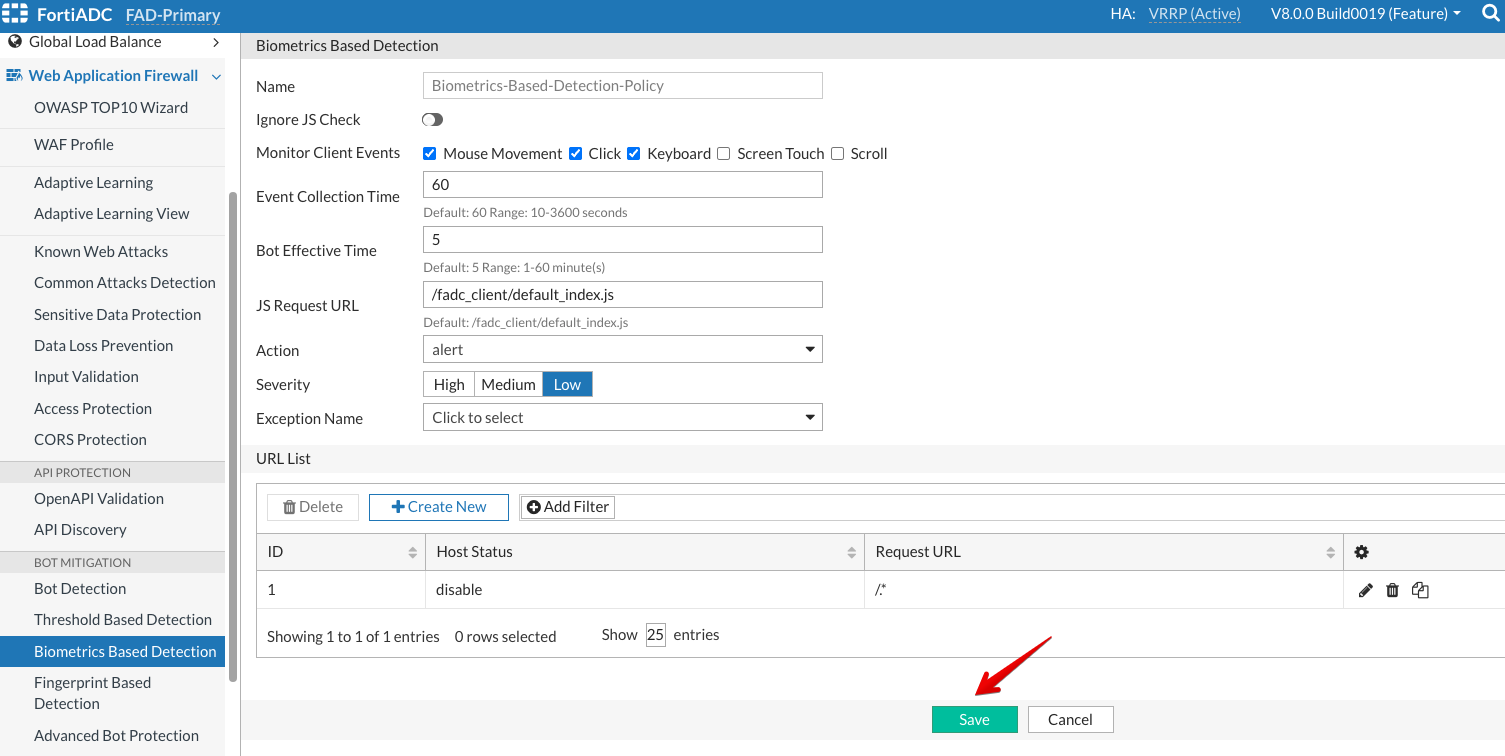
Click on +Create New
Under Request URL, type /.*
Click Save
Click Save once more.
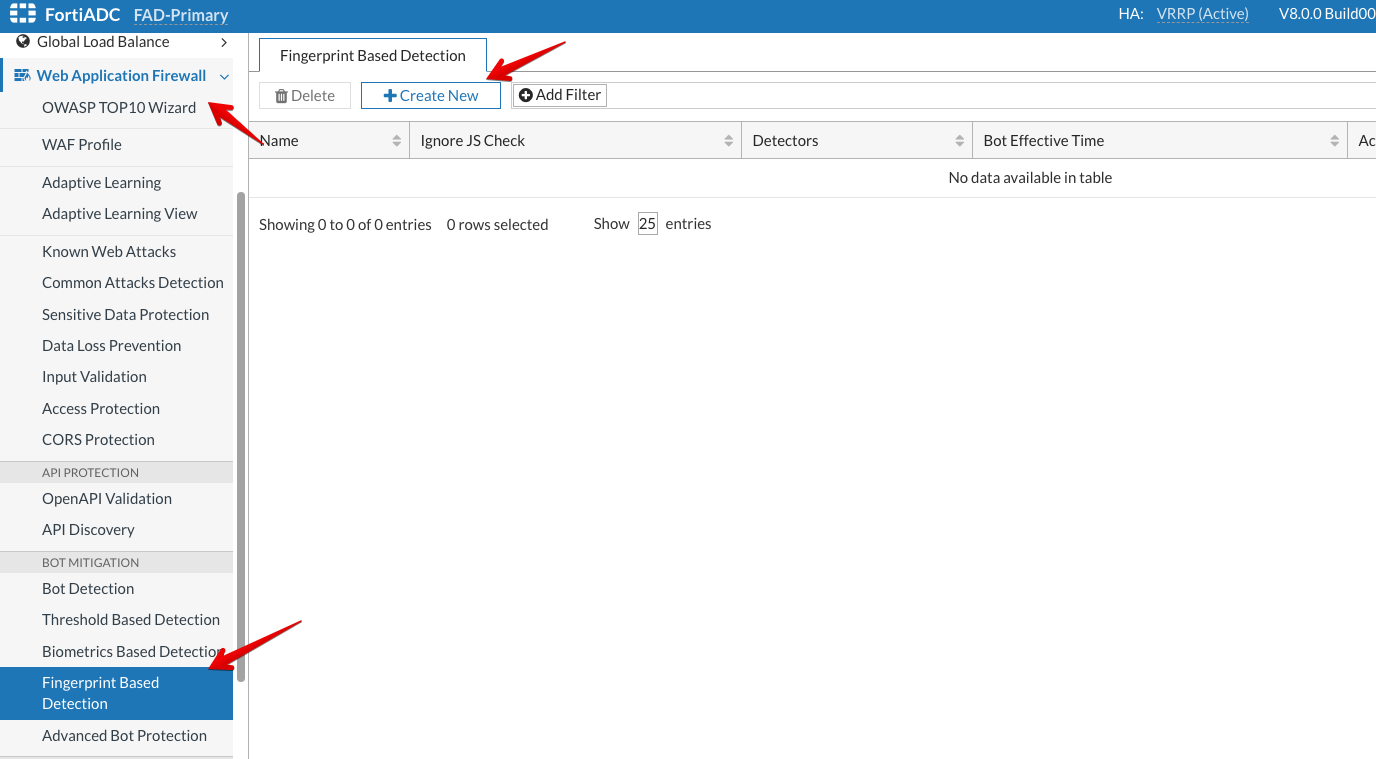
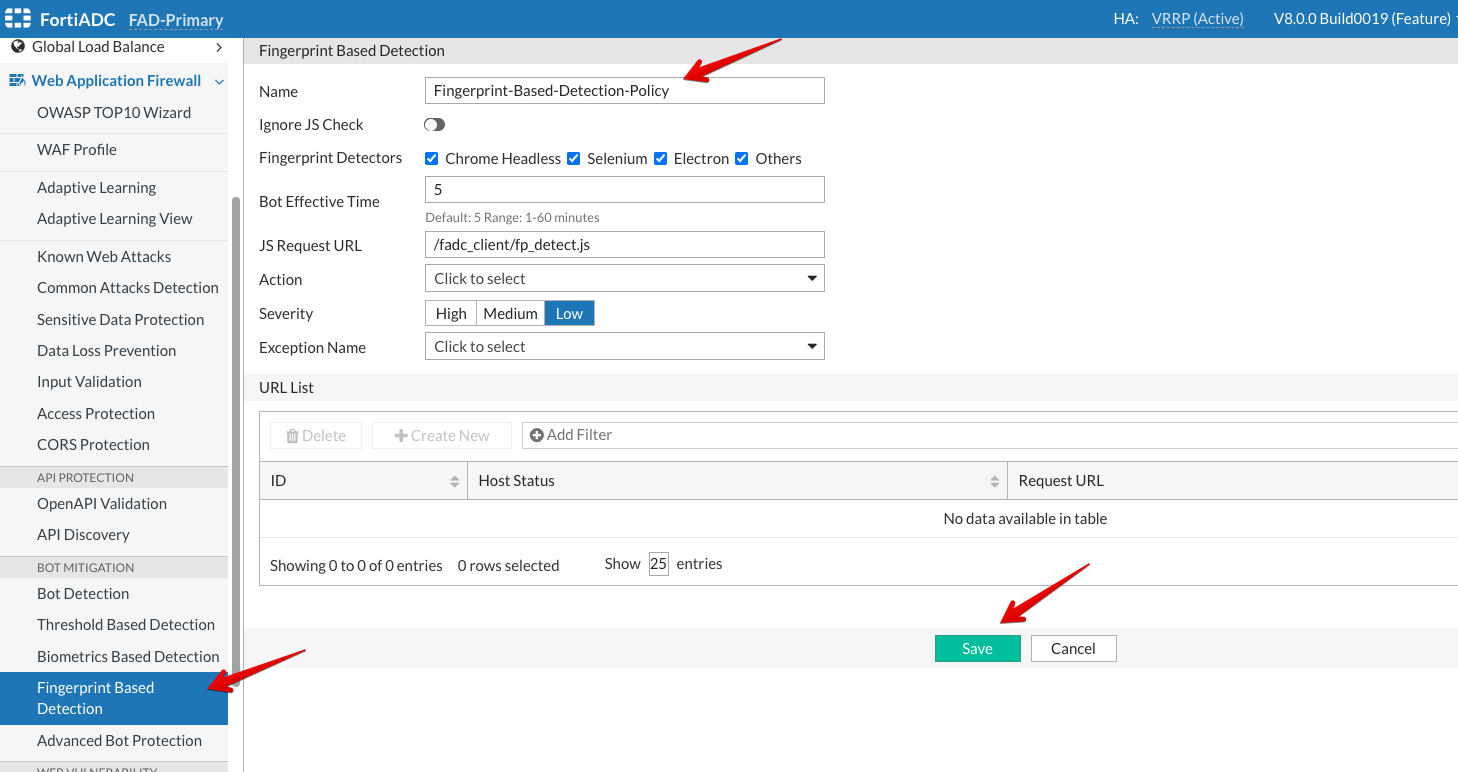
Configuring a Fingerprint Based Detection Policy
Go to Web Application Firewall → Fingerprint Based Detection Policy
Click on +Create New
Name: Fingerprint-Based-Detection-Policy
Keep everything default.
Click Save
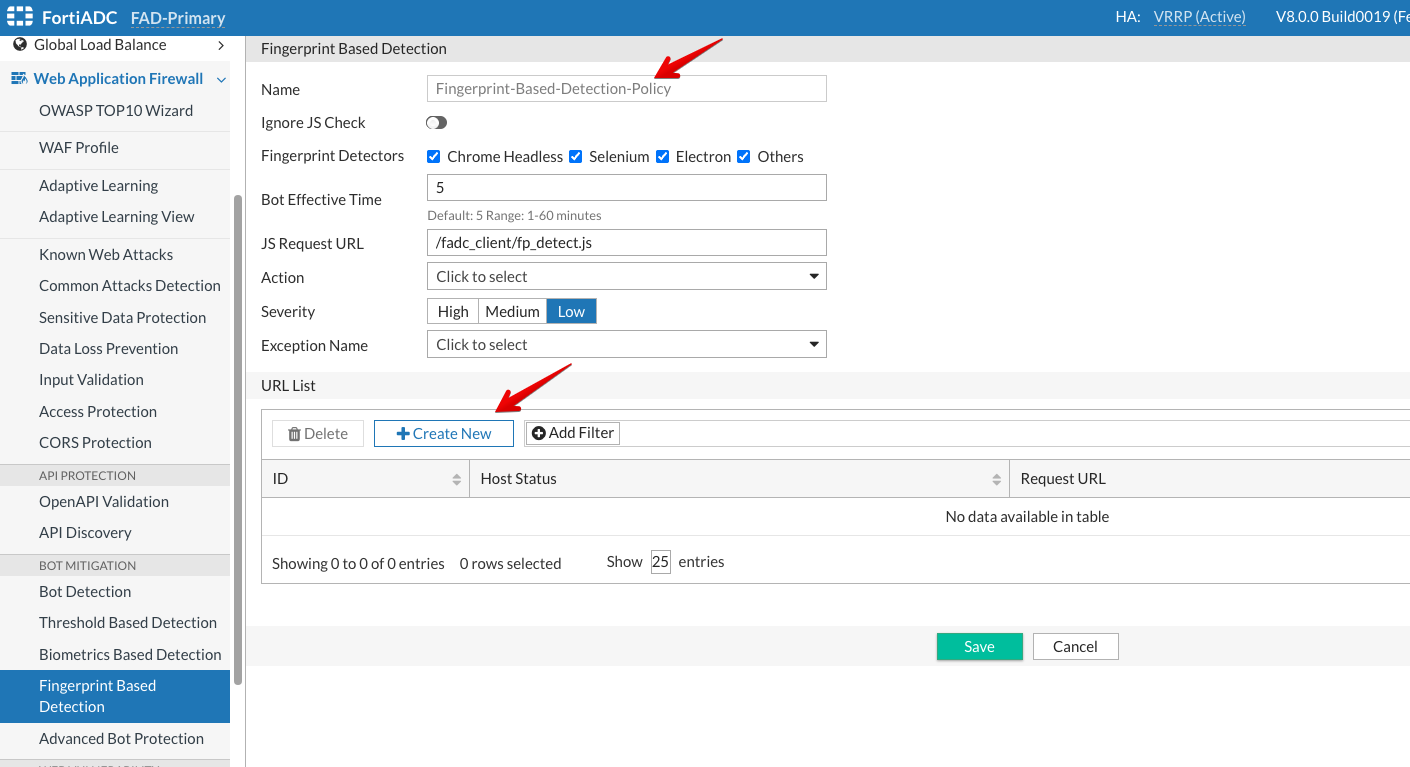
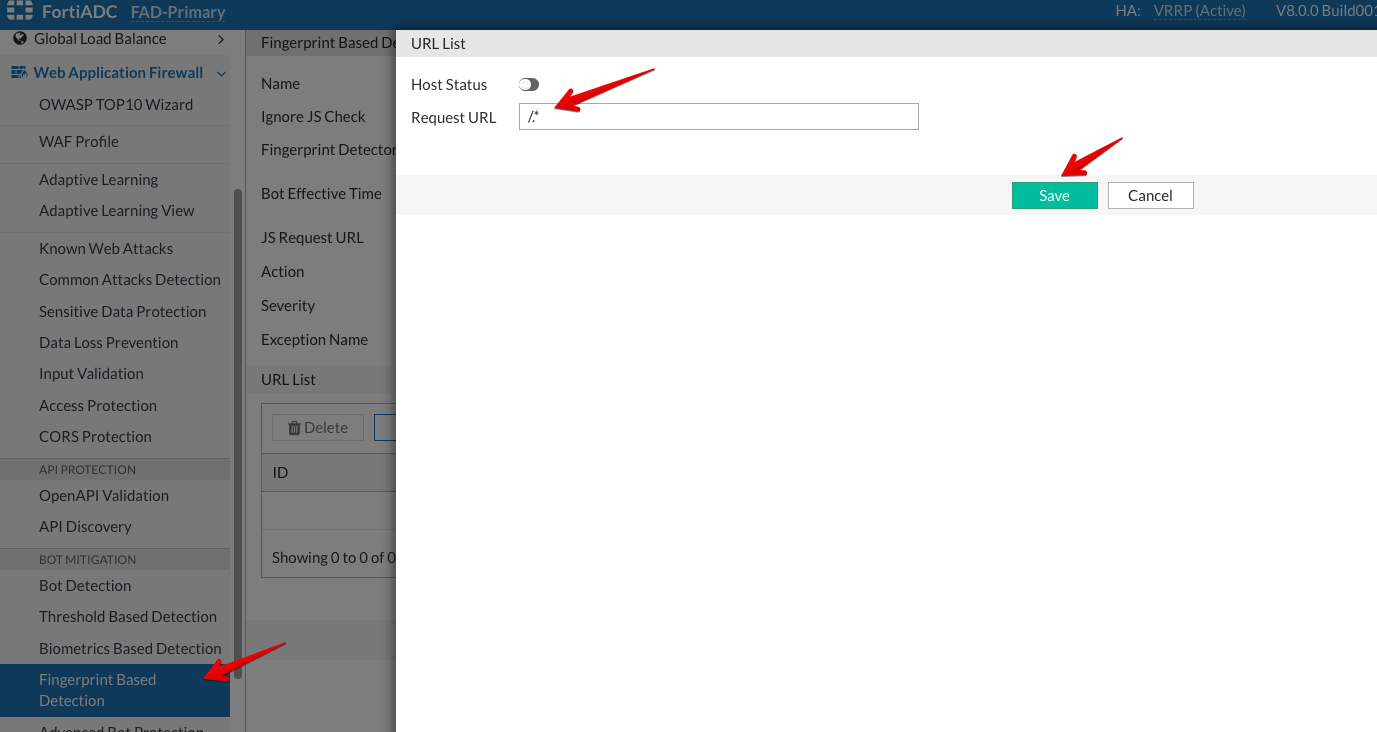
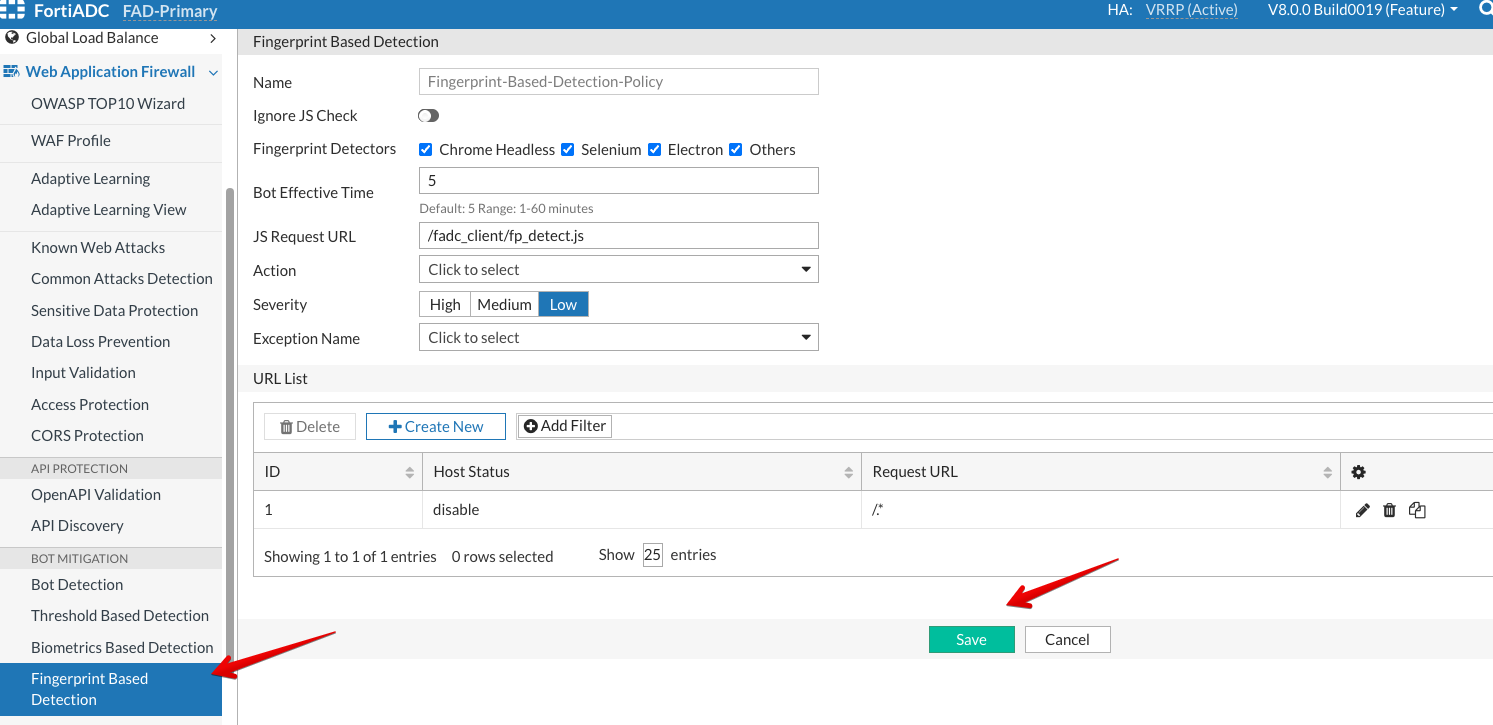
Click on +Create New
Under Request URL, type /.*
Click Save
Click Save once more.
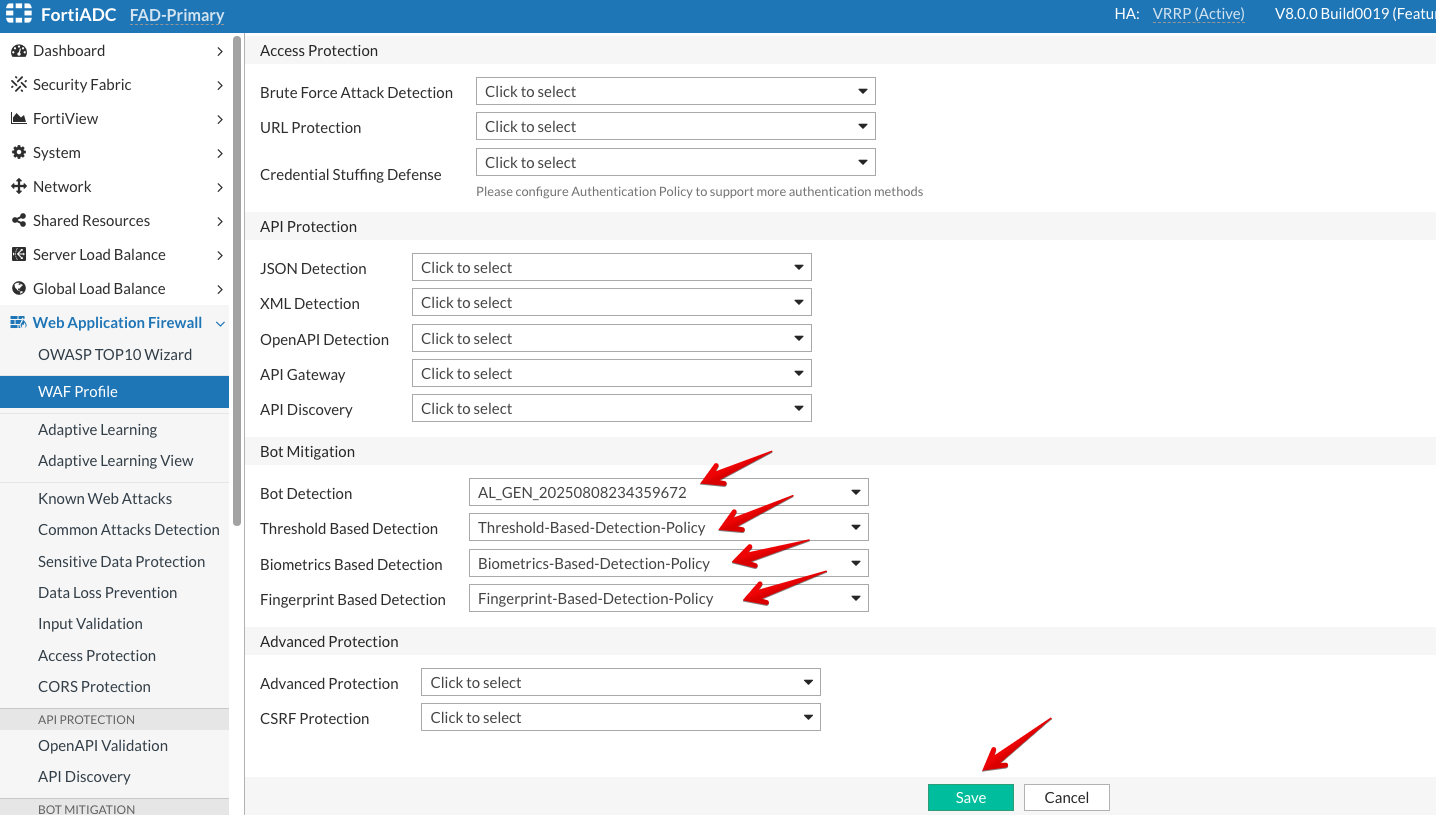
Configuring the DVWA WAF Profile with Bot Mitigation Modules
Now, we will add the Bot Mitigation Modules to the DVWA WAF Profile.
Double click DVWA
Select the highlighted Bot Mitigation modules from their respective dropdowns and click Save.
Application Access Gateway
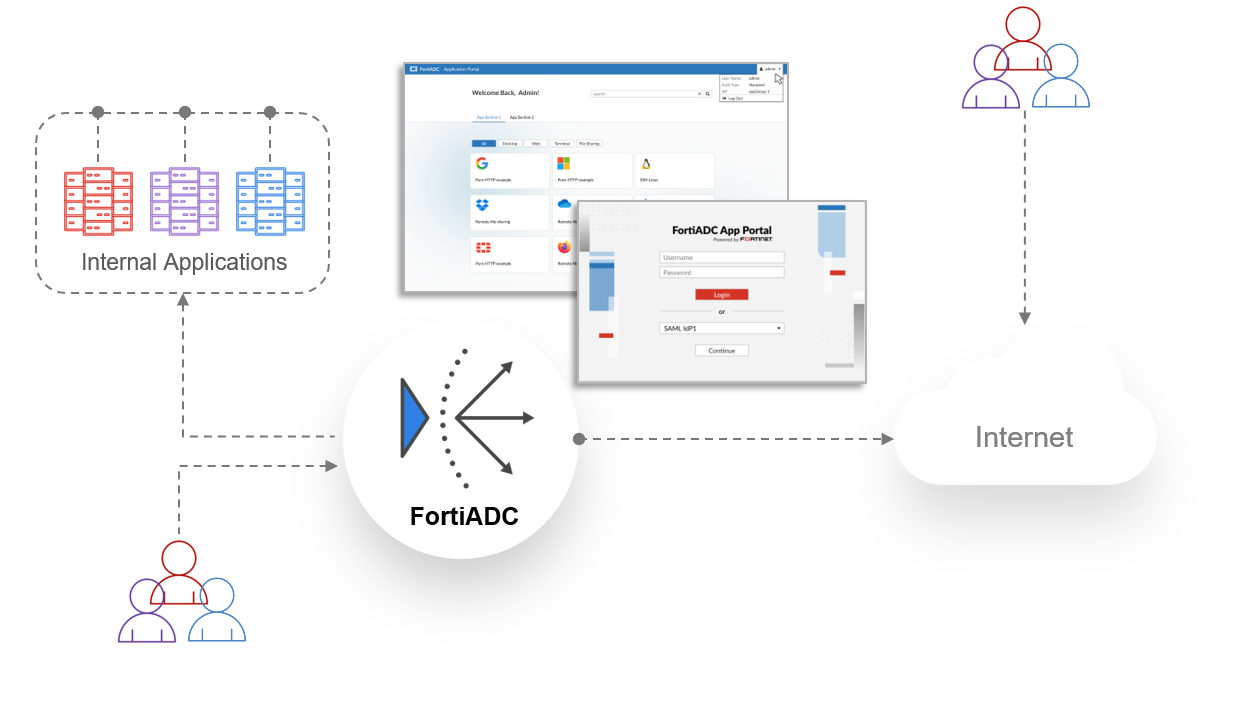
Application Access Gateway (AAG)
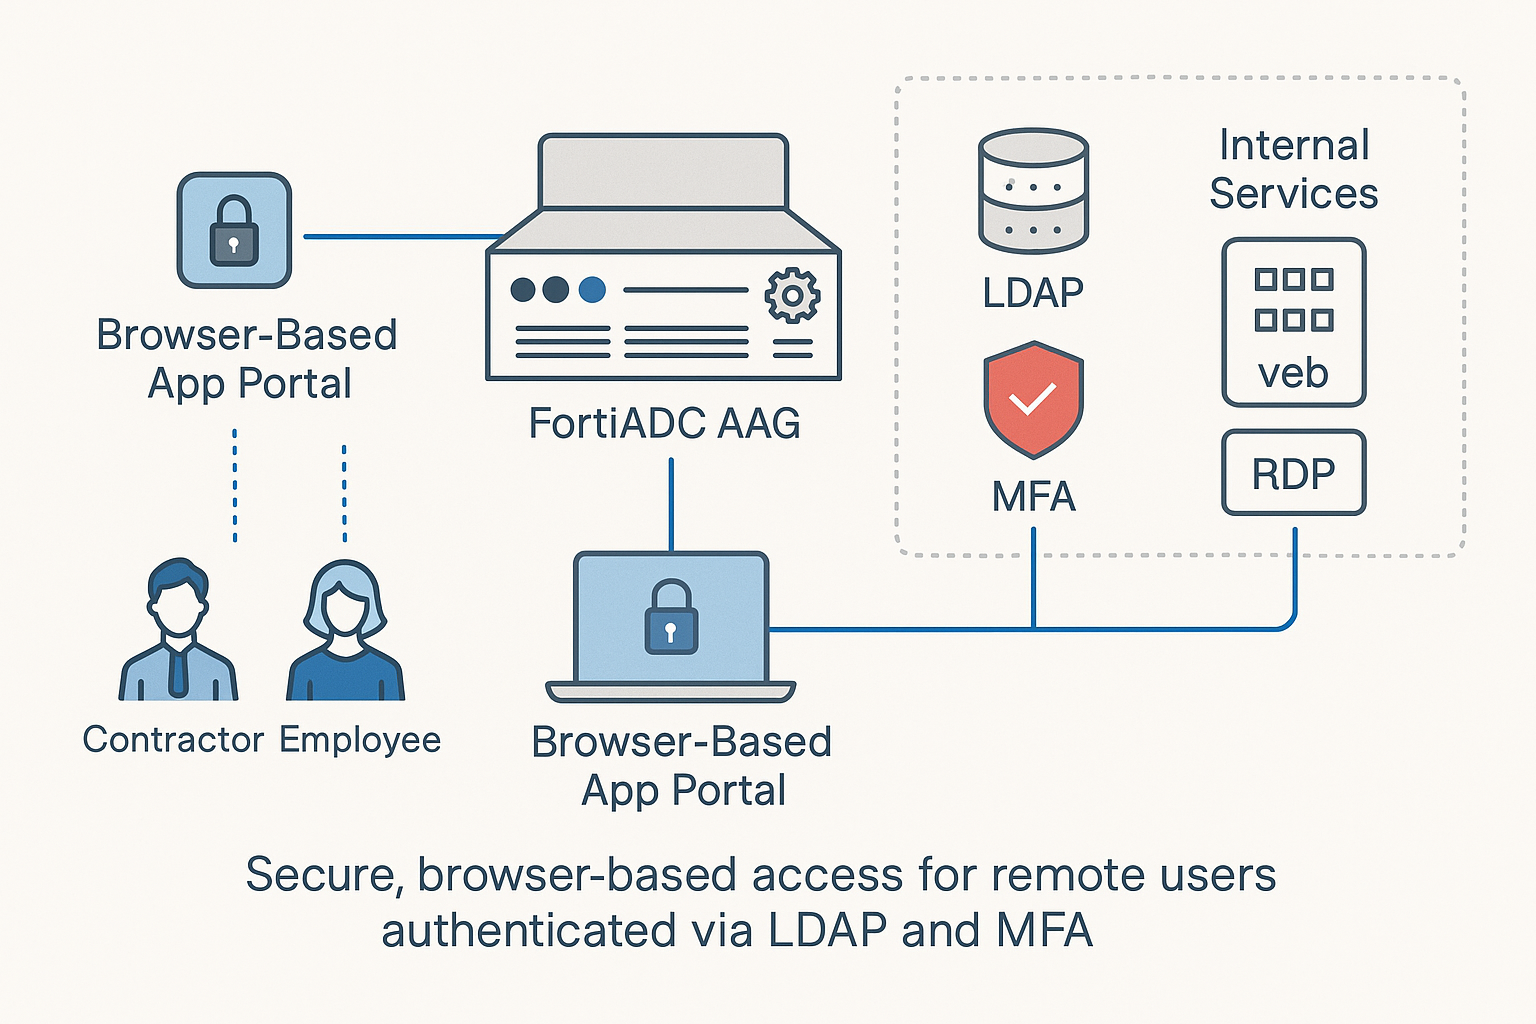
The Agentless Application Gateway (AAG) in FortiADC provides secure, seamless remote access to enterprise applications and critical resources without requiring agent installation on endpoints or backend servers. Acting as a reverse proxy, AAG publishes a web-based authentication portal that enables clientless access to Remote Desktop Protocol (RDP), Virtual Network Computing (VNC), Secure Shell (SSH), Telnet, and web applications.
Authentication to the AAG App Portal is enforced via Access Policies. These policies define the accepted authentication methods—including Local User, LDAP, RADIUS, or SAML—and determine session behavior such as idle timeout and reauthentication. Application visibility is controlled by App Portals and App Groups.
Key Features and Benefits
AAG in FortiADC delivers secure and scalable remote access with the following capabilities:
Agentless Access – Eliminates the need for client-side agents, reducing endpoint dependency and administrative burden.
Federated Authentication Support – Supports SAML 2.0-based authentication using providers like Microsoft Entra ID and FortiAuthenticator.
Simplified Deployment – Requires no software installation, enabling rapid implementation in secure environments.
Real-Time Monitoring – Tracks user sessions and access logs for compliance and auditing.
Application-Layer Security Controls – Enforces IP reputation filtering and geolocation restrictions through the Application Profile attached to the AAG Virtual Server.
Technical Overview
Traditional vs. Agentless Application Access
Traditional remote access solutions often require software agents installed on client devices or backend systems to enforce authentication and security policies. This introduces compatibility constraints, maintenance overhead, and security risks associated with unmanaged endpoints.
FortiADC’s Agentless Application Gateway (AAG) eliminates these dependencies by acting as a reverse proxy, terminating client sessions at the gateway and forwarding traffic to backend resources based on authentication and policy enforcement mechanisms.
Authentication Flow and Identity Integration
AAG supports the following authentication workflow:
The user accesses the AAG App Portal via browser.
FortiADC evaluates the Access Policy and enforces the configured authentication method by:
Validating credentials against Local User, LDAP, or RADIUS servers.
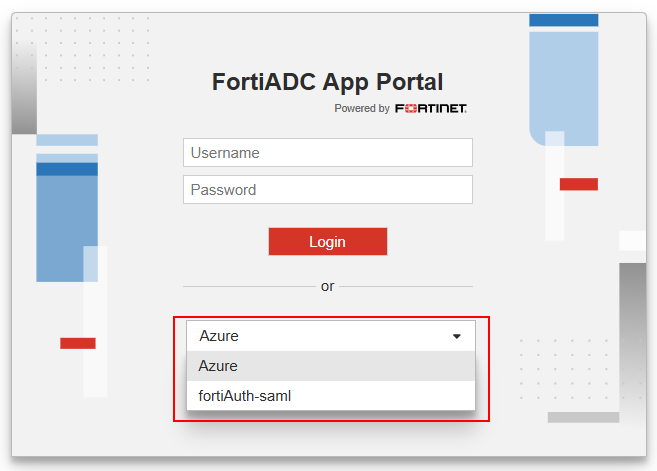
Redirecting to a SAML 2.0 Identity Provider (e.g., FortiAuthenticator, Microsoft Entra ID) for federated login.
Upon successful authentication, FortiADC grants access to the App Portal associated with the user’s session.
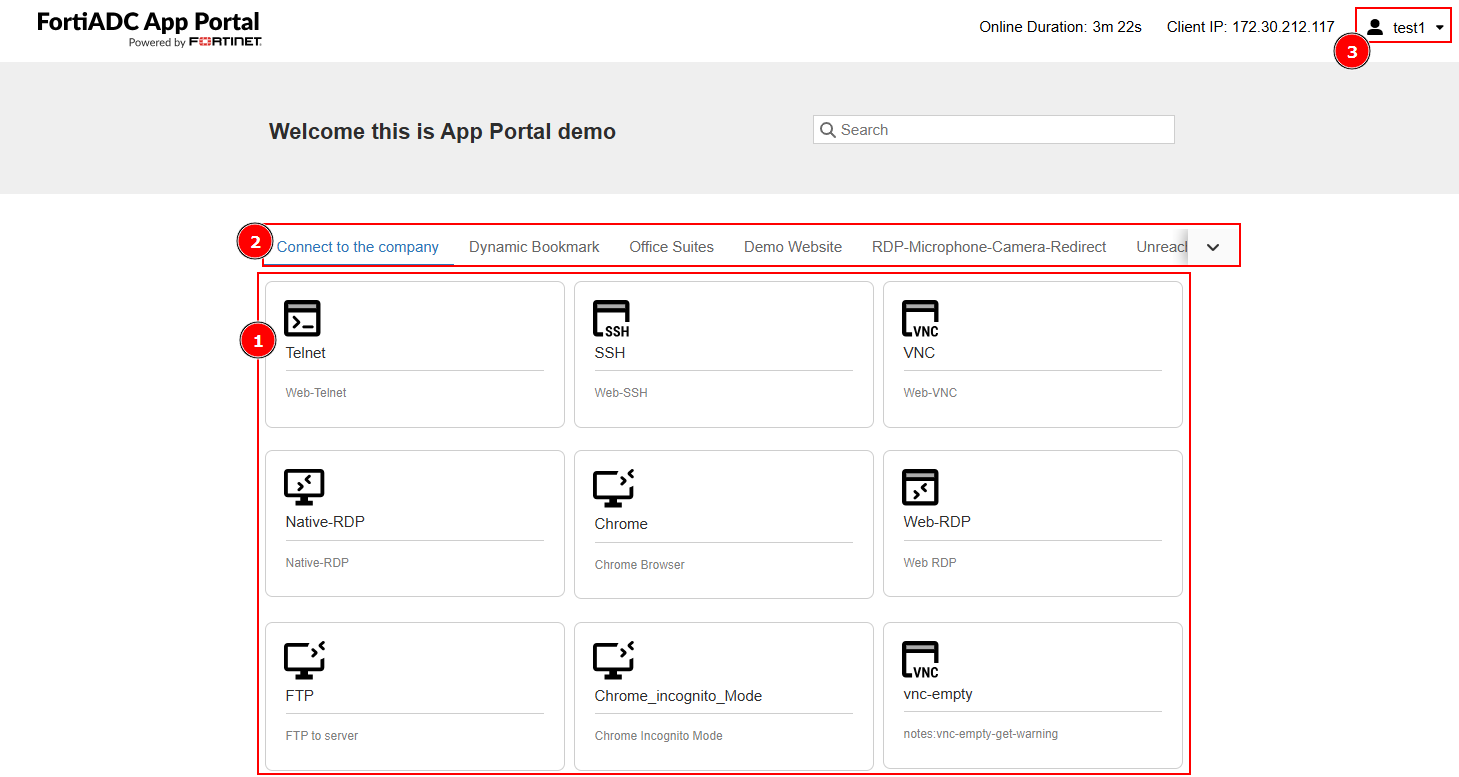
The user can view and launch their assigned application bookmarks for services such as RDP, SSH, VNC, Telnet, and web apps.
Multi-factor authentication (MFA), OAuth, and AD FS Proxy are not currently supported for AAG access.
Architecture and Components
AAG operates at Layer 7 as an SSL-terminating reverse proxy, inspecting client requests, performing authentication, and forwarding traffic to internal resources based on predefined access policies.
Client-SSL termination ensures encrypted client communication while enabling inspection and policy enforcement at the gateway.
Session persistence mechanisms maintain continuity for authenticated sessions.
Real-time logging and monitoring tracks user activity and enforces compliance requirements.
Control Plane Components
The control plane in AAG manages authentication, policy enforcement, session handling, and application publishing. It acts as the centralized management layer, integrating with identity providers (IdPs) and enforcing security policies based on user roles, device attributes, and contextual data. By decoupling authentication and access control from the data plane, the control plane ensures efficient session management while maintaining high security.
App Portal Virtual Server (L7 Reverse Proxy)
Handles user login, authentication enforcement, and session initiation.
Performs SSL termination and supports IPv4/IPv6.
Integrates with Access Policies and federated identity providers.
Authentication and Authorization Services
Supports local and remote identity verification through Access Policies.
Compatible with LDAP, RADIUS, and SAML IdPs (e.g., FortiAuthenticator, Microsoft Entra ID).
Application Portal and Bookmark Management
Hosts a centralized, web-based portal to give users access to published applications.
Supports dynamic bookmarks mapped via LDAP attributes for personalized access.
Data Plane Components
The data plane in AAG is responsible for handling user traffic, forwarding requests to backend applications, and enforcing security measures in real time. It processes encrypted sessions, inspects traffic for potential threats, and applies policy-based access controls. By managing the actual data exchange between users and applications, the data plane ensures that only authorized requests reach enterprise resources while maintaining performance and security.
Application Publishing and Session Management
Delivers HTML5-based clientless access for RDP, VNC, SSH, and Telnet.
Supports direct RDP and RemoteApp connections for seamless interaction.
Enforces RDP attribute-based policies to regulate session parameters.
Access Control and Security Enforcement
Enforces IP Reputation, Geo IP Blocklist, and Allowlist through Application Profiles.
Logs session details and access records for diagnostics and compliance.
This architecture ensures a scalable, policy-driven remote access solution while maintaining strong security controls.
AAG Configuration Components in FortiADC
The Agentless Application Gateway (AAG) configuration in FortiADC consists of two primary components: App Groups and App Portals. These components define how applications are published and accessed by authenticated users.
App Portal Configuration
An App Portal defines the web-based authentication interface where users log in and access applications. Each App Portal is associated with an App Group, controlling which applications are available to authenticated users.
Choosing the appropriate authentication method for FortiADC’s Agentless Application Gateway (AAG) is critical for securing access to applications while ensuring compatibility with existing identity management frameworks. This section provides a structured approach to determining the most suitable authentication mechanism based on user types, security policies, and infrastructure requirements.
Authentication Methods and Deployment Considerations
FortiADC supports multiple authentication mechanisms for AAG access, all enforced through Access Policies. Each authentication method is suited to specific deployment scenarios. The table below outlines the key characteristics of each method:
Authentication Method
Best Suited For
Key Advantages
Local User Authentication
Small-scale or standalone deployments without external authentication infrastructure
Self-contained user management with minimal configuration, allowing direct user administration within FortiADC
Remote User Authentication (LDAP, RADIUS)
Enterprises with centralized identity systems
Integration with Active Directory or RADIUS servers
SAML Authentication
Federated authentication across domains/clouds
Seamless login experience via trusted Identity Providers (IdPs), including FortiAuthenticator and Microsoft Entra ID
Multi-factor authentication (MFA) is not currently supported in the initial AAG release. Although FortiADC supports MFA in general access policies, these features are not enforced at the AAG App Portal level.
Authentication Deployment Considerations
Local User Authentication
Local user accounts are defined and stored directly on FortiADC. This method is suitable for small deployments or administrative access when external identity systems are unavailable. Local users can be assigned to User Groups and linked to App Portals via Access Policies.
Pros: Simple configuration, independent of external systems
AAG integrates with LDAP directories (e.g., Microsoft Active Directory) and RADIUS servers to authenticate users based on corporate credentials. This allows centralized user account management and simplifies integration into existing identity infrastructures.
Supports: Secure credential validation, dynamic group mapping
Does not support: MFA enforcement for AAG App Portal access
SAML is the preferred method for organizations using federated identity platforms such as FortiAuthenticator or Microsoft Entra ID (formerly Azure AD). FortiADC acts as a SAML 2.0 Service Provider (SP), redirecting authentication requests to the Identity Provider (IdP).
Benefits:
Centralized authentication and single sign-on (SSO)
Passwordless experience through external IdP
Support for cross-domain identity federation
Aligning Authentication with Security Policies
Authentication settings should be configured in conjunction with FortiADC’s access control policies, session management rules, and logging mechanisms to ensure a secure and compliant deployment.
By selecting an appropriate authentication method—such as Local User, LDAP, RADIUS, or SAML—and integrating with centralized identity services where applicable, organizations can strengthen authentication workflows and improve user experience in their AAG deployments.
Configuring an App Group
Configuring an App Group
An App Group is a logical container that organizes application bookmarks—each representing a backend resource such as an RDP host, SSH server, or internal web application. App Groups are assigned to App Portals, which define the user-facing interface through which authenticated users access their authorized applications.
Each App Group can contain bookmarks of various types (Web, RDP, SSH, VNC, etc.), and users accessing a given App Portal will only see the applications associated with its linked App Groups.
To create an App Group:
Navigate to Application Access Manager > Agentless Application Gateway.
The configuration page displays the App Portal tab.
Click the App Group tab.
Click Create New to display the configuration editor.
In the Name field, specify a unique name for the App Group configuration object. Valid characters are A-Z, a-z, 0-9, _, and -. No space is allowed.
Click Save.
Once the App Group is created, the App Bookmark section becomes configurable.
Each VDOM supports up to 1024 App Groups, but a single App Portal can be associated with a maximum of 32 App Groups.
App Bookmark Configuration Overview
The App Bookmark configuration workflow is entirely dependent on the specific protocol. Each App Bookmark within an App Group is configured with application-specific parameters to ensure optimal access control and user experience. Once configured, an App Group can be added to an App Portal, making the applications available to authenticated users. The steps below outline the basic workflow to configure an App Bookmark.
Go to Application Access Manager > Agentless Application Gateway
The configuration page displays the App Portal tab.
Click the App Group tab.
Create a new App Group or edit an existing configuration.
Under the App Bookmark section, click Create New to display the configuration editor.
In the Name field, specify a unique name for the App Bookmark configuration object. Valid characters are A-Z, a-z, 0-9, _, and -. No space is allowed.
From the Type field, select an application from the drop-down menu. This selection determines the parameters to configure. To view the configuration parameters for each application, see App Bookmark Types where you can navigate to the desired application type.
Click Save to save the configuration.
Repeat the steps to add up to 256 Bookmarks per App Group.
App Bookmark Types
Each App Bookmark Type requires specific parameters to be configured. The following table lists the supported Types and their usage. Use the links under the Application Type column to navigate to the configuration parameters applicable to each App Bookmark Type.
Application Type
Usage
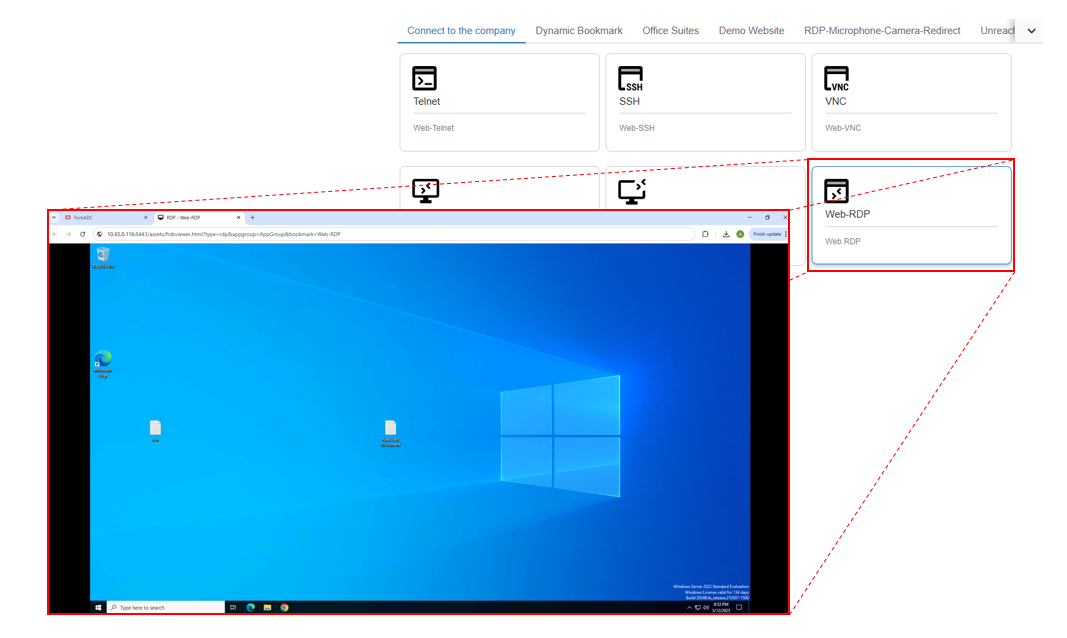
Web RDP
Provides web-based remote desktop access via an HTML5 client, eliminating the need for an RDP client on the user’s device.
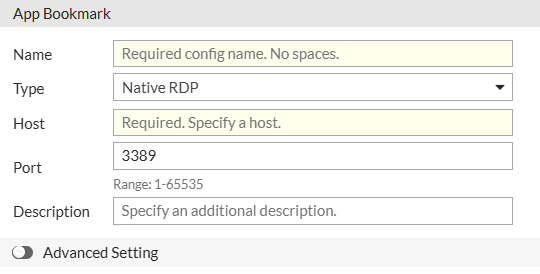
Native RDP
Establishes a direct connection to an RDP server, requiring an installed RDP client on the user’s device.
Remote App
Enables access to specific Windows applications over RDP without exposing the full desktop session.
Allows command-line access to remote Linux or Unix servers via a secure, browser-based SSH session.
Web Telnet
Provides browser-based access to Telnet-enabled devices for legacy terminal access.
Note: For application types that require login credentials—such as RDP, VNC, and SSH—you must specify a username and password within the App Group configuration. When cloning an App Group, all passwords are automatically cleared and must be re-entered manually to maintain secure handling.
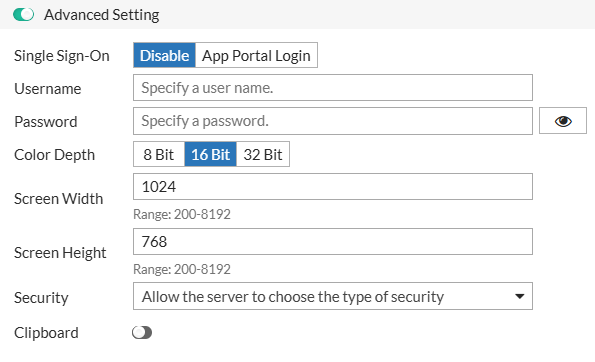
Web RDP
Web RDP (Remote Desktop Protocol) provides web-based access to a remote Windows desktop session without requiring an RDP client. It allows users to connect to Windows systems securely through their browser, making it ideal for remote administration, virtual desktop access, and troubleshooting.
Parameter
Description
Host
The IP address or hostname of the target Windows machine.
Port
The port used for the RDP connection (default: 3389, range: 1-65535).
Description
Optional description for the Web RDP bookmark.
Advanced Settings
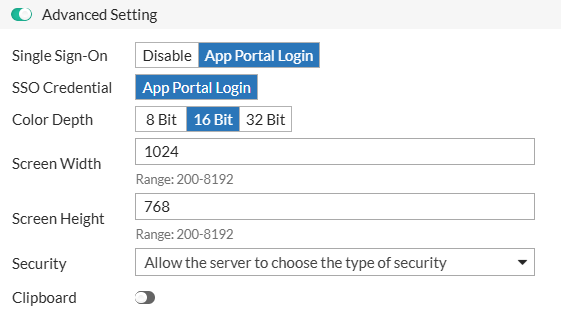
Single Sign-On
Determines whether Single Sign-On is used.
- Disable (default) — manual login required. You will need to set the Username and Password for this login.
- App Portal Login — uses portal credentials.
Username
The username for authentication when Single Sign-On is disabled.
Password
The password for authentication when Single Sign-On is disabled.
SSO Credential
Appears when Single Sign-On is set to App Portal Login. The SSO Credential is set to use the App Portal Login by default.
Color Depth
Sets the color depth for the remote session.
- 8 Bit
- 16 Bit (Default)
- 32 Bit
Screen Width
Specifies the width of the remote session display (default: 1024, range: 200-8192).
Screen Height
Specifies the height of the remote session display (default: 768, range: 200-8192).
Security
Defines the security protocol for the RDP session.
- Allow the server to choose the type of security – Uses the server’s configured security settings. This is the default option.
- Standard RDP security – Uses legacy RDP encryption.
- Network level authentication – Requires authentication before establishing the RDP session.
- TLS encryption – Uses Transport Layer Security (TLS) for encrypted communication.
Clipboard
Enables or disables clipboard sharing between the remote session and the local machine.
Native RDP
Native RDP allows users to launch a full remote desktop session using an installed RDP client. Unlike Web RDP, which runs in a browser, Native RDP opens the session in the system’s RDP client, providing a more responsive experience and leveraging full client-side capabilities, including peripheral redirection, multiple monitor support, and enhanced performance.
Parameter
Description
Host
The IP address or hostname of the target Windows machine.
Port
The port used for the RDP connection (default: 3389, range: 1-65535).
Description
Optional description for the Native RDP bookmark.
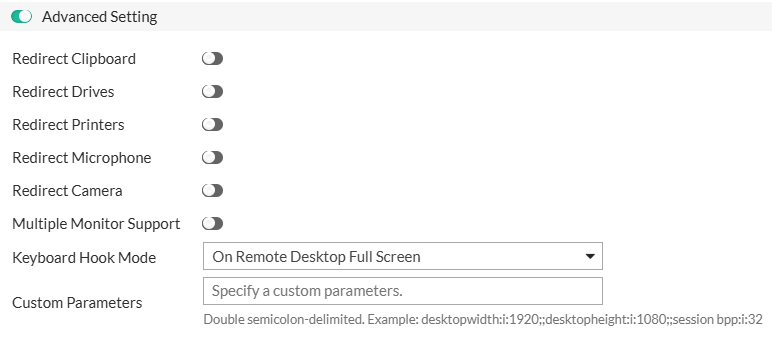
Advanced Settings
Redirect Clipboard
Allows clipboard sharing between the remote and local machine.
Redirect Drives
Enables access to local drives within the remote session.
Redirect Printers
Allows remote access to local printers.
Redirect Microphone
Enables microphone redirection for remote audio input.
Redirect Camera
Enables camera redirection for video conferencing applications.
Multiple Monitor Support
Allows the remote session to span multiple monitors.
Keyboard Hook Mode
Defines how keyboard shortcuts (e.g., Alt+Tab) are handled in the session.
- On Local – Keyboard shortcuts remain on the local machine.
- On Remote Desktop Focus – Shortcuts apply to the remote session only when it is the active window.
- On Remote Desktop Full Screen – Shortcuts apply to the remote session only when in full-screen mode. This is the default option.
- On Remote App Focus – Shortcuts apply to the remote application window, not the full desktop session.
Custom Parameters
Additional RDP client parameters for advanced configurations.
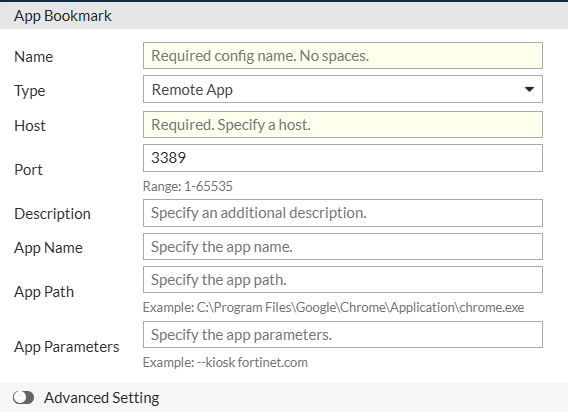
RemoteApp
RemoteApp provides access to specific applications hosted on a remote Windows server without opening a full remote desktop session. Unlike Web RDP, which grants access to the entire remote desktop environment, RemoteApp launches only the selected application in a separate window, making it appear as if it is running locally on the user’s device. This approach enhances security by restricting access to only approved applications and improves the user experience by integrating remote applications seamlessly into the local desktop environment.
Note: When publishing RemoteApp bookmarks
Privacy and security settings, such as camera redirection, must be properly configured on the RDP session host.
Redirect-printer support requires that the appropriate printer driver is installed on the RDP server before use.
Parameter
Description
Host
The IP address or hostname of the RemoteApp server.
Port
The port used for the RemoteApp connection (default: 3389, range: 1-65535).
Description
Optional description for the RemoteApp bookmark.
App Name
The display name of the RemoteApp application.
App Path
The full path to the executable of the RemoteApp.
App Parameters
Additional command-line arguments for the RemoteApp.
Advanced Settings
Redirect Clipboard
Allows clipboard sharing between the remote and local machine.
Redirect Drives
Enables access to local drives within the RemoteApp session.
Redirect Printers
Allows remote access to local printers.
Redirect Microphone
Enables microphone redirection for remote audio input.
Redirect Camera
Enables camera redirection for video conferencing applications.
Multiple Monitor Support
Allows the RemoteApp session to span multiple monitors.
Keyboard Hook Mode
Defines how keyboard shortcuts (e.g., Alt+Tab) are handled in the session.
- On Local – Keyboard shortcuts remain on the local machine.
- On Remote Desktop Focus – Shortcuts apply to the remote session only when it is the active window.
- On Remote Desktop Full Screen – Shortcuts apply to the remote session only when in full-screen mode. This is the default option.
- On Remote App Focus – Shortcuts apply to the remote application window, not the full desktop session.
Custom Parameters
Additional RDP client parameters for advanced configurations.
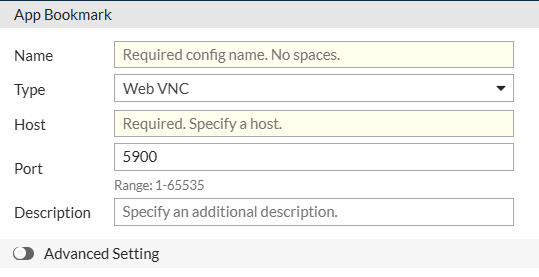
Web VNC
Web VNC (Virtual Network Computing) enables web-based remote access to graphical desktops on Linux, macOS, and other VNC-compatible systems. It is commonly used for remote system administration and technical support.
Parameter
Description
Host
The IP address or hostname of the VNC server.
Port
The port used for the VNC connection (default: 5900, range: 1-65535).
Description
Optional description for the Web VNC bookmark.
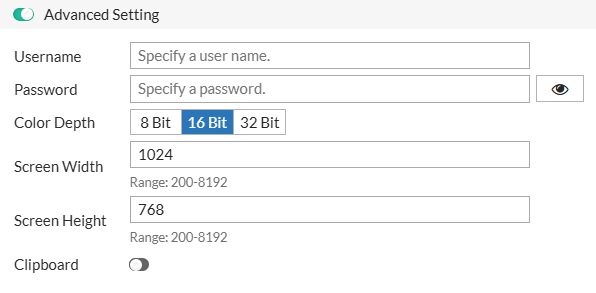
Advanced Settings
Username
The username for VNC authentication, if required.
Password
The password for VNC authentication, if required.
Color Depth
Sets the color depth for the VNC session.
- 8 Bit
- 16 Bit (Default)
- 32 Bit
Screen Width
Specifies the width of the VNC session display. The default value is 1024, with a valid range of 200-8192.
Screen Height
Specifies the height of the VNC session display. The default value is 768, with a valid range of 200-8192.
Clipboard
Enables or disables clipboard sharing between the remote and local system.
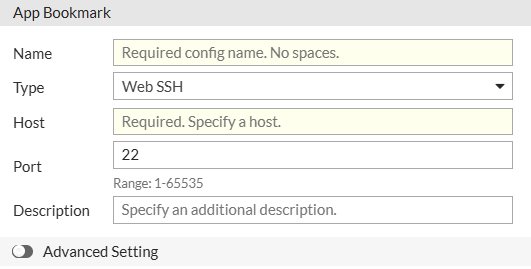
Web SSH
Web SSH (Secure Shell) provides secure, web-based command-line access to remote Linux and Unix systems. It is commonly used for server administration and troubleshooting.
Parameter
Description
Host
The IP address or hostname of the SSH server.
Port
The port used for the SSH connection (default: 22, range: 1-65535).
Description
Optional description for the Web SSH bookmark.
Advanced Settings
Username
The SSH login username.
Password
The SSH login password (if password authentication is used).
Web TELNET
Web Telnet provides browser-based access to network devices and legacy systems that use the Telnet protocol. It is commonly used for managing routers, switches, and older mainframe systems.
Parameter
Description
Host
The IP address or hostname of the Telnet server.
Port
The port used for the Telnet connection (default: 23, range: 1-65535).
Description
Optional description for the Web Telnet bookmark.
Configuring an App Portal
Configuring an App Portal
An App Portal in FortiADC serves as a centralized, browser-based interface that allows end-users to securely access applications published through the Agentless Application Gateway (AAG). It aggregates applications from one or more App Groups and integrates with the configured Access Policy to enforce authentication and authorization based on user identity and group membership.
From the App Portal configuration page, administrators can customize the portal’s appearance and structure. A Caption can be entered to display descriptive text in the top banner of the portal interface. App Group configurations are added as Members of the App Portal, with each Member appearing as a dedicated tab within the portal. The Title field within each Member configuration allows administrators to define the label that appears on the corresponding tab. Each tab provides access to the set of application bookmarks defined in its associated App Group.
Before you begin:
Ensure that you have already configured the necessary App Groups containing the application bookmarks that will be made available to end-users through the App Portal. For details, see Configuring an App Group.
To configure an App Portal:
Navigate to Application Access Manager > Agentless Application Gateway.
The configuration page displays the App Portal tab.
Click Create New to display the configuration editor.
In the Name field, specify a unique name for the App Portal configuration object. Valid characters are A-Z, a-z, 0-9, _, and -. No space is allowed.
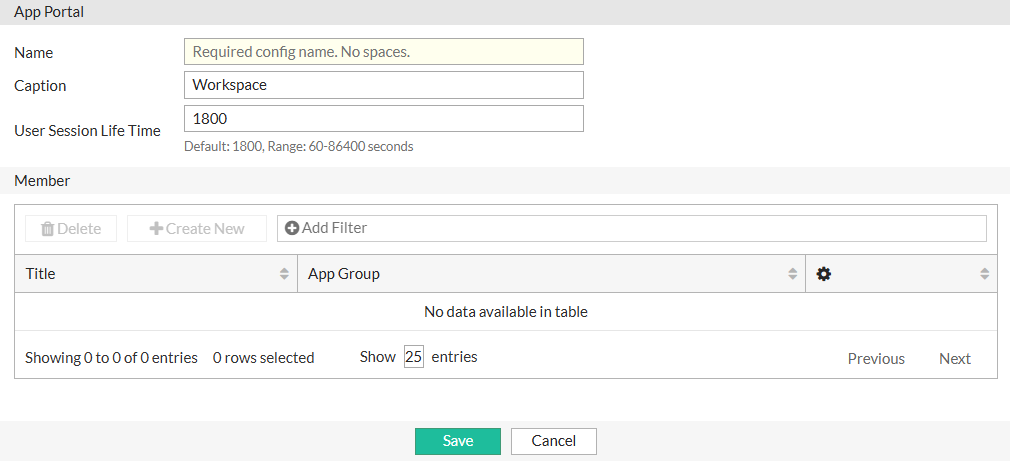
In the Caption field, enter the text you want to display in the top banner of the App Portal. This can be used to provide a welcome message, organization name, or other identifying information for users.
In the User Session Life Time field, specify the maximum duration (in seconds) that a user session can remain idle before automatic logout. The default is 1800 seconds. Valid values range from 60 to 86400 seconds.
Click Save. Once the App Portal is created, the Member section becomes configurable.
Under the Member section, click Create New to display the configuration editor.
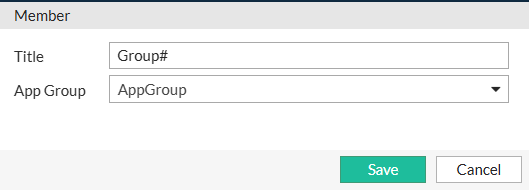
In the Title field, specify the label that will appear as the tab header for the associated App Group within the App Portal interface.
In the App Group field, select a predefined App Group configuration from the drop-down list.
Click Save to apply the configuration and close the App Portal Member dialog. You can add up to 32 members to a single App Portal.
Click Save to apply all changes to the App Portal and its member settings.
Note: Each VDOM supports up to 1024 App Groups, but a single App Portal can be associated with a maximum of 32 App Groups.
Deploying the AAG Virtual Server
Deploying the AAG Virtual Server
After configuring the App Portal and defining App Groups, the next step in deploying the Agentless Application Gateway (AAG) is to create a Layer 7 Virtual Server. This server acts as the central access point for authenticated users, routing traffic through the App Portal and enforcing security policies through access control.
FortiADC introduces a new application profile type—APP Access—to support agentless access use cases. This profile exposes AAG-specific parameters such as RDP Proxy Access Token Timeout and RDP Online User Access Limit. When bound to a Virtual Server, it enables AAG-specific capabilities, including optional RDP proxy functionality.
Configuring the APP Access profile
Before deploying the Virtual Server, an Application Profile of type APP Access must be configured. This profile defines protocol timeouts, DNS behavior, IP-based filtering, and RDP-specific limits for agentless access.
You can create a custom profile or use the predefined LB_PROF_APP_ACCESS profile.
To configure an APP Access Profile:
Navigate to Server Load Balance > Application Resources. The configuration page displays the Application Profile tab.
Click Create New to display the configuration editor.
In the Name field, specify a unique name for the custom Application Profile configuration object. Valid characters are A-Z, a-z, 0-9, _, and -. No space is allowed. Once saved, the name of a Application Profile configuration cannot be changed.
From the Type field, select APP Access.
Configure the settings for the APP Access profile type.
Click Save to save the configuration.
Parameter
Description
Client Header Timeout
Maximum time (in seconds) FortiADC waits to receive the complete HTTP headers from the client. The default value is 60 seconds, and the valid range is 1-86400 seconds.
Client Body Timeout
Maximum time (in seconds) FortiADC waits to receive the complete HTTP body after headers are received. The default value is 60 seconds, and the valid range is 1-86400 seconds.
Connect Timeout
Maximum time (in seconds) to wait for a connection attempt to a backend server to succeed. The default value is 5 seconds, and the valid range is 1-86400 seconds.
Select a Geo IP block list configuration object to deny access from specific countries or regions. See Using the Geo IP block list.
Geo IP Allowlist
Select a Geo IP allowlist configuration object to explicitly permit access from specific regions. See Using the Geo IP allowlist.
DNS Override
Enable to override the system DNS settings with custom DNS servers.
Primary DNS
The Primary DNS option is available if DNS Override is enabled. Specify the IP address of the primary DNS server.
Secondary DNS
The Secondary DNS option is available if DNS Override is enabled. Specify the IP address of the secondary DNS server.
RDP Proxy Access Token Timeout
Defines how long the RDP access token remains valid in seconds. The default value is 90 seconds, and the valid range is 30-600 seconds.
RDP Online User Access Limit
Enable to limit the number of concurrent RDP sessions per user through the App Portal.
Predefined APP Access Profile: LB_PROF_APP_ACCESS
Parameter
Default Value
Client Header Timeout
60
Client Body Timeout
60
Connect Timeout
5
IP Reputation
Disabled
Geo IP Blocklist
None
Geo IP Allowlist
None
DNS Override
Disabled
RDP Proxy Access Token Timeout
90
RDP Online User Access Limit
Disabled
Configuring the Virtual Server for AAG
Once the APP Access profile and Access Policy are in place, configure the Virtual Server that delivers the App Portal functionality.
To configure the Virtual Server:
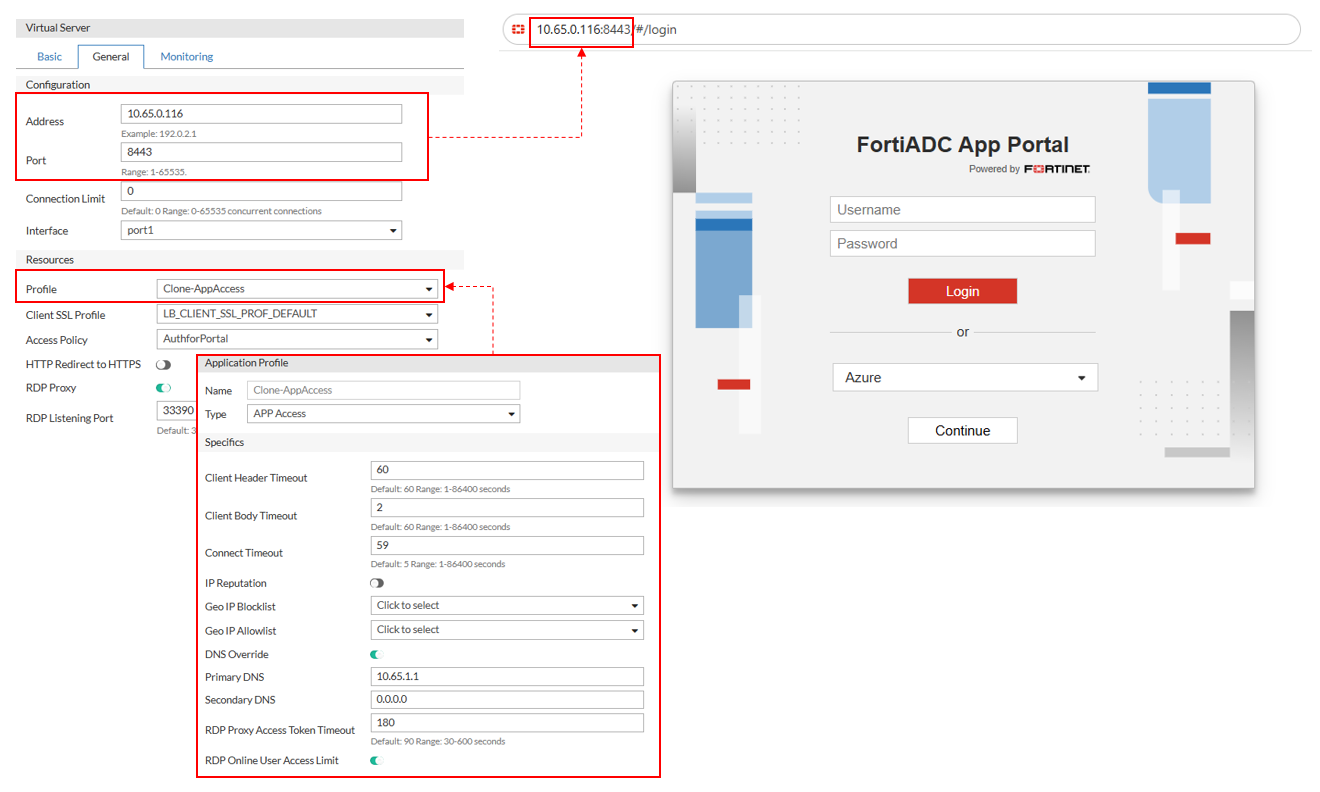
Navigate to Server Load Balance > Virtual Server. The configuration page displays the Virtual Server tab.
Click Create New > Advanced Mode to display the configuration editor.
Configure the following key Virtual Server settings:
In the Basic tab, select the virtual server Type as Layer 7.
In the General tab, configure the following Configuration settings:
Address — Specify the IP address that the virtual server will bind to.
Port — Enter the listening port for user connections (e.g., 443 for HTTPS).
Connection Limit — Optionally, define a maximum number of concurrent connections.
Interface — Select the network interface on which the virtual server will listen.
In the General tab, configure the following Resources settings:
Profile — Select a predefined or user-defined APP Access profile. This enables agentless access features and exposes AAG-specific settings. The configuration options will adjust to what is applicable to this profile type. For more information, see Configuring the APP Access profile.
Access Policy — Attach the corresponding Access Policy that enforces authentication and authorization rules for App Portal access.
RDP Proxy — If RDP access is required, enable the RDP Proxy option. This activates RDP-specific settings configured in the APP Access profile.
RDP Listening Port — Defines the TCP port on which FortiADC listens for inbound RDP client connections. This setting is only visible when RDP Proxy is enabled and applies specifically to Native RDP and RemoteApp bookmarks. The default port is 3389, and the valid range is 1–65535.
Click Save.
The configured Virtual Server will now route users through the App Portal, enabling secure, agentless access to internal web and desktop applications.
Note: The visibility of Native RDP and RemoteApp bookmarks in the App Portal depends on whether RDP Proxy is enabled on the associated Virtual Server.
By default, RDP Proxy is disabled, and any configured Native RDP or RemoteApp bookmarks will not appear in the App Portal until it is enabled.
To ensure these application types are accessible to users, enable RDP Proxy in the Virtual Server configuration.
Accessing the AAG App Portal
Accessing the AAG App Portal
After setting up the App Portal and deploying the Agentless Application Gateway (AAG) Virtual Server with the appropriate Access Policy, users can securely log in through their browser to access internal enterprise applications. The AAG App Portal serves as a centralized interface for launching web, desktop, and terminal-based resources—no client agents required.
This section provides an overview of the end-user experience, including authentication flow, portal navigation, application access, and session handling.
Topics Covered:
Signing In and Session Management – Authentication methods and session behavior.
Exploring the AAG Portal Interface – Layout and navigation overview.
Launching Applications – Accessing applications such as RDP, SSH, and web apps.
Managing Sessions and Logging Out – Viewing active sessions and secure logout.
Signing In and Session Management
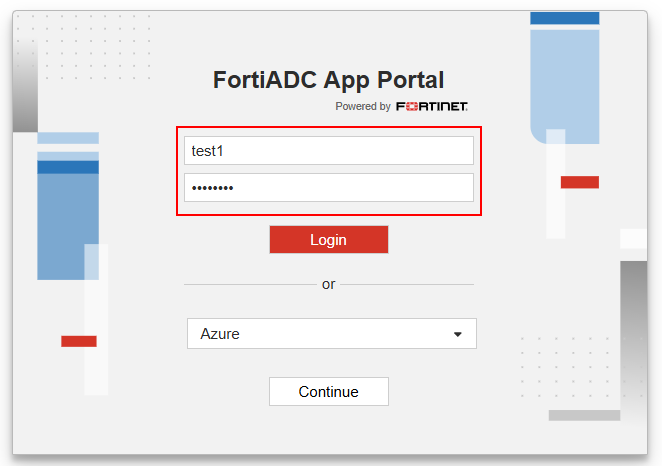
Users authenticate based on the method defined in the Access Policy bound to the AAG Virtual Server. FortiADC supports a range of authentication mechanisms, including:
Local authentication – Users enter credentials defined on FortiADC.
Remote authentication – Users authenticate via LDAP, RADIUS, or SAML-based identity providers.
Once authenticated, FortiADC initializes a user session, enforces idle timeouts, and supports reauthentication if required by policy.
Exploring the AAG Portal Interface
Upon successful login, users are presented with the AAG App Portal interface. The interface is browser-based, intuitive, and dynamically reflects the user’s access permissions.
RDP connections honor the settings configured in the APP Access profile:
RDP Proxy Access Token Timeout – Controls how long a token remains valid.
RDP Online User Access Limit – Limits the number of concurrent RDP sessions per user.
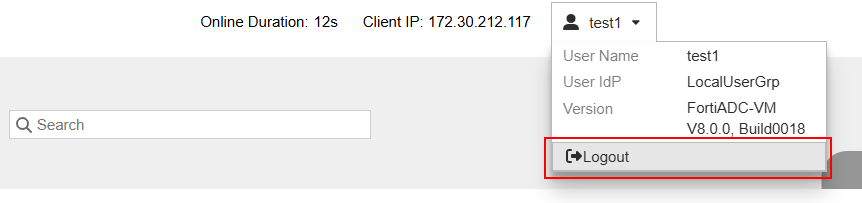
Managing Sessions and Logging Out
Users can track their active sessions within the portal and safely log out once done. FortiADC enforces session cleanup and authentication token removal on logout.
Session-related capabilities:
Switching Between Applications – Seamless navigation without reauthentication.
Manual Logout – Ends session and removes tokens.
AAG Implementation Scenarios
AAG Implementation Scenarios
FortiADC’s Agentless Application Gateway (AAG) is designed to provide secure, browser-based access to internal applications without requiring client-side agents or VPNs. AAG is especially effective in environments where users access sensitive resources from remote locations, unmanaged devices, or hybrid cloud infrastructures.
This section outlines three practical deployment scenarios where FortiADC AAG can be applied to meet specific organizational needs:
Secure Remote Access for Distributed Workforces
Unified Access to Hybrid Cloud Applications
Secure, Clientless RDP Access for Remote and BYOD Users
Each scenario presents specific challenges, followed by a technical walkthrough of the AAG solution and the resulting benefits.
Scenario 1: Secure Remote Access for Distributed Workforces
The Challenge:
Organizations need to grant secure, browser-based access to internal applications for remote employees and contractors—without relying on VPN clients or exposing internal systems to unmanaged endpoints.
The AAG Solution:
FortiADC AAG enables secure, clientless access to internal web, SSH, and RDP services via the browser-based App Portal. A Layer 7 Virtual Server acts as the centralized access point, enforcing user authentication and session handling through Access Policies. APP Access profiles and RDP Proxy support RDP for session delivery, while authentication is handled using LDAP, RADIUS, or SAML-based identity providers. Application access is controlled through App Groups and bookmarks assigned to the user’s portal session.
Outcome:
Simplified access from unmanaged or non-compliant devices
Reduced VPN complexity and administrative overhead
Centralized authentication and session-level visibility
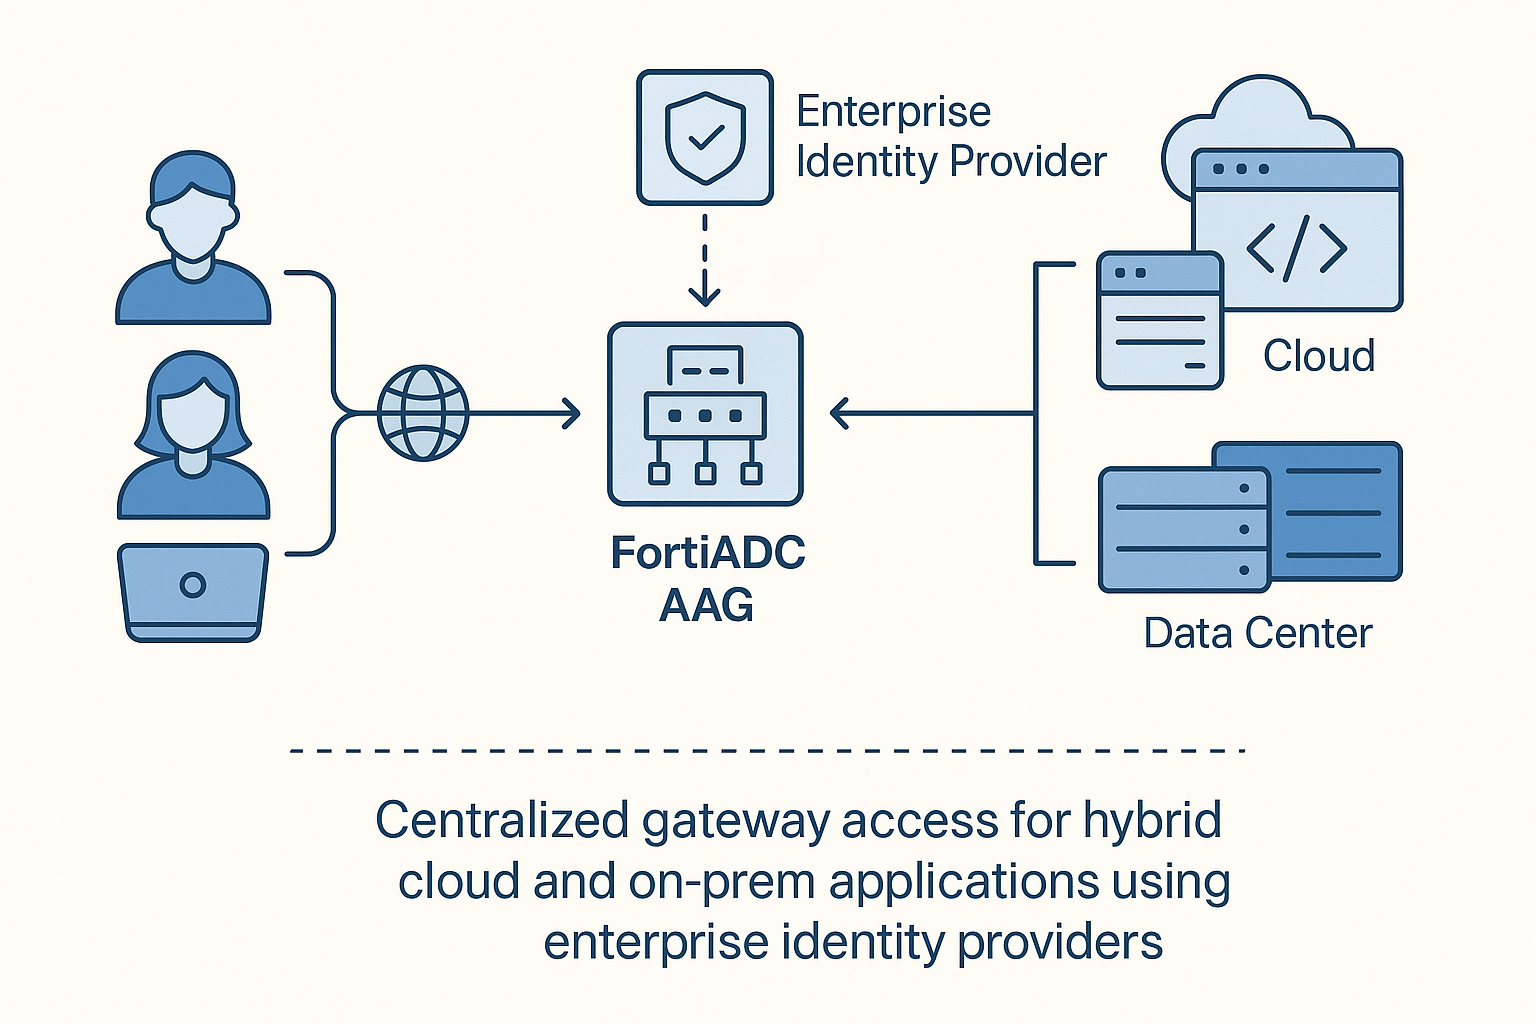
Scenario 2: Unified Access to Hybrid Cloud Applications
The Challenge:
Enterprises operating in hybrid environments struggle to provide secure, seamless access to both cloud and on-premises applications while maintaining consistent identity and policy enforcement.
AAG Solution:
FortiADC AAG centralizes access across environments using multiple Virtual Servers grouped by application location. Each is configured with APP Access profiles and Access Policies tied to federated authentication methods such as SAML. Unified access control policies ensure identity-aware enforcement and consistent auditing.
Outcome:
Single point of access for hybrid app environments
Reduced operational complexity via centralized policy management
Strengthened compliance through unified logging and identity-based controls
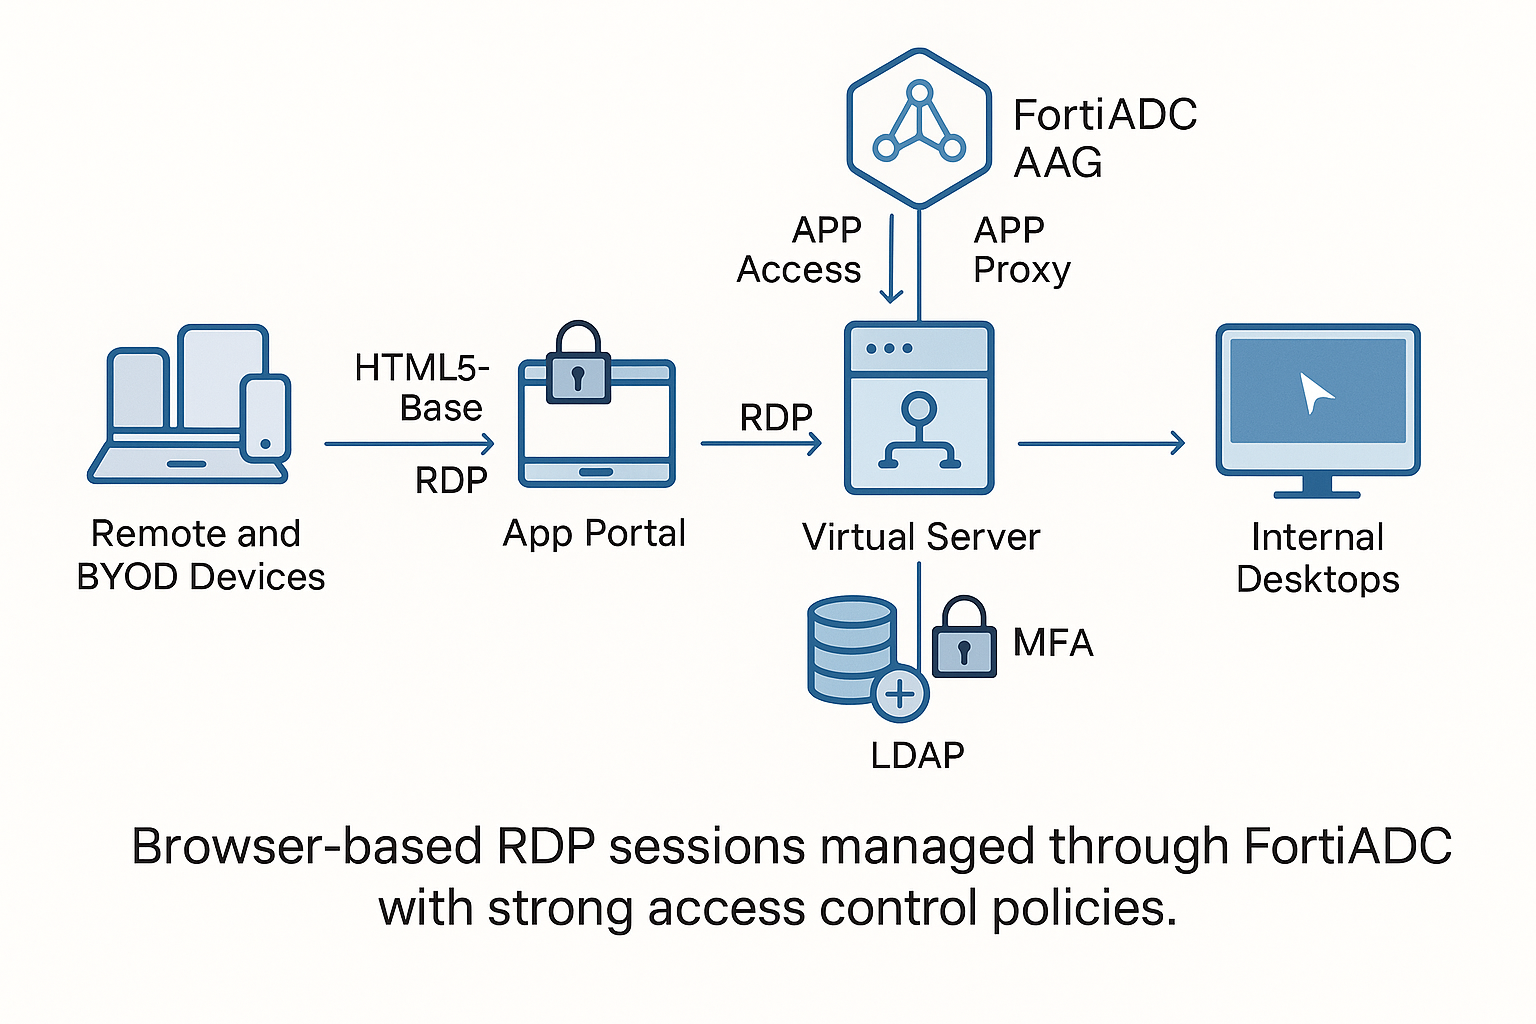
Scenario 3: Secure, Clientless RDP Access for Remote and BYOD Users
The Challenge:
Organizations need to provide secure remote desktop access for users on BYOD (Bring Your Own Device) or unmanaged endpoints—without relying on installed RDP clients or introducing the complexity of VPN deployments.
AAG Solution:
FortiADC’s Agentless Application Gateway (AAG) enables HTML5-based RDP access directly through a web browser. A Layer 7 Virtual Server configured with an APP Access profile and RDP Proxy handles authentication and session forwarding. Access Policies authenticate users against LDAP or RADIUS, and the APP Access profile enforces session constraints, such as RDP access token timeouts and user session limits. Optional controls—such as clipboard restriction and file transfer blocking—can be configured on the backend RDP server for enhanced endpoint security.
Outcome:
Fully browser-based RDP access from unmanaged devices
Reduced client and VPN management overhead
Secure session handling with enforced timeouts and session visibility
AAG Quick Start Lab Guide
AAG Quick Start Lab Guide
A Quick Start Lab Guide on how to set up the Application Access Gateway using a local user account.
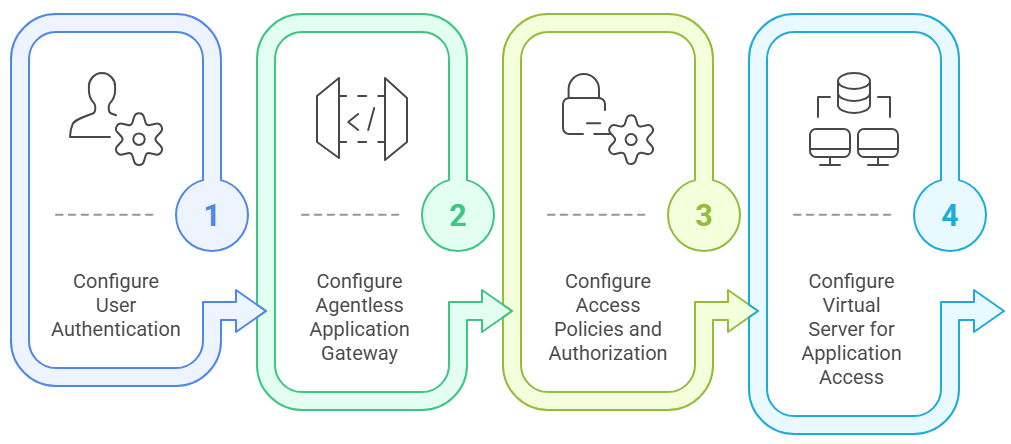
Workflow:
Configure a local user
Configure a user group
Configure the AAG Application Group
Configure the AAG Application Portal
Configure the AAG Application Access Policy
Configure a Virtual Server for the AAG
Test
Configure a Local User
Configure A local User
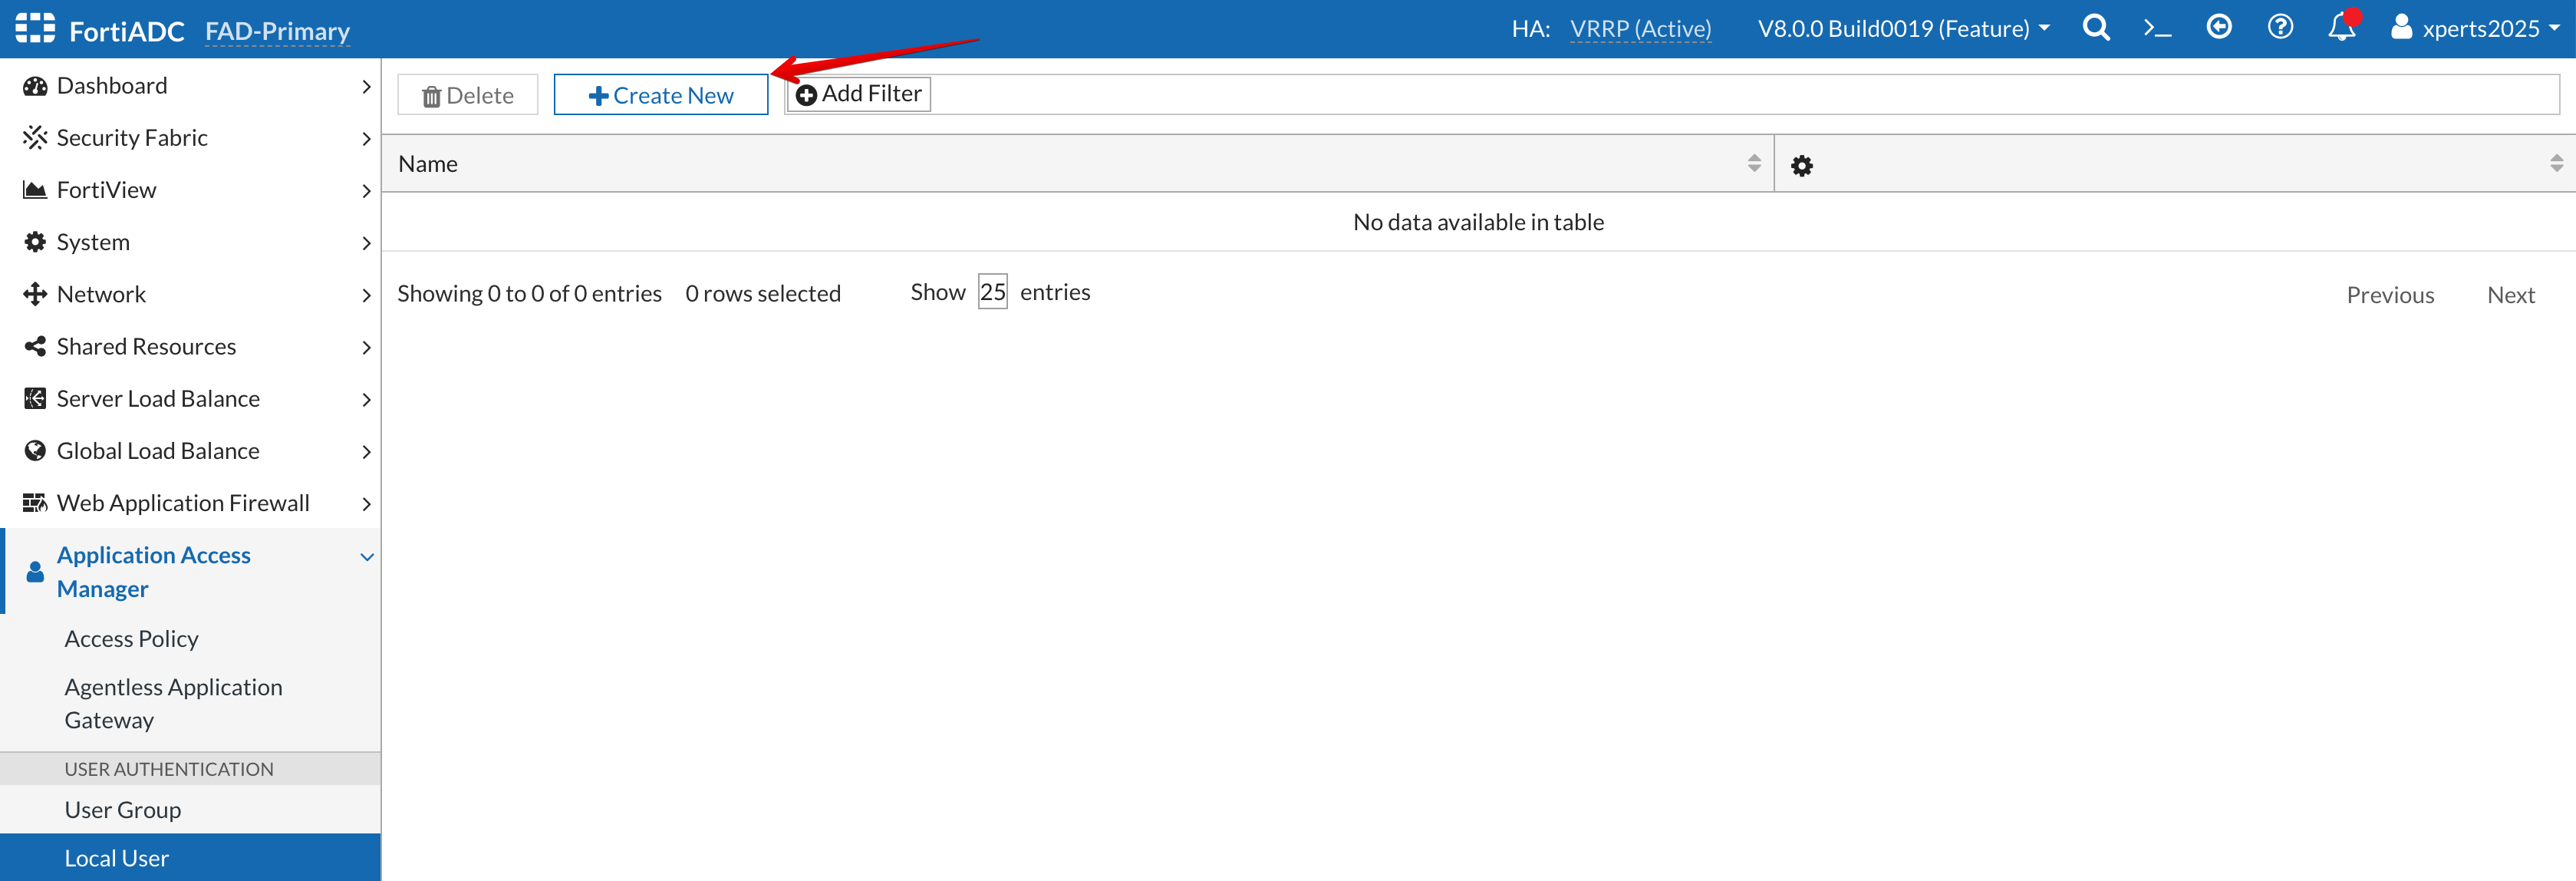
Login to the FortiADC (FAD-Primary) with the username xperts2025 and password AppSec-Xp3rts2025!
Go to Application Access Manager → Local User
Click +Create New
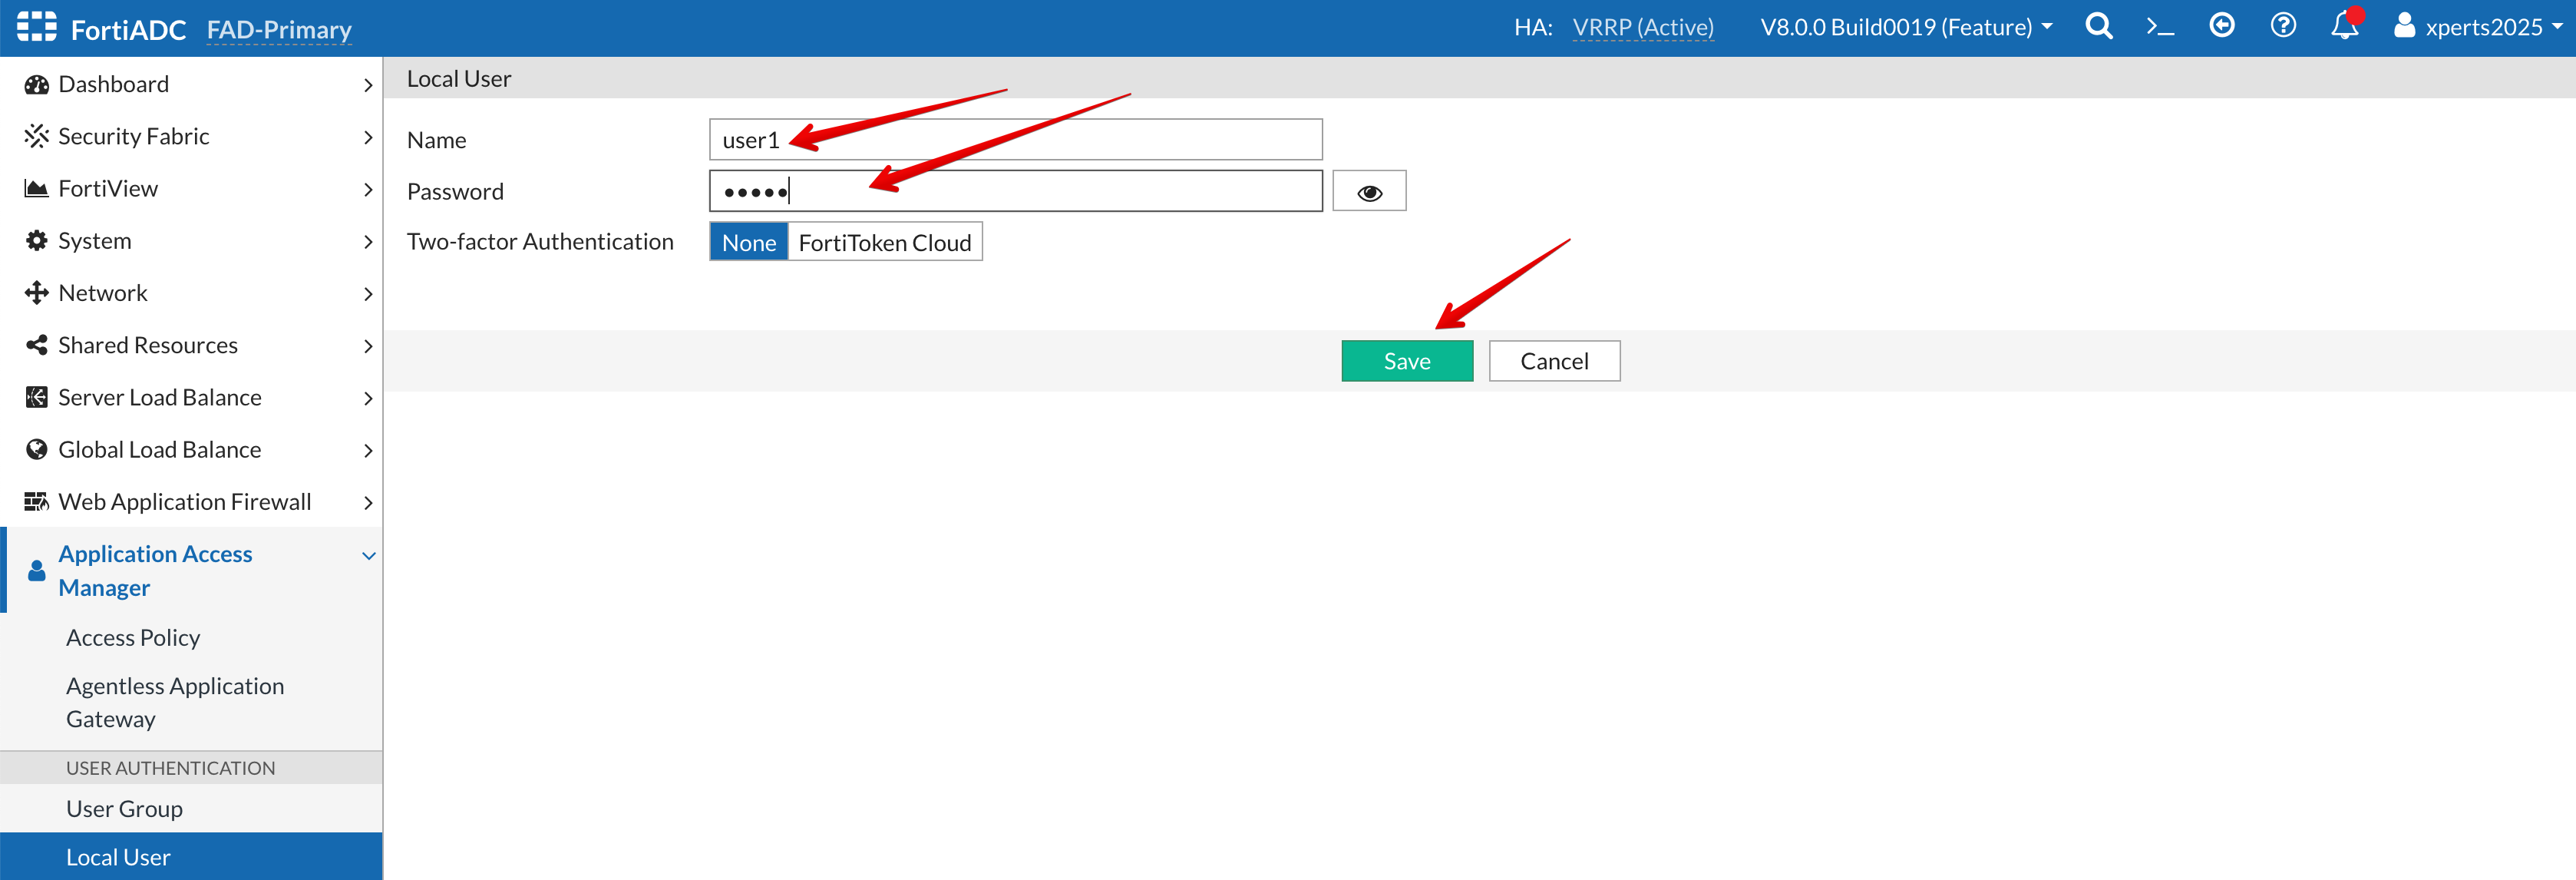
Name: user1
Password: user1
Save
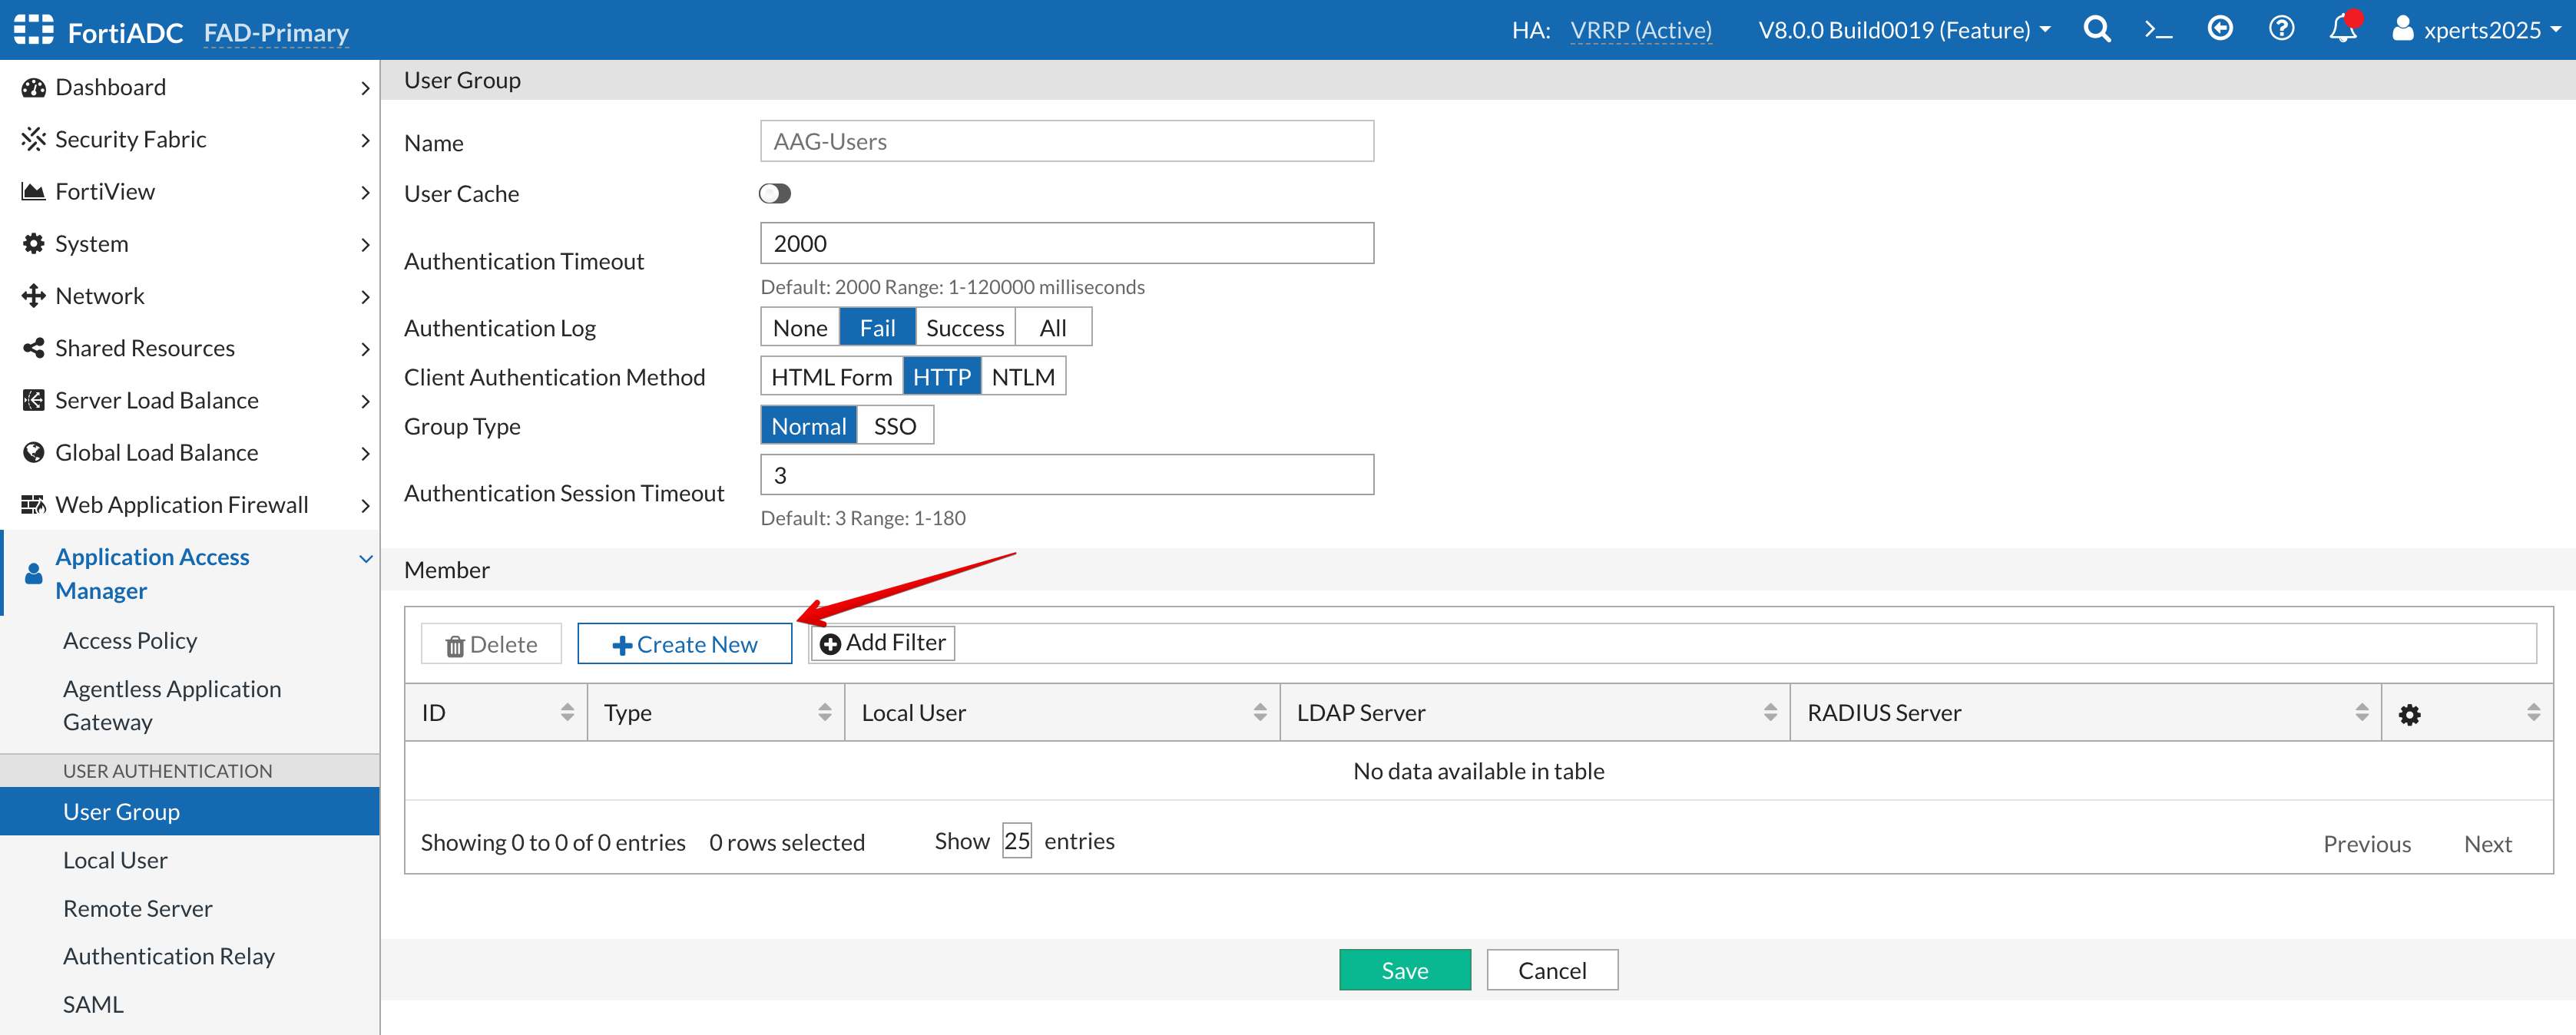
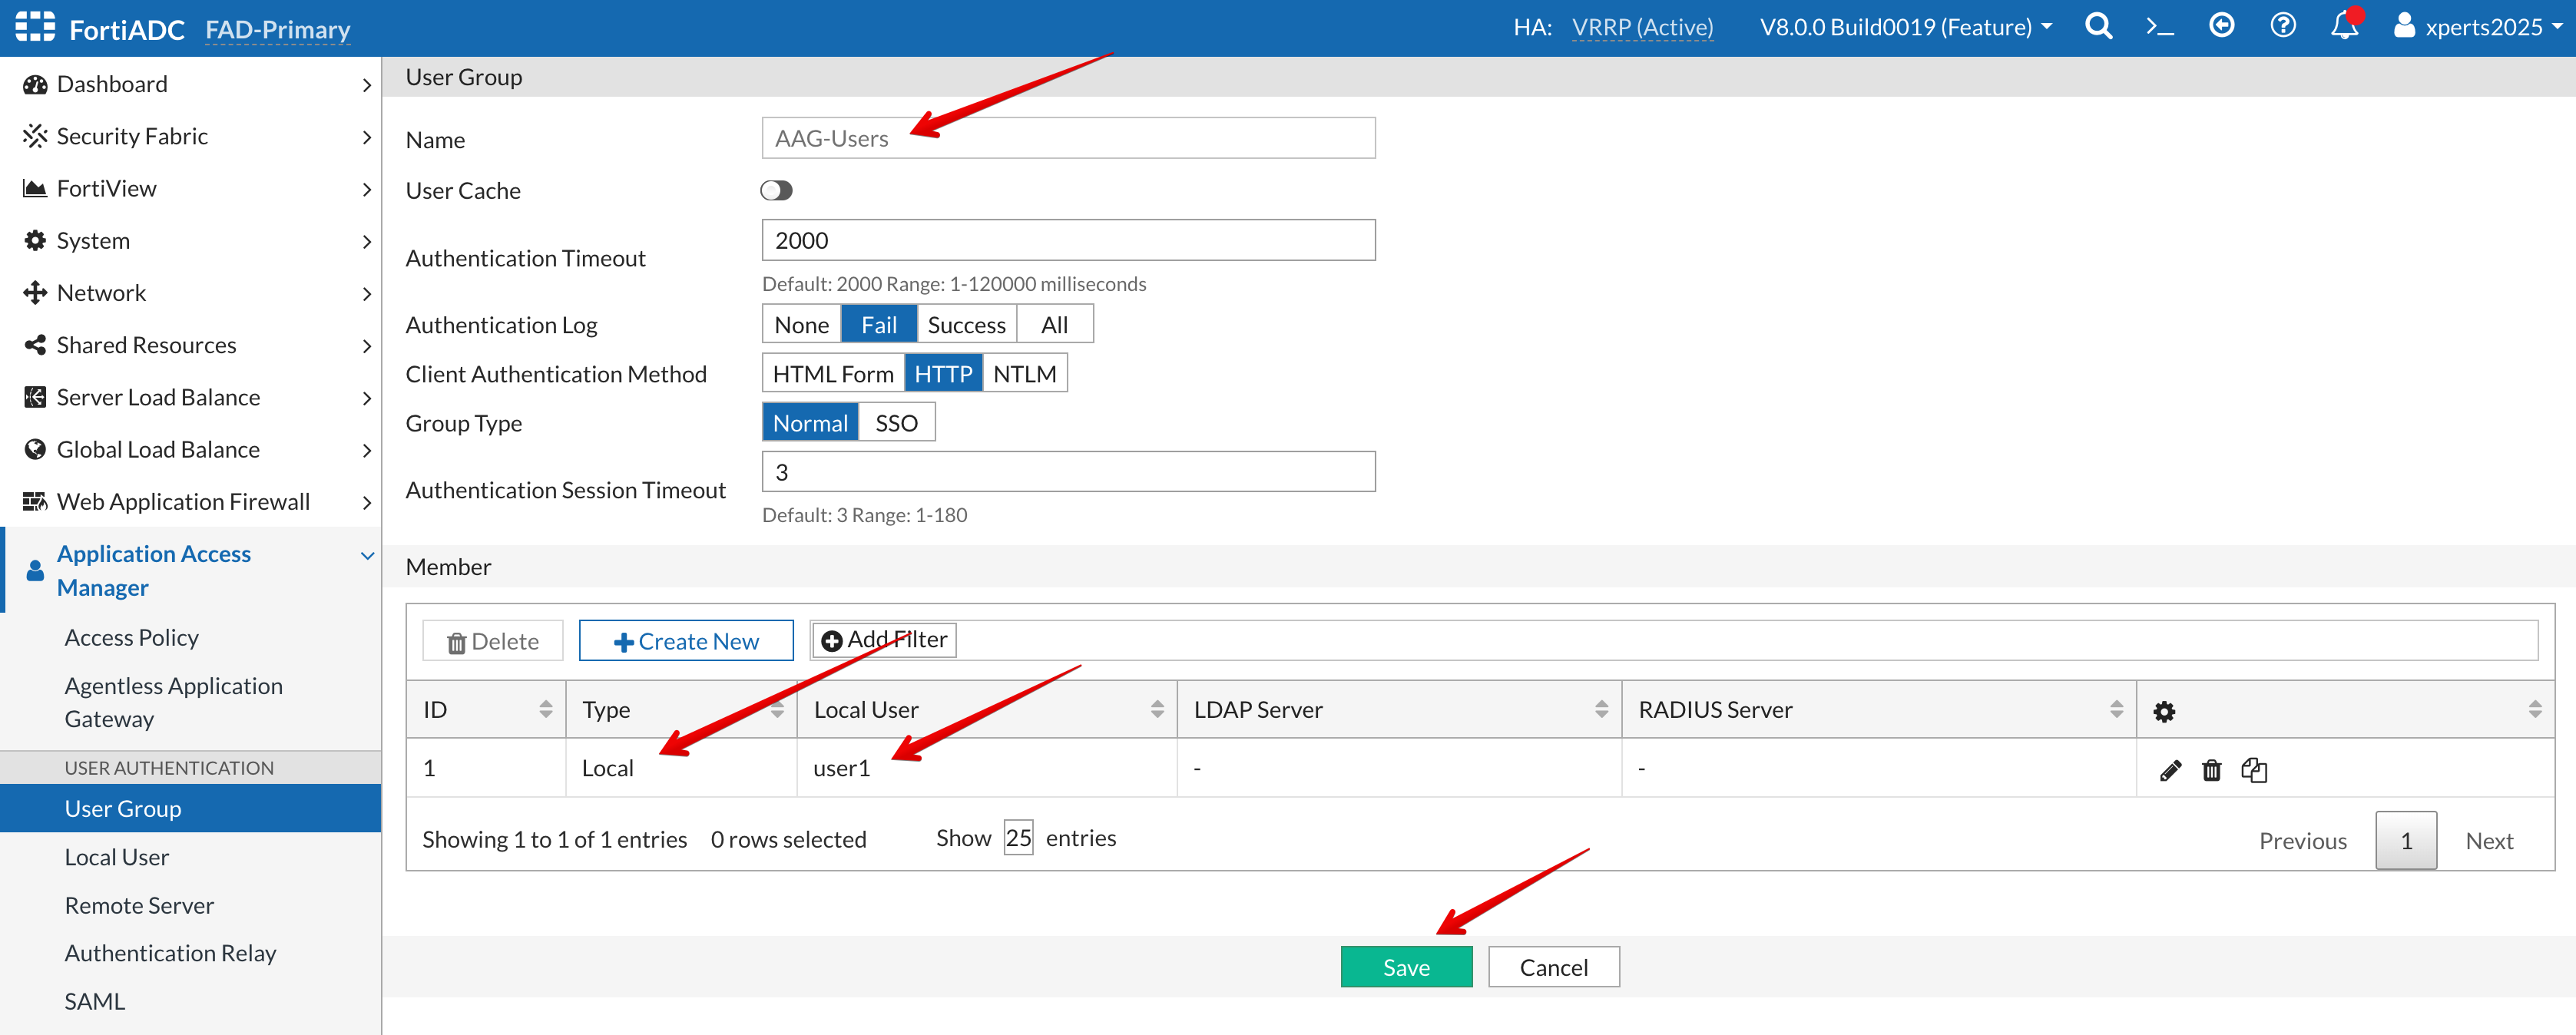
Configure a User Group
Configure a User Group
Go to Application Access Manager → User Group
Click +Create New
Group Name: AAG-Users
Save
Click +Create New
Type: Local
Local User: user1
Save
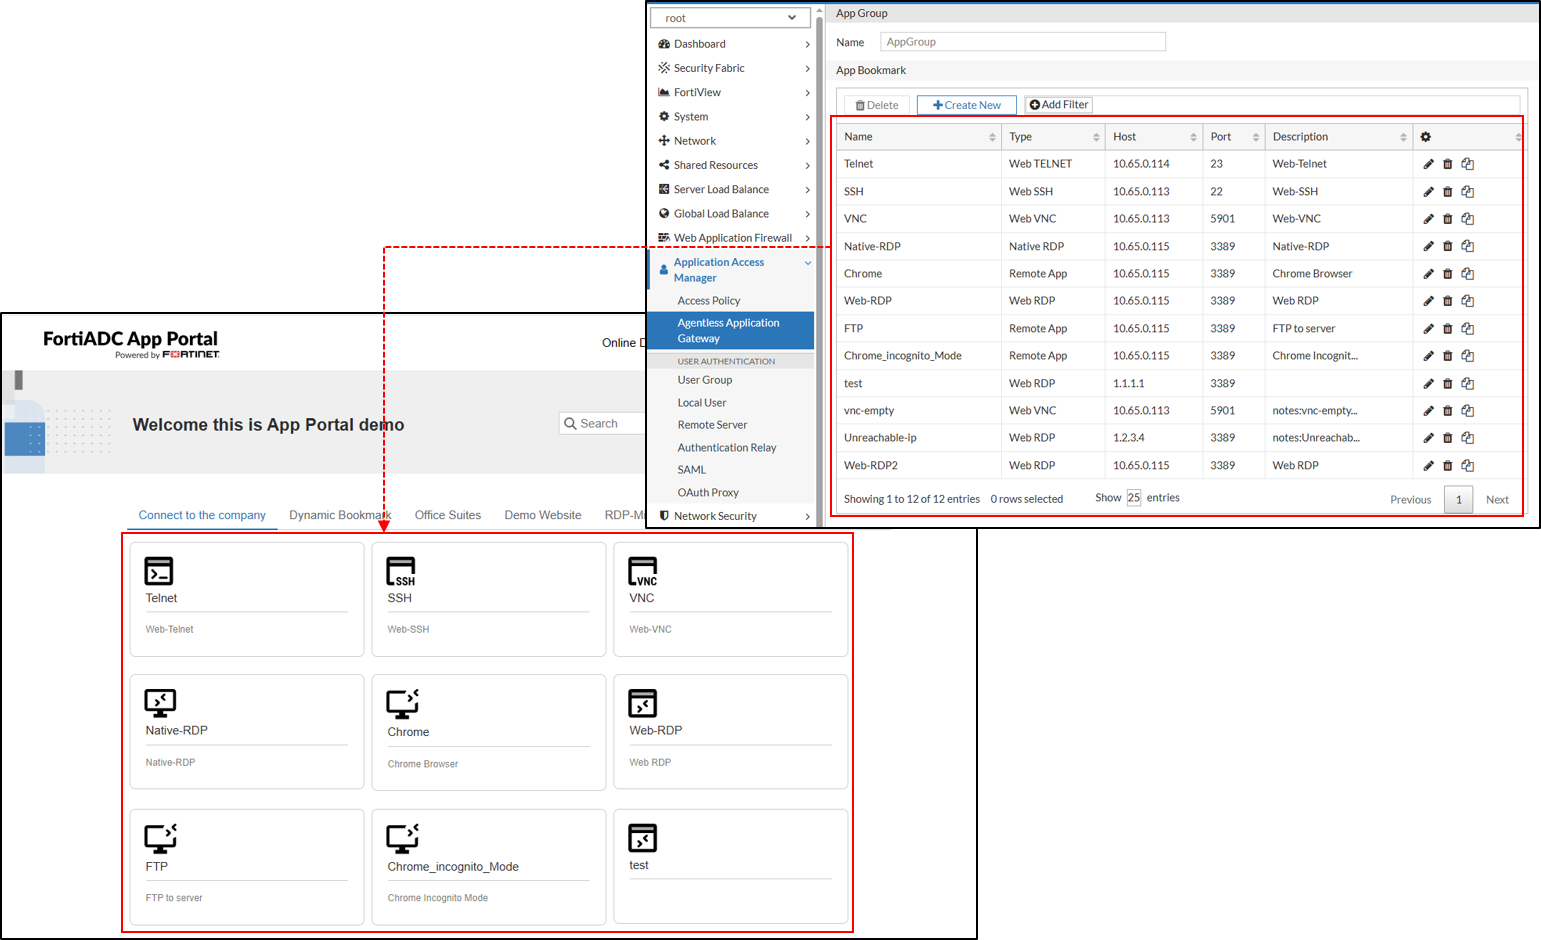
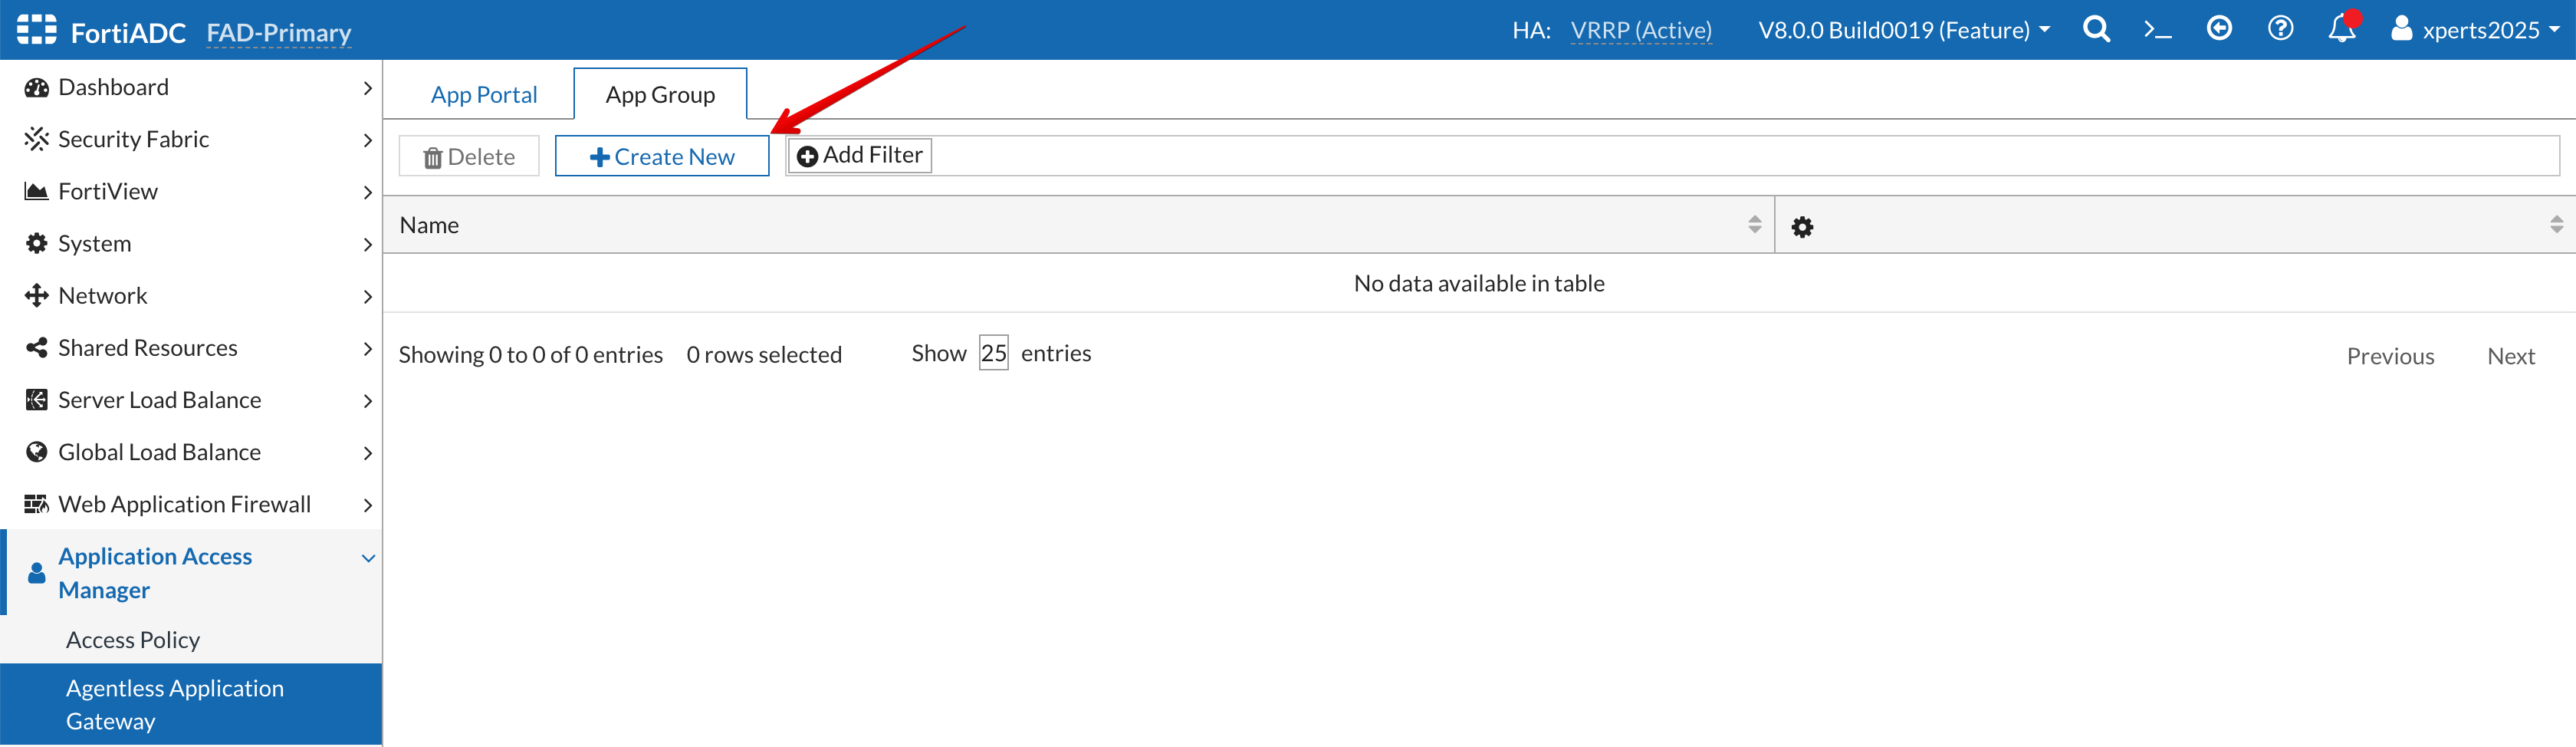
Configure the AAG Application Group
Configure the AAG Application Group
Go to Application Access Manager → Agentless Application Gateway → App Group
Click +Create New
Name: AAG-App-Group
Save
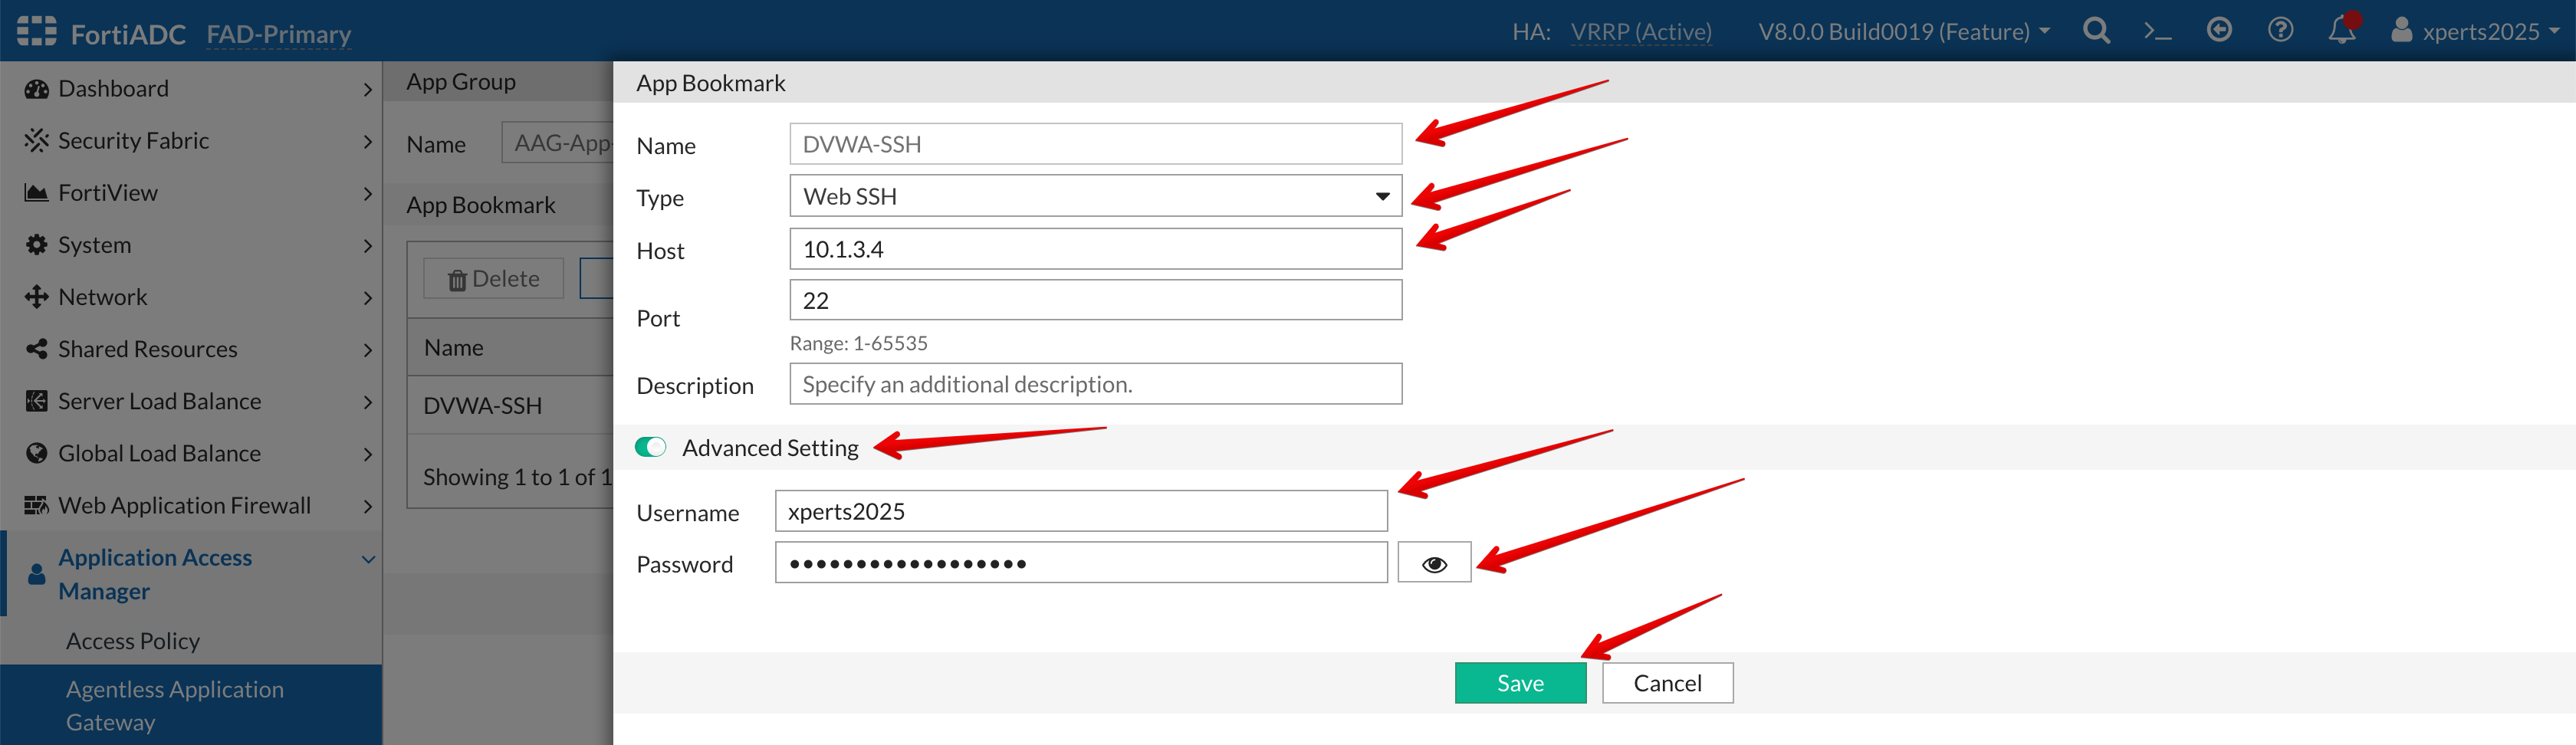
Click +Create New
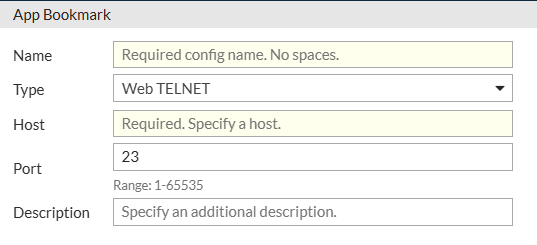
Name: DVWA-SSH
Type: Web-SSH
Host: 10.1.3.4
Port: 22
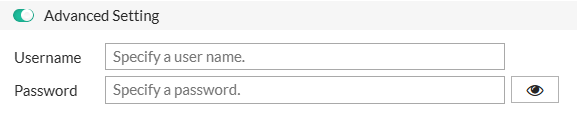
Set the Advanced Setting flag to ON
Username:xperts2025
Password:AppSec-Xp3rts2025!
Save
Save
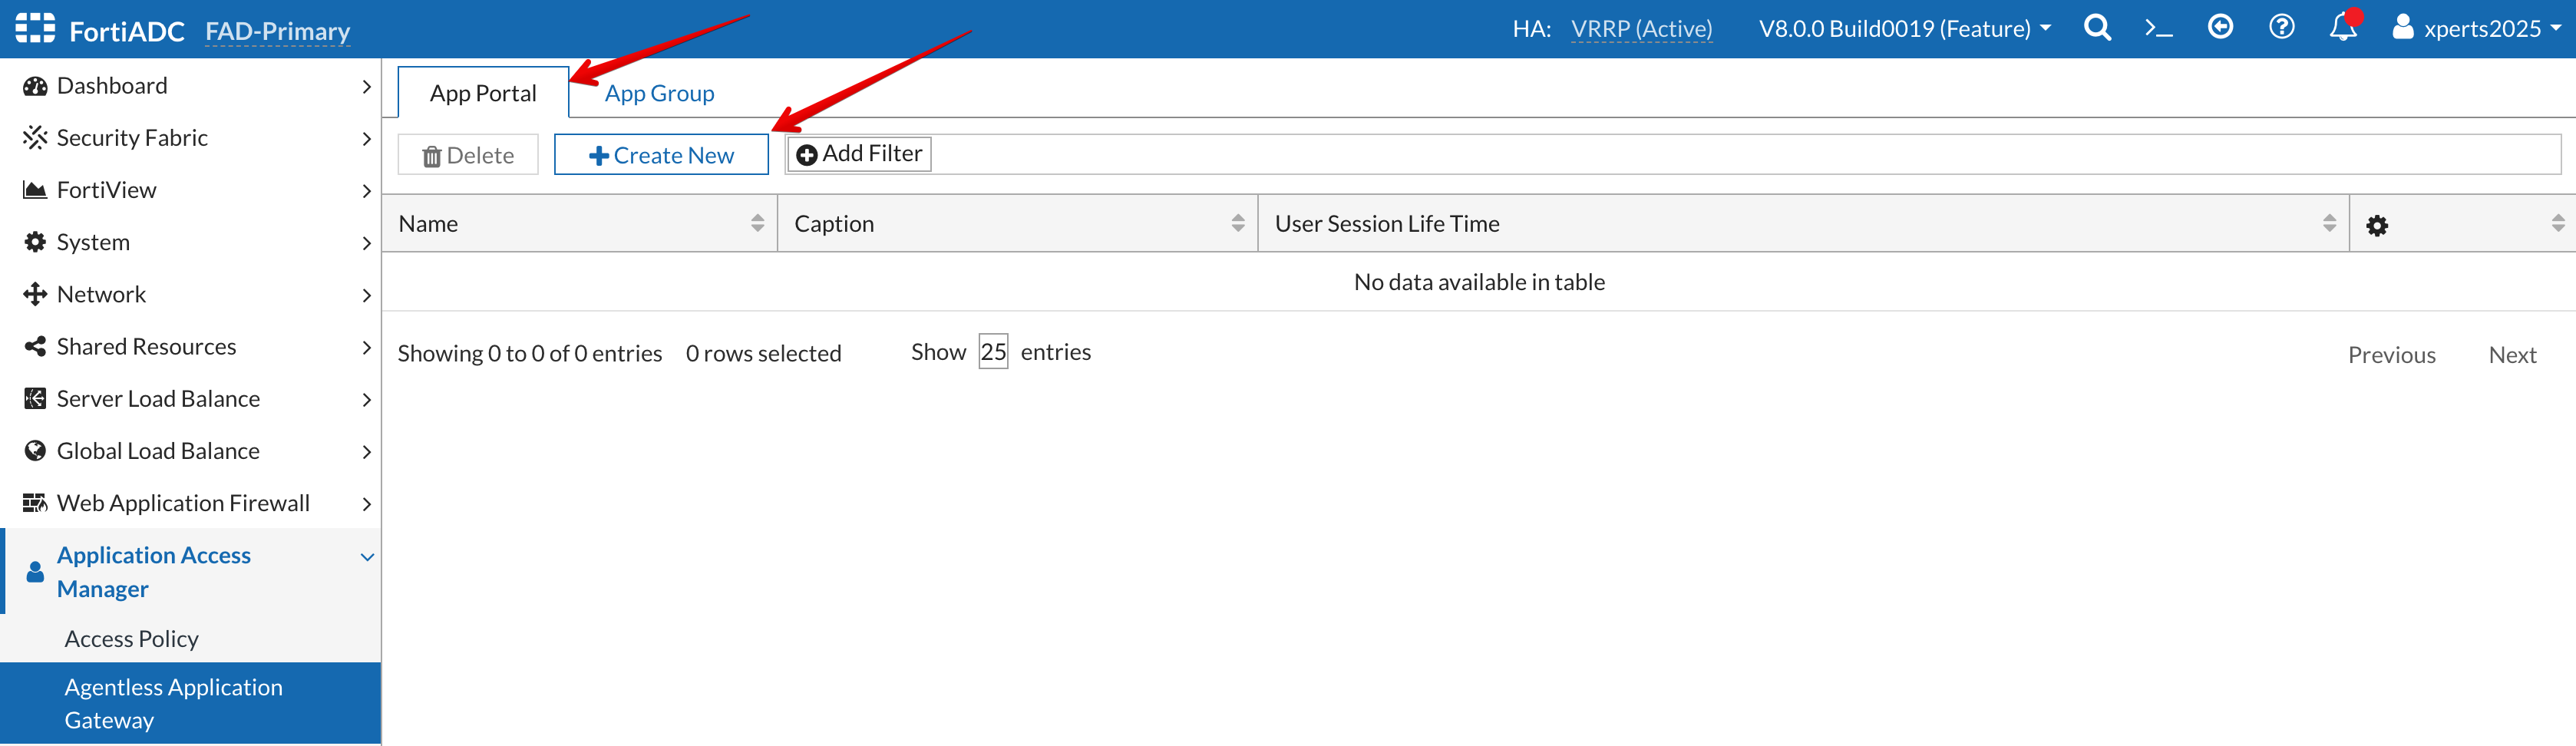
Configure the AAG Application Portal
Configure the AAG Application Portal
Go to Application Access Manager → Agentless Application Gateway → App Portal
Click +Create New
Name: AAG-App-Portal
Save
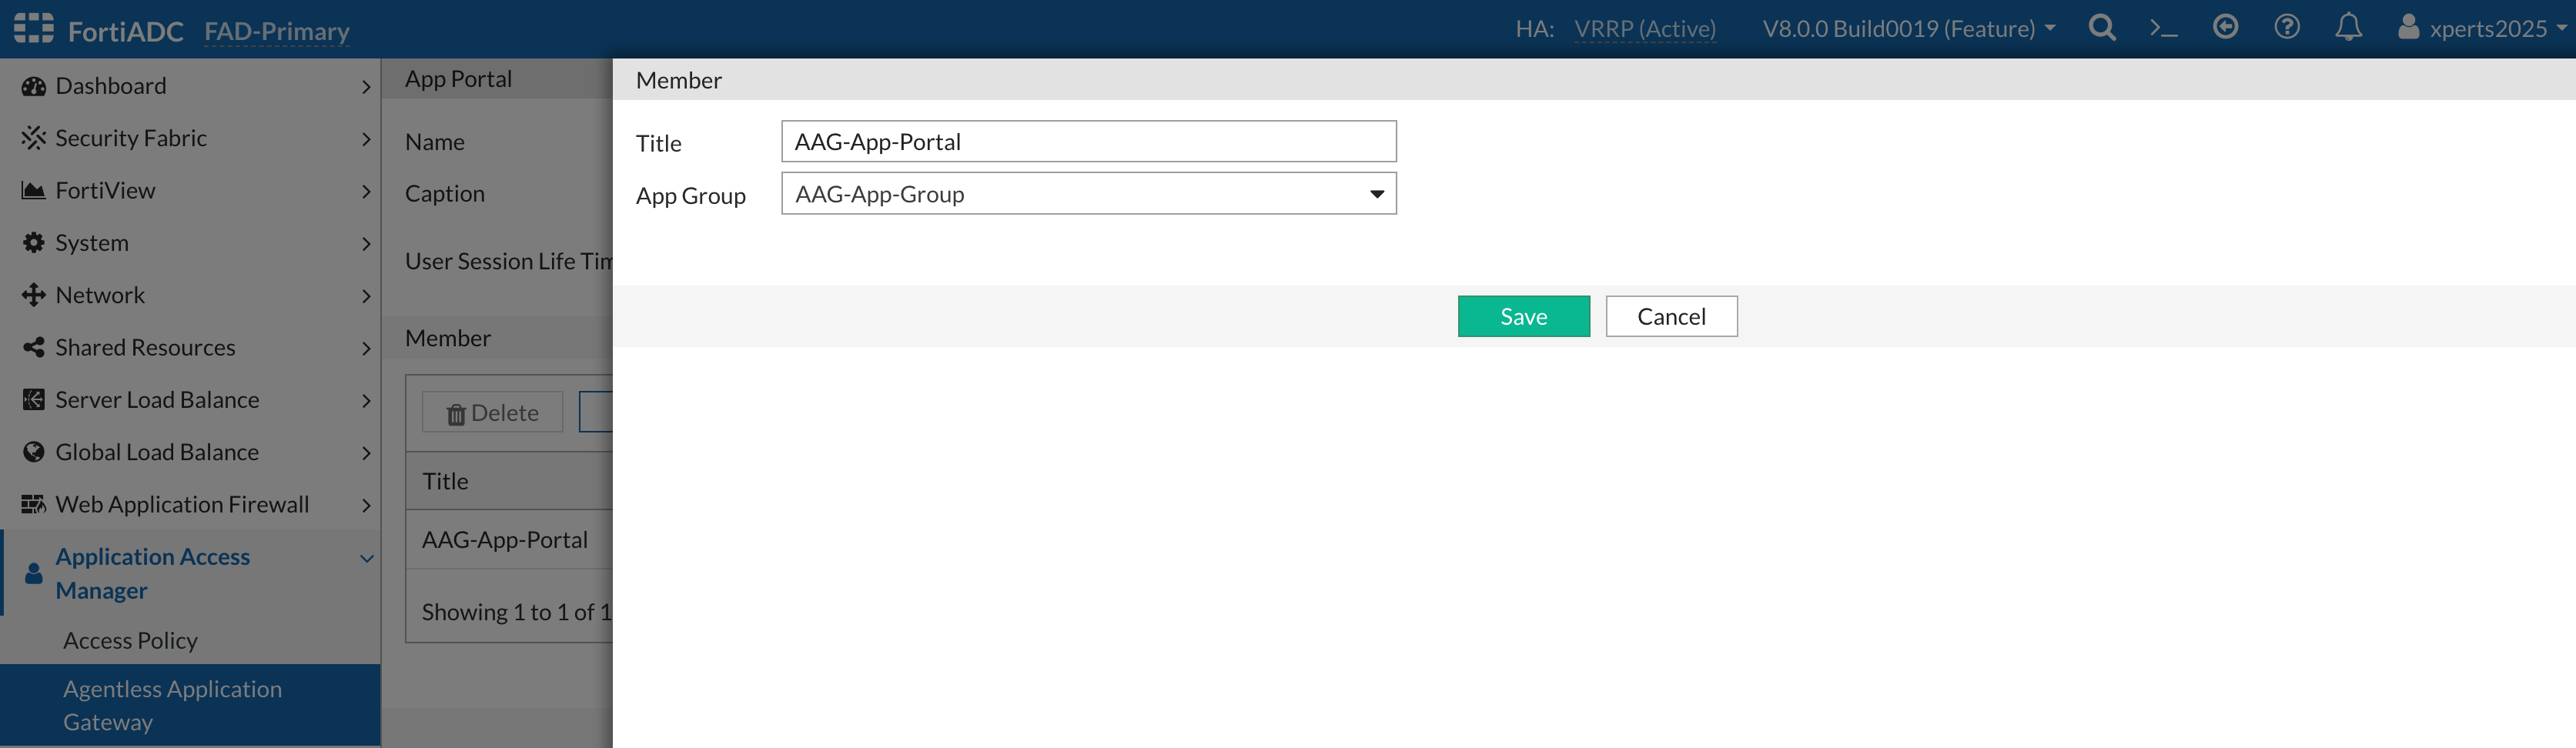
Click +Create New
Title: AAG-App-Portal
App Group: AAG-App-Group
Save
Save
Configure the AAG Application Access Policy
Configure the AAG Application Access Policy
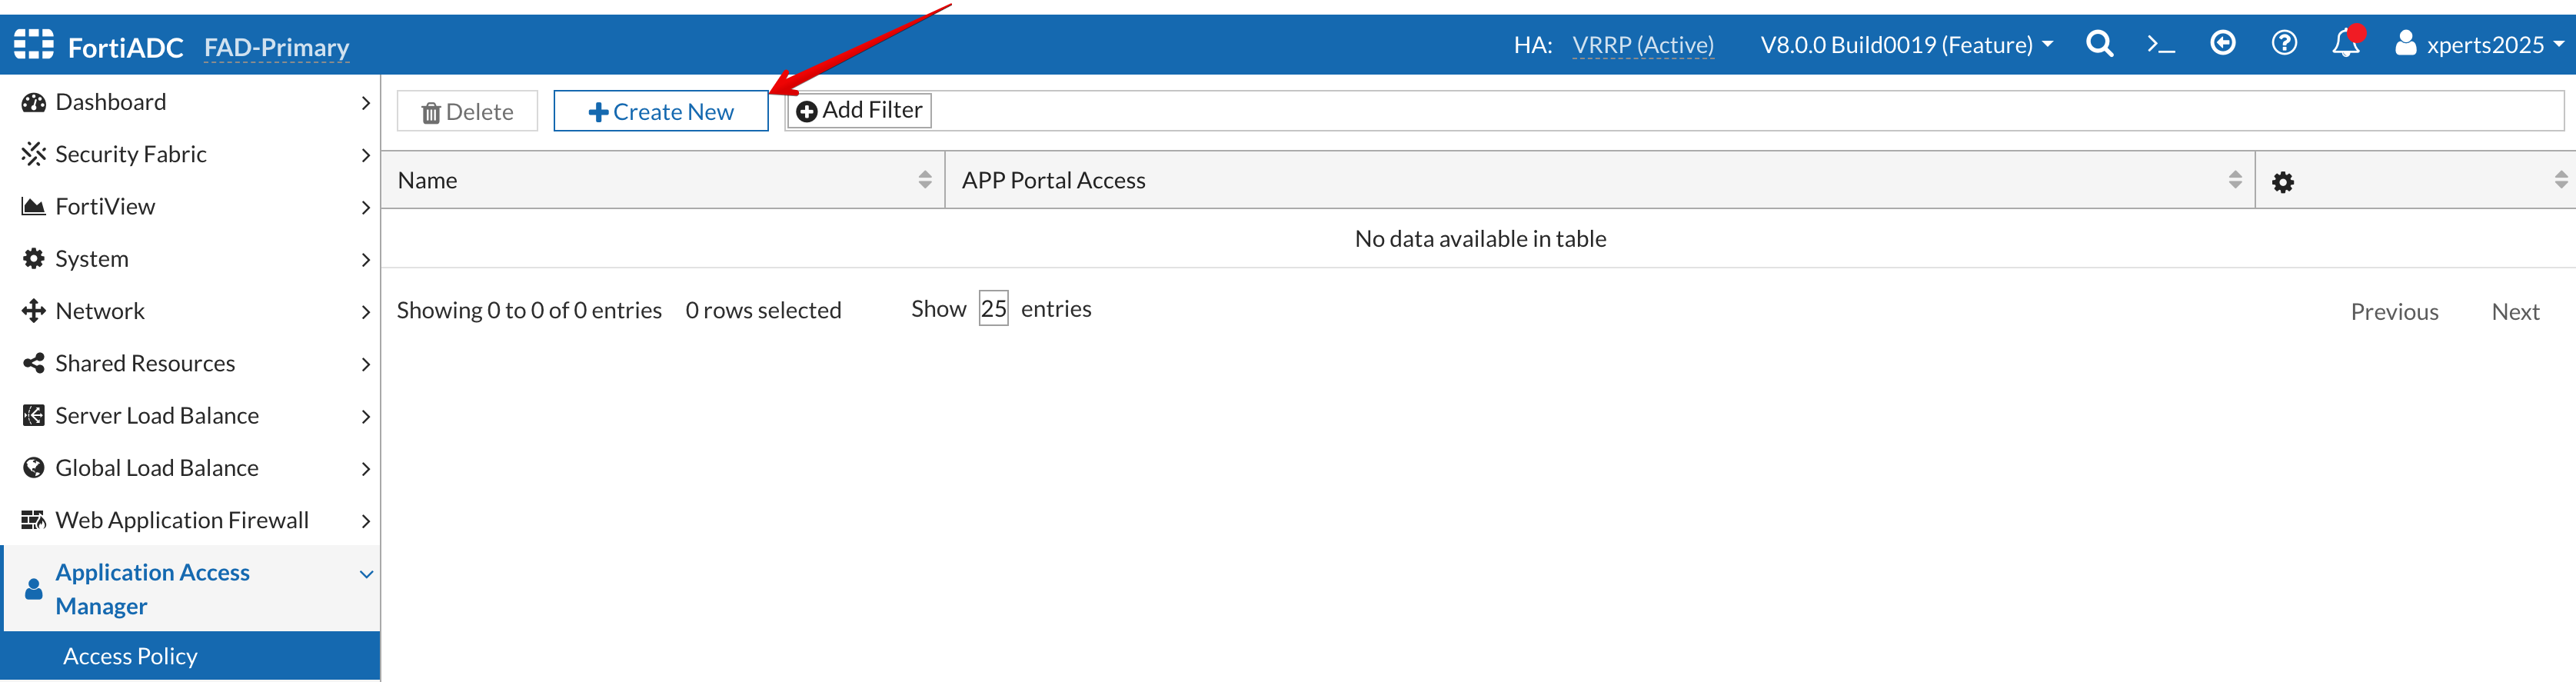
Go to Application Access Manager → Agentless Application Gateway → Access Policy
Click +Create New
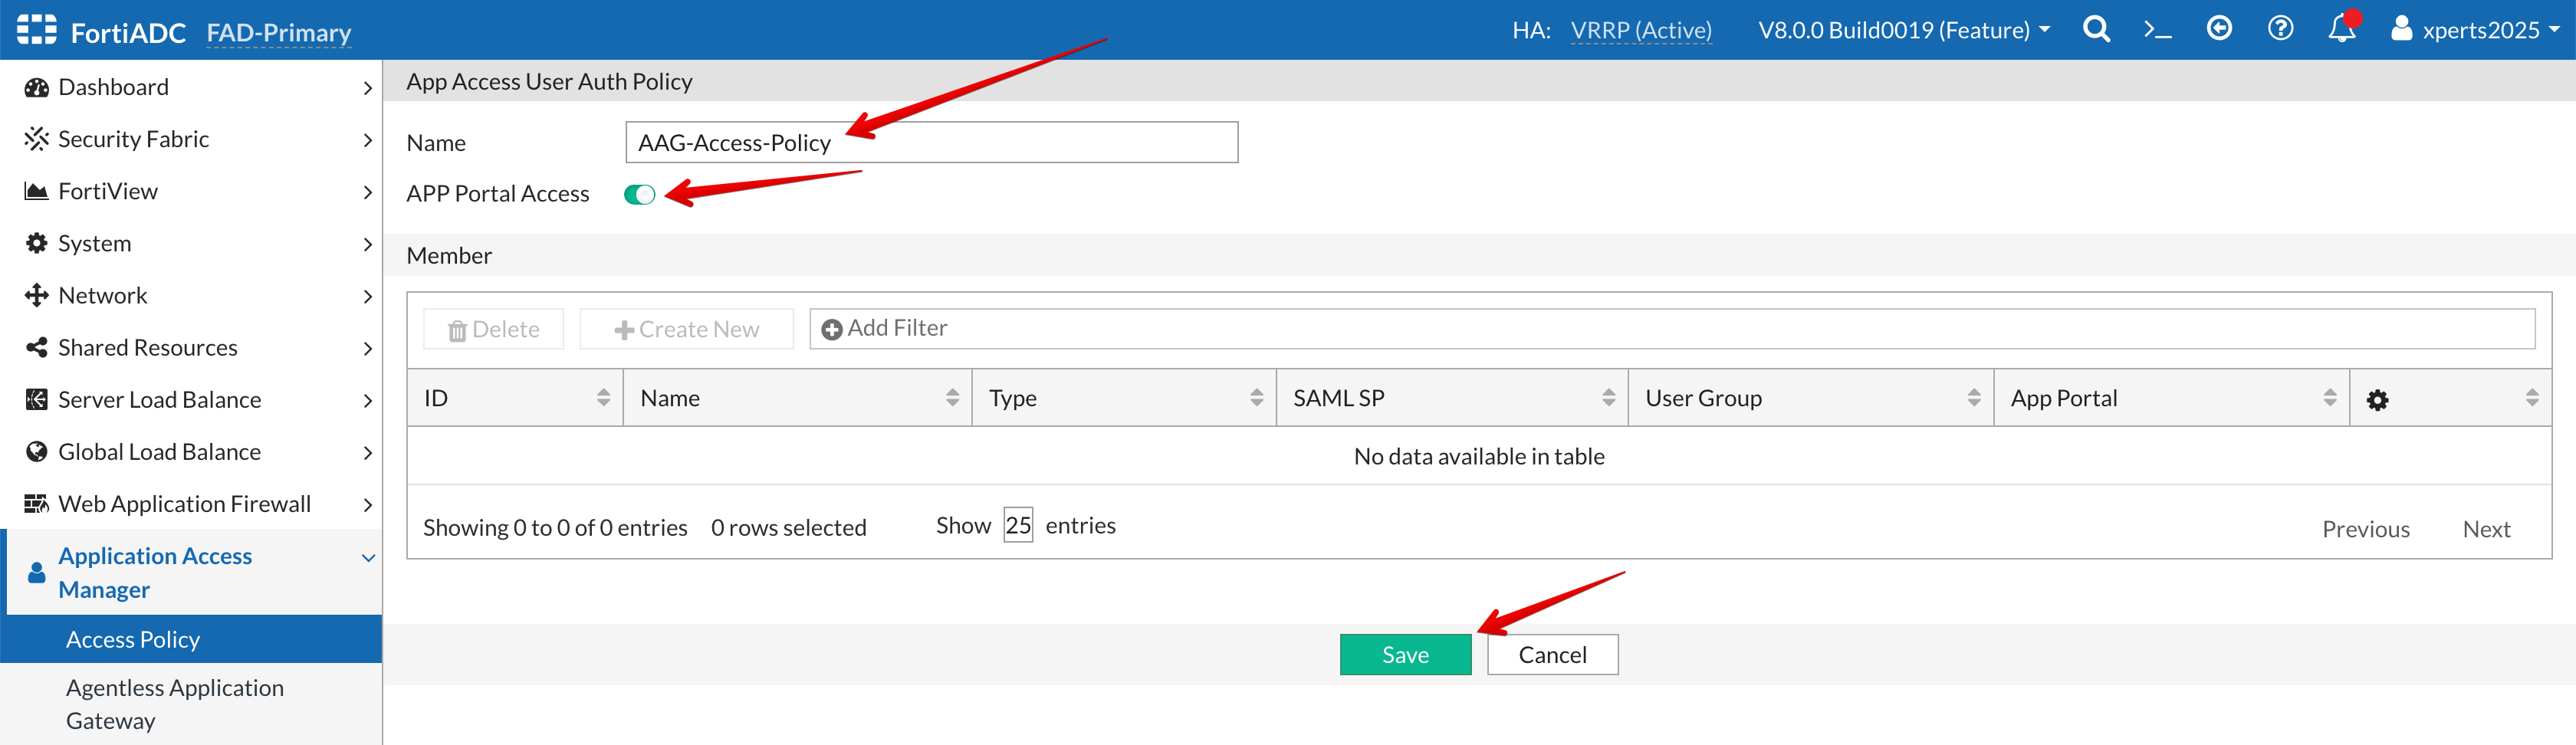
Name: AAG-Access-Policy
Set the App Portal Access flag to ON
Save
Click +Create New
Name: AAG-Portal-Users
User Group: AAG-Users
App Portal: AAG-App-Portal
Save
Save
Configure a Virtual Server for the AAG
Configure a Virtual Server for the AAG
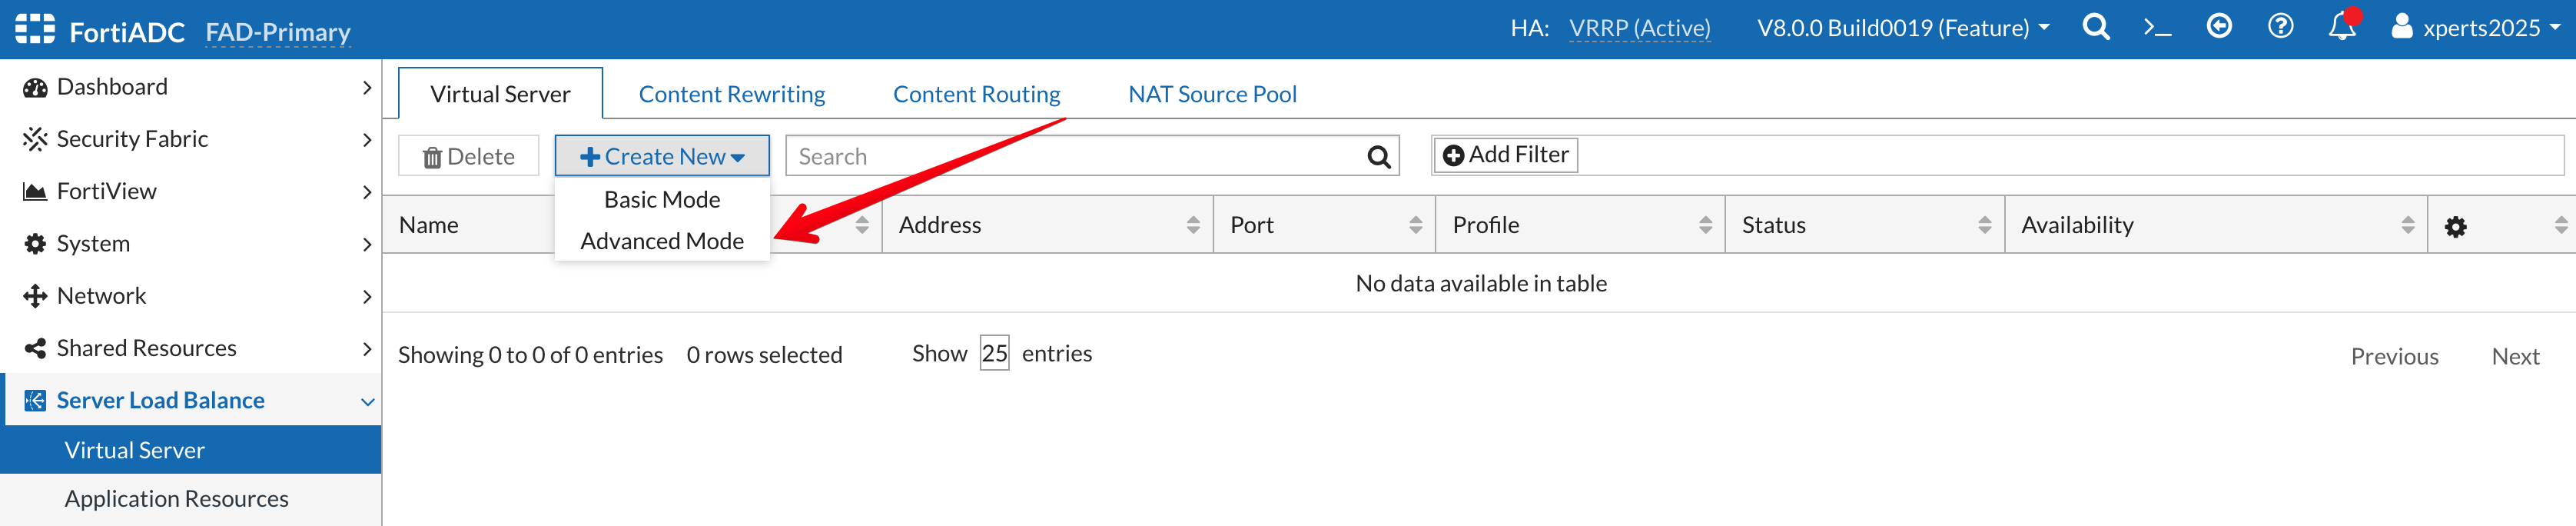
Go to Server Load Balance → Virtual Server
Click +Create New then Advanced Mode
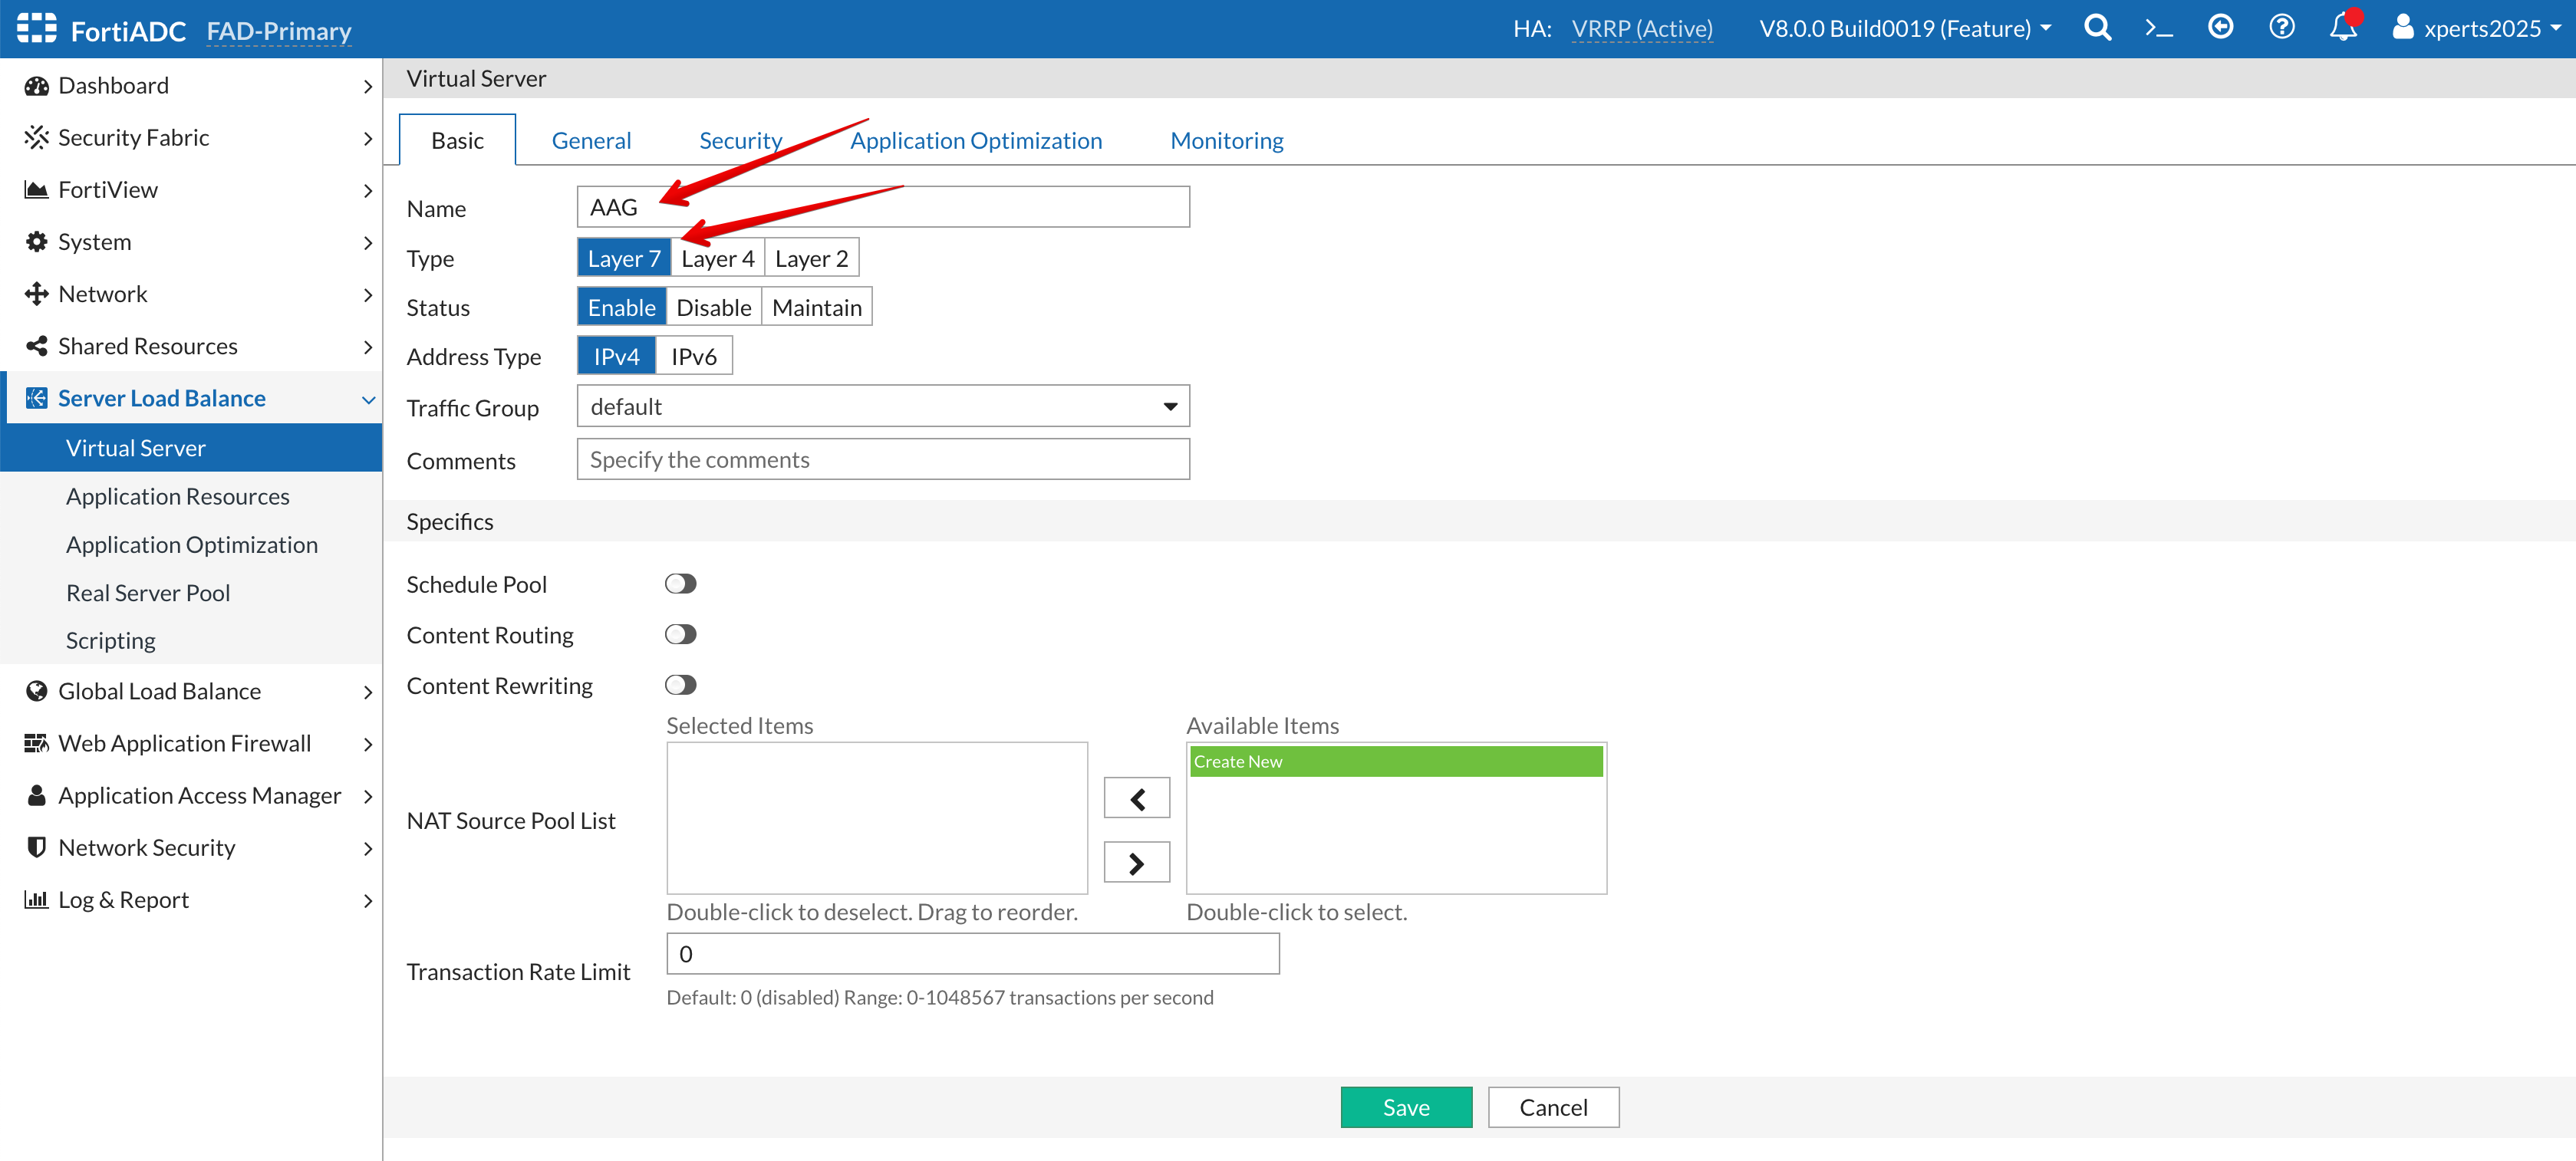
Name: AAG
Type: Layer 7
Info
There is no need to save yet. We will go to the General Tab and the Monitoring Tab then save the whole thing.
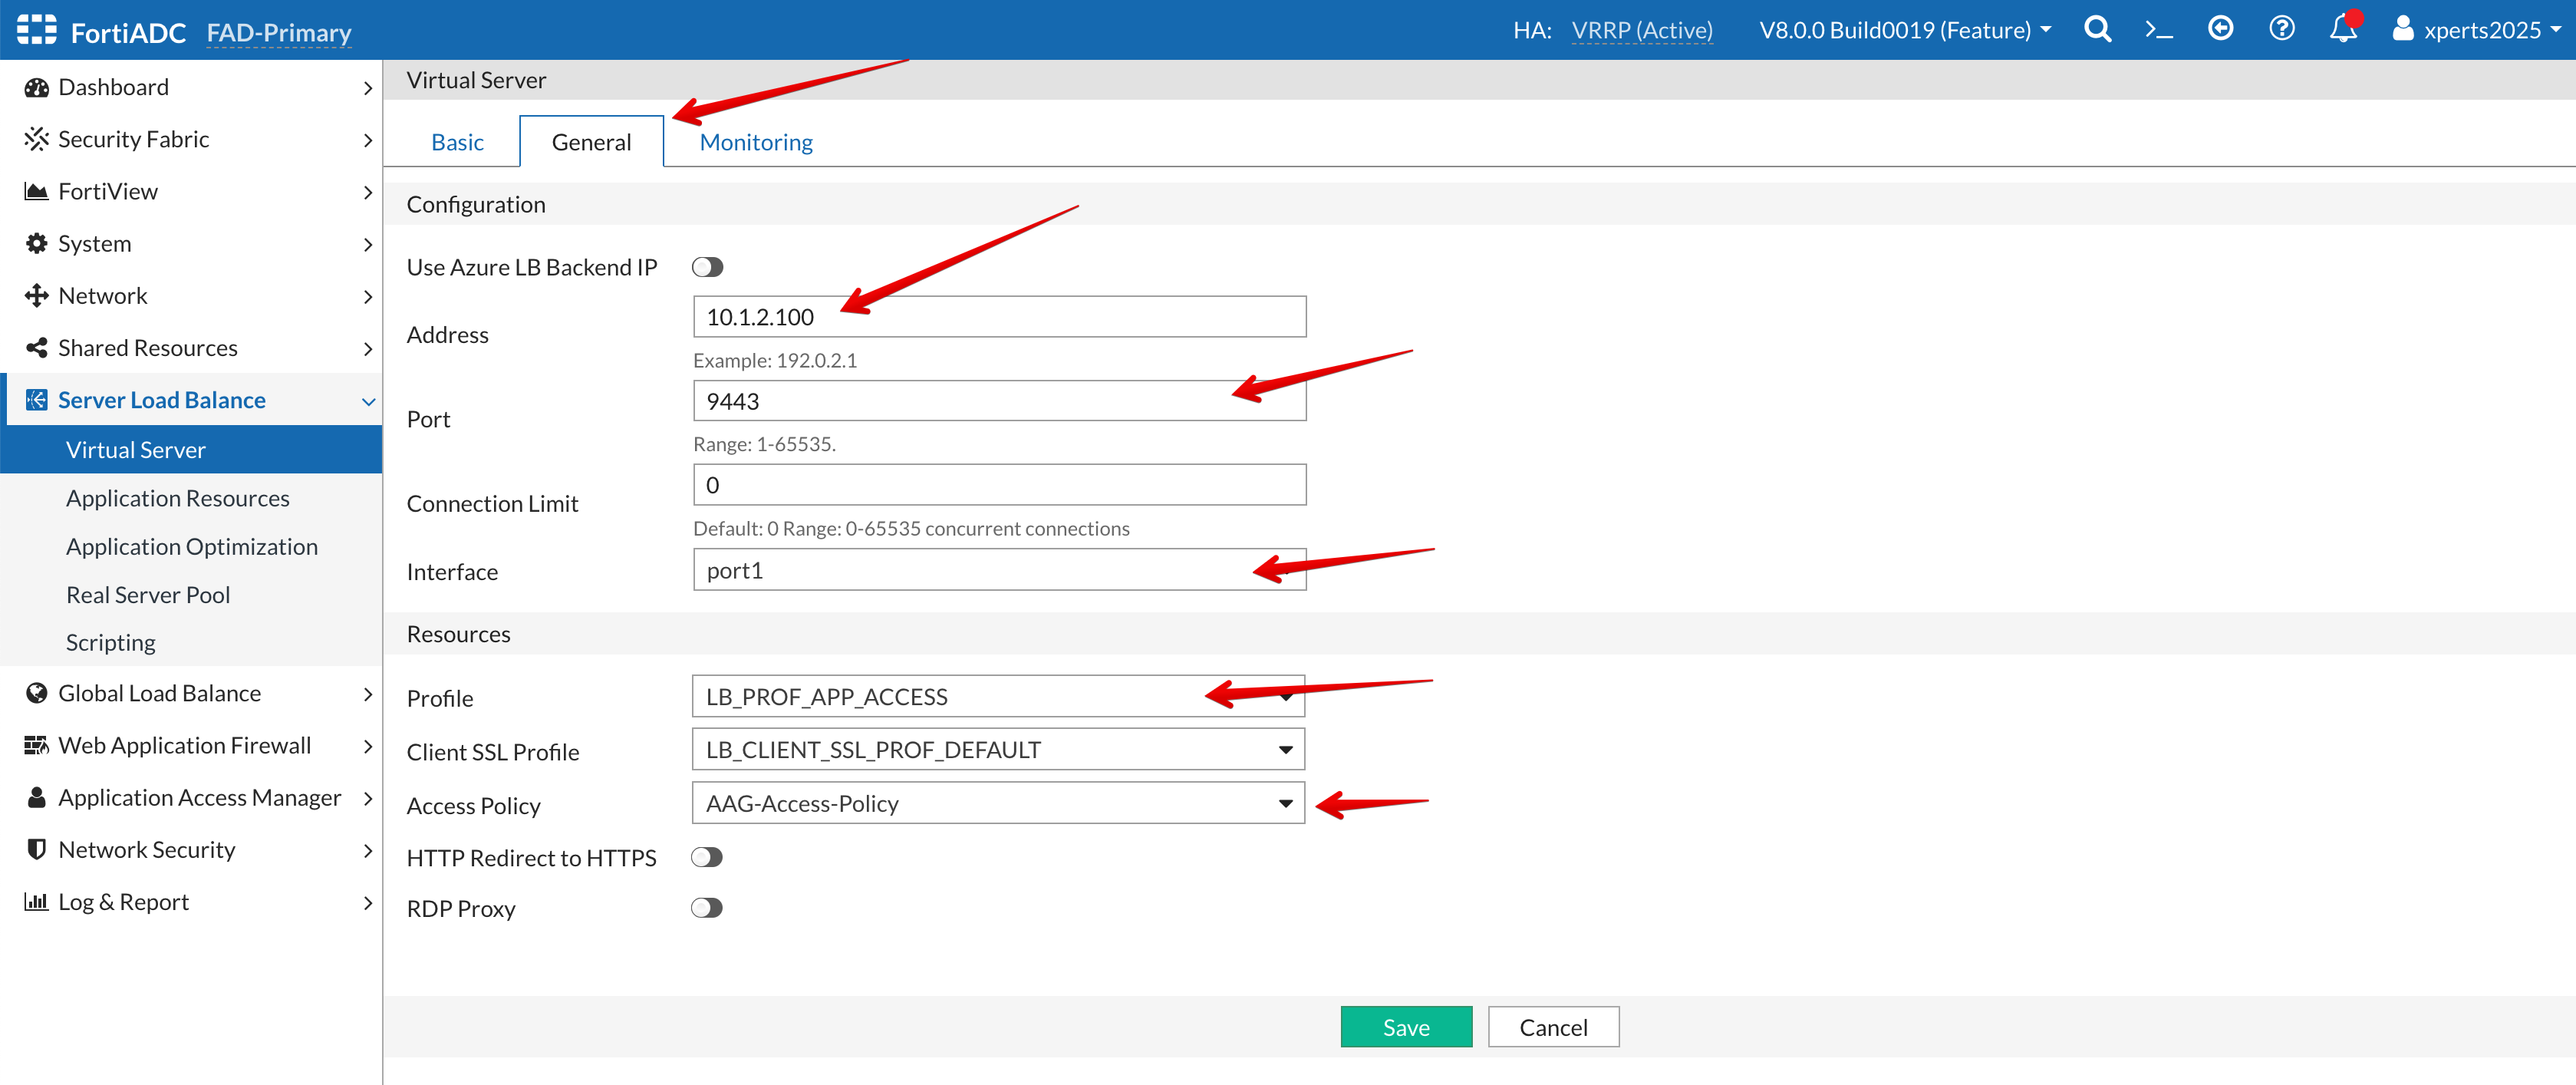
Click on the General Tab
Address: 10.1.2.100
Port: 9443
Interface: Port1
Profile: LB_PROFILE_APP_ACCESS
Access Policy: AAG-Access-Policy
No need to save yet.
Info
The Profile needs to be an AAG Profile.
Click on the Monitoring Tab
Toggle the Traffic Log flag to ON
Save
Info
Traffic logging should be used mainly for debugging; traffic logging will consume extensive memory and CPU resources. Please disable traffic logging after debugging is complete.
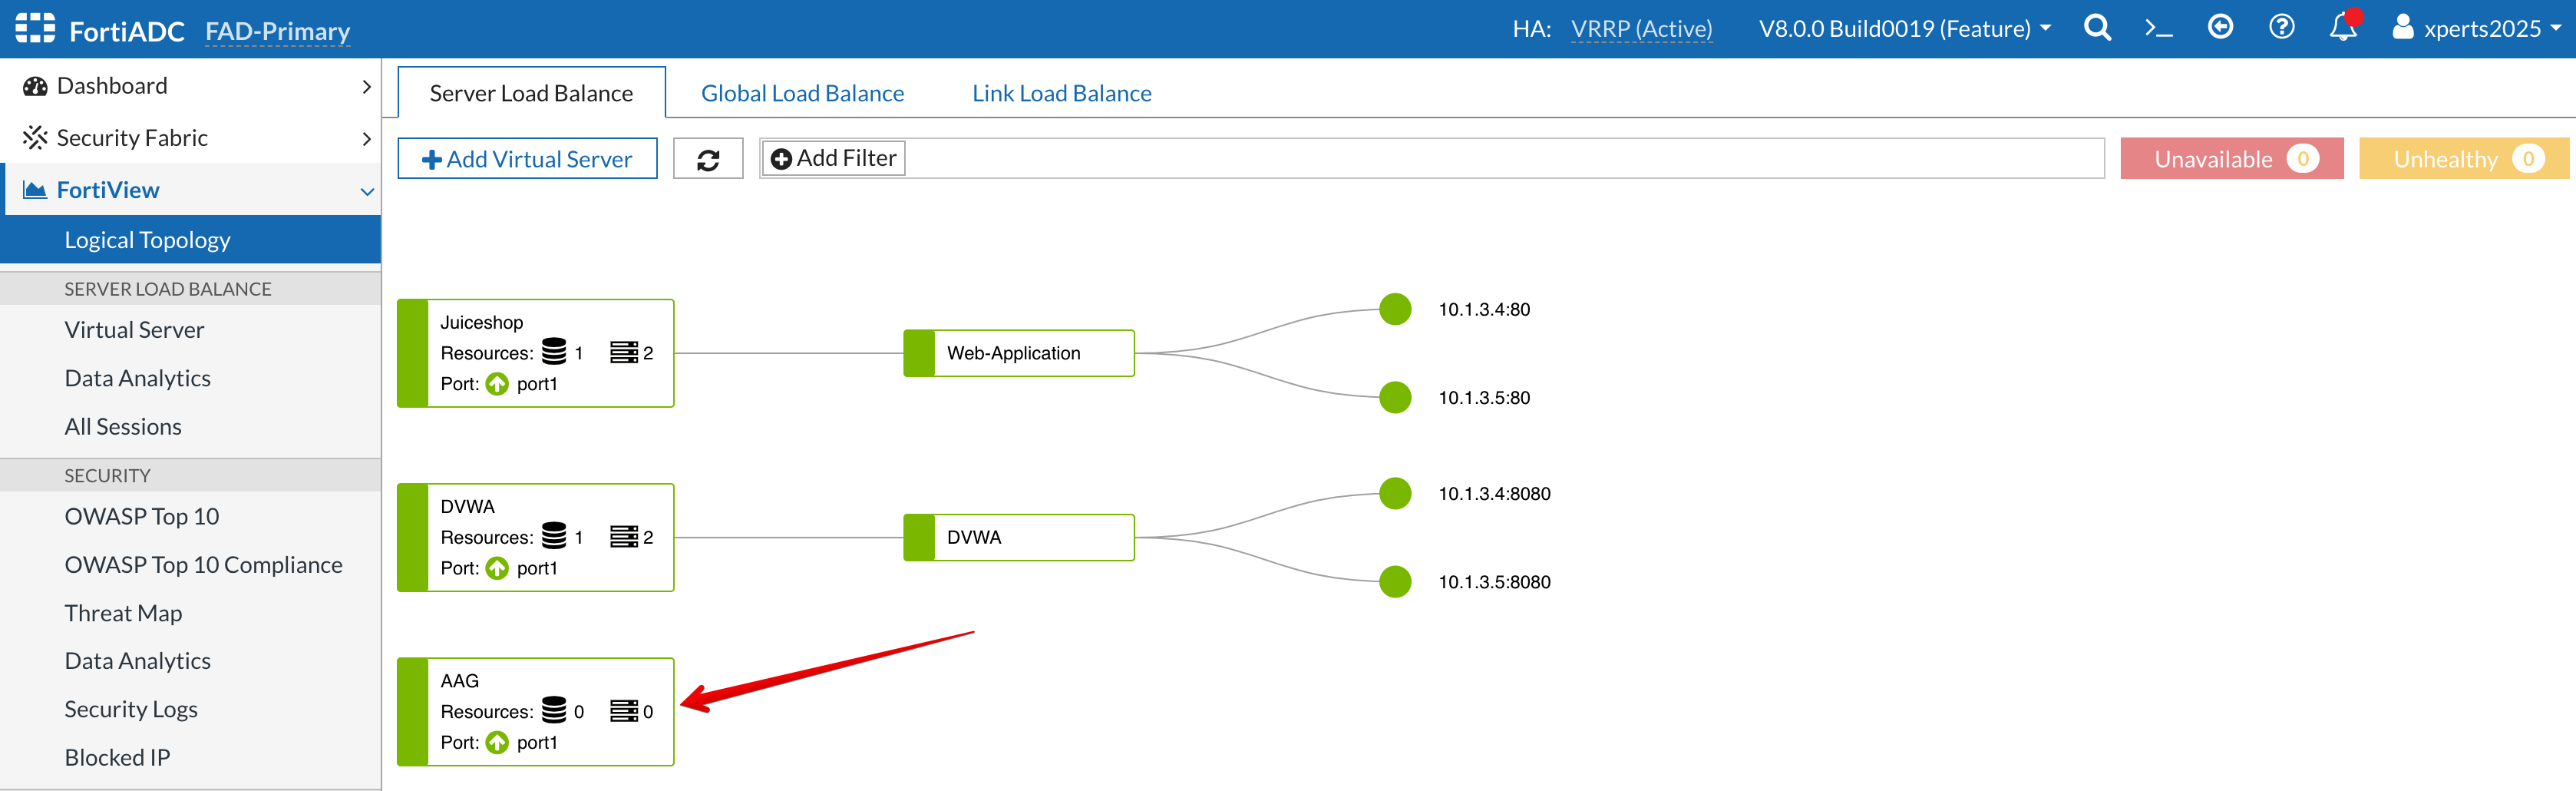
Go to FortiView → Logical Topology
You should see your Application Access Gateway.
Test
Test AAG Access
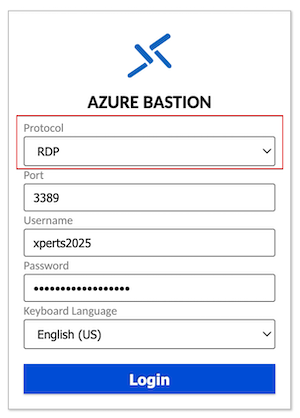
From the Client with username xperts2025 and password AppSec-Xp3rts2025!
Open Firefox
Go to https://10.1.1.100:9443
Username: user1
Password: user1
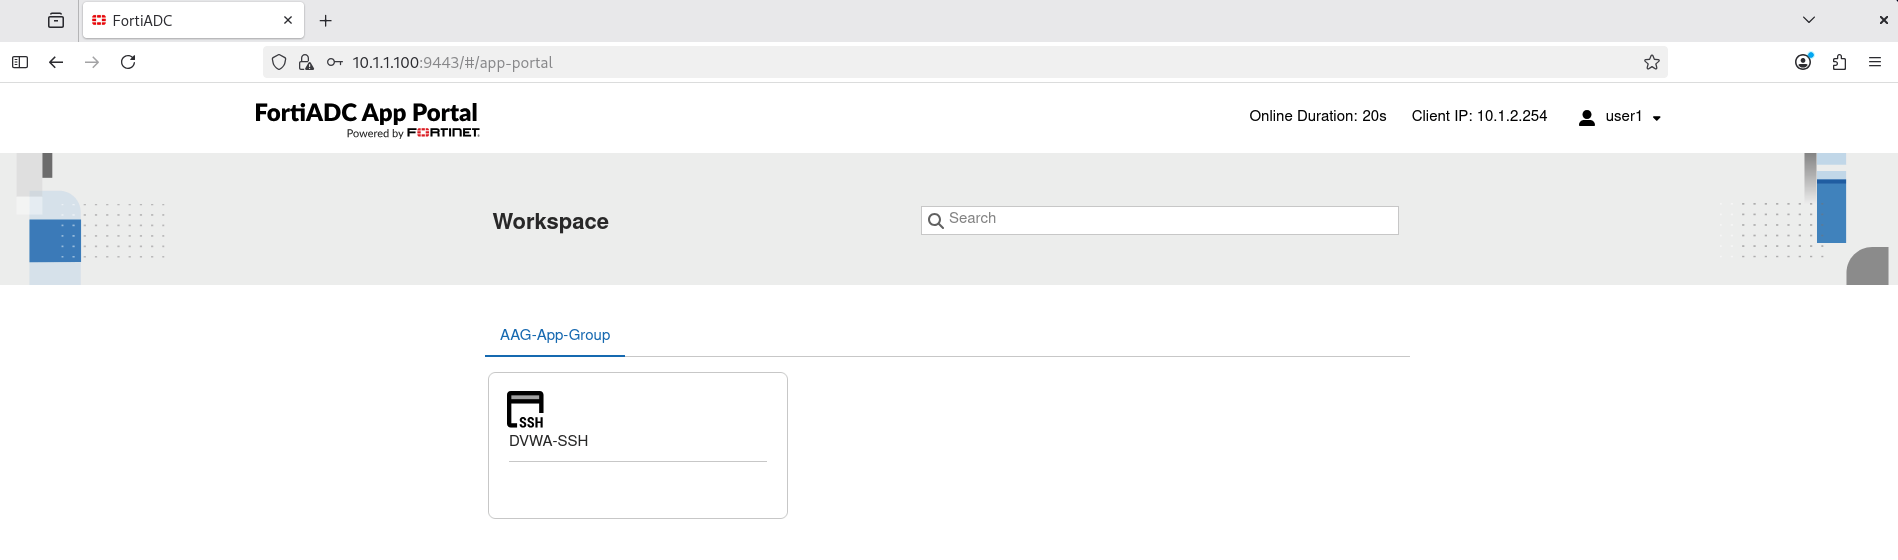
You should see your Application App Group
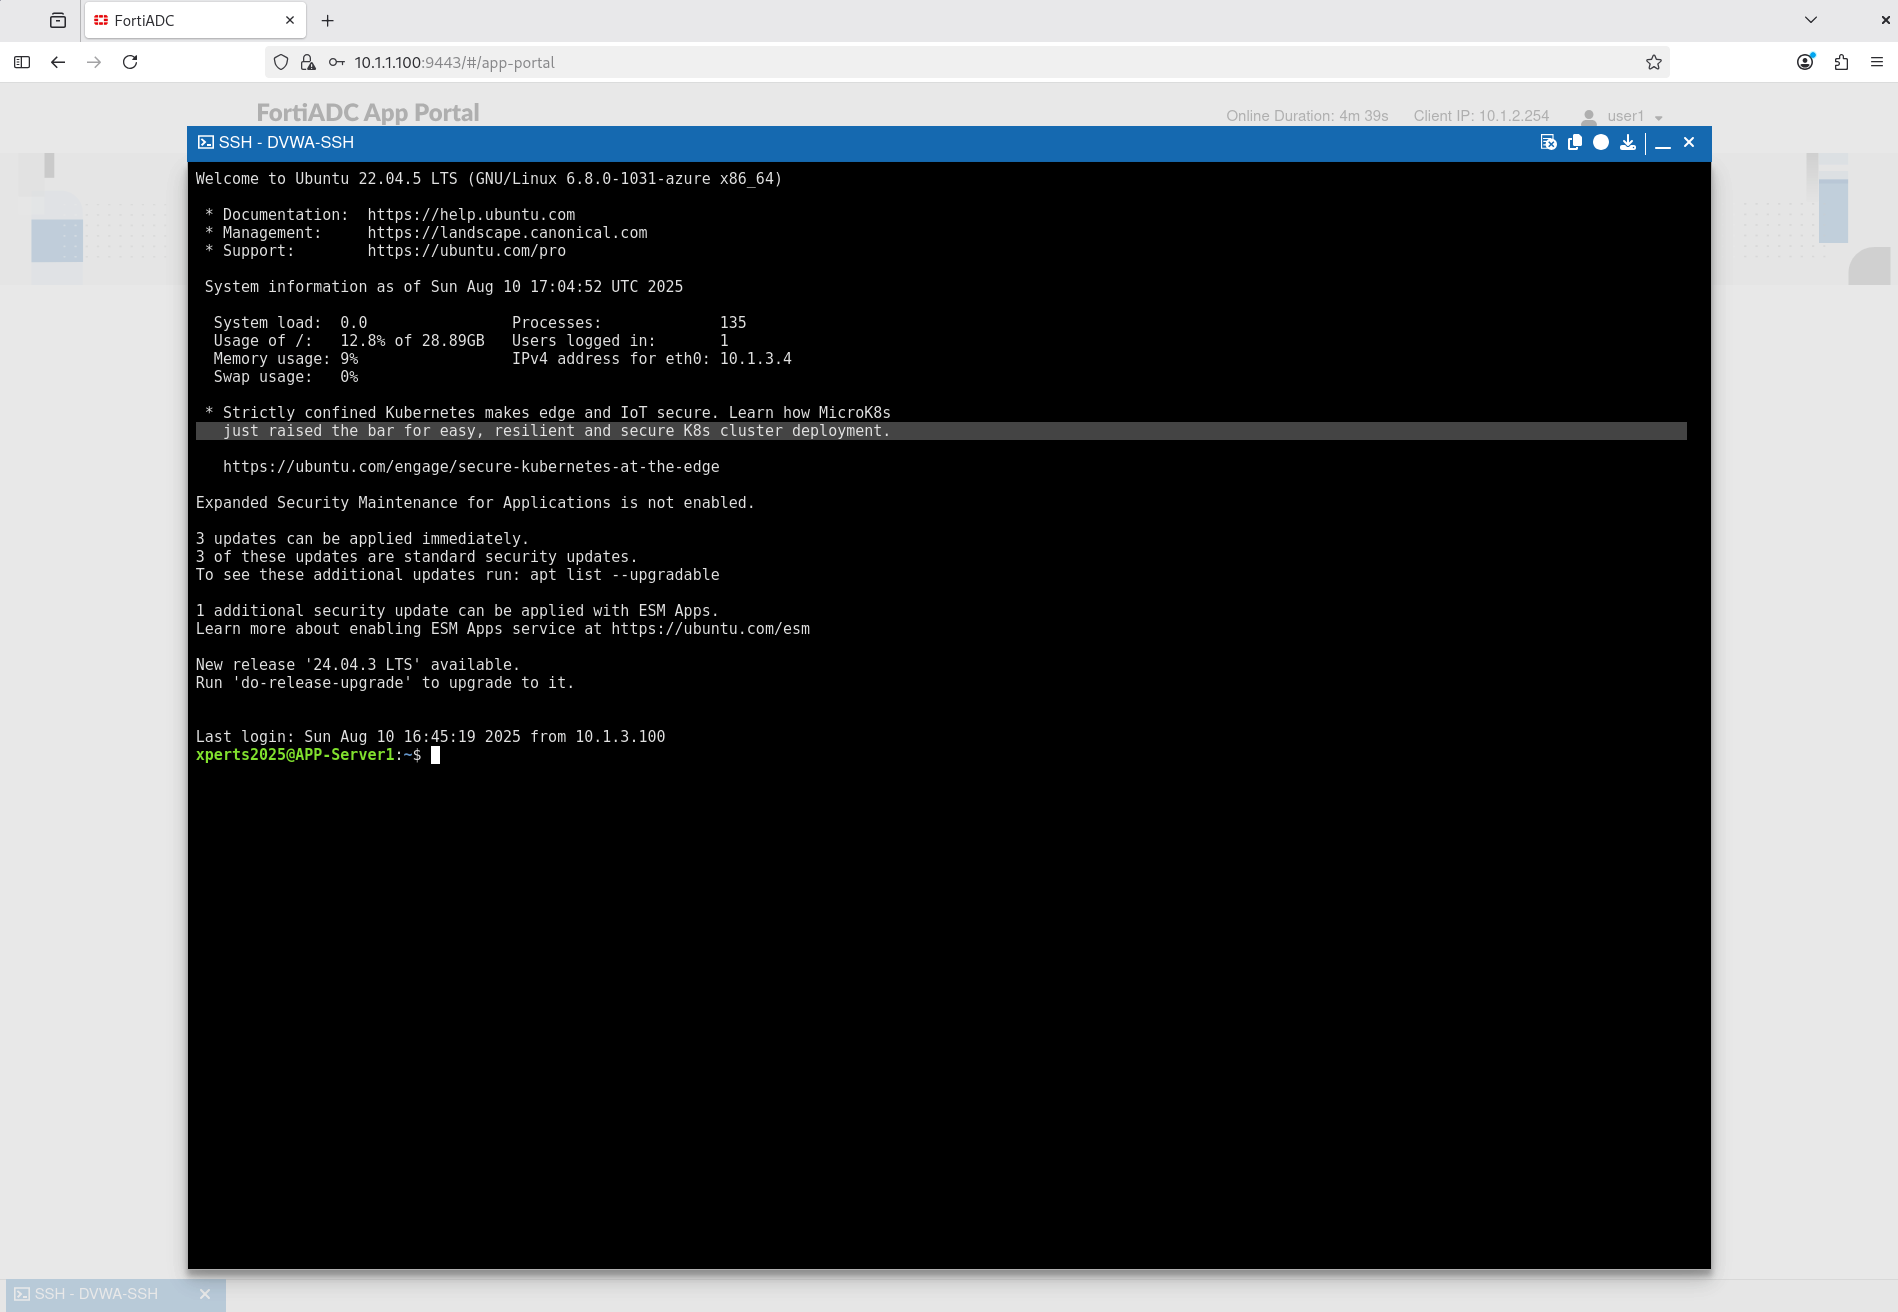
Click the DVWA-SSH App Group
You should have access to the DVWA server via SSH.
AAG Debugging and Troubleshooting
AAG Debugging and Troubleshooting
FortiADC provides both GUI and CLI-based diagnostic tools to monitor and troubleshoot Agentless Application Gateway (AAG) activity. These tools allow administrators to inspect authentication events, session status, traffic usage, and connection behavior in real time.
This information is also available in the FortiADC 8.0.0 Administration Guide and CLI Reference:
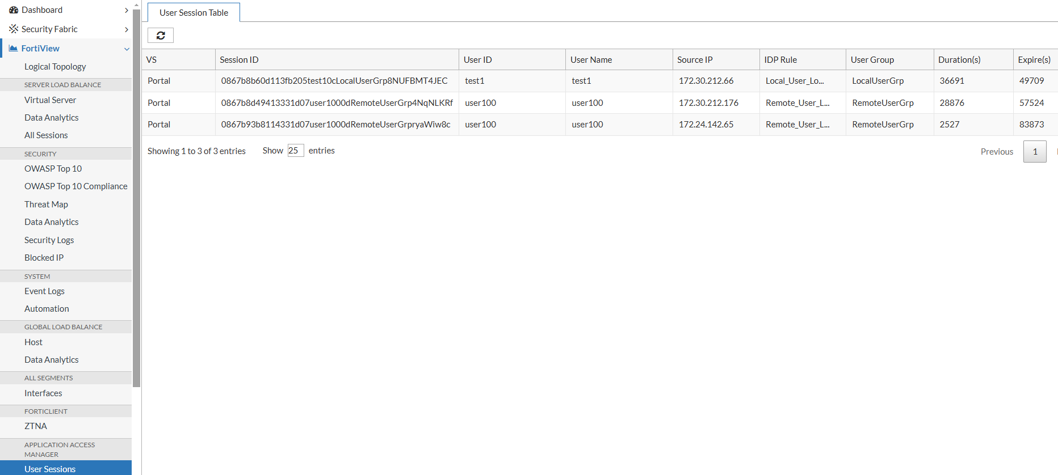
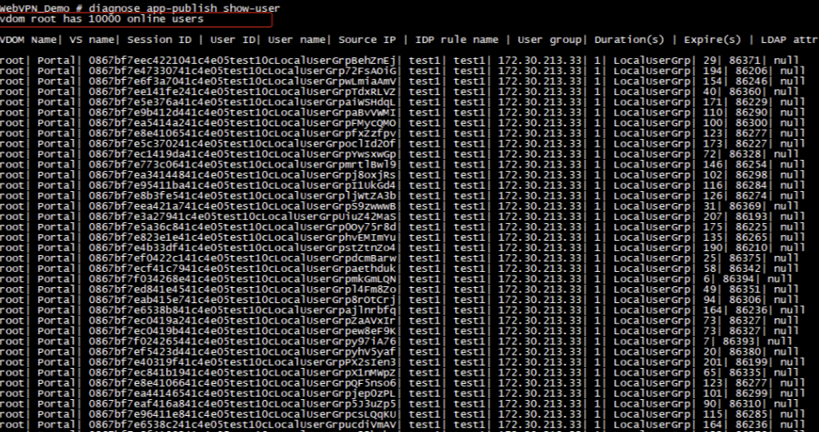
Navigate to FortiView > User Session to view real-time information about users currently authenticated through the AAG App Portal.
The table displays the following fields:
VS – Virtual Server name handling the session
Session ID – Unique identifier for the user session
User ID – Internal user identifier
User Name – Authenticated username
Source IP – Origin IP address of the client
IDP Rule – Identity provider rule that applied
User Group – Assigned group membership
Duration (s) – Time the session has been active
Expire (s) – Remaining time before session expiration
This dashboard is useful for tracking session state, identifying active users, and confirming authentication success.
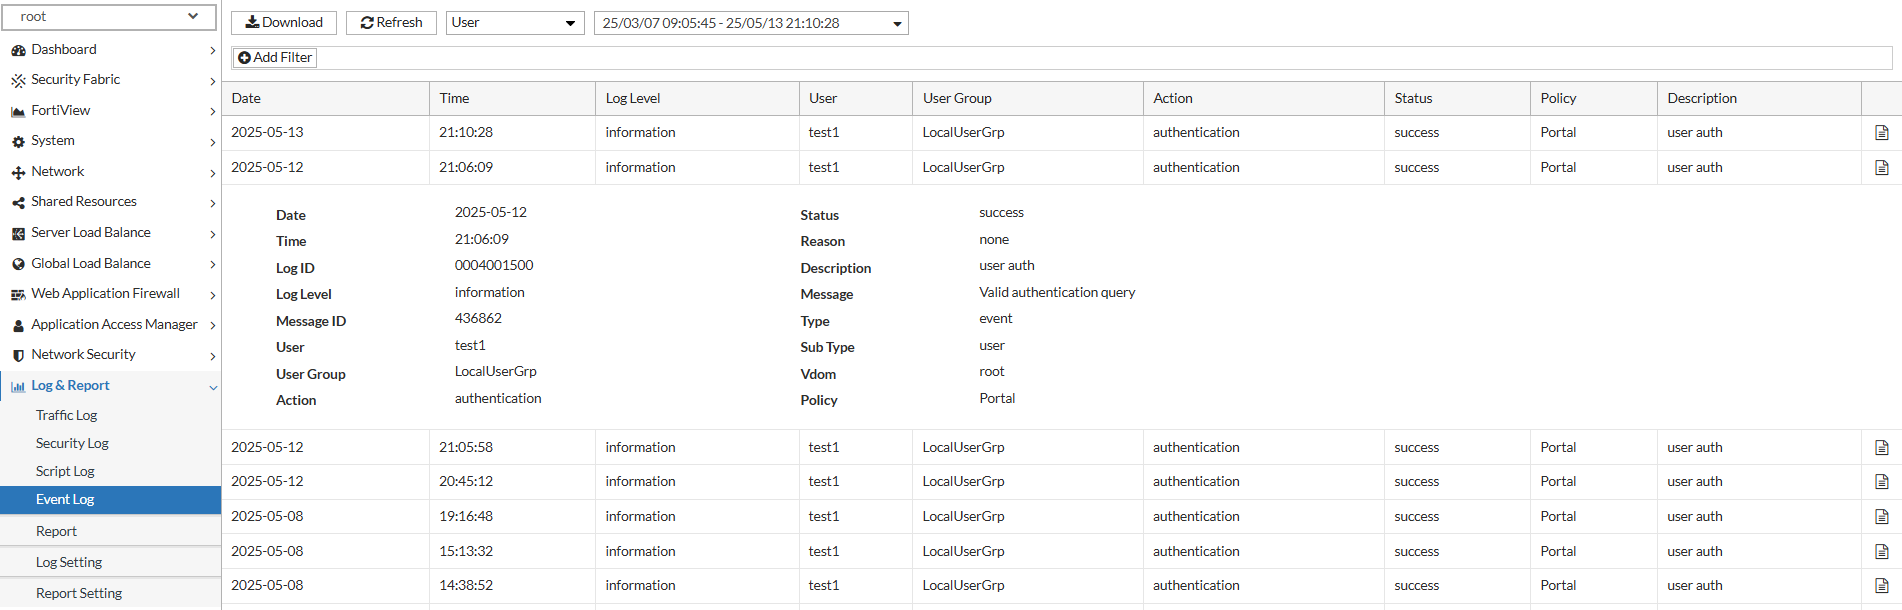
Event Logs – Authentication Activity
To review authentication behavior and diagnose login issues, navigate to Log & Report > Event Log and filter by User.
Each log entry provides detailed contextual information, including:
Date – The date the event occurred
Time – The timestamp of the event
Log Level – Severity or verbosity of the log (e.g., notice, warning)
User – Username of the individual attempting access
User Group – Group membership associated with the user
Action – Type of authentication event (e.g., login, logout, failure)
Status – Result of the event (e.g., success, failed)
Reason – High-level reason code for the event (e.g., invalid credentials)
Description – Summary of the action performed
Message – Detailed message or explanation from the system
Vdom – Virtual domain where the event occurred
Policy – Access Policy name that governed the authentication flow
Use this log view to validate user authentication behavior, troubleshoot policy misconfigurations, or verify enforcement across user groups and virtual domains.
Traffic Logs – Application Access
Navigate to Log & Report > Traffic Log and filter by Application Access to analyze usage and connection details for all applications accessed through the AAG App Portal.
Each entry includes:
Date, Time, Log Level
Duration (ms)
Received Bytes, Sent Bytes
Protocol, Service
Source, Source Port
Destination, Destination Port
Translated Source/Destination Port
Virtual Server
Action (accept, deny)
APP Type – Application type (e.g., RDP, SSH)
User Group
Source Country, Destination Country
Bookmark – The application bookmark used
AppGroup – The App Group containing the bookmark
This log provides visibility into user activity, bandwidth usage, and resource access patterns.
CLI-Based Diagnostic Tools
App-Publish Diagnostic Commands
Use the diagnose app-publish command set to inspect AAG configuration and manage user sessions directly from the CLI:
Command
Description
show-config
Displays the current AAG configuration, including App Portals, App Groups, and bookmarks.
show-user
Lists all currently authenticated AAG users and session details.
show-connection
Displays active application connections established through the AAG portal (e.g., RDP, SSH sessions).
kickoff-user
Terminates the session of a specific AAG user. Useful for forced logout or session resets.
clear-user
Clears all tracked session state for a specified user.
clear-connection
Terminates all AAG application connections for a specific user or session.
Example:
Module-Level Debug Logging
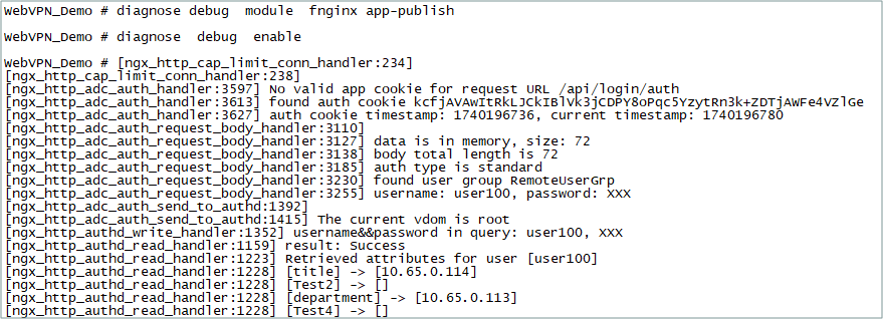
To enable verbose logging for the AAG module (app-publish), use the following command to view runtime behavior and debug issues:
diagnose debug module fnginx app-publish
This command provides backend insight into:
Portal rendering behavior
Bookmark resolution and visibility issues
Session negotiation
Authentication handoff and result mapping
Application proxy session establishment and teardown
Enable debug output when troubleshooting issues related to user login failures, bookmark rendering problems, or connection errors.
Example:
Logs and Dashboard
Logs and Dashboard
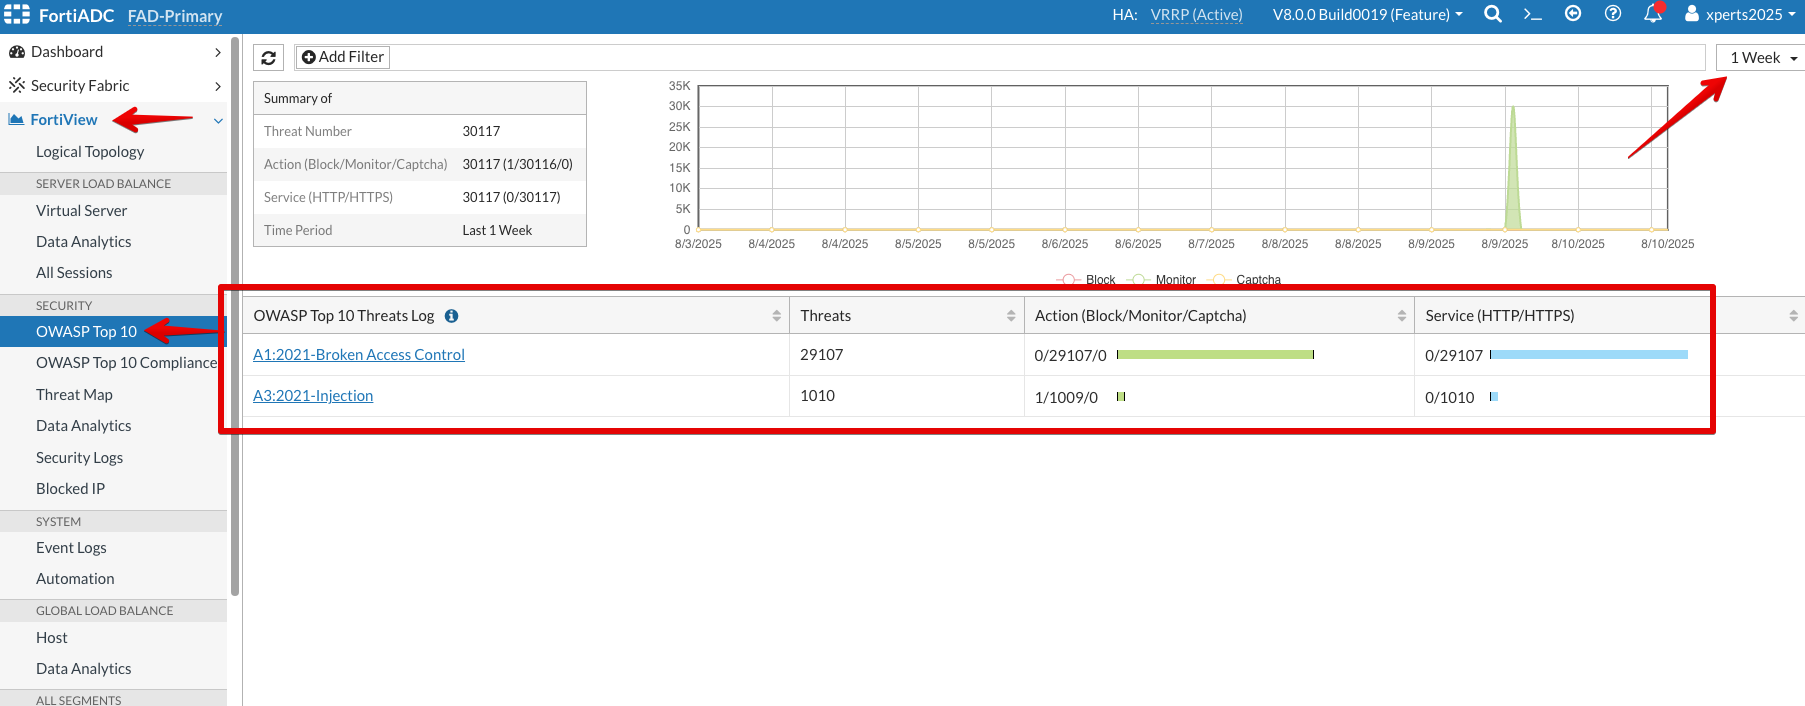
For this section, we will look at different types of logs and dashboards.
Login to the FortiADC (FAD-Primary) with the username xperts2025 and password AppSec-Xp3rts2025!
We will look at the Logical Topology of the FortiADC network structure showing the FortiADC’s Virtual Servers, Server Pools and Real Servers under the respective Server Pools.
Click FortiView and then, select Logical Topology and you will be able to see Virtual Servers under Server Load Balance tab.
From the below screenshot, we can see both Juiceshop and DVWA Virtual Servers.
Now, we will look at the Statistics status of the whole VDOM. For that, go to FortiView → Data Analytics under Server Load Balance tab.
We can see details about number of HTTP(S) Connections, number of GET or POST method requests, HTTP Server Response codes like 200, 400, 500 etc.
Through the FortiView → OWASP Top 10 page, we can monitor threats by OWASP Top 10 to analyze the 10 most critical attacks targeted to our application upto 1 week.