Using the Simplified Template to Deploy a FortiGate Autoscale Group

This documentation provides comprehensive guidance for deploying FortiGate autoscale groups in AWS using the FortiGate Autoscale Simplified Template. This template serves as an accessible wrapper around Fortinet’s enterprise-grade FortiGate Autoscale Templates, dramatically reducing deployment complexity while maintaining full architectural flexibility.
The official FortiGate autoscale templates available in the terraform-aws-cloud-modules repository deliver powerful capabilities for deploying elastic, scalable security architectures in AWS. However, these templates require:
The Simplified Template addresses these challenges by:
The Simplified Template enables rapid deployment of FortiGate autoscale groups by simplifying configuration of:
This template is specifically designed for the most frequently deployed FortiGate autoscale architectures:
The Simplified Template approach:
Before using this template, ensure you have:
init, plan, apply, destroy)terraform.tfvars configuration filesThis guide is organized into the following sections:
For comprehensive FortiGate and FortiOS documentation beyond the scope of this deployment guide, please reference:
For technical support:
For documentation feedback or Simplified Template enhancement requests, please reach out through your Fortinet account team or technical contacts.
Ready to deploy? Proceed to the Overview section to understand the architecture patterns available, or jump directly to the Templates section to begin configuration and deployment.
Before investing time in this deployment, it is worth asking whether autoscale is the right architecture for your use case. Our general recommendation is to consider intentional scaling — using Terraform to preemptively manage instance count — before committing to an autoscale deployment.
Most customers, once they understand the trade-offs, choose intentional scaling over autoscale. If you can make that case to your customer, you should.
A new FortiGate instance takes approximately 4-5 minutes to deploy, license, and become traffic-ready. If the burst event that triggered the scale-out lasts less than 4-5 minutes, the new instance will be ready after the event has already passed. In many cases, autoscale provides no benefit for short-duration bursts.
Once an instance is deployed, the scale-in backoff period is intentionally conservative to avoid prematurely removing capacity. This means you may be paying for instances well after they are needed.
In practice, FortiGate instances are often faster than the infrastructure they are protecting. The CPU thresholds that trigger scale-out are rarely reached, making the autoscale group effectively a fixed-size deployment with additional complexity. Vertical scaling — choosing a larger instance type — is often a simpler and more effective solution.
GWLB uses 5-tuple hashing to pin a flow to a specific FortiGate instance, but you have no visibility into which instance is handling a given flow without digging through GWLB flow logs and individual FortiGate session tables. Because instances are ephemeral, the instance that handled a flow may be terminated before you can investigate it. This makes troubleshooting traffic and security events significantly more difficult than in a static deployment.
Licenses are assigned dynamically by a Lambda function backed by a DynamoDB table. If Lambda fails or the table falls out of sync, instances can come up unlicensed. Troubleshooting requires inspecting Lambda execution logs, DynamoDB state, and FortiGate registration status simultaneously — none of which are familiar tools for most FortiGate administrators.
Lambda functions orchestrate the entire autoscale lifecycle: instance launch, license assignment, primary instance election, and scale-in cleanup. When something goes wrong, diagnosis requires navigating CloudWatch log groups, correlating Lambda execution events to specific FortiGate instance activity, and understanding the autoscale state machine. This requires a combined skill set of FortiGate administration, AWS networking, and AWS serverless operations.
Upgrading FortiOS on a running autoscale group is a manual, multi-step process involving AWS Console operations, new launch template versions, and per-instance firmware upgrades through the FortiGate GUI. There is no automated upgrade path.
VPN tunnels cannot be terminated on autoscale instances. IPSec requires a stable, known IP address or FQDN for the remote peer to establish a tunnel against. Autoscale instances are ephemeral — their IPs come and go as the group scales. Even if an EIP is attached, IKE/IPSec session state lives on a specific instance. If that instance is terminated, the tunnel drops and must be fully re-negotiated with a replacement instance. If your design requires site-to-site or client VPN termination on the FortiGate, a static deployment or HA pair is the appropriate solution.
If you use per-instance Elastic IPs for egress rather than a NAT Gateway, the source IP of outbound traffic is non-deterministic. EIPs are associated with ephemeral instances and change as the group scales. If your downstream systems, partners, or compliance requirements depend on a stable egress IP, you must use a NAT Gateway — which adds cost and a fixed point of failure.
If your workload has genuine, sustained traffic bursts that exceed what a single instance can handle, and you cannot predict when those bursts will occur, autoscale can be a good fit. The following guidance applies if you proceed:
Maintain at least one instance per Availability Zone. This avoids cross-AZ traffic inspection costs and ensures local capacity is always available without a cold-start delay.
Tune the CloudWatch alarms. The default scale-out threshold is CPU > 80% for two consecutive 120-second periods. If your bursts are shorter than the scale-out latency, adjust the thresholds or disable scale-out entirely and treat the group as a fixed-size deployment.
Enable primary_scalein_protection. This prevents the primary FortiGate
instance — which holds the authoritative configuration — from being selected
as a scale-in candidate. Without this, configuration can be lost if the
primary is terminated and a new primary election is required.
Use a NAT Gateway for egress. Per-instance EIPs result in non-deterministic source IPs as instances come and go. A NAT Gateway provides a stable, predictable egress IP.
Plan licensing carefully. A common pattern is BYOL or FortiFlex for baseline instances (those that never scale in) and PAYG for burst instances. Alternatively, size FortiFlex entitlements to cover the maximum desired capacity. Either way, license capacity must be planned ahead — running out of licenses during a scale-out event leaves new instances unlicensed.
Consider FortiAnalyzer. Given the non-deterministic traffic flow and ephemeral instance nature of autoscale, a central logging and analytics platform is more valuable here than in a static deployment. Without it, correlating security events across instances is very difficult.
If your load patterns are predictable — scheduled batch jobs, business-hours traffic, known maintenance windows — Terraform can manage instance count intentionally and preemptively. You define the capacity you need, when you need it, and Terraform applies it. This approach is simpler to operate, easier to troubleshoot, and avoids the Lambda/DynamoDB/CloudWatch machinery entirely.
This workshop focuses on autoscale deployments. If intentional scaling is a better fit, the FortiGate AWS Autoscale TEC Workshop covers the lower-level components and gives you more direct control over the deployment.
FortiOS natively supports AWS Autoscaling capabilities, enabling dynamic horizontal scaling of FortiGate clusters within AWS environments. This solution leverages AWS Gateway Load Balancer (GWLB) to intelligently distribute traffic across FortiGate instances in the autoscale group. The cluster dynamically adjusts its capacity based on configurable thresholds—automatically launching new instances when the cluster size falls below the minimum threshold and terminating instances when capacity exceeds the maximum threshold. As instances are added or removed, they are seamlessly registered with or deregistered from associated GWLB target groups, ensuring continuous traffic inspection capabilities while maintaining optimal cluster performance and capacity.
This autoscaling solution delivers several strategic advantages for AWS security architectures:
This simplified template streamlines the deployment of FortiGate autoscale groups by abstracting infrastructure complexity while providing customization options for:
Fortinet offers several complementary AWS security architectures optimized for different use cases:
For comprehensive information on Fortinet’s AWS security portfolio, deployment guides, and architectural best practices, visit www.fortinet.com/aws.
FortiGate autoscale deployments in AWS support three distinct licensing models, each optimized for different operational requirements, cost structures, and scaling behaviors. The choice of licensing strategy significantly impacts deployment complexity, operational costs, and the ability to dynamically scale capacity in response to demand.
This template supports all three licensing models and enables hybrid licensing configurations where multiple license types coexist within the same autoscale group, providing maximum flexibility for cost optimization and capacity management.
Best for: Proof of concepts, temporary workloads, elastic burst capacity
AWS Marketplace PAYG licensing offers the simplest deployment path with zero upfront licensing requirements. Instances are billed hourly through your AWS account based on instance type and included FortiGuard services.
Best for: Long-term production deployments with predictable capacity requirements
BYOL licensing leverages perpetual or term-based FortiGate-VM licenses purchased directly from Fortinet or authorized resellers. This model provides the lowest per-instance operating cost for sustained workloads but requires manual license file management.
lic_folder_path variable to point to license file directorylicenses/
├── FGVM01-001.lic
├── FGVM01-002.lic
├── FGVM01-003.lic
└── FGVM01-004.licCritical: Ensure sufficient licenses exist for asg_max_size. If licenses are exhausted during scale-out, new instances will remain unlicensed and non-functional.
Best for: Dynamic workloads requiring flexibility with optimized costs for medium to long-term deployments
FortiFlex (formerly Flex-VM) is Fortinet’s consumption-based, points-driven licensing program that combines the flexibility of PAYG with cost structures approaching BYOL. Points are consumed daily based on FortiGate configuration (CPU count, service package), and licenses are dynamically provisioned via API tokens.
FortiFlex Program Registration:
FC-10-ELAVR-221-02-XX (12, 36, or 60 months)https://support.fortinet.comPoint Pack Purchase:
LIC-ELAVM-10K (10,000 points, 1-year term with rollover)LIC-ELAVMMY-50K-XX (50,000 points, 3-5 year terms)LIC-ELAVMMY-BULK-SEAT (100,000 points per seat, minimum 10 seats)Configuration Creation:
https://fndn.fortinet.net/index.php?/tools/fortiflex/API Access Setup:
| Configuration | Daily Points | Monthly Points (30 days) | Annual Points |
|---|---|---|---|
| 1 CPU, FortiCare Premium | 1.63 | 49 | 595 |
| 2 CPU, UTP Bundle | 6.52 | 196 | 2,380 |
| 4 CPU, ATP Bundle | 26.08 | 782 | 9,519 |
| 8 CPU, Enterprise Bundle | 104.32 | 3,130 | 38,077 |
Note: Actual consumption varies based on specific service selections and VDOM count. Always use the FortiFlex Calculator for accurate estimates.
The autoscale template supports hybrid licensing configurations where multiple license types coexist within separate Auto Scaling Groups (ASGs). This architecture provides cost optimization by using BYOL or FortiFlex for baseline capacity and PAYG for elastic burst capacity.
┌─────────────────────────────────────────────────────┐
│              GWLB Target Group                      │
│                  (Unified)                          │
└────────┬────────────────────────────────┬───────────┘
         │                                │
         ▼                                ▼
┌─────────────────┐              ┌─────────────────┐
│  BYOL/FortiFlex │              │   PAYG ASG      │
│       ASG       │              │                 │
│                 │              │                 │
│  Min: 2         │              │  Min: 0         │
│  Max: 4         │              │  Max: 8         │
│  Desired: 2     │              │  Desired: 0     │
│                 │              │                 │
│ (Baseline)      │              │ (Burst)         │
└─────────────────┘ └─────────────────┘Primary ASG (BYOL or FortiFlex):
min_size = 2, max_size = 4, desired_capacity = 2Secondary ASG (PAYG):
min_size = 0, max_size = 8, desired_capacity = 0Scaling Coordination:
Scenario: E-commerce application with baseline 4 Gbps throughput, occasional spikes to 12 Gbps
Hybrid Configuration:
Primary: 4x c6i.xlarge (4 vCPUs) with FortiFlex
Secondary: 0-8x c6i.xlarge with PAYG
Savings vs. Pure PAYG: Approximately 35-45% reduction for this traffic pattern
START: What is your deployment scenario?
│
├─ POC / Testing / Short-term project (< 6 months)
│  └─ Use: AWS Marketplace PAYG
│     └─ Rationale: Simplicity, no upfront investment, easy teardown
│
├─ Long-term production (> 12 months) with steady-state capacity
│  └─ Do you have existing Fortinet licenses or ELA?
│     ├─ YES → Use: BYOL
│     │  └─ Rationale: Lowest cost, leverage existing investment
│     └─ NO → Use: FortiFlex
│        └─ Rationale: Flexible, better cost than PAYG, no upfront licensing
│
├─ Production with variable traffic patterns
│  └─ Use: Hybrid (FortiFlex + PAYG)
│     └─ Rationale: Baseline cost optimization with elastic burst capacity
│
└─ Multi-environment deployment (dev/staging/prod)
   └─ Use: FortiFlex
└─ Rationale: Point pooling across environments, on-demand provisioningCalculate total cost of ownership (TCO):
Start with PAYG for prototyping:
Implement hybrid licensing for cost optimization:
Automate license lifecycle management:
Maintain license inventory:
asg_max_size for maintenance windowsStandardize license file naming:
FGVMXX-001.lic)Test license recovery:
Monitor point consumption actively:
Plan point pack purchases:
Optimize entitlement lifecycle:
Right-size FortiGate configurations:
Symptoms: FortiGate instance boots but no license is applied; limited functionality
Causes:
lic_folder_path variableResolution:
aws s3 ls s3://<bucket>/licenses/s3:GetObject permissionexecute restore config license.licSymptoms: Instance launches but does not activate; no serial number assigned
Causes:
Resolution:
curl test authentication endpointhttps://support.fortinet.comSymptoms: PAYG instances launch while primary ASG has available capacity
Causes:
Resolution:
Symptoms: Instance operational but running in limited mode or showing expired license
Causes:
Resolution:
get system status/var/log/cloud-init-output.logexecute restore config tftp <license.lic> <tftp_server>execute vm-license <TOKEN>execute ping fortiguard.comChoosing the appropriate licensing model for your FortiGate autoscale deployment requires careful evaluation of deployment duration, traffic patterns, operational complexity tolerance, and budget constraints. This template supports all licensing models and hybrid configurations, enabling you to optimize costs while maintaining the flexibility to adapt to changing requirements.
Quick Selection Guide:
The FortiGate Autoscale Simplified Template abstracts complex architectural patterns into configurable components that can be enabled or customized through the terraform.tfvars file.
This section provides detailed explanations of each component, configuration options, and architectural considerations to help you design the optimal deployment for your requirements.
This section covers the major architectural elements available in the template:
Each component page includes:
Select a component from the navigation menu to learn more about specific configuration options.
The FortiGate autoscale solution provides two distinct architectures for internet egress traffic, each optimized for different operational requirements and cost considerations.
Each FortiGate instance in the autoscale group receives a dedicated Elastic IP address. All traffic destined for the public internet is source-NATed behind the instance’s assigned EIP.
access_internet_mode = "eip"In EIP mode, the architecture routes all internet-bound traffic to port2 (the public interface). The route table for the public subnet directs traffic to the Internet Gateway (IGW), where automatic source NAT to the associated EIP occurs.

All FortiGate instances share one or more NAT Gateways deployed in public subnets. Traffic is source-NATed to the NAT Gateway’s static Elastic IP address.
access_internet_mode = "nat_gw"NAT Gateway mode requires additional subnet and route table configuration. Internet-bound traffic is first routed to the NAT Gateway in the public subnet, which performs source NAT to its static EIP before forwarding to the IGW.

Scenario: 4 FortiGate instances processing 10 TB/month egress traffic
EIP Mode:
NAT Gateway Mode (2 AZs):
Decision Point: NAT Gateway makes sense when consistent source IP requirement justifies the additional cost.
| Factor | EIP Mode | NAT Gateway Mode |
|---|---|---|
| Monthly Cost | Minimal | $500+ (varies with traffic) |
| Source IP Predictability | Variable (changes with scaling) | Stable |
| Allowlisting Complexity | High (multiple IPs) | Low (single IP per AZ) |
| Throughput | Per-instance limit | Up to 45 Gbps per AZ |
| Operational Complexity | Low | Medium |
| Best For | Dev/test, cost-sensitive | Production, compliance-driven |
After selecting your internet egress option, proceed to Firewall Architecture to configure the FortiGate interface model.
FortiGate instances can operate in single-arm (1-ARM) or dual-arm (2-ARM) network configurations, fundamentally changing traffic flow patterns through the firewall.
firewall_policy_mode = "1-arm" # or "2-arm"
The 2-ARM configuration deploys FortiGate instances with distinct “trusted” (private) and “untrusted” (public) interfaces, providing clear network segmentation.
Traffic Flow:

The FortiGate GUI displays both physical interfaces and logical Geneve tunnel interfaces. Traffic inspection occurs on the logical tunnel interfaces, while physical port2 handles egress.
The 1-ARM configuration uses a single interface (port1) for all data plane traffic, eliminating the need for a second network interface.
Traffic Flow:
This “bump-in-the-wire” architecture is the typical 1-ARM pattern for distributed inspection, where the FortiGate provides security inspection but traffic egresses from the spoke VPC, not the inspection VPC.
GWLB Statefulness: The Gateway Load Balancer maintains connection state tables for traffic flows.
Primary Traffic Pattern (Distributed Architecture):
Key Requirement: Symmetric routing through the GWLB. Traffic must return via the same Geneve tunnel it arrived on to maintain proper state table entries.
Centralized Egress Architecture (Transit Gateway Pattern)
In centralized egress deployments with Transit Gateway, the traffic flow is fundamentally different and represents the primary use case for internet egress through the inspection VPC:
Traffic Flow:
This is the standard architecture for centralized internet egress where:
When to use: Centralized egress architectures where spoke VPCs do NOT have their own internet gateways.
Distributed Architecture - Alternative Pattern (Advanced Use Case)
In distributed architectures where spoke VPCs have their own internet egress, it is possible (but not typical) to configure traffic to exit through the inspection VPC instead of hairpinning:
This pattern requires:
This is rarely used in distributed architectures since spoke VPCs typically handle their own egress. The standard bump-in-the-wire pattern (hairpin through same Geneve tunnel) is recommended when spoke VPCs have internet gateways.
| Factor | 1-ARM | 2-ARM |
|---|---|---|
| Interfaces Required | 1 (port1) | 2 (port1 + port2) |
| Network Complexity | Lower | Higher |
| Cost | Lower | Slightly higher |
| Management Isolation | Not available | Available |
| Traffic Pattern | Hairpin (distributed) or egress (centralized) | Clear ingress/egress separation |
| Best For | Simple deployments, cost optimization | Production, clear segmentation |
After selecting your firewall architecture, proceed to Dedicated Management ENI to learn about management plane isolation options.
The FortiGate autoscale solution provides multiple approaches to isolating management traffic from data plane traffic, ranging from shared interfaces to complete physical network separation.
This page covers three progressive levels of management isolation, allowing you to choose the appropriate security posture for your deployment requirements.
In the default configuration, port2 serves dual purposes:
enable_dedicated_management_eni = false
enable_dedicated_management_vpc = falsePort2 is removed from the data plane and dedicated exclusively to management functions. FortiOS configures the interface with set dedicated-to management, placing it in an isolated VRF with independent routing.

enable_dedicated_management_eni = trueset dedicated-to managementThe dedicated management ENI can be verified in the FortiGate GUI:

The interface shows the dedicated-to: management attribute and separate VRF assignment, preventing data plane traffic from using this interface.
Critical Limitation: 2-ARM + NAT Gateway + Dedicated Management ENI
When combining:
firewall_policy_mode = "2-arm"access_internet_mode = "nat_gw"enable_dedicated_management_eni = truePort2 will NOT receive an Elastic IP address. This is a valid configuration, but imposes connectivity restrictions:
If you require public internet access to the FortiGate management interface with NAT Gateway egress, either:
access_internet_mode = "eip" (assigns EIP to port2)The dedicated management VPC provides complete physical network separation by deploying FortiGate management interfaces in an entirely separate VPC from the data plane.

enable_dedicated_management_vpc = true
dedicated_management_vpc_tag = "your-mgmt-vpc-tag"
dedicated_management_public_az1_subnet_tag = "your-az1-subnet-tag"
dedicated_management_public_az2_subnet_tag = "your-az2-subnet-tag"The existing_vpc_resources template creates the management VPC with standardized tags that the simplified template automatically discovers.
Advantages:
Default Tags (automatically created):


Configuration (terraform.tfvars):
enable_dedicated_management_vpc = true
dedicated_management_vpc_tag = "acme-test-management-vpc"
dedicated_management_public_az1_subnet_tag = "acme-test-management-public-az1-subnet"
dedicated_management_public_az2_subnet_tag = "acme-test-management-public-az2-subnet"If you have an existing management VPC with custom tags, configure the template to discover it:

Configuration:
enable_dedicated_management_vpc = true
dedicated_management_vpc_tag = "my-custom-mgmt-vpc-tag"
dedicated_management_public_az1_subnet_tag = "my-custom-mgmt-public-az1-tag"
dedicated_management_public_az2_subnet_tag = "my-custom-mgmt-public-az2-tag"
The template uses these tags to locate the management VPC and subnets via Terraform data sources.
When enable_dedicated_management_vpc = true:
enable_dedicated_management_eni = trueManagement VPC → Inspection VPC Connectivity:
Management VPC → Internet Connectivity:
| Factor | Combined (Default) | Dedicated ENI | Dedicated VPC |
|---|---|---|---|
| Security Isolation | Low | Medium | High |
| Complexity | Lowest | Medium | Highest |
| Cost | Lowest | Low | Medium |
| Management Access | Via data plane interface | Via dedicated interface | Via separate VPC |
| Failure Domain Isolation | No | Partial | Complete |
| VPC Peering Required | No | No | Yes |
| Compliance Suitability | Basic | Good | Excellent |
| Best For | Dev/test, simple deployments | Production, security-conscious | Enterprise, compliance-driven |
Use this decision tree to select the appropriate management isolation level:
1. Is this a production deployment?
   ├─ No → Combined Data + Management (simplest)
   └─ Yes → Continue to question 2

2. Do you have compliance requirements for management plane isolation?
   ├─ No → Dedicated Management ENI (good balance)
   └─ Yes → Continue to question 3

3. Do you have existing management VPC infrastructure?
   ├─ Yes → Dedicated Management VPC (leverage existing)
   └─ No → Evaluate cost/benefit:
       ├─ High security requirements → Dedicated Management VPC
└─ Moderate requirements → Dedicated Management ENIfirewall_policy_mode = "2-arm"
access_internet_mode = "eip"
enable_dedicated_management_eni = truefirewall_policy_mode = "2-arm"
access_internet_mode = "nat_gw"
enable_dedicated_management_vpc = true
dedicated_management_vpc_tag = "my-mgmt-vpc"firewall_policy_mode = "2-arm"
access_internet_mode = "eip"
enable_dedicated_management_eni = falseCheck:
Cause: Using access_internet_mode = "nat_gw" with dedicated management ENI
Solutions:
access_internet_mode = "eip" to receive public IP on port2enable_dedicated_management_vpc = true with separate internet connectivityCheck:
After configuring management isolation, proceed to Licensing Options to choose between BYOL, FortiFlex, or PAYG.
The FortiGate autoscale solution supports three distinct licensing models, each optimized for different use cases, cost structures, and operational requirements. You can use a single licensing model or combine them in hybrid configurations for optimal cost efficiency.
| Factor | BYOL | FortiFlex | PAYG |
|---|---|---|---|
| Total Cost (12 months) | Lowest | Medium | Highest |
| Upfront Investment | High | Medium | None |
| License Management | Manual (files) | API-driven | None |
| Flexibility | Low | High | Highest |
| Capacity Constraints | Yes (license pool) | Soft (point balance) | None |
| Best For | Long-term, predictable | Variable, flexible | Short-term, simple |
| Setup Complexity | Medium | High | Lowest |
BYOL uses traditional FortiGate-VM license files that you purchase from Fortinet or resellers. The template automates license distribution through S3 bucket storage and Lambda-based assignment.

asg_license_directory = "asg_license"
asg_byol_asg_min_size = 2
asg_byol_asg_max_size = 4Place BYOL license files in the directory specified by asg_license_directory:
terraform/autoscale_template/
├── terraform.tfvars
├── asg_license/
│   ├── FGVM01-001.lic
│   ├── FGVM01-002.lic
│   ├── FGVM01-003.lic
│ └── FGVM01-004.lic.lic files to S3 during terraform applyLicense Pool Exhaustion
Ensure your license directory contains at minimum licenses equal to asg_byol_asg_max_size.
What happens if licenses are exhausted:
Recommended: Provision 20% more licenses than max_size
FortiFlex provides consumption-based, API-driven licensing. Points are consumed daily based on configuration, offering flexibility and cost optimization compared to PAYG.
For detailed setup, see Licensing Section.
fortiflex_username      = "xxxxxxxx-xxxx-xxxx-xxxx-xxxxxxxxxxxx"
fortiflex_password      = "xxxxxxxxxxxxxxxxxxxxx"
fortiflex_sn_list       = ["FGVMELTMxxxxxxxx"]
fortiflex_configid_list = ["My_4CPU_Config"]FortiFlex Serial Number List - Optional
Important: Entitlements must be created manually in FortiFlex portal before deployment.
1. API Username and Password:
2. Serial Number List:
3. Configuration ID List:
Match CPU counts:
fgt_instance_type = "c6i.xlarge"  # 4 vCPUs
fortiflex_configid_list = ["My_4CPU_Config"] # Must matchSecurity Best Practice
Never commit FortiFlex credentials to version control. Use:
TF_VAR_fortiflex_usernameAt instance launch:
At instance termination:
Problem: Instances don’t activate license
Problem: “Insufficient points” error
PAYG uses AWS Marketplace on-demand instances with licensing included in hourly EC2 charge.
asg_ondemand_asg_min_size = 0
asg_ondemand_asg_max_size = 4
asg_ondemand_asg_desired_size = 0Scenario: 2 FortiGate-VM instances (c6i.xlarge, 4 vCPU, UTP) running 24/7
| Duration | BYOL | FortiFlex | PAYG | Winner |
|---|---|---|---|---|
| 1 month | $2,730 | $1,030 | $1,460 | FortiFlex |
| 3 months | $4,190 | $3,090 | $4,380 | FortiFlex |
| 12 months | $10,760 | $12,360 | $17,520 | BYOL |
| 24 months | $19,520 | $24,720 | $35,040 | BYOL |
Note: Illustrative costs. Actual pricing varies by term and bundle.
# BYOL for baseline
asg_license_directory = "asg_license"
asg_byol_asg_min_size = 2
asg_byol_asg_max_size = 4

# PAYG for burst
asg_ondemand_asg_max_size = 4
Best for: Production with occasional spikes
# FortiFlex for flexible baseline
fortiflex_configid_list = ["My_4CPU_Config"]
asg_byol_asg_max_size = 4

# PAYG for burst
asg_ondemand_asg_max_size = 4
Best for: Variable workloads with unpredictable spikes
asg_license_directory = "asg_license"
asg_byol_asg_min_size = 2
asg_byol_asg_max_size = 6
asg_ondemand_asg_max_size = 0
Best for: Stable, predictable workloads
asg_byol_asg_max_size = 0
asg_ondemand_asg_min_size = 2
asg_ondemand_asg_max_size = 8
Best for: POC, short-term, extreme variability
1. Expected deployment duration?
   ├─ < 3 months → PAYG
   ├─ 3-12 months → FortiFlex or evaluate costs
   └─ > 12 months → BYOL + PAYG burst

2. Workload predictable?
   ├─ Yes, stable → BYOL
   └─ No, variable → FortiFlex or Hybrid

3. Want to manage license files?
   ├─ No → FortiFlex or PAYG
   └─ Yes, for cost savings → BYOL

4. Tolerance for complexity?
   ├─ Low → PAYG
   ├─ Medium → FortiFlex
└─ High (cost focus) → BYOLAfter configuring licensing, proceed to FortiManager Integration for centralized management.
The template supports optional integration with FortiManager for centralized management, policy orchestration, and configuration synchronization across the autoscale group.
Enable FortiManager integration by setting the following variables in terraform.tfvars:
enable_fortimanager_integration = true
fortimanager_ip                 = "10.0.100.50"
fortimanager_sn                 = "FMGVM0000000001"
fortimanager_vrf_select = 1| Variable | Type | Required | Description |
|---|---|---|---|
enable_fortimanager_integration | boolean | Yes | Master switch to enable/disable FortiManager integration |
fortimanager_ip | string | Yes | FortiManager IP address or FQDN accessible from FortiGate management interfaces |
fortimanager_sn | string | Yes | FortiManager serial number for device registration |
fortimanager_vrf_select | number | No | VRF ID for routing to FortiManager (default: 0 for global VRF) |
When enable_fortimanager_integration = true:
config system central-management stanzaconfig system vdom-exception to prevent central-management config from syncing to secondariesLambda automatically generates the following configuration on the primary instance only:
config system vdom-exception
    edit 0
        set object system.central-management
    next
end

config system central-management
    set type fortimanager
    set fmg 10.0.100.50
    set serial-number FMGVM0000000001
    set vrf-select 1
end
Secondary instances do not receive central-management configuration, preventing:
FortiGate → FortiManager:
Ensure:
The fortimanager_vrf_select parameter specifies which VRF to use for FortiManager connectivity:
Common scenarios:
0 (default): Use global VRF; FortiManager accessible via default routing table1 or higher: Use specific management VRF; FortiManager accessible via separate routing domainWhen to use non-default VRF:
CRITICAL: FortiManager 7.6.3+ Requires VM Device Recognition
Starting with FortiManager version 7.6.3, VM serial numbers are not recognized by default for security purposes.
If you deploy FortiGate-VM instances with enable_fortimanager_integration = true to a FortiManager 7.6.3 or later WITHOUT enabling VM device recognition, instances will FAIL to register.
Required Configuration on FortiManager 7.6.3+:
Before deploying FortiGate instances, log into FortiManager CLI and enable VM device recognition:
config system global
    set fgfm-allow-vm enable
end
Verify the setting:
show system global | grep fgfm-allow-vmImportant notes:
fgfm-allow-vm is enabledVerification after deployment:
Troubleshooting if instances fail to register:
get system statusfgfm-allow-vm is enableddiagnose debug application fgfmd -1After deployment:
Verify device registration:
Authorize device:
Install policy package:
Verify configuration sync:
For complete FortiManager integration details, including User Managed Scaling (UMS) mode, see the project file: FortiManager Integration Configuration
After configuring FortiManager integration, proceed to Autoscale Group Capacity to configure instance counts and scaling behavior.
Configure the autoscale group size parameters to define minimum, maximum, and desired instance counts for both BYOL and on-demand (PAYG) autoscale groups.

# BYOL ASG capacity
asg_byol_asg_min_size         = 1
asg_byol_asg_max_size         = 2
asg_byol_asg_desired_size     = 1

# On-Demand (PAYG) ASG capacity
asg_ondemand_asg_min_size     = 0
asg_ondemand_asg_max_size     = 2
asg_ondemand_asg_desired_size = 0| Parameter | Description | Recommendations |
|---|---|---|
min_size | Minimum number of instances ASG maintains | Set to baseline capacity requirement |
max_size | Maximum number of instances ASG can scale to | Set based on peak traffic projections + 20% buffer |
desired_size | Target number of instances ASG attempts to maintain | Typically equals min_size for baseline capacity |
Objective: Optimize costs by using BYOL for steady-state traffic and PAYG for unpredictable spikes
# BYOL handles baseline 24/7 traffic
asg_byol_asg_min_size = 2
asg_byol_asg_max_size = 4
asg_byol_asg_desired_size = 2

# PAYG handles burst traffic only
asg_ondemand_asg_min_size = 0
asg_ondemand_asg_max_size = 6
asg_ondemand_asg_desired_size = 0
Scaling behavior:
Objective: Maximum flexibility with zero license management overhead
# No BYOL instances
asg_byol_asg_min_size = 0
asg_byol_asg_max_size = 0
asg_byol_asg_desired_size = 0

# All capacity is PAYG
asg_ondemand_asg_min_size = 2
asg_ondemand_asg_max_size = 8
asg_ondemand_asg_desired_size = 2
Use cases:
Objective: Minimum operating costs for long-term, predictable workloads
# All capacity is BYOL
asg_byol_asg_min_size = 2
asg_byol_asg_max_size = 6
asg_byol_asg_desired_size = 2

# No PAYG instances
asg_ondemand_asg_min_size = 0
asg_ondemand_asg_max_size = 0
asg_ondemand_asg_desired_size = 0Requirements:
max_size (6 in this example)Autoscale group scaling is triggered by CloudWatch alarms monitoring CPU utilization:
Default thresholds (set in underlying module):
Customization (requires editing underlying module):
# Located in module: fortinetdev/cloud-modules/aws
scale_out_threshold = 80  # Higher threshold = more aggressive cost optimization
scale_in_threshold = 20 # Lower threshold = more aggressive cost optimizationFormula: Capacity Needed = (Peak Gbps Throughput) / (Per-Instance Gbps) × 1.2
Example:
max_size = 5 or higher for safety marginTesting Capacity Settings
For initial deployments and testing:
After configuring capacity, proceed to Primary Scale-In Protection to protect the primary instance from being terminated during scale-in events.
Protect the primary FortiGate instance from scale-in events to maintain configuration synchronization stability and prevent unnecessary primary elections.

primary_scalein_protection = trueIn FortiGate autoscale architecture:
Without scale-in protection:
With scale-in protection:
The primary_scalein_protection variable is passed through to the autoscale group configuration:

In the underlying Terraform module (autoscale_group.tf):

AWS autoscaling respects the protection attribute and never selects protected instances for scale-in events.
You can verify scale-in protection in the AWS Console:
Scale-in protection automatically removes when:
min_size)primary_scalein_protection = true for production deploymentsFor more information on AWS autoscaling instance protection:
After configuring primary protection, review Additional Configuration Options for fine-tuning instance specifications and advanced settings.
This section covers additional configuration options for fine-tuning FortiGate instance specifications and advanced deployment settings.
fgt_instance_type = "c7gn.xlarge"Instance type selection considerations:
Common instance types for FortiGate:
| Instance Type | vCPUs | Memory | Network Performance | Best For |
|---|---|---|---|---|
| c6i.large | 2 | 4 GB | Up to 12.5 Gbps | Small deployments, dev/test |
| c6i.xlarge | 4 | 8 GB | Up to 12.5 Gbps | Standard production workloads |
| c6i.2xlarge | 8 | 16 GB | Up to 12.5 Gbps | High-throughput environments |
| c7gn.xlarge | 4 | 8 GB | Up to 30 Gbps | High-performance networking |
| c7gn.2xlarge | 8 | 16 GB | Up to 30 Gbps | Very high-performance networking |
fortios_version = "7.4.5"Version specification options:
"7.4.5"): Pin to specific version for consistency across environments"7.4"): Automatically use latest minor version within major release"latest" to always deploy newest available versionRecommendations:
Version considerations:
fortigate_gui_port = 443Common options:
443 (default): Standard HTTPS port8443: Alternate HTTPS port (some organizations prefer moving GUI off default port for security)10443: Another common alternate portWhen changing the GUI port:
allow_cross_zone_load_balancing = truetrue) - Recommended for Productionfalse)Enable for:
Disable for:
Recommendation: Enable for production deployments to maximize availability and capacity utilization
keypair_name = "my-fortigate-keypair"Purpose: SSH key pair for emergency CLI access to FortiGate instances
Best practices:
Creating a key pair:
# Via AWS CLI
aws ec2 create-key-pair --key-name my-fortigate-keypair --query 'KeyMaterial' --output text > my-fortigate-keypair.pem
chmod 400 my-fortigate-keypair.pem

# Or via AWS Console: EC2 > Key Pairs > Create Key Pairresource_tags = {
Environment = "Production"
Project = "FortiGate-Autoscale"
Owner = "security-team@example.com"
CostCenter = "CC-12345"
}Common tags to include:
Benefits of comprehensive tagging:
Before proceeding to deployment, verify you’ve configured:
You’re now ready to proceed to the Summary page for a complete overview of all solution components, or jump directly to Templates to begin deployment.
This summary provides a comprehensive reference of all solution components covered in this section, with quick decision guides and configuration references.
| Option | Hourly Cost | Data Processing | Monthly Cost (2 AZs) | Source IP | Best For |
|---|---|---|---|---|---|
| EIP Mode | $0.005/IP | None | ~$7.20 | Variable | Cost-sensitive, dev/test |
| NAT Gateway | $0.045/NAT × 2 | $0.045/GB | ~$65 base + data† | Stable | Production, compliance |
† Data processing example: 1 TB/month = $45 additional cost
Total NAT Gateway cost estimate: $65 (base) + $45 (1TB data) = $110/month for 2 AZs with 1TB egress
access_internet_mode = "eip" # or "nat_gw"Key Decision: Do you need predictable source IPs for allowlisting (white-listing)?
| Mode | Interfaces | Complexity | Best For |
|---|---|---|---|
| 2-ARM | port1 + port2 | Higher | Production, clear segmentation |
| 1-ARM | port1 only | Lower | Simplified routing |
firewall_policy_mode = "2-arm" # or "1-arm"Three progressive levels:
enable_dedicated_management_eni = true
enable_dedicated_management_vpc = true| Model | Best For | Cost (12 months) | Management |
|---|---|---|---|
| BYOL | Long-term, predictable | Lowest | License files |
| FortiFlex | Variable, flexible | Medium | API-driven |
| PAYG | Short-term, simple | Highest | None required |
Hybrid Strategy (Recommended): BYOL baseline + PAYG burst
enable_fortimanager_integration = true
fortimanager_ip                 = "10.0.100.50"
fortimanager_sn                 = "FMGVM0000000001"
⚠️ Critical: FortiManager 7.6.3+ requires fgfm-allow-vm enabled before deployment
asg_byol_asg_min_size = 2
asg_byol_asg_max_size = 4
asg_ondemand_asg_max_size = 4Formula: Capacity = (Peak Gbps / Per-Instance Gbps) × 1.2
primary_scalein_protection = trueAlways enable for production to prevent primary instance termination during scale-in.
fgt_instance_type               = "c6i.xlarge"
fortios_version                 = "7.4.5"
fortigate_gui_port              = 443
allow_cross_zone_load_balancing = true
keypair_name = "my-fortigate-keypair"access_internet_mode = "nat_gw"
firewall_policy_mode = "2-arm"
enable_dedicated_management_eni = true
enable_dedicated_management_vpc = true
asg_license_directory = "asg_license"
enable_fortimanager_integration = true
primary_scalein_protection = trueUse case: Enterprise production, compliance-driven
access_internet_mode = "eip"
firewall_policy_mode = "1-arm"
asg_ondemand_asg_min_size = 1
asg_ondemand_asg_max_size = 2
enable_fortimanager_integration = false
Use case: Development, testing, POC
access_internet_mode = "nat_gw"
firewall_policy_mode = "2-arm"
enable_dedicated_management_eni = true
fortiflex_username = "your-api-username"
enable_fortimanager_integration = true
primary_scalein_protection = true
Use case: Standard production, flexible licensing
1. Do you need predictable source IPs for allowlisting?
   ├─ Yes → NAT Gateway (~$110/month for 2 AZs + 1TB data)
   └─ No → EIP (~$7/month)

2. Dedicated management interface?
   ├─ Yes → 2-ARM + Dedicated ENI
   └─ No → 1-ARM

3. Complete management isolation?
   ├─ Yes → Dedicated Management VPC
   └─ No → Dedicated ENI or skip

4. Licensing model?
   ├─ Long-term (12+ months) → BYOL
   ├─ Variable workload → FortiFlex
   ├─ Short-term (< 3 months) → PAYG
   └─ Best optimization → BYOL + PAYG hybrid

5. Centralized policy management?
   ├─ Yes → Enable FortiManager
   └─ No → Standalone

6. Production deployment?
   ├─ Yes → Enable primary scale-in protection
└─ No → OptionalInfrastructure:
Licensing:
FortiManager (if applicable):
fgfm-allow-vm enabledConfiguration:
terraform.tfvars populated| Issue | Check |
|---|---|
| No internet connectivity | Route tables, IGW, NAT GW, EIP |
| Management inaccessible | Security groups, routing, EIP |
| License not activating | Lambda logs, S3, DynamoDB, FortiFlex API |
| FortiManager registration fails | fgfm-allow-vm, network, serial number |
| Scaling not working | CloudWatch alarms, ASG health checks |
| Primary terminated | Verify protection enabled |
Proceed to Templates for step-by-step deployment procedures.
The FortiGate Autoscale Simplified Template provides modular Terraform templates for deploying autoscale architectures in AWS. This section covers both templates and their integration patterns.
Understand the template architecture, choose deployment patterns, and learn how templates work together.
Create supporting infrastructure for lab and test environments including management VPC, Transit Gateway, and spoke VPCs with traffic generators.
Deploy the core FortiGate autoscale infrastructure including inspection VPC, Gateway Load Balancer, and FortiGate autoscale groups.
When using both templates together, ensure these variables match exactly:
aws_regionavailability_zone_1 and availability_zone_2cp (customer prefix)env (environment)vpc_cidr_managementvpc_cidr_spokeSee Templates Overview for detailed coordination requirements.
The FortiGate Autoscale Simplified Template consists of two complementary Terraform templates that work together to deploy a complete FortiGate autoscale architecture in AWS:
Fortinet-Role tags for resource discoveryImportant Workflow Change
The autoscale_template now deploys into existing VPCs rather than creating them. You must run existing_vpc_resources first to create the Inspection VPC with proper Fortinet-Role tags, then run autoscale_template to deploy the FortiGate autoscale group.
This modular approach allows you to:
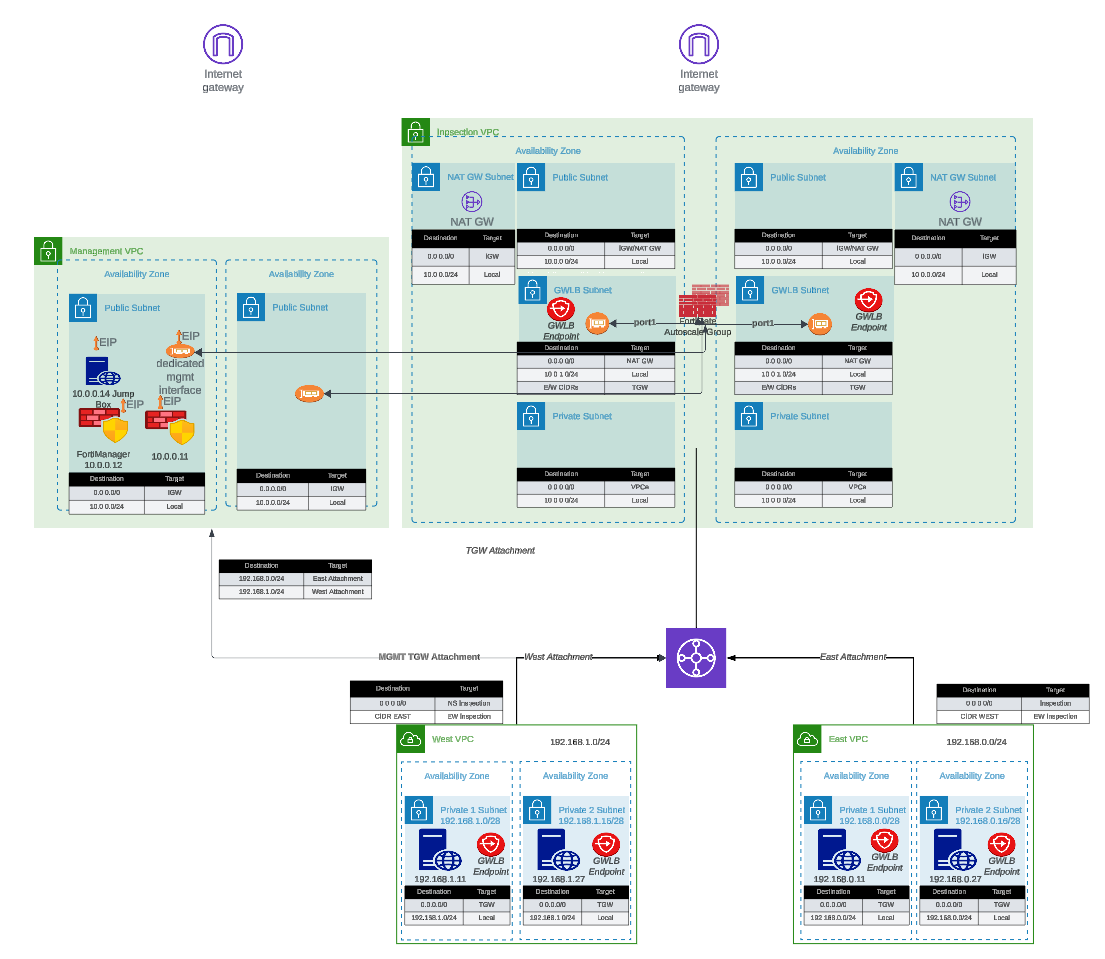
┌─────────────────────────────────────────────────────────────────┐
│ existing_vpc_resources Template (Run First)                     │
│                                                                 │
│  ┌──────────────────┐    ┌─────────────────┐                    │
│  │ Management VPC   │    │ Transit Gateway │                    │
│  │ - FortiManager   │    │ - Spoke VPCs    │                    │
│  │ - FortiAnalyzer  │    │ - Linux Instances                    │
│  │ - Jump Box       │    │ - Test Traffic  │                    │
│  └──────────────────┘    └─────────────────┘                    │
│          │                       │                              │
│          └───────────┬───────────┘                              │
│                      │                                          │
│  ┌───────────────────▼───────────────────┐                      │
│  │ Inspection VPC (with Fortinet-Role    │                      │
│  │ tags for resource discovery)          │                      │
│  │ - Public/Private/GWLBE Subnets        │                      │
│  │ - Route Tables, IGW, NAT GW           │                      │
│  │ - TGW Attachment (optional)           │                      │
│  └───────────────────────────────────────┘                      │
│                                                                 │
└─────────────────────────────────────────────────────────────────┘
                       │ (Fortinet-Role tag discovery)
┌──────────────────────┼──────────────────────────────────────────┐
│ autoscale_template (Run Second)   │                               │
│                      │                                          │
│  ┌────────────────── ▼ ────────────────┐                        │
│  │ Deploys INTO Inspection VPC         │                        │
│  │ - FortiGate Autoscale Group         │                        │
│  │ - Gateway Load Balancer             │                        │
│  │ - GWLB Endpoints                    │                        │
│  │ - Lambda Functions                  │                        │
│  │ - Route modifications               │                        │
│  └─────────────────────────────────────┘                        │
│                                                                 │
└─────────────────────────────────────────────────────────────────┘The autoscale_template discovers existing resources using Fortinet-Role tags. This tag-based approach provides:
existing_vpc_resourcesUse this decision tree to determine your deployment approach:
1. Do you have existing VPCs with Fortinet-Role tags?
   ├─ YES → Deploy autoscale_template only
   │         (Resources discovered via Fortinet-Role tags)
   │
   └─ NO → Continue to question 2

2. Do you need a complete lab environment for testing?
   ├─ YES → Deploy existing_vpc_resources (all components)
   │         Then deploy autoscale_template
   │         See: Lab Environment Pattern
   │
   └─ NO → Continue to question 3

3. Do you need centralized management (FortiManager/FortiAnalyzer)?
   ├─ YES → Deploy existing_vpc_resources (with management VPC)
   │         Then deploy autoscale_template
   │         See: Management VPC Pattern
   │
   └─ NO → Deploy existing_vpc_resources (inspection VPC only)
           Then deploy autoscale_template
See: Minimal Deployment PatternKey Point: The autoscale_template always requires an existing Inspection VPC with Fortinet-Role tags. Use existing_vpc_resources to create this infrastructure, or manually tag your existing VPCs.
| Aspect | existing_vpc_resources | autoscale_template |
|---|---|---|
| Required? | Yes (creates Inspection VPC) | Yes (deploys FortiGate) |
| Run Order | First | Second |
| Purpose | VPC infrastructure with Fortinet-Role tags | FortiGate autoscale deployment |
| Creates | Inspection VPC, Management VPC, TGW, Spoke VPCs | FortiGate ASG, GWLB, Lambda, route modifications |
| Discovery | N/A (creates resources) | Uses Fortinet-Role tags |
| Cost | VPC infrastructure costs | FortiGate instance costs |
| Lifecycle | Persistent infrastructure | Can be redeployed independently |
| Production Use | Yes (or tag existing VPCs) | Always |
Use case: Full-featured testing environment with management and traffic generation
Templates needed:
What you get:
Estimated cost: ~$300-400/month for complete lab
Deployment time: ~25-30 minutes
Next steps: Lab Environment Workflow
Use case: Deploy FortiGate inspection to existing production infrastructure
Templates needed:
Prerequisites:
Fortinet-Role tags (see Required Tags)What you get:
Estimated cost: ~$150-250/month (FortiGates only, plus any new VPC infrastructure)
Deployment time: ~15-20 minutes (plus tagging time if manual)
Next steps: Production Integration Workflow
Use case: Testing FortiManager/FortiAnalyzer integration without spoke VPCs
Templates needed:
What you get:
Estimated cost: ~$300/month
Deployment time: ~20-25 minutes
Next steps: Management VPC Workflow
Use case: Simplest deployment for testing FortiGate autoscale
Templates needed:
Configuration:
# existing_vpc_resources
enable_build_inspection_vpc   = true
enable_build_management_vpc   = false
enable_build_existing_subnets = false
What you get:
Estimated cost: ~$150-200/month
Deployment time: ~15 minutes
Next steps: Minimal Deployment Workflow
The autoscale_template discovers existing resources using Fortinet-Role tags. These tags are automatically created by existing_vpc_resources, or you can manually apply them to existing VPCs.
| Resource Type | Fortinet-Role Tag Value | Required |
|---|---|---|
| VPC | {cp}-{env}-inspection-vpc | Yes |
| Internet Gateway | {cp}-{env}-inspection-igw | Yes |
| Public Subnet AZ1 | {cp}-{env}-inspection-public-az1 | Yes |
| Public Subnet AZ2 | {cp}-{env}-inspection-public-az2 | Yes |
| GWLBE Subnet AZ1 | {cp}-{env}-inspection-gwlbe-az1 | Yes |
| GWLBE Subnet AZ2 | {cp}-{env}-inspection-gwlbe-az2 | Yes |
| Private Subnet AZ1 | {cp}-{env}-inspection-private-az1 | Yes |
| Private Subnet AZ2 | {cp}-{env}-inspection-private-az2 | Yes |
| Public Route Table AZ1 | {cp}-{env}-inspection-public-rt-az1 | Yes |
| Public Route Table AZ2 | {cp}-{env}-inspection-public-rt-az2 | Yes |
| GWLBE Route Table AZ1 | {cp}-{env}-inspection-gwlbe-rt-az1 | Yes |
| GWLBE Route Table AZ2 | {cp}-{env}-inspection-gwlbe-rt-az2 | Yes |
| Private Route Table AZ1 | {cp}-{env}-inspection-private-rt-az1 | Yes |
| Private Route Table AZ2 | {cp}-{env}-inspection-private-rt-az2 | Yes |
| NAT Gateway AZ1 | {cp}-{env}-inspection-natgw-az1 | If nat_gw mode |
| NAT Gateway AZ2 | {cp}-{env}-inspection-natgw-az2 | If nat_gw mode |
| Mgmt Subnet AZ1 | {cp}-{env}-inspection-management-az1 | If dedicated mgmt ENI |
| Mgmt Subnet AZ2 | {cp}-{env}-inspection-management-az2 | If dedicated mgmt ENI |
| Mgmt Route Table AZ1 | {cp}-{env}-inspection-management-rt-az1 | If dedicated mgmt ENI |
| Mgmt Route Table AZ2 | {cp}-{env}-inspection-management-rt-az2 | If dedicated mgmt ENI |
| TGW Attachment | {cp}-{env}-inspection-tgw-attachment | If TGW enabled |
| TGW Route Table | {cp}-{env}-inspection-tgw-rtb | If TGW enabled |
Example: For cp="acme" and env="test", the VPC tag would be acme-test-inspection-vpc
| Resource Type | Fortinet-Role Tag Value | Required |
|---|---|---|
| VPC | {cp}-{env}-management-vpc | If dedicated mgmt VPC |
| Public Subnet AZ1 | {cp}-{env}-management-public-az1 | If dedicated mgmt VPC |
| Public Subnet AZ2 | {cp}-{env}-management-public-az2 | If dedicated mgmt VPC |
Objective: Create complete testing environment from scratch
# Step 1: Deploy existing_vpc_resources (creates Inspection VPC with Fortinet-Role tags)
cd terraform/existing_vpc_resources
cp terraform.tfvars.example terraform.tfvars
# Edit: Enable all components:
#   enable_build_inspection_vpc   = true
#   enable_build_management_vpc   = true
#   enable_build_existing_subnets = true
#   enable_fortimanager           = true
#   enable_fortianalyzer          = true
terraform init && terraform apply

# Step 2: Note outputs (Fortinet-Role tags created automatically)
terraform output  # Save TGW name and FortiManager IP

# Step 3: Deploy autoscale_template (discovers VPCs via Fortinet-Role tags)
cd ../autoscale_template
cp terraform.tfvars.example terraform.tfvars
# Edit: Use SAME cp and env values (critical for tag discovery)
#       Set attach_to_tgw_name from Step 2 output
#       Configure FortiManager integration
terraform init && terraform apply

# Step 4: Verify
ssh -i ~/.ssh/keypair.pem ec2-user@<jump-box-ip>
curl http://<linux-instance-ip>  # Test connectivity
Time to complete: 30-40 minutes
Critical: The cp and env variables must match between both templates for Fortinet-Role tag discovery to work.
See detailed guide: existing_vpc_resources Template
Objective: Deploy FortiGate inspection into existing or new Inspection VPC
Option A: Tag Existing VPCs Manually
If you have existing VPCs you want to use:
cp and env valuesOption B: Create New Inspection VPC (Recommended)
# Step 1: Deploy existing_vpc_resources (Inspection VPC only)
cd terraform/existing_vpc_resources
cp terraform.tfvars.example terraform.tfvars
# Edit:
#   enable_build_inspection_vpc   = true
#   enable_build_management_vpc   = false
#   enable_build_existing_subnets = true  # if TGW needed
#   attach_to_tgw_name            = "production-tgw"  # existing TGW
terraform init && terraform apply

# Step 2: Deploy autoscale_template
cd ../autoscale_template
cp terraform.tfvars.example terraform.tfvars
# Edit: Use SAME cp and env values
#       Set attach_to_tgw_name to production TGW
#       Configure production-appropriate capacity
terraform init && terraform apply

# Step 3: Update TGW route tables (if needed)
# Route spoke VPC traffic (0.0.0.0/0) to inspection VPC attachment

# Step 4: Test and validate
# Verify traffic flows through FortiGate
Time to complete: 20-30 minutes
See detailed guide: autoscale_template
Objective: Deploy management infrastructure with FortiManager/FortiAnalyzer
# Step 1: Deploy existing_vpc_resources (Inspection + Management VPCs)
cd terraform/existing_vpc_resources
cp terraform.tfvars.example terraform.tfvars
# Edit:
#   enable_build_inspection_vpc   = true
#   enable_build_management_vpc   = true
#   enable_fortimanager           = true
#   enable_fortianalyzer          = true
#   enable_build_existing_subnets = false
terraform init && terraform apply

# Step 2: Configure FortiManager
# Access FortiManager GUI: https://<fmgr-ip>
# Enable VM device recognition if FMG 7.6.3+
config system global
    set fgfm-allow-vm enable
end

# Step 3: Deploy autoscale_template
cd ../autoscale_template
cp terraform.tfvars.example terraform.tfvars
# Edit: Use SAME cp and env values
#       enable_fortimanager_integration = true
#       fortimanager_ip = <from Step 1 output>
#       enable_dedicated_management_vpc = true
terraform init && terraform apply

# Step 4: Authorize devices on FortiManager
# Device Manager > Device & Groups
# Right-click unauthorized device > Authorize
Time to complete: 25-35 minutes
Objective: Deploy FortiGate with minimal infrastructure
# Step 1: Deploy existing_vpc_resources (Inspection VPC only)
cd terraform/existing_vpc_resources
cp terraform.tfvars.example terraform.tfvars
# Edit:
#   enable_build_inspection_vpc   = true
#   enable_build_management_vpc   = false
#   enable_build_existing_subnets = false
#   inspection_access_internet_mode = "eip"  # simpler, lower cost
terraform init && terraform apply

# Step 2: Deploy autoscale_template
cd ../autoscale_template
cp terraform.tfvars.example terraform.tfvars
# Edit: Use SAME cp and env values
#       enable_tgw_attachment = false
#       access_internet_mode = "eip"
terraform init && terraform apply

# Step 3: Note GWLB endpoint IDs for spoke VPC integration
terraform output gwlb_endpoint_az1_id
terraform output gwlb_endpoint_az2_id

# Step 4: Integrate spoke VPCs
# Deploy GWLB endpoints in spoke VPCs
# Update spoke VPC route tables to point to GWLB endpoints
Time to complete: 20-25 minutes (plus spoke VPC endpoint deployment)
The existing_vpc_resources template is required to create the Inspection VPC with proper Fortinet-Role tags. Use it when:
✅ Any new FortiGate autoscale deployment
autoscale_template deployment✅ Creating a lab or test environment
✅ Production deployments with new infrastructure
⚠️ Manually tag existing VPCs (advanced users only)
Fortinet-Role tags to existing VPCs following the tag schemaThe autoscale_template deploys FortiGate into the existing Inspection VPC:
✅ All FortiGate autoscale deployments
✅ Can be redeployed independently
When using both templates together, certain variables must match exactly for Fortinet-Role tag discovery to work:
| Variable | Purpose | Impact if Mismatched |
|---|---|---|
cp (customer prefix) | Fortinet-Role tag prefix | autoscale_template cannot find VPCs |
env (environment) | Fortinet-Role tag prefix | autoscale_template cannot find VPCs |
aws_region | AWS region | Resources in wrong region |
availability_zone_1 | First AZ | Subnet discovery fails |
availability_zone_2 | Second AZ | Subnet discovery fails |
Critical: The cp and env variables form the prefix for all Fortinet-Role tags. If these don’t match between templates, the autoscale_template will fail with “no matching VPC/Subnet found” errors.
existing_vpc_resources/terraform.tfvars:
aws_region          = "us-west-2"
availability_zone_1 = "a"
availability_zone_2 = "c"
cp                  = "acme"      # Creates tags like "acme-test-inspection-vpc"
env                 = "test"
vpc_cidr_ns_inspection = "10.0.0.0/16"
vpc_cidr_management = "10.3.0.0/16"autoscale_template/terraform.tfvars:
aws_region          = "us-west-2"  # MUST MATCH
availability_zone_1 = "a"          # MUST MATCH
availability_zone_2 = "c"          # MUST MATCH
cp                  = "acme"       # MUST MATCH - used for tag lookup
env                 = "test"       # MUST MATCH - used for tag lookup
vpc_cidr_inspection = "10.0.0.0/16"  # Should match existing VPC CIDR
vpc_cidr_management = "10.3.0.0/16"  # Should match if using management VPC

attach_to_tgw_name = "acme-test-tgw" # Matches cp-env naming conventionWhen autoscale_template runs, it looks up resources like this:
# autoscale_template/vpc_inspection.tf
data "aws_vpc" "inspection" {
  filter {
    name   = "tag:Fortinet-Role"
    values = ["${var.cp}-${var.env}-inspection-vpc"]  # e.g., "acme-test-inspection-vpc"
  }
}
This is why matching cp and env values is essential.
Choose your deployment pattern and proceed to the appropriate template guide:
The FortiGate Autoscale Simplified Template uses a two-phase deployment approach with Fortinet-Role tag discovery:
| Template | Purpose | Run Order | Creates |
|---|---|---|---|
| existing_vpc_resources | VPC infrastructure | First | Inspection VPC, Management VPC, TGW, Spoke VPCs (with Fortinet-Role tags) |
| autoscale_template | FortiGate deployment | Second | FortiGate ASG, GWLB, Lambda (discovers VPCs via tags) |
Key Principles:
Recommended Starting Point:
cp and env match between templatesThe existing_vpc_resources template creates the Inspection VPC and supporting infrastructure required for the FortiGate autoscale deployment. All resources are tagged with Fortinet-Role tags that allow the autoscale_template to discover and deploy into them.
This template must be run BEFORE autoscale_template. The autoscale_template discovers VPCs using Fortinet-Role tags created by this template. If you skip this template, you must manually apply the required tags to your existing VPCs.

The template conditionally creates the following components based on boolean variables. All resources are tagged with Fortinet-Role tags for discovery by autoscale_template.
| Component | Purpose | Required | Typical Cost/Month |
|---|---|---|---|
| Inspection VPC | VPC for FortiGate autoscale deployment | Yes | ~$50 (VPC/networking) |
| Management VPC | Centralized management infrastructure | No | ~$50 (VPC/networking) |
| FortiManager | Policy management and orchestration | No | ~$73 (m5.large) |
| FortiAnalyzer | Logging and reporting | No | ~$73 (m5.large) |
| Jump Box | Bastion host for secure access | No | ~$7 (t3.micro) |
| Transit Gateway | Central hub for VPC interconnectivity | No | ~$36 + data transfer |
| Spoke VPCs (East/West) | Simulated workload VPCs | No | ~$50 (networking) |
| Linux Instances | HTTP servers and traffic generators | No | ~$14 (2x t3.micro) |
Total estimated cost for complete lab: ~$300-400/month
Purpose: The VPC where FortiGate autoscale group will be deployed by autoscale_template
Configuration variable:
enable_build_inspection_vpc = trueWhat gets created:
Inspection VPC (10.0.0.0/16)
├── Public Subnet AZ1 (FortiGate login/management)
├── Public Subnet AZ2
├── GWLBE Subnet AZ1 (Gateway Load Balancer Endpoints)
├── GWLBE Subnet AZ2
├── Private Subnet AZ1 (TGW attachment)
├── Private Subnet AZ2
├── Management Subnet AZ1 (optional - dedicated management ENI)
├── Management Subnet AZ2 (optional)
├── Internet Gateway
├── NAT Gateways (optional - if nat_gw mode)
├── Route Tables (per subnet type and AZ)
└── TGW Attachment (optional - if TGW enabled)
Fortinet-Role tags applied (for autoscale_template discovery):
| Resource | Fortinet-Role Tag |
|---|---|
| VPC | {cp}-{env}-inspection-vpc |
| IGW | {cp}-{env}-inspection-igw |
| Public Subnet AZ1 | {cp}-{env}-inspection-public-az1 |
| Public Subnet AZ2 | {cp}-{env}-inspection-public-az2 |
| GWLBE Subnet AZ1 | {cp}-{env}-inspection-gwlbe-az1 |
| GWLBE Subnet AZ2 | {cp}-{env}-inspection-gwlbe-az2 |
| Private Subnet AZ1 | {cp}-{env}-inspection-private-az1 |
| Private Subnet AZ2 | {cp}-{env}-inspection-private-az2 |
| Public RT AZ1 | {cp}-{env}-inspection-public-rt-az1 |
| Public RT AZ2 | {cp}-{env}-inspection-public-rt-az2 |
| GWLBE RT AZ1 | {cp}-{env}-inspection-gwlbe-rt-az1 |
| GWLBE RT AZ2 | {cp}-{env}-inspection-gwlbe-rt-az2 |
| Private RT AZ1 | {cp}-{env}-inspection-private-rt-az1 |
| Private RT AZ2 | {cp}-{env}-inspection-private-rt-az2 |
| NAT GW AZ1 | {cp}-{env}-inspection-natgw-az1 (if nat_gw mode) |
| NAT GW AZ2 | {cp}-{env}-inspection-natgw-az2 (if nat_gw mode) |
| TGW Attachment | {cp}-{env}-inspection-tgw-attachment (if TGW enabled) |
| TGW Route Table | {cp}-{env}-inspection-tgw-rtb (if TGW enabled) |
Example: For cp="acme" and env="test", tags would be acme-test-inspection-vpc, acme-test-inspection-public-az1, etc.
Critical Variable Coordination
The cp and env values used here must match exactly in autoscale_template for tag discovery to work. Mismatched values will cause autoscale_template to fail with “no matching VPC found” errors.
inspection_access_internet_mode = "nat_gw" # or "eip"inspection_enable_dedicated_management_eni = trueCreates additional management subnets within the Inspection VPC for dedicated management interfaces on FortiGate instances.
Purpose: Centralized management infrastructure isolated from production traffic
Components:
Fortinet-Role tags for discovery by autoscale_templateConfiguration variable:
enable_build_management_vpc = trueWhat gets created:
Management VPC (10.3.0.0/16)
├── Public Subnet AZ1 (10.3.1.0/24)
├── Public Subnet AZ2 (10.3.2.0/24)
├── Internet Gateway
└── Route Tables
Fortinet-Role tags applied (for autoscale_template discovery):
| Resource | Fortinet-Role Tag |
|---|---|
| VPC | {cp}-{env}-management-vpc |
| Public Subnet AZ1 | {cp}-{env}-management-public-az1 |
| Public Subnet AZ2 | {cp}-{env}-management-public-az2 |
Configuration:
enable_fortimanager = true
fortimanager_instance_type = "m5.large"
fortimanager_os_version = "7.4.5"
fortimanager_host_ip = "10" # Results in .3.0.10Access:
https://<FortiManager-Public-IP>ssh admin@<FortiManager-Public-IP>admin / <instance-id>Use cases:
Configuration:
enable_fortianalyzer = true
fortianalyzer_instance_type = "m5.large"
fortianalyzer_os_version = "7.4.5"
fortianalyzer_host_ip = "11" # Results in .3.0.11Access:
https://<FortiAnalyzer-Public-IP>ssh admin@<FortiAnalyzer-Public-IP>admin / <instance-id>Use cases:
Configuration:
enable_jump_box = true
jump_box_instance_type = "t3.micro"Access:
ssh -i ~/.ssh/keypair.pem ec2-user@<jump-box-public-ip>Use cases:
Configuration:
enable_mgmt_vpc_tgw_attachment = truePurpose: Connects management VPC to Transit Gateway, allowing:
Routing:
enable_debug_tgw_attachment for bypass testingPurpose: Simulates production multi-VPC environment for traffic generation and testing
Configuration variable:
enable_build_existing_subnets = trueWhat gets created:
Transit Gateway
├── East Spoke VPC (192.168.0.0/24)
│   ├── Public Subnet AZ1
│   ├── Private Subnet AZ1
│   ├── NAT Gateway (optional)
│   └── Linux Instance (optional)
│
├── West Spoke VPC (192.168.1.0/24)
│   ├── Public Subnet AZ1
│   ├── Private Subnet AZ1
│   ├── NAT Gateway (optional)
│   └── Linux Instance (optional)
│
└── TGW Route Tables
    ├── Spoke-to-Spoke (via inspection VPC)
└── Inspection-to-InternetConfiguration:
# Created automatically when enable_build_existing_subnets = true
# Named: {cp}-{env}-tgwPurpose:
Attachments:
enable_mgmt_vpc_tgw_attachment = true)enable_debug_tgw_attachment = true)Configuration:
vpc_cidr_east = "192.168.0.0/24"
vpc_cidr_west = "192.168.1.0/24"
vpc_cidr_spoke = "192.168.0.0/16"  # Supernet
Components per spoke VPC:
Configuration:
enable_east_linux_instances = true
east_linux_instance_type = "t3.micro"

enable_west_linux_instances = true
west_linux_instance_type = "t3.micro"
What they provide:
Testing with Linux instances:
# From jump box or another instance
curl http://<linux-instance-ip>
# Returns: "Hello from <hostname>"

# Generate internet egress traffic
ssh ec2-user@<linux-instance-ip>
curl http://www.google.com # Traffic goes through FortiGateConfiguration:
enable_debug_tgw_attachment = truePurpose: Creates a bypass attachment from Management VPC directly to Transit Gateway, allowing traffic to flow:
Jump Box → TGW → Spoke VPC Linux Instances (bypassing FortiGate inspection)Debug path use cases:
Security Consideration
The debug attachment bypasses FortiGate inspection entirely. Do not enable in production environments. This is strictly for testing and validation purposes.
Use case: Full-featured lab for testing all capabilities
# Inspection VPC (Required)
enable_build_inspection_vpc            = true
inspection_access_internet_mode        = "nat_gw"
inspection_enable_dedicated_management_eni = false

# Management VPC Components
enable_build_management_vpc    = true
enable_fortimanager            = true
enable_fortianalyzer           = true
enable_jump_box                = true
enable_mgmt_vpc_tgw_attachment = true

# Spoke VPC Components
enable_build_existing_subnets  = true
enable_east_linux_instances    = true
enable_west_linux_instances    = true
enable_debug_tgw_attachment    = true
What you get: Complete environment with inspection VPC (with Fortinet-Role tags), management, spoke VPCs, traffic generators, and debug path
Cost: ~$300-400/month
Best for: Training, demonstrations, comprehensive testing
Use case: Testing FortiManager/FortiAnalyzer integration without spoke VPCs
# Inspection VPC (Required)
enable_build_inspection_vpc            = true
inspection_access_internet_mode        = "eip"

# Management VPC Components
enable_build_management_vpc    = true
enable_fortimanager            = true
enable_fortianalyzer           = true
enable_jump_box                = false
enable_mgmt_vpc_tgw_attachment = false

# Spoke VPC Components
enable_build_existing_subnets  = false
What you get: Inspection VPC (with Fortinet-Role tags) and Management VPC with FortiManager and FortiAnalyzer
Cost: ~$200/month
Best for: FortiManager/FortiAnalyzer integration testing, centralized management evaluation
Use case: Testing autoscale with traffic generators, no management VPC
# Inspection VPC (Required)
enable_build_inspection_vpc            = true
inspection_access_internet_mode        = "nat_gw"

# Management VPC Components
enable_build_management_vpc    = false

# Spoke VPC Components
enable_build_existing_subnets  = true
enable_east_linux_instances    = true
enable_west_linux_instances    = true
enable_debug_tgw_attachment    = false
What you get: Inspection VPC (with Fortinet-Role tags), Transit Gateway, and spoke VPCs with Linux instances
Cost: ~$100-150/month
Best for: Autoscale behavior testing, load testing, capacity planning
Use case: Lowest cost configuration - Inspection VPC only
# Inspection VPC (Required)
enable_build_inspection_vpc            = true
inspection_access_internet_mode        = "eip"  # Lower cost than nat_gw

# Management VPC Components
enable_build_management_vpc    = false

# Spoke VPC Components
enable_build_existing_subnets  = false
What you get: Inspection VPC with Fortinet-Role tags only - minimum required for autoscale_template
Cost: ~$30-50/month (VPC infrastructure only)
Best for: Minimal FortiGate testing, cost-sensitive environments, integration with existing TGW/spoke VPCs
Clone the repository containing both templates:
git clone https://github.com/FortinetCloudCSE/Autoscale-Simplified-Template.git
cd Autoscale-Simplified-Template/terraform/existing_vpc_resources
Copy the example file and customize:
cp terraform.tfvars.example terraform.tfvars
aws_region         = "us-west-2"
availability_zone_1 = "a"
availability_zone_2 = "c"Availability Zone Selection
Choose AZs that:
Verify AZ availability:
aws ec2 describe-availability-zones --region us-west-2
These values are prepended to all resources for identification:
cp  = "acme"    # Customer prefix
env = "test" # Environment: prod, test, devResult: Resources named like acme-test-management-vpc, acme-test-tgw, etc.

Critical: Variable Coordination
These cp and env values must match between existing_vpc_resources and autoscale_template for proper resource discovery via tags.
The Inspection VPC is required and must be enabled. This creates the VPC where FortiGate autoscale group will be deployed.
enable_build_inspection_vpc            = true
inspection_access_internet_mode        = "nat_gw"  # or "eip"
inspection_enable_dedicated_management_eni = false # or true for dedicated mgmt ENIFortinet-Role Tags: All Inspection VPC resources are automatically tagged with Fortinet-Role tags using the pattern {cp}-{env}-inspection-*. These tags are used by autoscale_template to discover the VPC resources.

enable_build_management_vpc = true
enable_build_existing_subnets = true
enable_fortimanager  = true
fortimanager_instance_type = "m5.large"
fortimanager_os_version = "7.4.5"
fortimanager_host_ip = "10"  # .3.0.10 within management VPC CIDR

enable_fortianalyzer = true
fortianalyzer_instance_type = "m5.large"
fortianalyzer_os_version = "7.4.5"
fortianalyzer_host_ip = "11" # .3.0.11 within management VPC CIDRInstance Sizing Recommendations
For testing/lab environments:
For heavier workloads or production evaluation:

enable_mgmt_vpc_tgw_attachment = trueThis allows jump box and management instances to reach spoke VPC Linux instances for testing.

enable_jump_box = true
jump_box_instance_type = "t3.micro"

enable_east_linux_instances = true
east_linux_instance_type = "t3.micro"

enable_west_linux_instances = true
west_linux_instance_type = "t3.micro"enable_debug_tgw_attachment = trueEnables bypass path for connectivity testing without FortiGate inspection.

vpc_cidr_management = "10.3.0.0/16"
vpc_cidr_east       = "192.168.0.0/24"
vpc_cidr_west       = "192.168.1.0/24"
vpc_cidr_spoke = "192.168.0.0/16" # Supernet for all spoke VPCsCIDR Planning
Ensure CIDRs:
existing_vpc_resources and autoscale_templatekeypair = "my-aws-keypair" # Must exist in target region
my_ip = "203.0.113.10/32" # Your public IP for SSH accessSecurity Group Source IP
The my_ip variable restricts SSH and HTTPS access to management interfaces.
For dynamic IPs, consider:
"203.0.113.0/24"Initialize Terraform:
terraform initReview the execution plan:
terraform planExpected output will show resources to be created based on enabled flags.
Deploy the infrastructure:
terraform applyType yes when prompted to confirm.
Expected deployment time: 10-15 minutes
Deployment progress:
Apply complete! Resources: 47 added, 0 changed, 0 destroyed.

Outputs:

east_linux_instance_ip = "192.168.0.50"
fortianalyzer_public_ip = "52.10.20.30"
fortimanager_public_ip = "52.10.20.40"
jump_box_public_ip = "52.10.20.50"
management_vpc_id = "vpc-0123456789abcdef0"
tgw_id = "tgw-0123456789abcdef0"
tgw_name = "acme-test-tgw"
west_linux_instance_ip = "192.168.1.50"aws ec2 describe-vpcs --filters "Name=tag:Name,Values=acme-test-management-vpc"Expected: VPC ID and CIDR information
# Get public IP from outputs
terraform output fortimanager_public_ip

# Access GUI
open https://<FortiManager-Public-IP>

# Or SSH
ssh admin@<FortiManager-Public-IP>
# Default password: <instance-id>
First-time FortiManager setup:
Enable VM device recognition (FortiManager 7.6.3+):
config system global
    set fgfm-allow-vm enable
end# Get public IP from outputs
terraform output fortianalyzer_public_ip
# Access GUI
open https://<FortiAnalyzer-Public-IP>
# Or SSH
ssh admin@<FortiAnalyzer-Public-IP>aws ec2 describe-transit-gateways --filters "Name=tag:Name,Values=acme-test-tgw"Expected: Transit Gateway in “available” state
# Get instance IPs from outputs
terraform output east_linux_instance_ip
terraform output west_linux_instance_ip

# Test HTTP connectivity (if jump box enabled)
ssh -i ~/.ssh/keypair.pem ec2-user@<jump-box-ip>
curl http://<east-linux-ip>
# Expected: "Hello from ip-192-168-0-50"Save key outputs for use in autoscale_template configuration:
# Save all outputs
terraform output > ../outputs.txt

# Or save specific values
echo "tgw_name: $(terraform output -raw tgw_name)" >> ../autoscale_template/terraform.tfvars
echo "fortimanager_ip: $(terraform output -raw fortimanager_private_ip)" >> ../autoscale_template/terraform.tfvarsThe template provides these outputs. Note that autoscale_template discovers resources via Fortinet-Role tags rather than using output values directly.
| Output | Description | Notes |
|---|---|---|
inspection_vpc_id | ID of inspection VPC | Discovered by autoscale_template via Fortinet-Role tag |
inspection_vpc_cidr | CIDR of inspection VPC | Used for route table configuration |
| Output | Description | Used By autoscale_template |
|---|---|---|
management_vpc_id | ID of management VPC | VPC peering or TGW routing |
management_vpc_cidr | CIDR of management VPC | Route table configuration |
tgw_id | Transit Gateway ID | TGW attachment |
tgw_name | Transit Gateway name tag | attach_to_tgw_name variable |
fortimanager_private_ip | FortiManager private IP | fortimanager_ip variable |
fortimanager_public_ip | FortiManager public IP | GUI/SSH access |
fortianalyzer_private_ip | FortiAnalyzer private IP | FortiGate syslog configuration |
fortianalyzer_public_ip | FortiAnalyzer public IP | GUI/SSH access |
jump_box_public_ip | Jump box public IP | SSH bastion access |
east_linux_instance_ip | East spoke instance IP | Connectivity testing |
west_linux_instance_ip | West spoke instance IP | Connectivity testing |
Tag-Based Discovery: The autoscale_template discovers Inspection VPC resources using Fortinet-Role tags rather than relying on output values. This allows the templates to be run independently as long as the cp and env values match.
If you enabled FortiManager and plan to integrate with autoscale group:
Access FortiManager GUI: https://<FortiManager-Public-IP>
Change default password:
admin / <instance-id>Enable VM device recognition (7.6.3+):
config system global
    set fgfm-allow-vm enable
end
Create ADOM for autoscale group (optional):
Note FortiManager details for autoscale_template:
get system statusIf you enabled FortiAnalyzer:
Access FortiAnalyzer GUI: https://<FortiAnalyzer-Public-IP>
Change default password
Configure log settings:
Note FortiAnalyzer private IP for FortiGate syslog configuration
Management Resource Persistence
If you deploy the existing_vpc_resources template:
terraform destroyManaging Lab Costs
The existing_vpc_resources template can create expensive resources:
Cost reduction strategies:
Example budget-conscious configuration:
enable_fortimanager = false    # Save $73/month
enable_fortianalyzer = false   # Save $73/month
jump_box_instance_type = "t3.micro"  # Use smallest size
east_linux_instance_type = "t3.micro"
west_linux_instance_type = "t3.micro"Store Terraform state securely:
# backend.tf (optional - recommended for teams)
terraform {
  backend "s3" {
    bucket = "my-terraform-state"
    key    = "existing-vpc-resources/terraform.tfstate"
    region = "us-west-2"
    encrypt = true
    dynamodb_table = "terraform-locks"
  }
}Symptoms:
Error: Error creating VPC: VpcLimitExceededSolutions:
Symptoms:
Solutions:
Verify security groups allow your IP:
aws ec2 describe-security-groups --group-ids <sg-id>Check instance is running:
aws ec2 describe-instances --filters "Name=tag:Name,Values=*fortimanager*"Verify my_ip variable matches your current public IP:
curl ifconfig.meCheck instance system log for boot issues:
aws ec2 get-console-output --instance-id <instance-id>Symptoms:
Solutions:
aws ec2 describe-transit-gateway-attachmentsSymptoms:
Solutions:
Symptoms:
Solutions:
Check what’s running:
aws ec2 describe-instances --filters "Name=instance-state-name,Values=running"Identify expensive resources:
# Use AWS Cost Explorer in AWS Console
# Filter by resource tags: cp and env
Shut down unused components:
terraform destroy -target=module.fortimanager
terraform destroy -target=module.fortianalyzer
Or destroy entire deployment:
terraform destroyTo destroy the existing_vpc_resources infrastructure:
cd terraform/existing_vpc_resources
terraform destroy
Type yes when prompted.
Destroy Order is Critical
If you also deployed autoscale_template, destroy it FIRST before destroying existing_vpc_resources:
# Step 1: Destroy autoscale_template
cd terraform/autoscale_template
terraform destroy

# Step 2: Destroy existing_vpc_resources
cd ../existing_vpc_resources
terraform destroy
Why? The inspection VPC has a Transit Gateway attachment to the TGW created by existing_vpc_resources. Destroying the TGW first will cause the attachment deletion to fail.
To destroy only specific components:
# Destroy only FortiManager
terraform destroy -target=module.fortimanager

# Destroy only spoke VPCs and TGW
terraform destroy -target=module.transit_gateway
terraform destroy -target=module.spoke_vpcs

# Destroy only management VPC
terraform destroy -target=module.management_vpcAfter destroying, verify no resources remain:
# Check VPCs
aws ec2 describe-vpcs --filters "Name=tag:cp,Values=acme" "Name=tag:env,Values=test"

# Check Transit Gateways
aws ec2 describe-transit-gateways --filters "Name=tag:cp,Values=acme"

# Check running instances
aws ec2 describe-instances --filters "Name=instance-state-name,Values=running" "Name=tag:cp,Values=acme"After deploying existing_vpc_resources, proceed to deploy the autoscale_template to create the FortiGate autoscale group and inspection VPC.
Key information to carry forward:
cp and env valuesRecommended next reading:
The autoscale_template deploys the FortiGate autoscale group into an existing Inspection VPC. It discovers VPC resources using Fortinet-Role tags created by the existing_vpc_resources template.
Prerequisites: You must run existing_vpc_resources FIRST to create the Inspection VPC with proper Fortinet-Role tags. Alternatively, you can manually apply the required tags to existing VPCs.
This template is required for all deployments. It deploys the FortiGate autoscale group, Gateway Load Balancer, Lambda functions, and configures routes for traffic inspection.
The autoscale_template discovers the existing Inspection VPC via Fortinet-Role tags and deploys FortiGate autoscale components into it:
| Resource | Tag Pattern | Purpose |
|---|---|---|
| Inspection VPC | {cp}-{env}-inspection-vpc | VPC for FortiGate deployment |
| Subnets | {cp}-{env}-inspection-{type}-{az} | Public, GWLBE, Private subnets |
| Route Tables | {cp}-{env}-inspection-{type}-rt-{az} | For route modifications |
| IGW | {cp}-{env}-inspection-igw | Internet connectivity |
| NAT Gateways | {cp}-{env}-inspection-natgw-{az} | If nat_gw mode |
| TGW Attachment | {cp}-{env}-inspection-tgw-attachment | If TGW enabled |
| Component | Purpose | Always Created |
|---|---|---|
| FortiGate Autoscale Groups | BYOL and/or on-demand instance groups | ✅ Yes |
| Gateway Load Balancer | Distributes traffic across FortiGate instances | ✅ Yes |
| GWLB Endpoints | Connection points in each AZ | ✅ Yes |
| Lambda Functions | Lifecycle management and licensing automation | ✅ Yes |
| DynamoDB Table | License tracking and state management | ✅ Yes (if BYOL) |
| S3 Bucket | License file storage and Lambda code | ✅ Yes (if BYOL) |
| IAM Roles | Permissions for Lambda and EC2 instances | ✅ Yes |
| Security Groups | Network access control | ✅ Yes |
| CloudWatch Alarms | Autoscaling triggers | ✅ Yes |
| Route Modifications | Points private subnets to GWLB endpoints | ✅ Yes (if enabled) |
| Component | Purpose | Enabled By |
|---|---|---|
| Transit Gateway Attachment | Connection to TGW for centralized architecture | enable_tgw_attachment |
| Dedicated Management ENI | Isolated management interface | enable_dedicated_management_eni |
| Dedicated Management VPC Connection | Management in separate VPC | enable_dedicated_management_vpc |
| FortiManager Integration | Centralized policy management | enable_fortimanager_integration |
| East-West Inspection | Inter-spoke traffic inspection | enable_east_west_inspection |
The autoscale_template supports multiple deployment patterns:
Configuration:
enable_tgw_attachment = true
attach_to_tgw_name = "production-tgw"
Traffic flow:
Spoke VPCs → TGW → Inspection VPC → FortiGate → GWLB → InternetUse cases:
Configuration:
enable_tgw_attachment = falseTraffic flow:
Spoke VPC → GWLB Endpoint → FortiGate → Internet GatewayUse cases:
Configuration:
enable_tgw_attachment = true
enable_dedicated_management_vpc = true
enable_fortimanager_integration = true
Traffic flow:
Data: Spoke VPCs → TGW → FortiGate → Internet
Management: FortiGate → Management VPC → FortiManager
Use cases:
The autoscale_template discovers all Inspection VPC resources using Fortinet-Role tags. This is how it finds the VPC, subnets, route tables, and other resources created by existing_vpc_resources.
How discovery works:
# autoscale_template looks up resources like this:
data "aws_vpc" "inspection" {
  filter {
    name   = "tag:Fortinet-Role"
    values = ["${var.cp}-${var.env}-inspection-vpc"]
  }
}

data "aws_subnet" "inspection_public_az1" {
  filter {
    name   = "tag:Fortinet-Role"
    values = ["${var.cp}-${var.env}-inspection-public-az1"]
  }
}Critical: The cp and env variables must match exactly between existing_vpc_resources and autoscale_template for tag discovery to work.
When deploying after existing_vpc_resources:
Required variable coordination:
# MUST MATCH existing_vpc_resources values (for Fortinet-Role tag discovery)
aws_region          = "us-west-2"
availability_zone_1 = "a"
availability_zone_2 = "c"
cp                  = "acme"      # MUST MATCH - used for tag lookup
env                 = "test"      # MUST MATCH - used for tag lookup

# Connect to created TGW (if enabled in existing_vpc_resources)
enable_tgw_attachment = true
attach_to_tgw_name    = "acme-test-tgw"  # From existing_vpc_resources output

# Connect to management VPC (if created in existing_vpc_resources)
enable_dedicated_management_vpc = true
# Management VPC also discovered via Fortinet-Role tags

# FortiManager integration (if enabled in existing_vpc_resources)
enable_fortimanager_integration = true
fortimanager_ip = "10.3.0.10"  # From existing_vpc_resources output
fortimanager_sn = "FMGVM0000000001"If you have existing VPCs that you want to use instead of creating new ones with existing_vpc_resources, you must apply Fortinet-Role tags to all required resources:
Required tags (see Templates Overview for complete list):
{cp}-{env}-inspection-vpc{cp}-{env}-inspection-{public|gwlbe|private}-az{1|2}{cp}-{env}-inspection-{type}-rt-az{1|2}{cp}-{env}-inspection-igwConfiguration:
# Match your tag prefix
cp  = "acme"
env = "prod"

# Connect to existing production TGW
enable_tgw_attachment = true
attach_to_tgw_name = "production-tgw"  # Your existing TGW

# Use existing management infrastructure
enable_fortimanager_integration = true
fortimanager_ip = "10.100.50.10"  # Your existing FortiManager
fortimanager_sn = "FMGVM1234567890"existing_vpc_resources deployed (creates Inspection VPC with Fortinet-Role tags)Fortinet-Role tags applied manuallyRequired: The Inspection VPC must exist with proper Fortinet-Role tags before running this template. Run existing_vpc_resources first, or manually tag your existing VPCs.
cd Autoscale-Simplified-Template/terraform/autoscale_templatecp terraform.tfvars.example terraform.tfvars
aws_region         = "us-west-2"
availability_zone_1 = "a"
availability_zone_2 = "c"Variable Coordination
If you deployed existing_vpc_resources, these values MUST MATCH exactly:
aws_regionavailability_zone_1availability_zone_2cp (customer prefix)env (environment)Mismatched values will cause resource discovery failures and deployment errors.
cp  = "acme"    # Customer prefix - MUST MATCH existing_vpc_resources
env = "test" # Environment - MUST MATCH existing_vpc_resourcesCritical for Tag Discovery
These values form the prefix for Fortinet-Role tags used to discover the Inspection VPC. For example, with cp="acme" and env="test", the template looks for:
Fortinet-Role = acme-test-inspection-vpcFortinet-Role = acme-test-inspection-public-az1If these don’t match the tags created by existing_vpc_resources, the template will fail with “no matching VPC found” errors.

keypair                 = "my-aws-keypair"  # Must exist in target region
my_ip                   = "203.0.113.10/32" # Your public IP for management access
fortigate_asg_password = "SecurePassword123!" # Admin password for FortiGatesPassword Requirements
The fortigate_asg_password must meet FortiOS password requirements:
Never commit passwords to version control. Consider using:
TF_VAR_fortigate_asg_password
To connect to Transit Gateway:
enable_tgw_attachment = true
Specify TGW name:
# If using existing_vpc_resources template
attach_to_tgw_name = "acme-test-tgw"  # Matches existing_vpc_resources output

# If using existing production TGW
attach_to_tgw_name = "production-tgw" # Your production TGW nameFinding Your Transit Gateway Name
If you don’t know your TGW name:
aws ec2 describe-transit-gateways \
  --query 'TransitGateways[*].[Tags[?Key==`Name`].Value | [0], TransitGatewayId]' \
  --output table
The attach_to_tgw_name should match the Name tag of your Transit Gateway.
To skip TGW attachment (distributed architecture):
enable_tgw_attachment = falseEast-West Inspection (requires TGW attachment):
enable_east_west_inspection = true # Routes spoke-to-spoke traffic through FortiGatefirewall_policy_mode = "2-arm" # or "1-arm"Recommendations:
See Firewall Architecture for detailed comparison.
access_internet_mode = "nat_gw" # or "eip"Recommendations:
See Internet Egress for detailed comparison.
enable_dedicated_management_eni = trueSeparates management traffic from data plane. Recommended for production.
enable_dedicated_management_vpc = true

# If using existing_vpc_resources with default tags:
dedicated_management_vpc_tag = "acme-test-management-vpc"
dedicated_management_public_az1_subnet_tag = "acme-test-management-public-az1-subnet"
dedicated_management_public_az2_subnet_tag = "acme-test-management-public-az2-subnet"

# If using existing management VPC with custom tags:
dedicated_management_vpc_tag = "my-custom-mgmt-vpc-tag"
dedicated_management_public_az1_subnet_tag = "my-custom-mgmt-az1-tag"
dedicated_management_public_az2_subnet_tag = "my-custom-mgmt-az2-tag"
See Management Isolation for options and recommendations.
Automatic Implication
When enable_dedicated_management_vpc = true, the template automatically sets enable_dedicated_management_eni = true. You don’t need to configure both explicitly.

The template supports three licensing models. Choose one or combine them for hybrid licensing.
asg_license_directory = "asg_license" # Directory containing .lic filesPrerequisites:
Create the license directory:
mkdir asg_licensePlace license files in the directory:
terraform/autoscale_template/
├── terraform.tfvars
├── asg_license/
│   ├── FGVM01-001.lic
│   ├── FGVM01-002.lic
│   ├── FGVM01-003.lic
│   └── FGVM01-004.lic
Ensure you have at least as many licenses as asg_byol_asg_max_size
License Pool Exhaustion
If you run out of BYOL licenses:
Recommended: Provision 20% more licenses than asg_byol_asg_max_size
fortiflex_username      = "xxxxxxxx-xxxx-xxxx-xxxx-xxxxxxxxxxxx"  # API username (UUID)
fortiflex_password      = "xxxxxxxxxxxxxxxxxxxxx"  # API password
fortiflex_sn_list       = ["FGVMELTMxxxxxxxx"]  # Optional: specific program serial numbers
fortiflex_configid_list = ["My_4CPU_Config"] # Configuration names (must match CPU count)Prerequisites:
CPU count matching:
fgt_instance_type = "c6i.xlarge"  # 4 vCPUs
fortiflex_configid_list = ["My_4CPU_Config"] # MUST have 4 CPUs configuredSecurity Best Practice
Never commit FortiFlex credentials to version control. Use:
TF_VAR_fortiflex_username and TF_VAR_fortiflex_passwordExample using environment variables:
export TF_VAR_fortiflex_username="xxxxxxxx-xxxx-xxxx-xxxx-xxxxxxxxxxxx"
export TF_VAR_fortiflex_password="xxxxxxxxxxxxxxxxxxxxx"
terraform apply
See FortiFlex Setup Guide for complete configuration details.
# No explicit configuration needed
# Just set on-demand ASG capacities

asg_byol_asg_min_size = 0
asg_byol_asg_max_size = 0

asg_ondemand_asg_min_size = 2
asg_ondemand_asg_max_size = 8Prerequisites:
Combine licensing models for cost optimization:
# BYOL for baseline capacity (lowest cost)
asg_license_directory = "asg_license"
asg_byol_asg_min_size = 2
asg_byol_asg_max_size = 4

# PAYG for burst capacity (highest flexibility)
asg_ondemand_asg_min_size = 0
asg_ondemand_asg_max_size = 4
See Licensing Options for detailed comparison and cost analysis.
# BYOL ASG
asg_byol_asg_min_size     = 2
asg_byol_asg_max_size     = 4
asg_byol_asg_desired_size = 2

# On-Demand ASG
asg_ondemand_asg_min_size     = 0
asg_ondemand_asg_max_size     = 4
asg_ondemand_asg_desired_size = 0

# Primary scale-in protection
primary_scalein_protection = true
Capacity planning guidance:
| Deployment Type | Recommended Configuration |
|---|---|
| Development/Test | min=1, max=2, desired=1 |
| Small Production | min=2, max=4, desired=2 |
| Medium Production | min=2, max=8, desired=4 |
| Large Production | min=4, max=16, desired=6 |
Scaling behavior:
asg_byol_asg_max_size)See Autoscale Group Capacity for detailed planning.
fgt_instance_type = "c7gn.xlarge"
fortios_version   = "7.4.5"
fortigate_gui_port = 443
Instance type recommendations:
| Use Case | Recommended Type | vCPUs | Network Performance |
|---|---|---|---|
| Testing/Lab | t3.xlarge | 4 | Up to 5 Gbps |
| Small Production | c6i.xlarge | 4 | Up to 12.5 Gbps |
| Medium Production | c6i.2xlarge | 8 | Up to 12.5 Gbps |
| High Performance | c7gn.xlarge | 4 | Up to 25 Gbps |
| Very High Performance | c7gn.4xlarge | 16 | 50 Gbps |
FortiOS version selection:
enable_fortimanager_integration = true
fortimanager_ip                 = "10.3.0.10"  # FortiManager IP
fortimanager_sn                 = "FMGVM0000000001"  # FortiManager serial number
fortimanager_vrf_select = 1 # VRF for management routingFortiManager 7.6.3+ Configuration Required
If using FortiManager 7.6.3 or later, you must enable VM device recognition before deploying:
On FortiManager CLI:
config system global
    set fgfm-allow-vm enable
end
Verify the setting:
show system global | grep fgfm-allow-vmWithout this configuration, FortiGate-VM instances will fail to register with FortiManager.
See FortiManager Integration for complete details.
FortiManager integration behavior:
config system central-management on primary FortiGate onlySee FortiManager Integration Configuration for advanced options including UMS mode.
vpc_cidr_inspection = "10.0.0.0/16"
vpc_cidr_management = "10.3.0.0/16"  # Must match existing_vpc_resources if used
vpc_cidr_spoke      = "192.168.0.0/16"  # Supernet for all spoke VPCs
vpc_cidr_east       = "192.168.0.0/24"
vpc_cidr_west       = "192.168.1.0/24"

subnet_bits = 8 # /16 + 8 = /24 subnetsCIDR Planning Considerations
Ensure:
existing_vpc_resources if usedCommon mistakes:
endpoint_name_az1 = "asg-gwlbe_az1"
endpoint_name_az2 = "asg-gwlbe_az2"
These names are used for route table lookups when configuring TGW routing or spoke VPC routing.
enable_fgt_system_autoscale = trueEnables FortiGate-native HA synchronization between instances. Recommended to leave enabled.
# Scale-out threshold (default: 80% CPU)
scale_out_threshold = 80

# Scale-in threshold (default: 30% CPU)
scale_in_threshold = 30
Adjust based on your traffic patterns and capacity requirements.
Review your complete terraform.tfvars file before deployment. Here’s a complete example:
#-----------------------------------------------------------------------
# Core Configuration
#-----------------------------------------------------------------------
aws_region          = "us-west-2"
availability_zone_1 = "a"
availability_zone_2 = "c"
cp                  = "acme"
env                 = "prod"

#-----------------------------------------------------------------------
# Security
#-----------------------------------------------------------------------
keypair                = "acme-keypair"
my_ip                  = "203.0.113.10/32"
fortigate_asg_password = "SecurePassword123!"

#-----------------------------------------------------------------------
# Transit Gateway
#-----------------------------------------------------------------------
enable_tgw_attachment      = true
attach_to_tgw_name         = "acme-prod-tgw"
enable_east_west_inspection = true

#-----------------------------------------------------------------------
# Architecture Options
#-----------------------------------------------------------------------
firewall_policy_mode = "2-arm"
access_internet_mode = "nat_gw"

#-----------------------------------------------------------------------
# Management Options
#-----------------------------------------------------------------------
enable_dedicated_management_eni = true
enable_dedicated_management_vpc = true
dedicated_management_vpc_tag = "acme-prod-management-vpc"
dedicated_management_public_az1_subnet_tag = "acme-prod-management-public-az1-subnet"
dedicated_management_public_az2_subnet_tag = "acme-prod-management-public-az2-subnet"

#-----------------------------------------------------------------------
# FortiManager Integration
#-----------------------------------------------------------------------
enable_fortimanager_integration = true
fortimanager_ip                 = "10.3.0.10"
fortimanager_sn                 = "FMGVM0000000001"
fortimanager_vrf_select         = 1

#-----------------------------------------------------------------------
# Licensing - Hybrid BYOL + PAYG
#-----------------------------------------------------------------------
asg_license_directory = "asg_license"

#-----------------------------------------------------------------------
# Autoscale Group Capacity
#-----------------------------------------------------------------------
# BYOL baseline
asg_byol_asg_min_size     = 2
asg_byol_asg_max_size     = 4
asg_byol_asg_desired_size = 2

# PAYG burst
asg_ondemand_asg_min_size     = 0
asg_ondemand_asg_max_size     = 4
asg_ondemand_asg_desired_size = 0

# Scale-in protection
primary_scalein_protection = true

#-----------------------------------------------------------------------
# FortiGate Specifications
#-----------------------------------------------------------------------
fgt_instance_type       = "c6i.xlarge"
fortios_version         = "7.4.5"
fortigate_gui_port      = 443
enable_fgt_system_autoscale = true

#-----------------------------------------------------------------------
# Network CIDRs
#-----------------------------------------------------------------------
vpc_cidr_inspection = "10.0.0.0/16"
vpc_cidr_management = "10.3.0.0/16"
vpc_cidr_spoke      = "192.168.0.0/16"
vpc_cidr_east       = "192.168.0.0/24"
vpc_cidr_west       = "192.168.1.0/24"
subnet_bits         = 8

#-----------------------------------------------------------------------
# GWLB Endpoints
#-----------------------------------------------------------------------
endpoint_name_az1 = "acme-prod-gwlbe-az1"
endpoint_name_az2 = "acme-prod-gwlbe-az2"Initialize Terraform:
terraform initReview the execution plan:
terraform planExpected output will show ~40-60 resources to be created.
Deploy the infrastructure:
terraform applyType yes when prompted.
Expected deployment time: 15-20 minutes
Deployment progress indicators:
Watch CloudWatch logs for Lambda execution:
# Get Lambda function name from Terraform
terraform output lambda_function_name

# Stream logs
aws logs tail /aws/lambda/<function-name> --follow
Watch Auto Scaling Group activity:
# Get ASG name
aws autoscaling describe-auto-scaling-groups \
  --query 'AutoScalingGroups[?contains(AutoScalingGroupName, `acme-prod`)].AutoScalingGroupName'

# Watch instance launches
aws autoscaling describe-scaling-activities \
  --auto-scaling-group-name <asg-name> \
--max-records 10# List running FortiGate instances
aws ec2 describe-instances \
--filters "Name=tag:cp,Values=acme" \
"Name=tag:env,Values=prod" \
"Name=instance-state-name,Values=running" \
--query 'Reservations[*].Instances[*].[InstanceId,PublicIpAddress,Tags[?Key==`Name`].Value|[0]]' \
--output table# Get FortiGate public IP
terraform output fortigate_instance_ips
# Access GUI
open https://<fortigate-public-ip>:443Login credentials:
adminfortigate_asg_password variableFor BYOL:
# SSH to FortiGate
ssh -i ~/.ssh/keypair.pem admin@<fortigate-ip>

# Check license status
get system status

# Look for:
# Serial-Number: FGVMxxxxxxxxxx (not FGVMEVXXXXXXXXX)
# License Status: Valid
For FortiFlex:
For PAYG:
aws ec2 describe-transit-gateway-attachments \
  --filters "Name=state,Values=available" \
           "Name=resource-type,Values=vpc" \
--query 'TransitGatewayAttachments[?contains(Tags[?Key==`Name`].Value|[0], `inspection`)]'If FortiManager integration enabled:
https://<fortimanager-ip>From jump box (if using existing_vpc_resources):
# SSH to jump box
ssh -i ~/.ssh/keypair.pem ec2-user@<jump-box-ip>

# Test internet connectivity (should go through FortiGate)
curl https://www.google.com

# Test spoke VPC connectivity
curl http://<linux-instance-ip>
On FortiGate:
# SSH to FortiGate
ssh -i ~/.ssh/keypair.pem admin@<fortigate-ip>

# Monitor real-time traffic
diagnose sniffer packet any 'host 192.168.0.50' 4

# Check firewall policies
get firewall policy

# View active sessions
diagnose sys session listIf you enabled enable_tgw_attachment = true, configure Transit Gateway route tables to route traffic through inspection VPC:
Spoke VPC route table (route internet traffic to inspection VPC):
# Get inspection VPC TGW attachment ID
INSPECT_ATTACH_ID=$(aws ec2 describe-transit-gateway-attachments \
  --filters "Name=resource-type,Values=vpc" \
           "Name=tag:Name,Values=*inspection*" \
  --query 'TransitGatewayAttachments[0].TransitGatewayAttachmentId' \
  --output text)

# Add default route to spoke route table
aws ec2 create-transit-gateway-route \
  --destination-cidr-block 0.0.0.0/0 \
  --transit-gateway-route-table-id <spoke-rt-id> \
  --transit-gateway-attachment-id $INSPECT_ATTACH_ID
Inspection VPC route table (route spoke traffic to internet):
# This is typically configured automatically by the template
# Verify it exists:
aws ec2 describe-transit-gateway-route-tables \
--transit-gateway-route-table-ids <inspection-rt-id>If you enabled enable_east_west_inspection = true:
Spoke-to-spoke traffic routes through inspection VPC automatically.
Verify routing:
# From east spoke instance
ssh ec2-user@<east-linux-ip>
ping <west-linux-ip>  # Should succeed and be inspected by FortiGate

# Check FortiGate logs
diagnose debug flow trace start 10
diagnose debug enable
# Generate traffic and watch logsAccess FortiGate GUI and configure firewall policies:
Policy & Objects > Firewall Policy > Create New

Name: Internet-Egress
Incoming Interface: port1 (or TGW interface)
Outgoing Interface: port2 (internet interface)
Source: all
Destination: all
Service: ALL
Action: ACCEPT
NAT: Enable
Logging: All SessionsPolicy & Objects > Firewall Policy > Create New
Name: East-West-Inspection
Incoming Interface: port1 (TGW interface)
Outgoing Interface: port1 (TGW interface)
Source: 192.168.0.0/16
Destination: 192.168.0.0/16
Service: ALL
Action: ACCEPT
NAT: Disable
Logging: All Sessions
Security Profiles: Enable IPS, Application Control, etc.Authorize FortiGate device:
Create policy package:
Install policy:
Verify sync to secondary instances:
Key metrics to monitor:
# CPU utilization (triggers autoscaling)
aws cloudwatch get-metric-statistics \
  --namespace AWS/EC2 \
  --metric-name CPUUtilization \
  --dimensions Name=AutoScalingGroupName,Value=<asg-name> \
  --start-time 2024-01-01T00:00:00Z \
  --end-time 2024-01-02T00:00:00Z \
  --period 3600 \
  --statistics Average

# Network throughput
aws cloudwatch get-metric-statistics \
  --namespace AWS/EC2 \
  --metric-name NetworkIn \
  --dimensions Name=AutoScalingGroupName,Value=<asg-name> \
  --start-time 2024-01-01T00:00:00Z \
  --end-time 2024-01-02T00:00:00Z \
  --period 3600 \
--statistics SumMonitor license assignment and lifecycle events:
# Stream Lambda logs
aws logs tail /aws/lambda/<function-name> --follow

# Search for errors
aws logs filter-log-events \
  --log-group-name /aws/lambda/<function-name> \
  --filter-pattern "ERROR"

# Search for license assignments
aws logs filter-log-events \
  --log-group-name /aws/lambda/<function-name> \
--filter-pattern "license"# View scaling activities
aws autoscaling describe-scaling-activities \
--auto-scaling-group-name <asg-name> \
--max-records 20
# View current capacity
aws autoscaling describe-auto-scaling-groups \
--auto-scaling-group-names <asg-name> \
--query 'AutoScalingGroups[0].[MinSize,DesiredCapacity,MaxSize]'Symptoms:
Causes and Solutions:
For BYOL:
Check license files exist in directory:
ls -la asg_license/Check S3 bucket has licenses uploaded:
aws s3 ls s3://<bucket-name>/licenses/Check Lambda CloudWatch logs for errors:
aws logs tail /aws/lambda/<function-name> --follow | grep -i errorVerify DynamoDB table has available licenses:
aws dynamodb scan --table-name <table-name>For FortiFlex:
For PAYG:
Symptoms:
Solutions:
Verify instance is running:
aws ec2 describe-instances --instance-ids <instance-id>Check security groups allow your IP:
aws ec2 describe-security-groups --group-ids <sg-id>Verify you’re using correct port (default 443):
https://<fortigate-ip>:443Try alternate access methods:
# SSH to check if instance is responsive
ssh -i ~/.ssh/keypair.pem admin@<fortigate-ip>

# Check system status
get system status
If using dedicated management VPC:
Symptoms:
Solutions:
Verify TGW routing (if using TGW):
# Check TGW route tables
aws ec2 describe-transit-gateway-route-tables \
  --transit-gateway-id <tgw-id>

# Verify routes point to inspection VPC attachment
aws ec2 search-transit-gateway-routes \
  --transit-gateway-route-table-id <spoke-rt-id> \
  --filters "Name=state,Values=active"
Check GWLB health checks:
aws elbv2 describe-target-health \
  --target-group-arn <gwlb-target-group-arn>
Verify FortiGate firewall policies:
# SSH to FortiGate
ssh admin@<fortigate-ip>

# Check policies
get firewall policy

# Enable debug
diagnose debug flow trace start 10
diagnose debug enable
# Generate traffic and watch logs
Check spoke VPC route tables (for distributed architecture):
# Verify routes point to GWLB endpoints
aws ec2 describe-route-tables \
--filters "Name=vpc-id,Values=<spoke-vpc-id>"Symptoms:
Solutions:
Check Lambda logs for election logic:
aws logs tail /aws/lambda/<function-name> --follow | grep -i primaryVerify enable_fgt_system_autoscale = true:
# On FortiGate
get system auto-scale
Check for network connectivity between instances:
# From one FortiGate, ping another
execute ping <other-fortigate-private-ip>
Manually verify auto-scale configuration:
# SSH to FortiGate
ssh admin@<fortigate-ip>

# Check auto-scale config
show system auto-scale

# Should show:
# set status enable
# set role primary (or secondary)
# set sync-interface "port1"
# set psksecret "..."Symptoms:
Solutions:
Verify FortiManager 7.6.3+ VM recognition enabled:
# On FortiManager CLI
show system global | grep fgfm-allow-vm
# Should show: set fgfm-allow-vm enable
Check network connectivity:
# From FortiGate
execute ping <fortimanager-ip>

# Check FortiManager reachability
diagnose debug application fgfmd -1
diagnose debug enable
Verify central-management config:
# On FortiGate
show system central-management

# Should show:
# set type fortimanager
# set fmg <fortimanager-ip>
# set serial-number <fmgr-sn>
Check FortiManager logs:
# On FortiManager CLI
diagnose debug application fgfmd -1
diagnose debug enable
# Watch for connection attempts from FortiGate
Verify only primary instance has central-management config:
# On primary: Should have config
show system central-management

# On secondary: Should NOT have config (or be blocked by vdom-exception)
show system vdom-exceptionImportant outputs from the template:
terraform output| Output | Description | Use Case |
|---|---|---|
inspection_vpc_id | ID of inspection VPC | VPC peering, routing configuration |
inspection_vpc_cidr | CIDR of inspection VPC | Route table configuration |
gwlb_arn | Gateway Load Balancer ARN | GWLB endpoint creation |
gwlb_endpoint_az1_id | GWLB endpoint ID in AZ1 | Spoke VPC route tables |
gwlb_endpoint_az2_id | GWLB endpoint ID in AZ2 | Spoke VPC route tables |
fortigate_autoscale_group_name | BYOL ASG name | CloudWatch, monitoring |
fortigate_ondemand_autoscale_group_name | PAYG ASG name | CloudWatch, monitoring |
lambda_function_name | Lifecycle Lambda function name | CloudWatch logs, debugging |
dynamodb_table_name | License tracking table name | License management |
s3_bucket_name | License storage bucket name | License management |
tgw_attachment_id | TGW attachment ID | TGW routing configuration |
To destroy the autoscale_template infrastructure:
cd terraform/autoscale_template
terraform destroy
Type yes when prompted.
Destroy Order is Critical
If you also deployed existing_vpc_resources, destroy in this order:
autoscale_template (this template)existing_vpc_resourcesWhy? The inspection VPC has a Transit Gateway attachment to the TGW created by existing_vpc_resources. Destroying the TGW first will cause the attachment deletion to fail.
# Correct order:
cd terraform/autoscale_template
terraform destroy

cd ../existing_vpc_resources
terraform destroyTo destroy only specific components:
# Destroy only BYOL ASG
terraform destroy -target=module.fortigate_byol_asg

# Destroy only on-demand ASG
terraform destroy -target=module.fortigate_ondemand_asg

# Destroy only Lambda and DynamoDB
terraform destroy -target=module.lambda_functions
terraform destroy -target=module.dynamodb_tableAfter destroying, verify no resources remain:
# Check VPCs
aws ec2 describe-vpcs --filters "Name=tag:cp,Values=acme" "Name=tag:env,Values=prod"

# Check running instances
aws ec2 describe-instances \
  --filters "Name=instance-state-name,Values=running" \
           "Name=tag:cp,Values=acme"

# Check GWLB
aws elbv2 describe-load-balancers \
  --query 'LoadBalancers[?contains(LoadBalancerName, `acme`)]'

# Check Lambda functions
aws lambda list-functions --query 'Functions[?contains(FunctionName, `acme`)]'The autoscale_template deploys FortiGate autoscale into an existing Inspection VPC discovered via Fortinet-Role tags:
✅ Tag-based resource discovery: Finds Inspection VPC resources via Fortinet-Role tags
✅ Complete autoscale infrastructure: FortiGate ASG, GWLB, Lambda, IAM
✅ Flexible deployment options: Centralized, distributed, or hybrid architectures
✅ Multiple licensing models: BYOL, FortiFlex, PAYG, or hybrid
✅ Management options: Dedicated ENI, dedicated VPC, FortiManager integration
✅ Production-ready: High availability, autoscaling, lifecycle management
Key Requirements:
existing_vpc_resources first to create Inspection VPC with Fortinet-Role tagscp and env values match between both templates for tag discoveryNext Steps:
Document Version: 1.0
Last Updated: November 2025
Terraform Module Version: Compatible with terraform-aws-cloud-modules v1.0+
The upgrade_fortios/ toolset upgrades a FortiGate autoscale group running in AWS.
Two strategies are available, selected interactively at runtime based on the deployment’s
current state and the operator’s risk tolerance.
| Strategy | Best For | Traffic Impact | Rollback |
|---|---|---|---|
| In-Place | Same-major-version bumps on healthy deployments | Brief per-instance restart | Manual LT revert |
| Blue-Green | Cross-major-version upgrades, config remediation, or when full fallback is required | Near-zero (session interrupt at cutover) | Single script call, < 60 seconds |
The in-place strategy inspects live ASG state and selects the appropriate path automatically:
| Path | Condition | What Happens |
|---|---|---|
| A | desired = 0, no running instances | Update launch templates only — no instance replacement |
| B | desired > 0, instances running | Rolling replacement: secondaries first, primary last |
| C | desired = 0 + config backup present | Update LTs, launch primary, restore config, scale out |
The blue-green strategy deploys a parallel inspection stack and flips TGW routes at cutover:
| Phase | Action | Duration |
|---|---|---|
| 0 — Discovery | Extract Blue inventory from terraform.tfstate | 30 min |
| 1 — Backup | Export primary FortiGate configuration | 30–60 min |
| 2 — Deploy Green | terraform apply with new FortiOS AMI | 30–60 min |
| 3 — Validate Green | Health checks, config verification | 30–60 min |
| 4 — Cutover | Atomic TGW route flip + EIP migration | 5–10 min |
| 5 — Monitor | Blue suspended as fallback | 24–48 hours |
| 6 — Cleanup | terraform destroy Blue (irreversible) | 1–2 hours |
Strategy selection guide, toolset architecture, and prerequisites.
Paths A, B, and C — step-by-step procedures for in-place FortiOS upgrades.
Phase-by-phase guide for parallel deployment with TGW route flip cutover.
How discover.py extracts the Blue environment from Terraform state and the
blue_inventory.json schema used by all subsequent phases.
All upgrade scripts, documentation, and state files live under:
upgrade_fortios/
├── scripts/
│   ├── discover.py          — Extract Blue inventory from terraform.tfstate
│   ├── inplace_upgrade.py   — In-place upgrade workflow (Paths A, B, C)
│   ├── cutover.py           — TGW route flip + NAT GW EIP migration
│   ├── rollback.py          — Revert TGW routes to Blue + EIP rollback
│   └── watch_lambda.sh      — Stream Lambda CloudWatch logs during upgrade
├── state/                   — Working directory for tfstate files and backups
└── README.mdThe upgrade_fortios/ toolset upgrades the FortiOS version on a FortiGate autoscale group
running in AWS. It reads the existing terraform.tfstate file to discover the deployment
automatically — no manual resource identification is required.
The toolset has two separate entry points — one for each strategy. Run discover.py first
for both strategies to build the inventory file.
In-Place:
cd upgrade_fortios
bash state/refresh.sh
python3 scripts/discover.py --state state/autoscale_template.tfstate \
  --target-version 7.6.2 --output state/blue_inventory.json
python3 scripts/inplace_upgrade.py --inventory state/blue_inventory.json
Blue-Green:
cd upgrade_fortios
bash state/refresh.sh
python3 scripts/discover.py --state state/autoscale_template.tfstate \
  --vpc-state state/existing_vpc_resources.tfstate \
  --target-version 7.6.2 --output state/blue_inventory.json
# Then follow the six-phase blue-green procedureUse in-place when:
Avoid in-place for:
Use blue-green when:
Blue-green requires approximately 2x license capacity during the monitoring window (Phase 5) while both Blue and Green ASGs are running simultaneously.
| In-Place (Path B) | Blue-Green | |
|---|---|---|
| FortiOS versions | Same major (e.g., 7.2.x) | Any (7.4 → 7.6) |
| Config sync during upgrade | Required | Not required |
| Traffic gap | None (rolling) | None (route flip) |
| Rollback | Manual LT revert | Single script, < 60 seconds |
| Cost | Normal | 2x licenses during monitoring window |
| Terraform state | Unchanged | New Green state added |
| Typical duration | ~30 min | Longer (full stack deploy + 24–48h monitoring) |
boto3 library: pip3 install boto3The operator’s IAM role or user requires:
| Service | Permissions |
|---|---|
| EC2 | DescribeInstances, DescribeImages, CreateLaunchTemplateVersion, ModifyLaunchTemplate, DescribeNetworkInterfaces |
| AutoScaling | DescribeAutoScalingGroups, DescribeAutoScalingInstances, UpdateAutoScalingGroup, SuspendProcesses, ResumeProcesses, TerminateInstanceInAutoScalingGroup |
| ELBv2 | DescribeTargetHealth, DescribeLoadBalancers, DescribeTargetGroups |
| EC2 Transit Gateway | DescribeTransitGatewayRouteTables, SearchTransitGatewayRoutes, ReplaceTransitGatewayRoute (blue-green only) |
| CloudWatch | DescribeAlarms |
| Lambda | GetFunction |
| DynamoDB | DescribeTable |
The scripts read terraform.tfstate to discover the Blue environment. Get the state file
into the upgrade_fortios/state/ directory before running any scripts:
# Refresh from local Terraform working directories
bash upgrade_fortios/state/refresh.sh

# Or for remote S3 backend, pull state manually
cd terraform/autoscale_template
terraform state pull > ../../upgrade_fortios/state/autoscale_template.tfstateAlways use a fresh state file. An outdated state file can produce incorrect inventory results and cause the upgrade scripts to target the wrong resources.
upgrade_fortios/
├── scripts/
│   ├── discover.py          ← Parse terraform.tfstate → blue_inventory.json
│   ├── inplace_upgrade.py   ← In-place upgrade: Paths A, B, C
│   ├── cutover.py           ← TGW route flip + NAT GW EIP migration
│   ├── rollback.py          ← Revert TGW routes to Blue + EIP rollback
│   └── watch_lambda.sh      ← Stream Lambda CloudWatch logs during upgrade
├── state/
│   ├── refresh.sh                          ← Copy fresh tfstate from terraform/ dirs
│   ├── autoscale_template.tfstate          (Blue autoscale state)
│   ├── existing_vpc_resources.tfstate      (VPC/TGW topology)
│   ├── blue_inventory.json                 (output of discover.py)
│   ├── blue_primary_config.conf            (FortiGate backup — Phase 1)
│   ├── green.tfstate                       (Green stack state — blue-green only)
│ └── cutover_progress.json (written by cutover.py — used by rollback.py)autoscale_template.tfstate ──┐
existing_vpc_resources.tfstate─┤
▼
discover.py
│
▼
blue_inventory.json
│
┌───────────────────┤
│ │
▼ ▼
inplace_upgrade.py cutover.py ──→ cutover_progress.json
(Paths A / B / C) │ │
└───────────────▼
rollback.py
Blue-Green Phase 2:
terraform apply (green_inspection_stack) ──→ green.tfstate
(cutover.py reads green.tfstate outputs for Green attachment ID + NAT GW info)Both strategies require explicit operator confirmation at each significant step. The scripts
will not proceed automatically past a gate — they print the current state, describe the
next action, and wait for [y/N] confirmation.
This is intentional: upgrades affect production traffic and should not proceed unattended past checkpoints.
The in-place upgrade updates the launch template AMI and replaces running instances without deploying a parallel environment. The script reads live ASG state from AWS and selects the appropriate path automatically.
Cross-major-version upgrades (e.g., 7.4.x → 7.6.x) require Path C — FortiGate native config sync does not work across major versions. Rolling replacement (Path B) alone is not sufficient; a config restore must follow.
The script detects the current ASG desired capacity to determine the path:
BYOL desired=0 AND On-Demand desired=0?
    ├─ YES, and .conf backup present in state/ → Path C
    ├─ YES, no .conf backup               → Path A
└─ NO (instances running) → Path B| Path | Condition | Downtime | Use When |
|---|---|---|---|
| A | desired=0, no backup | None — no instances | ASG is already scaled to zero |
| B | desired>0 | Per-secondary restart; brief at primary | Same-major-version, healthy deployment |
| C | desired=0 + backup | Yes — ASG starts at zero, scales up | Cross-major-version or any desired=0 upgrade with config restore |
Condition: Both BYOL and On-Demand ASGs have desired=0. No instances running.
Phase 0: Discovery    — Read state, detect architecture, confirm path
Phase 1: Update LTs   — Create new launch template version with target AMI
                        Update both BYOL and On-Demand ASGs to use new version
Done — all future instance launches use the new FortiOS.cd upgrade_fortios
bash state/refresh.sh
# Step 1: Discovery (sets target AMI in inventory)
python3 scripts/discover.py \
--state state/autoscale_template.tfstate \
--target-version 7.4.6 \
--output state/blue_inventory.json
# Step 2: Upgrade
python3 scripts/inplace_upgrade.py \
--inventory state/blue_inventory.jsonThe script detects desired=0, updates launch templates, and exits. When the ASG is
later scaled up (manually or by CloudWatch alarms), new instances launch with the
target FortiOS version.
Condition: One or more instances are running (desired > 0).
Phase 0: Discovery — Read state, detect architecture, detect path
Phase 1: Backup — Export primary FortiGate config (safety net)
Phase 2: Update LTs — New launch template version with target AMI on both ASGs
Phase 3: Rolling — Terminate secondaries one at a time, wait for replacement
Terminate primary last — secondaries cover traffic, no gap
Lambda elects new primary from surviving secondaries
Phase 4: Verify — All instances on new AMI, GWLB healthy, primary electedFor a 2-instance deployment (1 primary, 1 secondary):
Start: [Primary 7.2.8] [Secondary 7.2.8] ← both in service, config synced
Step 1: Terminate secondary
[Primary 7.2.8] [Secondary TERMINATED]
Step 2: ASG launches replacement
[Primary 7.2.8] [New Secondary 7.2.13 — initializing]
Step 3: Wait: GWLB healthy + Autoscale Role: Secondary tag
[Primary 7.2.8] [New Secondary 7.2.13 — ready]
Step 4: Operator confirms → terminate primary
[Primary TERMINATED] [New Secondary 7.2.13 — handling traffic]
Step 5: Lambda elects new primary
[New Primary 7.2.13] [slot vacant]
Step 6: ASG launches replacement for vacated slot
[New Primary 7.2.13] [New Secondary 7.2.13 — initializing]
Step 7: Wait: GWLB healthy + Autoscale Role: Secondary tag
[New Primary 7.2.13] [New Secondary 7.2.13 — ready]
Done: Both instances on 7.2.13, config syncedFor deployments with multiple secondaries, Steps 1–3 repeat for each secondary before the primary is touched.
After a replacement instance launches, the script waits for all three conditions:
Autoscale Role: Secondary tag — Lambda completed initialization: license
assigned, config pushed from primary, instance registered in DynamoDBThe primary is not terminated until all secondaries satisfy all three conditions.
Known limitation: The GWLB health check passes before native FortiGate-to-FortiGate config sync completes. For same-major-version upgrades, this gap is small — by the time the operator reads the confirmation prompt and responds, sync is complete in practice. For cross-major-version upgrades, native sync does not work at all — use Path C.
During rolling replacement, the script suspends three ASG processes to prevent interference:
| Process | Why Suspended |
|---|---|
ReplaceUnhealthy | Prevents ASG from replacing instances the script is managing |
AZRebalance | Prevents unwanted launches/terminates for AZ balance |
ScheduledActions | Prevents scheduled scaling changes during upgrade |
Processes are automatically resumed after completion or on error.
cd upgrade_fortios
bash state/refresh.sh

# Step 1: Discovery (sets target AMI in inventory)
python3 scripts/discover.py \
  --state state/autoscale_template.tfstate \
  --target-version 7.4.6 \
  --output state/blue_inventory.json

# Step 2: Upgrade
python3 scripts/inplace_upgrade.py \
  --inventory state/blue_inventory.json
The script pauses at each gate and prompts for confirmation before proceeding.
Condition: desired=0 AND a .conf backup file is present in the state/ directory.
Path C is used for:
Phase 0: Discovery    — Read state, detect architecture, detect Path C
Phase 1: Update LTs   — New launch template version with target AMI on both ASGs
Phase 2: Launch       — Set ASG min=1, desired=1; wait for instance running,
                        GWLB healthy, and Autoscale Role: Primary tag
Phase 3: Config       — Restore blue_primary_config.conf to new primary
                        (via FortiGate REST API if --fgt-api-key provided,
                         otherwise operator restores via GUI and confirms)
Phase 4: Wait         — Poll until primary recovers from reboot after restore
Phase 5: Scale out    — Set ASG to original min/desired/max capacity
Secondary launches; Lambda assigns license and syncs configBefore running the script, scale the BYOL ASG down manually:
aws autoscaling update-auto-scaling-group \
  --auto-scaling-group-name <byol_asg_name> \
  --min-size 0 \
  --desired-capacity 0 \
  --max-size 0
Wait for all instances to terminate.
Back up the primary FortiGate config before scaling to zero if the ASG is currently running. Once instances terminate, the config is gone.
upgrade_fortios/state/blue_primary_config.confcd upgrade_fortios
bash state/refresh.sh
# Step 3a: Discovery (sets target AMI in inventory)
python3 scripts/discover.py \
--state state/autoscale_template.tfstate \
--target-version 7.6.2 \
--output state/blue_inventory.json
# Step 3b: Upgrade (detects Path C from desired=0 + backup file)
python3 scripts/inplace_upgrade.py \
--inventory state/blue_inventory.json \
--fgt-api-key <api-key> # optional — enables automated config restoreWith --fgt-api-key, the script posts the config backup to the FortiGate REST API
automatically:
POST /api/v2/monitor/system/config/restoreWithout it, the script pauses at Phase 3 and prompts the operator to restore the config manually via the FortiGate GUI:
System → Settings → Restore → Upload blue_primary_config.conf
After confirming the restore, the FortiGate reboots and the script resumes polling.
After scale-out completes, verify:
Autoscale Role: PrimaryAutoscale Role: SecondaryThe script determines whether the existing ASG uses x86 or ARM64 instances by inspecting the current launch template AMI name:
| AMI Name Contains | Architecture |
|---|---|
VMARM64-AWS | ARM64 (BYOL) |
VM64-AWS | x86 (BYOL) |
VMARM64-AWSONDEMAND | ARM64 (On-Demand) |
VM64-AWSONDEMAND | x86 (On-Demand) |
The target AMI lookup uses the detected architecture to find the correct AMI for the target FortiOS version.
When a new instance launches, the ASG lifecycle hook triggers the Lambda function:
Pending:Wait lifecycle stateEC2 Instance-launch Lifecycle ActionInServiceAutoscale Role: SecondaryWhen the primary is terminated:
EC2 Instance-terminate Lifecycle ActionProtectedFromScaleIn: true on the elected instanceAutoscale Role: PrimaryUpdate the launch template back to the previous AMI version. No instances were affected.
If replacement fails mid-rolling:
ReplaceUnhealthy, AZRebalance, ScheduledActionsIf the upgrade fails after config restore and the instance is unrecoverable:
min=1, desired=1Tail Lambda logs in a separate terminal while the upgrade runs:
bash upgrade_fortios/scripts/watch_lambda.shThis streams CloudWatch logs from the ASG Lambda function, showing license assignment, instance initialization, and config sync events in real time.
Blue-green upgrade deploys a parallel (Green) inspection stack alongside the existing (Blue) stack, validates Green under real conditions, then flips all TGW routes atomically at cutover. Blue remains suspended as a live fallback until the operator explicitly approves cleanup.
This strategy eliminates cross-version config sync issues and gives full rollback capability at every phase up through cleanup.
Spoke VPCs (East, West, ...)
        │
        ▼
Transit Gateway
        │  TGW route tables → Blue inspection VPC attachment
        ▼
Blue Inspection VPC  (10.0.0.0/16)
    ├── GWLB + Target Group
    ├── FortiGate ASG (BYOL + On-Demand)
    ├── DynamoDB (instance tracking)
└── Lambda (lifecycle management)Transit Gateway
│ TGW attachment created but routes NOT switched yet
▼
Green Inspection VPC (10.0.0.0/16) ← SAME CIDR as Blue
├── GWLB + Target Group (new)
├── FortiGate ASG (new FortiOS AMI, corrected config)
├── DynamoDB (clean state)
└── Lambda (current version)Spoke VPCs
│
▼
Transit Gateway
│ TGW route tables → Green inspection VPC attachment
▼
Green Inspection VPC (traffic flows here)
Blue Inspection VPC (suspended — no new instances, kept as rollback target)Green uses the same CIDR blocks as the Blue inspection VPC. This is a deliberate design choice, not a limitation.
FortiGate configurations contain hard-coded references to inspection VPC CIDRs:
vdom-exceptions — reference management interface subnet CIDRsrouter static — routes to spoke VPC supernet via inspection VPC gatewaysystem interface — IP addresses derived from subnet assignmentsfirewall address — objects may reference internal subnetsIf Green used different CIDRs, every CIDR reference in the exported Blue config would need manual editing before restore. Identical CIDRs mean the config restores cleanly to Green without modification.
Blue and Green are fully isolated VPCs with no peering between them — having the same CIDR causes no routing conflict while they coexist.
Goal: Produce a complete inventory of the Blue environment.
Duration: ~30 minutes
Traffic impact: None (read-only)
cd upgrade_fortios
bash state/refresh.sh

python3 scripts/discover.py \
  --state state/autoscale_template.tfstate \
  --vpc-state state/existing_vpc_resources.tfstate \
  --target-version 7.6.2 \
  --output state/blue_inventory.json
Review the output before proceeding:
python3 -m json.tool state/blue_inventory.json | lessGate: Operator reviews inventory and confirms all resources are identified correctly.
Note the key values you will need for Green terraform.tfvars: inspection_vpc.cidr_block,
egress_mode, autoscale_groups.byol.desired/min/max, AZs, and TGW name.
See Discovery for details on the inventory schema.
Goal: Export the primary FortiGate configuration before any changes.
Duration: 30–60 minutes
Traffic impact: None
Do not skip this phase. The backup is required to restore Green’s primary FortiGate to the current production configuration after Green launches.
ProtectedFromScaleIn: true in the
Blue ASG. The blue_inventory.json shows the primary instance ID.upgrade_fortios/state/blue_primary_config.confGate: Operator confirms backup file is present and readable.
| Included | Not Included |
|---|---|
| Security policies (firewall rules) | Interface IP assignments (re-assigned by bootstrap) |
| Address objects and groups | Autoscale-specific dynamic config (pushed by Lambda) |
| Routing customizations | License state (handled by Green’s clean licensing) |
| FortiManager connection settings | Session tables (stateful sessions interrupted at cutover — expected) |
| VPN configurations | |
| Custom logging/reporting |
Complete this checklist before Phase 2. All items must be confirmed before deploying Green.
Licensing
.lic files for Green instancesCapacity
Credentials and Access
Config and State
state/blue_inventory.json exists and reviewedstate/blue_primary_config.conf exists and readableterraform.tfvars prepared — fortios_version set, all required fields populatedvpc_cidr_inspection in Green tfvars matches Blue exactly (required for config restore)asg_module_prefix set to "green" (avoids resource name collisions with Blue)FortiManager (if enabled)
fgfm-allow-vm enable configuredGoal: Deploy a correctly configured FortiGate ASG in a new inspection VPC.
Duration: 30–60 minutes
Traffic impact: None — TGW routes unchanged, Blue still handles all traffic
The Green deployment uses a dedicated Terraform module at terraform/green_inspection_stack/.
Start from the provided example:
cd terraform/green_inspection_stack
cp terraform.tfvars.example terraform.tfvars
Edit terraform.tfvars and set the required fields. Values should match your Blue
deployment — the blue_inventory.json provides a reference for all discovered parameters:
# ── Required manual inputs ─────────────────────────────
fortios_version        = "7.6.2"      # Target FortiOS version
fortigate_asg_password = "..."        # FortiGate admin password
keypair                = "my-keypair" # EC2 key pair name

# ── Must match Blue exactly ───────────────────────────
cp                   = "acme"
env                  = "test"
aws_region           = "us-west-2"
availability_zone_1  = "a"
availability_zone_2  = "c"
vpc_cidr_inspection  = "10.0.0.0/16"   # MUST match Blue
subnet_bits          = 8               # MUST match Blue
firewall_policy_mode = "2-arm"         # MUST match Blue
access_internet_mode = "nat_gw"        # MUST match Blue

# ── Green-specific ─────────────────────────────────────
asg_module_prefix = "green" # REQUIRED: different from Bluecd terraform/green_inspection_stack
terraform init
terraform applyGreen’s TGW attachment is created by terraform apply but TGW routes are not modified.
Blue continues handling all traffic.
Note the key outputs after apply — you will need them for verification:
terraform output green_tgw_attachment_id
terraform output green_natgw_az1_temp_eip
terraform output green_natgw_az2_temp_eip
Save the state file for the cutover script:
cp terraform.tfstate ../../upgrade_fortios/state/green.tfstateAfter Green FortiGates are running and the Lambda has initialized them, restore the Blue config to the Green primary FortiGate.
Option A — via FortiGate GUI (manual):
ProtectedFromScaleIn: true in the
Green BYOL ASGhttps://<management-ip>/state/blue_primary_config.confOption B — via FortiGate REST API:
# Get Green primary management IP from AWS
aws ec2 describe-instances \
  --instance-ids <green-primary-instance-id> \
  --query "Reservations[0].Instances[0].PublicIpAddress" \
  --output text

# POST config backup to Green primary
curl -k -X POST \
  "https://<green-primary-ip>/api/v2/monitor/system/config/restore" \
  -H "Authorization: Bearer <api-key>" \
  -F "source=upload" \
  -F "scope=global" \
  -F "file=@state/blue_primary_config.conf"
After restore, the FortiGate reboots. Poll until it returns to GWLB healthy state (~5–10 minutes). The Green secondary will receive config from the Green primary automatically via the Lambda once the primary is back online.
Gate: Terraform apply completes. Green ASG instances are healthy.
Complete this checklist after Phase 2 and before proceeding to Phase 3 (Validate Green). These checks confirm that Green is structurally sound before automated validation runs.
Infrastructure
terraform apply completed with no errorsstate/green.tfstate saved to upgrade_fortios/state/FortiGate Health
InService lifecycle stateProtectedFromScaleIn: true (primary elected)Config Validation
get system status shows target FortiOS versionget router info routing-table all shows expected routes (VPC subnets present)FortiManager (if enabled)
TGW Routing (confirm Blue still active)
Goal: Confirm Green is healthy and ready for production traffic before cutover.
Duration: 30–60 minutes
Traffic impact: None — Blue still handling all traffic
Manually verify each of the following before proceeding to cutover:
| Check | How to Verify |
|---|---|
| ASG instances healthy | AWS Console → EC2 Auto Scaling → confirm all Green instances InService |
| GWLB targets healthy | AWS Console → EC2 → Load Balancers → Target Groups → confirm all targets healthy |
| Primary elected | Check for one instance with ProtectedFromScaleIn: true in Green BYOL ASG |
| Config restored | Log in to Green primary FortiGate → confirm expected security policies present |
| CloudWatch alarms | AWS Console → CloudWatch → Alarms → confirm Green alarms in OK state |
| Lambda operating | AWS Console → Lambda → confirm recent successful invocations in CloudWatch metrics |
| DynamoDB state | AWS Console → DynamoDB → scan fgt_asg_track_table → confirm Green instances registered |
| Licenses valid | FortiGate CLI: `get system status |
Gate: All checks pass. Operator reviews results and confirms cutover can proceed.
Do not proceed to cutover until all validation checks pass. A failed validation check indicates Green is not ready to handle production traffic.
Goal: Redirect production traffic from Blue to Green with minimum downtime.
Duration: Phase 1 (TGW flip) < 30 seconds. Phase 2 (EIP migration, nat_gw only) ~2–3 minutes.
Traffic impact: Active sessions interrupted at TGW route flip. New sessions immediately
go through Green. Outbound source IPs are preserved after EIP migration completes.
Before running the cutover script, confirm:
state/blue_primary_config.conf existsstate/green.tfstate present in upgrade_fortios/state/ directoryAlways run dry-run first to confirm what cutover.py will do:
cd upgrade_fortios

python3 scripts/cutover.py \
  --inventory  state/blue_inventory.json \
  --green-state state/green.tfstate \
  --dry-run
Dry-run output shows:
Review this output carefully before proceeding.
python3 scripts/cutover.py \
  --inventory  state/blue_inventory.json \
  --green-state state/green.tfstate
The script prompts for confirmation before executing. The cutover sequence:
Phase 1 — TGW Route Flip (< 30 seconds)
For each spoke TGW route table:
  Replace: 0.0.0.0/0 → Blue attachment
      with: 0.0.0.0/0 → Green attachment

→ Traffic immediately routes to Green FortiGates
Phase 2 — NAT Gateway EIP Migration (nat_gw mode only, ~2–3 minutes)
Step 2a  Delete Blue NAT Gateways          → Blue EIPs released
Step 2b  Wait for deletion                  (~60 s)
Step 2c  Create new Green NAT GWs           using Blue EIP allocation IDs
Step 2d  Wait for new NAT GWs available     (~60 s)
Step 2e  Update Green VPC route tables      old Green natgw IDs → new natgw IDs
Step 2f  Delete original Green NAT GWs      (temp EIPs)
Step 2g  Release Green temp EIP allocations

→ Outbound source IPs preserved — external firewall rules and IP allowlists unchanged
Progress is written to state/cutover_progress.json after each phase so that
rollback.py can undo exactly what was done.
EIP mode (access_internet_mode = "eip"): EIPs are attached to ephemeral FortiGate
instances and are already non-deterministic. No EIP migration is needed — Phase 2 is
skipped automatically when egress_mode: eip is set in the inventory. Total cutover
duration is under 30 seconds.
After cutover.py completes, verify immediately:
# Confirm spoke route tables point to Green attachment
aws ec2 search-transit-gateway-routes \
  --transit-gateway-route-table-id <spoke-rtb-id> \
  --filters "Name=type,Values=static"

# Check Green ASG instance health
aws autoscaling describe-auto-scaling-groups \
--auto-scaling-group-names <green-byol-asg-name>If traffic issues are detected immediately after cutover:
python3 scripts/rollback.py \
  --inventory state/blue_inventory.json \
  --progress  state/cutover_progress.json
rollback.py reads cutover_progress.json to determine exactly what ran and performs
the inverse:
rollback.py deletes the new Green
NAT GWs holding Blue EIPs, recreates Blue NAT GWs in the original Blue subnets with
the original EIP allocation IDs, and updates Blue VPC route tables. Allow 2–3 minutes.# Preview rollback before executing
python3 scripts/rollback.py \
  --inventory state/blue_inventory.json \
--progress state/cutover_progress.json \
--dry-runRollback after EIP migration requires recreating Blue NAT Gateways, which takes ~2 minutes. During this window Blue instances handle traffic but outbound traffic may use different source IPs until the new Blue NAT GWs are ready.
Gate: Traffic confirmed flowing through Green (or Blue if rolled back). Connectivity to all spoke VPCs verified.
Goal: Confirm Green stability under production traffic before destroying Blue.
Duration: 24–48 hours
Traffic impact: None — operating normally on Green
During this phase:
rollback.py| Source | What to Watch |
|---|---|
| CloudWatch | Green ASG instance health, CPU utilization, scaling events |
| FortiGate | Session counts, policy hit counts, threat logs |
| Application teams | Application connectivity and performance |
If issues are found during the monitoring period:
python3 scripts/rollback.py \
--inventory state/blue_inventory.json \
--progress state/cutover_progress.jsonTraffic returns to Blue immediately. Investigate and fix Green before attempting another cutover.
Gate: 24–48 hours of stable operation. Application teams confirm no issues. Operator explicitly approves Blue teardown before proceeding.
Goal: Destroy Blue environment and release resources.
Duration: 1–2 hours
Reversibility: None — Blue is permanently destroyed
Irreversible. Once Phase 6 completes, Blue is gone. Confirm Green is stable and application teams have signed off before proceeding.
Blue’s ASG, GWLB, Lambda, DynamoDB, and inspection VPC were created across two Terraform
state files (autoscale_template and existing_vpc_resources). The inspection VPC itself
is in existing_vpc_resources alongside shared infrastructure (TGW, management VPC,
spokes) — do not run terraform destroy on existing_vpc_resources.
Instead, destroy Blue resources selectively using targeted AWS CLI commands or by removing
them from the autoscale_template state and running terraform destroy:
cd terraform/autoscale_template

# Review what will be destroyed — ensure shared resources are NOT listed
terraform plan -destroy

# Destroy only autoscale_template resources (ASG, GWLB, Lambda, DynamoDB, LTs)
terraform destroy
The Blue inspection VPC and its subnets must be deleted separately after confirming
no other resources depend on them. The TGW attachment for Blue should already be in
a deleted state after cutover.py ran the TGW route flip — verify before proceeding.
After destroy completes:
blue_primary_config.conf and blue_inventory.json for audit purposesGreen’s VPC resources carry {cp}-{env}-green-inspection-* tags to prevent collision with
Blue during the cutover window. After Blue is gone those tags can be renamed to the bare
{cp}-{env}-inspection-* pattern that autoscale_template data sources expect — making
the stack discoverable by a future autoscale_template deployment without modification.
Set stack_label = "" in terraform/green_inspection_stack/terraform.tfvars and run:
cd terraform/green_inspection_stack
terraform apply
This is a pure tag update — no VPC resources are recreated. All Name and Fortinet-Role tags on the VPC, subnets, route tables, NAT Gateways, internet gateway, and TGW attachment are renamed in a single apply.
asg_module_prefix controls ASG, GWLB, Lambda, and DynamoDB resource names — those
are not affected by stack_label and cannot be renamed without recreating the resources.
Set asg_module_prefix = "" (matching the Blue default) only when deploying a fresh stack
for the next upgrade cycle.
Phase 2 (Deploy Green) fails
  → Fix terraform.tfvars or Green config, re-run terraform apply
  → Blue is completely unaffected

Phase 3 (Validate Green) fails
  → Debug Green; destroy Green if needed, fix, and redeploy
  → Blue is completely unaffected

Phase 4 (Cutover) — traffic issues detected
  → Run rollback.py immediately (< 60 seconds)
  → Blue resumes all traffic
  → Investigate Green before re-attempting cutover

Phase 5 (Monitor) — issues found
  → Run rollback.py
  → Blue resumes all traffic
  → Investigate and fix Green

Phase 6 (Cleanup) — no rollback possible
→ Blue has been destroyedGreen FortiGates have different serial numbers from Blue. If FortiManager or FortiAnalyzer integration is enabled:
fgfm-allow-vm is enabled:config system global
set fgfm-allow-vm enable
end| Risk | Mitigation |
|---|---|
| Same-CIDR conflict during parallel operation | Blue and Green are isolated VPCs — no routing between them |
| Session interruption at cutover | Expected and accepted; new sessions route to Green immediately |
| Green config restore fails | Test restore on one instance before full cutover; fallback to manual GUI restore |
| License capacity during monitoring | Ensure FortiFlex pool has capacity for 2x licenses during monitoring window |
| TGW route update fails mid-cutover | Script checks each route update; partial failure leaves some spokes on Blue — run rollback.py |
| FortiManager loses sync | Re-authorize Green serial numbers in FortiManager post-cutover |
| NAT Gateway EIP migration window | Brief period (seconds) where outbound uses temporary IPs — minimize by not interrupting cutover.py |
discover.py extracts the complete Blue environment inventory from the existing
terraform.tfstate file and produces a structured blue_inventory.json used by
all subsequent upgrade phases.
Discovery does not rely on AWS resource tags — it reads the Terraform state directly.
This makes it reliable for deployments that were not created with the Simplified Template
and may not follow the {cp}-{env}-{resource} tag convention.
If the deployment uses local Terraform state (default):
# Use the refresh script to copy fresh state into the working directory
bash upgrade_fortios/state/refresh.sh
refresh.sh copies:
terraform/autoscale_template/terraform.tfstateterraform/autoscale_template/terraform.tfvarsterraform/existing_vpc_resources/terraform.tfstateterraform/existing_vpc_resources/terraform.tfvarsinto upgrade_fortios/state/.
If the deployment uses an S3 backend:
cd terraform/autoscale_template
terraform state pull > ../../upgrade_fortios/state/autoscale_template.tfstate

cd ../existing_vpc_resources
terraform state pull > ../../upgrade_fortios/state/existing_vpc_resources.tfstateAlways pull a fresh state file before running discovery. An outdated state can produce incorrect inventory results and cause scripts to target the wrong resources.
cd upgrade_fortios

python3 scripts/discover.py \
  --state state/autoscale_template.tfstate \
  --target-version 7.6.2 \
  --output state/blue_inventory.json
For blue-green upgrade, also provide the existing_vpc_resources state to discover
spoke TGW routes that cutover.py will flip:
python3 scripts/discover.py \
  --state state/autoscale_template.tfstate \
  --vpc-state state/existing_vpc_resources.tfstate \
  --target-version 7.6.2 \
--output state/blue_inventory.json| Argument | Description |
|---|---|
--state | Path to autoscale_template.tfstate |
--vpc-state | Path to existing_vpc_resources.tfstate (blue-green only — adds spoke TGW routes) |
--target-version | Target FortiOS version (e.g., 7.6.2) — triggers AMI lookup |
--output | Path for blue_inventory.json output (default: blue_inventory.json) |
| Category | Information Extracted |
|---|---|
| VPC | VPC ID, CIDR block, region, availability zones |
| Subnets | IDs, CIDRs, and AZs for: public, private, GWLBE, NAT GW, management |
| Internet Gateway | IGW ID |
| NAT Gateways | NAT GW IDs, EIP allocation IDs, public IPs (if nat_gw egress mode) |
| Transit Gateway | TGW ID, inspection attachment ID, TGW route table IDs, spoke attachment IDs, routes to update at cutover |
| GWLB | Load balancer ARN, listener ARN, target group ARN, endpoint IDs per AZ |
| Auto Scaling Groups | BYOL and On-Demand ASG names, launch template IDs/versions, desired/min/max, current instances, primary instance |
| Instance Architecture | x86 vs ARM64 (detected from current launch template AMI name) |
| Target AMI | AMI ID for target FortiOS version and detected architecture |
| Lambda | Function name |
| DynamoDB | Table name |
| CloudWatch | Alarm names and current thresholds |
| Security Groups | Data plane and management security group IDs |
| Egress Mode | nat_gw or eip (determined from presence/absence of aws_nat_gateway resources) |
The primary FortiGate has scale-in protection enabled. discover.py queries the live
ASG via boto3 to find the instance where ProtectedFromScaleIn is true:
# Manual verification using AWS CLI
aws autoscaling describe-auto-scaling-instances \
  --query "AutoScalingInstances[?AutoScalingGroupName=='<byol_asg_name>' && ProtectedFromScaleIn==\`true\`]" \
--output table| Launch Template AMI Name Contains | Architecture |
|---|---|
VMARM64-AWS | ARM64 (BYOL) |
VM64-AWS | x86 (BYOL) |
VMARM64-AWSONDEMAND | ARM64 (On-Demand) |
VM64-AWSONDEMAND | x86 (On-Demand) |
All sections are top-level keys — there is no nesting under a blue_environment wrapper.
{
  "discovery_metadata": {
    "state_file": "state/autoscale_template.tfstate",
    "vpc_state_file": "state/existing_vpc_resources.tfstate",
    "discovered_at": "2025-01-15T10:30:00Z",
    "region": "us-west-2"
  },
  "inspection_vpc": { "vpc_id": "vpc-xxx", "cidr_block": "10.0.0.0/16" },
  "subnets": [ { "id": "subnet-xxx", "cidr": "10.0.0.0/24", "az": "us-west-2a",
                  "role": "acme-test-inspection-public-az1", "name": "..." }, ... ],
  "nat_gateways": [
    { "id": "nat-xxx", "subnet_id": "subnet-aaa",
      "eip_allocation_id": "eipalloc-xxx", "public_ip": "203.0.113.10" }
  ],
  "egress_mode": "nat_gw",
  "gwlb": {
    "lb_arn": "arn:aws:elasticloadbalancing:...",
    "lb_name": "fortigate-gwlb",
    "target_group_arn": "arn:aws:elasticloadbalancing:...",
    "endpoint_ids": ["vpce-xxx", "vpce-yyy"]
  },
  "transit_gateway": {
    "tgw_id": "tgw-xxx",
    "inspection_attachment_id": "tgw-attach-xxx",
    "routes_to_update": [ ... ]
  },
  "architecture": {
    "arch": "x86_64",
    "current_ami_id": "ami-xxx",
    "current_ami_name": "FortiGate-VM64-AWS build1762 (7.2.13) ...",
    "current_fortios_version": "7.2.13"
  },
  "target": {
    "fortios_version": "7.6.2",
    "byol_ami_id": "ami-yyy",
    "byol_ami_name": "...",
    "ondemand_ami_id": "ami-zzz",
    "ondemand_ami_name": "..."
  },
  "launch_templates": {
    "byol":     { "id": "lt-xxx", "name": "...", "current_version": 1,
                  "current_ami_id": "ami-xxx", "license_type": "byol", "target_ami_id": "ami-yyy" },
    "ondemand": { "id": "lt-yyy", "name": "...", "current_version": 1,
                  "current_ami_id": "ami-xxx", "license_type": "ondemand", "target_ami_id": "ami-zzz" }
  },
  "autoscale_groups": { ... },
  "lambda": { "function_names": ["fgt-asg-handler-xxx"] },
  "dynamodb": { "table_name": "fgt_asg_track_table" },
  "cloudwatch_alarms": [ { "alarm_name": "...", "metric": "...", "threshold": 80, ... } ],
  "upgrade_path": "B",
  "upgrade_path_reason": "2 running instance(s) — rolling replacement",
  "vpc_resources": { ... }
}
vpc_resourcesis only present when--vpc-stateis provided.targetis only present when--target-versionis provided.
autoscale_groups"autoscale_groups": {
"byol": {
"asg_name": "fgt-byol-asg-xxx",
"license_type": "byol",
"desired": 2,
"min": 1,
"max": 4,
"instances": [
{"instance_id": "i-xxx", "health": "Healthy", "lifecycle": "InService", "protected": true},
{"instance_id": "i-yyy", "health": "Healthy", "lifecycle": "InService", "protected": false}
],
"primary_instance": "i-xxx",
"launch_template_id": "lt-xxx"
},
"ondemand": {
"asg_name": "fgt-ondemand-asg-xxx",
"license_type": "ondemand",
"desired": 0,
"min": 0,
"max": 4,
"instances": [],
"primary_instance": null
}
}The desired values determine the in-place upgrade path:
desired=0, no .conf backup → Path Adesired=0 + state/blue_primary_config.conf present → Path Cdesired>0 → Path Btransit_gateway.routes_to_update"routes_to_update": [
{
"destination_cidr_block": "0.0.0.0/0",
"route_table_id": "tgw-rtb-xxx",
"current_attachment_id": "tgw-attach-xxx"
}
]Routes from the autoscale_template state managed by the Fortinet module.
cutover.py also merges vpc_resources.cutover_routes (from --vpc-state) which
contains spoke VPC TGW routes. Both sources are de-duplicated at cutover time.
If the state file is unavailable or incomplete, resources can be identified using AWS CLI queries:
# Find inspection VPC by CIDR
aws ec2 describe-vpcs \
  --filters "Name=cidr,Values=10.0.0.0/16" \
  --output table

# Find FortiGate ASGs
aws autoscaling describe-auto-scaling-groups \
  --query "AutoScalingGroups[?contains(AutoScalingGroupName, 'fgt')]" \
  --output table

# Find Gateway Load Balancer
aws elbv2 describe-load-balancers \
  --query "LoadBalancers[?Type=='gateway']" \
  --output table

# Find TGW attachments for a VPC
aws ec2 describe-transit-gateway-vpc-attachments \
  --filters "Name=vpc-id,Values=<vpc-id>" \
  --output table

# Find primary FortiGate instance (scale-in protected)
aws autoscaling describe-auto-scaling-instances \
  --query "AutoScalingInstances[?AutoScalingGroupName=='<asg-name>' && ProtectedFromScaleIn==\`true\`]" \
  --output table
Populate a blue_inventory.json manually from these results if needed. Use the schema
above as a template.