FortiFlex Integrations
| Goal | Explore the capabilities of advanced integrations with FortiFlex |
| Task | Launch Terraform Apply with Flex Token, Explore Reporting with Python Script, Interact with Demo MSSP Marketplace |
| Validation | FortiFlex Maretplace Deployed & Licensed 2vCPU FortiGate VM in Azure |
Now that we understand the basic FortiFlex API building blocks underpining the service, let’s take a look at how we can automate our Security Operations using the FortiFlex API in different scenarios
In this section, we’ll explore how to automate FortiFlex operations using Terraform, take a peak at what an MSSP implementation for FortiFlex Might look like.
1. Terraform
Let’s take a peek at how we’d take advantage of the Terraform provider for FortiFlex to automate our infrastructure deployments! Under the covers, the Terraform FortiFlex Provider is using an implementation of the FortiFlex API to create, read, update, and delete Configurations and Entitlements!
We’ll use Terraform in Cloudshell from the Azure Portal, so head over to the Azure Portal and launch Cloudshell. Recall steps from setup tasks to find cloudshell
Run the following commands to clone this repo and navigate to the Terraform directory:
git clone https://github.com/FortinetCloudCSE/PublicCloud105-FortiFlex.git
cd PublicCloud105-FortiFlex/terraform/azure
export ARM_SUBSCRIPTION_ID=$(az account show --query "id" -otsv)
echo $ARM_SUBSCRIPTION_ID
Initialize and run a Terraform plan to see what resources will be created:
terraform init
terraform plan
You will be asked to provide values for the following variables:
- FortiFlex Entitlement Token: You can get this from the FortiFlex portal.
- FortiGate VM Username: Use your Workshop Username Prefix (e.g. Flex01)
Warning
There is no error checking on the FortiFlex Entitlement Token, so you could enter whatever you’d like here, the VM just won’t be licensed correctly!
There is also no error checking on the FortiGate VM Username, but it will error out if you try to use an invalid username due to invalid access to the related resources.
Once you’ve provided the variables, you should see output with a plan of the resources Terraform will create
In a real production environment you would review the plan output to ensure it matches your expectations, and then apply the plan to deploy the FortiGate VM licensed by FortiFlex with the following command:
Warning
WE’RE NOT GOING TO ACTUALLY DEPLOY THIS IN THE WORKSHOP, AS WE HAVE SOMETHING MORE INTERESTING PLANNED FOR THE NEXT STEP!
terraform applyAlso in a real production environment:
- Your entire cloud infrastructure would be defined in code (Terraform)
- You would be using a version control system like Git to manage changes to your infrastructure
- All of your system variables would be stored securely in a secrets manager or environment variables, not hardcoded into your Terraform files
- You’d be using the FortiFlex Terraform provider to directly integrate with FortiFlex, not passing the Entitlement Token or Username “manually” as a variable
- This terraform deployment would ideally be running as part of a CI/CD pipeline to ensure consistent and repeatable deployments across your environments
2. Python Example - Points Reporting
Remember when we said you can only get 90 days of point history at the FortiFlex WebUI? Here, we demonstrate a simple Python script to interact with the FortiFlex API to retrieve points reporting information to go back to the beginning of the FortiFlex service.
We’ll use python from the Azure Cloudshell, so head over to the Azure Portal and launch Cloudshell.
cd ~/PublicCloud105-FortiFlex/scripts/python
pip install -r requirements.txt --user
python fortiflex_points_by_config.py
You’ll be prompted to enter the following information:
- FortiFlex API Username: <IAM_API_Username_you_created_earlier>
- FortiFlex API Password: <IAM_API_password_you_created_earlier>
- Starting Date Range (YYYY-MM-DD):
1900-01-01 - Ending Date Range (YYYY-MM-DD):
2025-08-26 - FortiFlex Program Serial Number:
ELAVMS0000000518
After entering the initial info, you’ll enter a loop where you can choose different options for point reporting. Try a few and then exit!
3. Advanced Use Cases
We don’t have time to get into every possible integration use case in this workshop but we wanted to at least give you a taste. Here are some additional resources to get you started if you’re interested in exploring further:
- Code: Ansible, Terraform, Python, and Postman
- Terraform Provider: Infrastructure-as-code integration
- Ansible Module: https://galaxy.ansible.com/ui/repo/published/fortinet/fortiflexvm/
4. MSSP Use Case
Now that we know how the FortiFlex Program works, and we know how to automate with it, lets fly!
This task will explore how a Managed Security Service Provider (MSSP) might implement FortiFlex to manage multiple clients’ security infrastructure efficiently and automatically. The MSSP may want to offer a self service portal for their customers to provision, entitle, and deploy their own FortiGate VMs with pre-defined security templates created by the MSSP.
Open the CloudCSE FortiFlex Marketplace Demo and click “Sign In” at the top right.
As long as you’re using the same browser you used for logging into the Azure and FortiCloud Portals, you should be auto logged in with SAML and see your workshop account username next to the login button.

Info
This is an MVP0 demo application created by the Fortinet Cloud CSE team to demonstrate how an MSSP might implement a self-service portal for their customers to provision, entitle, and deploy FortiGate VMs using FortiFlex.
This is not a production ready application, and is not supported by Fortinet. It is provided as-is for educational purposes only.
Disregard the front page…those 5 products are just to test frontend to backend connectivity.
The real magic is on the FortiFlex Configs and Entitlements pages….which are Empty presently, because we haven’t provided any credentials yet!
The Demo hasn’t implemented any kind of secure storage for credentials, because FortiCloud doesn’t offer API creation of IAM accounts yet.
So for now, we’ll just use the IAM API credentials you created earlier in the workshop.
Click on the API Credentials link in the top menu
Enter the following information:
- FortiFlex IAM API Username: <IAM_API_Username_you_created_earlier>
- FortiFlex IAM API Password: <IAM_API_password_you_created_earlier>
- FortiFlex Program Serial Number:
ELAVMS0000000518 - FortiCloud Account ID: You can get this from your FortiCloud account info (top right).
then click Submit
- You can get your FortiCloud Account ID from the FortiCloud Portal top right corner
- click on the down arrow next to your account name, and look for the Member Account ID
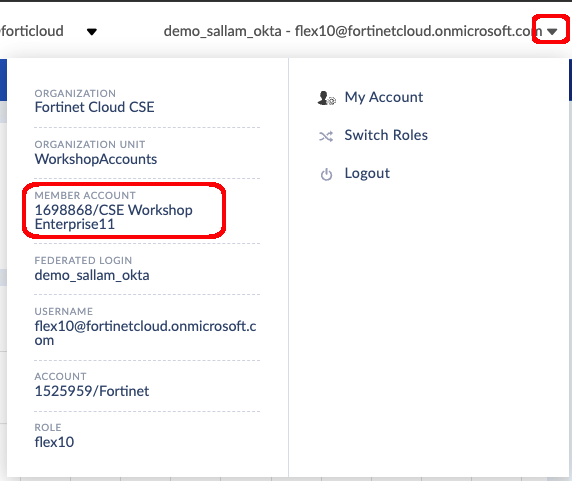
FortiCloud Account ID
If you provided all the info correctly, the FortiFlex Configs page, will show the XPerts25-FGT-VM Config you created manually back in the beginning of the hands on section!
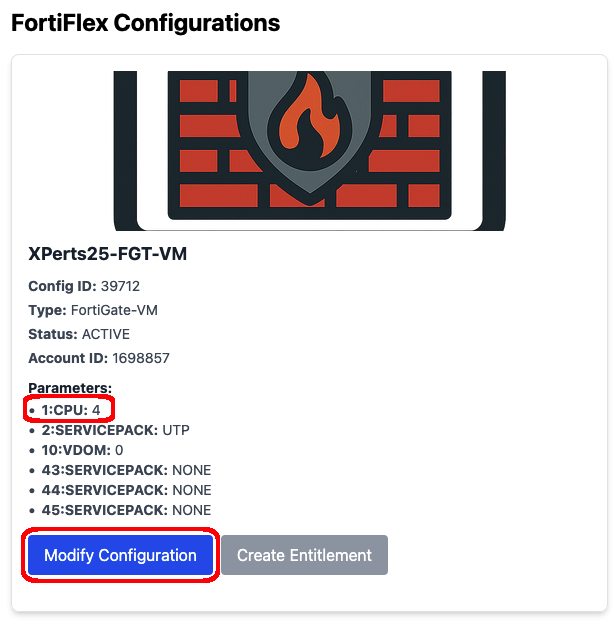
You’ll notice the parameters show the config is set for 4 CPUs, and the Create Entitlement is disabled. This is purposeful as we’re trying to conserve resources for this workshop.
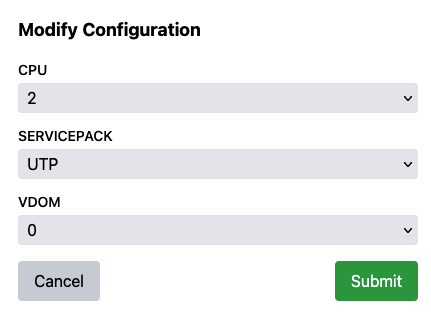
From the FortiFlex Configurations Page, Click on Modify Configuration for the XPerts25-FGT-VM Flex Config and set it back to 2 CPU’s.
Confirm the changes and you’ll see the Create Entitlement Button Activate.
Once the Configuration is back at 2 CPU, Click Create Entitlement and confirm
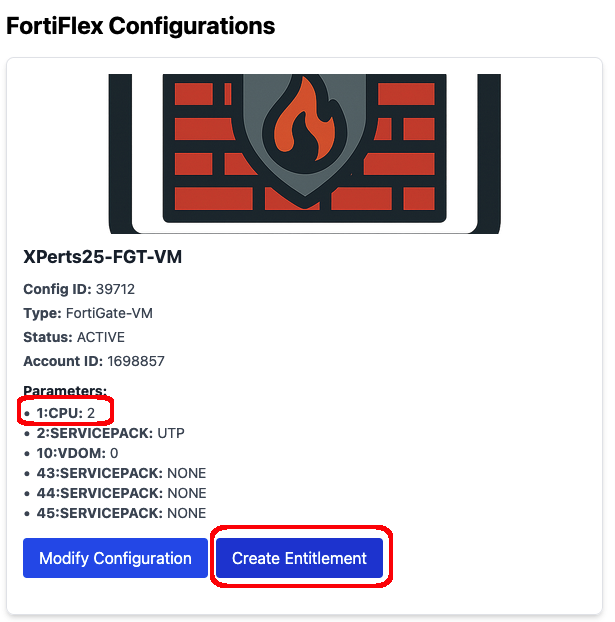
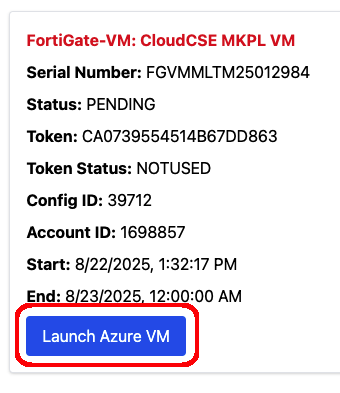
You’ll be redirected to the FortiFlex Entitlements Page to view the newly created Entitlement named CloudCSE MKPL VM. You’ll also notice the entitlement you previously created manually at the WebUI.
Click on Launch VM on the Cloud CSE MKPL VM Entitlement, and confirm the prompts.
Behind the scenes, the MSSP Marketplace is launch a combination of API calls and Terraform to automatically deploy a FortiGate into your Azure account. That FortiFate is already licensed with the FortiFlex Entitlement Token you just created at the MSSP Portal!
It will take approx 5 mins to fully deploy, and then you can go check in your Azure Portal in the resource group for your account.
Imagine the possibilities for MSSP’s to customize the deployment options (single VM’s, A/P, A/A, Azure vWAN, AWS GWLB, AutoScaling, etc)
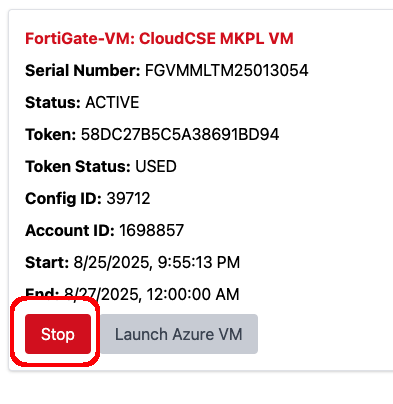
You will know the VM is ready when you see the Flex Entitlement Card:
- Launch Azure VM Button turn Grey
- RED STOP Button Appear
- Status turn to Active
- Token Status turn to Used
Go to the Azure Portal and check your resource group for a Virtual Machine prefixed with cat-. This is the VM deployed from the Flex Catalog.
Tip
For step-by-step instructions, reference the Azure Portal steps in the FortiFlex WebUI steps here
Click on the VM, and copy the Public IP opening it in a new browser window.
Login using the following (replacing [XX] with your student number):
- Username: “flex[XX]”
- Password:
ChangeMe123#@!
You will see the Serial number of the Flex Entitlement you used to provision this VM.