FortiFlex Workshop

Real-World Scenario: CloudSecure Solutions MSSP Challenge

Company: CloudSecure Solutions - A mid-sized MSSP serving 150+ enterprise customers

The Challenge: CloudSecure Solutions was struggling with their traditional Fortinet licensing model. Their customers had varying security needs that changed seasonally - retail customers needed additional protection during holiday seasons, financial services required scaling during quarterly reporting, and manufacturing clients had project-based security requirements.

Pain Points:

  • Procurement Delays: Traditional licensing required 2-4 weeks lead time, missing customer opportunities
  • Over-provisioning Costs: Customers paid for peak capacity year-round, leading to 40% waste during low-usage periods
  • Manual Provisioning: Each new customer deployment required manual license allocation, taking 3-5 business days
  • Billing Complexity: Monthly reconciliation across different license types and customer usage patterns consumed 20+ hours of administrative work

The FortiFlex Solution: With FortiFlex’s usage-based licensing and API-driven automation, CloudSecure Solutions transformed their operations:

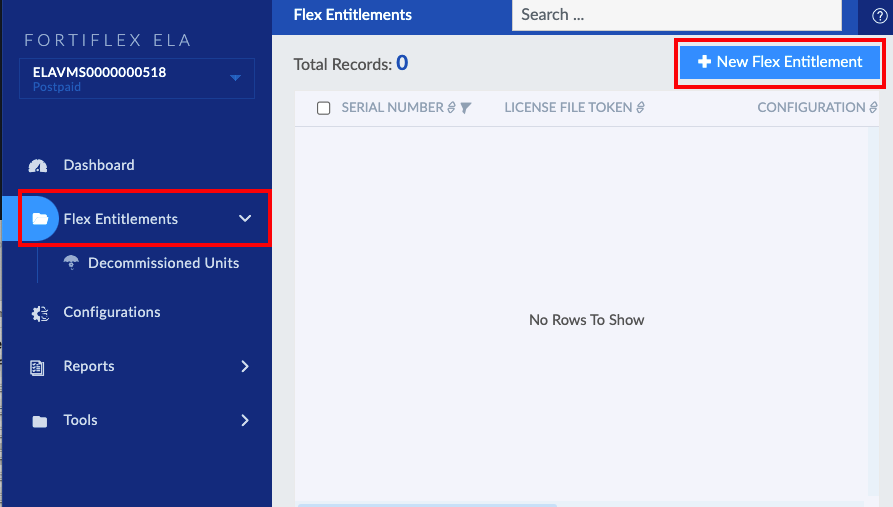
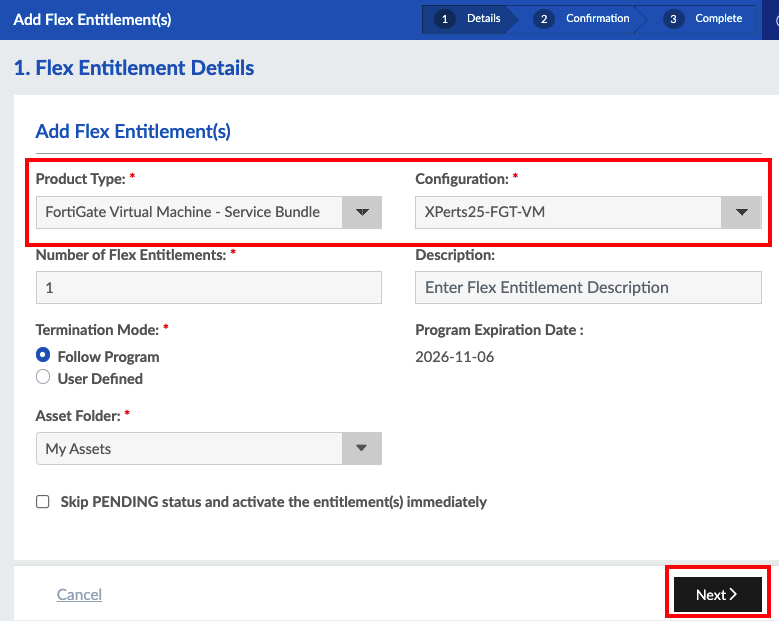
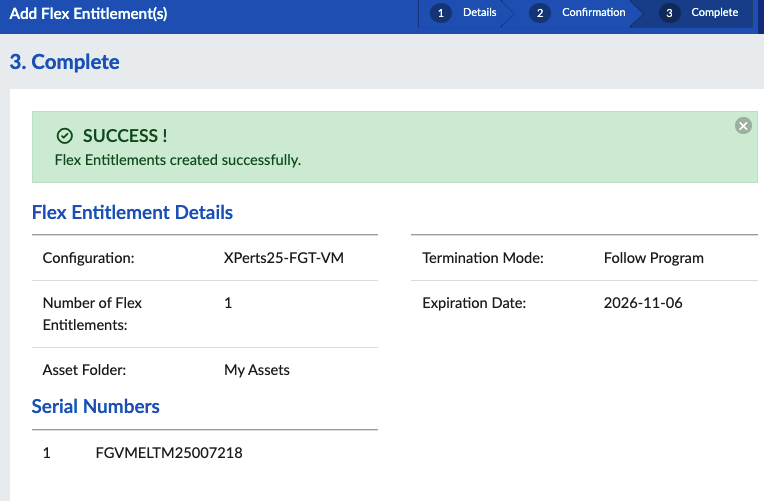
  • Instant Provisioning: New customer deployments automated down to 15 minutes
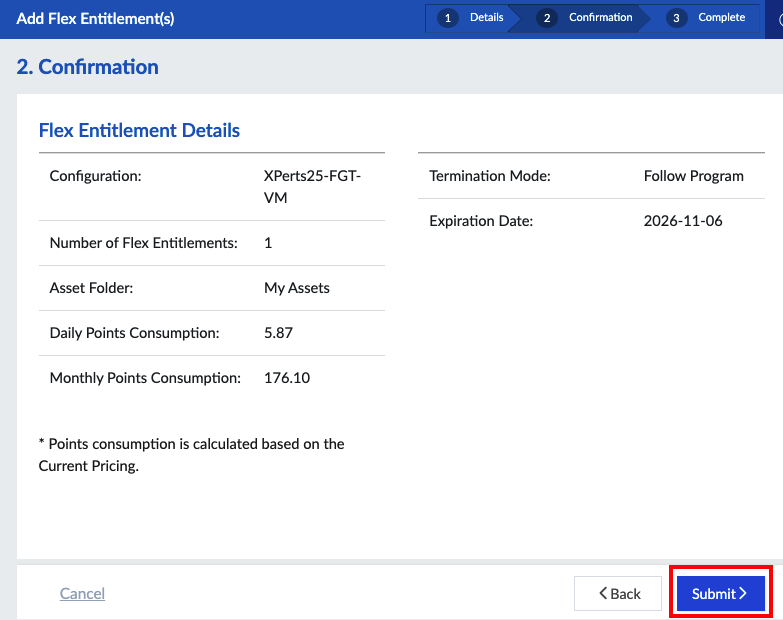
  • Cost Optimization: Customers now pay only for actual usage, reducing costs by 35%
  • Automated Scaling: Seasonal traffic handled automatically without manual intervention
  • Streamlined Billing: API integration with their billing system reduced admin overhead by 80%

Workshop Goal: Learn how to implement FortiFlex to solve similar challenges in your organization through hands-on experience with both manual operations and API automation.

CloudCSE Version: v25.3.c
Revision:
Last updated: Thu, Oct 2, 2025 21:36:50 UTC
Copyright© 2025 Fortinet, Inc. All rights reserved. Fortinet®, FortiGate®, FortiCare® and FortiGuard®, and certain other marks are registered trademarks of Fortinet, Inc., and other Fortinet names herein may also be registered and/or common law trademarks of Fortinet. All other product or company names may be trademarks of their respective owners. Performance and other metrics contained herein were attained in internal lab tests under ideal conditions, and actual performance and other results may vary. Network variables, different network environments and other conditions may affect performance results. Nothing herein represents any binding commitment by Fortinet, and Fortinet disclaims all warranties, whether express or implied, except to the extent Fortinet enters a binding written contract, signed by Fortinet’s General Counsel, with a purchaser that expressly warrants that the identified product will perform according to certain expressly-identified performance metrics and, in such event, only the specific performance metrics expressly identified in such binding written contract shall be binding on Fortinet. For absolute clarity, any such warranty will be limited to performance in the same ideal conditions as in Fortinet’s internal lab tests. Fortinet disclaims in full any covenants, representations, and guarantees pursuant hereto, whether express or implied. Fortinet reserves the right to change, modify, transfer, or otherwise revise this publication without notice, and the most current version of the publication shall be applicable.

Subsections of

1. Introduction

Welcome to Public Cloud 105: FortiFlex & FortiCloud Organizations

In this workshop, we’ll explore the FortiFlex feature set. We will show examples and limitations of the Organizations capabilities. Finally, we’ll explore FortiFlex entitlements within an Org structure and provide examples of the FortiFlex API.

FortiFlex Intro

Learning Objectives

  • Lean how FortiFlex can simplify Fortinet Product Licensing across much of the product portfolio
  • Discover FortiCloud Organizations basic terminology and concepts
  • Understand how FortiFlex operates in a single & multi-tenant environment
  • Learn how to use the FortiFlex API to manage configurations and entitlements

Primary Use Cases

  • Enterprises
    • prepaid/flexible licensing
  • MSSP
    • FortiFlex PAY-as-you-Go licensing for customers and/or offered in MSSP Marketplaces
    • Partner/Enterprise/Customer Consolidation & Organization of (FortiCloud Accounts, Users, and Assets)
  • FortiSASE
    FortiCloud Organizations Use Cases

Learning Objectives & Workshop Components

By the end of this workshop, you will be able to:

  1. Understand FortiFlex Architecture

    • Explain the difference between traditional licensing and usage-based billing
    • Identify key FortiFlex components and their relationships
    • Navigate the FortiFlex WebUI effectively
  2. Manual FortiFlex Operations

    • Create and manage FortiFlex configurations
    • Entitle devices through the WebUI
    • Modify entitlements to match changing requirements
    • Monitor usage and costs
  3. API-Driven Automation

    • Use the FortiFlex API with Postman
    • Create configurations and entitlements programmatically
    • Implement serverless automation triggers
    • Integrate FortiFlex with existing workflows
  4. FinOps Best Practices

    • Optimize costs through usage-based scaling
    • Implement automated provisioning workflows
    • Monitor and report on license utilization

Workshop Components

Prerequisites

  • Technical Background: Basics of web apps
  • Fortinet Knowledge: Basic familiarity with FortiGate

Workshop Duration

  • Total Time: 4 hours
  • Introduction & Setup: 60 minutes
  • Manual Operations: 45 minutes
  • API Automation: 45 minutes
  • Integrations & Marketplace Demo: 45 minutes
  • Wrap-up & Q&A: 15 minutes

Lab Environment

Your lab environment includes:

  • Pre-configured Azure environment & Resource Group
  • FortiCloud account with Flex licensing & Required IAM permissions for FortiFlex operations
  • Sample configurations and scripts

Workshop Materials

  • Step-by-step lab guides with screenshots
  • FortiFlex API Postman collection
  • Best practices documentation

Success Criteria

You’ll know you’ve mastered the material when you can:

  • Provision a FortiGate in under 15 minutes using FortiFlex
  • Automate entitlement changes through API calls
  • Explain the cost benefits of usage-based licensing to customers
  • Design an automated provisioning workflow for your organization

Ready to get started? Let’s explore the FortiFlex platform components.

Subsections of 1. Introduction

Learning Modules

All about FortiFlex and FortiCloud Organizations

In the next 2 sections, we’ll cover the key features of FortiFlex and how FortiCloud Organizations enabled multitenancy/MSSP features for FortiFlex licensing

We’ll cover the following topics:

  • FortiFlex features
  • FortiFlex use cases
  • FortiFlex API
  • FortiCloud Organizations & IAM features
  • MSSP features
  • Tools and resources
  • Integrations and Automations

Subsections of Learning Modules

FortiFlex

What is FortiFlex?

FortiFlex is Fortinet’s usage-based licensing solution that transforms how organizations consume and manage Fortinet security services. Instead of traditional fixed licenses, FortiFlex provides:

  • Pay-as-you-use billing based on actual consumption
  • API-driven automation for instant provisioning
  • Flexible scaling to match business demands
  • Simplified management through centralized control

Supported Products?

VM’s, Hardware Services, Cloud/SaaS

FortiFlex Products

FortiFlex Flavors: Enterprise vs MSSP

FortiFlex Models
  • FortiFlex Enterprise(also called FortiFlex prepaid subscription service): Designed for individual organizations to manage their own Fortinet deployments with flexible licensing.
    • Flex Points are purchased in advance and consumed as Fortinet products are deployed.
    • Ideal for enterprises with predictable usage patterns and a need for direct control over their security infrastructure.
  • FortiFlex MSSP(also referred to a FortiFlex postpaid subscription service): Tailored for Managed Security Service Providers (MSSPs) to offer Fortinet services to multiple customers.
    • Allows MSSPs to manage multiple customer deployments from a single FortiFlex account.
    • Provides features for multi-tenancy, centralized billing, and customer management.
    • Ideal for MSSPs looking to provide automated Marketplace deployments with flexible billing to their customers.

Core Components

1. FortiFlex Points

FortiPoints

Purpose: Mechanism for measuring and billing usage of FortFlex licensed products FortiPoints facilitate:

  • Licensing scalability and flexibility
  • Efficient and agile procurement
  • Easy access to a broad product ecosystem
  • Simplified management

2. FortiFlex Configurations

Purpose: Templates that define the type and parameters of Fortinet products you want to deploy.

Key Parameters:

  • Product selection (FortiGate, FortiManager, FortiAnalyzer, etc.)
  • VM sizing and specifications

Example Use Cases:

  • FortiGate: CPU Size, # of VDOMs, Service Package, Services
  • FortiAppSec Cloud: WAF, GSLB, Service Package, SOCaaS
  • FortiManager: # of Managed Devices, # of ADOMs

3. FortiFlex Entitlements

Purpose: Individual instances of deployed Fortinet products that consume FortiFlex points.

Key Parameters:

  • Unique serial numbers for each deployment
  • Real-time usage tracking
  • License lifecycle management

Billing Model:

  • Charged by points per Day of operation
  • Different VM sizes consume different point rates
  • Automatic billing integration with Fortinet accounts
Warning

Due to the regulatory nature and requirements around serial numbers and billing of the FortiFlex program, it is not possible to delete configurations or entitlements once they are created. This is to ensure compliance and accurate billing records are maintained in perpetuity.

As such, we will not be creating any more entities than are necessary for demonstration purposes during this workshop

4. Reporting

Purpose: Provides insights into FortiFlex usage and consumption patterns.

Key Features:

  • FortiFlex Points Usage Summary by Product
  • Daily detail up to 90 days
  • Customizable reports available via API

5. FortiFlex WebUI

Access: https://support.fortinet.com → FortiFlex section

Key Features:

  • Configuration management dashboard
  • Usage monitoring
  • Entitlement lifecycle operations
  • Reporting
  • Tools - Points Calculator

Navigation Overview:

FortiFlex Dashboard
├── Configurations
│   ├── Create New Configuration
│   ├── Manage Existing Configurations
│   └── Configuration Templates
├── Entitlements
│   ├── Active Entitlements
│   ├── Create New Entitlement
│   └── Entitlement History
├── Reporting
│   ├── Point Usage Summary
│   ├── Point Usage Detail
└── Tools
    ├── Points Calculator

Useful Resources

Documentation

Tools & Integrations


Subsections of FortiFlex

FortiFlex API

API Documentation: FNDN

Base URL: https://support.fortinet.com/ES/api/fortiflex/v2/

Authentication: API key-based authentication

API Benefits:

  • Programmatic control over all FortiFlex operations
  • Integration with CI/CD pipelines
  • Automated scaling based on metrics
  • Custom billing and reporting solutions
  • REST – Representational State Transfer - https://restcookbook.com/ –> good explanations
    • HTTP Protocol and REST Architecture are intertwined
    • The HTTP Response Codes are (should be) indicative of the status of the REST API call
    • REST APIs are typically REST-ish as they do not fully/correctly implement the REST Architecture
    • REST call Operations can be defined by a combination of Idempotency and Safety
    • Most Common REST API calls – Idempotency: when then same request provides the same results or state
HTTP MethodIdempotentSafe
GET
POST
PUT
DELETE
PATCH
  • FortiFlex API is REST-ish
    • All FortiFlex API calls are POSTs, some calls should be GETs or PUTs

Anatomy of a REST API Query

FortiCloud Organizations

FortiCloud Organizations consolidate multiple FortiCloud Accounts into an Organizational Units (OUs) and manage user access to cloud products and services with fine grained service level permissions

  • Group multiple customer accounts and organize them into Organizational Units
  • Register and transfer assets between the accounts in the Organization
  • Delegate tenant or OU management to admins with detailed service level permissions and access scope
  • Access OU level views to manage assets or services across multiple account

Terminology - Start with a solid foundation!

  • Organizations/“OU”/Units – these are hierarchical identifiers indicating directories or folders within the FCLD Organizations concept 

    • The Org has a root OU ID and can have child OU ID’s
  • IAM - Accounts – numbered FortiCloud Account ID’s.

    • The Org has a single Root Account (belonging to MSSP)
    • MSSP can create child/member Accounts in an OU via FCLD Web GUI
  • IAM - Users –3 types as described in docs

    1. IAM “users”- user entity managed in FCLD

    • Can be local or Org with same “permission scope” and “permission profile” as below
    • Password must be set with “Reset URL”, which can only be triggered by admin (not user)
    • 2FA enabled by default and cannot be disabled
      • Delivered to User’s email, so must be valid (FortiToken is the only other option presently)

    2. External Idp Roles/Roles – which is really just a mapping of a SAML Assertion containing “Role” = “XYZ” to the following

    • Local role – access to the “Account” in which the Role is created
      • Permission scope (asset folder)
      • Permission profile (local specific) – specifies which FCLD Portal features are available
    • Org role – access to an OU or Account within the Org
      • Permission scope (Org OU or Account within OU)
      • Permission profile (Org specific) - specifies which FCLD Portal features are available
    • 2FA handled by IdP
    • IDP enablement is via special request to PM

    3. API User – required for calling any of the available API’s

TermDefinition
Organization Root AccountFortiCloud numbered <012345> Account which created the organization.
Org Root UserFortiCloud User registered with REAL EMAIL address and owns the Org Root Account
Organizational Unit (OU)A unit within organization. Single OU member can be designated OU Master account.
OU Member AccountFortiCloud numbered <987654> Accounts invited to organization with no administrative privileges.
OU ScopeIAM User’s scope (OU) within the Organization.
IAM UserLocal IAM user with credentials stored in FortiCloud
IdP User RoleExternal IdP user with role mapping to FortiCloud Organization where credentials are stored in external IdP
Organization Hierarchy

https://docs.fortinet.com/document/forticloud/23.4.0/organization-portal/829537/introduction

Subsections of FortiCloud Organizations

FortiFlex & Orgs

FortiFlex For MSSP’s

FortiCloud Organizations enables Muliti-Tenancy for FortiFlex. This is particularly interesting for MSSP’s.

Each Org Account can represent a separate entity with its own set of devices, Users, and Permission scope/Permission profile, which can be arranged in Org Units . This allows service providers to manage multiple customers from a single FortiCloud account.

  • MSSP’s can leverage Organizations to manage individual customer FortiFlex entities under the same program
  • FortiFlex Configurations and Entitlements are dedicated to the Org Account and not visible from others
    • MSSP Admins Users could have read/write access to all of their customers Org Accounts
    • Each individual customer Users might only have read access or maybe no access to the FortiCloud portal, depending on how the MSSP wants to setup their services.
    • Maybe the MSSP want to fully automate the provisioning and management of these the Forti products and only provide customer access to FortiCare for ticketing/etc
    • Controlled via Permission scope & Permission profile, assigned at the User level
  • Global Organization can navigate all and view each OU consumption
  • Global Organization can build automation from Root level to all individual Org Account
  • Global Organization receives monthly consolidated billing for MSSP FortiFlex Program
Info

This Workshop is setup using a FortiCloud MSSP level Root Account with each workshop participant representing an individual customer. The Cloud CSE Marketplace Demo is an example of how the API’s can facilitate automation at the MSSP level for individual customers

WebUI Organizations

NumberExplanation
1OU Listing
2Create Sub-OU’s
3Create FortiCloud Accounts in current OU view (no email necessary)
4FortiCloud Account View
5Invite existing FortiCloud Accounts to the Org

WebUI IAM Users

Org Root Admin view

NumberExplanation
1Create new
2IAM User listing with type, profile, and scope

WebUI IAM Permission Profile

NumberExplanation
1Profile Name
2Profile Type (Local or Organization)
3Add Fortinet Product Portals
4Specify Permissions per portal

WebUI IAM User Creation

User creation is generally the same as IAM Users, IdP Role creation, or API Users. The interface differs slightly, but the components are the same.

NumberExplanation
1User/Role Name
2User Tyle (Local or Organization)
3Permission Scope (OU bucket or specific Account
4Permission Profile (choose from pre-created profiles

Warning

IAM Users and IdP Roles can have ONLY 1 Permission Scope and 1 Permission Profile. You cannot layer multiples on a single user/role.

Presentation Quiz

2. QuickStart & FAQ

Provision your Portal Accounts
Required for hands-on portion of this workshop
Warning

You must submit a valid email address here to get an account provisioned for this workshop.

Subsections of 2. QuickStart & FAQ

Workshop Setup Guide

Prerequisites Checklist

Before starting the hands-on lab, ensure you have completed the following setup steps and have the necessary tools ready:

  • Azure Portal Access: Valid Azure subscription credentials
  • Fortinet Support Portal Account: Registered account with FortiFlex access
  • Postman: Desktop application, Web Version, or Azure VM
  • Web Browser: Chrome, Firefox, or Edge (latest version)
  • Lab Environment Access: Resource group and permissions provided by instructor
Tip

Login URL’s for all the portals used in this Workshop are perma-linked in the left navbar for easy reference!

To have the best experience, use a single browser for the entire workshop and all related logins.

Step 1: Azure Portal & Cloudshell Access

Use these steps to access your Azure Portal environment.

Open a browser and access the following URL: https://portal.azure.com

Use the credentials provided in the email you got from fortinetsecdevops@gmail.com.

  1. Enter Temporary access credentials, and click Sign In

    Azure Access Pass
  2. Click No on the ‘Stay signed in?’ prompt

  3. Click Get started on the ‘Welcome to Microsoft Azure’ page.

  4. Click Skip on the ‘How do you plan to use Azure’ page.

  5. Click Skip on the ‘Now, let show you around Azure’ page.

  • After login, you should see the Azure dashboard
  • Locate your assigned resource group: flex[XX]
    Azure Resource Group
  1. Click the Cloud Shell icon in the top navigation bar and Select Bash as the shell type
Azure Cloud Shell
  1. Wait for the Cloud Shell to initialize
  • Next, you will see a “Getting started” page.

    • Select Mount Storage Account
    • Choose Internal-Training as the Storage account subscription
    • Click Apply
    Azure Cloud Shell Storage
  • On the Mount storage account screen
    • click Select existing storage account

    • click Next

      Azure Cloud Shell Storage Mount
  • On the Select storage account screen (values in drop down)
    • choose Internal-Training as description

    • resource group will be [XX]flex-flex105-workshop where [XX] is your unique student number

    • storage account name will be “student number” followed by some random numbers and letters

    • File share will be cloudshellshare

    • Click Select

      Azure Cloud Shell Storage Account

Step 2: Fortinet Support Portal Access

Tip

We’ve provisioned a Fortinet Support Portal account with appropriate Flex entitlements for this workshop Same credentials as the Azure Portal, slightly different logon procedure. YOU MUST LOGIN USING THIS URL which is conveniently perma-listed on the left navbar, and as long as you use the same browser as your Azure login, you should be signed in with SAML SSO.

If your FortiCloud Login times out, click on the FortiCloud Login Link from the Left Navbar to get automatically logged back in.

Browse to the following URL: https://customersso1.fortinet.com/saml-idp/proxy/demo_sallam_okta/login/

Warning

Important: PLEASE URL EXACTLY AS ABOVE, ENDING WITH /. Do not use general Fortinet Support Portal URL.

Enter the credentials provided in the email you got from fortinetsecdevops@gmail.com

  • Username: “flex[XX]@fortinetcloud.onmicrosoft.com

  • Temporary Access Password: “[TemporaryPassword]

  • You can choose No to “stay Signed In”

  • You may have to click “Login” at the SAML Login Portal

From the FortiCloud Main Portal, look for “FortiFlex” in the main navigation menu

  • Click to enter the FortiFlex dashboard
FortiFlex Dashboard

Step 3: Postman Options

We will be using an existing Postman Collection to interact with the FortiFlex API

  1. Postman desktop application will provide the best user experience and is a great tool for working with API’s
  2. If you can’t install the Desktop client for some reason, you can use Postman’s web version requiring a login (you can use your personal email)
  3. If you’d prefer not creating a Postman login, you can create an Azure VM with Postman pre-installed, and import the

Installing Postman

Option 1: Desktop Application (Recommended) 👈

  1. Download from https://www.postman.com/downloads/
  2. Install following the standard process for your operating system
  3. Create a free Postman account when prompted

Option 2: Web Version

  1. Go to https://web.postman.co/
  2. Sign in with your Google or create a Postman account

Setup Complete? Let’s address some common questions before diving into the lab.

Frequently Asked Questions

General FortiFlex Questions

Q: What’s the difference between FortiFlex and traditional Fortinet licensing?

A: Traditional licensing requires purchasing fixed-term licenses upfront (typically 1-3 years) for specific capacities. FortiFlex uses a usage-based model where you:

  • Pay only for actual consumption (daily billing)
  • Scale resources up/down automatically
  • Provision instantly without procurement delays
  • Get consolidated billing across all Fortinet products

Q: How does FortiFlex pricing work?

A: FortiFlex uses a “points” system:

Q: Can I use FortiFlex for on-premises deployments?

A: FortiFlex licensing works on VM’s, Hardware Services, Cloud/SaaS

  • FortiGate VMs in the cloud or on Prem.
  • Hardware Services
  • Cloud/SaaS Services

Q: Does FortiFlex Points Consumption Stop if my VM/Service stops?

A: No, there is currently no inherrent link between individual services and Fortinet Entitlements. If the Entitlement is active, it will incure FortiFlex Point deductions, regardless of the VM/service state

  • Customers can setup triggers and automated actions using the FortiFlex API, FortiGate Automation Stitches, and automation platforms of their choice to monitor instance state and trigger FortiFlex Entitlement stop/reactivate

Technical Questions

Q: What happens if I run out of FortiFlex points?

A: When points are low:

  1. You’ll receive email notifications at 80% and 90% consumption
  2. At 100% consumption, new entitlements cannot be created
  3. Existing entitlements continue running but accrue overage charges
  4. You can purchase additional points anytime through the portal

Q: How quickly can I provision a new FortiGate?

A: With FortiFlex:

  • Manual provisioning: 5-10 minutes through WebUI
  • API provisioning: 1-3 minutes with automation
  • Traditional licensing: 2-4 weeks for procurement + provisioning

Q: Can I change VM sizes after deployment?

A: Yes! This is a key FortiFlex advantage:

  • Update the FortiFlex configuration which the entitlement is governed by (this will impact all entitlements for that configuration)
  • Modify the VM size in your cloud provider (which will trigger a VM reboot)
  • FortiFlex Licensing will automatically update License coverage
  • FortiOS should automatically add the CPU’s after the resize reboot, but there are open bugs on this issue. You may need to add the CPUs or reboot the device again to get FortiOS to recognize the new CPU’s.
  • Billing automatically adjusts to new point consumption

Q: How does FortiFlex integrate with Infrastructure-as-Code?

A: FortiFlex provides multiple automation options:

  • REST API: Direct integration with Terraform, Ansible, etc.
  • Terraform Provider: Native Fortinet provider for FortiFlex resources
  • Ansible Collection: Playbook to interact FortiFlex
  • CI/CD Pipelines: API calls in deployment workflows

Lab-Specific Questions

Q: Can I access my lab environment after the workshop?

A: Lab environments are temporary:

  • Available during workshop + 24 hours for practice
  • All Scripts used in the workshop are available at the course GitHub Repo

Q: What if my API calls aren’t working in Postman?

A: Common issues and solutions:

  1. Authentication Error: Verify API key is correct in environment variables
  2. 404 Errors: Check the base URL is set correctly
  3. JSON Formatting: Use Postman’s JSON validator for request bodies

Q: How do I get production FortiFlex access for my organization?

A: To enable FortiFlex for production use:

  1. Contact your Fortinet sales representative
  2. Request FortiFlex access for your organization
  3. Complete any required MSP/partner agreements
  4. Purchase initial points allocation
  5. Set up billing and payment methods

Best Practices Questions

Q: How should I organize FortiFlex configurations?

A: Recommended organization strategies:

  • By Environment: dev-config, staging-config, prod-config
  • By Customer: customer-a-config, customer-b-config (for MSPs)
  • By Region: us-east-config, eu-west-config
  • By Function: branch-office-config, datacenter-config

Q: What’s the best way to monitor FortiFlex costs?

A: Cost monitoring best practices:

  1. Set up billing alerts at 75% and 90% of monthly budget
  2. Regular usage reviews - weekly for active environments
  3. Automated reporting - API calls to extract usage data
  4. Tag entitlements with cost centers or customer codes
  5. Schedule regular optimization reviews to identify unused resources

Q: Should I use separate FortiFlex accounts for different customers?

A: For MSPs, consider:

  • Single Account: Easier management, consolidated billing, use tagging for separation
  • Multiple Accounts: Complete isolation, individual customer billing, more complex management
  • Hybrid Approach: Major customers get separate accounts, smaller customers share an account with tagging

Troubleshooting

Q: My FortiGate VM isn’t getting a license from FortiFlex

A: Check these items:

  1. VM has internet connectivity to Fortinet licensing servers
  2. Entitlement is in “Active” status in FortiFlex portal
  3. Serial number matches between VM and entitlement
  4. No firewall rules blocking licensing traffic (TCP 443 to *.fortinet.com)

Q: I’m getting “Insufficient Points” errors

A: Resolution steps:

  1. Check current points balance in FortiFlex dashboard
  2. Review active entitlements and their point consumption
  3. Purchase additional points if needed
  4. Consider stopping unused entitlements to free up points

Q: Can I migrate from traditional licenses to FortiFlex?

A: Migration options:

  • New Deployments: Use FortiFlex for all new cloud deployments
  • Existing VMs: Contact Fortinet support for migration assistance
  • Hybrid Approach: Keep existing traditional licenses, use FortiFlex for new/scaled resources
  • Contract Renewal: Consider FortiFlex when traditional licenses expire

Questions Answered? Time to get hands-on with FortiFlex!

Next: Hands-On Lab →

3. Workshop Hands-On

Workshop Agenda

In this workshop, we’ll use a crawl, walk, run approach to obtaining practical experience with FortiFlex through manual FortiFlex operations followed by API automation.

  1. FortiFlex WebUI Operations
    • Navigating the FortiFlex WebUI
    • Creating and managing FortiFlex configurations and entitlements
  2. FortiFlex API Operations
    • Introduction to FortiFlex API
    • Exploring FortiFlex API via Postman Collection tasks
  3. Integration Use Cases -
    • Integrating FortiFlex API with Terraform IaC
    • Demoing a PoC MSSP FortiFlex MSSP Marketplace Integration PoC
Warning

We will be creating FortiFlex Configurations and Entitlements on the live/Production/customer facing FortiFlex System, and as mentioned, none of these entities can ever be deleted or cleaned up.

We’ve crafted this course to create a minimal infrastructure while still conveying the primarily FortiFlex learning points. Please exercise caution while working through hands-on portion of the workshop and try not to create any extra configurations or entitlements than are necessary!

Thanks for your consideration, and enjoy the workshop!

Subsections of 3. Workshop Hands-On

FortiFlex WebUI

GoalGain Experience with the FortiFlex WebUI
TaskCreate a FortiFlex configuration and entitlement, deploy a FortiGate VM in Azure using the entitlement, and then update the configuration to increase vCPU count.
ValidationFortiFlex Licensed 4vCPU FortiGate VM in Azure with matching SN and License.

In this section, you’ll learn how to manage FortiFlex entitlements through the FortiCloud web interface, providing a foundational understanding of FortFlex,

Note

If you need help accessing Azure FortiCloud/FortiFlex Portal, please refer to the Workshop Setup Guide page from QuickStart.

Step 1: Create a Configuration

Every FortiFlex subscription starts with a configuration. A configuration defines the product type, form factor, and service package for your FortiFlex subscription. You can create multiple configurations to manage different products or services.

Start from the FortiCloud Dashboard

  • Click on “Services”, then “FortiFlex” in the navigation menu
    FCLD Menu

Navigate to Configurations

  • In the FortiFlex dashboard, click “Configurations”

  • You should see an empty list or existing lab configurations

    FCLD Menu

  • Click the + New Configuration button

You’ll see the configuration wizard. Enter details as follows:

  • Name: XPerts25-FGT-VM (or any name you prefer)
  • Select Form Factor: Virtual Machines
  • Product Type: FortiGate Virtual Machine - Service Bundle
  • Click Next
    Config Wizard

On the next screen, set the following details:

  • Number of CPU’s: 2
  • Service Package: UTP
  • Leave Virtual domains set to 0
  • Click Next
    Config Details

Review the details of your configuration and click Submit

Config Review

You’ll see the config successfully created

Config Success

Step 2: Create an Entitlement

Once you have a configuration, you can create entitlements. An entitlement is a license that allows you to use the product defined in your configuration.

Navigate to the Flex Entitlements tab and click + New Entitlement

Flex Entitlements

Fill in the following details in the entitlement wizard:

  • Product Type: Select FortiGate Virtual Machine - Service Bundle
  • Select the configuration you created above in Step 1 from the dropdown
  • Click Next
    Entitlement Wizard

Review the details of your entitlement and click Submit

Entitlement Review

You’ll see the entitlement successfully created. Serial Number for future reference.

Entitlement Success

Click on List to go back to the Entitlement Listing and retrieve the Entitlement Token

From the entitlement details page, copy the License File Token. You will need this token to activate your FortiGate VM in the next step.

Entitlement Token

Step 3: Create a FortiGate VM in Azure & License with Flex Entitlement

Now that you have an entitlement, you can assign it to your FortiGate VM in Azure. Login to the Azure portal and follow these steps:

Navigate into your Resource Group and click on the + Create located at the top left of the tool bar. You will be redirected to the Azure Marketplace.

In the Marketplace search bar, type: Fortinet FortiGate and then enter. Navigate to the Fortinet FortiGate Next-Generation Firewall offering from Fortinet and select Create and Single VM.

Tip

Recently the ordering of marketplace listings has changed, and the first one to pop up will likely be the PAYG Listing with a price starting at $0.36/ 1 year. THIS IS NOT WHAT YOU WANT TO SELECT. Make sure you find the listing which allows you to Create a single VM

Azure Marketplace

You will be redirected to the Create Single VM template.

Warning

Make sure you select the BYOL (Bring Your Own License) option. This is important as it allows you to use your FortiFlex entitlement. When you click Create on the listing, you should see options for Active-Active, Active-Passive, and Single VM.

If you see anything referencing PAYG (Pay-As-You-Go), you are viewing the wrong listing.

  1. Under the Basics tab, the Subscription and Resource Groups should already be filled in with your assigned info. If not, see the screen shot below for details.
Note

Use the **flexXX** username you've been assigned. Replace **[XX]** with your specific number.

  • Under Instance details, select/enter the following:
    • Region: East US
    • FGT VM instance Architecture: ARM64
    • FortiGate administrative username: flex[XX]
    • FortiGate password/Confirm password: FortinetAzure2025!
    • Fortigate Name Prefix: flex[XX]
    • Resource Group: flex[XX]-flex104-workshop
  • Select Next.
VM Creation Basics
  • In the Instance Details tab, scroll down to the License section, and check the box for Use FortiFlex Entitlement entering the License File Token you copied earlier.
  • Then click Review + Create
VM Creation Flex License

Review all the settings in the Review + create tab. Ensure that everything is correct, especially the License File Token. Click on Create to deploy the FortiGate VM.

VM Create

You’ll see the deployment in progress. This may take a few minutes. Once completed, you can navigate to the resource to manage your FortiGate VM.

VM in progress
VM Complete

Step 4: Verify the FortiGate VM Licensing

From the Resource Group, click on the FortiGate VM you just created. Note the public IP address assigned to the VM. You can use this IP to access the FortiGate CLI or GUI.

VRG VM

Copy the Public IP address.

VM Public IP

  • In a new browser tab, enter the public IP address of the FortiGate VM in the address bar in the format: https://a.b.c.d

  • Accept the security warnings for the unsigned Cert.

  • You will be prompted to log in.

  • Use the username and password you set during the VM creation (e.g., flex[XX] and FortinetAzure2025!).

    FGT Login

    You may need to wade through some of the initial setup steps, but you can safely can skip or delay by choosing Later

You’ll see the FortiGate Status Dashboard where the License will show 2 vCPU. The SN will match the entitlement you created in FortiFlex.

FGT SN
Tip

FortiOS View Above and FortiFlex WebUI view Below.

Flex SN

You can also verify the license via CLI in FortiOS. get system status You will see the matching SN, with Valid License, and the number of vCPU’s allowedreflecting the assigned entitlement.

FGT License Info

Step 5: Update the Flex Config & Entitlement to add Additional new vCPU count

Next, we’ll update the FortiFlex configuration to increase the licensed vCPU count.

In the FortiFlex dashboard, navigate to the Configurations tab. Select the configuration you created earlier and click on the edit icon.

Edit Config

Click Next to continue past the product selection screen.

Update the number of CPU’s to 4 and click Next until you reach the review screen.

Edit Config vCPU

Click Submit to save the changes

You will see a warning message, and you should click to Confirm the changes.

Edit Config Confirm

The entitlement linked this configuration will automatically reflect the vCPU change.

Step 6: Double the vCPU on the Azure FortiGate VM

Now, we’ll change the VM size in Azure to double the vCPU from 2 to 4.

Go to the VM Overview Page and then on left side click on Availability + scale and then Size. For simplicy and speed, we’re going to select the same Family and Options VM with 4CPU’s which is: D4ps_v6 and click “Resize”.

Azure Resize VM

You’ll see a confirmation message that the resize is in progress. This may take a few minutes.

Proceed when you see the successful message

Azure Resize Success

On the VM Overview Page, you can verify that the VM size has been updated to reflect the new vCPU count.

Azure VM Size

Step 7: Add the additional CPU’s to FortiGate

Finally, log back into the FortiGate VM WebUI to verify that the license now reflects the updated vCPU count, and add the additional CPU’s to the FortiGate configuration.

From the Resource Group, click on to the FortiGate VM you just created. Note the public IP address assigned to the VM. You can use this IP to access the FortiGate CLI or GUI.

VRG VM

Copy the Public IP address.

VM Public IP

  • In a new browser tab, enter the public IP address of the FortiGate VM in the address bar
  • Accept the security warnings for the unsigned Cert.
  • You will be prompted to log in.
    • Use the username and password you set during the VM creation (e.g., flexXX and FortinetAzure2025!).
    • You can skip the inital setup by choosing Later
    • You’ll see the FortiGate Status Dashboard where the License will show 2/4 Allocated vCPU
    • You can also verify the vCPU via CLI.
    • get system status
    • You will see 2/4 vCPU.
      FGT License Info 4vCPU

To add the additional CPU’s to the FortiGate configuration, open the system CLI and run the following commands:

exec cpu add 2

Then verify the CPU count again:

get system status

You should now see 4/4 vCPU allocated.

FGT License Info 4vCPU Added

WebUI Quiz

FortiFlex API

GoalGain Experience with the FortiFlex API
TaskImport FortiCloud Postman Collection, Authenticate, and explore the FortiFlex API
ValidationStop and Start FortiFlex Entitlement via Postman

In this section, you’ll learn about the building blocks of automating FortiFlex operations…the FortiFlex REST API

We’ll start by setting up Postman with our FortiFlex Collection, then create an API Key in FortiCloud, and finally use Postman to interact with the FortiFlex API.

Step 1: Import FortiFlex Postman Collection

The following steps should remain relatively consistent regardless of how you’re using Postman, so open Postman and proceed.

  • In Postman, use an existing collection, or create a new one if you’d like
  • click on File–>Import in the top left corner, or Import button in the top left of the collection
  • On the import dialog, paste the following URL:
    • https://raw.githubusercontent.com/FortinetCloudCSE/fortiflexvm-api/refs/heads/main/api/Postman/v2/FortiCloud.postman_collection.json
  • You should see the FortiCloud Collection appear in the left sidebar
Postman Import Collection
  • All variables used in the collection are stored at the highest level of the Collection (rather than in a seperate environment file)
  • Click on Collection Title in the left sidebar, then click on the Variables tab
  • You’ll see variables for the following
API Base URLsBASE URLs for each of the specific Service Endpointspre-set
api_usernameUsed for Authenticationuser-set
api_passwordUsed for Authenticationuser-set
accountIdSpecify the FortiCloud Account we’re targettinguser-set
programSerialNumberSpecifies the FortiFlex Program Serial Numberauto-set (overridable)
client_idfor authentication (only used to override the automated client_id in the script)auto-set (overridable)
access_tokenstores Bearer token returned from authentication request for each client_id/requestauto-set
expires_atstores token expiration checked on each use to see if refresh neededauto-set
Postman Collection Variables
Tip

In most situations, the only variables you’ll need to modify are the api_user, api_password, and accountId. You will notice the access_tokens populate as you launch different API requests

  • We’ve set up the FortiCloud Postman collection to automate the authentication process and store the access token for use in subsequent requests
    • You can see the scripting used to fetch Bearer tokens by clicking on the Scripts tab at the top level of the Collection, and viewing the Pre-request Script
    • Pseudocode
      1. Grab the URL of the request, along with the API Username and Password
      2. Set the authentication client_id depending on the path in the URL
      3. If (No bearer token or it's already expired): get a new bearer token with api_username, api_password, and client_id
      4. Set the bearer token in the request header for the given request type
      Postman Collection script

Step 2: API Authentication Setup

From the FortiCloud Portal, click on Services–>IAM

FortiCloud IAM Portal

Click on Users (left nav menu) –> Add New –> API User

Create FortiFlex API User
  • Enter a description for the API User such as: flex[XX] where [XX] is your flex student number
  • Choose the SysAdmin Permission Profile
  • Click Next
API User
  • When the API User is created, you will see a message to download the credentials.
  • Click to download, and enter a password to encrypt the file, such as FortiFlex2025!
API Credentials
  • You’ll get a password-protected zip file with the API credentials. Open it using the same password you entered when downloading the file.
  • The folder will contain a single text file with the apiId and password
  • You’ll enter the apiId and password into a Postman Collection Variables the next step
Tip

Keep these API credentials handy as we’ll use them for the rest of the workshop!

  • Back in Postman, enter the newly created apiId and password into the Postman Collection Variables
  • Copy the apiId from the credentials text file into the api_user field
  • Copy the password from the credentials text file into the api_password field
Postman Environment
Tip

Postman recently released a newer version with changes to the way variables are stored. If you happen to have an older version showing Current and Initial values, Important: Make sure to use the Current value field, not the Initial value field. The Current value is what will be used when you send requests. Also if you see this, be sure to save your values

  • From the top level FortiCloud Collection, open folder: FortiFlex V2.0–>Programs, and then POST Request: List
  • Click the Send button
Tip
  • Notice how the POST URL is constructed using the {{flexvm_base_url}} variable. This allows for an easy change to the entire collection if the baseURL ever changes
  • After the POST returns, open the Variables in Request button on the top right and click to view All Variables
    • Notice how the programSerialNumber variable is populated with the value returned from our Post call!
Postman Auth Token
  • You should see a response with a 200 OK status and 2 different serialNumber in the response body

Congratulations, you’re now authenticated with the FortiFlex API!

Warning

If you get an error at this step, please double-check everything and-or check with the Workshop Instructor before proceeding!

Step 3: Basic List Actions

Let’s take a moment to understand FortiFlex API list actions

To view configurations

  • In the Collection’s Configurations folder, open the Post/List request
    • Notice how the request URL is built with the Base URL Variable
    • Notice the Request Body requires a programSerialNumber, which is a variable already populated from our last request to list programs!
      • If yours isn’t populated for some reason, For this Workshop, we’re focusing on FortiFlex MSSP(postpaid), and the Program SN is: ELAVMS0000000518
    • Click Send
    • You should see a response with a 200 OK status and a list of configurations and their id in the response body
    FortiFlex Configurations List Body

Next, we can retrieve a list of Entitlements by sending a request to the /entitlements/list endpoint.

  • In the Collection’s Entitlements folder, open the Post List request
  • Enter the configId returned from the previous request into the Body of the Get Entitlements request, and click Send
FortiFlex Entitlements List

Step 4: Entitlement Management via API

Let’s look at modifying entitlements via the API

Note

The FortiFlex API is incredibly powerful and can create/modify every type of FortiFlex Config and Entitlement available. However, doing so in a workshop would be complicated and create a large amount of overhead. As such, the simplest mechanism to show modification of Flex entites is stopping and starting the entitlement you’ve already created!

In a production environment, the main use case for stopping and starting entitlements would be in auto-scaling clusters where standby members aren’t active all the time, so we don’t need incur FortiFlex point deductions while the instances are not in use

  • Open the Stop request from the Entitlements folder in the collection
  • Under the Body tab, enter the serialNumber you got from the previous request
  • Click Send to disable the entitlement
  • You should see a response with a 200 OK status and the entitlement status updated to “STOPPED”
  • You can verify this by sending the list request and checking the status, or by checking the WebUI
Disable Entitlement
  • Open the reactivate request from the Entitlements folder in the collection
  • Under the Body tab, enter the serialNumber you got from the previous request
  • Click Send to enable the entitlement
  • You should see a response with a 200 OK status and the entitlement status updated to “ACTIVE”
  • You can verify this by sending the list request and checking the status, or by checking the WebUI
Enable Entitlement
Info

API Basics Complete! You’ve successfully:

  • Authenticated with the FortiFlex API using Postman
  • Viewed configurations and entitlements programmatically
  • Made a simple modification to an existing entitlement

Key Takeaways from API Basics

  • Speed: API operations complete in seconds vs minutes for manual operations.
  • Consistency: Automated processes eliminate human error and ensure standardization.
  • Integration: APIs enable seamless integration with existing DevOps and FinOps workflows.
  • Best Practices Learned:
    • Always validate API responses before proceeding to next steps
    • Use Collection variables for sensitive data like API keys, and to automate future steps

FortiFlex Integrations

GoalExplore the capabilities of advanced integrations with FortiFlex
TaskLaunch Terraform Apply with Flex Token, Explore Reporting with Python Script, Interact with Demo MSSP Marketplace
ValidationFortiFlex Maretplace Deployed & Licensed 2vCPU FortiGate VM in Azure

Now that we understand the basic FortiFlex API building blocks underpining the service, let’s take a look at how we can automate our Security Operations using the FortiFlex API in different scenarios

In this section, we’ll explore how to automate FortiFlex operations using Terraform, take a peak at what an MSSP implementation for FortiFlex Might look like.

1. Terraform

Let’s take a peek at how we’d take advantage of the Terraform provider for FortiFlex to automate our infrastructure deployments! Under the covers, the Terraform FortiFlex Provider is using an implementation of the FortiFlex API to create, read, update, and delete Configurations and Entitlements!

We’ll use Terraform in Cloudshell from the Azure Portal, so head over to the Azure Portal and launch Cloudshell. Recall steps from setup tasks to find cloudshell

Run the following commands to clone this repo and navigate to the Terraform directory:

git clone https://github.com/FortinetCloudCSE/PublicCloud105-FortiFlex.git
cd PublicCloud105-FortiFlex/terraform/azure
export ARM_SUBSCRIPTION_ID=$(az account show --query "id" -otsv)
echo $ARM_SUBSCRIPTION_ID

Initialize and run a Terraform plan to see what resources will be created:

terraform init
terraform plan 

You will be asked to provide values for the following variables:

  • FortiFlex Entitlement Token: You can get this from the FortiFlex portal.
  • FortiGate VM Username: Use your Workshop Username Prefix (e.g. Flex01)
Warning

There is no error checking on the FortiFlex Entitlement Token, so you could enter whatever you’d like here, the VM just won’t be licensed correctly!

There is also no error checking on the FortiGate VM Username, but it will error out if you try to use an invalid username due to invalid access to the related resources.

Once you’ve provided the variables, you should see output with a plan of the resources Terraform will create

In a real production environment you would review the plan output to ensure it matches your expectations, and then apply the plan to deploy the FortiGate VM licensed by FortiFlex with the following command:

Warning

WE’RE NOT GOING TO ACTUALLY DEPLOY THIS IN THE WORKSHOP, AS WE HAVE SOMETHING MORE INTERESTING PLANNED FOR THE NEXT STEP!

terraform apply

Also in a real production environment:

  • Your entire cloud infrastructure would be defined in code (Terraform)
  • You would be using a version control system like Git to manage changes to your infrastructure
  • All of your system variables would be stored securely in a secrets manager or environment variables, not hardcoded into your Terraform files
  • You’d be using the FortiFlex Terraform provider to directly integrate with FortiFlex, not passing the Entitlement Token or Username “manually” as a variable
  • This terraform deployment would ideally be running as part of a CI/CD pipeline to ensure consistent and repeatable deployments across your environments

2. Python Example - Points Reporting

Remember when we said you can only get 90 days of point history at the FortiFlex WebUI? Here, we demonstrate a simple Python script to interact with the FortiFlex API to retrieve points reporting information to go back to the beginning of the FortiFlex service.

We’ll use python from the Azure Cloudshell, so head over to the Azure Portal and launch Cloudshell.

cd ~/PublicCloud105-FortiFlex/scripts/python
pip install -r requirements.txt --user
python fortiflex_points_by_config.py

You’ll be prompted to enter the following information:

  1. FortiFlex API Username: <IAM_API_Username_you_created_earlier>
  2. FortiFlex API Password: <IAM_API_password_you_created_earlier>
  3. Starting Date Range (YYYY-MM-DD): 1900-01-01
  4. Ending Date Range (YYYY-MM-DD): 2025-08-26
  5. FortiFlex Program Serial Number: ELAVMS0000000518

After entering the initial info, you’ll enter a loop where you can choose different options for point reporting. Try a few and then exit!

3. Advanced Use Cases

We don’t have time to get into every possible integration use case in this workshop but we wanted to at least give you a taste. Here are some additional resources to get you started if you’re interested in exploring further:

4. MSSP Use Case

Now that we know how the FortiFlex Program works, and we know how to automate with it, lets fly!

This task will explore how a Managed Security Service Provider (MSSP) might implement FortiFlex to manage multiple clients’ security infrastructure efficiently and automatically. The MSSP may want to offer a self service portal for their customers to provision, entitle, and deploy their own FortiGate VMs with pre-defined security templates created by the MSSP.

Open the CloudCSE FortiFlex Marketplace Demo and click “Sign In” at the top right.

As long as you’re using the same browser you used for logging into the Azure and FortiCloud Portals, you should be auto logged in with SAML and see your workshop account username next to the login button.

FortiFlex Marketplace Demo
Info

This is an MVP0 demo application created by the Fortinet Cloud CSE team to demonstrate how an MSSP might implement a self-service portal for their customers to provision, entitle, and deploy FortiGate VMs using FortiFlex.

This is not a production ready application, and is not supported by Fortinet. It is provided as-is for educational purposes only.

Disregard the front page…those 5 products are just to test frontend to backend connectivity.

The real magic is on the FortiFlex Configs and Entitlements pages….which are Empty presently, because we haven’t provided any credentials yet!

The Demo hasn’t implemented any kind of secure storage for credentials, because FortiCloud doesn’t offer API creation of IAM accounts yet.

So for now, we’ll just use the IAM API credentials you created earlier in the workshop.

Click on the API Credentials link in the top menu

Enter the following information:

  • FortiFlex IAM API Username: <IAM_API_Username_you_created_earlier>
  • FortiFlex IAM API Password: <IAM_API_password_you_created_earlier>
  • FortiFlex Program Serial Number: ELAVMS0000000518
  • FortiCloud Account ID: You can get this from your FortiCloud account info (top right).

then click Submit

  • You can get your FortiCloud Account ID from the FortiCloud Portal top right corner
    • click on the down arrow next to your account name, and look for the Member Account ID
    FortiCloud Account ID
    FortiCloud Account ID

If you provided all the info correctly, the FortiFlex Configs page, will show the XPerts25-FGT-VM Config you created manually back in the beginning of the hands on section!

Flex Config

You’ll notice the parameters show the config is set for 4 CPUs, and the Create Entitlement is disabled. This is purposeful as we’re trying to conserve resources for this workshop.

From the FortiFlex Configurations Page, Click on Modify Configuration for the XPerts25-FGT-VM Flex Config and set it back to 2 CPU’s.

Confirm the changes and you’ll see the Create Entitlement Button Activate.

Modify Config

Once the Configuration is back at 2 CPU, Click Create Entitlement and confirm

Create Entitlement

You’ll be redirected to the FortiFlex Entitlements Page to view the newly created Entitlement named CloudCSE MKPL VM. You’ll also notice the entitlement you previously created manually at the WebUI.

Click on Launch VM on the Cloud CSE MKPL VM Entitlement, and confirm the prompts.

Behind the scenes, the MSSP Marketplace is launch a combination of API calls and Terraform to automatically deploy a FortiGate into your Azure account. That FortiFate is already licensed with the FortiFlex Entitlement Token you just created at the MSSP Portal!

It will take approx 5 mins to fully deploy, and then you can go check in your Azure Portal in the resource group for your account.

Launch VM

Imagine the possibilities for MSSP’s to customize the deployment options (single VM’s, A/P, A/A, Azure vWAN, AWS GWLB, AutoScaling, etc)

You will know the VM is ready when you see the Flex Entitlement Card:

  • Launch Azure VM Button turn Grey
  • RED STOP Button Appear
  • Status turn to Active
  • Token Status turn to Used
Entitlement Used

Go to the Azure Portal and check your resource group for a Virtual Machine prefixed with cat-. This is the VM deployed from the Flex Catalog.

Tip

For step-by-step instructions, reference the Azure Portal steps in the FortiFlex WebUI steps here

Click on the VM, and copy the Public IP opening it in a new browser window.

Login using the following (replacing [XX] with your student number):

  • Username: “flex[XX]
  • Password: ChangeMe123#@!

You will see the Serial number of the Flex Entitlement you used to provision this VM.

Workshop Cleanup

This section provides instructions on how to clean up resources created during the workshop. Follow these steps to ensure that all resources are properly deleted and your environment is left in a clean state for the next session.

We’ll use the Demo FortiFlex MSSP Marketplace to Stop all Entitlements we created as part of this workshop Go to the FortiFlex Enttlements Page and click Stop on any active entitlements. Click to confirm.

Stop Entitlement
Info

Remember, FortiFlex points deduction doesn’t stop even if the resources stop, are terminated, or are decomissioned. So it’s imperative to maintain proper FortiFlex maintenance records or automation on the entitlements

In the FortiCloud Portal, Go to the IAM Portal, Users section, Select the API account you created for this workshop and delete it.

IAM user delete
Warning

After deleting your API key, the FortiFlex Marketplace will cease to function!

4. Wrap-up & Take-away

Thank you for joining our workshop! We covered a lot of material in very little time. As the is a 100 level course, one of the main goals is exposure to the FortiFlex Product while also providing examples of advanced use cases.

To that end, all of the materials used in today’s workshop are freely available and will be generally kept up-to-date (on a best-effort basis) with product developments. All of the Postman, Terraform, Python, etc is avaialble via links throughout this workshop, and provides a great starting point for additional learning and understanding.

Bookmark this workshop URL, as it will always be availalbe for future reference!

If you are intersted in learning more about implementing a FortiFlex Marketplace concept, please reach out to one of the Fortinet Cloud CSE instructors and/or your Account Management team. Ask them to get you in touch with the Cloud CSE team who build this FortiFlex Marketplace POC.