Task 1 - Start Flask Application
| |
|---|
| Goal | Start application |
| Task | Clone github repository and deploy application |
| Verify task completion | You should see the repo |
According to Google AI: Flask is a web development framework written in Python that helps developers build web applications. It’s a microframework, which means it doesn’t rely on specific tools or libraries, and it’s considered a good choice for developers who are already familiar with Python. Flask’s minimalistic design gives developers more control over their applications’ structure, and it includes features like templating, database integration, and routing.
More information about Flask can be found at the Flask documentation page
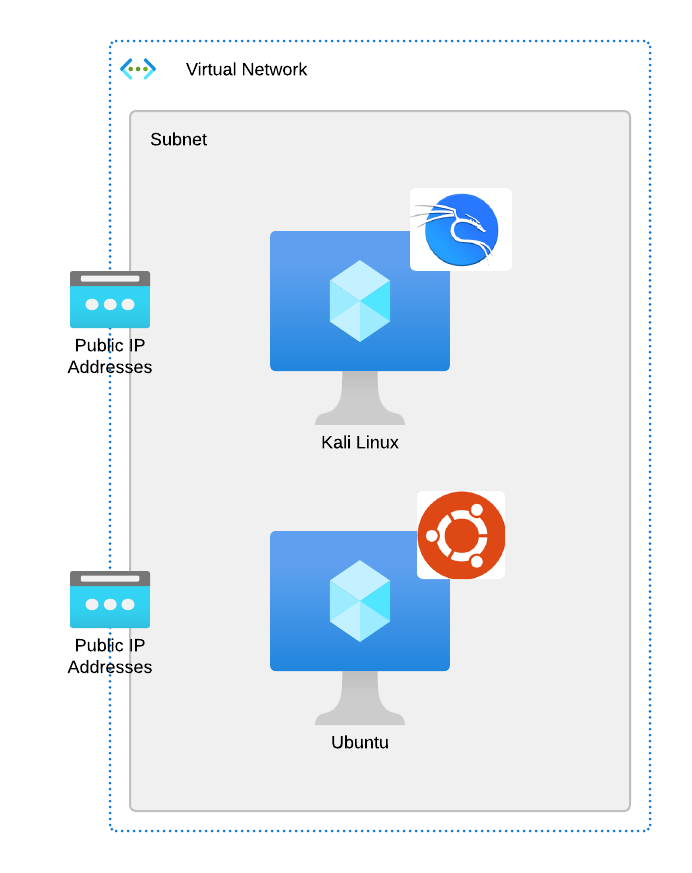
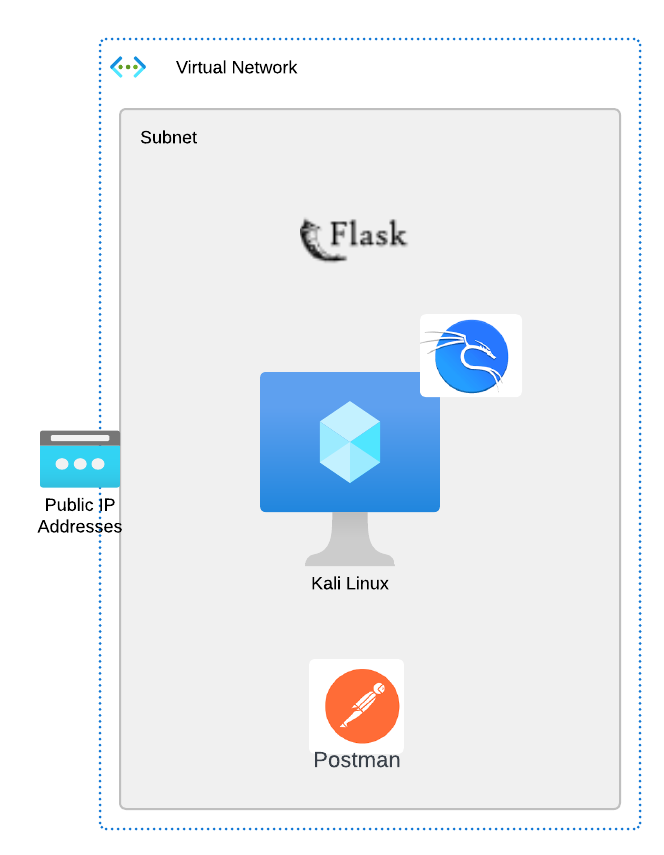
Navigate to the Kali Linux CLI
For this exercise, we will be using a very simple flask application. Students will start the application within a python virtual environment. It is useful to monitor the debug messages for the application during user interactions.
We will be opening two CLI connections to Kali. If you have the ability to ssh from your laptop, you can open two sessions:
ssh labuser@<kali-ip>

password: S3cur3P4ssw0rd123!
If you prefer, you can open two terminal windows from the Kali Desktop

Start Flask Application
Choose one of the terminal sessions that you opened and issue the below commands:
git clone  https://github.com/fortidg/simple_flask_auth.git
cd simple_flask_auth
python3 app.py
You should see that the flask application has successfully started and is listening on port 8000.
Leave this terminal window open so the app continues to run

Info
If you would like to take a look at the Flask Application itself, you can use
cat simple_flask_auth/app.py or navigate to this Github Repo.
Task 2 - Use Netcat to interact with Application
| |
|---|
| Goal | Learn how to use netcat to craft http requests |
| Task | Use netcat to interact with our simple application by using form data and json. We will monitor network behavior using Wireshark. |
| Verify task completion | If entered properly, the flask application will return data, as highlighted below |
According to the “manpage”: netcat is a simple unix utility which reads and writes data across network connections, using TCP or UDP protocol. It is designed to be a reliable “back-end” tool that can be used directly or easily driven by other programs and scripts. At the same time, it is a feature-rich network debugging and exploration tool, since it can create almost any kind of connection you would need and has several interesting built-in capabilities. Netcat, or “nc” as the actual program is named, should have been supplied long ago as another one of those cryptic but standard Unix tools.
We will be using Netcat to craft a series of HTTP calls to our flask application and observing the resulting actions. We are using “localhost” as our destination because we are executing NC from the same Kali Linux instance that’s hosting the Flask Web App, but it could just as easily use a public URL.
Make your first web call
For this first example, we want to use Wireshark to watch the interaction between netcat and the Flask web server.
In wireshark, select Loopback:lo as the interface and enter host 127.0.0.1 and port 8000 into the capture filter

Warning
Please take care when entering the commands below. Please enter the commands one line at a time, and be sure to hit enter twice after each web command.
For Example:

1. Open the TCP 3-way handshake and wait for the return

```
nc localhost 8000 -vvv
```

2. Enter the HTTP request

```
GET /hello HTTP/1.1
```

3. _**Hit enter 2 times**_
From the 2nd ssh session terminal to Kali Linux, let’s start the tcp connection
The resulting Wireshark capture should show us the TCP three-way handshake

Now let’s finish the call by adding L7 components
GET /hello HTTP/1.1
<hit enter again>
You should see some response headers returned as well as the programmed response from the app. We can see the 200 OK status, meaning that our application is actually working, and we requested a valid resource.

Now we can look back at Wireshark and see the rest of the traffic associated with this call.

Info
We can see the underlying HTTP in this Wireshark capture because we are not using Secure HTTP (TLS or Quic) If this traffic were encrypted using TLS, we would only see TCP and TLS
Tip
We also get some other useful information about the application, including the Application server software as well as the python version used. Generally speaking the less information potential attackers have about your application, the better. If this information is exposed, it is imperative to ensure that servers are appropriately patched.
Take a look back at the terminal where you originally started the Flask application. You should see your first debug message.

Method Not Allowed
In our first call above, we used the GET method against http://localhost:8000/hello. Let’s try the same thing against a different resource
GET /login  HTTP/1.1
<hit enter again>
- Click here for example

As you can see, we got the Method Not Allowed (405) error. In the example output, you can see that we only allow POST and OPTIONS methods for the /login resource.
The FormData interface provides a way to construct a set of key/value pairs representing form fields and their values. Formdata is useful if the client does not support Javascript, or in a situation where it is desirable to send binary data without text encoding. For This step, we are going to set the “Content-Type” to x-www-form-urlencoded and then add key/values for username and password.
POST /login HTTP/1.1
Content-Type: application/x-www-form-urlencoded
Content-Length: 34

username=student&password=welcome
Click here for example

JSON
JavaScript Object Notation (JSON) is a text-based format for representing and exchanging data that is both human and machine-readable. It is often used in web applications, but can be used independently from JavaScript and in any programming language. JSON is popular with developers because it is lightweight, easy to parse and generate, and requires less coding. For This step, we are going to set the “Content-Type” to json and then add key/values for username and password in a simple JSON string.
For more information about JSON, click on this link.
POST /save HTTP/1.1
Content-Type: application/json
Content-Length: 32

{"id": 5150, "name": "student"}
Click here for example

| |
|---|
| Goal | Learn to use Browser based developer tools |
| Task | We will enable Firefox’ Developer tools and use them to inspect the content returned by our simple flask application |
| Verify task completion | You will be able to see detailed information about the application’s content |
For this exercise, we will take a high level look at the Web Developer tool in Firefox. For more information about this tool, you can go to the Firefox DevTools User Docs.
Almost all browsers have developer toolkits. Below are some notable examples:
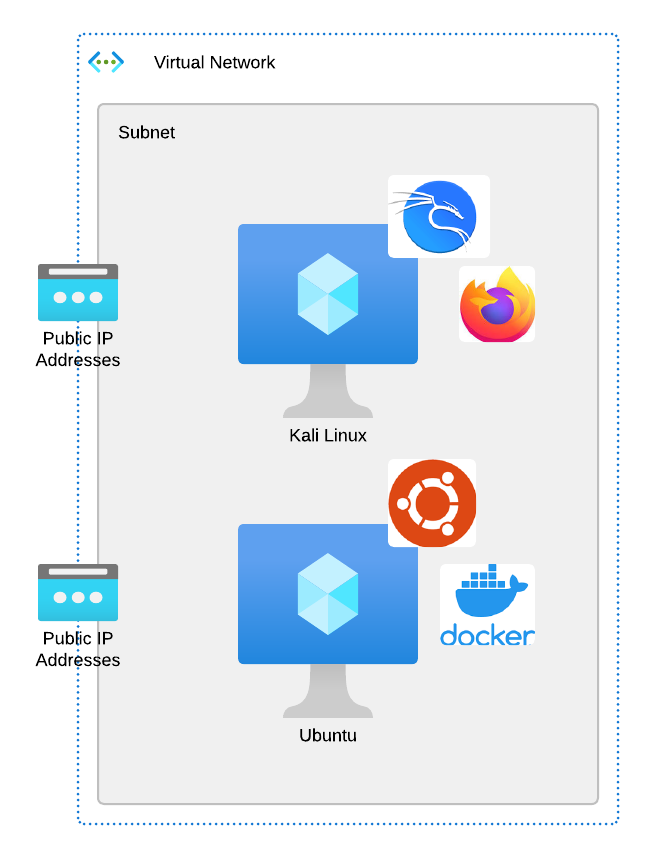
- Go to your Kali Linux RDP session
- Open Firefox from the top left menu bar and navigate to
http://localhost:8000/ - Right click anywhere on the screen, which will cause a menu to pop up. At the bottom of that menu, click on Inspect(Q)
- This will cause “Web Developer Tools” to open at the bottom of the screen.
Dig a bit deeper
Inspector
The inspector tab shows the HTML used to render this page. Take a look at the code and expand some of the menus.
Scroll down and right-click on the link “To hear what other have to say”. Select Inspect(Q). This will highlight the code associated with this line.

We can see that this is a href (hypertext reference). this tells us the source of the file used in this tag.
You should see something like:

Now, left-click on the link to go to the page. Compare the html to the outputs on the rendered page.
Network Inspector
The network tab gives us a lot of information about traffic to and from the application itself. This can be quite useful for viewing how the application is actually operating at layer 7.
Click on The “Network” tab in the Web Developer Tool section at the bottom of the page.

At a glance, we can see the HTTP status code, method and domain.
- Notice here that much of the network traffic displayed is not from “localhost”. As we can see a lot of the traffic is from, or related to giphy.com. This is due to the embedded link, which ultimately renders the fun Kitty GIF.
By default, All option is selected. The other options to the right, are high level category filters.
- Select the Images filter.
- In the “Filter URLs” bar, type giphy
- Hover over the “File” section of one of the “media1.giphy.com” lines.
Storage Inspector
On the left hand side of this screen is the “Storage tree”, which lists all the storage types that can be inspected. Objects under each type are organized by origin. In our output, we only have two origins (http://localhost:8000 and https://giphy.com)
Expand the Cookies storage type. Note that our two origins are there, but we cannot see any cookies.

Back on the web page (http://localhost:8000/view_feedback), click the link below the GIF to give feedback.
- Enter the Username
student and Password Fortinet1! and select Sign In - Type a name and some feedback into the appropriate boxes and click Submit
Back on the Storage tree, expand the Cookies Section and you will notice that you now have a cooked with a key/value of “name/whatever name you entered” in the “Table Widget” to the right of the Storage Tree
Click on the new cookie. You will notice a new “Sidebar” pop up to the right of the Table Widget. This contains more detailed information about the cookie.

Task 4 - Stored Cross Site Scripting (XSS) Example Attack
| |
|---|
| Goal | Create a web defacement attack against our browser |
| Task | We will use a simple cross site scripting attack to deface our web page |
| Verify task completion | If properly executed, you will see our replacement content displayed on the feedback page |
While this is not intended as an ethical hacking course, it is useful to understand how simple attacks work. The simple flask site that we have here doesn’t have any juicy databases, chock-full of Personally Identifiable Information (PII) that can be harvested, but we can set a trap for a user who logs in to check the site feedback.
Leave Feedback
- In your browser on Kali, navigate to
http://localhost:8000/view_feedback- Scroll down and read the Feedback.
- Click on the link to leave feedback and follow the process to do so.
- Navigate back to http://localhost:8000/view_feedback and note that your feedback was recorded.
Deface Page
Now that we have established the fact that we can leave feedback, let’s use that to perpetrate a Defacement XSS attack.
In your browser on Kali, navigate to http://localhost:8000/view_feedback
Click on the link to leave feedback and follow the process to do so.
- For this time however, use any name in the Name section but copy and paste the below text into the Feedback section.
- Click Submit
<svg onload="document.body.innerHTML='<img src=https://objectstorage.us-ashburn-1.oraclecloud.com/n/fortinetoraclecloud1/b/public-bucket/o/Cordimungus.svg>'">
You should be re-directed to the Thank You Page.
Navigate back to http://localhost:8000/view_feedback and note that your feedback was recorded.
- Click here for example

HTTP review
Review
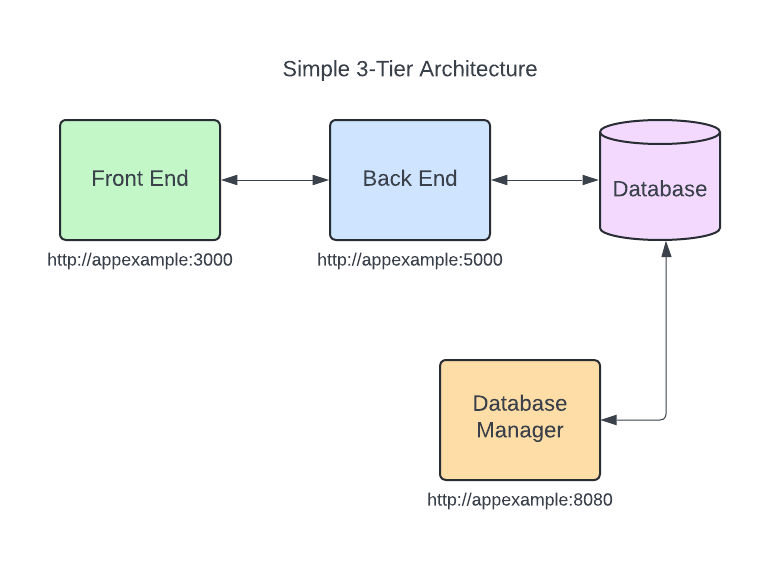
In this module, we used some very common troubleshooting tools to interact with a very simple monolithic web application written using Flask.
- Netcat was used to better understand how to manually craft http requests
- Wireshark was used to observe the layer3 and layer4 traffic patterns between the client and server
- Browser dev tools were used to help students understand how to dig more deeply into the client/server interactions at layer7
- Finally, we perpetrated a simple web attack, to deface our simple website
Hopefully this engendered a desire on the part of the student to use these tools and techniques to further explore and learn how to secure this type of application.
HTTP Quiz
What is a cookie?
Click here for Answer
A small piece of data sent from a server to a user’s web browser
What can you learn from developer tools in the browser?
Click here for Answer
- request and response headers
- scripts passed to the browser from the server
- cookies and other content
- response codes
Web attacks are difficult to perpetrate,m and you need to be an inveterate hacker to attempt it (True or False)
Click here for Answer
FALSE - The attack in this lab is very simple, but very effective. This should highlight the need to protect web applications with a purpose built Web Application Firewall (WAF)