This course covers the deployment of a FortiGate NGFW to secure an Azure Virtual Network to meet the security requirements of Company ABC as they move server workloads to Azure. This course will start with understanding key services and terminology used in Azure when deploying public and private facing services in the public cloud. The hands-on portion of the course covers the deployment of a FortiGate to secure the Azure Virtual Network and hosted services.
Course Goals
Learn key Azure services and terms
Deploy and configure an Azure Virtual Network (VNET)
Deploy server Virtual Machines VMs in a VNET
Deploy and configure a FortiGate Network Virtual Appliance (NVA)
Deploy an Azure Route Table and create User Define Routes (UDR)
Secure the VNET and hosted services utilizing FortiGate polices
Continue to Chapter 1: Architecture Diagrams
Subsections of Azure 102: FortiGate Foundational
Chapter 1: Architecture
Azure Reference Architecture Diagrams
Azure networking offers multiple ways to organize your Azure architecture to take advantage of FortiGate traffic inspection. Most importantly, traffic must follow a symmetrical routing path (for forward and reverse flows). As long as flows are symmetrical, the architecture will work and traffic will flow through a FortiGate NGFW for inspection.
During this course the following two architectures will be deployed:
Single VNET without a FortiGate NVA - Unsecured VNET
Single VNET with a FortiGate NVA - Secured VNET
Chapter 2: Azure Fundamentals
This chapter presents Azure services that are key when deploying production solutions. These terms and services will be used extensively in this course.
Overview
Task 1: Fundamental Azure Services
Task 2: Azure Networking Concepts
Task 3: FortiGate NVA Support for Azure
Subsections of Chapter 2: Azure Fundamentals
Task 1: Fundamental Azure Services
Azure Portal
The Azure portal is a web-based, unified console that lets you create and manage all your Azure resources. With the Azure portal, you can manage your Azure subscription using a graphical user interface. You can build, manage, and monitor everything from simple web apps to complex cloud deployments in the portal. For example, you can set up a new database, increase the compute power of your virtual machines, and monitor your monthly costs. You can review all available resources, and use guided wizards to create new ones.
The Azure portal is designed for resiliency and continuous availability. It has a presence in every Azure datacenter. This configuration makes the Azure portal resilient to individual datacenter failures and helps avoid network slowdowns by being close to users. The Azure portal updates continuously, and it requires no downtime for maintenance activities. You can access the Azure portal with any supported browser.
Azure Resource Group
An Azure Resource Group is a container similar to a folder that enables you to manage related resources for an Azure solution. By using the resource group, you can coordinate changes to the related resources. For example, you can deploy an update to the resource group and have confidence that the resources are updated in a coordinated operation. Or, when you’re finished with the solution, you can delete the resource group and know that all of the resources are deleted.
There are some important factors to consider when defining your resource group:
All the resources in your resource group should share the same lifecycle. You deploy, update, and delete them together. If one resource, such as a server, needs to exist on a different deployment cycle it should be in another resource group.
Each resource can exist in only one resource group.
You can add or remove a resource to a resource group at any time.
You can move a resource from one resource group to another group.
The resources in a resource group can be located in different regions than the resource group, but it’s recommended that you use the same location.
A resource group can be used to scope access control for administrative actions. To manage a resource group, you can assign Azure Policies, Azure roles, or resource locks.
You can apply tags to a resource group. The resources in the resource group don’t inherit those tags.
A resource can connect to resources in other resource groups. This scenario is common when the two resources are related but don’t share the same lifecycle. For example, you can have a web app that connects to a database in a different resource group.
When you delete a resource group, all resources in the resource group are also deleted.
You can deploy up to 800 instances of a resource type in each resource group. Some resource types are exempt from the 800 instance limit. For more information, see resource group limits
Some resources can exist outside of a resource group. These resources are deployed to the subscription, management group, or tenant. Only specific resource types are supported at these scopes.
To create a resource group, you can use the portal, Azure Resource Manager REST API, PowerShell, Azure CLI, ARM templates, and IaC tools, to name a few.
Azure Marketplace
Azure Marketplace is an online store for solutions that are built on or built for Azure. Buyers can access Azure Marketplace in the Azure portal or access the Azure Marketplace online store. The Azure Marketplace online store includes listings for consulting and managed services. Azure Marketplace consulting services are professional service offerings that help customers get started with or accelerate the use of Azure.
Azure Marketplace is a part of Azure, so you can access the catalog of Azure Marketplace solutions in the Azure portal through the Create a resource option. This option opens Azure Marketplace within the Azure portal, where you can search for solutions by name or by category.
Task 2: Azure Networking Concepts
Azure Virtual Network
Azure Virtual Network is a service that provides the fundamental building block for your private network in Azure. An instance of the service (a virtual network) enables many types of Azure resources to securely communicate with each other, the internet, and on-premises networks. These Azure resources include virtual machines (VMs).
All resources in a virtual network by default cannot communicate outbound with the internet. You can use a public IP address, NAT gateway, or public load balancer to manage your outbound connections. You can communicate inbound with a resource by assigning a public IP address or a public load balancer.
You can connect virtual networks to each other by using virtual peering. The resources in either virtual network can then communicate with each other. The virtual networks that you connect can be in the same, or different, Azure regions.
You can connect your on-premises computers and networks to a virtual network by using any of the following options:
Point-to-site virtual private network (VPN): Established between a virtual network and a single computer in your network. Each computer that wants to establish connectivity with a virtual network must configure its connection. This connection type is useful if you’re just getting started with Azure, or for developers, because it requires few or no changes to an existing network. The communication between your computer and a virtual network is sent through an encrypted tunnel over the internet.
Site-to-site VPN: Established between your on-premises VPN device and an Azure VPN gateway that’s deployed in a virtual network. This connection type enables any on-premises resource that you authorize to access a virtual network. The communication between your on-premises VPN device and an Azure VPN gateway is sent through an encrypted tunnel over the internet.
Azure ExpressRoute: Established between your network and Azure, through an ExpressRoute partner. This connection is private. Traffic doesn’t go over the internet.
You can filter network traffic between subnets by using either or both of the following options:
Network security groups: Network security groups and application security groups can contain multiple inbound and outbound security rules. These rules enable you to filter traffic to and from resources by source and destination IP address, port, and protocol.
Network virtual appliances (NVA): A network virtual appliance is a VM that performs a network function, such as a firewall or WAN optimization. The FortiGate is considered a NVA.
Azure routes traffic between subnets, connected virtual networks, on-premises networks, and the internet, by default. You can implement either or both of the following options to override the default routes that Azure creates:
Route tables: You can create custom route tables that control where traffic is routed to for each subnet.
Border gateway protocol (BGP) routes: If you connect your virtual network to your on-premises network by using an Azure VPN gateway, ExpressRoute connection, or FortiGate NVA, you can propagate your on-premises BGP routes to your virtual networks.
Azure Virtual Network Concepts
Before diving into the reference architecture for this workshop, let’s review some basic Azure networking concepts.
Address space: When creating a virtual network, you must specify a custom private IP address space using public and private (RFC 1918) addresses. Azure assigns resources in a virtual network a private IP address from the address space that you assign. For example, if you deploy a VM in a virtual network with address space, 10.0.0.0/16, the VM is assigned a private IP like 10.0.0.4.
Subnets: Subnets enable you to segment the virtual network into one or more sub-networks and allocate a portion of the virtual network’s address space to each subnet. You can then deploy Azure resources in a specific subnet. Just like in a traditional network, subnets allow you to segment your virtual network address space into segments that are appropriate for the organization’s internal network. Segmentation improves address allocation efficiency. You can “secure” resources within subnets using Network Security Groups.
Regions: A virtual network is scoped to a single region/location; however, multiple virtual networks from different regions can be connected together using Virtual Network Peering.
Subscription: A virtual network is scoped to a subscription. You can implement multiple virtual networks within each Azure subscription and Azure region.
In this workshop we will use these components to highlight insertion of FortiGate NGFW into an enterprise architecture.
Task 3: FortiGate-VM Support for Azure
FortiGate-VM
By combining stateful inspection with a comprehensive suite of powerful security features, FortiGate Next Generation Firewall (NGFW) technology delivers complete content and network protection. This solution is available for deployment on Microsoft Azure.
In addition to advanced features such as an extreme threat database, vulnerability management, and flow-based inspection, features including application control, firewall, antivirus, IPS, web filter, VPN, and SD-WAN work in concert to identify and mitigate the latest complex security threats.
FortiGate-VM Azure Deploymnet Options
Standalone NVA
Active/Passive NVAs - with these failover options
Using Azure Load Balancers for failover
Using Azure Resource Manager API for Public and Private IP address movement
Active/Active NVAs
Azure Virtual WAN Hub deployment
Instance Type Support
FortiGate-VM supports a variety of Instance Types on Azure
Licensing
FortiGate-VM supports the following Licensing methods
PAYG - Pay As You Go - per CPU cost assessed hourly
BYOL - Bring Your Own License
FortiFlex - Point based entitlement assessed daily.
Chapter 3: Getting Started
In this chapter, you will enter your information to confirm course attendance and login to the Azure portal for the first time with your assign credentials.
Overview
Azure Environment Provision - If required.
Azure Portal - Lab Access
Subsections of Chapter 3: Getting Started
Azure Environment Provision
Public Cloud - 102 - Azure Foundational
Provision an environment for this workshop
Info
Provision an environment only if this session is being run without pre-staged environments. A pre-provisioned environment is one where a username and password has been or will be provided by the instructor.
Email Address
Please use the same email address here as the one provided at the beginning of this session.
PLEASE DO NOT SUBMIT MULTIPLE TIMES
After submitting, this page will return with a blank email address box and no other indications.
Task 1: Azure Portal Lab Access
Lab Environment
This lab is configured to allow each student to have their own training lab environment using pre-created Azure resource groups all in one shared Azure Subscription.
Azure Portal Lab Access
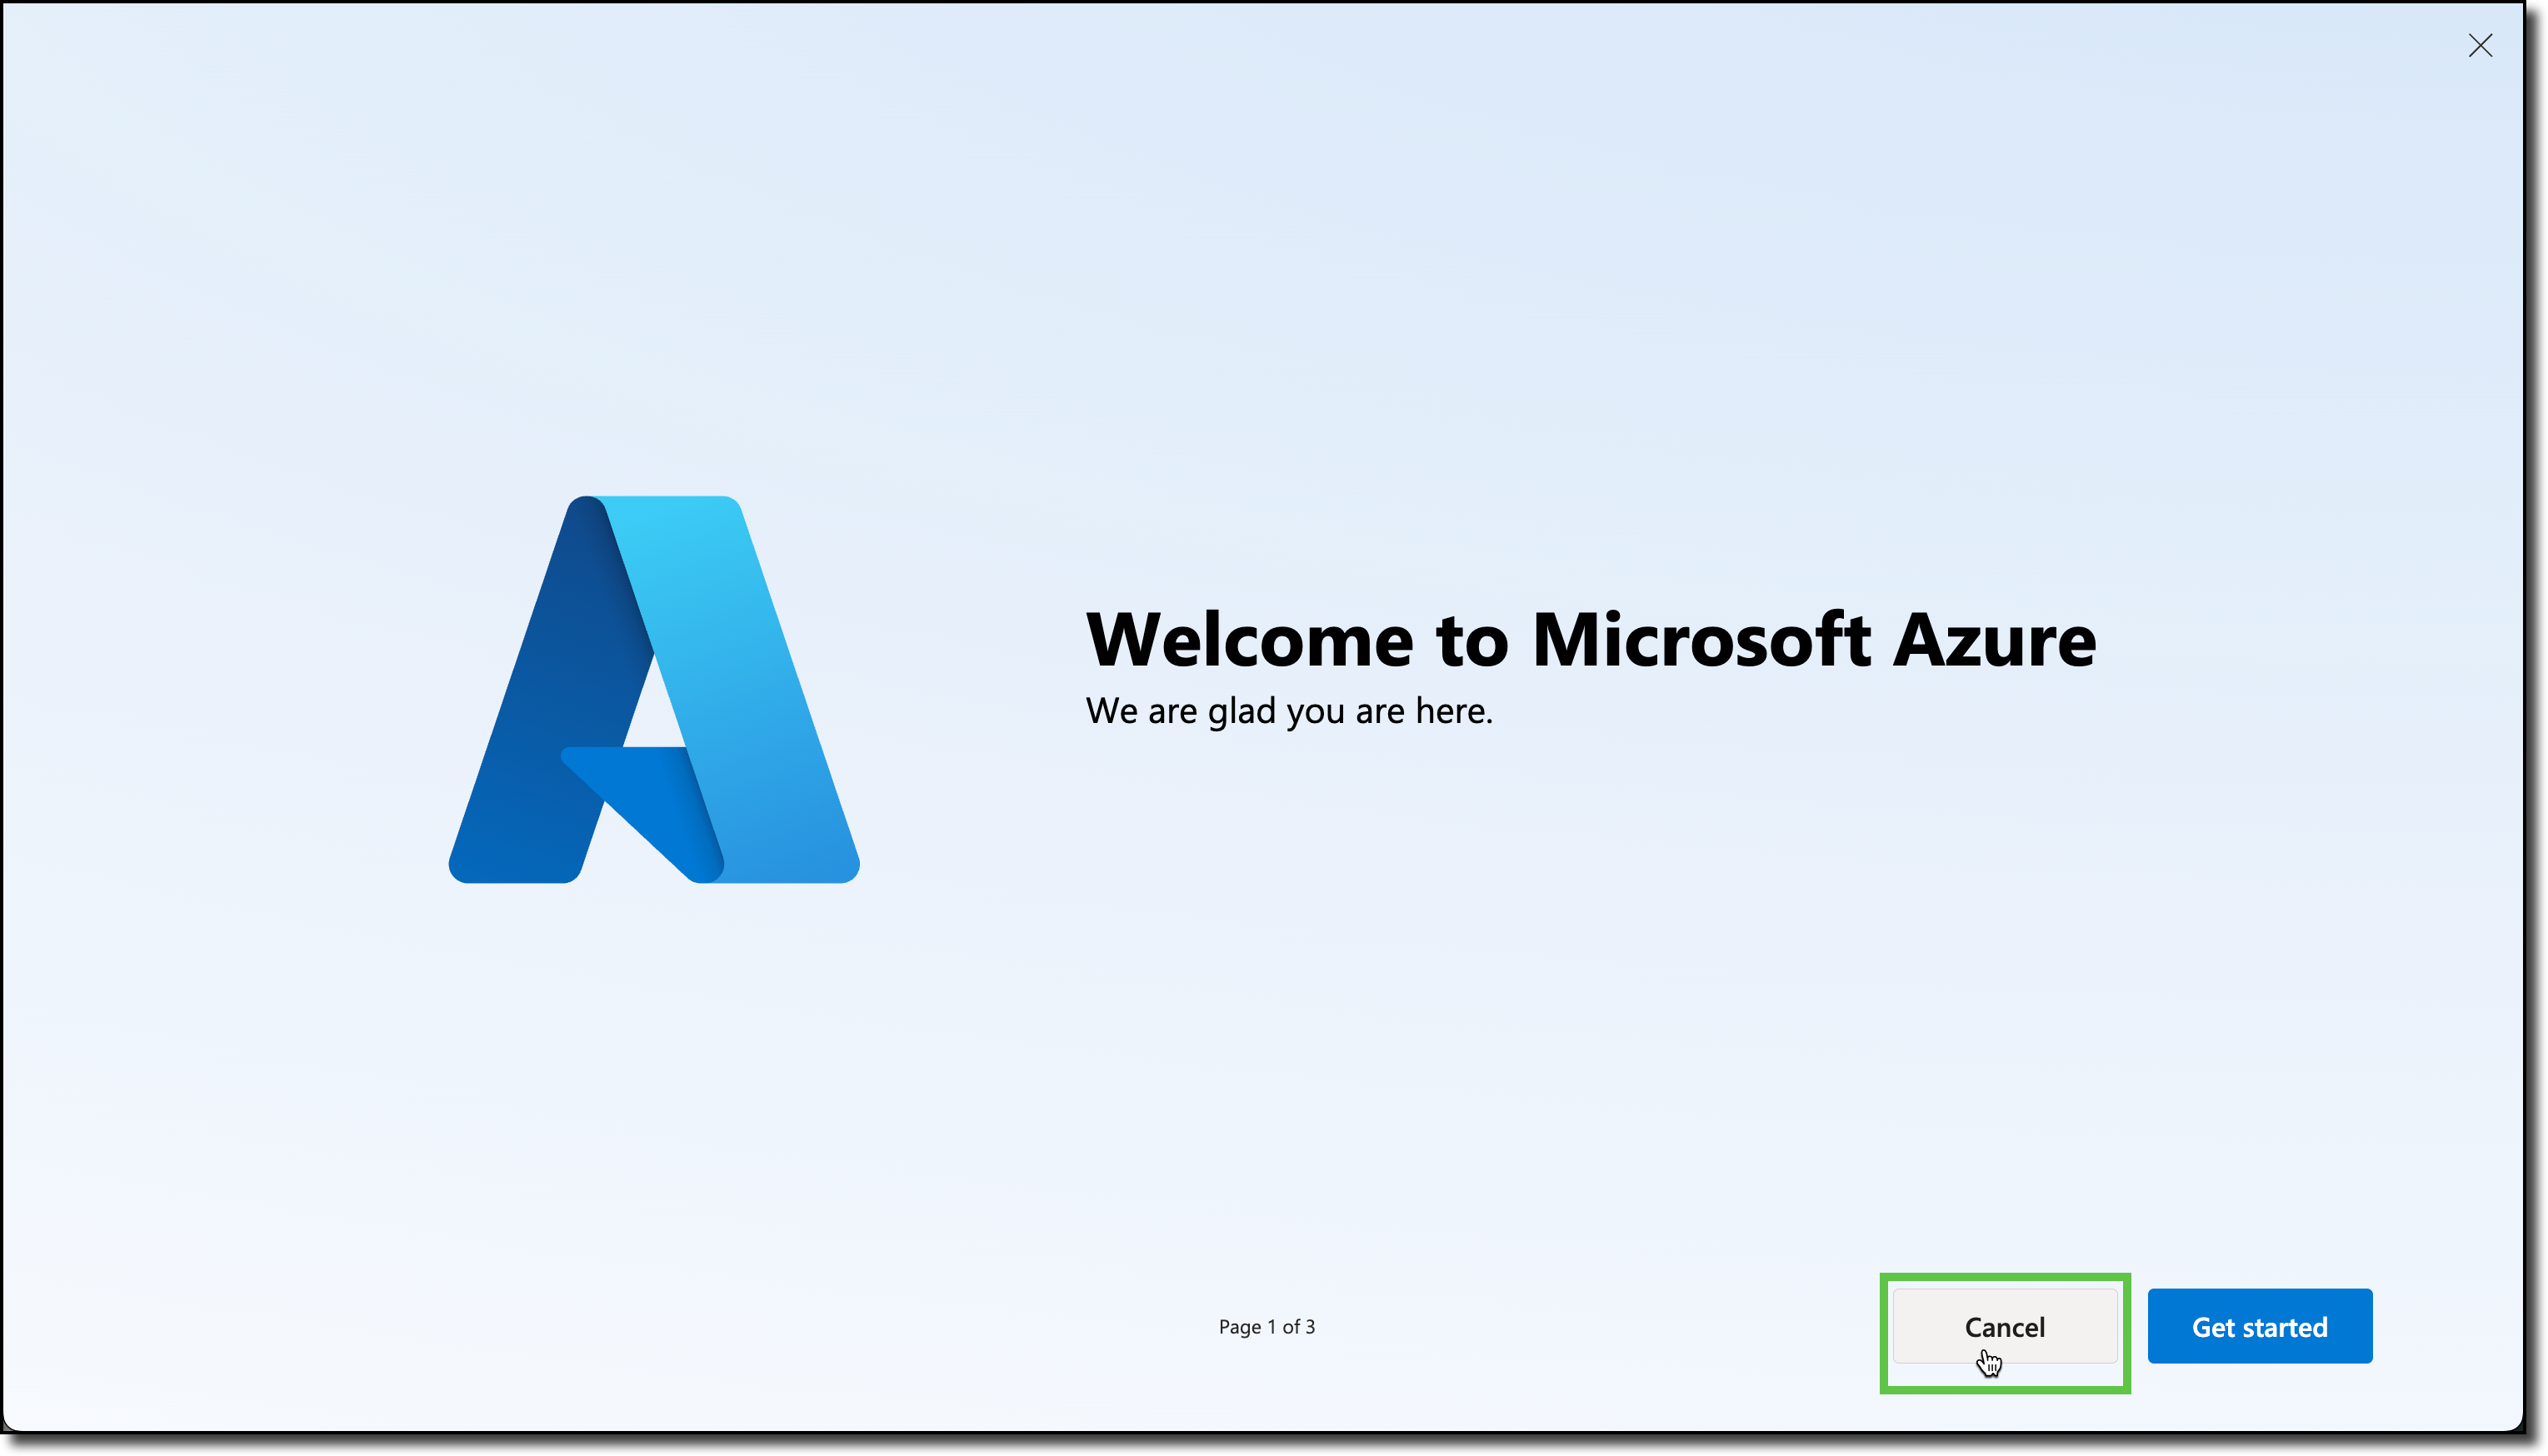
First log in to the Azure Portal, next access to the lab environment.
Click Cancel on the ‘Welcome to Microsoft Azure’ page.
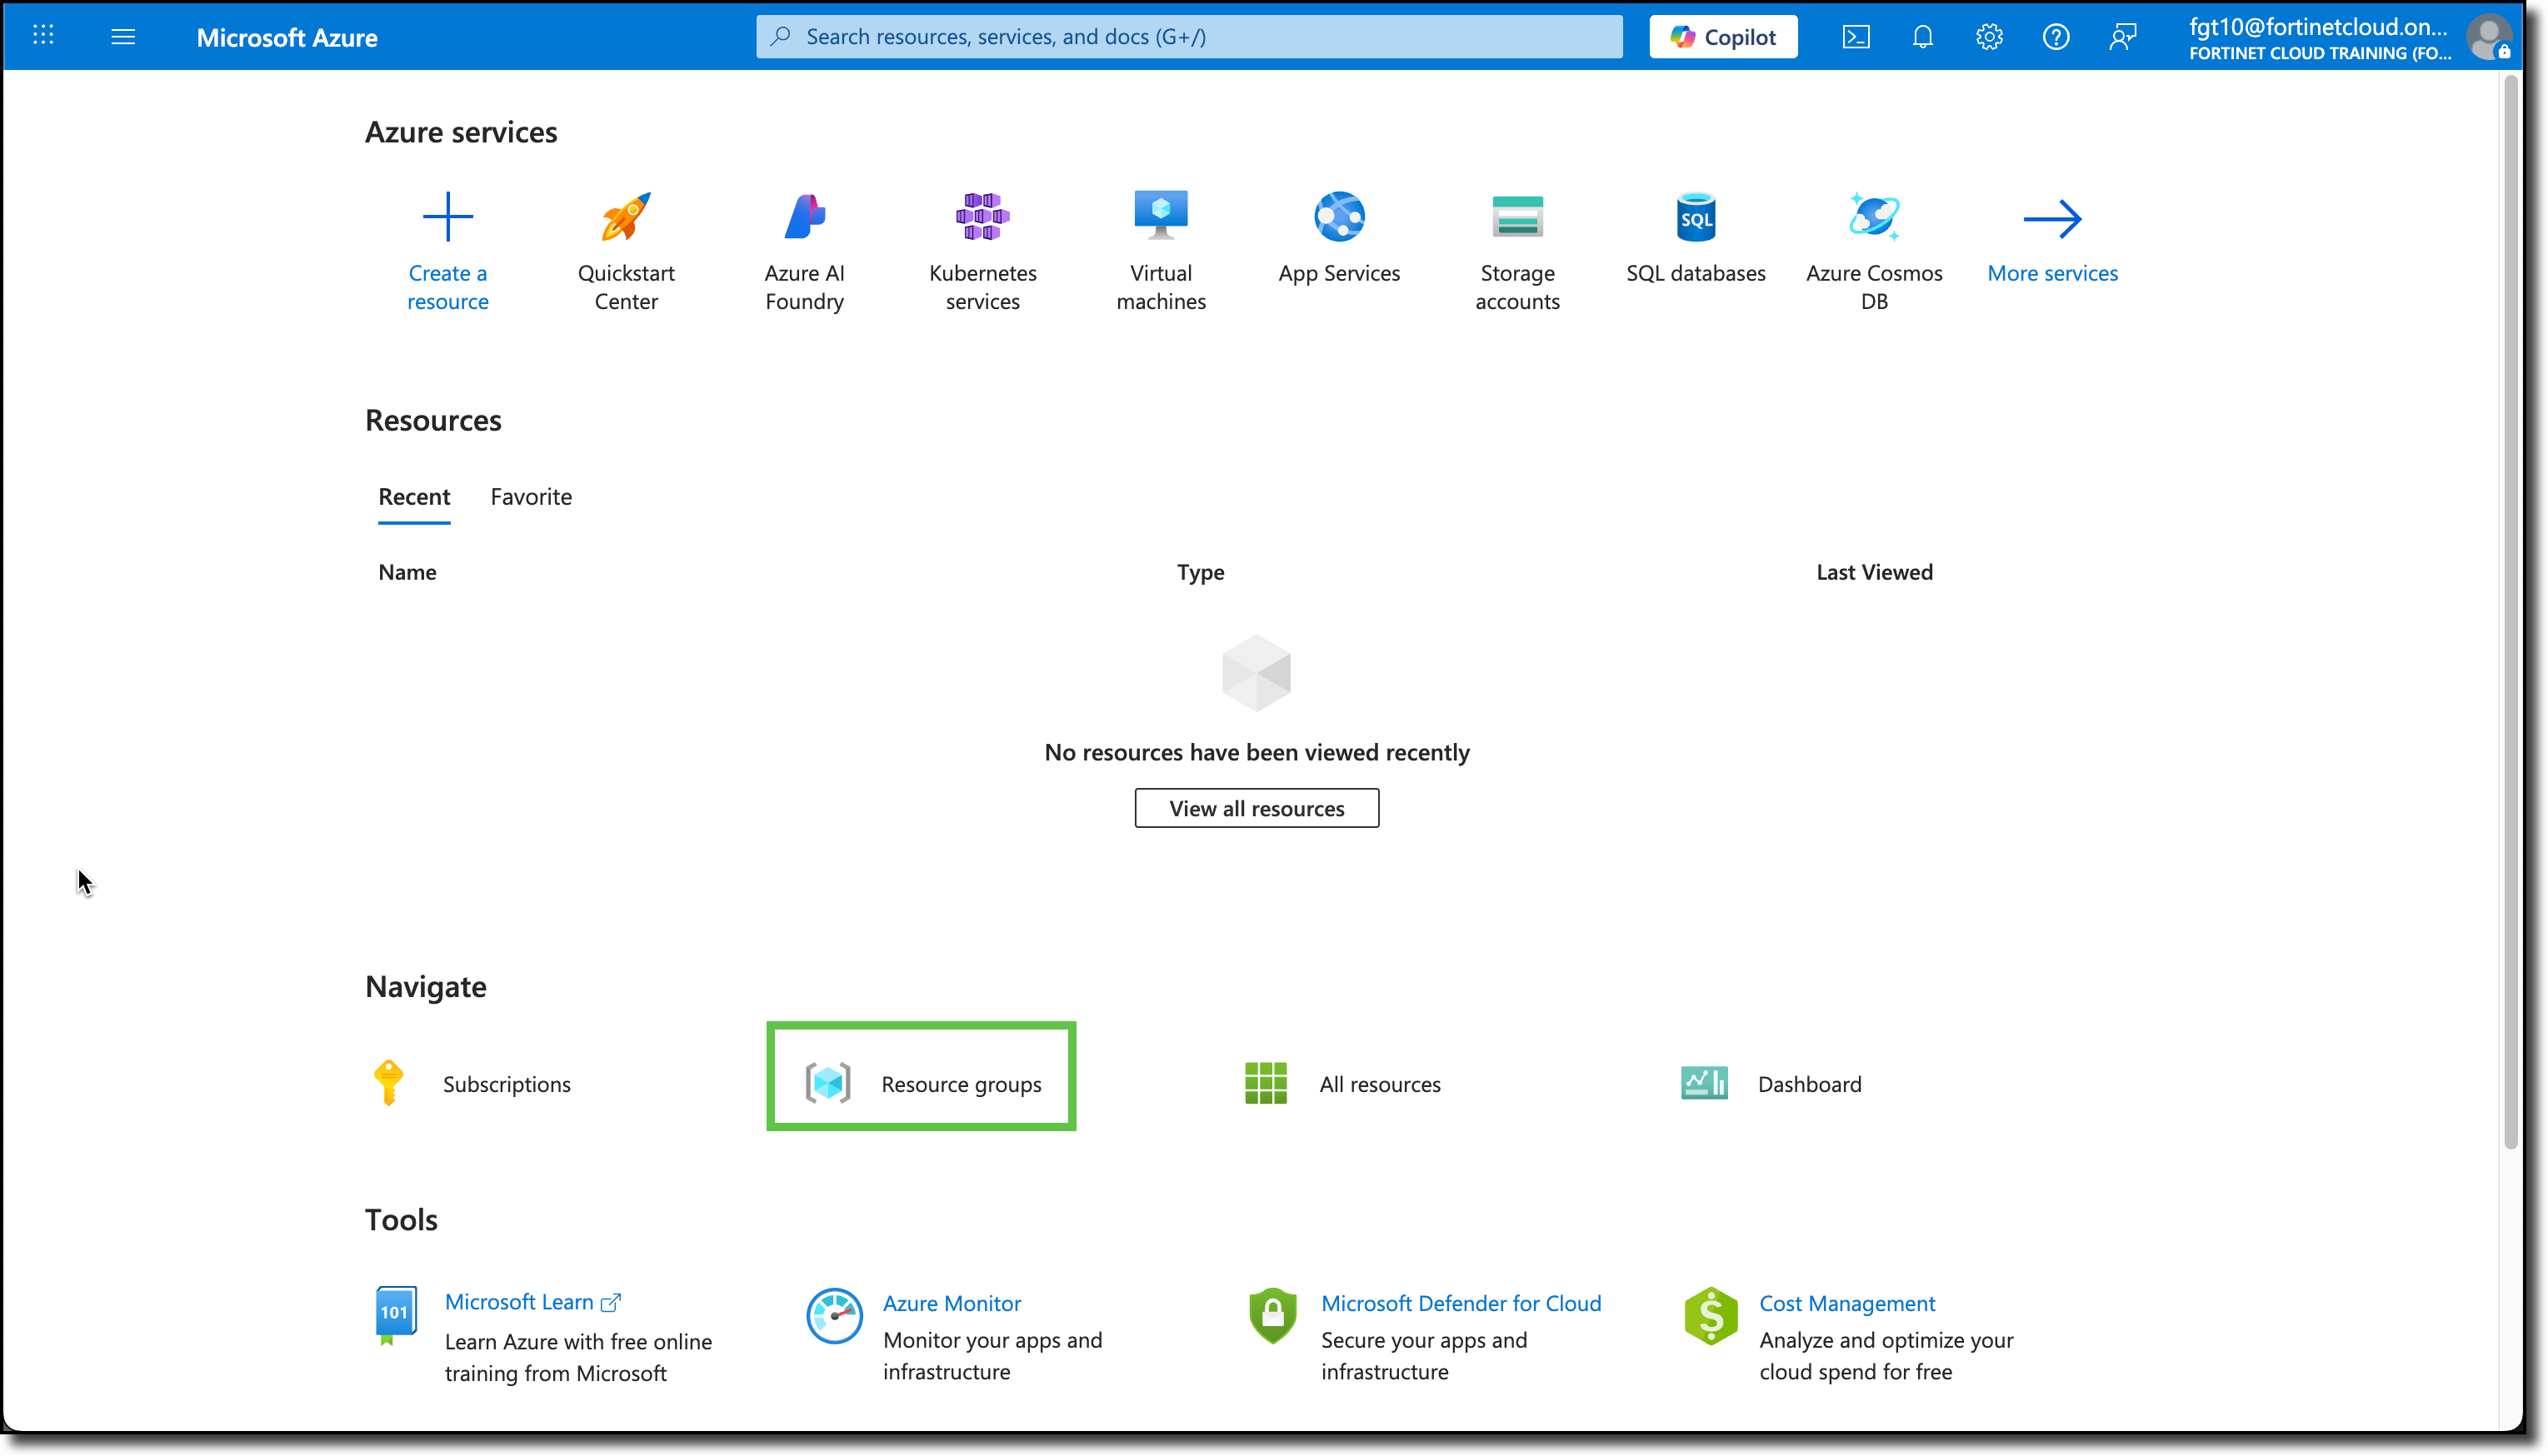
Click on Resource Groups in the main page.
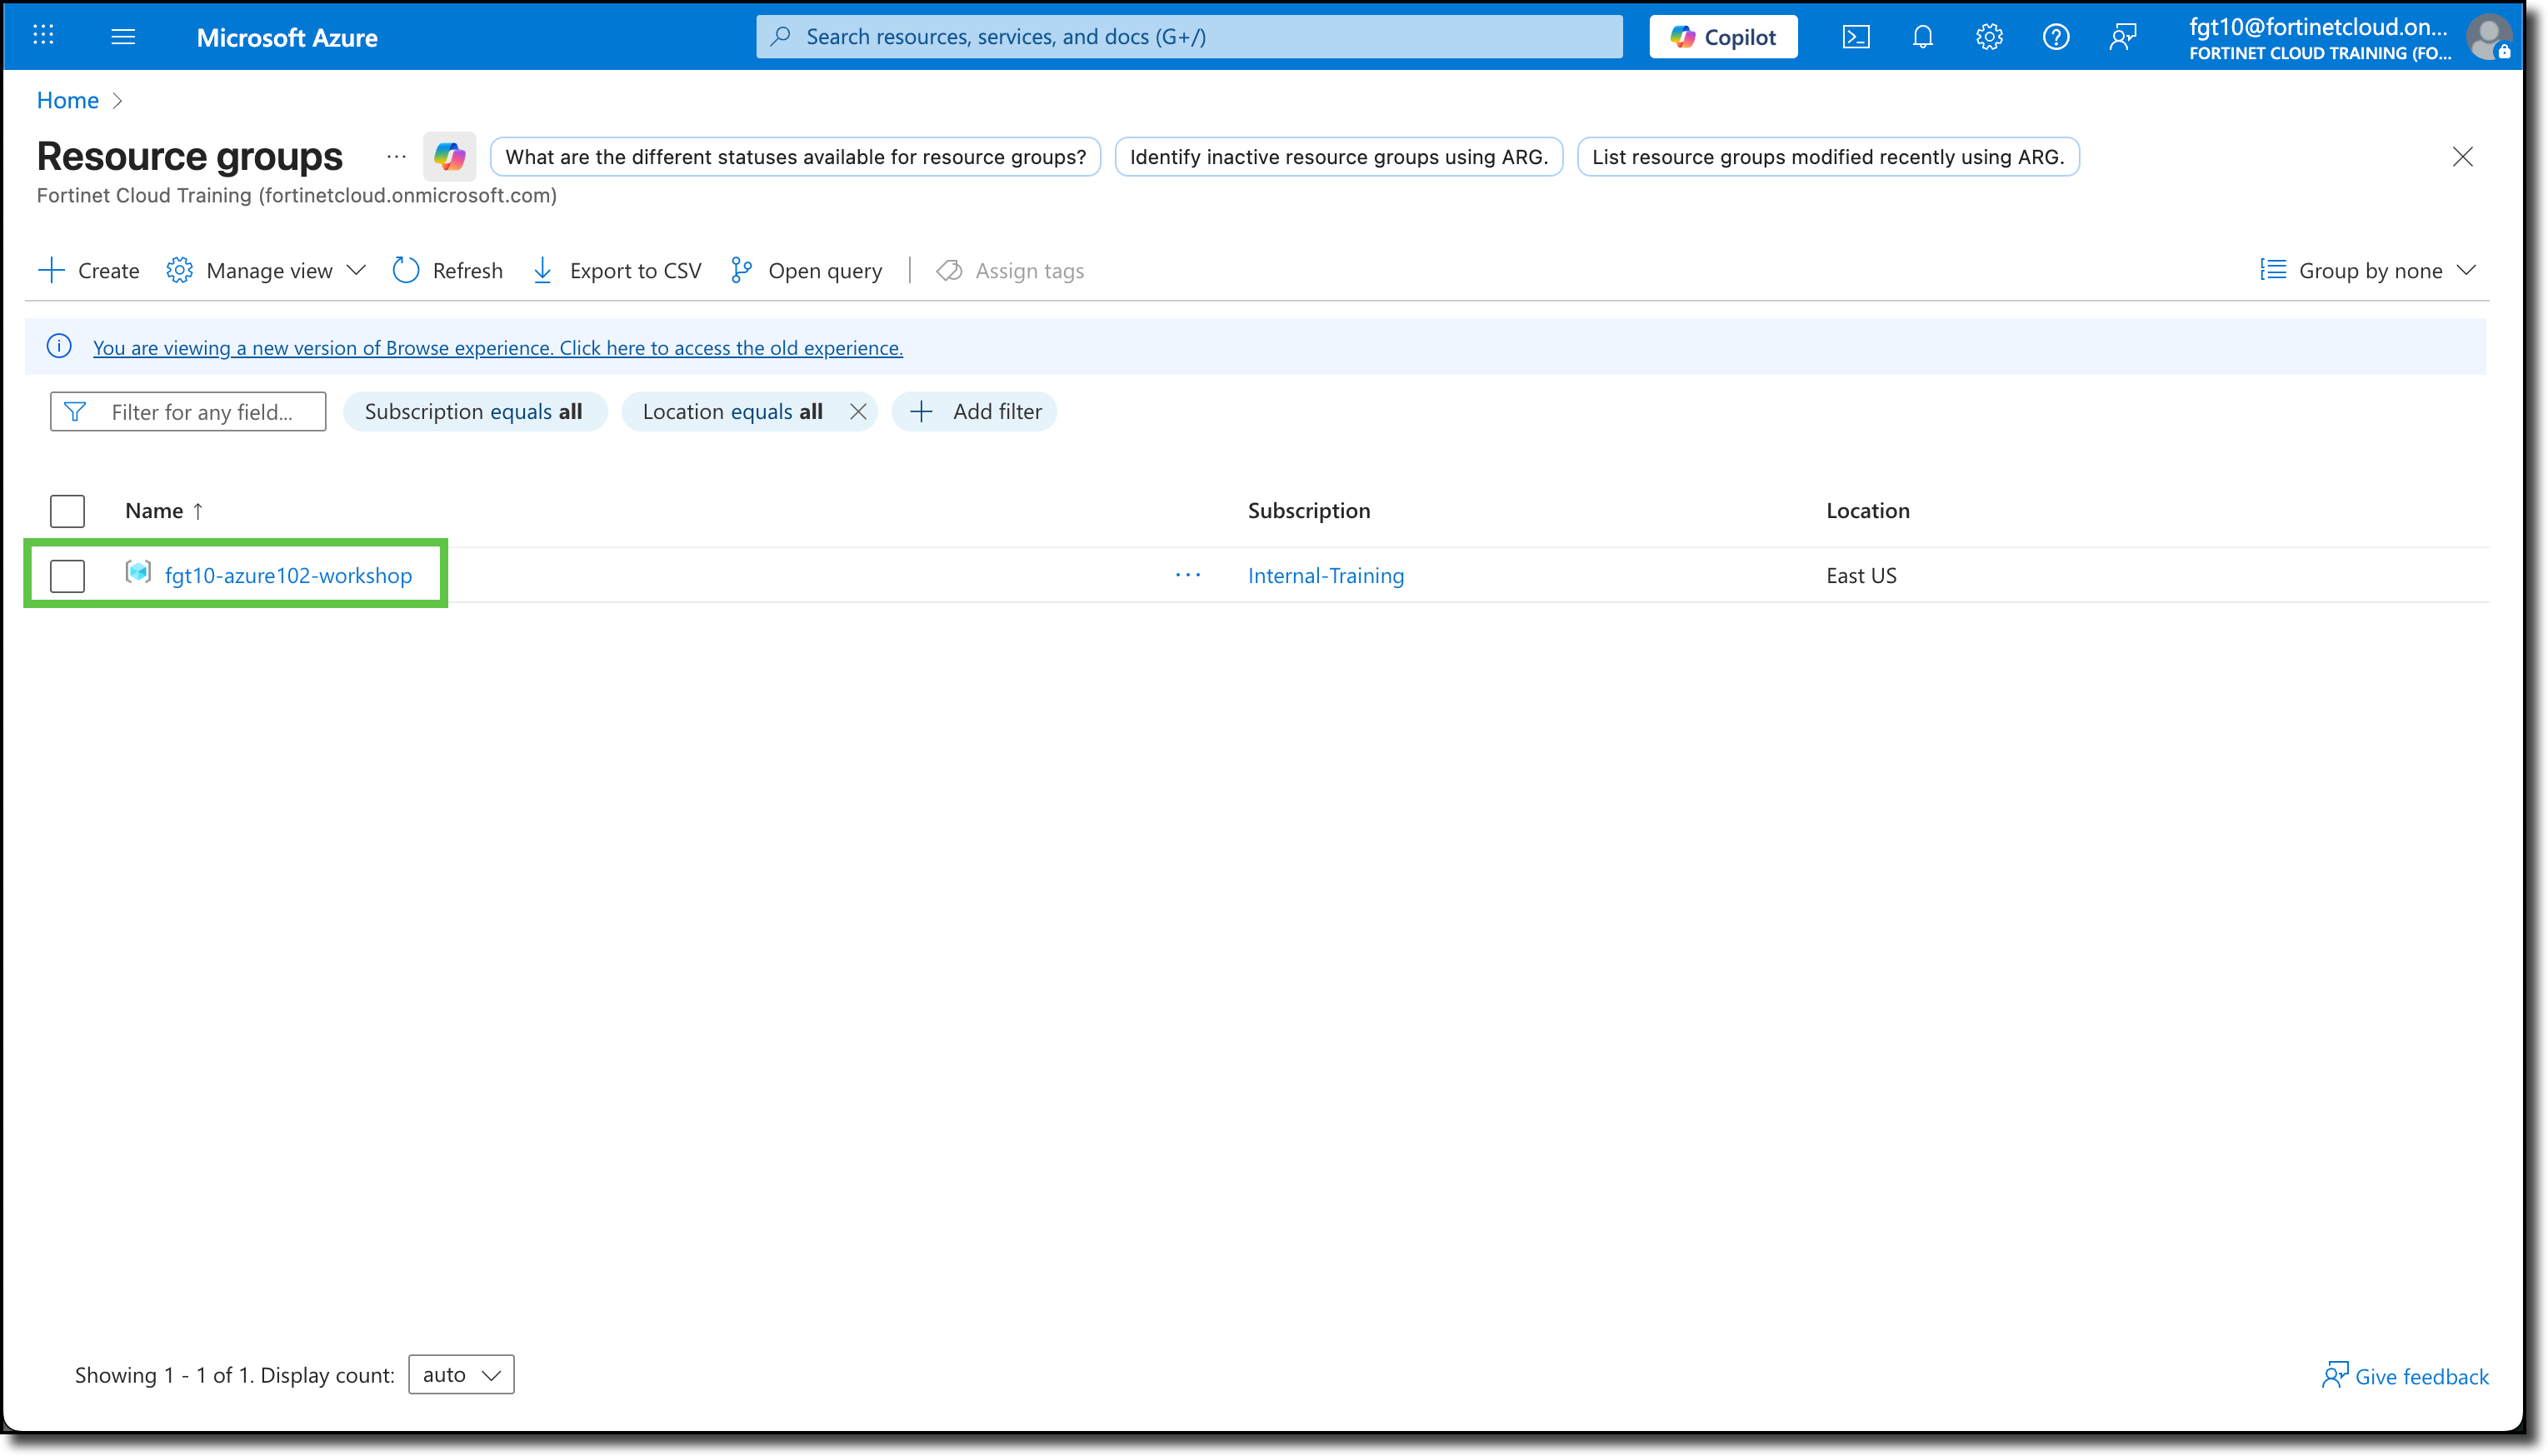
Confirm your resource group is shown - fgtXX-azure102-workshop
Chapter 4: Deploy a VNET
In this chapter, you will deploy an Azure VNET, deploy two Linux VMs in their respective subnets, and identify services that are enabled on each Linux VM and confirm access to the Internet.
Tasks to complete
Task 1: Deploy an Azure Virtual Network (VNET)
Task 2: Deploy Linux VMs
Task 3: Identify VM Info and Unsecured Services
Subsections of Chapter 4: Deploy a VNET
Task 1: Deploy an Azure Virtual Network (VNET)
Deploy a VNET (Virtual Network) in the assigned workshop Resource Group.
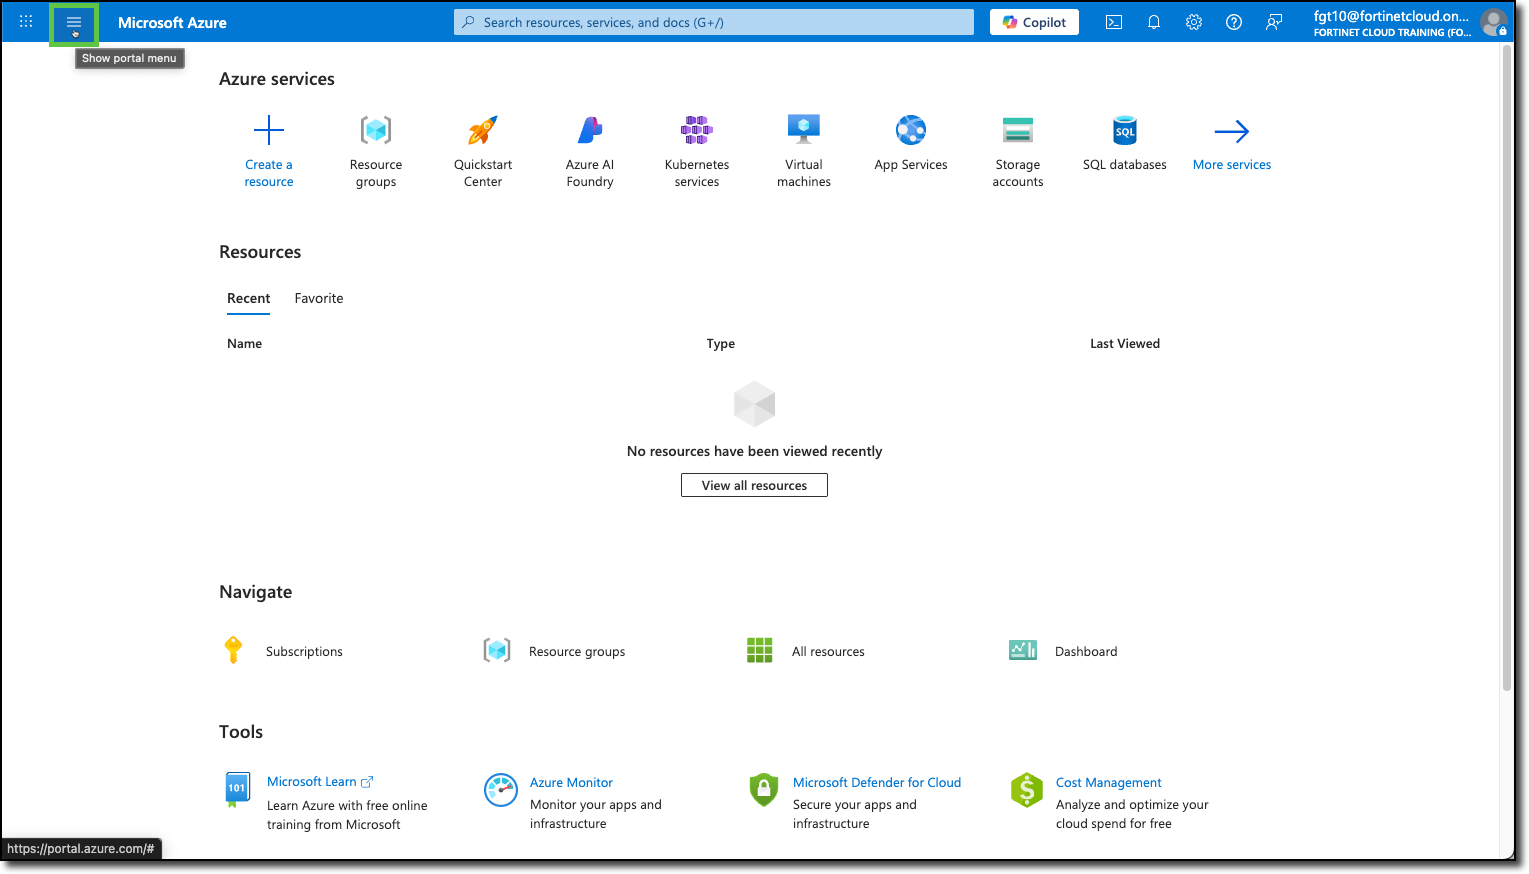
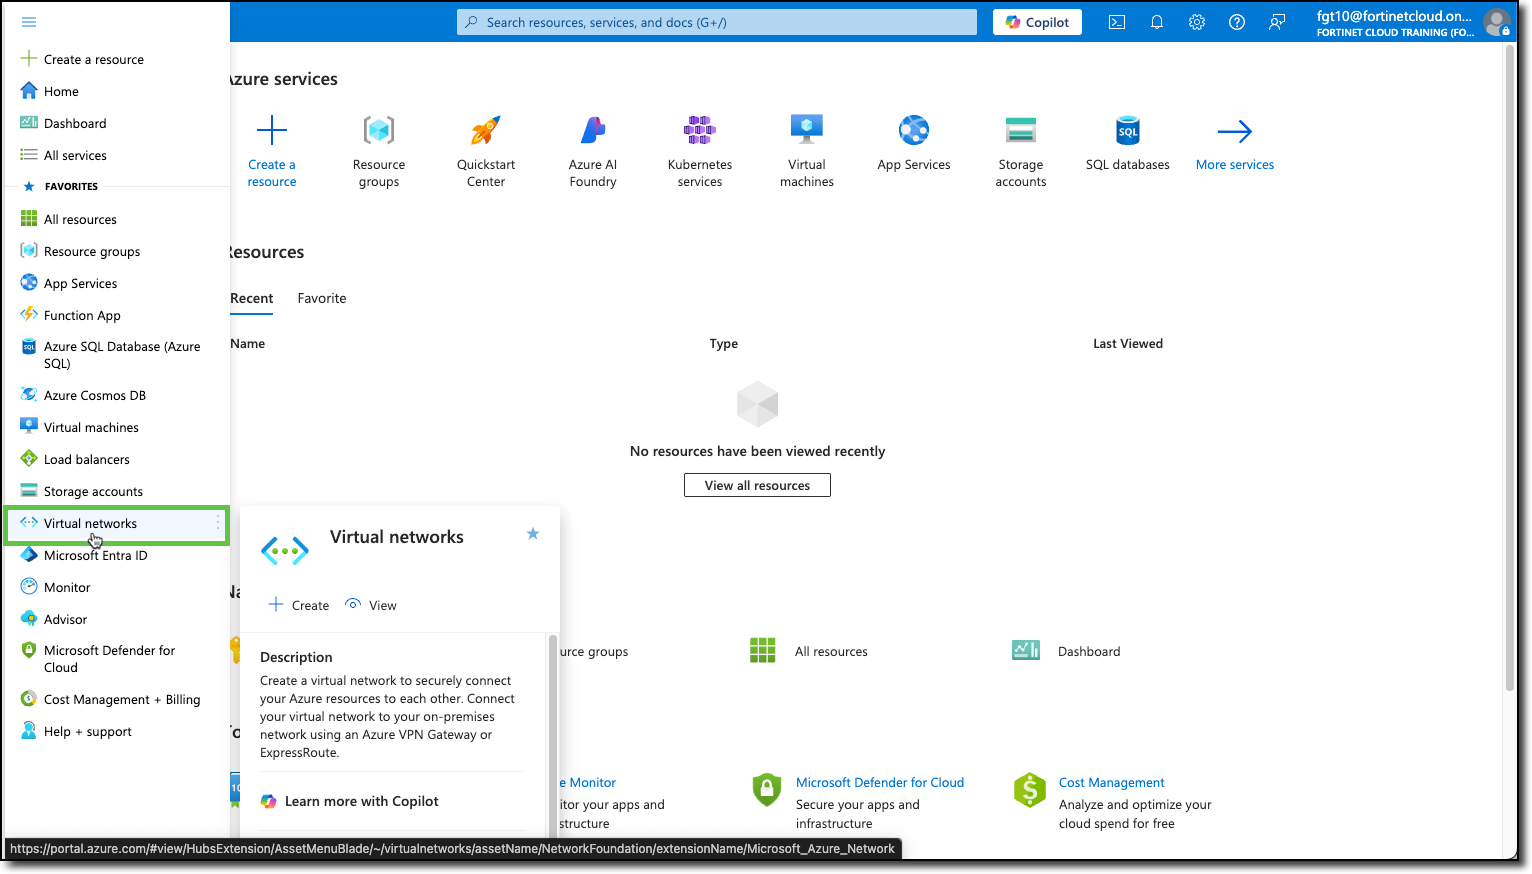
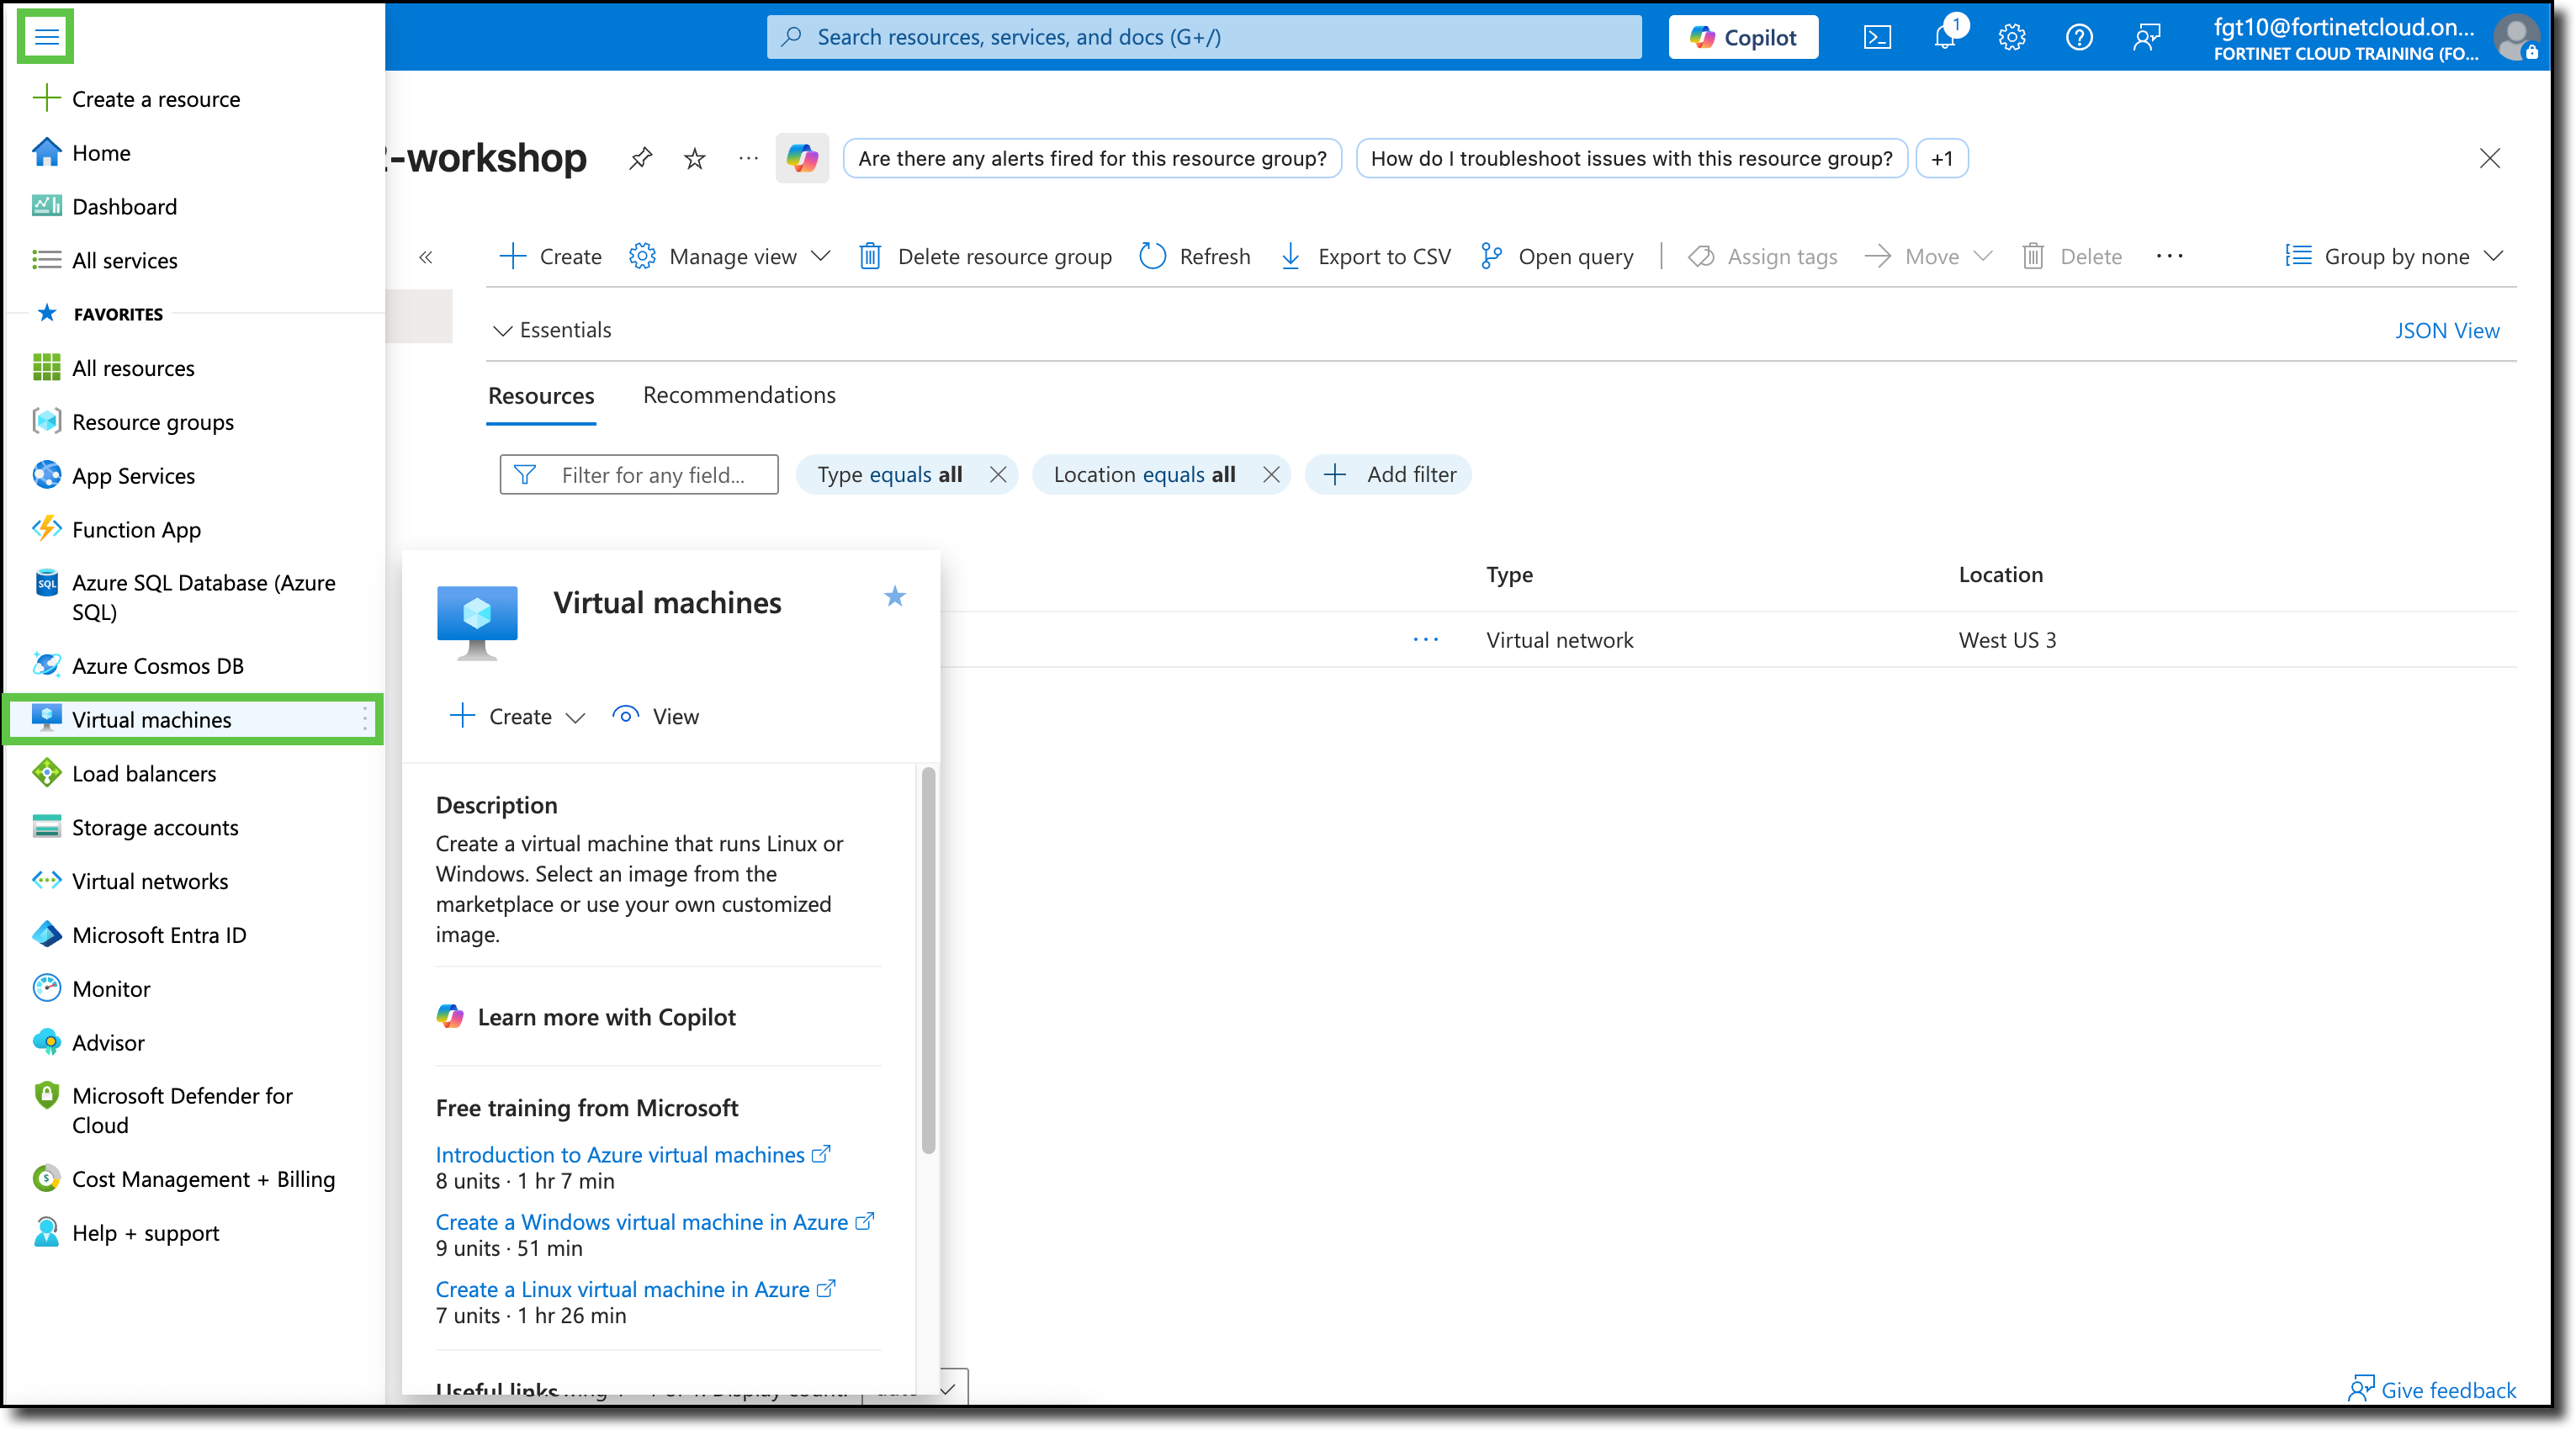
Click the Hamburger menu in the upper-left corner of the Azure Portal to show the “Portal Menu”
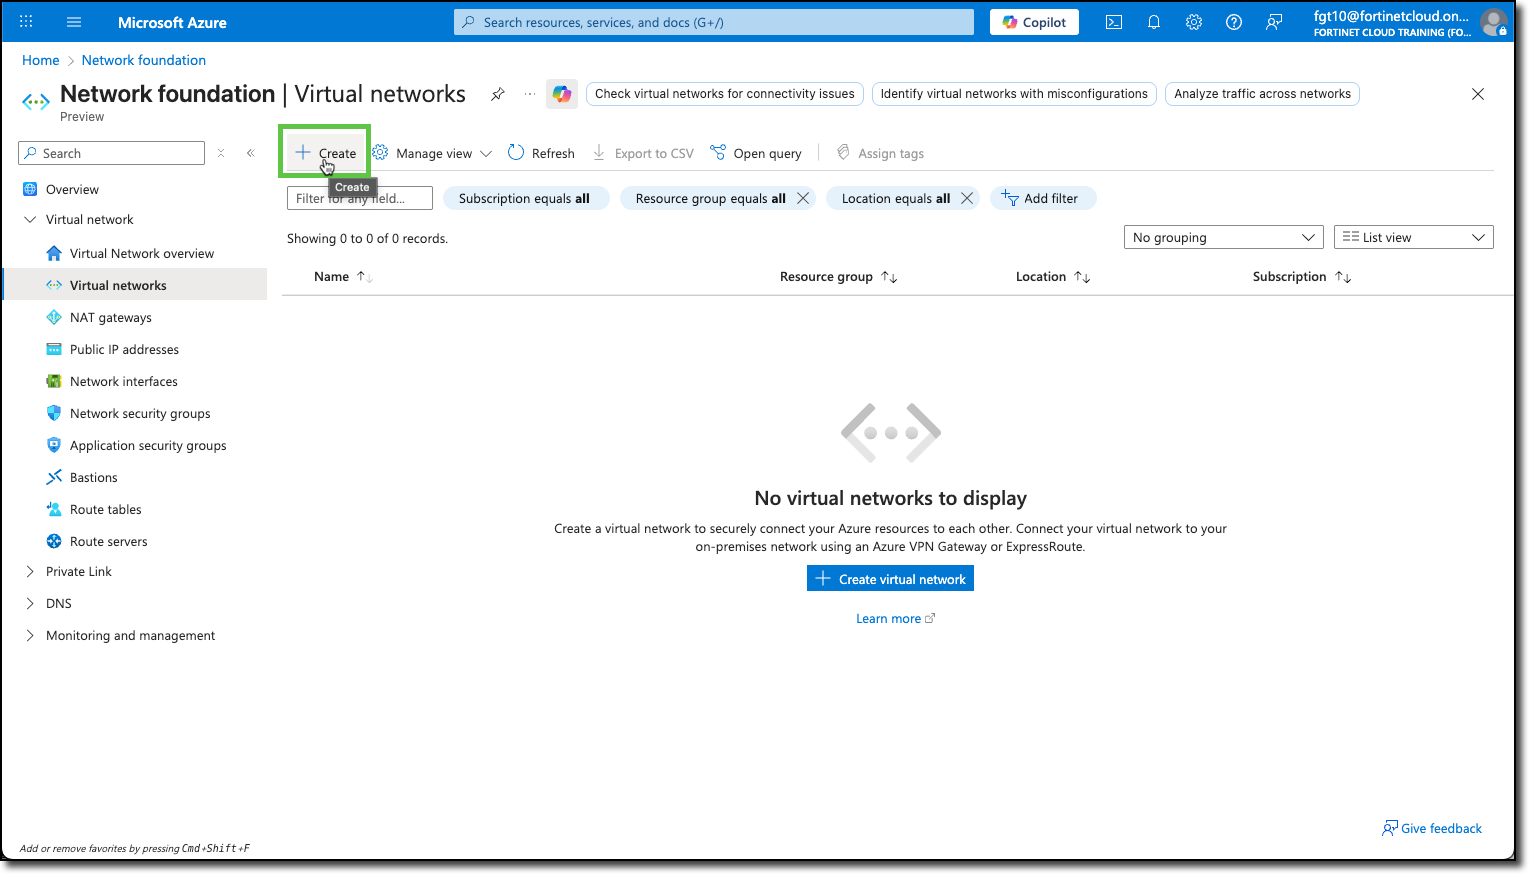
Click “Virtual networks”
Click “+ Create”
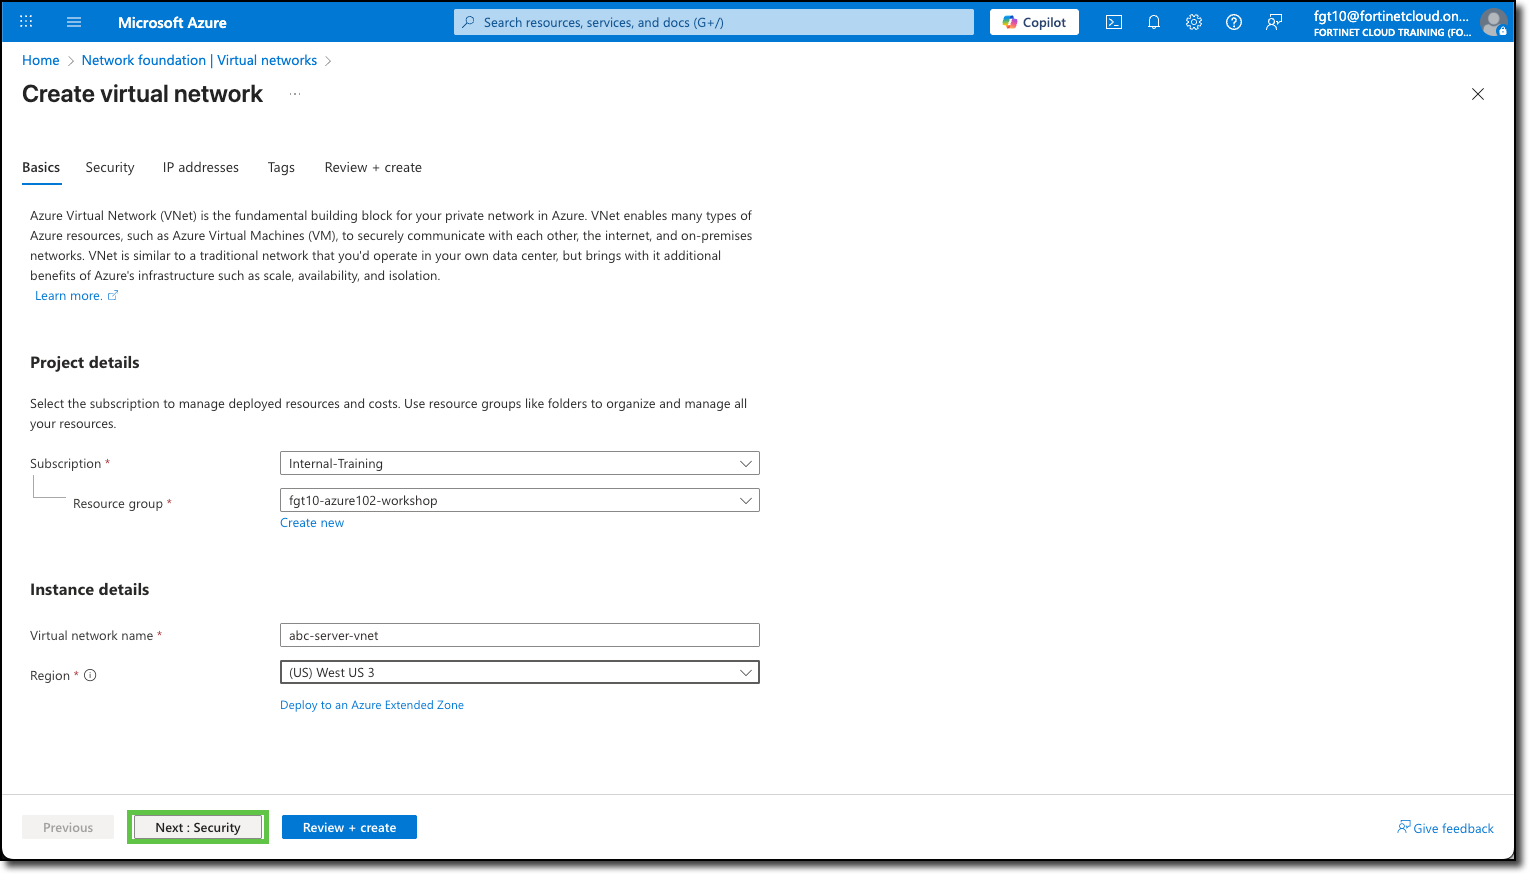
You will be redirected to the Create virtual network template.
Under the Basics tab, the Subscription and Resource Groups may already be filled in with your assigned info. If not, see the screenshot below for details.
In the Instance details section, enter the following:
Virtual network name: abc-server-vnet
Region: (US) West US 3
Click “Next : Security”
On the Security tab, ensure none of the services are selected - Feel free to read through the available services that can be enabled.
Click “Next : IP addresses”
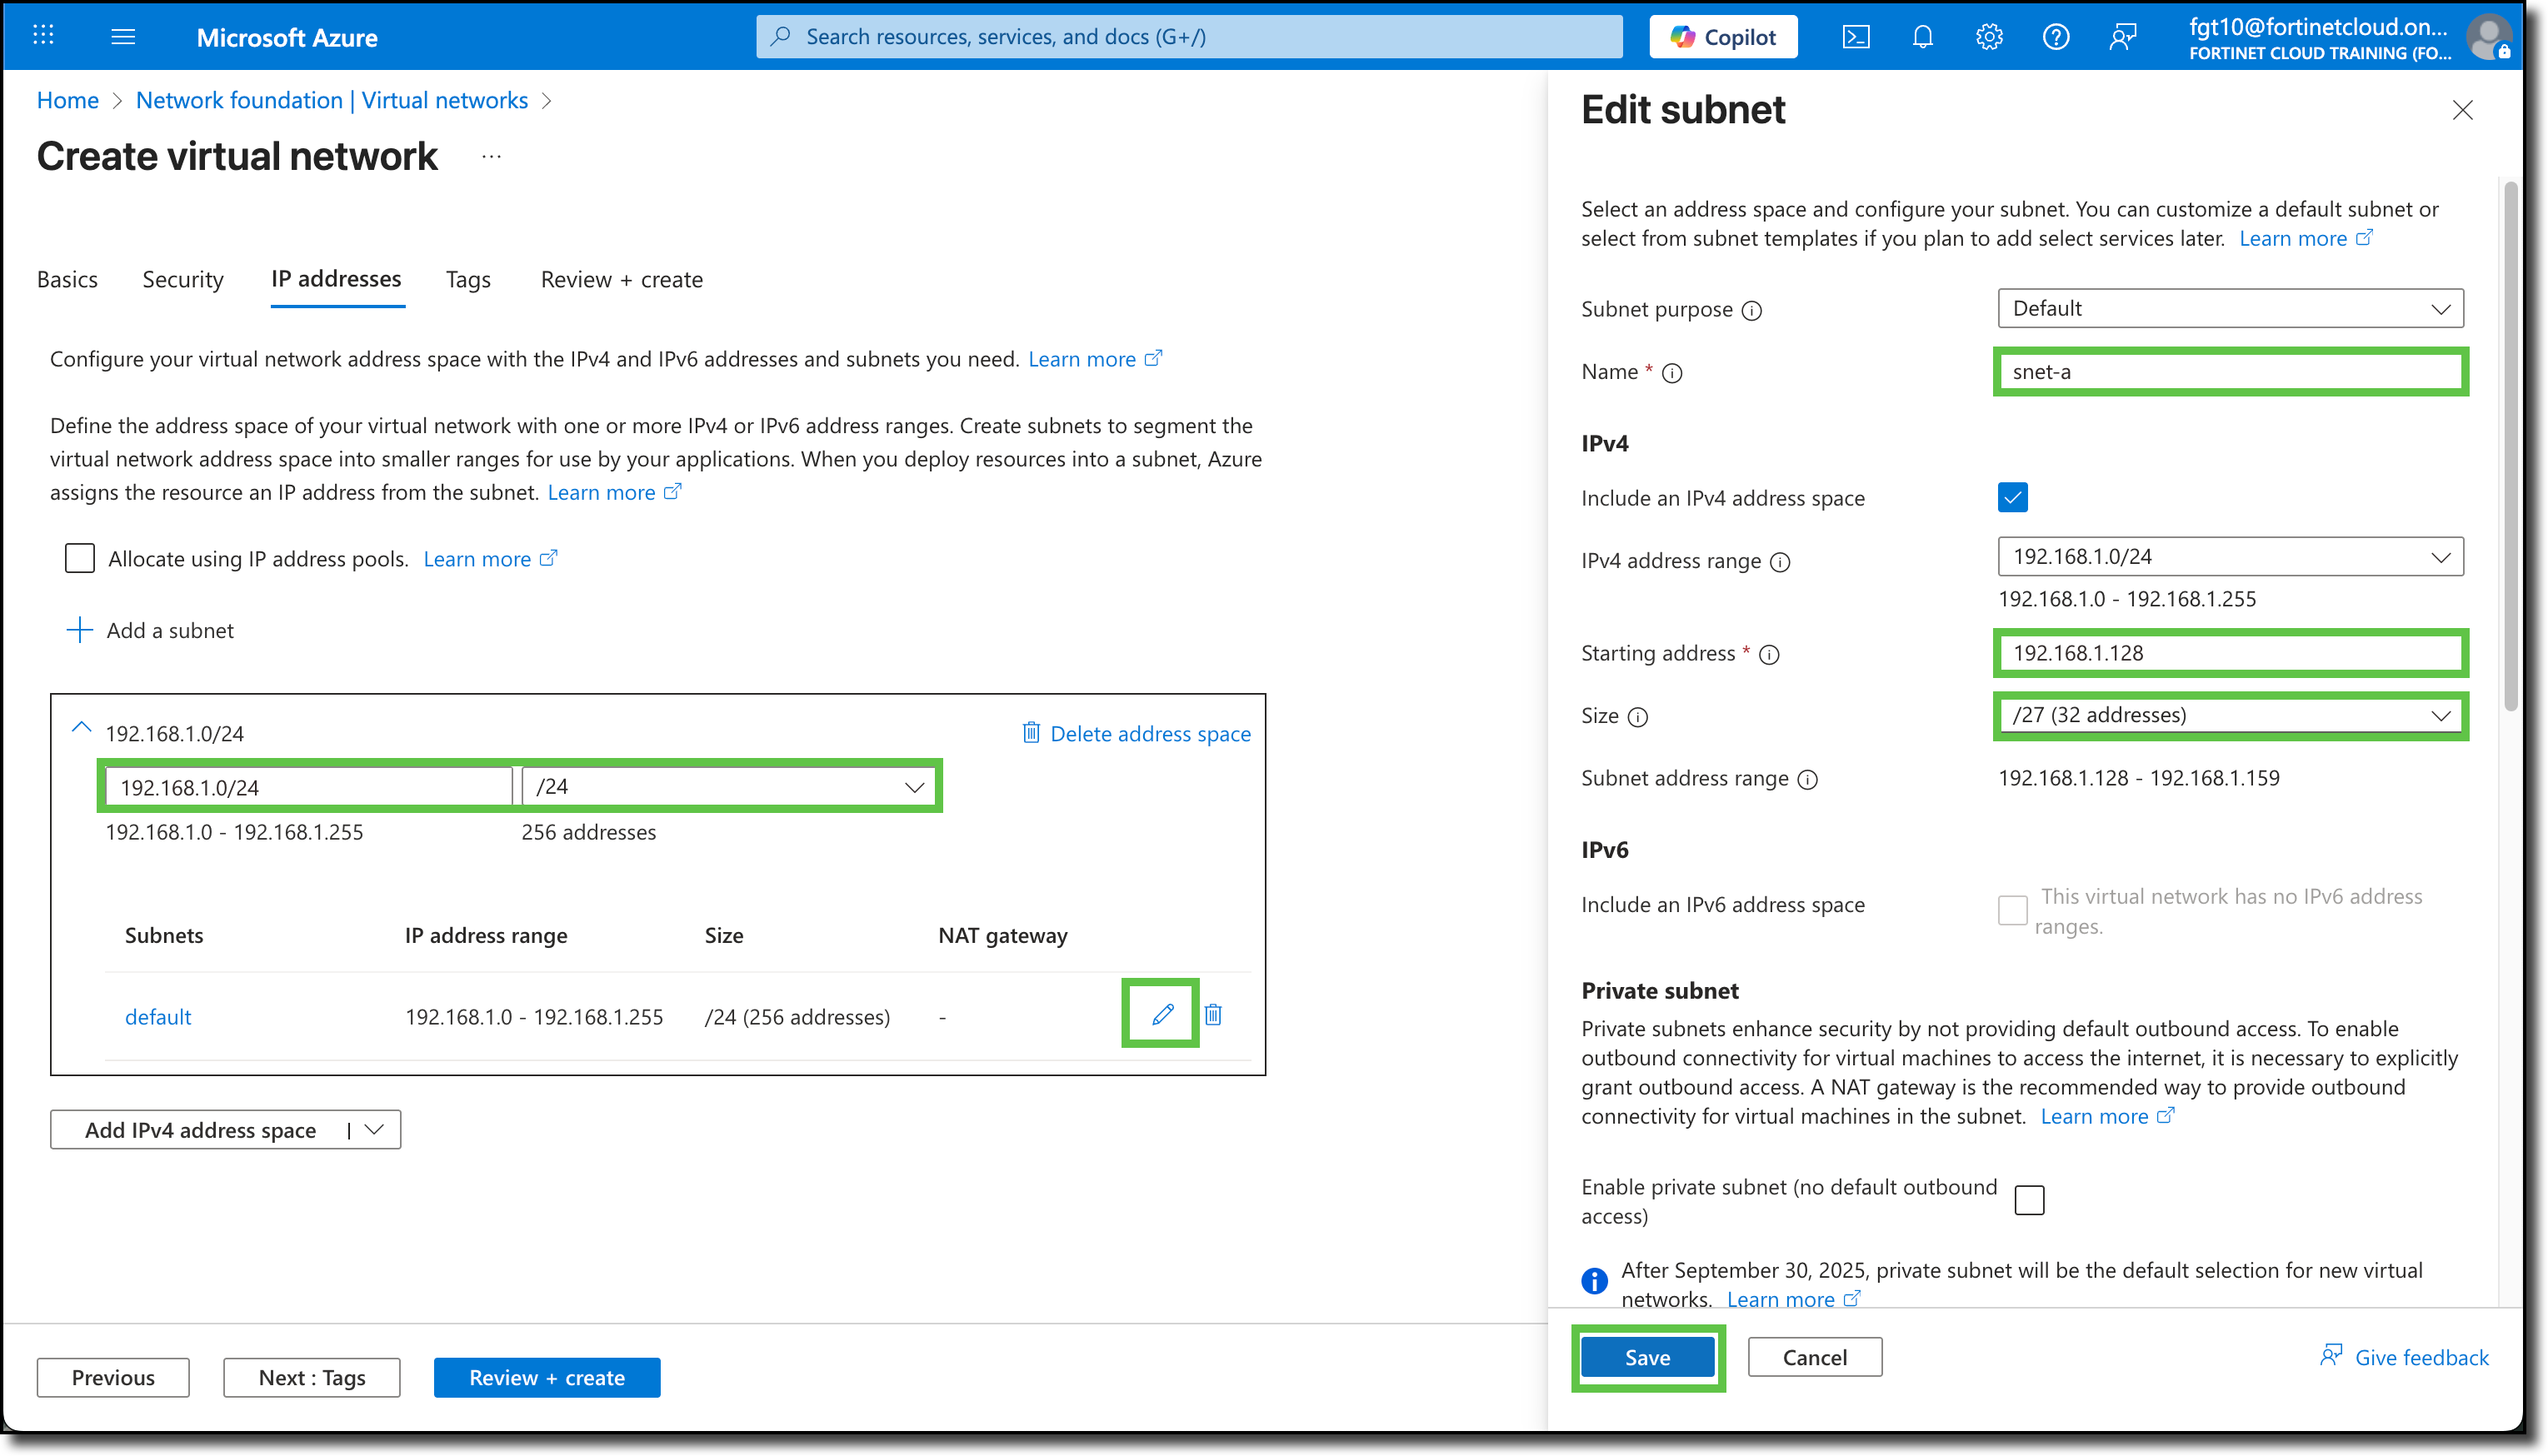
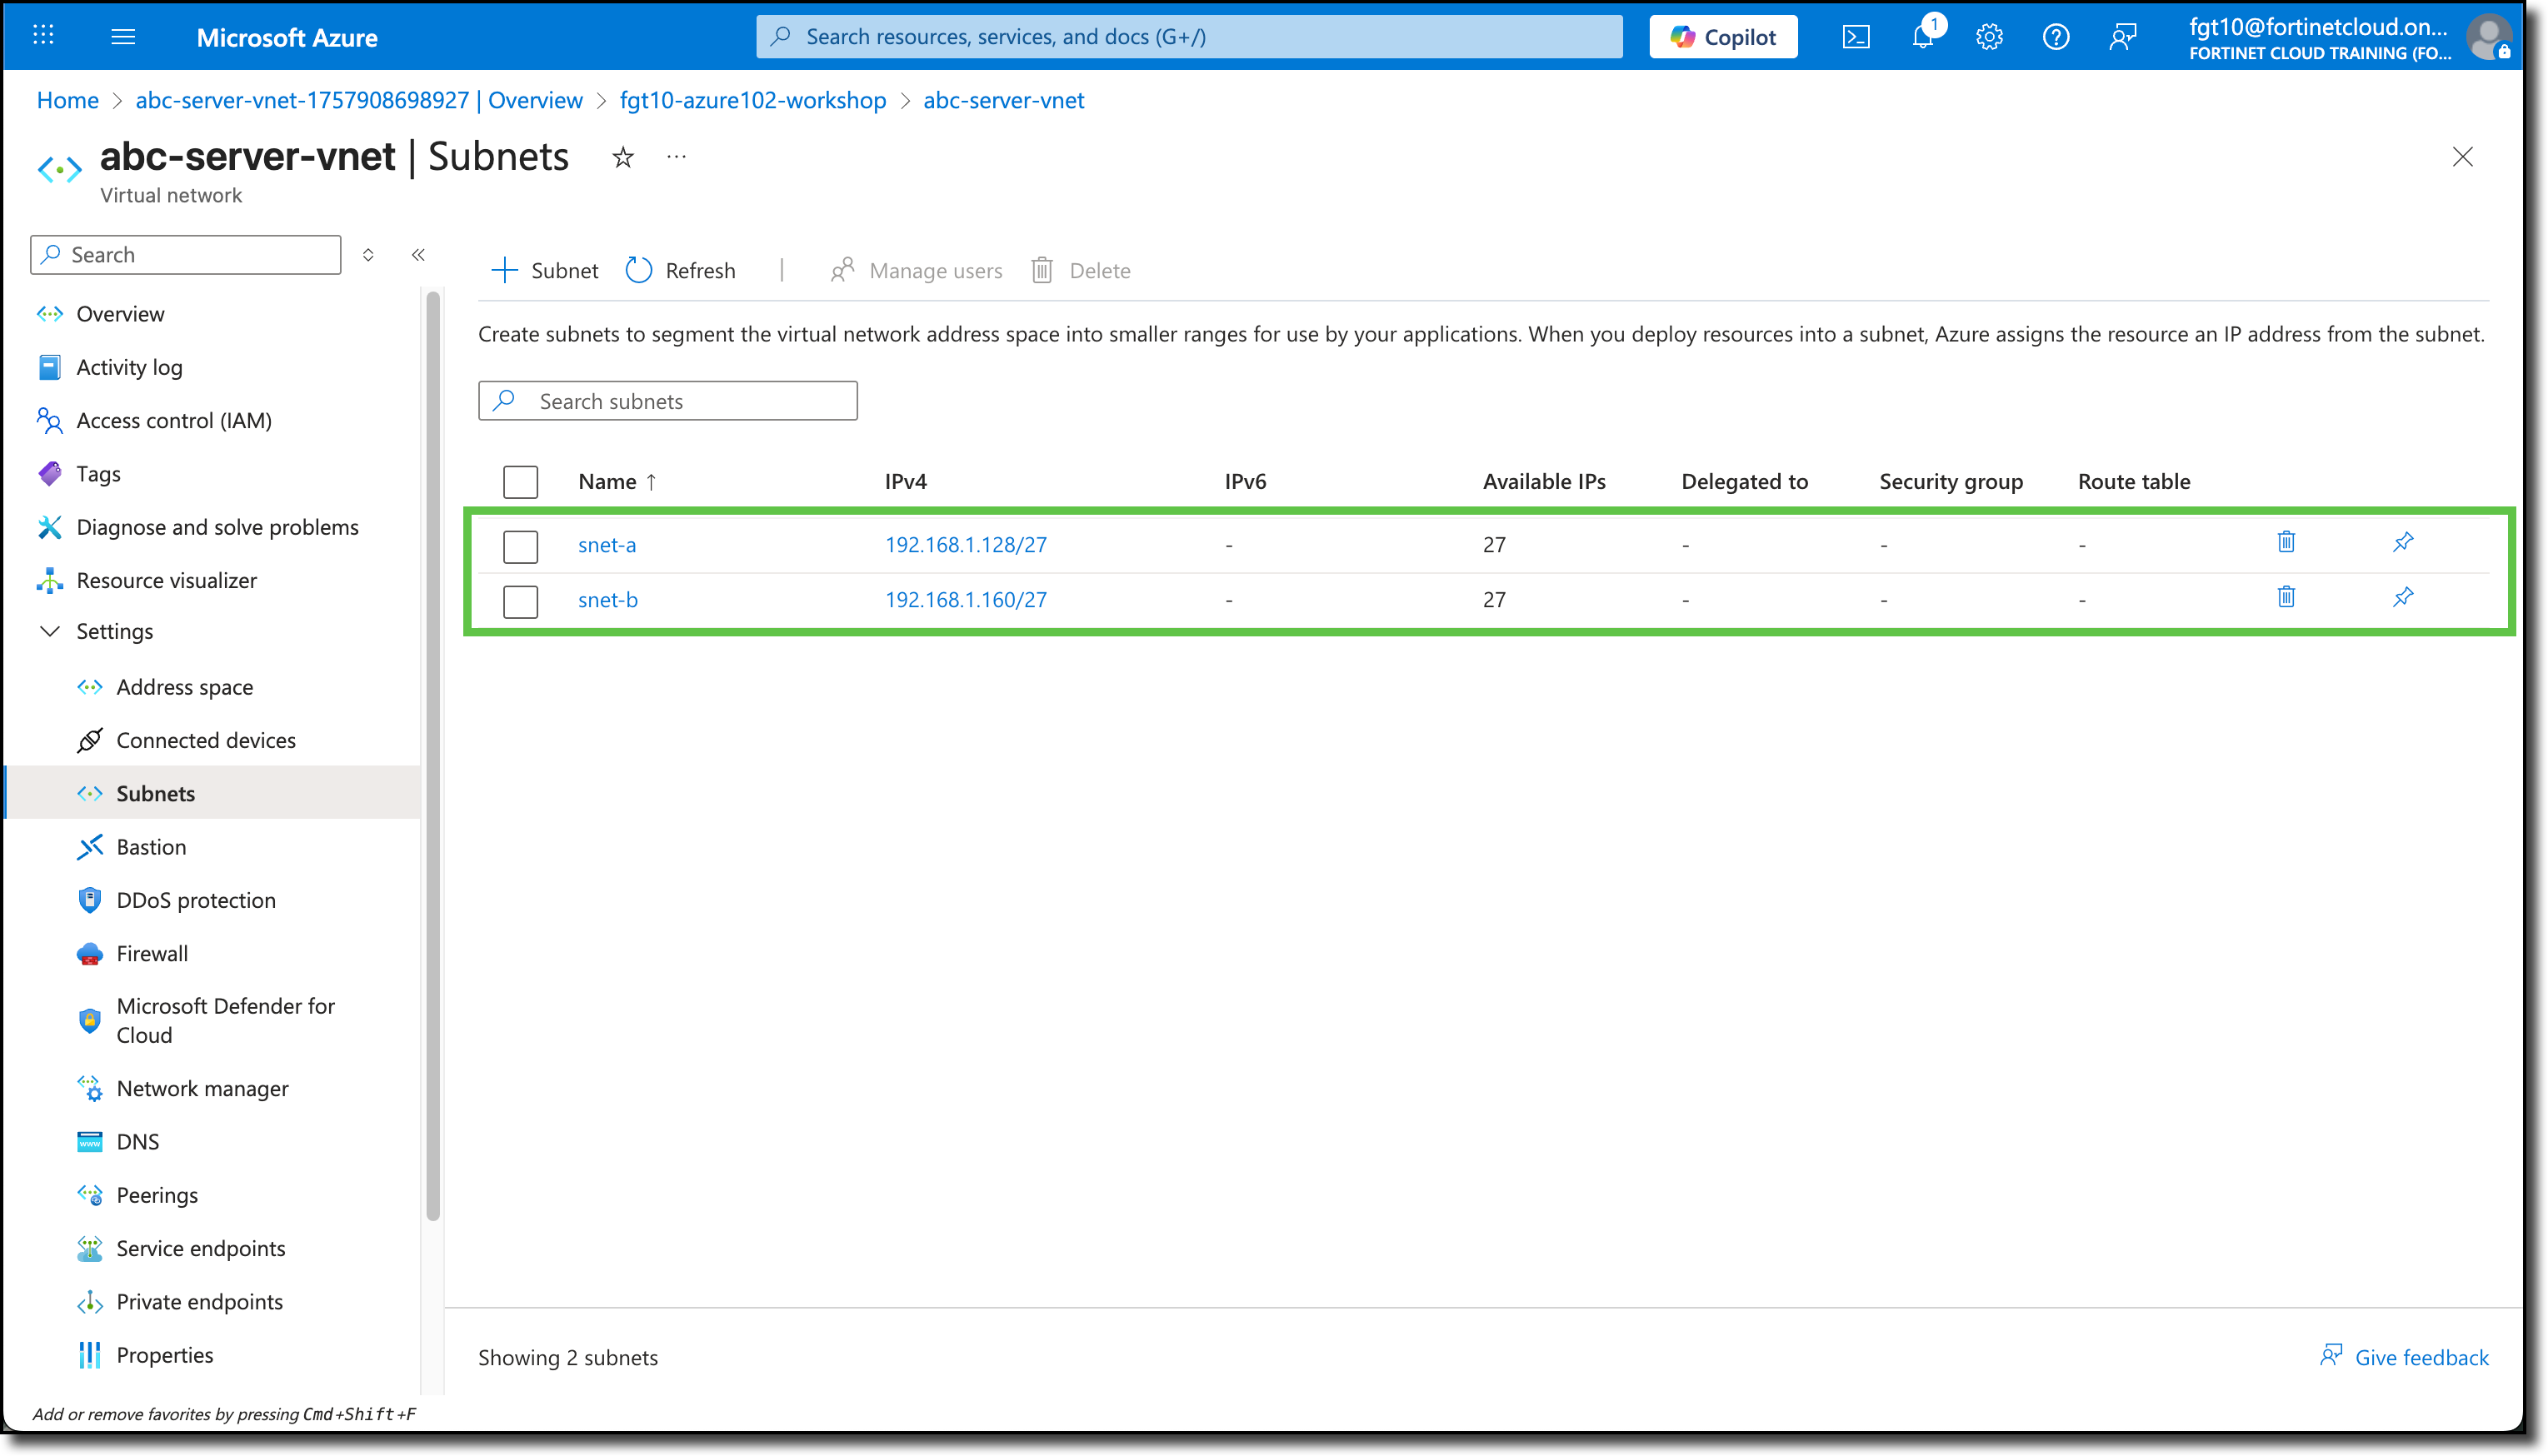
Edit the default address space, change to 192.168.1.0/24
Click The pencil icon to the right of the “default” subnet, in the new window to the right, update the following settings:
Name: snet-a
Starting address: 192.168.1.128
Size: /27
Click Save
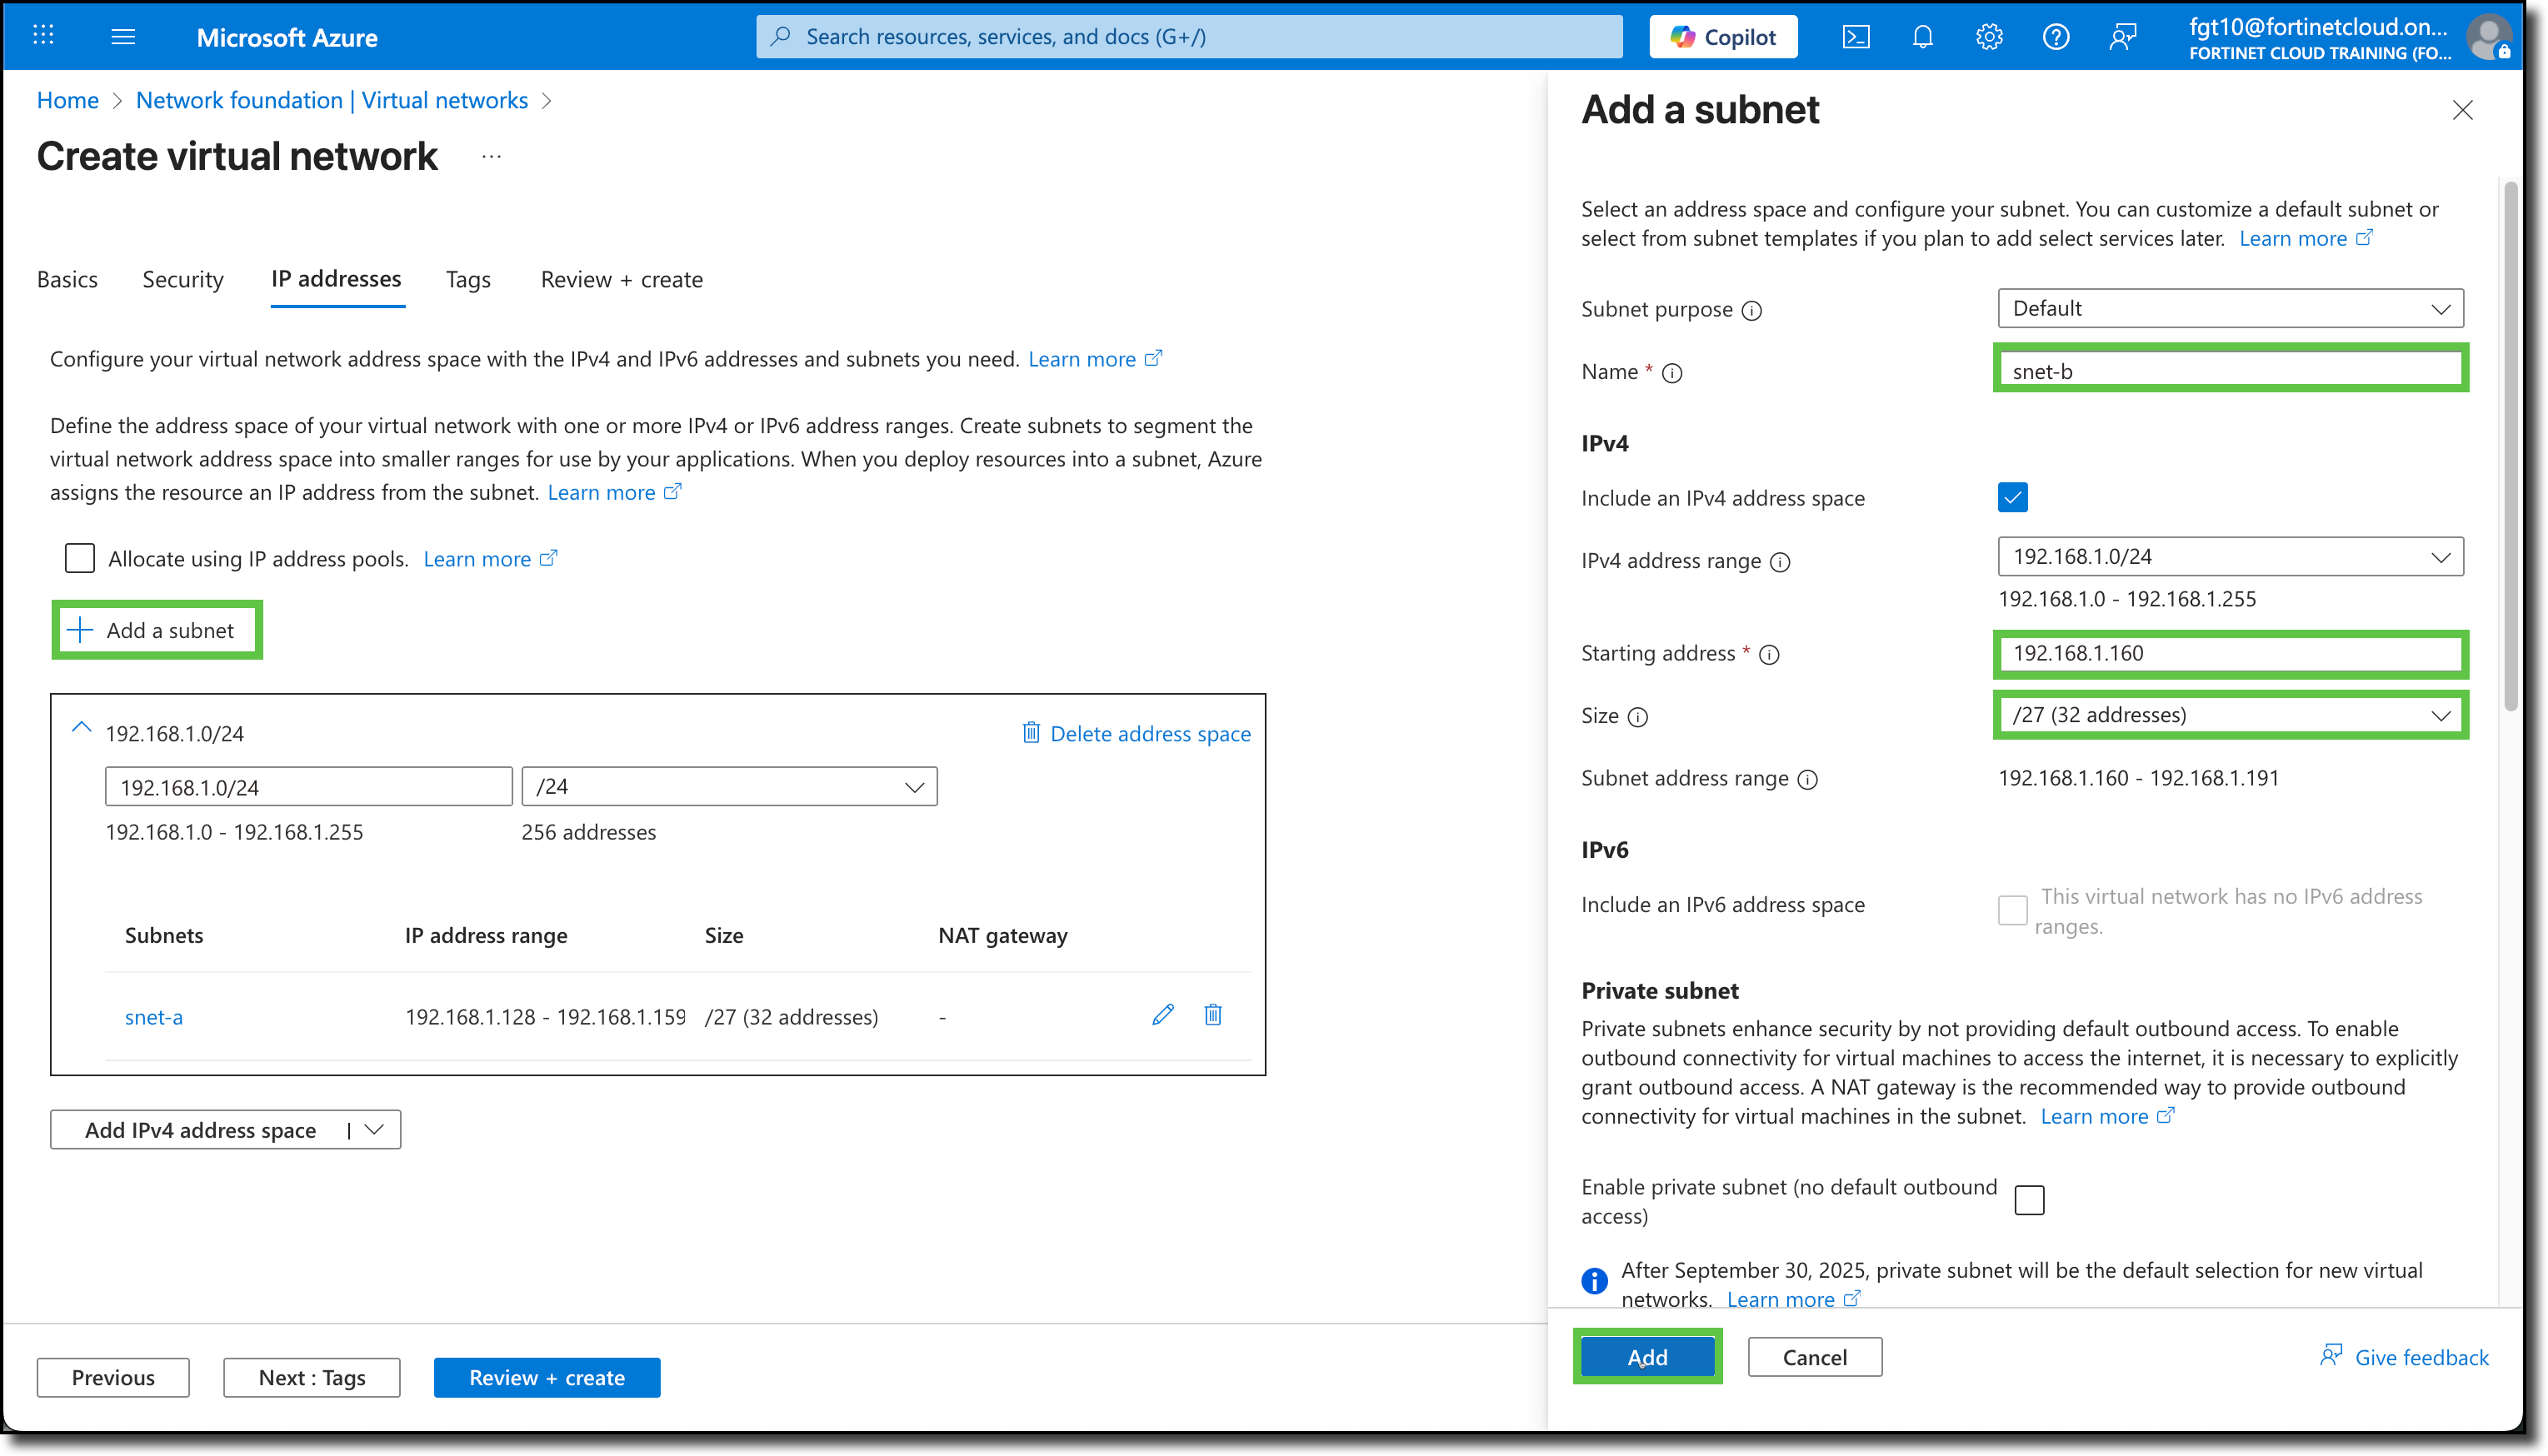
Click “+ Add a subnet” add the following subnet:
Name: snet-b
Starting address: 192.168.1.160
Size: /27
Click Add
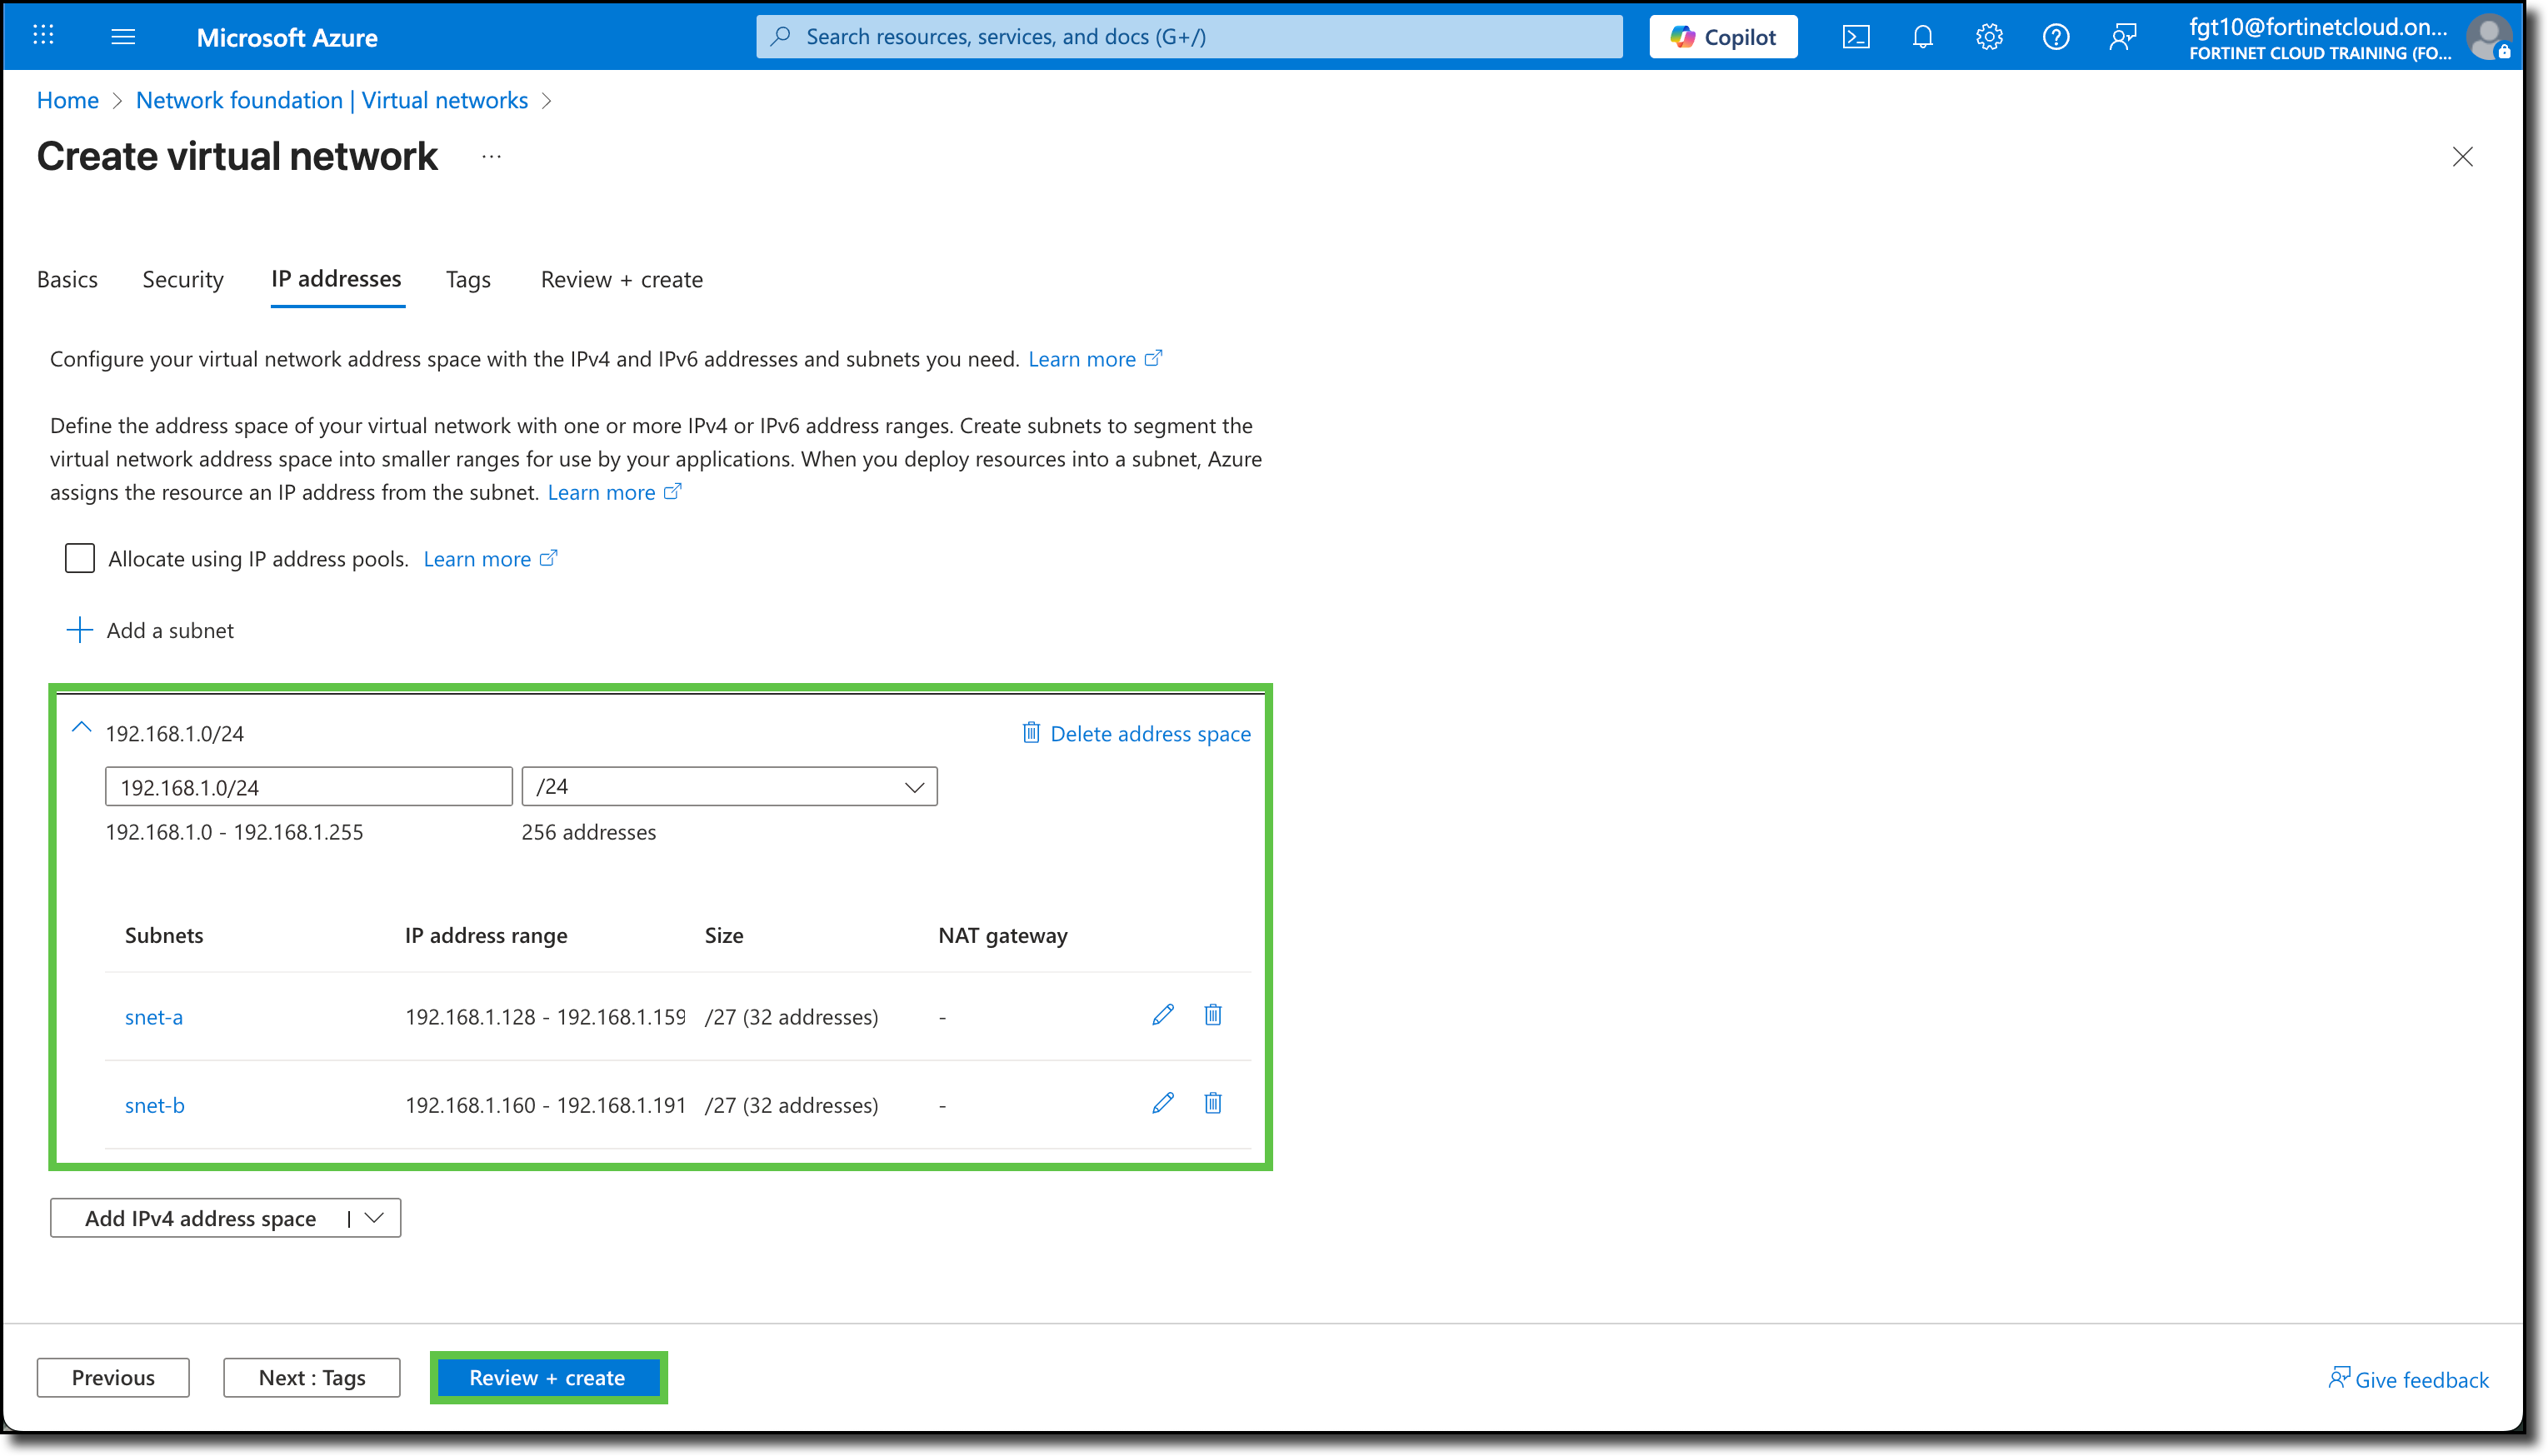
Click “Review + create”
Confirm the settings
Click “Create”
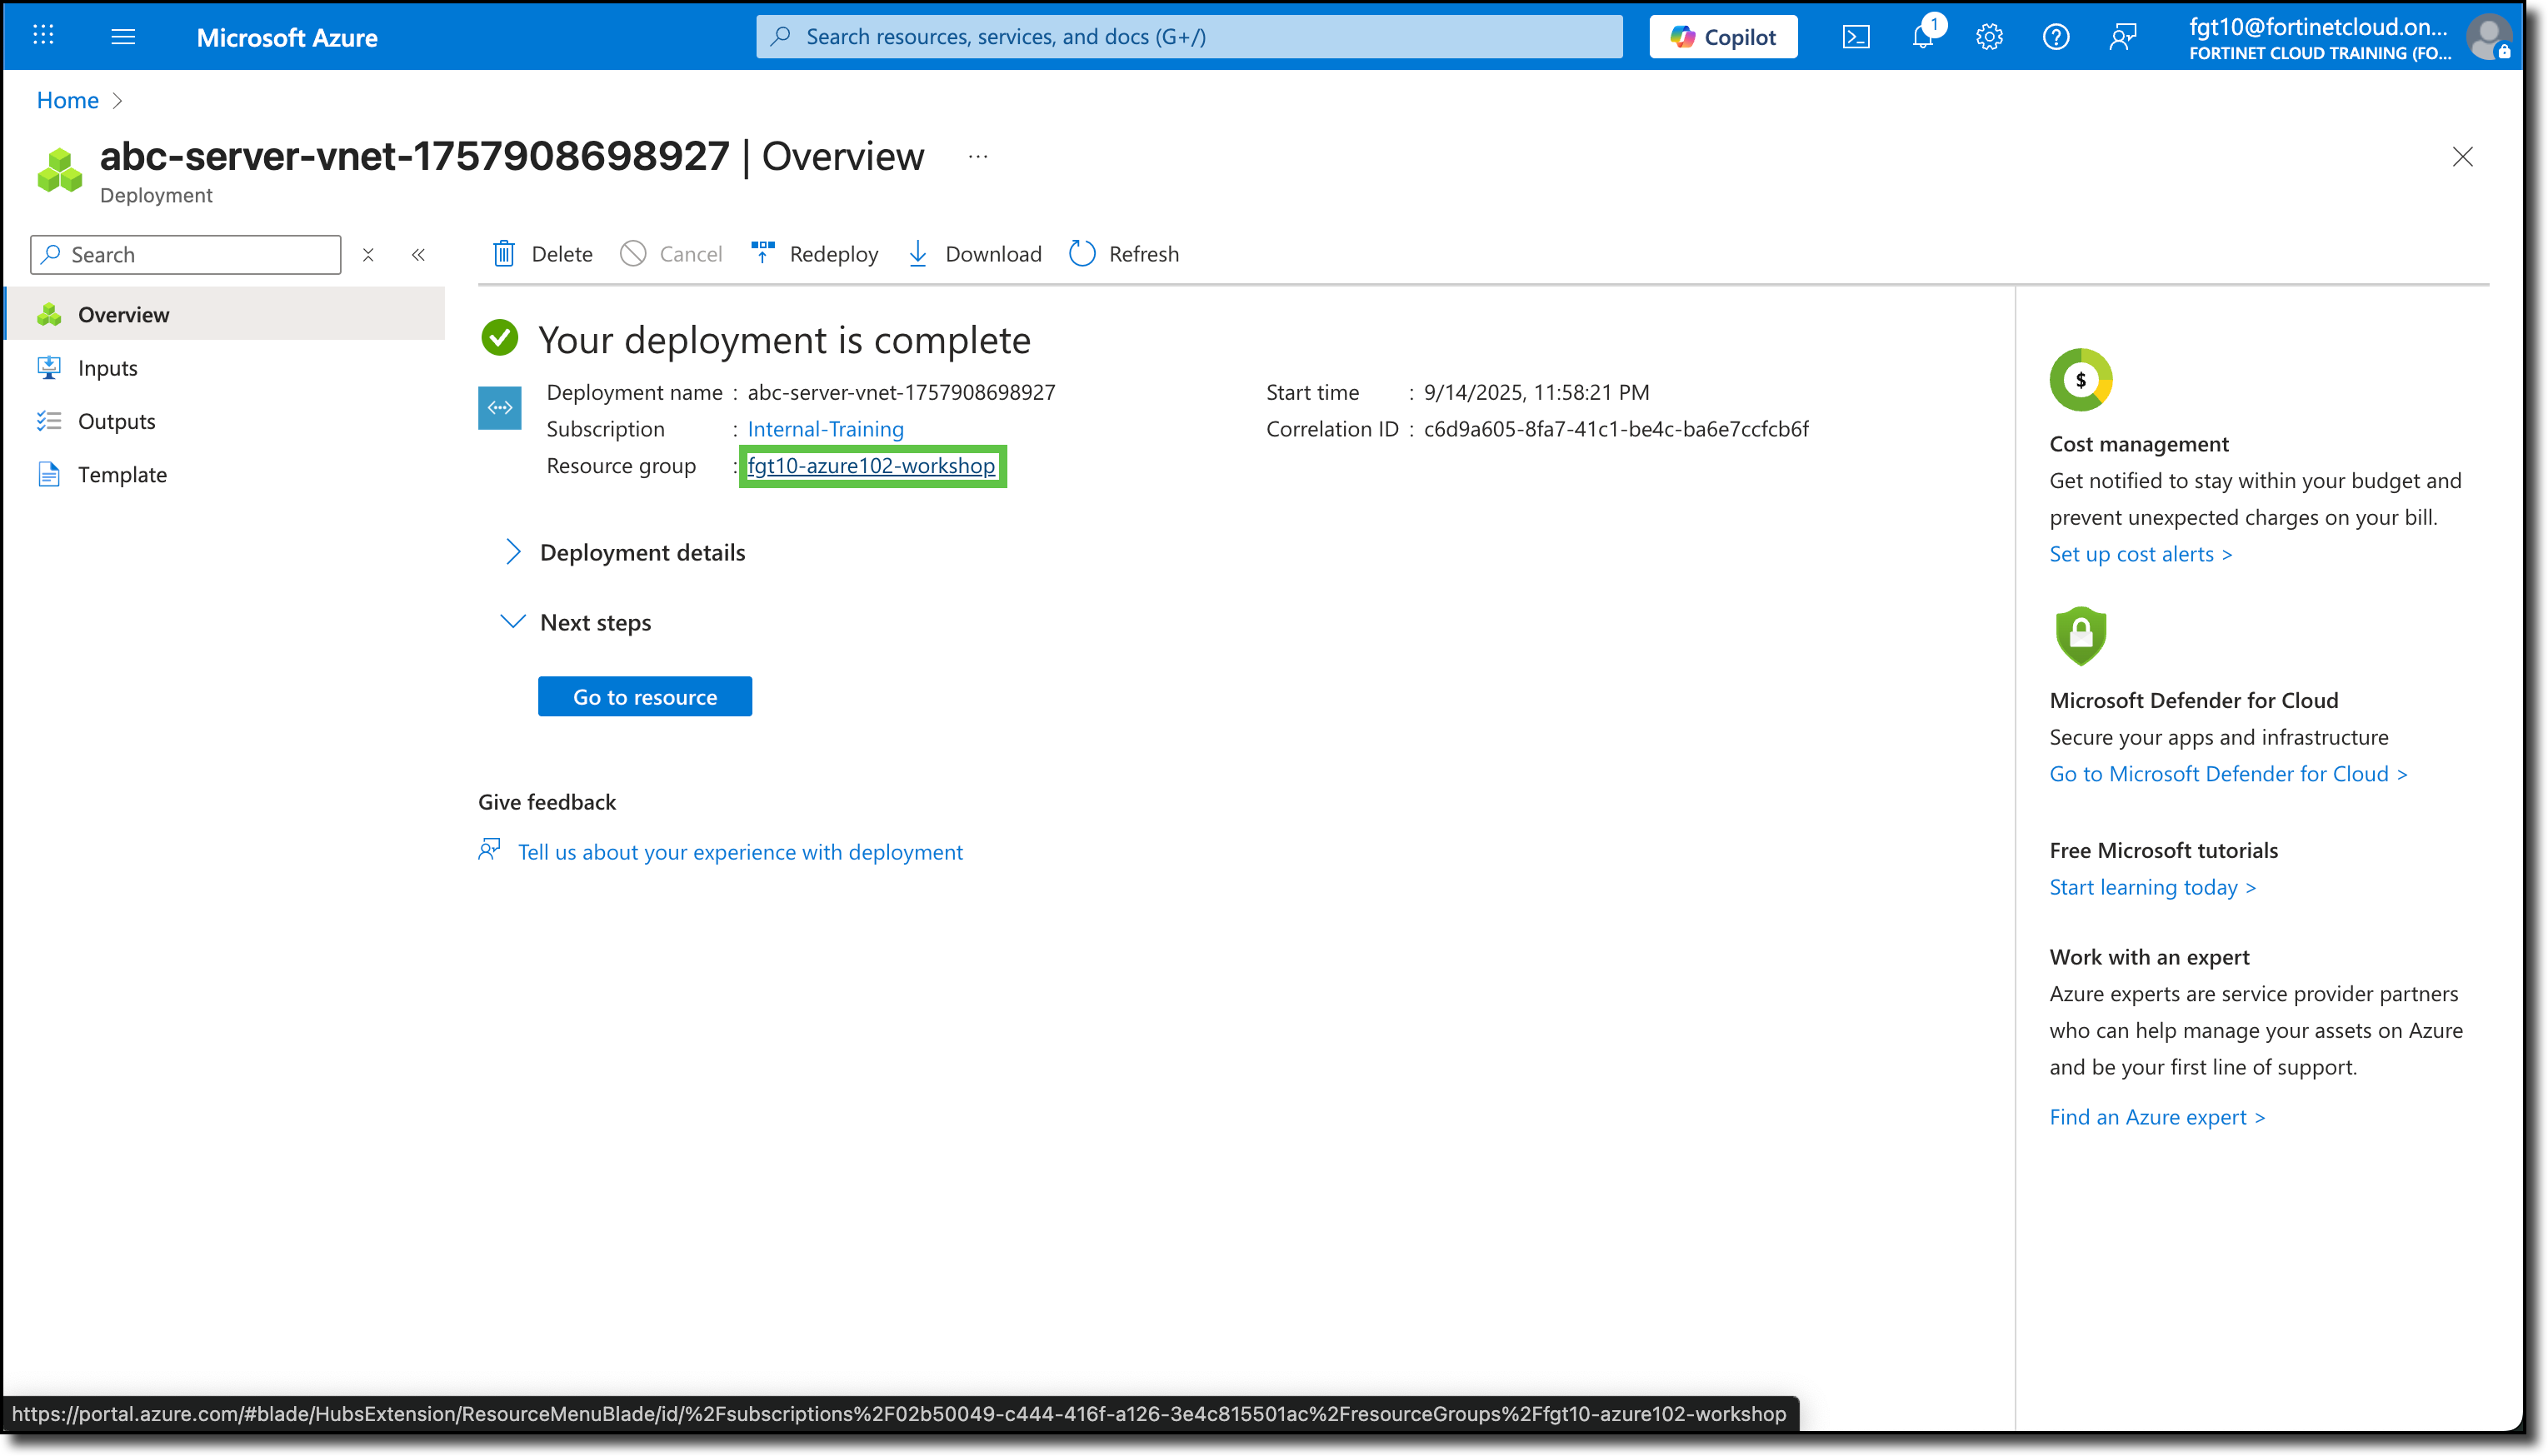
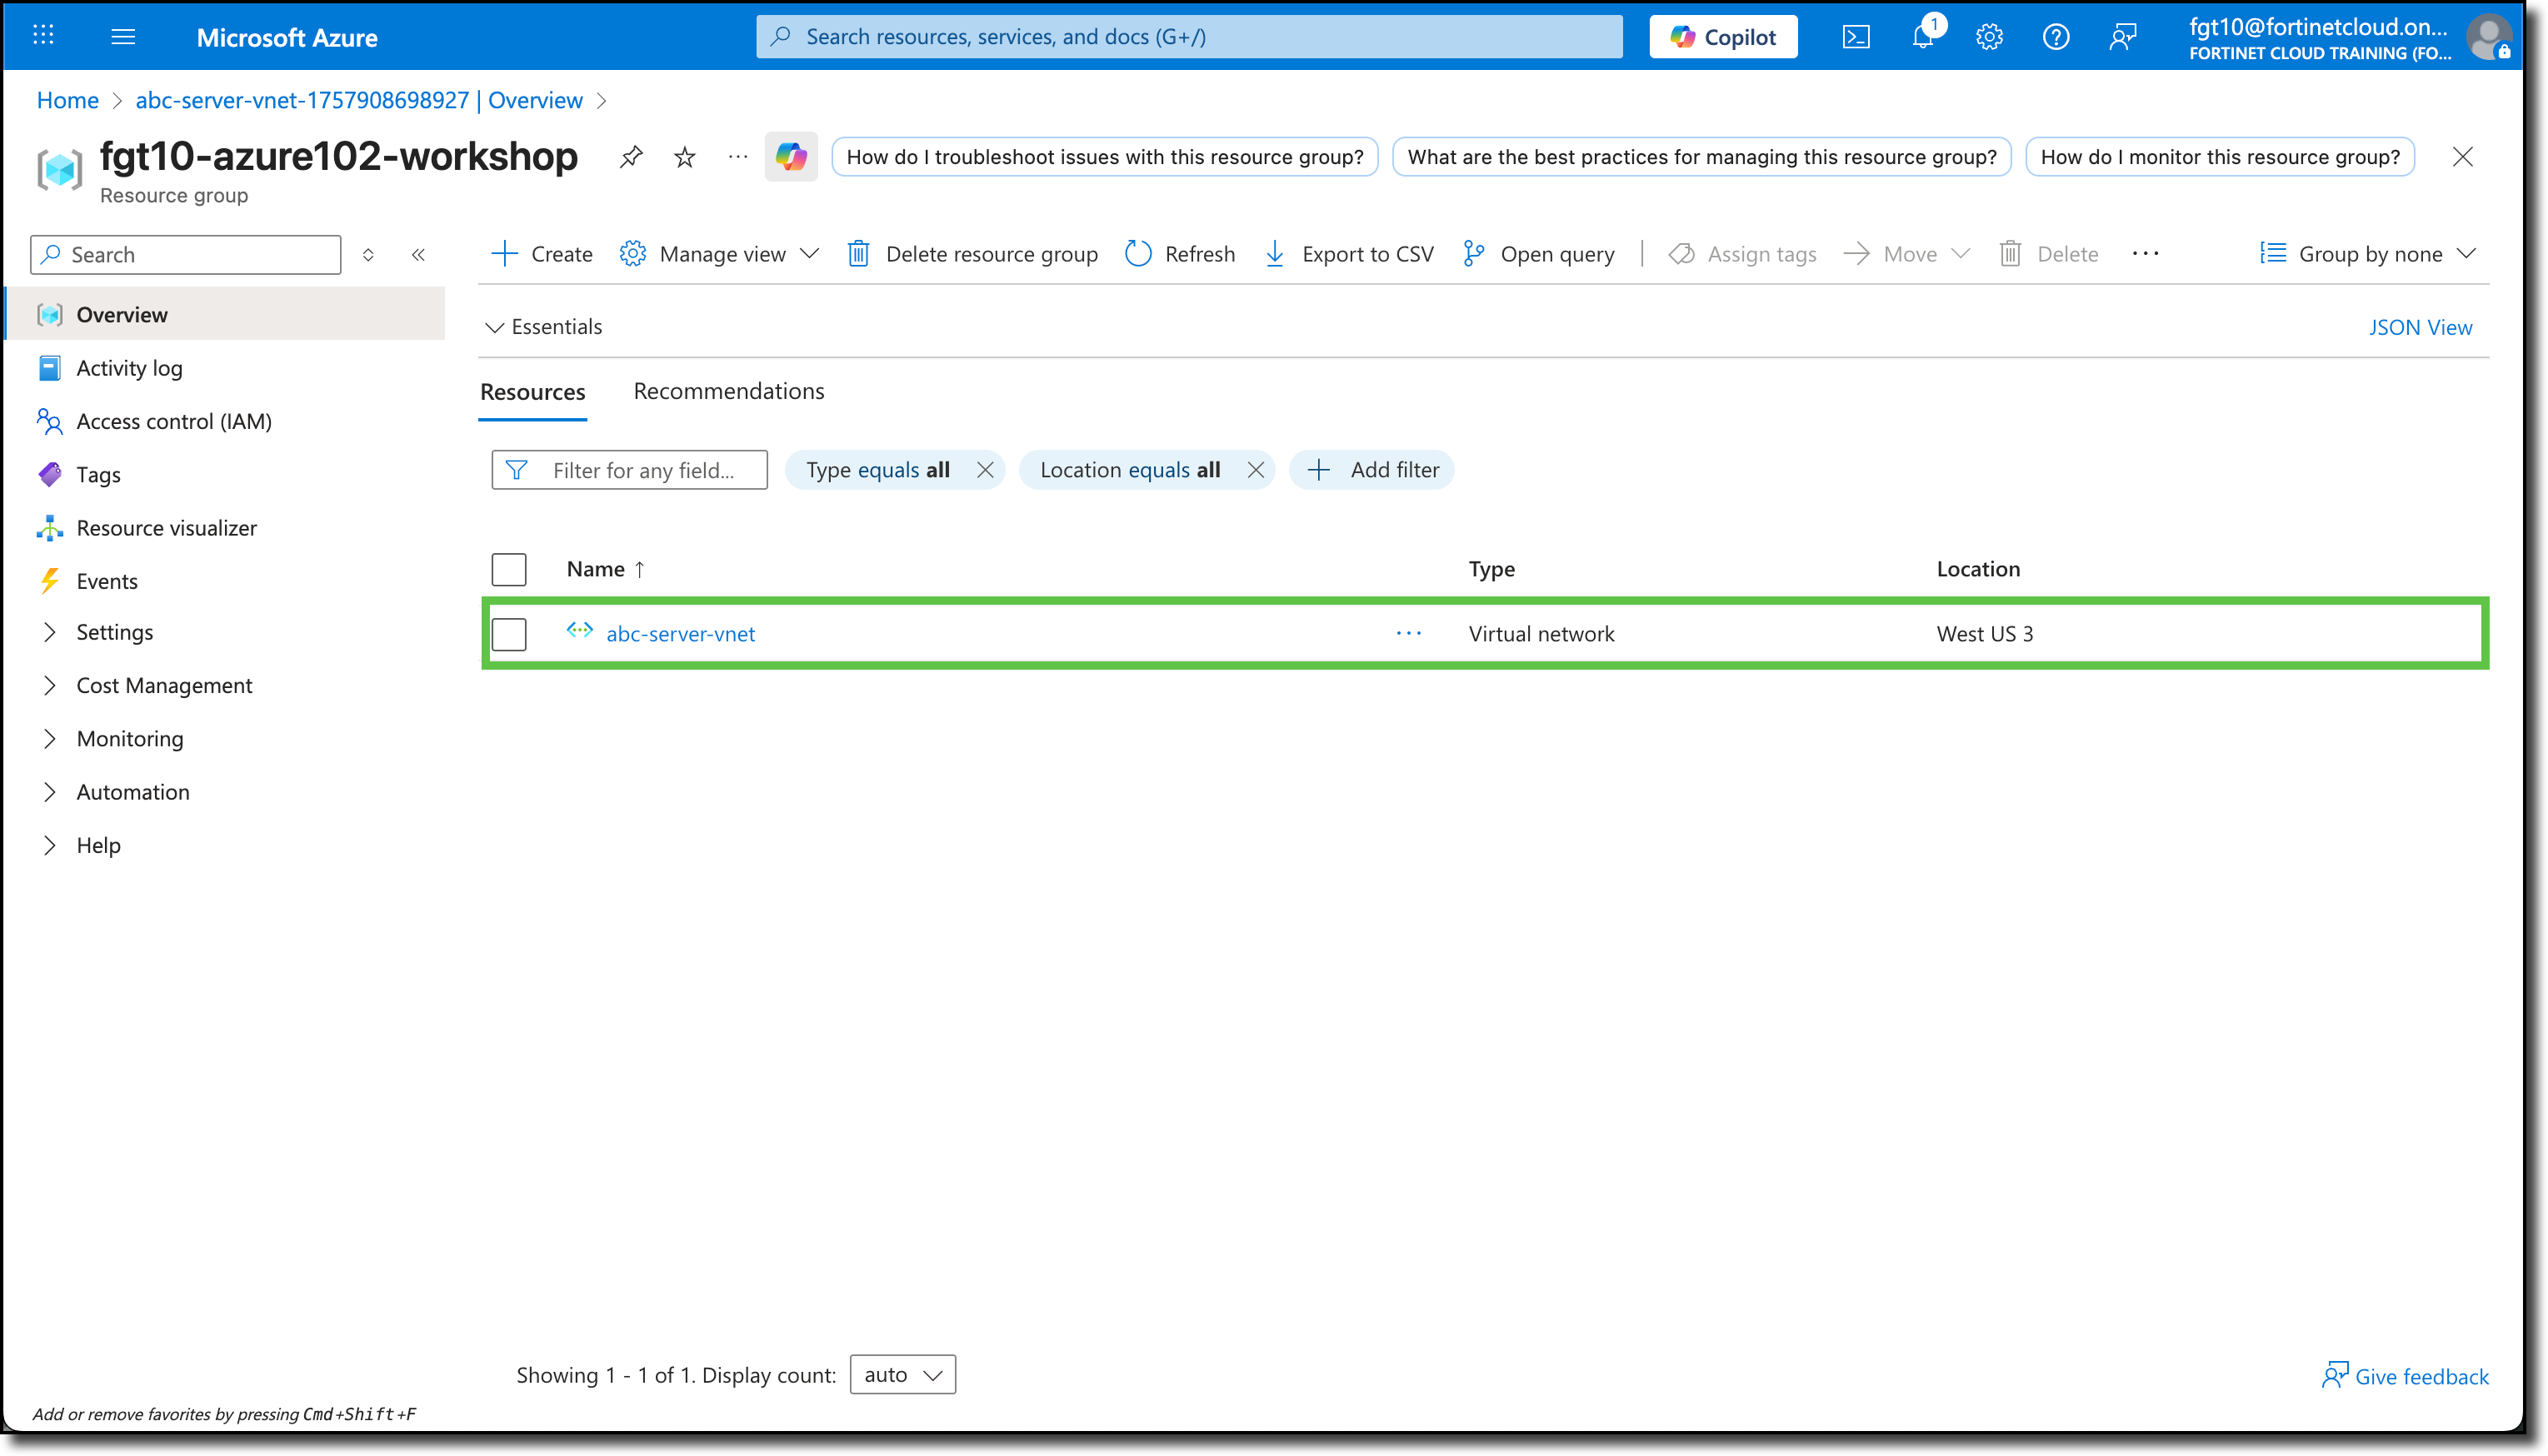
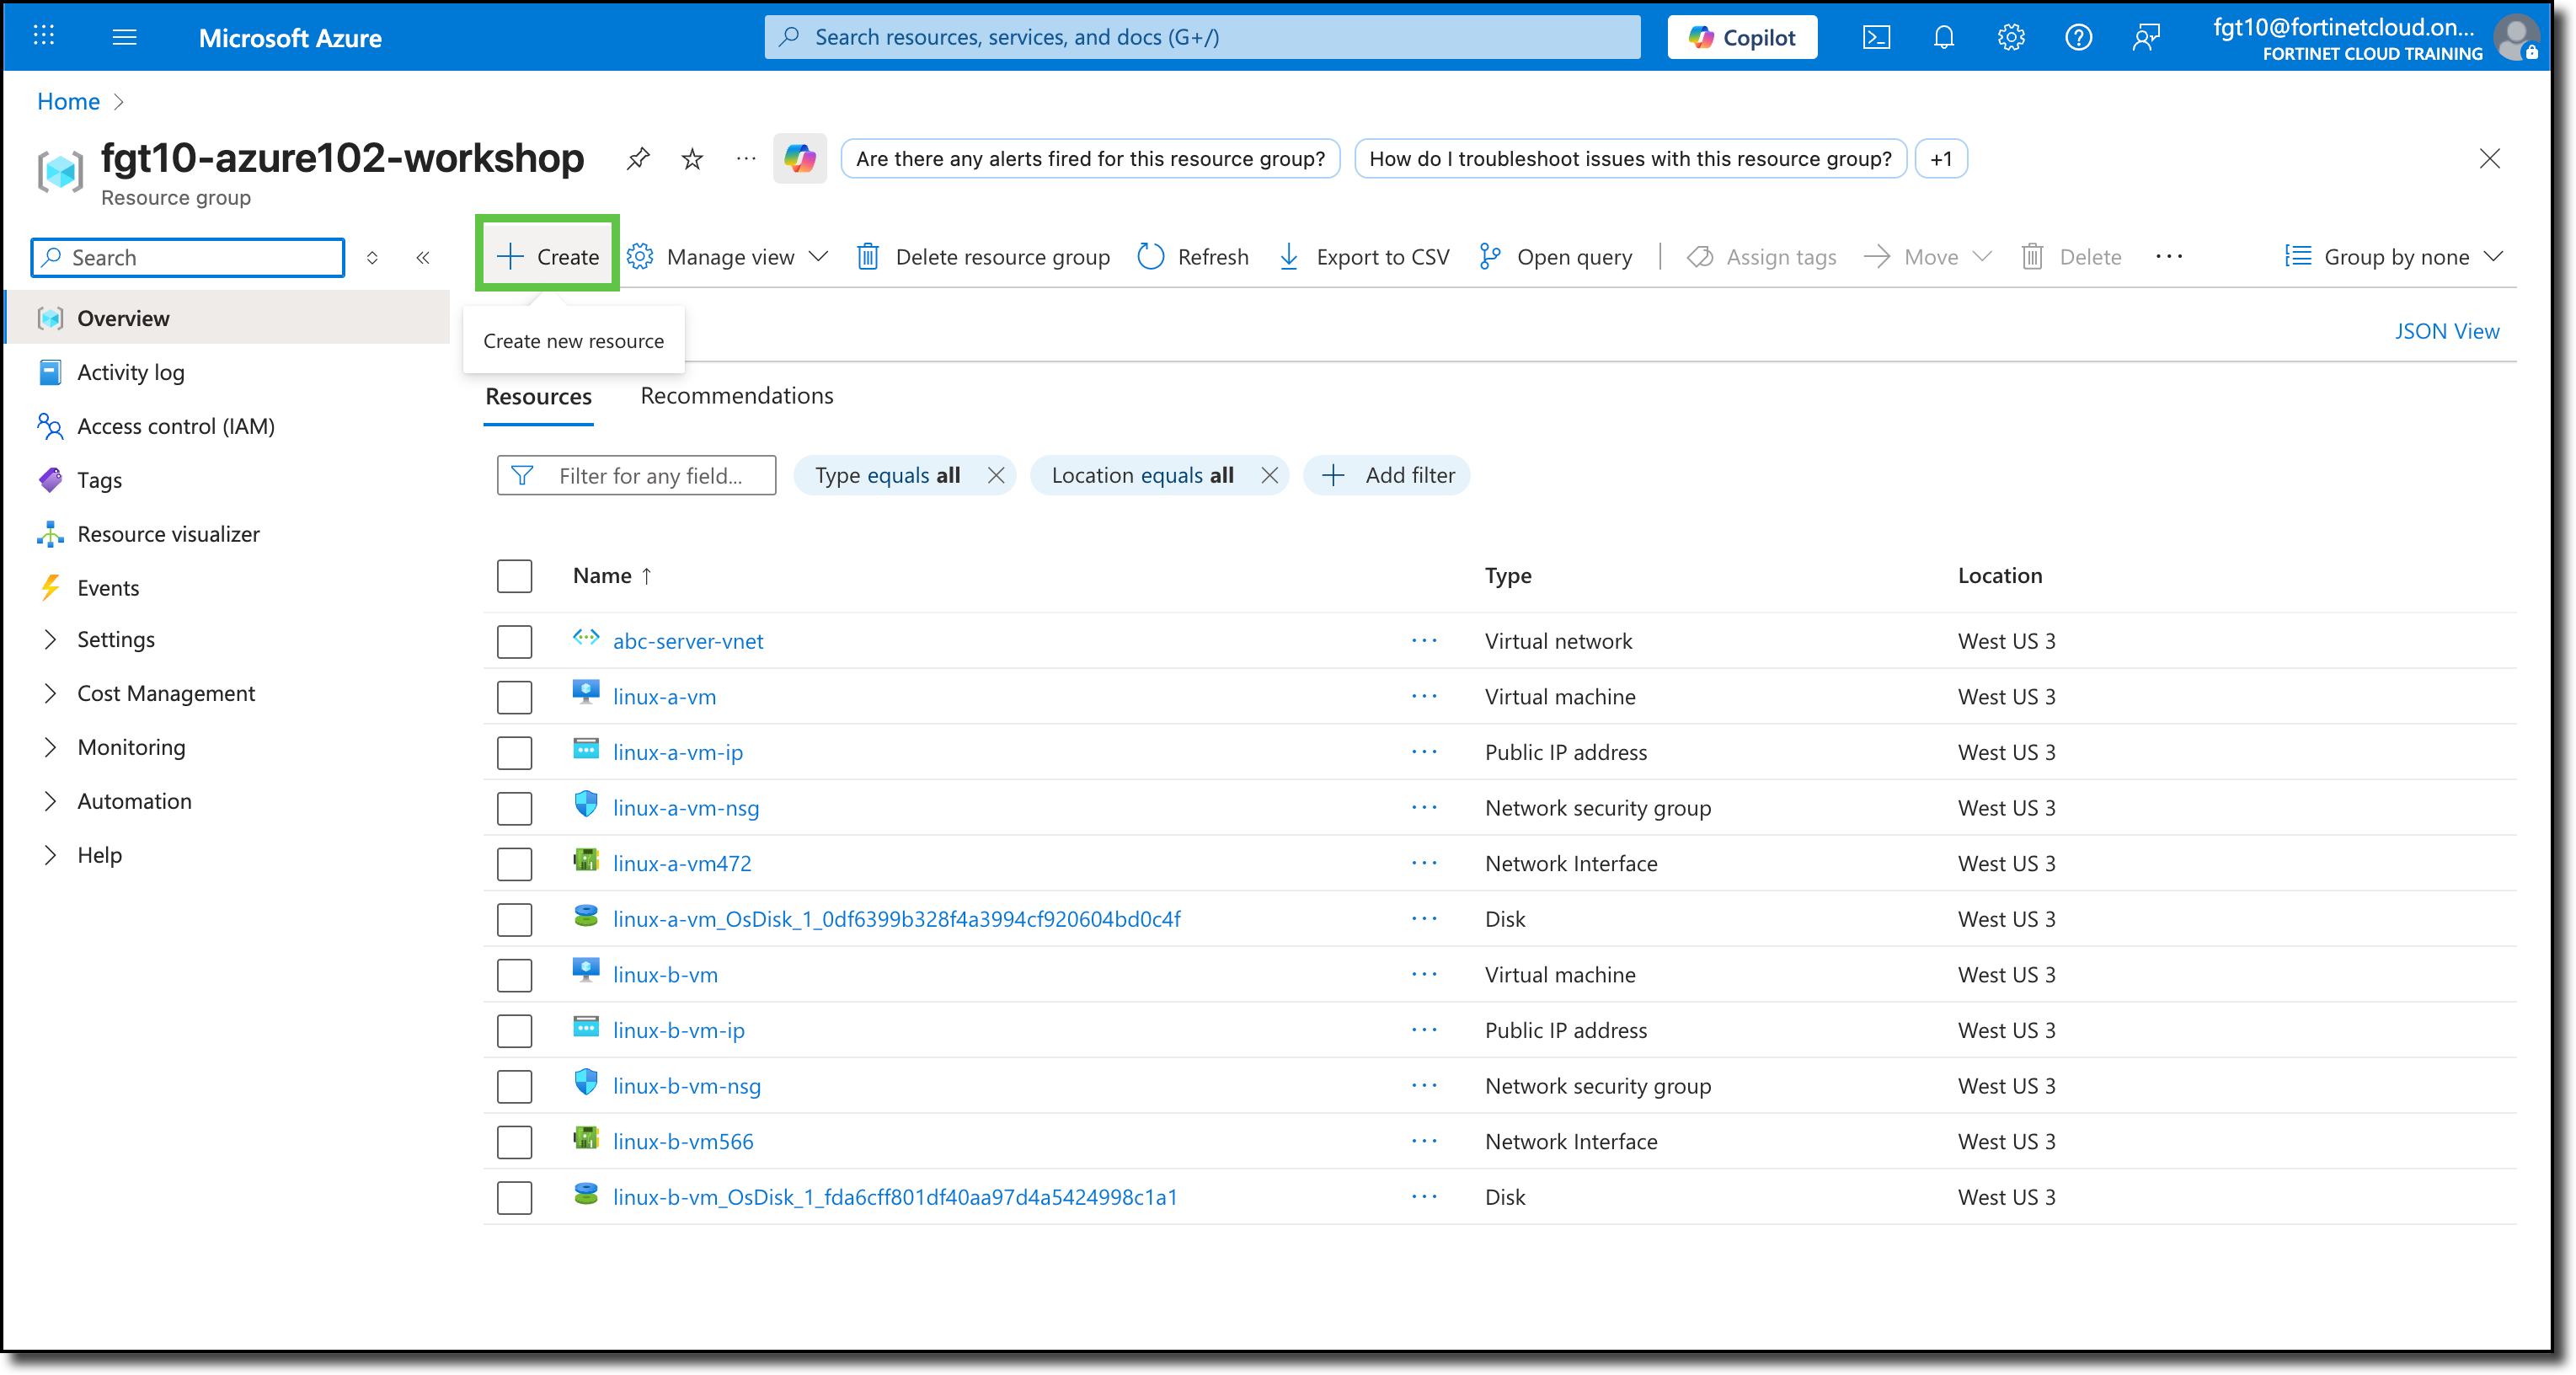
Click your Resource Group link, When the deployment is complete
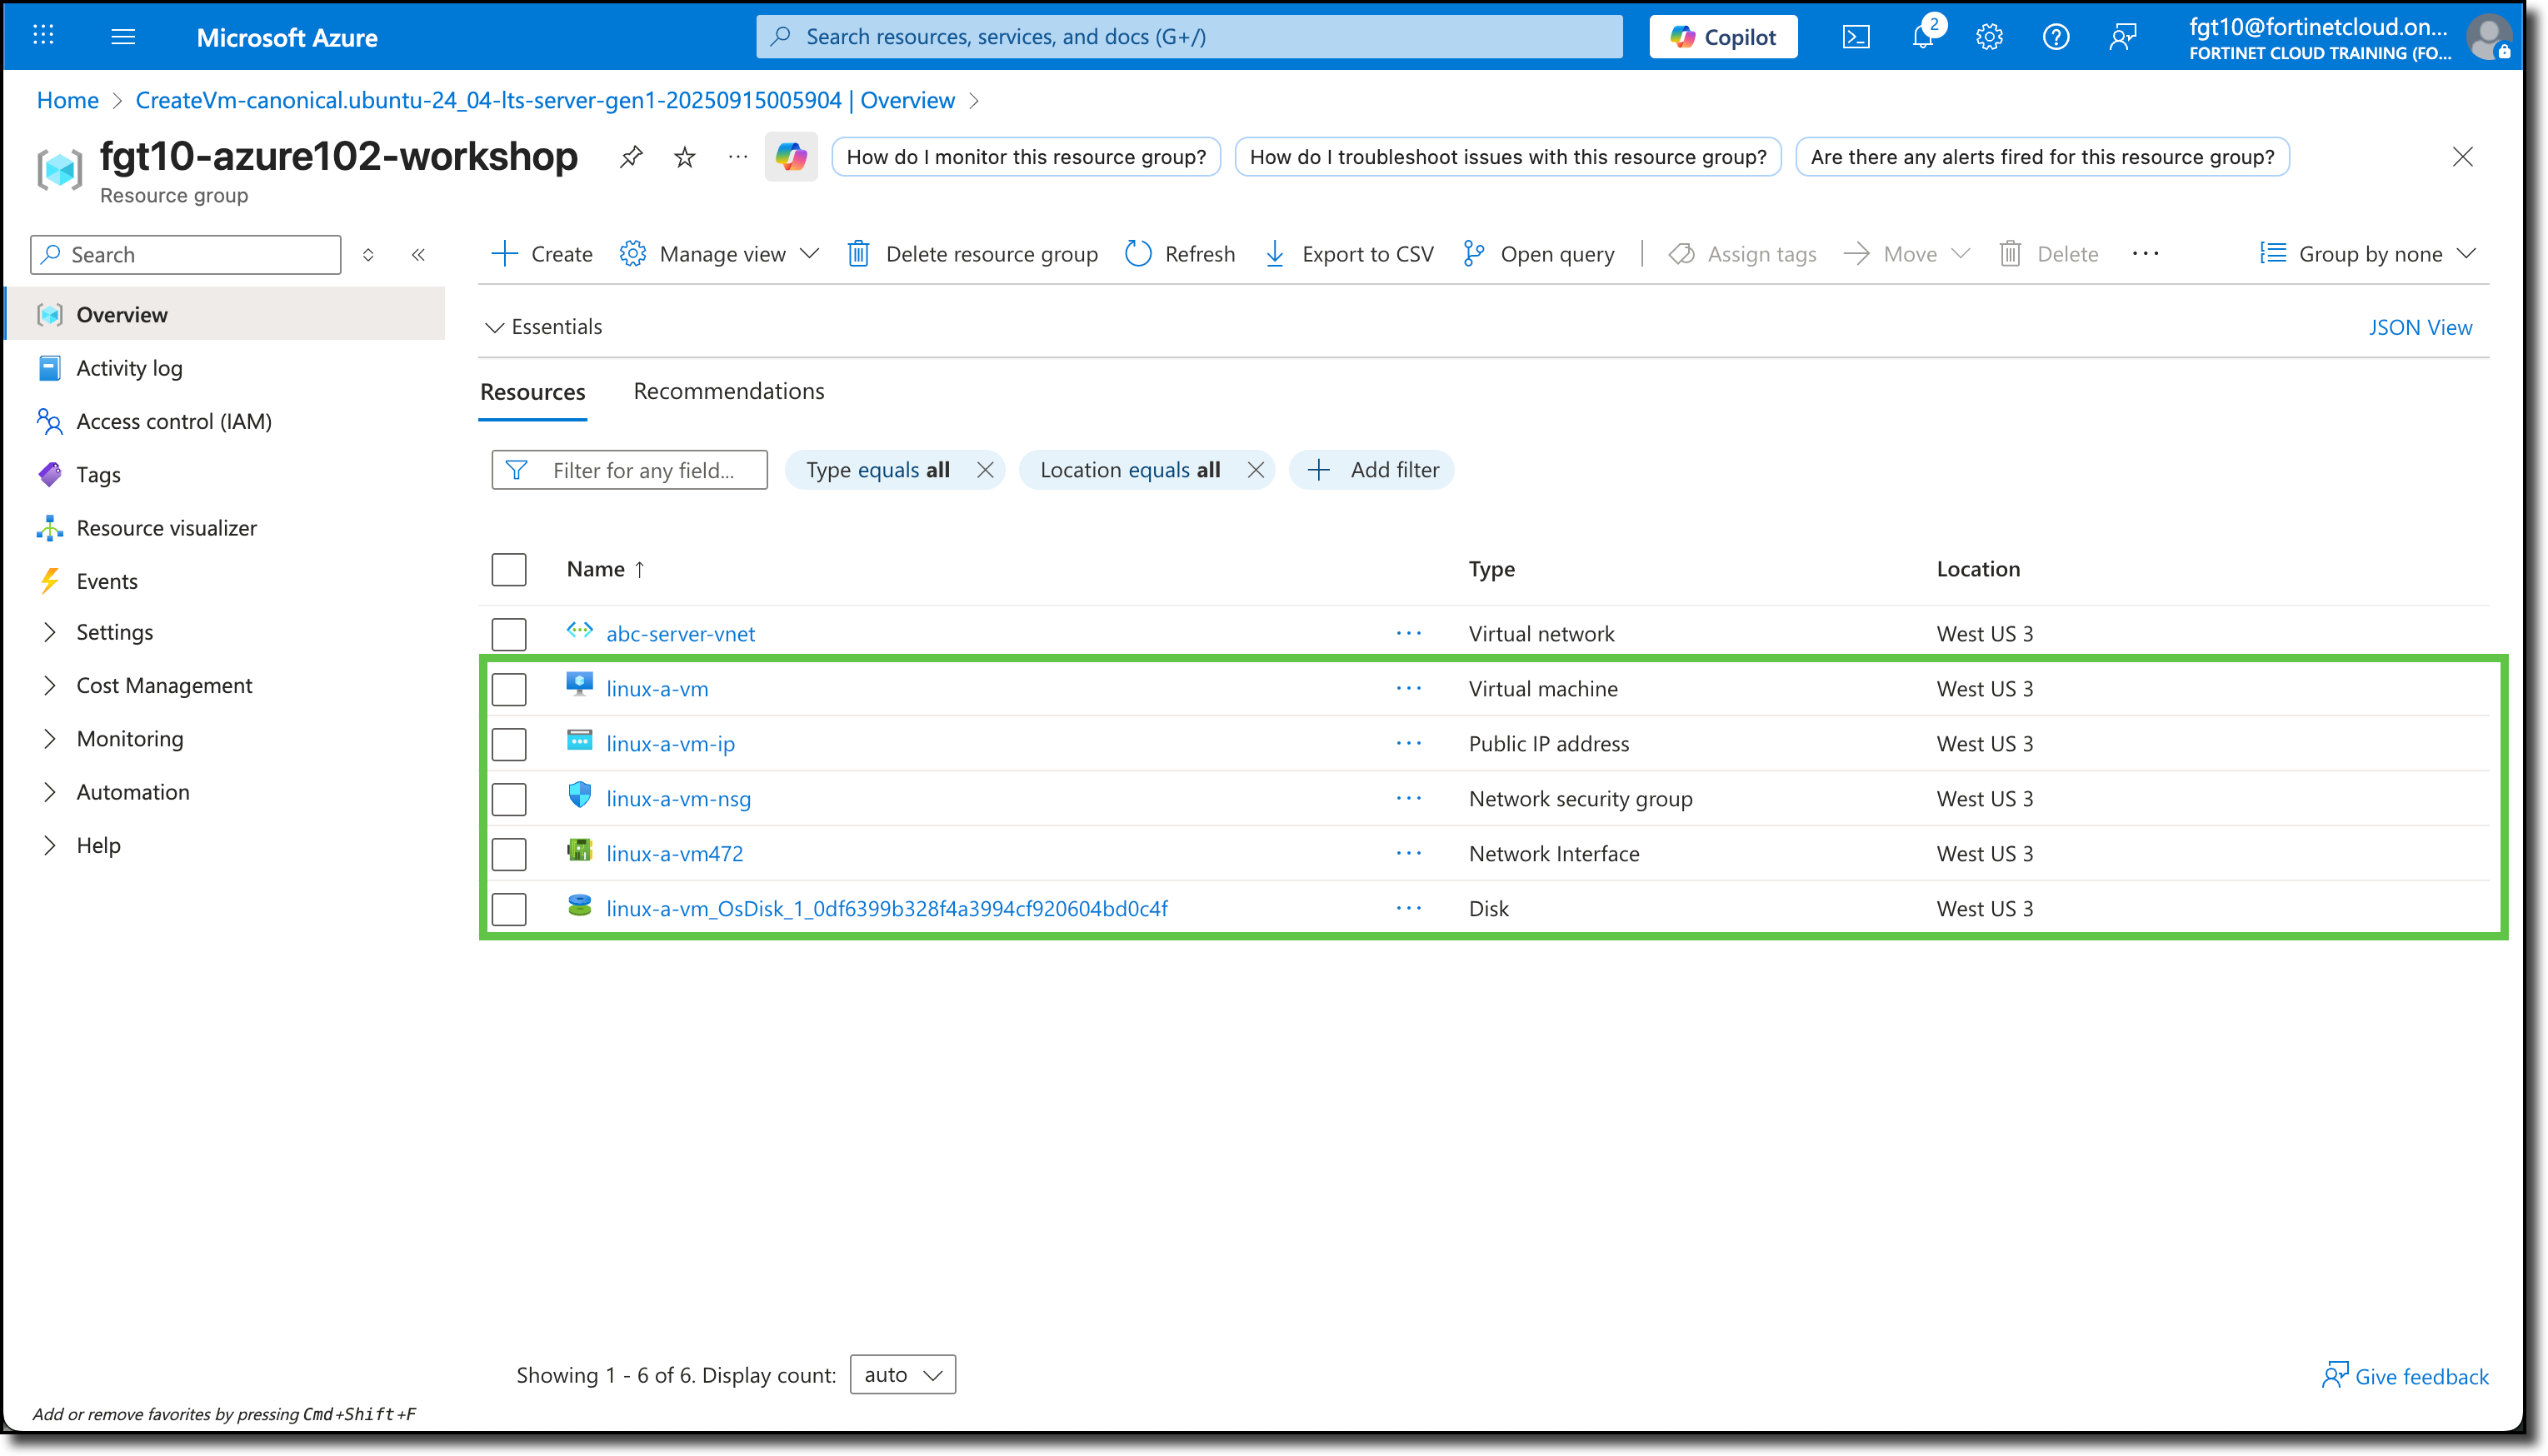
Your Resource Group should now have a VNET named abc-server-vnet
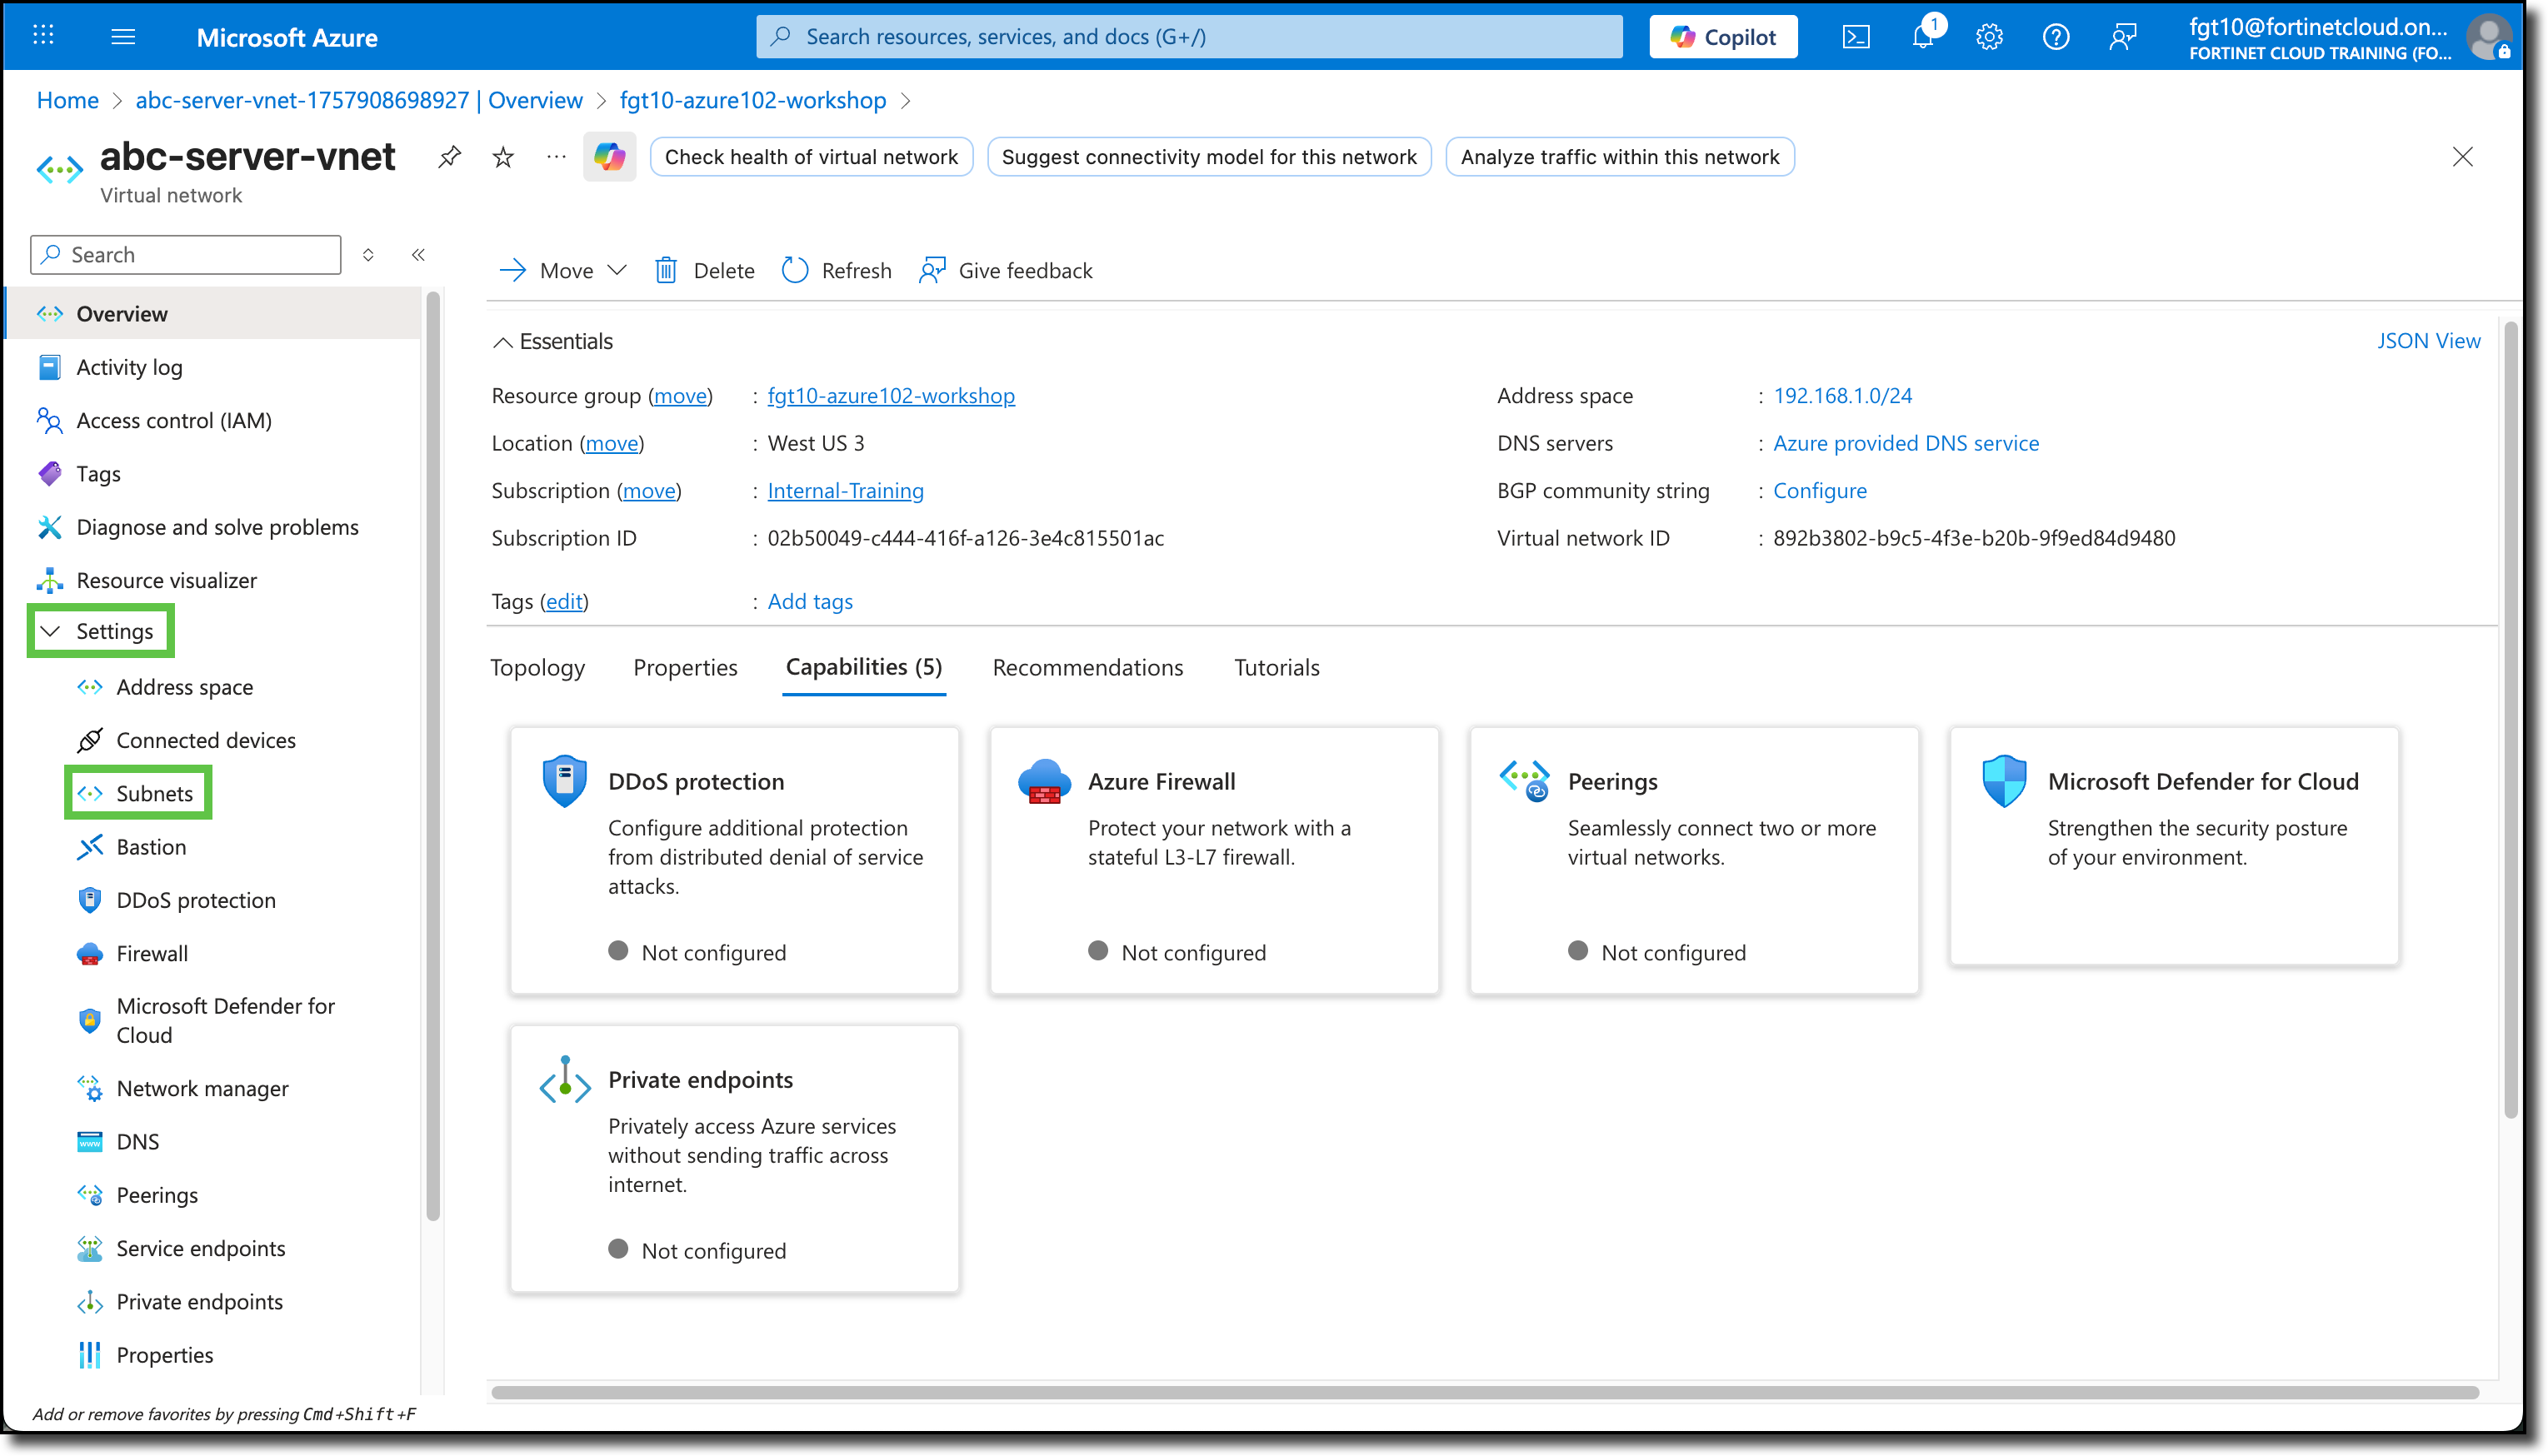
Click on the VNET name and explore the various settings that can be applied to or utilized with an Azure Virtual Network.
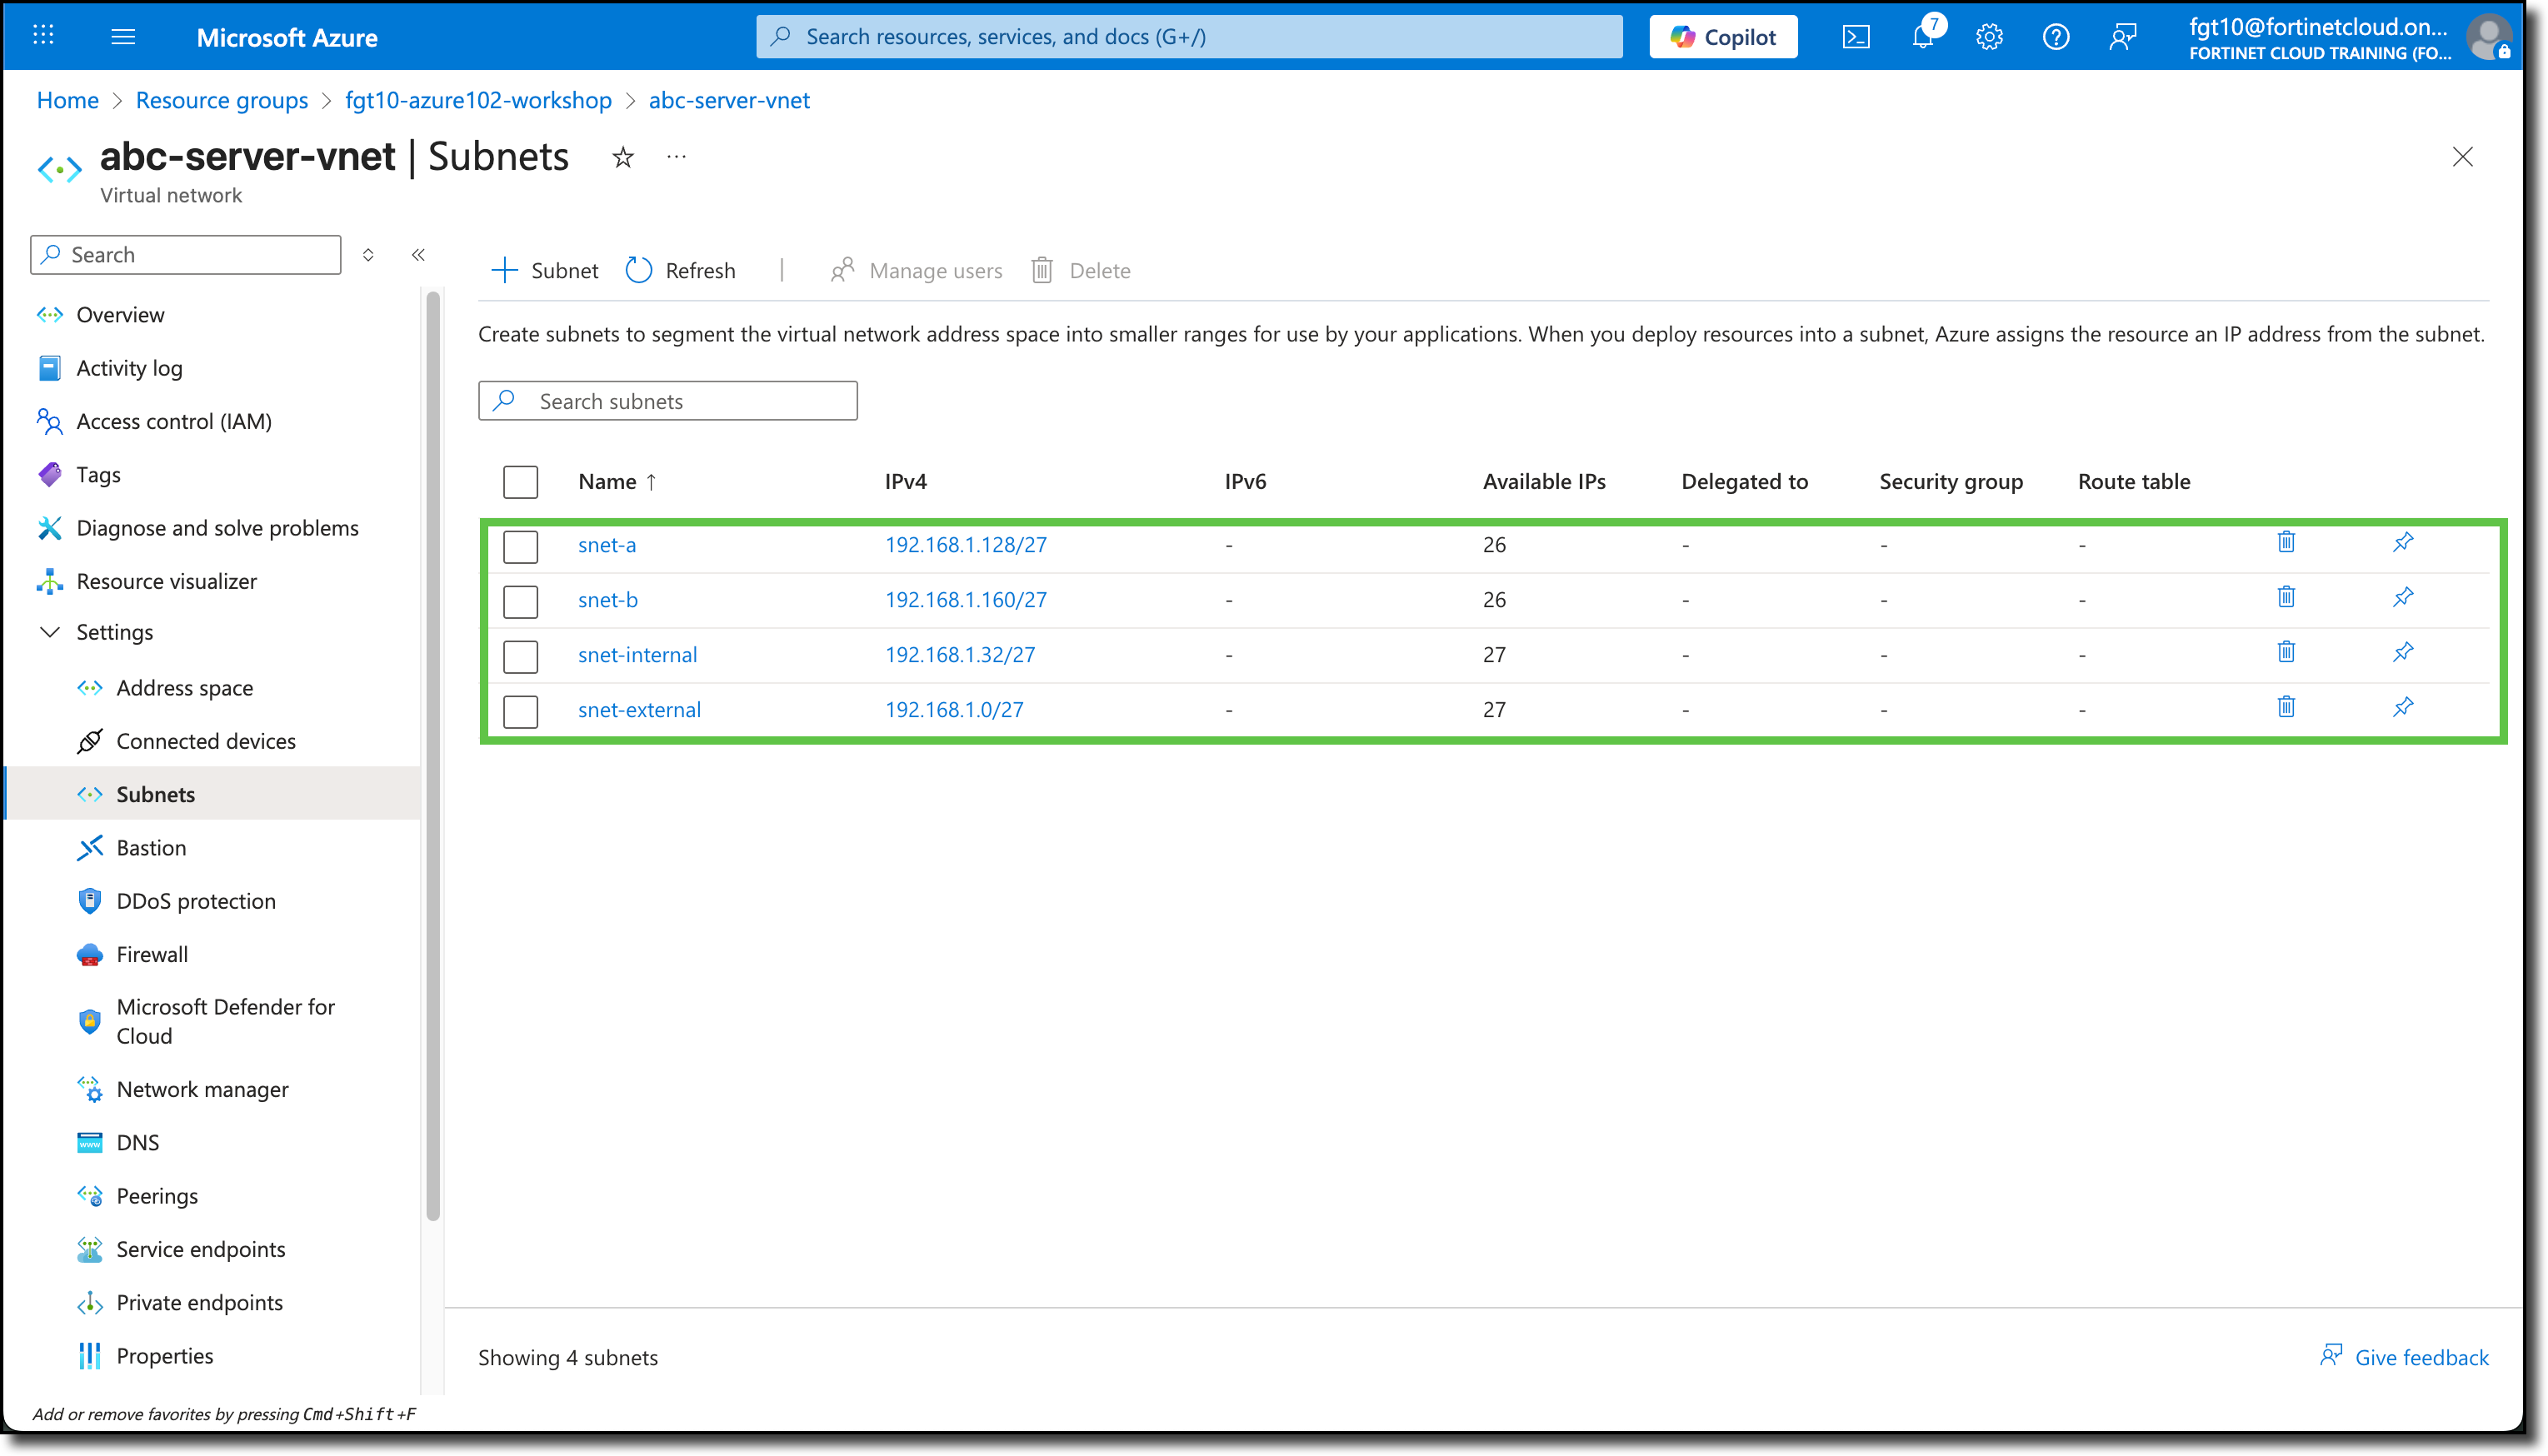
Click on “Subnets” under “Settings” to view the subnets that were just created.
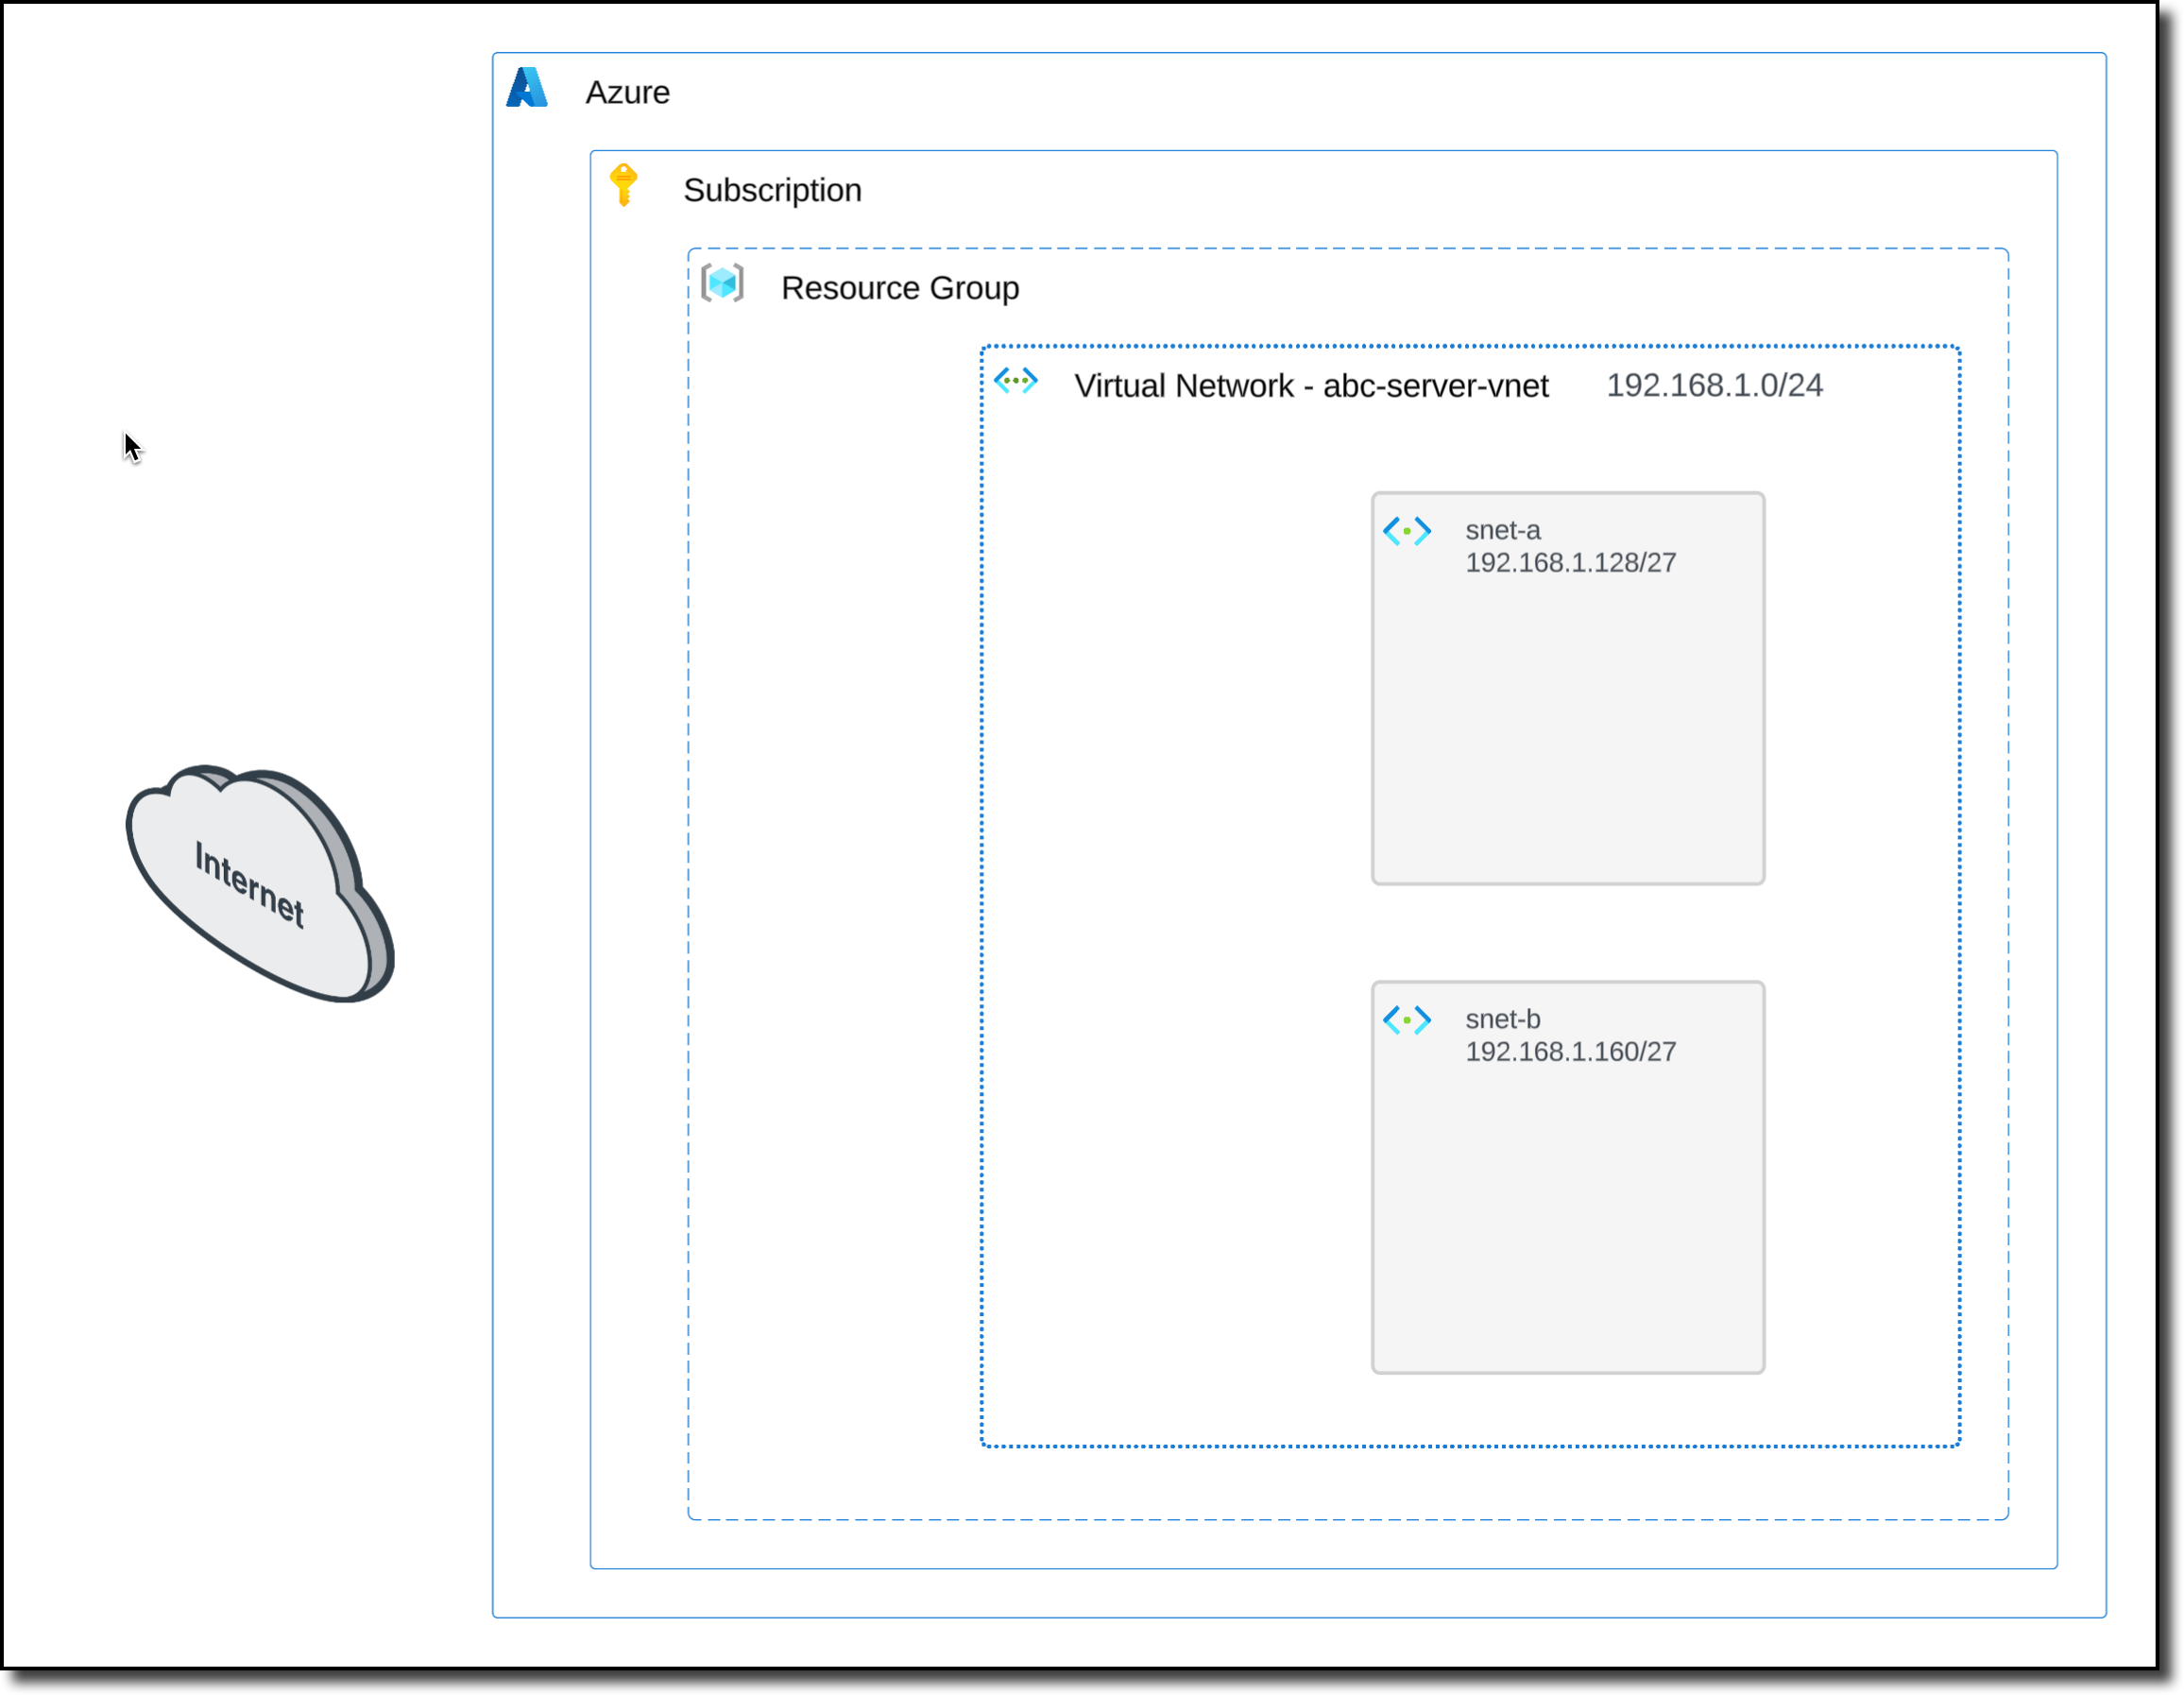
At this point these are your Azure Resources
Task 2: Deploy Linux Virtual Machines
Now that a VNET is configured, Task 2 will cover
Deploying two Linux Virtual Machines (VMs) in the VNET
Identify assigned Public IP (PIP)
Confirm access to the Internet
Confirm access between each VM
linux-a-vm will have an interface in subnet snet-alinux-b-vm will have an interface in subnet snet-b
Steps to create linux-a-vm
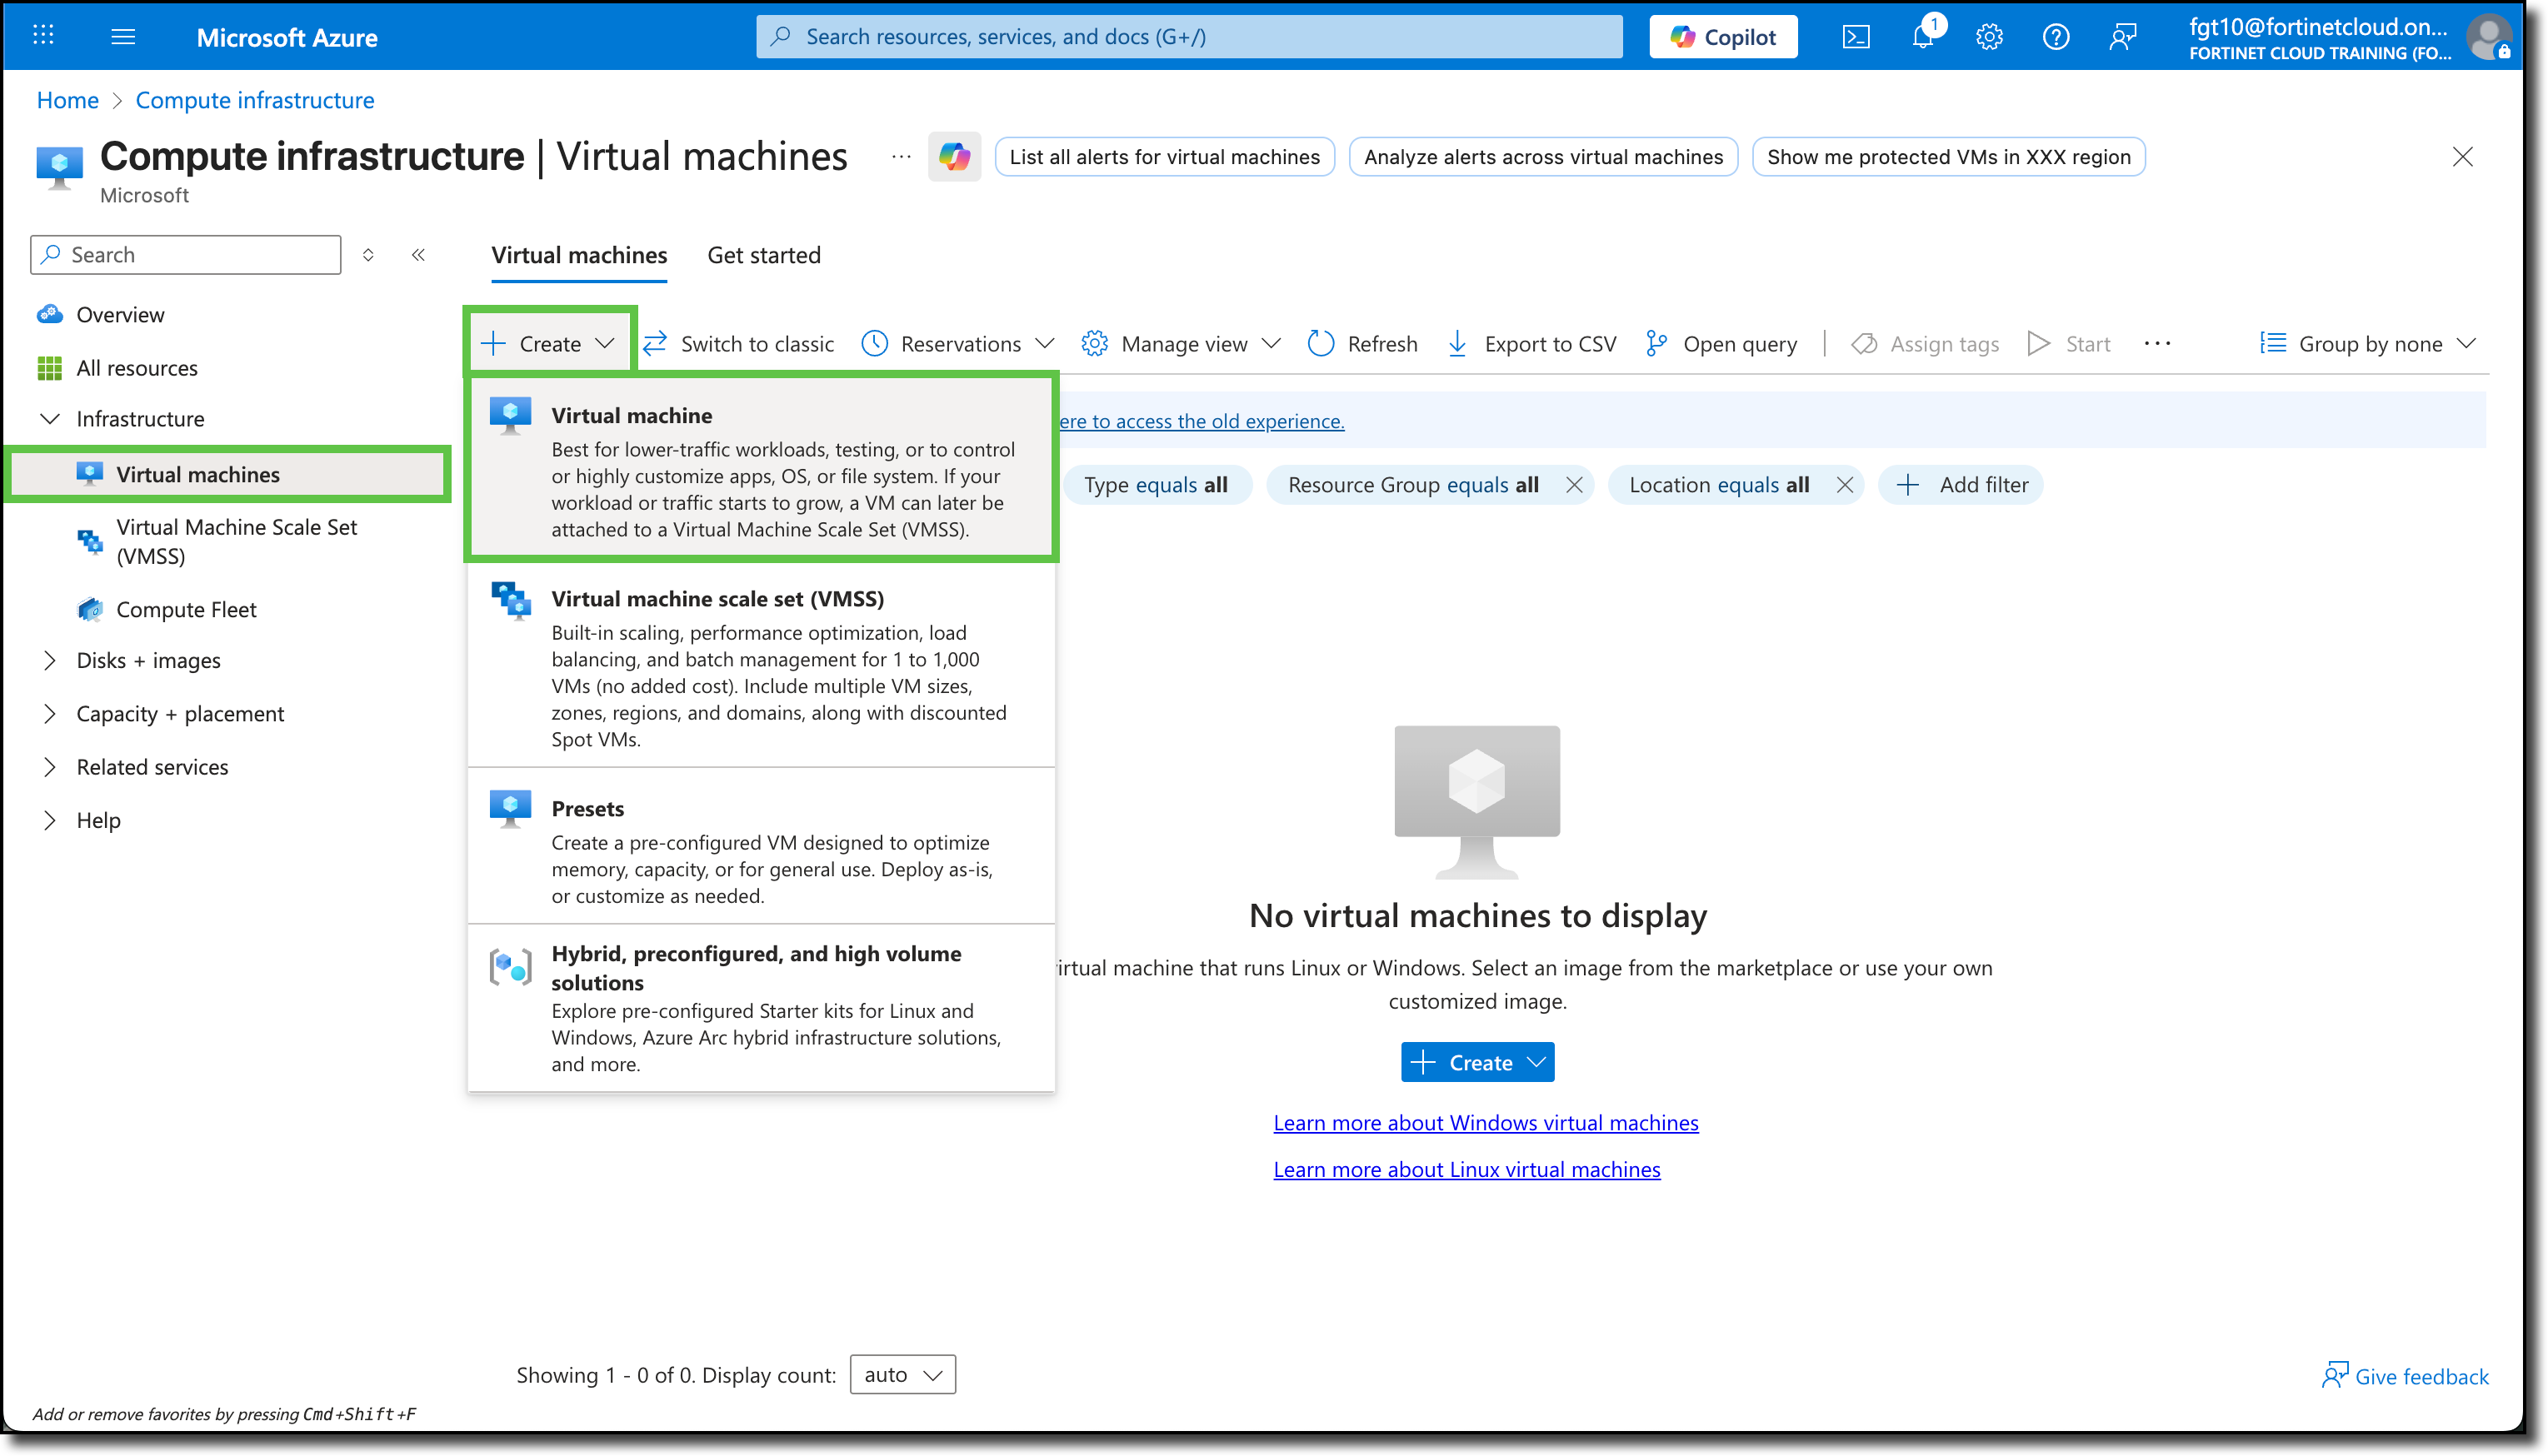
Click the Hamburger menu in the upper-left corner of the Azure Portal to show the “Portal Menu”
Click “Virtual machines”
Click “+ Create”
Click Virtual Machine", You will be redirected to the Create a virtual machine template.
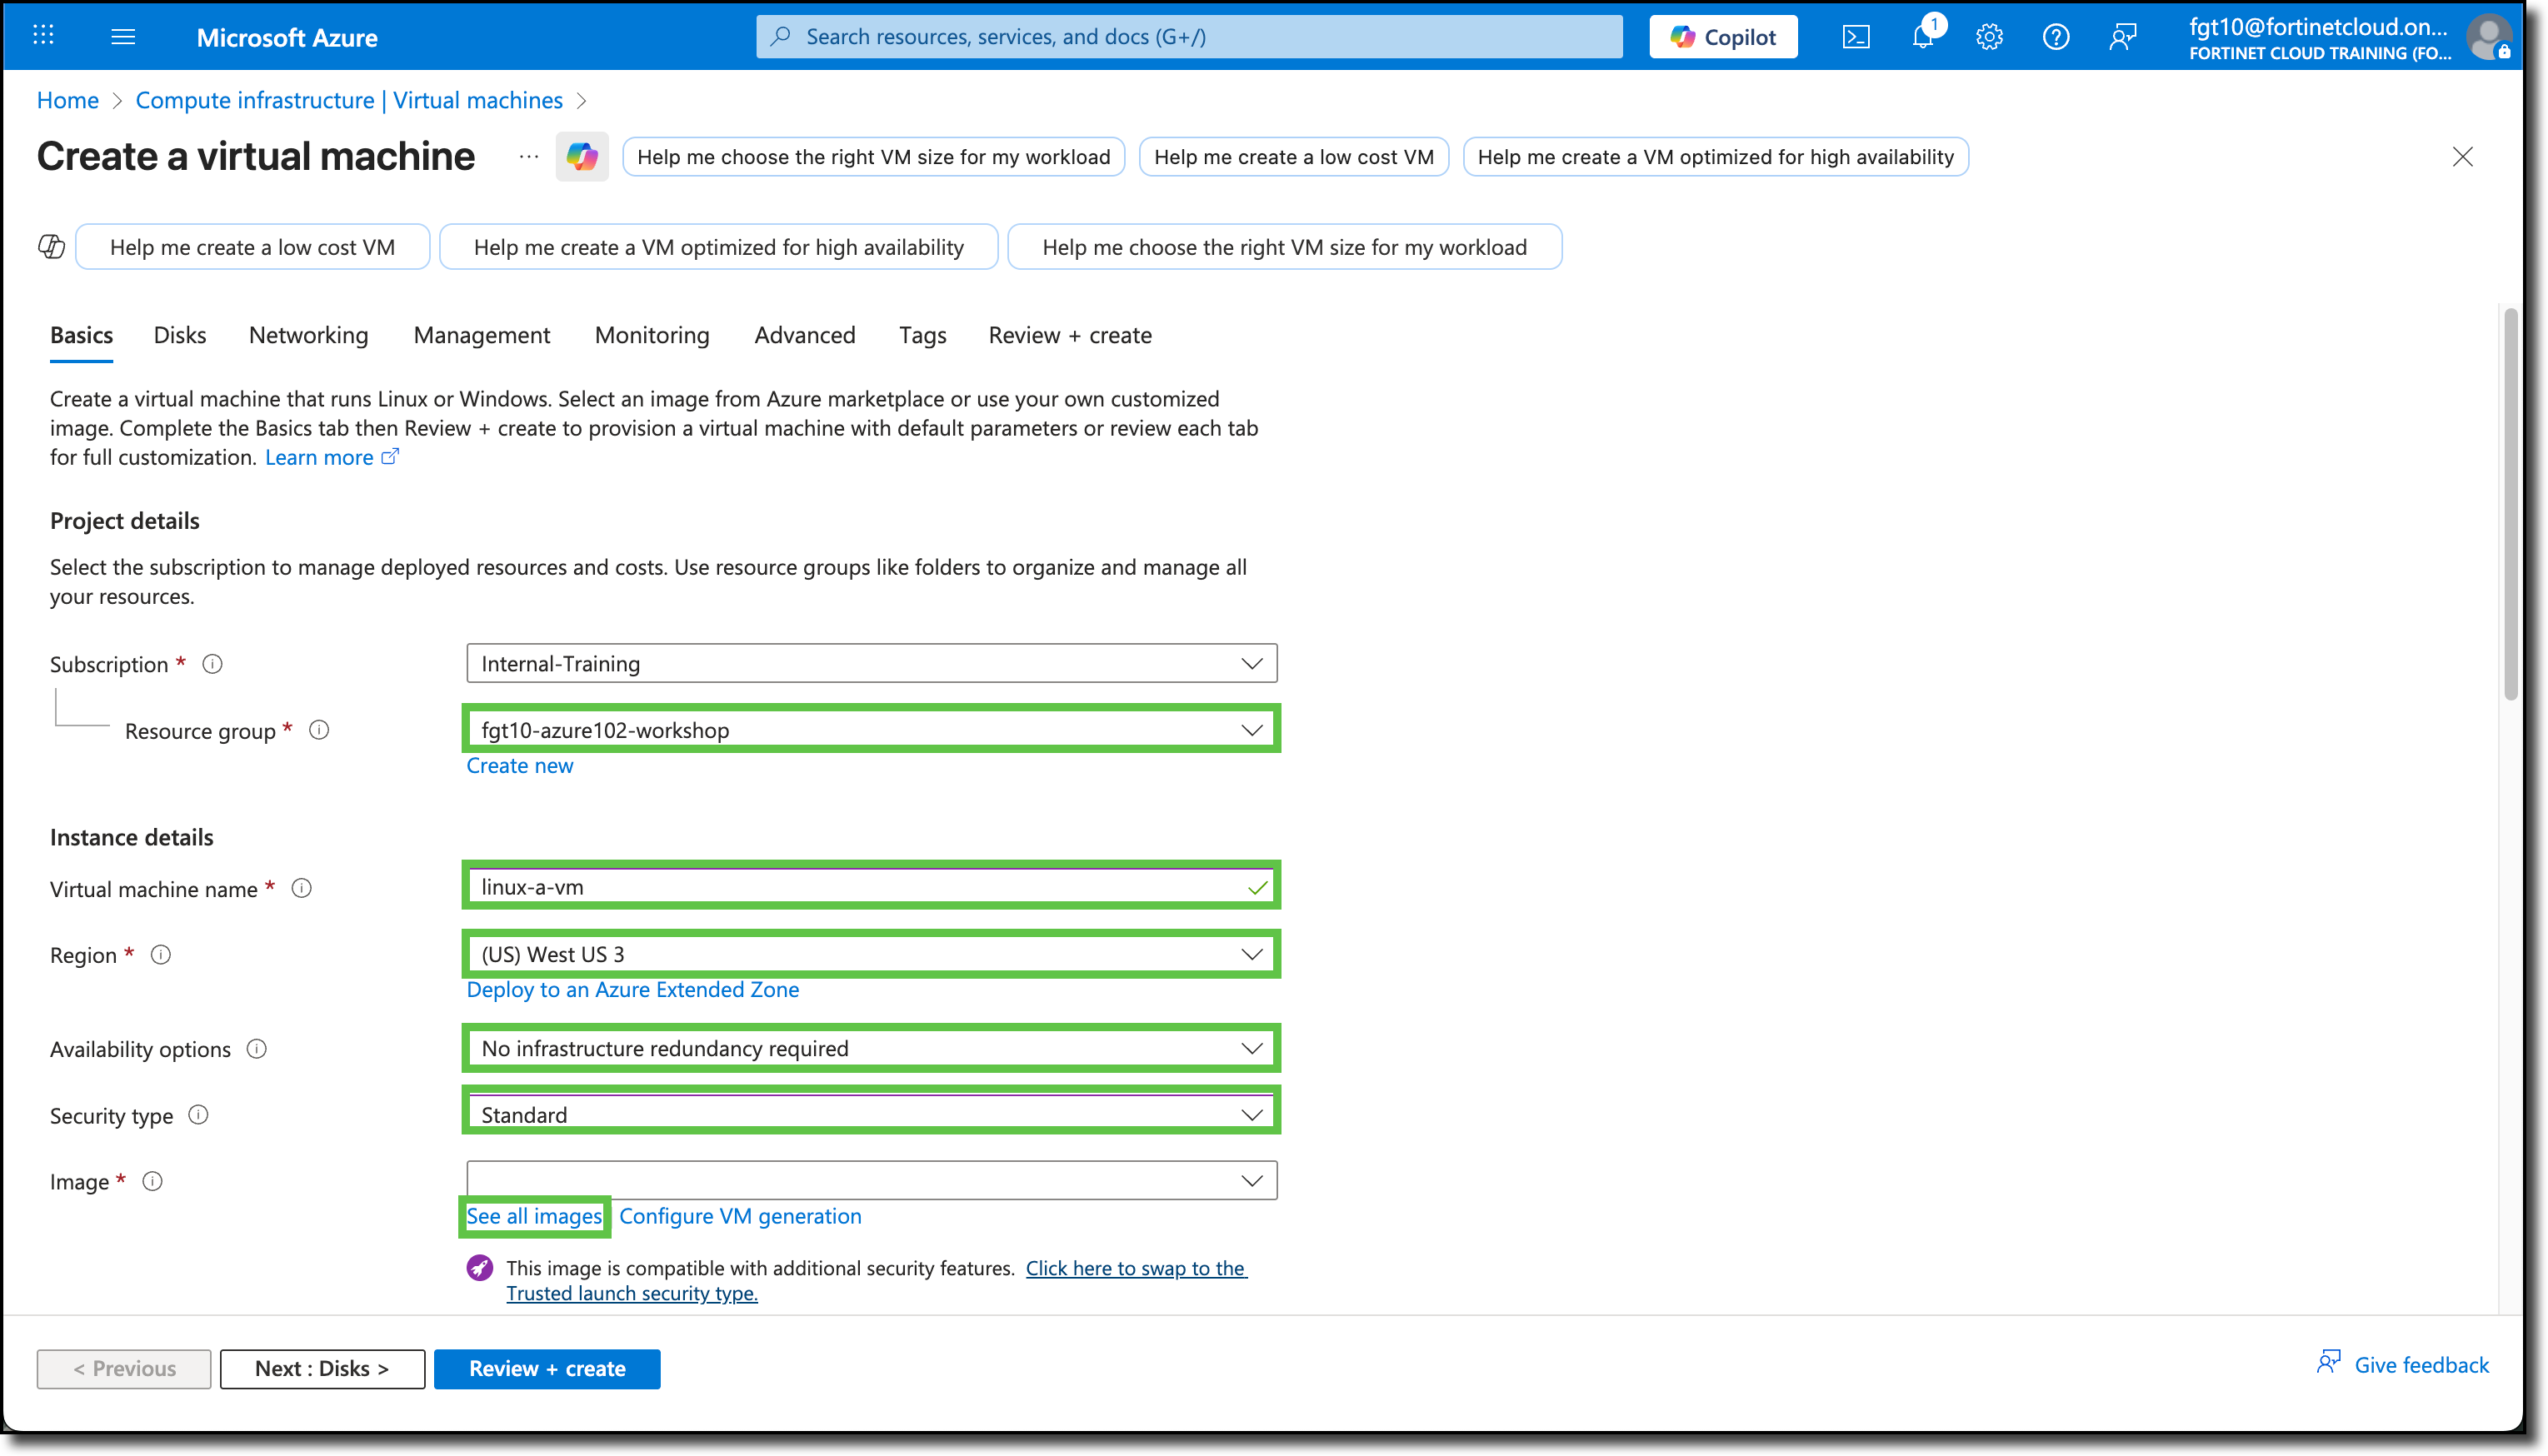
Under the Basics tab, the Subscription and Resource Groups may already be filled in with your assigned info. If not, see the screenshot below for details.
Update the following fields:
(Leave the default entry for fields not listed here)
Resource group: fgtXX-azure102-workshop
Virtual machine name: linux-a-vm
Availability options: No infrastructure redundancy required
Security type: Standard
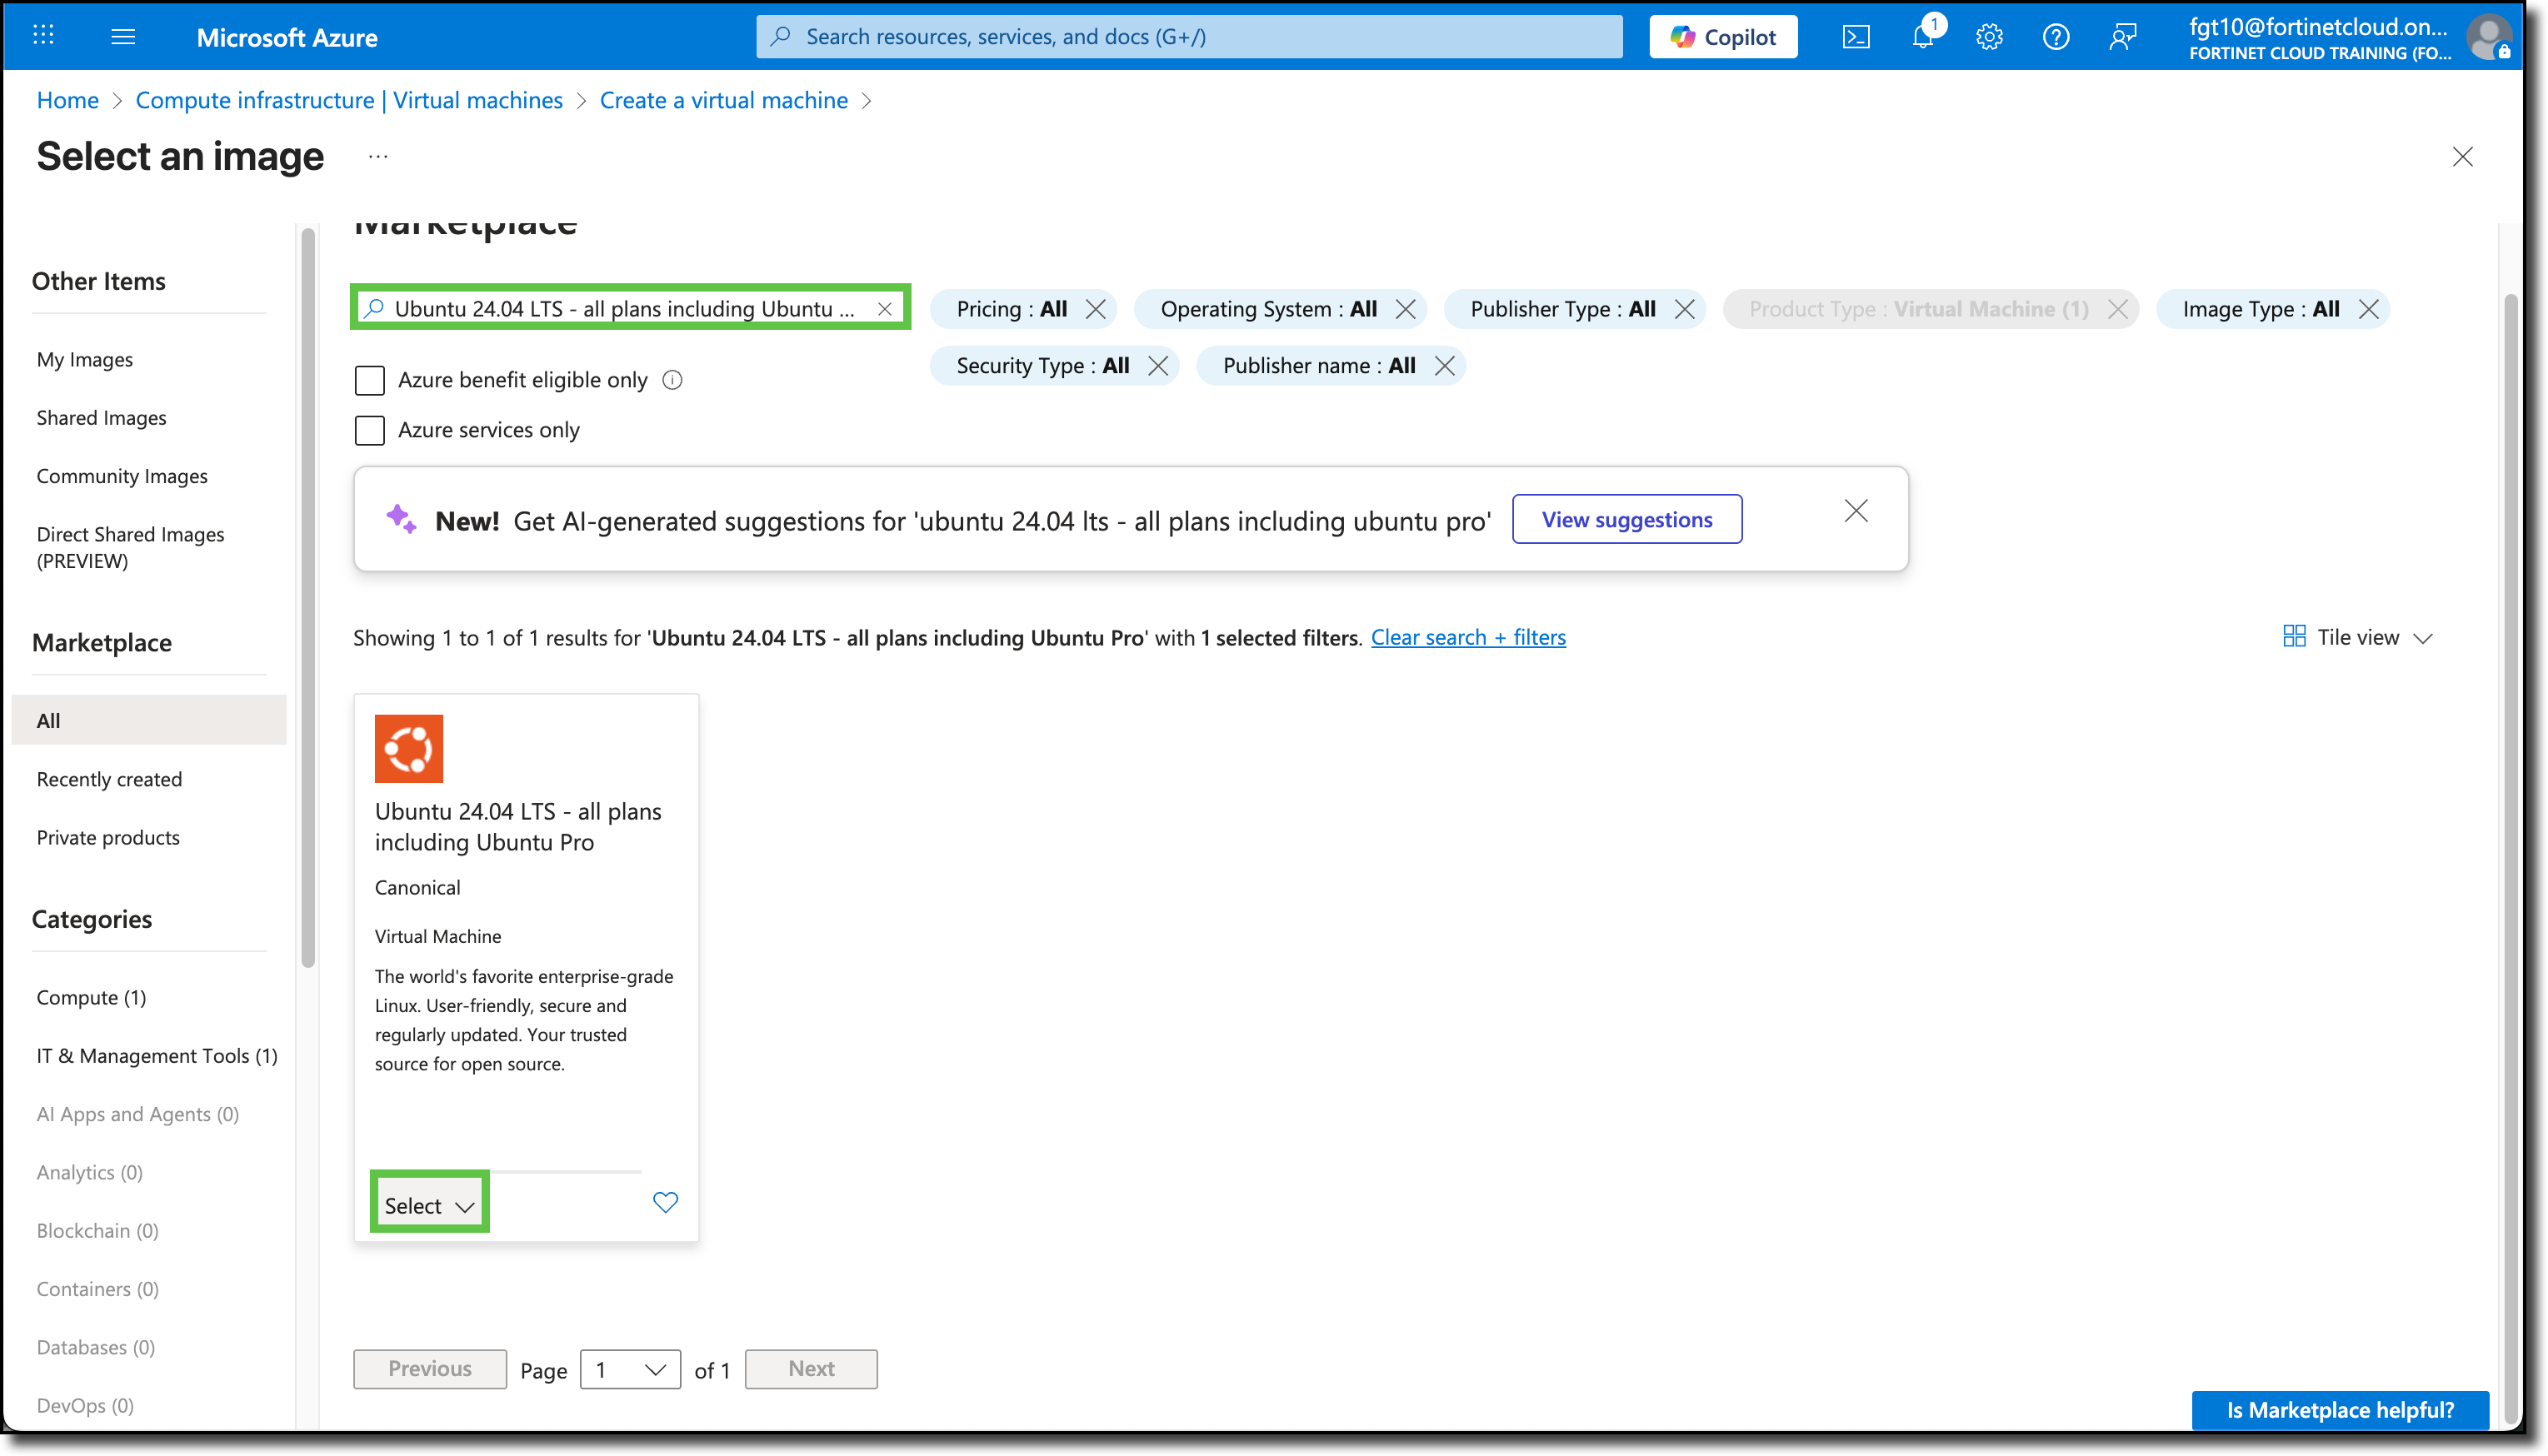
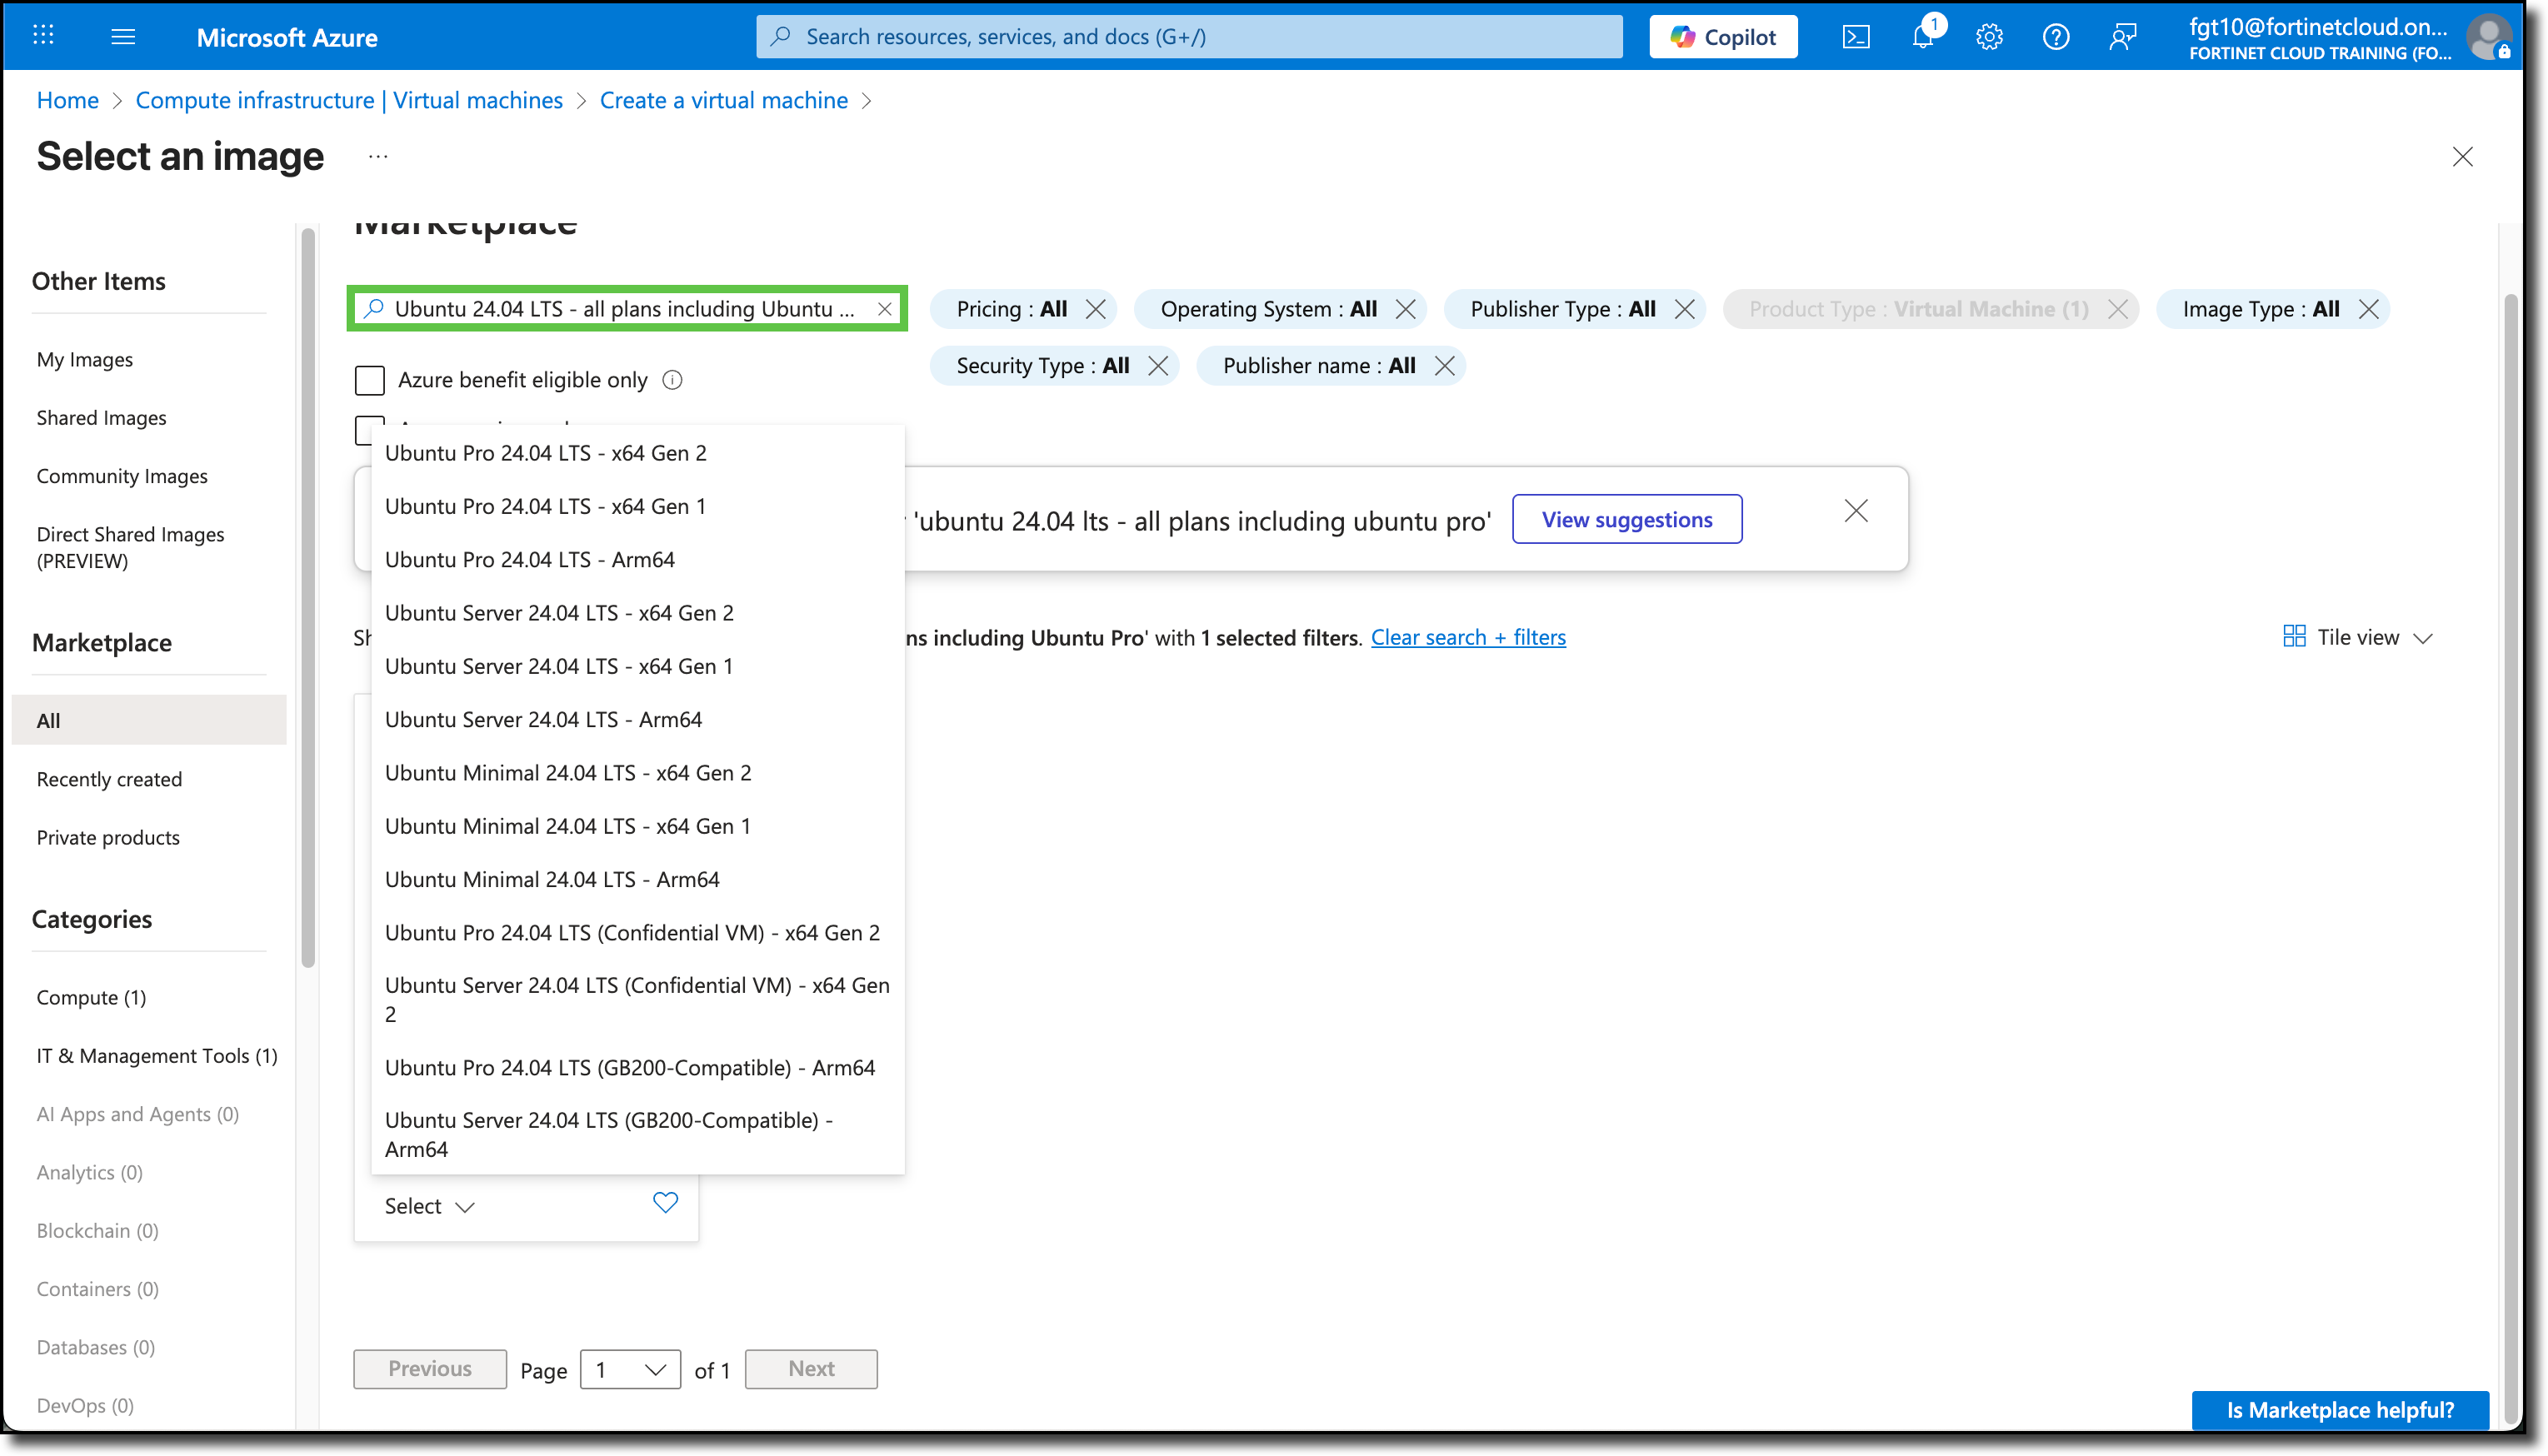
Image: Select See all images under the image drop-down
EnterUbuntu 24.04 LTS in the search field
Click “Select”
Click “Ubuntu Server 24.04 LTS - x64 Gen 1”
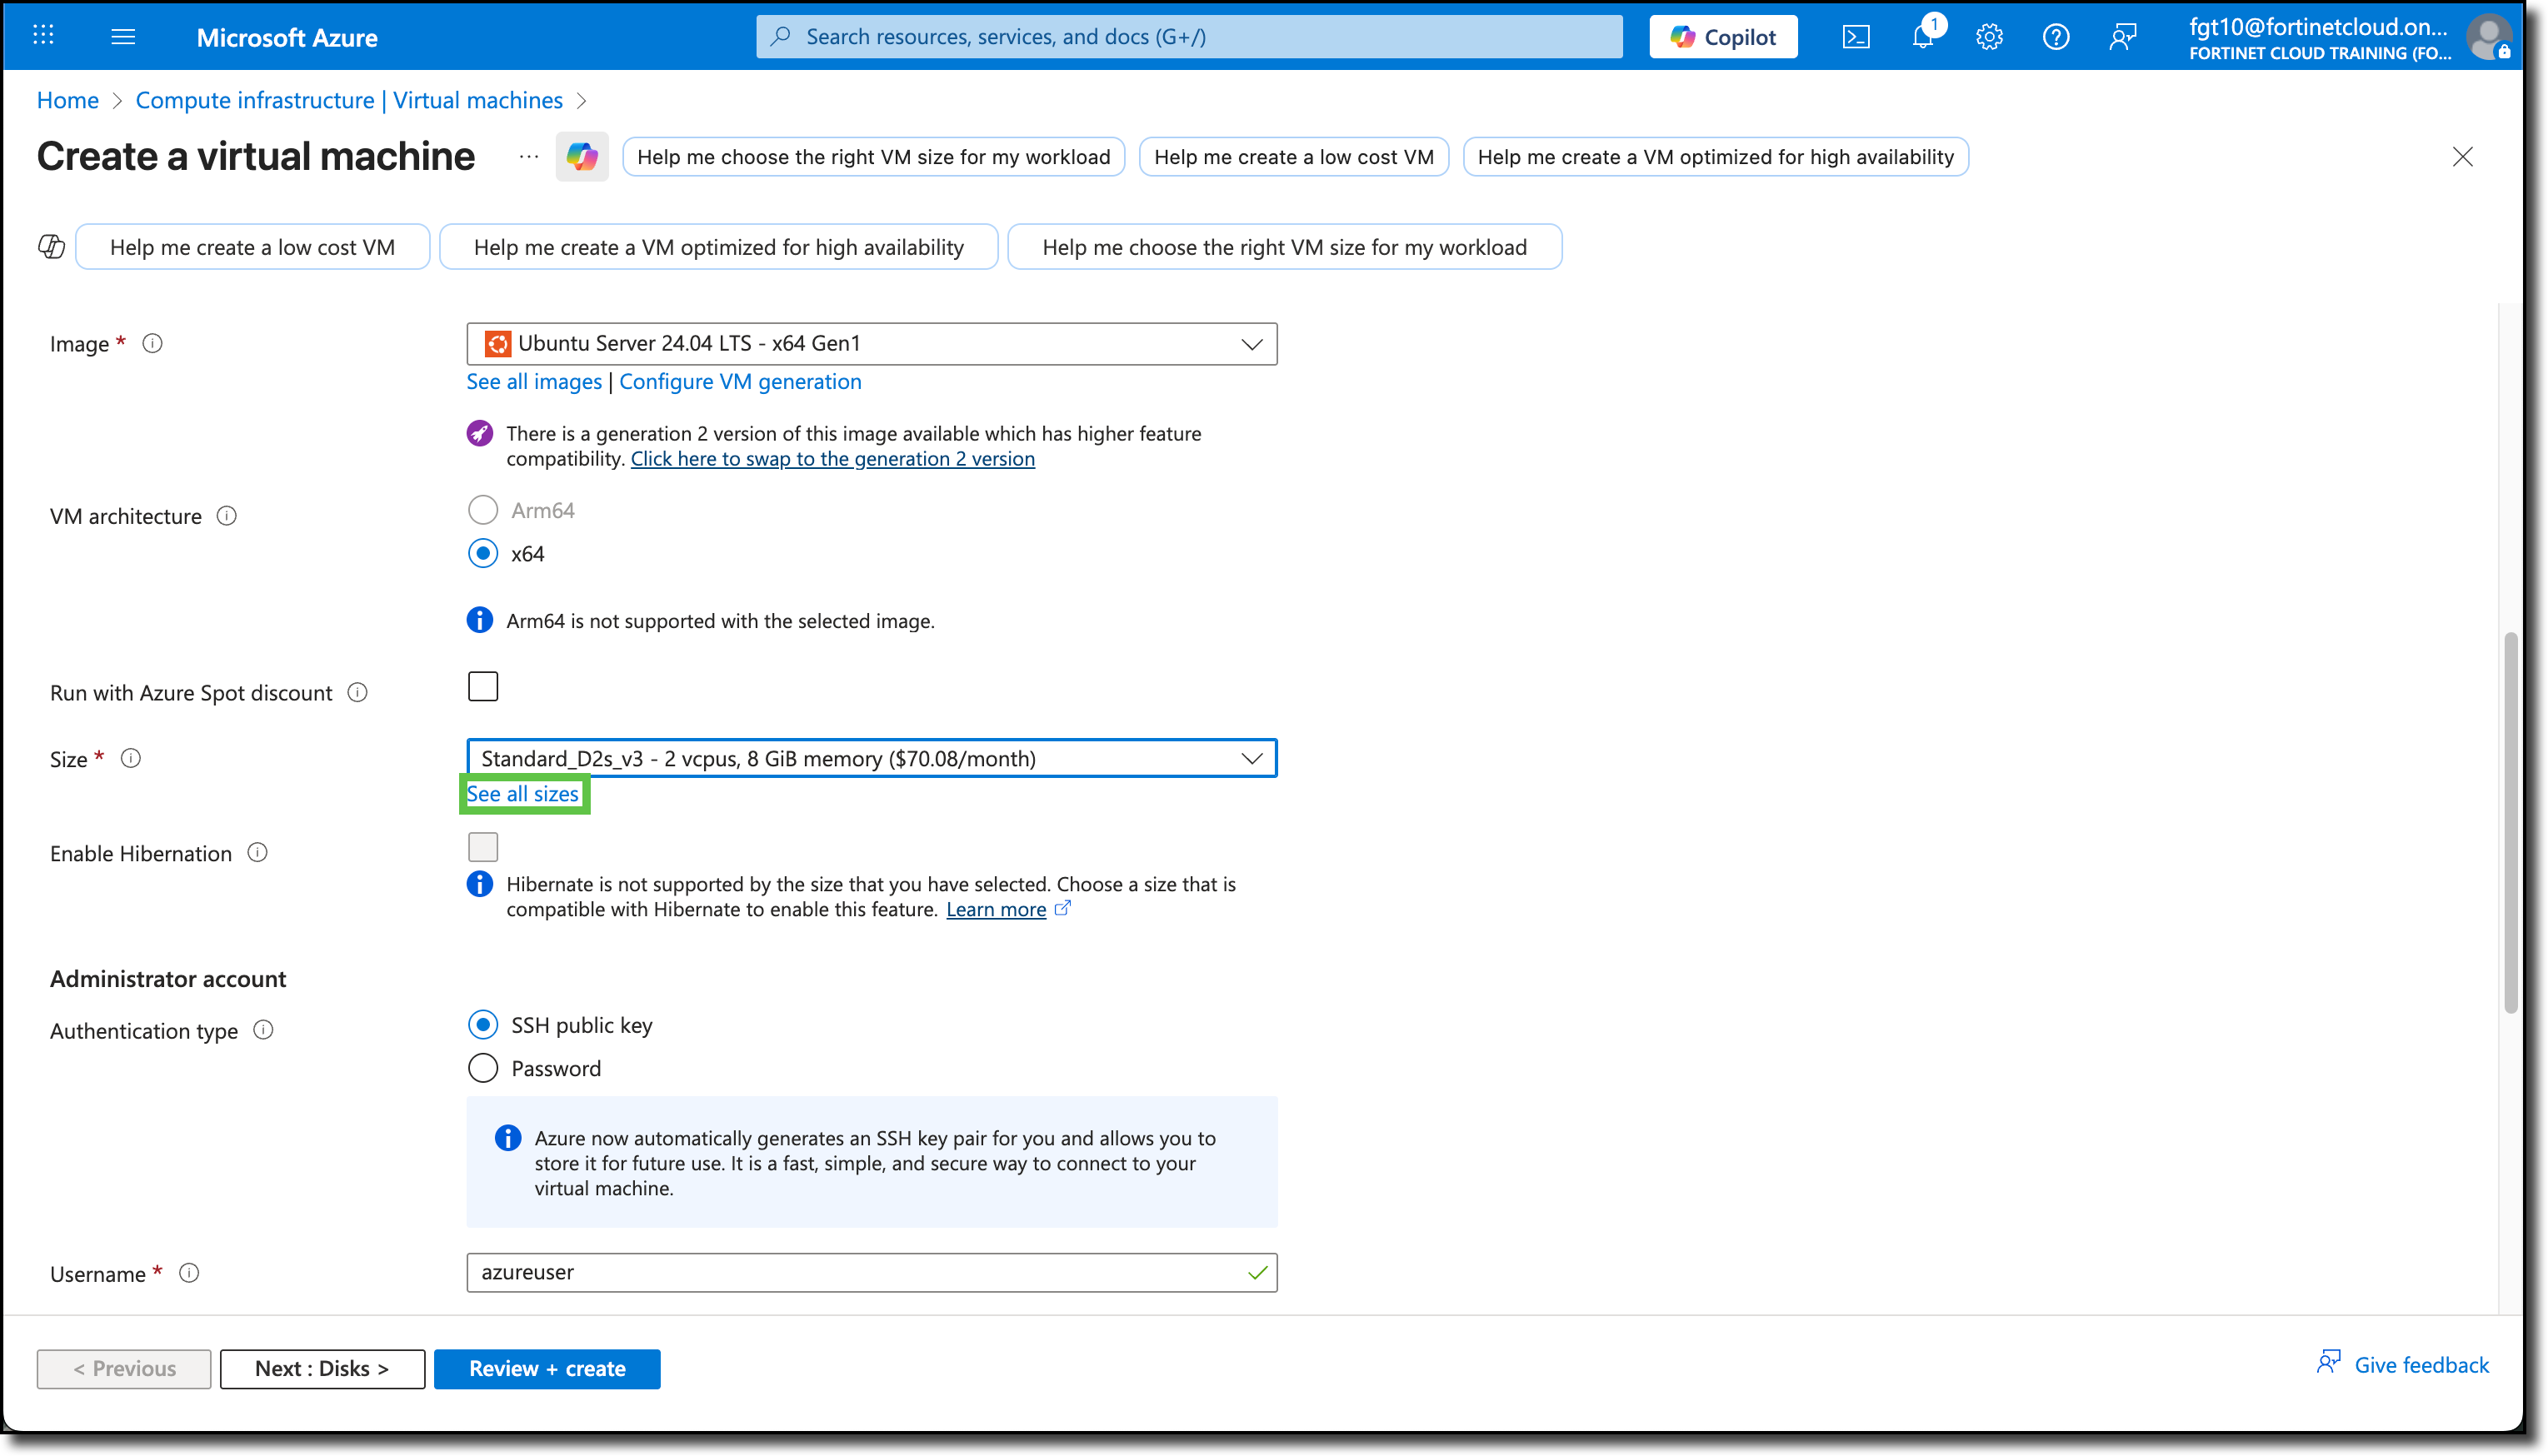
Continuing from Create a virtual machine Basics tab:
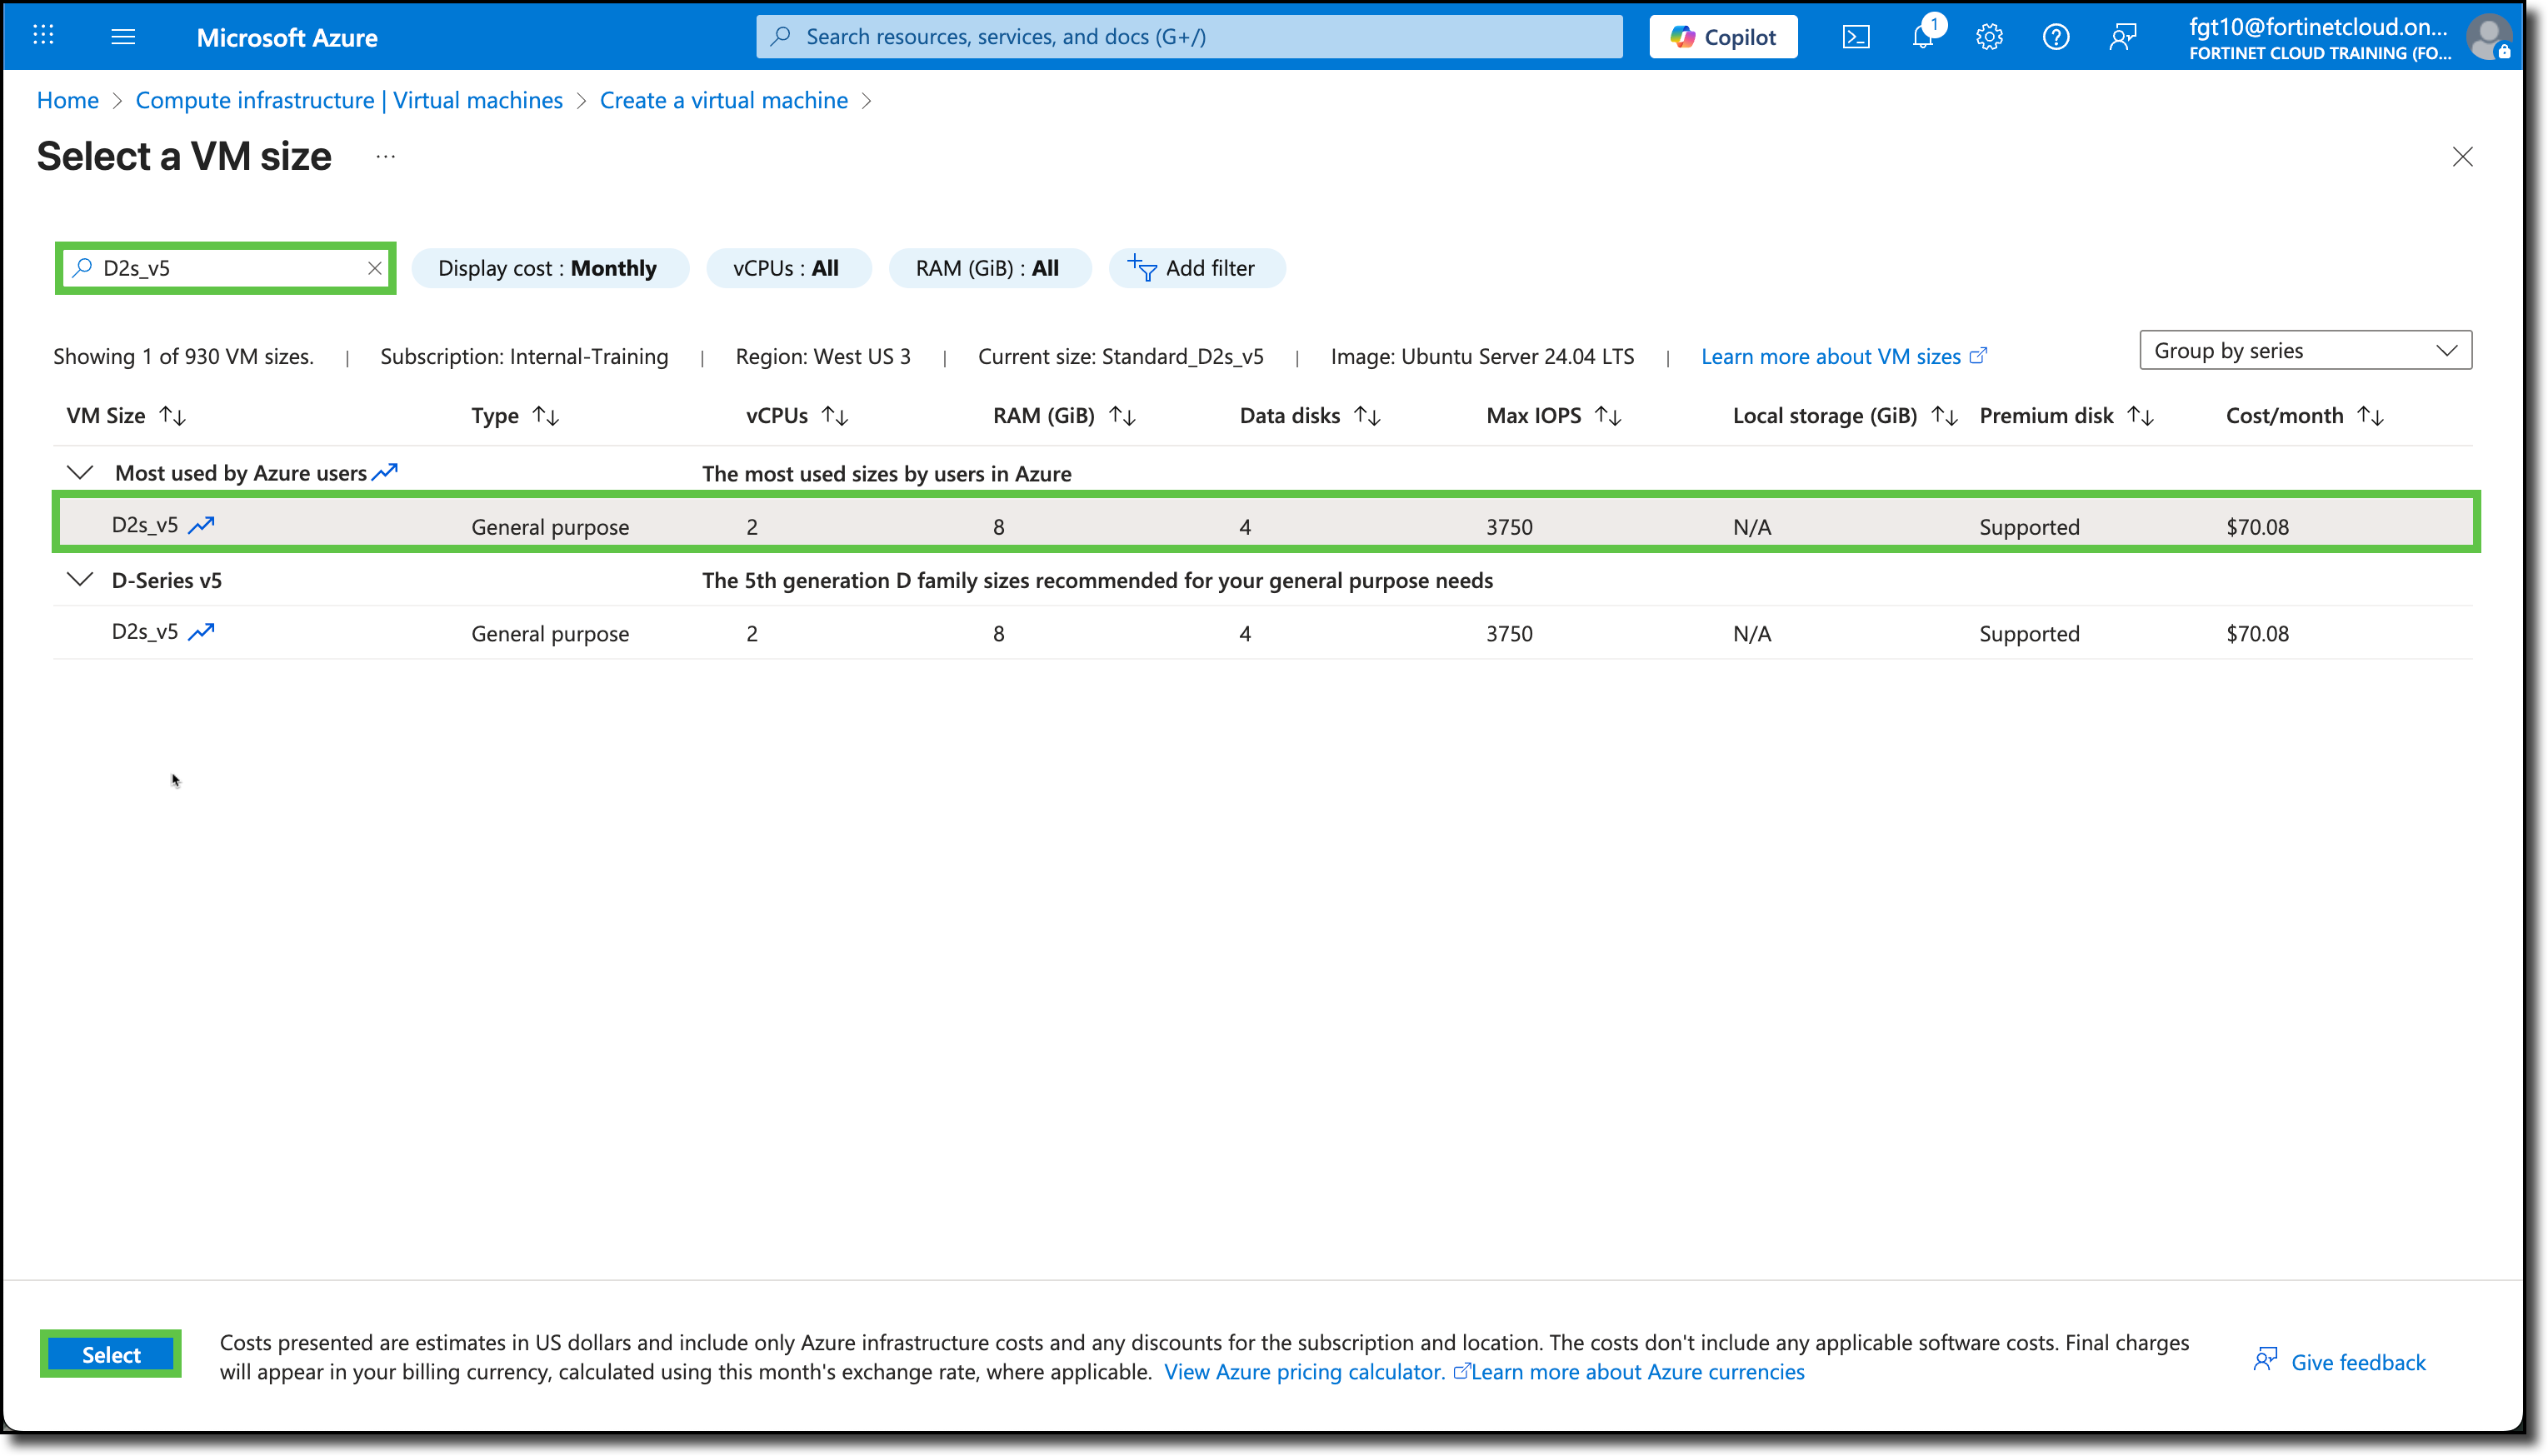
Size: Select See all sizes under the size drop-down
Search for D2s_v5
Select “D2s_v5”
Click “Select”
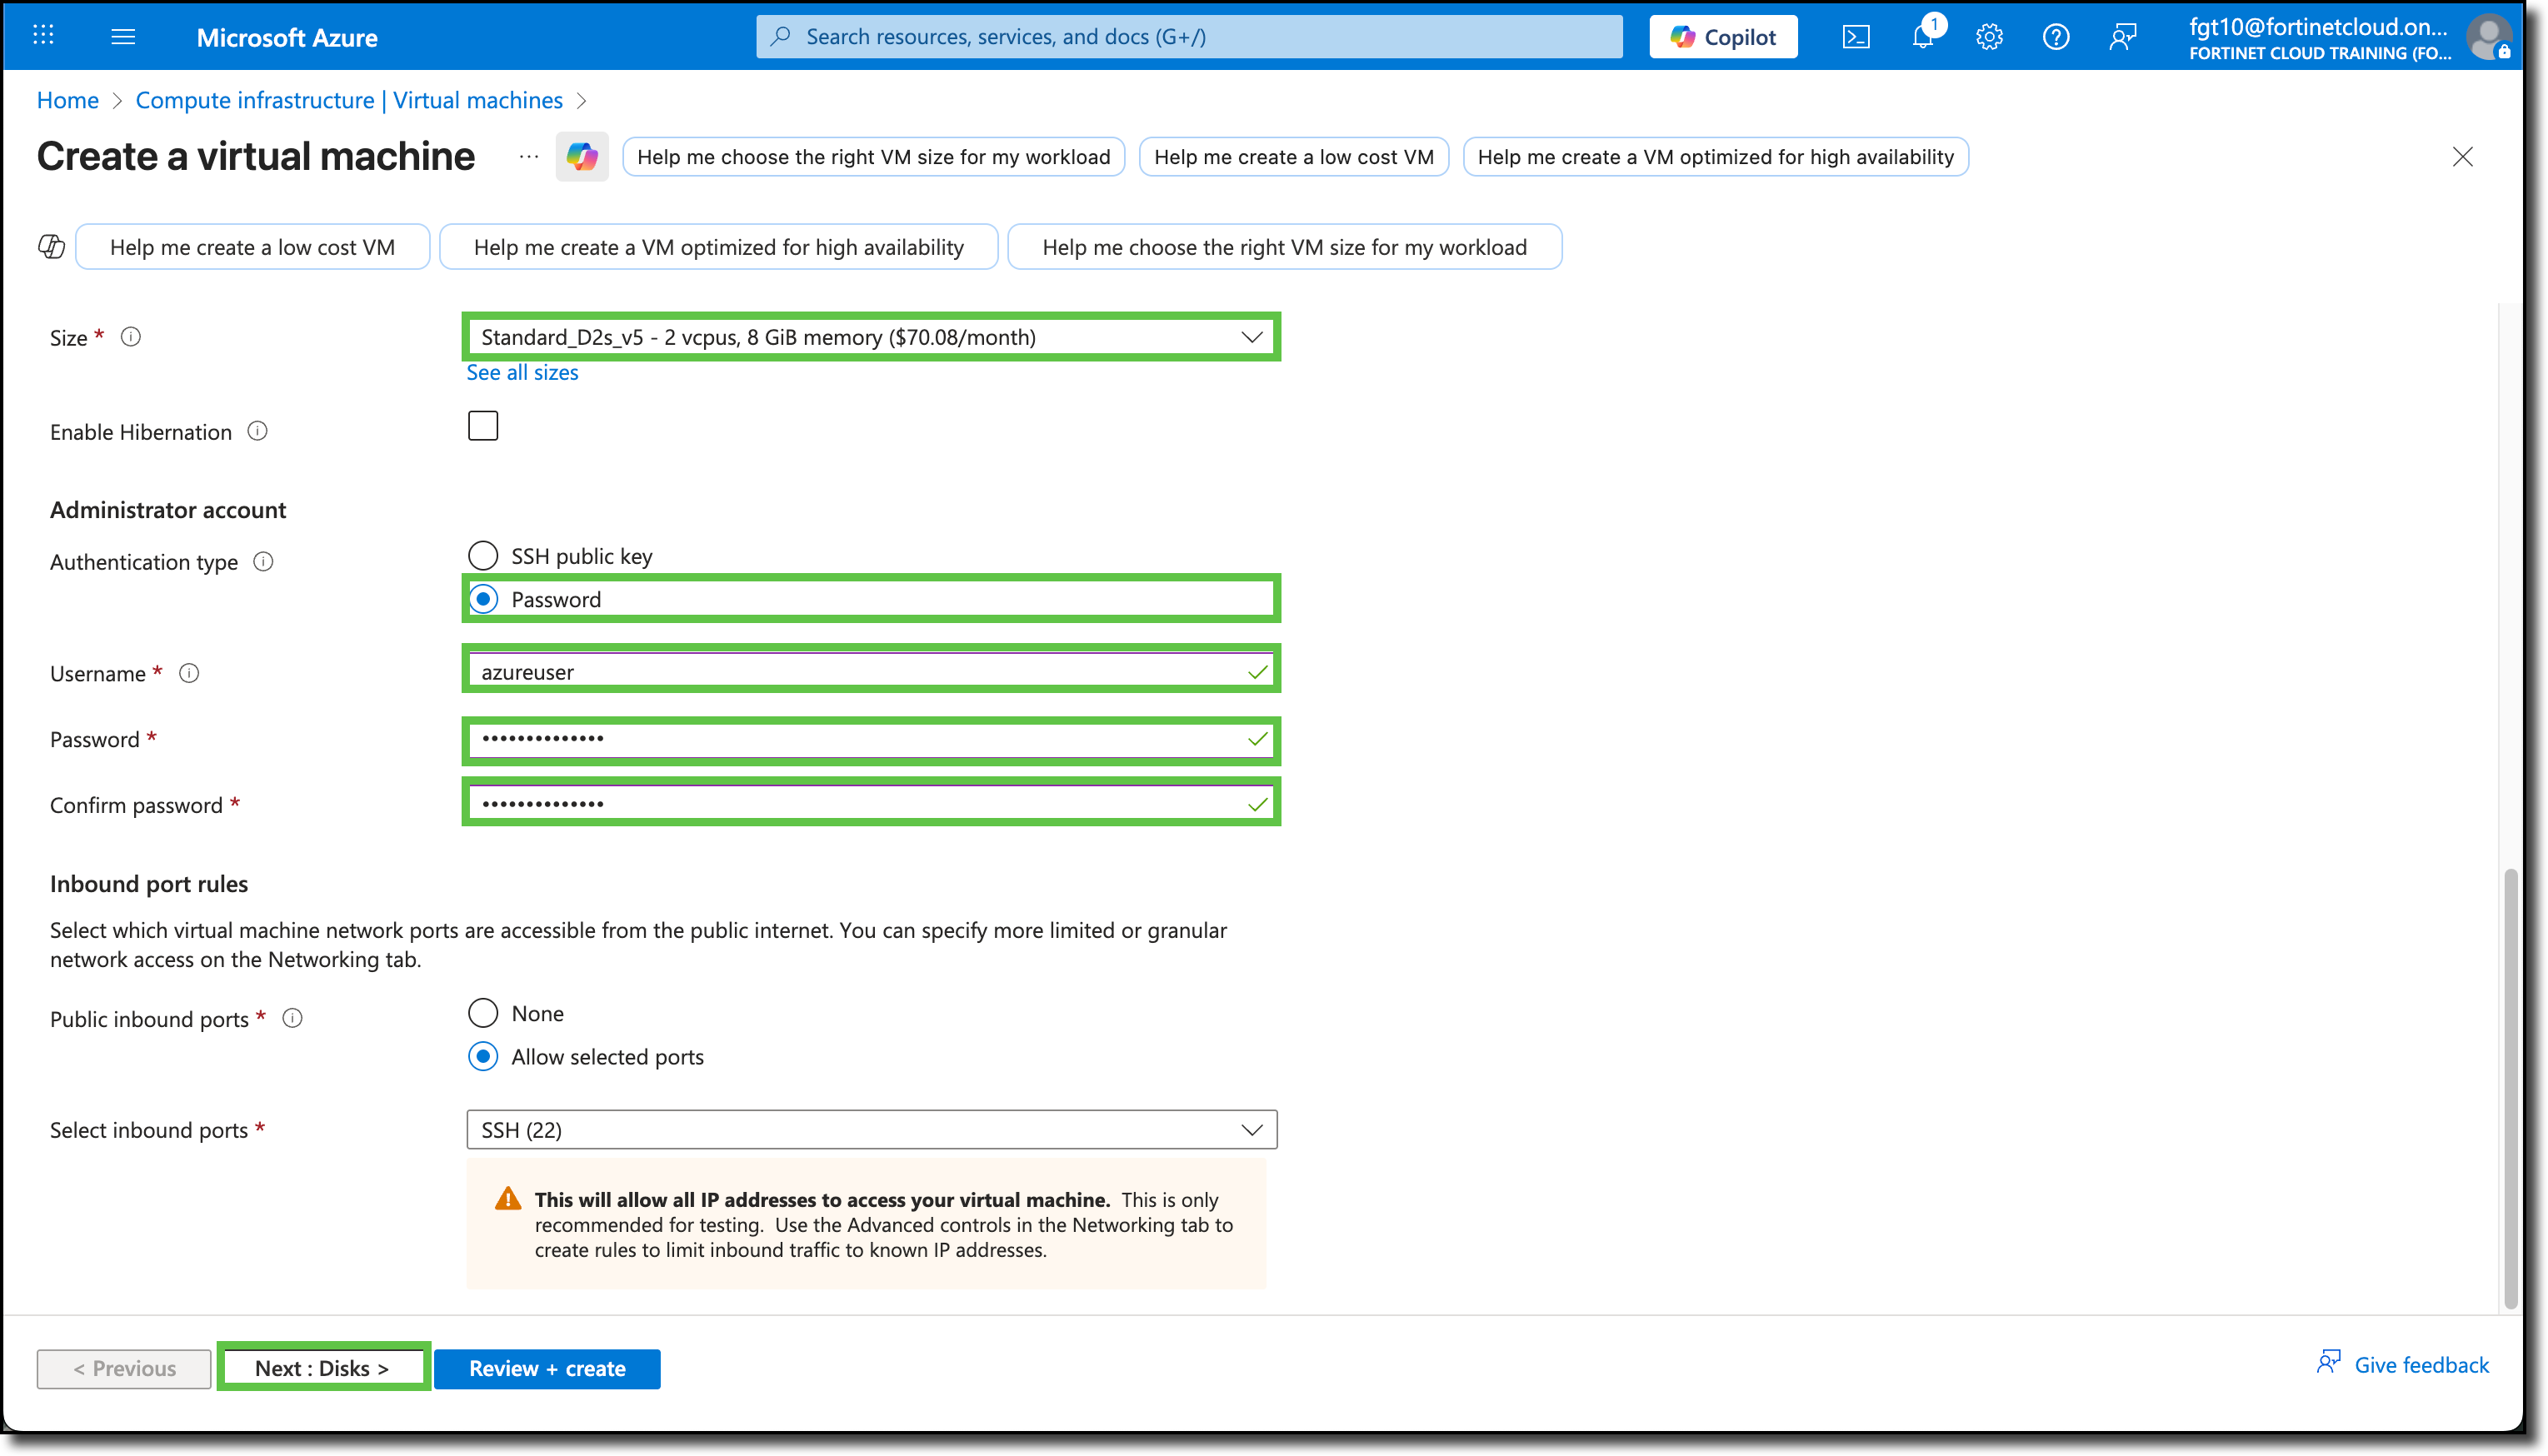
Continuing from Create a virtual machine Basics tab:
Authentication type: Password
Username: azureuser
Password: 123Password#@!
Confirm password: 123Password#@!
Confirm the changes and the other field’s default entries match as shown here.
ClickNext: Disks >.
On the Disk tab, keep the default settings, take a moment to review the available disk services and settings.
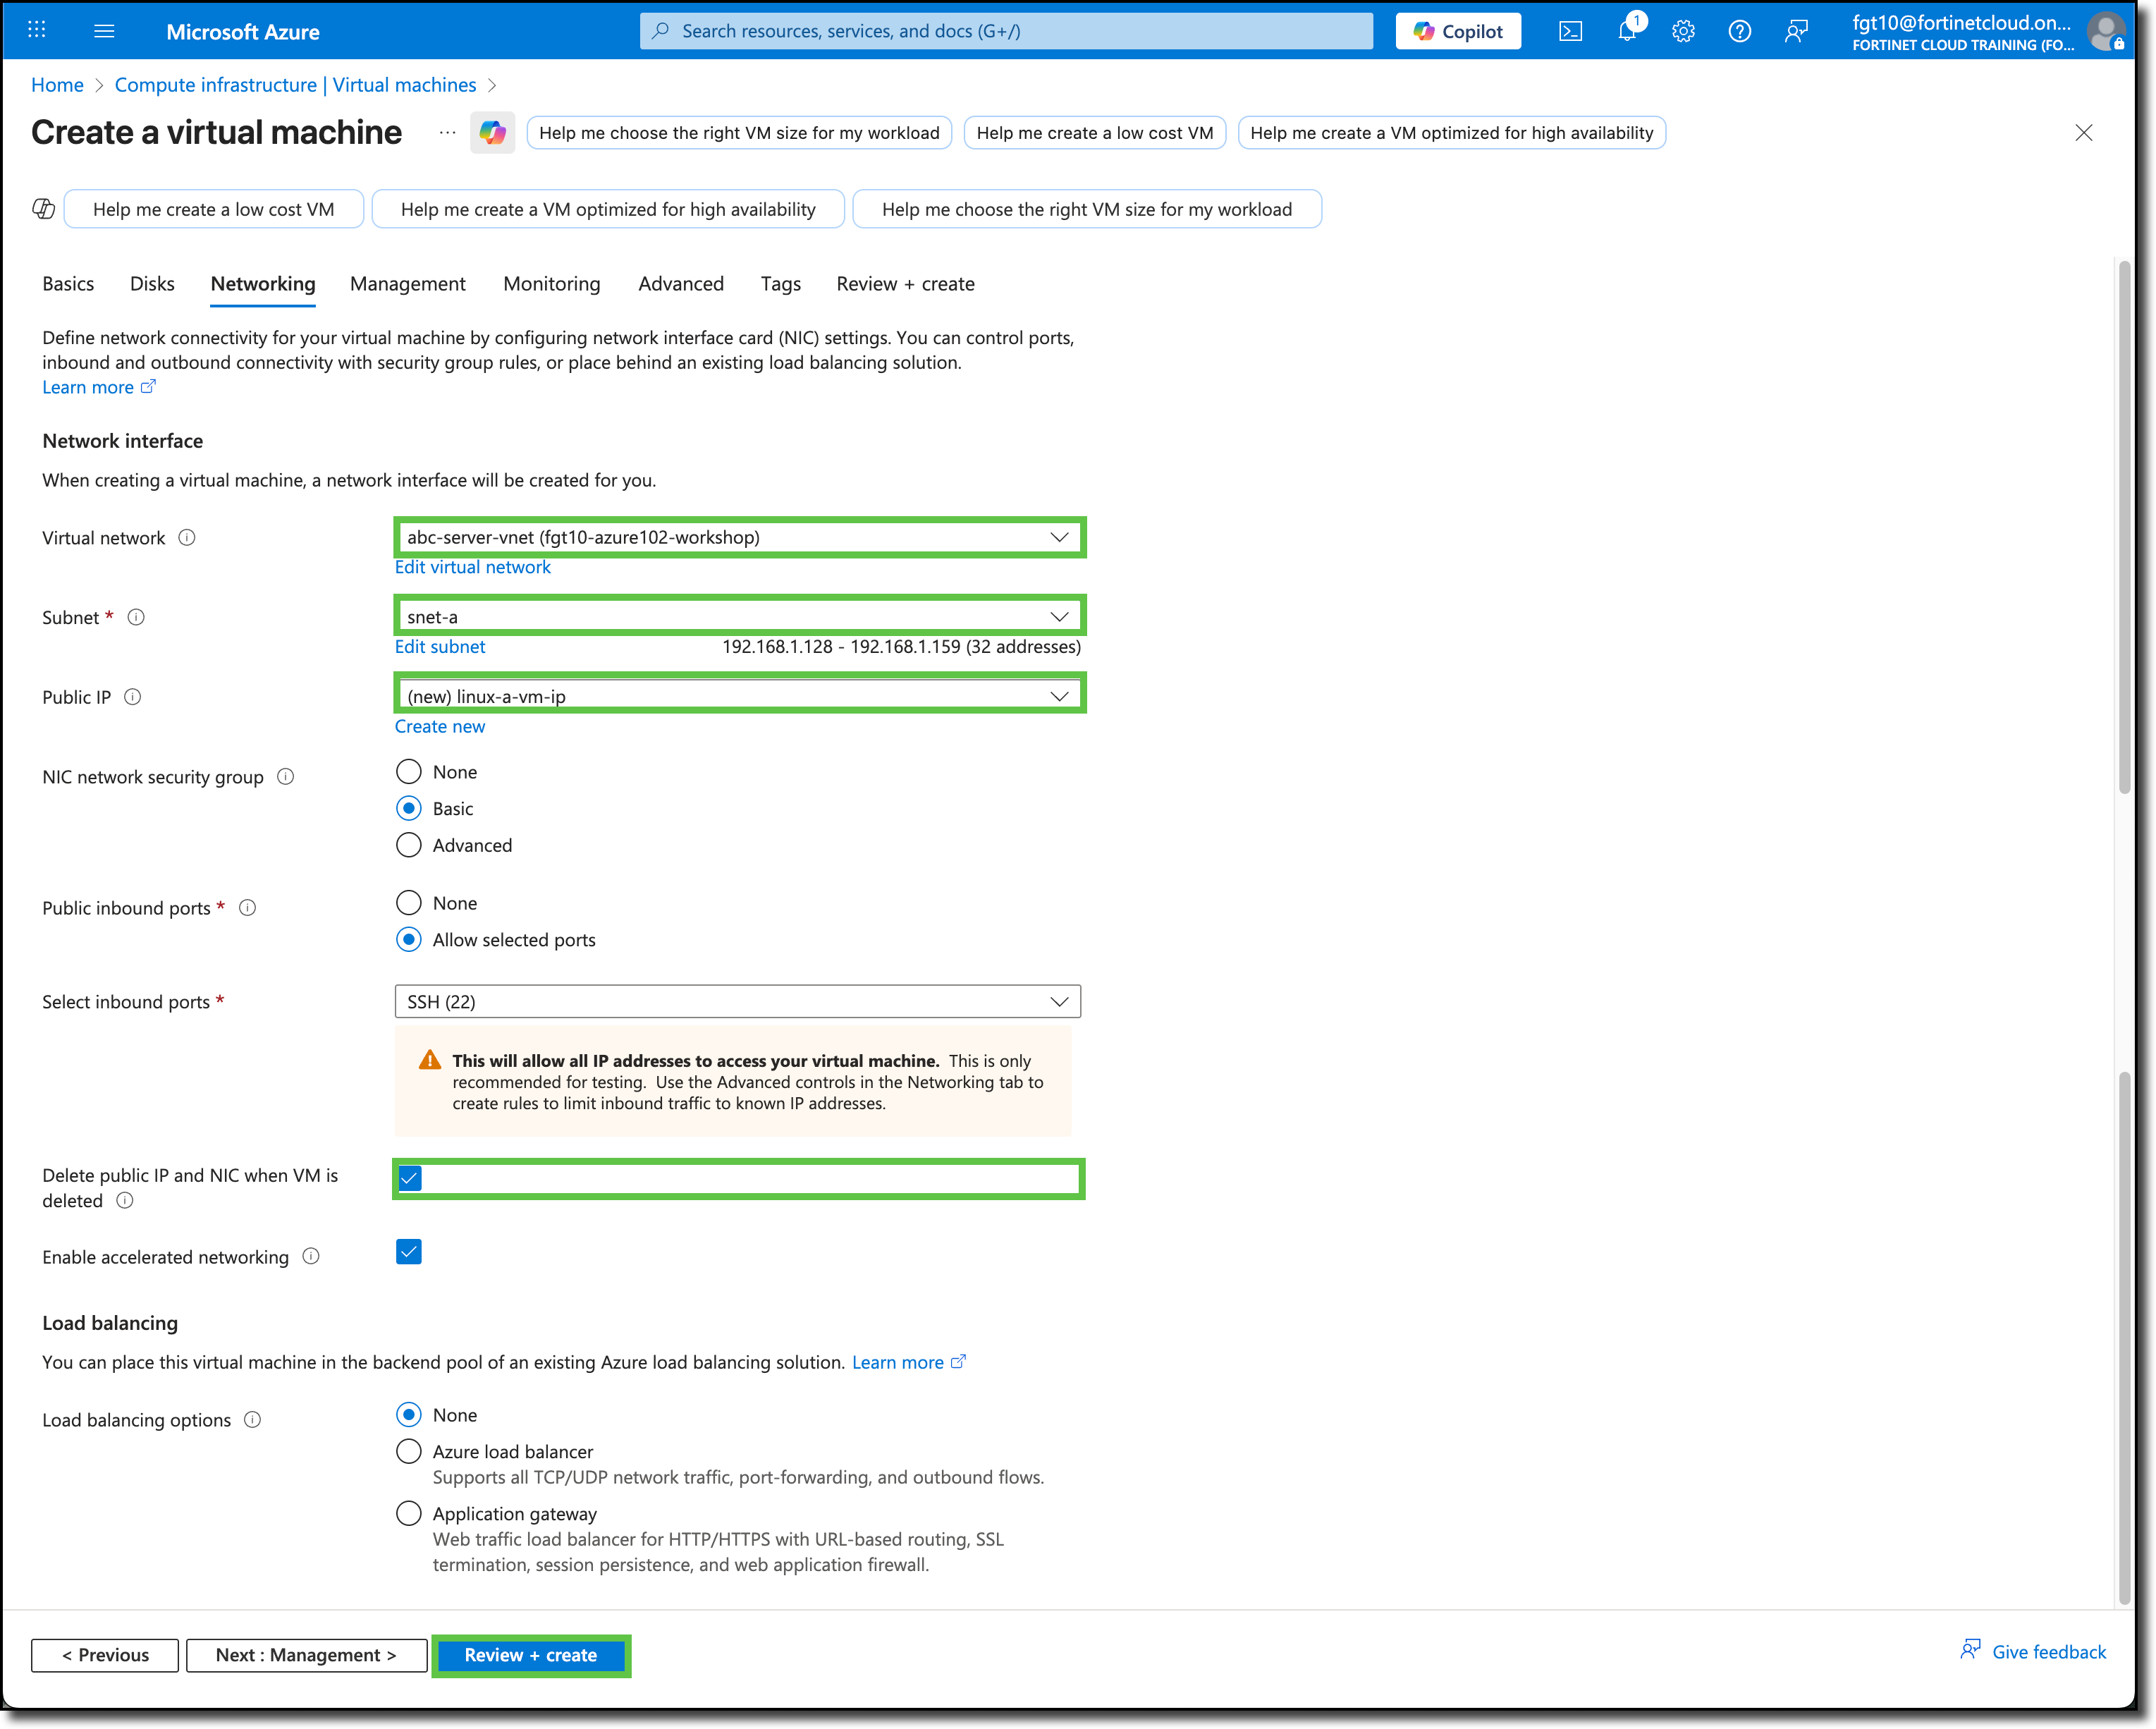
Click “Next: Networking >”
On the Networking tab, update the following fields:
(Leave the default entry of the other fields not listed here)
Virtual network: Selectabc-server-vnet
Subnet: Selectsnet-a (192.168.1.128/27)
Delete public IP and NIC when VM is deleted: Select
Confirm the changes and the other field’s default entries match as shown here.
Select Review + create >.
Note
You are skipping the Management, Monitoring, Advanced, and Tags tabs. Feel free to review those tabs to view the available services and settings on those tabs.
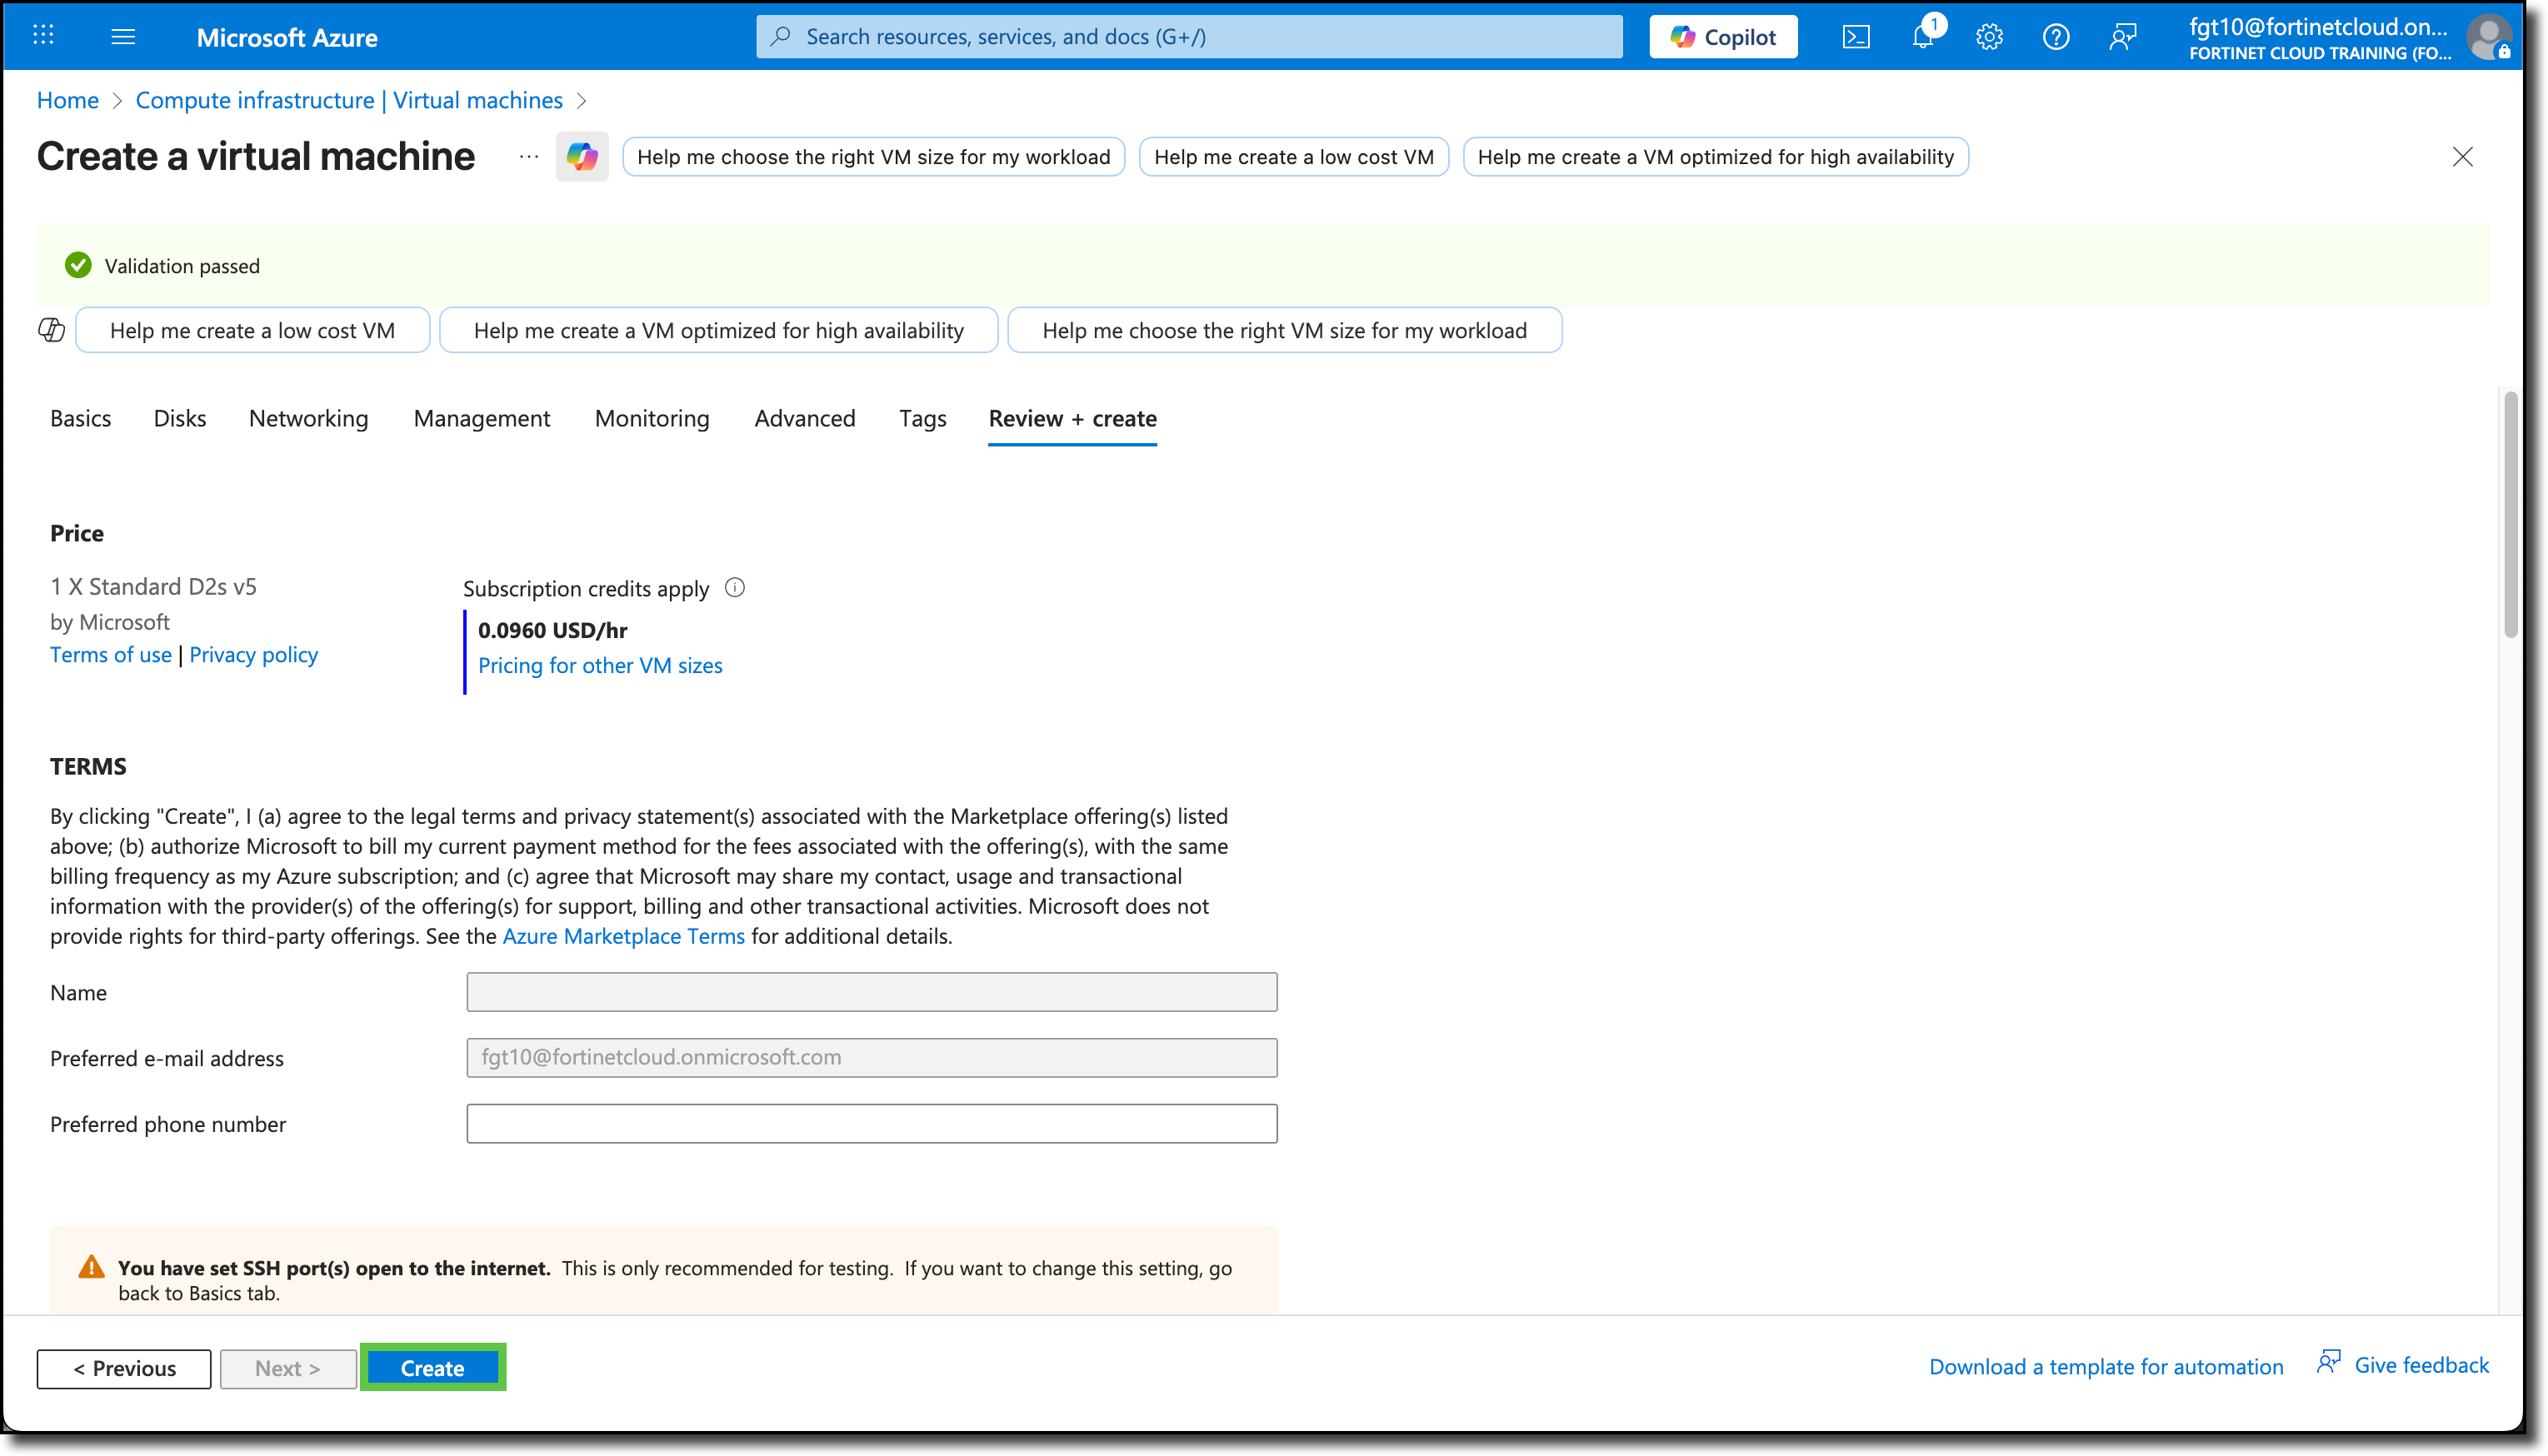
Confirm the template validation has passed and select Create
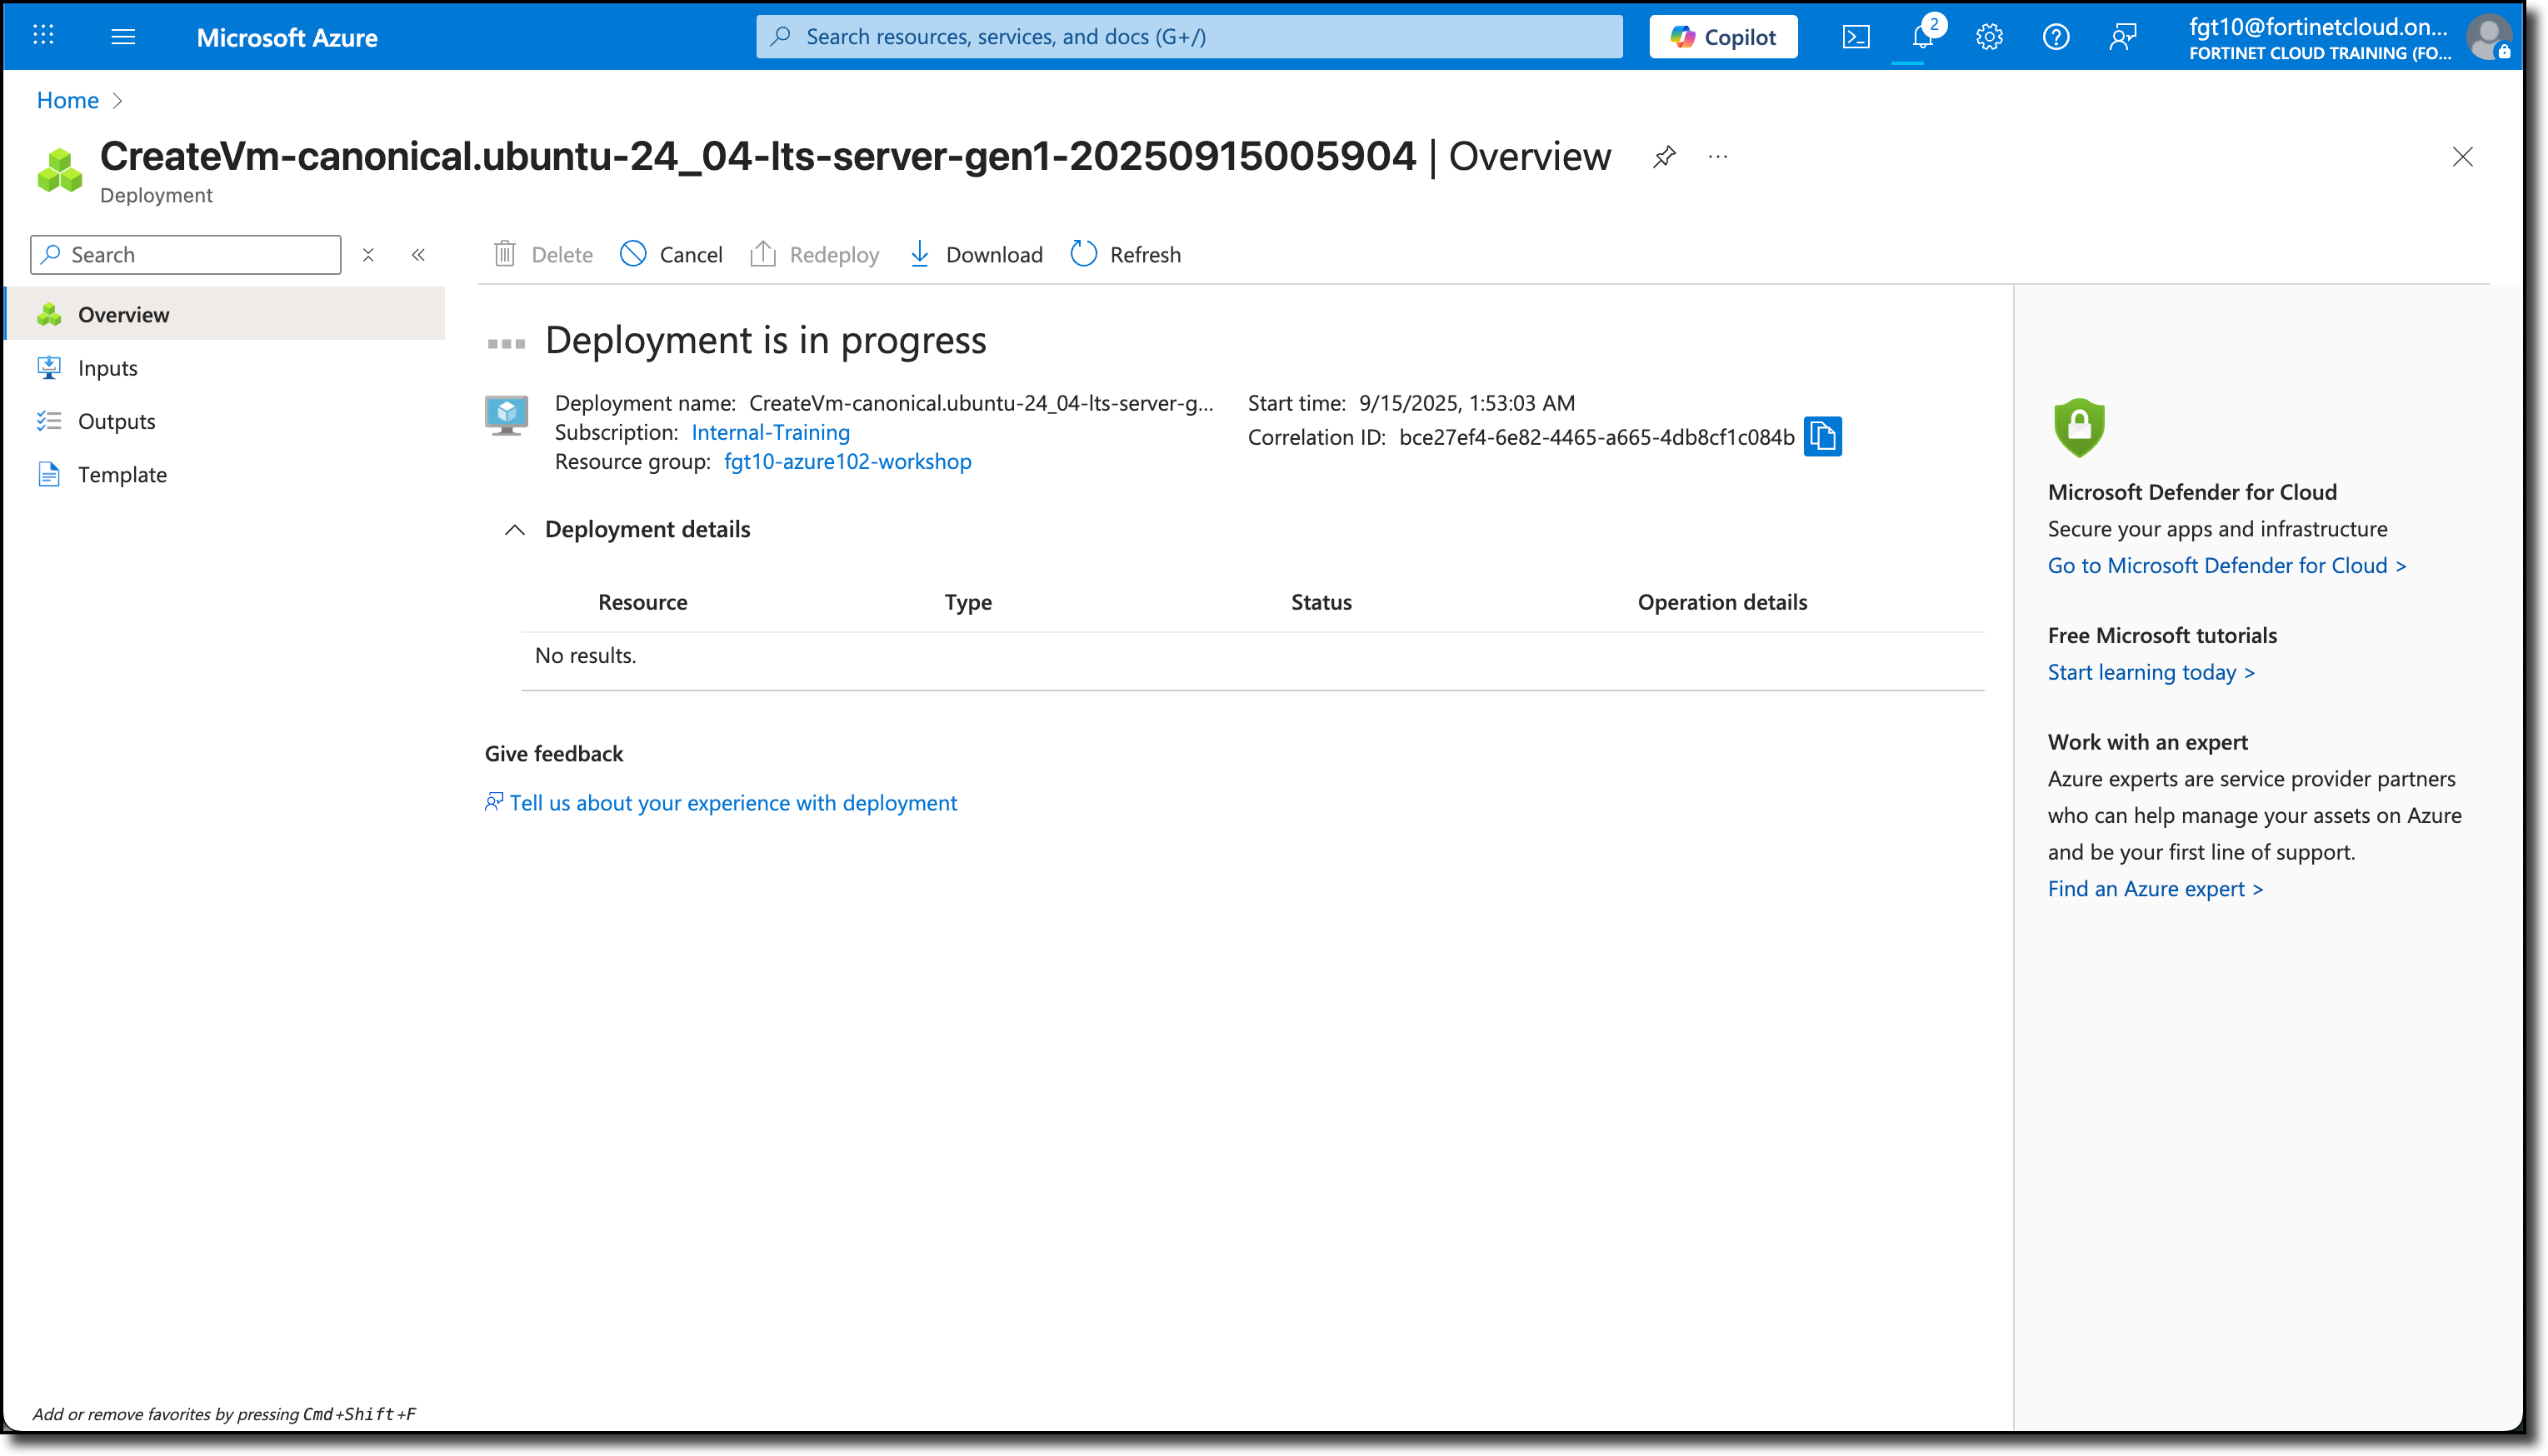
The Deployment is in progress notice is displayed.
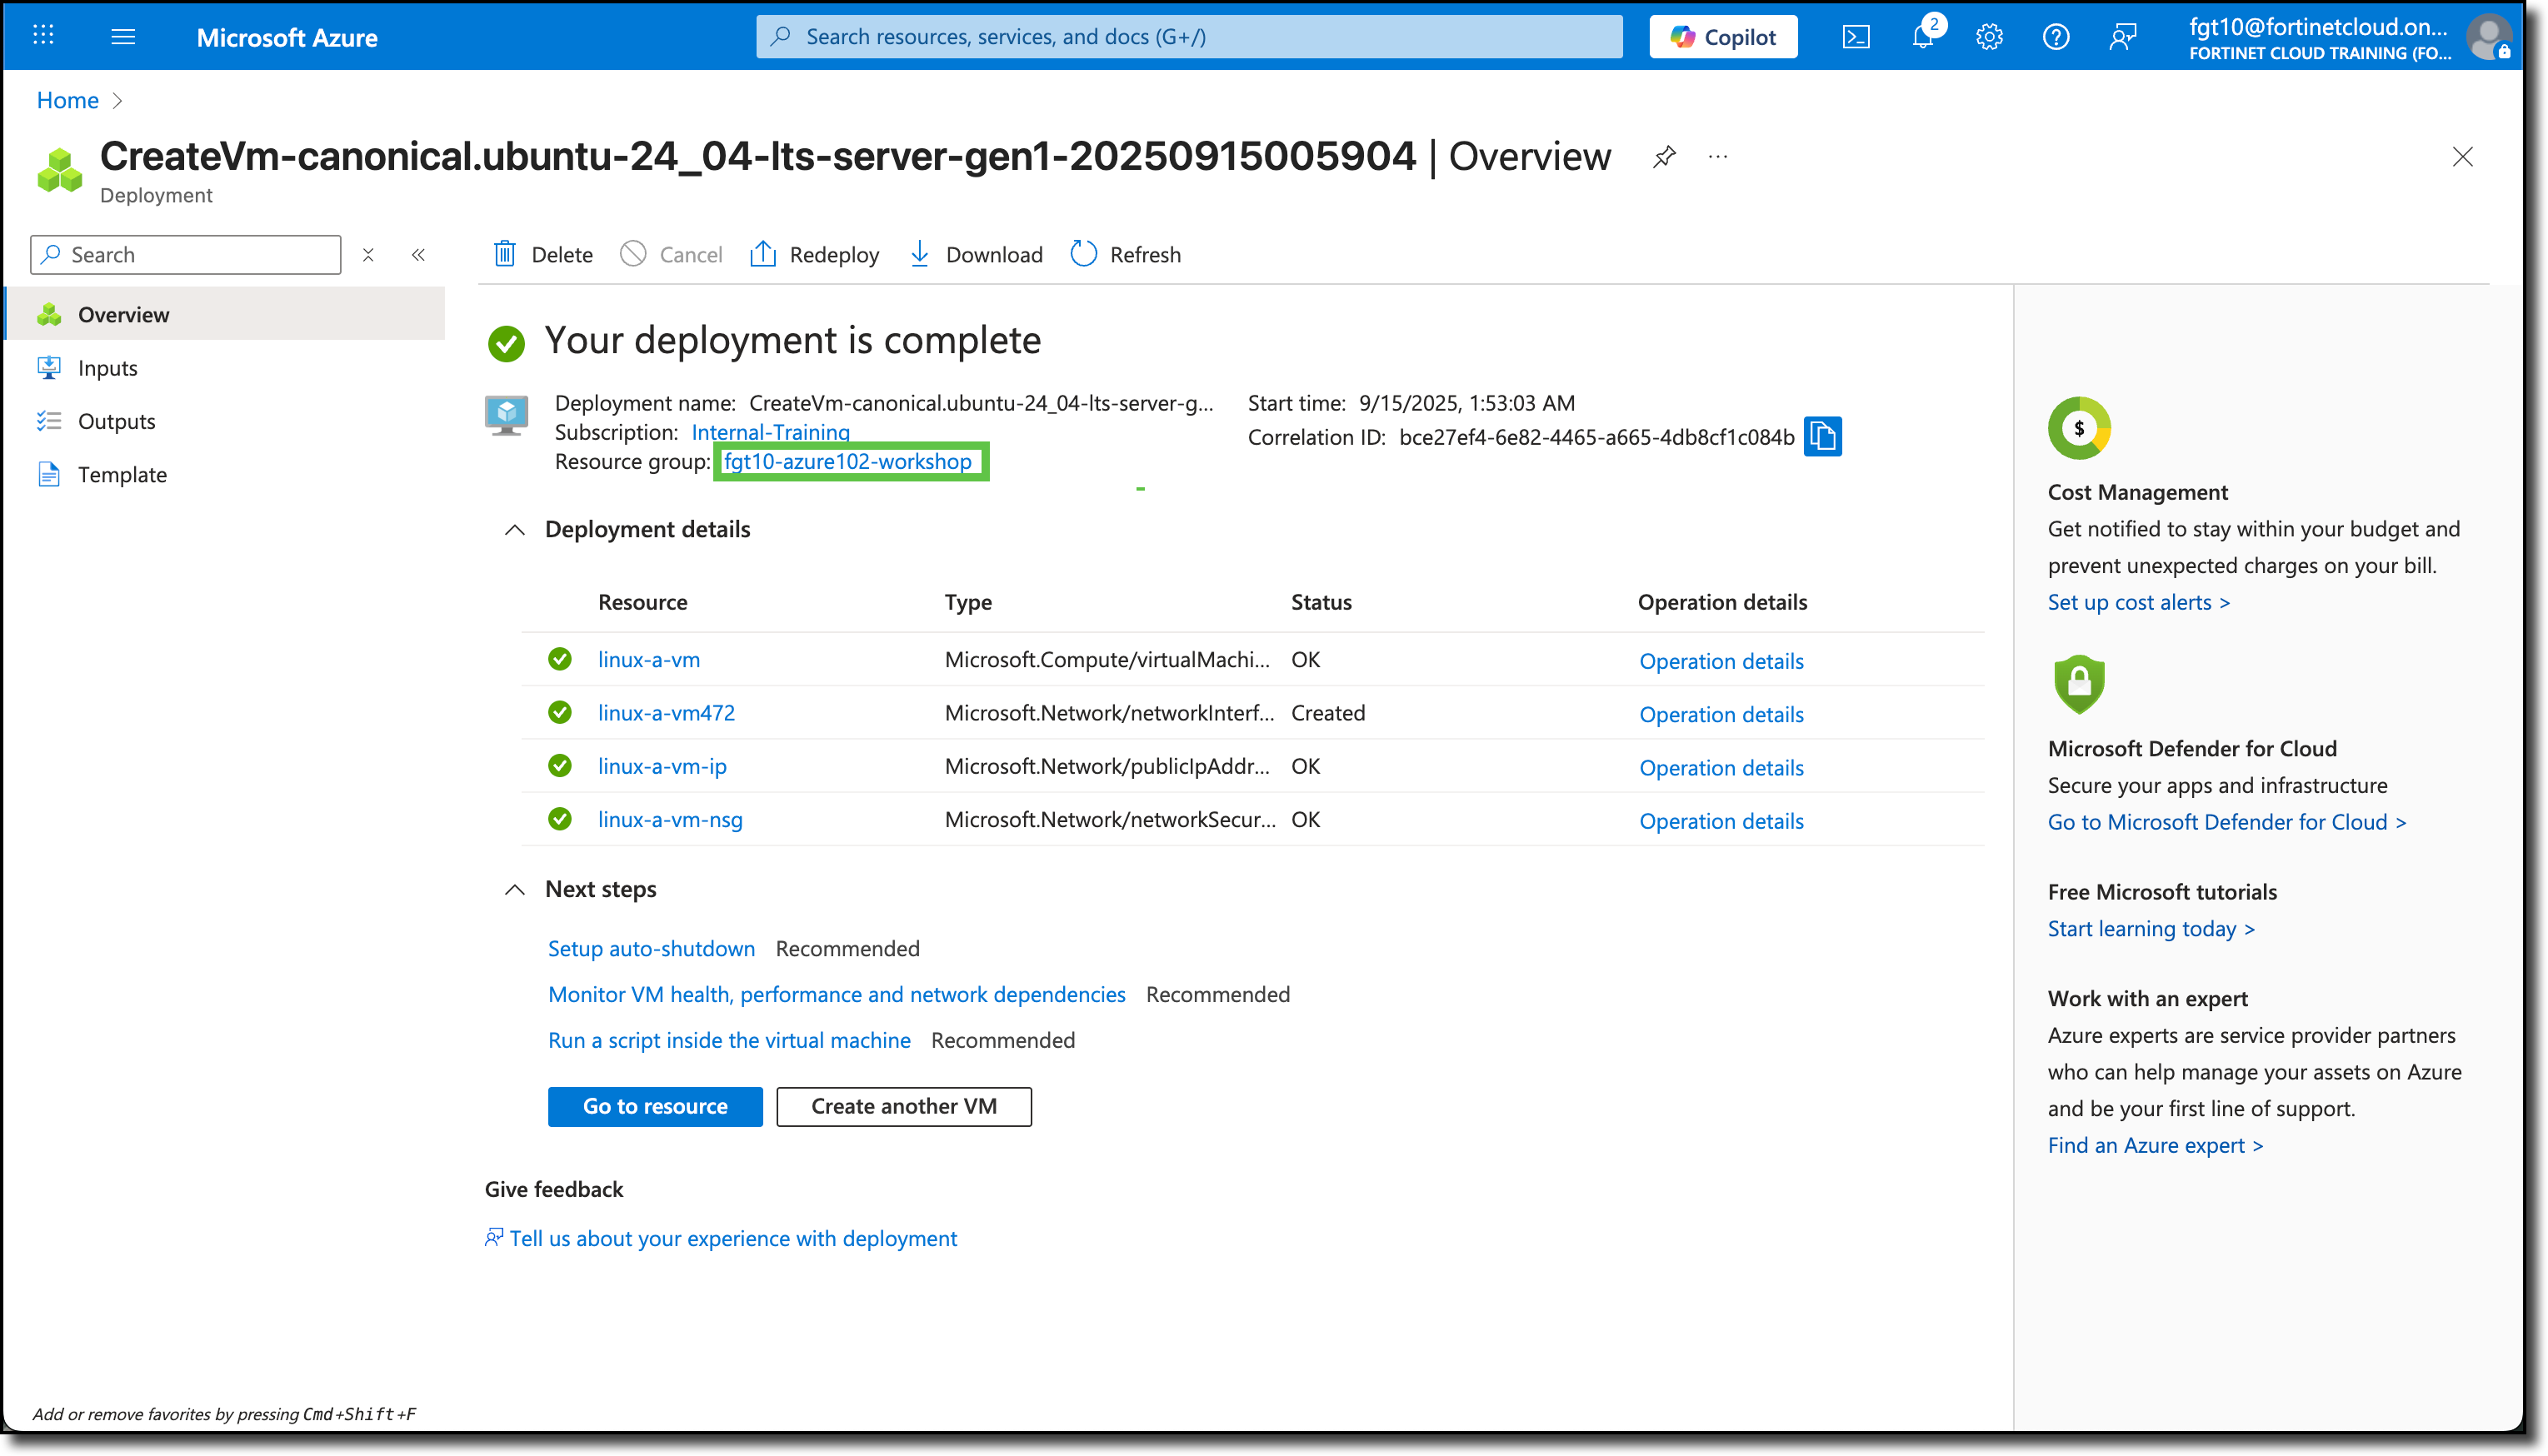
Once the Your deployment is complete notice is displayed, click on the fgtXX-azure102-workshop link to be re-directed to your Resource Group.
Verify the new linux-a-vm and the associated components are listed.
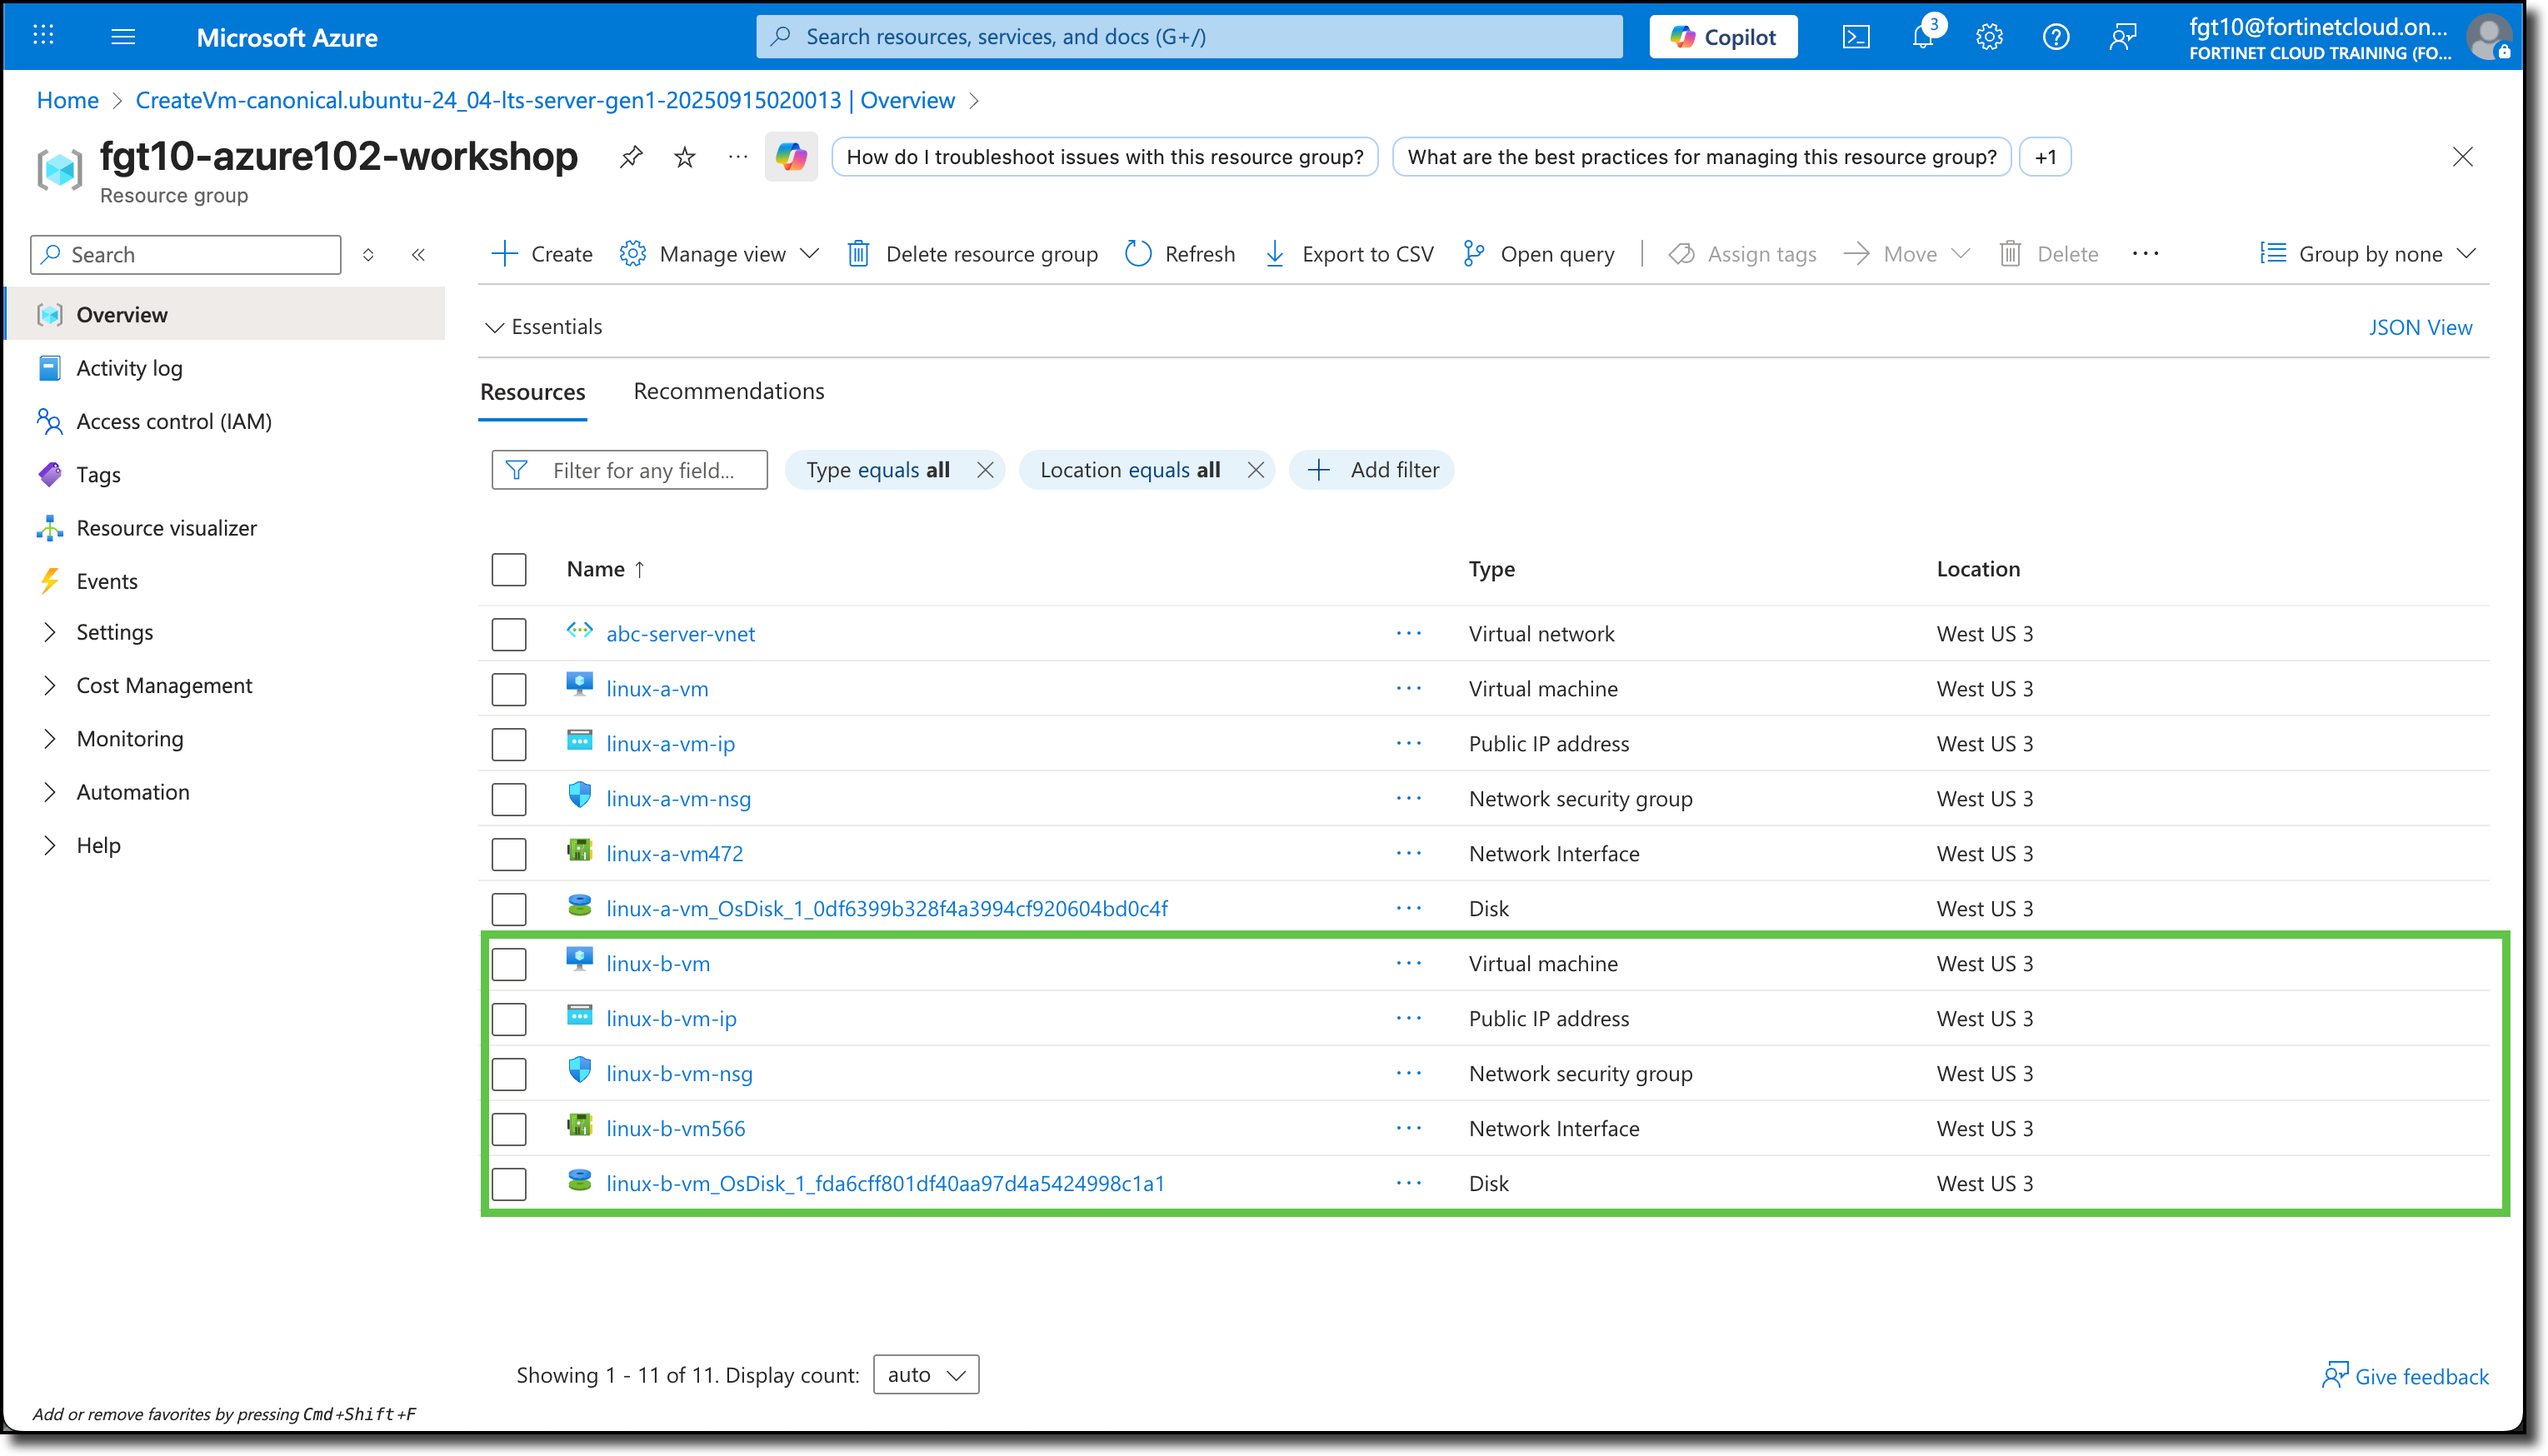
Steps to create linux-b-vm
Follow the same steps to create the linux-b-vm. You will need to alter the following where appropriate:
Virtual machine name: linux-b-vm
Subnet: snet-b (192.168.1.160/27)
Verify the new linux-b-vm and the associated components are listed.
Task 3: Identify VM Information and Unsecured Services
Login to Linux VM Serial Console
Now that both Linux virtual machines, linux-a-vm and linux-b-vm, have been deployed, you are going to identify their assigned private and public IP (PIP) addresses, confirm which ports are open on each VM, and what access is available to and from their assigned subnets.
In the following steps 1-6, you will navigate and identify IP information for both VMs and login to each VM via the serial console, in Azure.
Tip
Access the serial console of each virtual machine in different browser tabs.
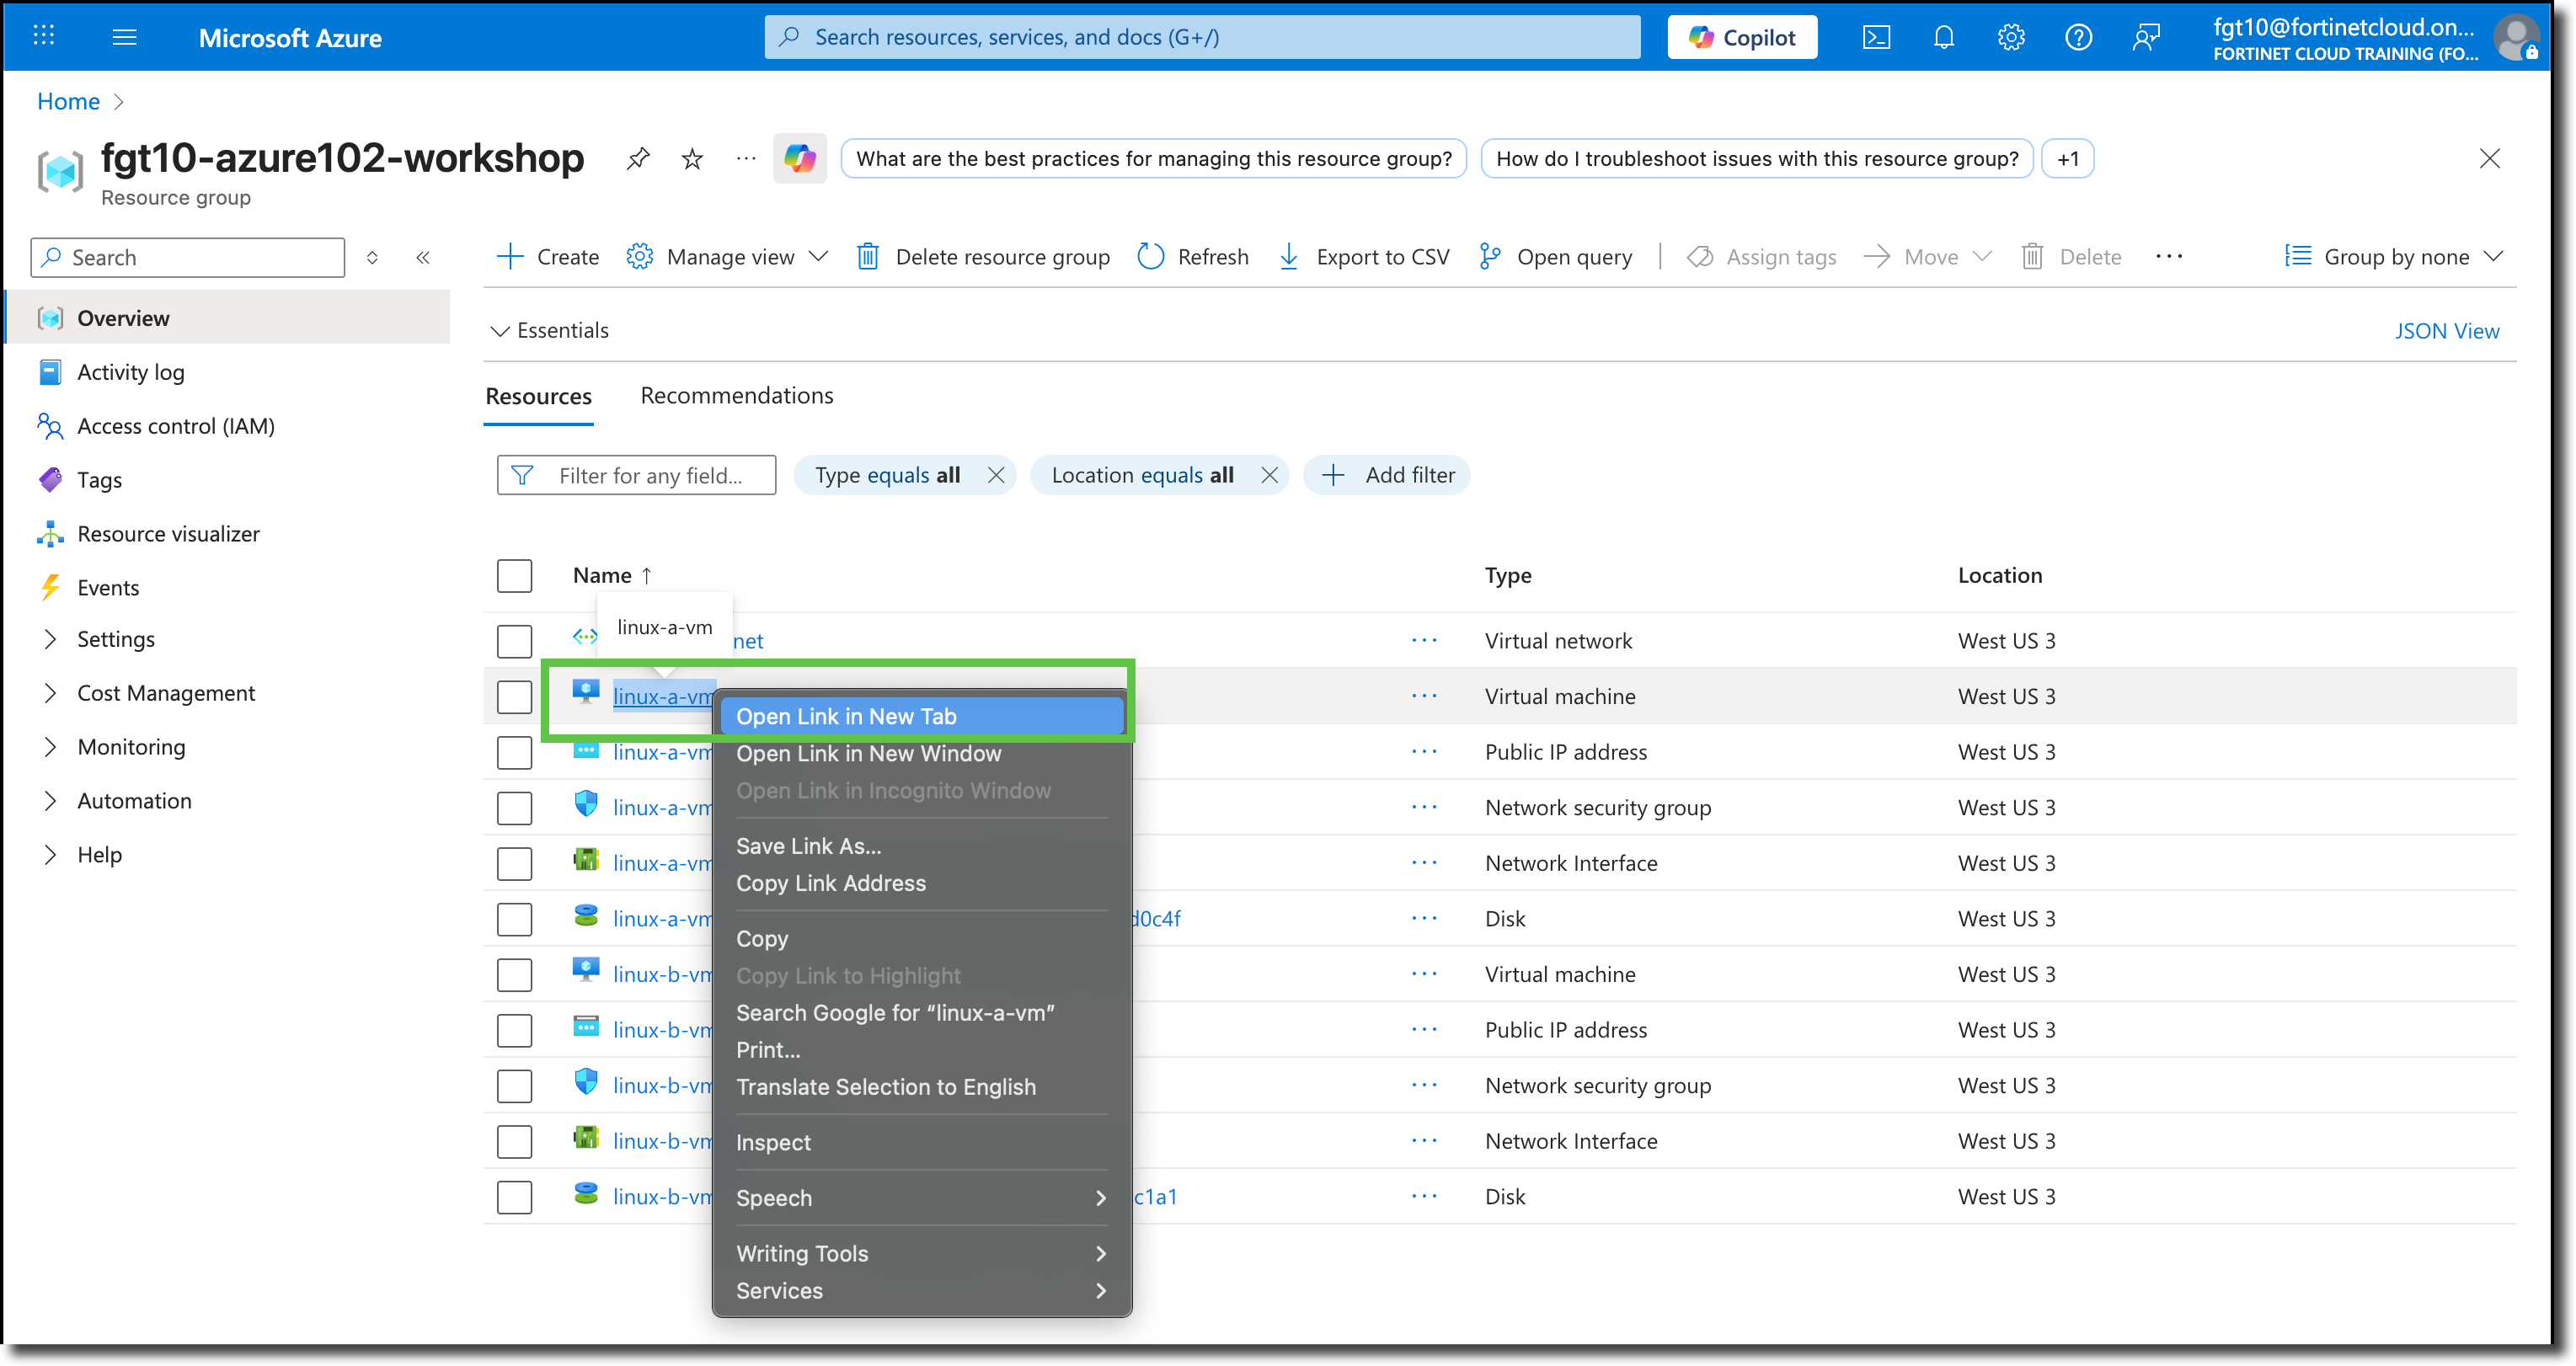
Navigate to your Resource Group
Right Click on the virtual machine linux-a-vm
Select “Open Link in New Tab”
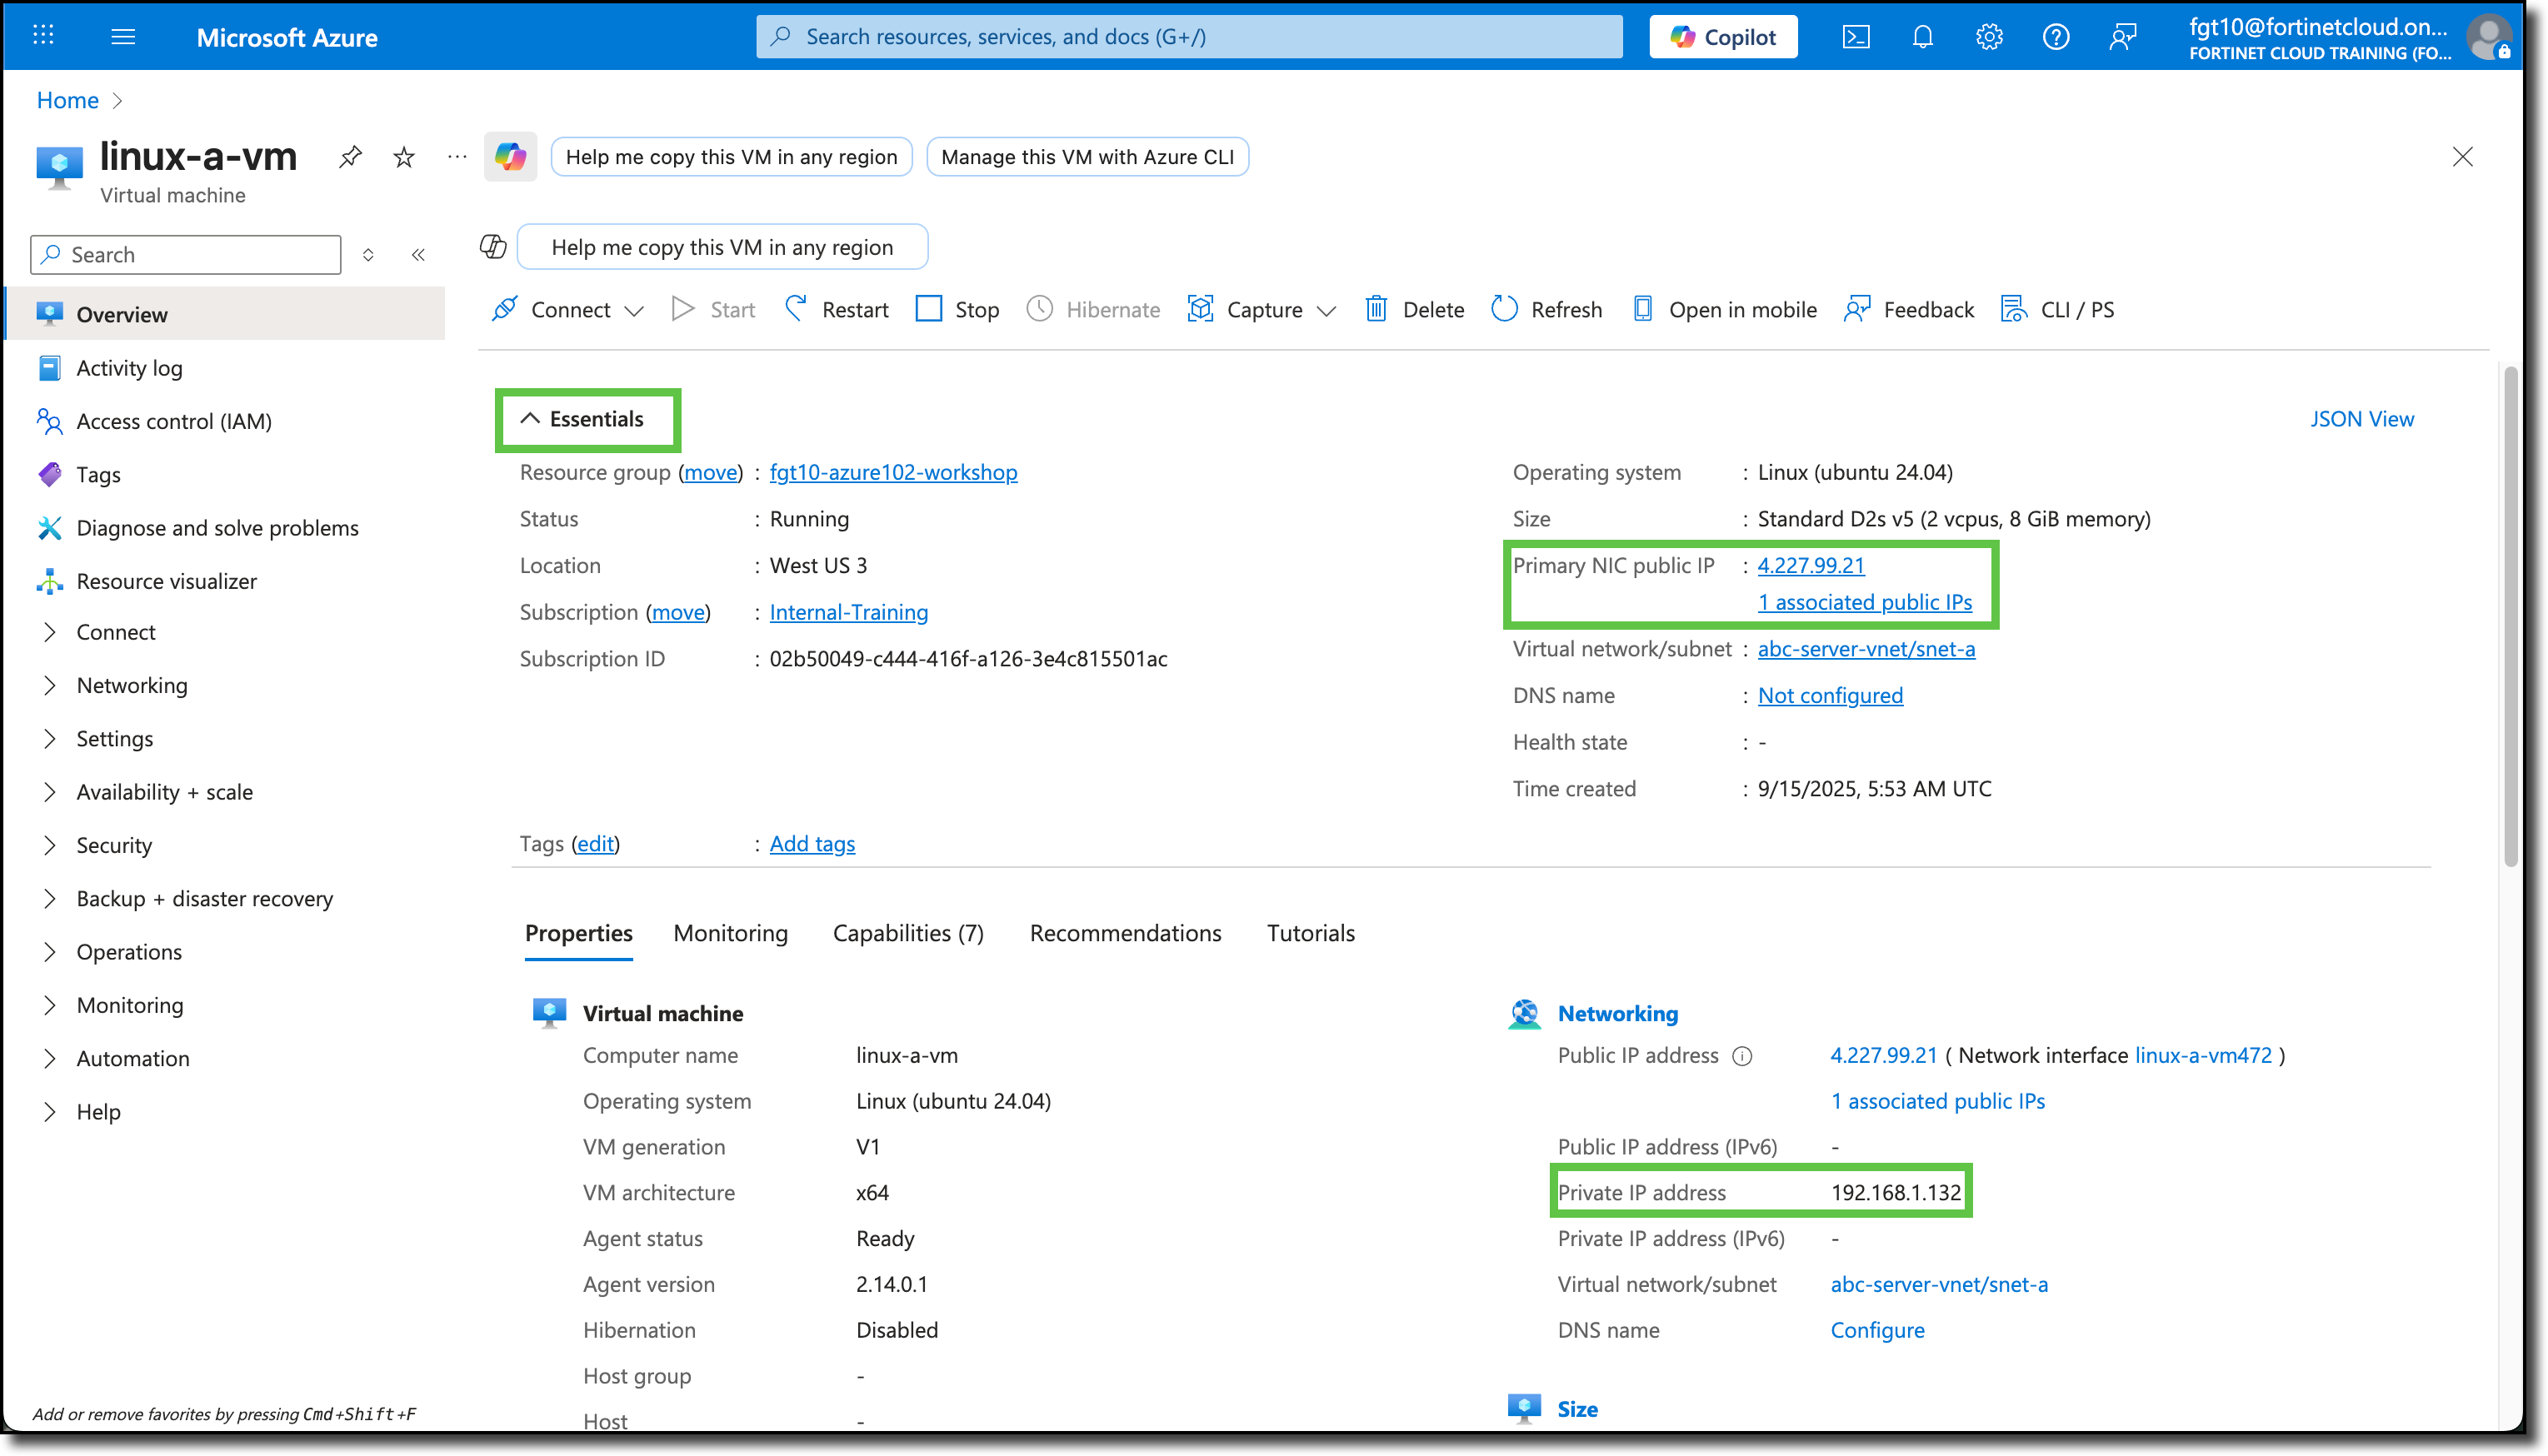
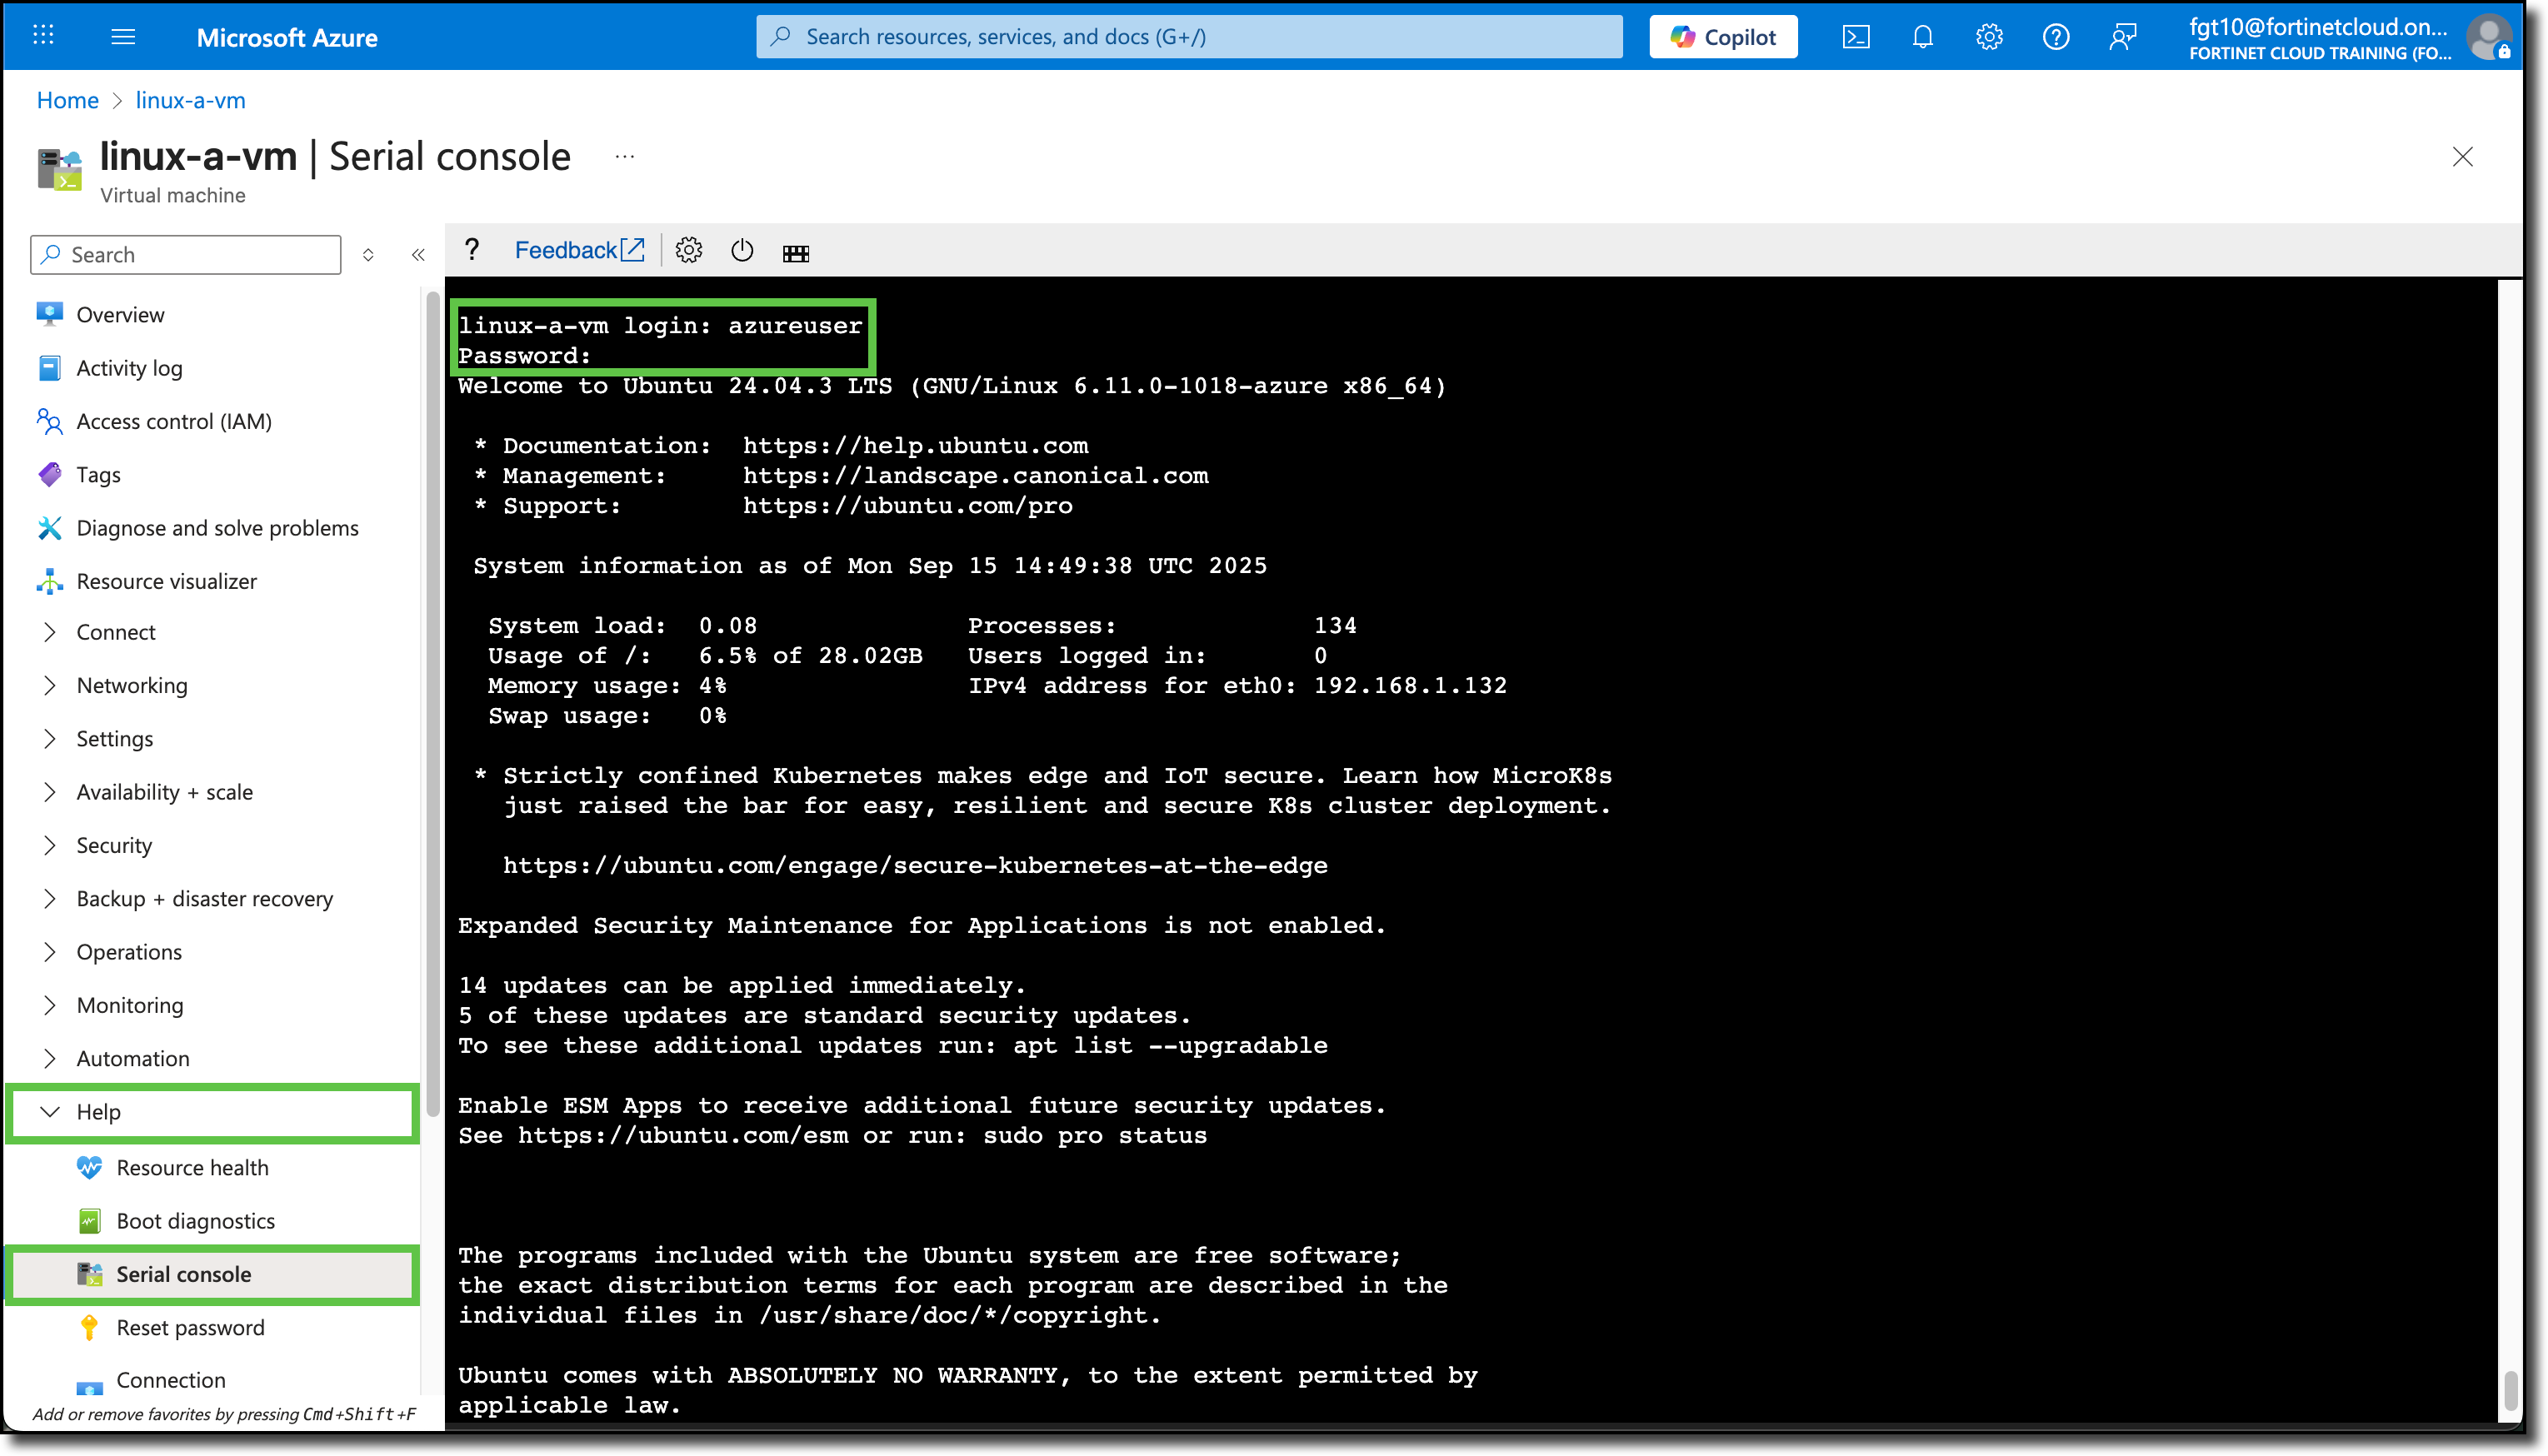
The browser tab will open to the linux-a-vm Overview page, under the Essentials and Properties sections, right-hand side, identify the assigned private and public IP of linux-a-vm
Navigate to the bottom of the left-side menu
Expand “Help”
Select “Serial console”
Login to the linux-a-vm console using the credentials used when creating the linux-a-vm.
Repeat the same process to login to the serial console of **linux-b-vm-in another tab
The VNET security policy for company ABC is as follows
linux-a-vm will be the management server. Per company ABC security policy:
linux-a-vm should only have SSH and PING access to linux-b-vm
linux-a-vm should have HTTP/HTTPS access to the Internet
linux-a-vm should be SSH accessible from the Internet
linux-b-vm is the www server. Per company ABC security policy:
linux-b-vm should be HTTP accessible from the Internet
linux-b-vm should have HTTP and HTTPS access to the Internet
linux-b-vm should only have PING access to linux-a-vm
The goals of the following steps, are to note:
Which service ports are open and listening on each VM
What access does each VM have across subnets
Which services to and from the Internet are available to each VM
Using this information, we can implement company ABC’s security policies when securing the VNET with a FortiGate
Configure linux-b-vm first
Tip
Use the linux clear command to clear the screen
Verify Connectivity and Services
Note
These commands are completed from the linux-b-vm
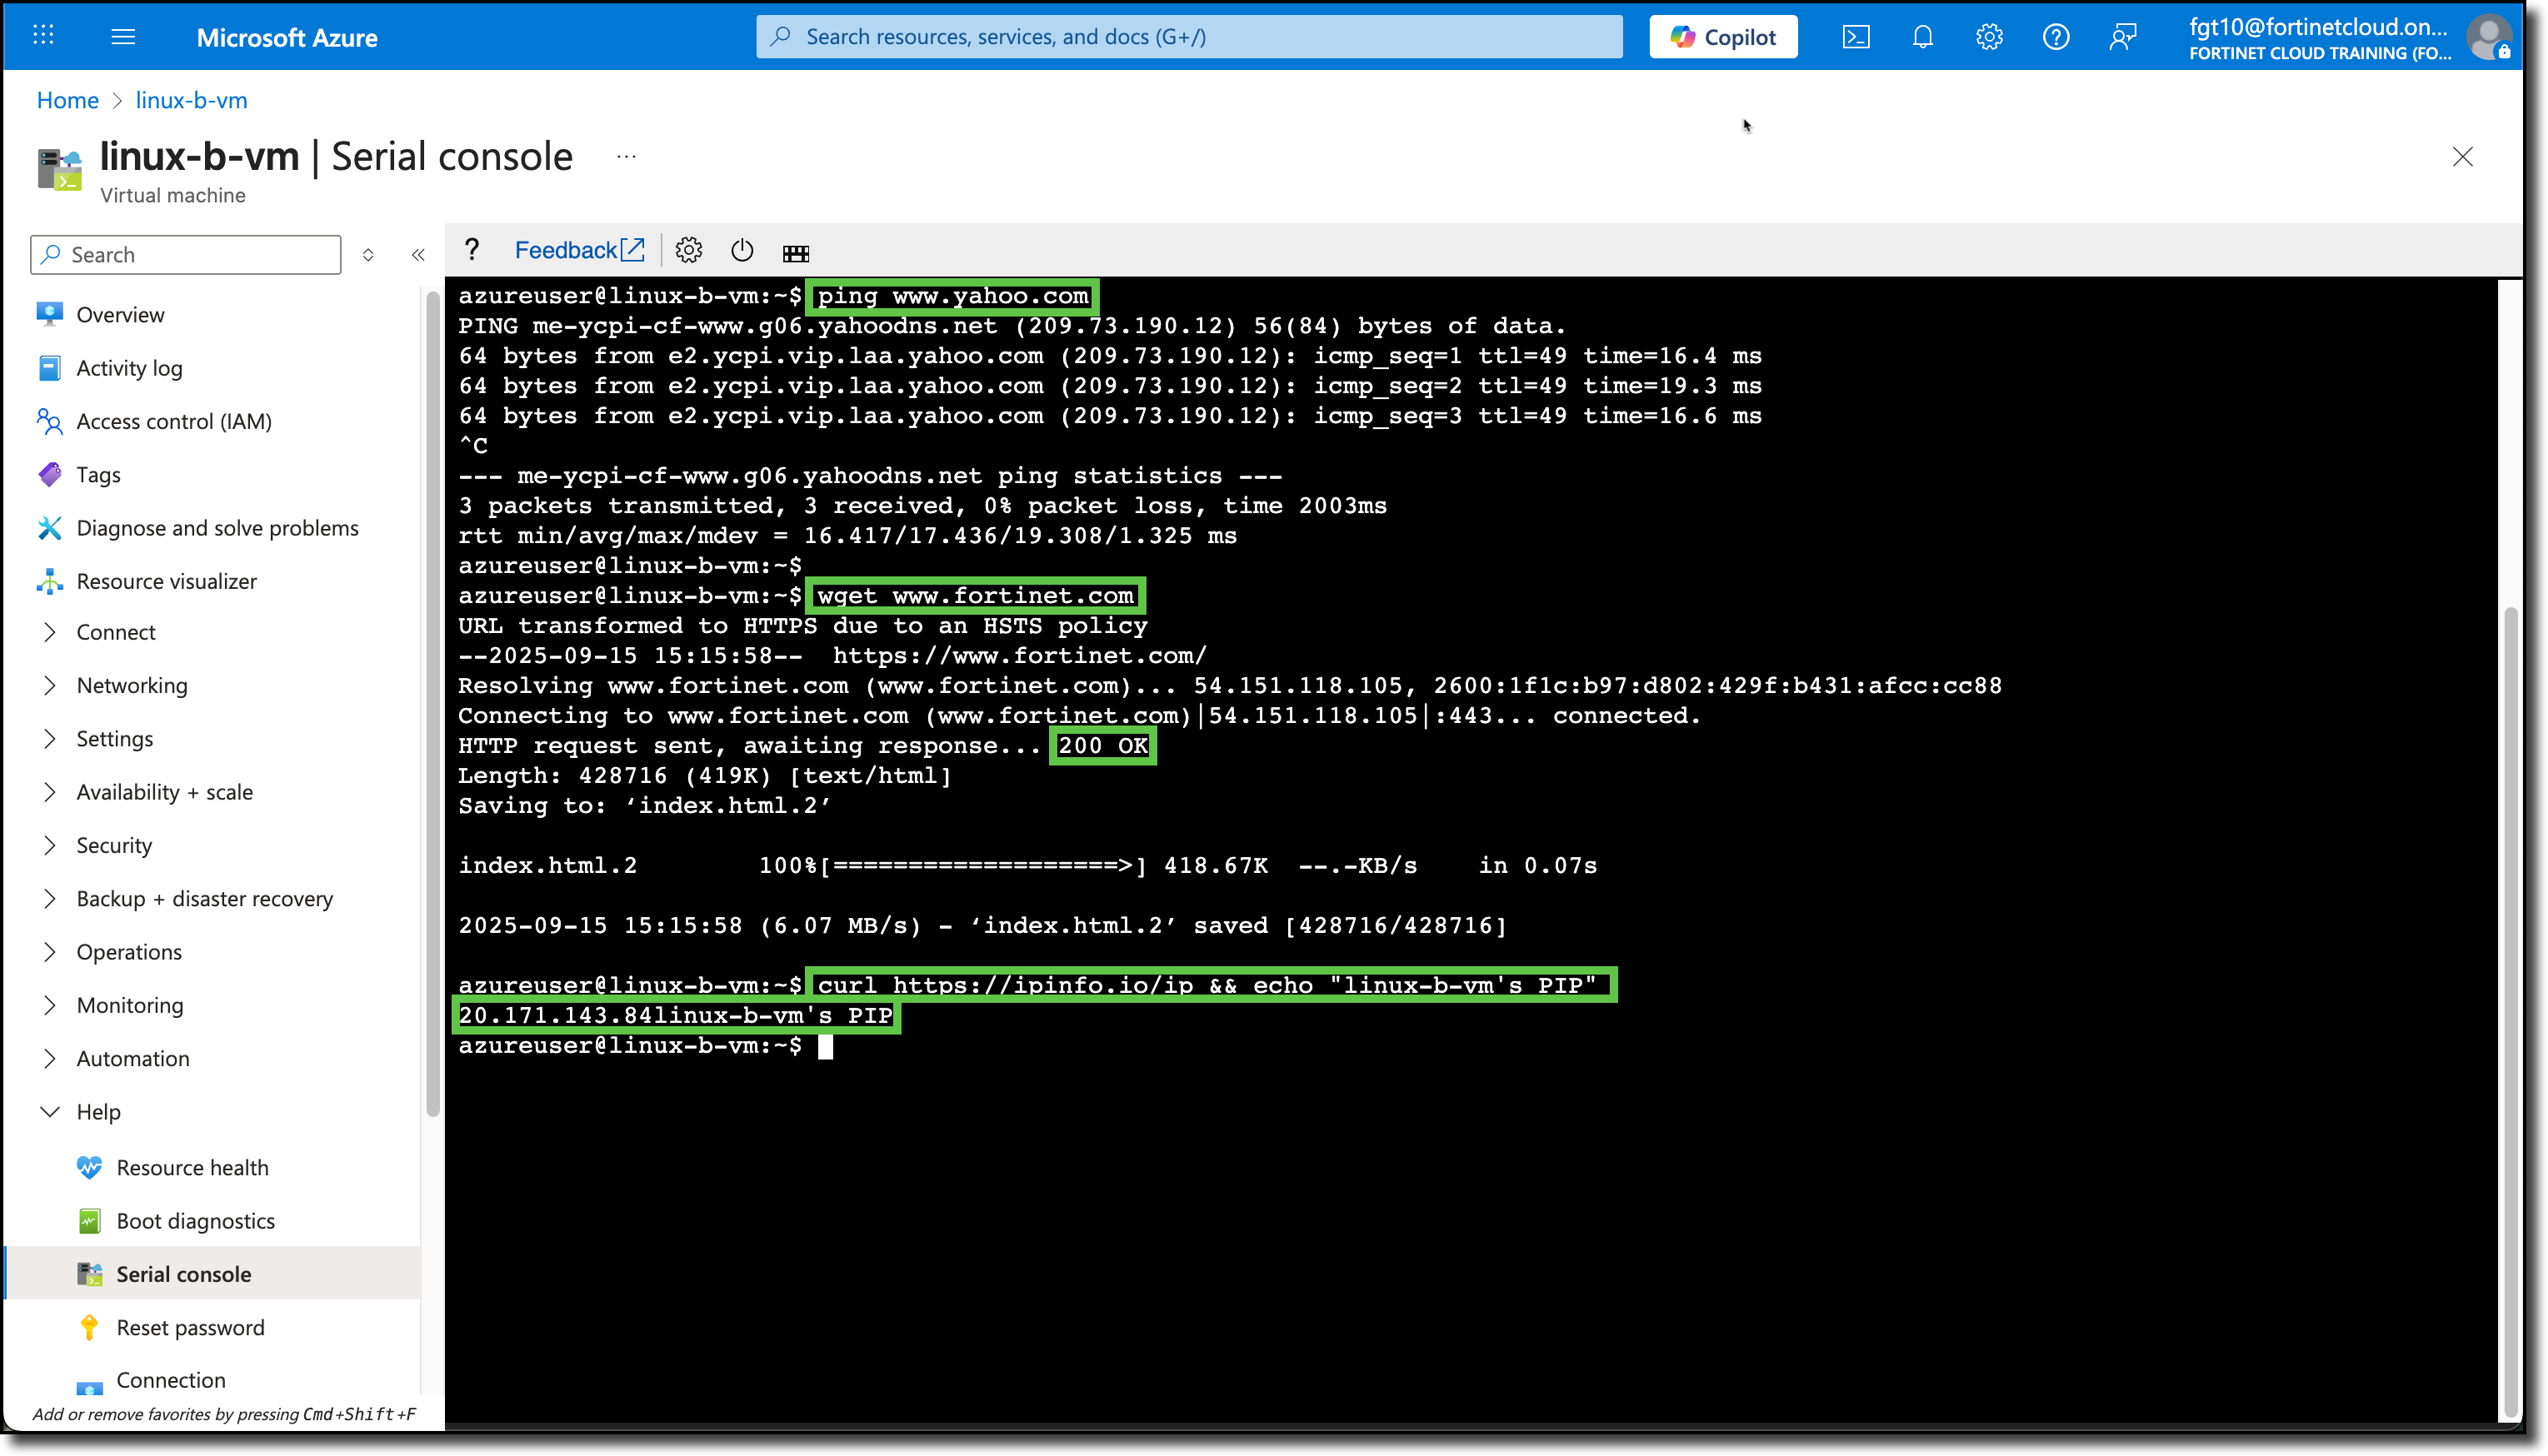
Use ping www.yahoo.com
confirms DNS and ICMP access to the Internet: (CTRL+c to stop ping)
Use wget www.fortinet.com
confirms port 80 access to the Internet: (Confirm “200 OK” response)
Use curl https://ipinfo.io/ip && echo " linux-b-vm's PIP"
confirms port 443 access to the Internet
confirms Public IP assigned to linux-b-vm: (Verify against what the Azure portal listed in the Overview section for this VM)
Check for and install Ubuntu updates
sudo apt update
sudo apt -y upgrade
clear after updates have finished
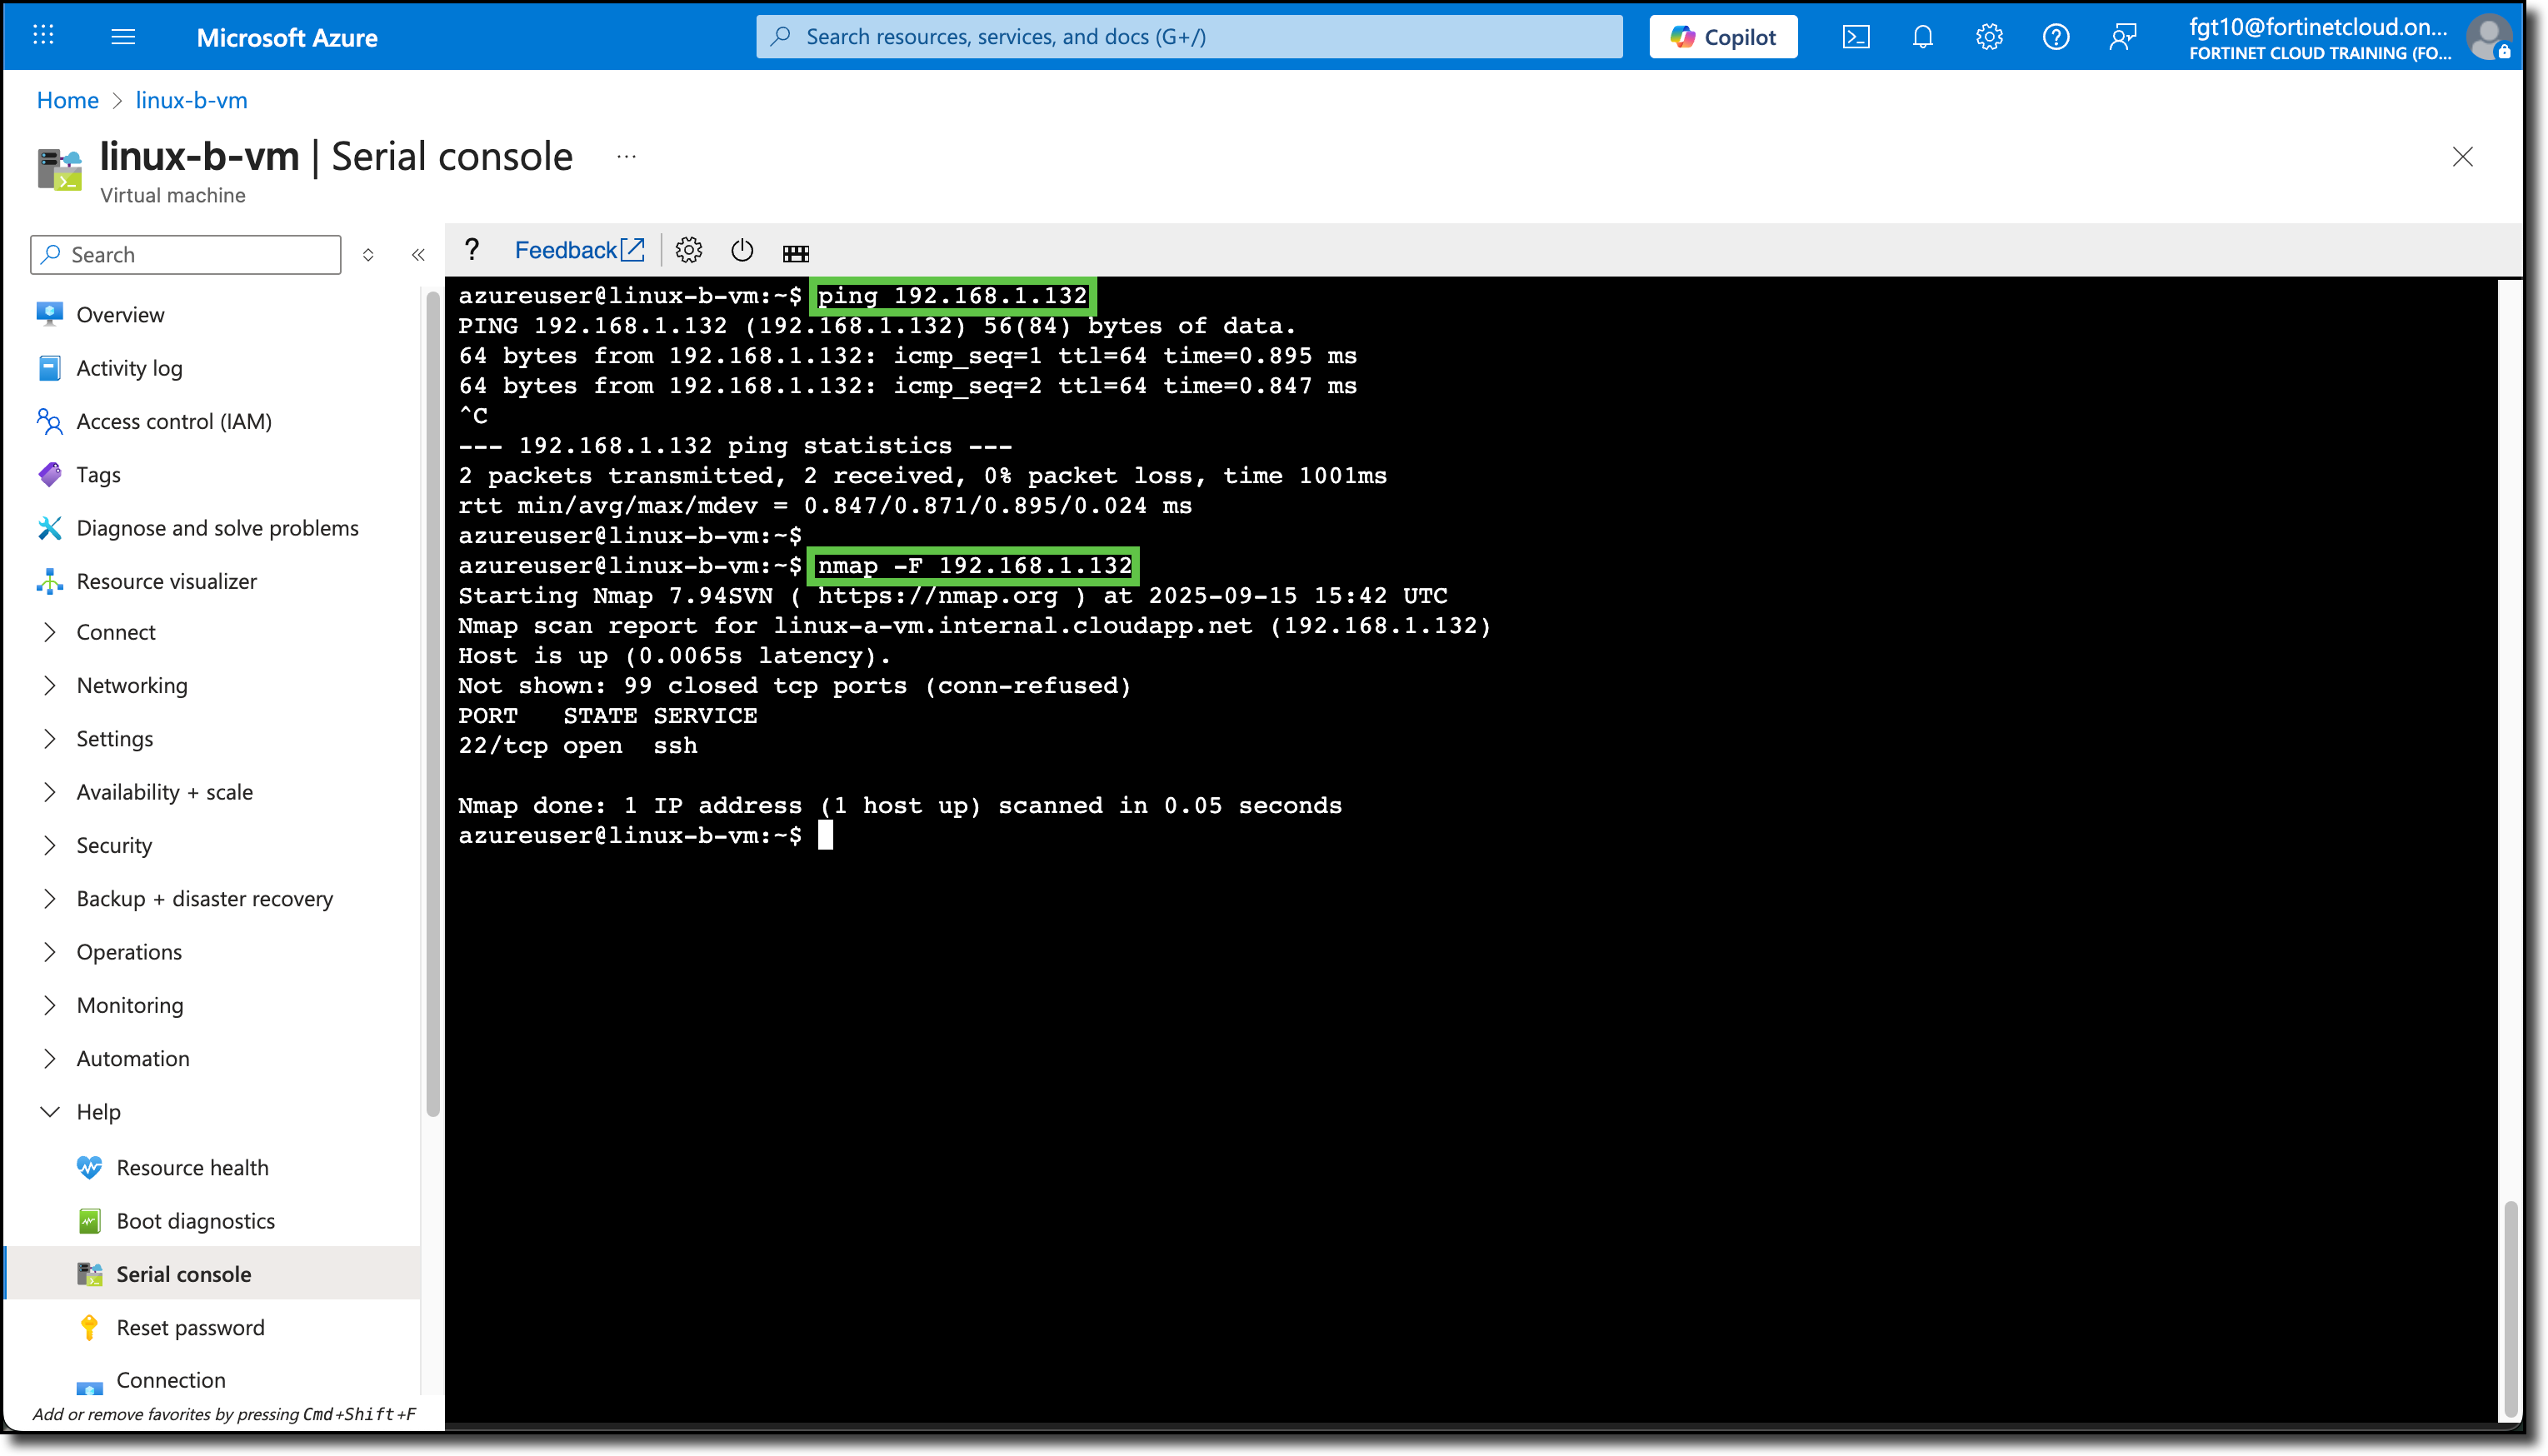
Ping the private IP of linux-a-vm
ping 192.168.1.xxx (Refer to previous steps for Private IP)
InstallNMAP Scan open ports on linux-a-vm
sudo apt -y install nmap
nmap -F 192.168.1.xxx (Refer to previous steps for Private IP)
Note the open port(s) on linux-a-vm
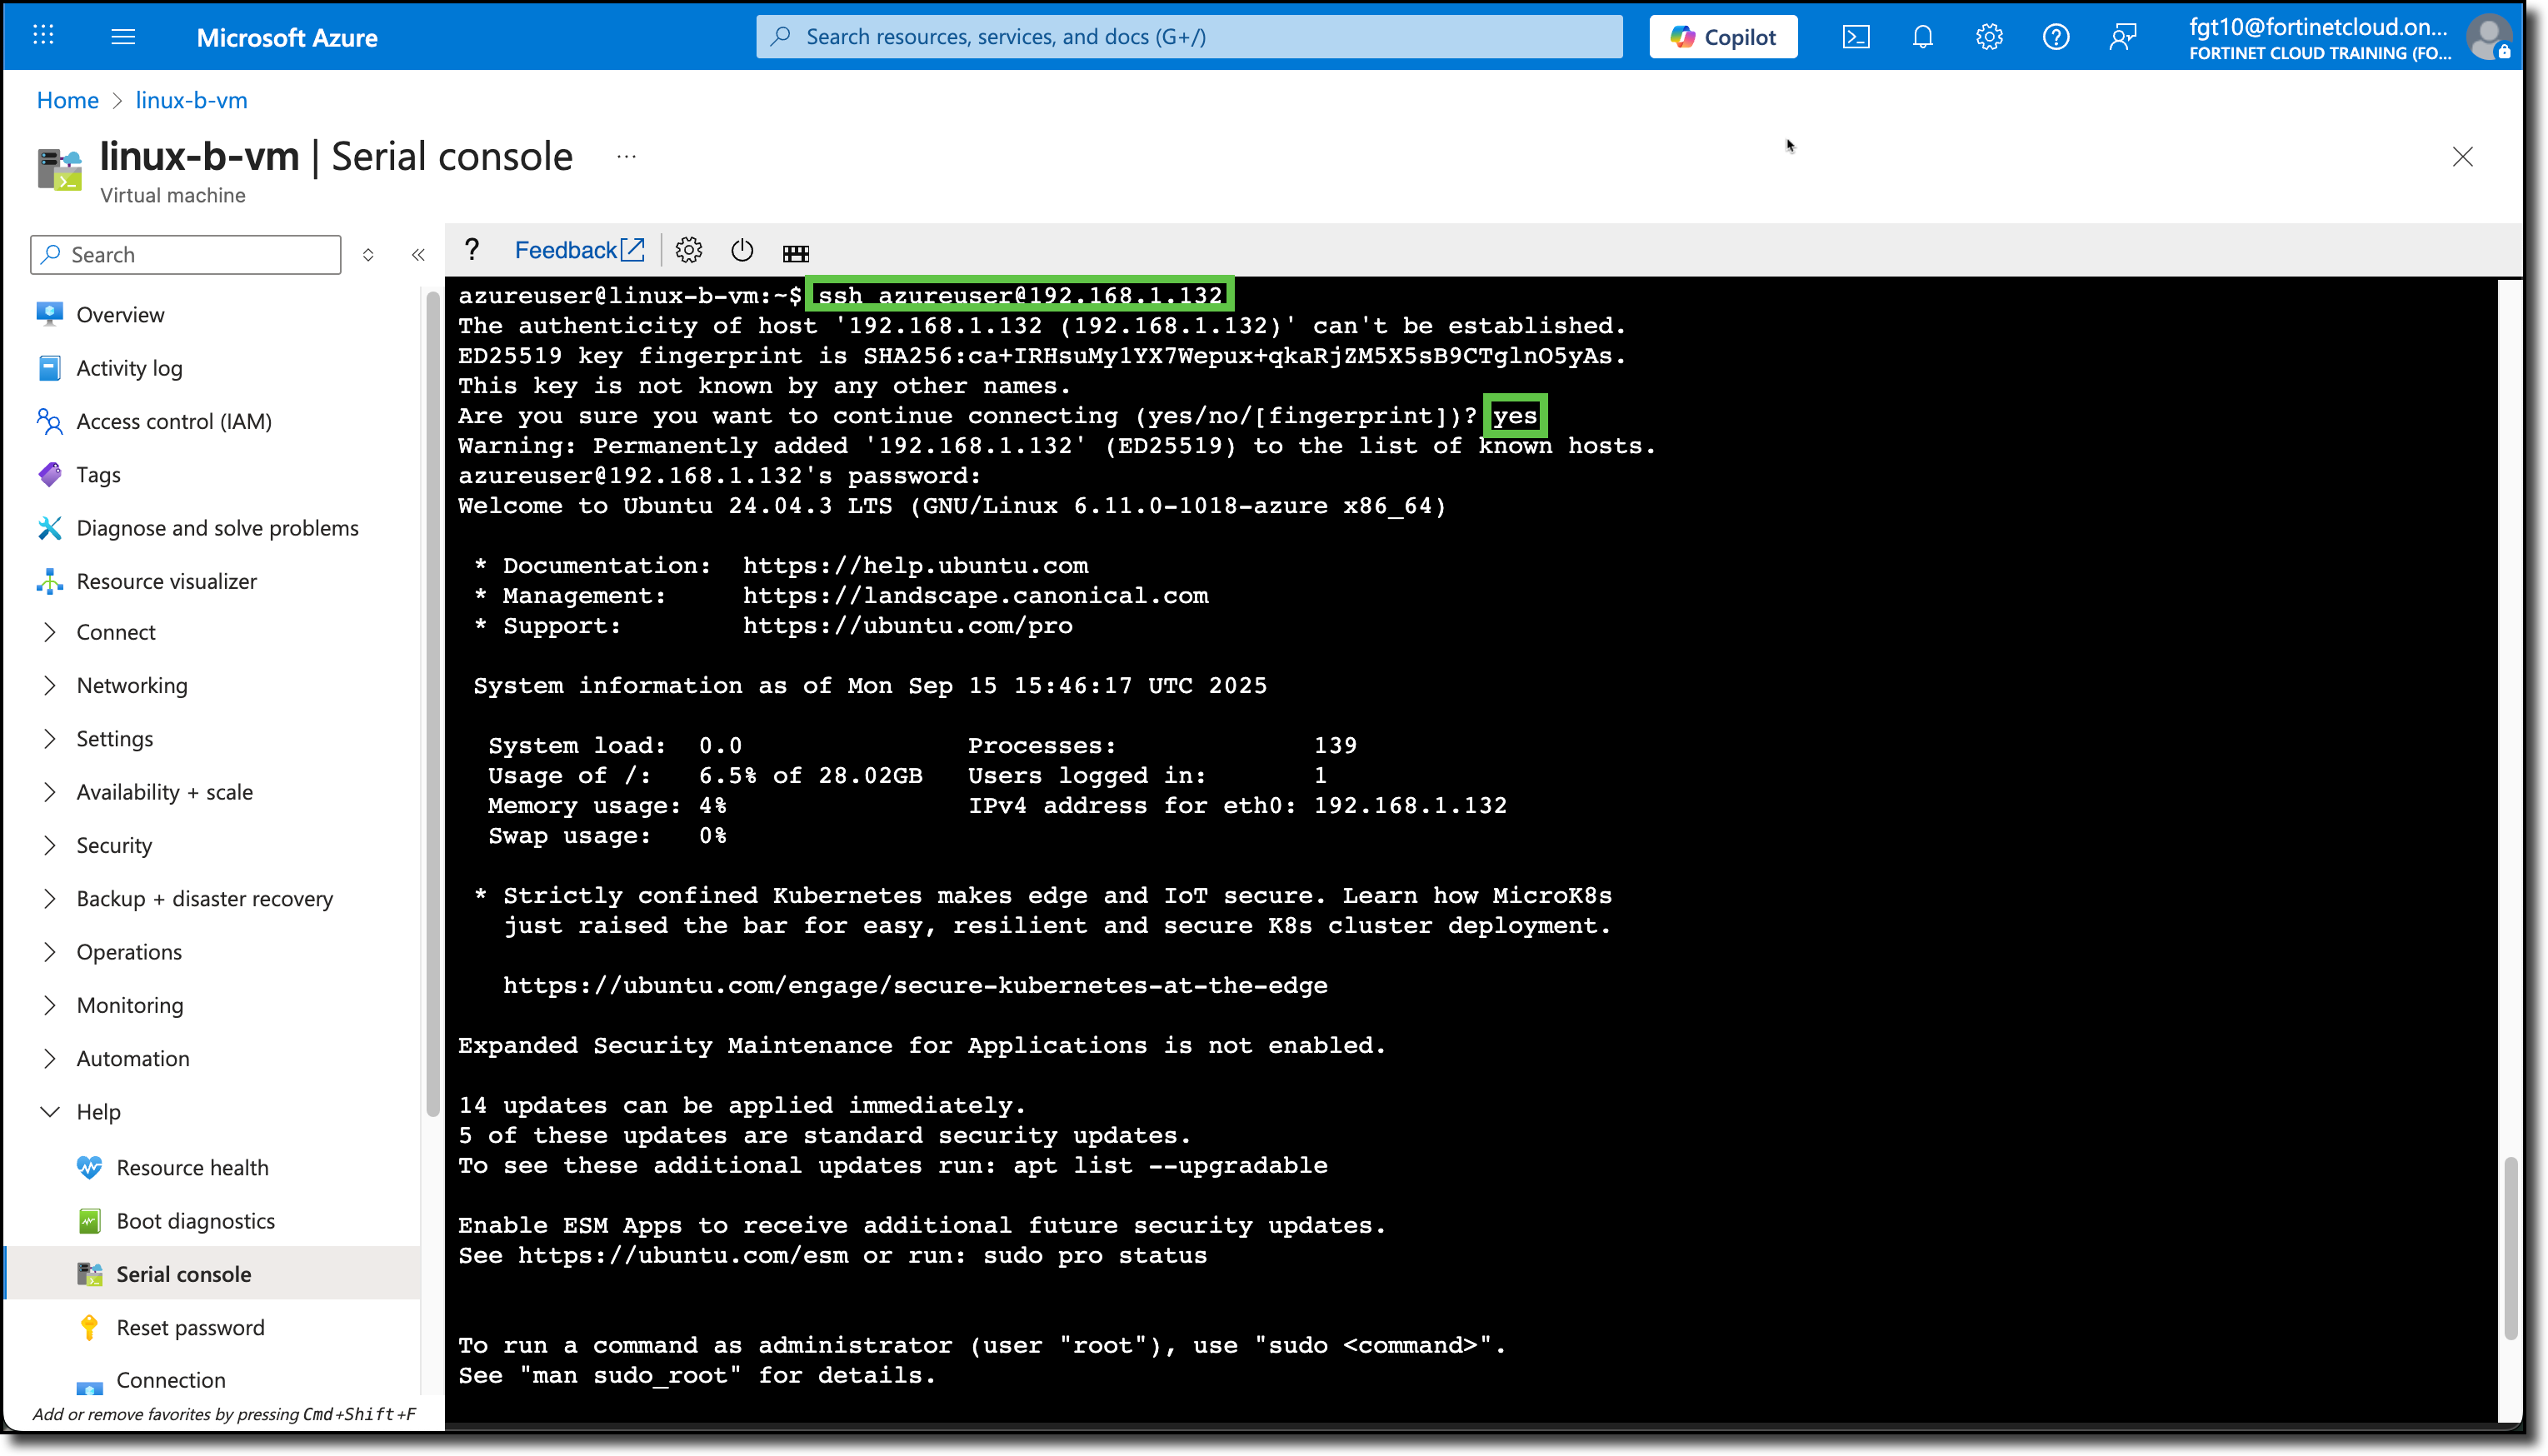
Confirm SSH access to linux-a-vm:
ssh azureuser@192.168.1.xxx (Refer to previous steps for Private IP)
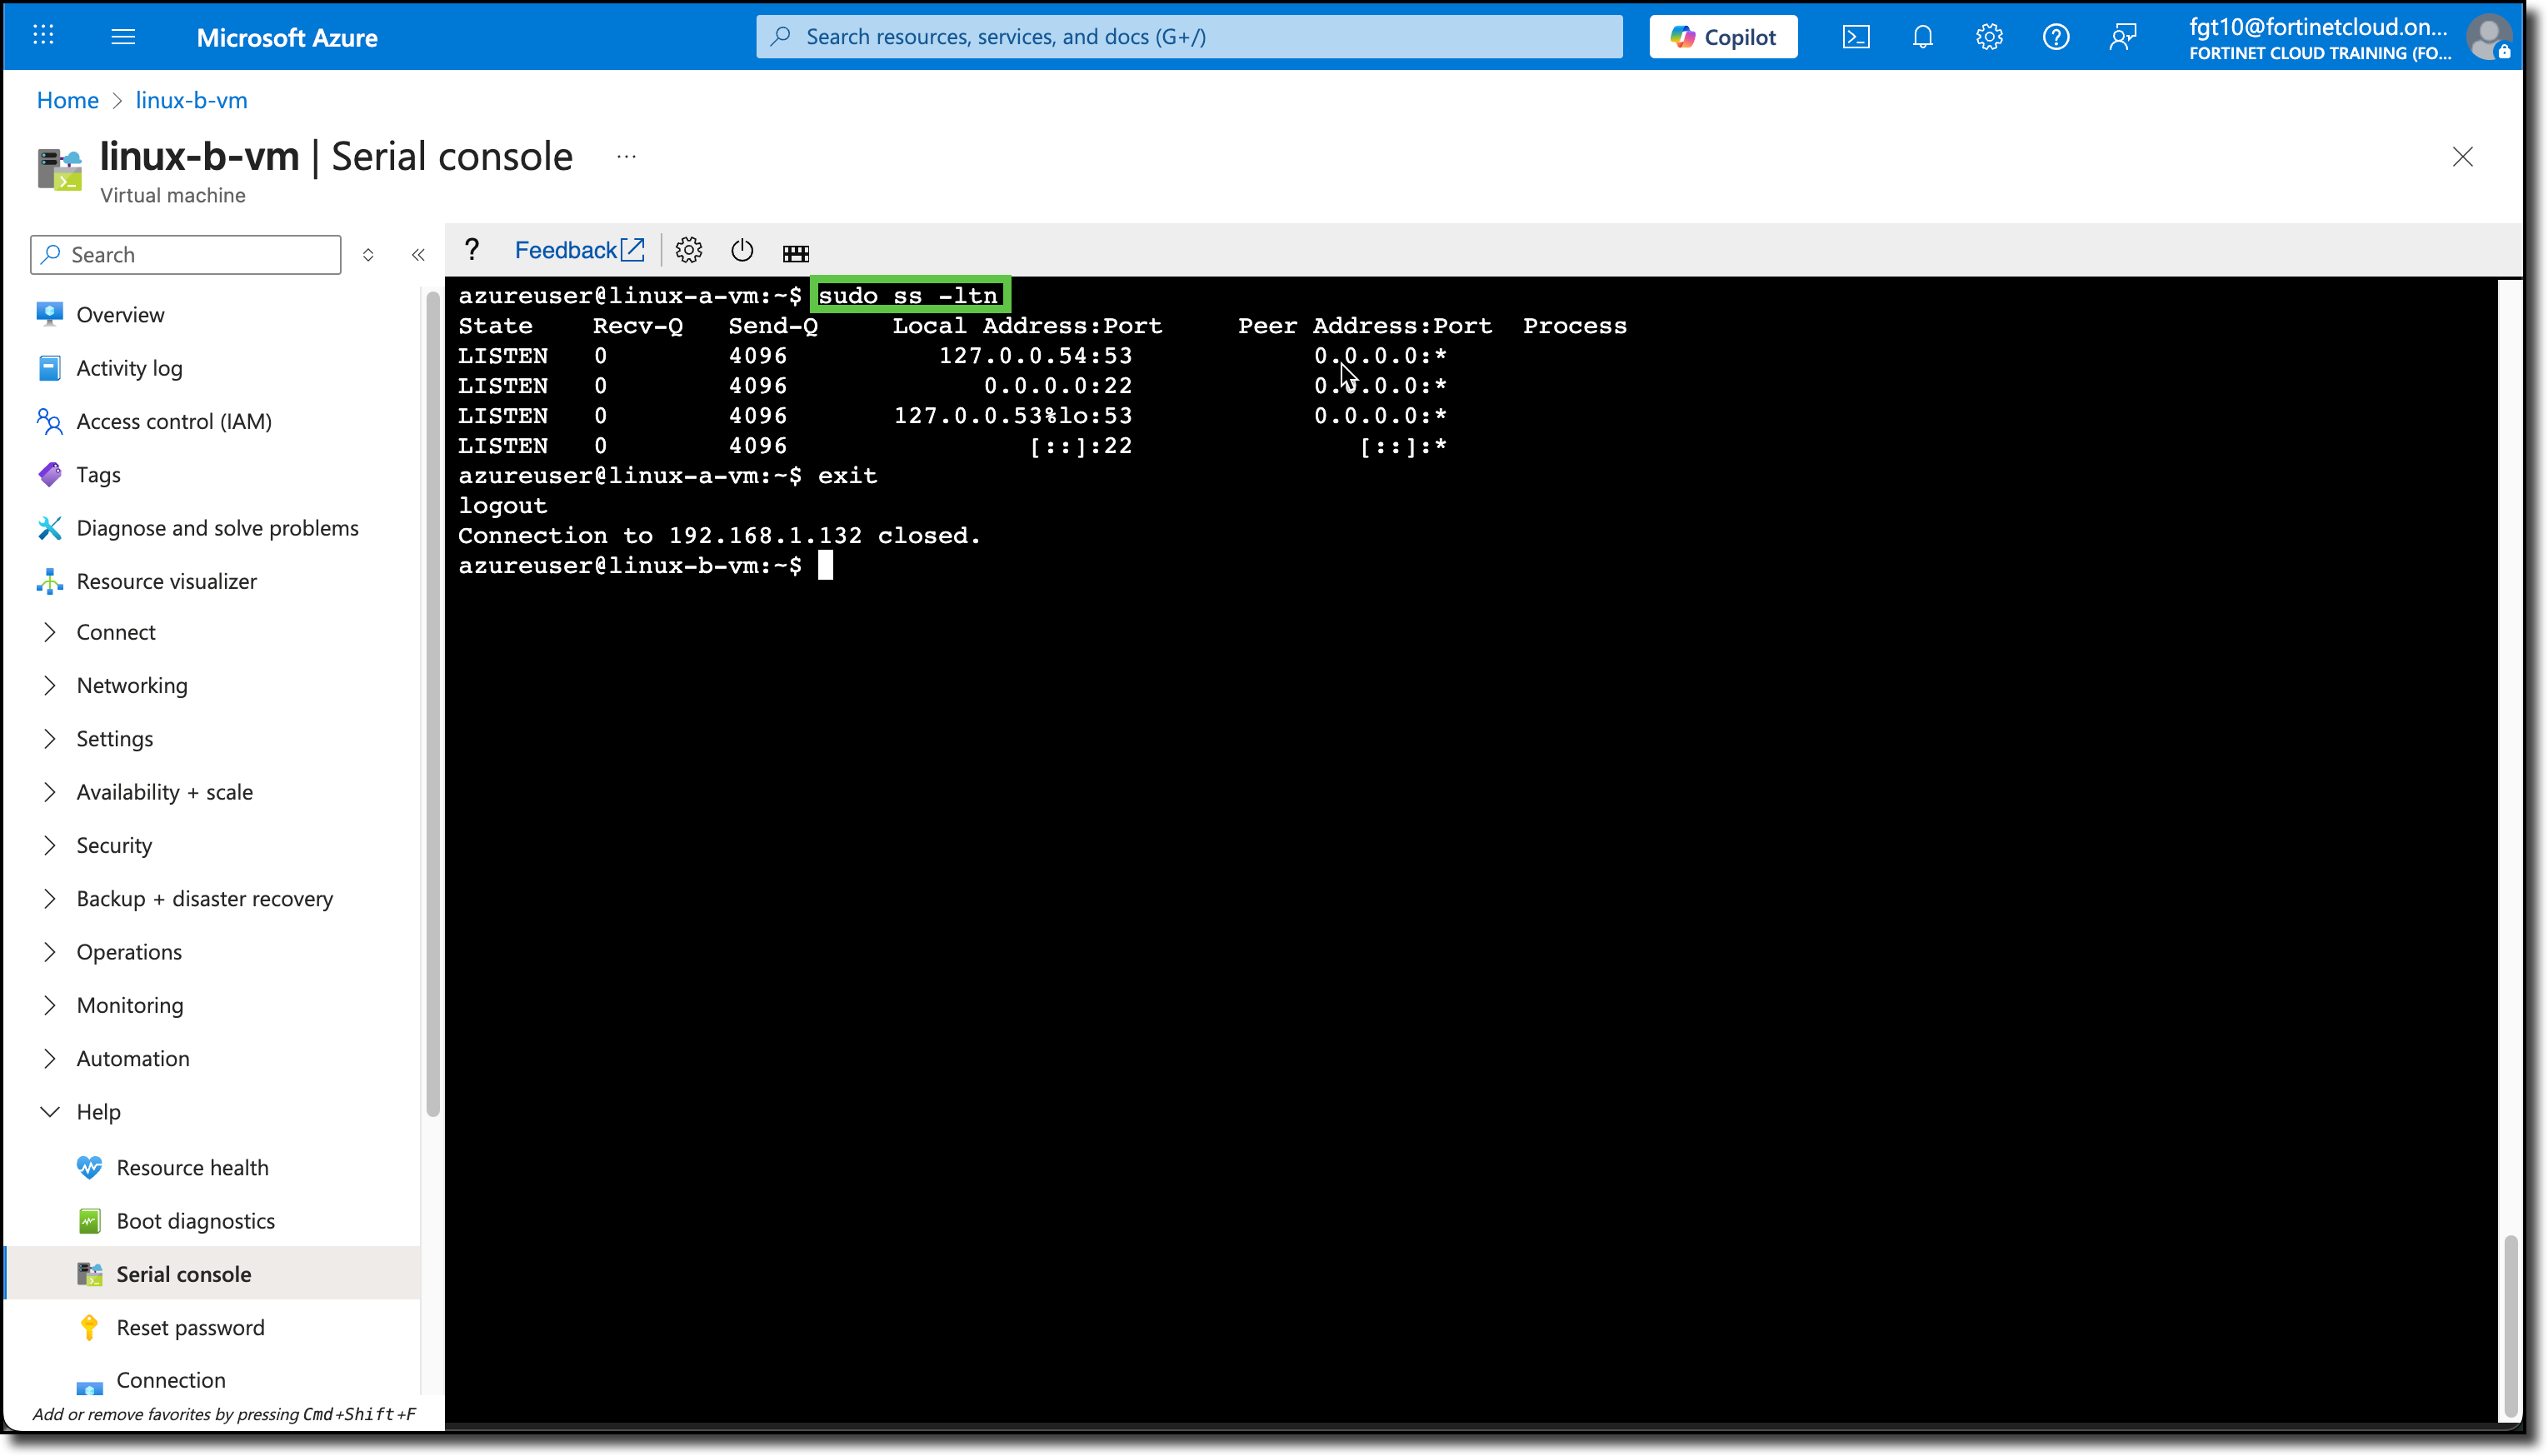
Use sudo ss -ltn to confirm the same open ports that NMAP reported
Use exit to disconnect from linux-a-vm
Install the web service NGINX
sudo apt -y install nginx
Configure linux-a-vm second
Note
These commands are completed from the linux-a-vm
Use ping www.yahoo.com
confirms DNS and ICMP access to the Internet: (CTRL+c to stop ping)
Use wget www.fortinet.com
confirms port 80 access to the Internet: (Confirm “200 OK” response)
Use curl https://ipinfo.io/ip && echo " linux-a-vm's PIP"
confirms port 443 access to the Internet
confirms Public IP assigned to linux-a-vm: (Verify against what the Azure portal listed in the Overview section for this VM)
Check for and install Ubuntu updates
sudo apt update
sudo apt -y upgrade
clear after updates have finished
Ping the private IP of linux-b-vm
ping 192.168.1.xxx (Refer to previous steps for Private IP)
InstallNMAP Scan open ports on linux-b-vm
sudo apt -y install nmap
nmap -F 192.168.1.xxx (Refer to previous steps for Private IP)
Note the open port(s) on linux-a-vm
Confirm SSH access to linux-b-vm:
ssh azureuser@192.168.1.xxx (Refer to previous steps for Private IP)
Use sudo ss -ltn to confirm the same open ports that NMAP reported
Use exit to disconnect from linux-b-vm
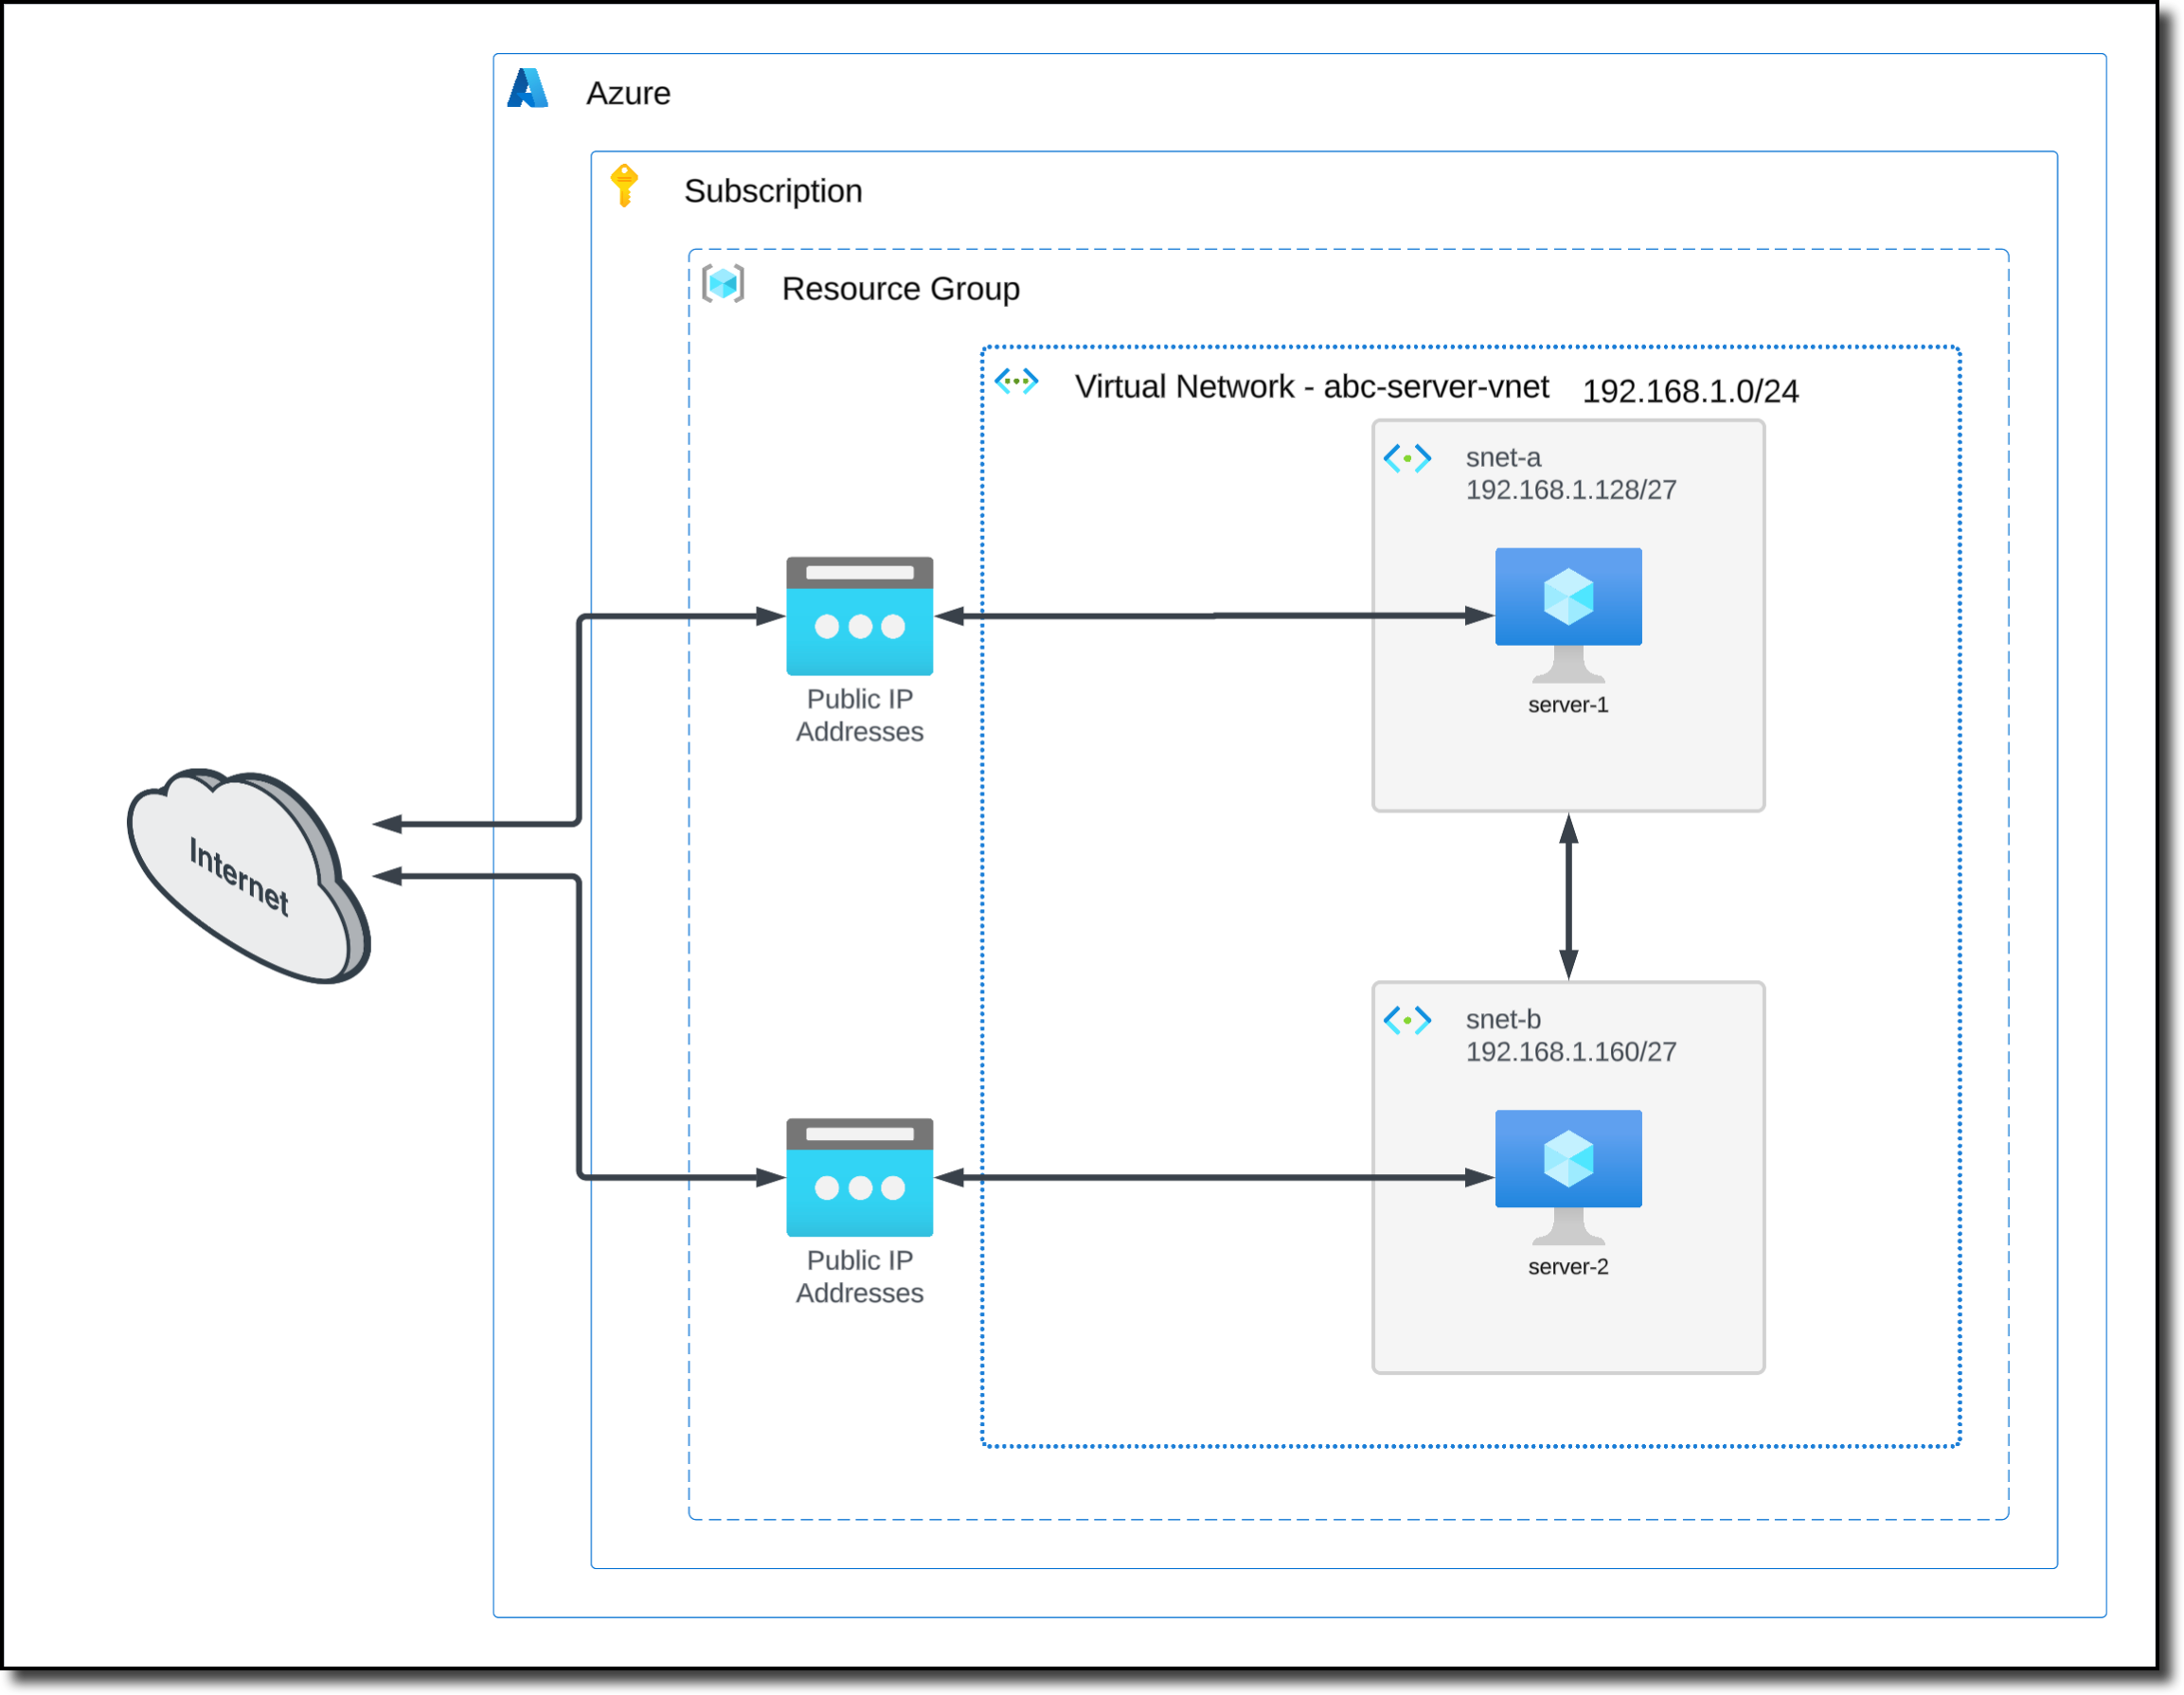
The following diagram is a representation of your current VNET and VM deployment.
Chapter 5: Securing the VNET
In this chapter, you will secure your VNET by deploying a FortiGate NVA, deploying a Route Table, and modifying the Route Table so the Linux VMs will send their traffic to the FortiGate for inspection and filtering. The FortiGate will essentially become the default gateway for all traffic to/from the Linux VMs.
In task three, four, and five, you will confirm Linux VM traffic through the FortiGate and create policies to manage the network traffic.
Tasks to complete
Task 1: Deploy a FortiGate NVA
Task 2: Deploy a Route Table and Create a UDR
Task 3: Confirm Linux VMs access via FortiGate
Task 4: Configure FortiGate Policies
Task 5: Confirm Managed Traffic
Subsections of Chapter 5: Securing the VNET
Task 1: Deploy a FortiGate NVA
In Task 1, you will deploy a FortiGate network virtual appliance (NVA) in your Resource Group. After deployment, you will login to the FortiGate and verify settings.
FortiGate Deployment - Prerequisite
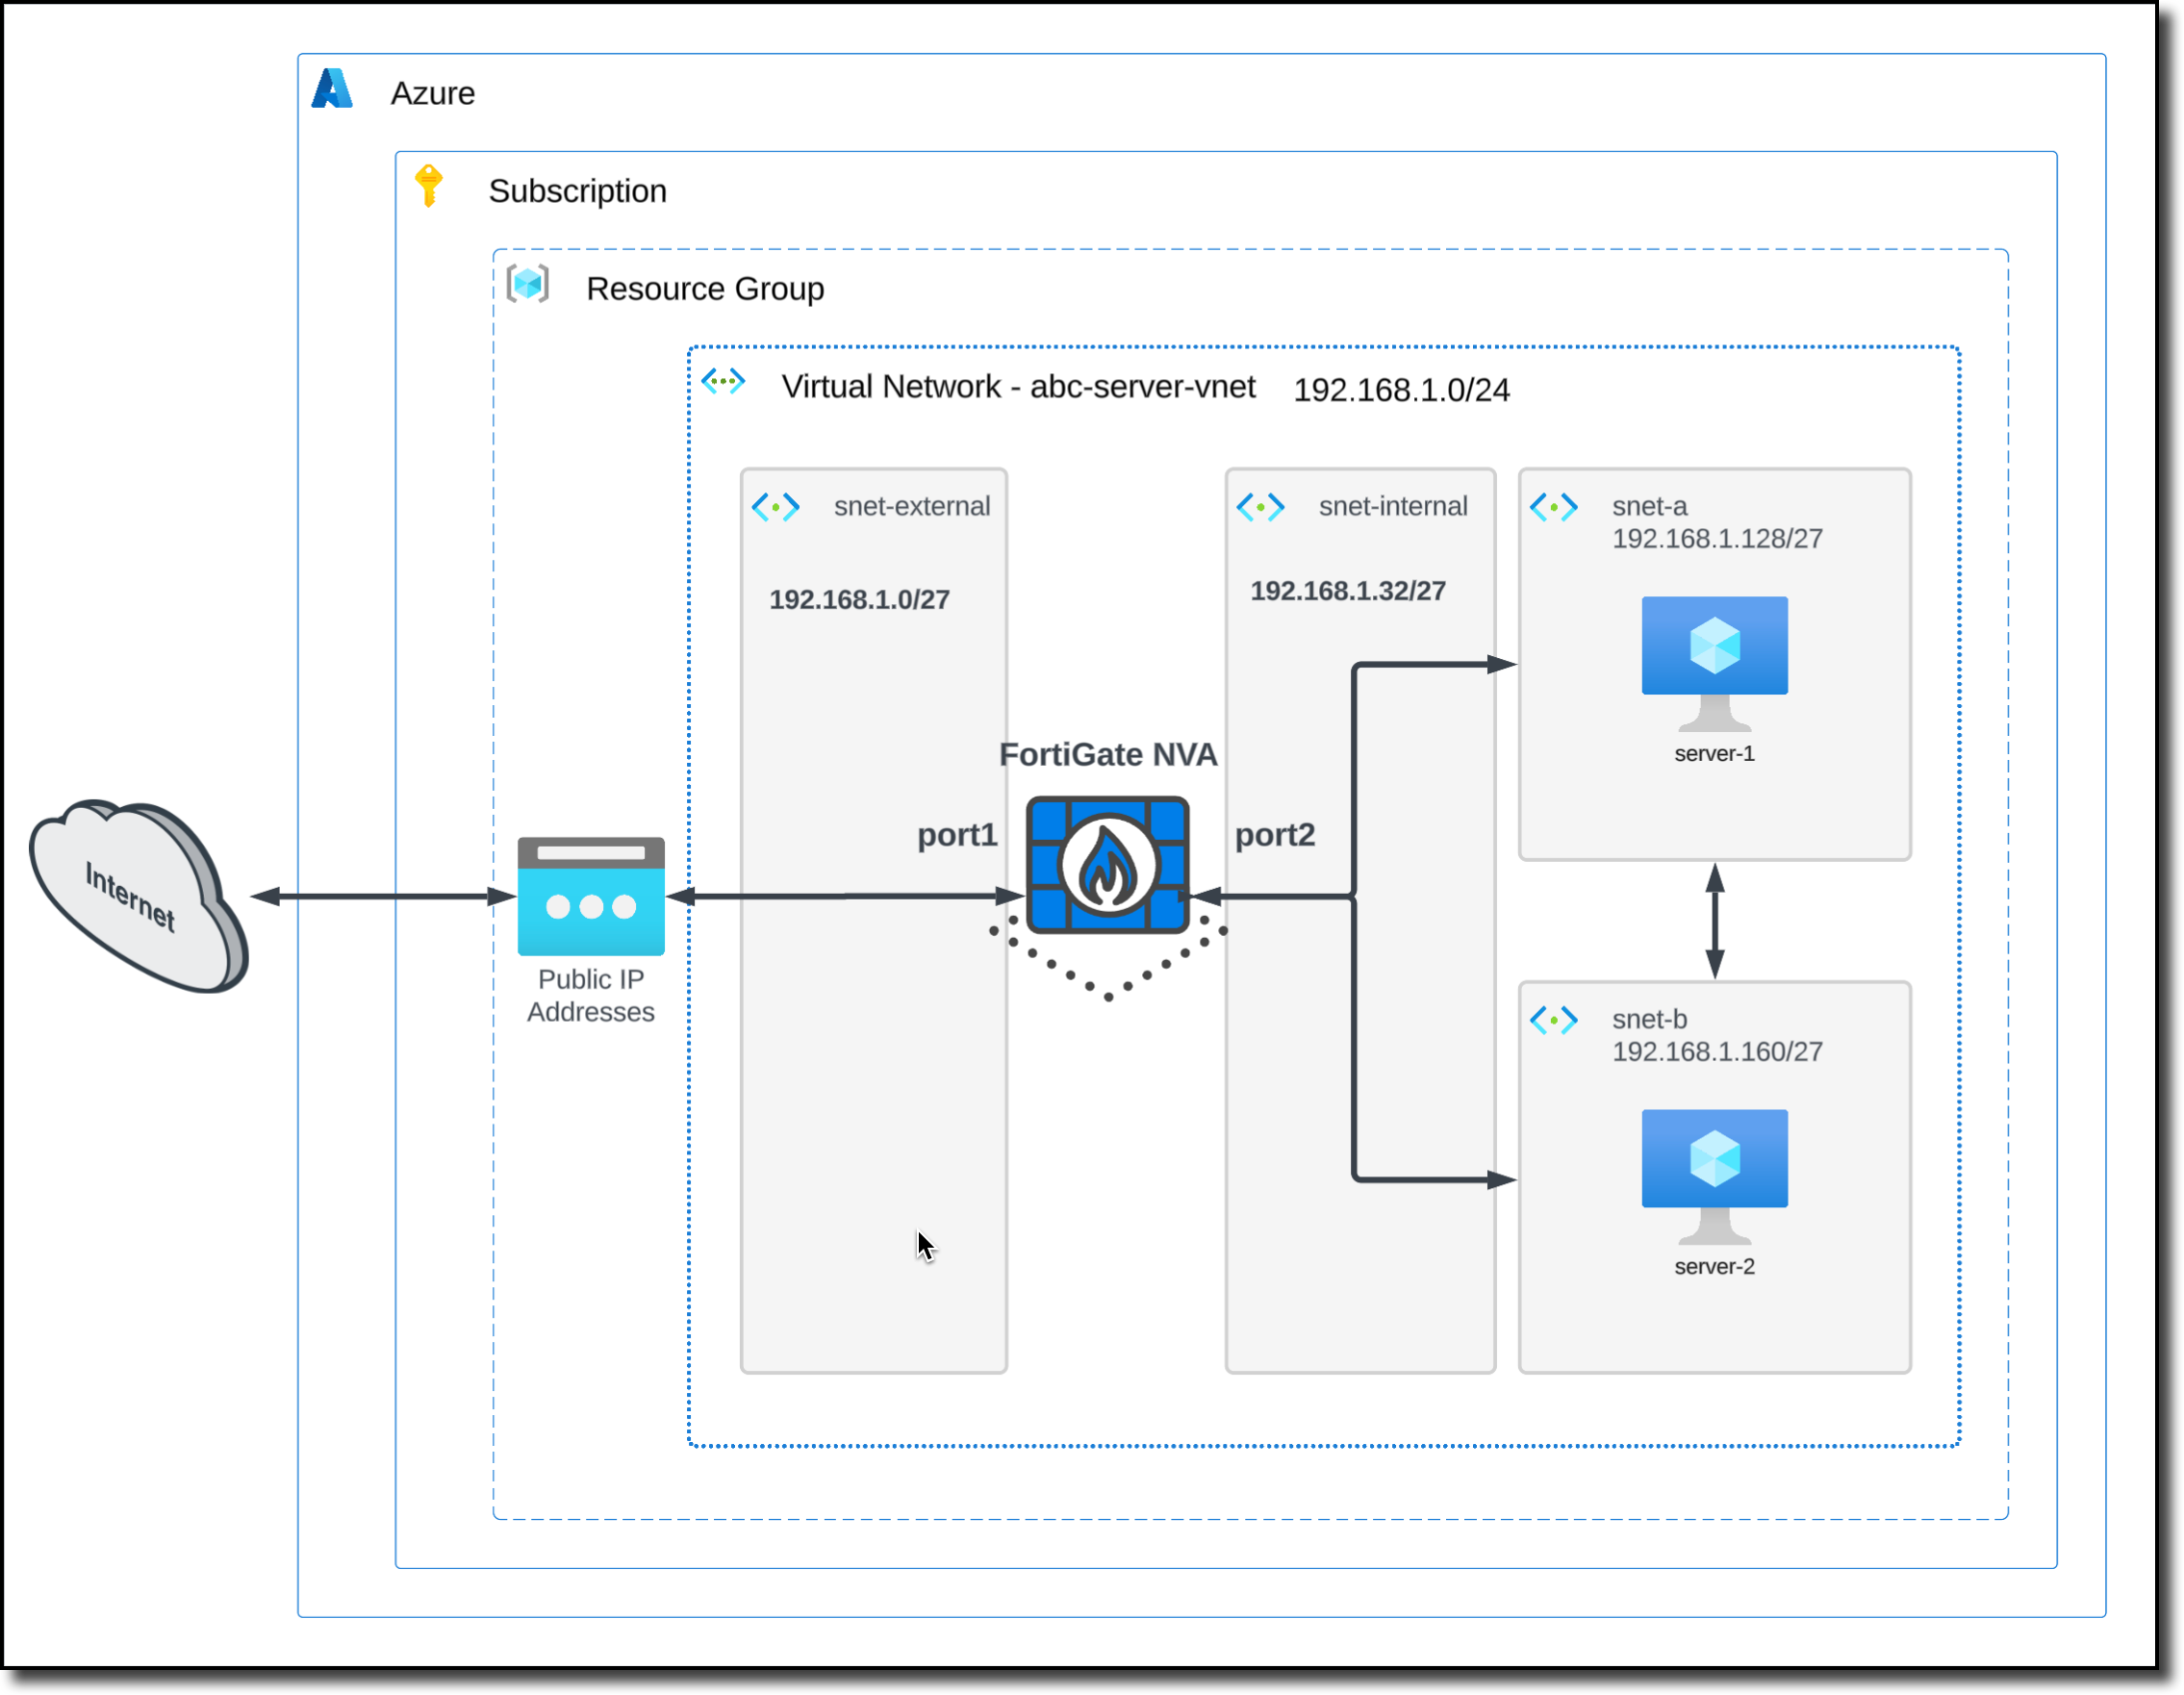
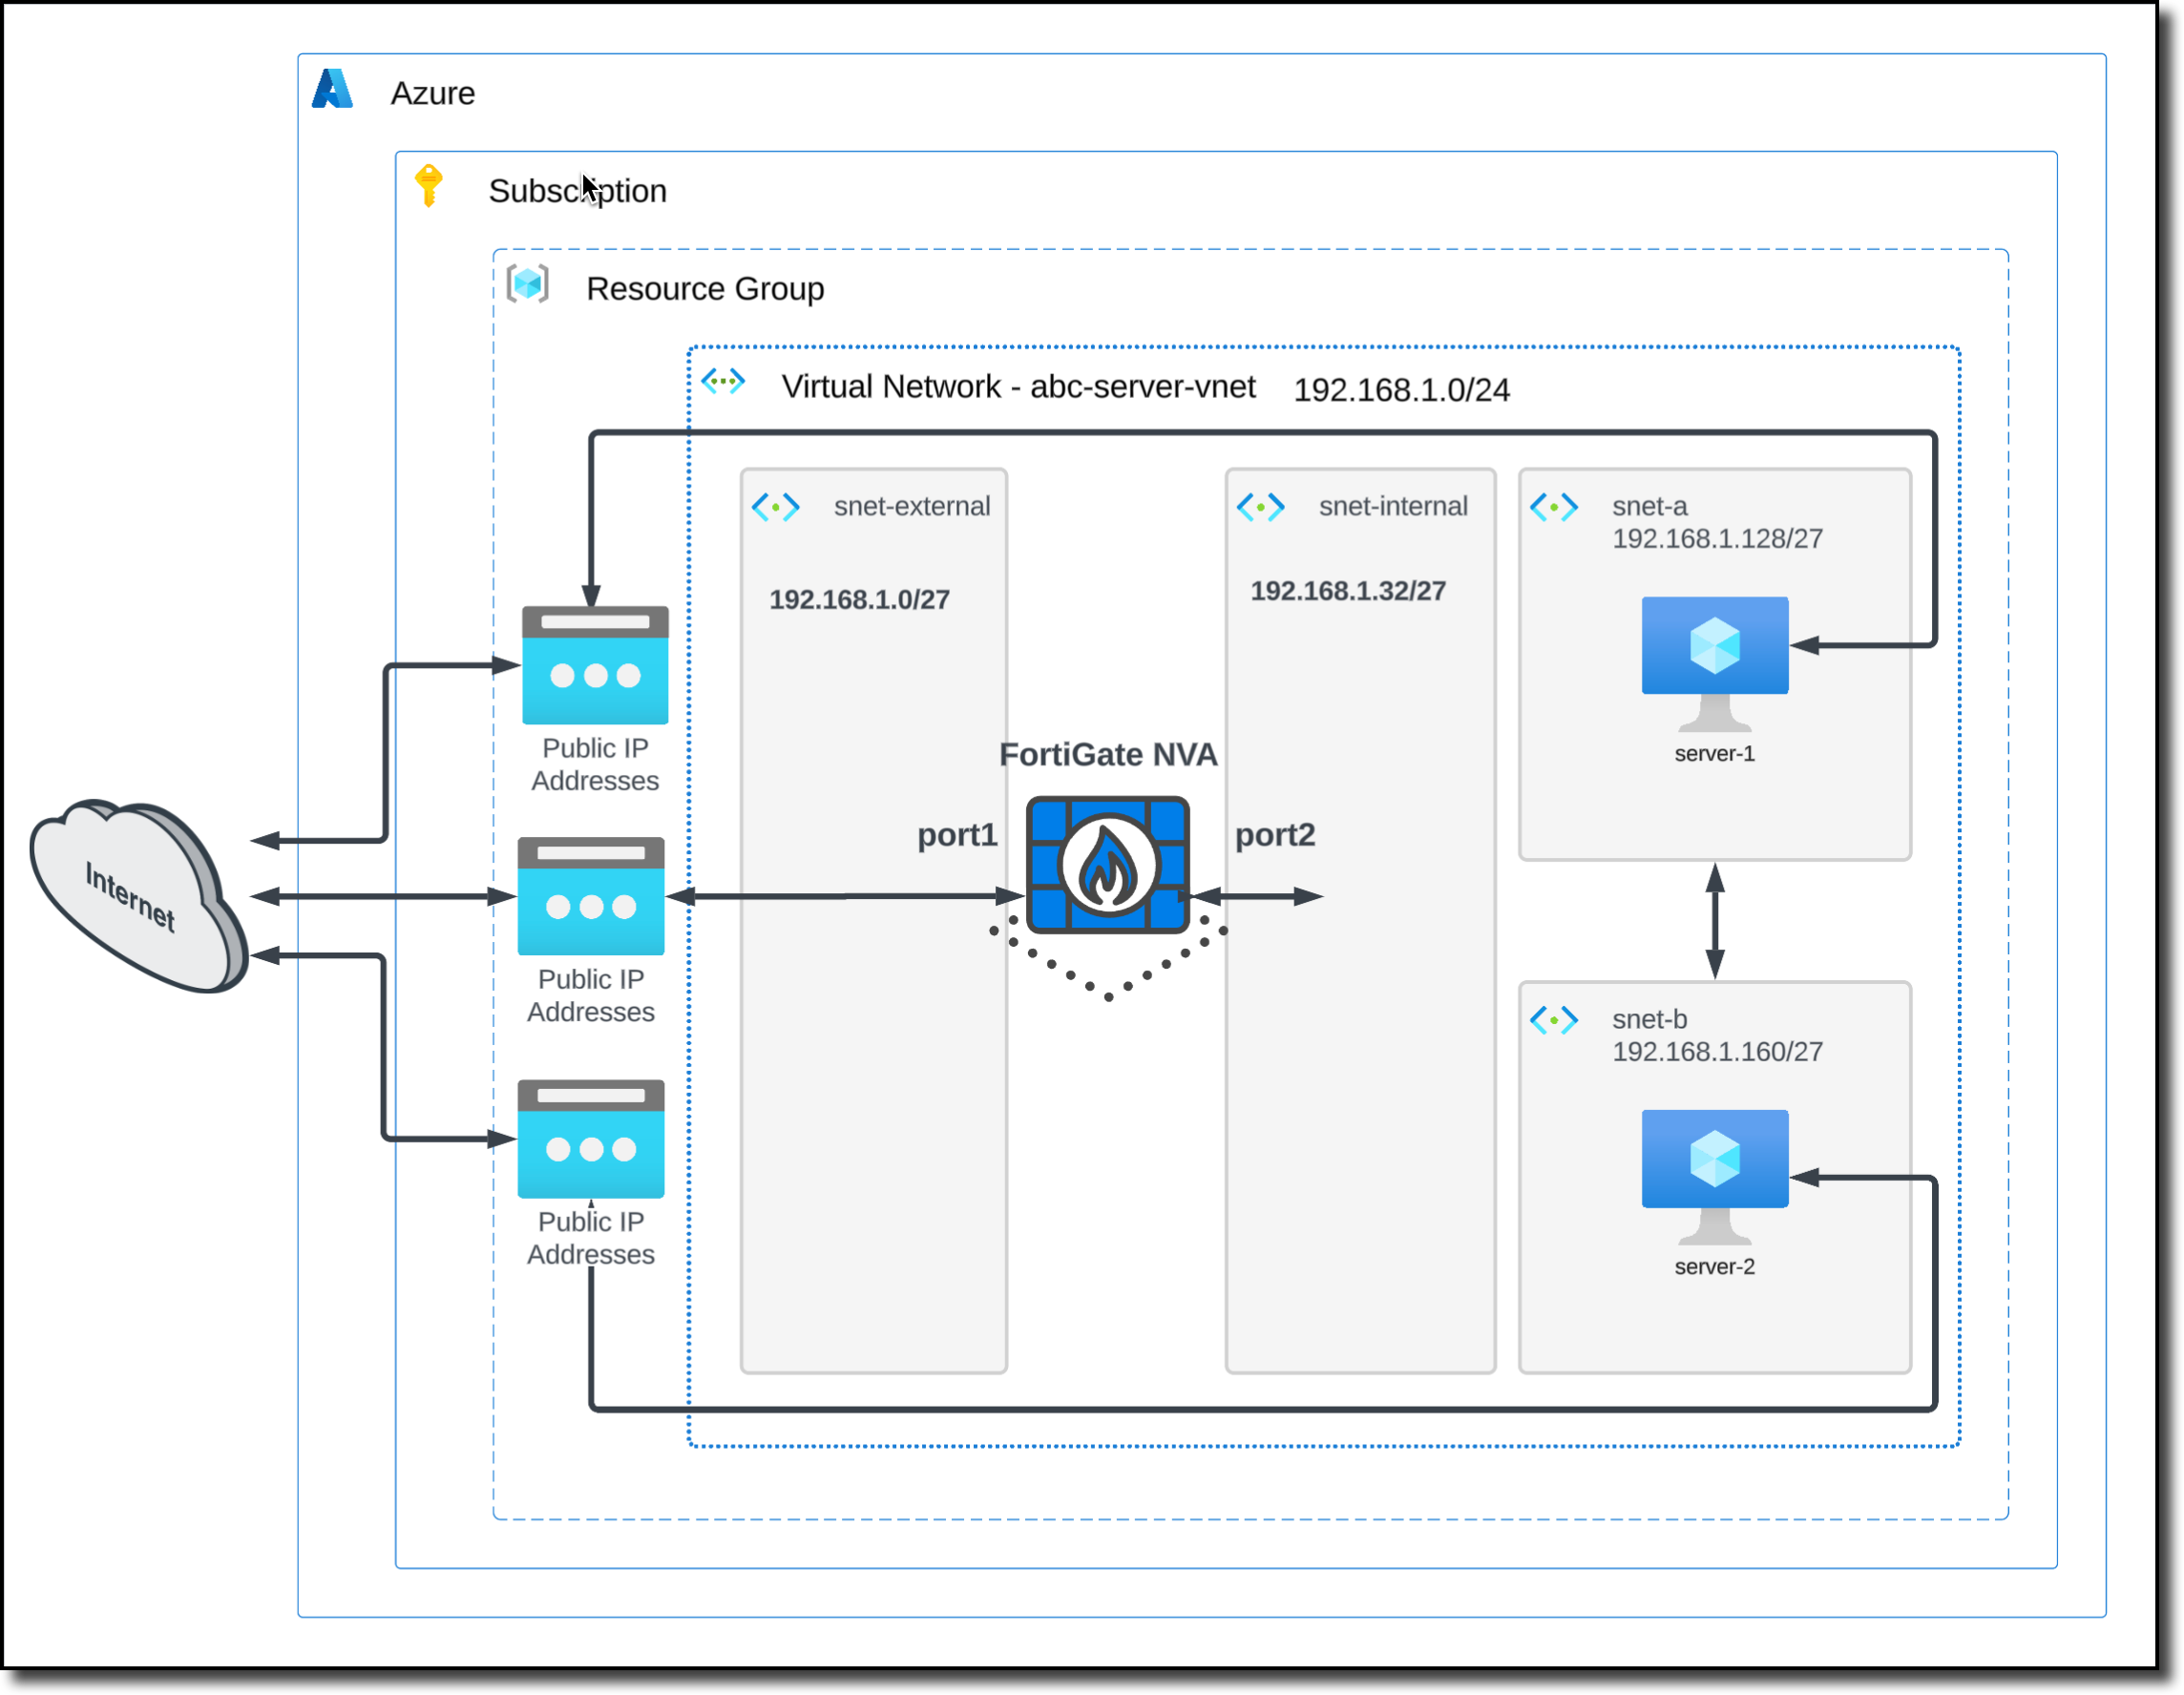
The Single Fortinet FortiGate requires two interfaces
external (port1) untrusted interface
internal (port2) trusted interface
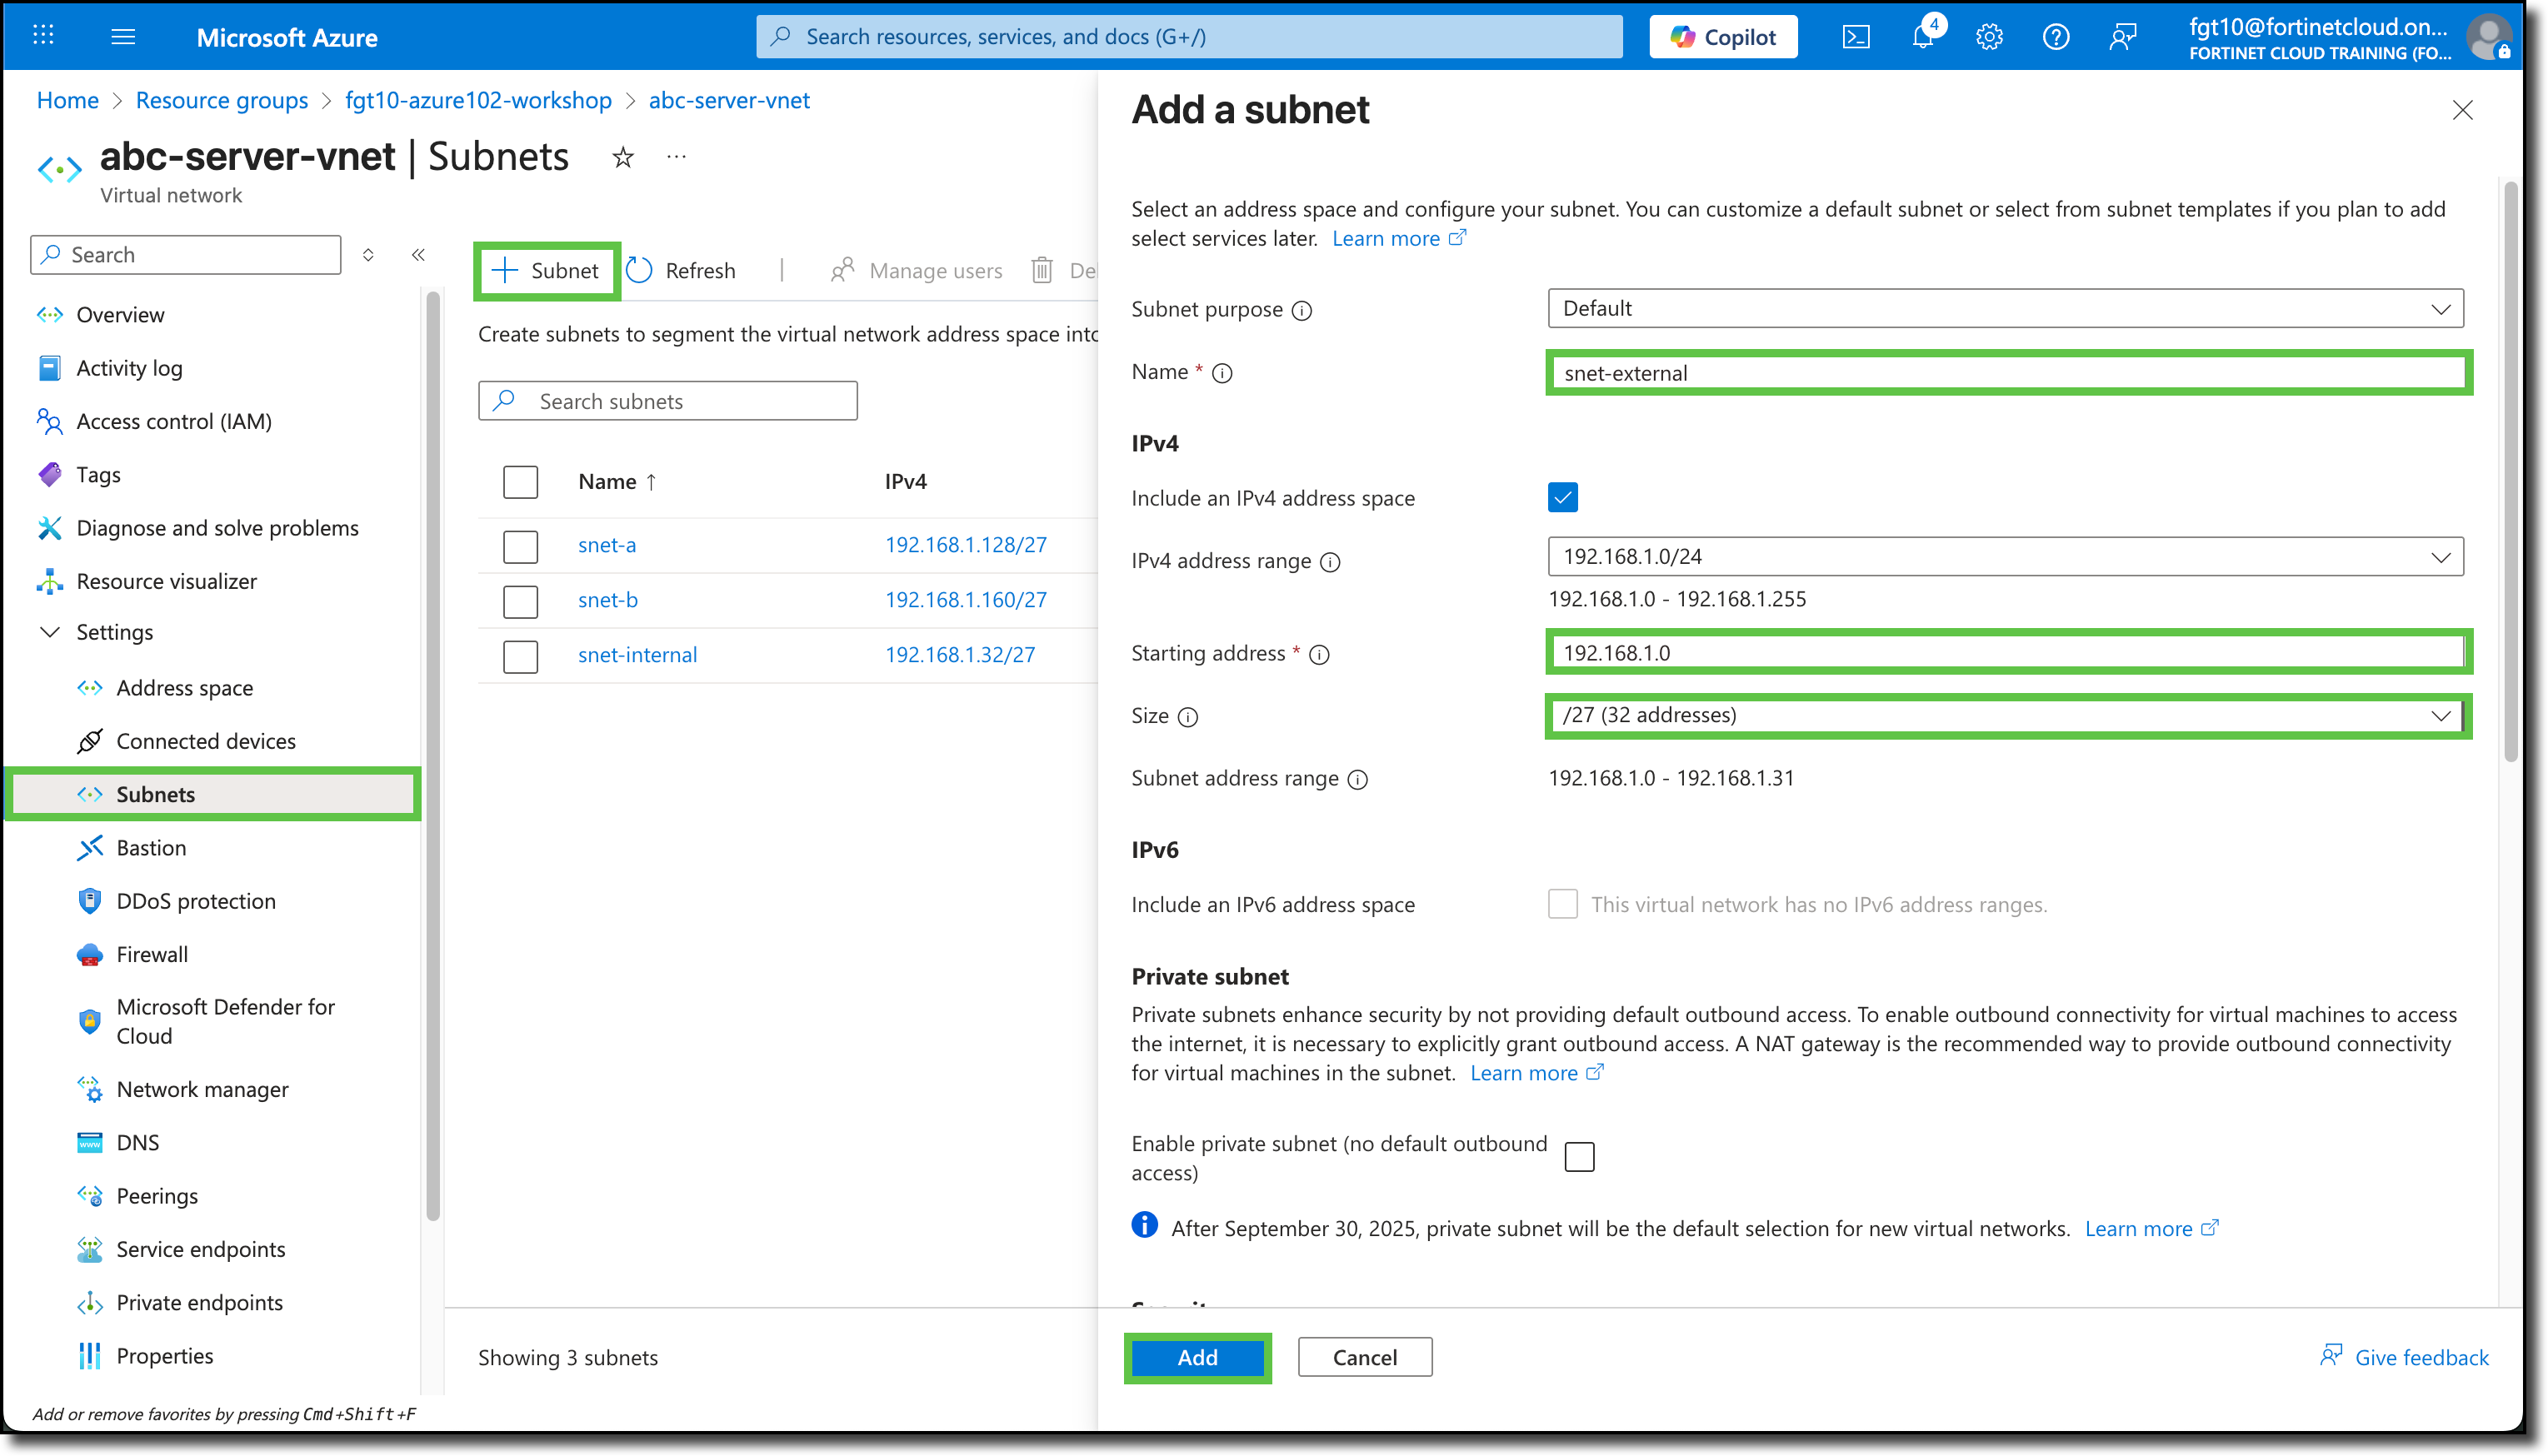
These interfaces require two additional subnets be added to VNET acb-server-vnet
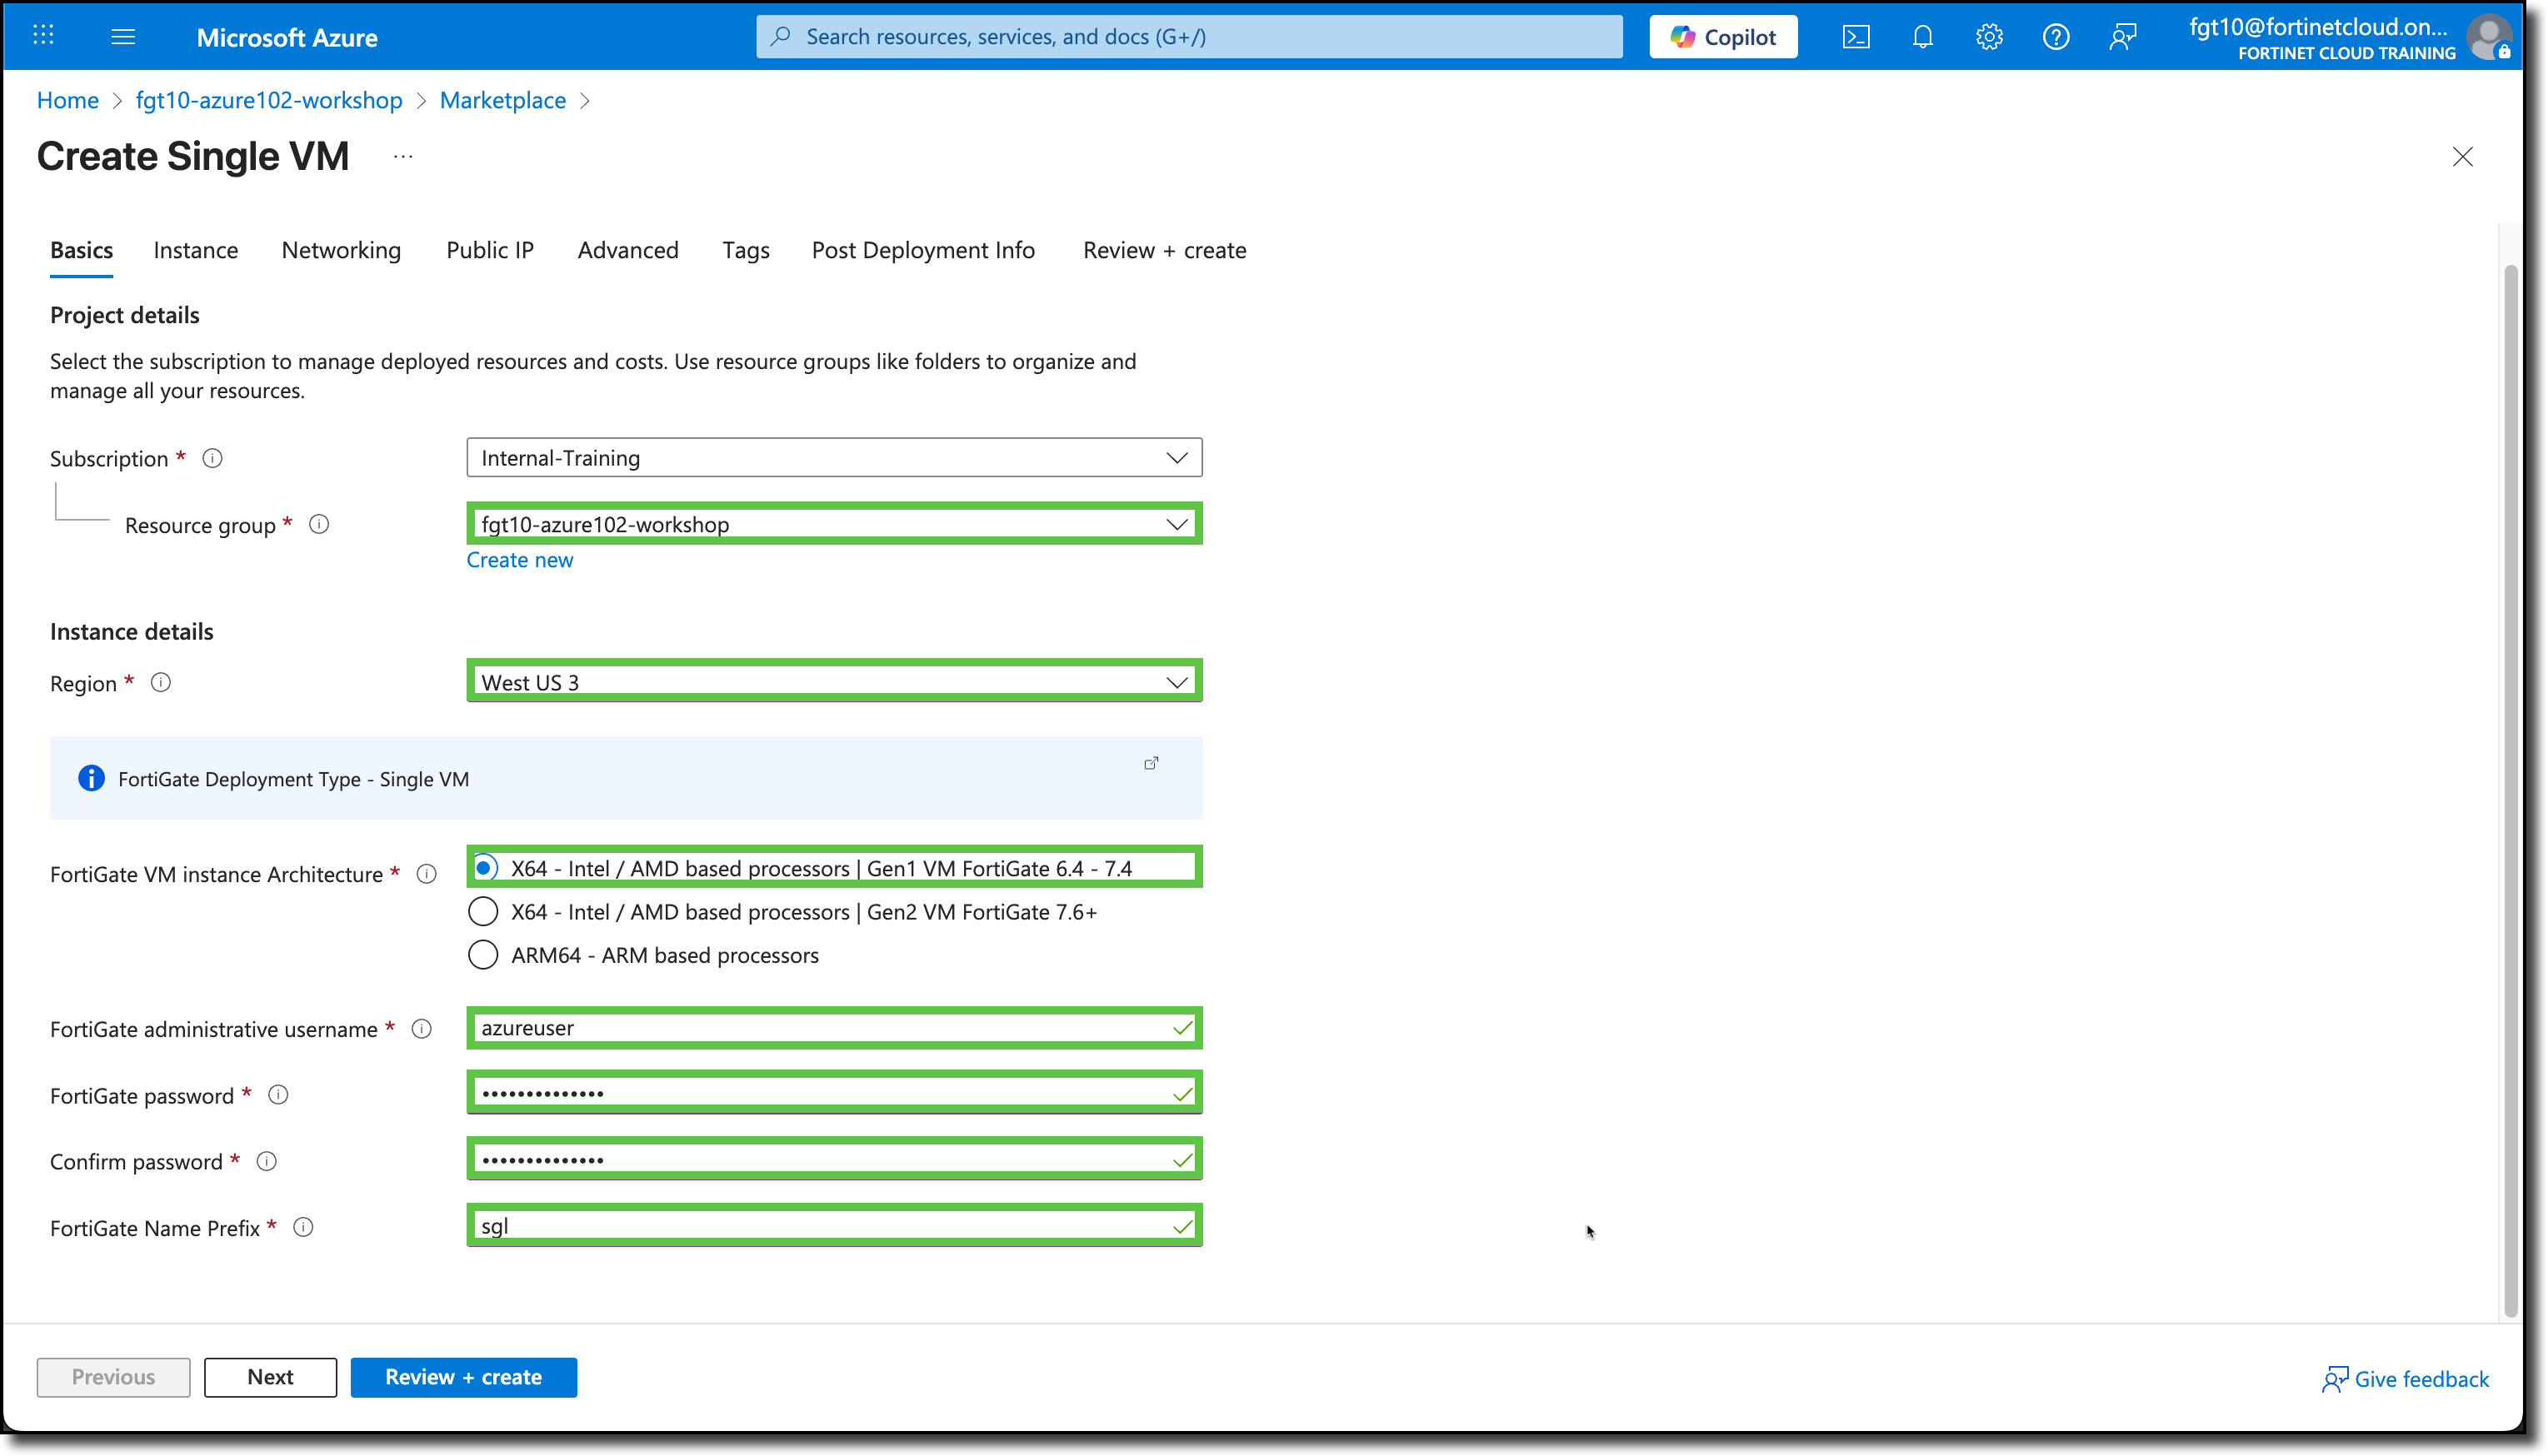
You will be redirected to the Create Single VM template.
Under the Basics tab, the Subscription and Resource Groups may already be filled in with your assigned info. If not, see the screenshot below for details.
Under Instance details, select/enter the following:
Region: West US 3
FortiGate VM instance Architecture: “X64 - Intel / AMD based processors | Gen1 VM FortiGate 6.4 - 7.4”
FortiGate administrative username: azureuser
FortiGate password: 123Password#@!
Confirm password: 123Password#@!
FortiGate Name Prefix: sgl
Click “Next”
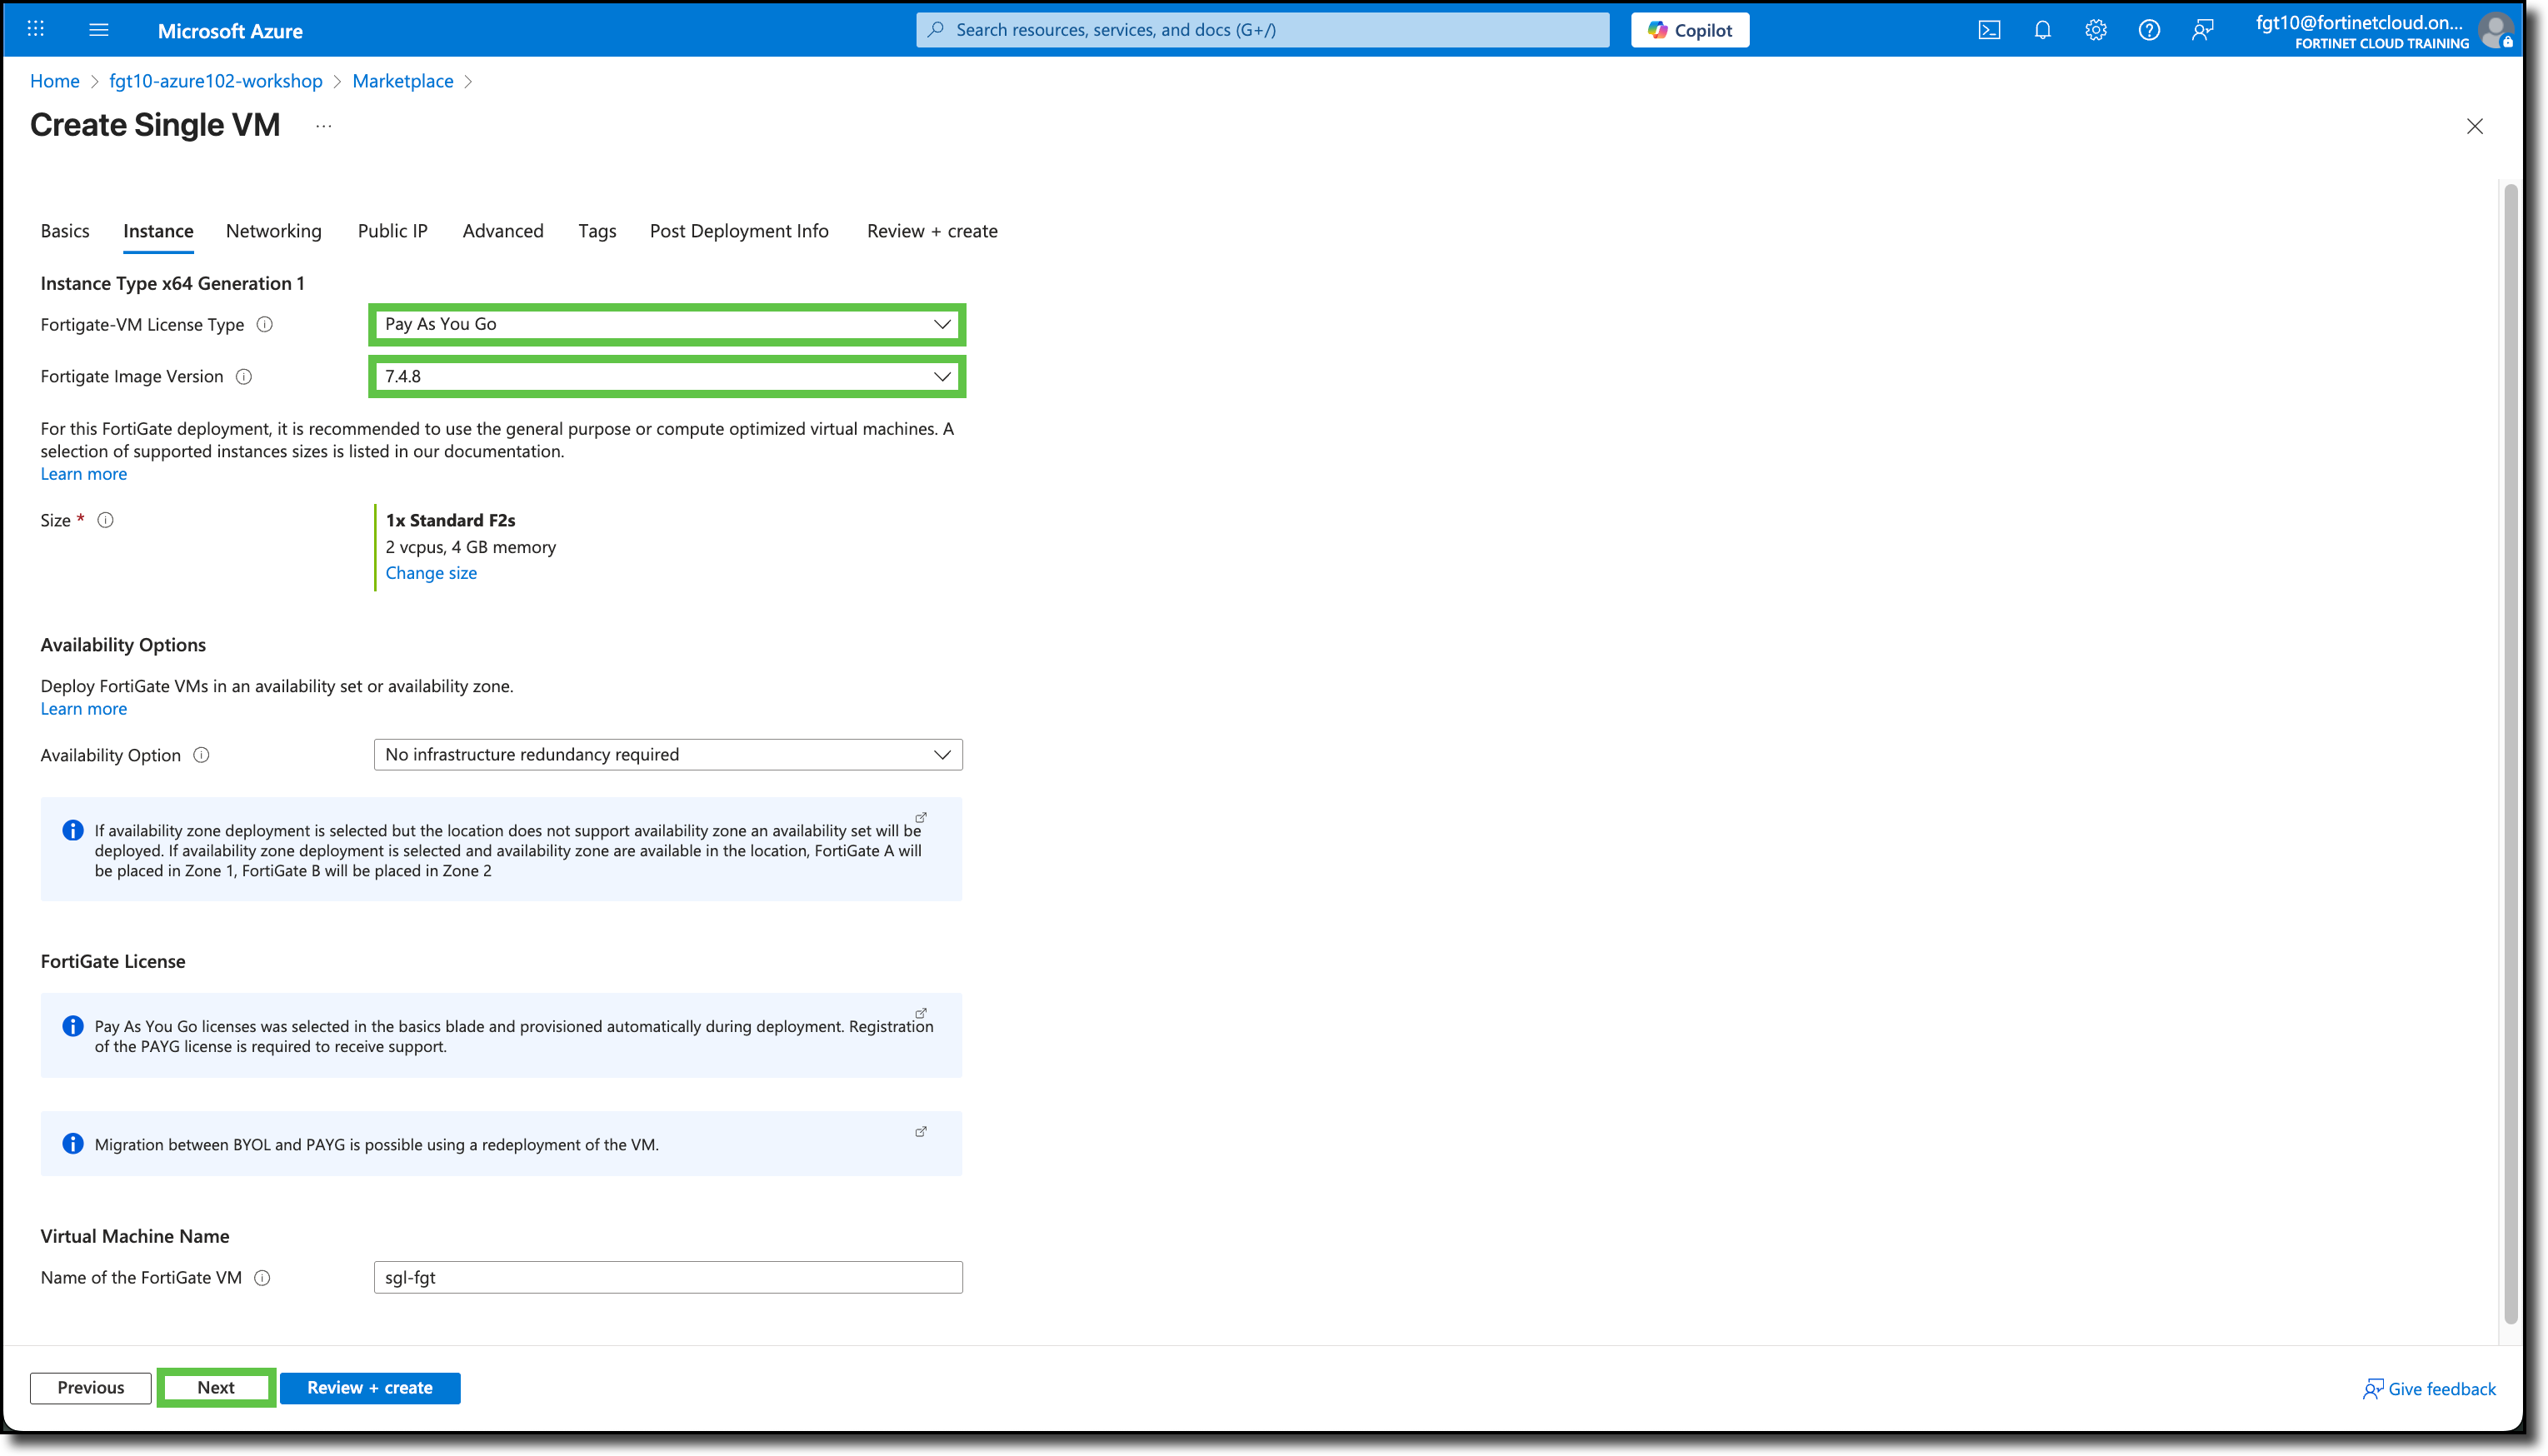
On the Instance tab, select the following
Fortigate-VM License Type: “Pay As You Go”
Fortigate Image Version: “7.4.x” - Select the latest version
Size: “F2s_v2” - If the size is not “F2s_v2” use the “Change size” link and select “F2s_v2”
Tip
Note the blue shaded areas, they are links to additional information
Click “Next”
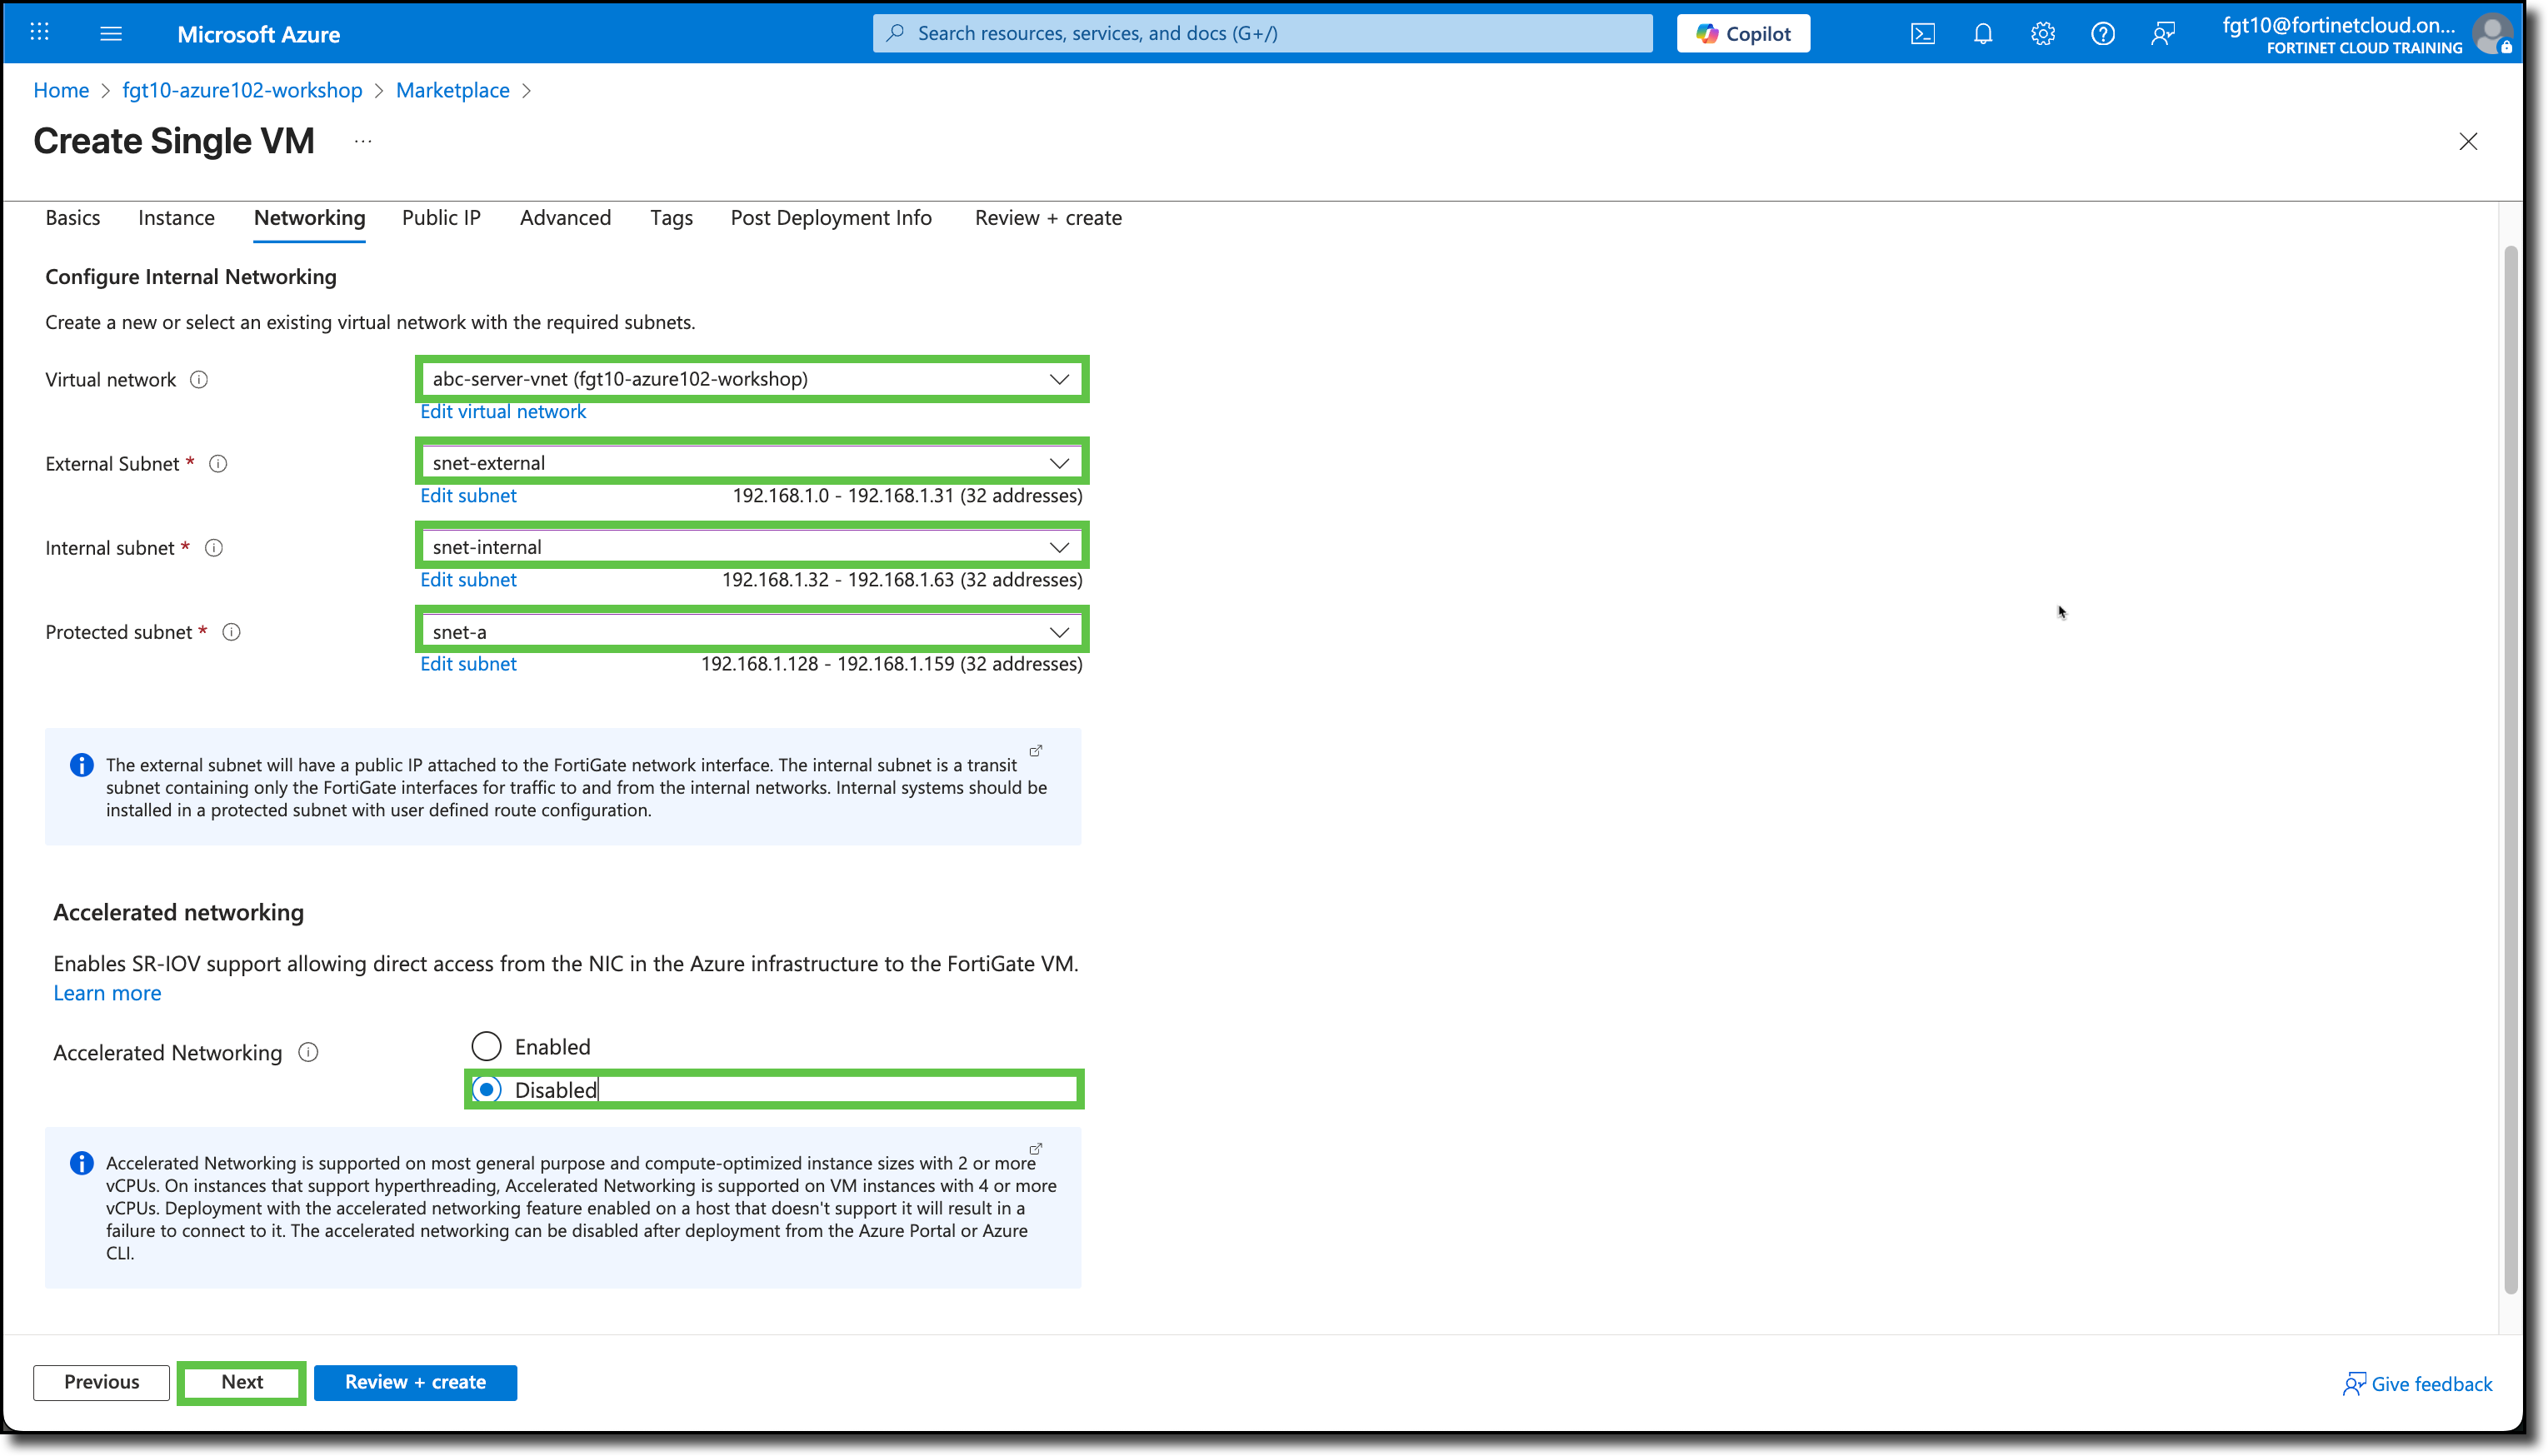
On the Networking tab, select the following:
Virtual network: abc-server-vnet
External Subnet: snet-external
Internal subnet: snet-internal
Protected subnet: snet-a
Accelerated Networking: Disabled
Note
snet-b will be protected as well, the template just does not have a selection for it.
Click “Next”
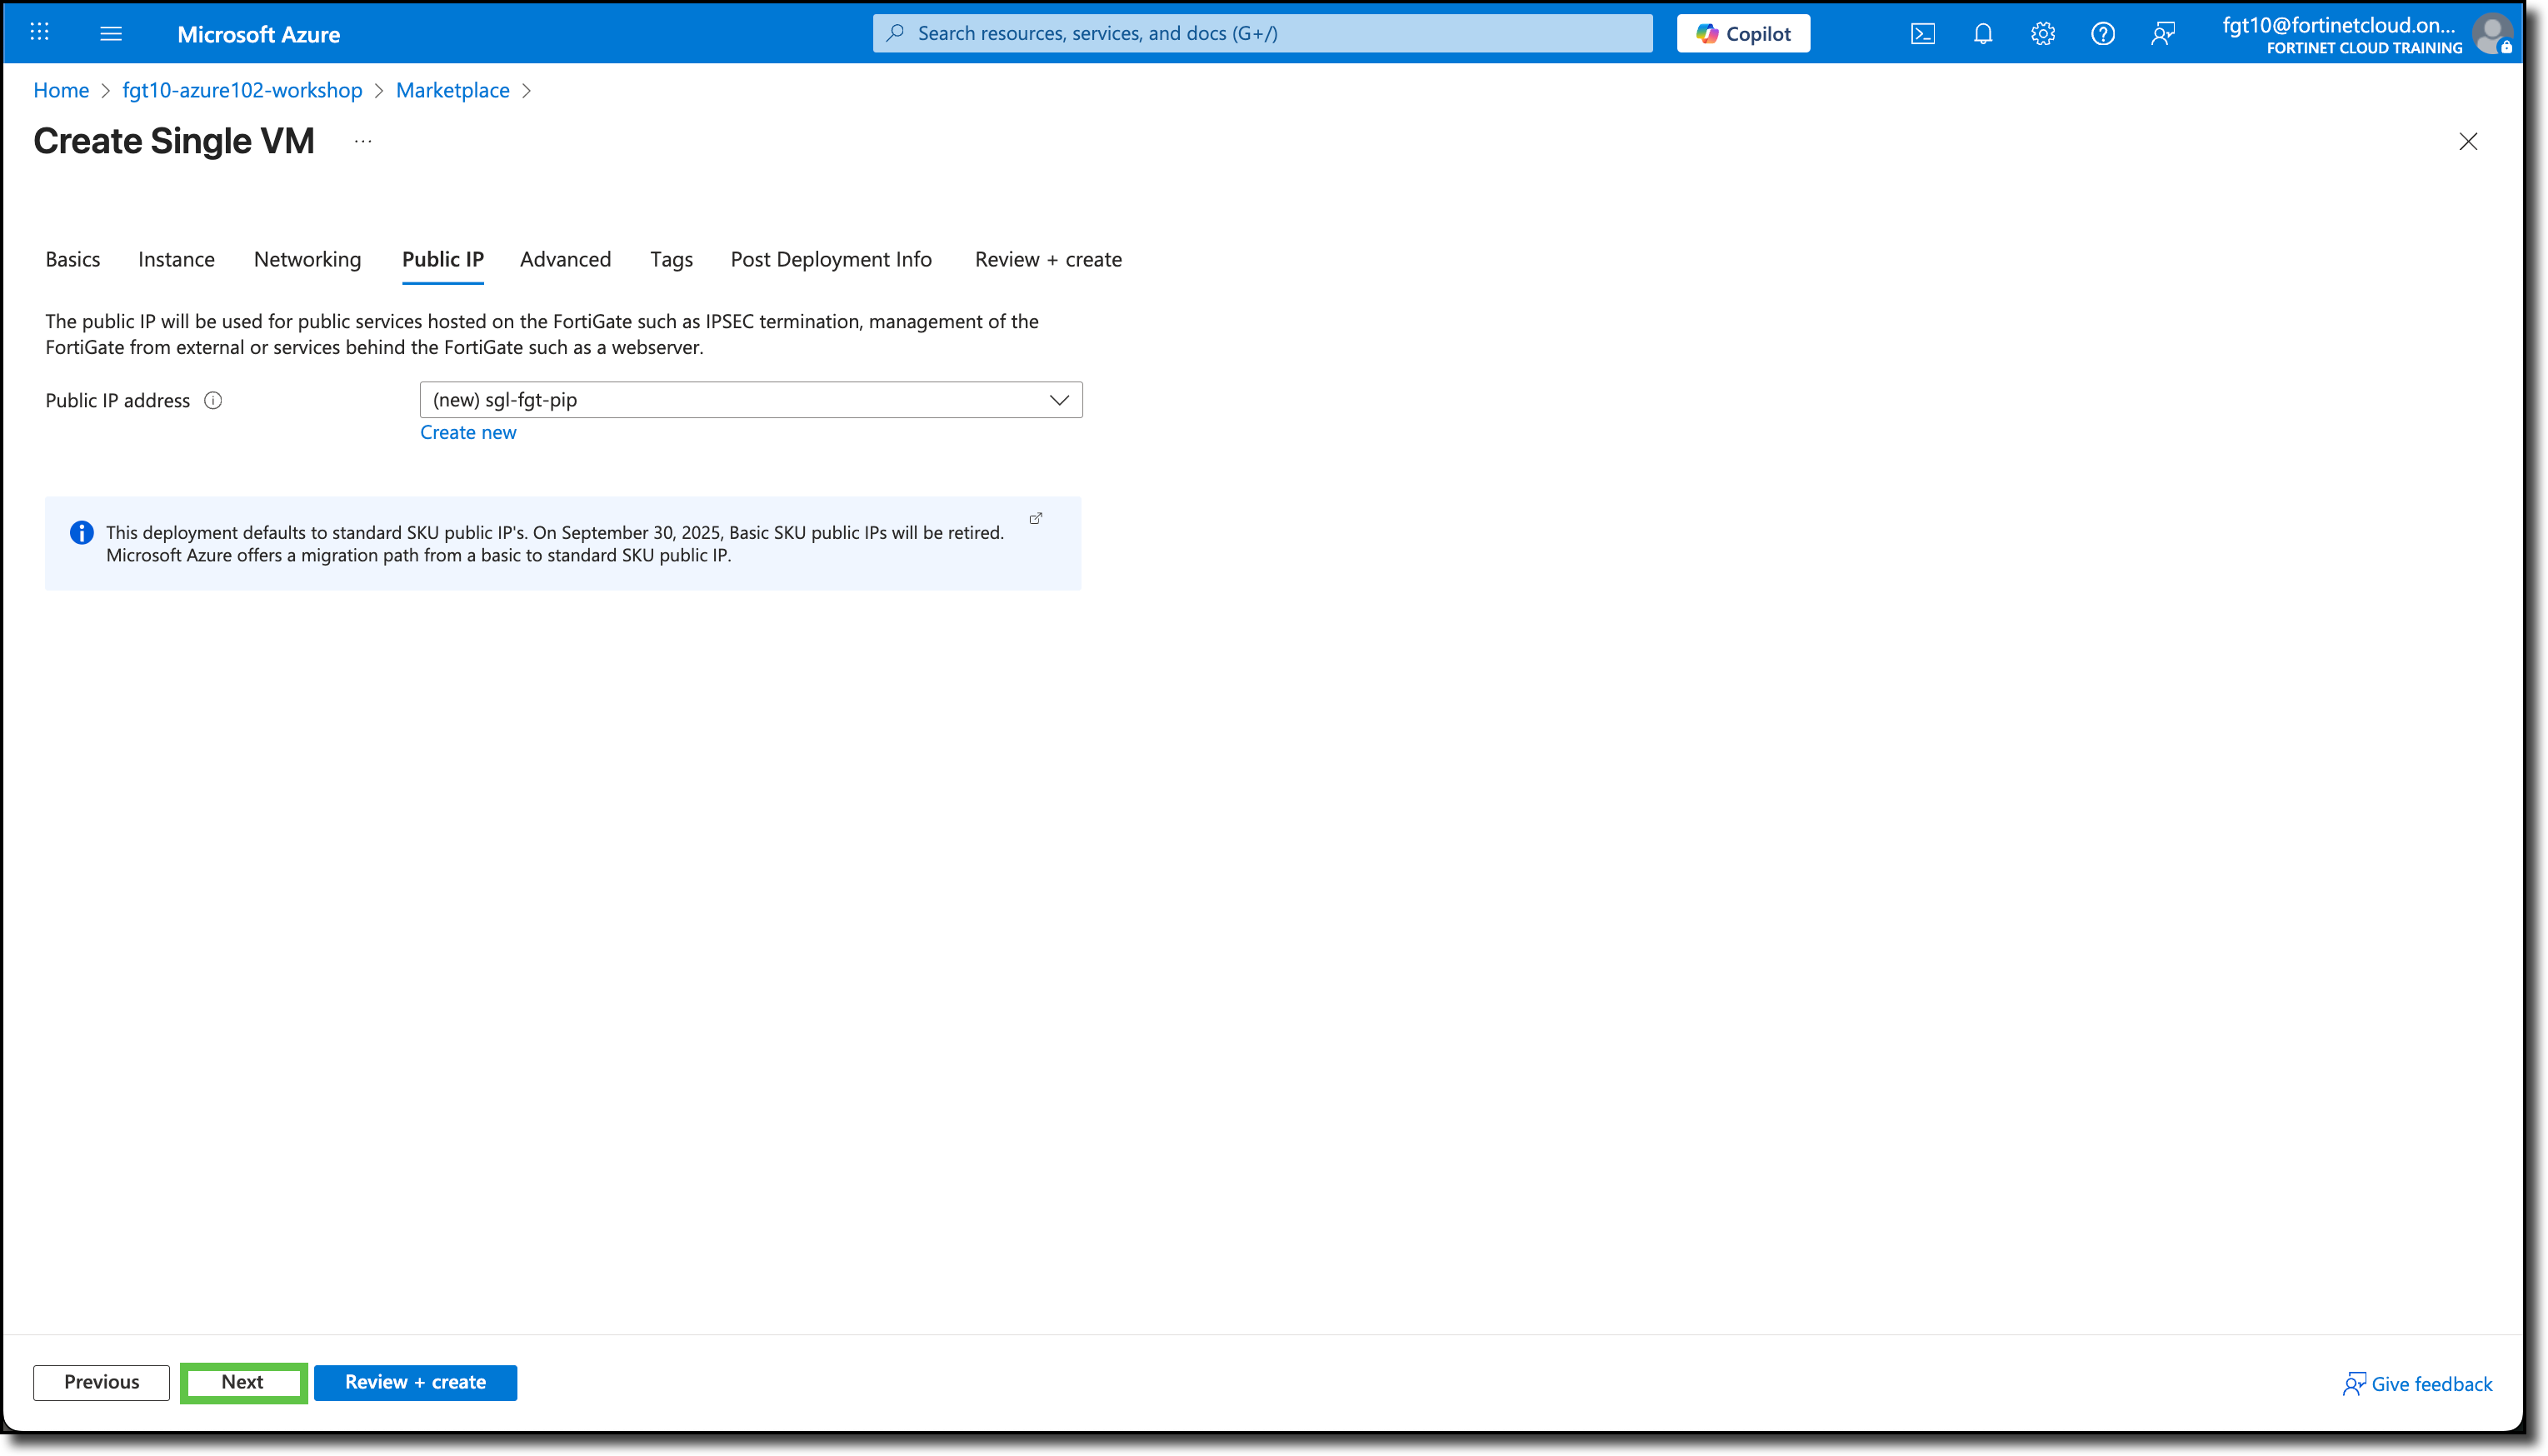
On the Public IP tab, keep the default Public IP address already entered. It should have a “(new)” listed in the beginning of the field.
Click “Next”
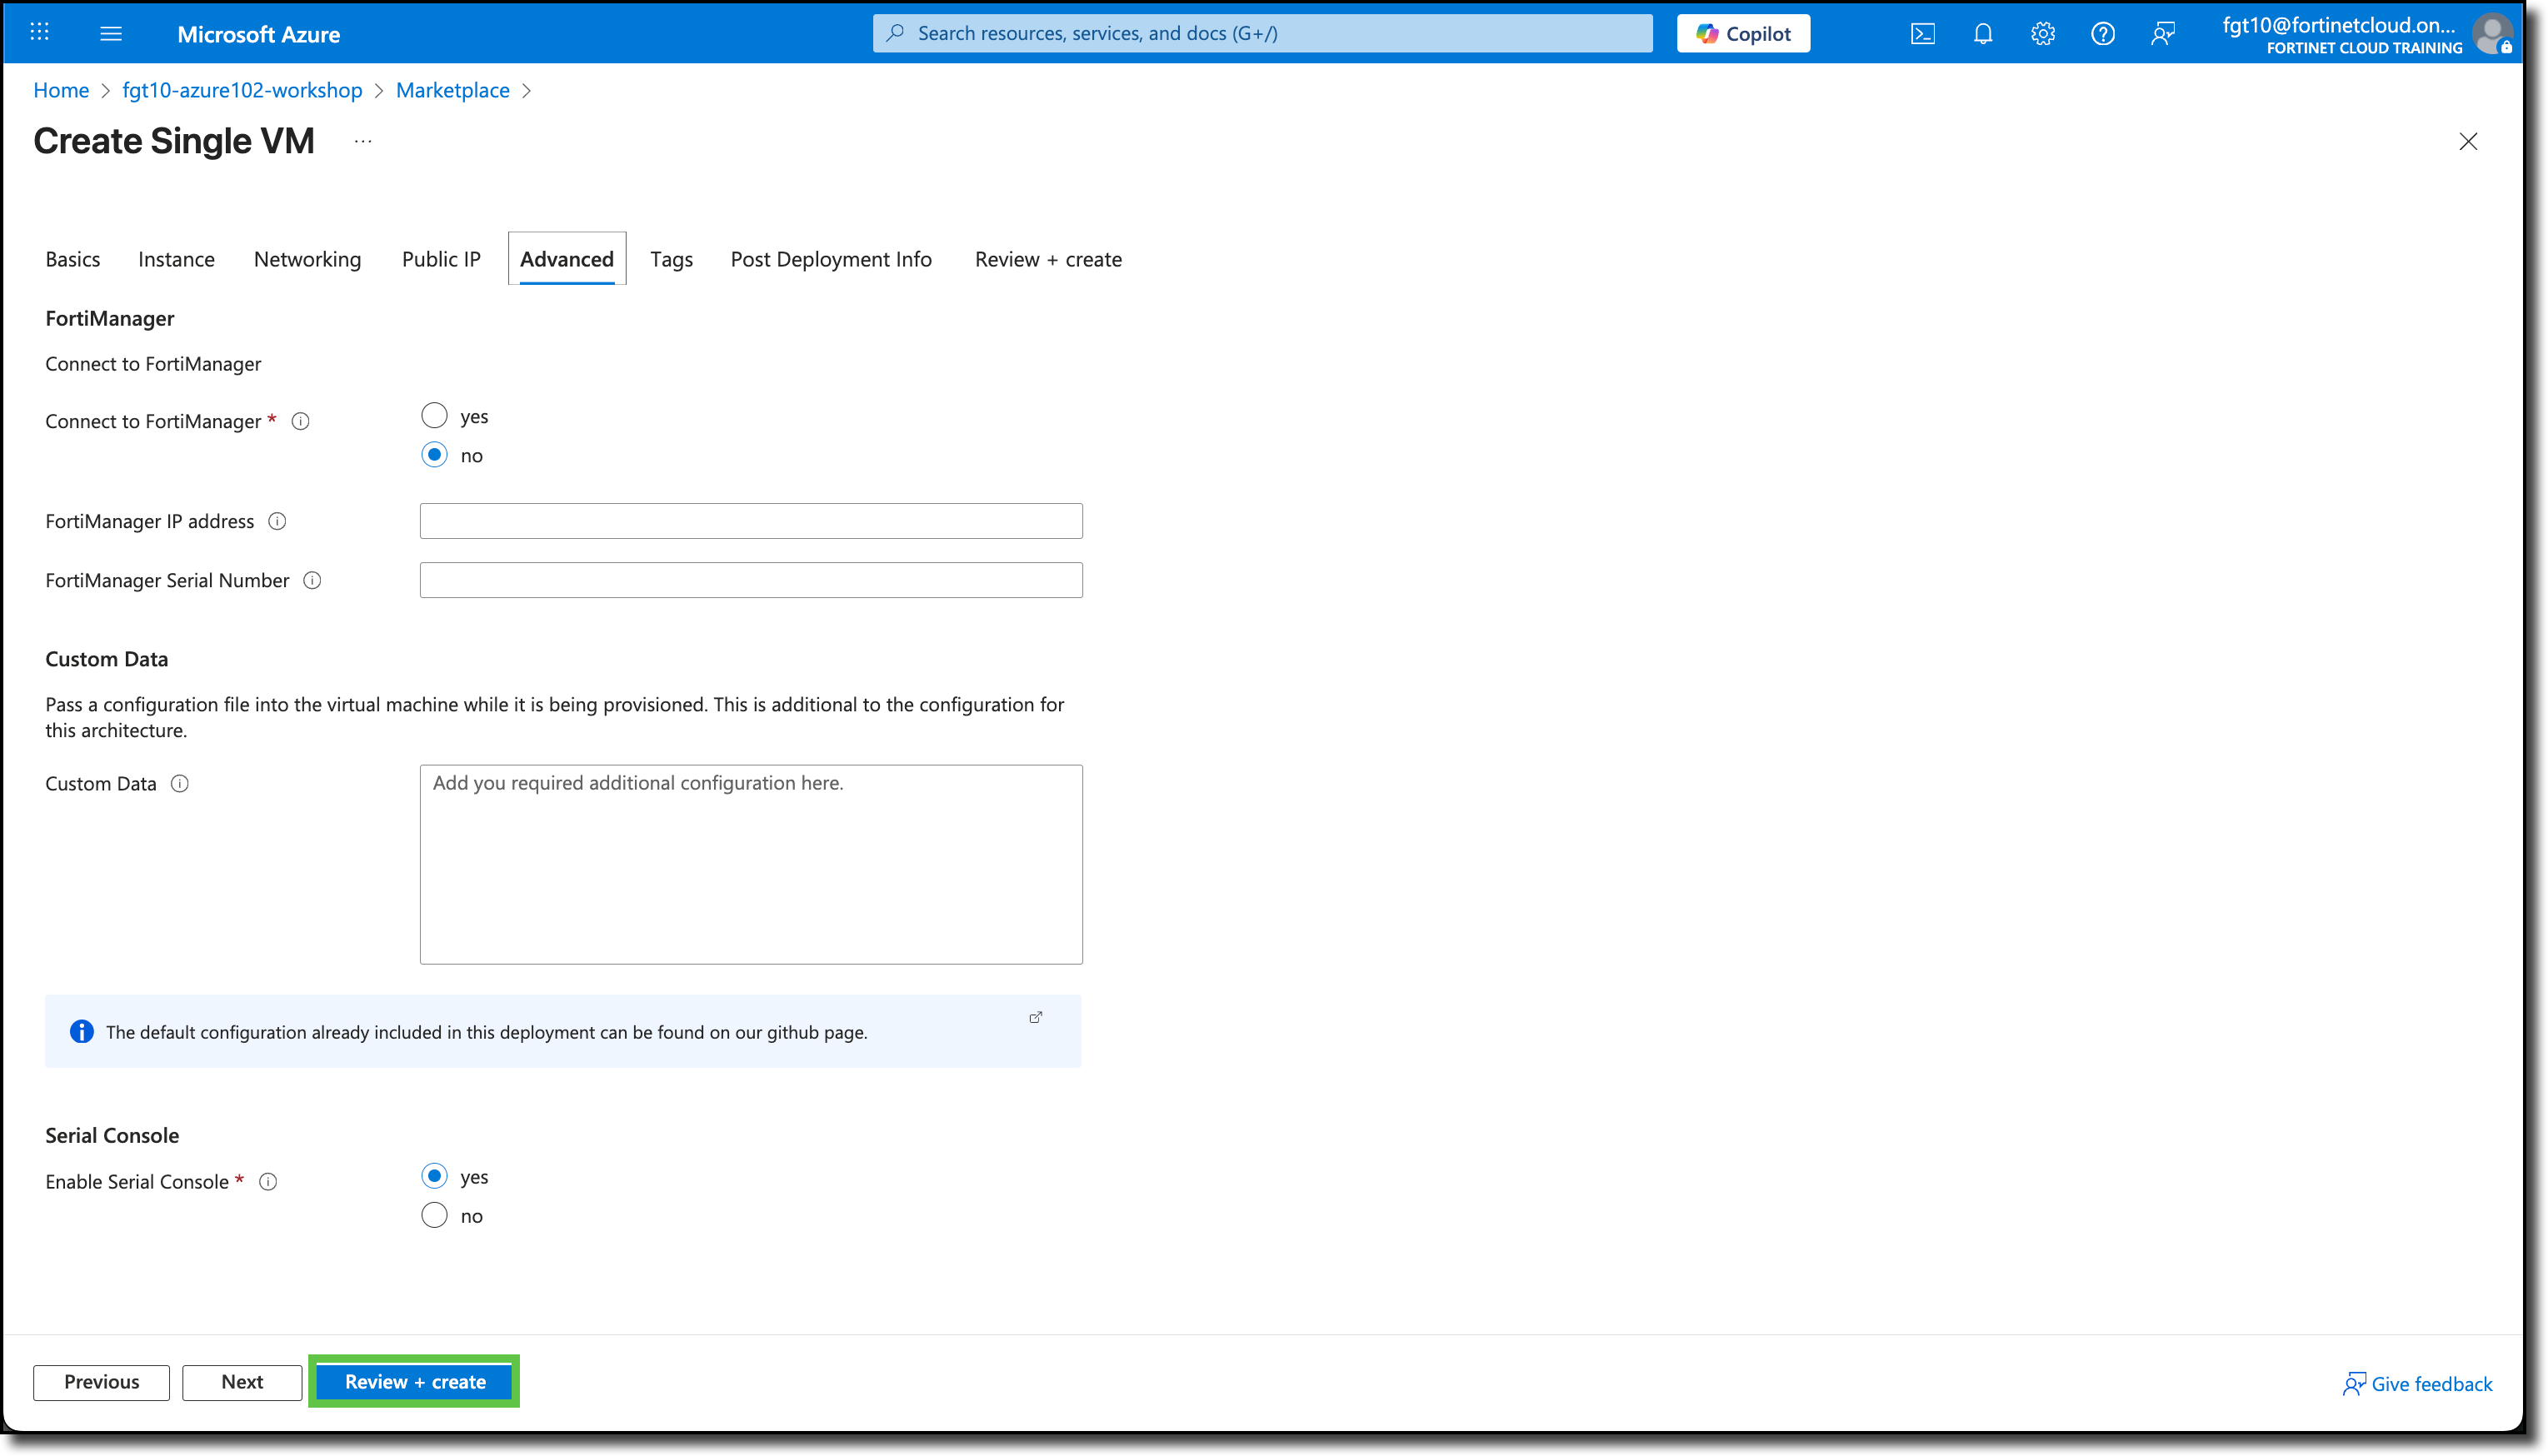
On the Advanced tab, keep the default settings.
Click “Review + create”
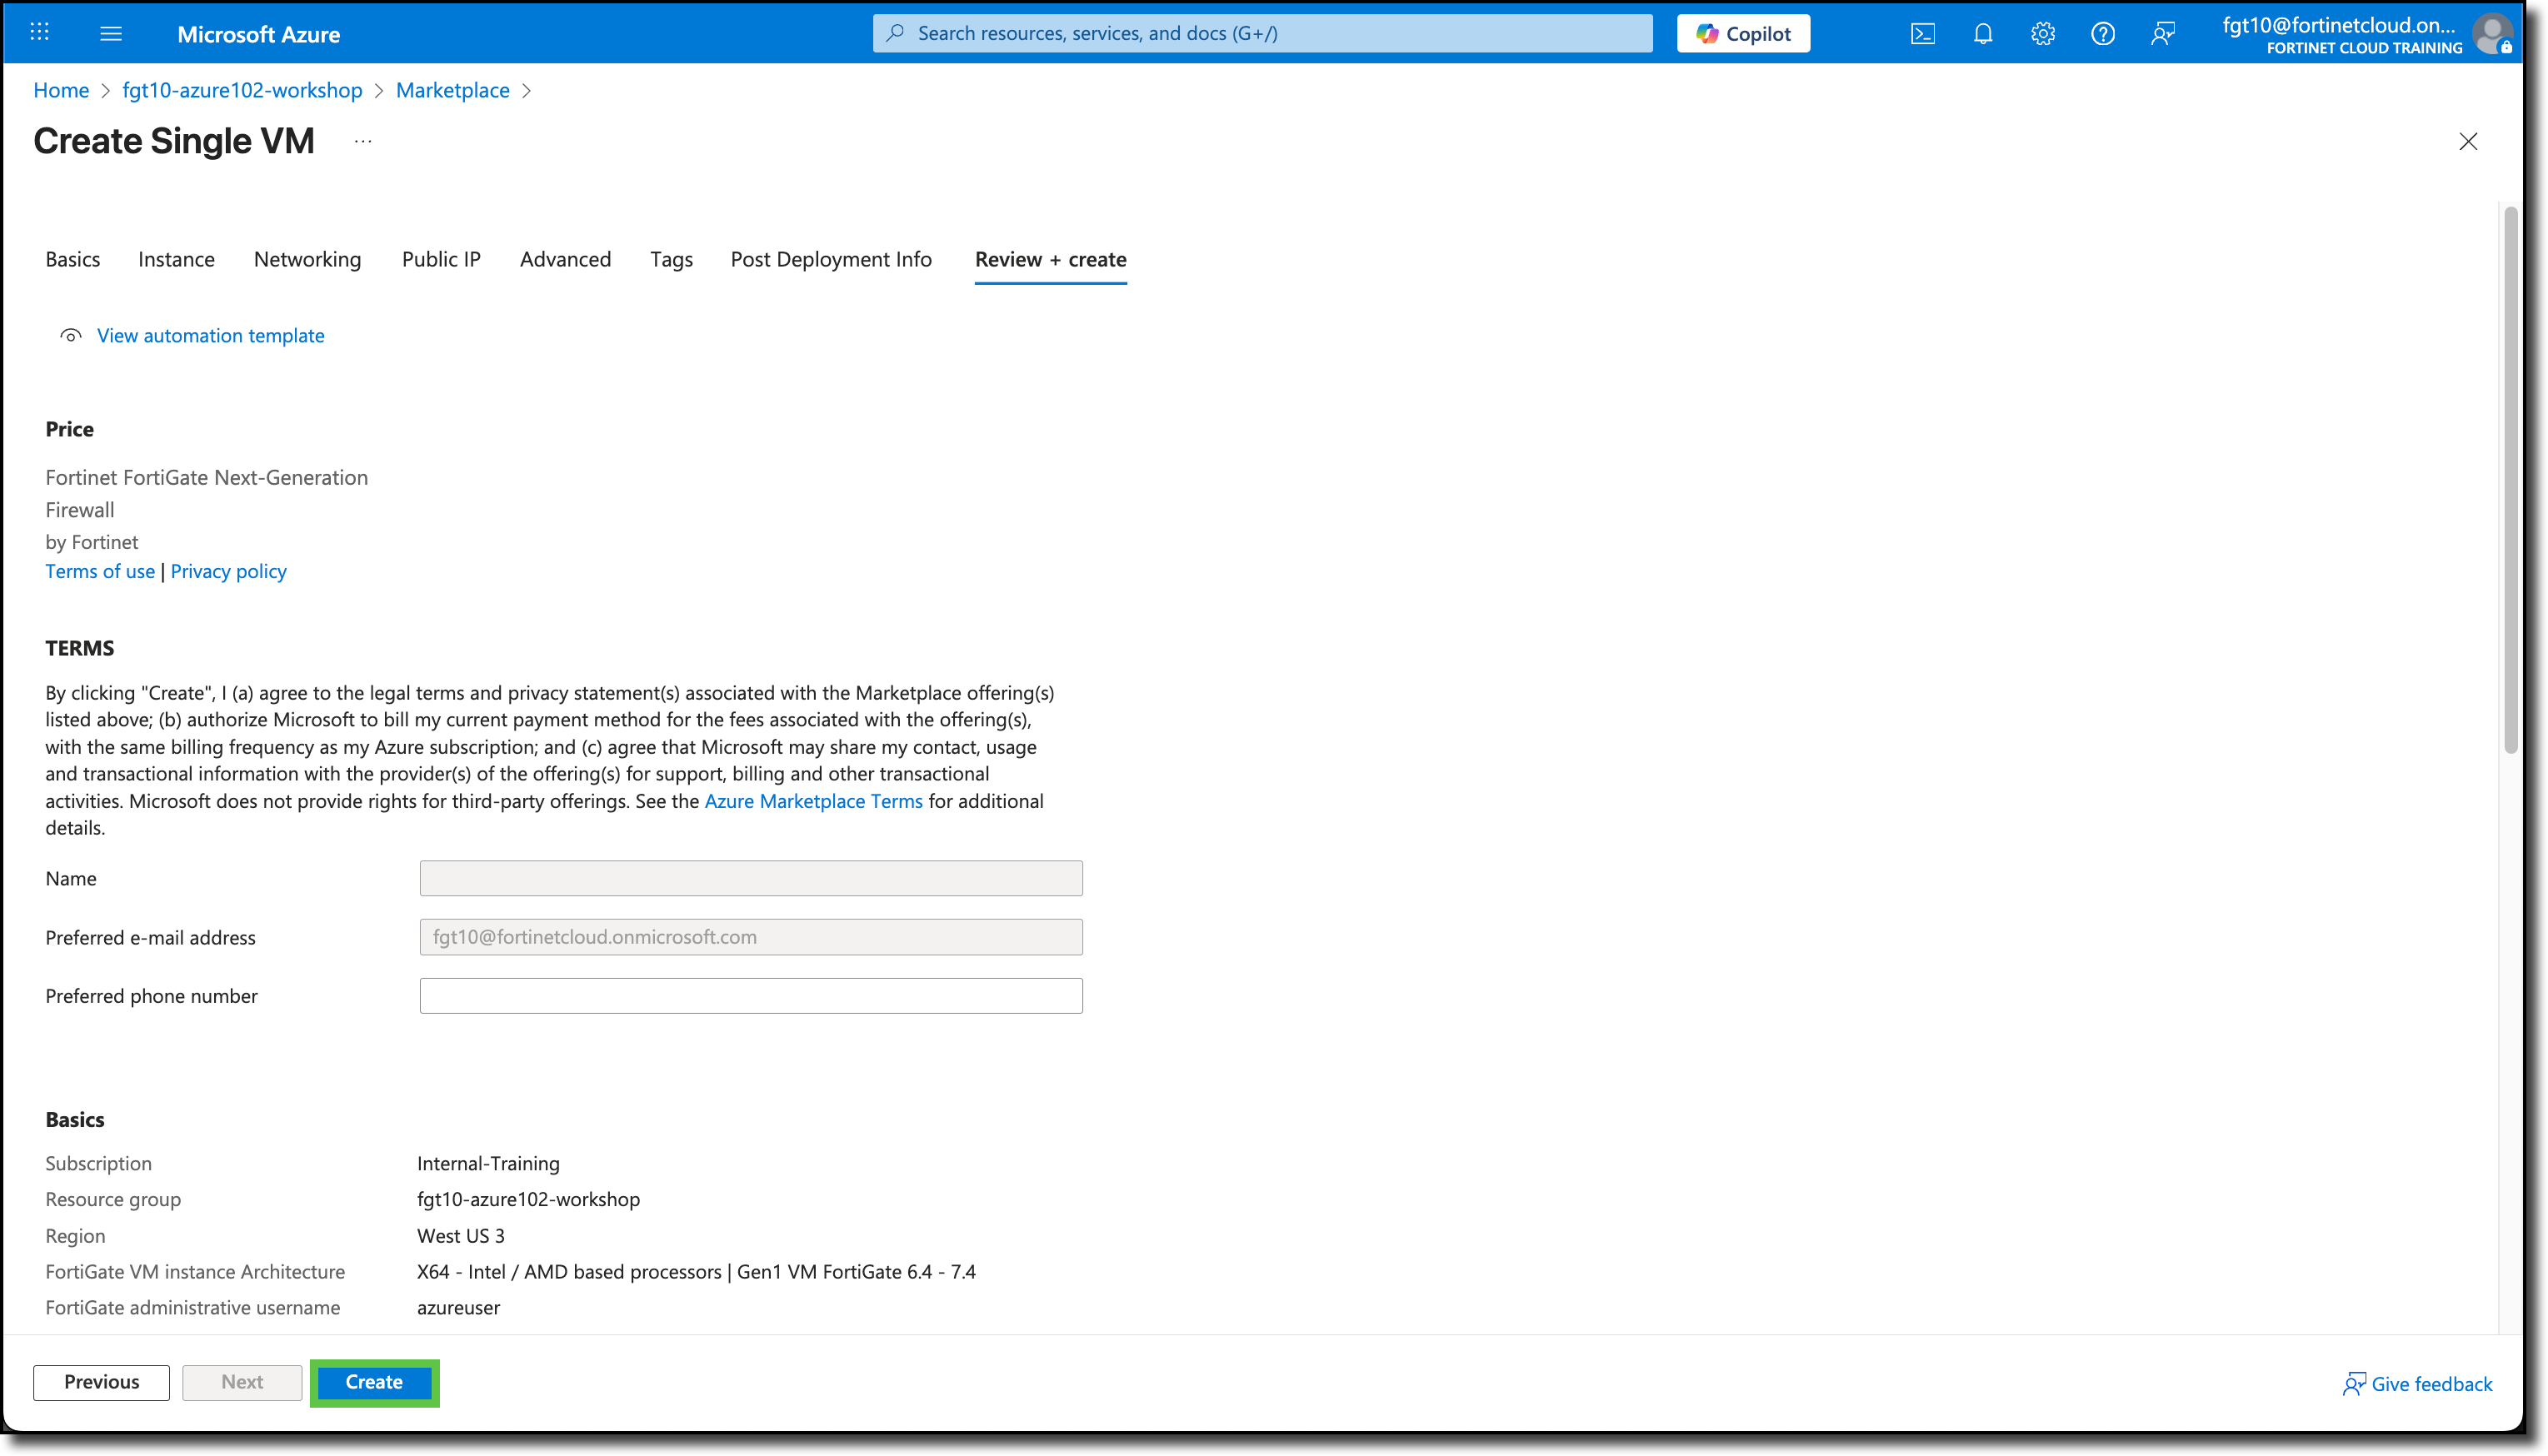
On the Review + create tab, scroll down and review the template entries.
Click “Create”
The screen will refresh and you will see Deployment is in progress.
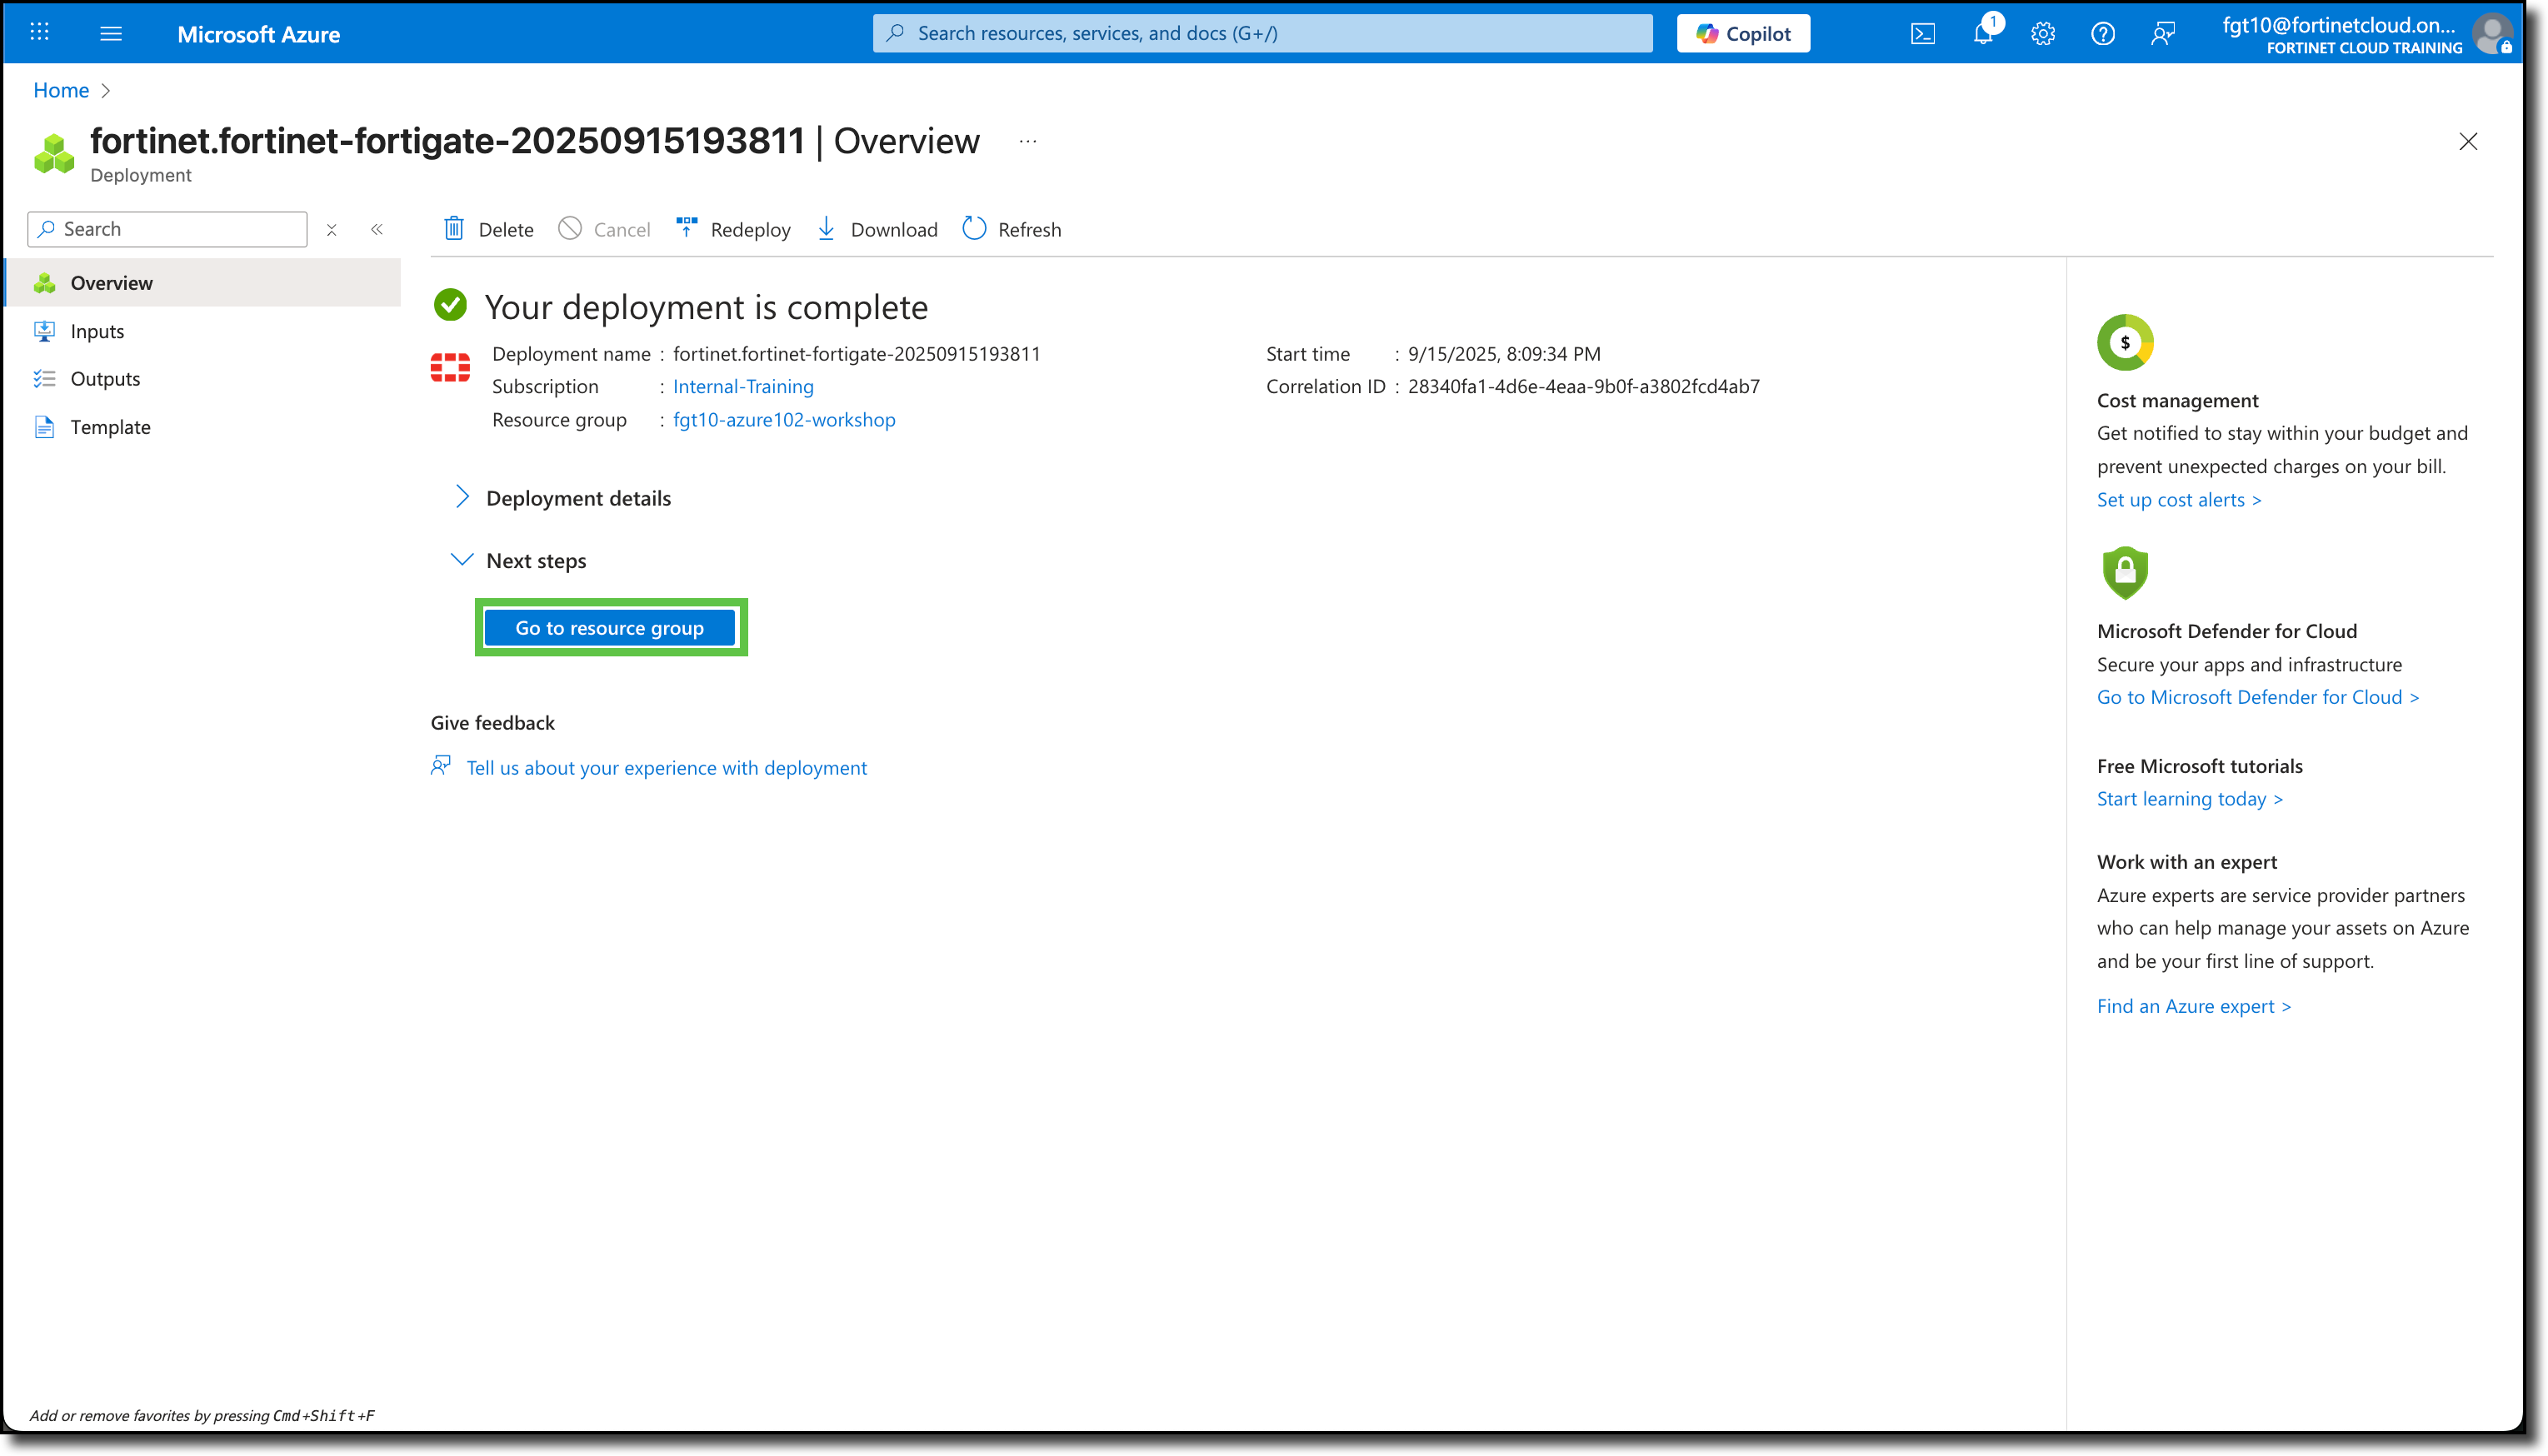
After a few minutes, you will see Your deployment is complete
Click Go to resource group
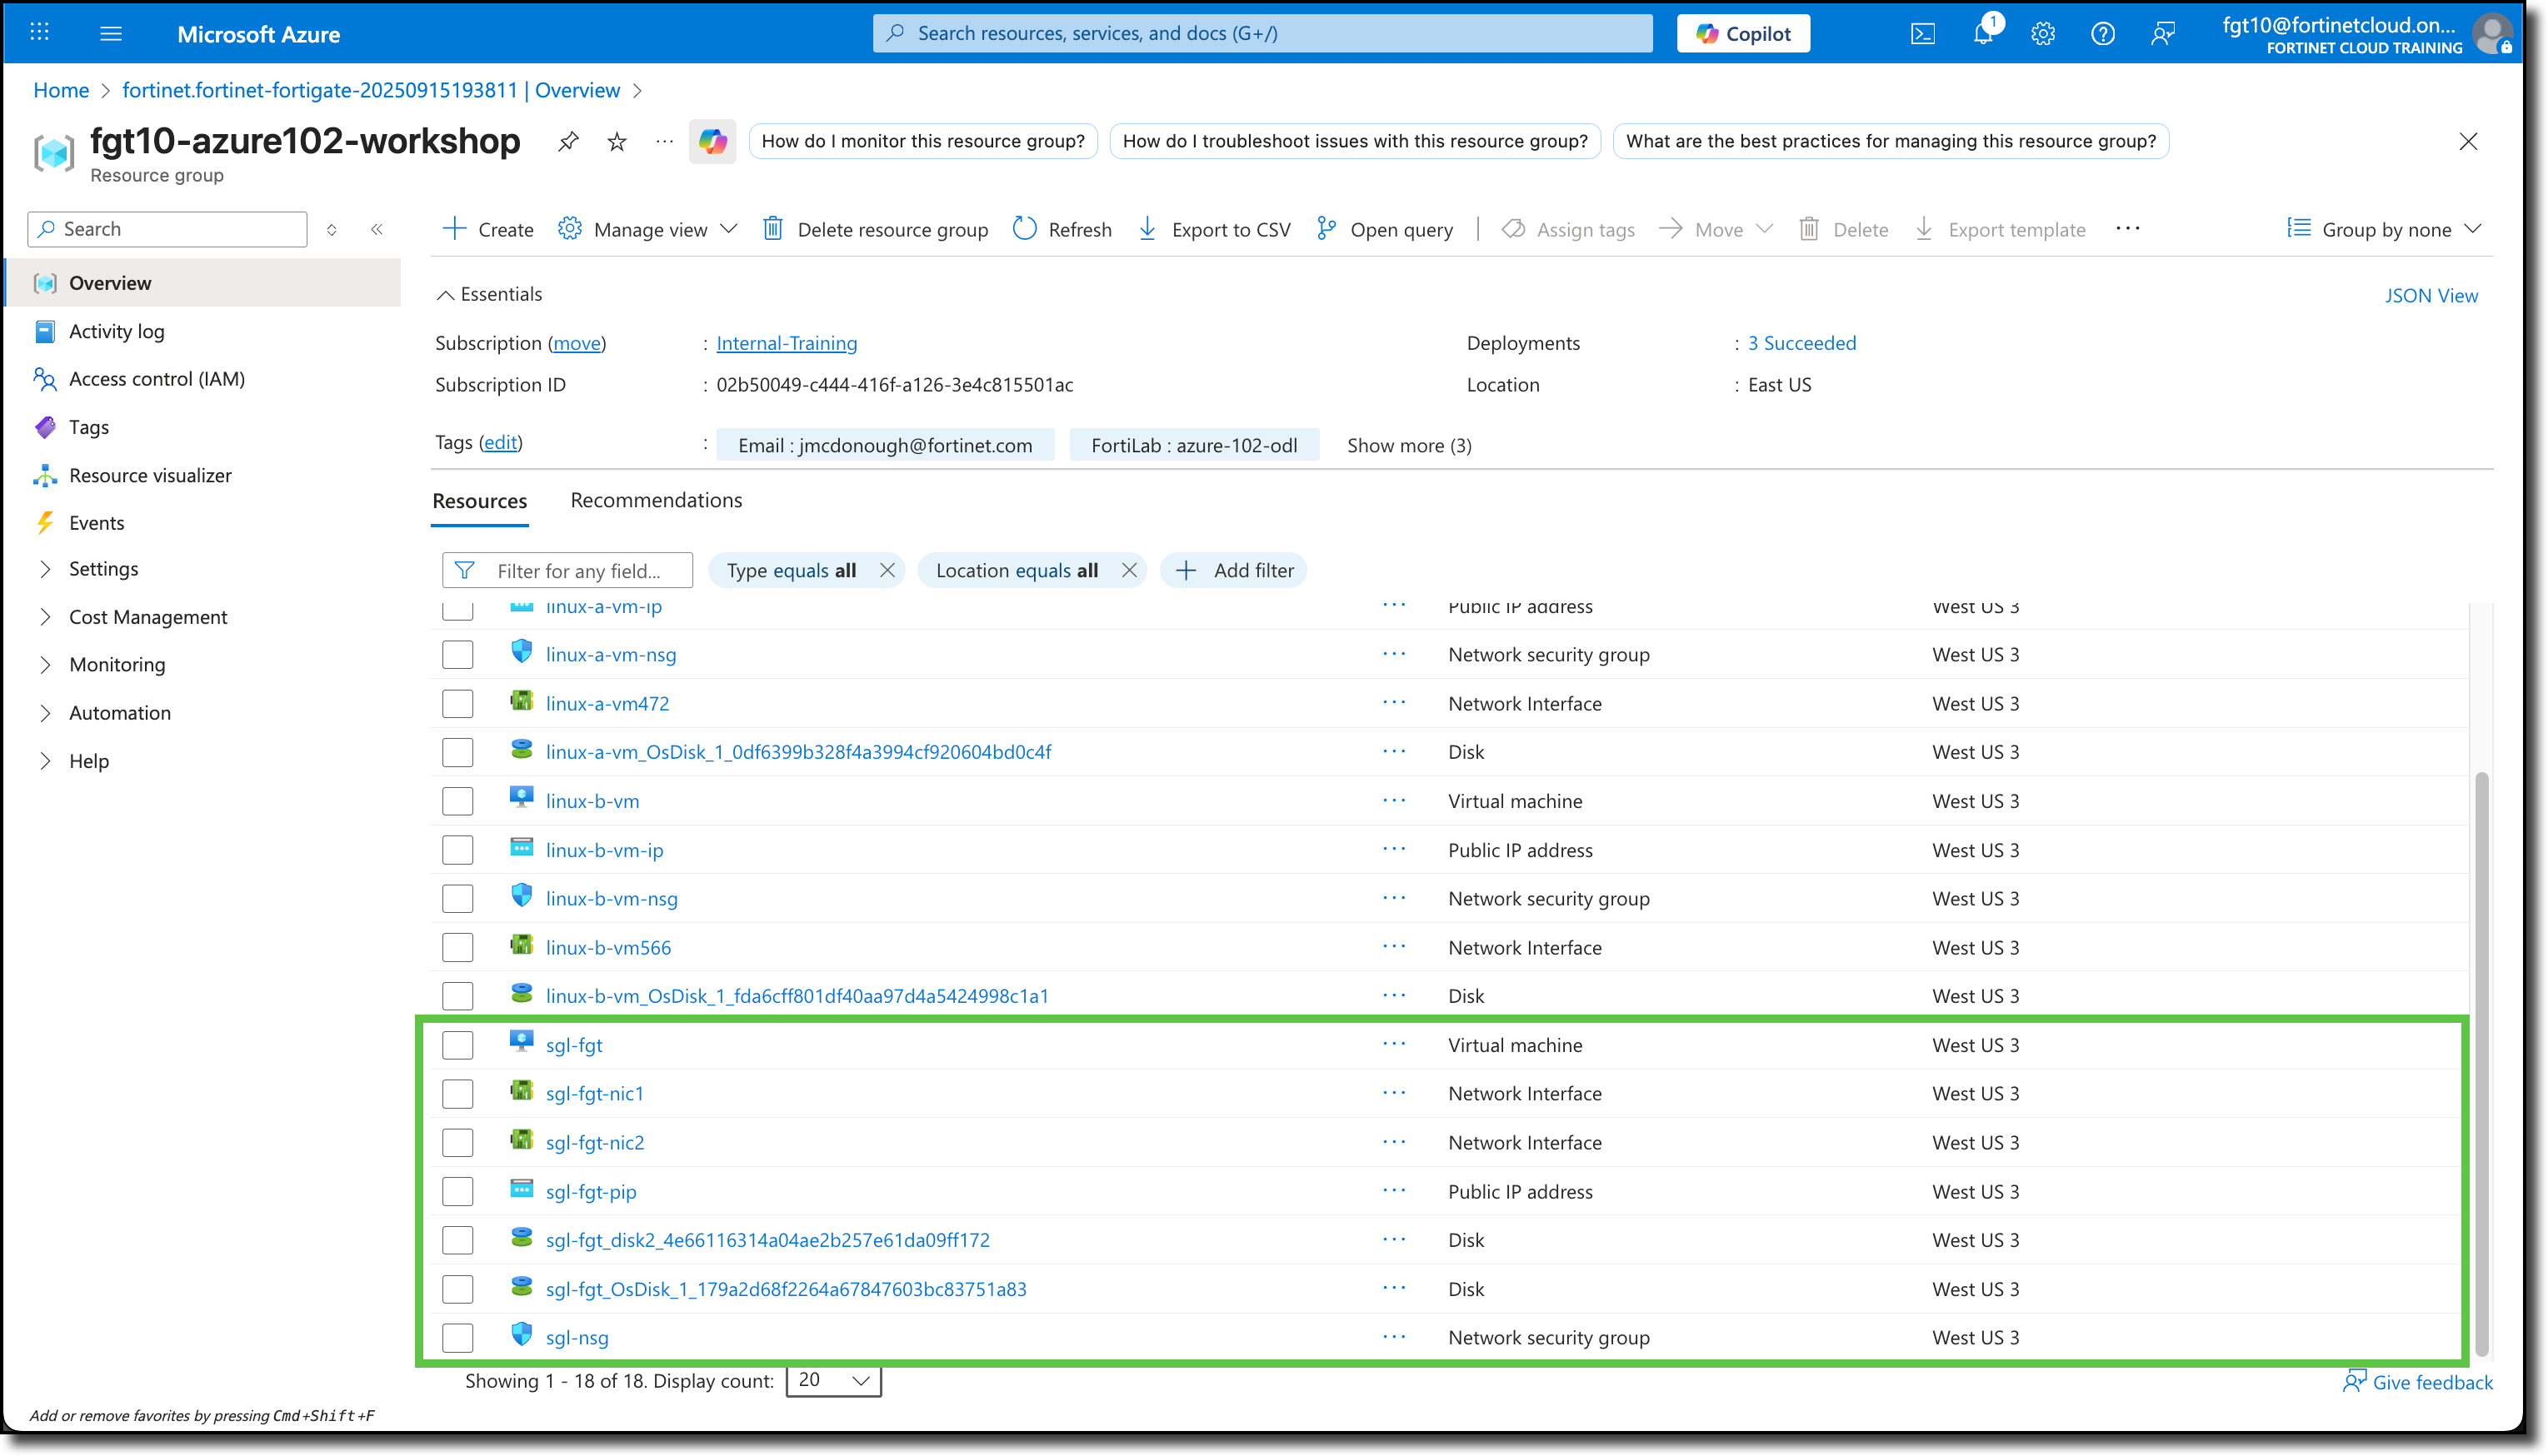
Confirm the FortiGate NVA and its related services have been deployed.
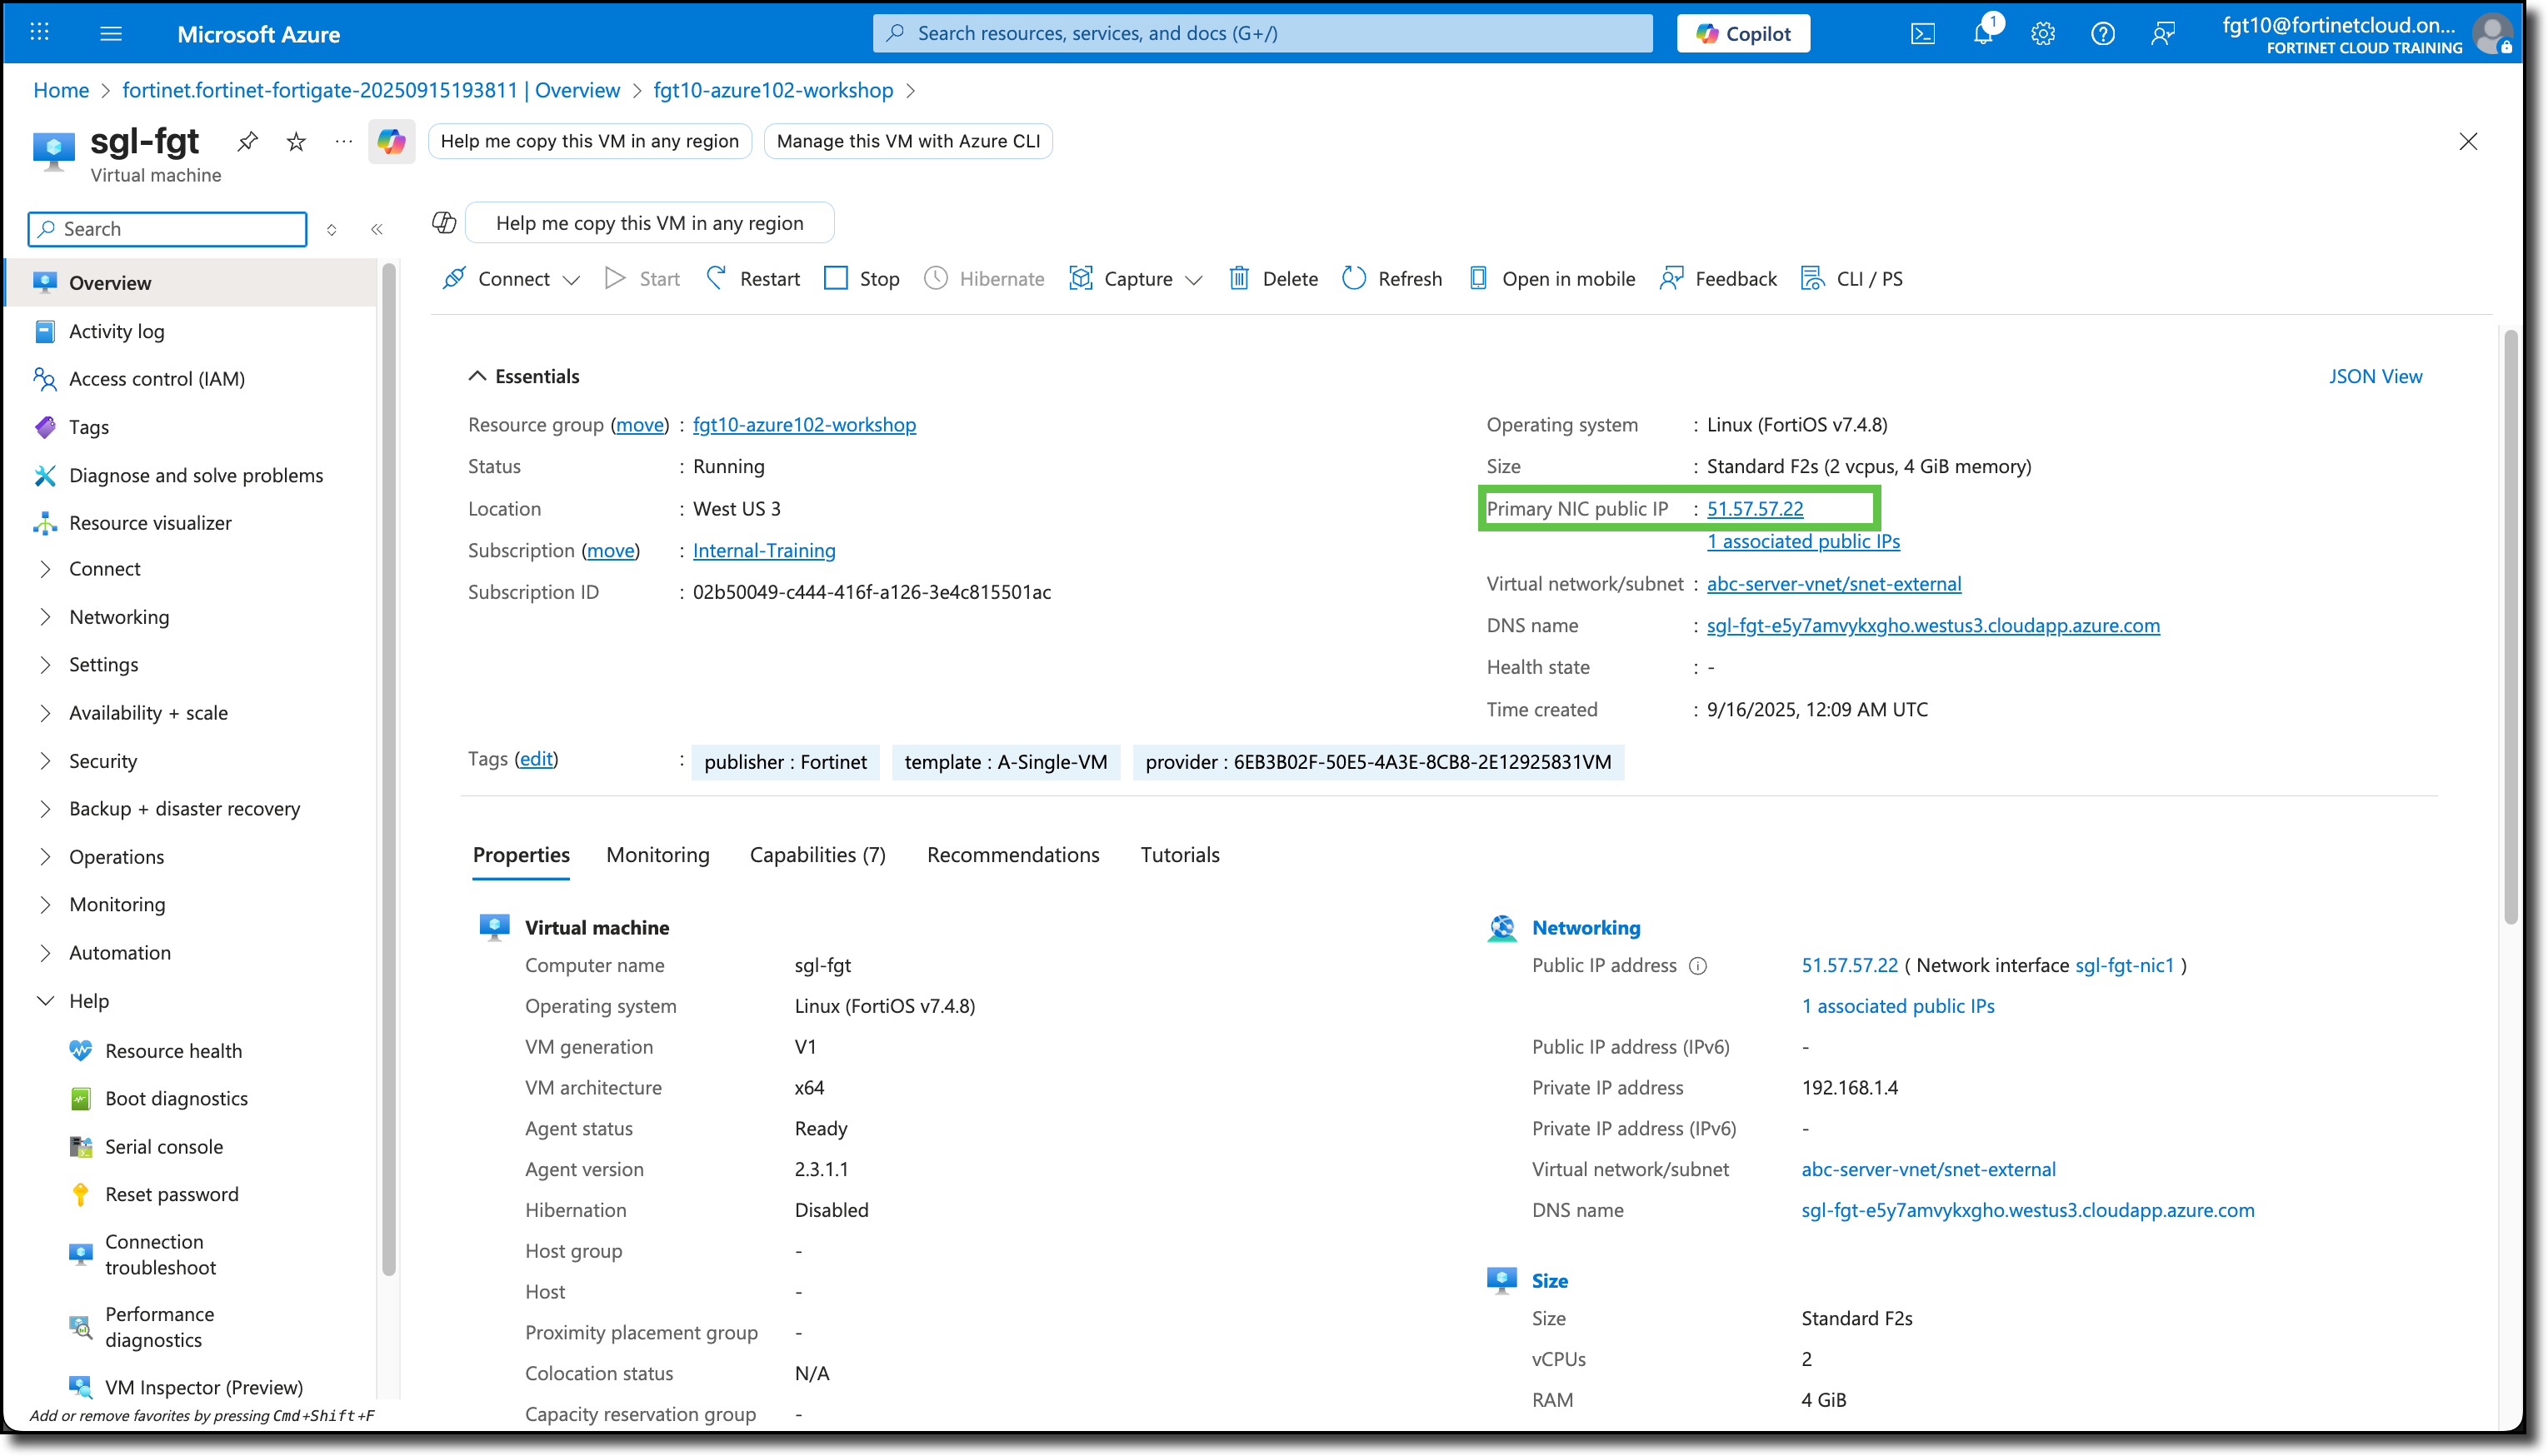
Click “sgl-fgt”
View Public IP address on overview page
FortiGate Access
Use the “Public IP address” in a browser to access the FortiGate interface
Enter the login info from above
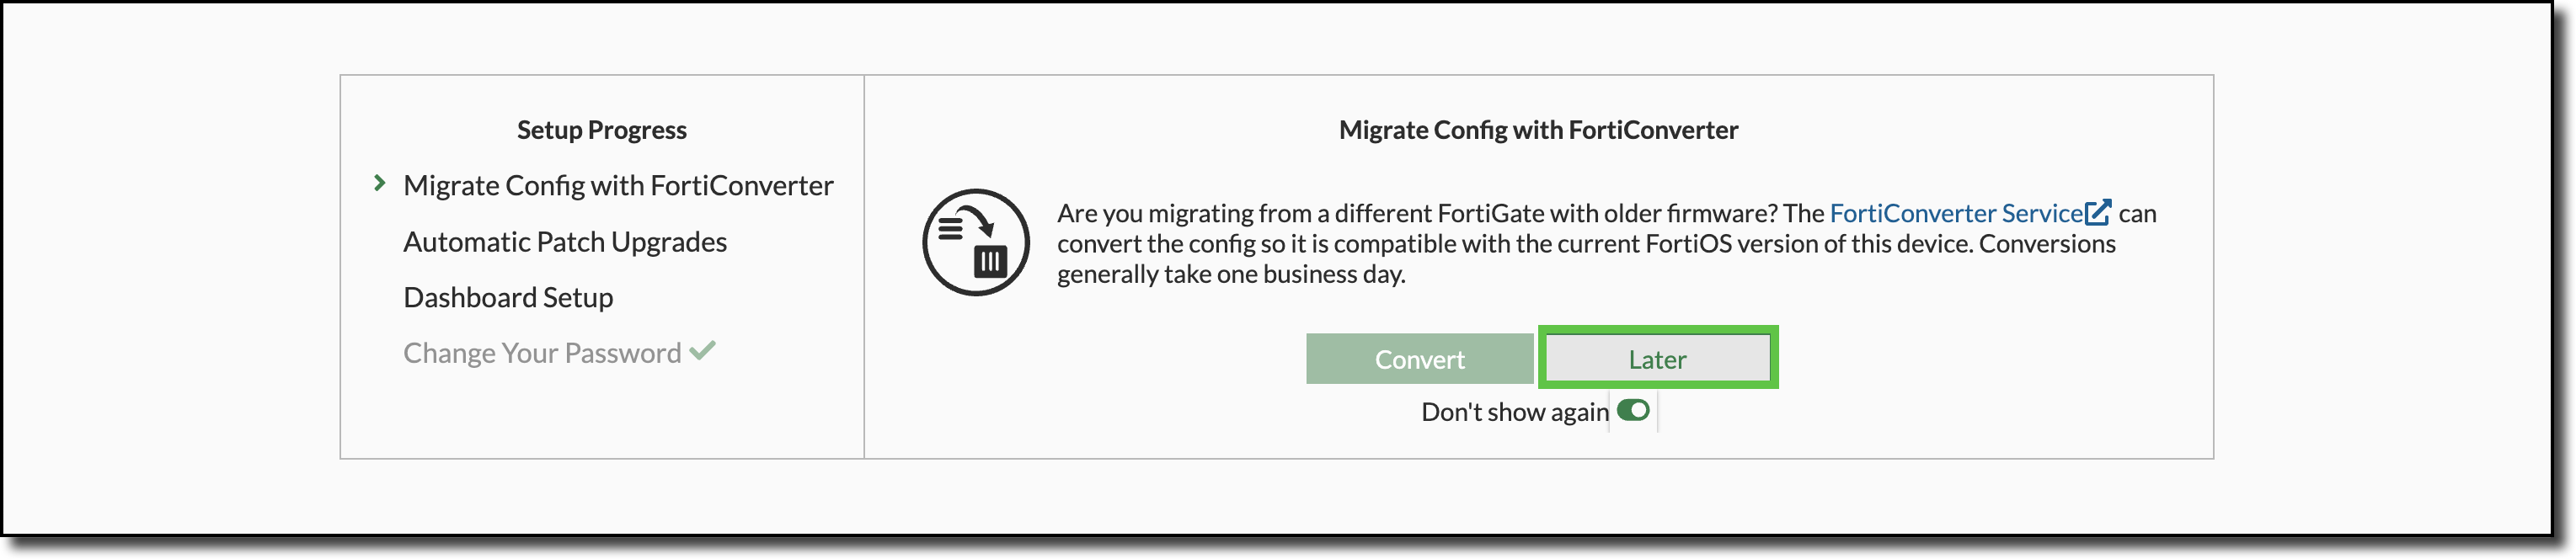
Click “Begin” on the FortiGate Setup page
Click “Later” on the Migrate Config with FortiConverter page
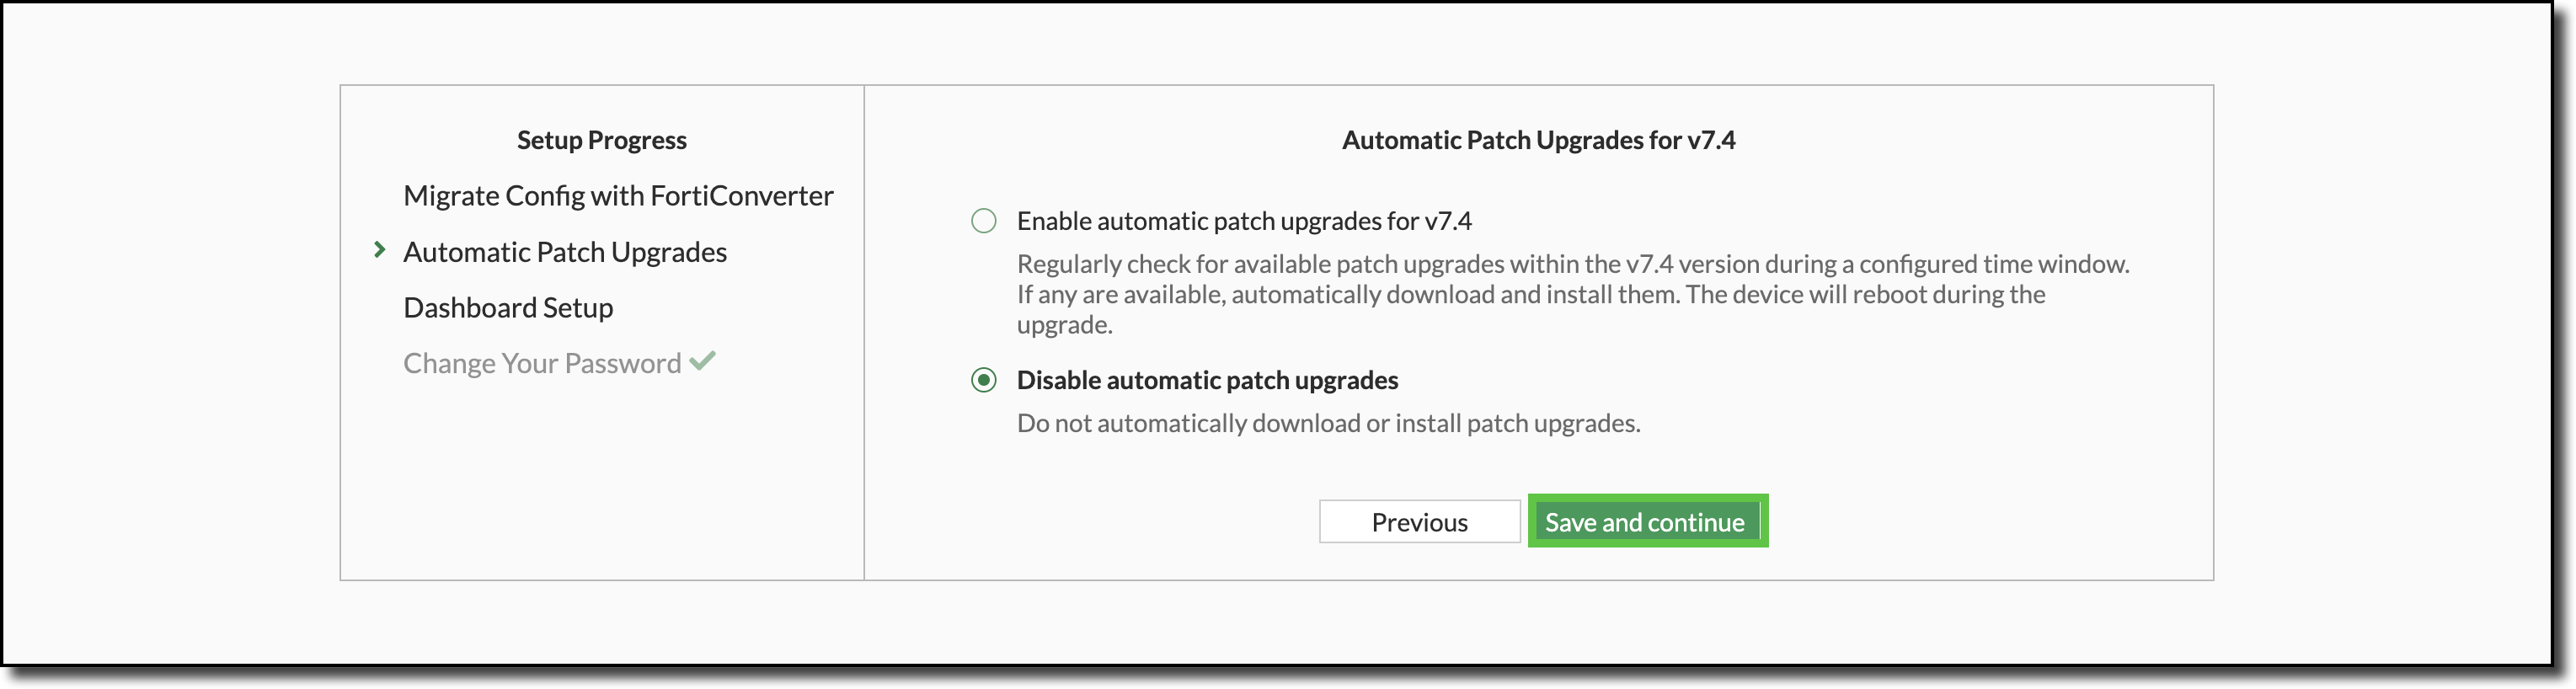
Select “Disable automatic patch upgrades” then Click “Save and continue” on the Automatic Patch Upgrades for v7.4 page
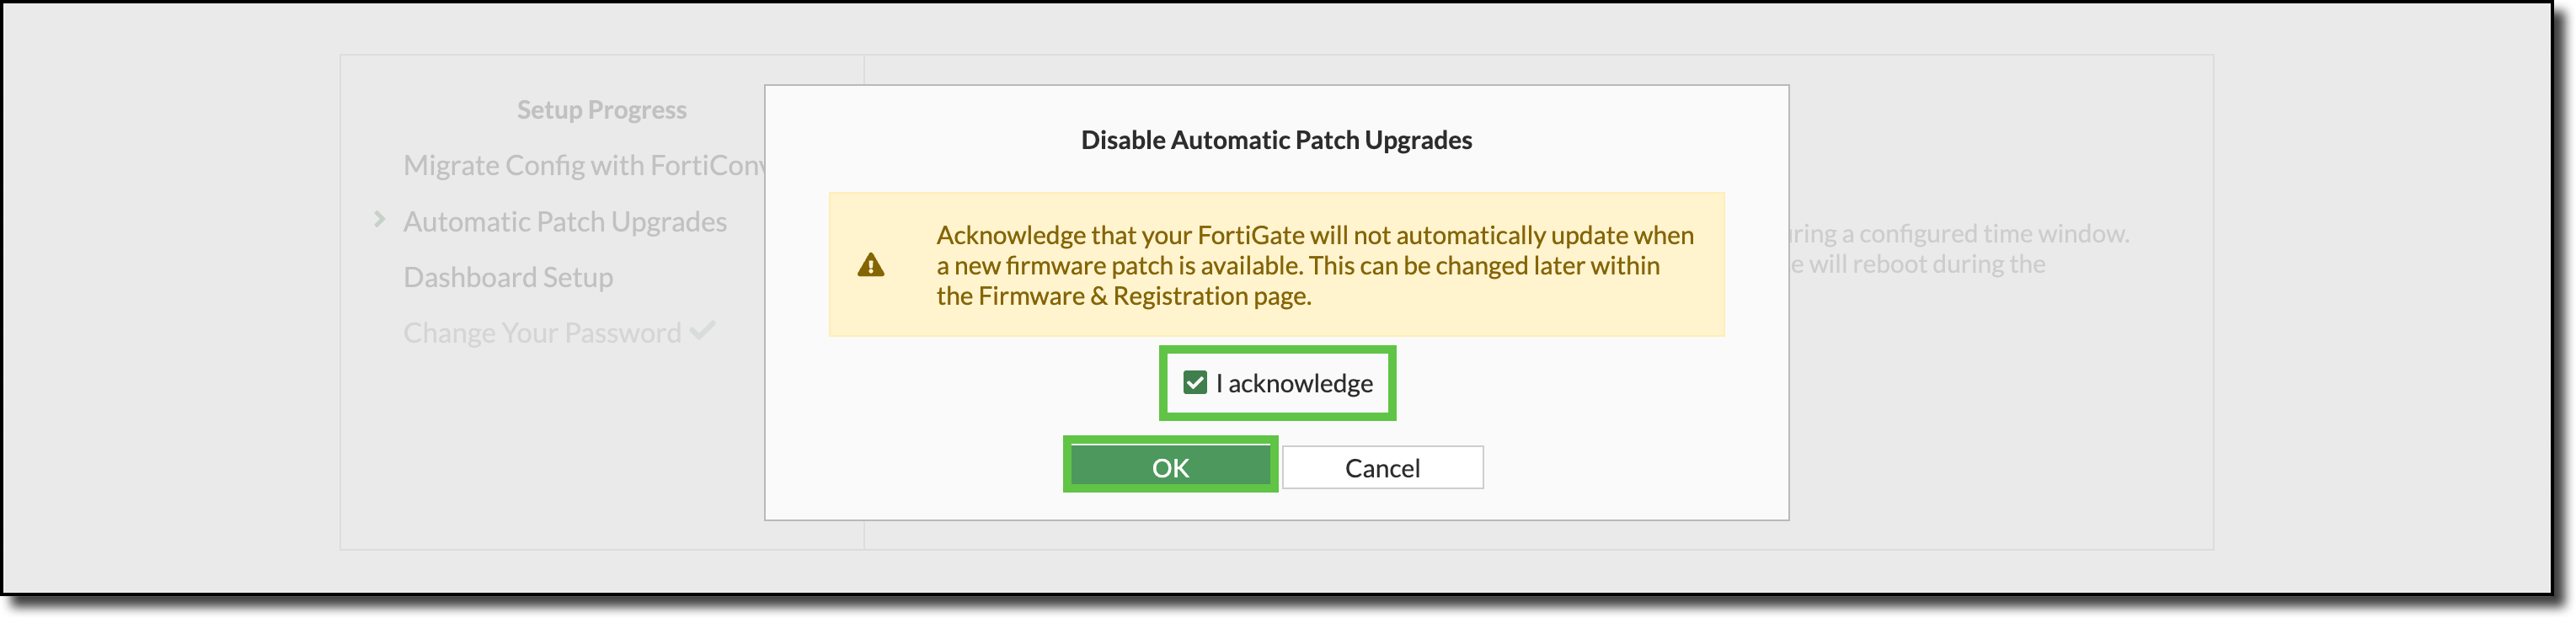
Select “I acknowledge” and Click “OK” on the Disable Automatic Patch Upgrades page
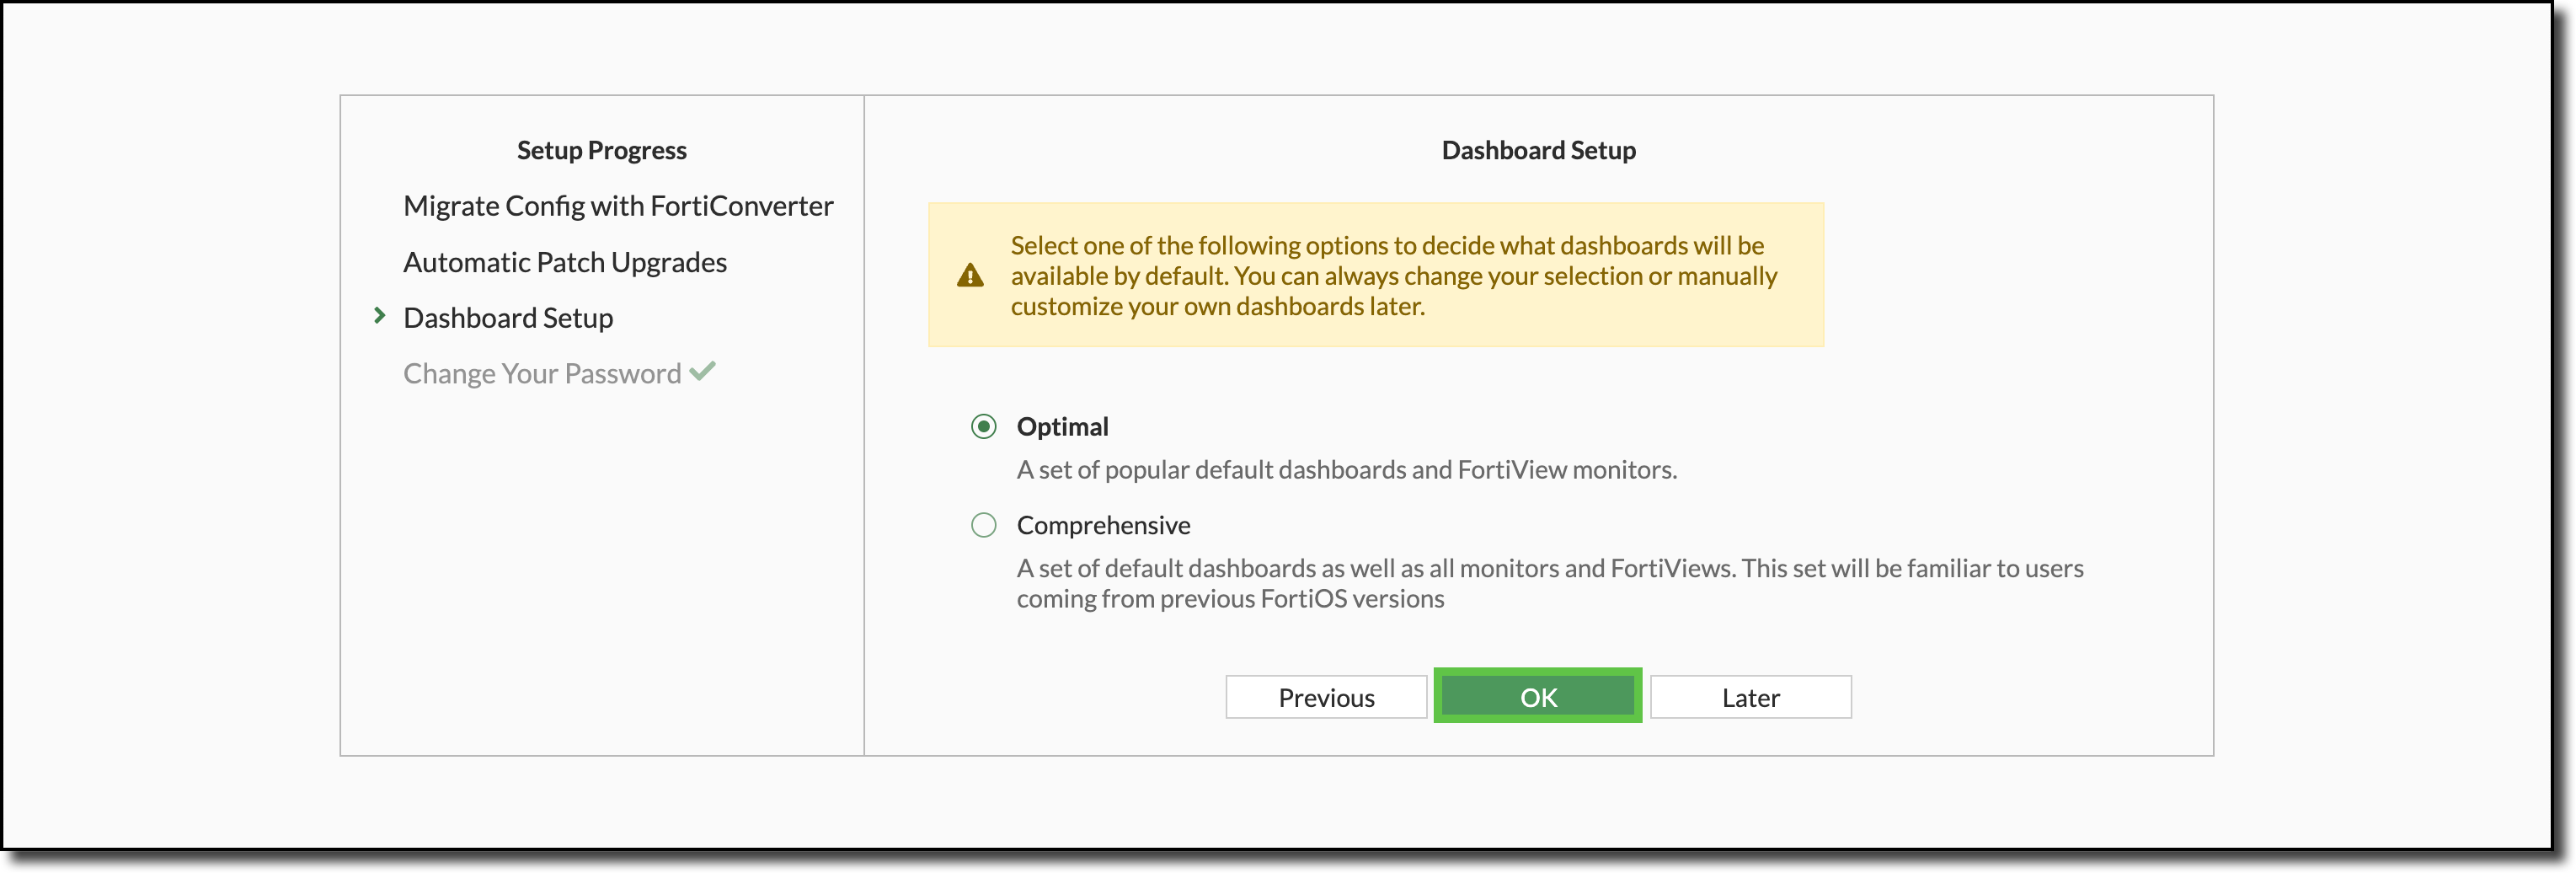
Click “OK” on the Dashboard Setup page
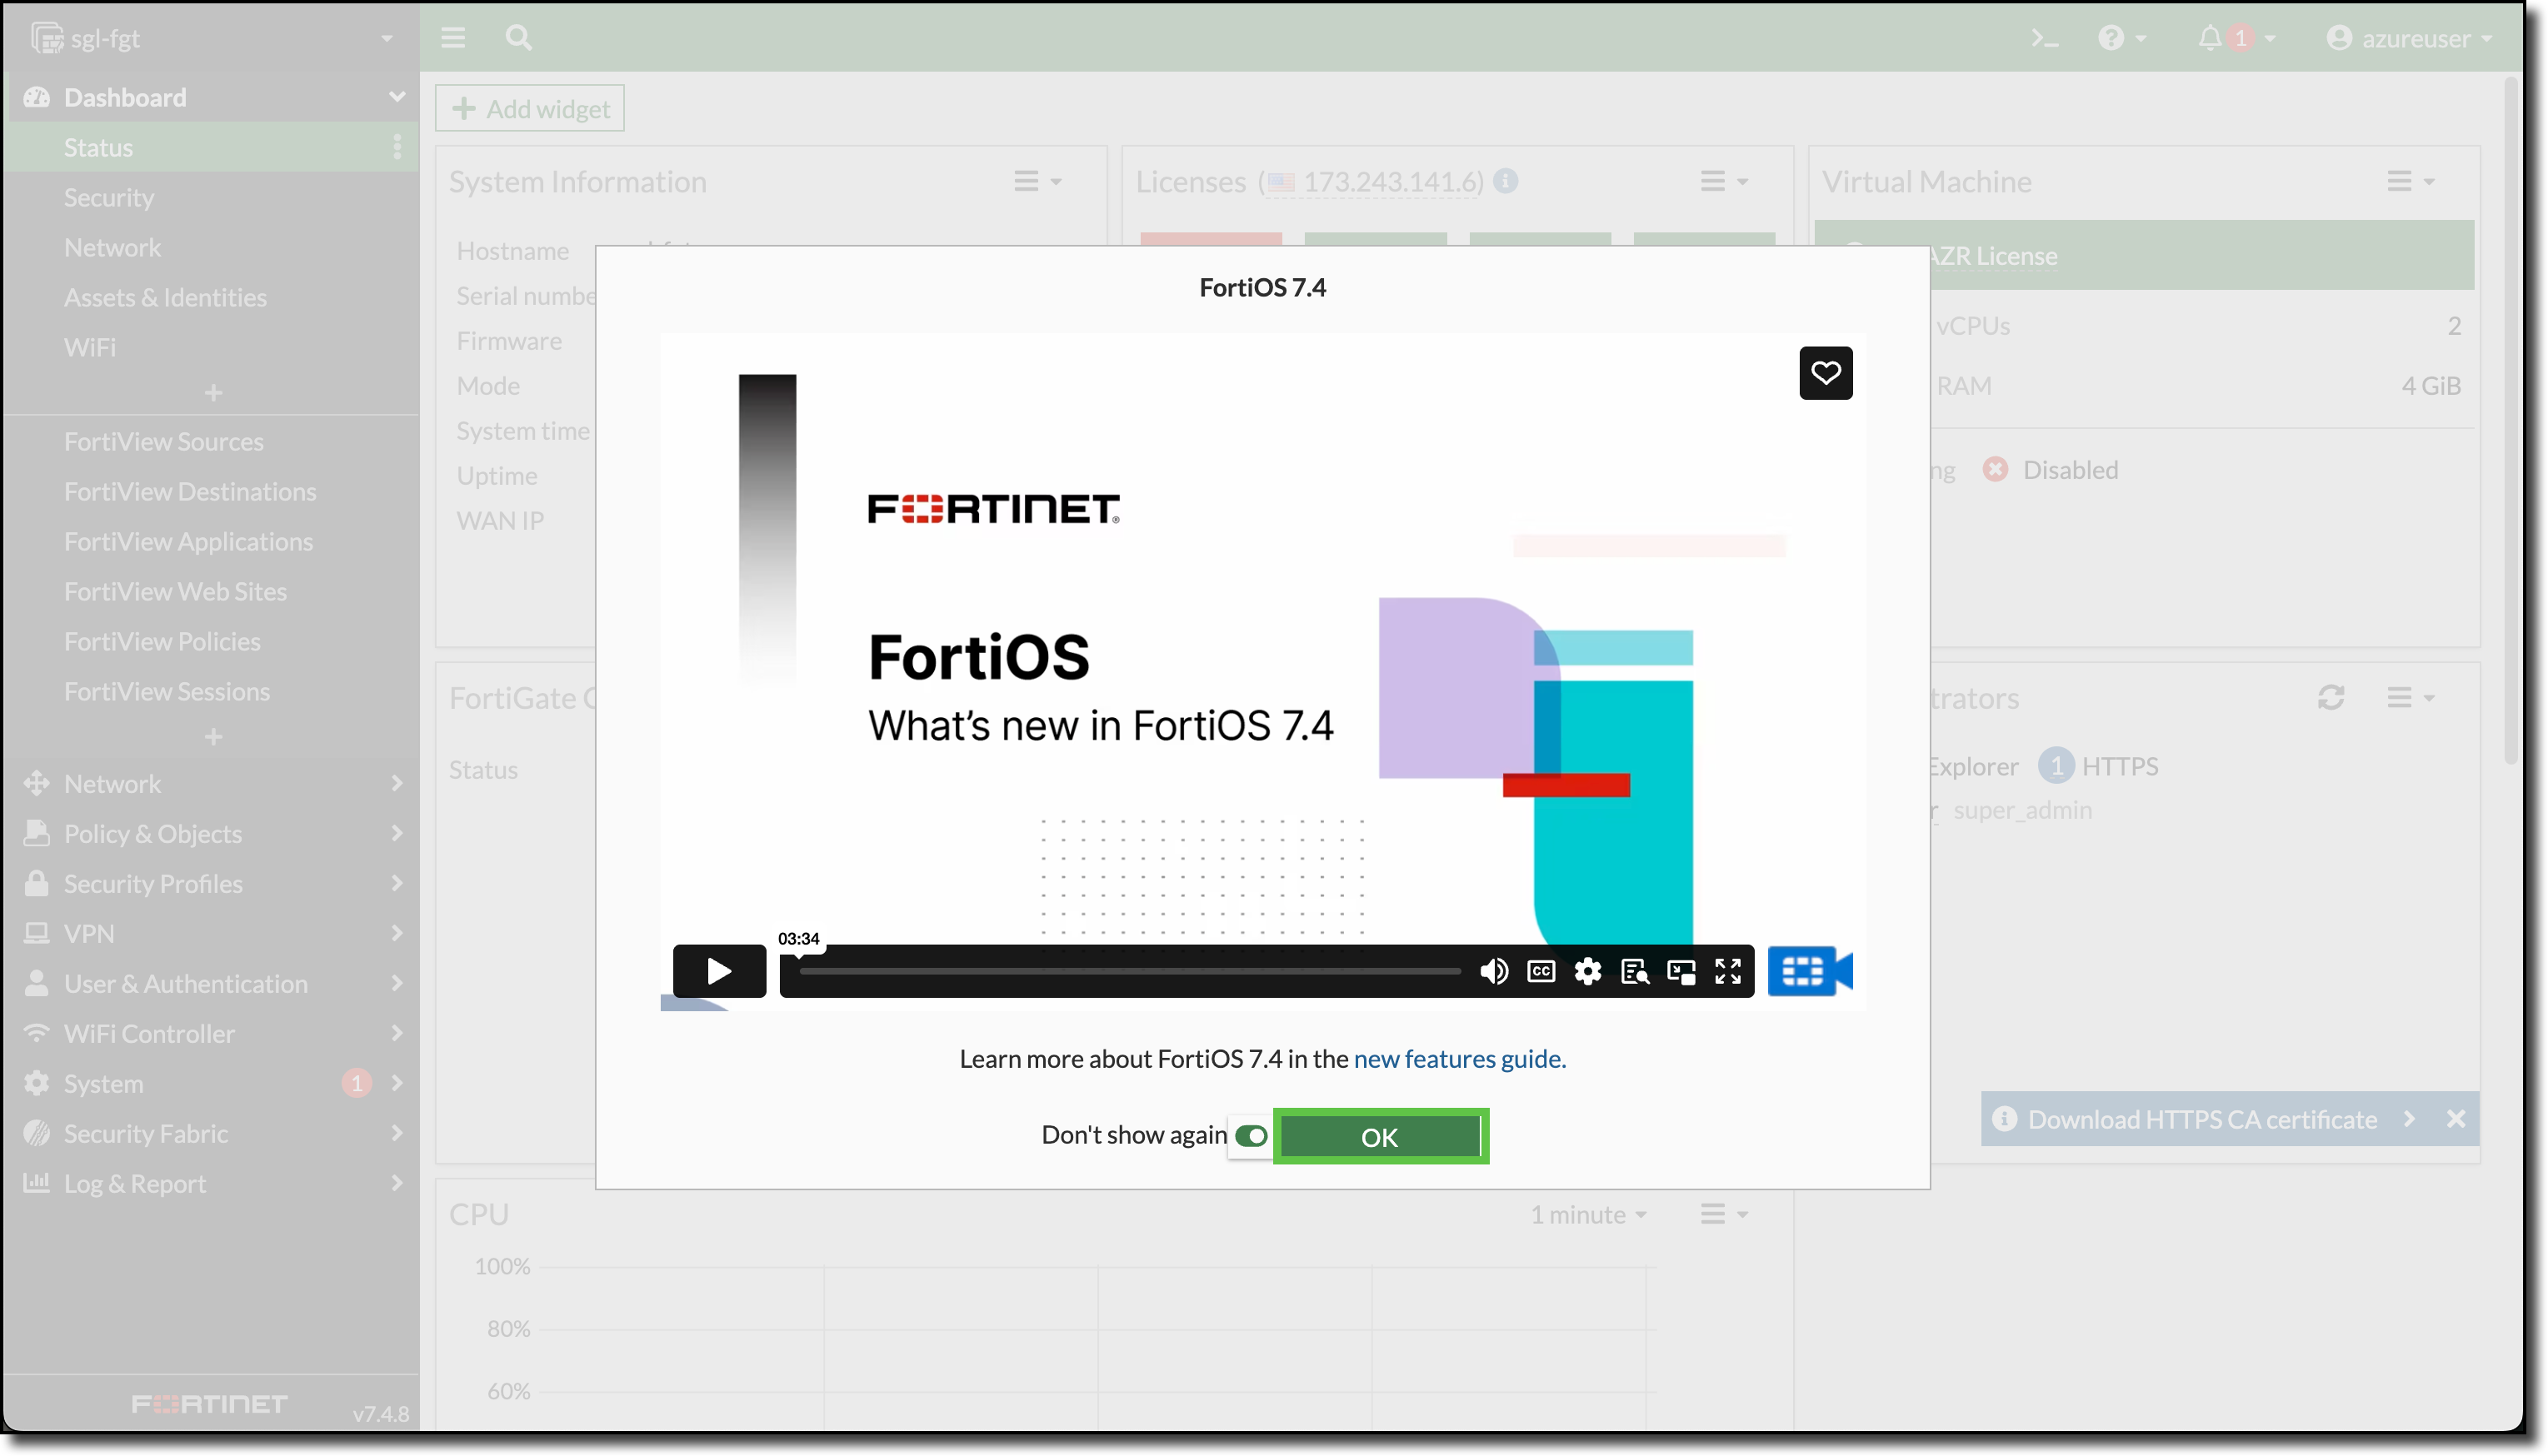
Select “Don’t show again” and Click “OK” on the What’s new in FortiOS 7.4 video
The following diagram is a representation of your current VNET with Linux VM deployment and FortiGate NVA
Task 2: Deploy a Route Table and Create a UDR
In Task 2, you will deploy a Route Table and modify the Route Table by associating both protected subnets to use port2 of the FortiGate as the default route. These routes are referred to as User Defined Routes (UDRs).
Create and configure an Azure Route Table
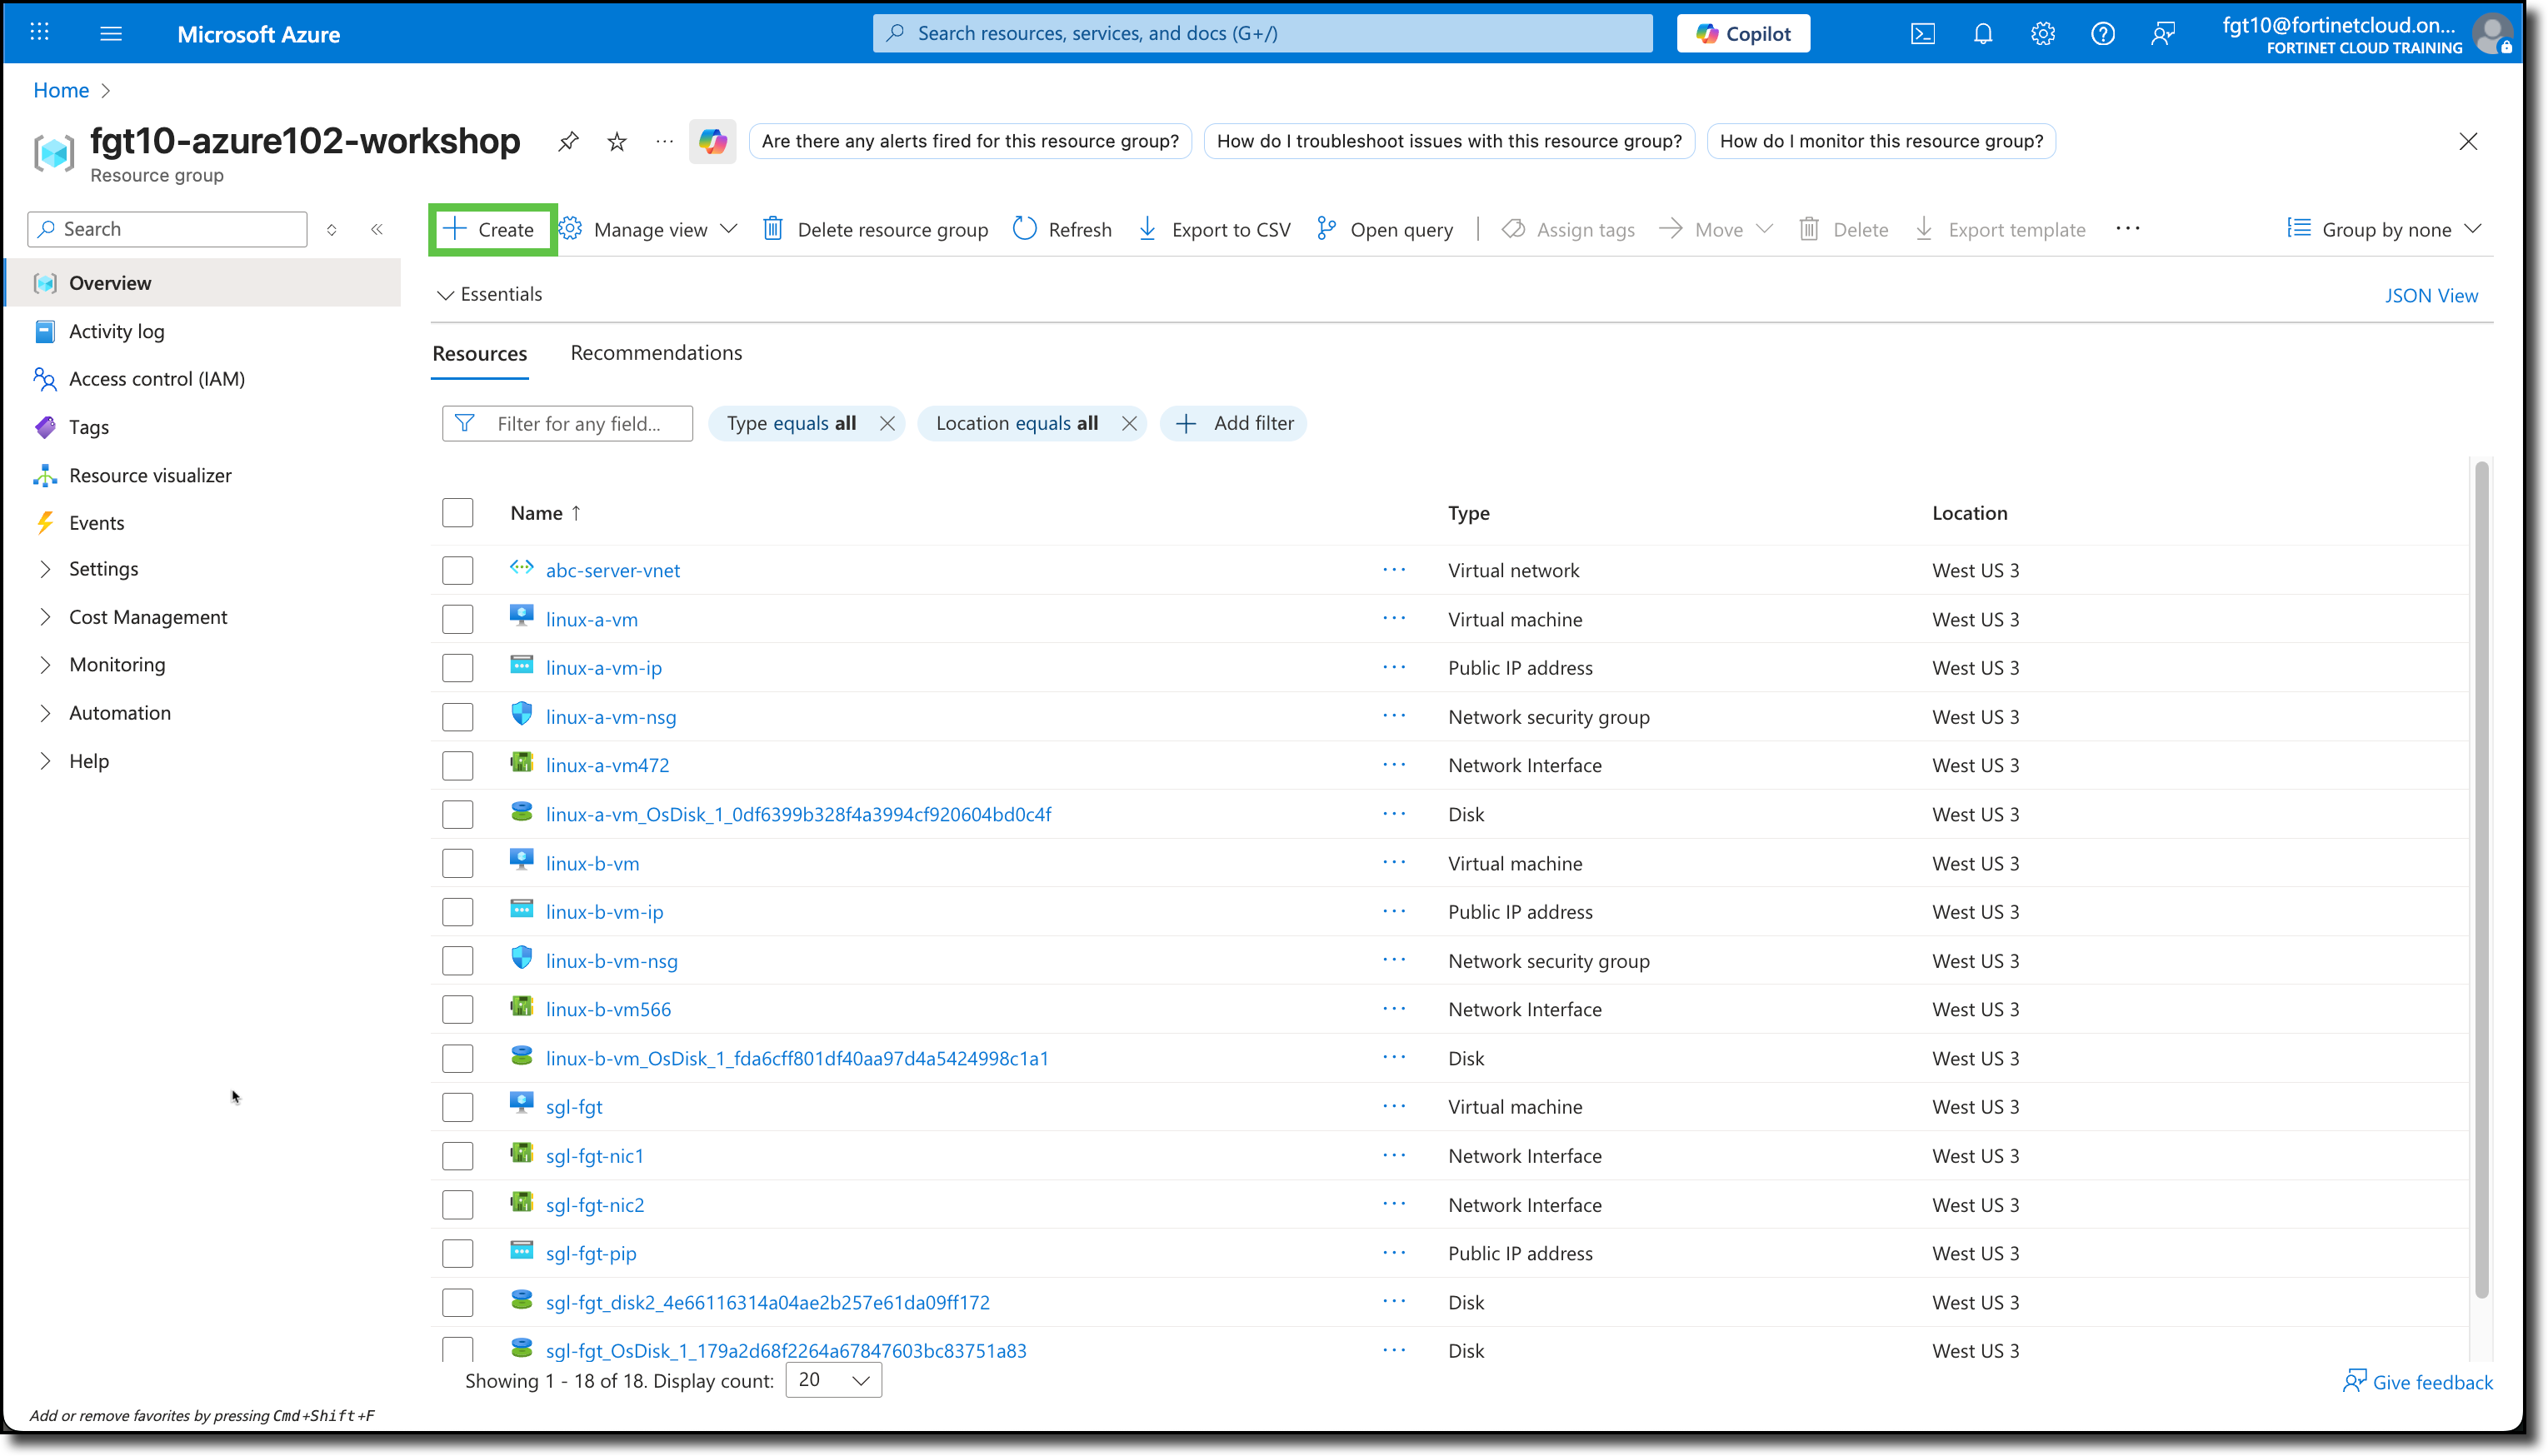
Navigate to your Resource Group
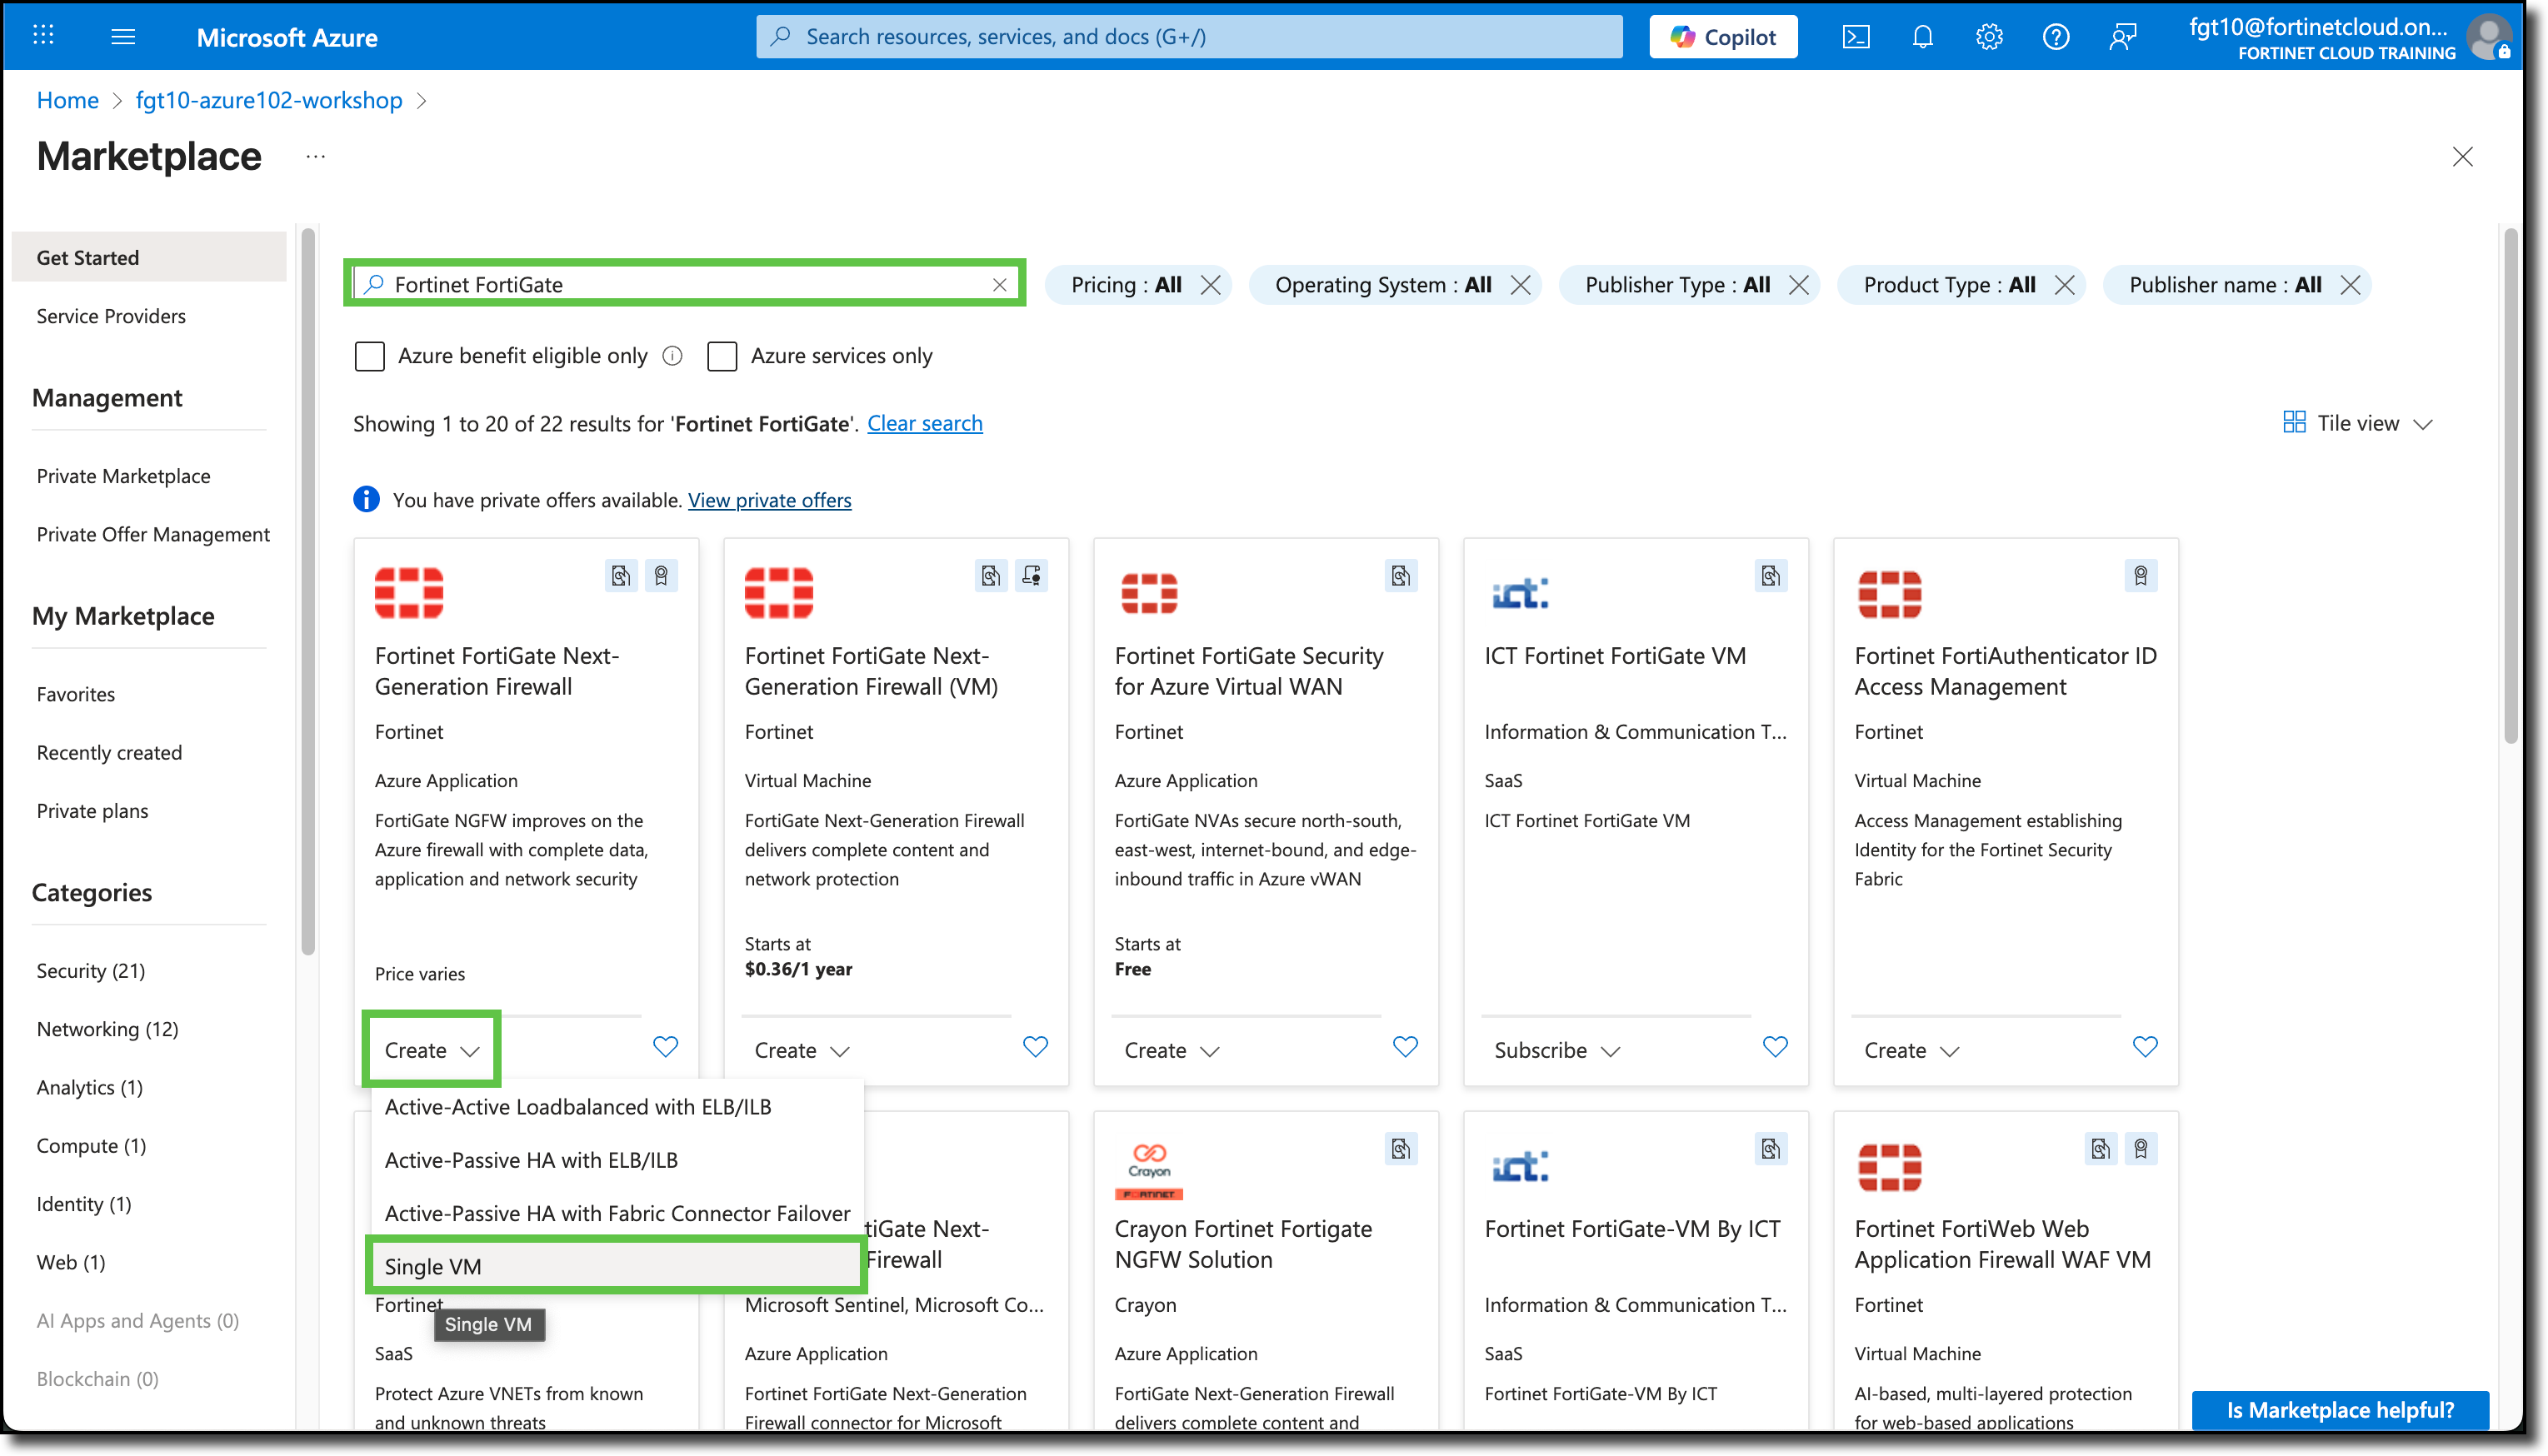
Click “+ Create”
You will be redirected to the Azure Marketplace.
SearchRoute Table
Select the “Route table” offering from Microsoft
Click “Create”
Click “Route table”
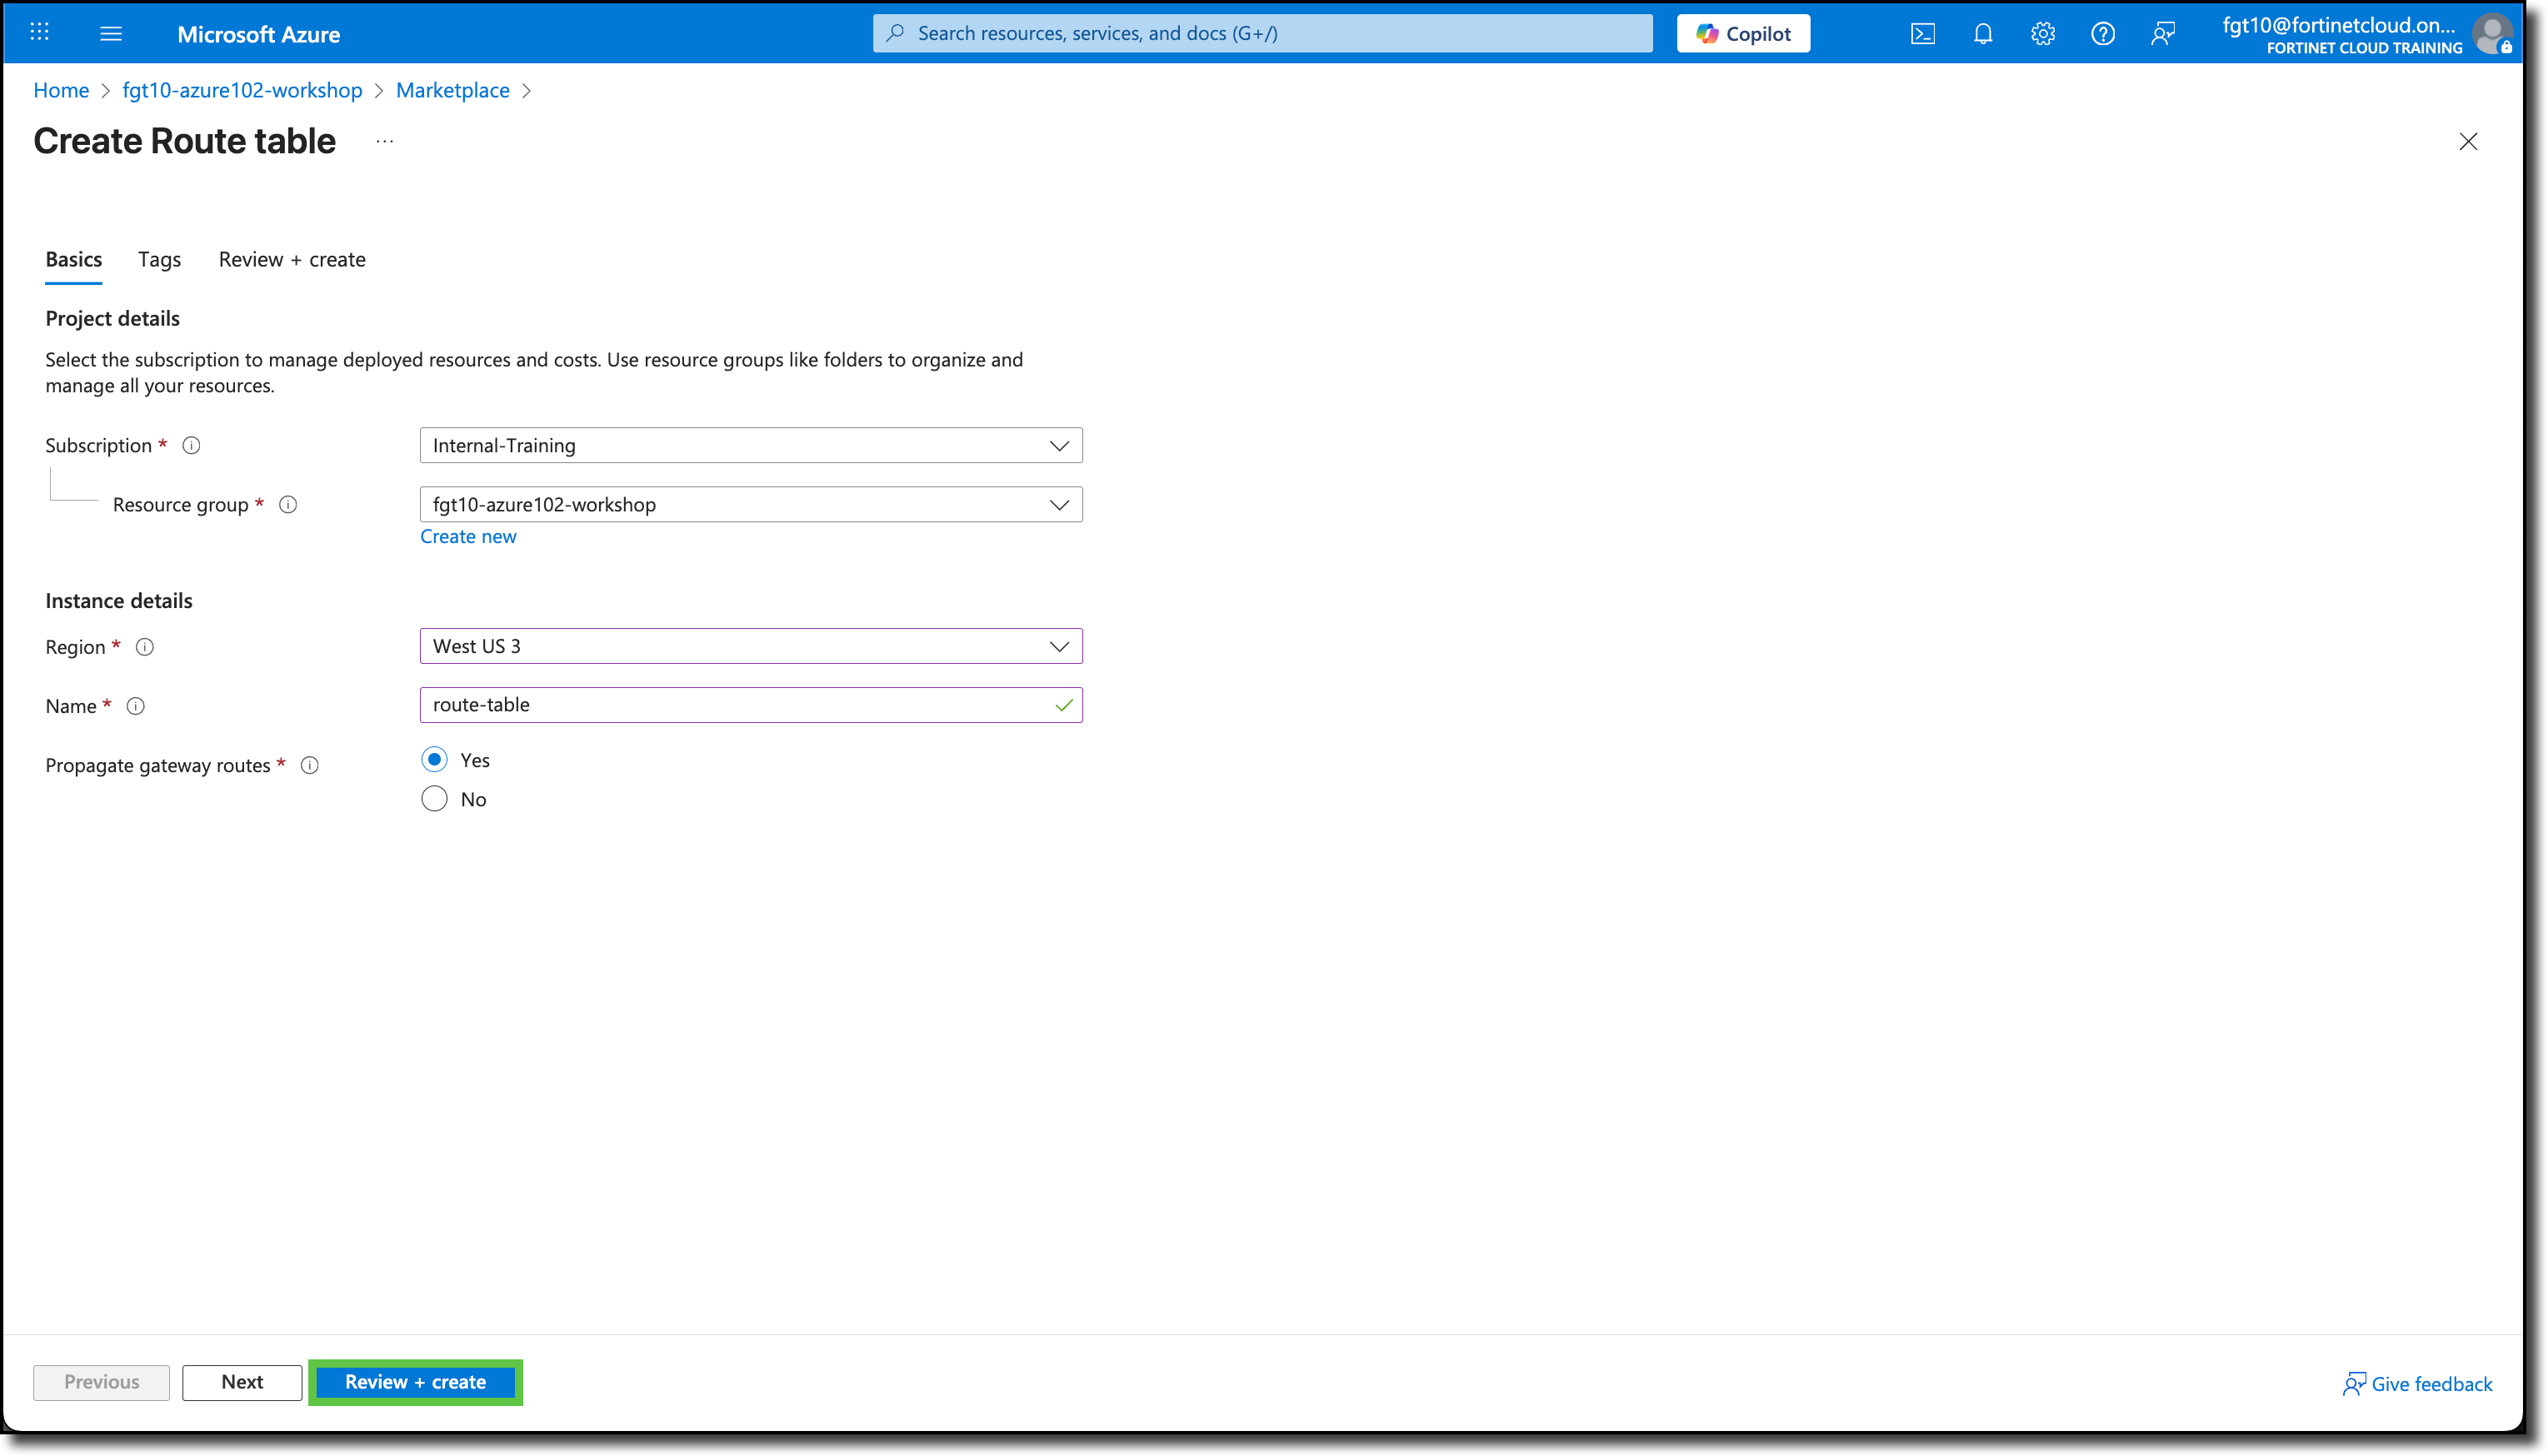
You will be redirected to the Create Route table template.
Under the Basics tab, the Subscription and Resource Groups should already be filled in with your assigned info. If not, see the screen shot below for details.
Under Instance details, enter the following:
Region: West US 3
Name: route-table
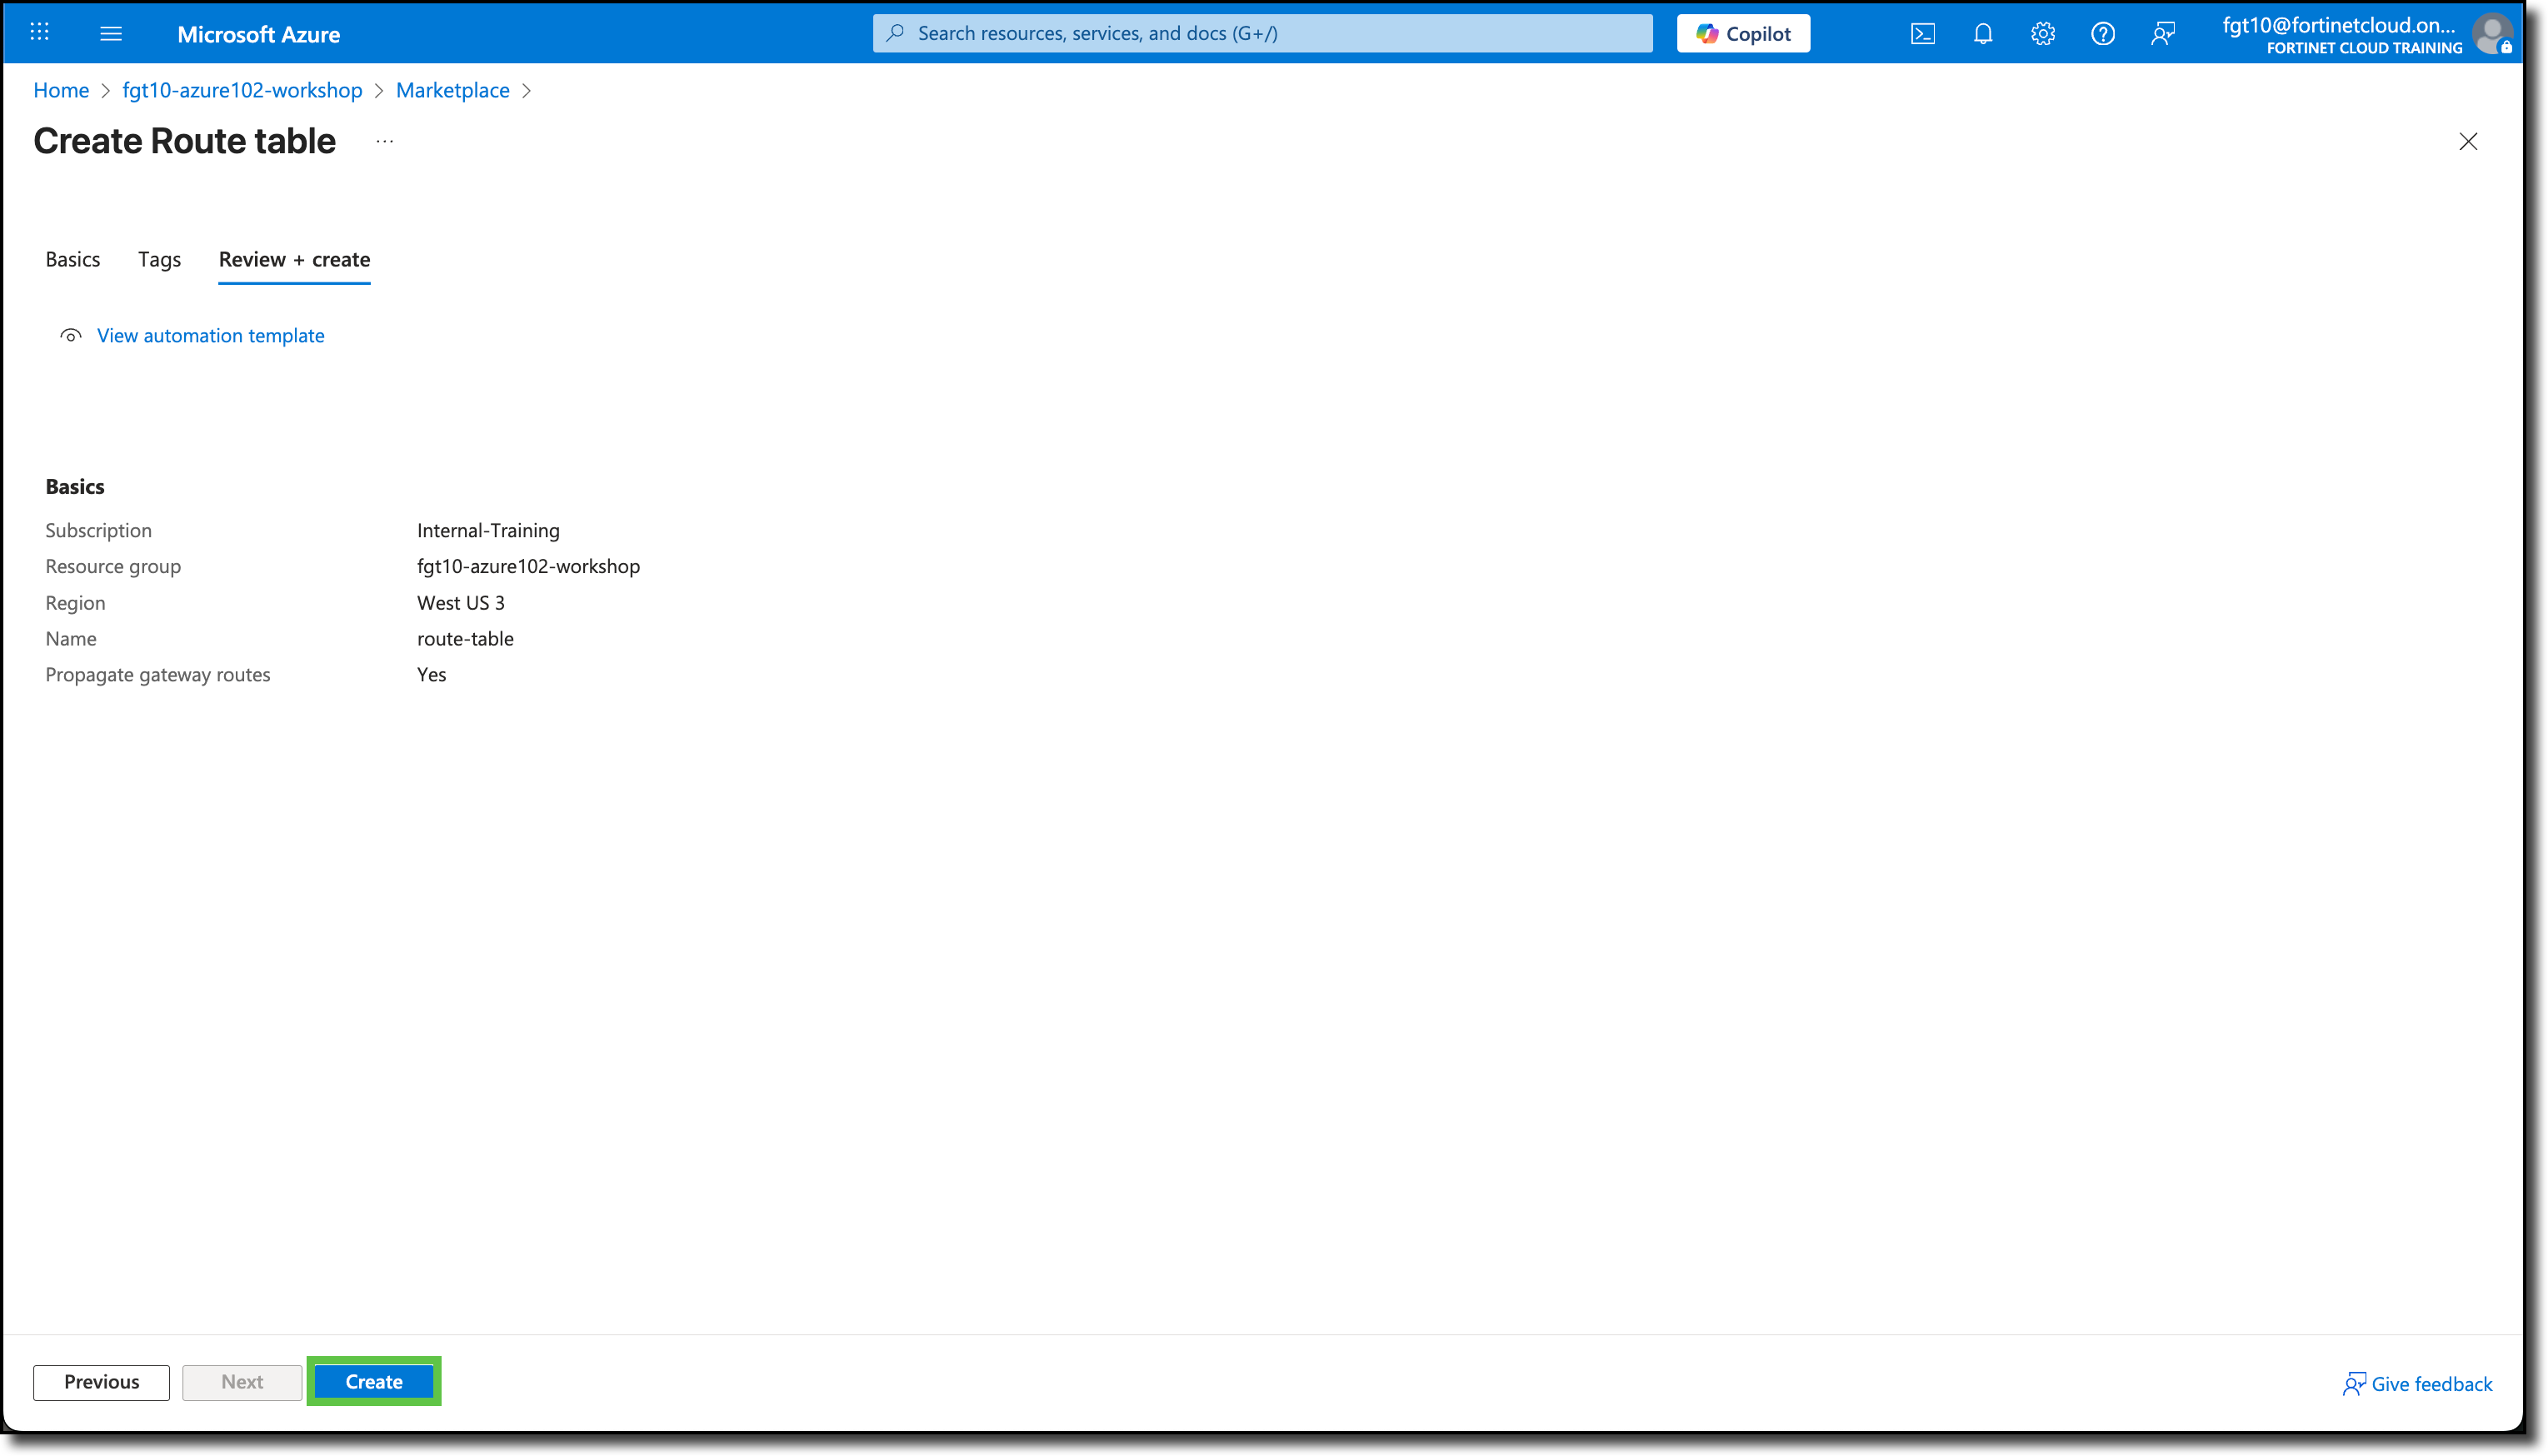
Click “Review + create”
Click “Create”
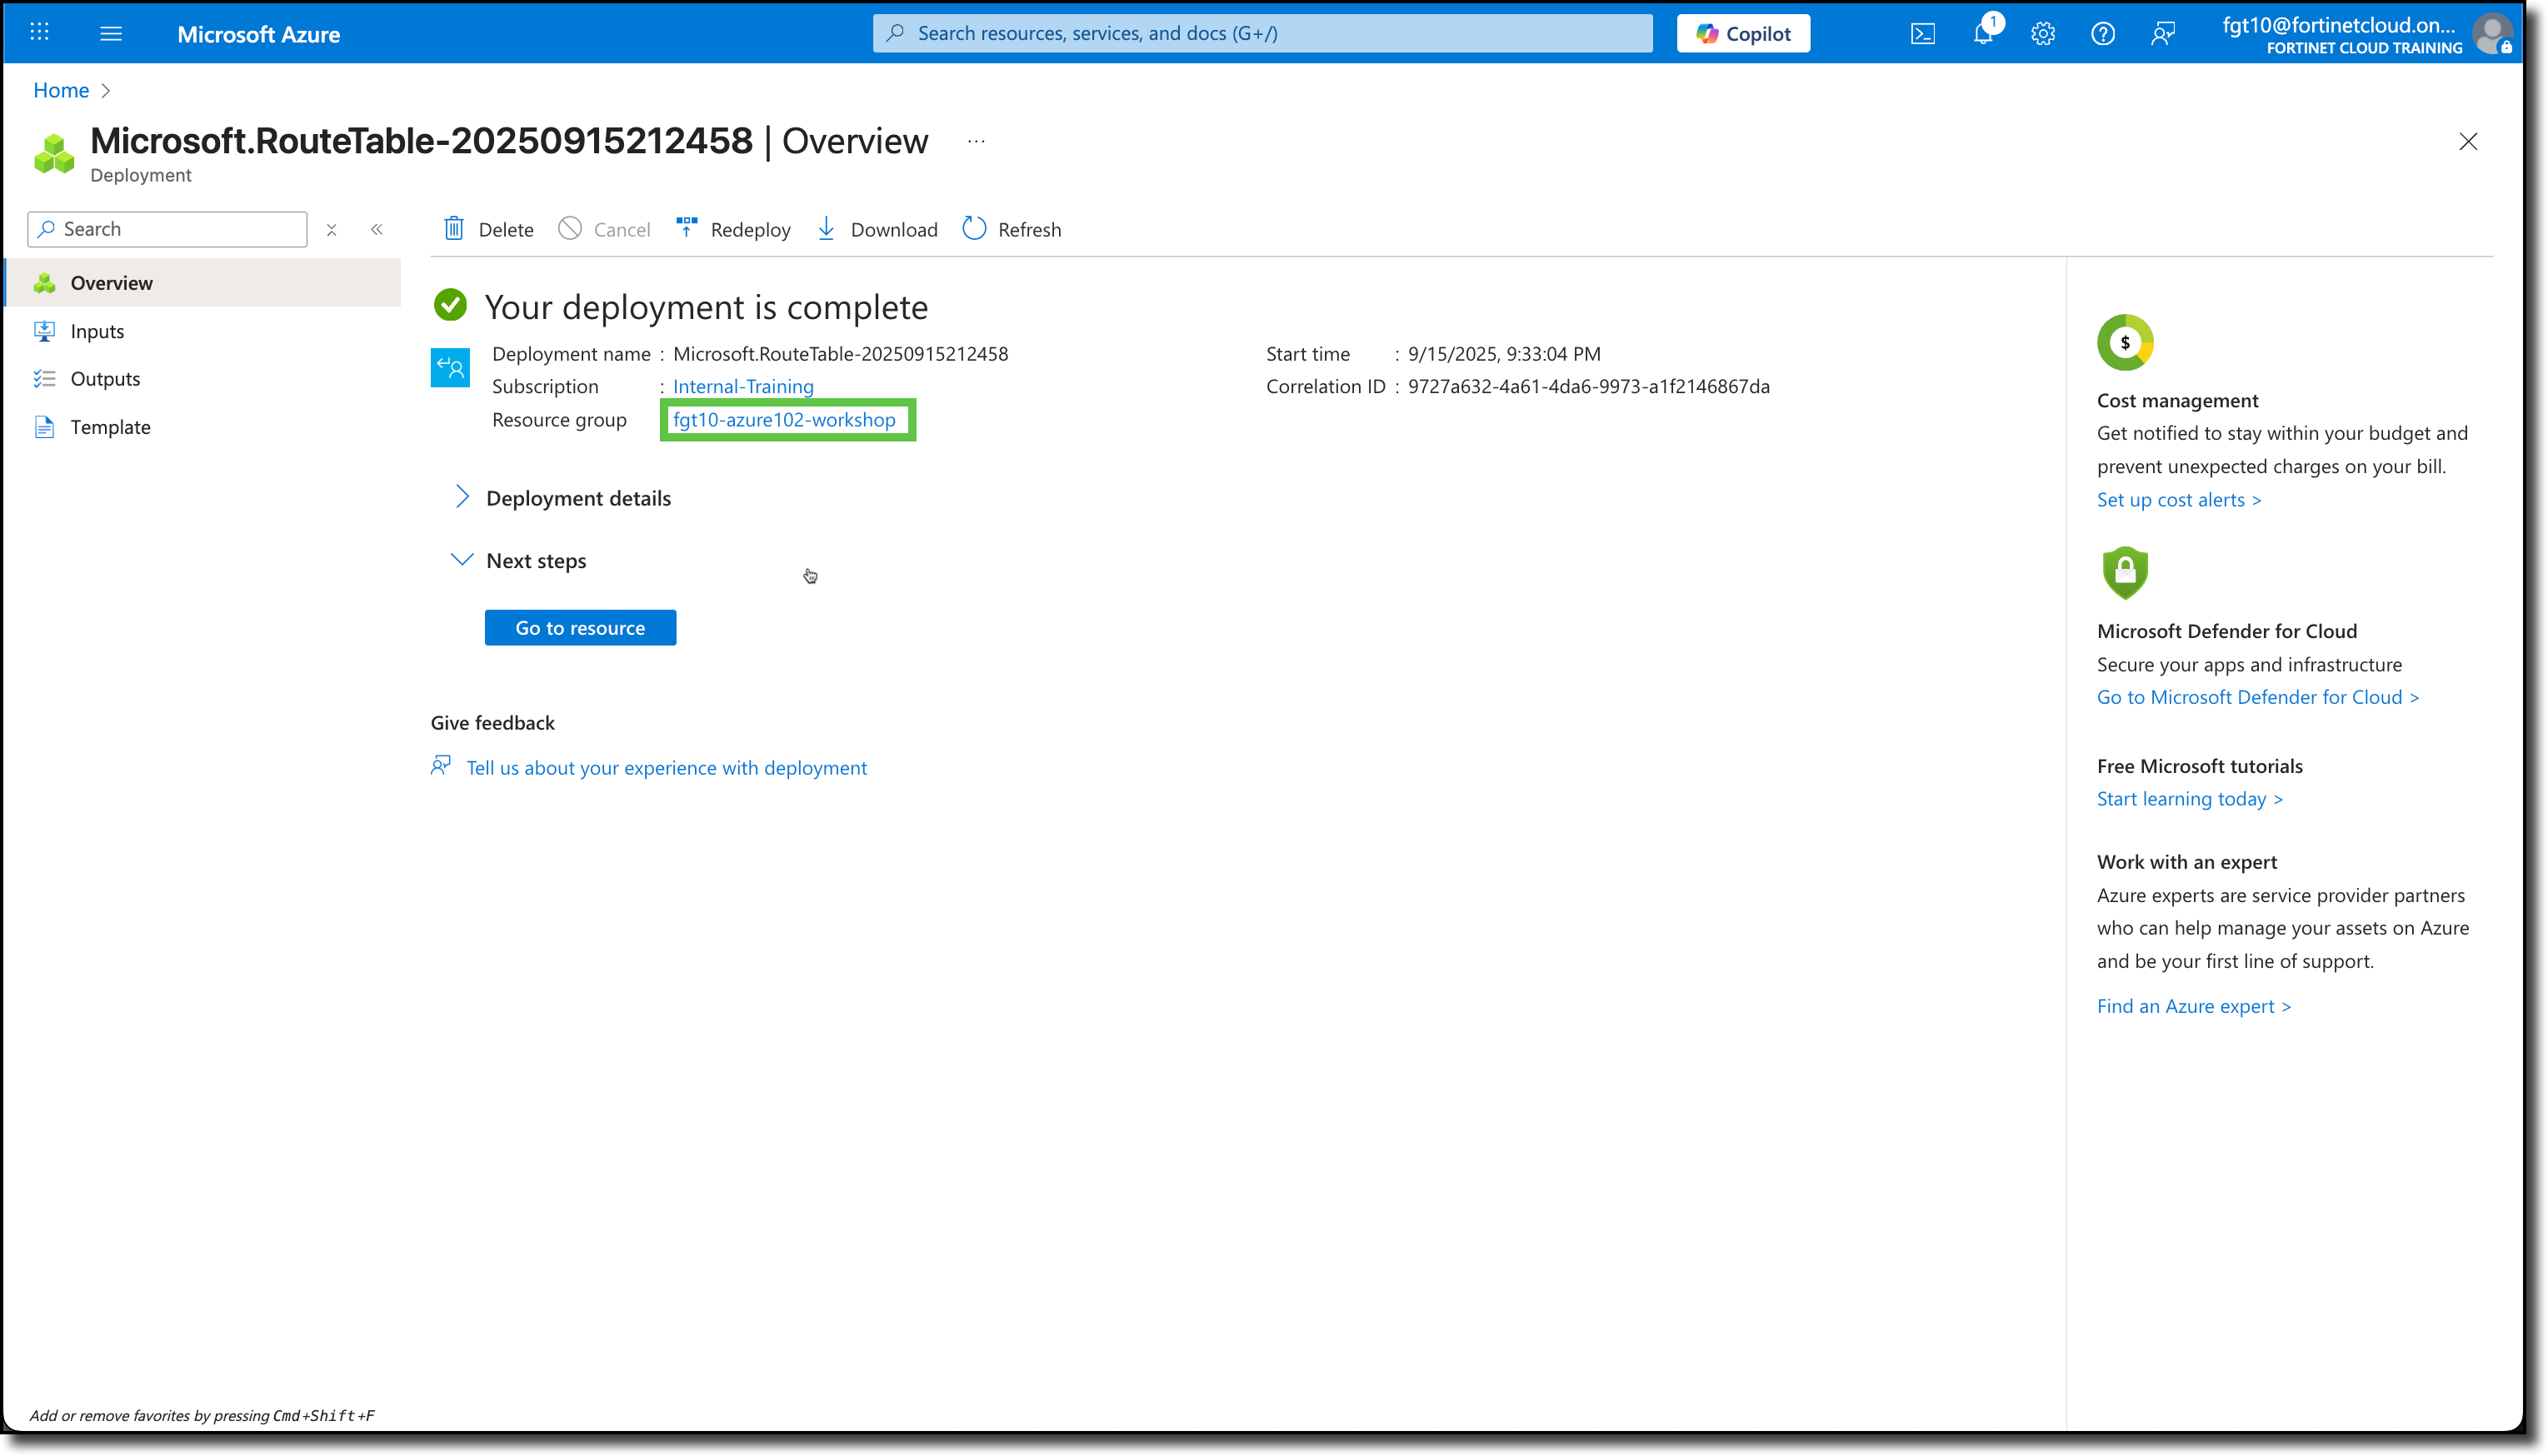
Click on the “Resource group” when the deployment is complete
Click on “route-table”
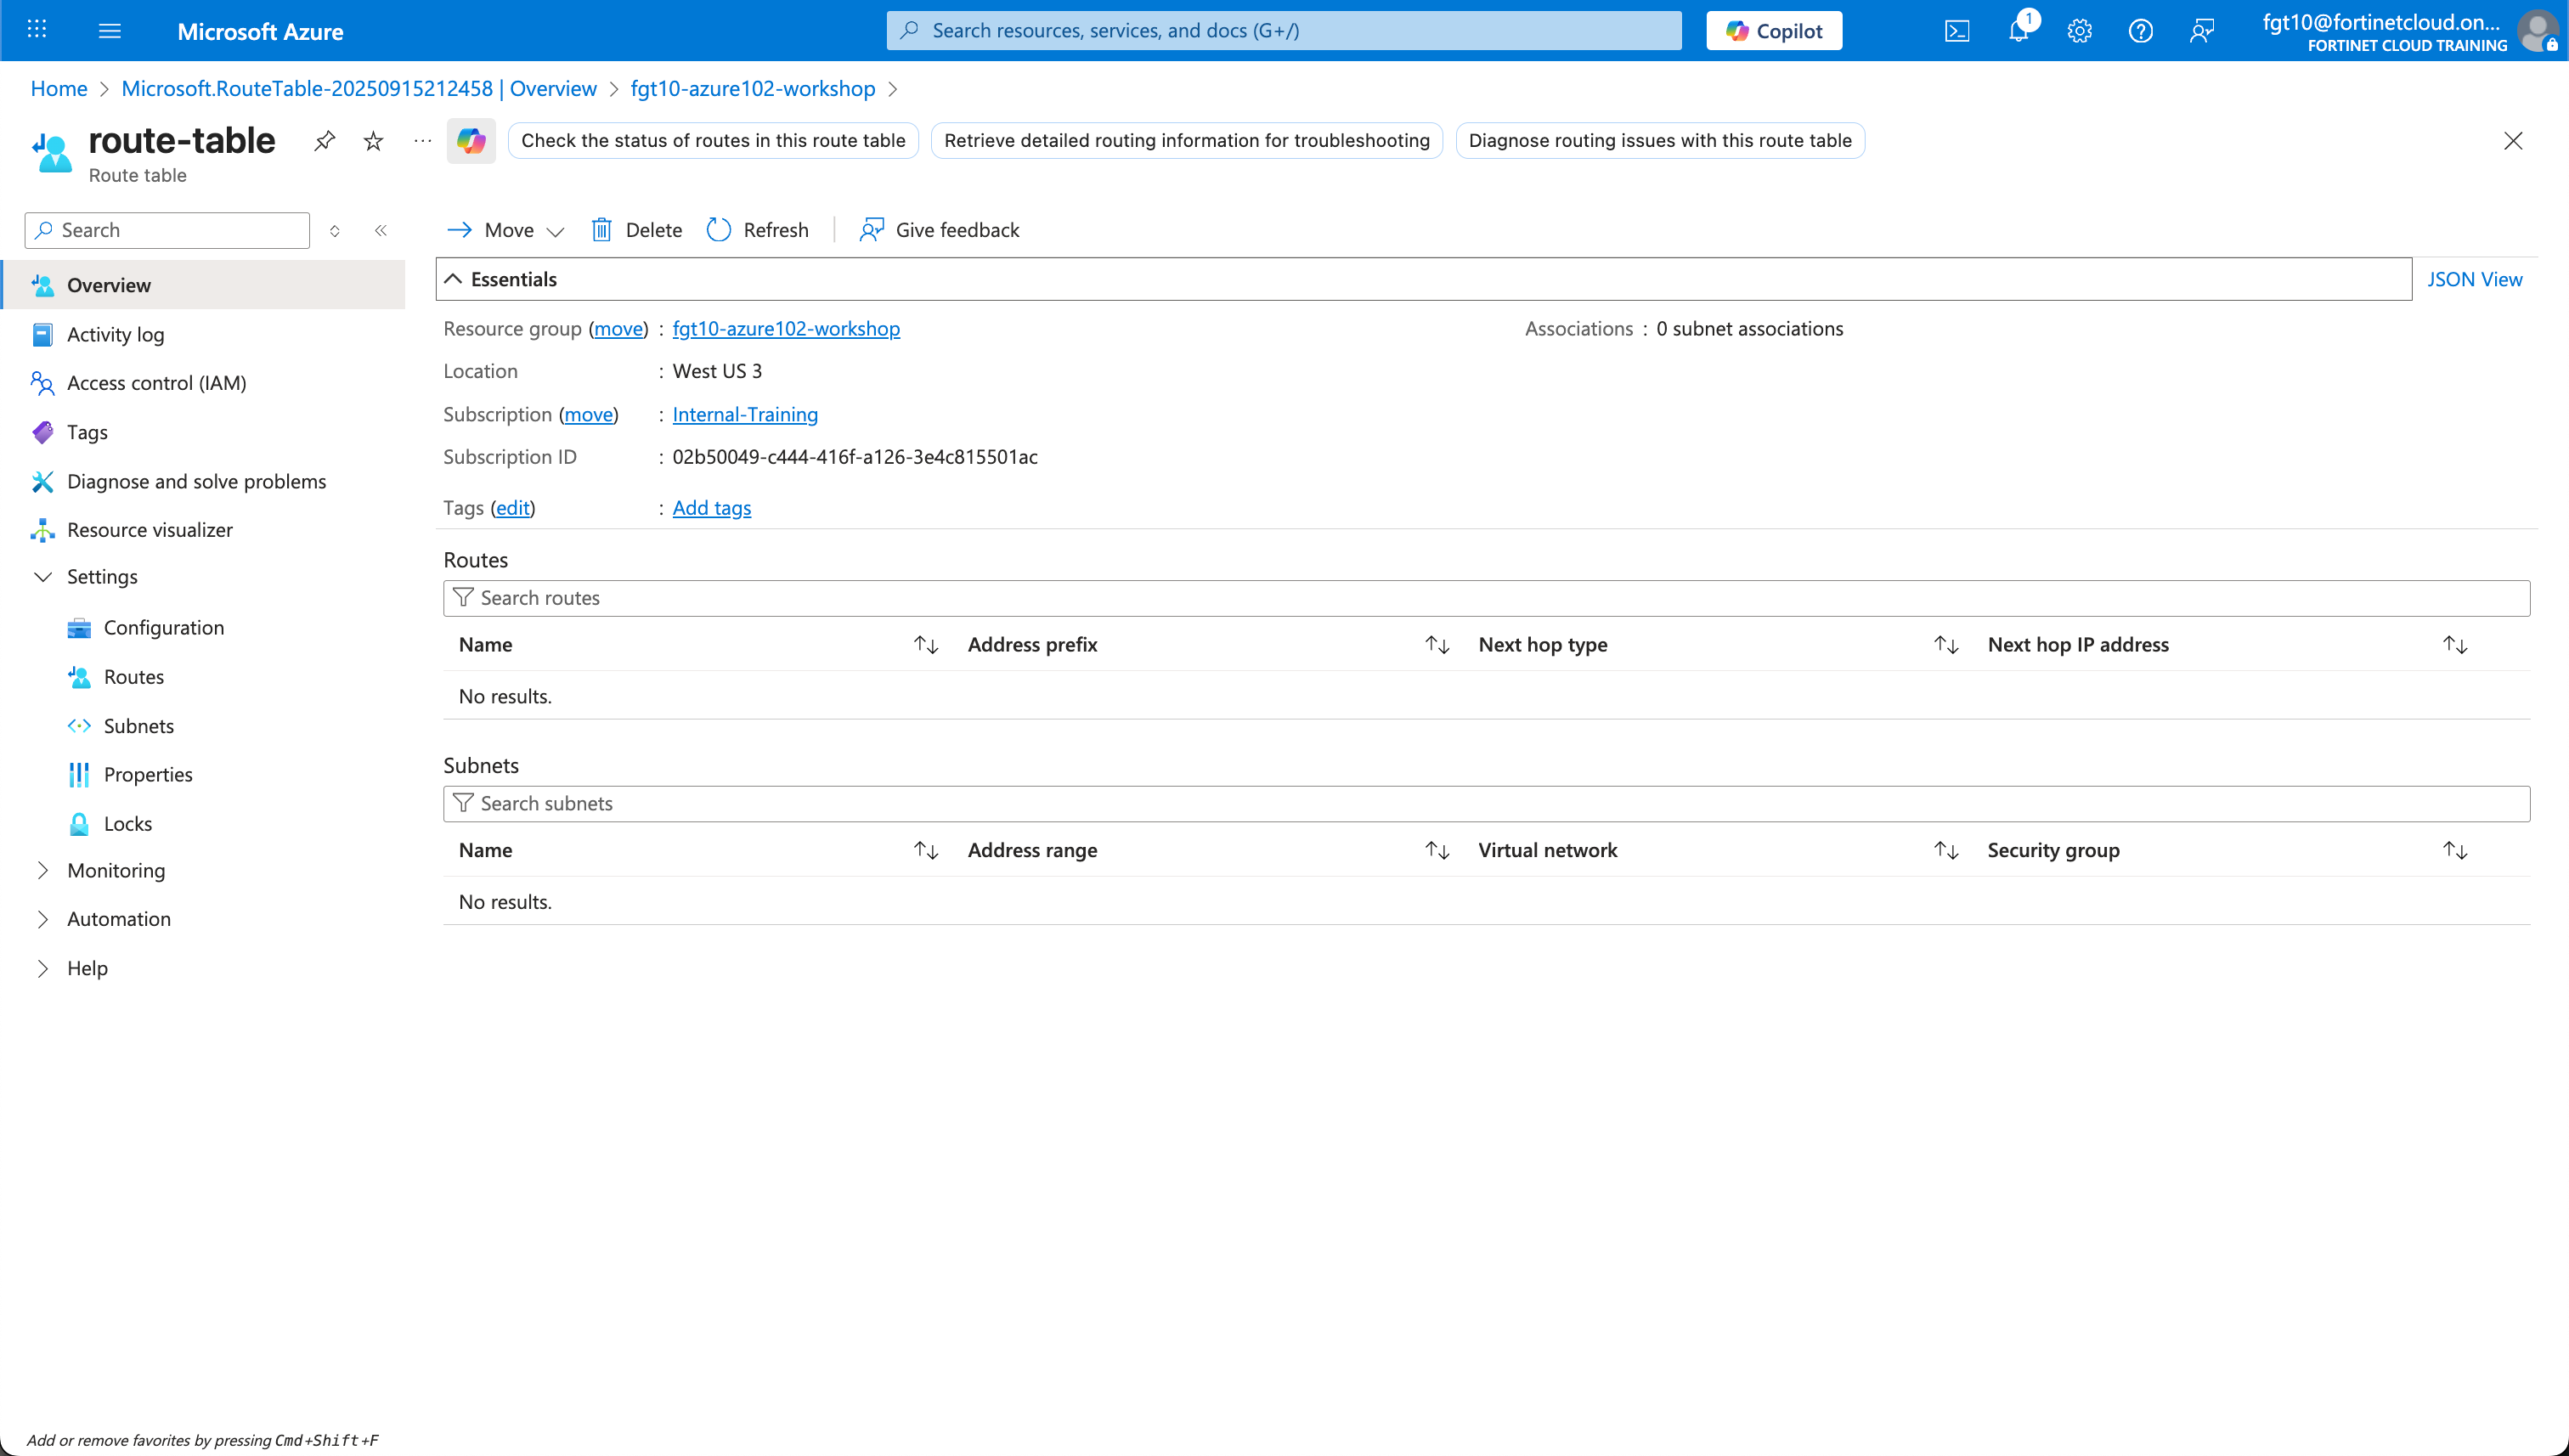
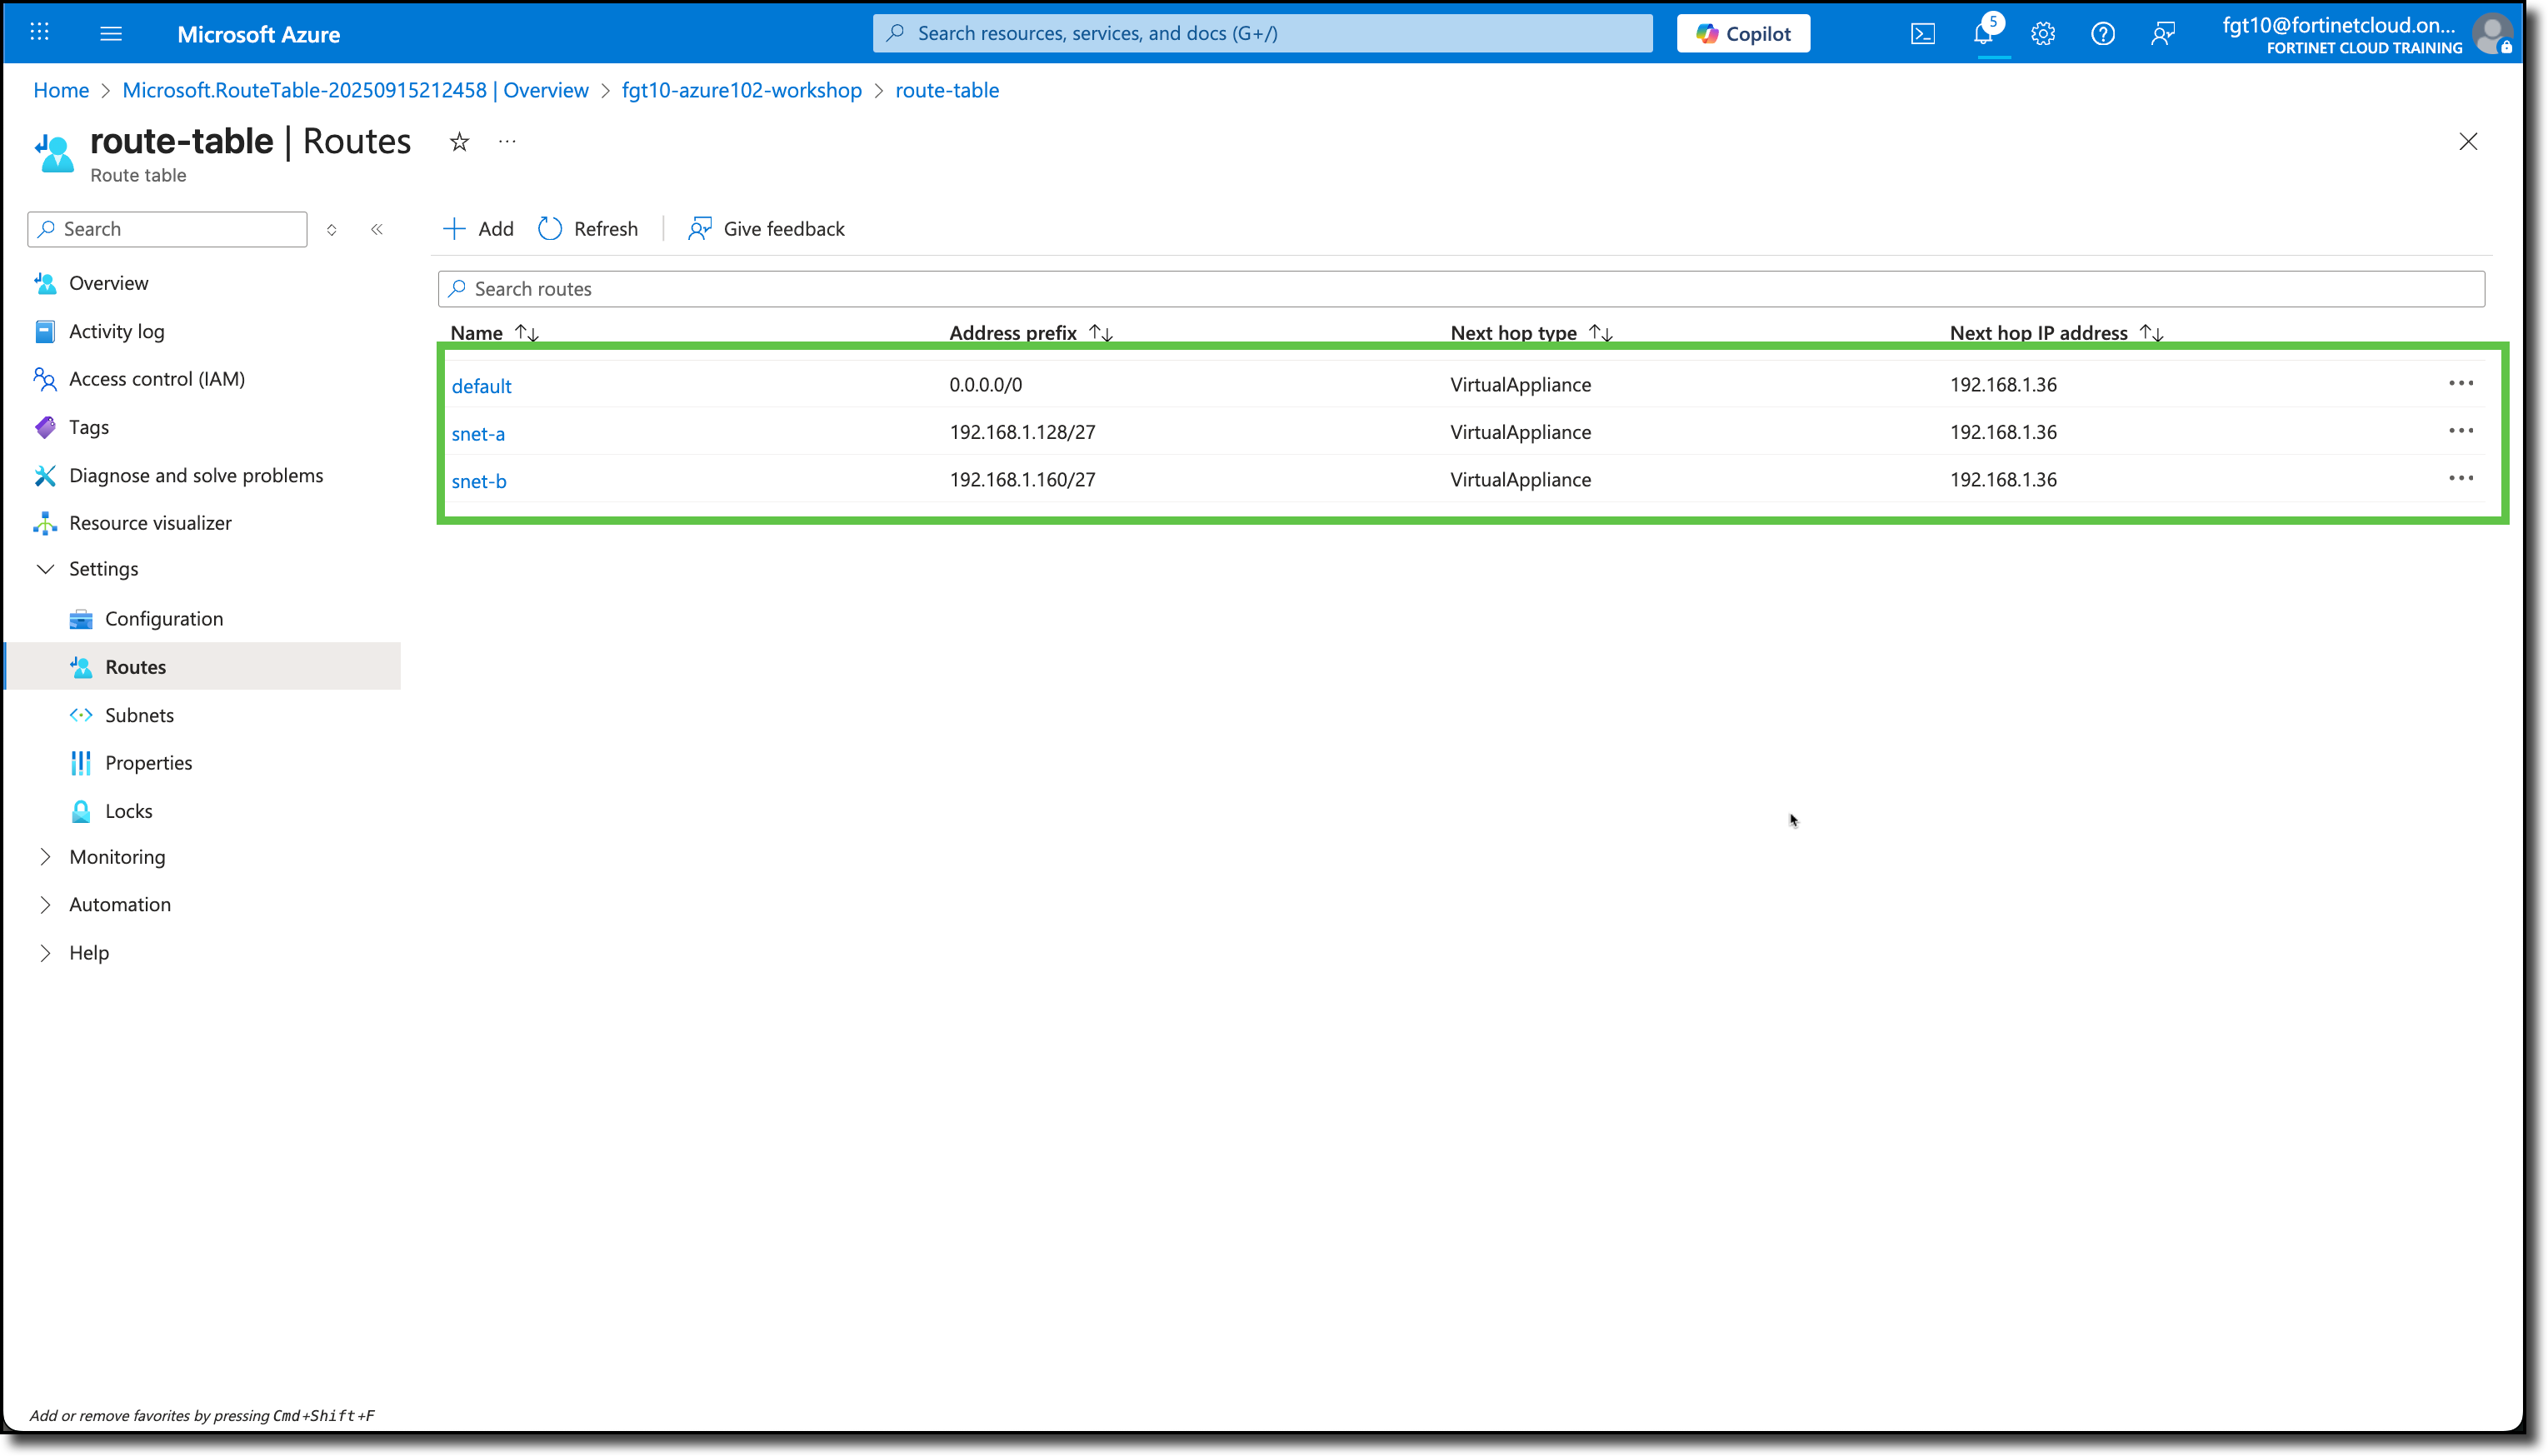
Click “Routes” under “Settings”
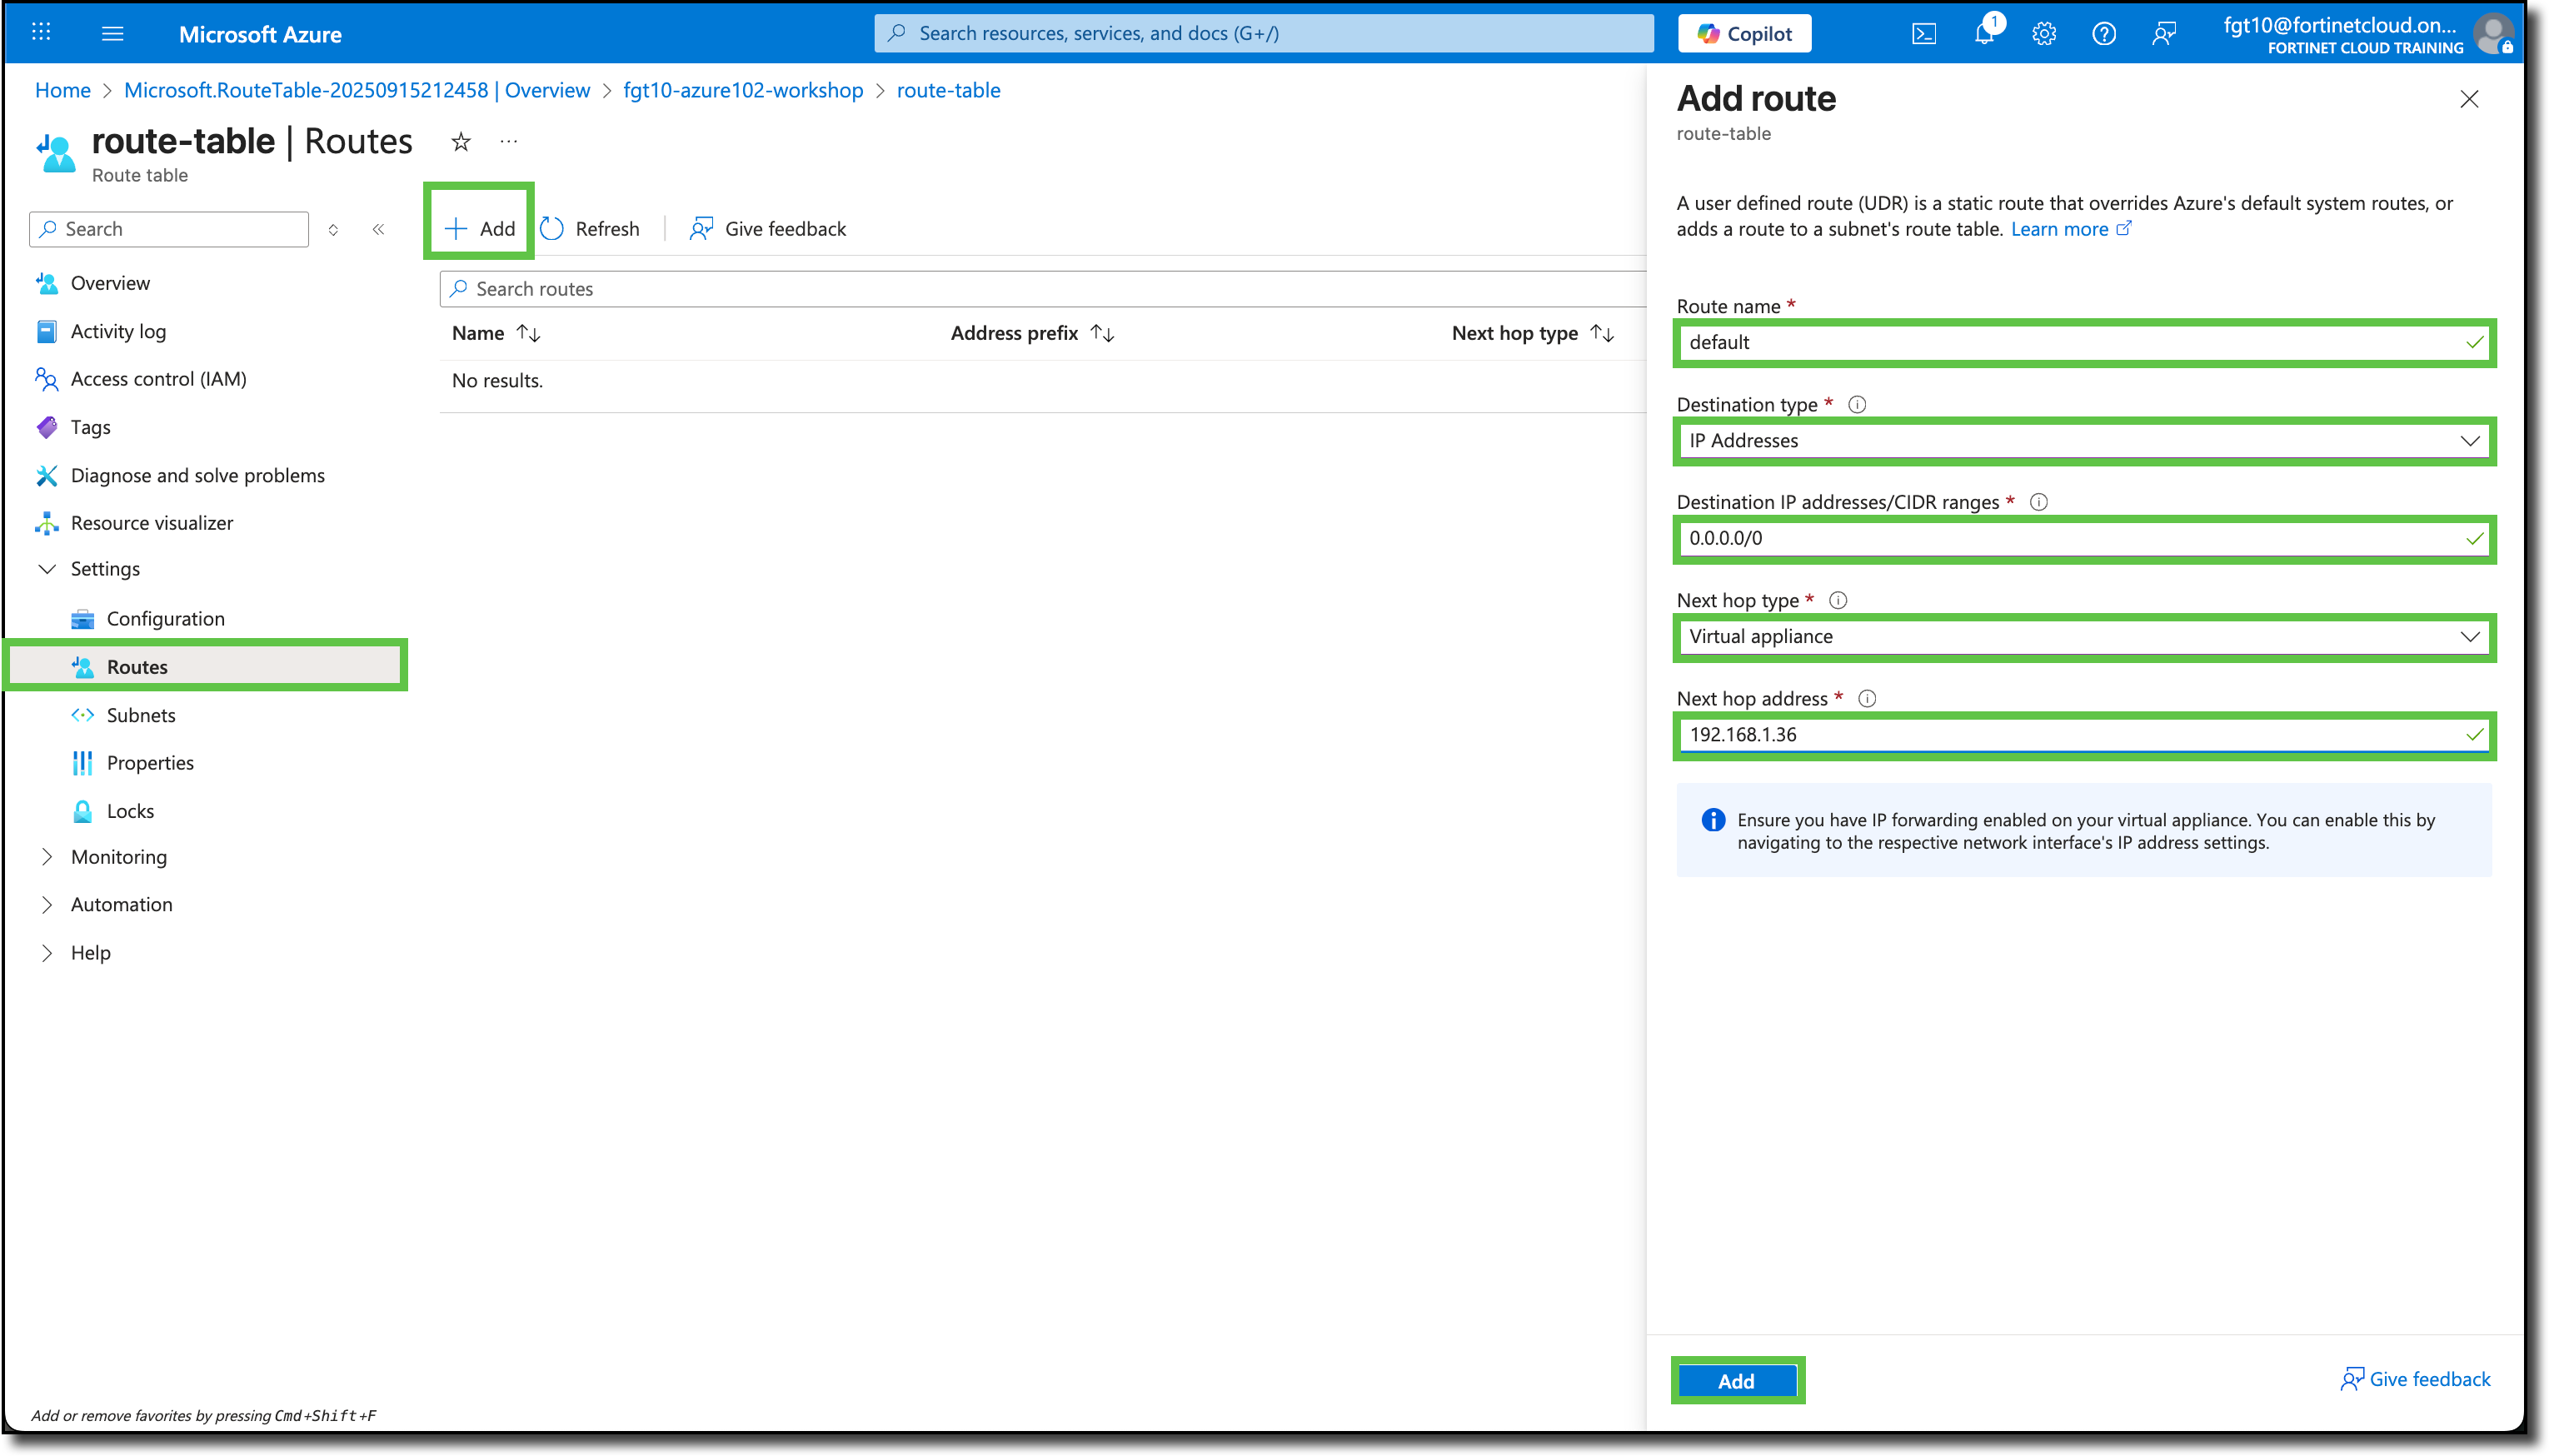
Click “+ Add”
Enter in the Add route panel
Route name: default
Destination type: Select IP Addresses
Destination IP address/CIDR ranges: 0.0.0.0/0
Next hop type: Select Virtual appliance
Next hop address: 192.168.1.36 (Confirm this is the same IP assigned to port2 on your FortiGate NVA).
ClickAdd
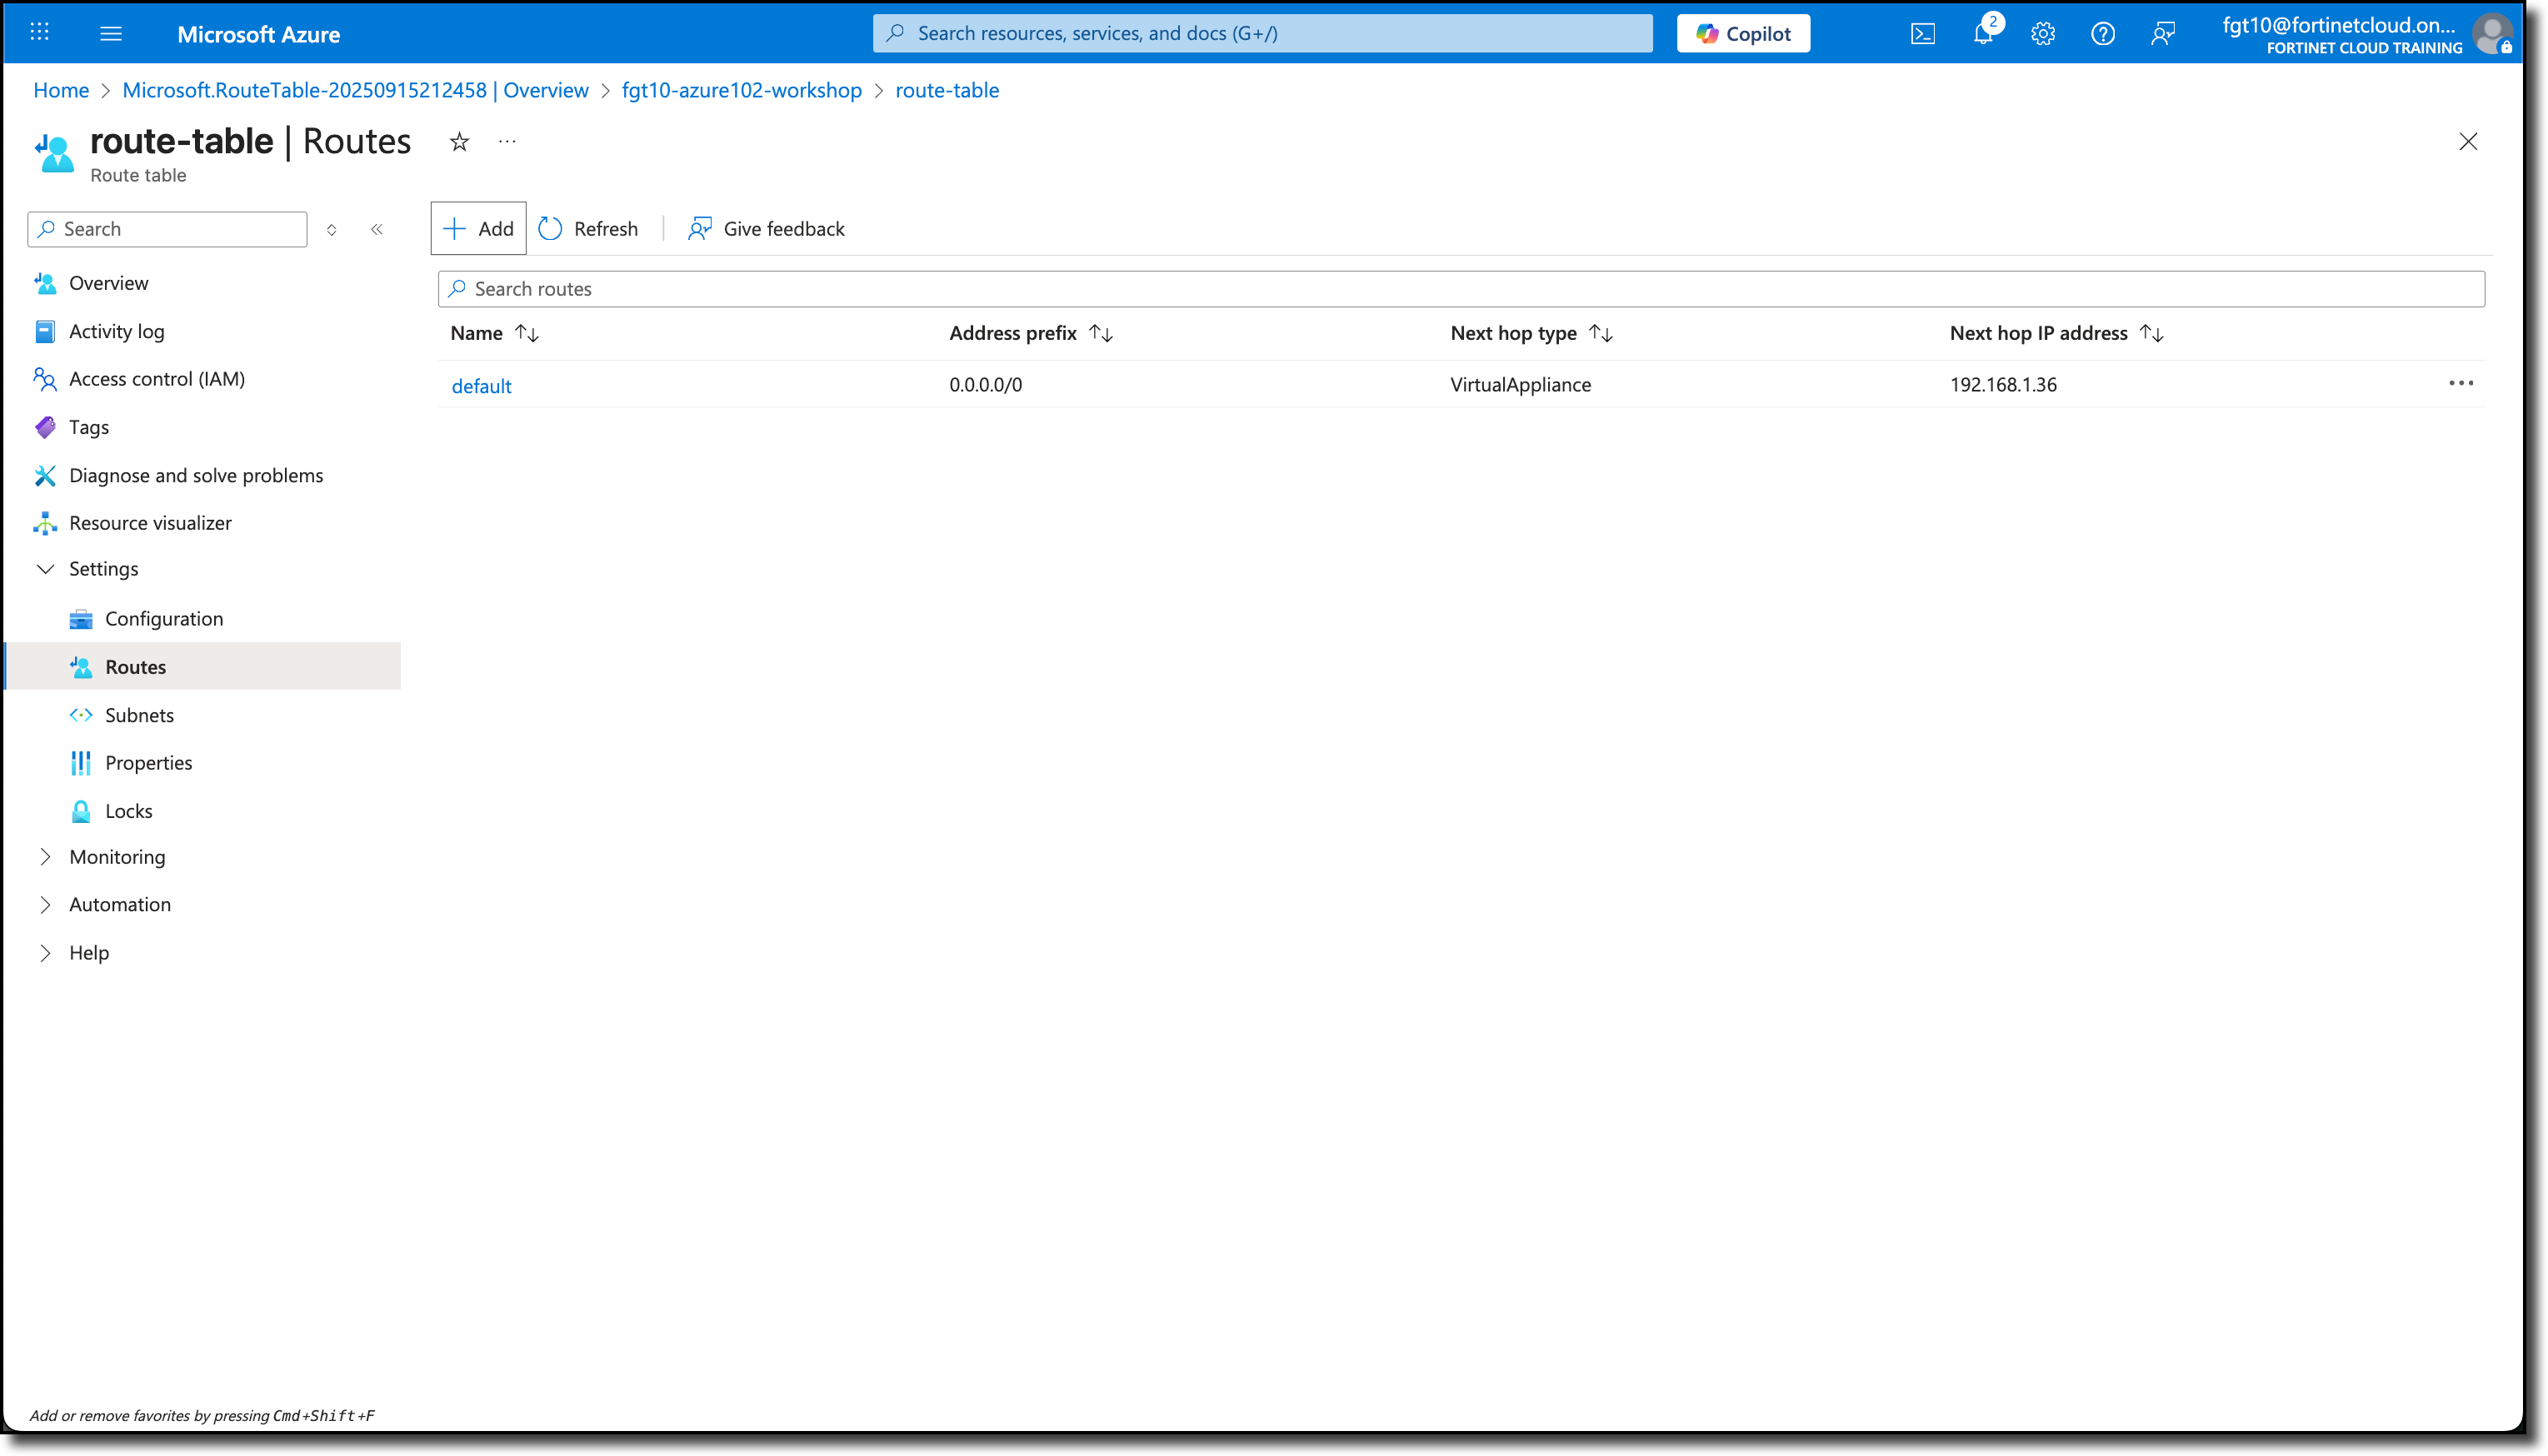
The new route called default is listed under the Routes section
Add two more routes for snet-a and snet-b.
Route name: snet-a
Destination type: Select IP Addresses
Destination IP address/CIDR ranges: 192.168.1.128/27
Next hop type: Select Virtual appliance
Next hop address: 192.168.1.36 (Confirm this is the same IP assigned to port2 on your FortiGate NVA).
ClickAdd
Route name: snet-b
Destination type: Select IP Addresses
Destination IP address/CIDR ranges: 192.168.1.160/27
Next hop type: Select Virtual appliance
Next hop address: 192.168.1.36 (Confirm this is the same IP assigned to port2 on your FortiGate NVA).
ClickAdd
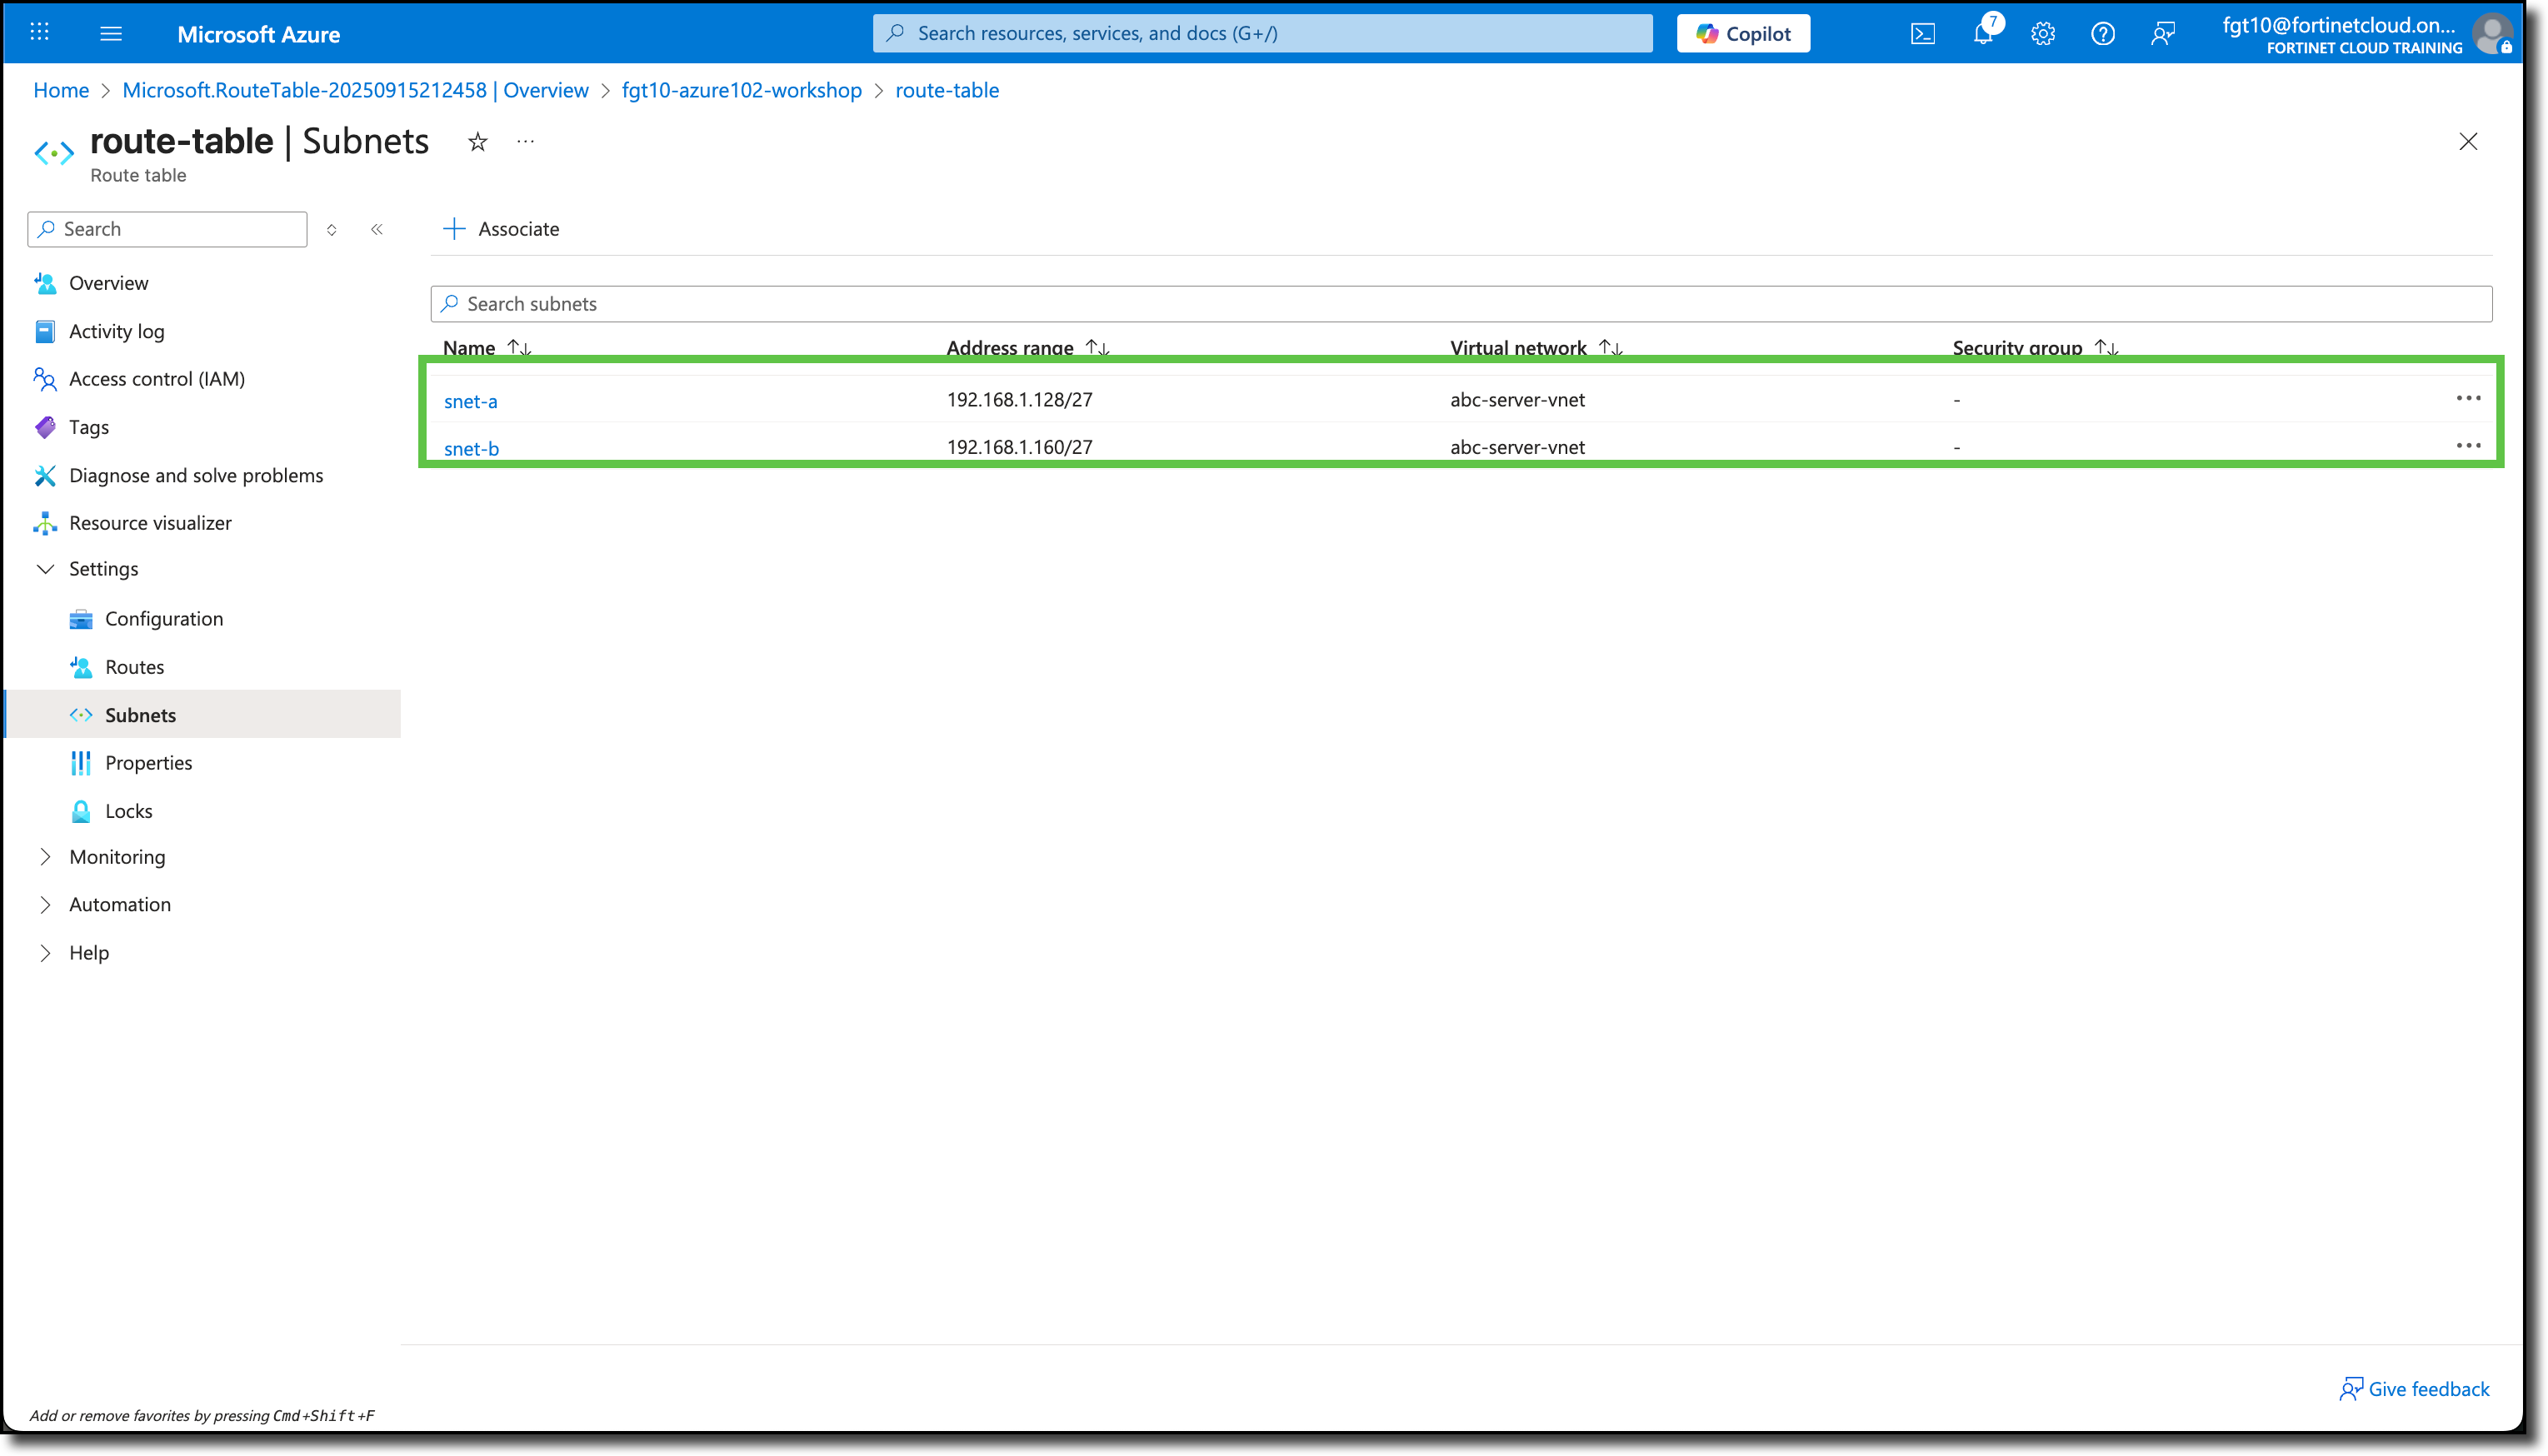
Click “Subnets”
Click “+ Associate”
Enter in the Associate subnet panel
Virtual network: abc-server-vnet
Subnet: Select snet-a
Click “OK”
Enter in the Associate subnet panel
Virtual network: abc-server-vnet
Subnet: Select snet-b
Click “OK”
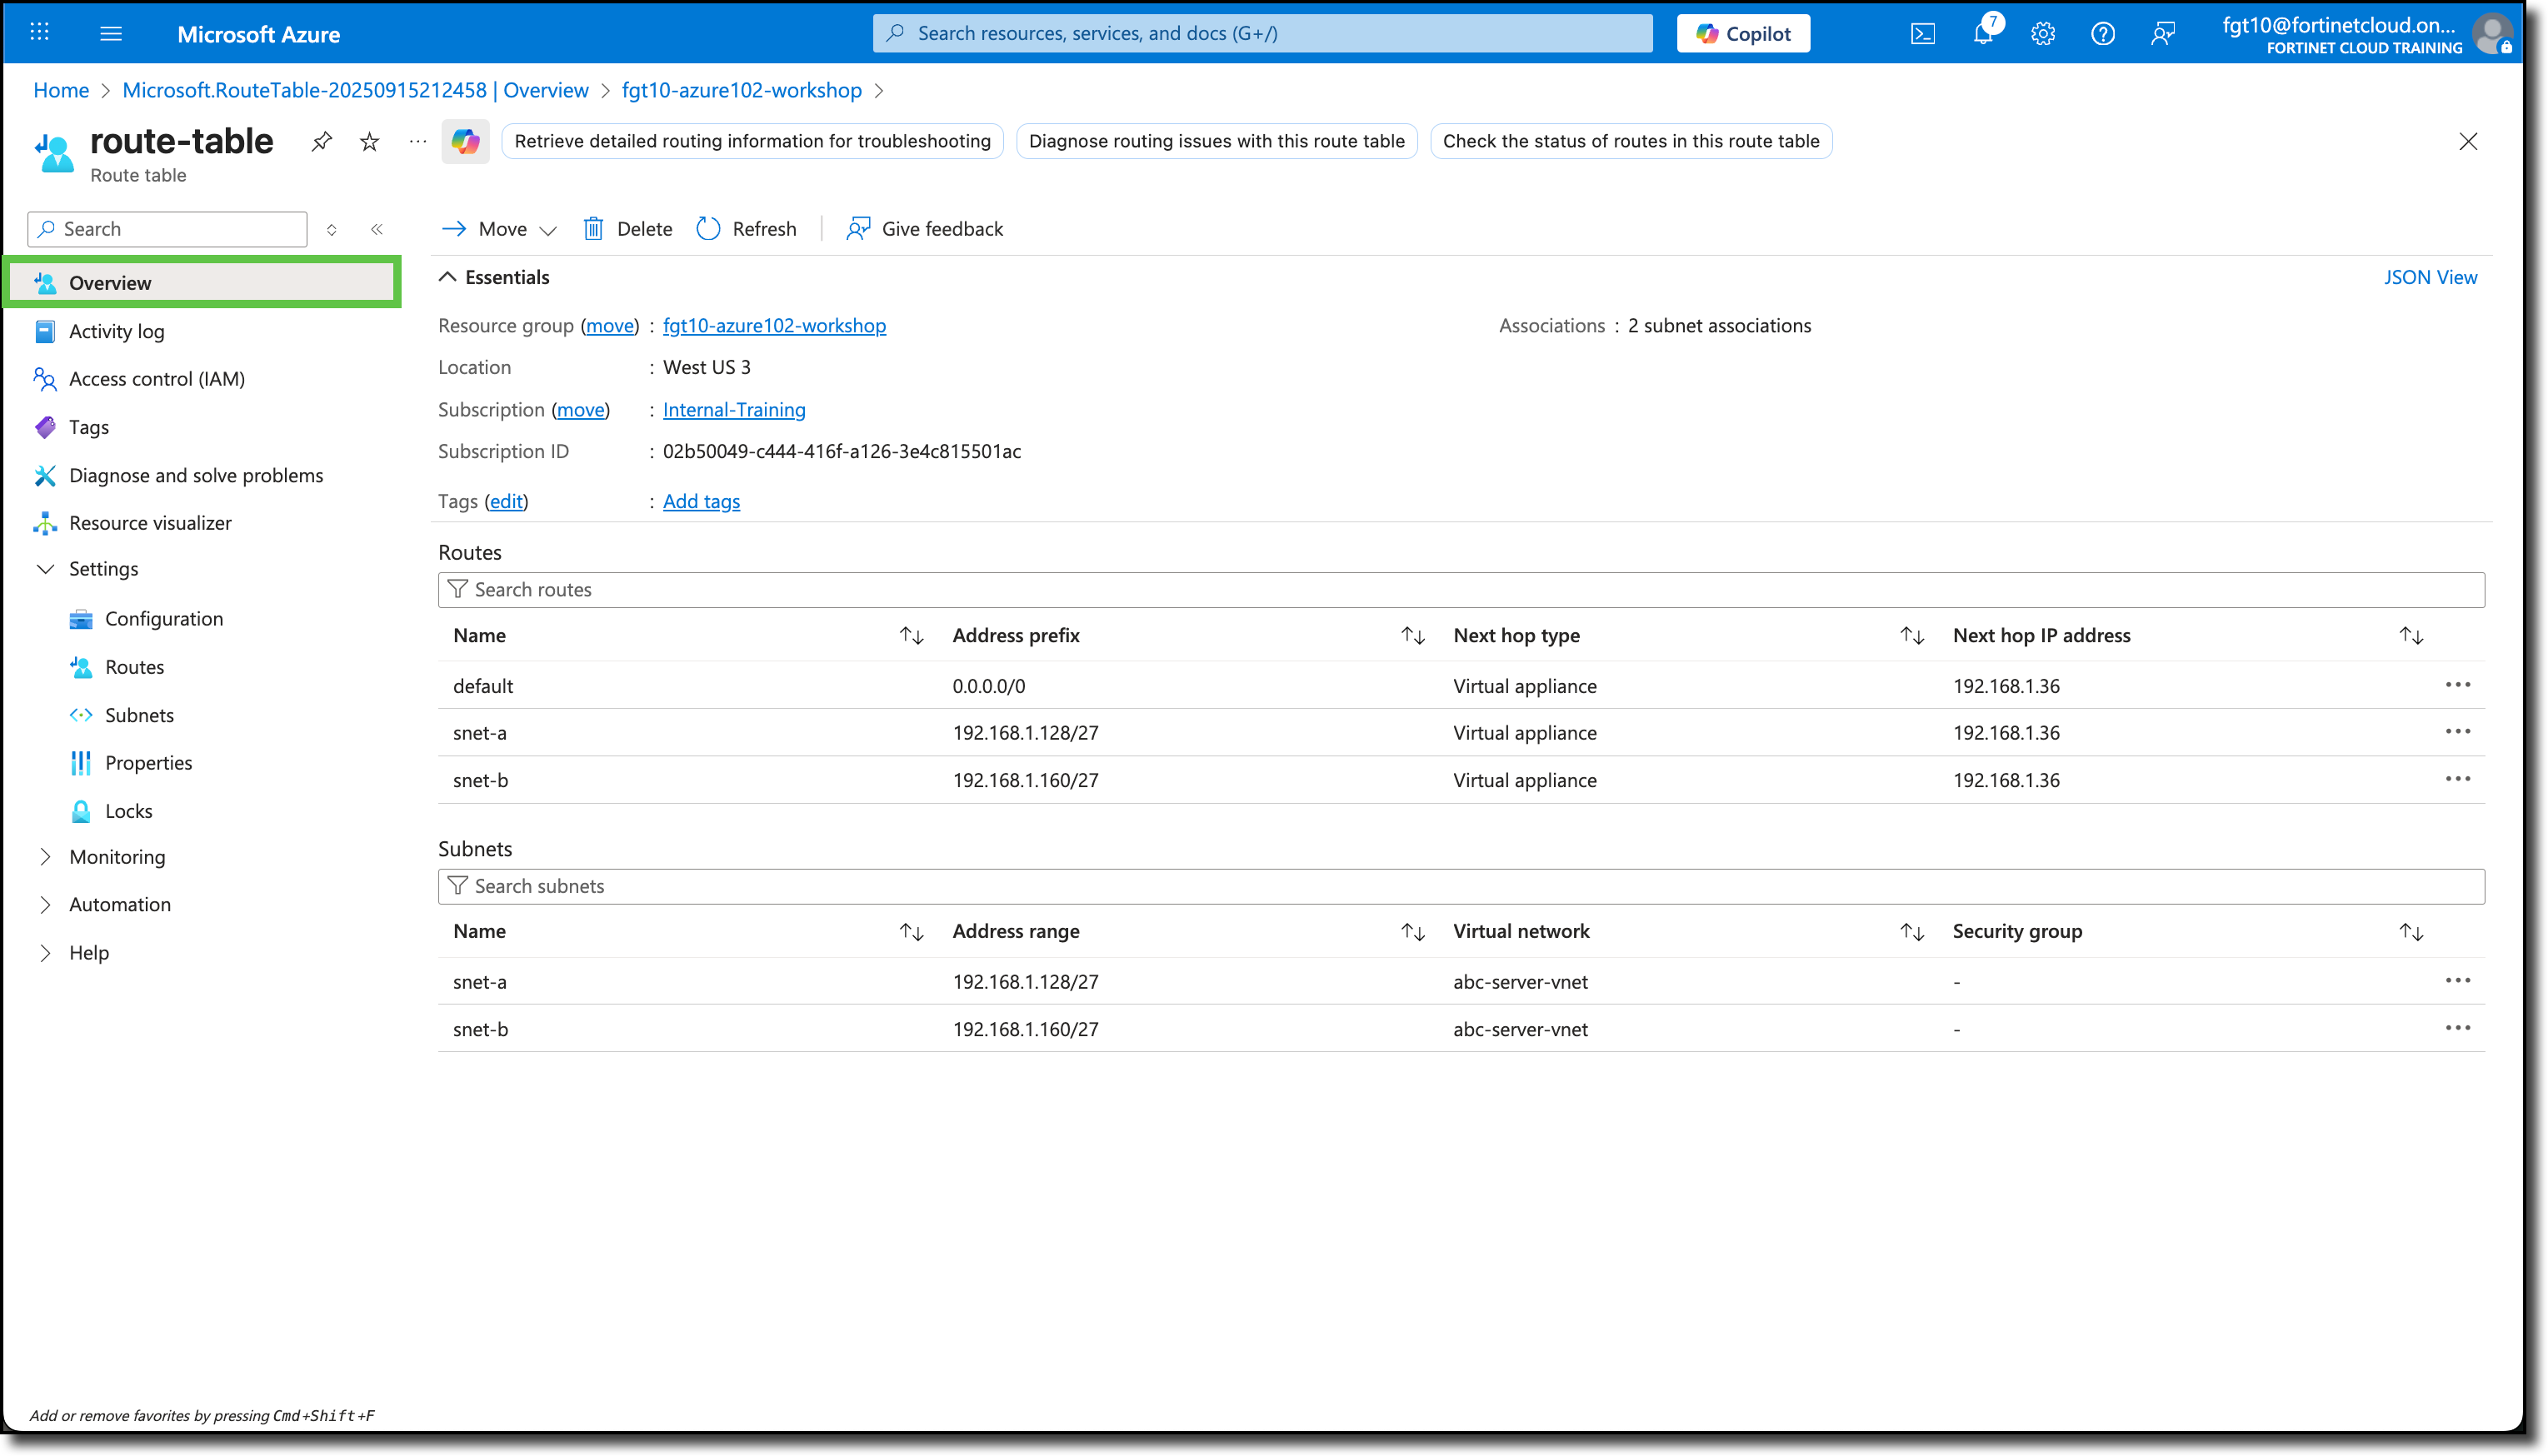
ClickOverview
View a summary of the Routes and associated Subnets
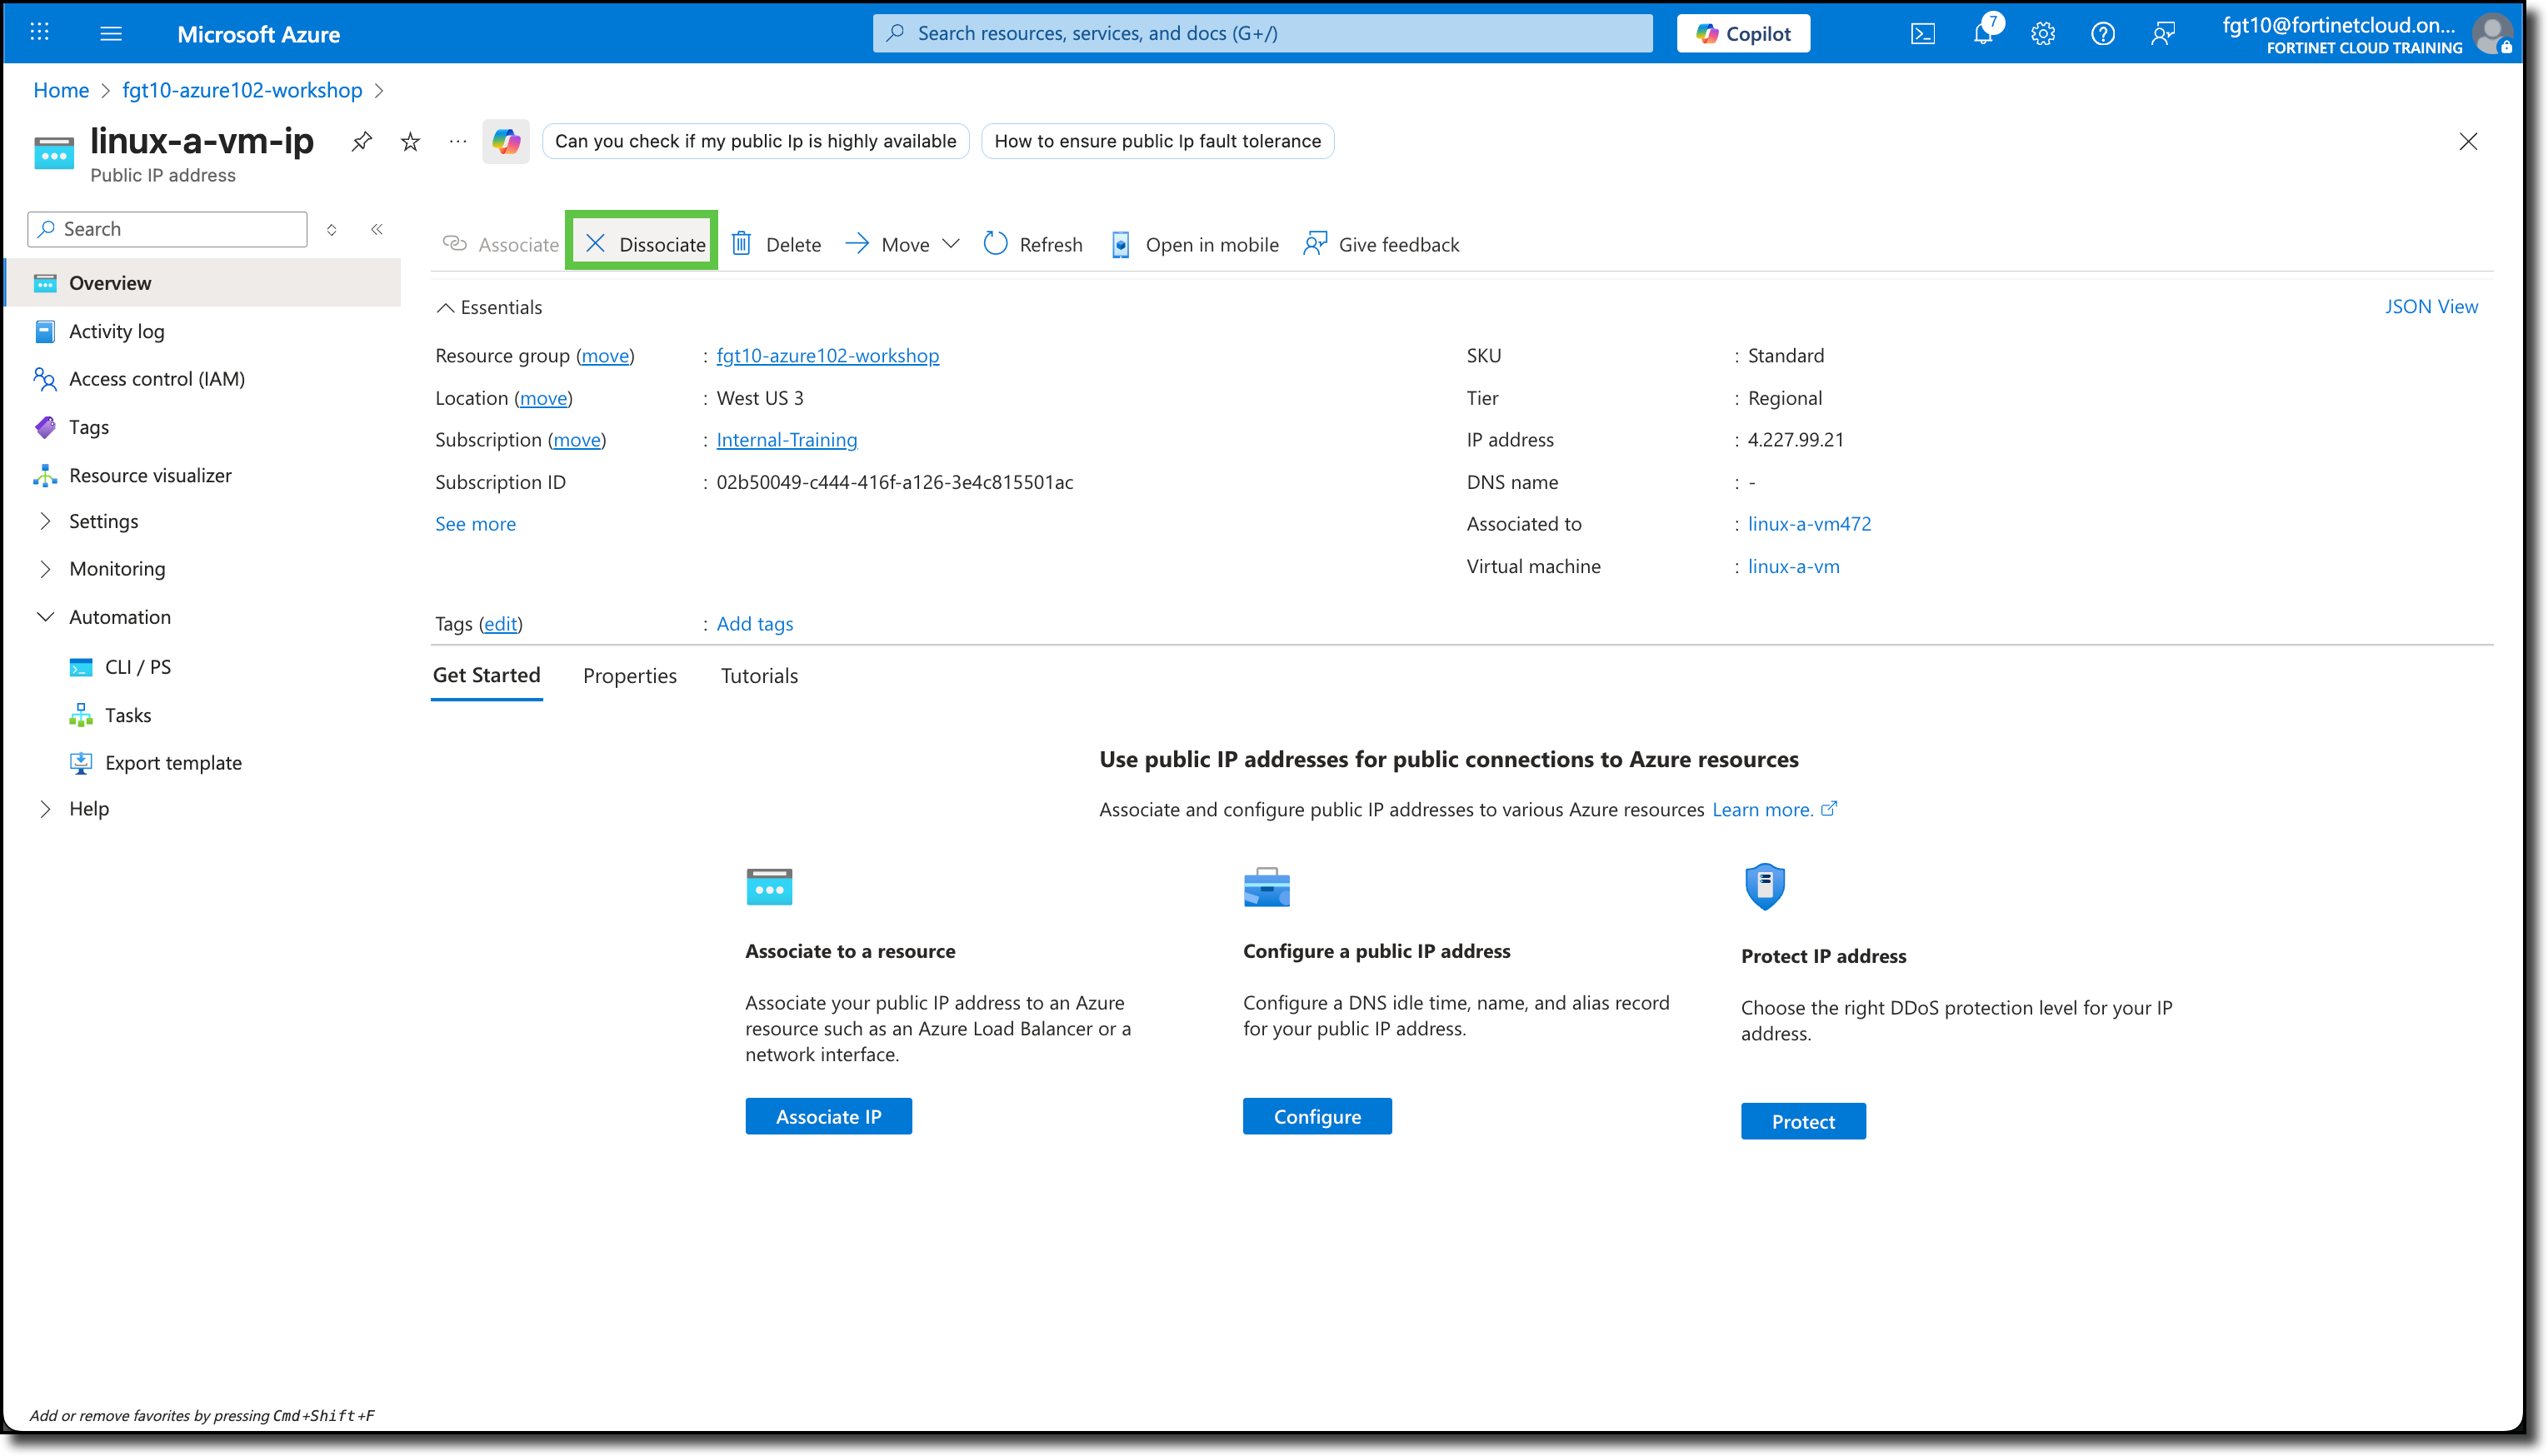
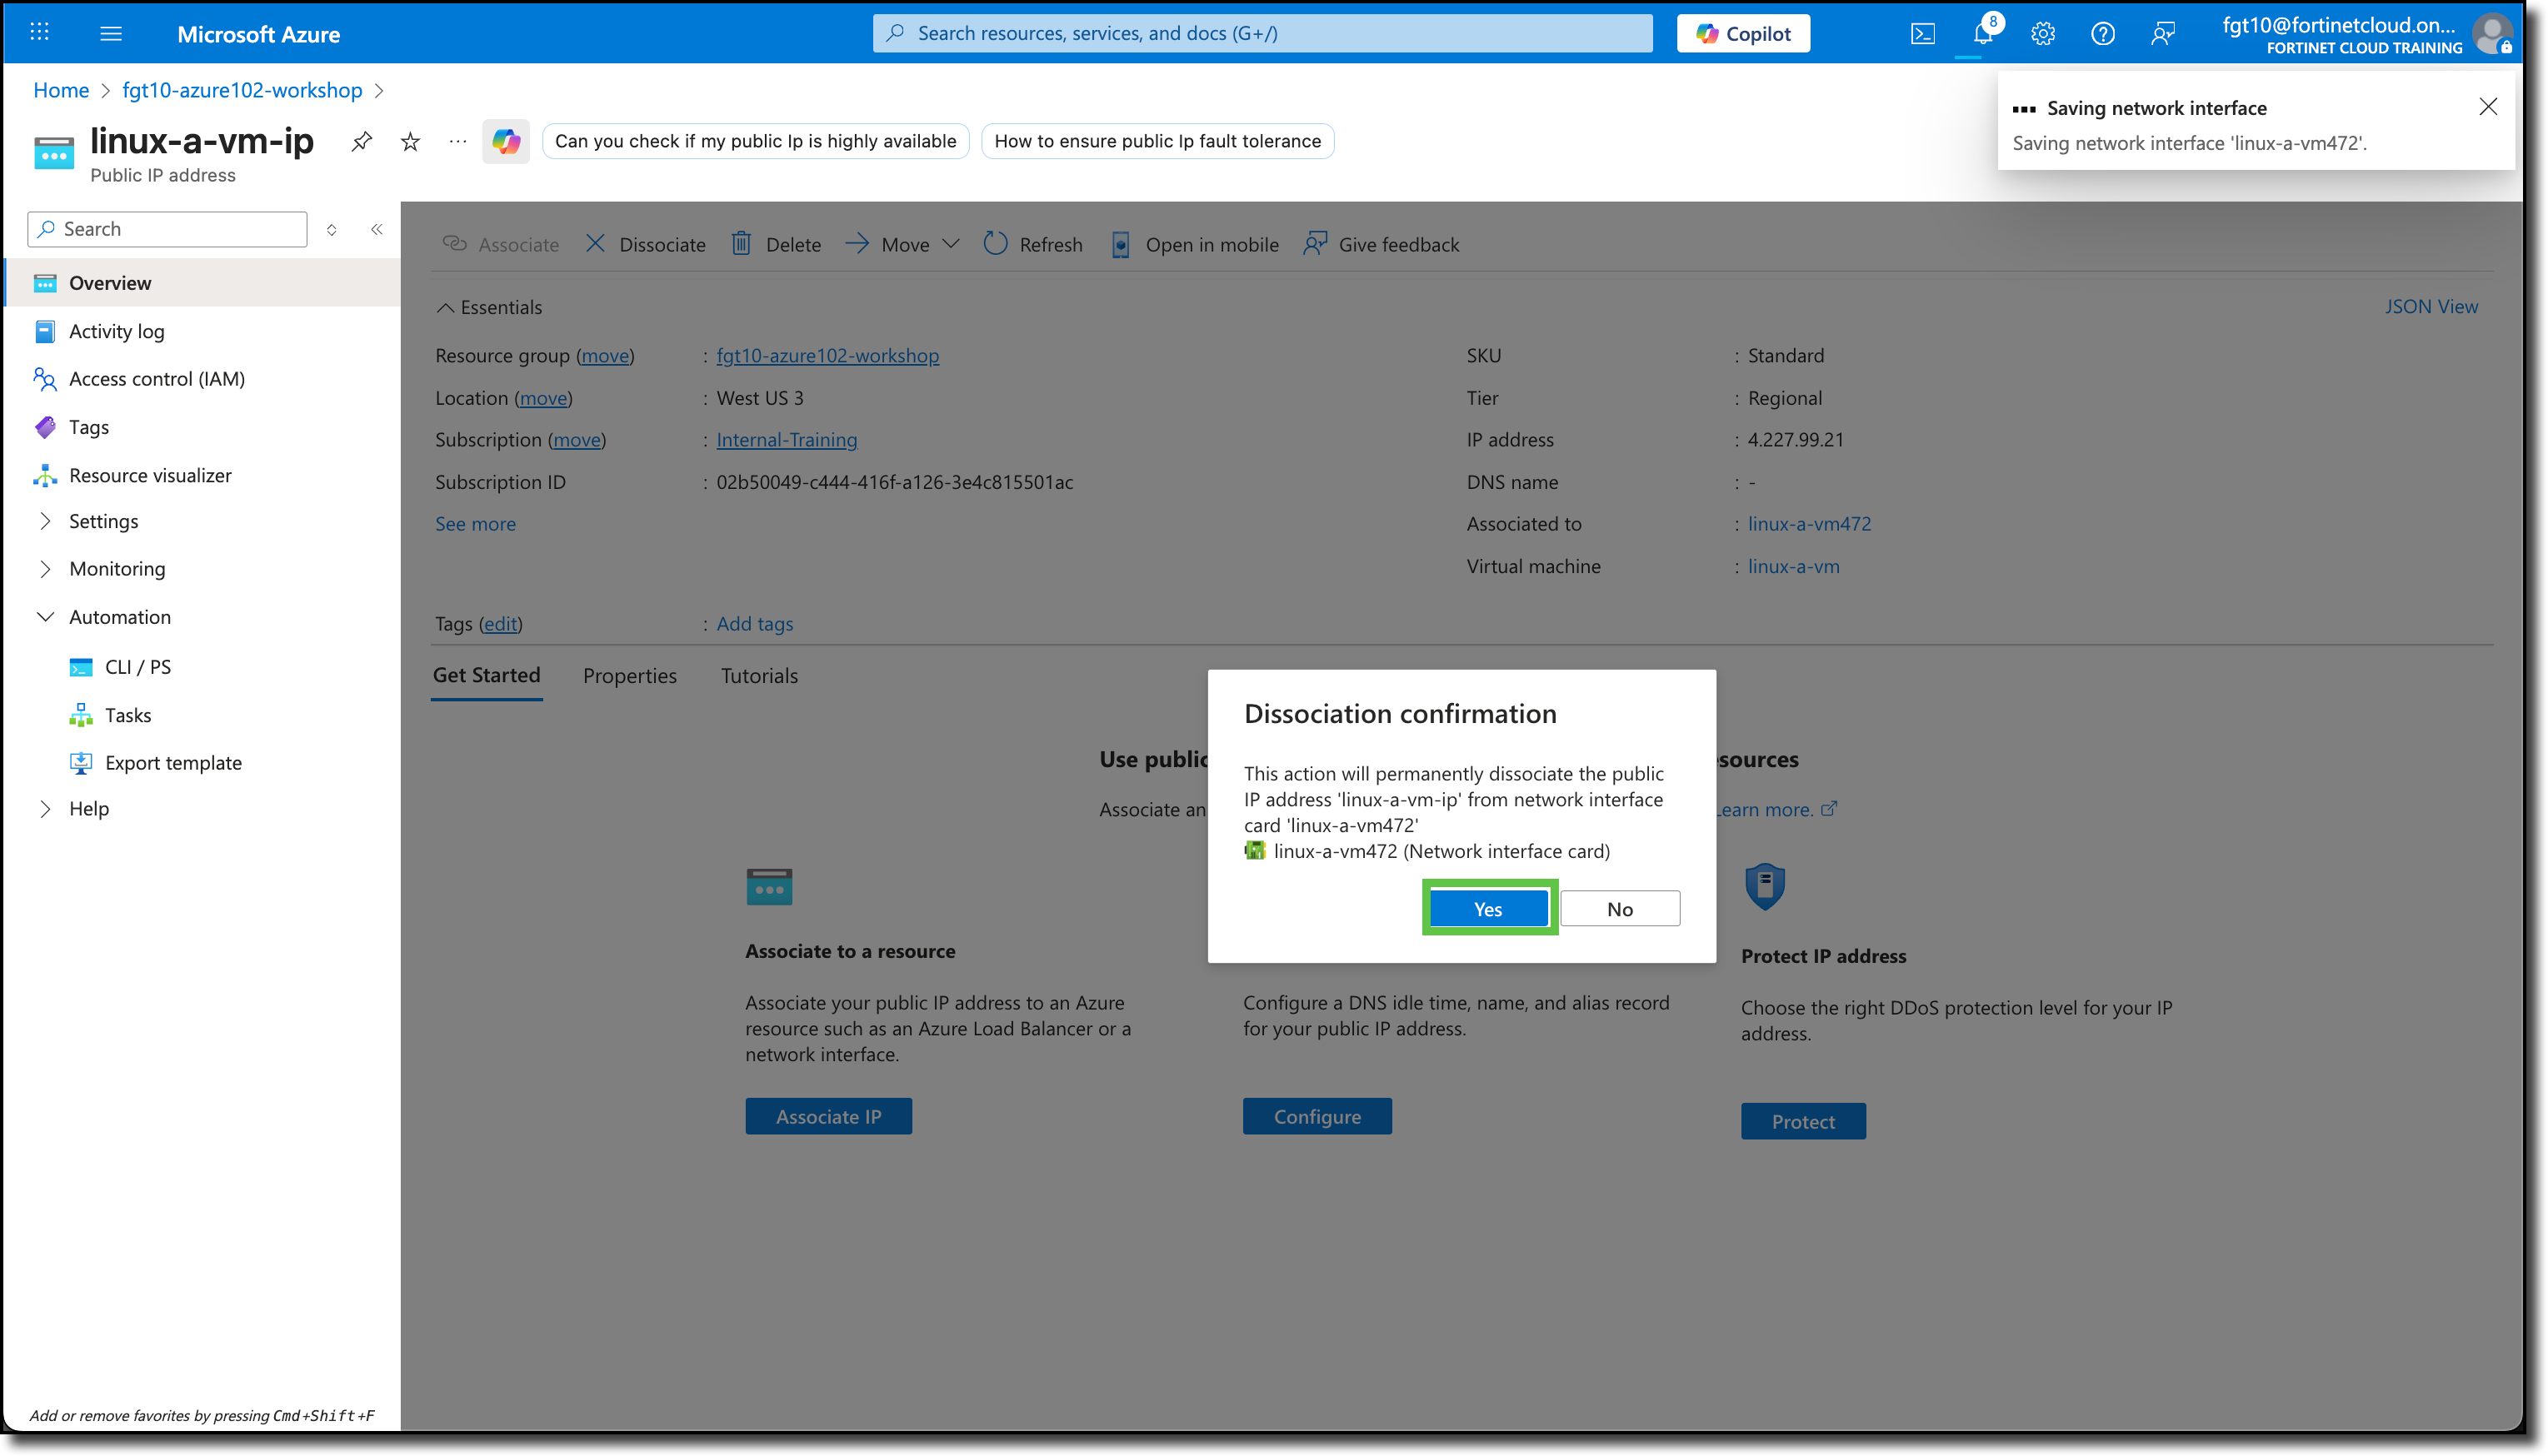
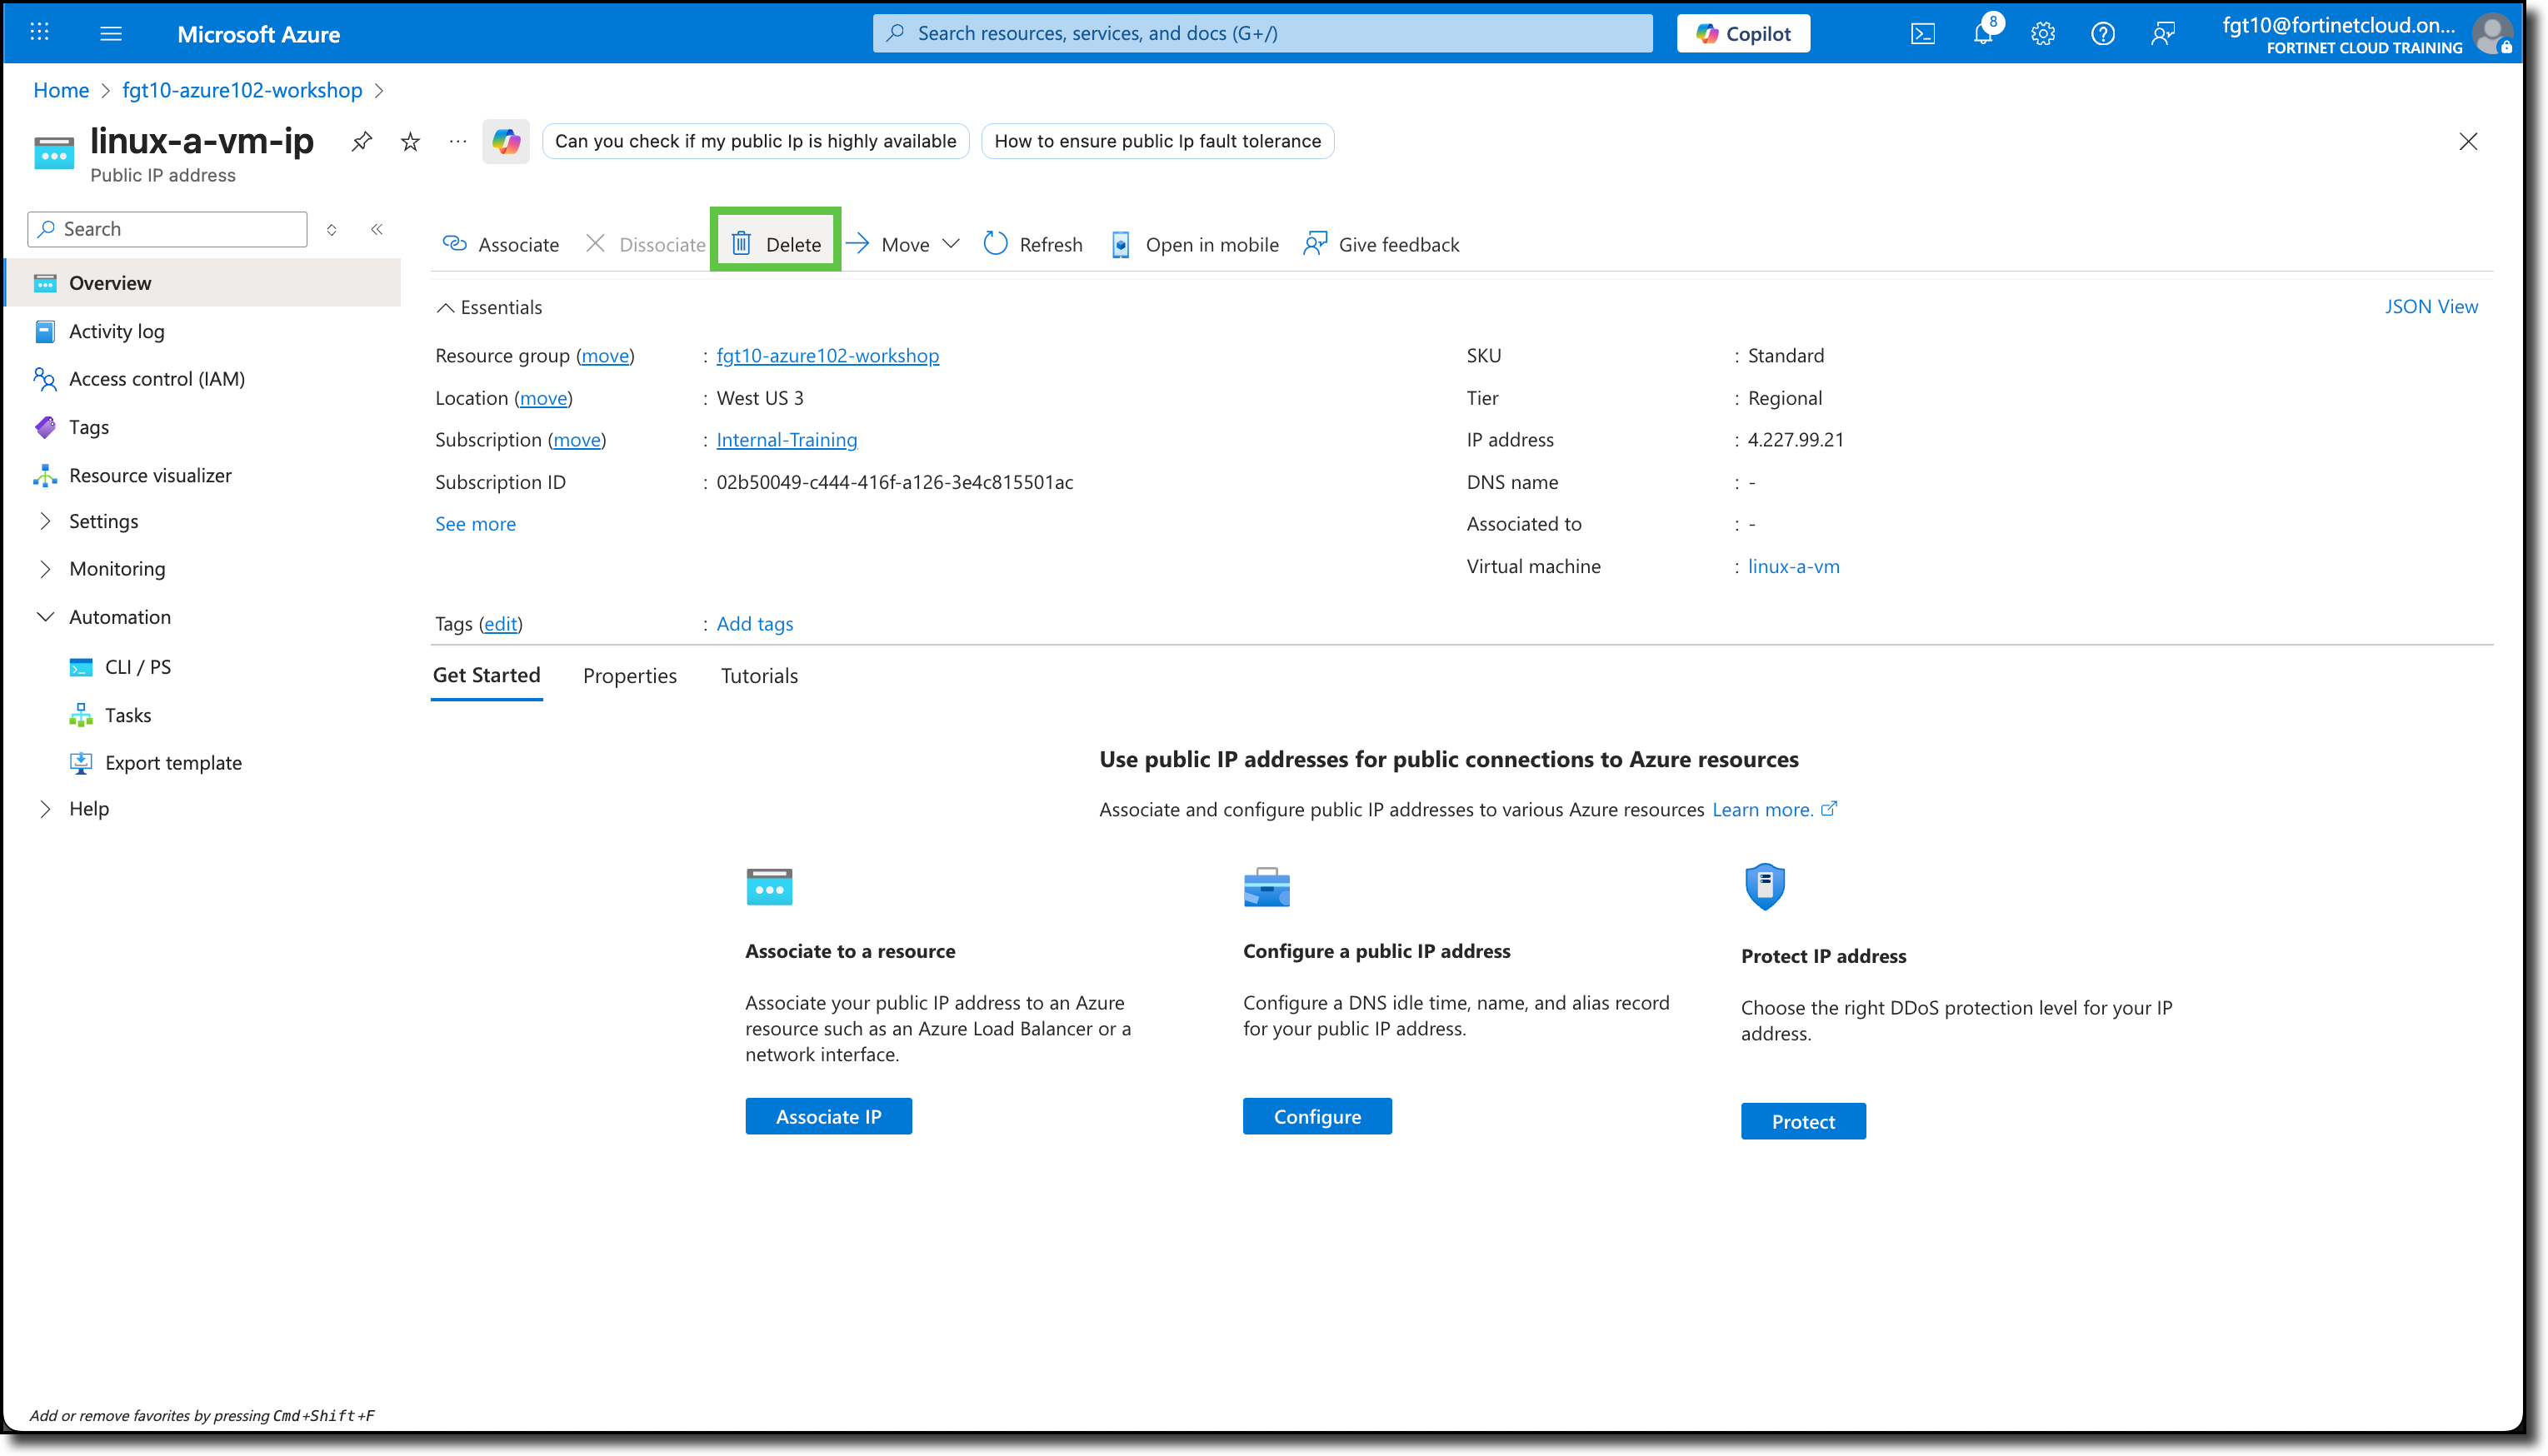
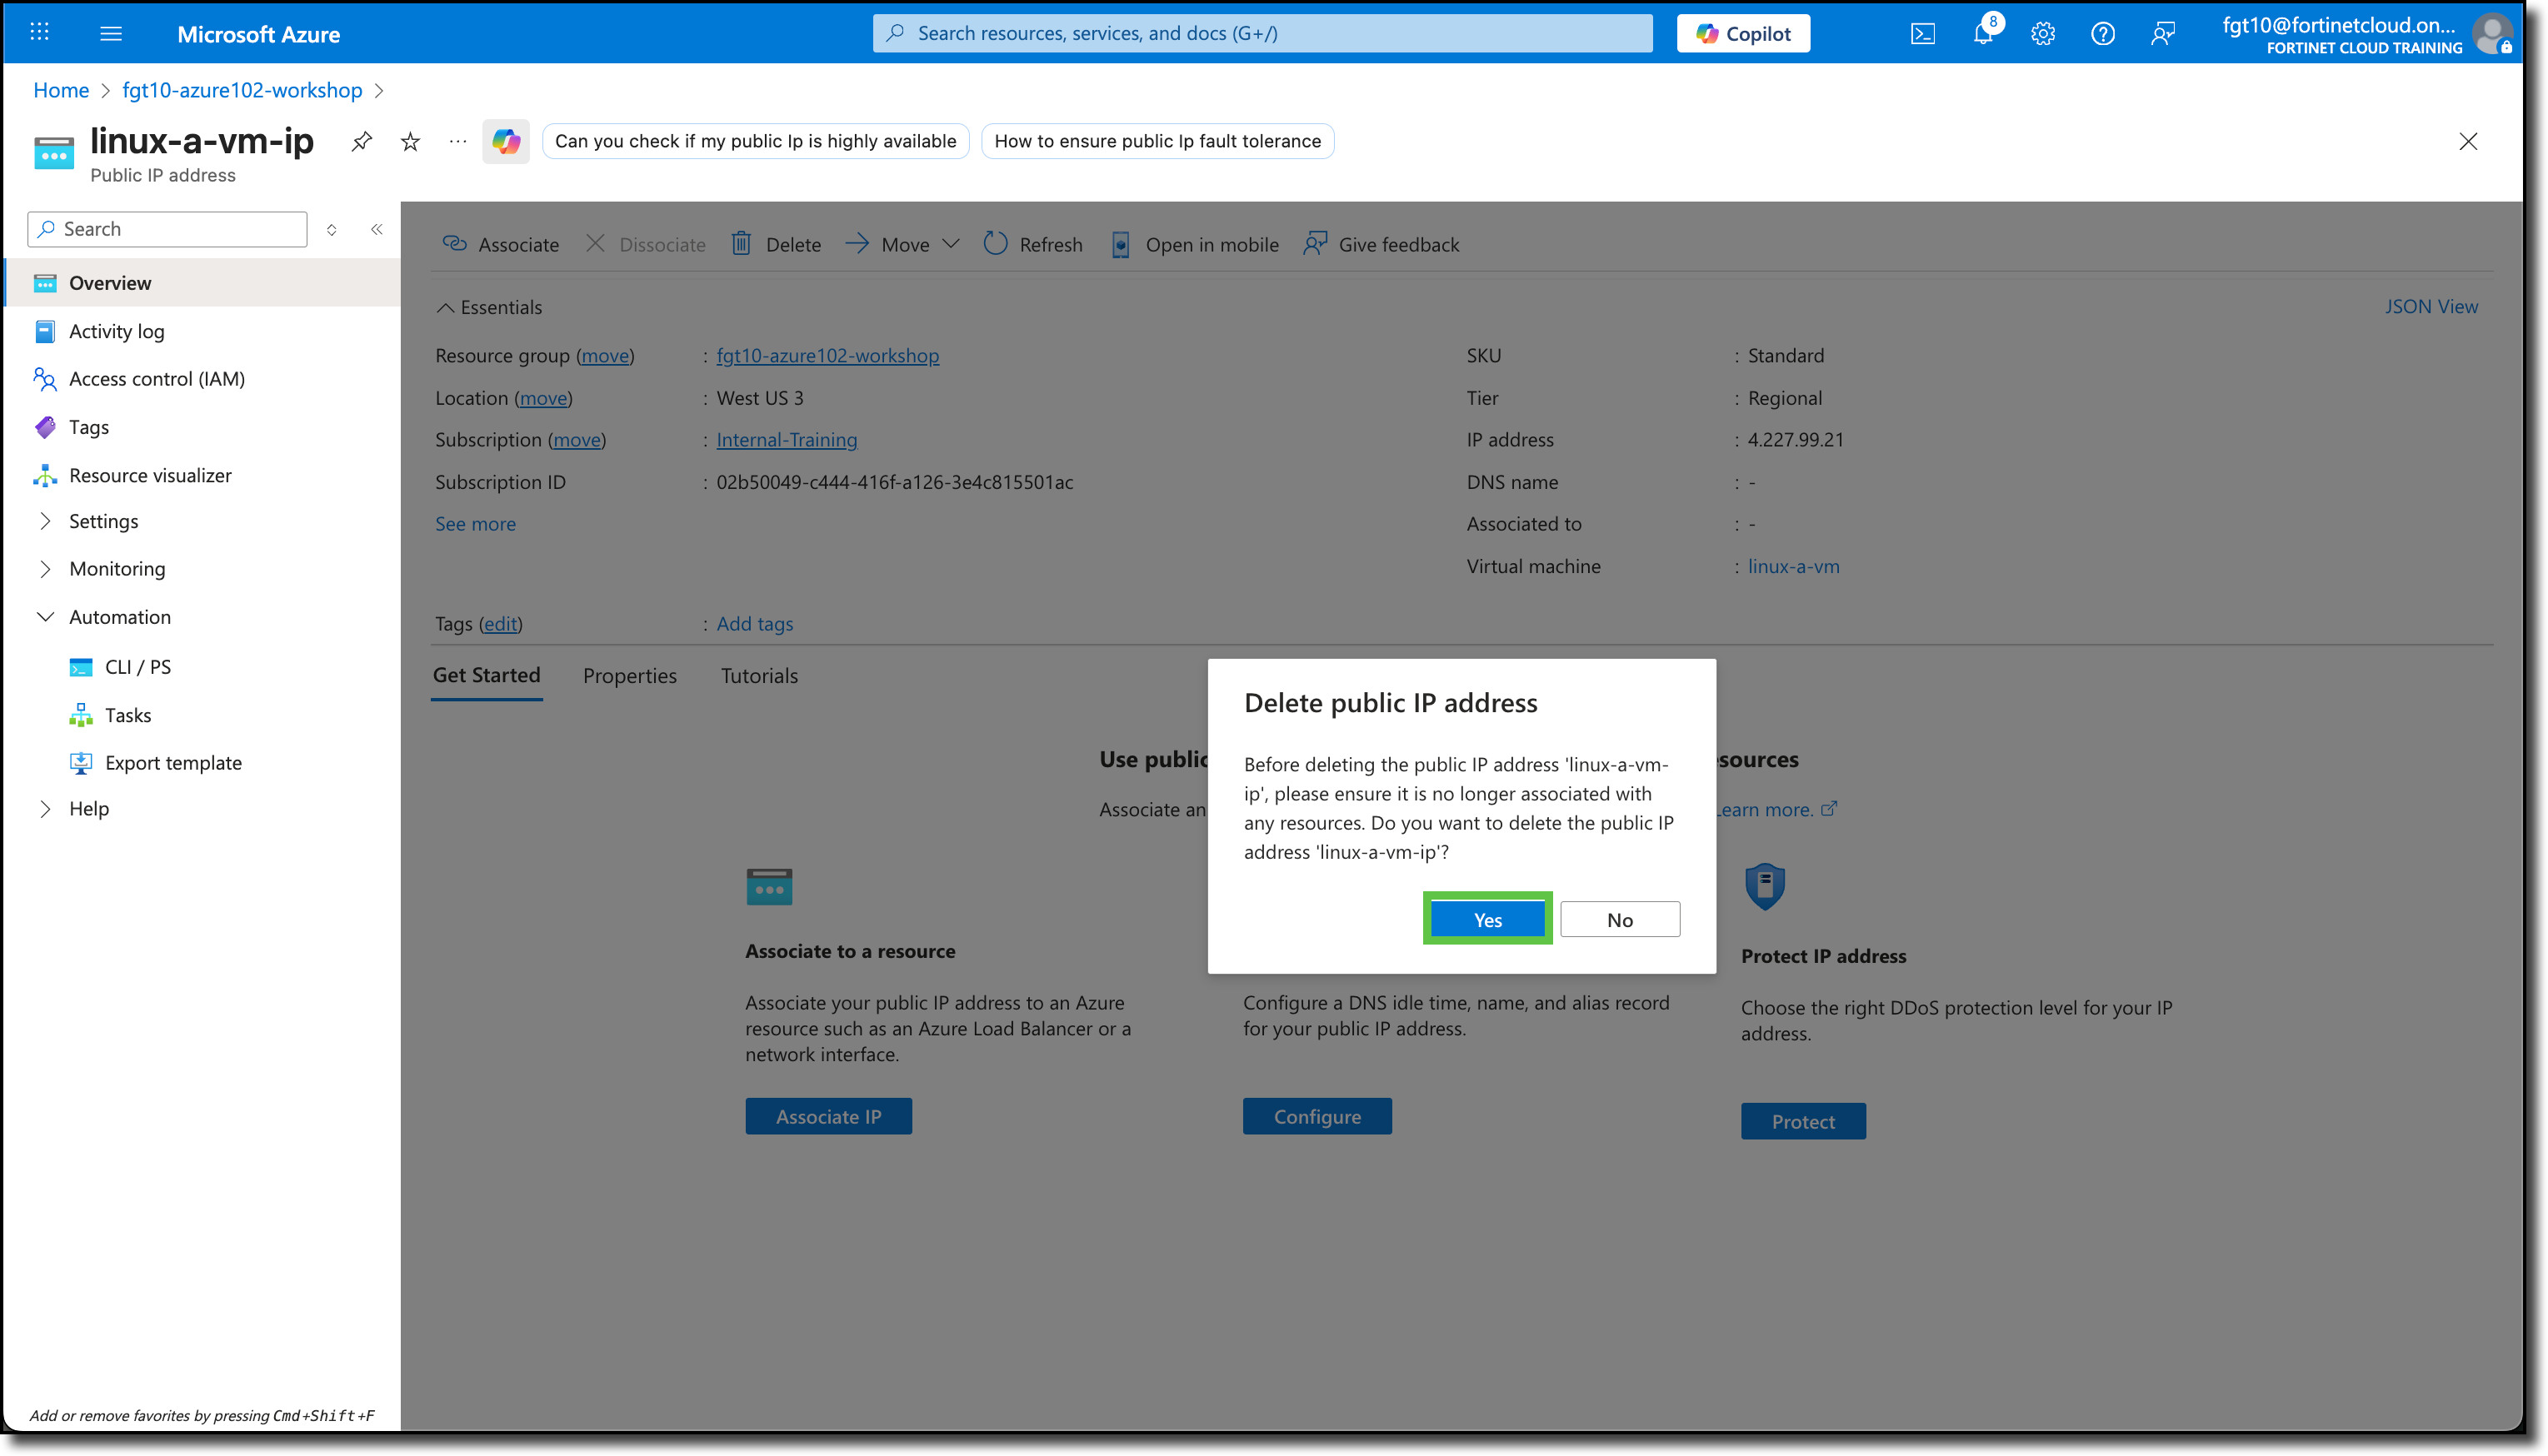
Remove the Public IP Addresses from the Linux VMs
Navigate to your Resource Group
Click on “linux-a-vm-ip”
Click on “Disassociate”
Click “Yes” to confirm disassociation
Click on “Delete”
Click “Yes” to confirm deletion
Repeat for “linux-b-vm-ip”
Because the Route Table is associated to the VNET, directing traffic to the FortiGate using the Public IPs attached to the Linux VMs is not possible because traffic leaving Linux VMs will be forced to the FortiGate and there will be no awareness and the traffic will be dropped.
The following diagram is a representation of your current VNET with Linux VM deployment and FortiGate NVA
Task 3: Confirm Linux VMs access via FortiGate
In Task 3, you will confirm the Linux VMs are using the FortiGate NVA as their default route and that all traffic to/from the Linux VMs is going through the FortiGate.
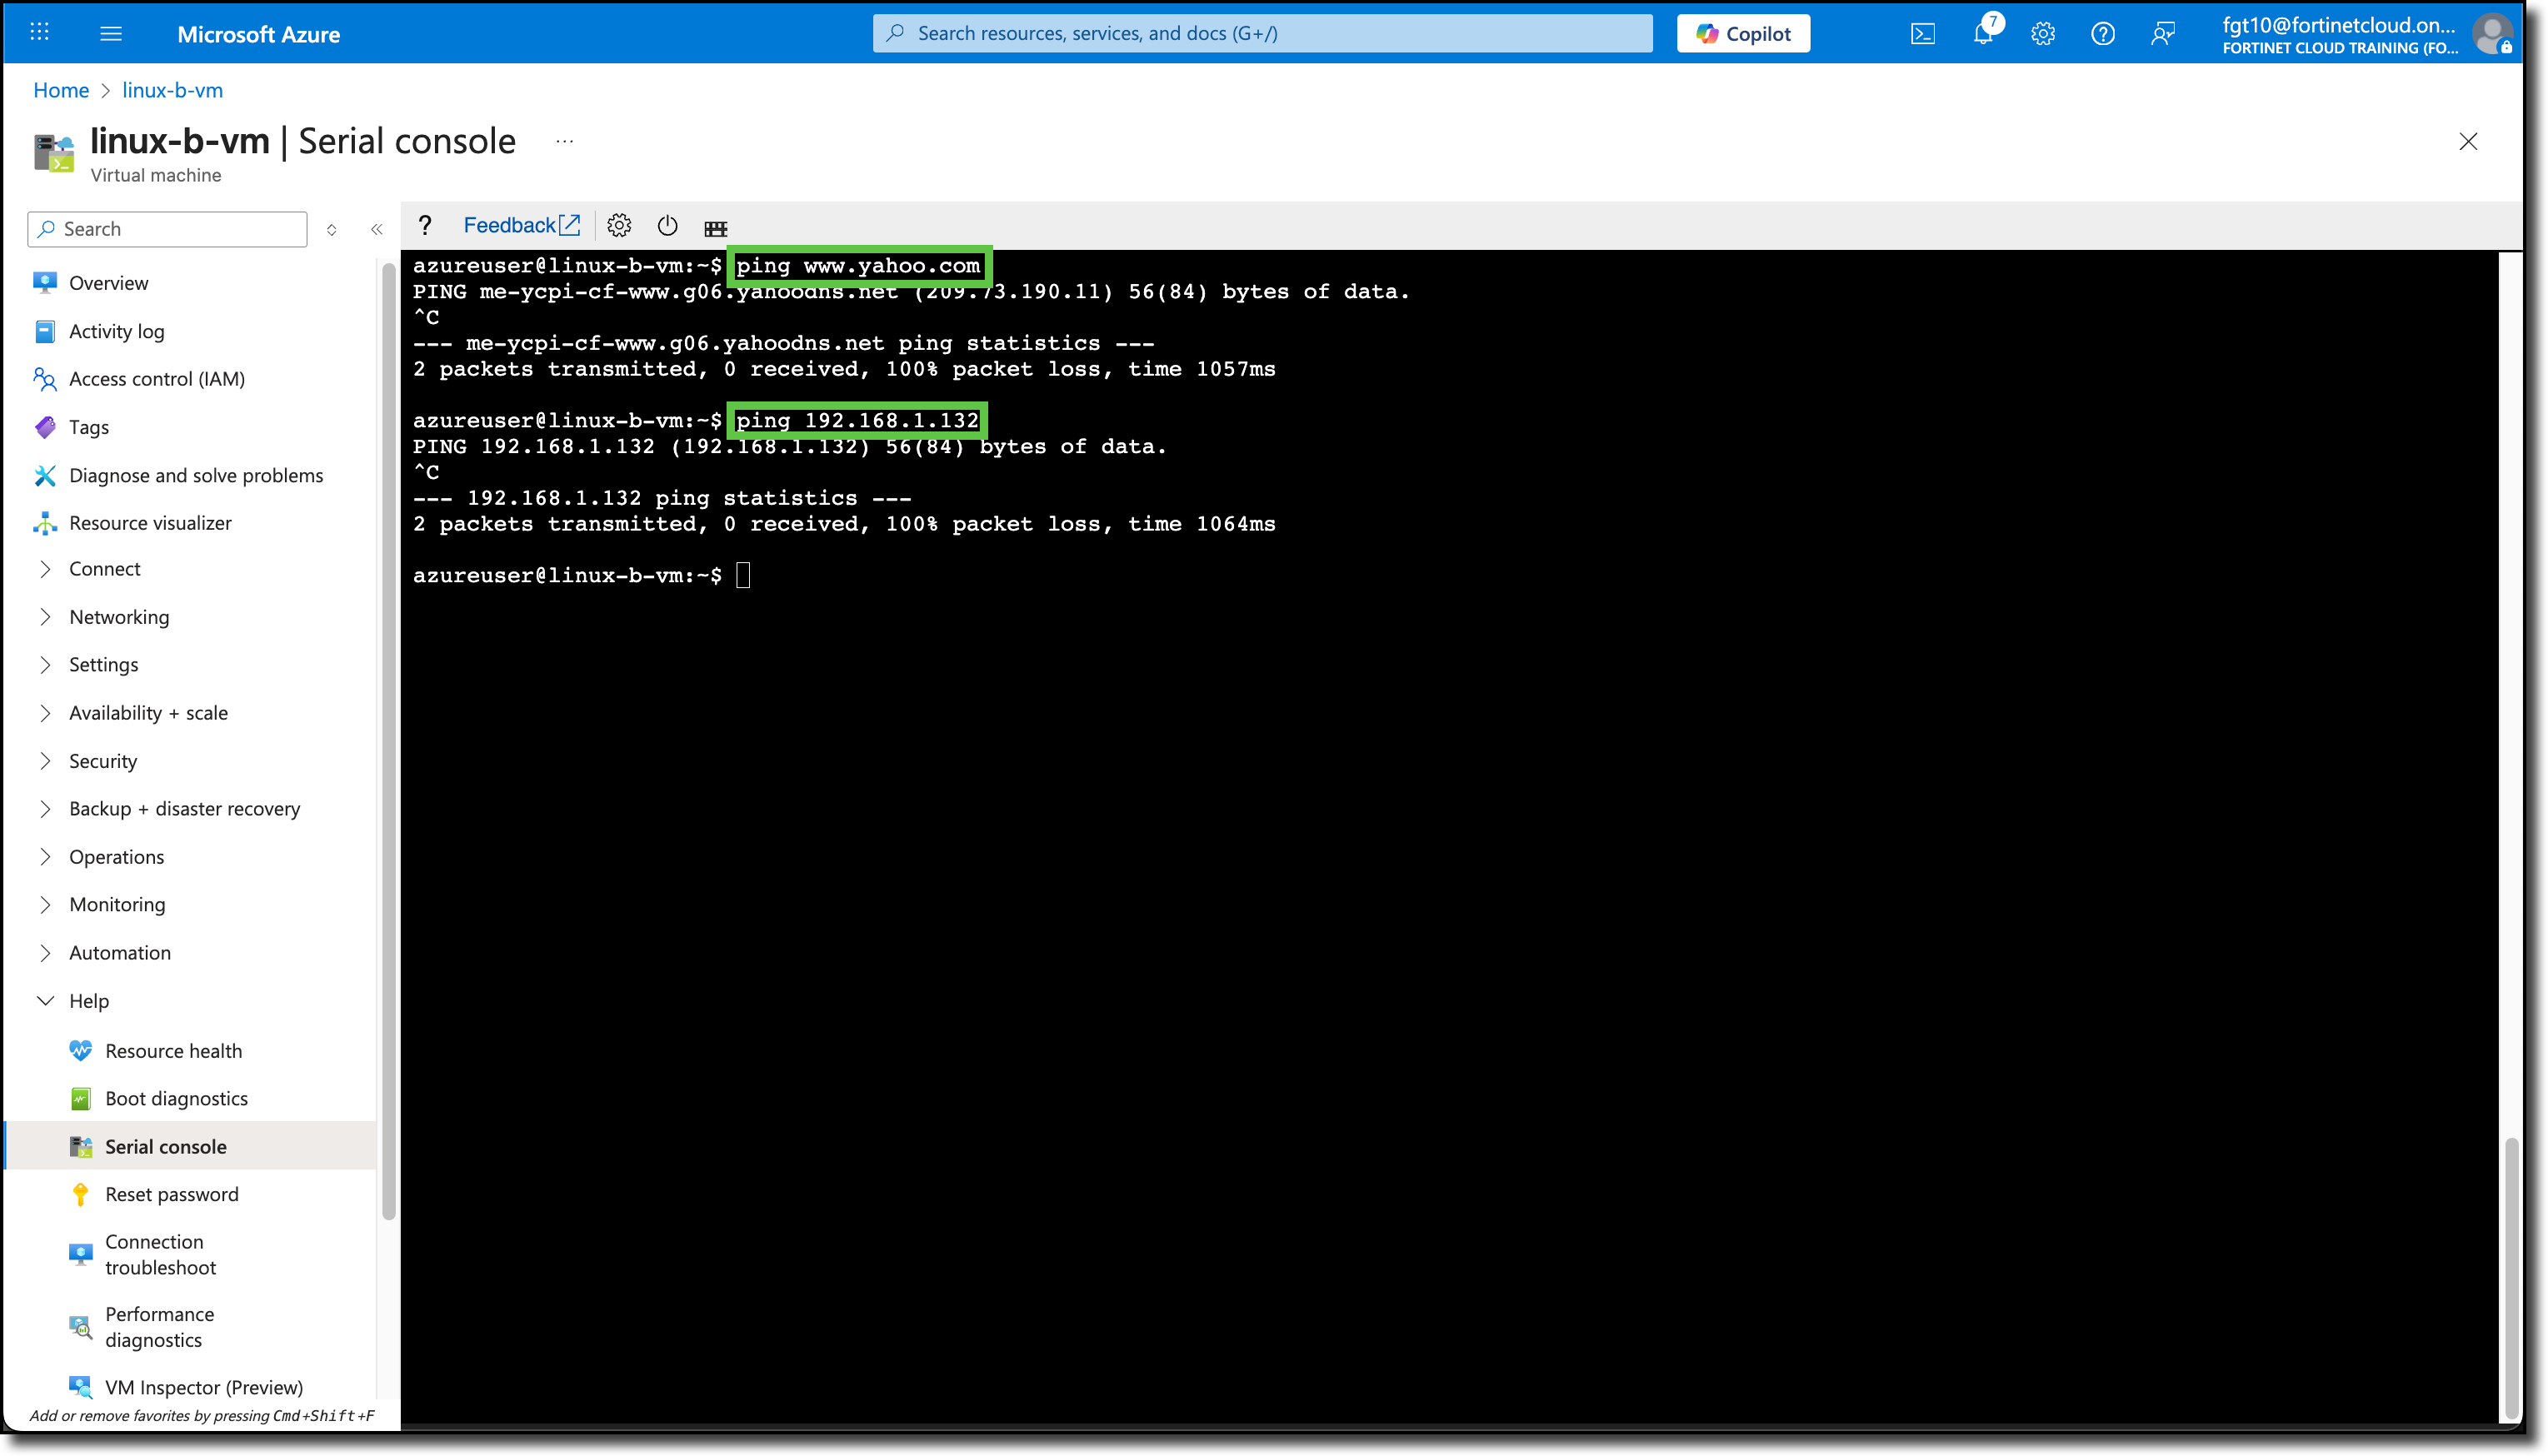
Open Serial consoles linux-a-vm and linux-b-vm
Fromlinux-a-vm console run
ping www.yahoo.com
ping 192.168.1.164 <– Most likely the Private IP of linux-b-vm
Neither should respond
Fromlinux-b-vm console run
ping www.yahoo.com
ping 192.168.1.132 <– Most likely the Private IP of linux-a-vm
Neither should respond
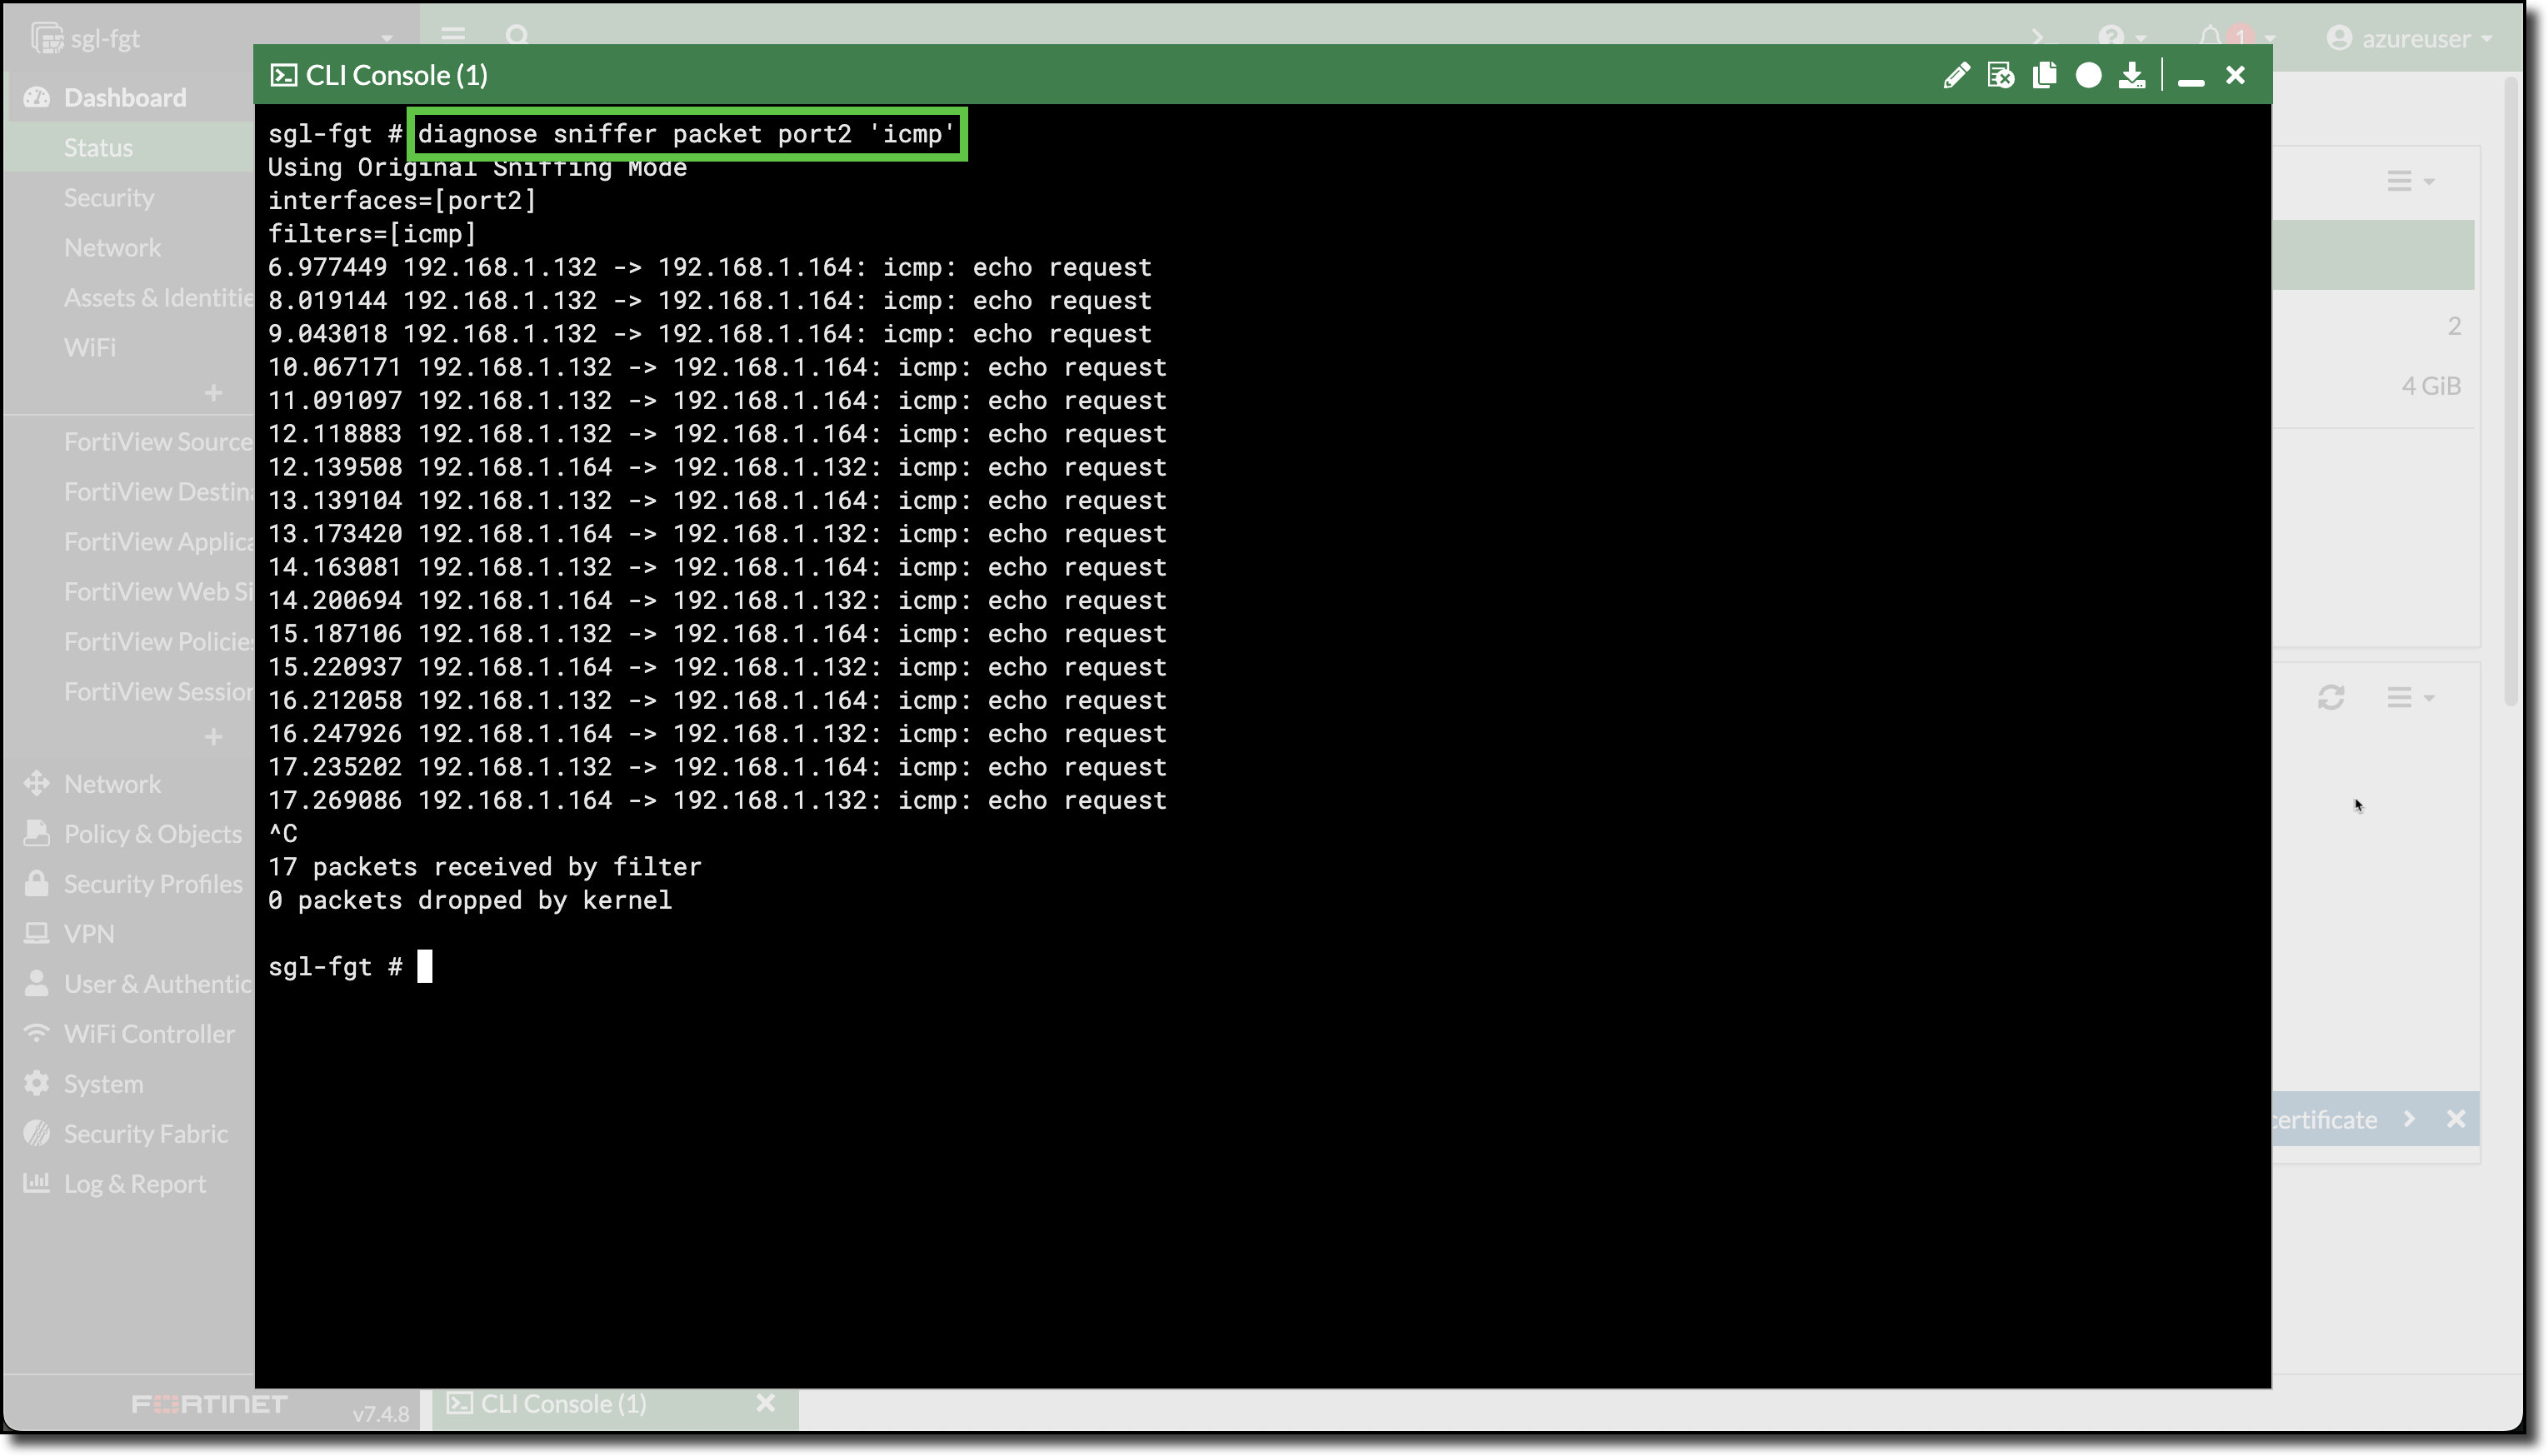
Login to the FortiGate
Open a CLI session on the FortiGate
Enter the FortiGate CLI command
diagnose sniffer packet port2 'icmp'
Run steps two and three again.
The ICMP echo request traffic reaches the FortiGate, however the FortiGate does not have any policies to allow or deny the traffic.
Task 4: Configure FortiGate Policies
In Task 4, now that you have confirmed traffic from both Linux VMs is being routed to the FortiGate, you will create policies that will accomplish the security requirements requested by company ABC.
To meet these requirements, the following access needs to be setup for each Linux VM.
linux-a-vm is the management server and should have the following access:
SSH and PING access to linux-b-vm
HTTP and HTTPS access to the Internet
SSH access to linux-a-vm from the Internet
linux-b-vm is the www server and should have the following access:
HTTP service from the Internet
HTTP and HTTPS access to the Internet
PING access to linux-a-vm
Configure FortiGate Policies and Objects
In the following steps, you will create
An Address object
A Virtual IP Address (VIP)
A Firewall Policy for linux-a-vm
Then repeat each step to create similar configurations for linux-b-vm
Tip
In FortiGate System–>Settings change the “Idle timeout” to 60 to stay logged into the FortiGate
From the FortiGate GUI
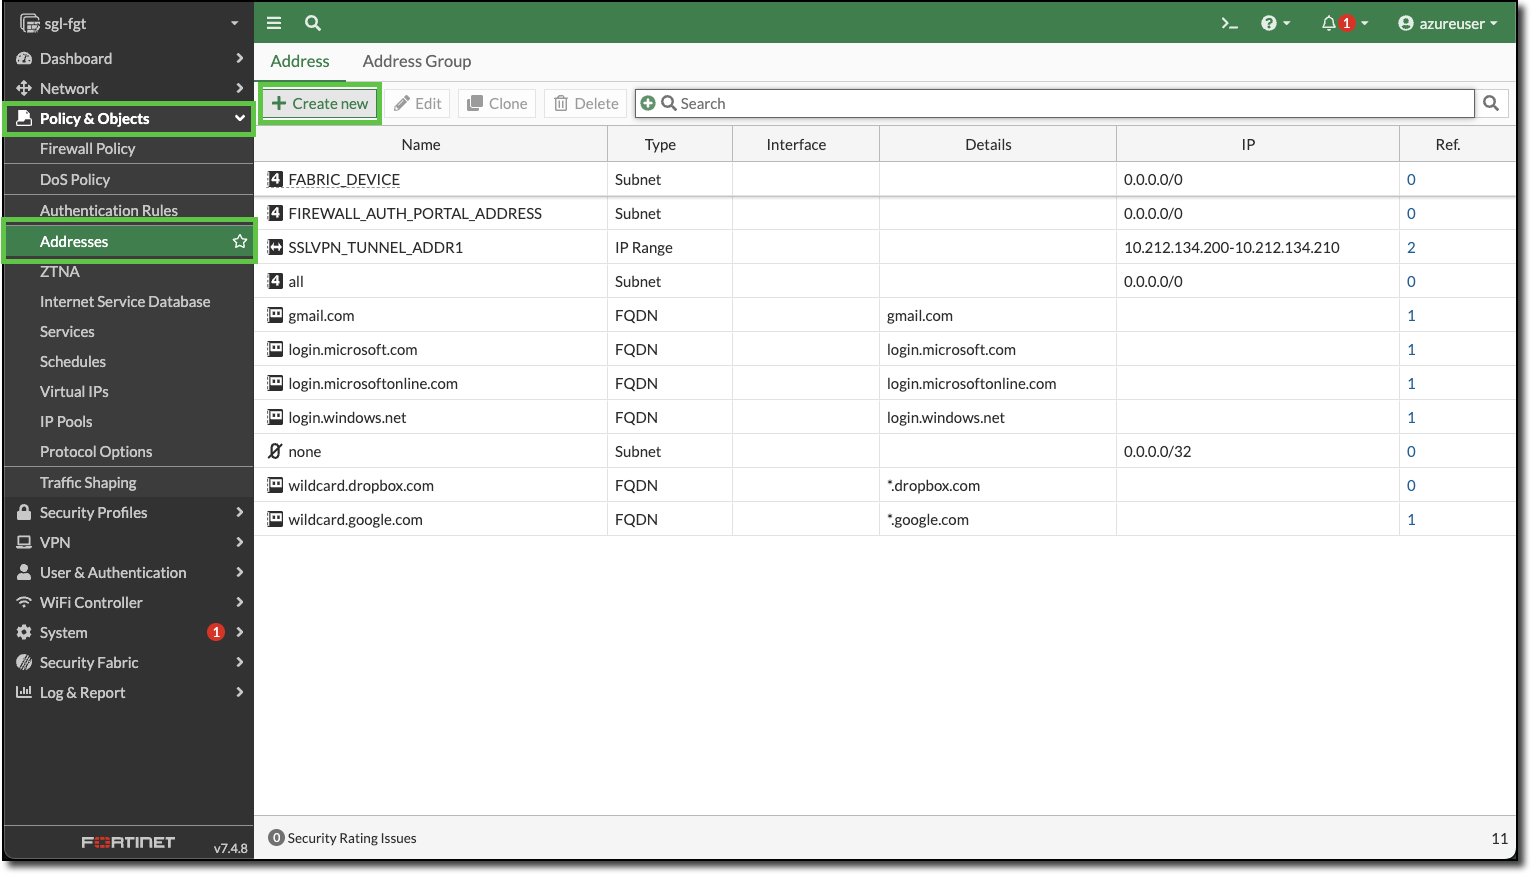
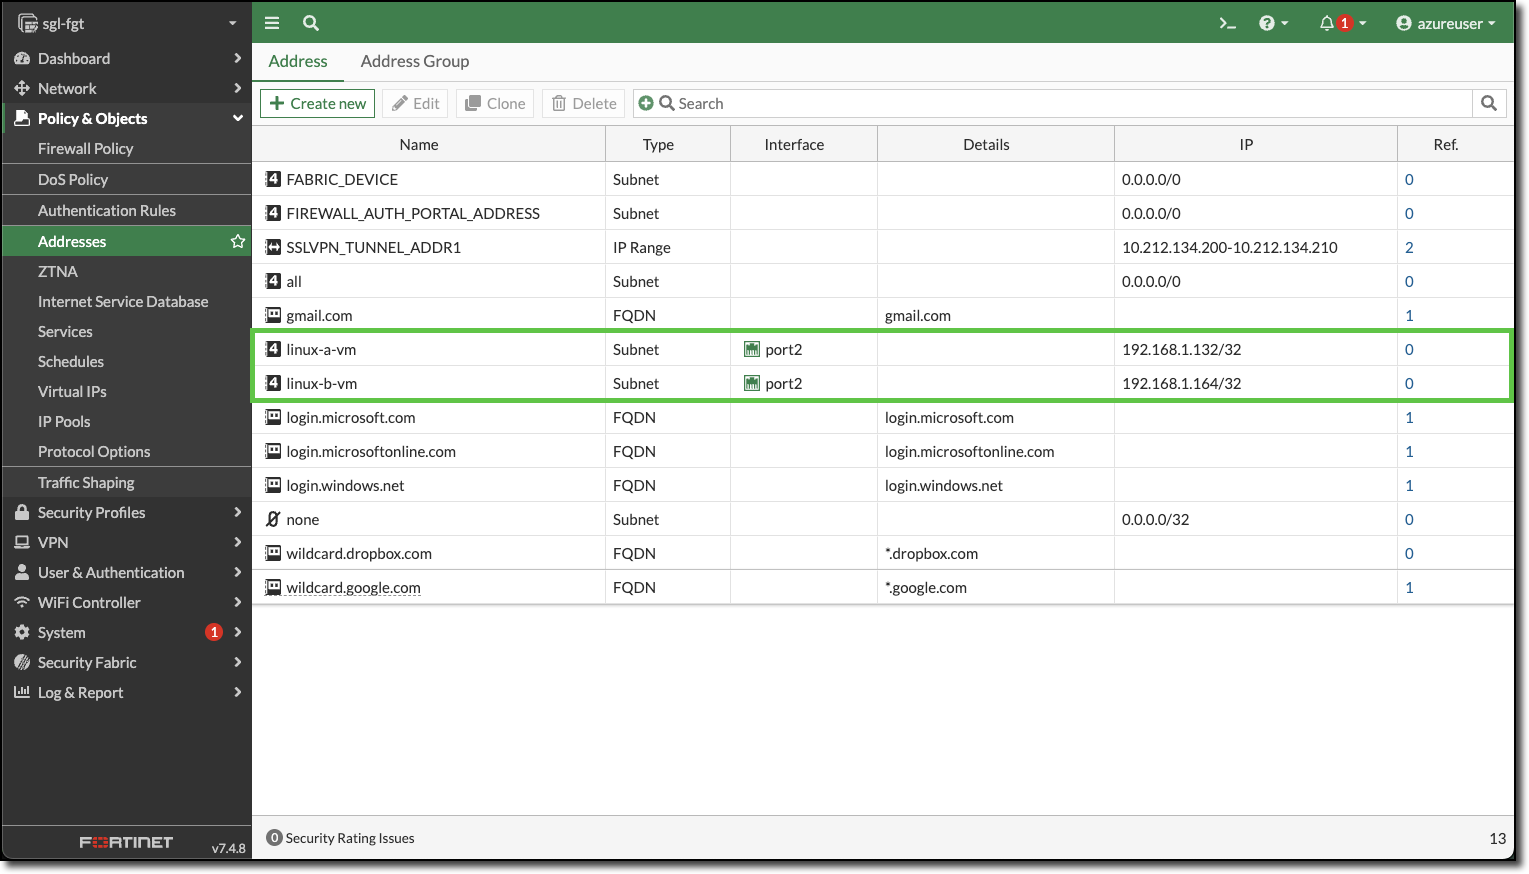
Navigate to Policy & Objects–>Addresses
Click “+ Create new”
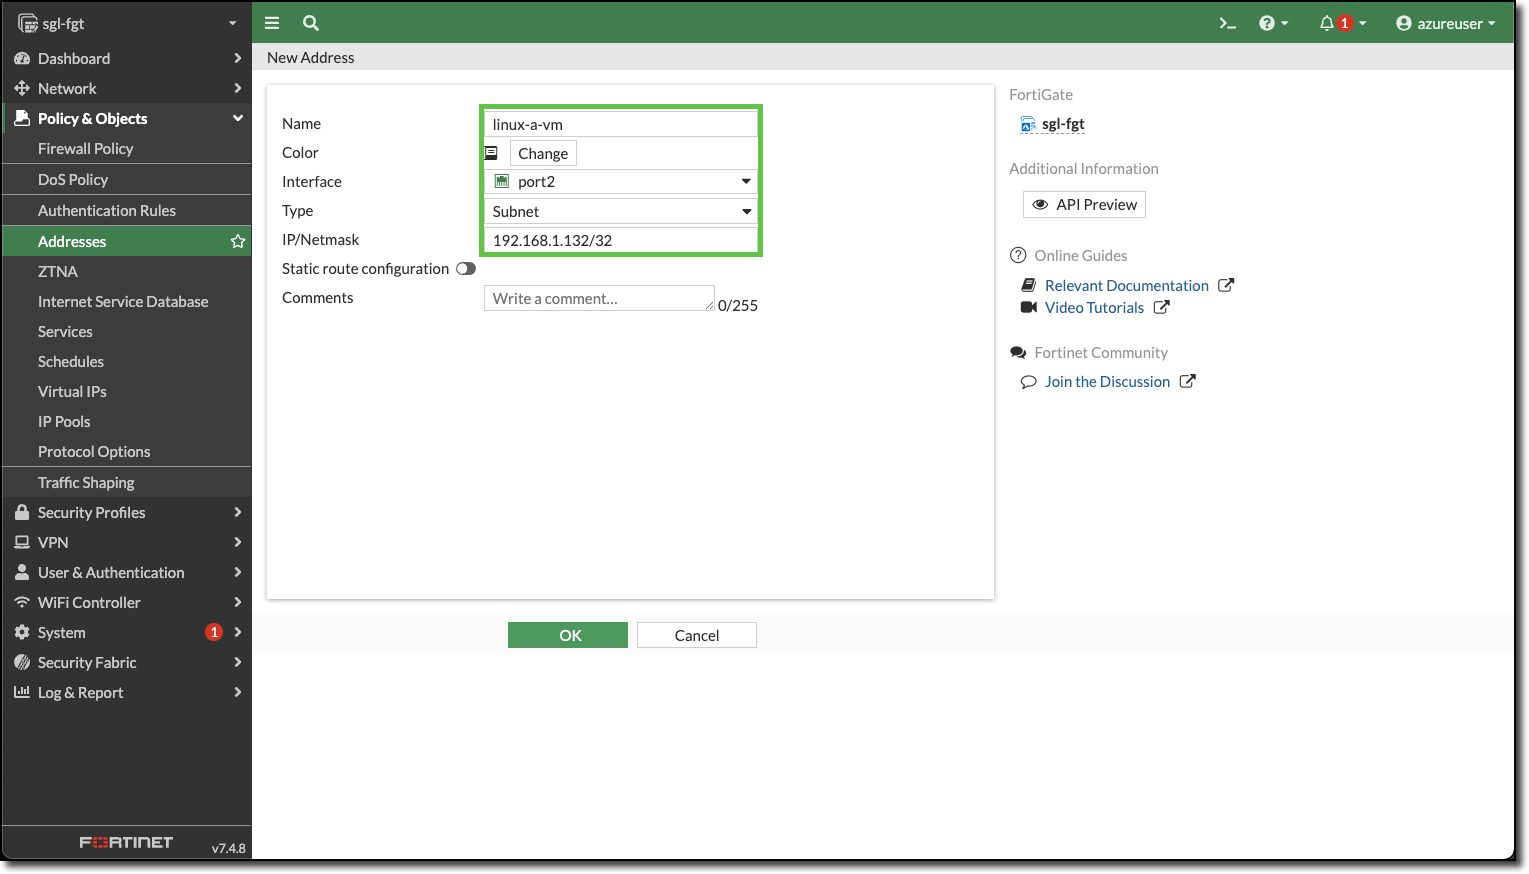
Enter the following:
Name: linux-a-vm
Interface: port2
Type: Subnet
IP/Netmask: 192.168.1.132/32
Click “OK”
Repeat for linux-b-vm. Your Address screen should have both Linux VMs listed.
Click “+ Create new”
Enter the following:
Name: linux-b-vm
Interface: port2
Type: Subnet
IP/Netmask: 192.168.1.164/32
Click “OK”
View the created Address Objects
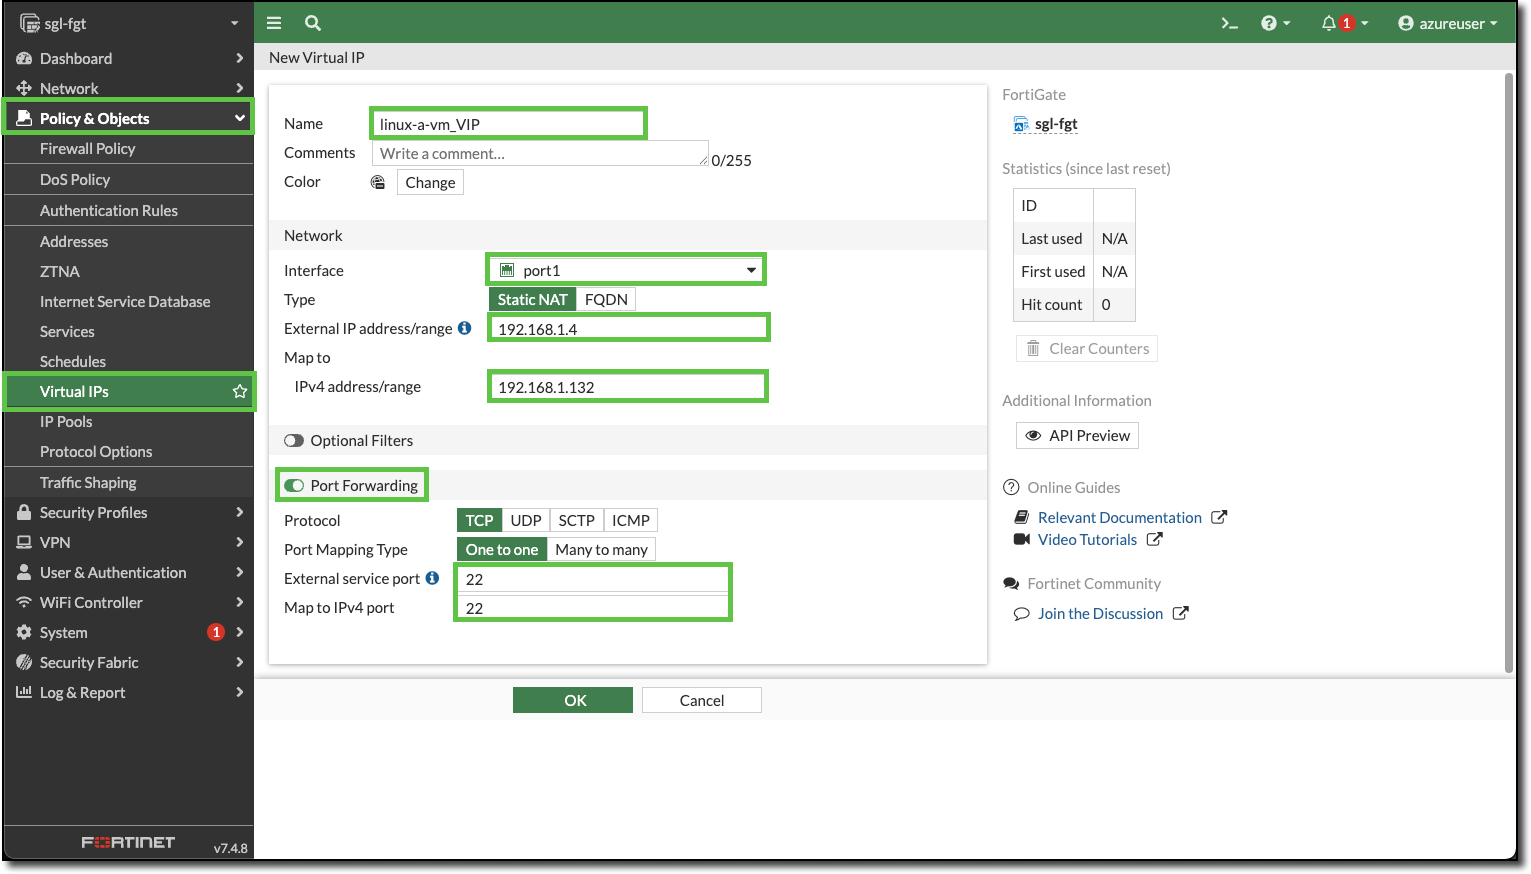
Navigate to Policy & Objects–>Virtual IPs
Click “+ Create new”
Enter the following:
Name: linux-a-vm_VIP
Interface: port1
External IP address/range: 192.168.1.4
Map to IPv4 address/range: 192.168.1.132
Port Forwarding: Enable
External service port: 22
Map to IPv4 port: 22
Click “OK”
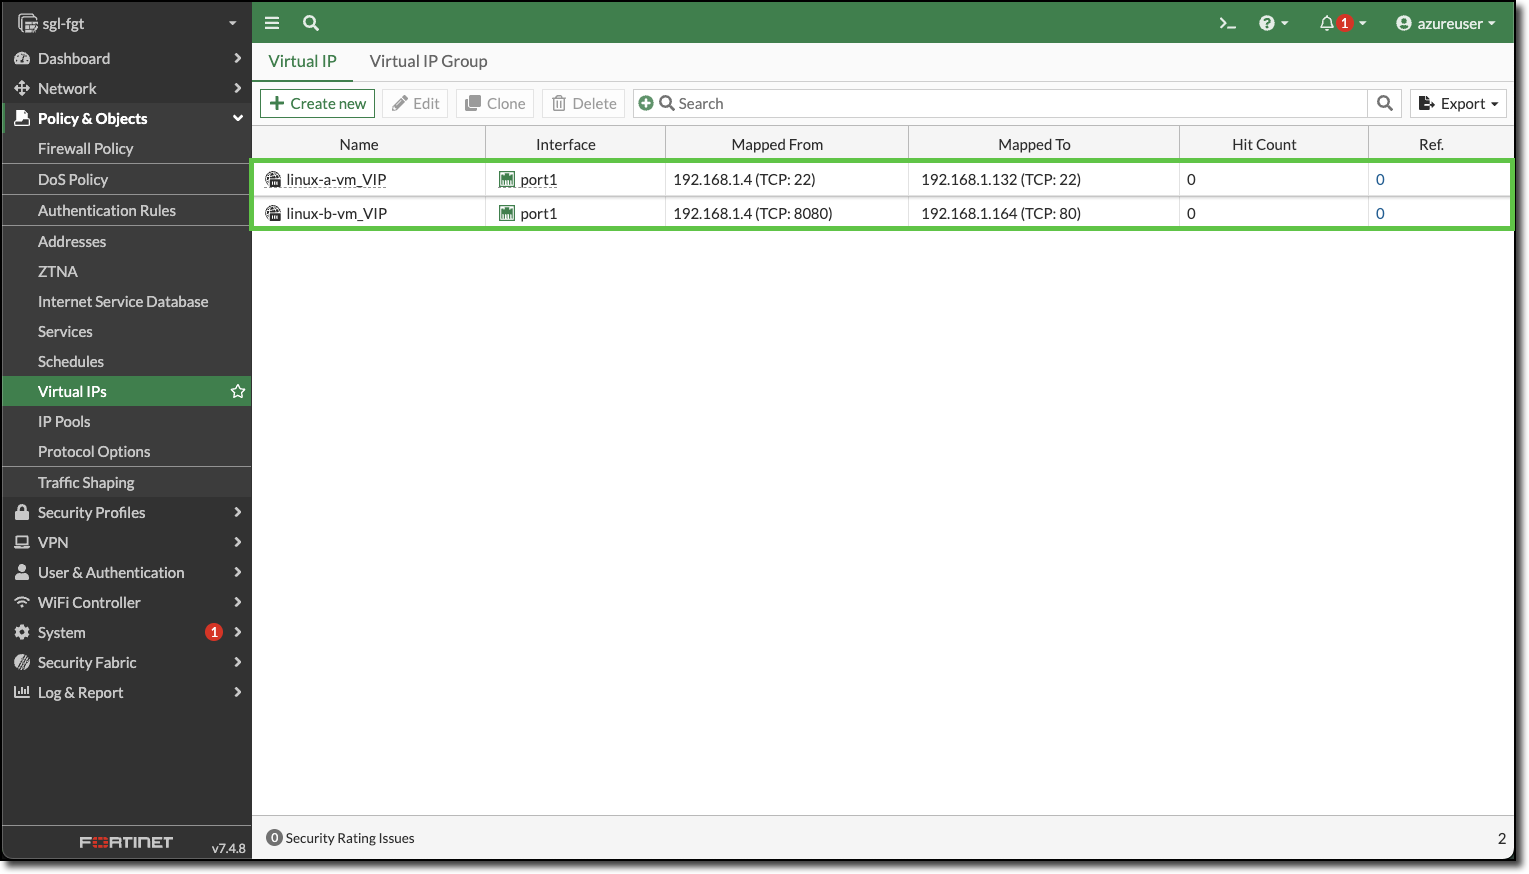
Repeat and create a VIP for linux-b-vm, HTTP is the service port.
Name: linux-b-vm_VIP
Interface: port1
External IP address/range: 192.168.1.4
Map to IPv4 address/range: 192.168.1.164
Port Forwarding: Enable
External service port: 8080
Map to IPv4 port: 80
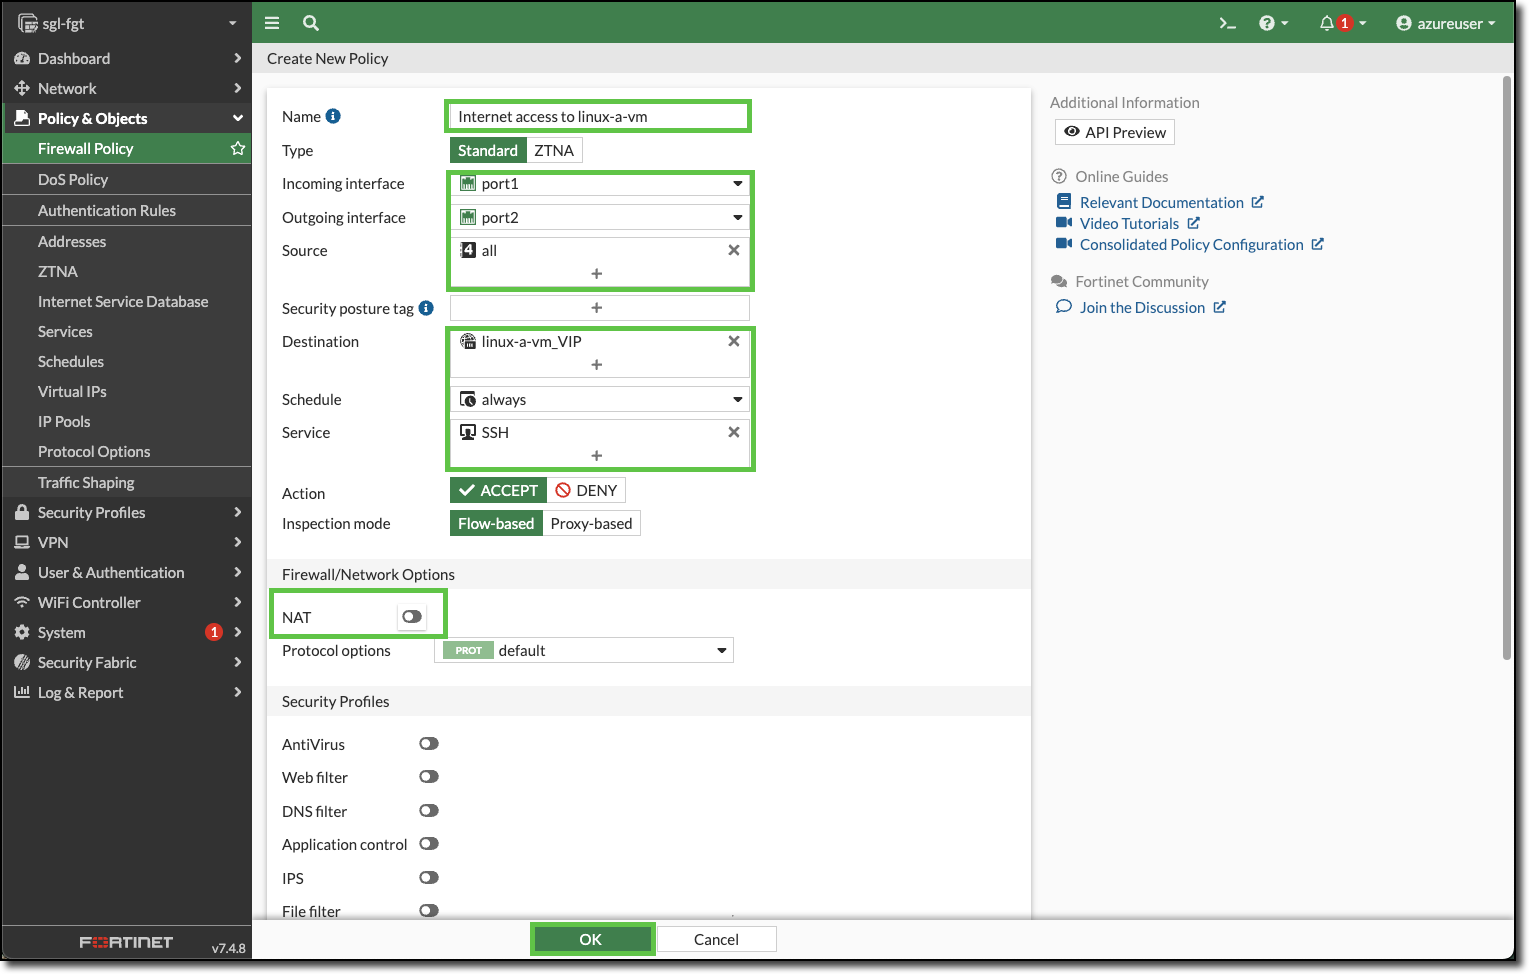
Navigate to Policy & Objects–>Firewall Policy
Click “+ Create new”
Enter the following:
Name: Internet access to linux-a-vm
Incoming interface: port1
Outgoing interface: port2
Source: all
Destination: linux-a-vm_VIP
Service: SSH
NAT: Toggle to disabled
Click “OK”
Confirm the new policy for linux-a-vm is displayed
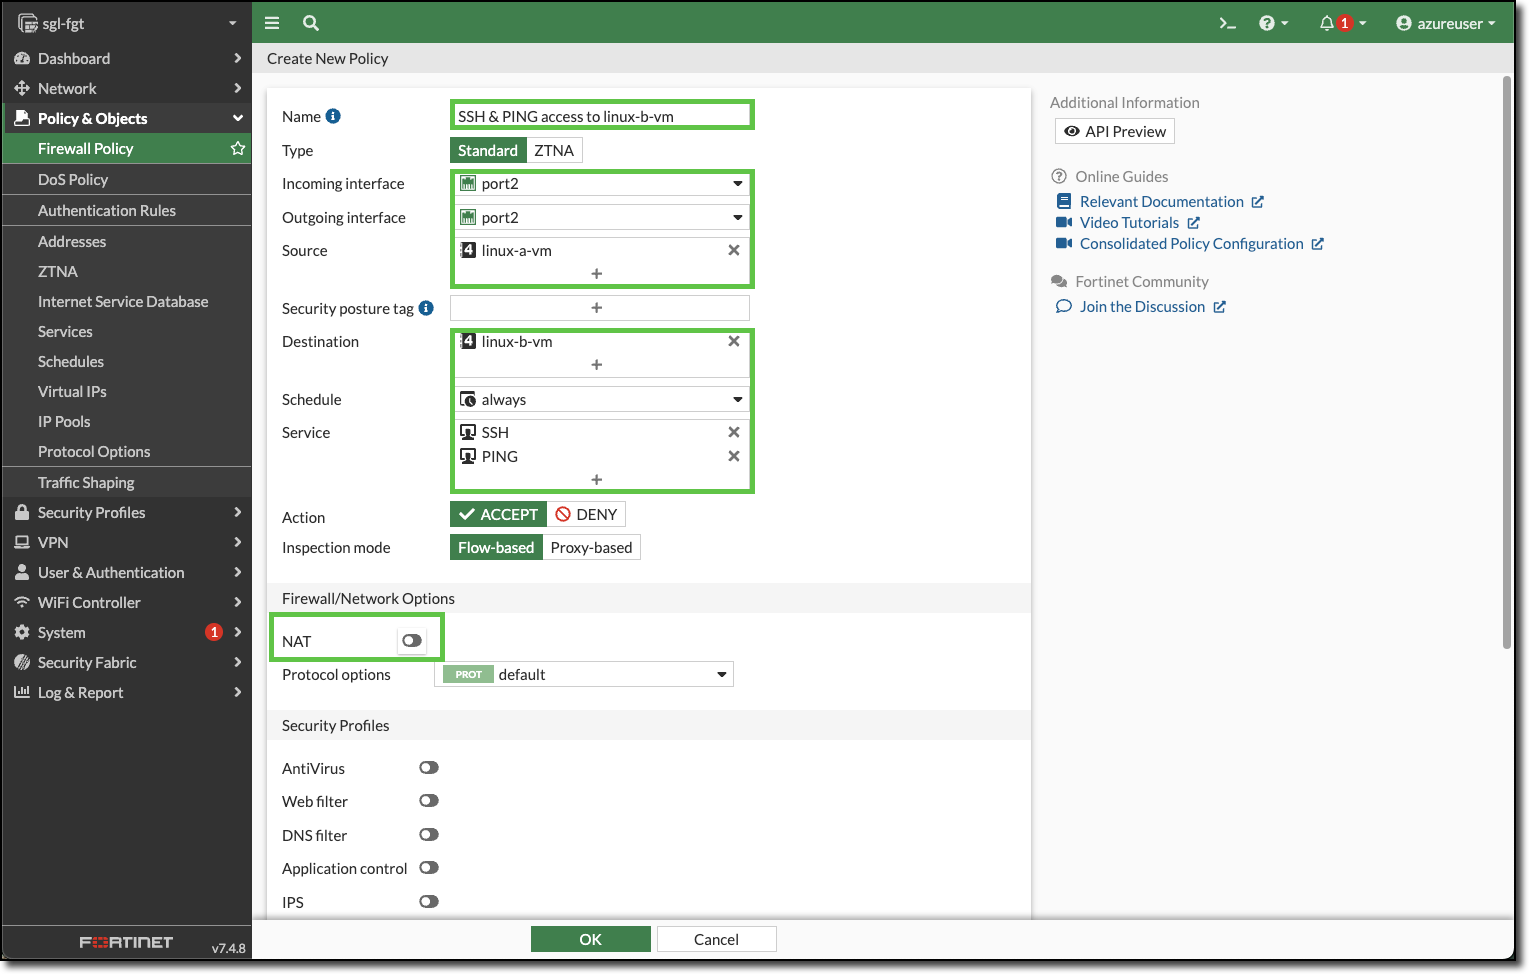
Enter the following to create a policy to allow SSH and PING access to linux-b-vm.
Name: SSH & PING access to linux-b-vm
Incoming interface: port2
Outgoing interface: port2
Source: linux-a-vm
Destination: linux-b-vm
Service: SSH PING
NAT: Toggle to disabled
Click OK and confirm the new policy is displayed.
Repeat and modify to finishing adding the required policies
linux-a-vm needs these additional policies
HTTP and HTTPS access to the Internet
Name: linux-a-vm access to the internet
NAT: enabled
linux-b-vm needs these additional policies
HTTP service from the Internet
Name: Internet access to linux-b-vm
HTTP and HTTPS access to the Internet
Name: linux-b-vm access to the internet
NAT: enabled
PING access to linux-a-vm
Name: Ping Access to linux-a-vm
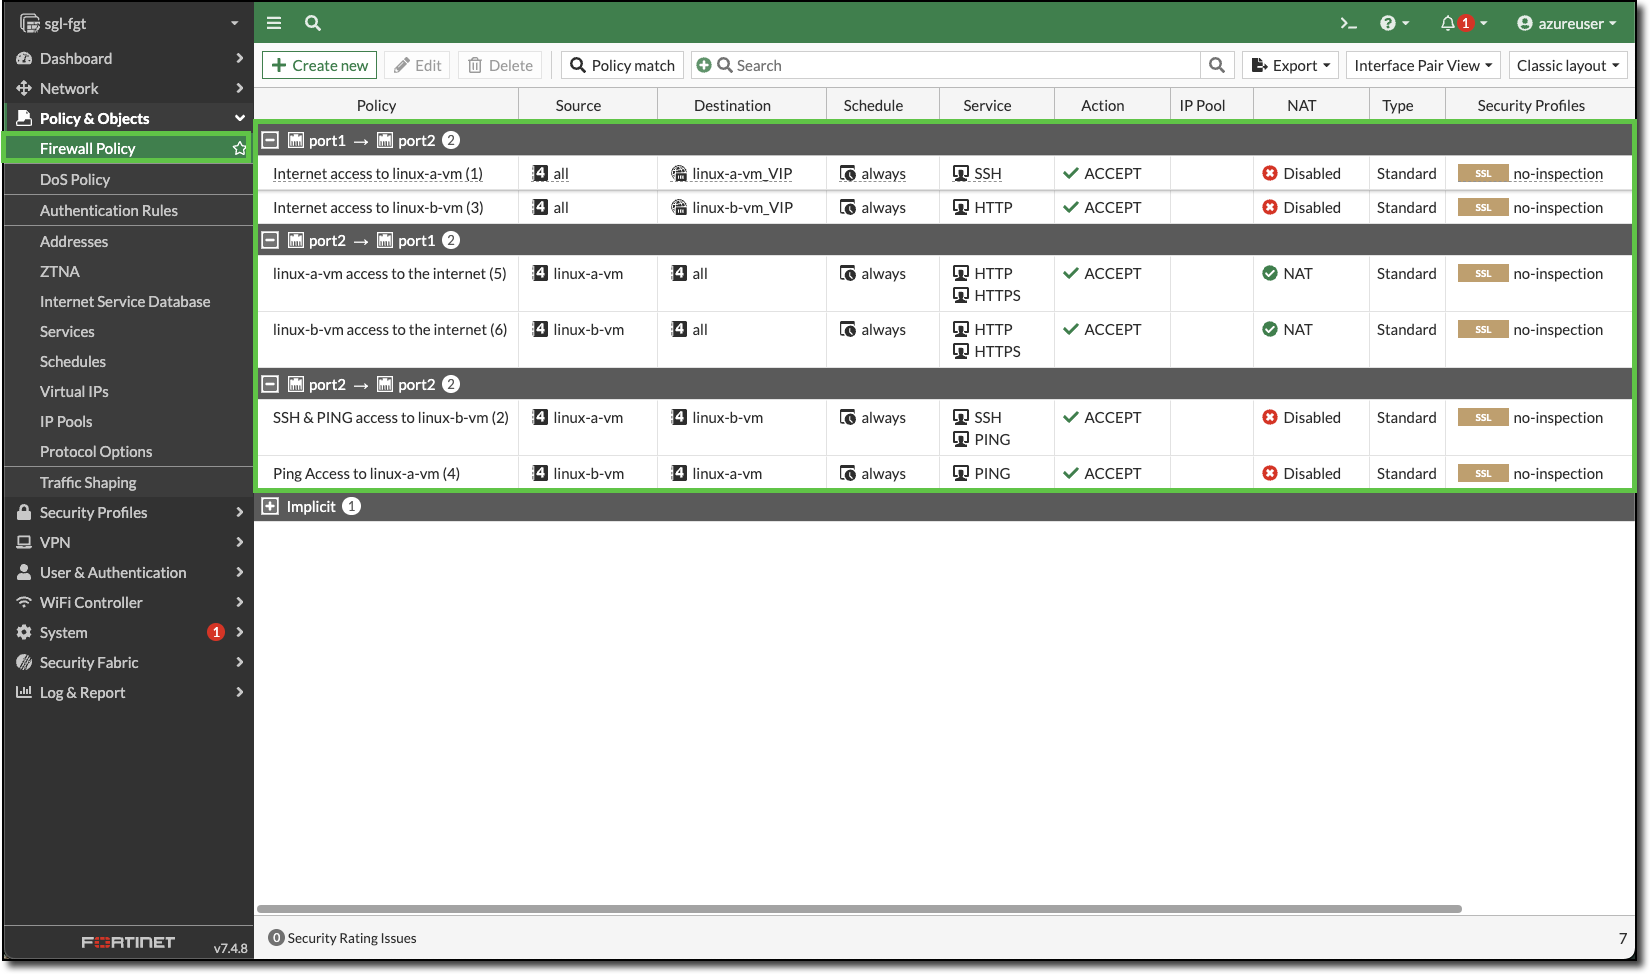
When you are finished adding all the policies for both Linux VMs, your Firewall Policy page should look similar to the following:
Task 5: Confirm Managed Traffic
In Task 5, you will confirm that the Firewall Policies are correct and accomplish the security requirements for Company ABC. In the following steps, you will run the same cli commands on each Linux VM to confirm which services are reachable and blocked.
Summary of access to/from each Linux VM:
linux-a-vm is the management server and should have the following access:
SSH and PING access to linux-b-vm
HTTP and HTTPS access to the Internet
SSH access to linux-a-vm from the Internet
From the linux-a-vm CLI:
ping 192.168.1.164 <– Most likely the Private IP of linux-b-vm
Ping the private IP of linux-b-vm and confirm replies
ssh azureuser@192.168.1.164 <– Most likely the Private IP of linux-b-vm
Confirm SSH access to linux-b-vm and login
Type exit to disconnect from linux-b-vm
wget www.fortinet.com
Confirm port 80 access to the Internet
curl https://ipinfo.io/ip
Confirm port 443 access to the Internet and the public IP assigned to linux-a-vm
Confirm against what the Azure portal has listed as the Public IP assigned to the FortiGate
ssh azureuser@<public-ip-of-fortigate>
From your client of choice, SSH from the Internet to the VIP assigned to linux-a-vm
If you do not have a SSH client installed, use the following website and scan for the SSH service.
Select Port Type: “Server Ports”
linux-b-vm is the www server and should have the following access:
HTTP and HTTPS access to the Internet
PING access to linux-a-vm
HTTP service available from the Internet
From the linux-b-vm CLI:
ping 192.168.1.132 <– Most likely the Private IP of linux-a-vm
Ping the private IP of linux-a-vm and confirm replies
wget www.fortinet.com
Confirm port 80 access to the Internet
curl https://ipinfo.io/ip
Confirm port 443 access to the Internet and the public IP assigned to linux-b-vm
Confirm against what the Azure portal has listed as the Public IP assigned to the FortiGate
From your local browser, open a tab and enter http://x.x.x.x:8080
- x.x.x.x is the Public IP of the FortiGate
- Confirm the display of NGINX welcome screen.
If all the tests worked as expected you have successfully deployed workloads in an Azure environment and secured them with Fortinet FortiGate.
Thank you for attending Azure 102 Foundational - FortiGate