Data Security 101
FortiDLP
Next-Gen DLP and Insider Risk Management Solution to Anticipate and Prevent Data Theft
Overview: securing data from insider threats and risks
Today’s most valuable currency is data. Whether it’s intellectual property, financial account details, patient records, or customer cardholder information, data must be protected from theft or exposure by threat actors, malicious insiders, and careless or untrained employees.
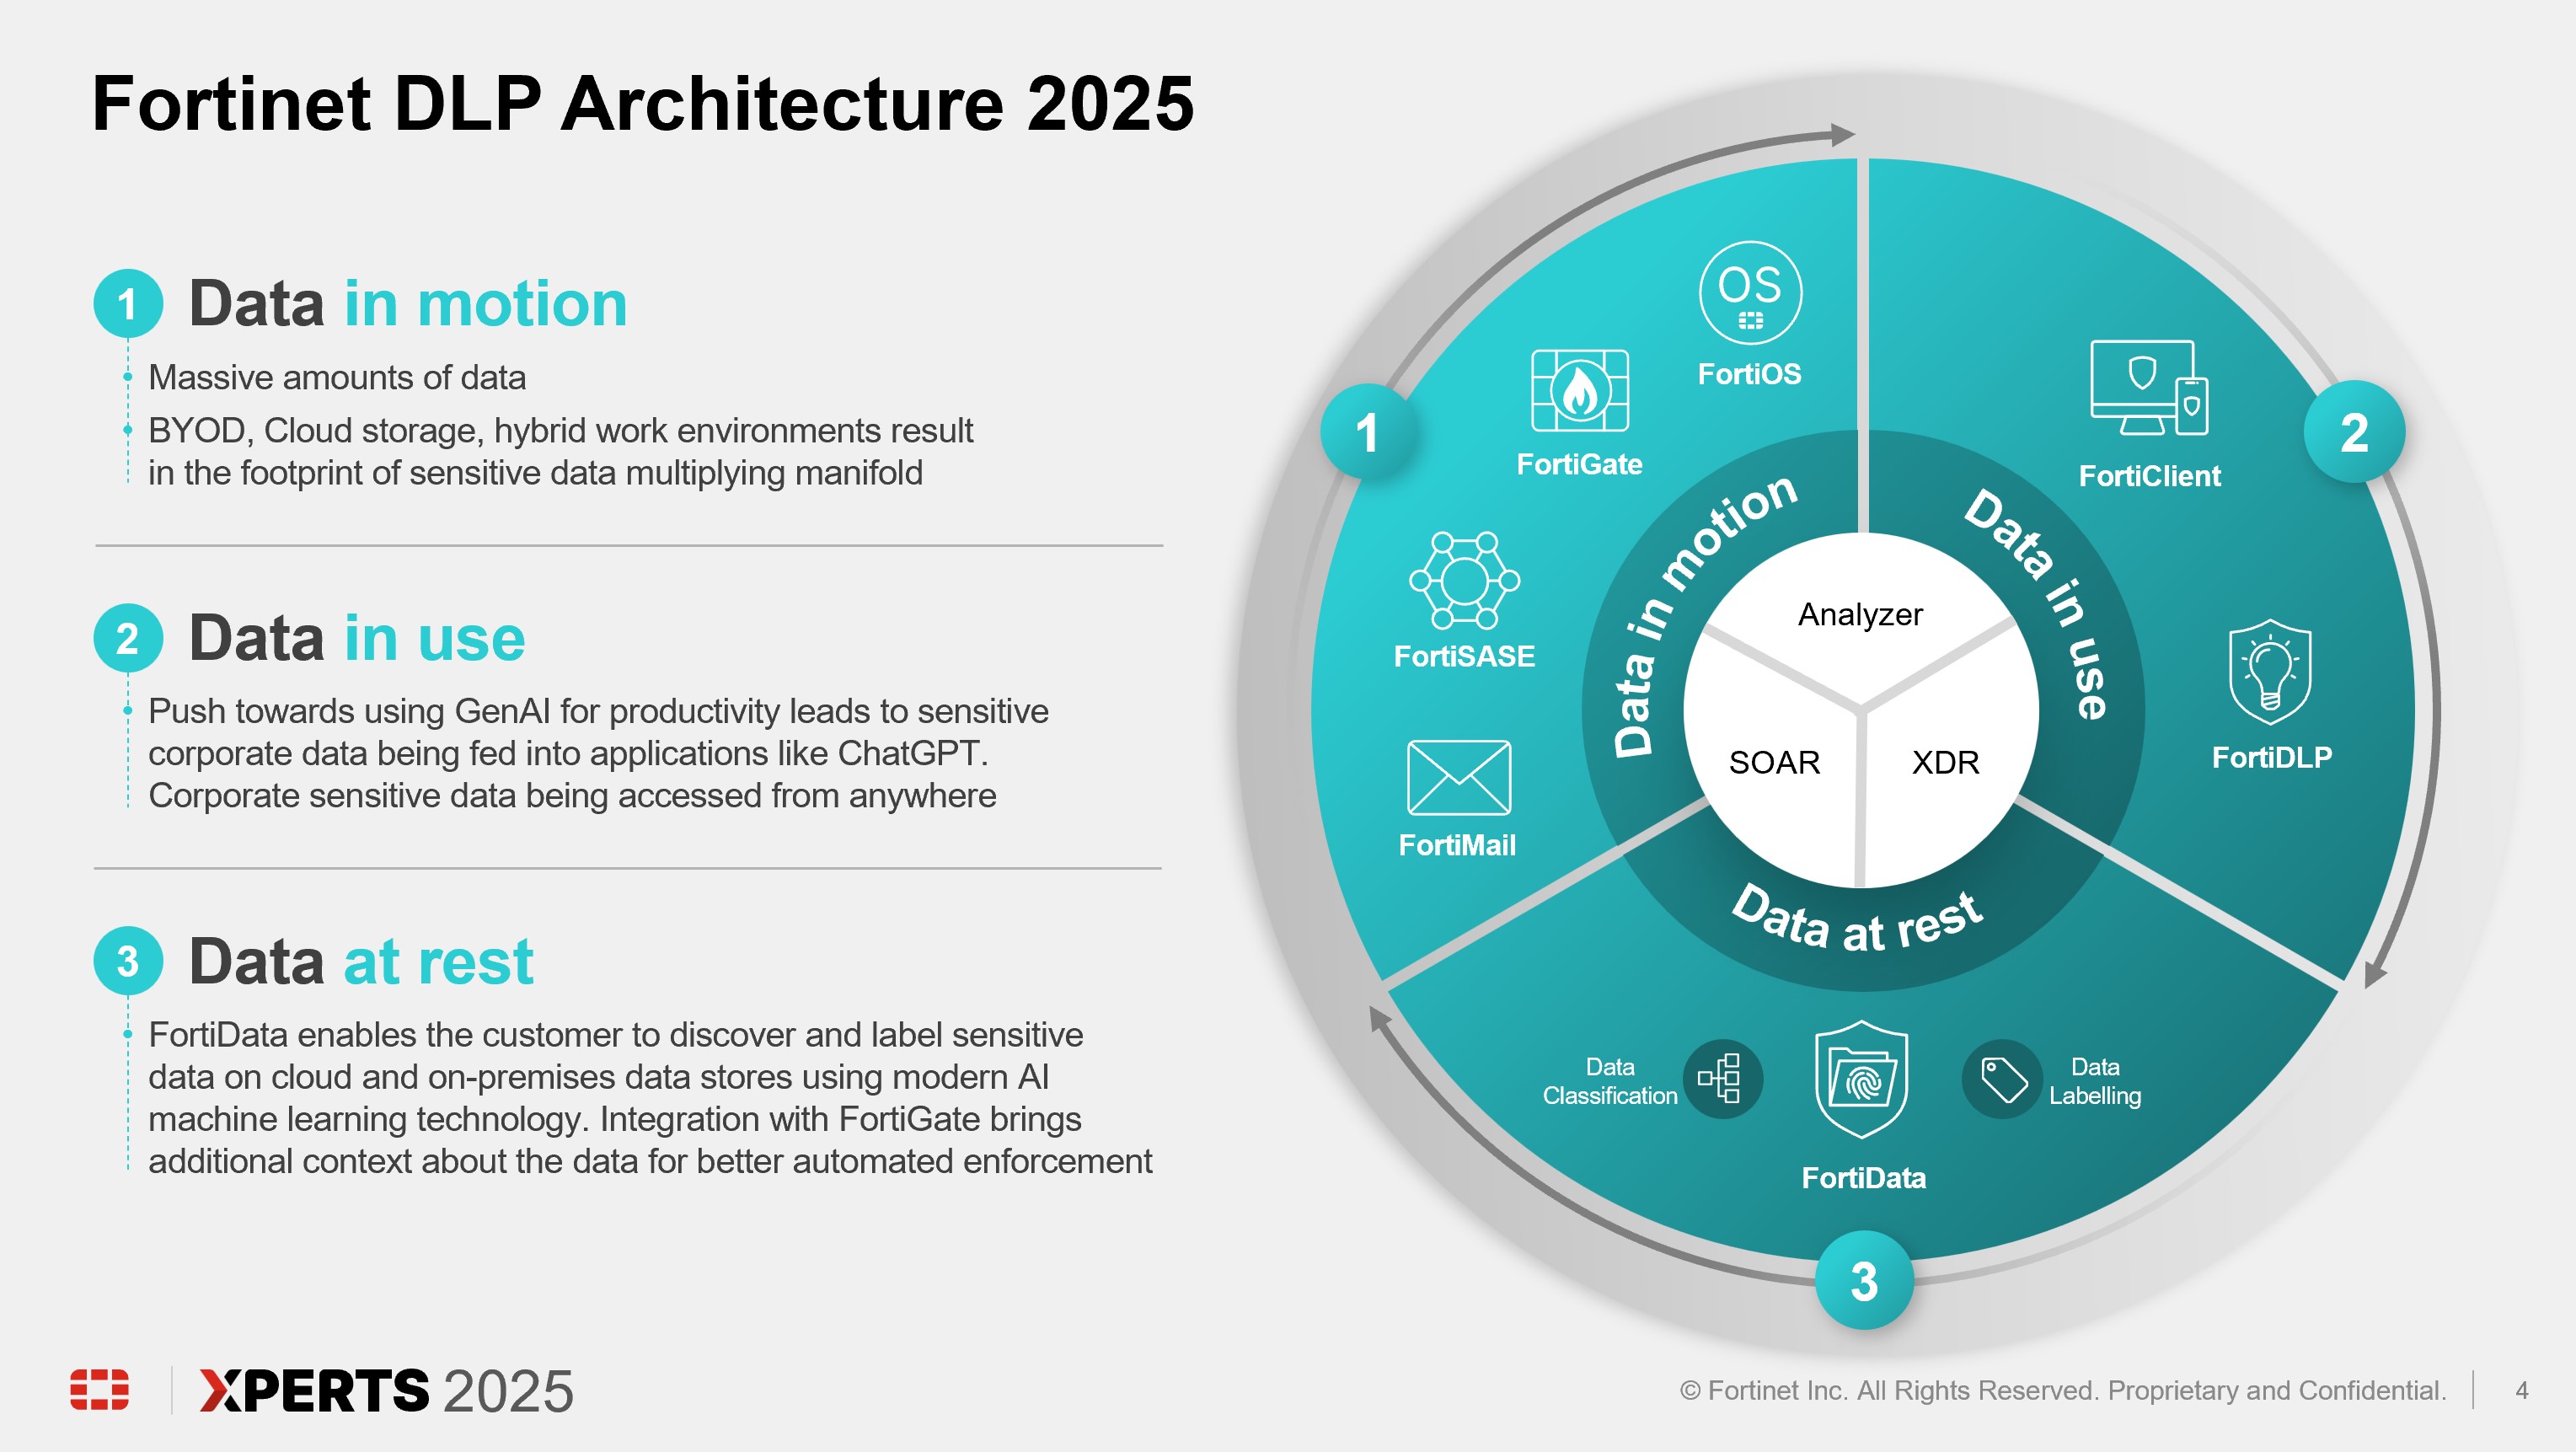
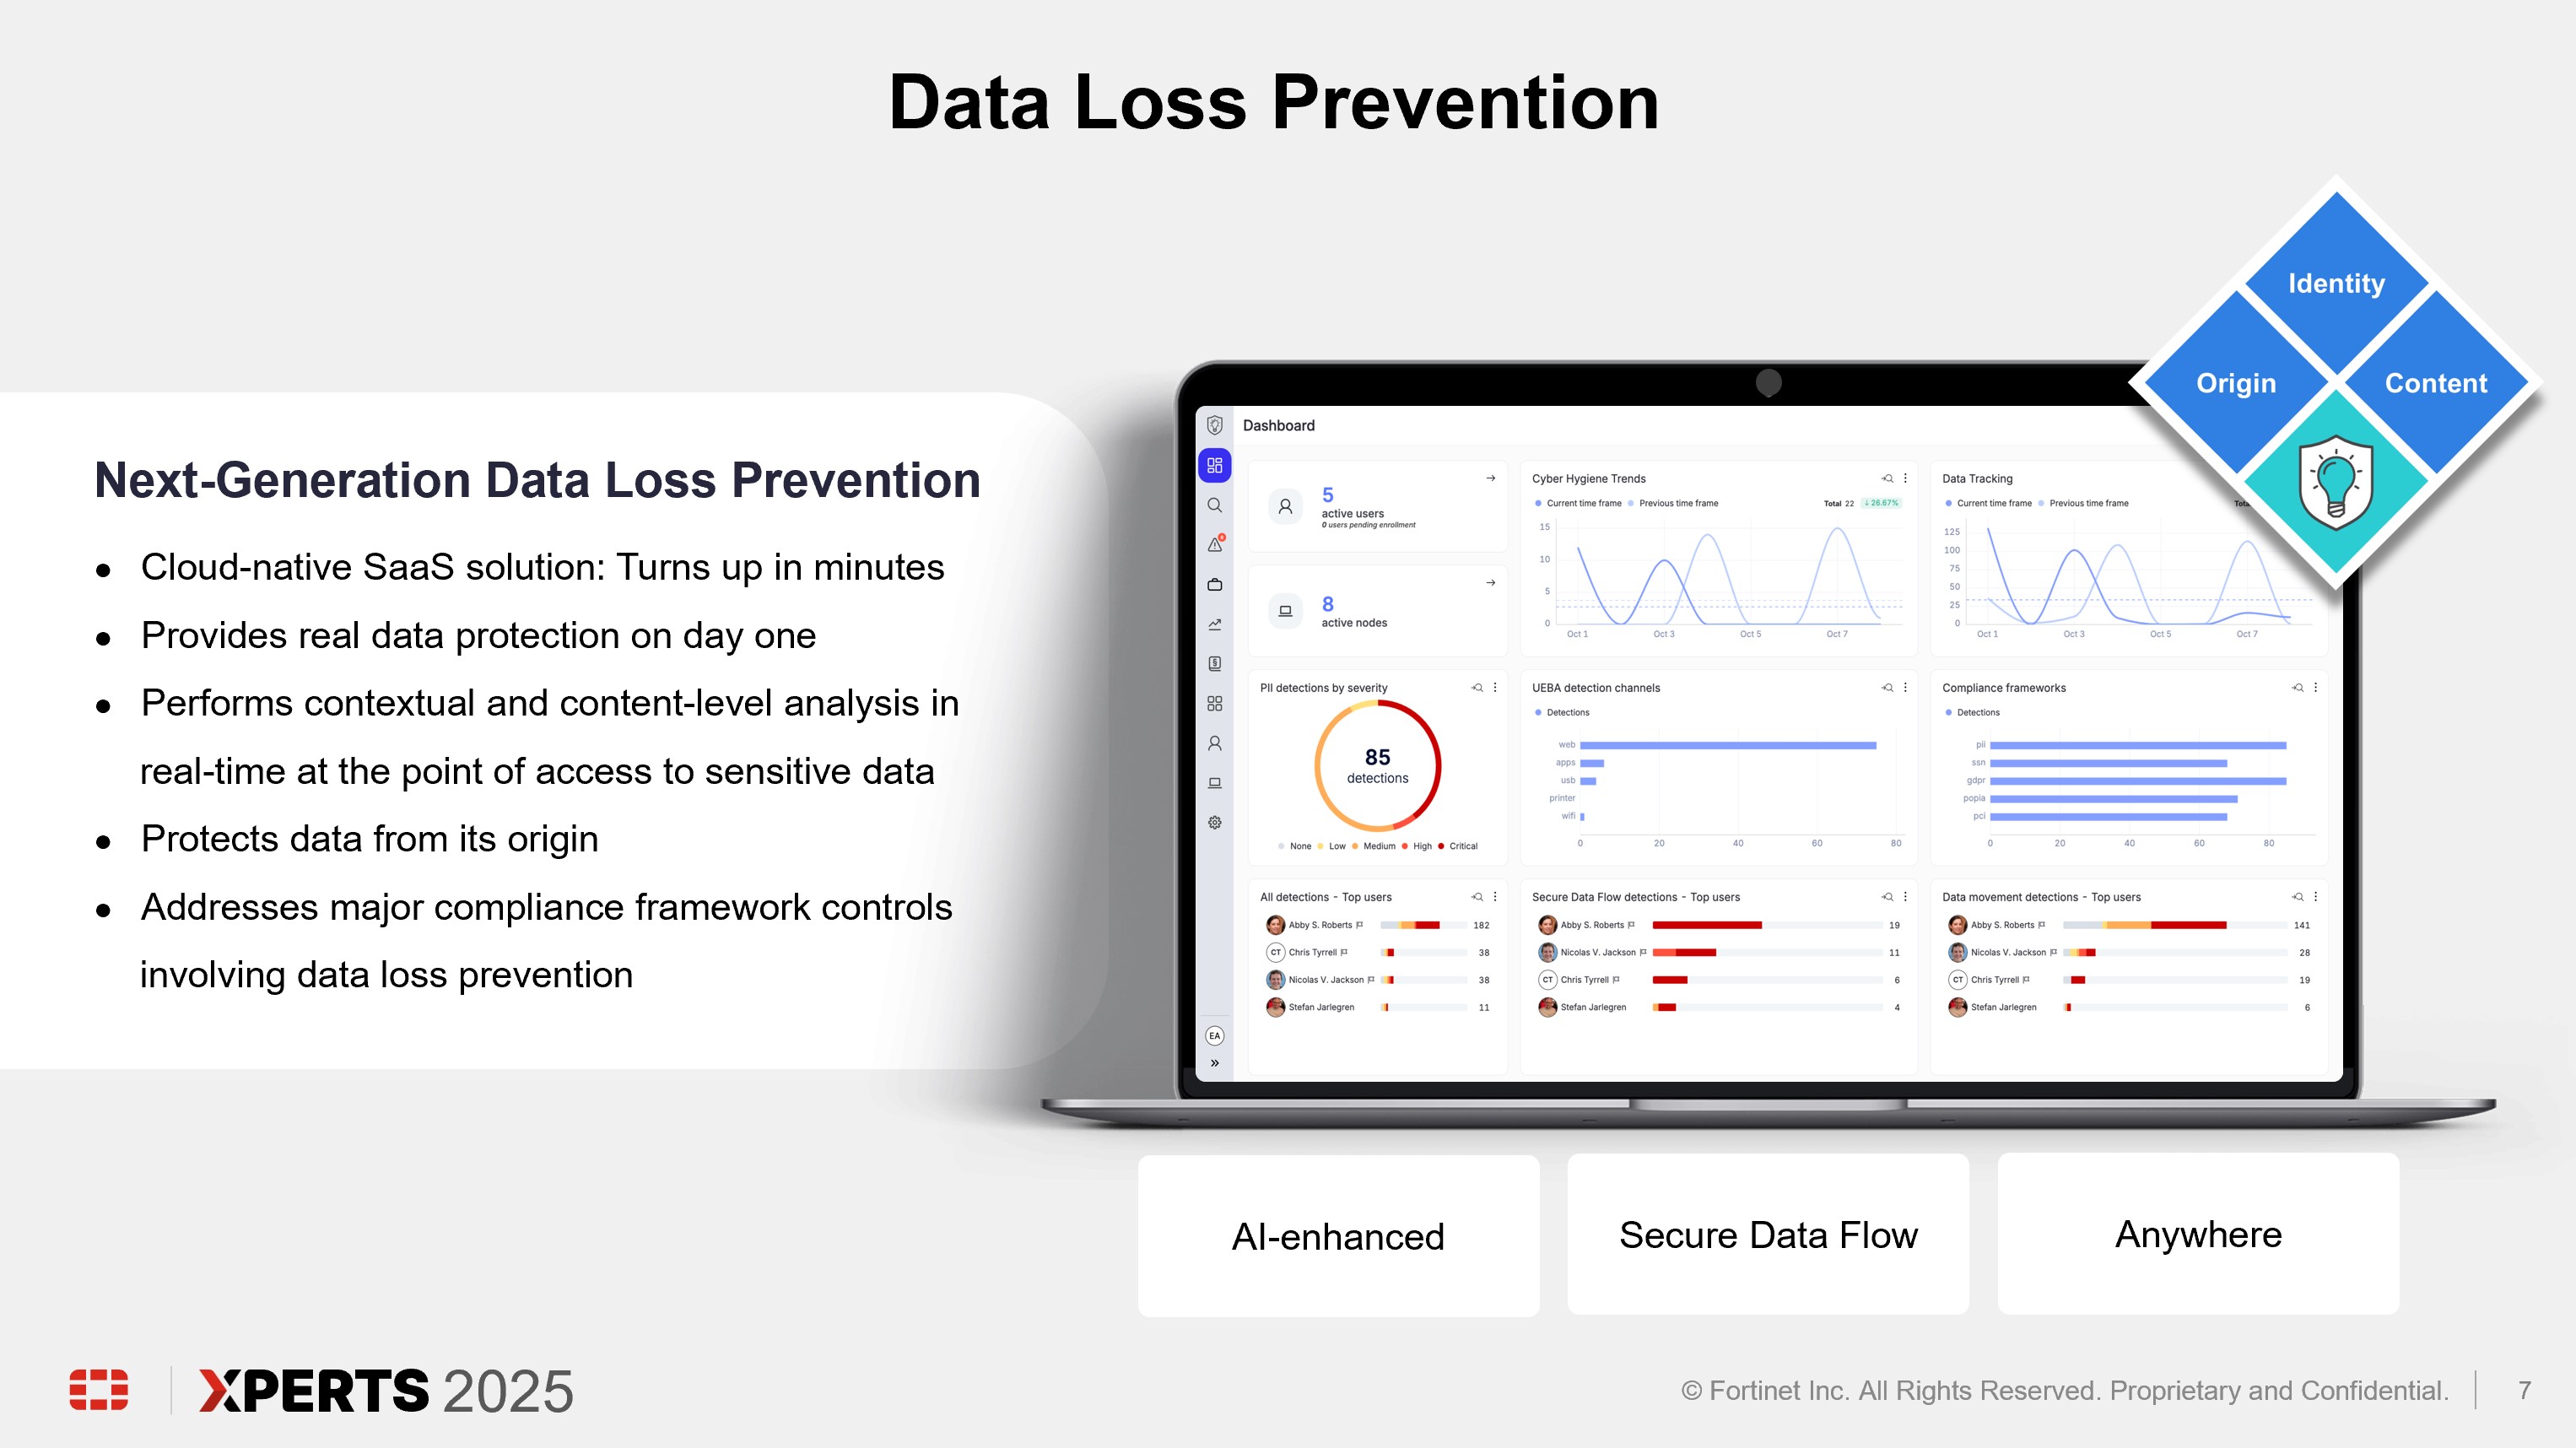
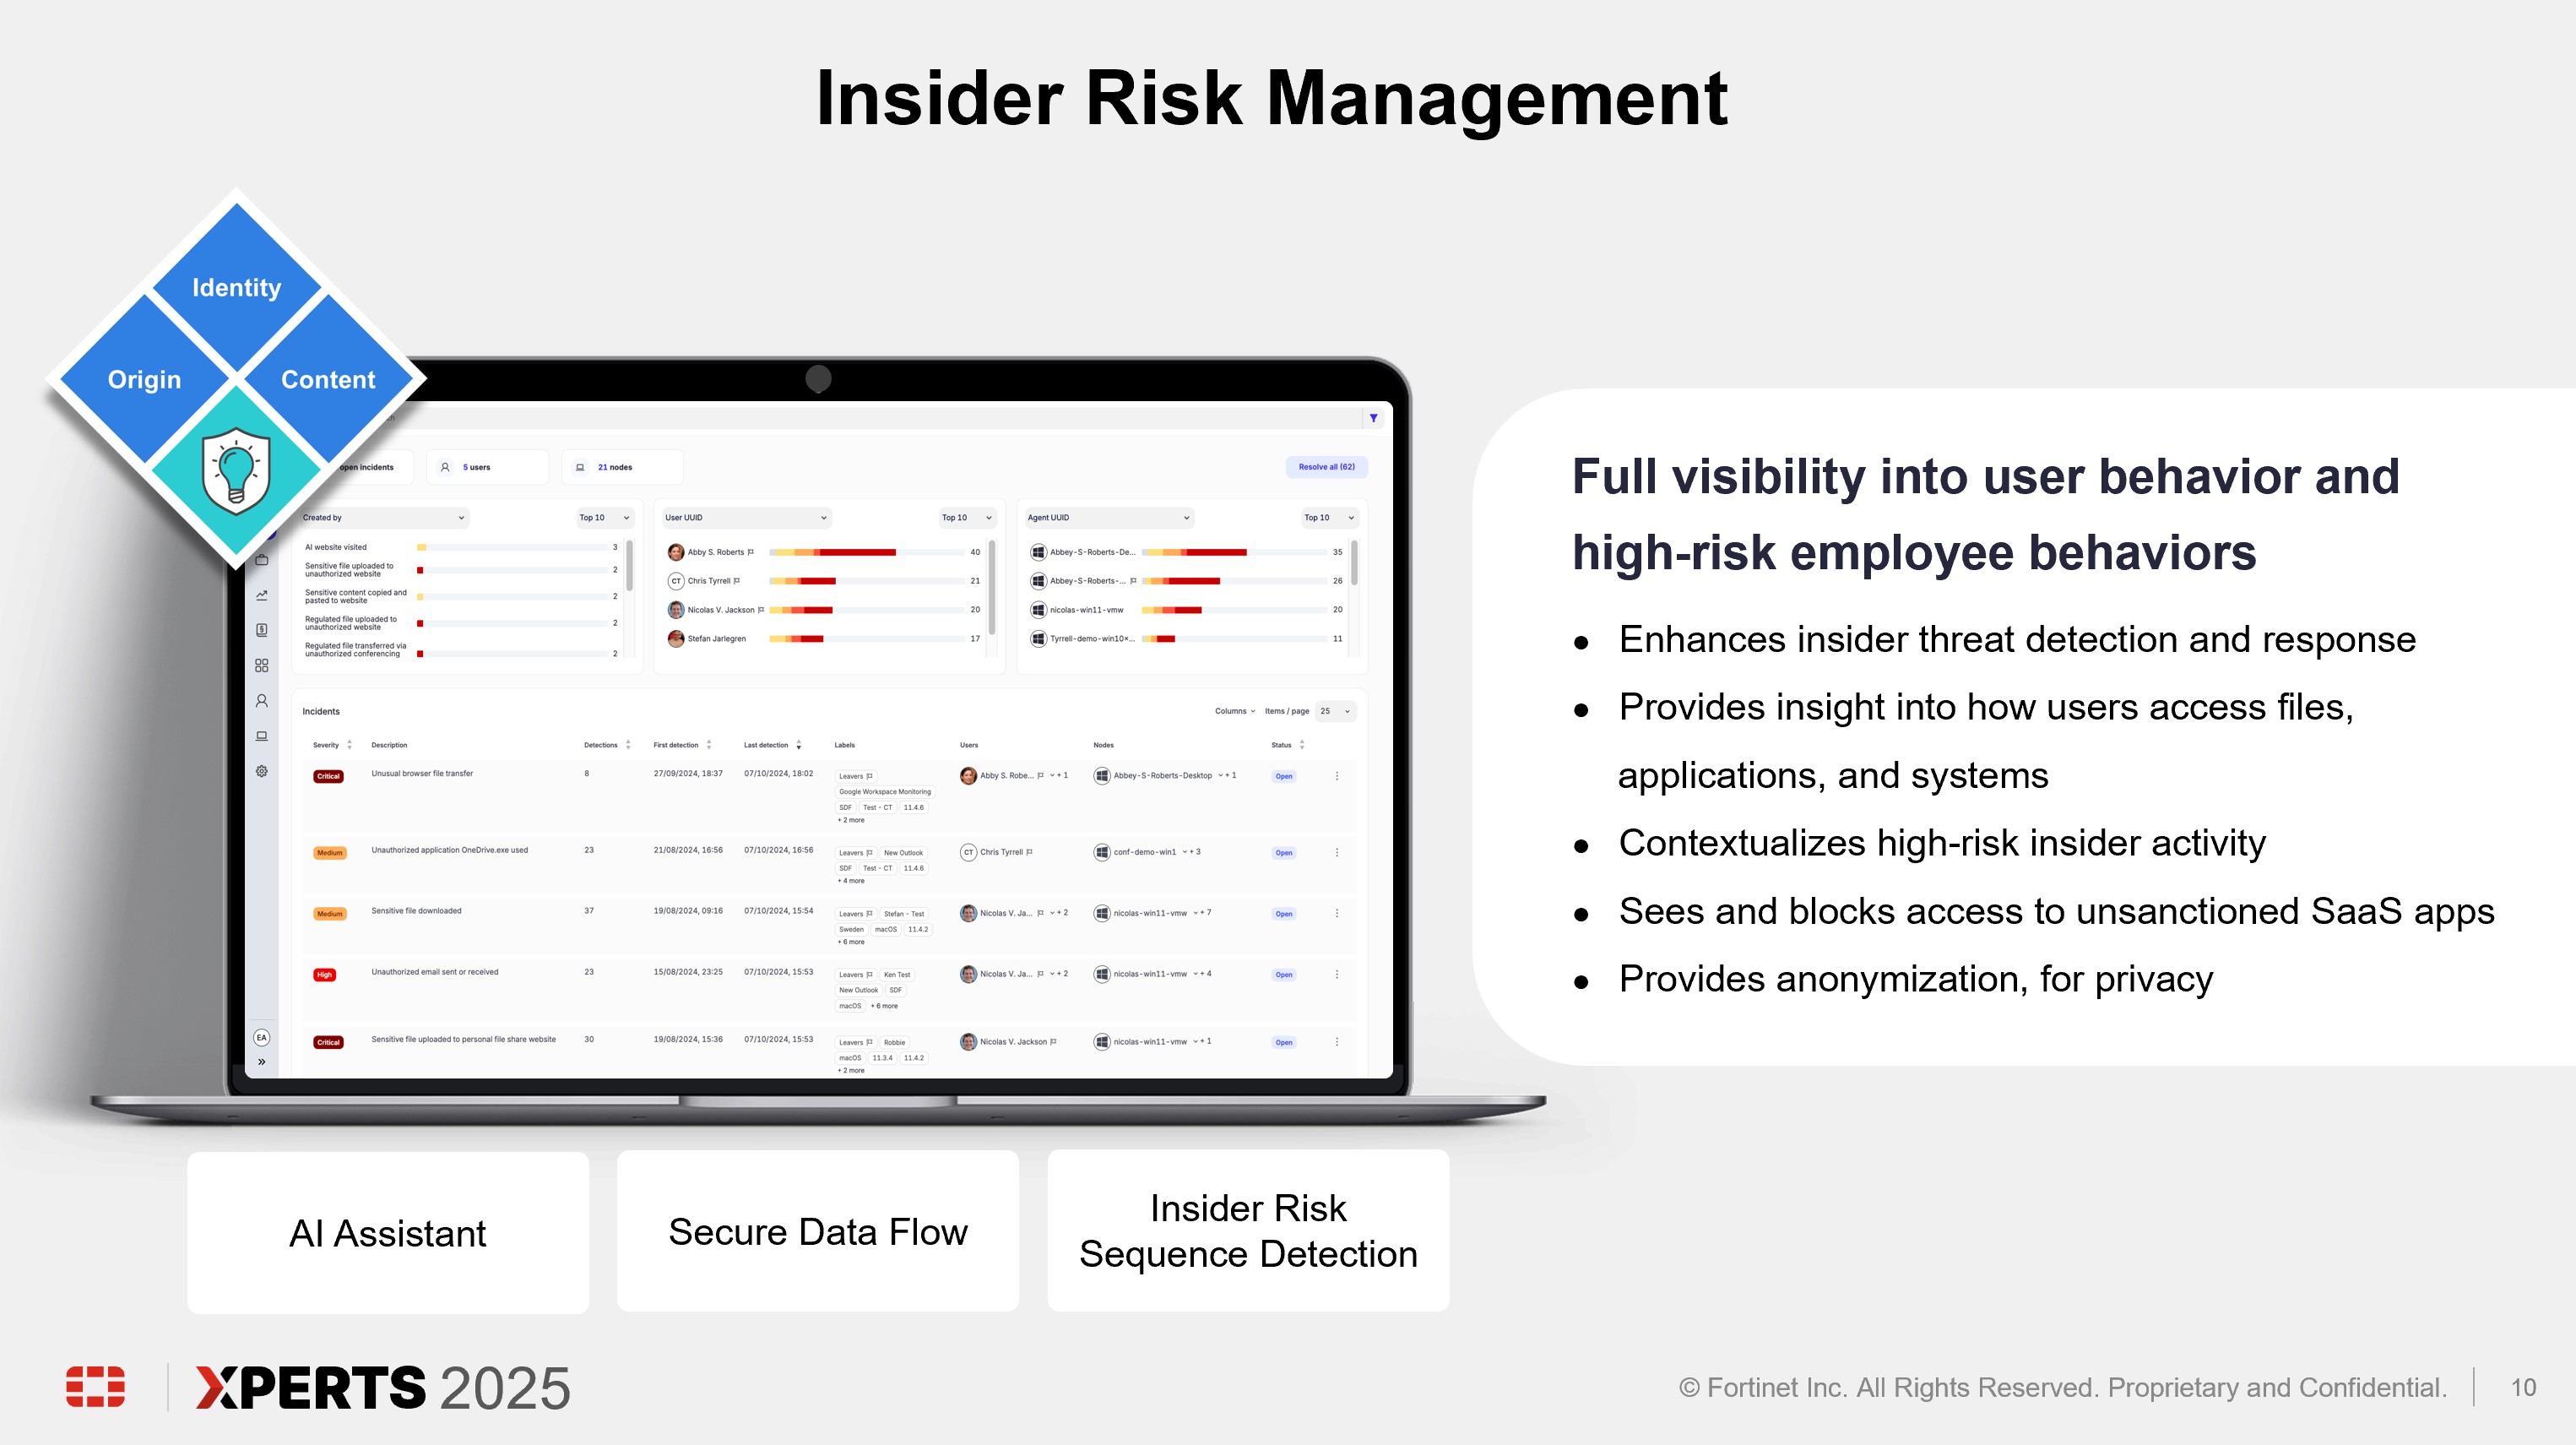
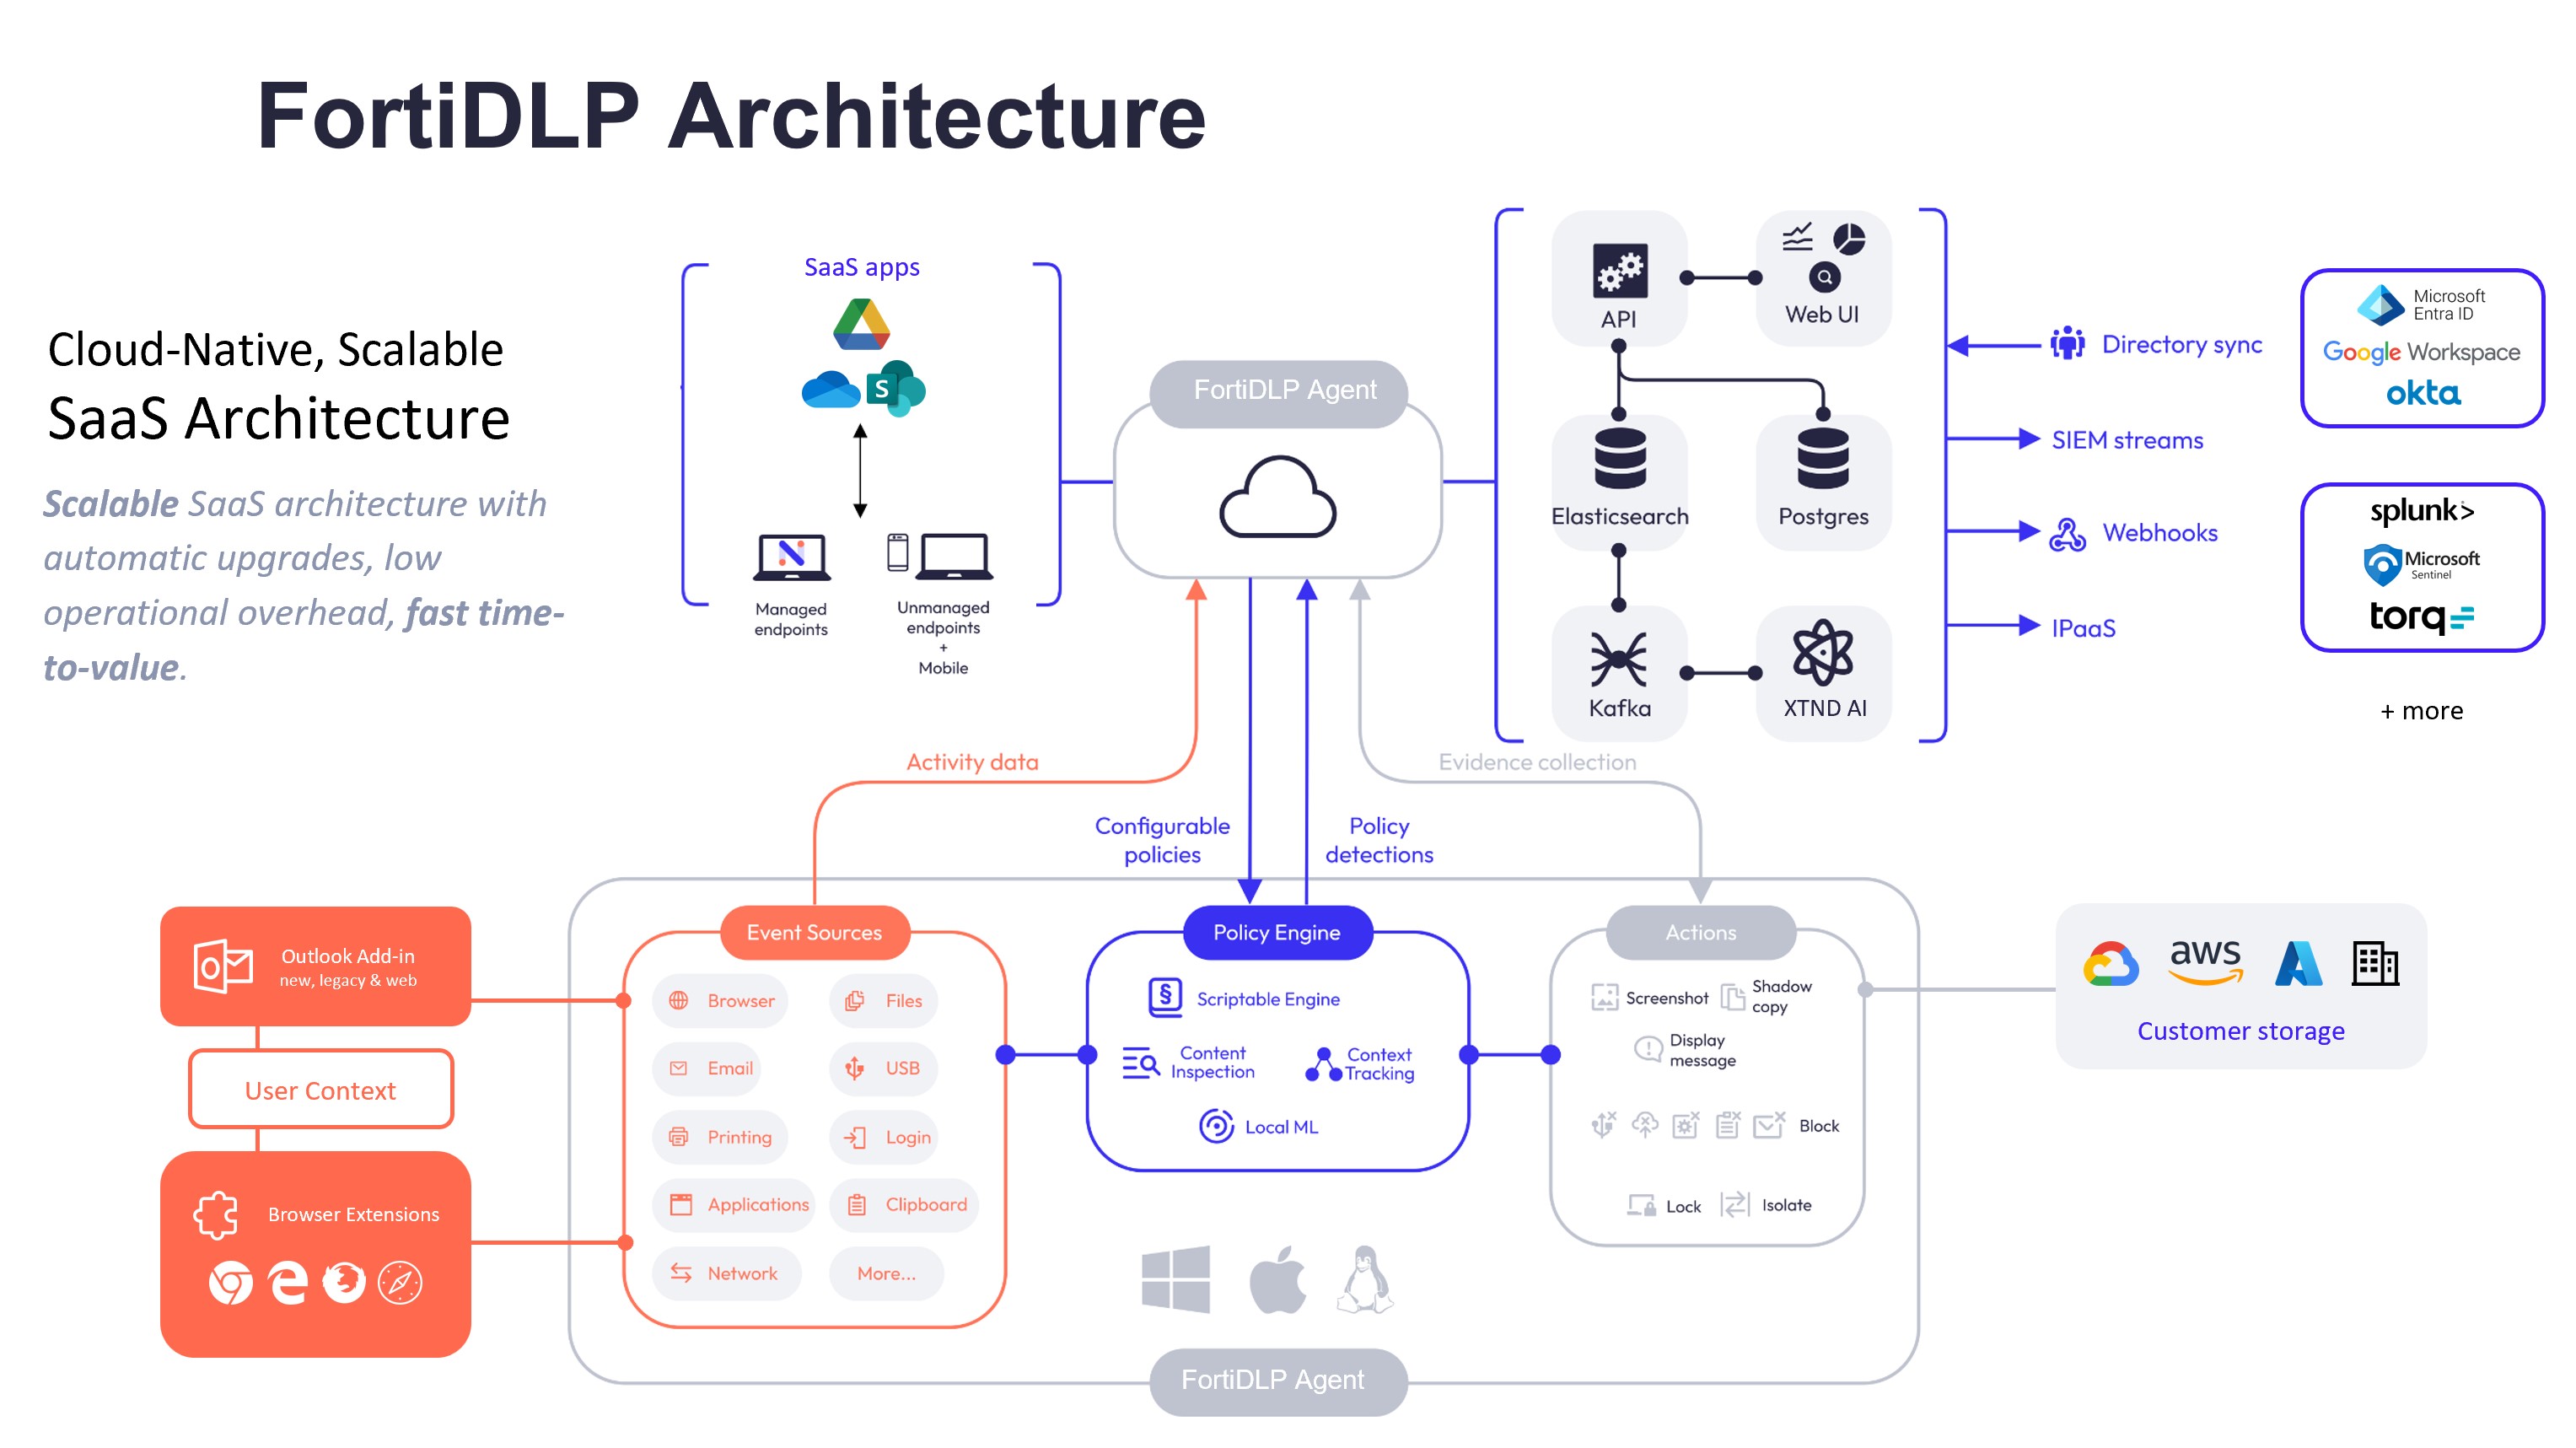
FortiDLP is a next-generation, AI-enhanced, cloud-native endpoint data loss prevention solution that helps your security team anticipate and prevent data leaks, detect behavior-related insider risks, and train employees on proper cyber hygiene at the point of access to sensitive data including intellectual property—starting from day one. With FortiDLP, your organization gains immediate and full visibility into business data flows and usage across endpoints, cloud drives, SaaS apps and other points of egress, allowing teams to detect high-risk activity across users, stop the exfiltration or leakage of sensitive data, and drive prioritized investigations.
Challenges: Traditional DLP fails to deliver in today’s world
Legacy DLP tools address modern data security challenges with cumbersome data classification and complex static policies before offering any visibility into data loss risks or controls to mitigate them. As a result, data security teams are overburdened by constant policy creation and tuning, inefficient data classification, false positives, and noisy alarms.
FortiDLP overcomes these legacy DLP challenges. FortiDLP baselines individual user behavior (through machine learning embedded in the FortiDLP lightweight agent) and combines localized real-time context and content-level inspection to classify data at the point of access by employees. And unlike legacy solutions, FortiDLP doesn’t require exhaustive data discovery or policy formulation before it can provide actual data protection value.
The approach: A powerful integrated approach to data loss prevention
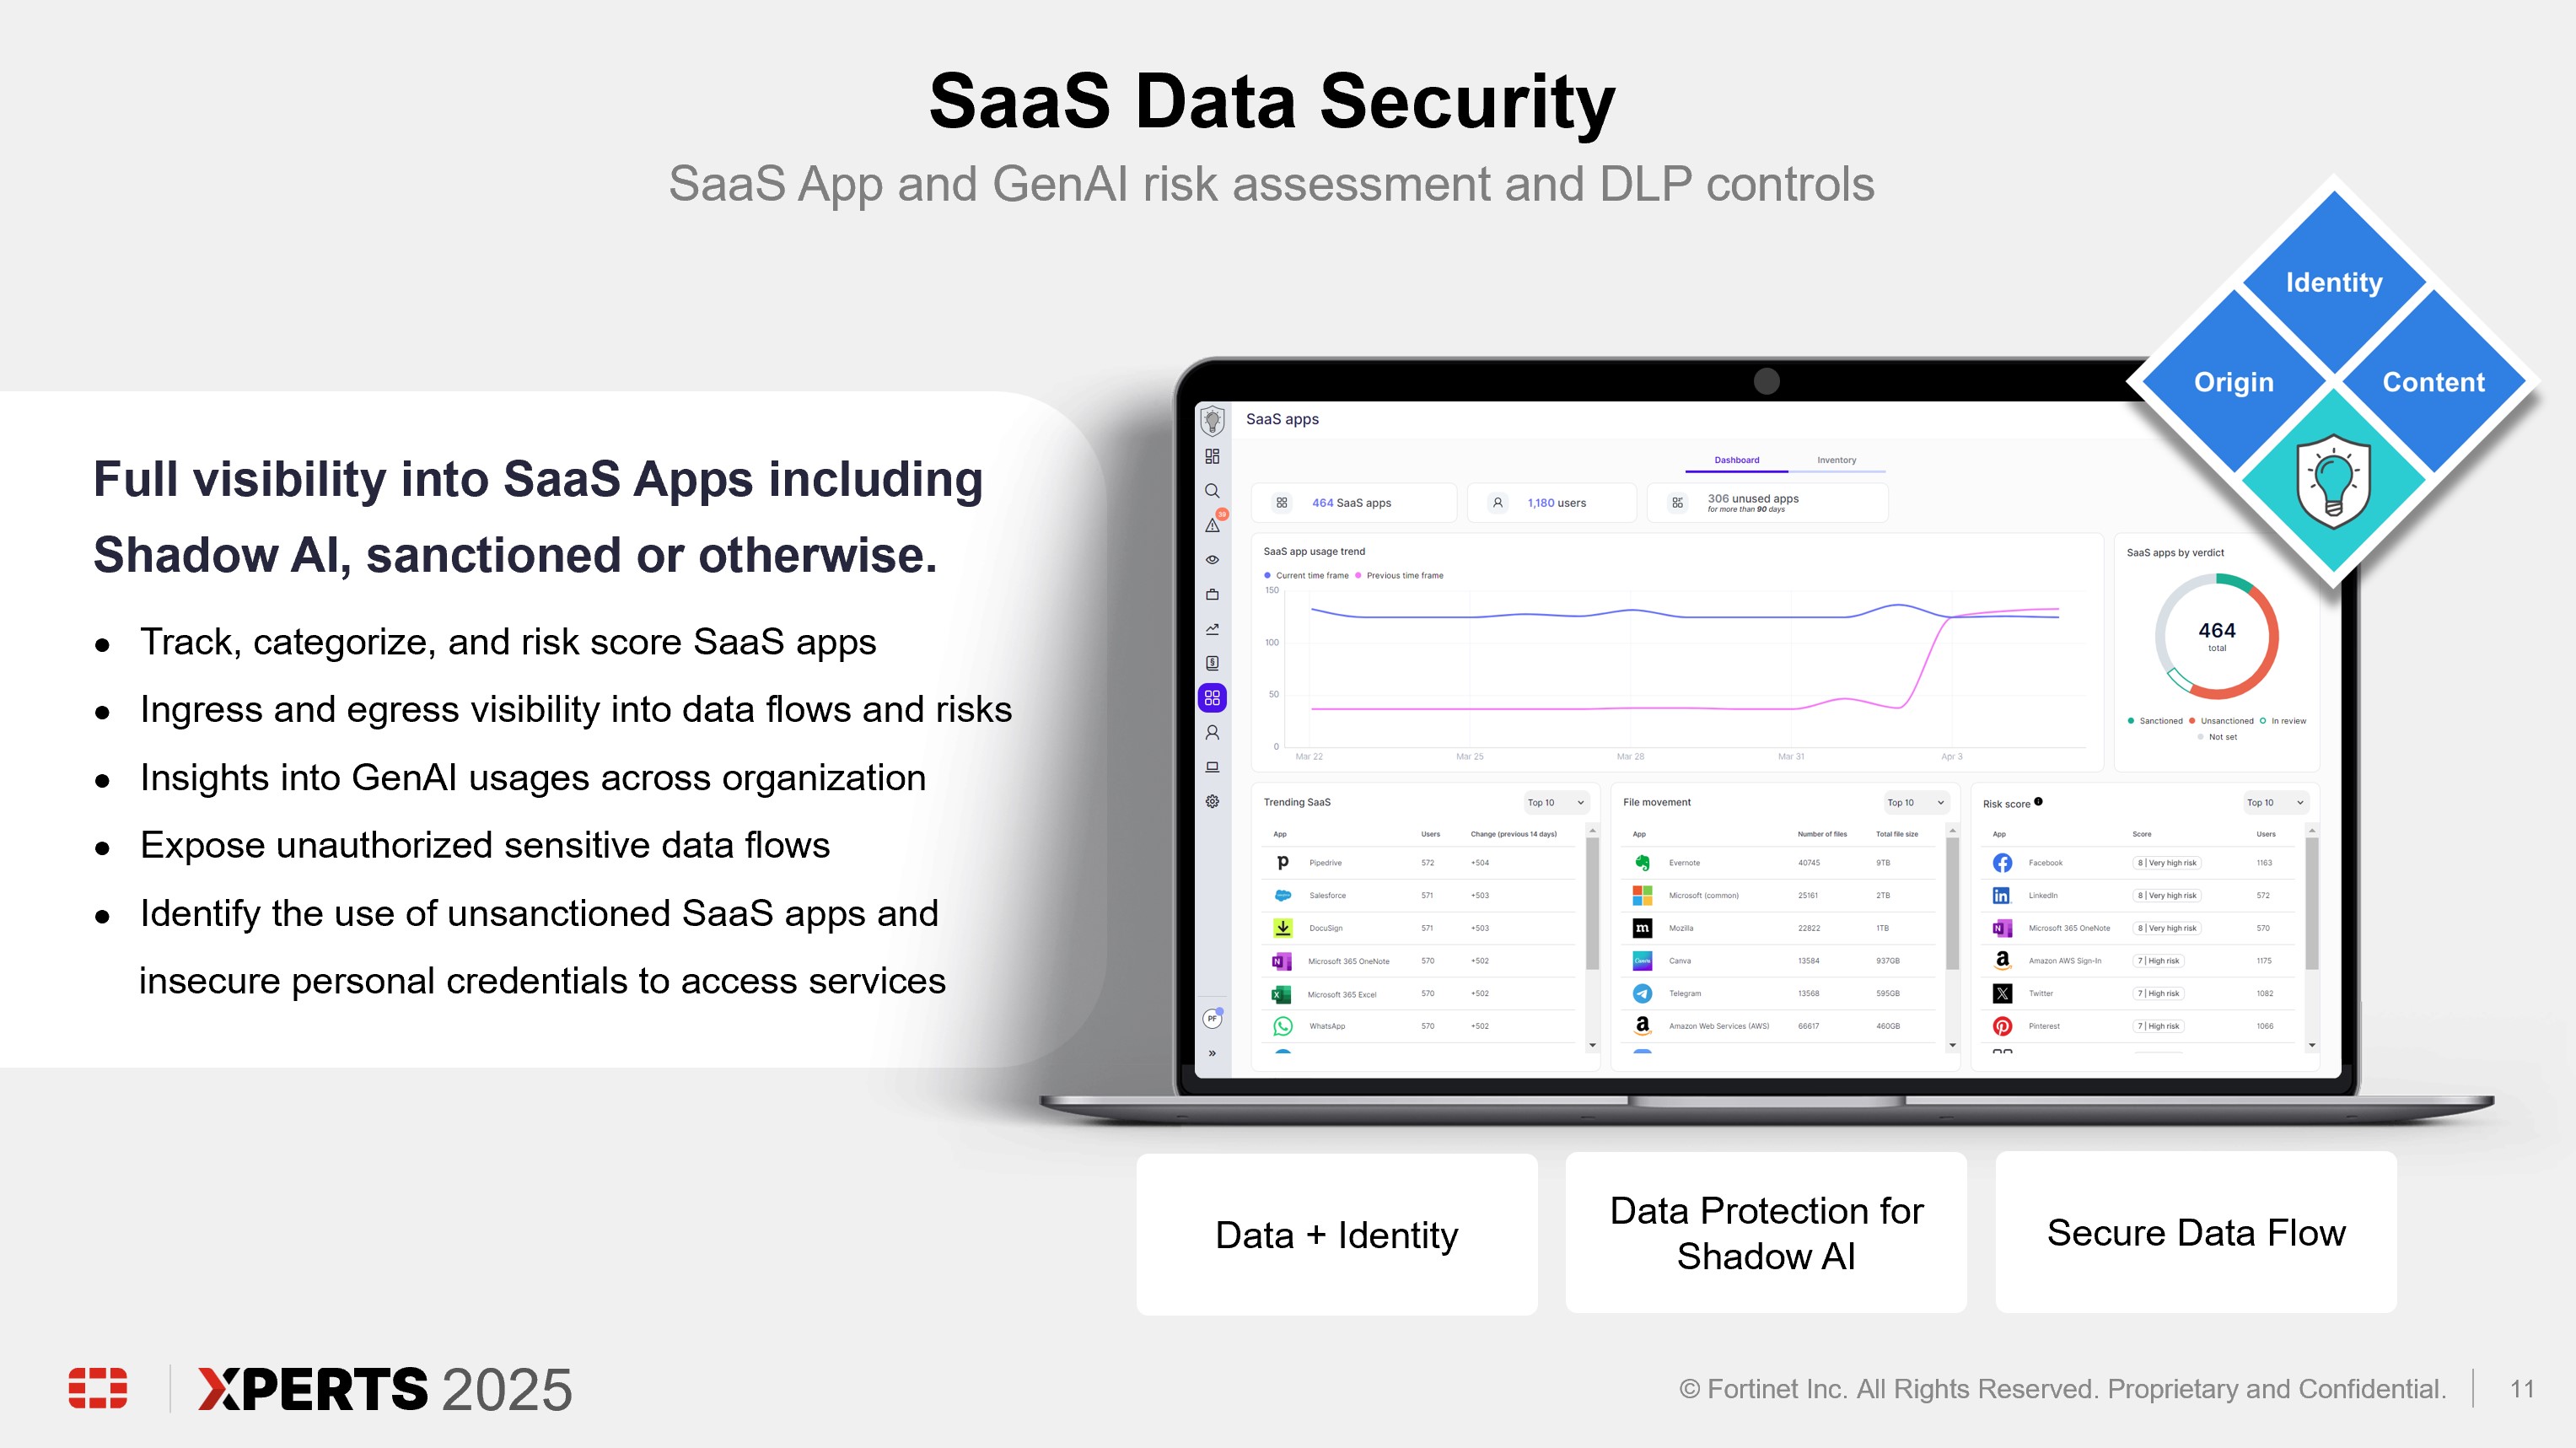
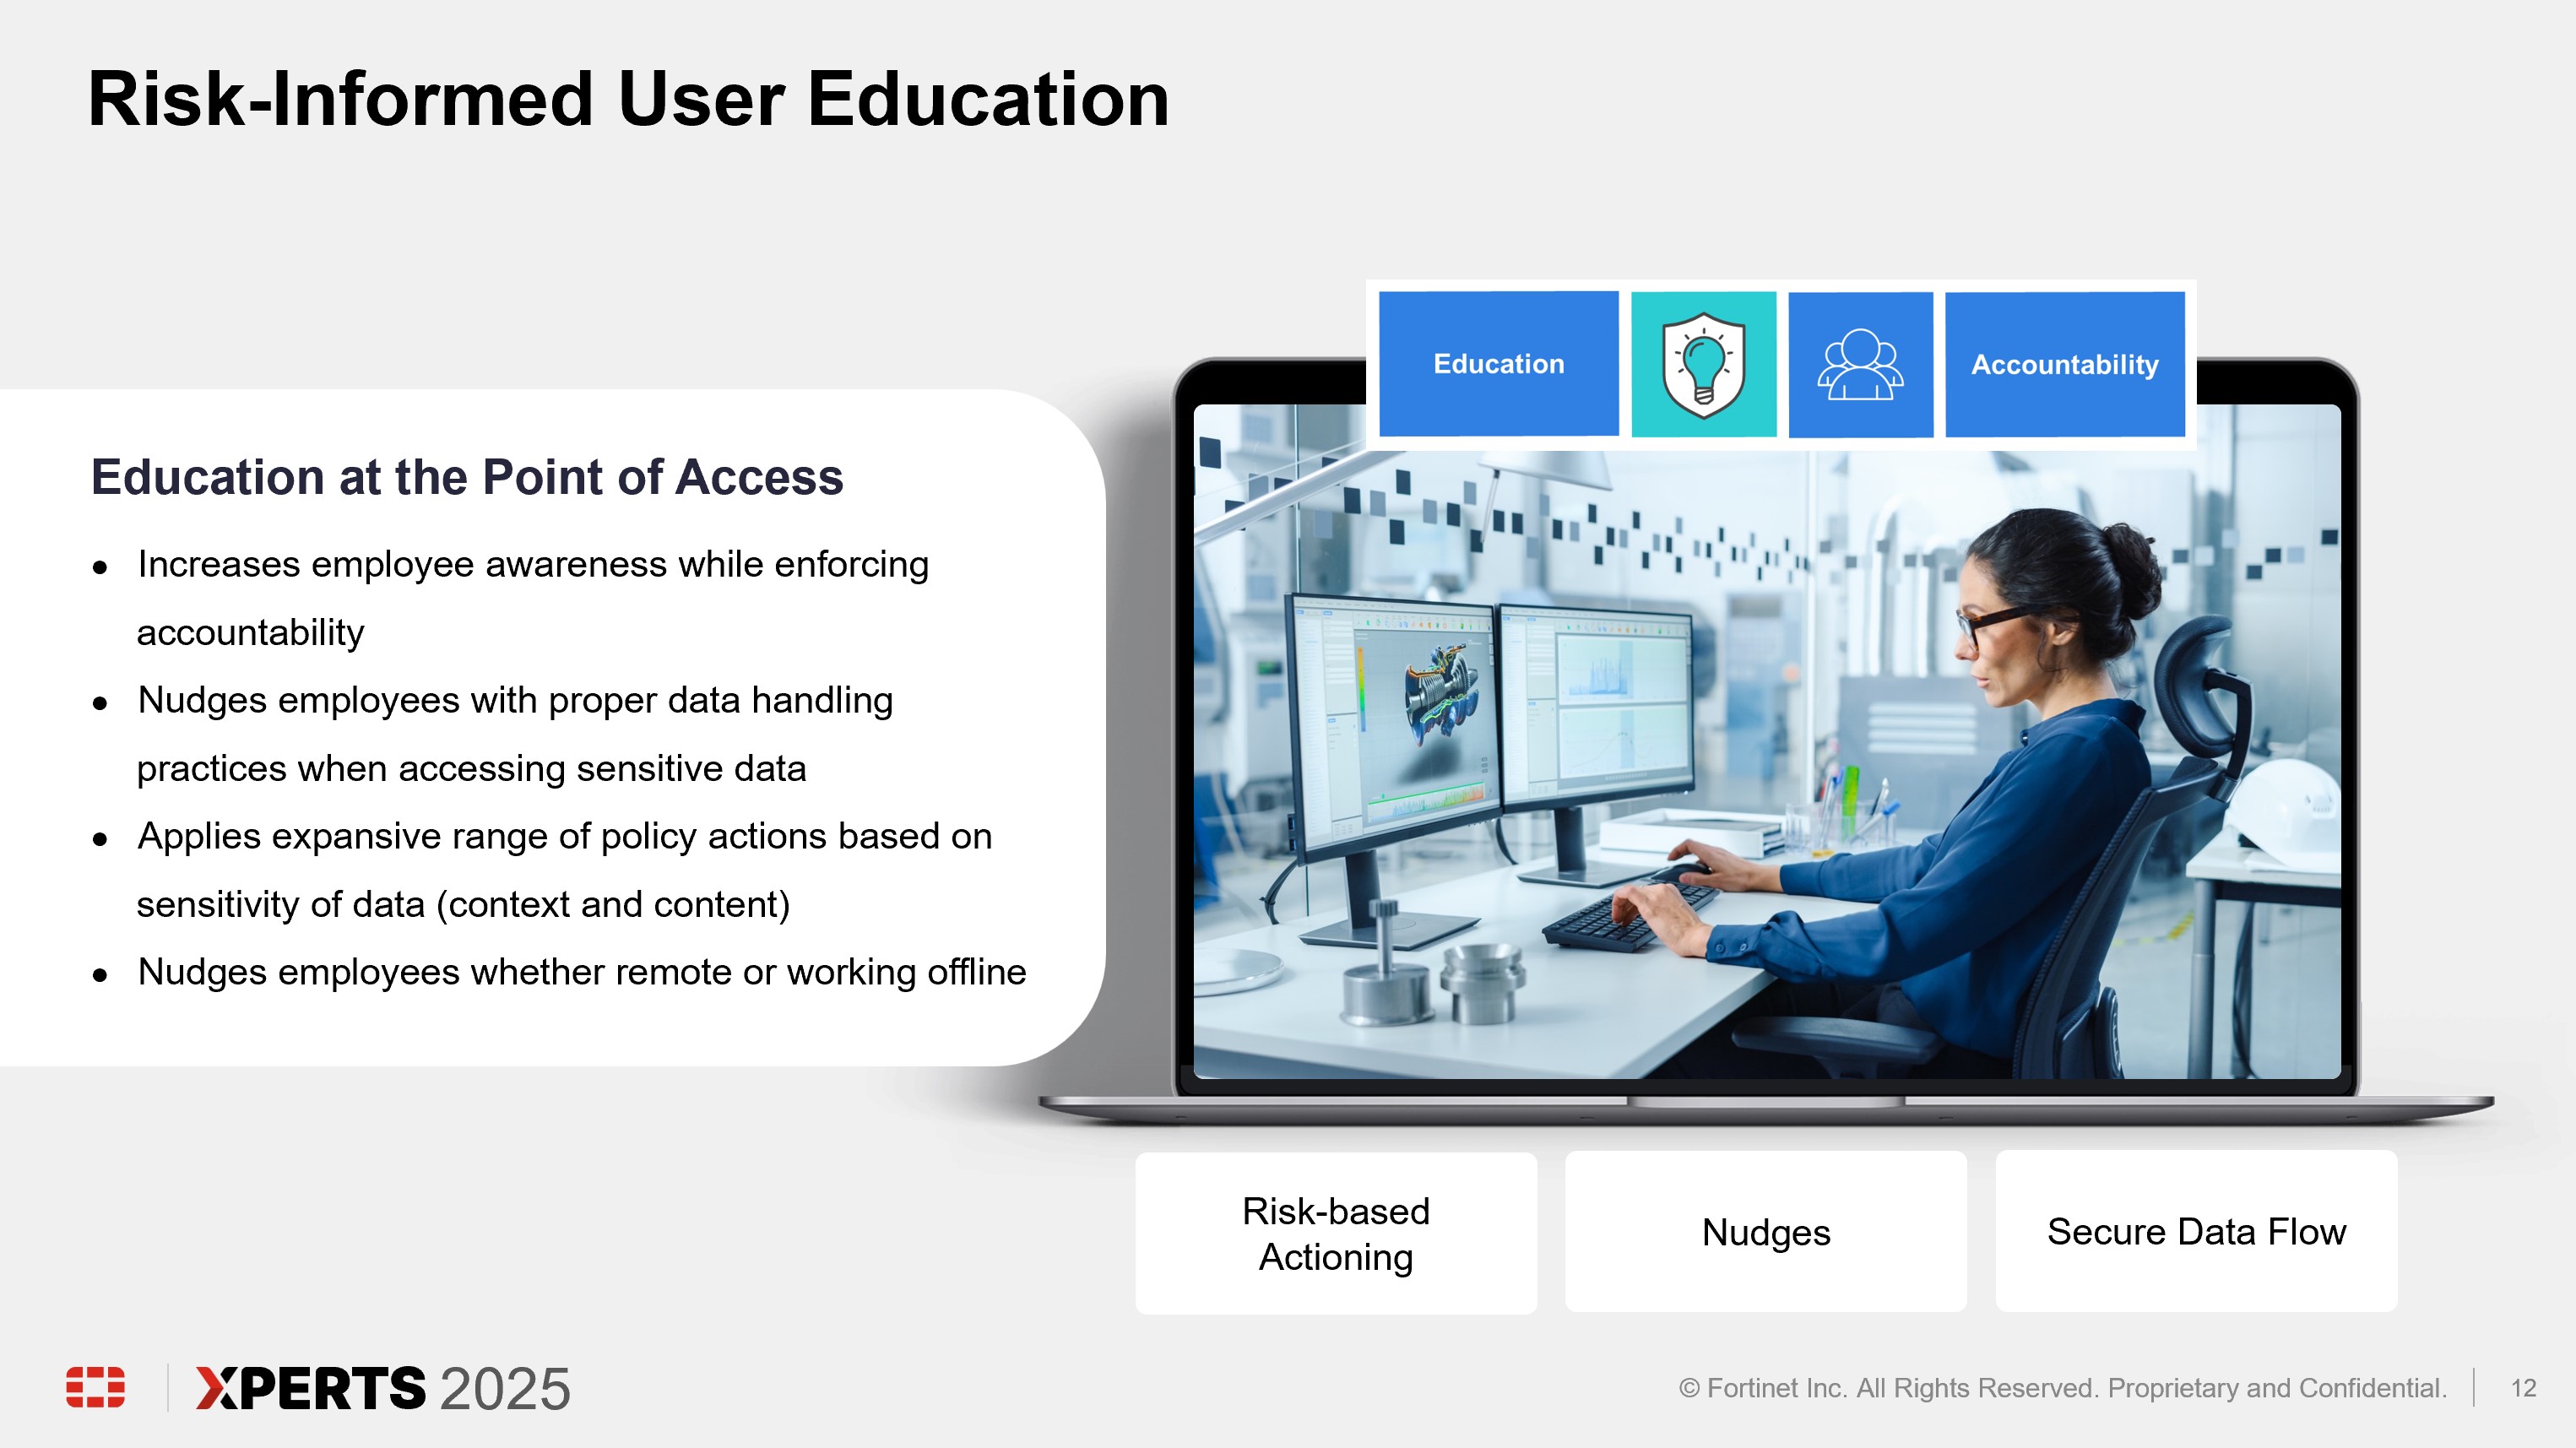
FortiDLP applies a modern and unified approach to data security, combining data loss prevention, insider risk management, SaaS data security, and risk- informed user education.
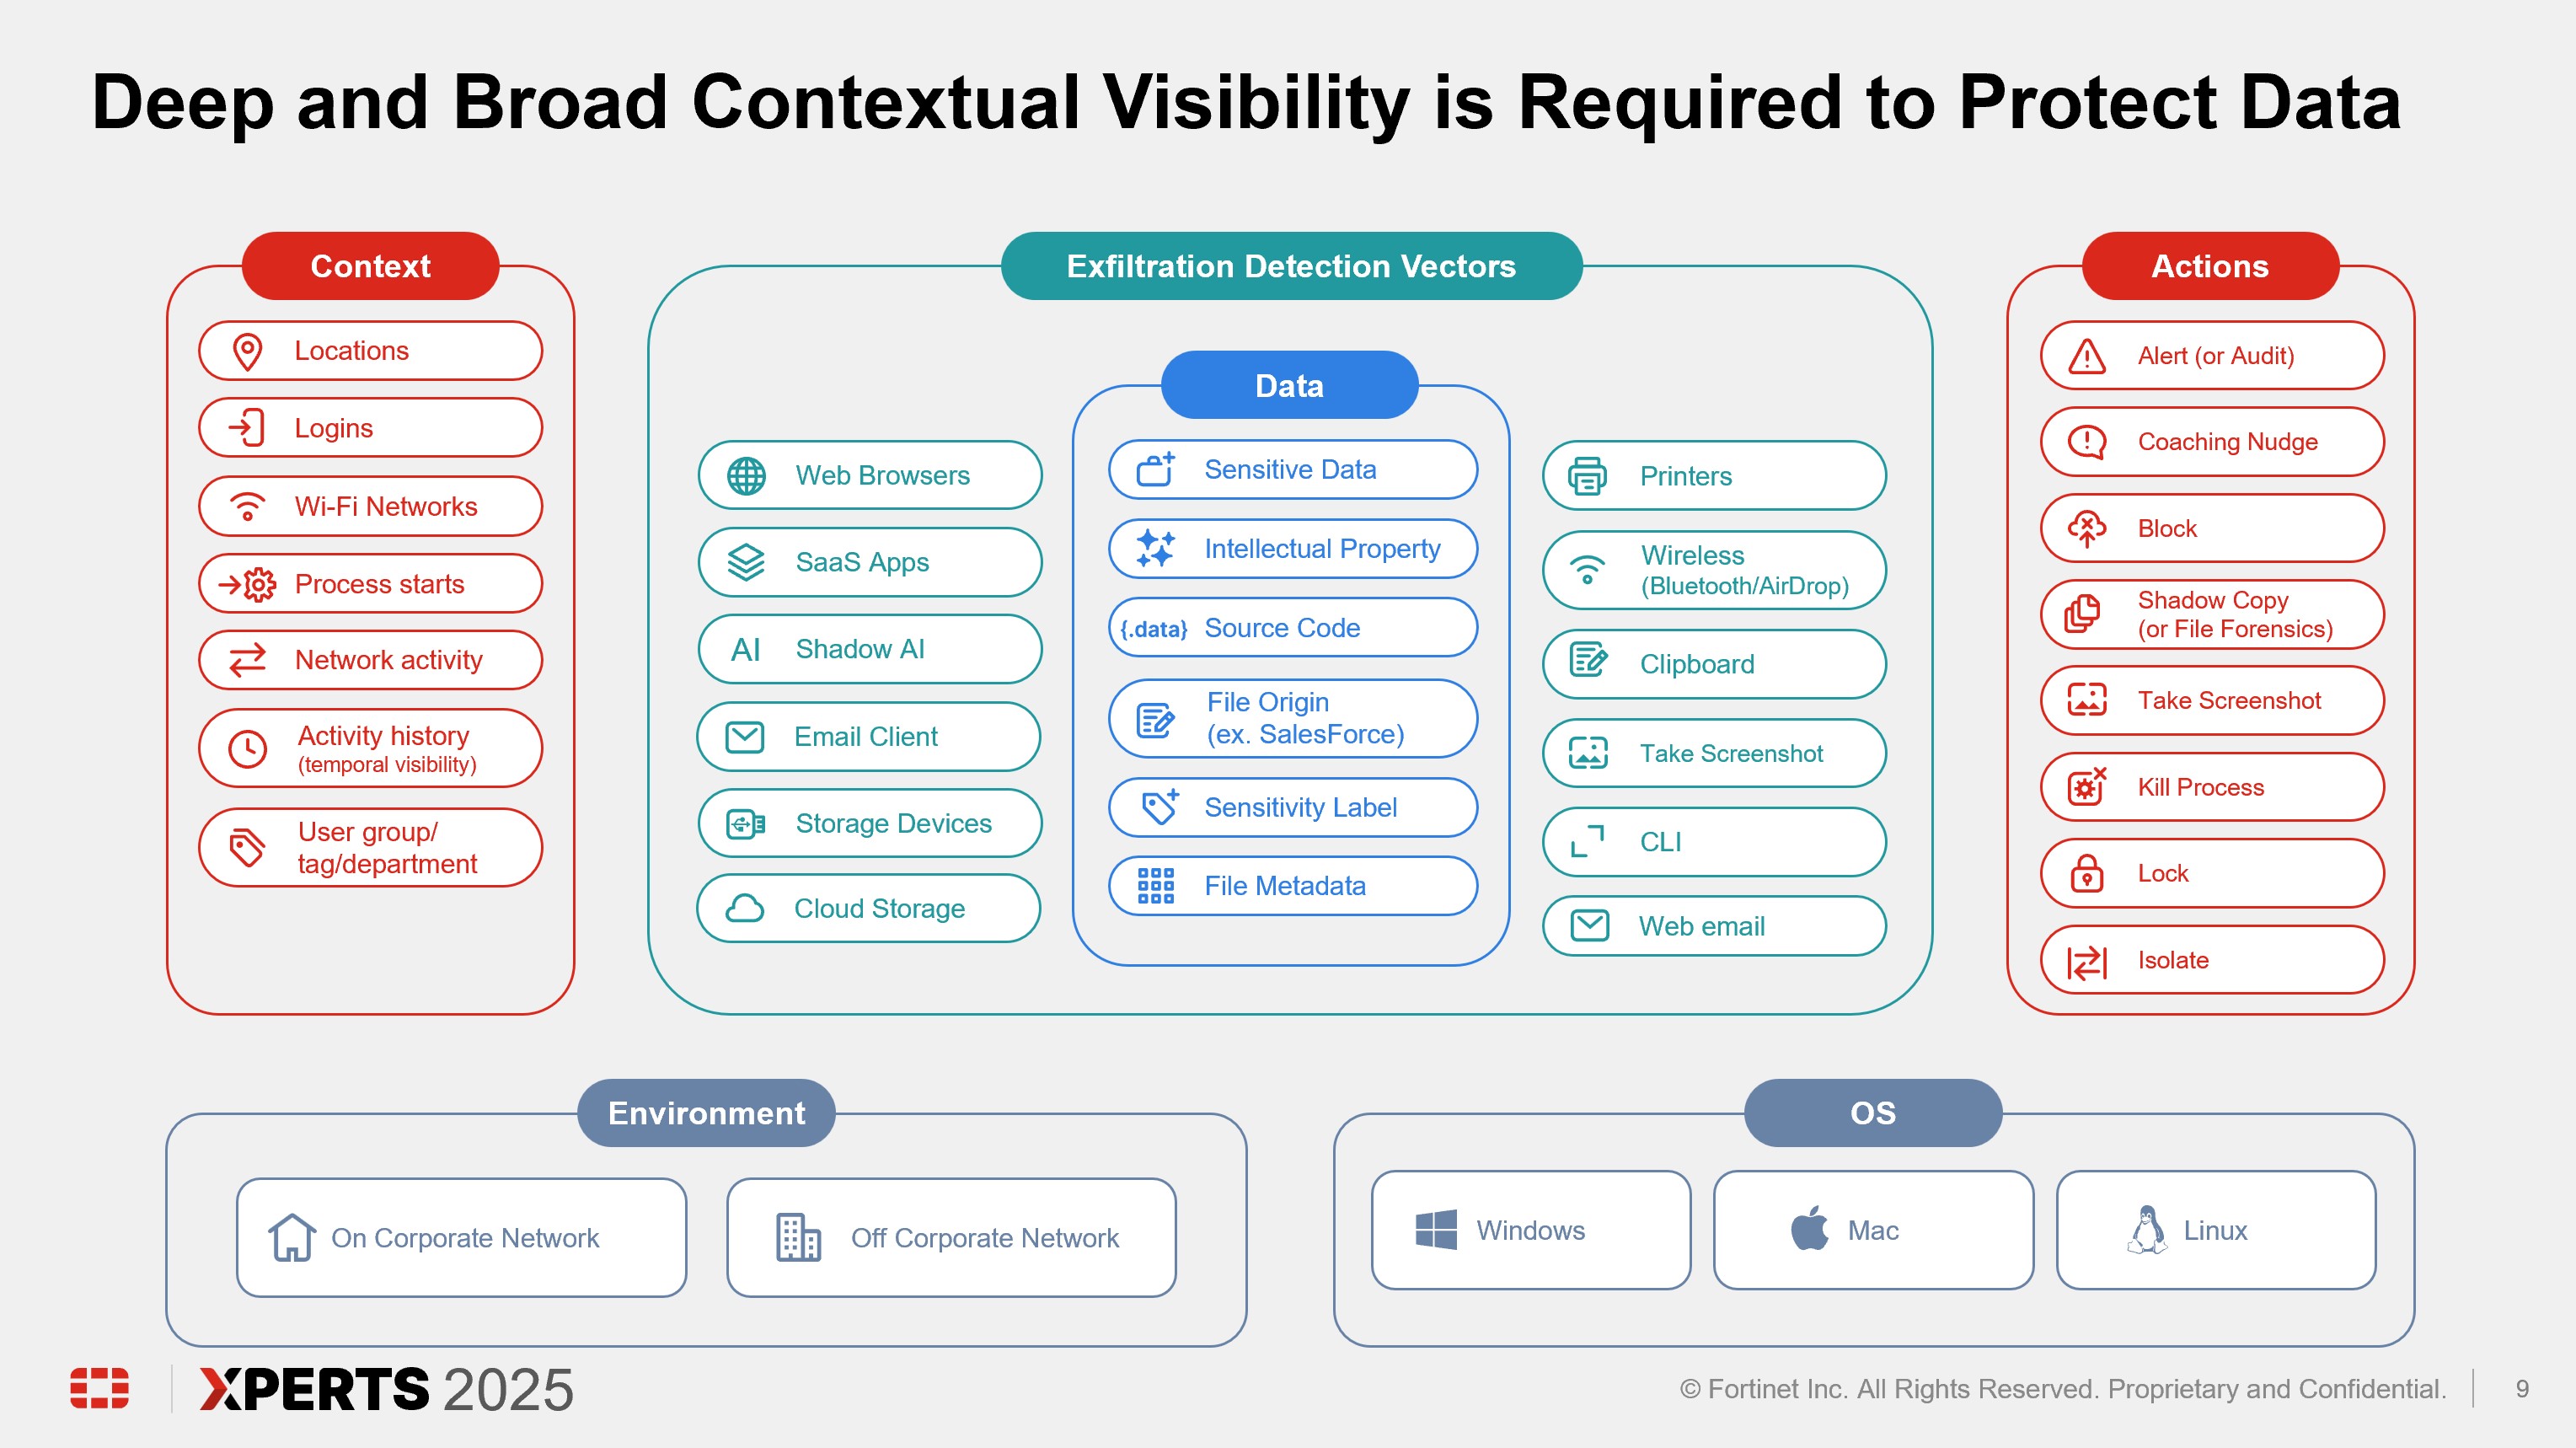
FortiDLP provides immediate visibility into data movement and activity across devices and collaboration platforms, empowering organizations to assess risk and enforce DLP and insider risk policies with proactive data security actions in real time.
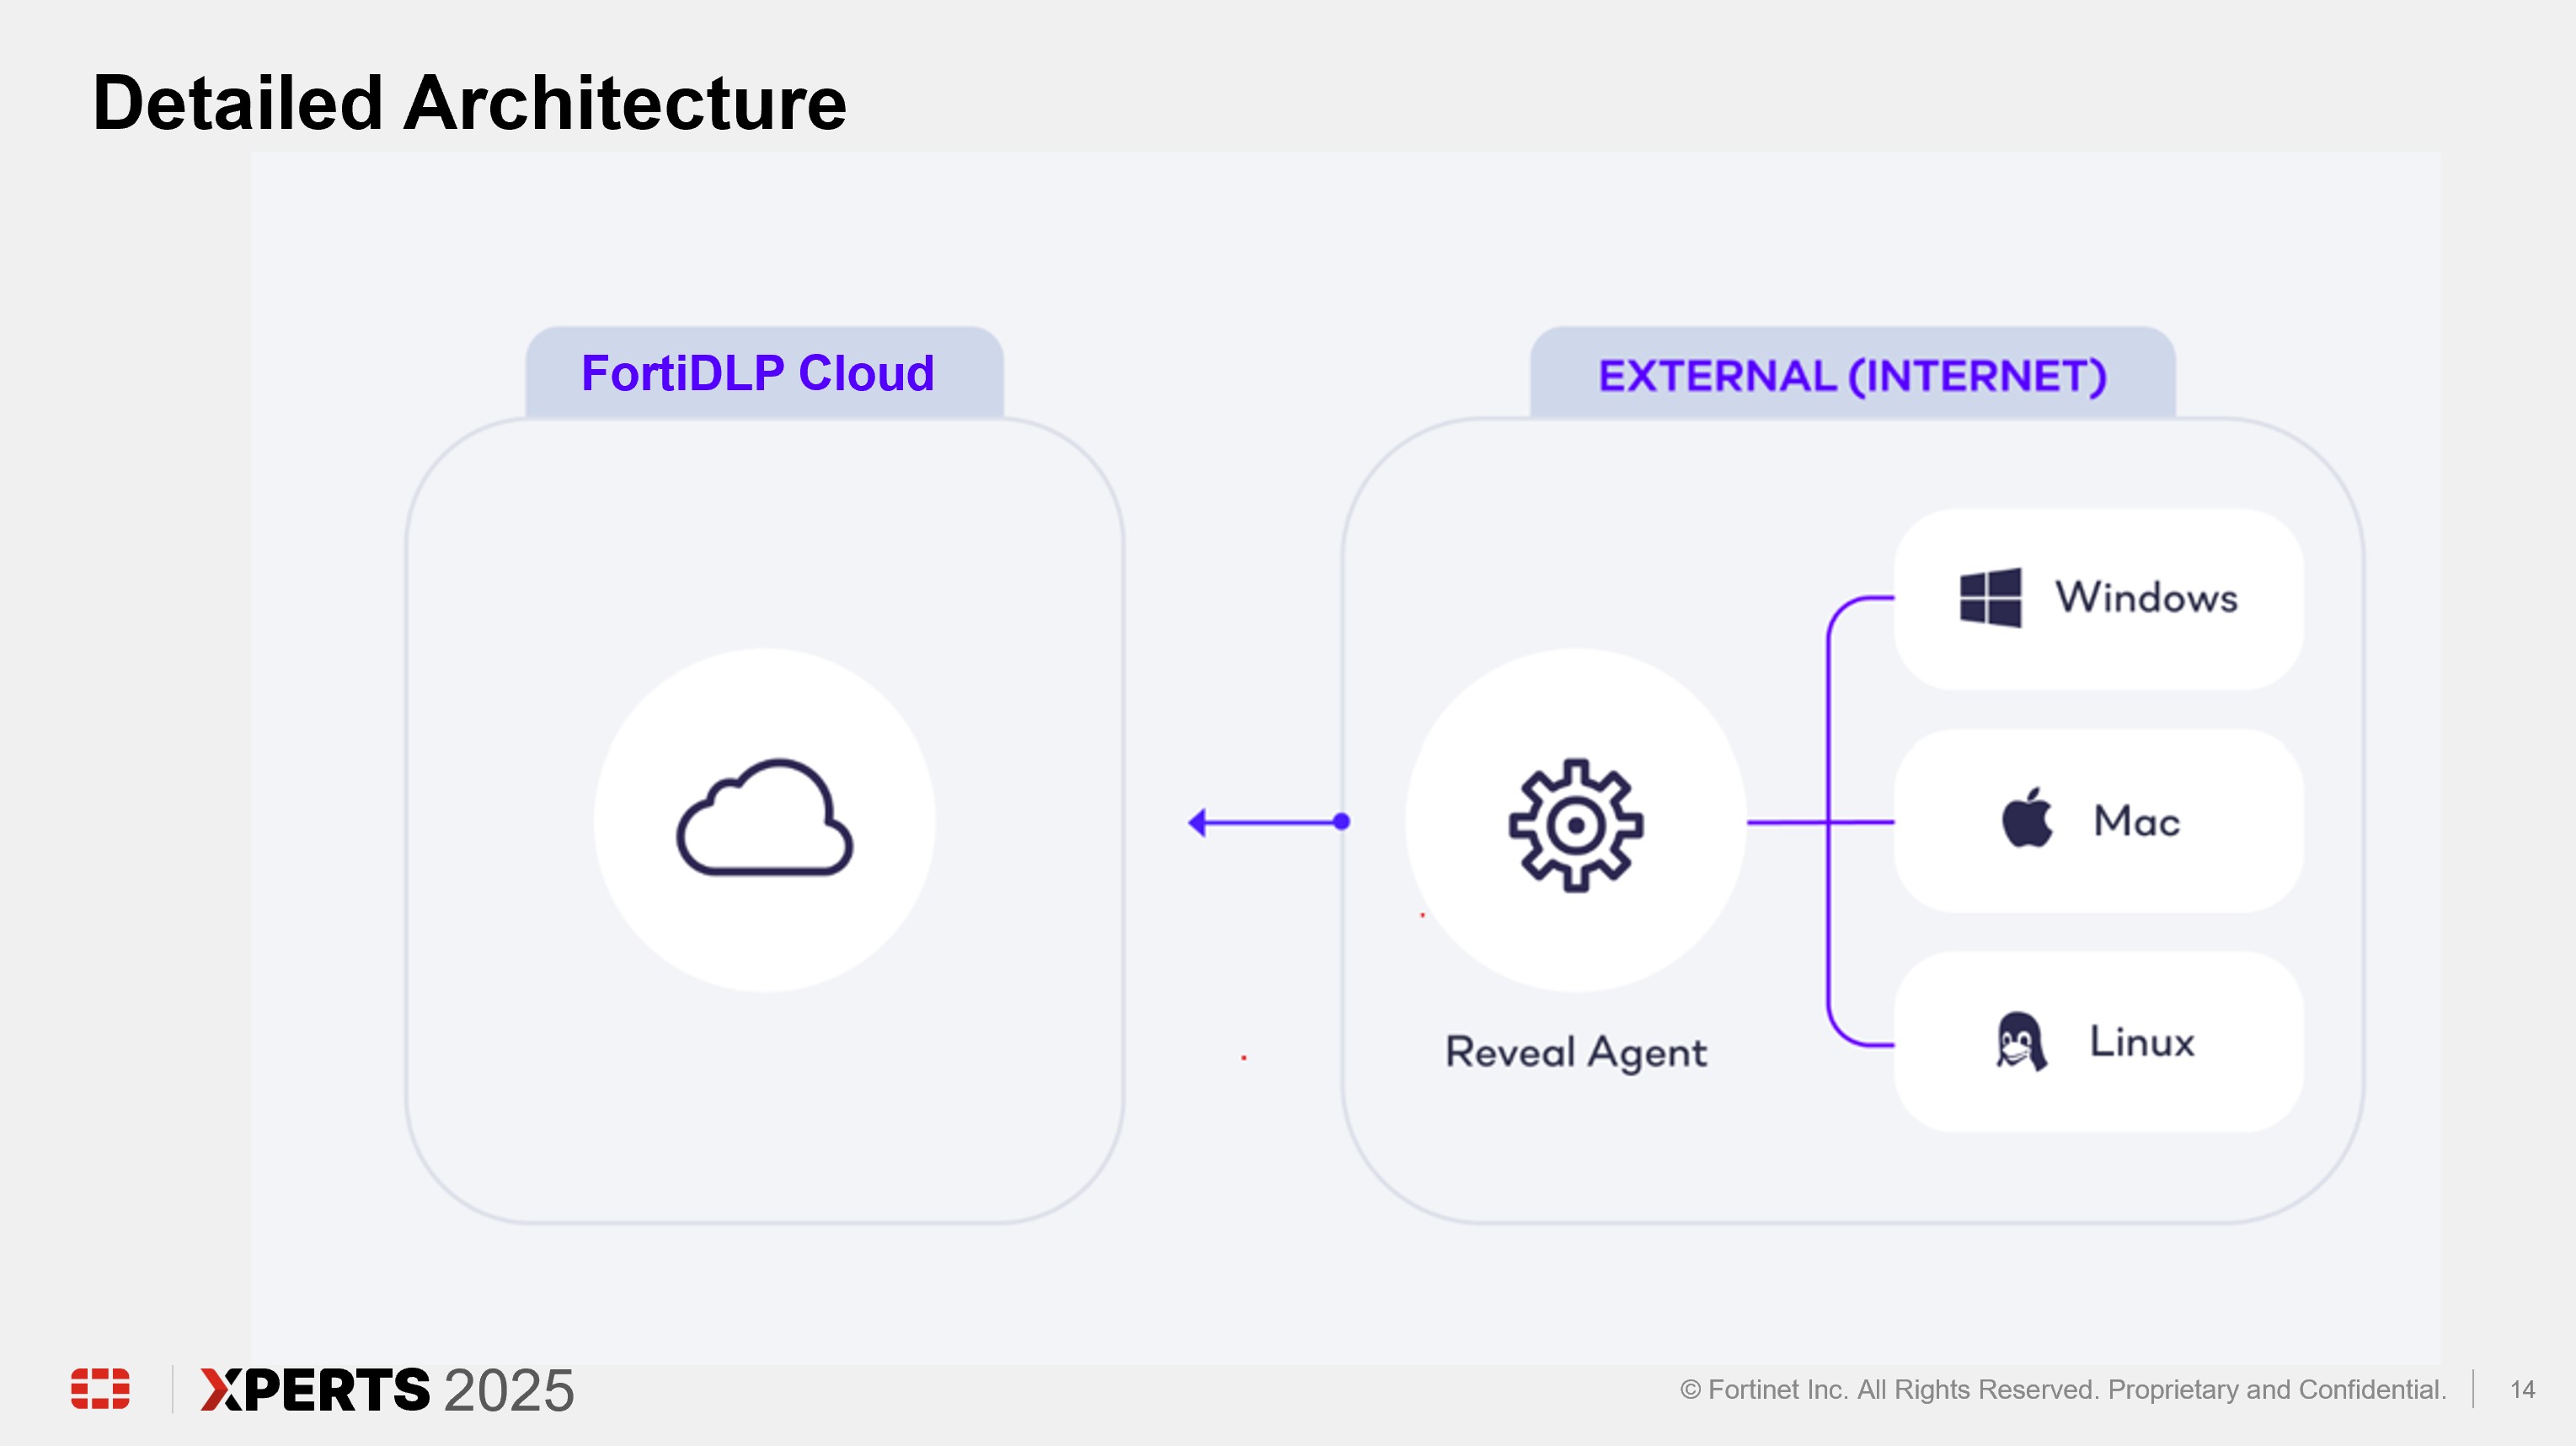
FortiDLP’s scalable, lightweight agent collects and records data regardless of network connection and location, meaning you get full protection of your employees’ data flows whether they’re in the office, working remotely, or on the road. The result is data protection that doesn’t rely on sending your critical business data to a cloud-based file scanning engine, reducing bandwidth costs and addressing data residency requirements.
Enhanced with Artificial Intelligence
From day one, FortiDLP applies machine learning—integrated into FortiDLP’s agent—to baseline individual user activity and uses behavioral analytics algorithms to detect typical versus novel or anomalous behavior. Additional powerful analysis and analytics capabilities provide insights at an organizational level.
In addition, FortiDLP utilizes FortiAI (AI Assistant) to summarize and contextualize data associated with high-risk activity to accelerate incident analysis. Activities are mapped to MITRE ENGENUITY™ Insider Threat Tactics, Techniques, and Procedures (TTP) Knowledge Base.
Track data from its origin
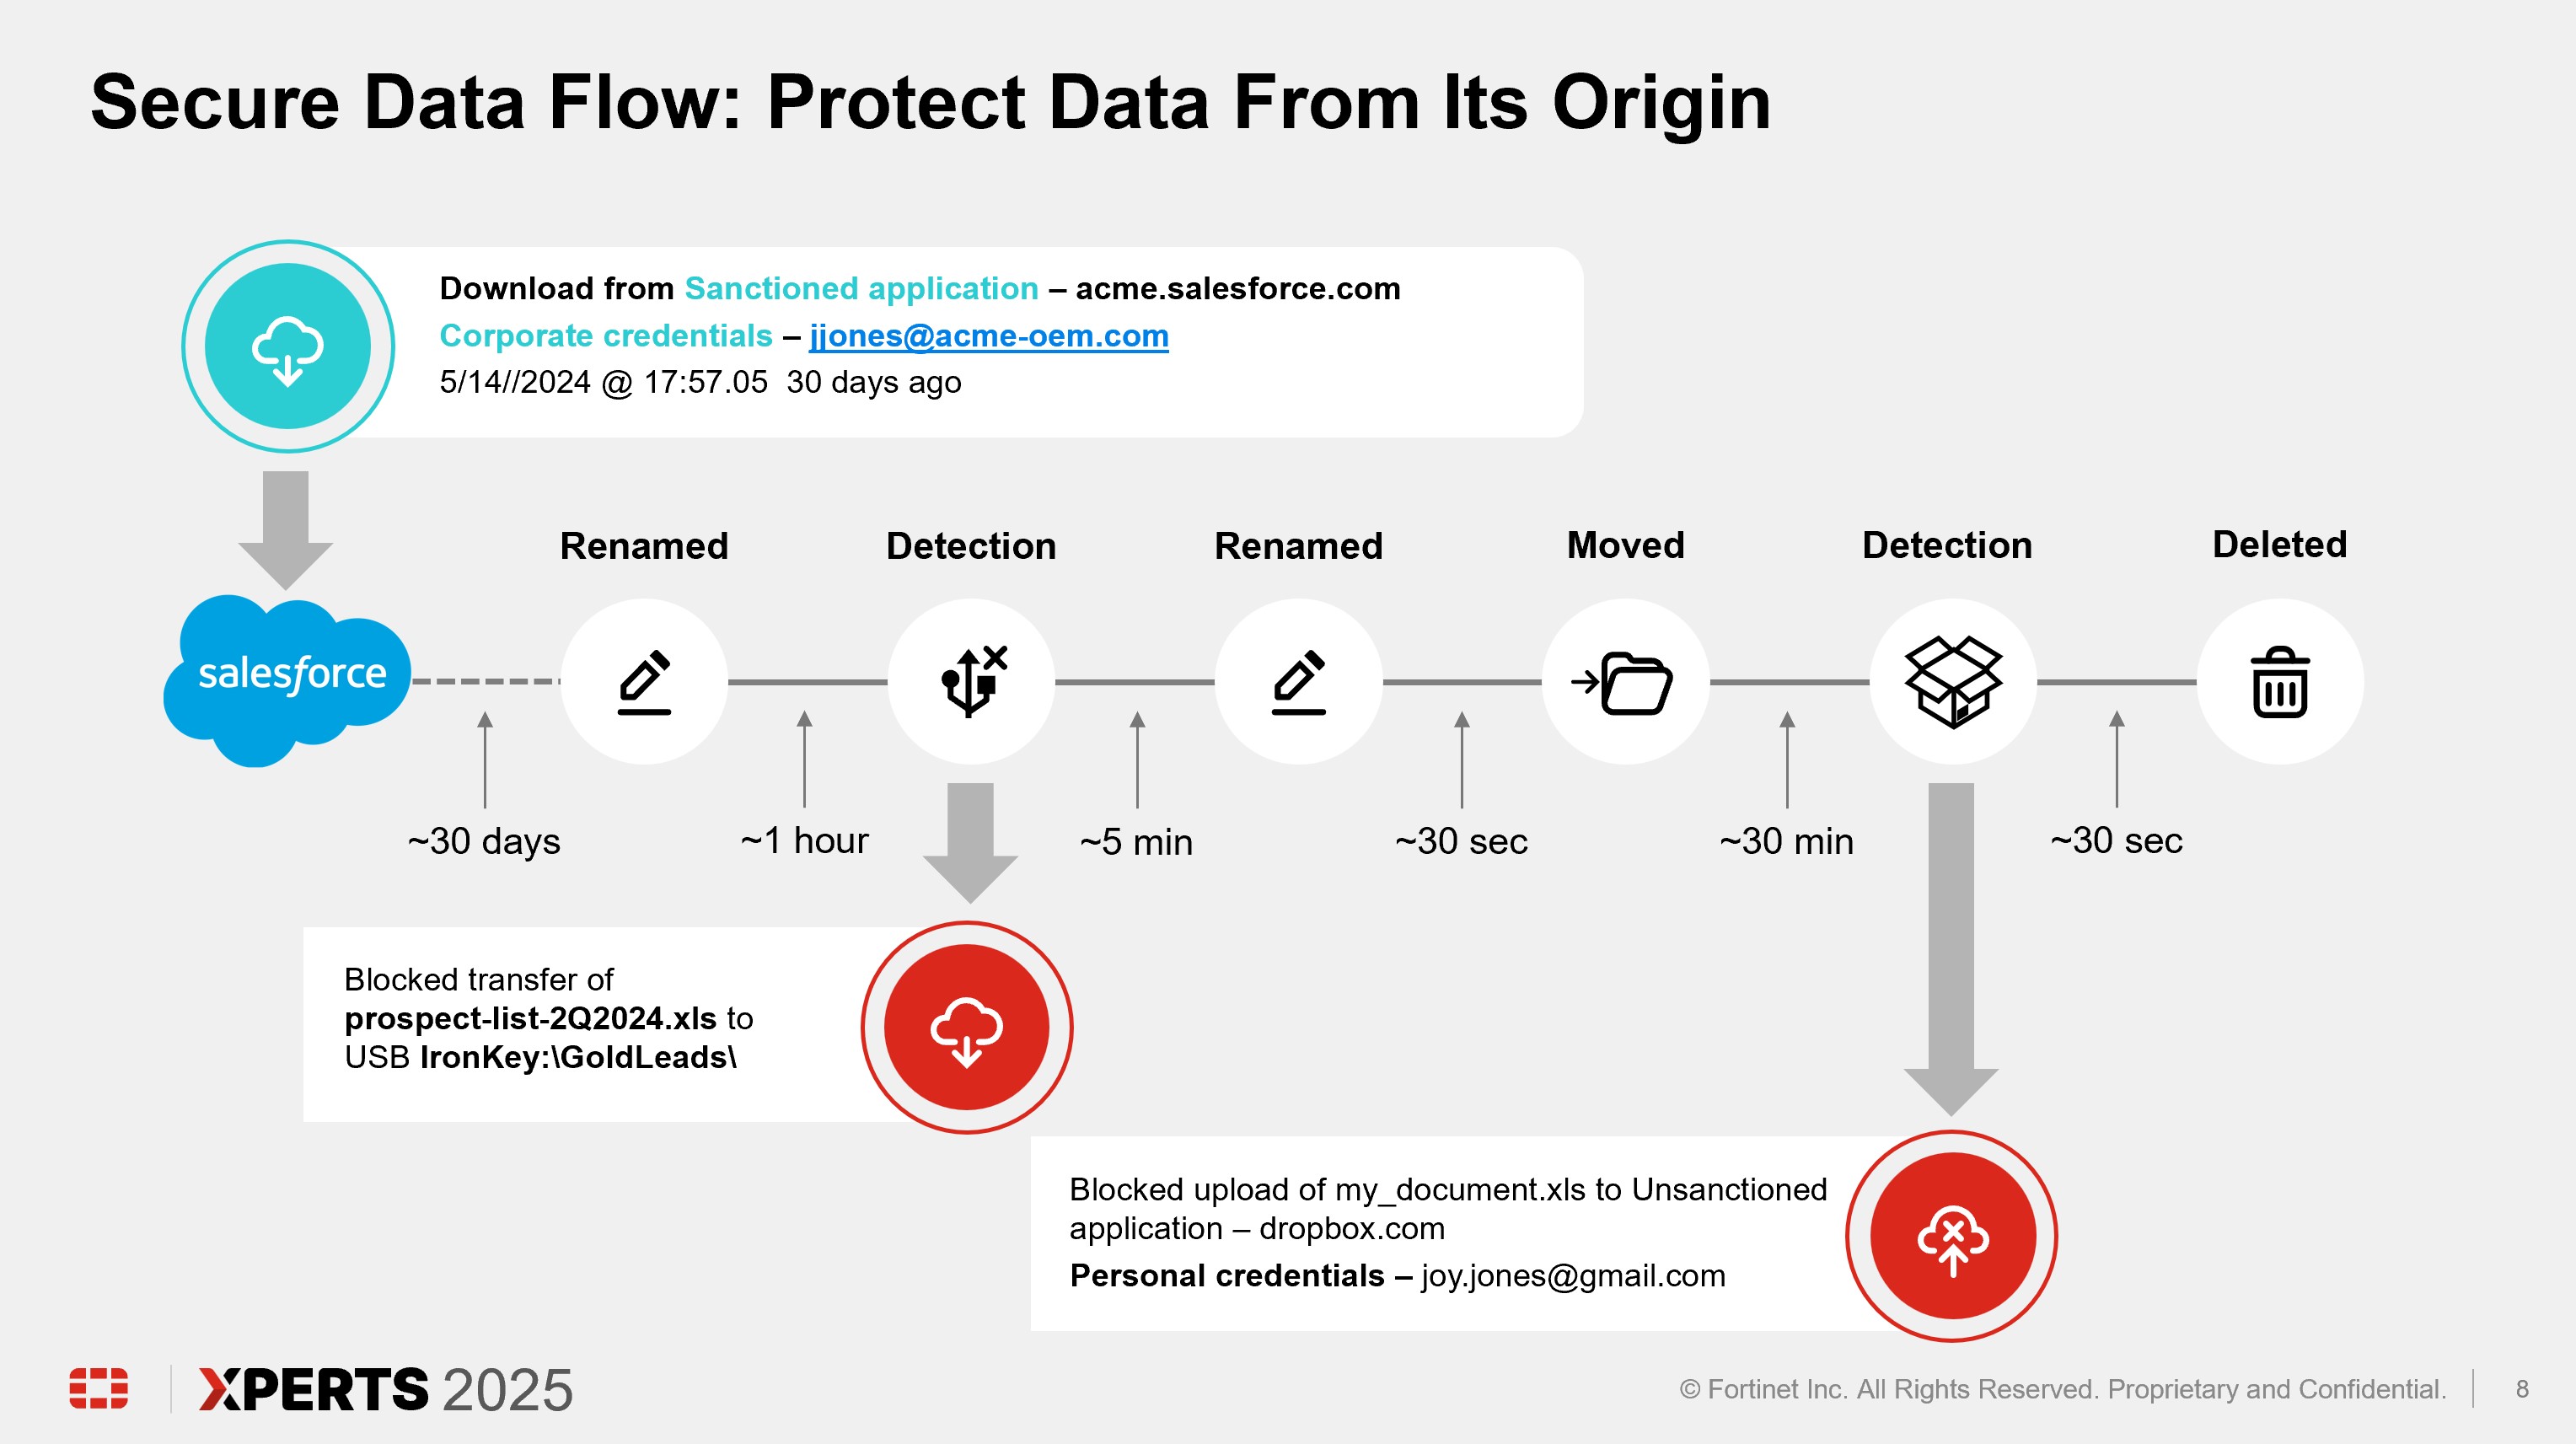
Through Secure Data Flow, FortiDLP can also automatically identify and track data based on its origin, such as Workday or a source code repository. DLP and insider risk policies can be enforced based on where the data originated and whether a corporate or non-corporate account was used to egress data.
Highlights
• Integrates Data Loss Prevention, Insider Risk Management, SaaS Data Security, and Risk- Informed User Education in a single solution• Is cloud-native, allowing organizations to turn on services and gain visibility into business data flows and risks in minutes• Utilizes lightweight agent technology for Windows, macOS, and Linux operating systems for seamless deployment and automated updating at enterprise scale• Delivers immediate policy-free visibility into data movement and business processes• Accurately detects Intellectual Property and sensitive data using advanced data classification, data origin, and identity-based data tracking (Secure Data Flow)• Detects and responds to data manipulation and anomalous activity using AI and ML• Monitors SaaS application usage, including Shadow AI tools like Gen-AI• Incorporates risk-informed user education at the point of access of sensitive data• Provides administrators with a fully featured, always up-to-date management console and behavior analytics system to monitor, report, and enable automated actions• Addresses regulatory compliance controls involving data loss prevention with minimal effort using templated PII/PHI/PCI policies• Applies a Privacy-first approach to data protection by:
Subsections of DS101 - DLP
FortiDLP Presentation
FortiDLP Presentation Agenda

Subsections of FortiDLP Presentation
FortiDLP Introduction (15 minutes)


Architecture Review (15 minutes)

Console Configuration Deep Dive (1 hour)

Policy Deep Dive (30 minutes)

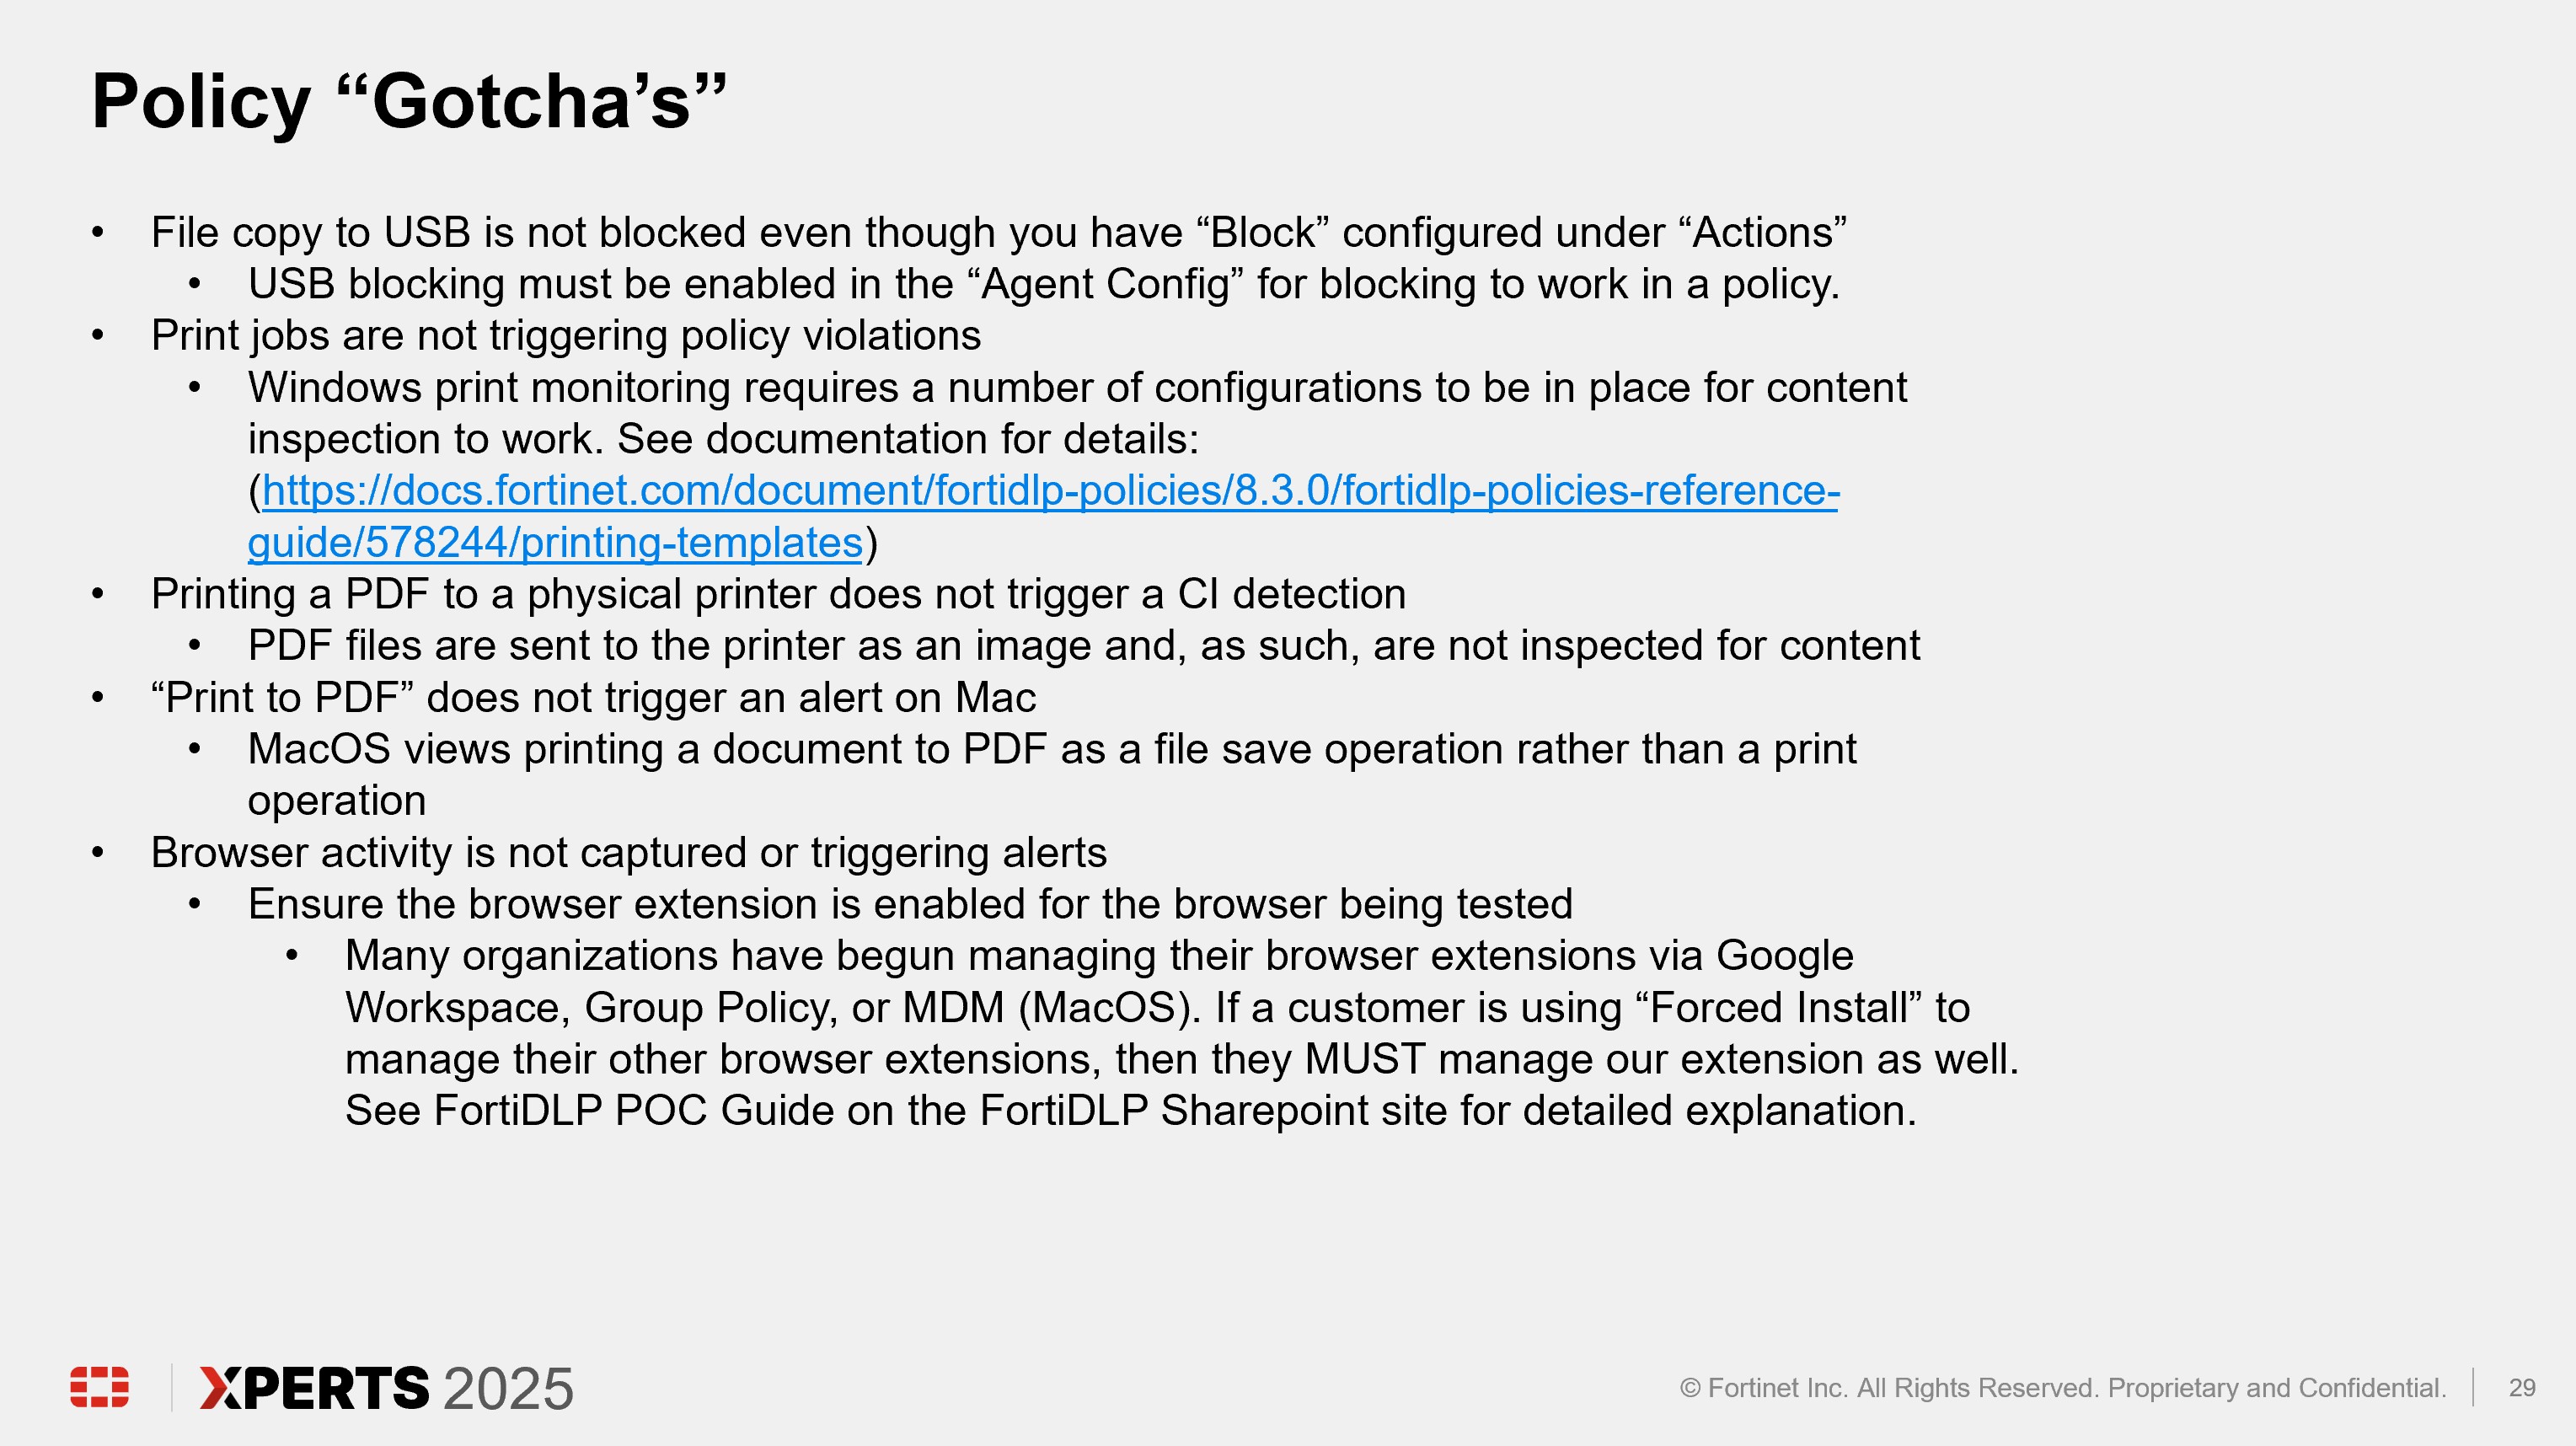
Hands On Lab (2 hours)
The FortiDLP Hands on Lab is designed to give attendees an opportunity to gain hands-on experience with all of the concepts discussed in the presentation. Key themes in the use case will include:
- Console navigation
- Policy group creation and administration
- Policy creation to meet most common customer use cases
- Advanced alerting creation and administration
Warning
The FordiDLP instance used in this training is a shared environment. Please read through the “Lab Rules of Engagement” web page to ensure all users have a positive experience.
Subsections of Hands On Lab
Lab Access Instructions
Management Console Access Instructions
Warning
Please note that the FortiDLP management console is a shared environment. Any changes made can impact other users if not properly scoped via labels. Please see the “Lab Rules of Engagement” page before making any changes.
- Open your preferred browser (Chrome, Edge, or Firefox) and navigate to:
https://fortidlp-training.reveal.nextdlp.com/
Login to FortiDLP with the course credentials you received via the email address you used to register for the course.
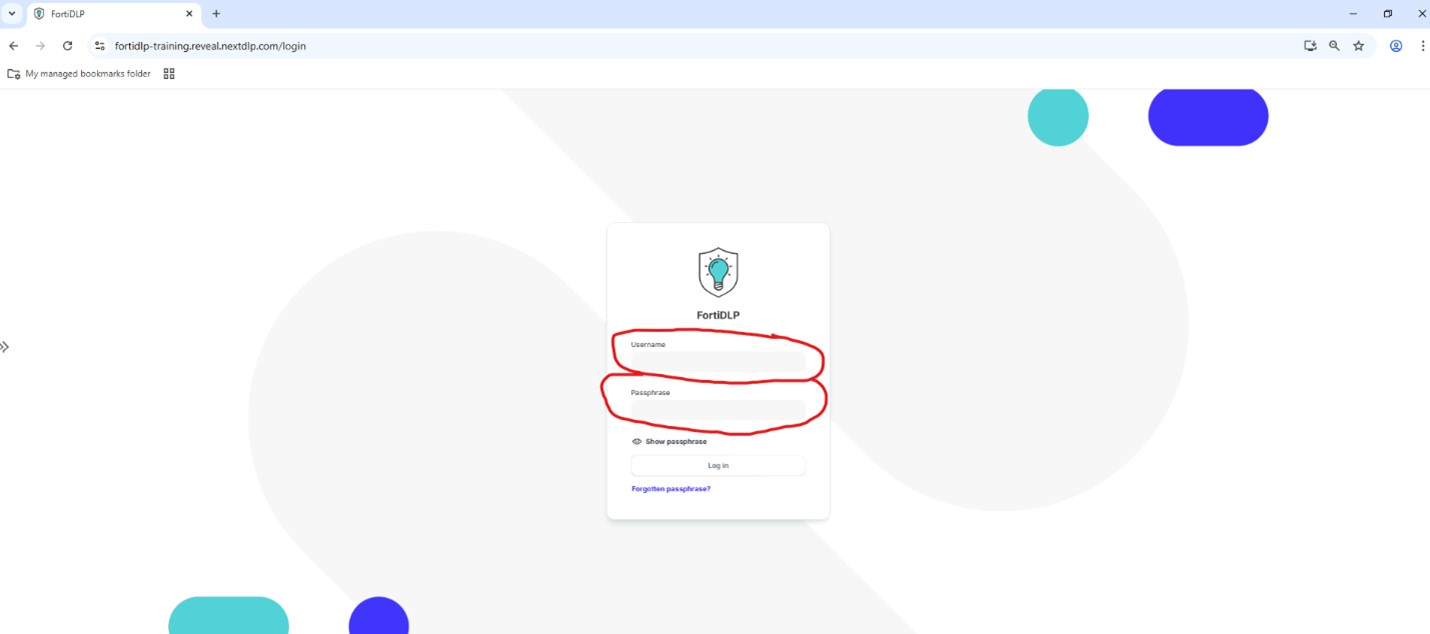
Note
If you did not receive or cannot find the email with your login credentials, notify a course instructor who will initiate a “re-send” of the credentials.
Tip
Your user name is your first initial followed by your last name… NOT your email address (ex. John Smith would be “jsmith”)
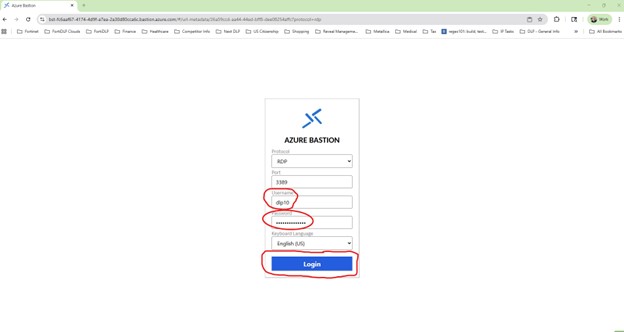
Virtual Endpoint Access and Configuration Instructions
Enter the URL for your specific assigned VM device.
Enter your assigned “username” and “password” in the appropriate fields and click “Login”. The Username identifies your device:
On the VM device open the Chrome Browser:
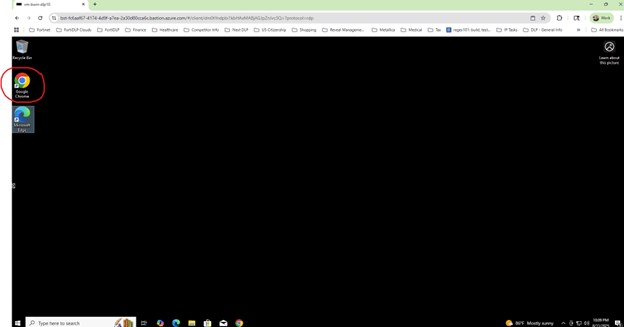
Enter the FortiDLP Training Platform URL in to the Chrome browser:
https://fortidlp-training.reveal.nextdlp.com/
Logon to FortiDLP with your assigned course credentials:
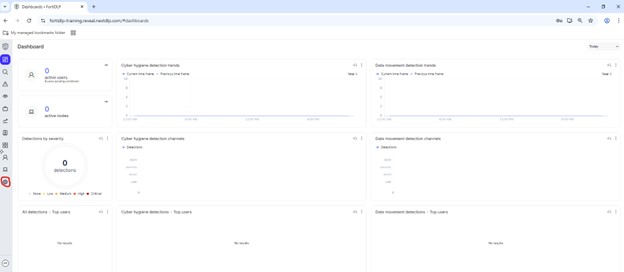
Click the “Admin” icon:
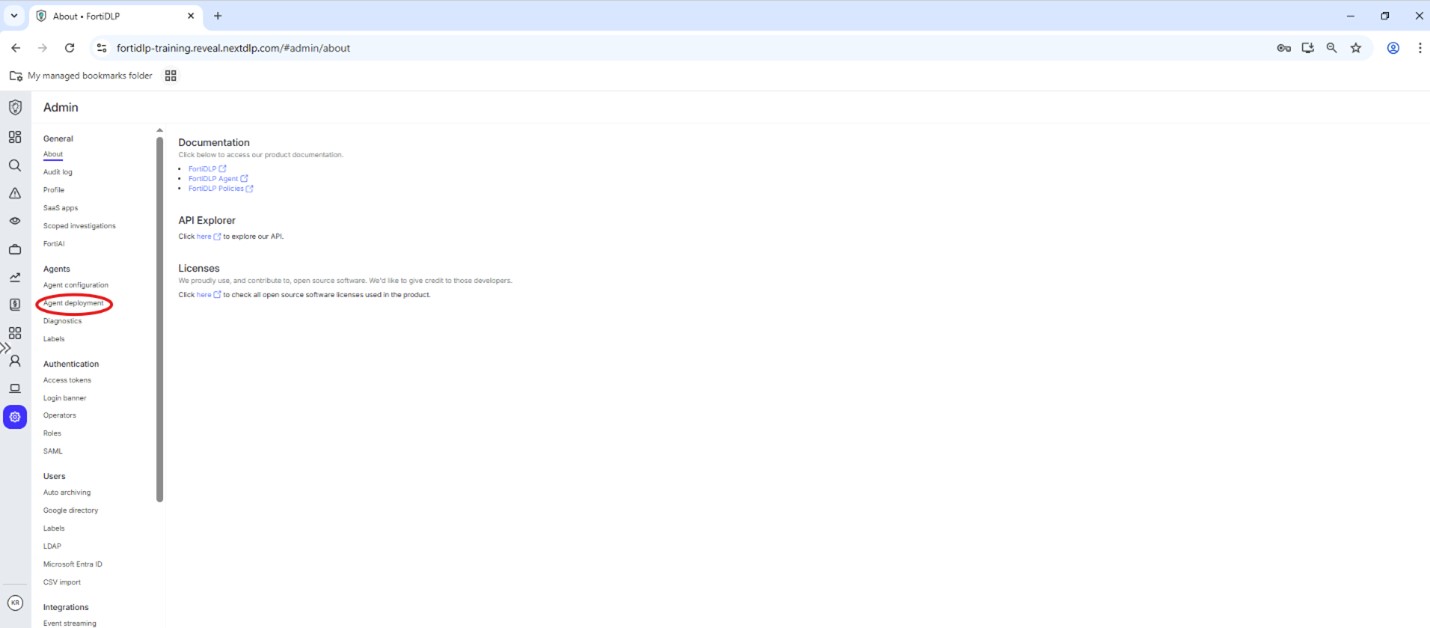
On Admin page click “Agent Deployment” in the left hand pane:
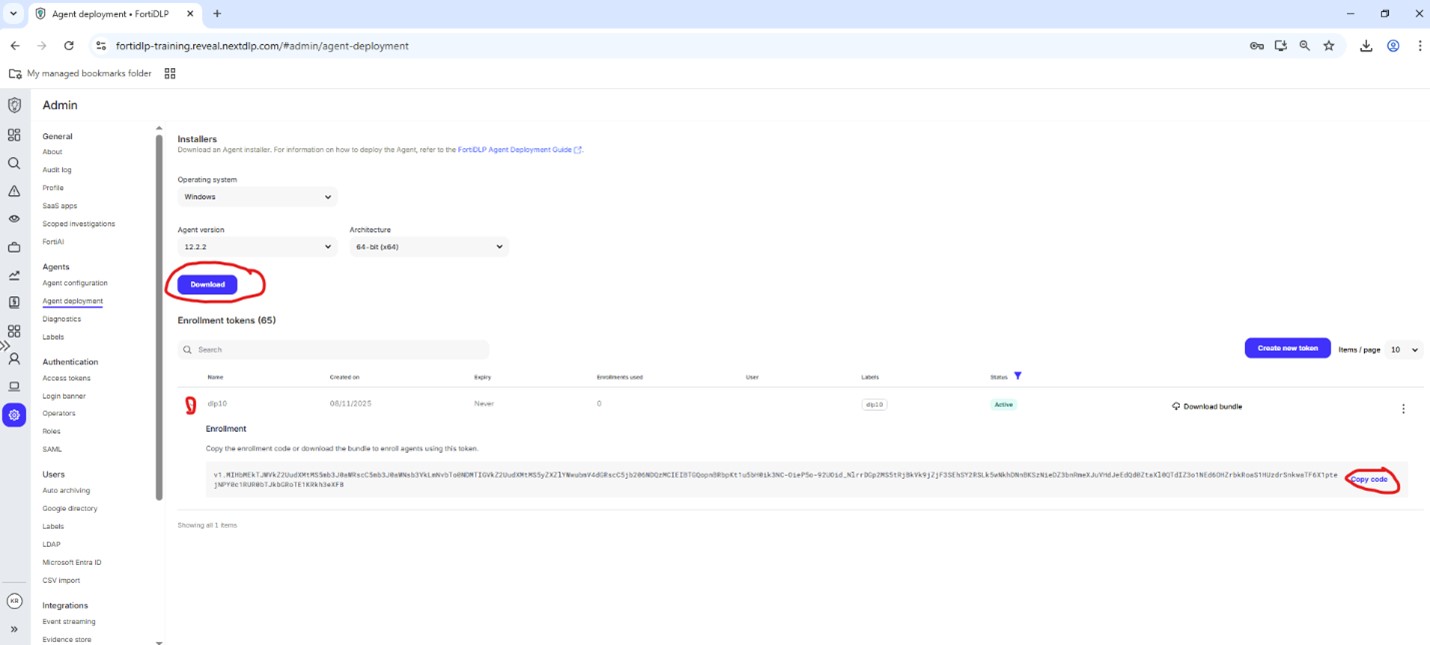
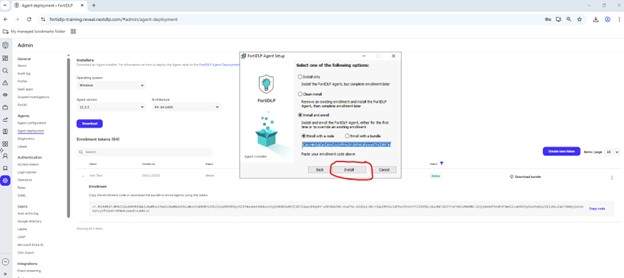
Expand the “XPERTS2025” enrollment code and click “Copy code” then click “Download” to obtain the agent installer:
Go to “Downloads” folder and double click the agent installer package downloaded in the previous step
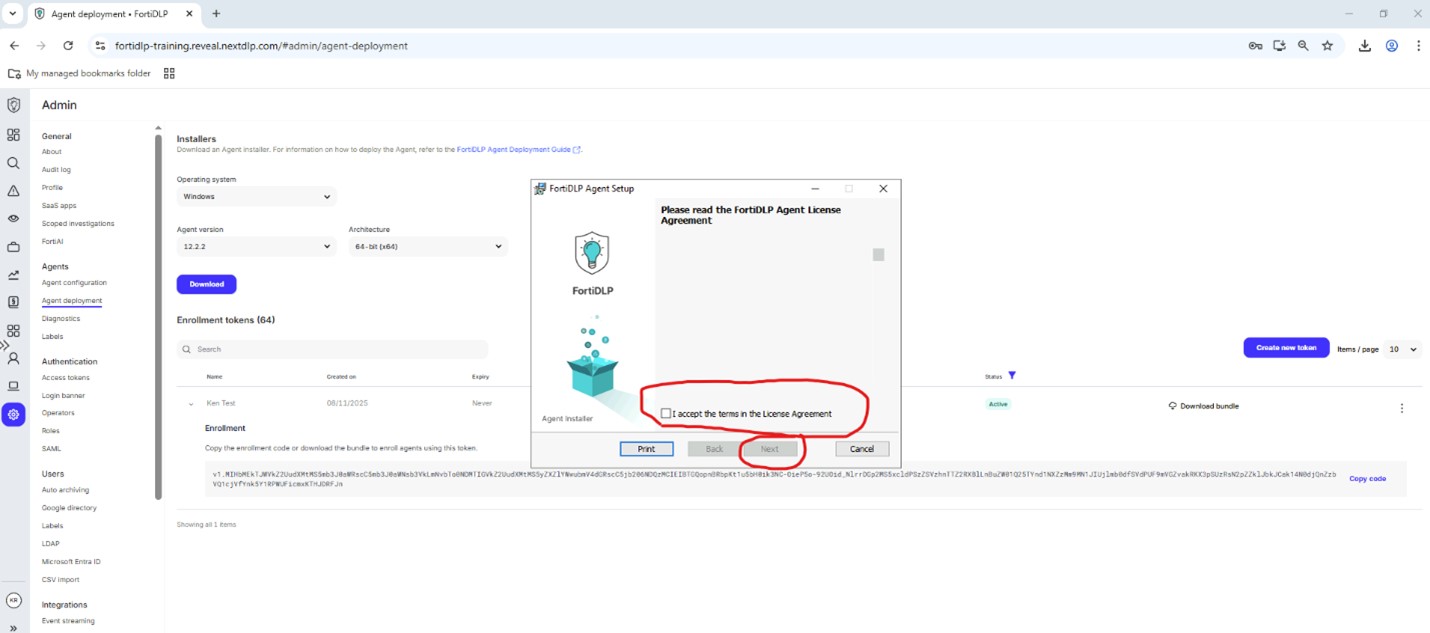
Accept the terms in the license agreement and click “Next:”
Paste the enrollment code copied in step 8 into the text box under “Install with a code” and click “Install:”
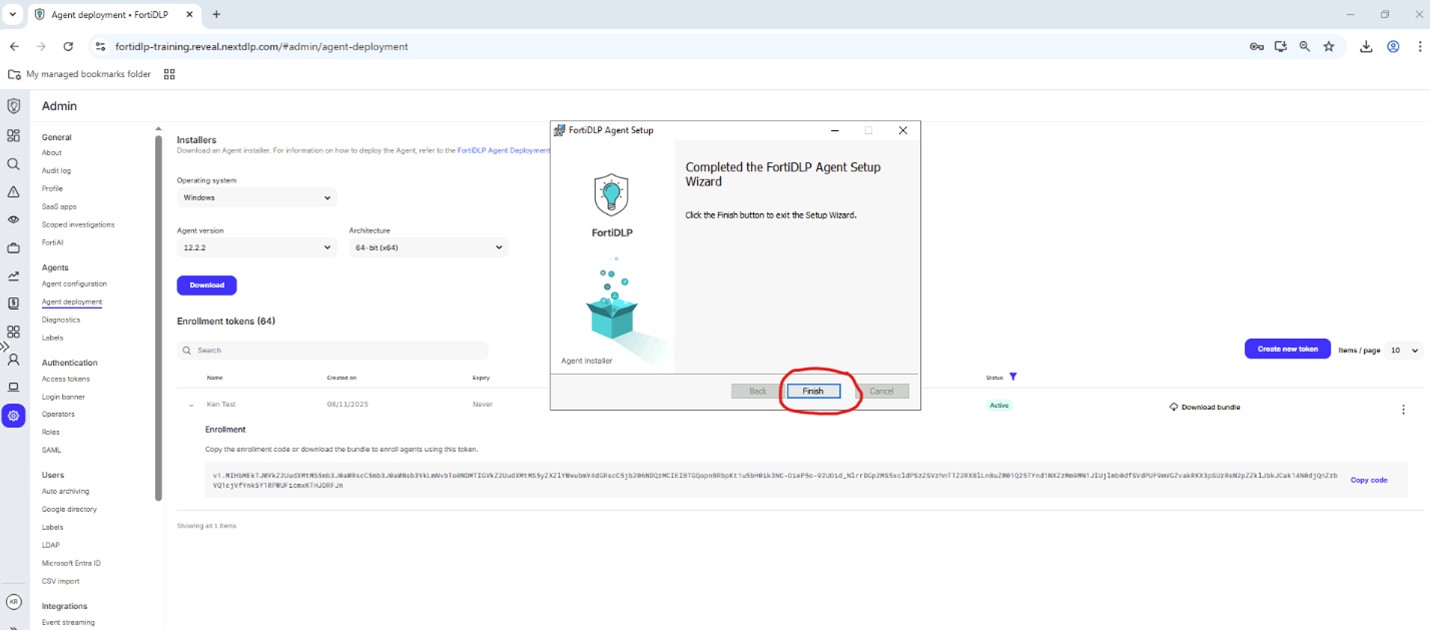
When prompted, click “Finish” to complete the install:
Warning
When prompted, DO NOT reboot the machine at this point!
Click “Nodes” in the left pane of the management console and click “Table” to confirm that your agent is reporting in successfully:
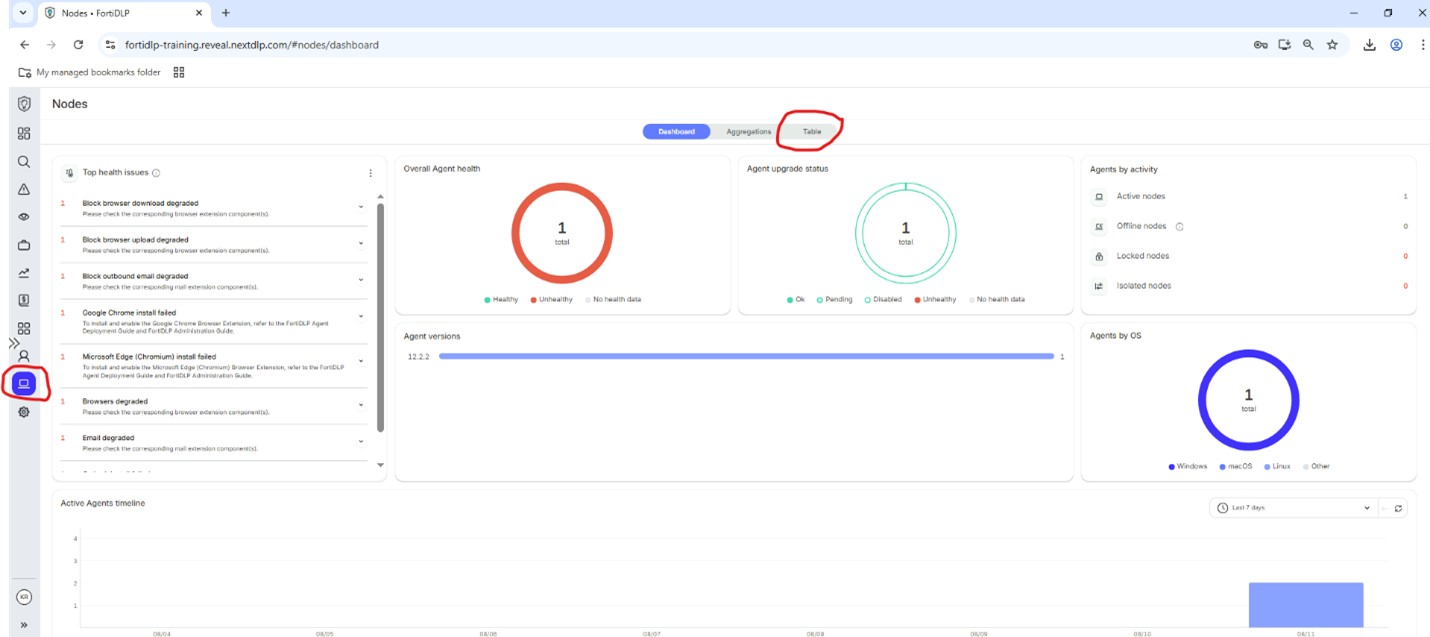
Reboot your VM and log in again.
CONGRATULATIONS! You have successfully installed the FortiDLP agent on your lab virtual machine.
Lab Rules of Engagement
Warning
Please note that the FortiDLP management console is a shared environment. Any changes made can impact other users if not properly scoped via labels. Please see below before making any changes.
Details
💡 If you did not receive or cannot find the email with your login credentials, notify a course instructor who will initiate a “re-send” of the credentials.
Details
💡 When first created, all policy groups and configurations default to “All entities” in scope. Make sure to change the scope to your label ONLY! Failure to do so will impact other attendees’ ability to test their configurations.
<img src="/data-security-101/002handsonlab/002_lab_rules_of_engagement/lab_rules_1.jpg" alt="lab_rules_1" loading="lazy">
Details
💡 Use the following naming convention for all lab use cases and configurations:
First initial followed by last name - use case number (ex. Josh Smith creating a policy for use case 3 would be “jsmith - Prevent upload of PII to website”).
Tip
💡 All use case solutions are available in the “Lab Use Case Solutions” page accessible via the course registration page. Please only view them if you are uncertain how to solve a problem.
Lab Use Cases

Lab Use Case Solutions
Warning
***SPOILERS AHEAD***
This section contains step by step instructions for solving all of the use cases. Only proceed if you are struggling to solve the use cases!
Warning
***SPOILERS AHEAD***
This section contains step by step instructions for solving all of the use cases. Only proceed if you are struggling to solve the use cases!
Subsections of Lab Use Case Solutions
Use Case 1
Details
Create a custom label to use to apply a policy to your device only
Click “Admin settings” in the left pane of the management console.
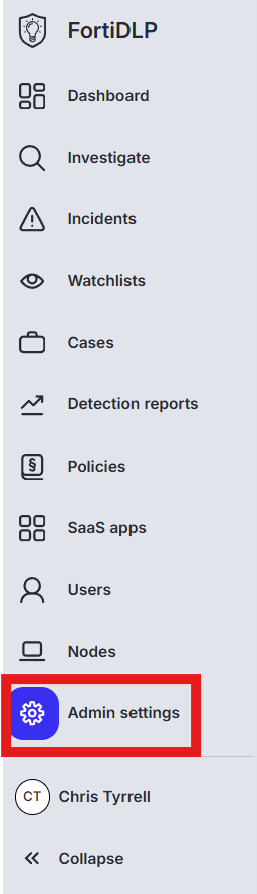
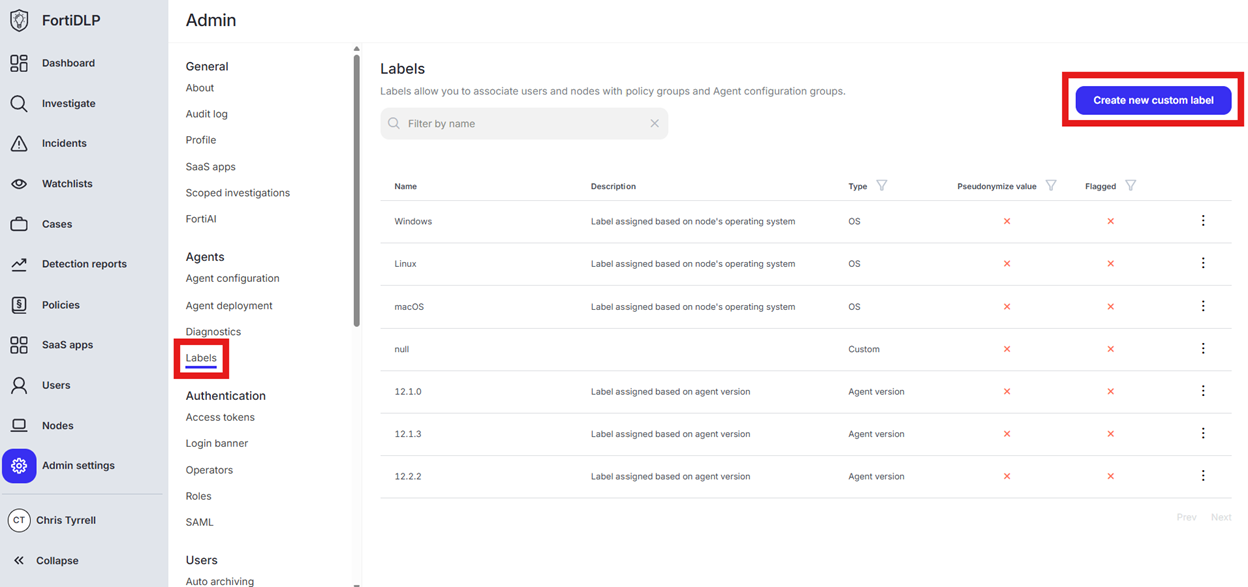
Click “Labels” and then “Create new custom label”
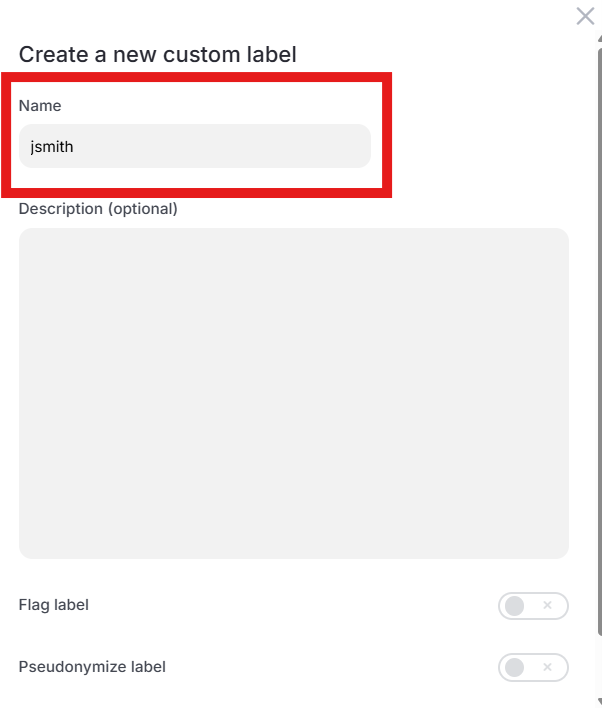
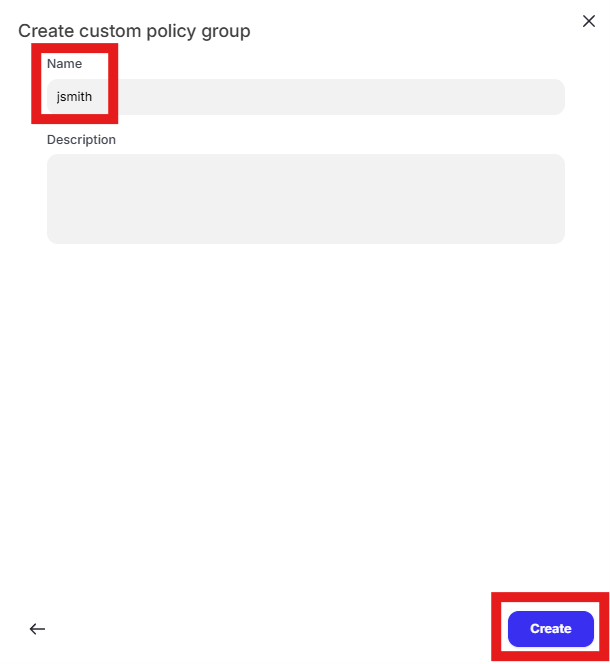
Enter your first initial last name in the “Name” text box (ex. John Smith will enter “jsmith”)
Use Case 2
Details
Create a new policy group and assign the label created in use case 1
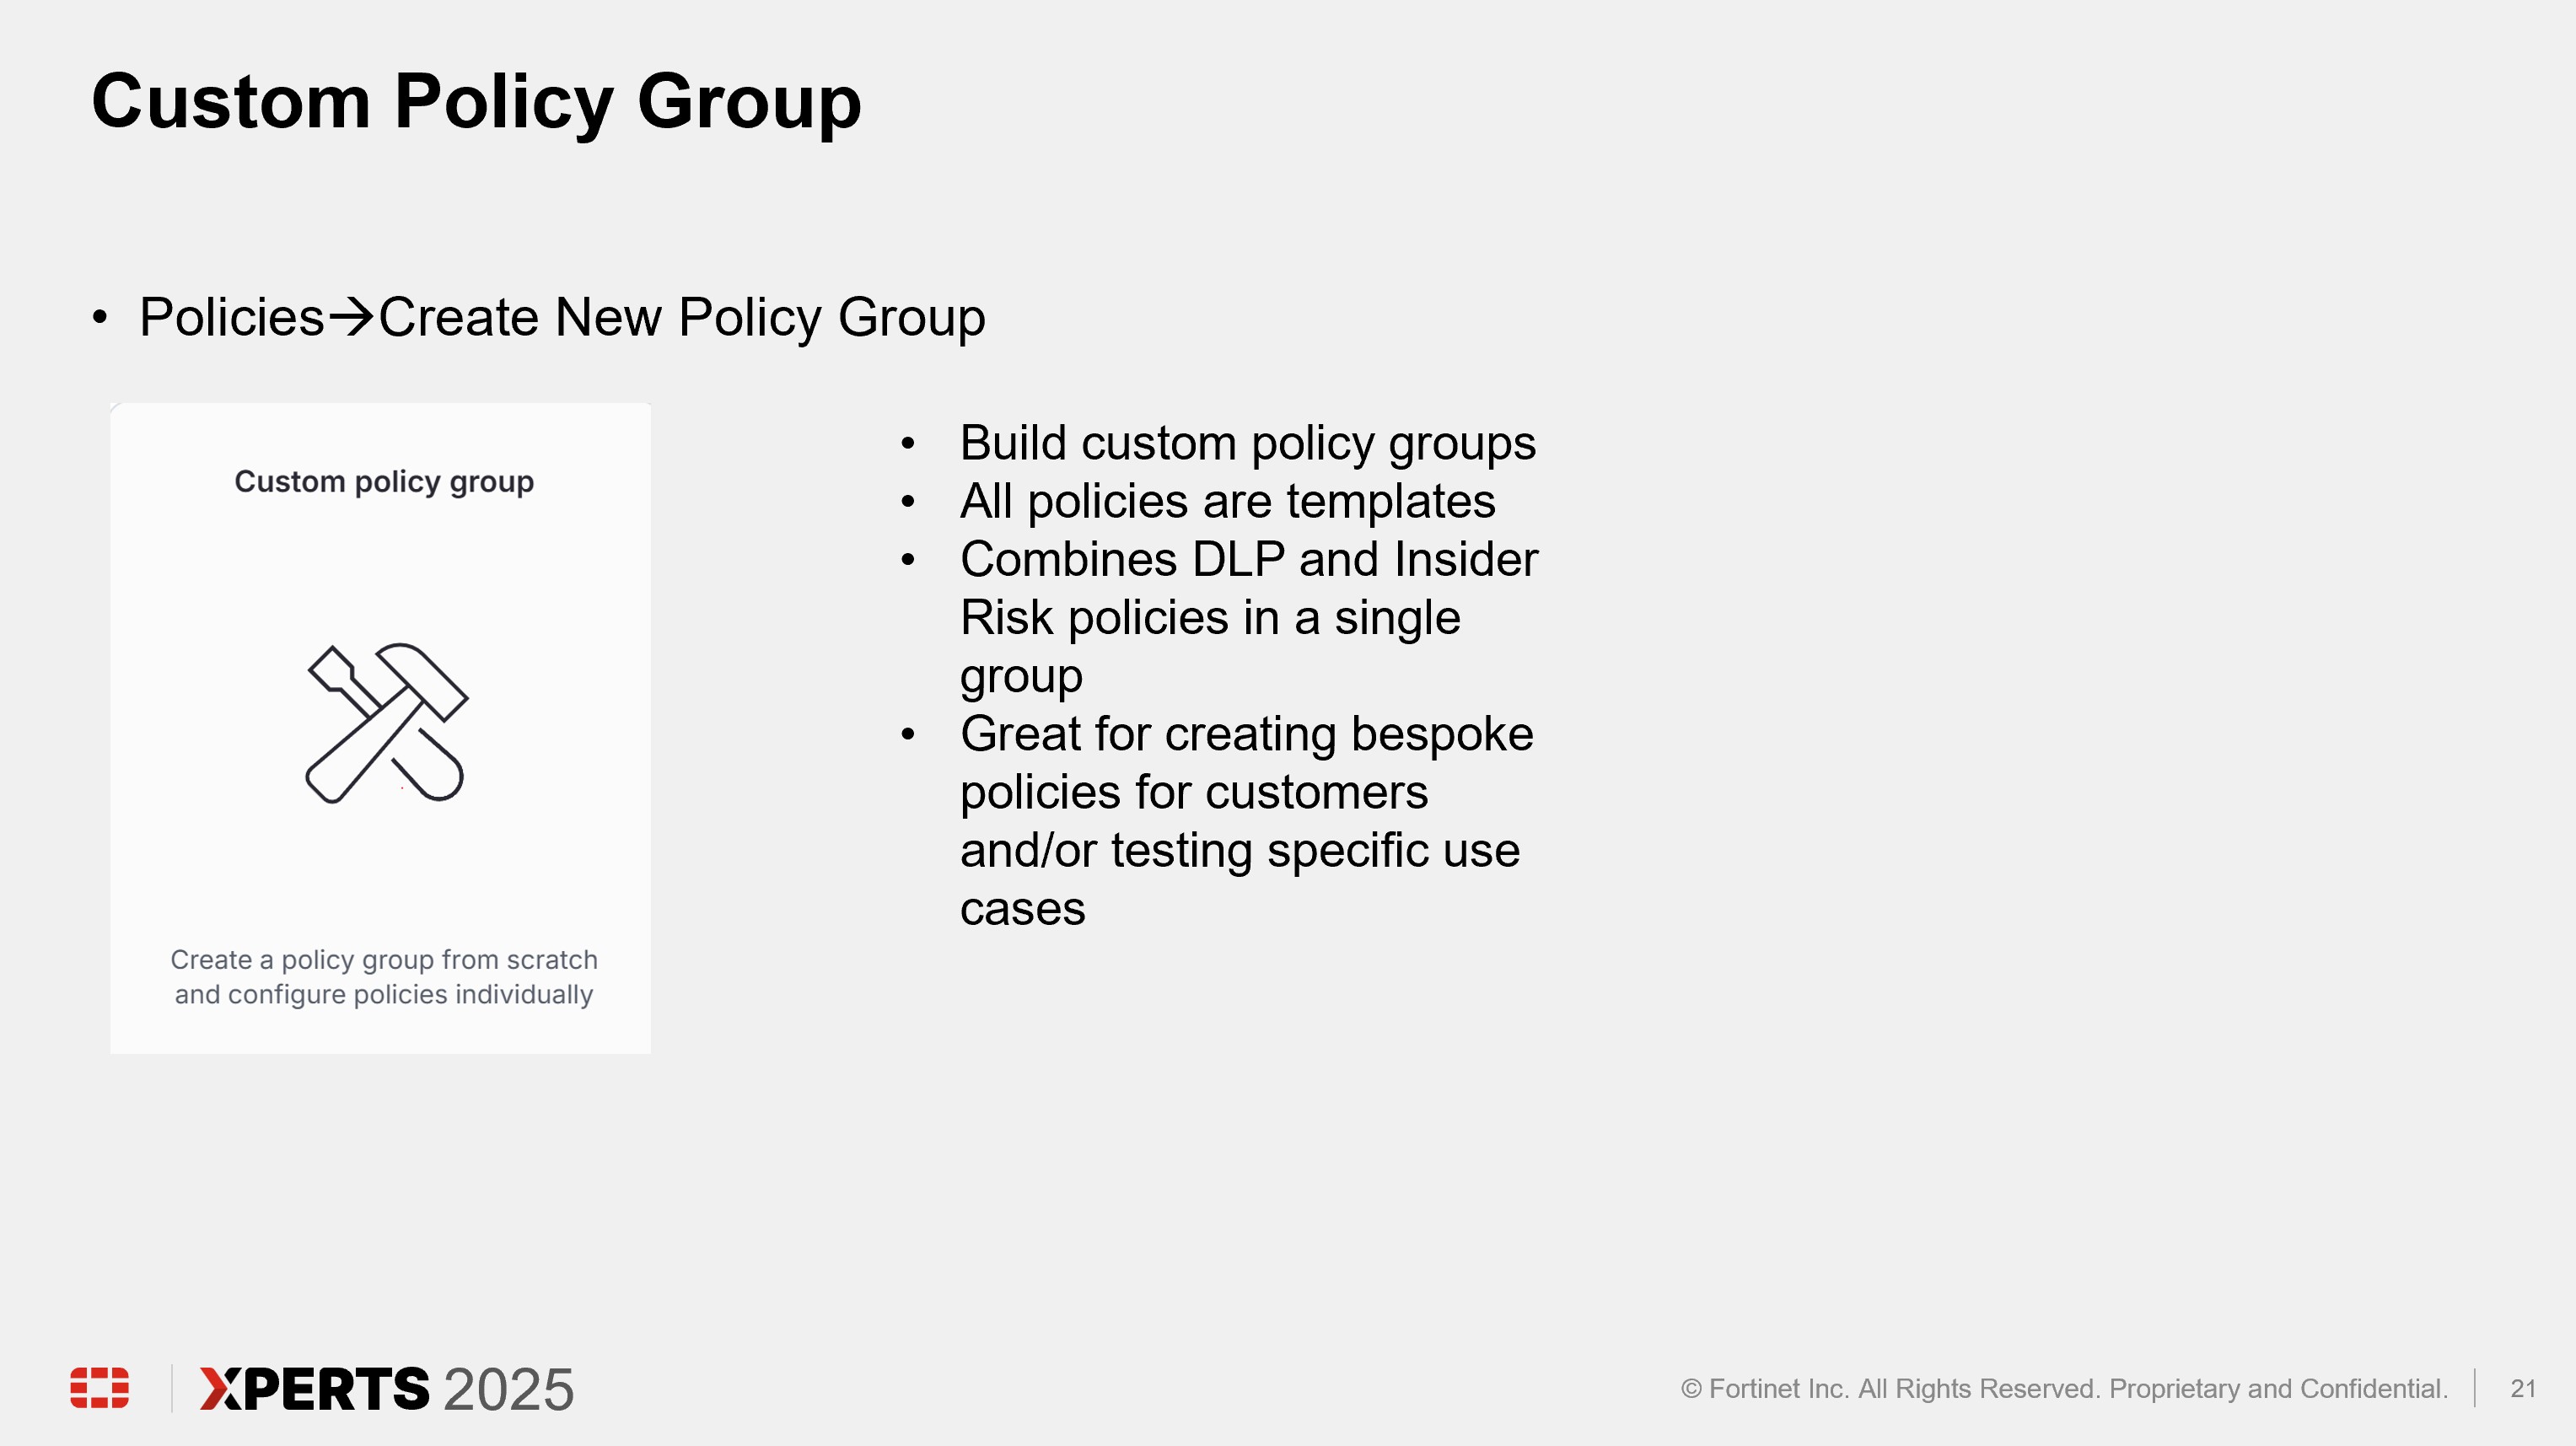
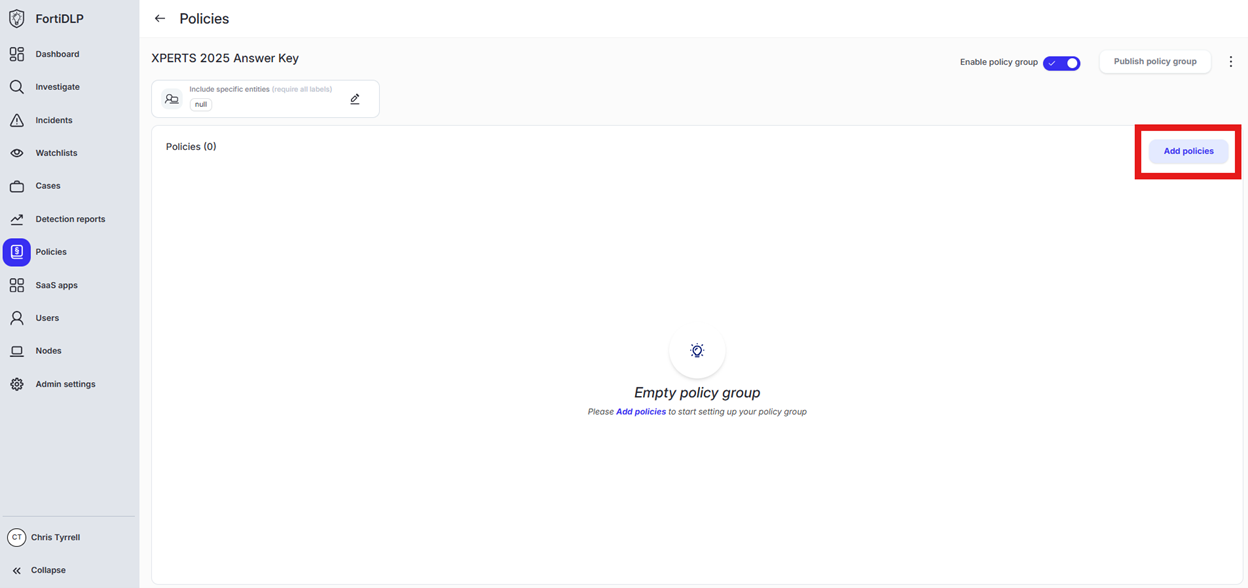
Click “Policies” in the left pane and click “Create new policy group”

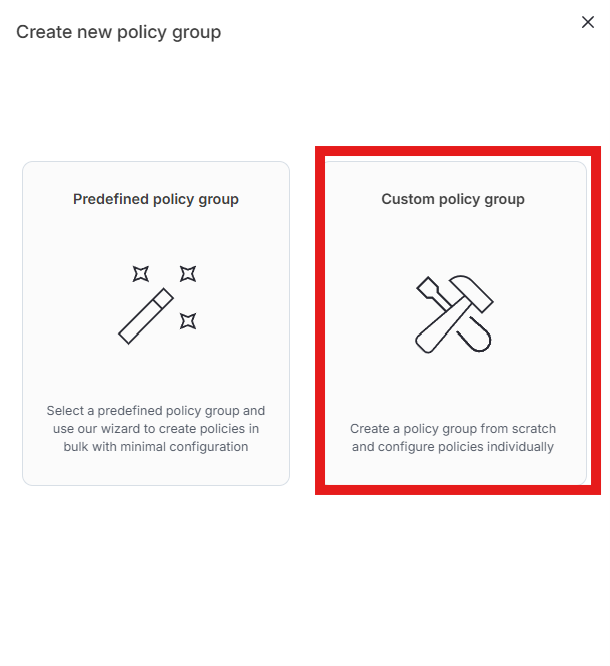
Click “Custom policy group”
Enter first initial last name in the “Name” text box (ex. John Smith will enter “jsmith”) and click “Create”
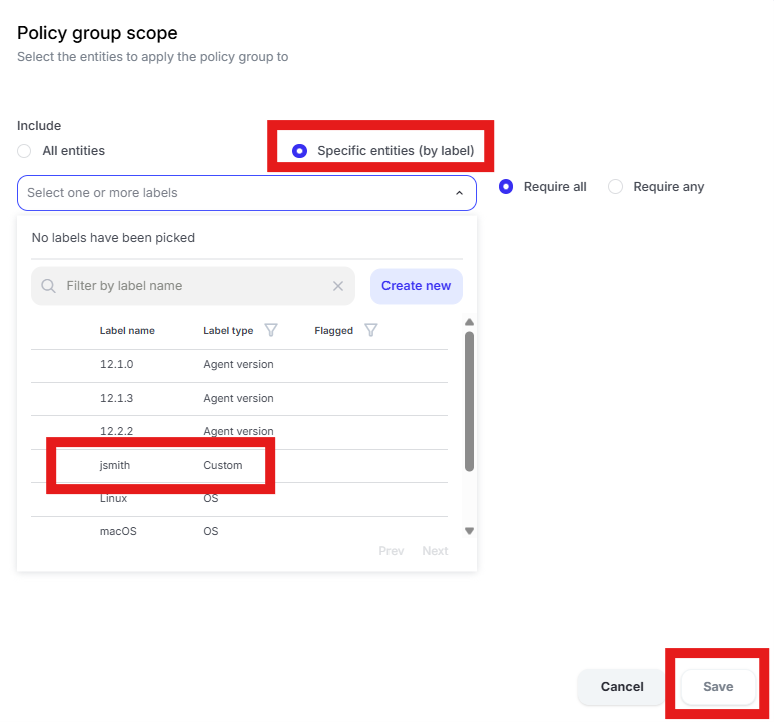
Click the edit pencil in the “Include” box that currently shows “All entities”

Select the “Specific entities (by label) radio button and choose the label created in “Use case 1” and then click “Save”
Use Case 3
Details
Prevent PII (US SSN) data from being uploaded to website
Open the policy group created in use case 2 (if not already open)
Click “Add policies”

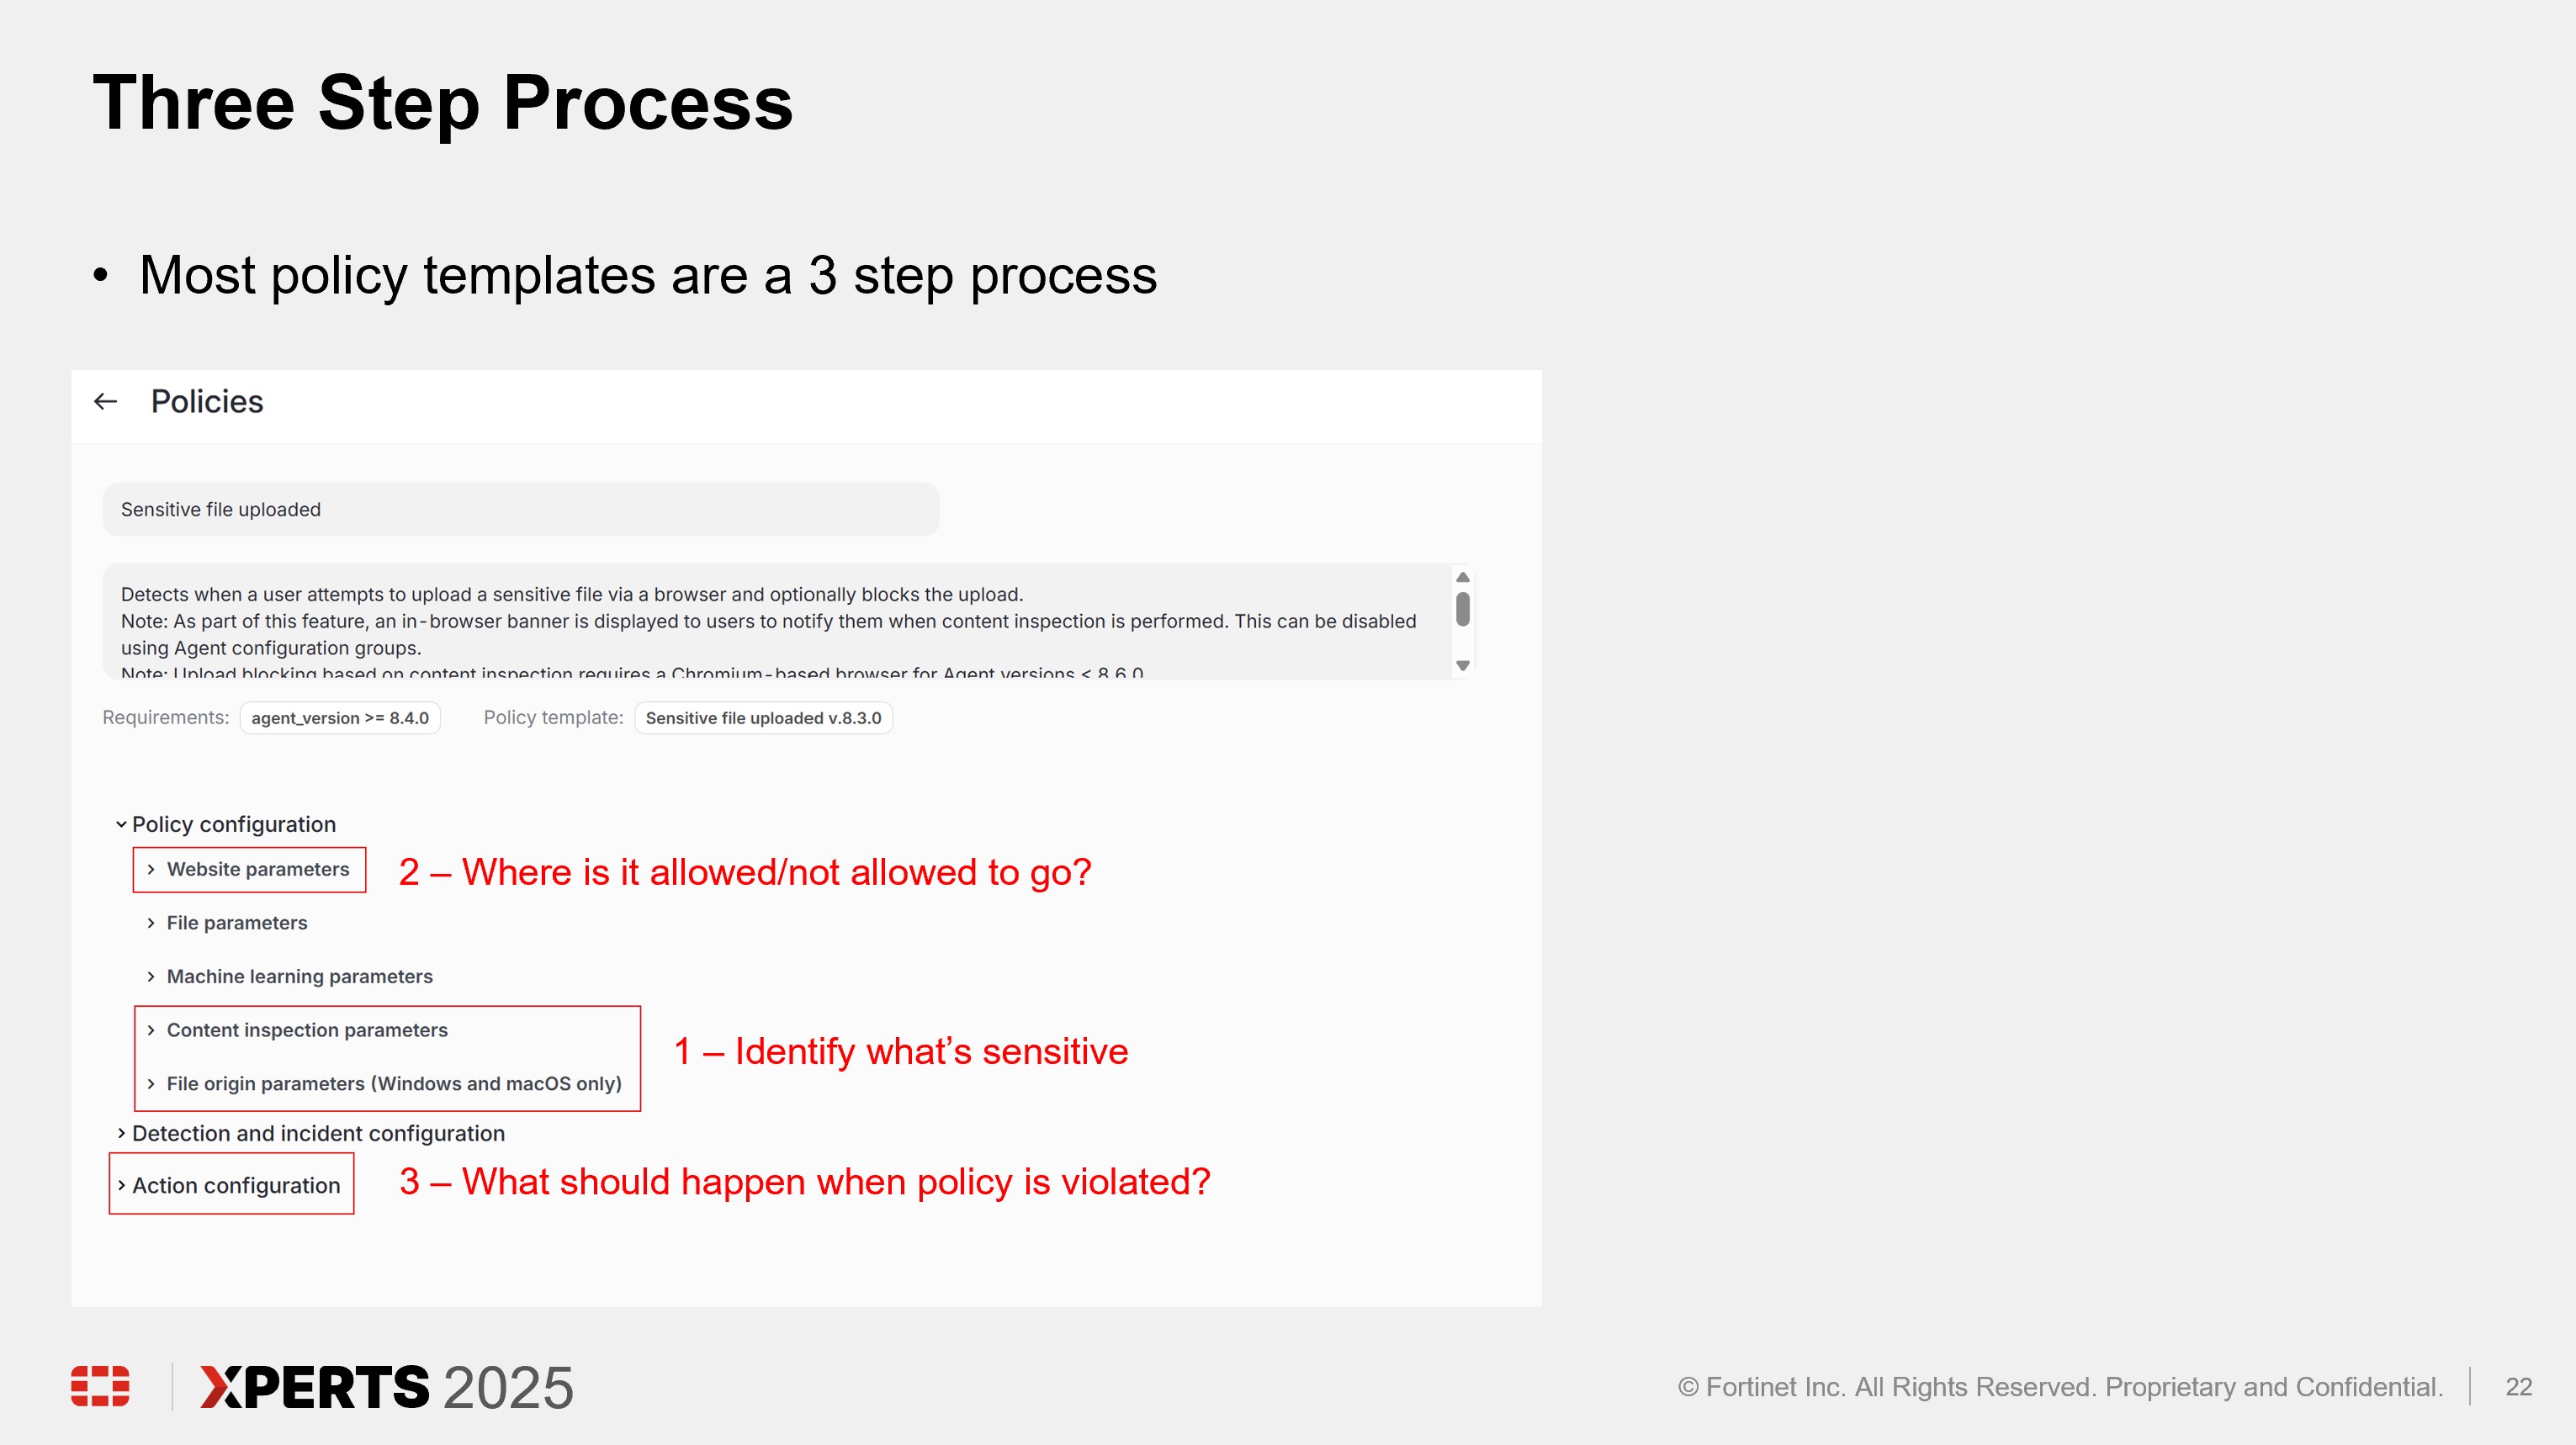
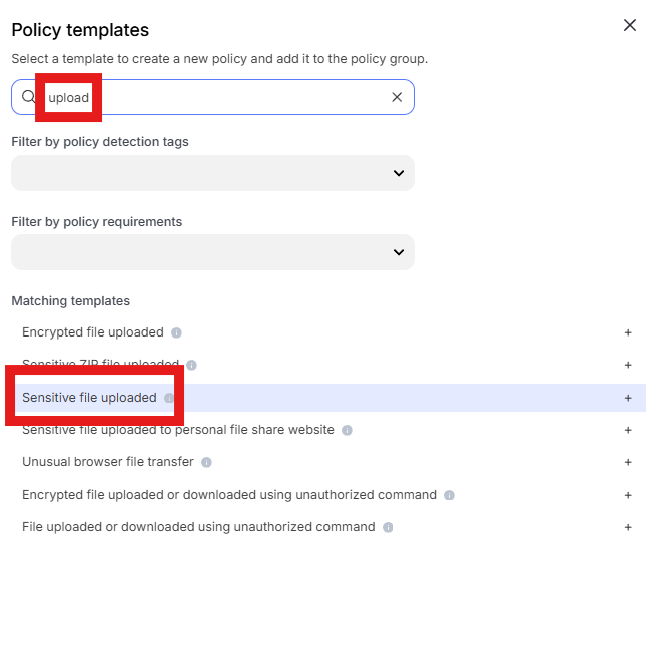
Enter “Upload” into the “Search” text box OR expand “Browser Templates” and select “Sensitive file uploaded”
Change the policy name to “jsmith – Prevent upload of PII to website” where “jsmith” is your first initial and last name.
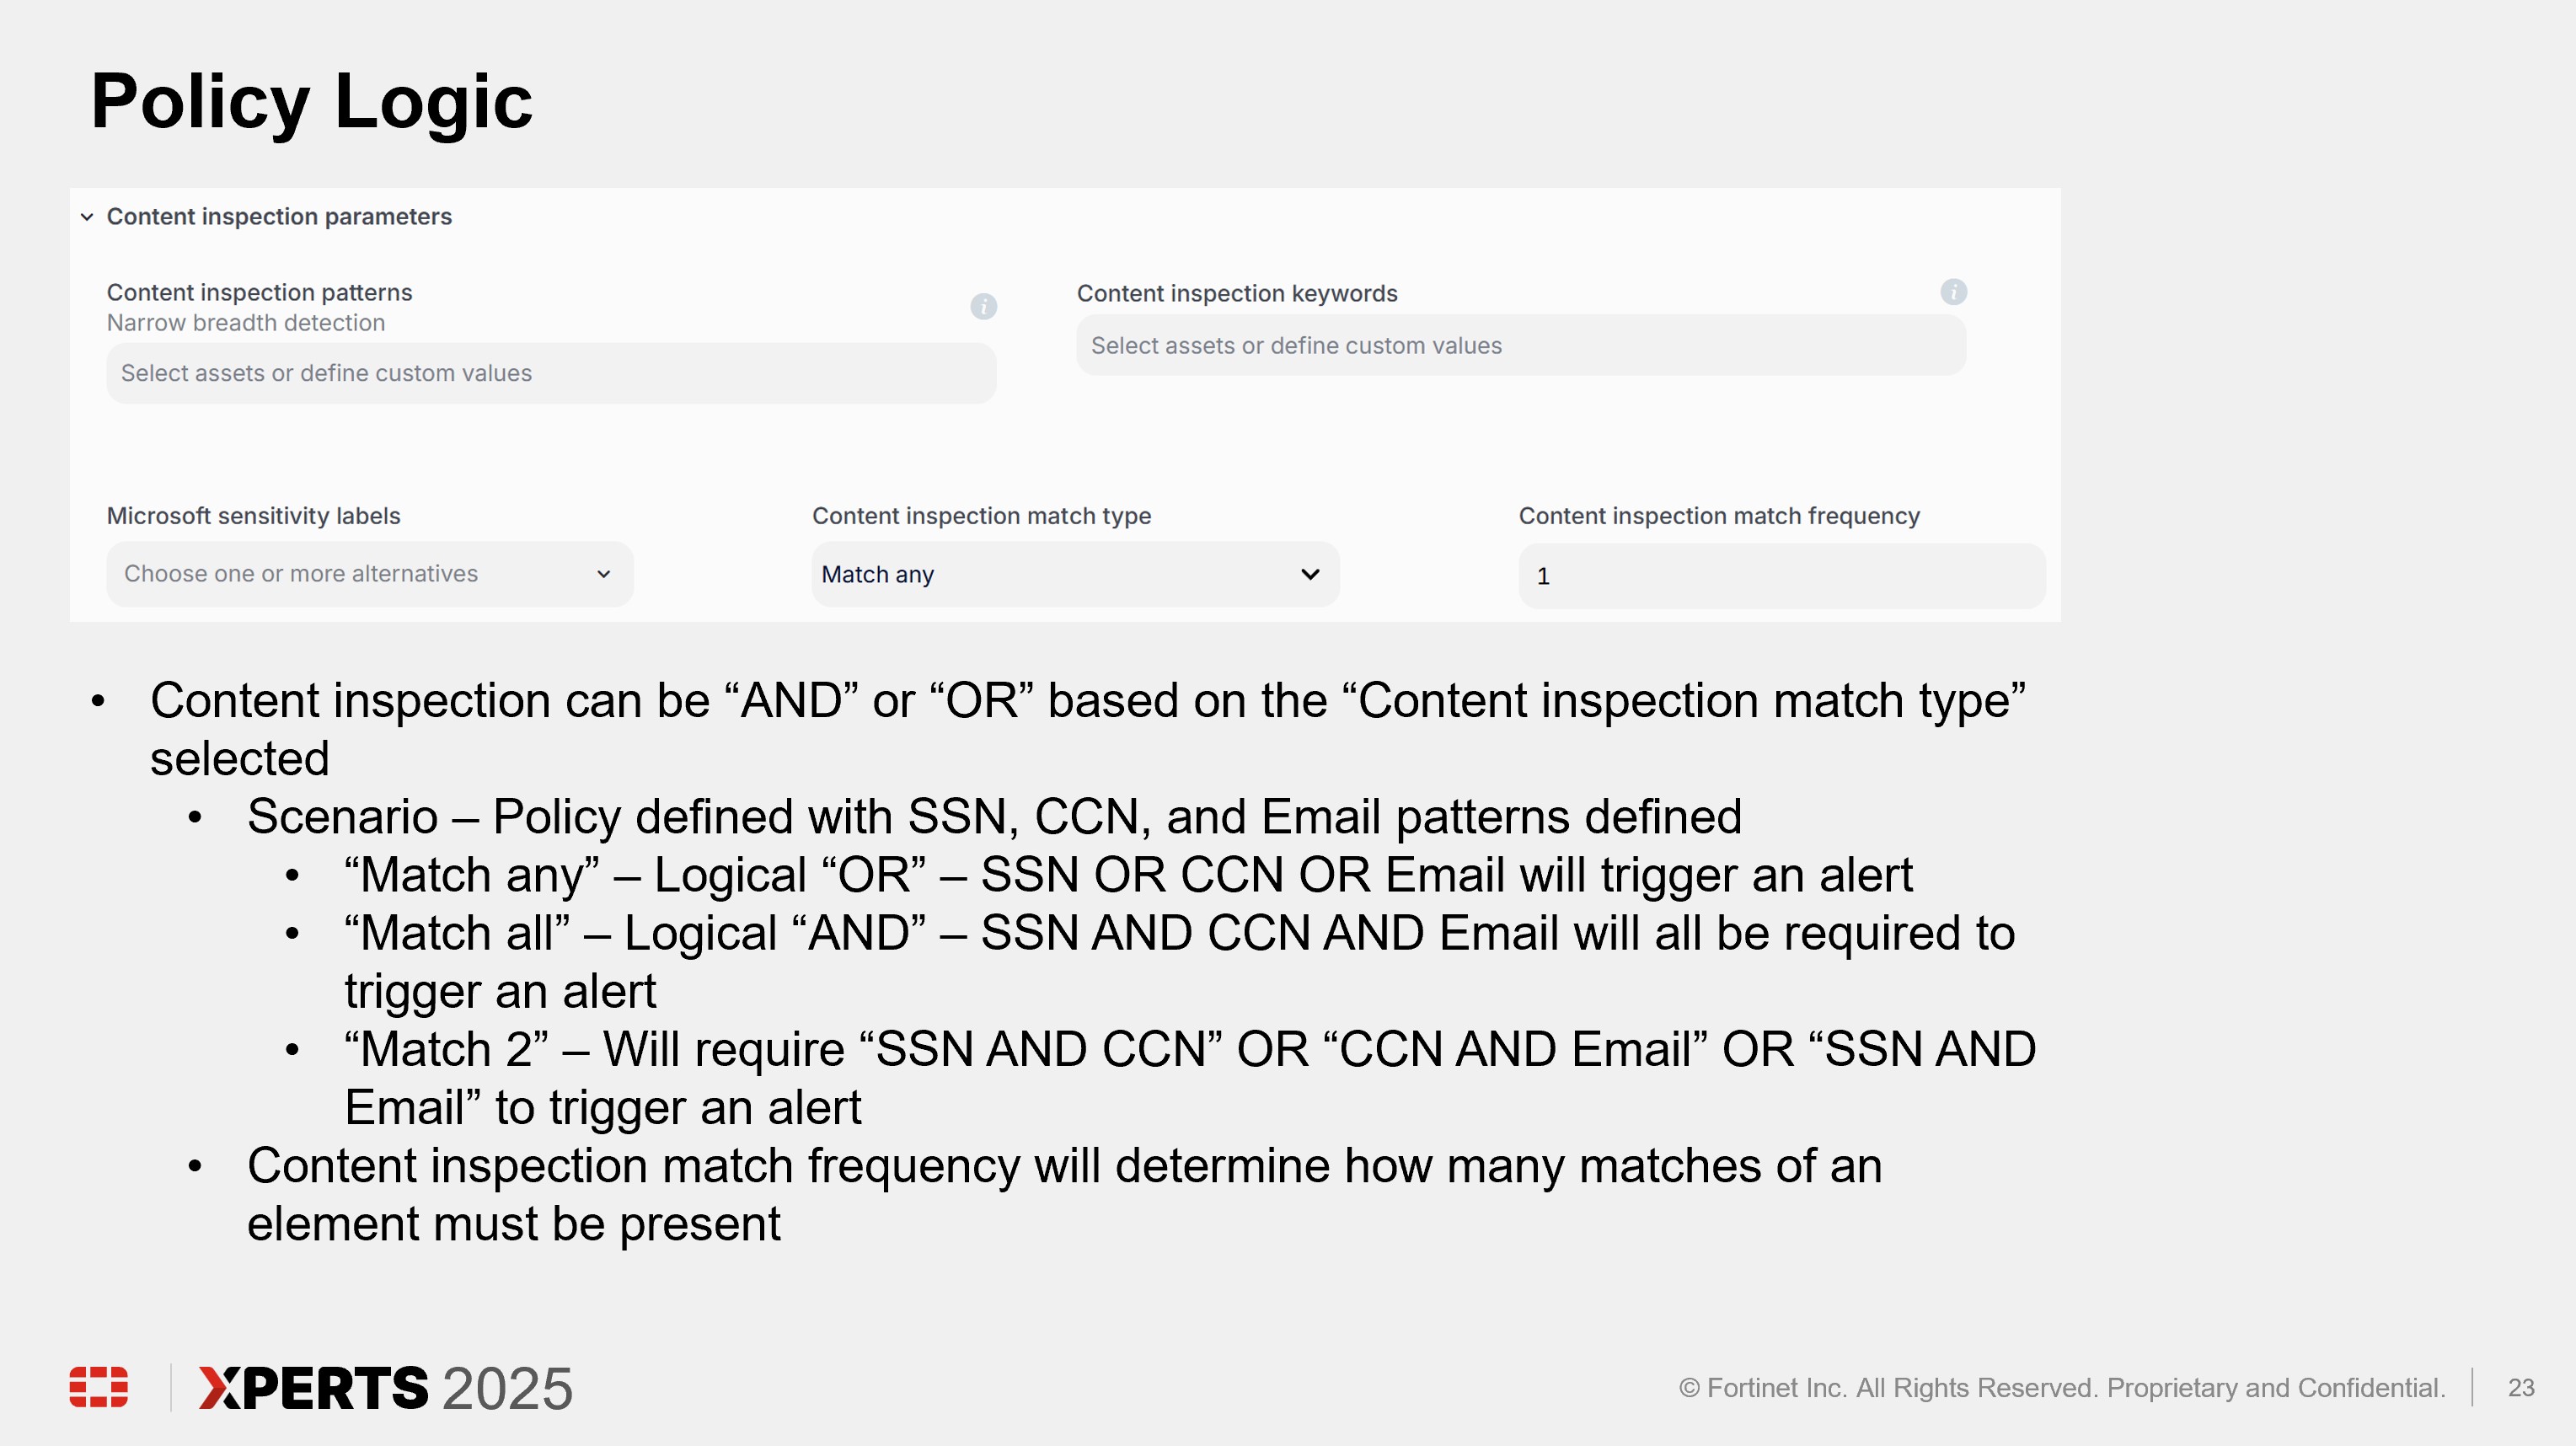
Scroll down to “Content inspection parameters” and click into “Select assets or define custom values”

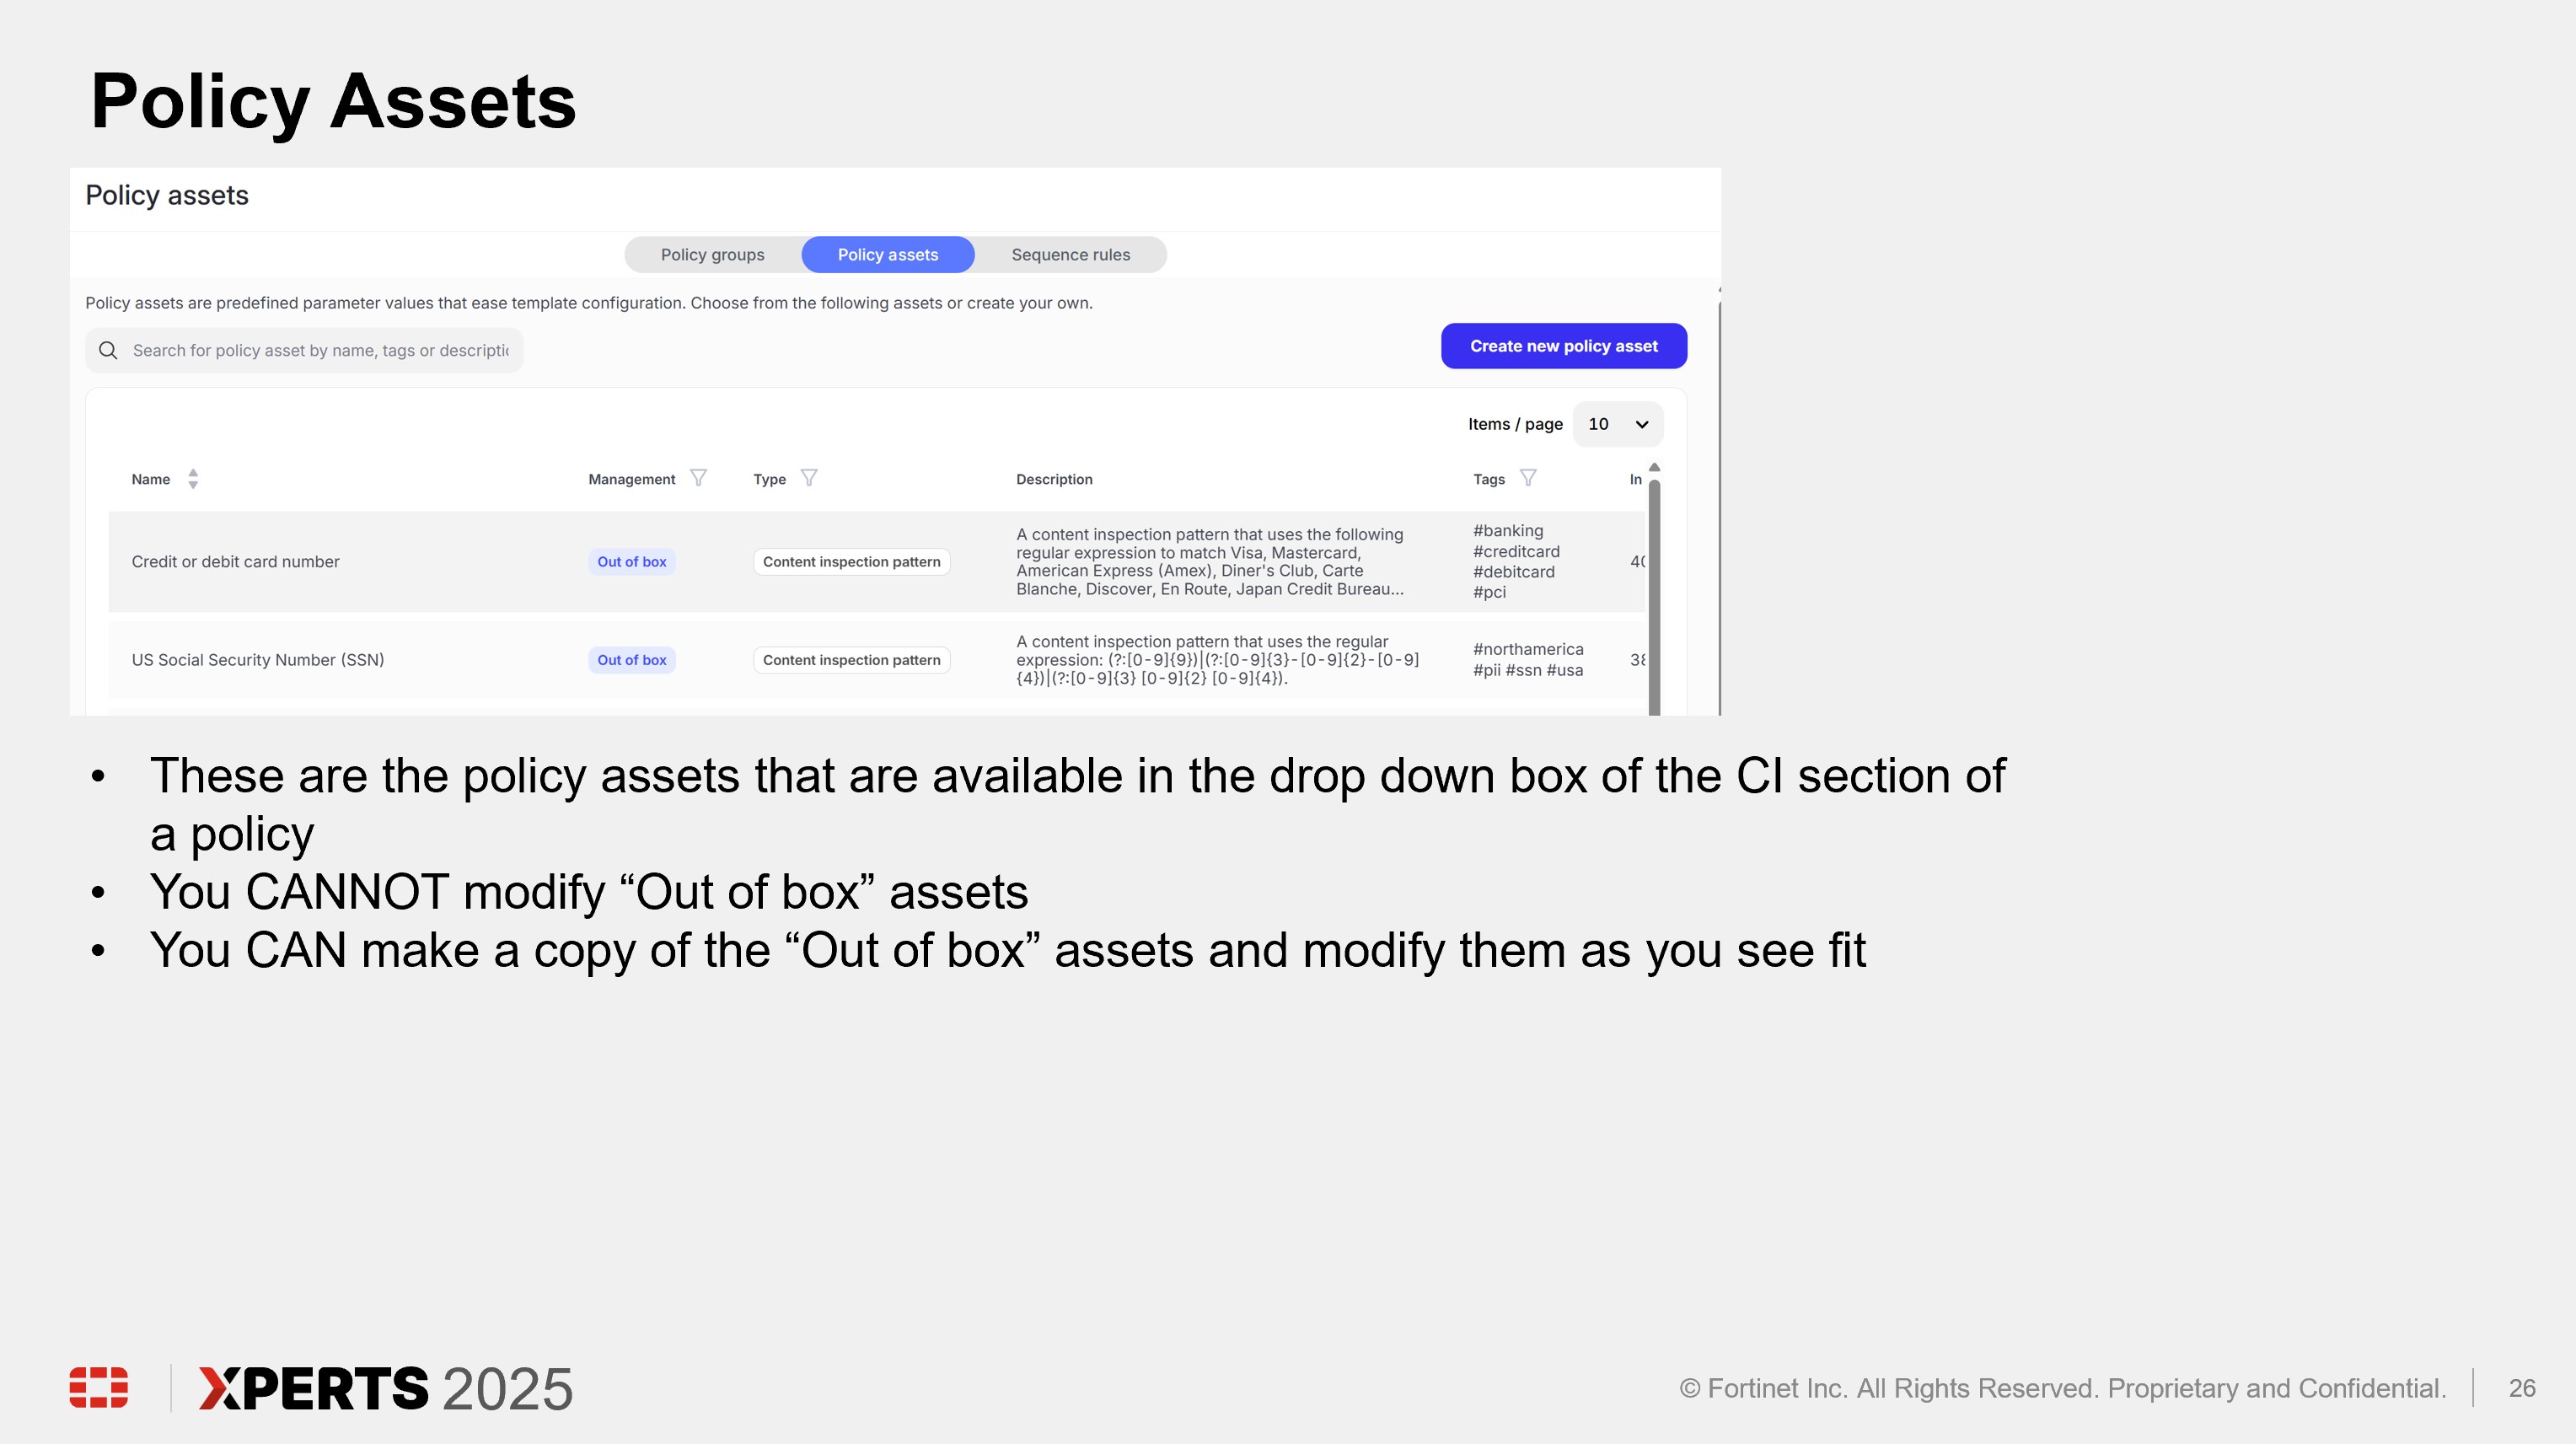
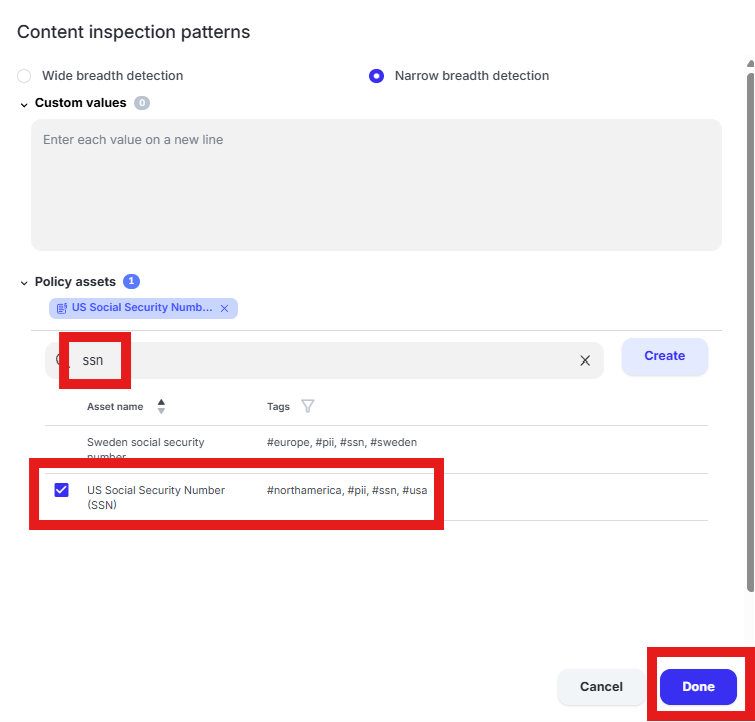
Enter “ssn” in the “Filter by policy asset name” and select “US Social Security Number (SSN)” by placing a check in the box. Click “Done” to finalize selection of the pattern.
Tip
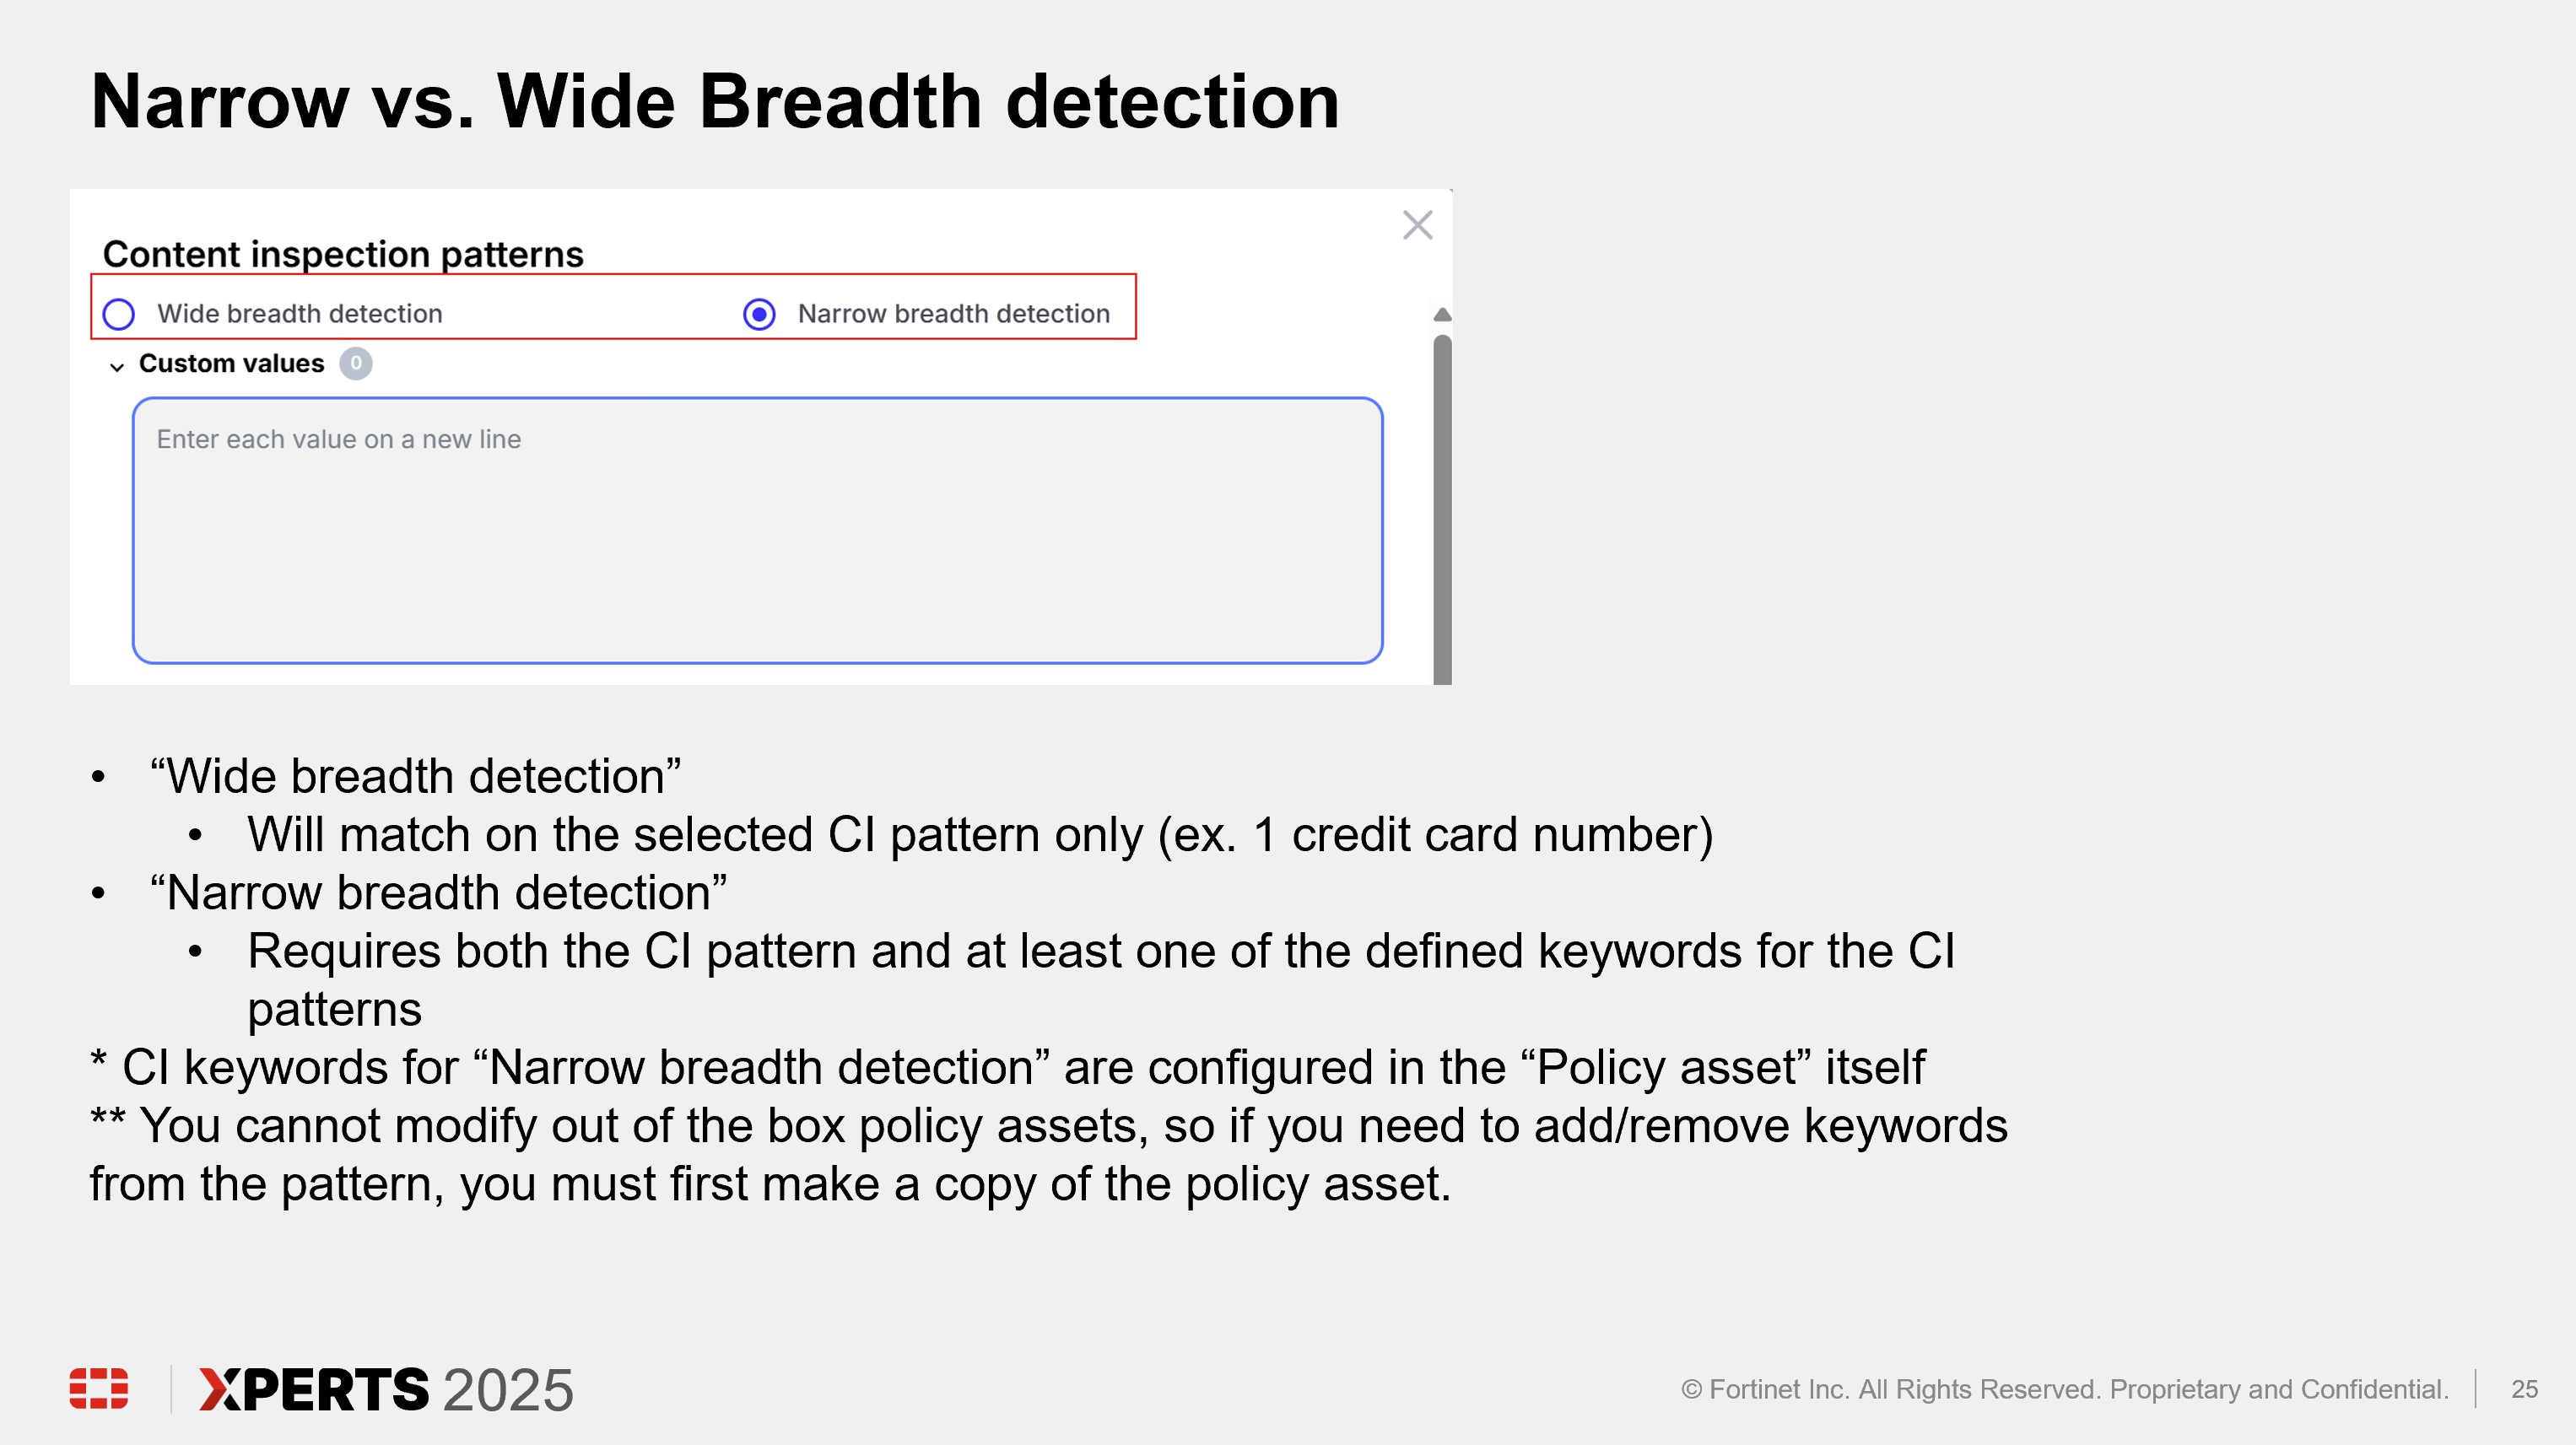
“Wide breadth detection” will match on the number only. “Narrow breadth detection” will match on the specified pattern in addition to a keyword as defined in the “Policy asset” being used. The test file downloaded from dlptest.ai will trigger the alert with either wide or narrow breadth selected.
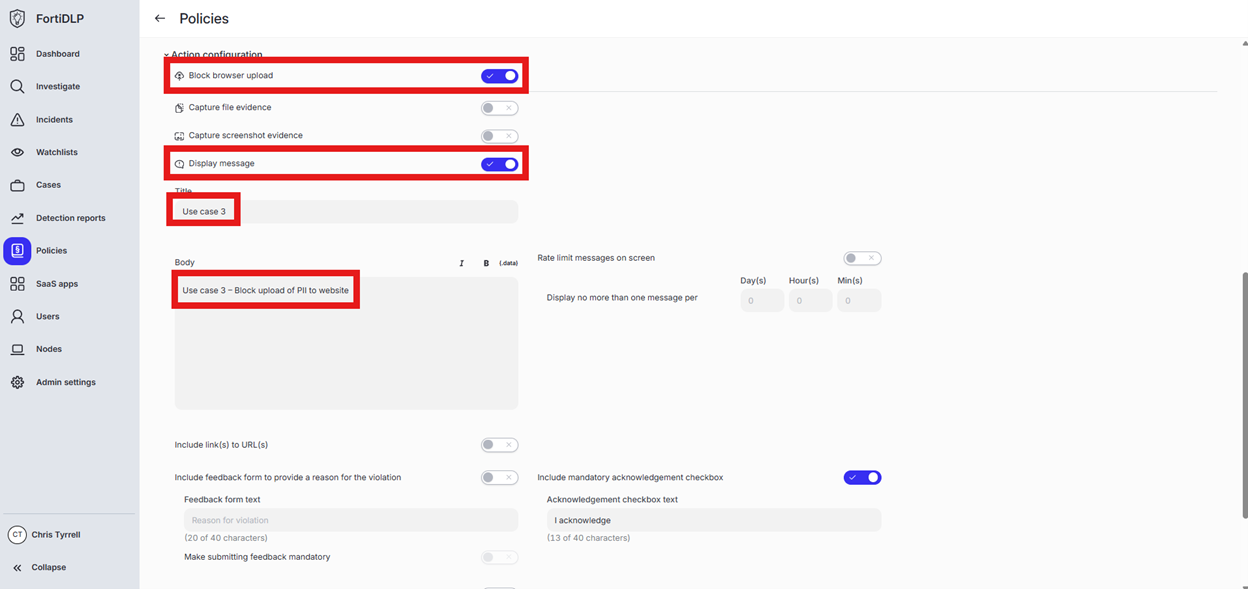
Expand “Action configuration” and enable “Block browser upload” and “Display message. Enter “Use case 3” in the “Title” text box. Enter “Use case 3 – Block upload of PII to website” in the “Body” text box. Optionally, enable the other options in the “Display message” area if desired.
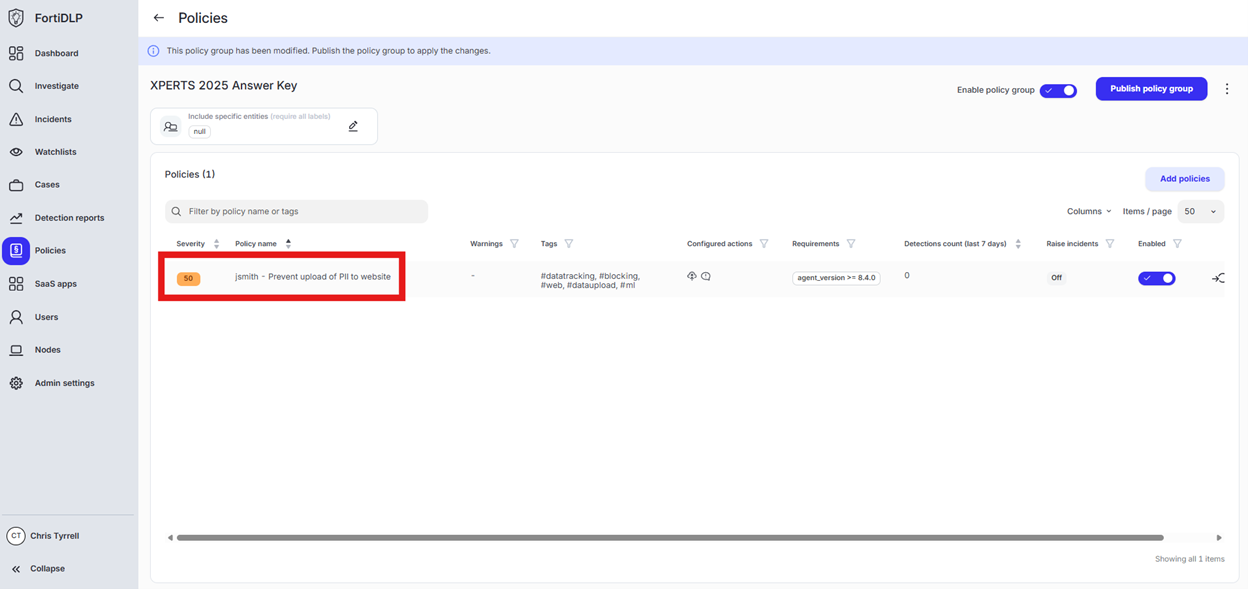
Scroll down and click “Save and exit” in the lower right hand corner.
You should now see the newly created policy in the window
Use Case 4
Details
Prevent PII (US SSN) data from being printed to PDF
Open the policy group created in use case 2 (if not already open)
Click “Add policies”

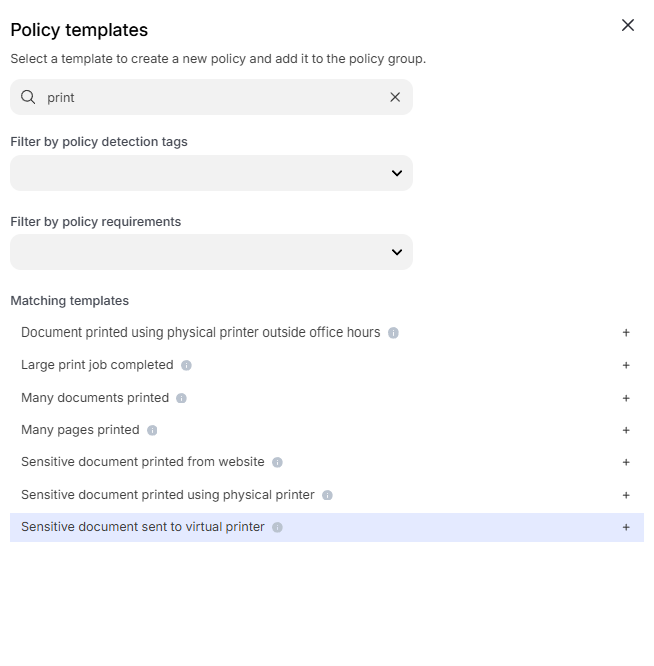
Enter “print” into the “Search” text box OR expand “Printing templates” and select “Sensitive document sent to virtual printer”
Change the policy name to “jsmith – Prevent printing of PII to PDF” where “jsmith” is your first initial and last name.
Scroll down to “Content inspection parameters” and click into “Select assets or define custom values”
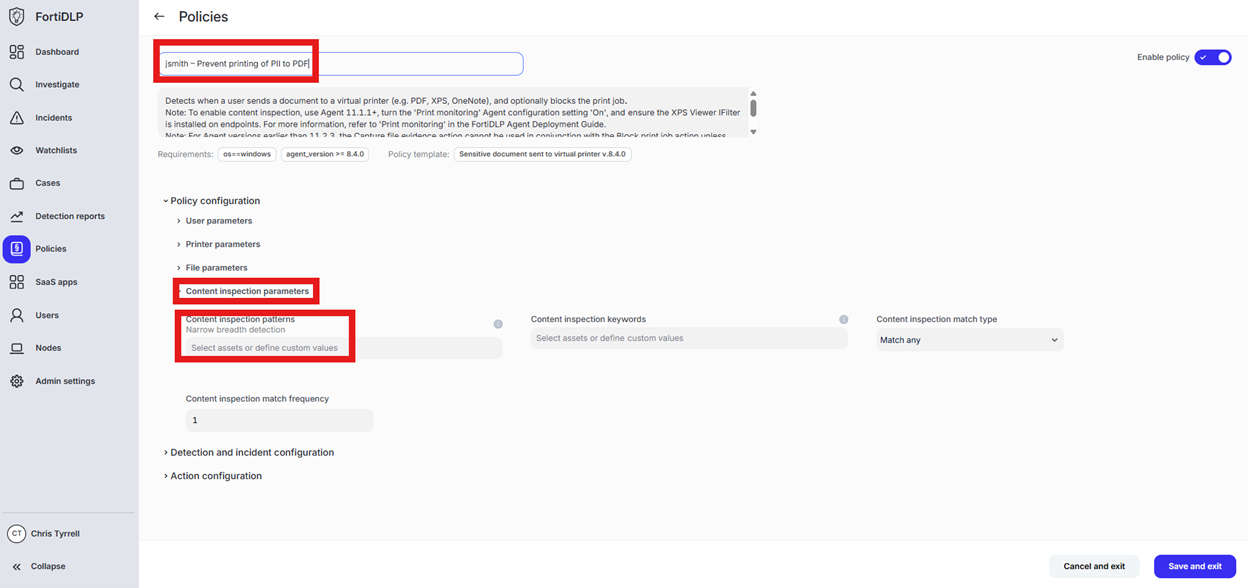
Enter “ssn” in the “Filter by policy asset name” and select “US Social Security Number (SSN)” by placing a check in the box. Click “Done” to finalize selection of the pattern.

Tip
“Wide breadth detection” will match on the number only. “Narrow breadth detection” will match on the specified pattern in addition to a keyword as defined in the “Policy asset” being used. The test file downloaded from dlptest.ai will trigger the alert with either wide or narrow breadth selected.
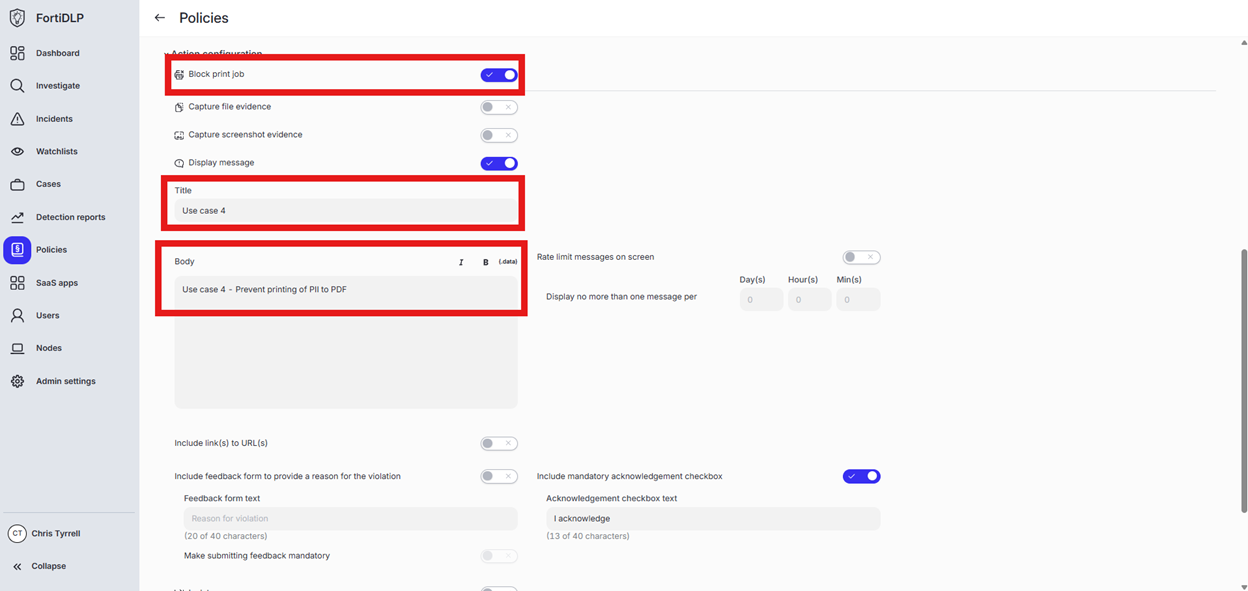
Expand “Action configuration” and enable “Block browser upload” and “Display message. Enter “Use case 4” in the “Title” text box. Enter “Use case 4 - Prevent printing of PII to PDF” in the “Body” text box. Optionally, enable the other options in the “Display message” area if desired.
Scroll down and click “Save and exit” in the lower right hand corner.
You should now see the newly created policy in the window
Use Case 5
Details
Generate a warning prompt for any file downloaded from OneDrive
Open the policy group created in use case 2 (if not already open)
Click “Add policies”

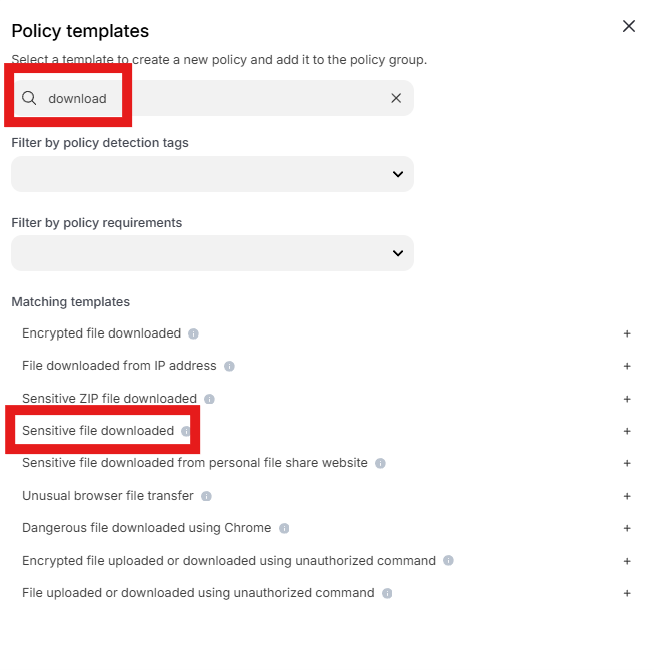
Enter “download” into the “Search” text box OR expand “Browser templates” and select “Sensitive file downloaded”
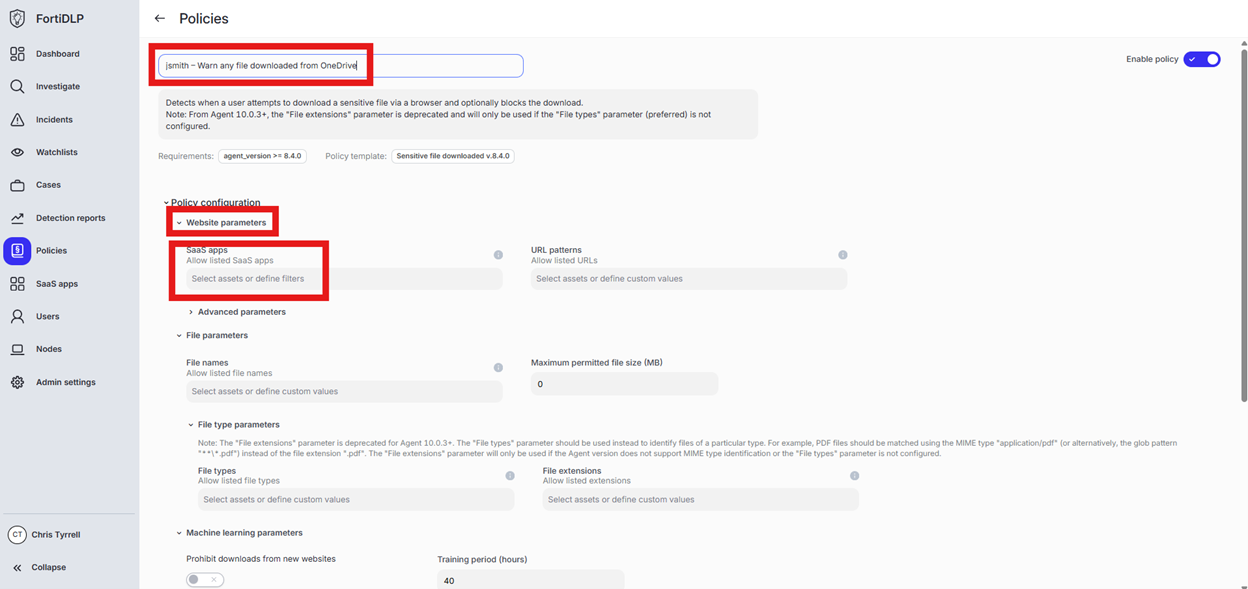
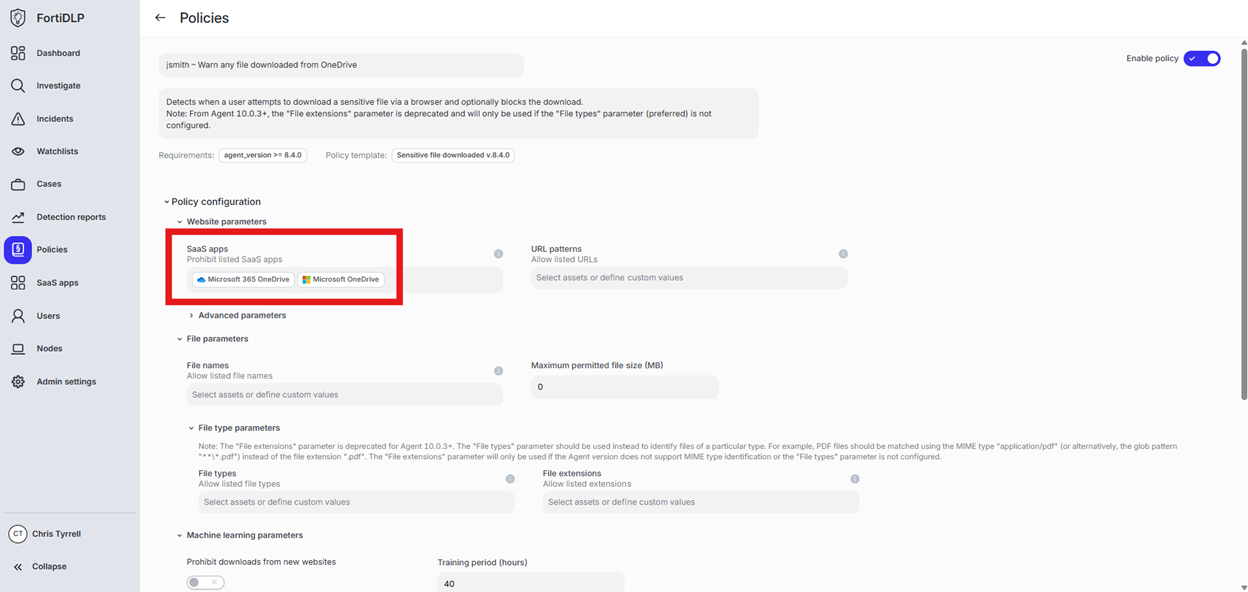
Change the policy name to “jsmith – Warn any file downloaded from OneDrive” where “jsmith” is your first initial and last name.
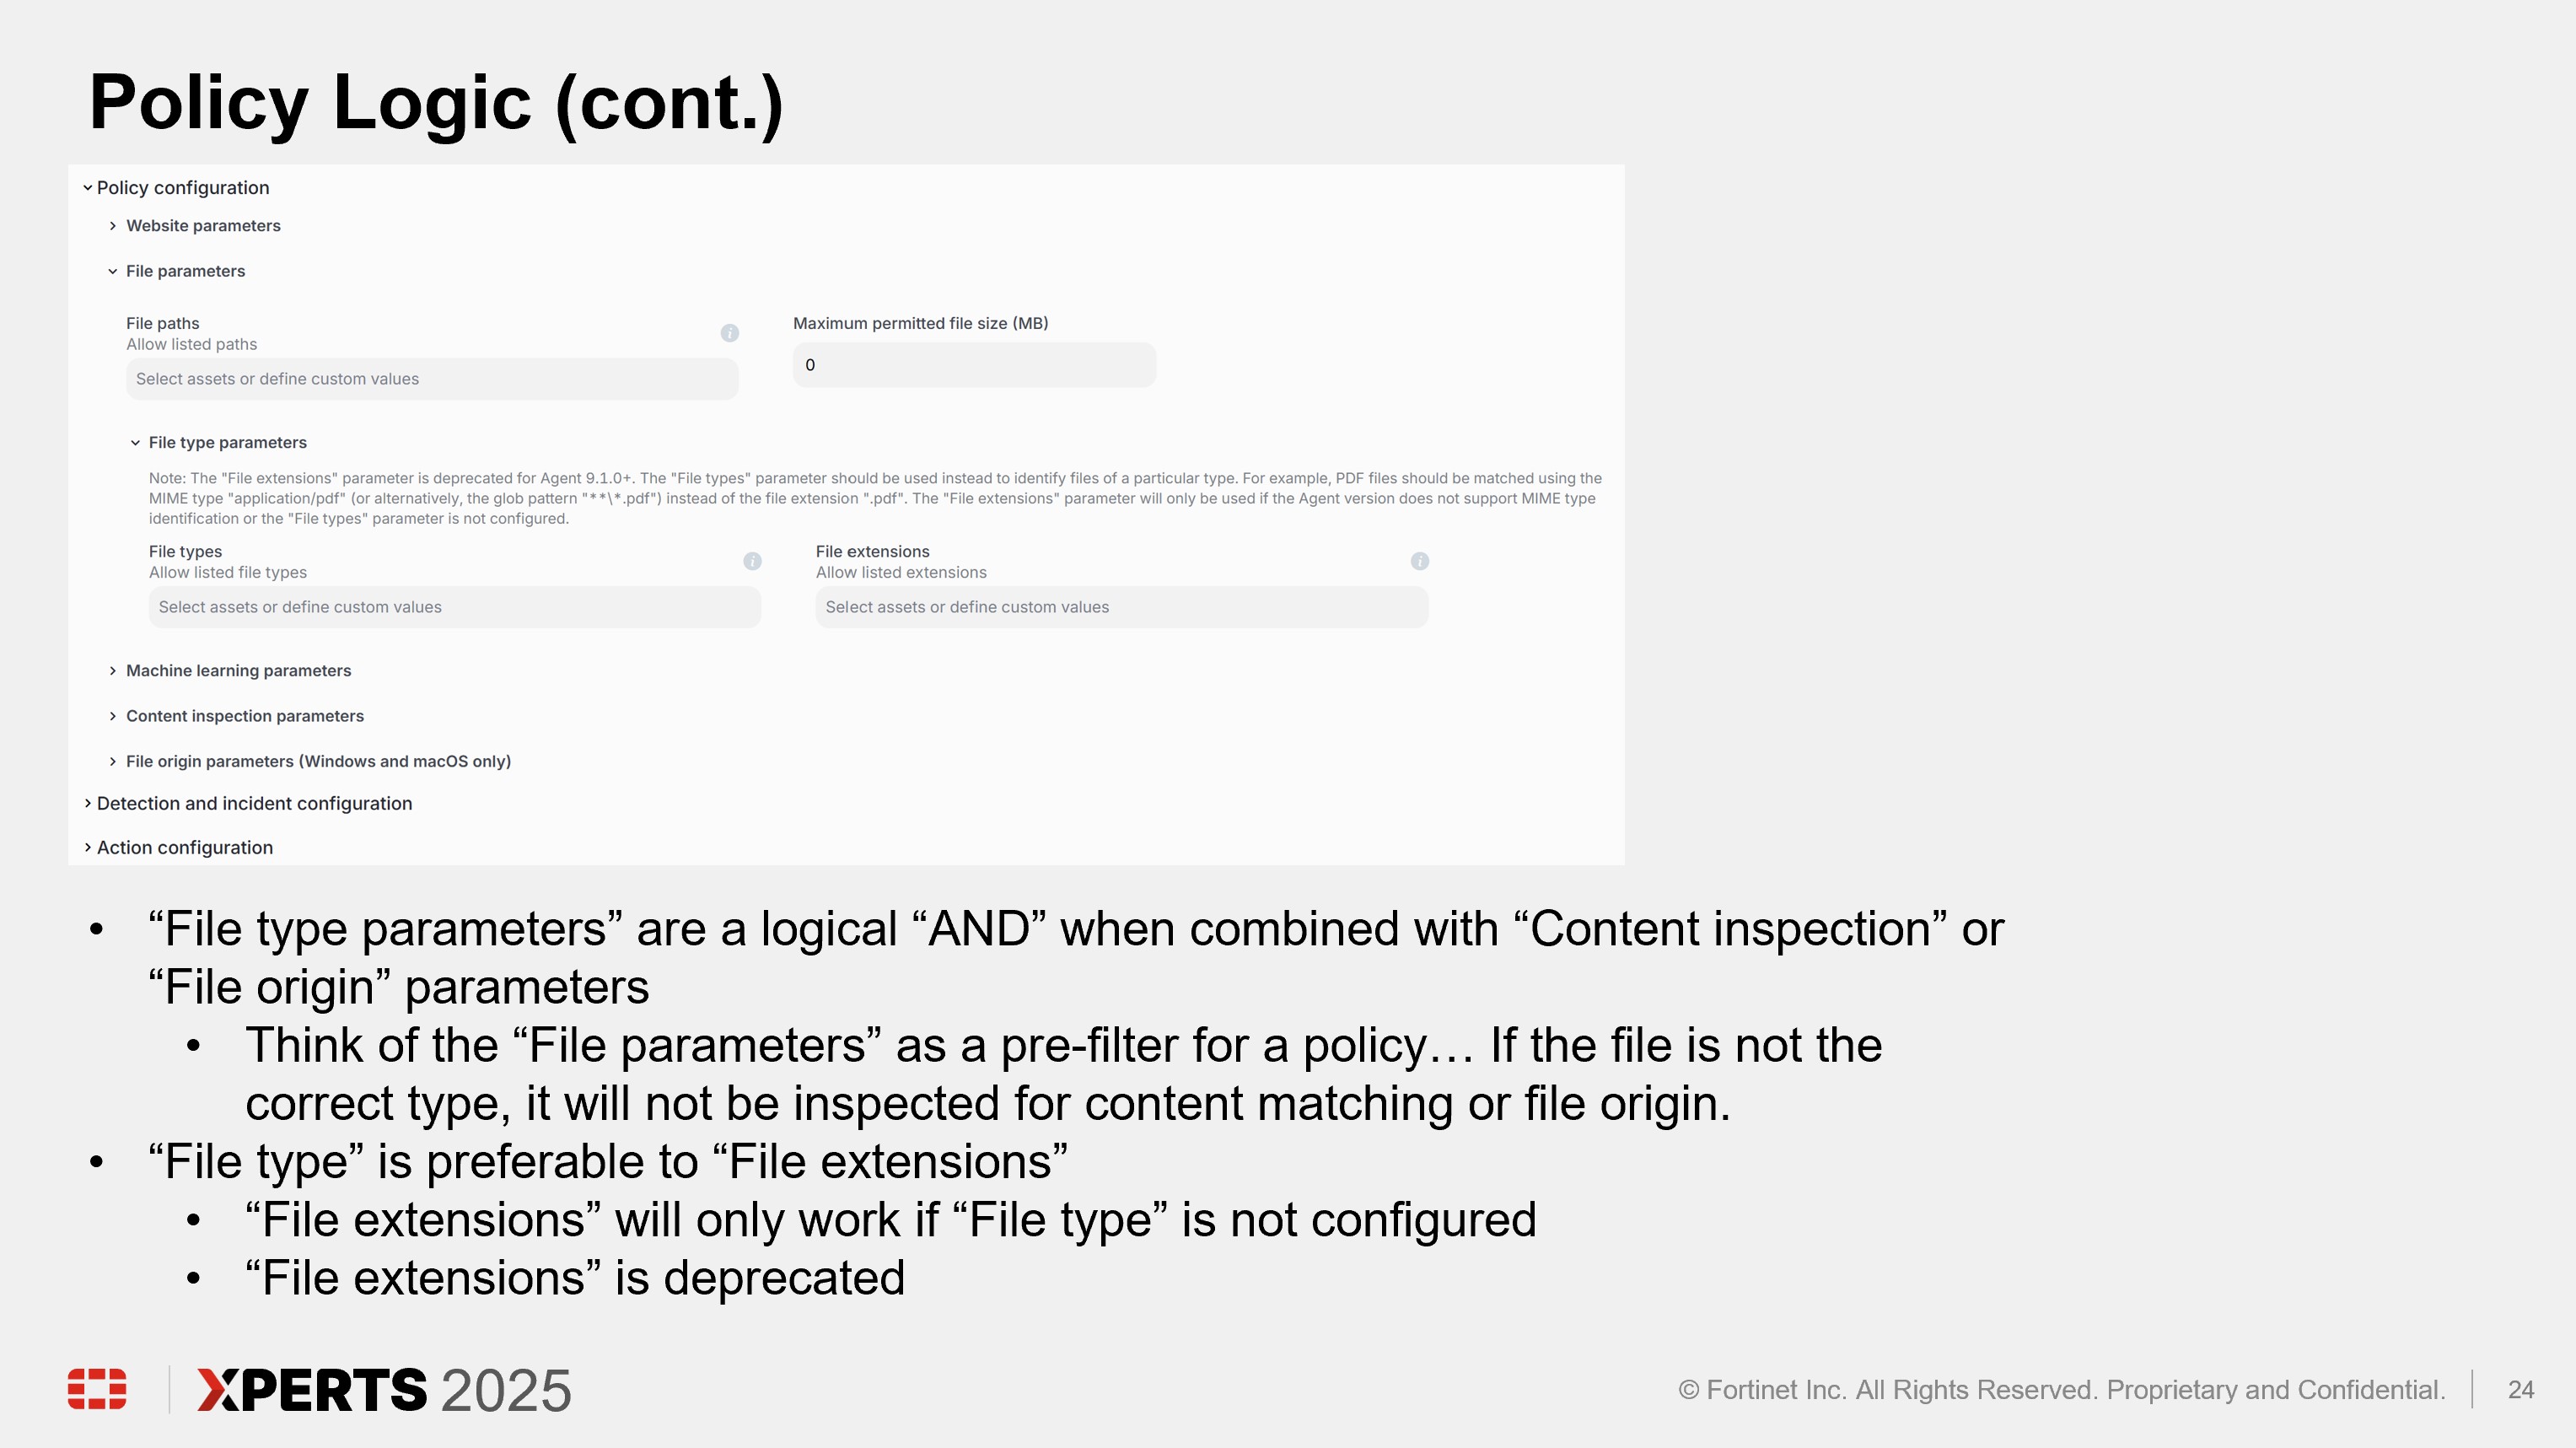
Scroll down to “Website Parameters” and click into “Select assets or define filters” under “SaaS apps”
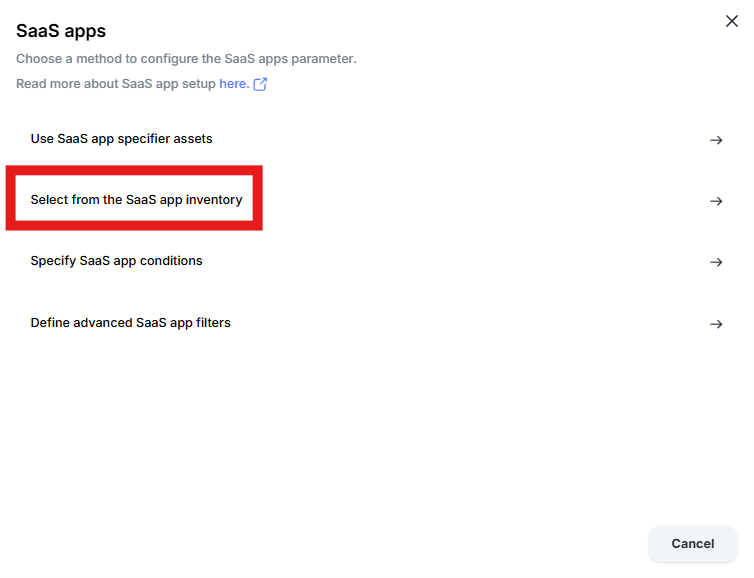
Click “Select from the SaaS app inventory”
Change the radio button to “Prohibit listed SaaS apps” and click “Add apps”

Enter “one” into the “Filter by SaaS app name” text box and select “Microsoft 365 OneDrive” and “Microsoft OneDrive” by placing checks in the box. Click “Add apps”
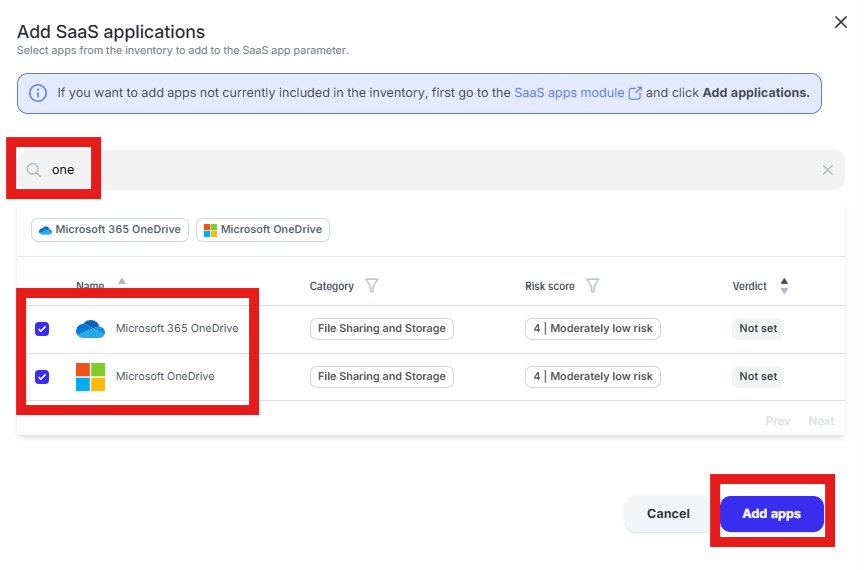
Click “Done” to add the apps to the policy
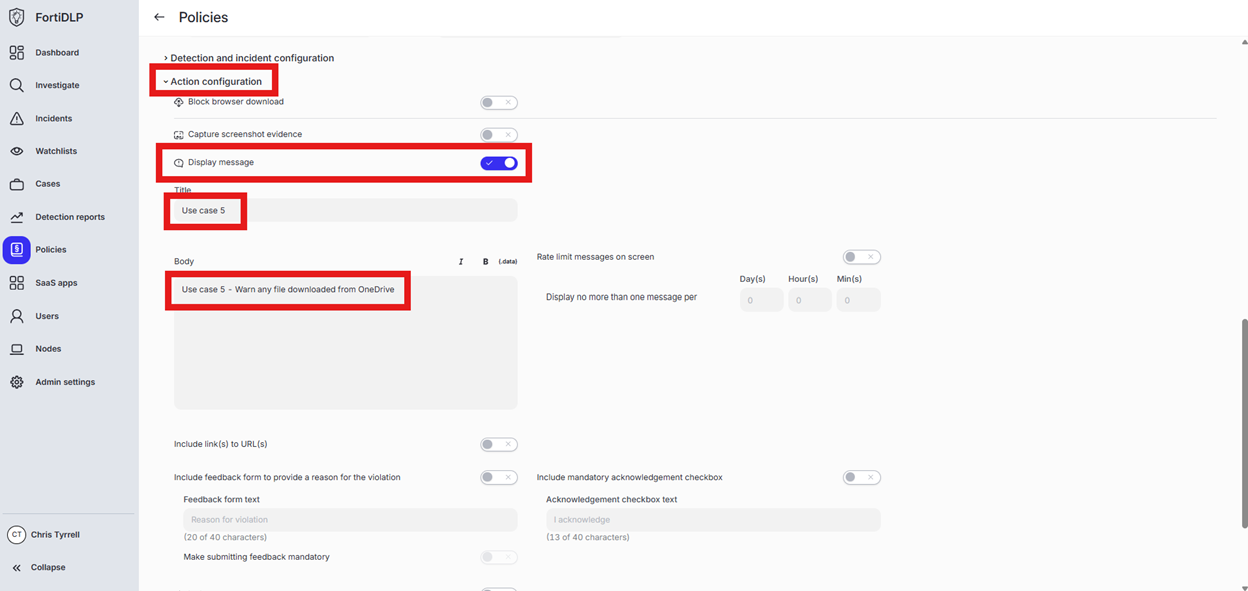
Expand “Action configuration” and enable “Display message. Enter “Use case 5” in the “Title” text box. Enter “Use case 5 – Warn any file downloaded from OneDrive” in the “Body” text box. Optionally, enable the other options in the “Display message” area if desired.
Scroll down and click “Save and exit” in the lower right hand corner.
You should now see the newly created policy in the window
Use Case 6
Details
Prevent file downloaded from OneDrive being uploaded to dlptest.ai
Open the policy group created in use case 2 (if not already open)
Click “Add policies”

Enter “Upload” into the “Search” text box OR expand “Browser Templates” and select “Sensitive file uploaded”

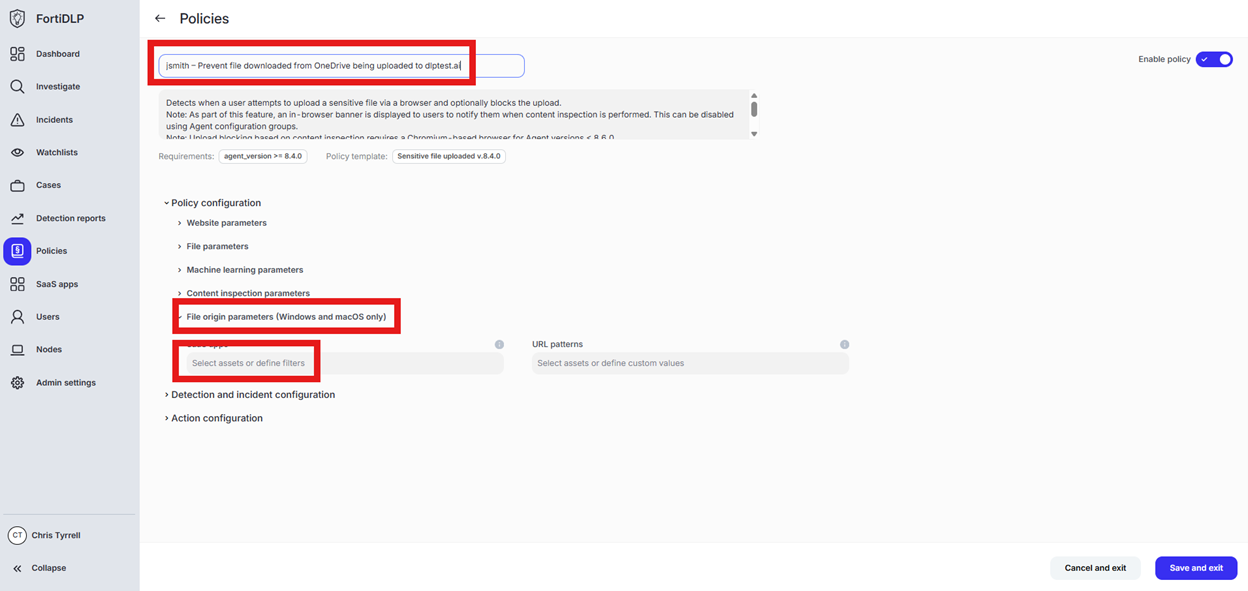
Change the policy name to “jsmith – Prevent file downloaded from OneDrive being uploaded to dlptest.ai” where “jsmith” is your first initial and last name.
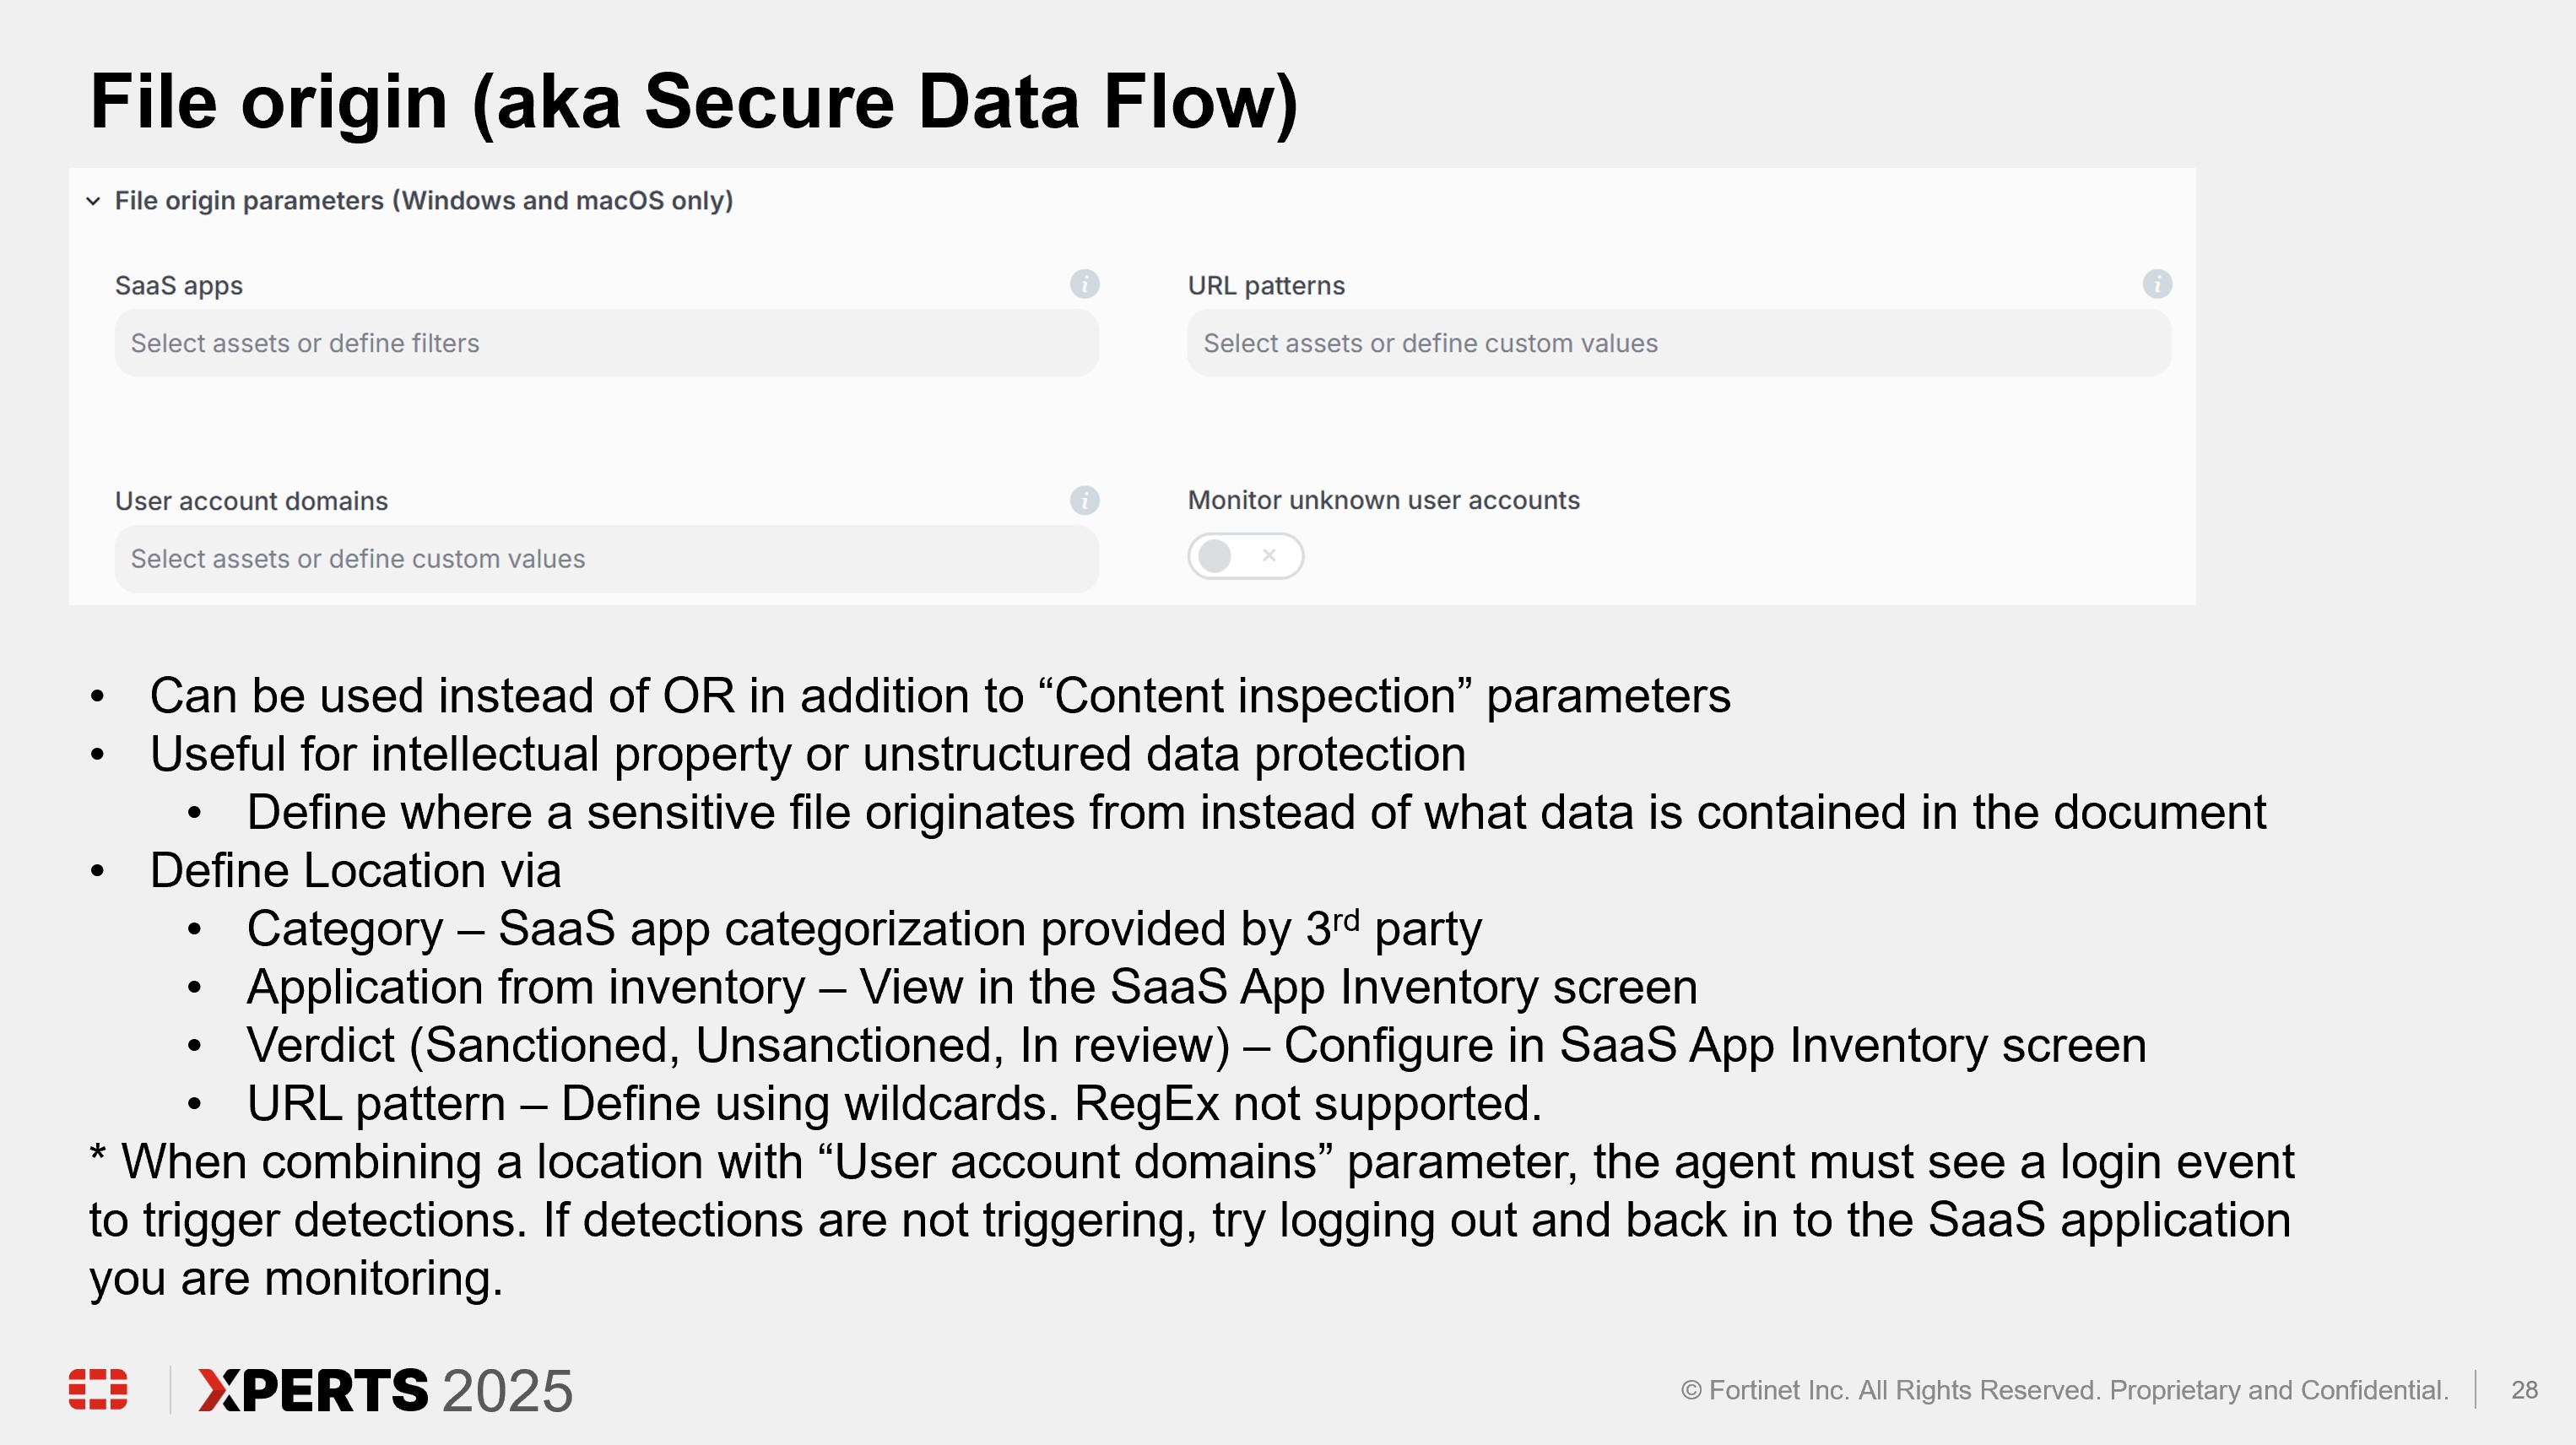
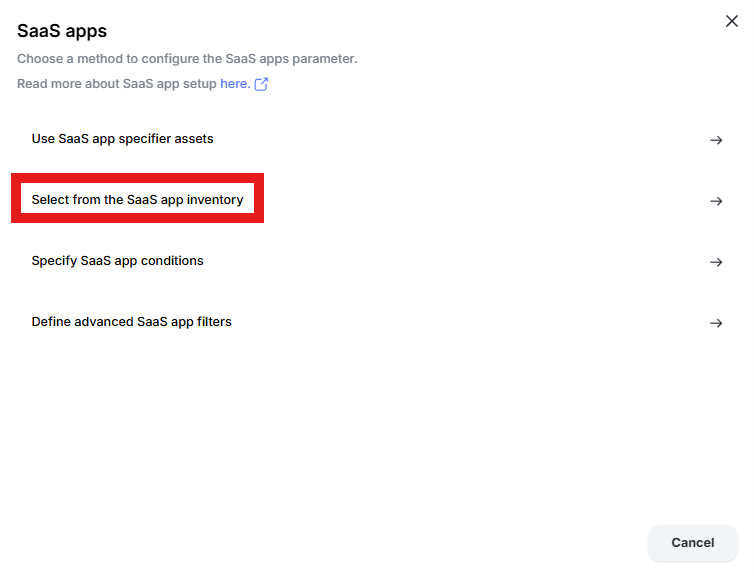
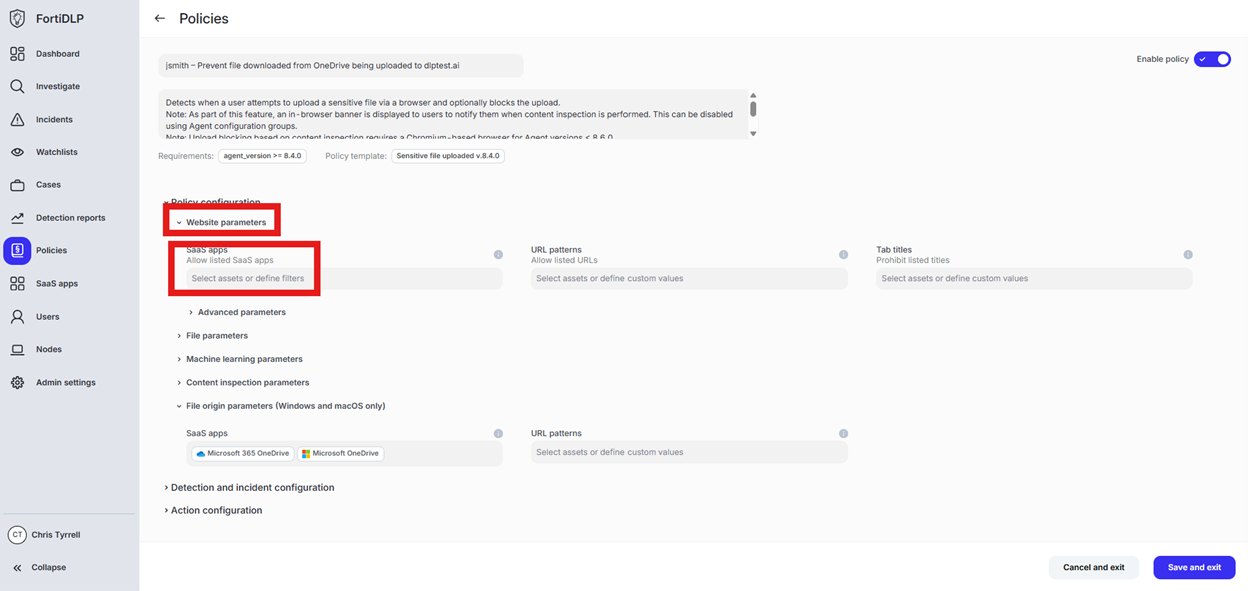
Scroll down to “File origin parameters (Windows and macOS only)” and click into “Select assets or define filters”
Click “Select from the SaaS app inventory”
Click “Add Apps” in the upper right hand corner of the window

Enter “one” into the “Filter by SaaS app name” text box and select “Microsoft 365 OneDrive” and “Microsoft OneDrive” by placing checks in the box. Click “Add apps”

Click “Done” to add the apps to the policy
Scroll to “Website parameters” and click “Select assets or define filters” under “SaaS apps”
Change the radio button to “Prohibit listed SaaS apps” and click “Add apps”
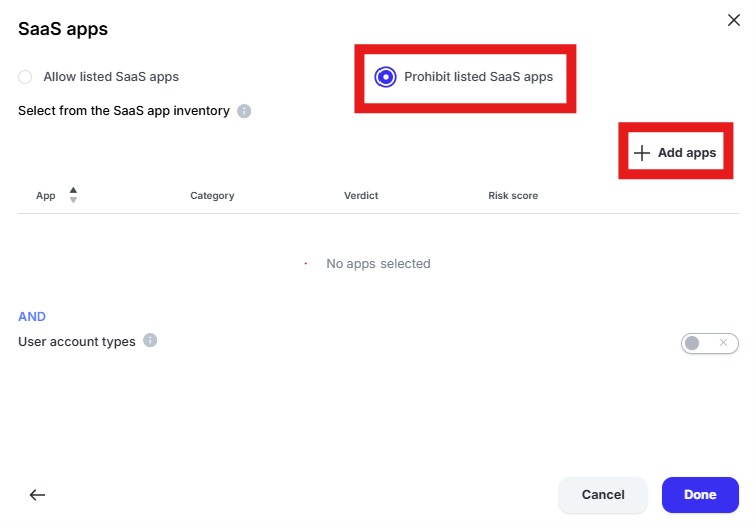
Enter “dlp” in the “Filter by SaaS app name” text box and select “DLPTest.ai” by placing a check in the box. Click “Add apps” and “Done” to add the application to the policy.
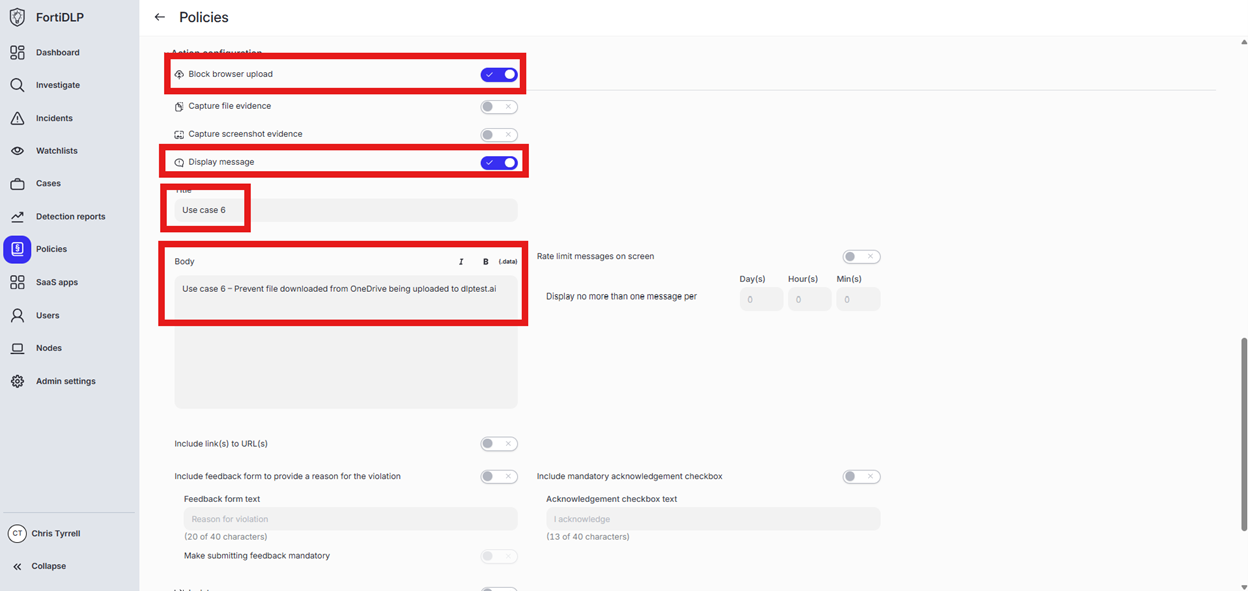
Scroll to and expand “Action configuration” and enable “Block browser upload” and “Display message. Enter “Use case 6” in the “Title” text box. Enter “Use case 6 – Prevent file downloaded from OneDrive being uploaded to dlptest.ai” in the “Body” text box. Optionally, enable the other options in the “Display message” area if desired.
Scroll down and click “Save and exit” in the lower right hand corner.
You should now see the newly created policy in the window:
Use Case 7
Details
File downloaded from OneDrive Renamed
Open the policy group created in use case 2 (if not already open)
Click “Add policies”

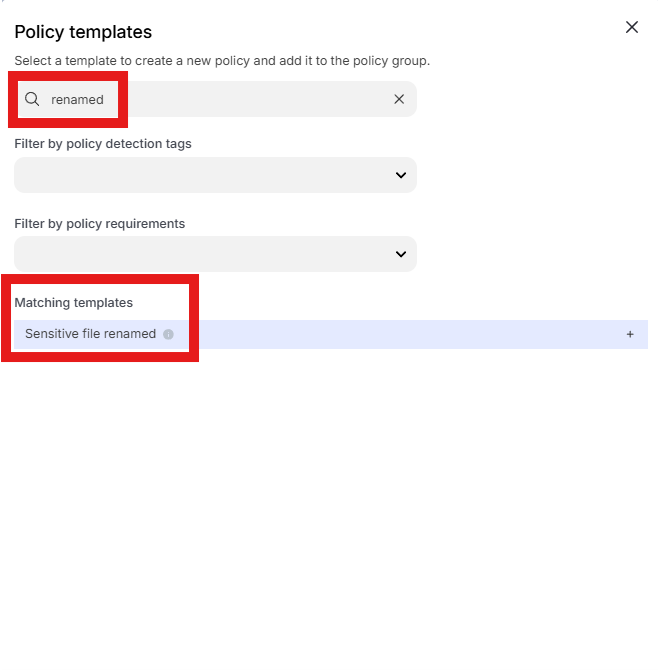
Enter “renamed” into the “Search” text box OR expand “File templates” and select “Sensitive file renamed”
Change the policy name to “jsmith – File downloaded from OneDrive renamed” where “jsmith” is your first initial and last name.
Scroll down to “File origin parameters (Windows and macOS only)” and click into “Select assets or define filters”

Click “Select from the SaaS app inventory”

Click “Add Apps” in the upper right hand corner of the window
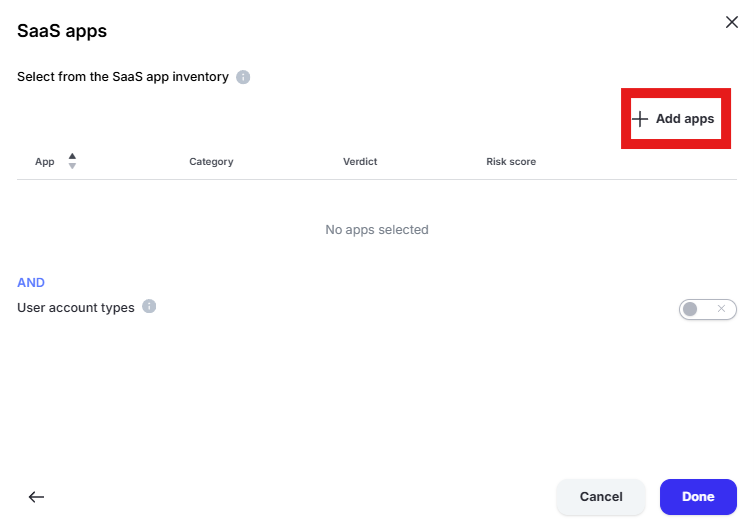
Enter “one” into the “Filter by SaaS app name” text box and select “Microsoft 365 OneDrive” and “Microsoft OneDrive” by placing checks in the box. Click “Add apps”

Click “Done” to add the apps to the policy
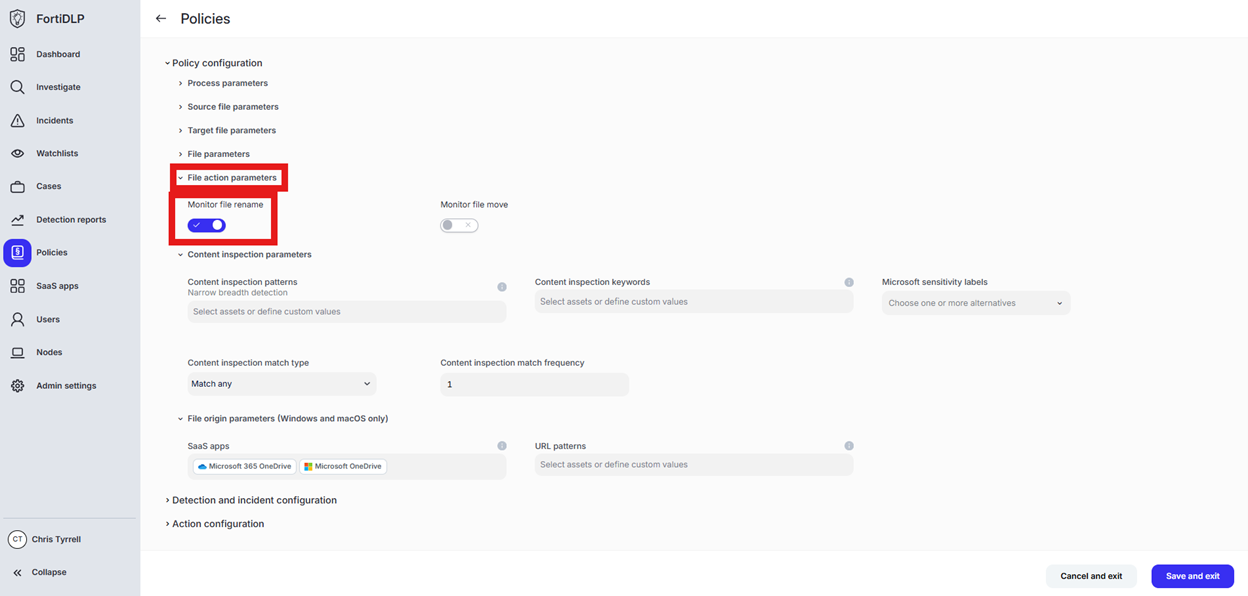
Scroll to “File action parameters” and ensure “Monitor file rename” is selected
Scroll to “Content inspection parameters” and click “Select assets or define custom values”
Click the text box under “Custom Values” and enter “.*” in the box. Click “Done”
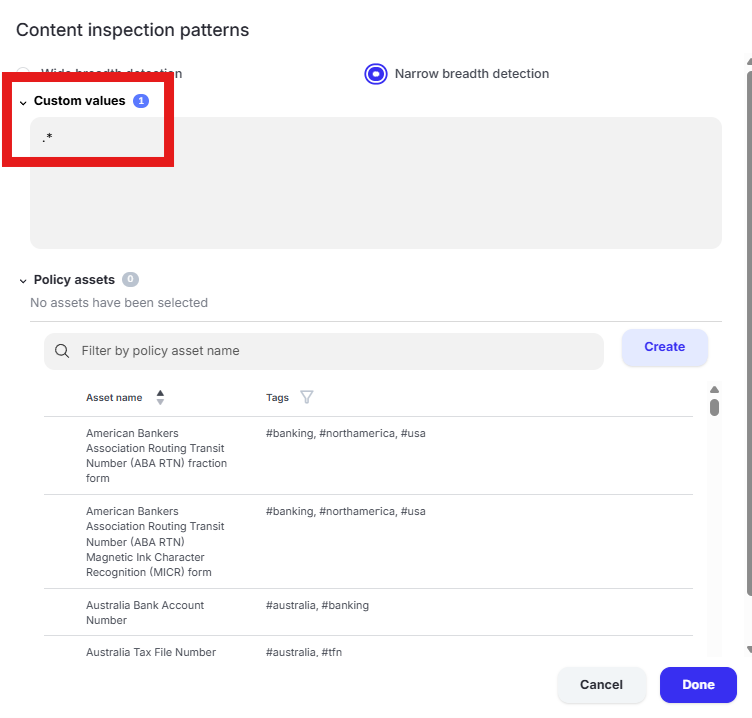
Tip
For “Sensitive file” policies, you must configure a value in the content inspection section. “.*” will match any content.
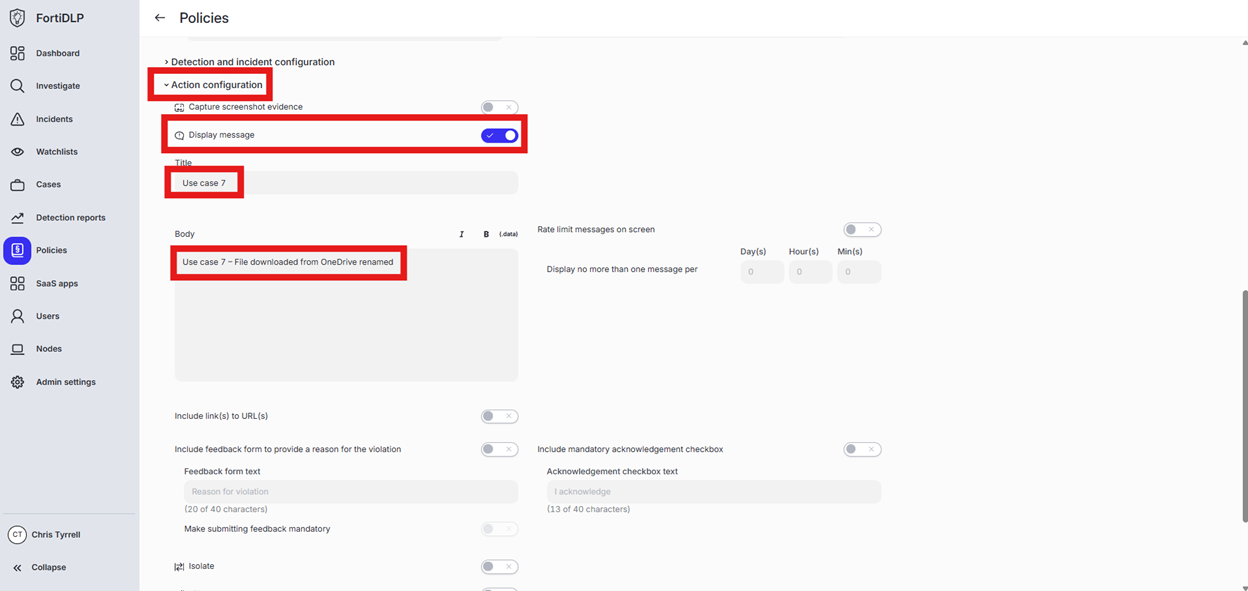
Scroll to and expand “Action configuration” and enable “Display message.” Enter “Use case 7” in the “Title” text box. Enter “Use case 7 – File downloaded from OneDrive renamed” in the “Body” text box. Optionally, enable the other options in the “Display message” area if desired.
Scroll down and click “Save and exit” in the lower right hand corner.
You should now see the newly created policy in the window
Use Case 8
Details
Warn User when PII (US SSN) is pasted to an AI website (chatgpt.com)
Open the policy group created in use case 2 (if not already open)
Click “Add policies”

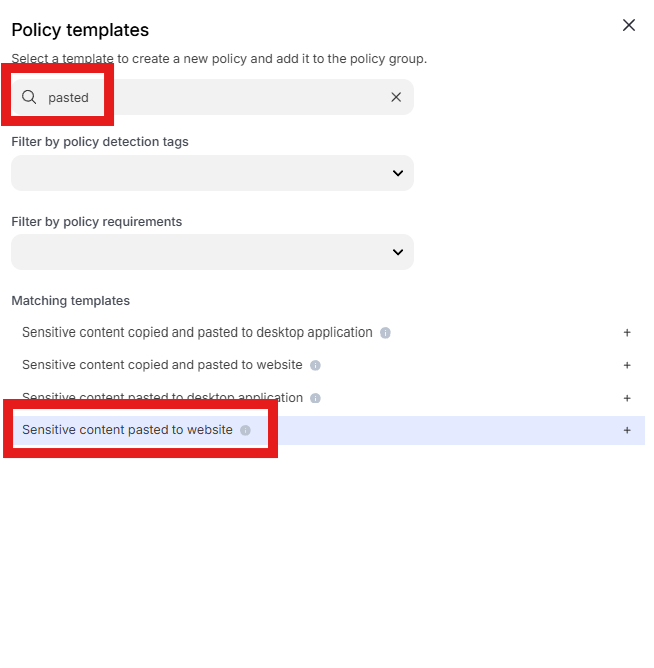
Enter “Pasted” into the “Search” text box OR expand “Clipboard Templates” and select “Sensitive content pasted to website”
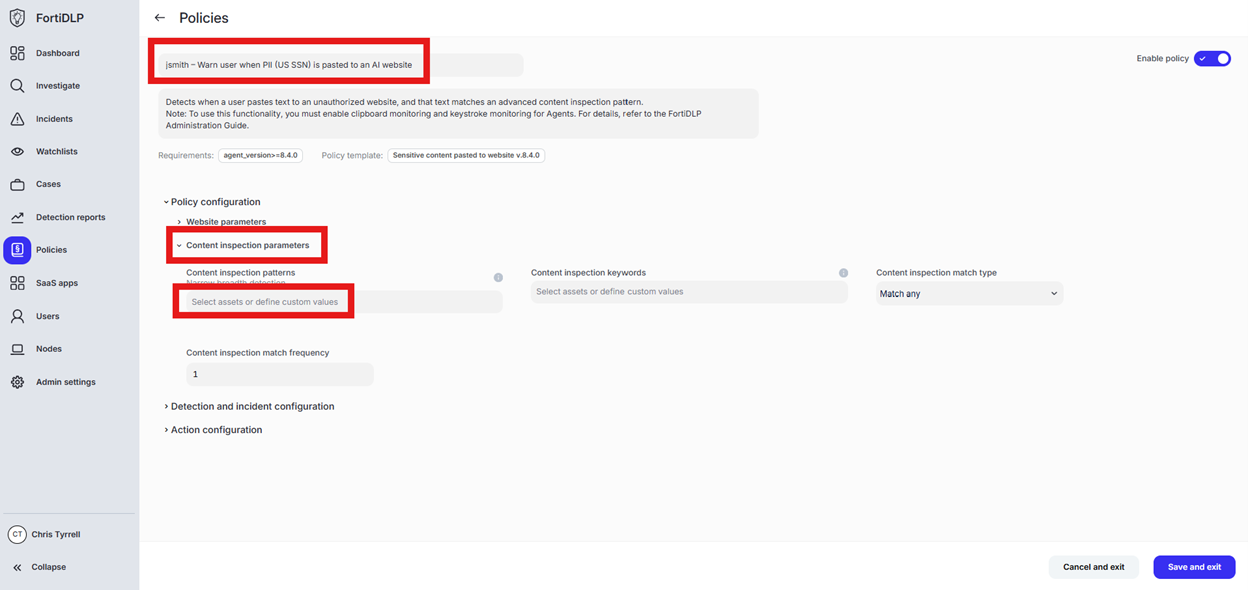
Change the policy name to “jsmith – Warn user when PII (US SSN) is pasted to an AI website” where “jsmith” is your first initial and last name.
Scroll down to “Content inspection parameters” and click into “Select assets or define custom values”
Enter “ssn” in the “Filter by policy asset name” and select “US Social Security Number (SSN)” by placing a check in the box. Click “Done” to finalize selection of the pattern.

Tip
“Wide breadth detection” will match on the number only. “Narrow breadth detection” will match on the specified pattern in addition to a keyword as defined in the “Policy asset” being used. The test file downloaded from dlptest.ai will trigger the alert with either wide or narrow breadth selected.
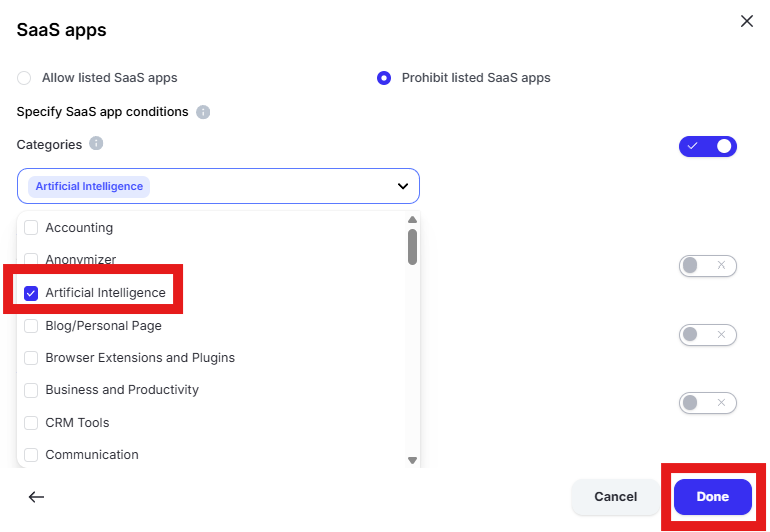
Scroll to “Website parameters” and click into “Select assets or define filters” under “SaaS apps”

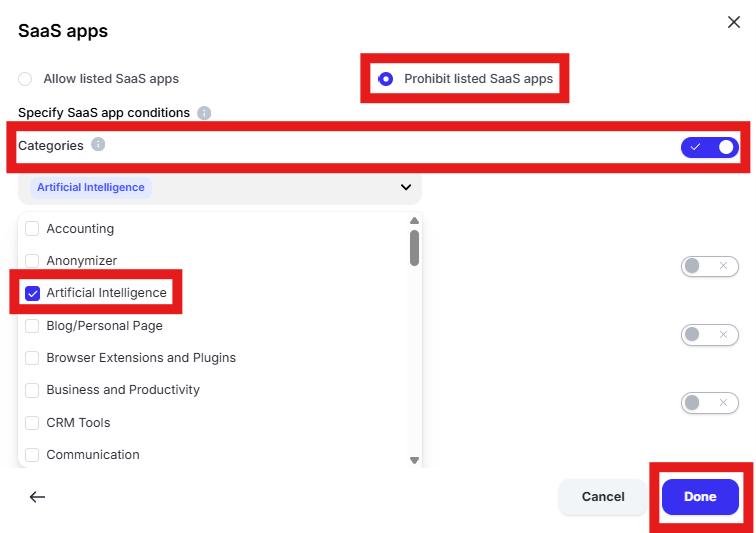
Click “Specify SaaS app conditions,” select “Prohibit listed SaaS apps” and enable “Categories”
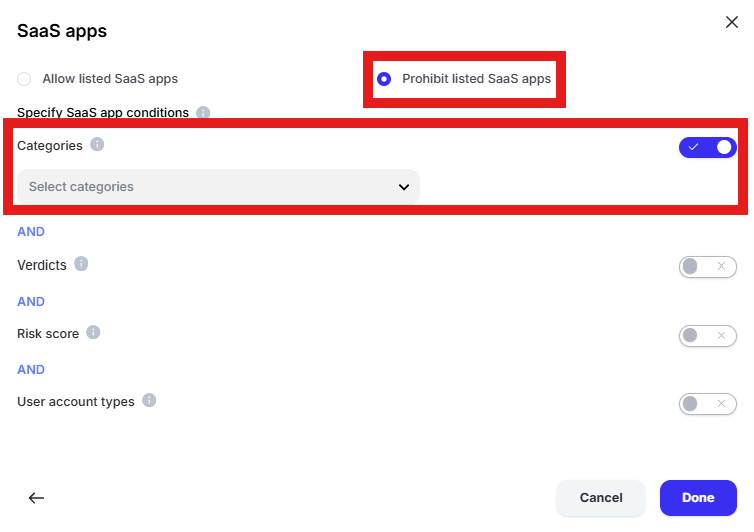
Click “Select categories” and choose “Artificial Intelligence.” Click “Done”
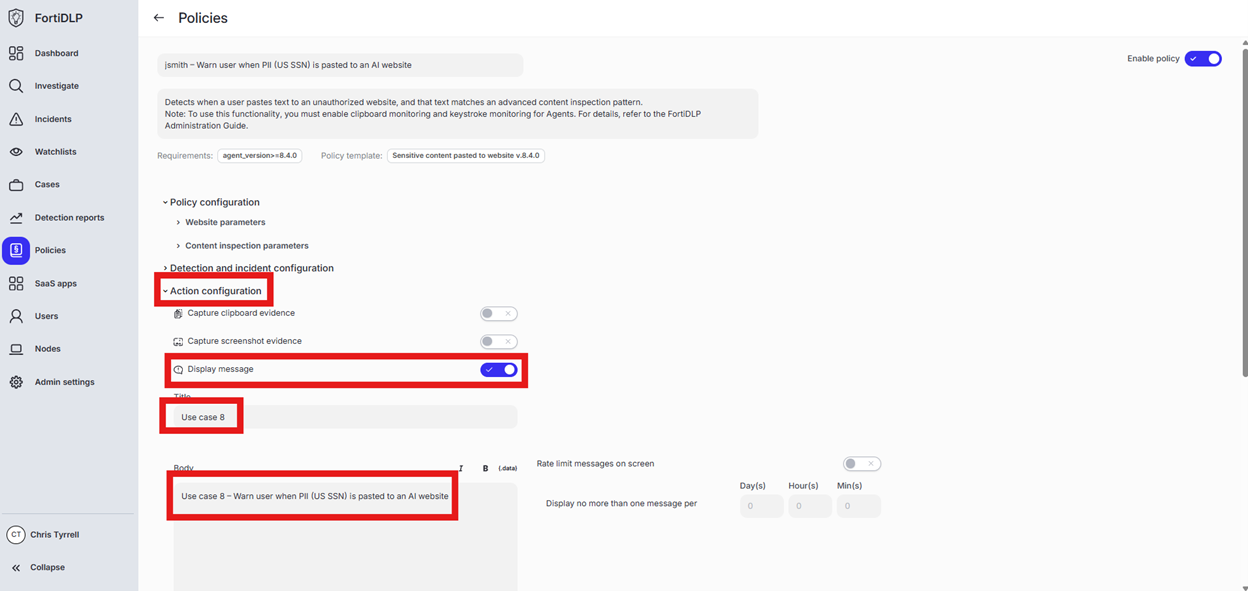
Expand “Action configuration” and enable “Display message. Enter “Use case 8” in the “Title” text box. Enter “Use case 8 – Warn user when PII (US SSN) is pasted to an AI website” in the “Body” text box. Optionally, enable the other options in the “Display message” area if desired.
Scroll down and click “Save and exit” in the lower right hand corner.
You should now see the newly created policy in the window
Use Case 9
Details
Generate a warning prompt for users visiting an AI website (chatgpt.com, etc.)
Open the policy group created in use case 2 (if not already open)
Click “Add policies”

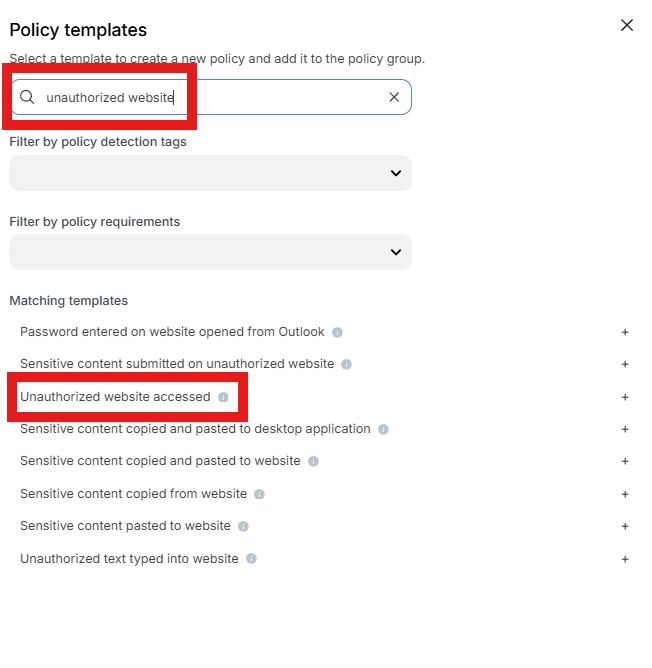
Enter “Unauthorized website” into the “Search” text box OR expand “Browser templates” and select “Unauthorized website accessed”
Change the policy name to “jsmith – Warn user when accessing AI website (chatgpt.com)” where “jsmith” is your first initial and last name.
Scroll to “Website parameters” and click in “Select assets or define filters”
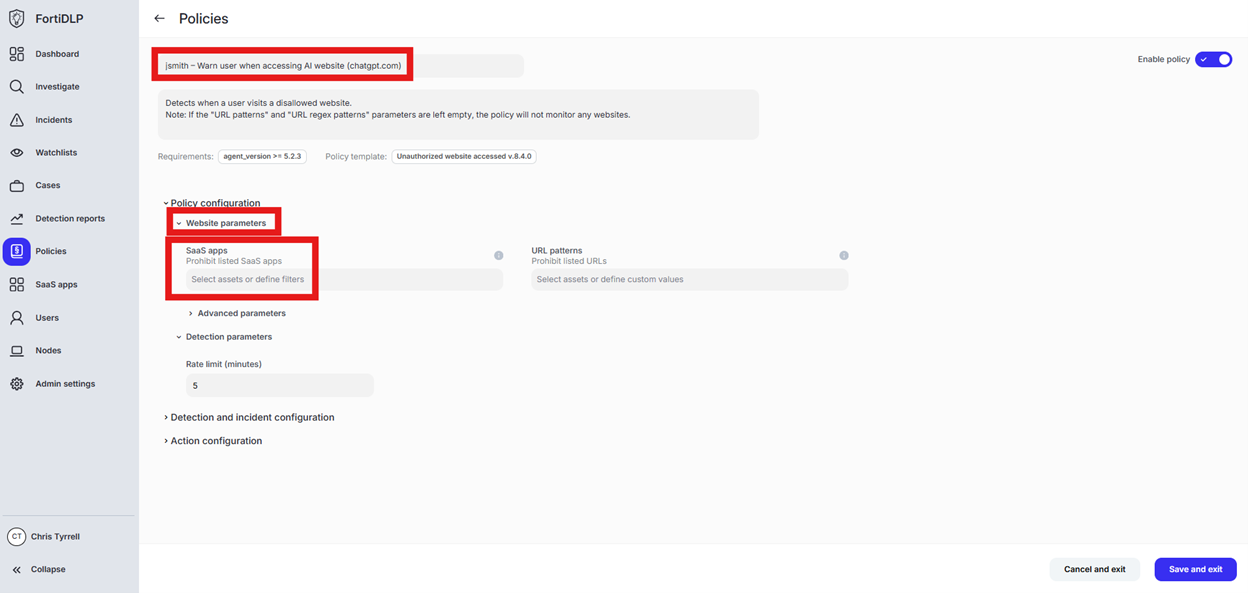
Click “Specify SaaS app conditions.” Select “Prohibit listed SaaS apps.” Turn on “Categories.” Click “Select categories” and choose “Artificial Intelligense.” Click “Done” to add the category to the policy.
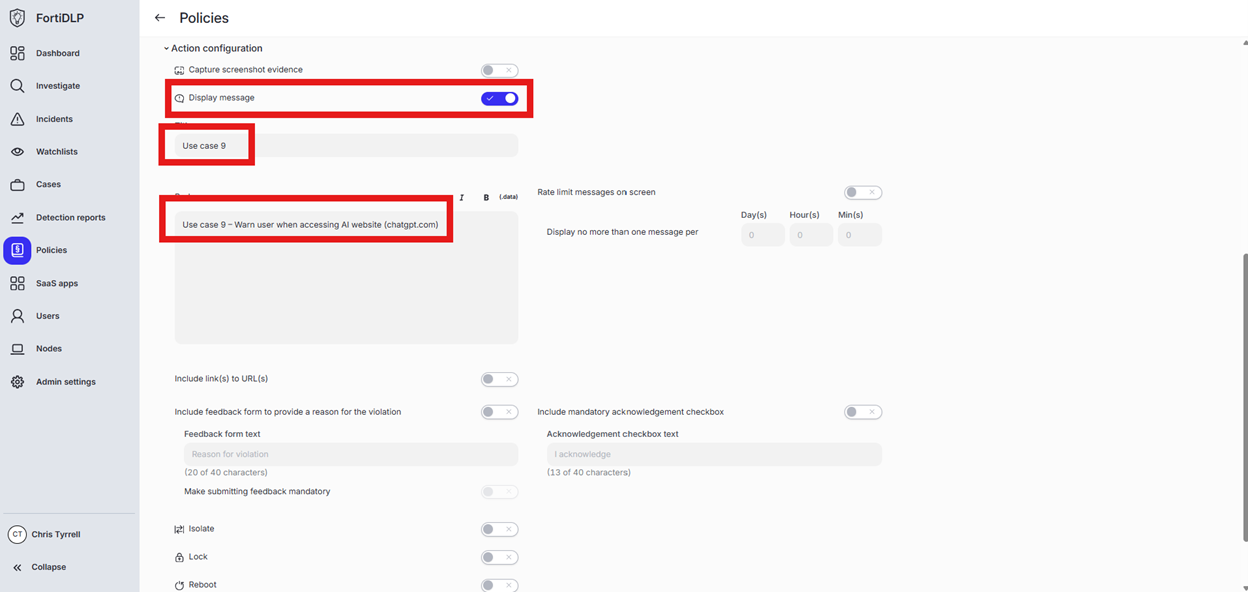
Expand “Action configuration” and enable “Display message. Enter “Use case 9” in the “Title” text box. Enter “Use case 9 – Warn user when accessing AI website (chatgpt.com)” in the “Body” text box. Optionally, enable the other options in the “Display message” area if desired.
Scroll down and click “Save and exit” in the lower right hand corner.
You should now see the newly created policy in the window
Use Case 10
Details
Prevent a user from downloading and installing an unsafe application (7-zip.exe)
Open the policy group created in use case 2 (if not already open)
Click “Add policies”
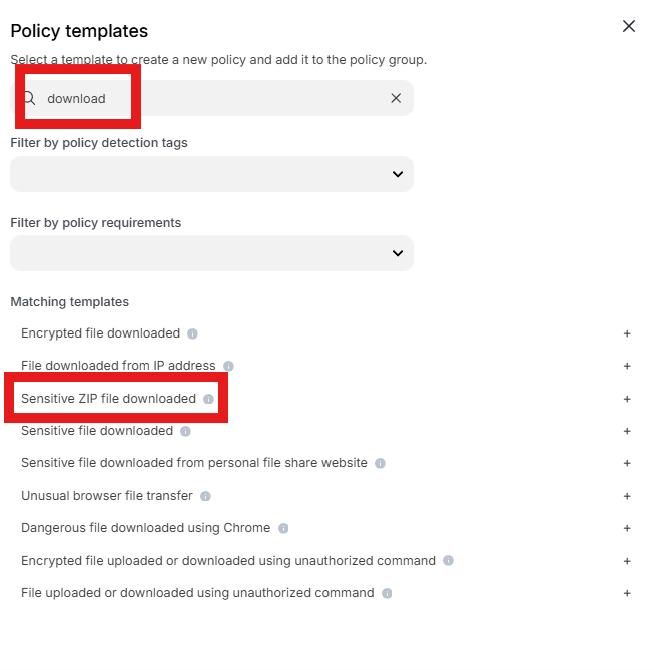
Enter “download” into the “Search” text box OR expand “Browser templates” and select “Sensitive ZIP file downloaded”
Change the policy name to “jsmith – Prevent download of unsafe file (7-zip.exe)” where “jsmith” is your first initial and last name.
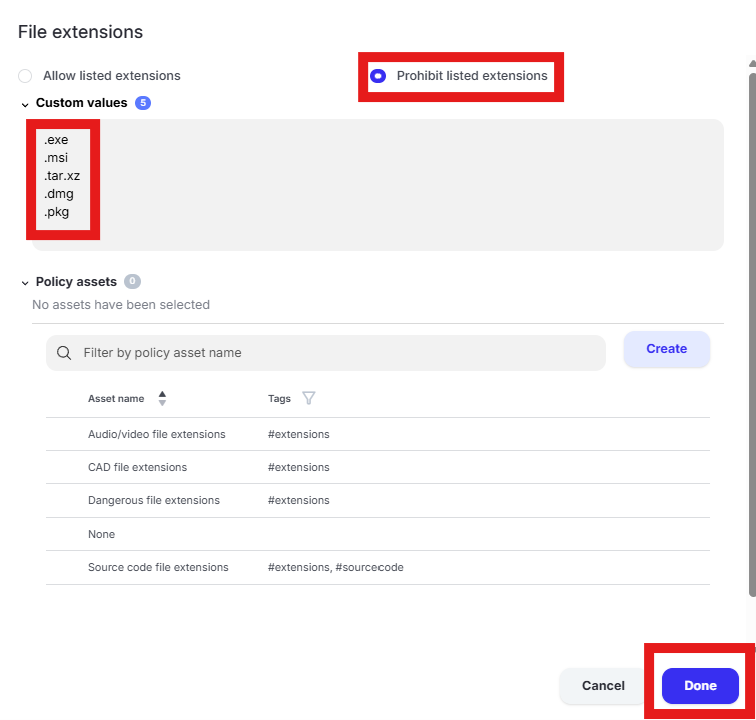
Scroll to “File extensions” and click in “Select assets or define custom values”

Select “Prohibit listed extensions” and enter the following extensions in the “Custom values” box one per line and click “Done”:a. .exeb. .msic. .tard. .xze. .dmge. .pkg
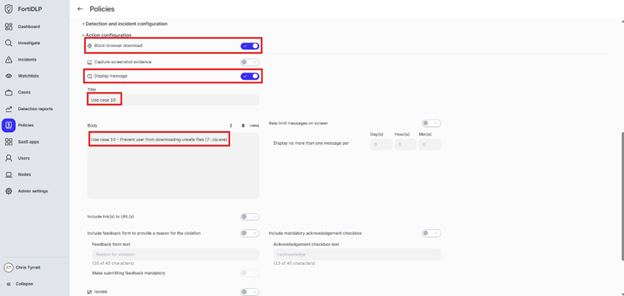
Expand “Action configuration” and click to enable “Block browser download.” Next, enable “Display message. Enter “Use case 10” in the “Title” text box. Enter “Use case 10 – Prevent user from downloading unsafe files (7-zip.exe)” in the “Body” text box. Optionally, enable the other options in the “Display message” area if desired.
Scroll down and click “Save and exit” in the lower right hand corner.
You should now see the newly created policy in the window
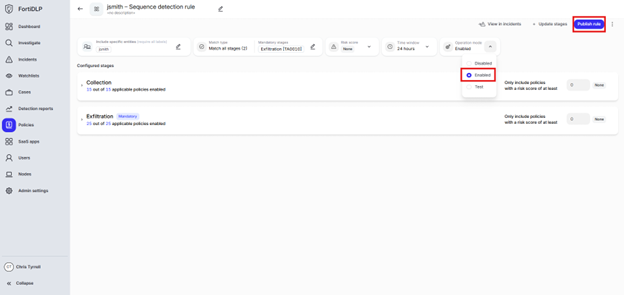
Use Case 11
Details
Create a “Sequenced Incident” for your device only
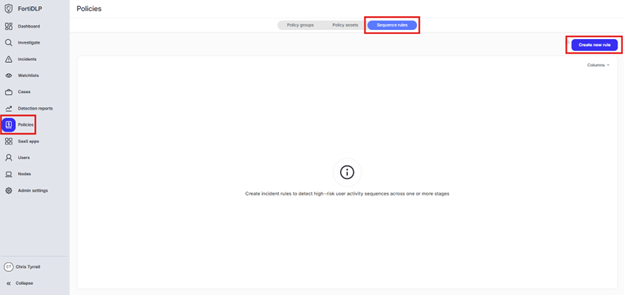
Click “Policies” in the left pane of the management console and select “Sequence rules” in the top center of the screen. Click “Create new rule.”
Type “jsmith – Sequence detection rule” in the “Name” box and click “Next”
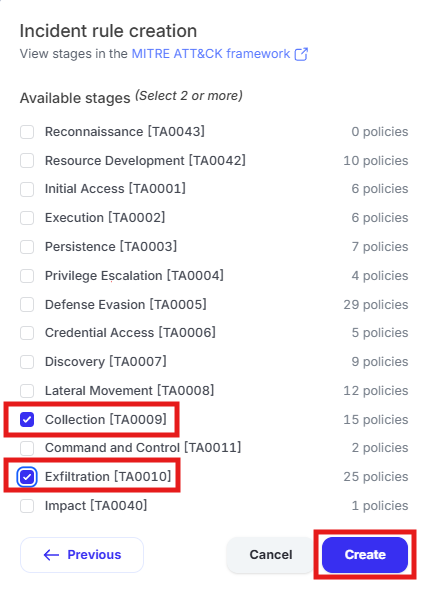
Select the following stages and click “Create”a. Collection [TA0009]b. Exfiltration [TA0010]
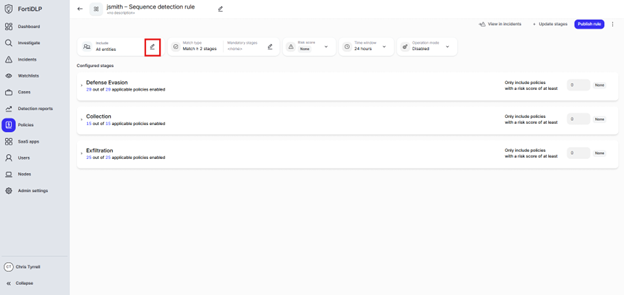
Click the edit pencil in the “Include” box
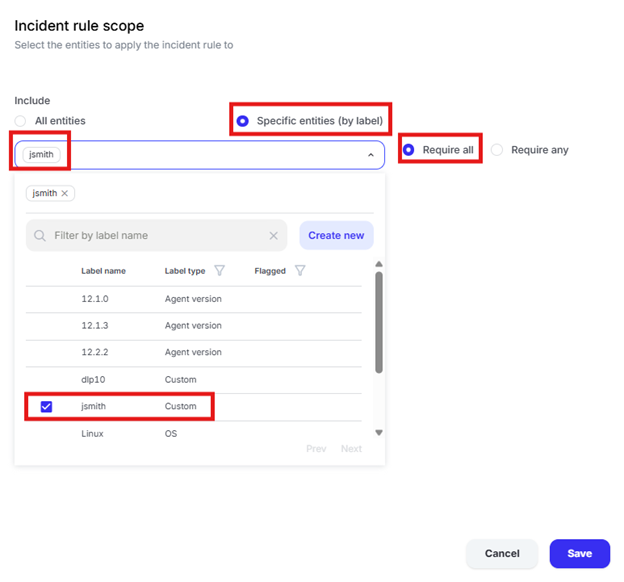
Select “Specific entities (by label)” and choose your label created in use case 1
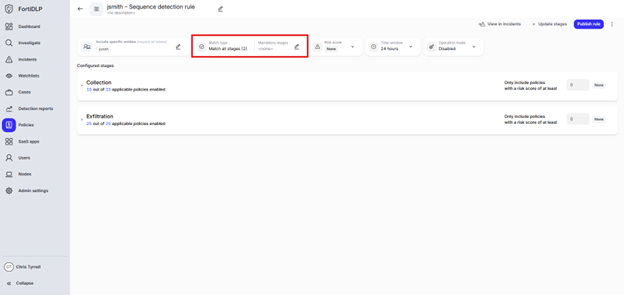
Click the edit pencil in the “Mandatory stages” box
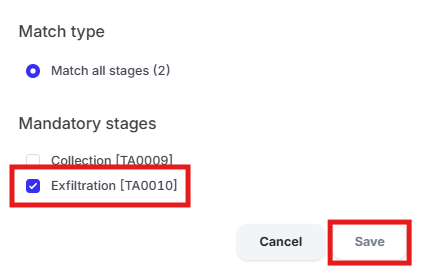
Select “Exfiltration [TA0010]” and click “Save”
Click “Operation mode” and click “Enabled” then click “Publish rule”
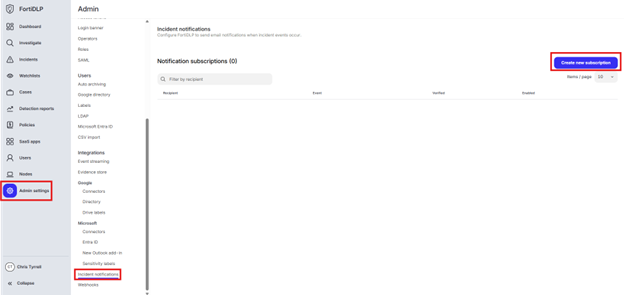
Use Case 12
Details
Create an “incident notification” to send an email alert for any incident created with severity over 90
Click “Admin settings” in the left pane of the management console and click “Incident notifications.” Click “Create new subscription.”
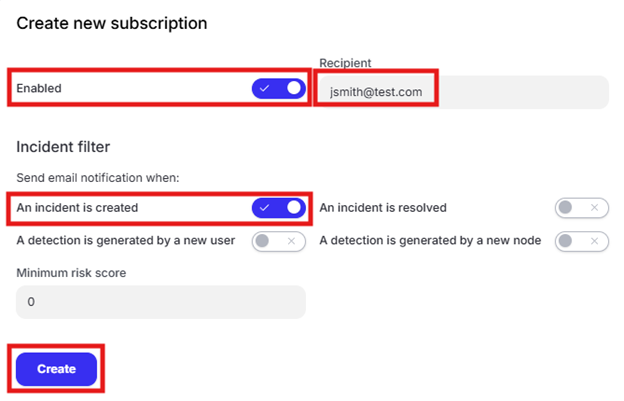
Enter an email address in the “Recipient” text box. Enable the “An incident is created” button and click “Create.”
Use Case 13A
Details
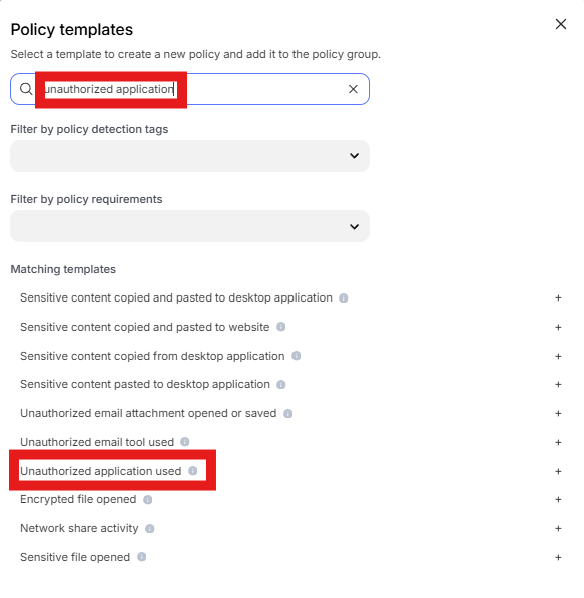
Prevent an unauthorized application from launching (calc.exe)
Open the policy group created in use case 2 (if not already open)
Click “Add policies”

Enter “unauthorized application” into the “Search” text box OR expand “External threat templates” and select “Unauthorized application used”
Change the policy name to “jsmith – Prevent unauthorized application from launching (calc.exe)” where “jsmith” is your first initial and last name.
Scroll to “Application parameters” and select “Process parameters.” Click the text box under “Binary names”
Select “Prohibit listed binaries.” Remove the existing entries from “Custom values” and enter “calc.exe”. Click “Done”

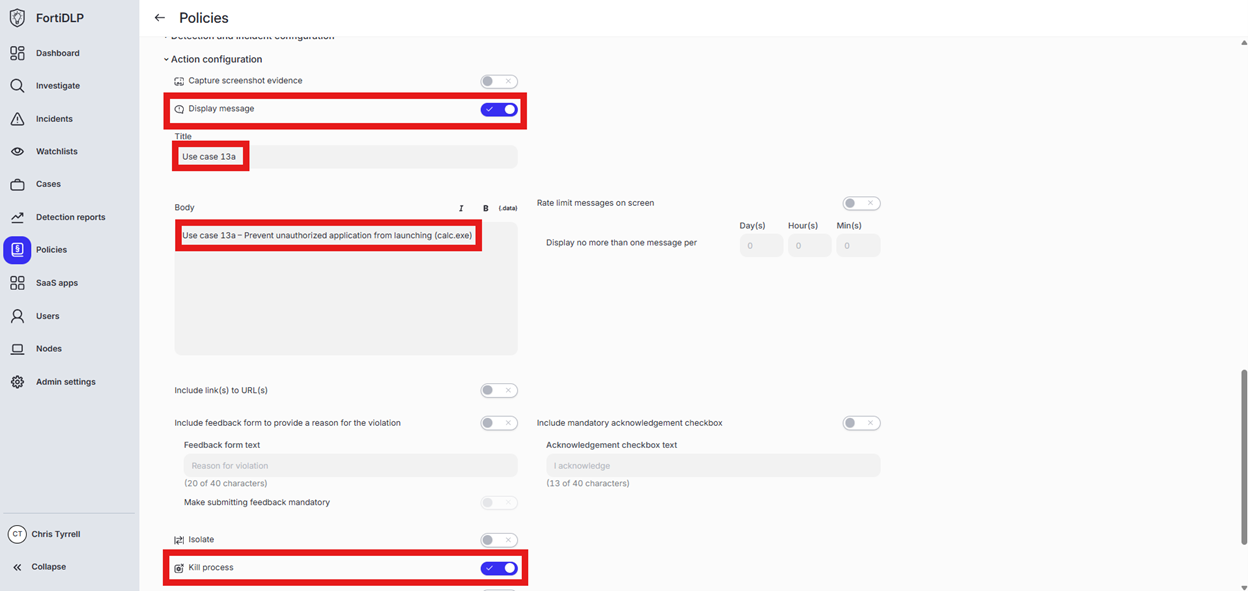
Expand “Action configuration” and enable “Kill process” and “Display message.” Enter “Use case 13a” in the “Title” text box. Enter “Use case 13a – Prevent unauthorized application from launching (calc.exe)” in the “Body” text box. Optionally, enable the other options in the “Display message” area if desired.
Scroll down and click “Save and exit” in the lower right hand corner.
Use Case 13B
Details
Create a custom regular expression policy asset to match a number in the format: AA-111111
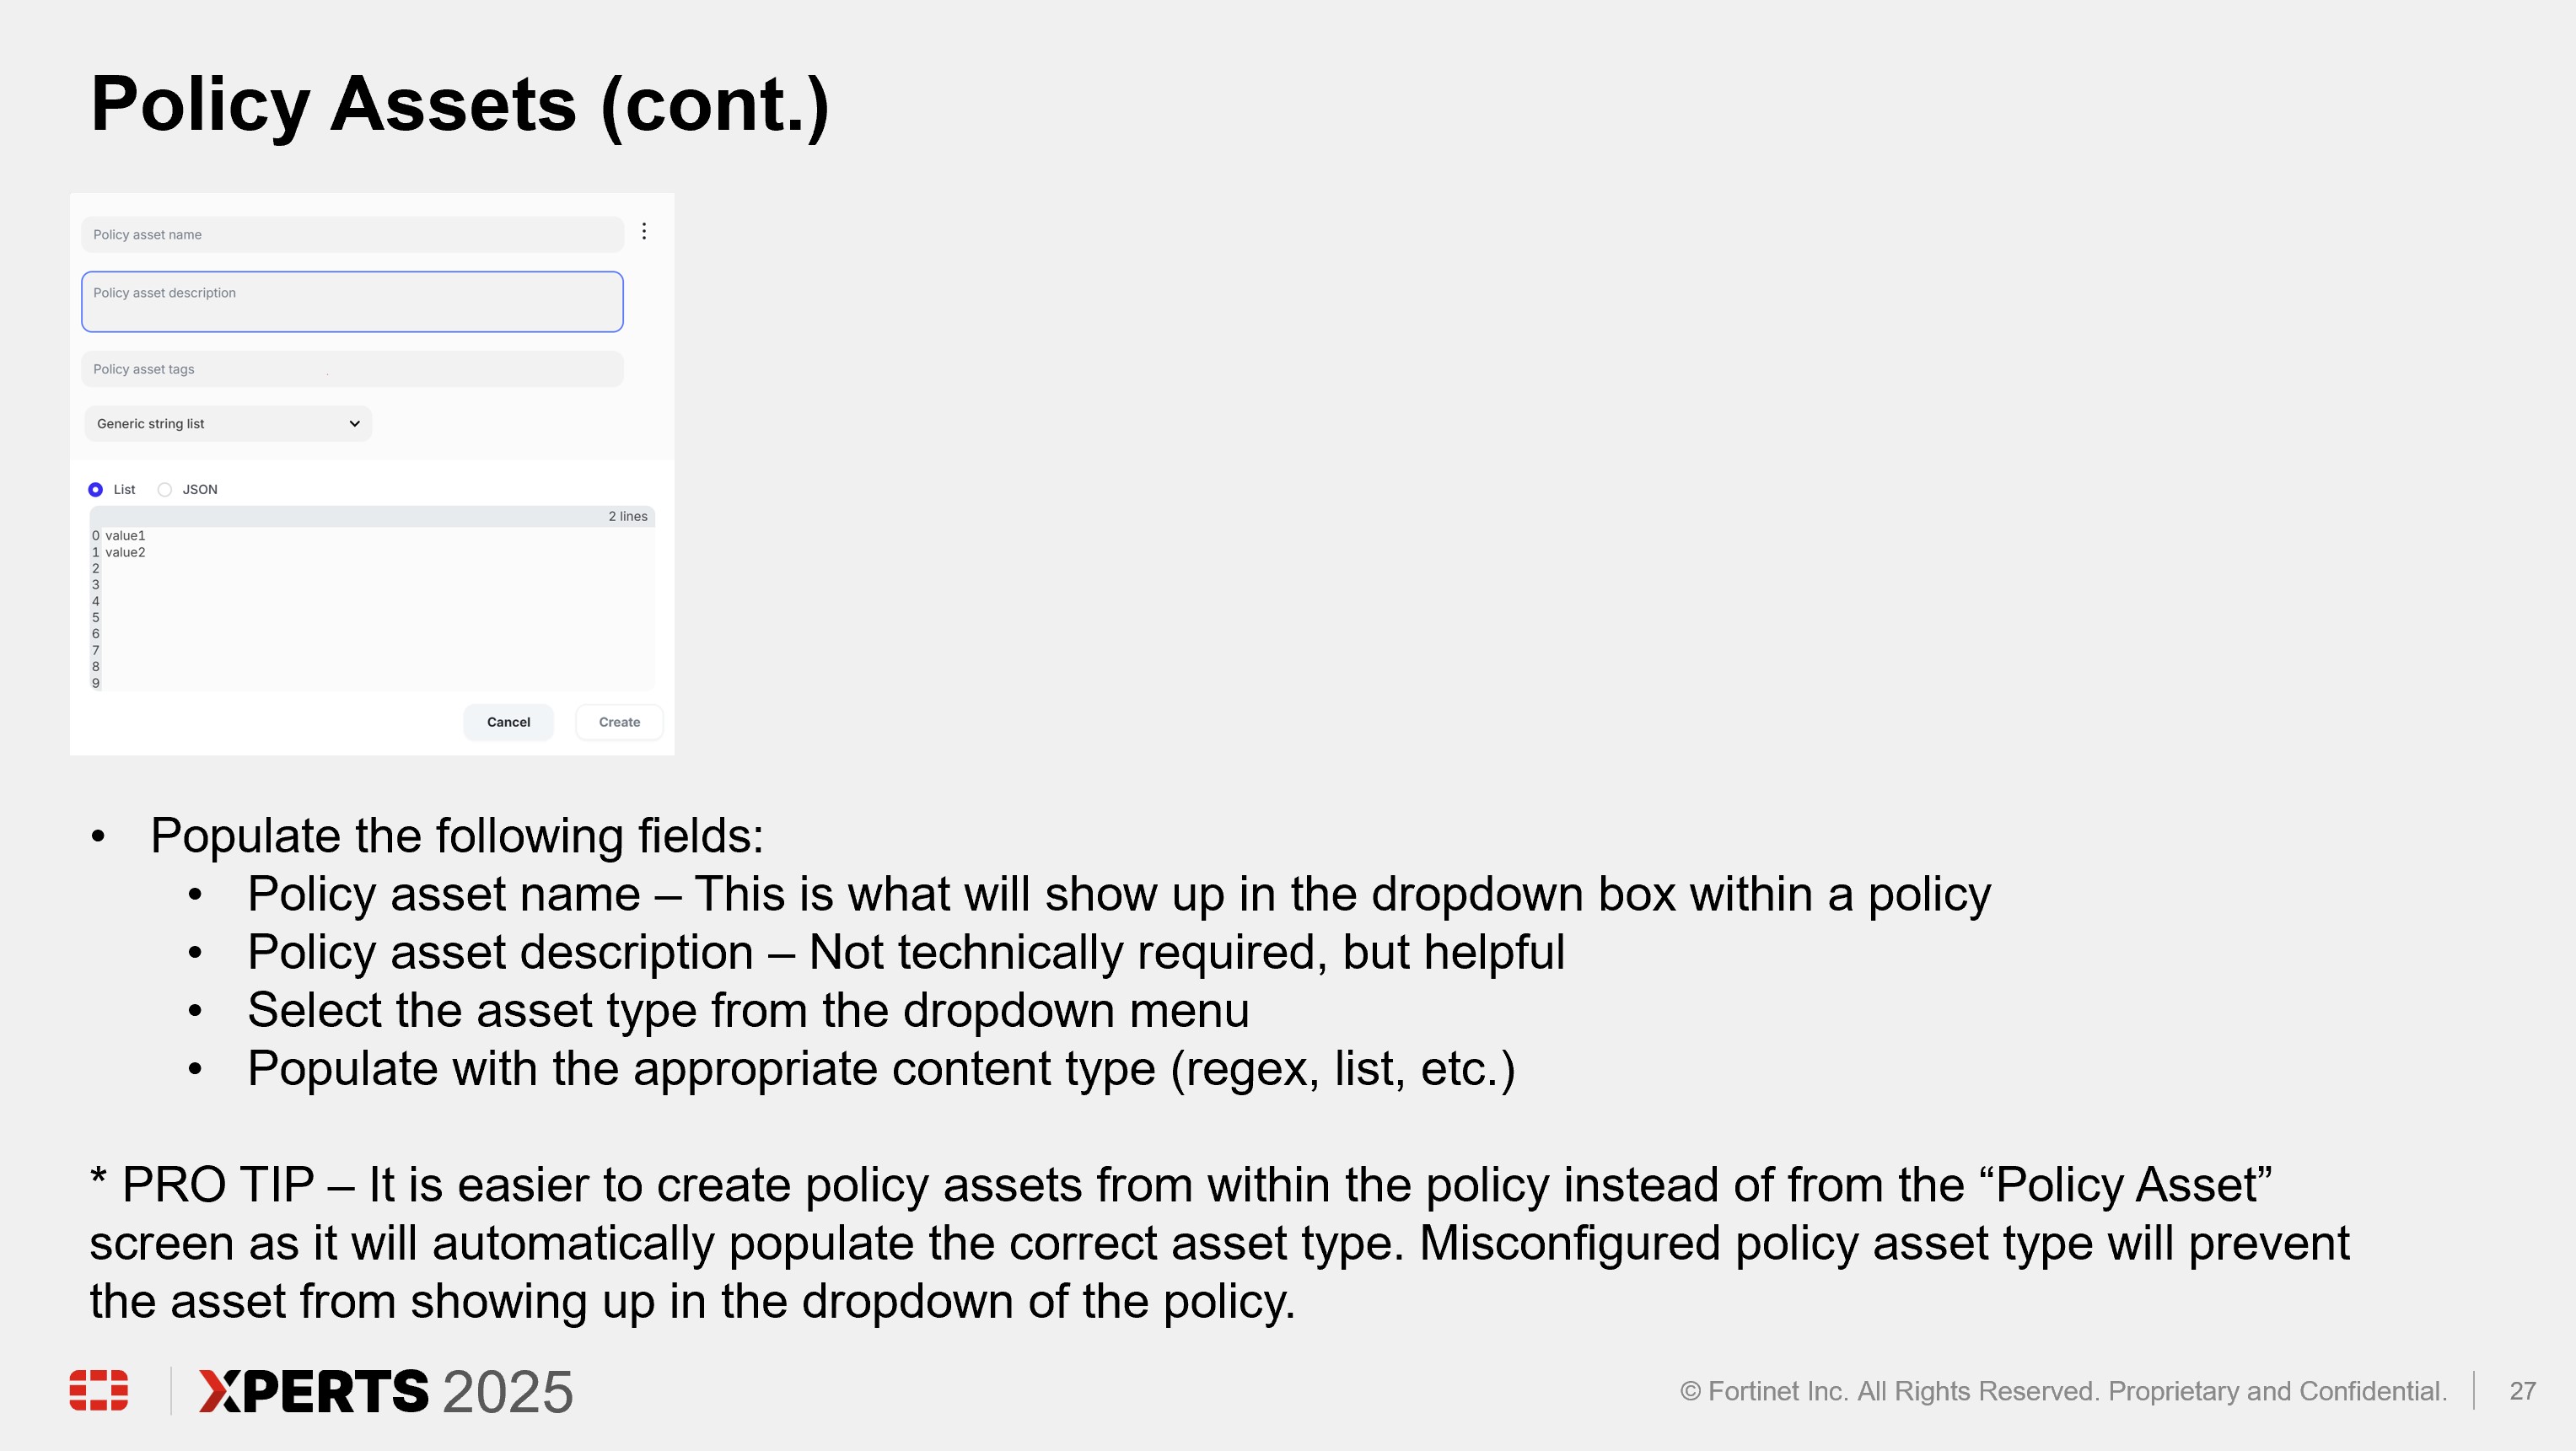
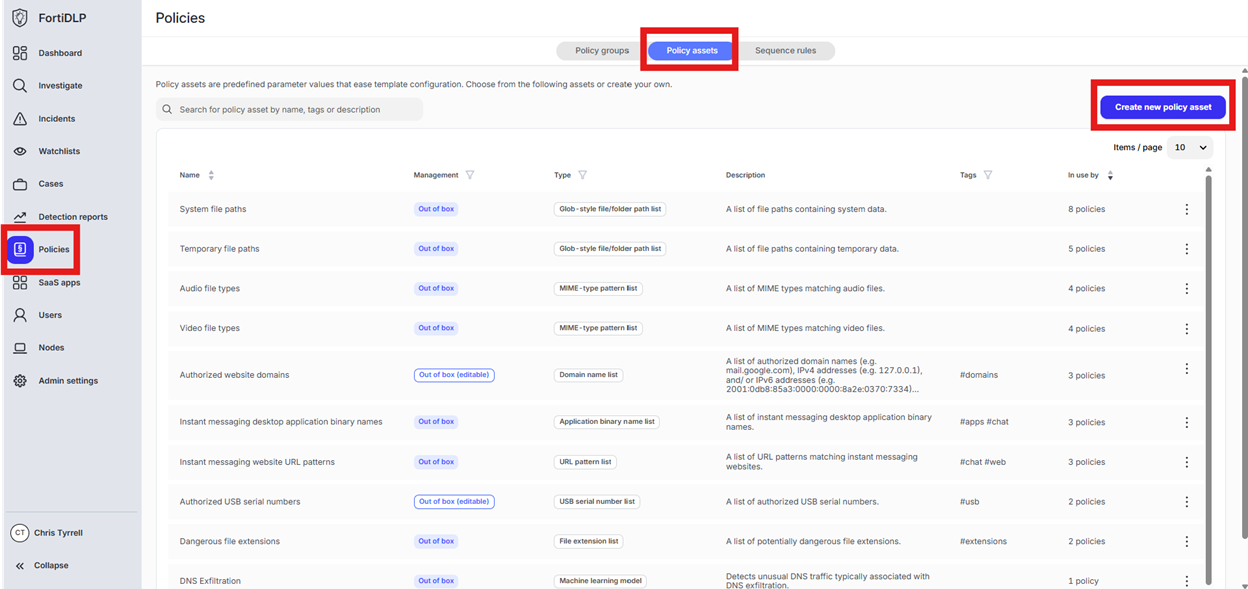
Click “Policies” in the left hand panel, click “Policy assets”, and click “Create new policy asset”
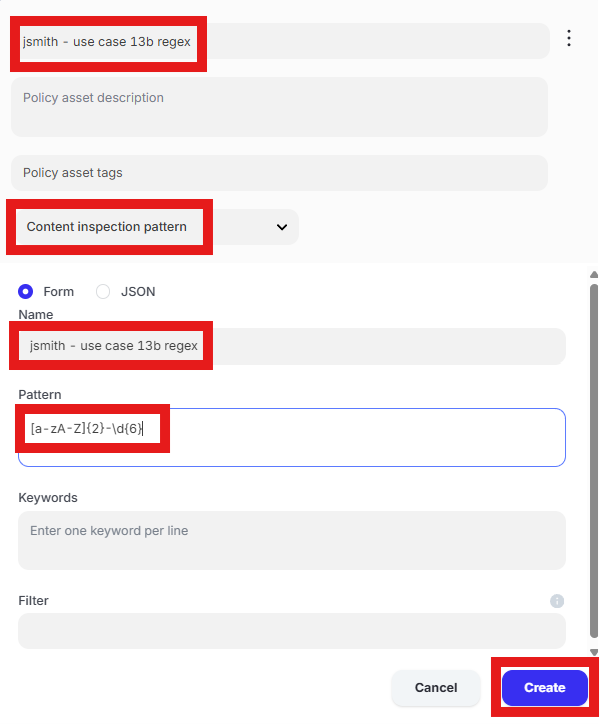
Click in the text box for “Policy asset name” and enter “jsmith – use case 13b regex” where jsmith is your first initial followed by last name. Click “Generic string list” and select “Content inspection pattern.” Click the text box under “Name” and enter “jsmith - use case 13b regex”. Click in the text box under “Pattern” and enter “[a-zA-Z]{2}-\d{6}”. Click “Create.”
Use Case 13C
Details
Prevent notepad.exe from opening a file containing custom regex pattern
Open the policy group created in use case 2 (if not already open)
Click “Add policies”

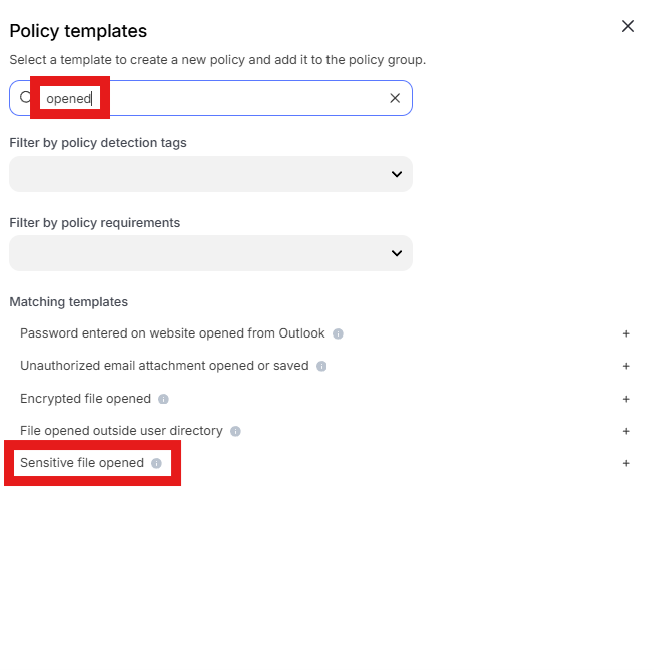
Enter “opened” into the “Search” text box OR expand “File templates” and select “Sensitive file opened”
Change the policy name to “Prevent notepad.exe from opening a file containing custom regex pattern” where “jsmith” is your first initial and last name.
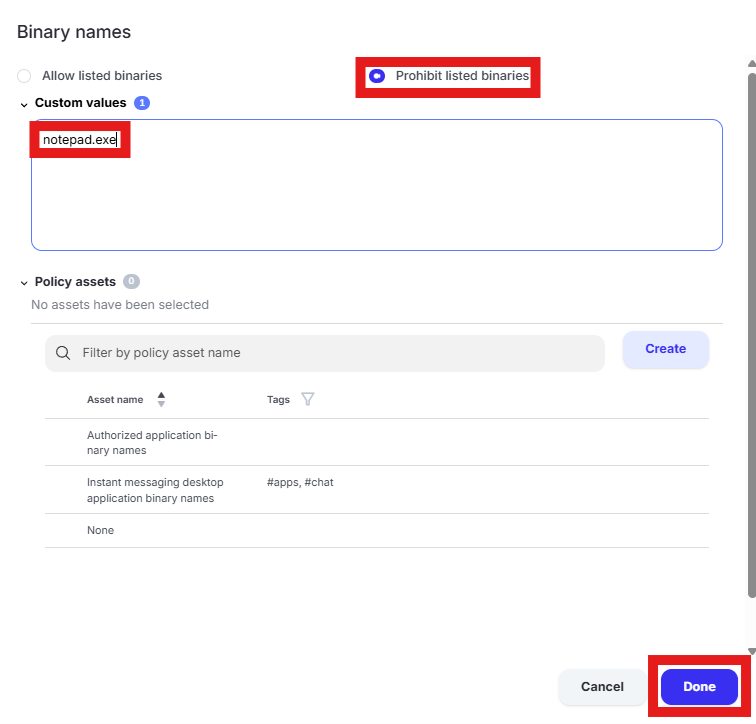
Scroll to “Process parameters.” Click the text box under “Binary names”
Select “Prohibit listed binaries.” Remove the existing entries from “Custom values” and enter “notepad.exe”. Click “Done”
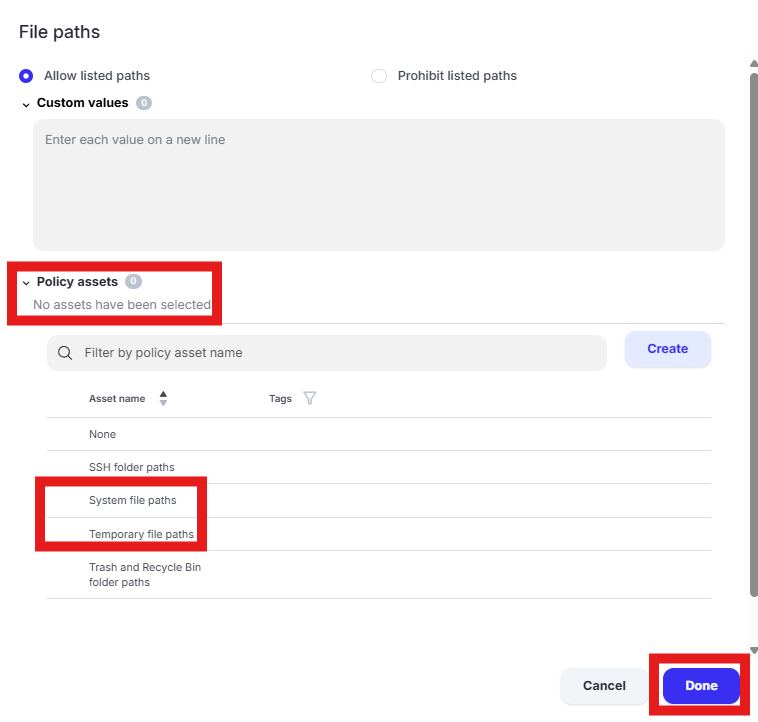
Scroll to “File parameters” and uncheck the selected “Policy assets” to clear them. Click “Done.”
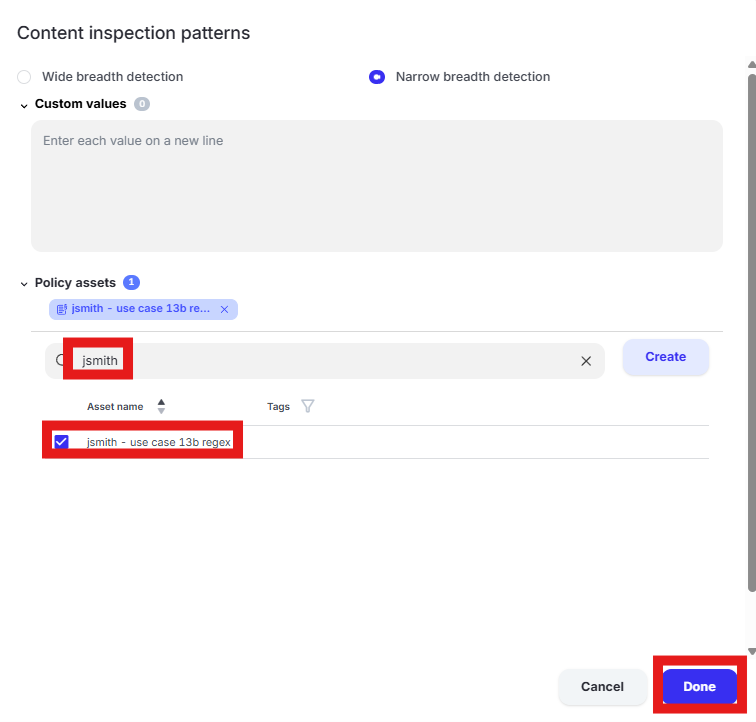
Scroll to “Content inspection parameters.” Click the text box under “Content inspection parameters.”

Enter “jsmith” into the “Filter by policy asset name” search box where “jsmith” is your first initial and last name. Select the custom regex pattern created in use case 13b. Click “Done.”
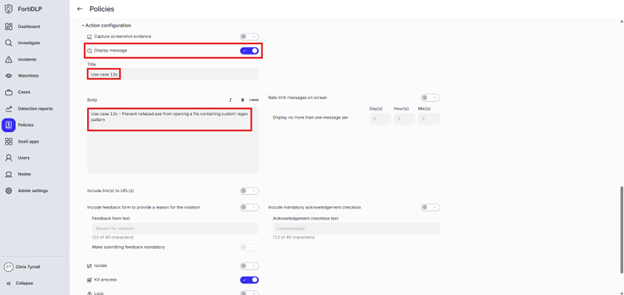
Expand “Action configuration” and enable “Kill process” and “Display message.” Enter “Use case 13c” in the “Title” text box. Enter “Use case 13c – Prevent notepad.exe from opening a file containing custom regex pattern” in the “Body” text box. Optionally, enable the other options in the “Display message” area if desired.
- Scroll down and click “Save and exit” in the lower right hand corner.