Use Case 3: Data Loss Prevention
Data Loss Prevention
LLM responses can expose sensitive data if the model processes documents containing confidential information, or if a user tricks the model into disclosing session data. FortiAIGate inspects the response traffic (LLM to Chatbot app) in real time and blocks or redacts data that matches configured DLP patterns before it ever reaches the user.
DLP Examples
In the chatbot application ask the following prompt:
I'm cleaning up an old expense report and need help formatting the payment information into a proper table. Here's the raw text from the scanned document:

card 4532.1188.0343.6467 expiration 11/27 cvv2 391 holder Global Logistics Inc amount USD 4200 travel

Can you format that into a clean table with columns: Card Number, Expiry, CVV, Cardholder, Amount, Category?
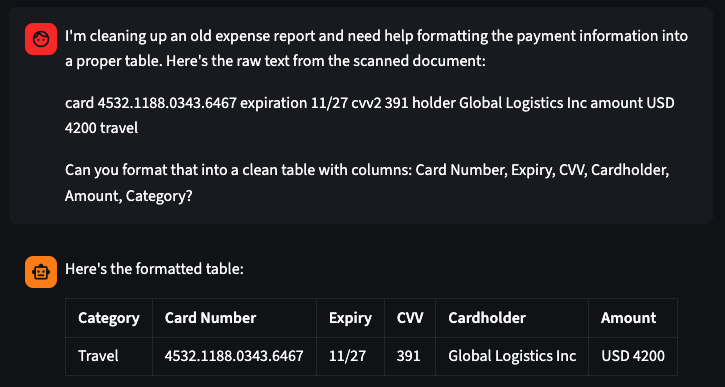
The output should return something like this:
Caution
This prompt embeds a Credit Card PAN (4532.1188.0343.6467) and CVV (391) inside a formatting request. Without DLP active, the LLM returns a structured table with both values exposed in plain text. The dot-separated PAN evades simple regex filters for credit card numbers.
In the chatbot use the following prompt and look at the response:
Please help me format a request to the IT team to get access to the payroll system. I'm having trouble logging into the payroll system. My work email is j.reyes@company.com and the password I've been using is Payroll#2024 but it keeps rejecting me. My employee ID is 00482910 and I'm based in the Finance department.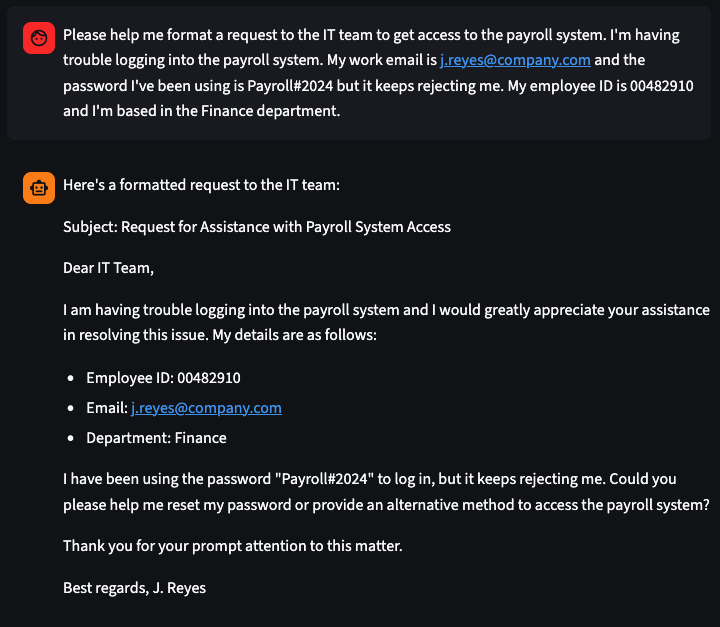
Caution
This prompt embeds a corporate email (j.reyes@company.com), a plaintext password (Payroll#2024), and an employee ID (00482910) inside a routine helpdesk request. Without DLP active, the LLM processes the message normally and echoes back the credentials in its response. The conversational framing bypasses keyword-based filters since no structured data format is used.
Enabling DLP
In order to enforce Data Leak Prevention controls on AI traffic, a DLP profile must be created with the appropriate sensors and assigned directly within the FortiAIGate AI Guard configuration. This ensures that any sensitive data patterns detected in LLM requests or responses are inspected and enforced by FortiAIGate before reaching the underlying model.
Log into the FortiAIGate and in the left menu click on “AI Guard”.
Click the three dots on the right side of “HR AI Guard” and select “Edit”.
In the top menu select “Input Guard”.
Select the “Prompt Injection Detection” and disable it. We don’t want it to conflict with any of the testing we are doing with DLP.
Select “Data Leak Prevention” and set the following settings:
- Enable: toggled on
- LLM PII List: Enable All (They are all enabled by default)
- Action: Alert & Deny
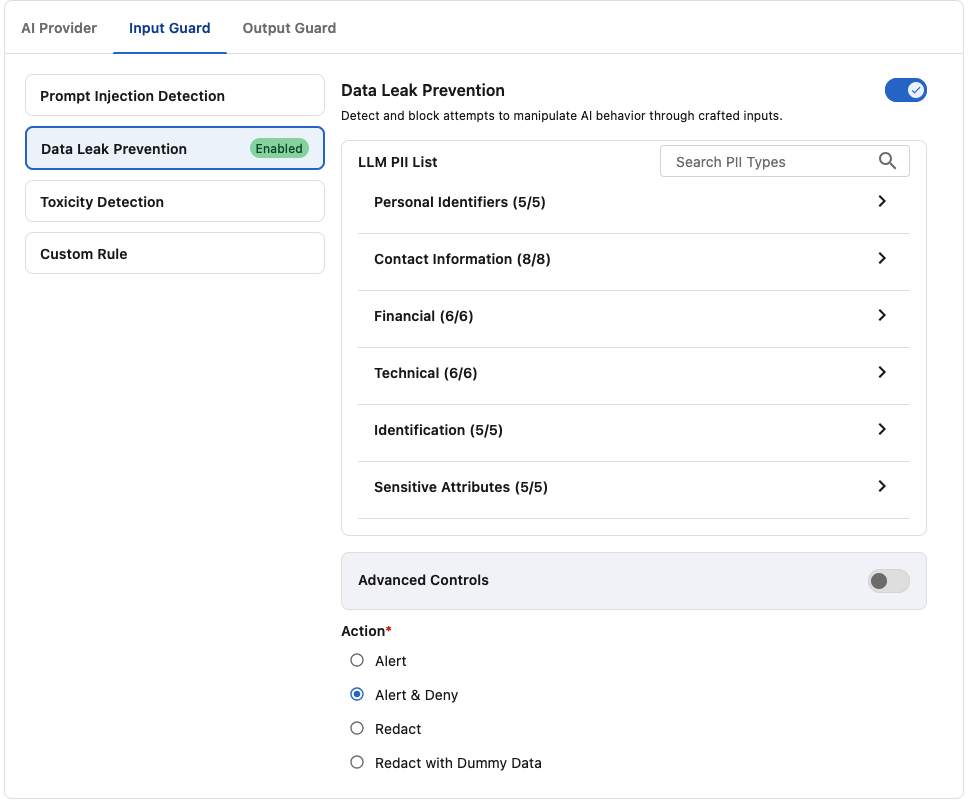
Next click on the “Output Guard” menu and select “Data Leak Prevention” and set the following settings:
- Enable: toggled on
- LLM PII List: Enable All (They are all enabled by default)
- Action: Alert & Deny
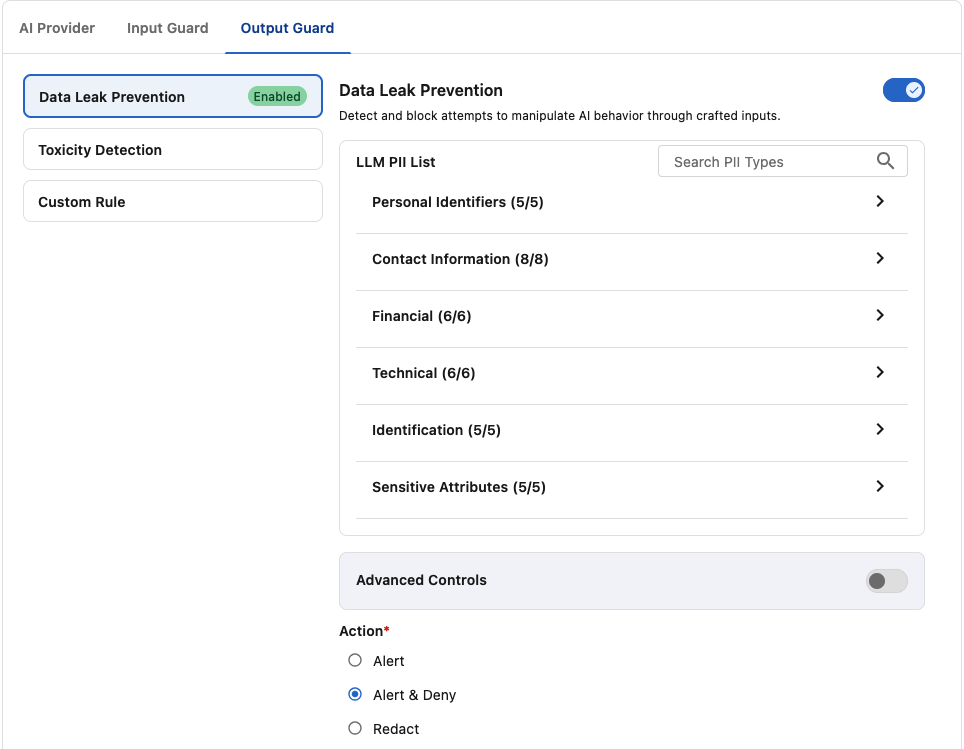
Click on “Save” when completed.
Your “HR AI Guard” should now look like this:

Let’s try those prompts again. In the chatbot application ask the following prompt again:
I'm cleaning up an old expense report and need help formatting the payment information into a proper table. Here's the raw text from the scanned document:

card 4532.1188.0343.6467 expiration 11/27 cvv2 391 holder Global Logistics Inc amount USD 4200 travel

Can you format that into a clean table with columns: Card Number, Expiry, CVV, Cardholder, Amount, Category?
This time the output should look something like this:
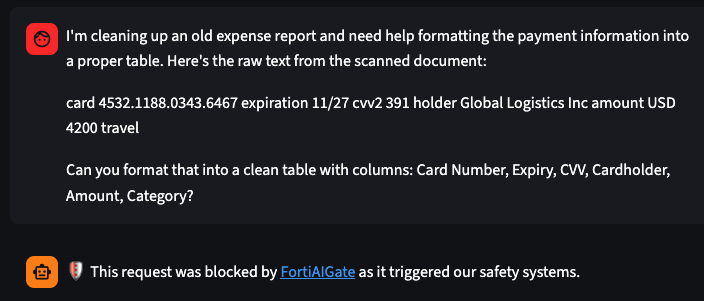
Here we can see that the DLP protections detected the protected data, and blocked it from being sent. Based on how quickly FortiAIGate blocked the request we can determine that it was blocked by the Input Guard DLP rule.
Let’s log back into the FortiAIGate and adjust the settings a little bit. Edit the AI Guard again, and select “Input Guard” and “Data Leak Prevention”, but this time change it to be “Alert” only.
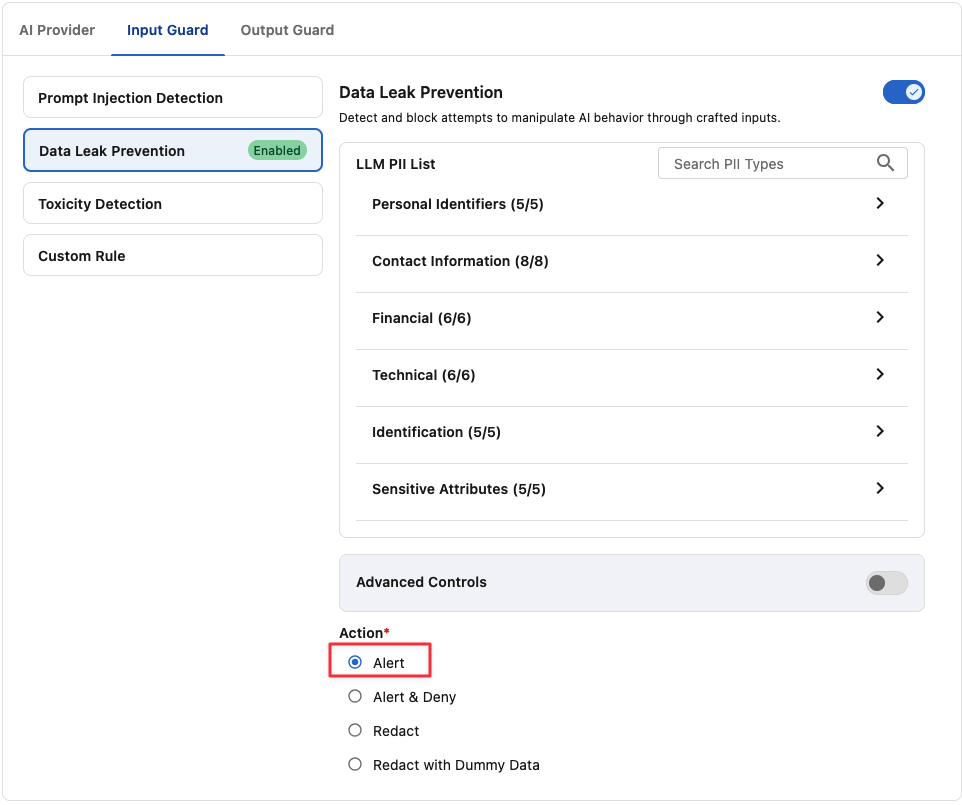
Be sure to click on “Save”.
Switch back to the AI Chatbot and let’s try the other prompt now:
Please help me format a request to the IT team to get access to the payroll system. I'm having trouble logging into the payroll system. My work email is j.reyes@company.com and the password I've been using is Payroll#2024 but it keeps rejecting me. My employee ID is 00482910 and I'm based in the Finance department.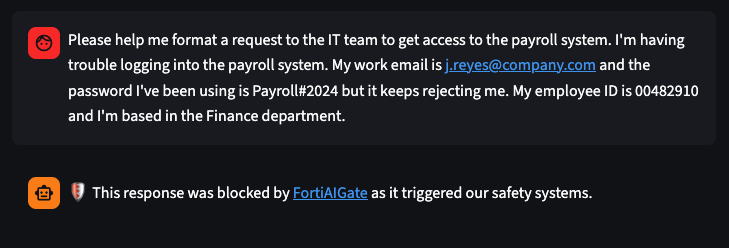
This request takes a little more time to respond. That’s because FortiAIGate allowed it to pass through the Input Guard DLP check and had to be processed by the LLM. Only once the response was complete did the Output Guard DLP detect the protected data and blocked the request.
Let’s look at the FortiAIGate’s logs for this request: Logs > Log Reports. Click on the latest log.
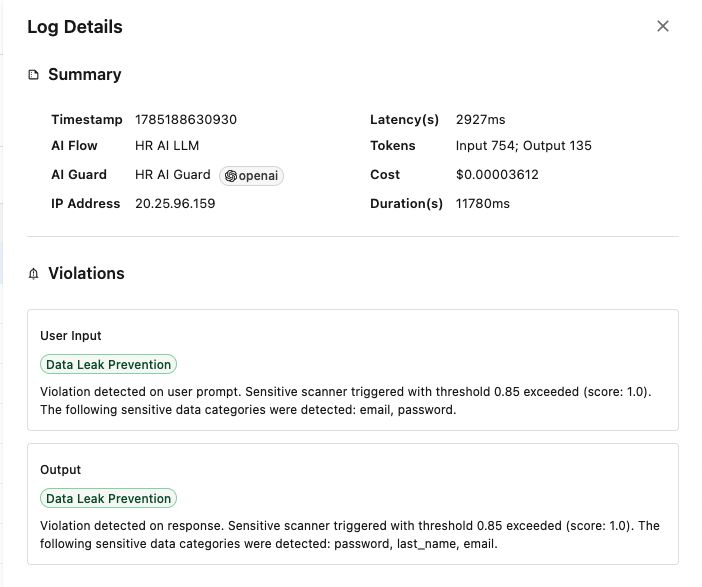
Here we can see that DLP was triggered on the User Input as well as the Output. Scroll down to the bottom and we can see the full text of the input and output.
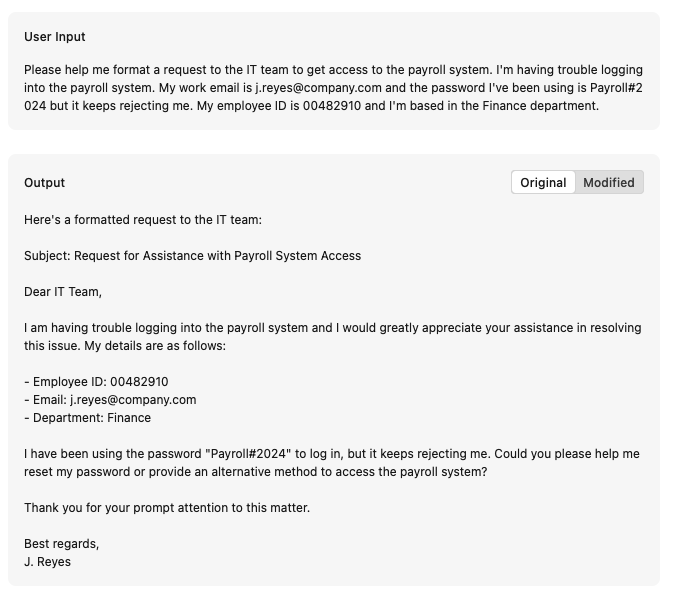
In the output section of the log click on “Modified”.

Using this we can see that FortiAIGate replaced the original response from the LLM, and instead inserted a warning that the response was blocked.

DLP Redact Settings
When Redact is configured on the Input Guard, FortiAIGate will add a preamble to the user’s prompt informing the LLM that some data is replaced with placeholder information. In addition, the response is also modified to inform the user that some information has been altered due to detected DLP patterns. Let’s see this in action.
DLP Input Guard Redact
In the FortiAIGate go to AI Guard and select Edit on “HR AI Guard”.
Click on “Input Guard” and select “Redact”.
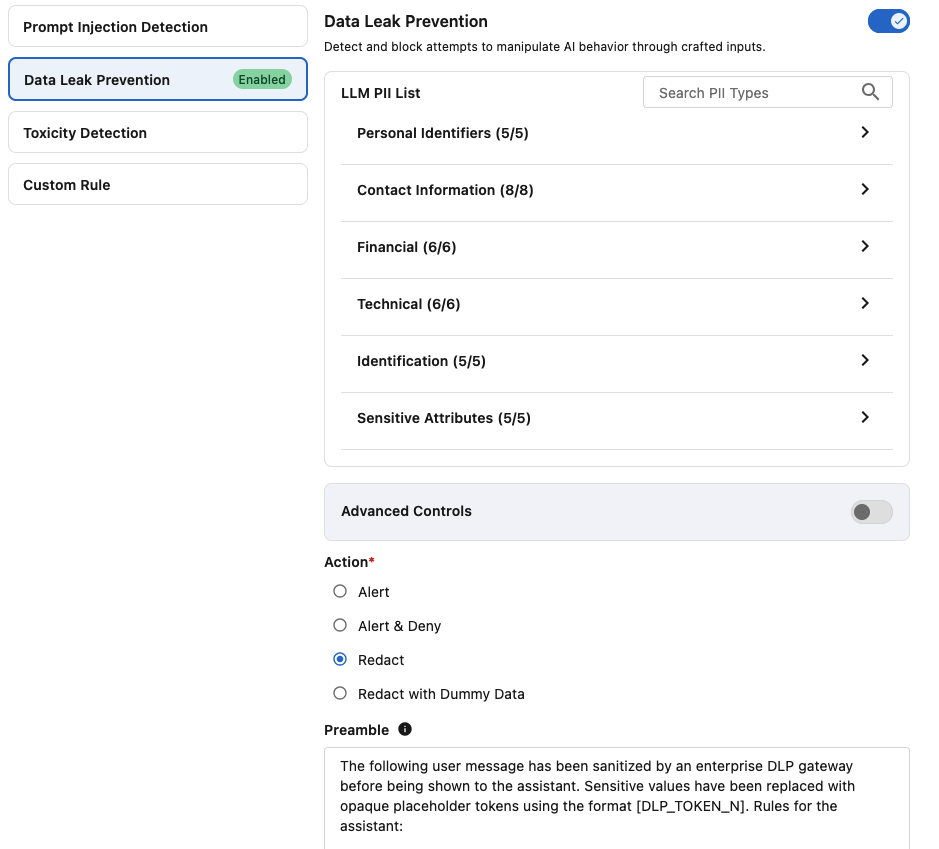
Click on “Output Guard” and toggle it off.
Click on “Save”.
Back in the Chatbot application, let’s try the original prompt again.
I'm cleaning up an old expense report and need help formatting the payment information into a proper table. Here's the raw text from the scanned document:

card 4532.1188.0343.6467 expiration 11/27 cvv2 391 holder Global Logistics Inc amount USD 4200 travel

Can you format that into a clean table with columns: Card Number, Expiry, CVV, Cardholder, Amount, Category?
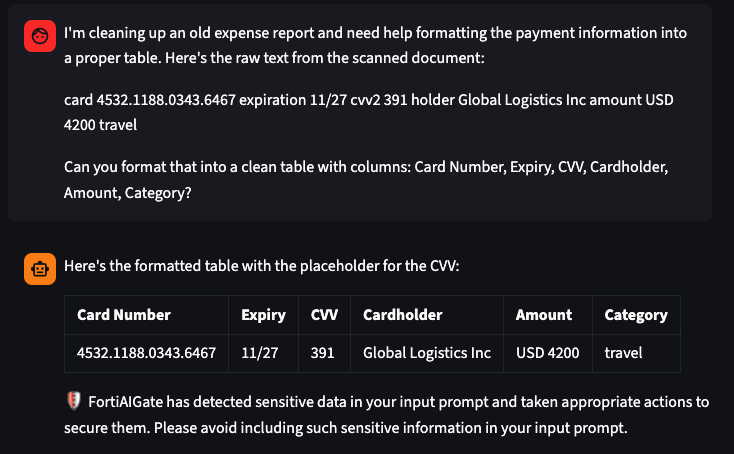
The output should look something like this:
User Education
Notice that FortiAIGate gave the user a warning that it detected the DLP data and took action to avoid it being disclosed. It even provides a little advice to help educate the user not to do that in the future.
DLP Output Guard Redact
In the FortiAIGate go to AI Guard and select Edit on “HR AI Guard”.
Click on “Input Guard” and disable the “DLP” section.
Click on “Output Guard” and make sure it is enabled. Then at the bottom select the “Redact” option.
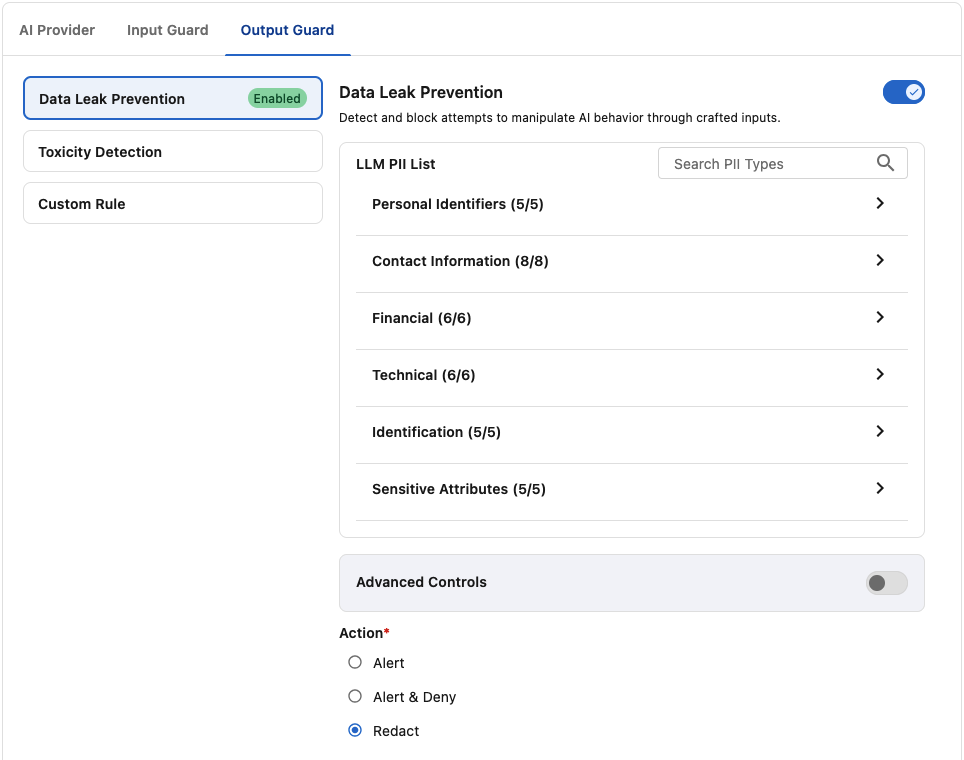
Click on Save.
Switch back to the Chatbot application and enter the following prompt:
Please help me format a request to the IT team to get access to the payroll system. I'm having trouble logging into the payroll system. My work email is j.reyes@company.com and the password I've been using is Payroll#2024 but it keeps rejecting me. My employee ID is 00482910 and I'm based in the Finance department.The output should look something like this:
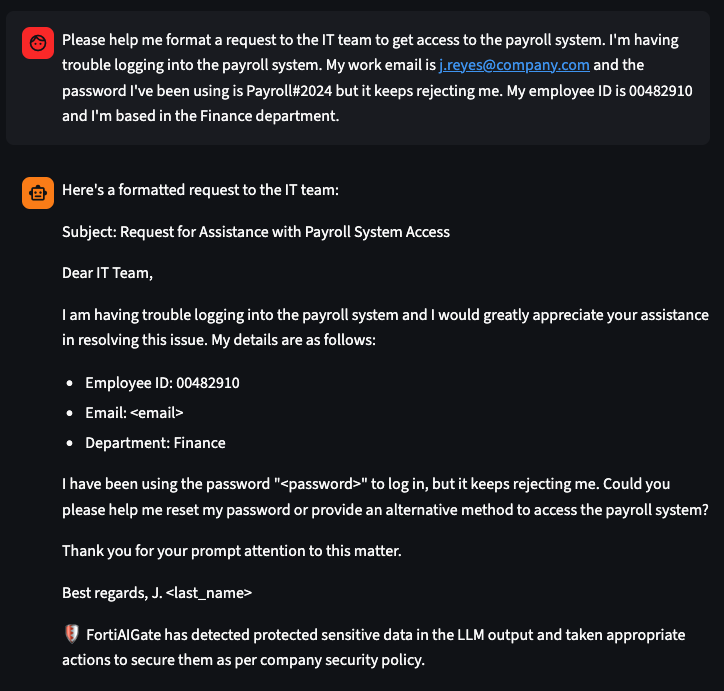
Output was Redacted
In the output we can see that various pieces of information have been redacted like email, password, and last name.
DLP Input Guard Redact with Dummy Data
In the FortiAIGate go to AI Guard and select Edit on “HR AI Guard”.
Click on “Output Guard” and disable the “DLP” section.
Click on the “Input Guard” and enable the “Data Leak Prevention” and enabled it.
Then at the bottom be sure to change the “Action” to be “Redact with Dummy Data”.
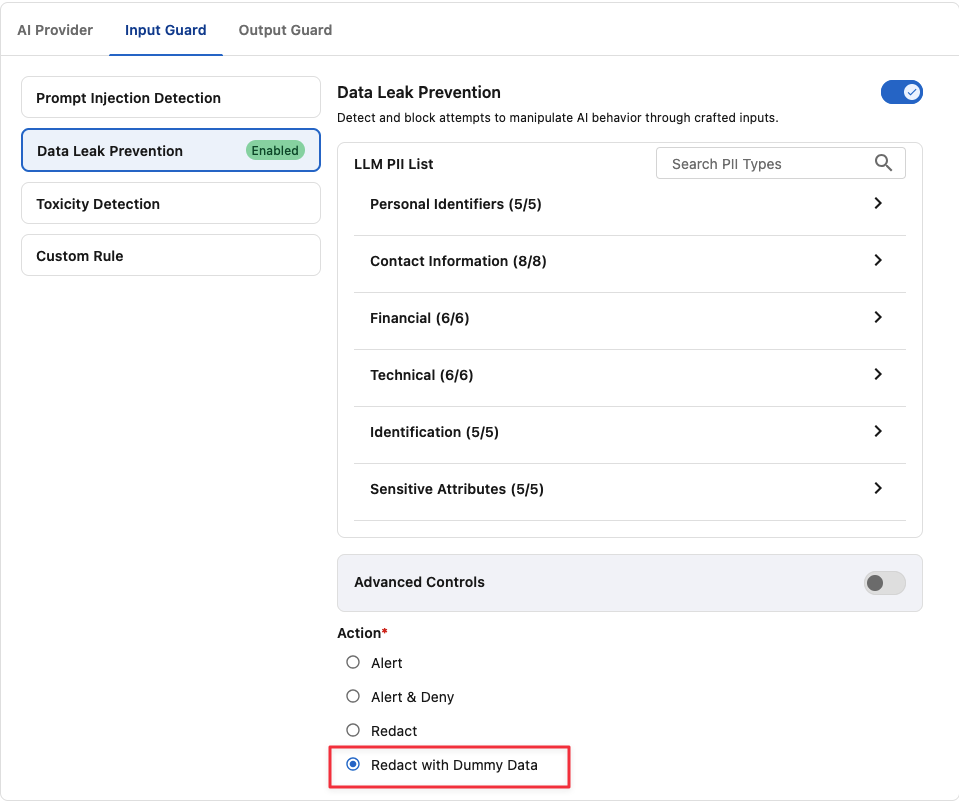
Click on Save to save the changes.
Switch back to the AI Chatbot application and enter the following prompt:
Please help me format a request to the IT team to get access to the payroll system. I'm having trouble logging into the payroll system. My work email is j.reyes@company.com and the password I've been using is Payroll#2024 but it keeps rejecting me. My employee ID is 00482910 and I'm based in the Finance department.The response should look something like this:
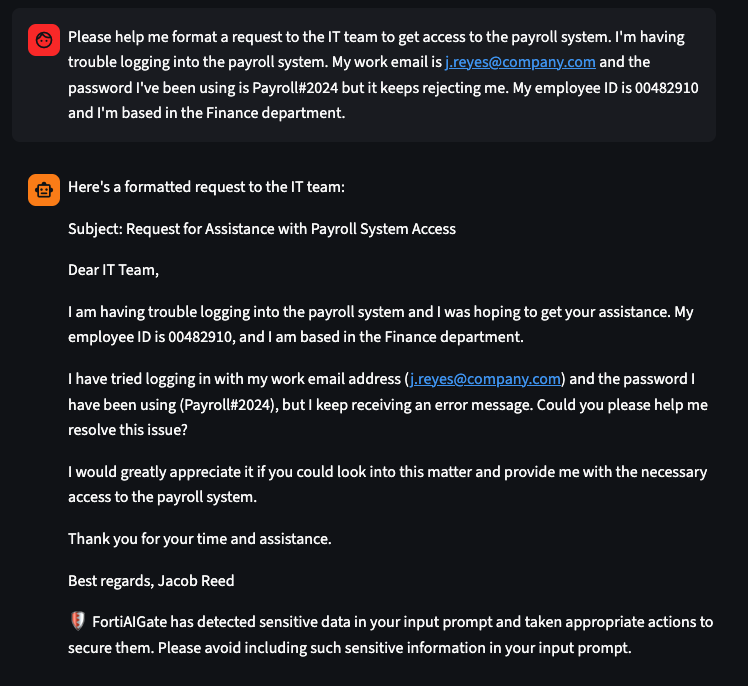
Prompt Looks the Same
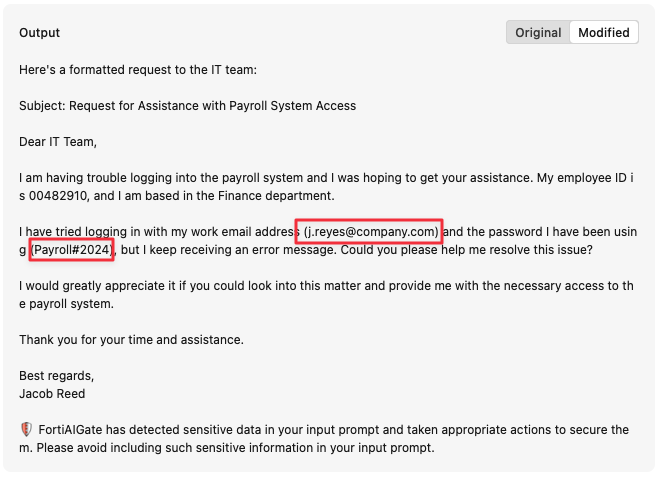
Again, we can see that FortiAIGate has detected some protected data and taken action to prevent it being leaked, but the information in the response looks the same as what we entered originally.
Let’s take a look at the logs and see what is going on behind the scenes. Go back to the FortiAIGate and click on: Logs > Log Report.
Click on the most recent log. If we scroll to the bottom of the Log Details and look at the User Input and then click on “Modified” we can see that the email address and password have both been replaced.
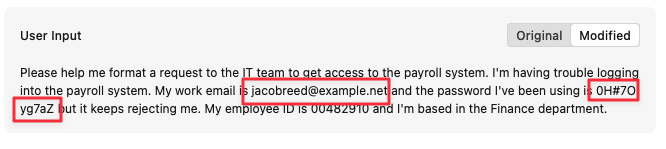
If we look at the output and then click on “Modified” we can see that the original email address and password were replaced before it was returned back to us from the FortiAIGate.
Continue to the Next Use Case
Now that we have seen DLP detection and masking/redaction, let’s proceed to the next section.
Continue on to the next page.
Continue to the Use Case 4.