Deployment Guide
Step-by-Step Deployment
Prerequisites
- AWS account with appropriate permissions
- Terraform 1.0 or later installed
- AWS CLI configured with credentials
- SSH keypair created in target AWS region
- FortiGate licenses (if using BYOL) or FortiFlex account (if using FortiFlex)
existing_vpc_resourcesdeployed (if using lab environment)
Step 1: Navigate to Template Directory
cd fortinet-ui-terraform/terraform/aws/autoscale_templateStep 2: Create terraform.tfvars
cp terraform.tfvars.example terraform.tfvarsStep 3: Configure Core Variables
Region and Availability Zones
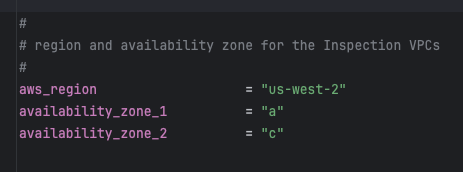
aws_region         = "us-west-2"
availability_zone_1 = "a"
availability_zone_2 = "c"
Warning
Variable Coordination
If you deployed existing_vpc_resources, these values MUST MATCH exactly:
aws_regionavailability_zone_1availability_zone_2cp(customer prefix)env(environment)
Mismatched values will cause resource discovery failures and deployment errors.
Customer Prefix and Environment
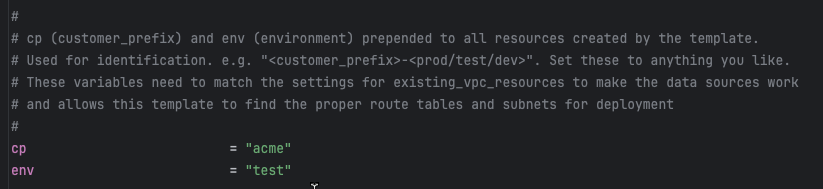
cp  = "acme"    # Customer prefix
env = "test"    # Environment: prod, test, dev
Step 4: Configure Security Variables
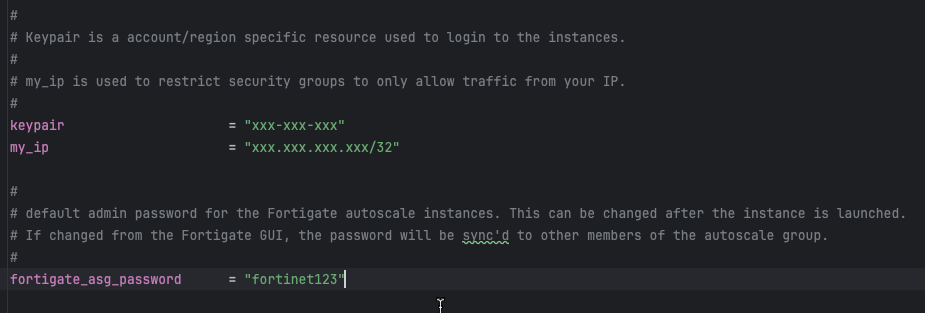
keypair                 = "my-aws-keypair"  # Must exist in target region
my_ip                   = "203.0.113.10/32" # Your public IP for management access
fortigate_asg_password  = "SecurePassword123!"  # Admin password for FortiGates
Warning
Password Requirements
The fortigate_asg_password must meet FortiOS password requirements:
- Minimum 8 characters
- At least one uppercase letter
- At least one lowercase letter
- At least one number
- No special characters that might cause shell escaping issues
Never commit passwords to version control. Consider using:
- Terraform variables marked as sensitive
- Environment variables:
TF_VAR_fortigate_asg_password - AWS Secrets Manager
- HashiCorp Vault
Step 5: Configure Transit Gateway Integration
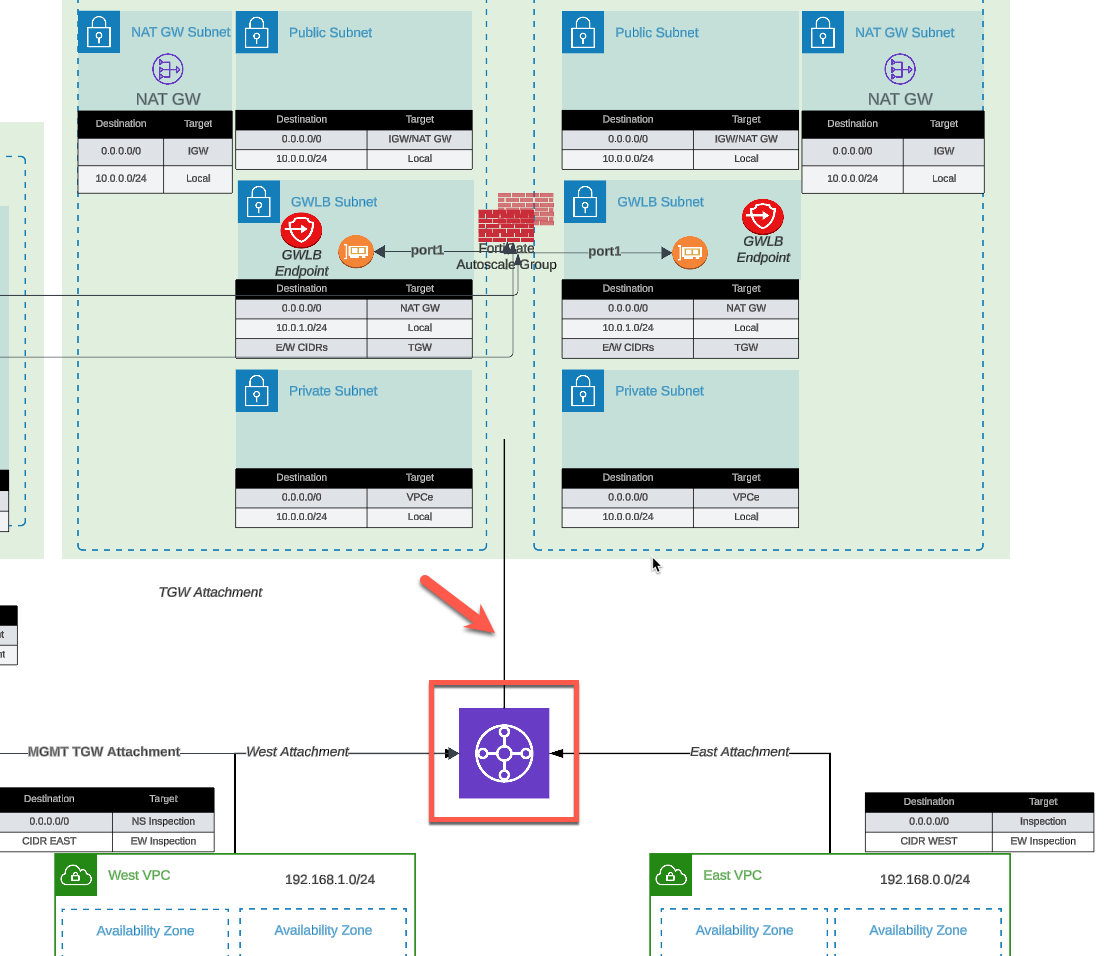
To connect to Transit Gateway:
enable_tgw_attachment = true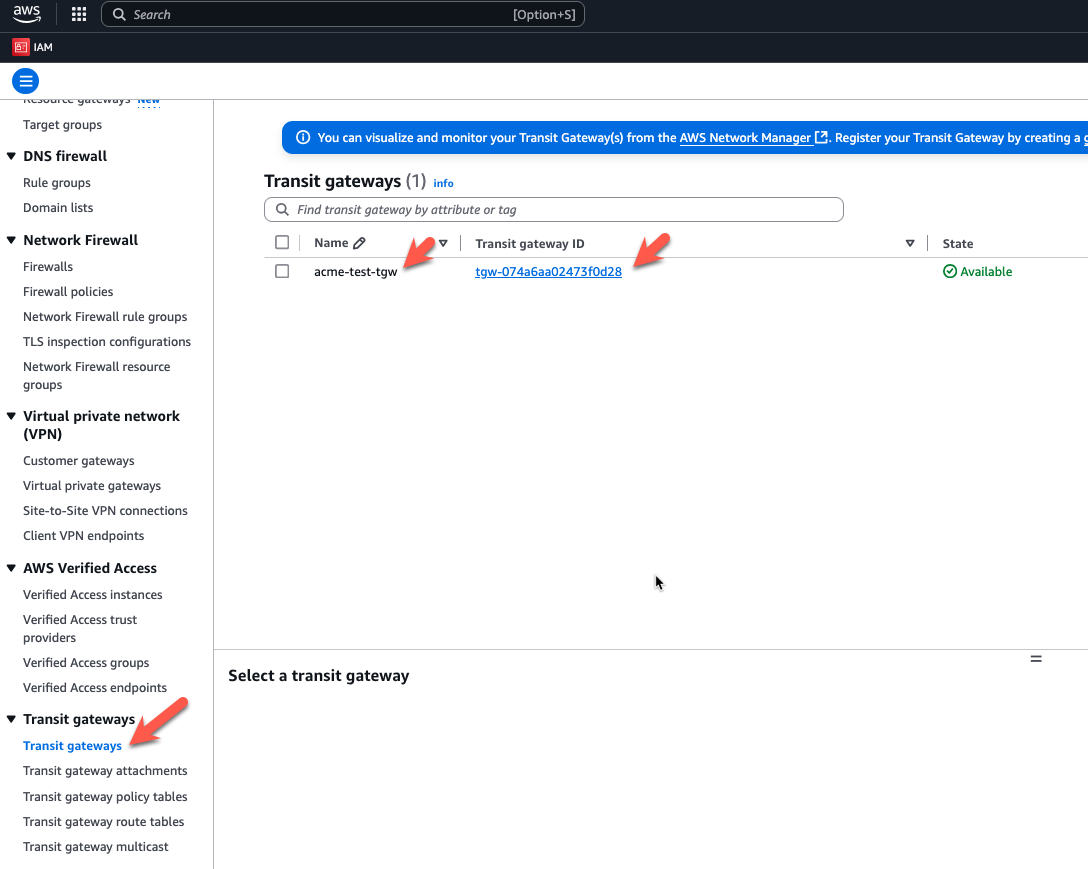
Specify TGW name:
# If using existing_vpc_resources template
attach_to_tgw_name = "acme-test-tgw"  # Matches existing_vpc_resources output

# If using existing production TGW
attach_to_tgw_name = "production-tgw"  # Your production TGW name
Tip
Finding Your Transit Gateway Name
If you don’t know your TGW name:
aws ec2 describe-transit-gateways \
  --query 'TransitGateways[*].[Tags[?Key==`Name`].Value | [0], TransitGatewayId]' \
  --output table
The attach_to_tgw_name should match the Name tag of your Transit Gateway.
To skip TGW attachment (distributed architecture):
enable_tgw_attachment = falseEast-West Inspection (requires TGW attachment):
enable_east_west_inspection = true # Routes spoke-to-spoke traffic through FortiGateStep 6: Configure Architecture Options
Firewall Mode
firewall_policy_mode = "2-arm" # or "1-arm"Recommendations:
- 2-arm: Recommended for most deployments (better throughput)
- 1-arm: Use when simplified routing is required
See Firewall Architecture for detailed comparison.
Internet Egress Mode
access_internet_mode = "nat_gw" # or "eip"Recommendations:
- nat_gw: Production deployments (higher availability)
- eip: Lower cost, simpler architecture
See Internet Egress for detailed comparison.
Step 7: Configure Management Options
Dedicated Management ENI
enable_dedicated_management_eni = trueSeparates management traffic from data plane. Recommended for production.
Dedicated Management VPC
enable_dedicated_management_vpc = true

# If using existing_vpc_resources with default tags:
dedicated_management_vpc_tag = "acme-test-management-vpc"
dedicated_management_public_az1_subnet_tag = "acme-test-management-public-az1-subnet"
dedicated_management_public_az2_subnet_tag = "acme-test-management-public-az2-subnet"

# If using existing management VPC with custom tags:
dedicated_management_vpc_tag = "my-custom-mgmt-vpc-tag"
dedicated_management_public_az1_subnet_tag = "my-custom-mgmt-az1-tag"
dedicated_management_public_az2_subnet_tag = "my-custom-mgmt-az2-tag"
See Management Isolation for options and recommendations.
Info
Automatic Implication
When enable_dedicated_management_vpc = true, the template automatically sets enable_dedicated_management_eni = true. You don’t need to configure both explicitly.
Step 8: Configure Licensing

The template supports three licensing models. Choose one or combine them for hybrid licensing.
Option 1: BYOL (Bring Your Own License)
asg_license_directory = "asg_license" # Directory containing .lic filesPrerequisites:
Create the license directory:
mkdir asg_licensePlace license files in the directory:
terraform/aws/autoscale_template/
|---- terraform.tfvars
|---- asg_license/
|   |---- FGVM01-001.lic
|   |---- FGVM01-002.lic
|   |---- FGVM01-003.lic
|   \---- FGVM01-004.lic
Ensure you have at least as many licenses as
asg_byol_asg_max_size
Warning
License Pool Exhaustion
If you run out of BYOL licenses:
- New BYOL instances launch but remain unlicensed
- Unlicensed instances operate at 1 Mbps throughput
- FortiGuard services will not activate
- If on-demand ASG is configured, scaling continues using PAYG instances
Recommended: Provision 20% more licenses than asg_byol_asg_max_size
Option 2: FortiFlex (API-Driven)
fortiflex_username      = "xxxxxxxx-xxxx-xxxx-xxxx-xxxxxxxxxxxx"  # API username (UUID)
fortiflex_password      = "xxxxxxxxxxxxxxxxxxxxx"  # API password
fortiflex_sn_list       = ["FGVMELTMxxxxxxxx"]  # Optional: specific program serial numbers
fortiflex_configid_list = ["My_4CPU_Config"] # Configuration names (must match CPU count)Prerequisites:
- Register FortiFlex program via FortiCare
- Purchase point packs
- Create configurations matching your instance types
- Generate API credentials via IAM portal
CPU count matching:
fgt_instance_type = "c6i.xlarge"  # 4 vCPUs
fortiflex_configid_list = ["My_4CPU_Config"]  # MUST have 4 CPUs configured
Warning
Security Best Practice
Never commit FortiFlex credentials to version control. Use:
- Terraform Cloud sensitive variables
- AWS Secrets Manager
- Environment variables:
TF_VAR_fortiflex_usernameandTF_VAR_fortiflex_password - HashiCorp Vault
Example using environment variables:
export TF_VAR_fortiflex_username="xxxxxxxx-xxxx-xxxx-xxxx-xxxxxxxxxxxx"
export TF_VAR_fortiflex_password="xxxxxxxxxxxxxxxxxxxxx"
terraform apply
See FortiFlex Setup Guide for complete configuration details.
Option 3: PAYG (AWS Marketplace)
# No explicit configuration needed
# Just set on-demand ASG capacities

asg_byol_asg_min_size = 0
asg_byol_asg_max_size = 0

asg_ondemand_asg_min_size = 2
asg_ondemand_asg_max_size = 8Prerequisites:
- Accept FortiGate-VM terms in AWS Marketplace
- No license files or API credentials required
- Licensing cost included in hourly EC2 charge
Hybrid Licensing (Recommended for Production)
Combine licensing models for cost optimization:
# BYOL for baseline capacity (lowest cost)
asg_license_directory = "asg_license"
asg_byol_asg_min_size = 2
asg_byol_asg_max_size = 4

# PAYG for burst capacity (highest flexibility)
asg_ondemand_asg_min_size = 0
asg_ondemand_asg_max_size = 4
See Licensing Options for detailed comparison and cost analysis.
Step 9: Configure Autoscale Group Capacity
# BYOL ASG
asg_byol_asg_min_size     = 2
asg_byol_asg_max_size     = 4
asg_byol_asg_desired_size = 2

# On-Demand ASG
asg_ondemand_asg_min_size     = 0
asg_ondemand_asg_max_size     = 4
asg_ondemand_asg_desired_size = 0

# Primary scale-in protection
primary_scalein_protection = true
Capacity planning guidance:
| Deployment Type | Recommended Configuration |
|---|---|
| Development/Test | min=1, max=2, desired=1 |
| Small Production | min=2, max=4, desired=2 |
| Medium Production | min=2, max=8, desired=4 |
| Large Production | min=4, max=16, desired=6 |
Scaling behavior:
- BYOL instances scale first (up to
asg_byol_asg_max_size) - On-demand instances scale when BYOL capacity exhausted
- CloudWatch alarms trigger scale-out at 80% CPU (default)
- Scale-in occurs at 30% CPU (default)
See Autoscale Group Capacity for detailed planning.
Step 10: Configure FortiGate Specifications
fgt_instance_type = "c7gn.xlarge"
fortios_version   = "7.4.5"
fortigate_gui_port = 443
Instance type recommendations:
| Use Case | Recommended Type | vCPUs | Network Performance |
|---|---|---|---|
| Testing/Lab | t3.xlarge | 4 | Up to 5 Gbps |
| Small Production | c6i.xlarge | 4 | Up to 12.5 Gbps |
| Medium Production | c6i.2xlarge | 8 | Up to 12.5 Gbps |
| High Performance | c7gn.xlarge | 4 | Up to 25 Gbps |
| Very High Performance | c7gn.4xlarge | 16 | 50 Gbps |
FortiOS version selection:
- Use latest stable release for new deployments
- Test new versions in dev/test before production
- Check FortiOS Release Notes for compatibility
Step 11: Configure FortiManager Integration (Optional)
enable_fortimanager_integration = true
fortimanager_ip                 = "10.3.0.10"  # FortiManager IP
fortimanager_sn                 = "FMGVM0000000001"  # FortiManager serial number
fortimanager_vrf_select         = 1  # VRF for management routing
Warning
FortiManager 7.6.3+ Configuration Required
If using FortiManager 7.6.3 or later, you must enable VM device recognition before deploying:
On FortiManager CLI:
config system global
    set fgfm-allow-vm enable
end
Verify the setting:
show system global | grep fgfm-allow-vmWithout this configuration, FortiGate-VM instances will fail to register with FortiManager.
See FortiManager Integration for complete details.
FortiManager integration behavior:
- Lambda generates
config system central-managementon primary FortiGate only - Primary FortiGate registers with FortiManager as unauthorized device
- VDOM exception prevents sync to secondary instances
- Configuration syncs from FortiManager –> Primary –> Secondaries
See FortiManager Integration Configuration for advanced options including UMS mode.
Step 12: Configure Network CIDRs
vpc_cidr_inspection = "10.0.0.0/16"
vpc_cidr_management = "10.3.0.0/16"  # Must match existing_vpc_resources if used
vpc_cidr_spoke      = "192.168.0.0/16"  # Supernet for all spoke VPCs
vpc_cidr_east       = "192.168.0.0/24"
vpc_cidr_west       = "192.168.1.0/24"

subnet_bits = 8  # /16 + 8 = /24 subnets
Warning
CIDR Planning Considerations
Ensure:
- No overlap with existing networks
- Management VPC CIDR matches
existing_vpc_resourcesif used - Spoke supernet encompasses all individual spoke VPC CIDRs
- Sufficient address space for growth
- Alignment with corporate IP addressing standards
Common mistakes:
- Overlapping inspection VPC with management VPC
- Spoke CIDR too small for number of VPCs
- Mismatched CIDRs between templates
Step 13: Configure GWLB Endpoint Names
endpoint_name_az1 = "asg-gwlbe_az1"
endpoint_name_az2 = "asg-gwlbe_az2"
These names are used for route table lookups when configuring TGW routing or spoke VPC routing.
Step 14: Configure Additional Options
FortiGate System Autoscale
enable_fgt_system_autoscale = trueEnables FortiGate-native HA synchronization between instances. Recommended to leave enabled.
CloudWatch Alarms
# Scale-out threshold (default: 80% CPU)
scale_out_threshold = 80

# Scale-in threshold (default: 30% CPU)
scale_in_threshold = 30
Adjust based on your traffic patterns and capacity requirements.
Step 15: Review Complete Configuration
Review your complete terraform.tfvars file before deployment. Here’s a complete example:
Click to expand complete example terraform.tfvars
#-----------------------------------------------------------------------
# Core Configuration
#-----------------------------------------------------------------------
aws_region          = "us-west-2"
availability_zone_1 = "a"
availability_zone_2 = "c"
cp                  = "acme"
env                 = "prod"

#-----------------------------------------------------------------------
# Security
#-----------------------------------------------------------------------
keypair                = "acme-keypair"
my_ip                  = "203.0.113.10/32"
fortigate_asg_password = "SecurePassword123!"

#-----------------------------------------------------------------------
# Transit Gateway
#-----------------------------------------------------------------------
enable_tgw_attachment      = true
attach_to_tgw_name         = "acme-prod-tgw"
enable_east_west_inspection = true

#-----------------------------------------------------------------------
# Architecture Options
#-----------------------------------------------------------------------
firewall_policy_mode = "2-arm"
access_internet_mode = "nat_gw"

#-----------------------------------------------------------------------
# Management Options
#-----------------------------------------------------------------------
enable_dedicated_management_eni = true
enable_dedicated_management_vpc = true
dedicated_management_vpc_tag = "acme-prod-management-vpc"
dedicated_management_public_az1_subnet_tag = "acme-prod-management-public-az1-subnet"
dedicated_management_public_az2_subnet_tag = "acme-prod-management-public-az2-subnet"

#-----------------------------------------------------------------------
# FortiManager Integration
#-----------------------------------------------------------------------
enable_fortimanager_integration = true
fortimanager_ip                 = "10.3.0.10"
fortimanager_sn                 = "FMGVM0000000001"
fortimanager_vrf_select         = 1

#-----------------------------------------------------------------------
# Licensing - Hybrid BYOL + PAYG
#-----------------------------------------------------------------------
asg_license_directory = "asg_license"

#-----------------------------------------------------------------------
# Autoscale Group Capacity
#-----------------------------------------------------------------------
# BYOL baseline
asg_byol_asg_min_size     = 2
asg_byol_asg_max_size     = 4
asg_byol_asg_desired_size = 2

# PAYG burst
asg_ondemand_asg_min_size     = 0
asg_ondemand_asg_max_size     = 4
asg_ondemand_asg_desired_size = 0

# Scale-in protection
primary_scalein_protection = true

#-----------------------------------------------------------------------
# FortiGate Specifications
#-----------------------------------------------------------------------
fgt_instance_type       = "c6i.xlarge"
fortios_version         = "7.4.5"
fortigate_gui_port      = 443
enable_fgt_system_autoscale = true

#-----------------------------------------------------------------------
# Network CIDRs
#-----------------------------------------------------------------------
vpc_cidr_inspection = "10.0.0.0/16"
vpc_cidr_management = "10.3.0.0/16"
vpc_cidr_spoke      = "192.168.0.0/16"
vpc_cidr_east       = "192.168.0.0/24"
vpc_cidr_west       = "192.168.1.0/24"
subnet_bits         = 8

#-----------------------------------------------------------------------
# GWLB Endpoints
#-----------------------------------------------------------------------
endpoint_name_az1 = "acme-prod-gwlbe-az1"
endpoint_name_az2 = "acme-prod-gwlbe-az2"
Step 16: Deploy the Template
Initialize Terraform:
terraform initReview the execution plan:
terraform planExpected output will show ~40-60 resources to be created.
Deploy the infrastructure:
terraform applyType yes when prompted.
Expected deployment time: 15-20 minutes
Deployment progress indicators:
- VPC and networking: ~2 minutes
- Security groups and IAM: ~1 minute
- Lambda functions and DynamoDB: ~2 minutes
- GWLB and endpoints: ~5 minutes
- FortiGate instances launching: ~5-10 minutes
Step 17: Monitor Deployment
Watch CloudWatch logs for Lambda execution:
# Get Lambda function name from Terraform
terraform output lambda_function_name

# Stream logs
aws logs tail /aws/lambda/<function-name> --follow
Watch Auto Scaling Group activity:
# Get ASG name
aws autoscaling describe-auto-scaling-groups \
  --query 'AutoScalingGroups[?contains(AutoScalingGroupName, `acme-prod`)].AutoScalingGroupName'

# Watch instance launches
aws autoscaling describe-scaling-activities \
  --auto-scaling-group-name <asg-name> \
  --max-records 10
Step 18: Verify Deployment
Check FortiGate Instances
# List running FortiGate instances
aws ec2 describe-instances \
  --filters "Name=tag:cp,Values=acme" \
           "Name=tag:env,Values=prod" \
           "Name=instance-state-name,Values=running" \
  --query 'Reservations[*].Instances[*].[InstanceId,PublicIpAddress,Tags[?Key==`Name`].Value|[0]]' \
  --output table
Access FortiGate GUI
# Get FortiGate public IP
terraform output fortigate_instance_ips

# Access GUI
open https://<fortigate-public-ip>:443
Login credentials:
- Username:
admin - Password: Value from
fortigate_asg_passwordvariable
Verify License Assignment
For BYOL:
# SSH to FortiGate
ssh -i ~/.ssh/keypair.pem admin@<fortigate-ip>

# Check license status
get system status

# Look for:
# Serial-Number: FGVMxxxxxxxxxx (not FGVMEVXXXXXXXXX)
# License Status: Valid
For FortiFlex:
- Check Lambda CloudWatch logs for successful API calls
- Verify entitlements created in FortiFlex portal
- Check FortiGate shows licensed status
For PAYG:
- Instances automatically licensed via AWS
- Verify license status in FortiGate GUI
Verify Transit Gateway Attachment
aws ec2 describe-transit-gateway-attachments \
  --filters "Name=state,Values=available" \
           "Name=resource-type,Values=vpc" \
  --query 'TransitGatewayAttachments[?contains(Tags[?Key==`Name`].Value|[0], `inspection`)]'
Verify FortiManager Registration
If FortiManager integration enabled:
- Access FortiManager GUI:
https://<fortimanager-ip> - Navigate to Device Manager > Device & Groups
- Look for unauthorized device with serial number matching primary FortiGate
- Right-click device and select Authorize
Test Traffic Flow
From jump box (if using existing_vpc_resources):
# SSH to jump box
ssh -i ~/.ssh/keypair.pem ec2-user@<jump-box-ip>

# Test internet connectivity (should go through FortiGate)
curl https://www.google.com

# Test spoke VPC connectivity
curl http://<linux-instance-ip>
On FortiGate:
# SSH to FortiGate
ssh -i ~/.ssh/keypair.pem admin@<fortigate-ip>

# Monitor real-time traffic
diagnose sniffer packet any 'host 192.168.0.50' 4

# Check firewall policies
get firewall policy

# View active sessions
diagnose sys session list