Provisioning can take several minutes. Delivery to corporate email addresses can be delayed, so we recommend using a personal email address (gmail works great) to speed up delivery. If you do not receive an email after 10 minutes, please check your spam folder and/or notify the instructors
*** PLEASE DO NOT SUBMIT MULTIPLE TIMES ***
There is no notice here of submission, your email address just disappears.
Provision your Azure Environment, enter your Email address and click Provision
Provision your Portal Accounts
Required for hands-on portion of this workshop
When provisioning is complete, one of the following will happen.
You will receive an email with Azure environment credentials. Use those credentials for this environment, even if you have your own.
You will receive an email indicating that there are no environments available to utilize. In this case please try again at a later date.
You will receive an email indicating that the supplied email address is from an unsupported domain.
No email received due to an unexpected error. You can try again or notify the Azure CSE team.
Tasks
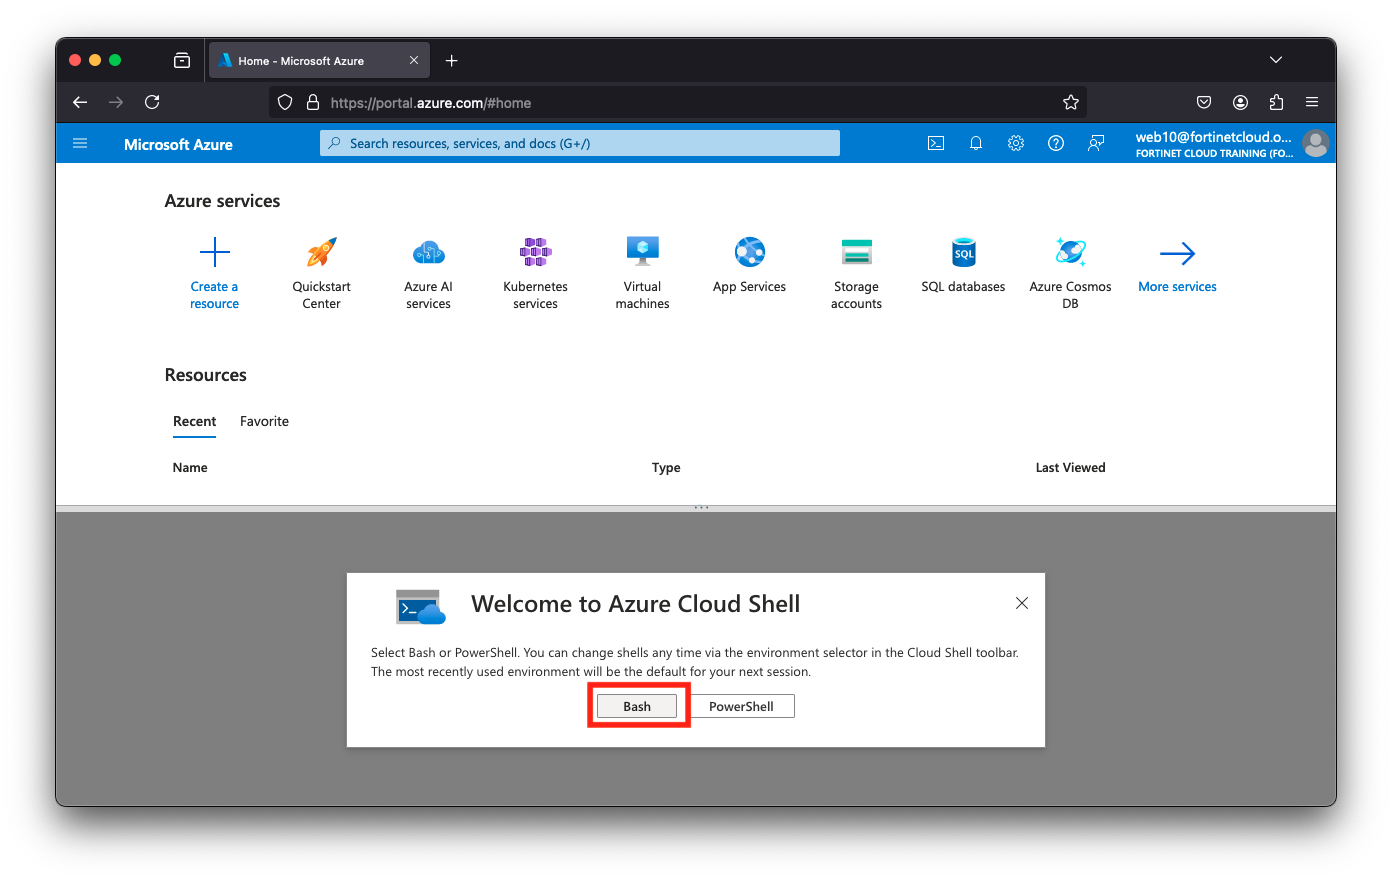
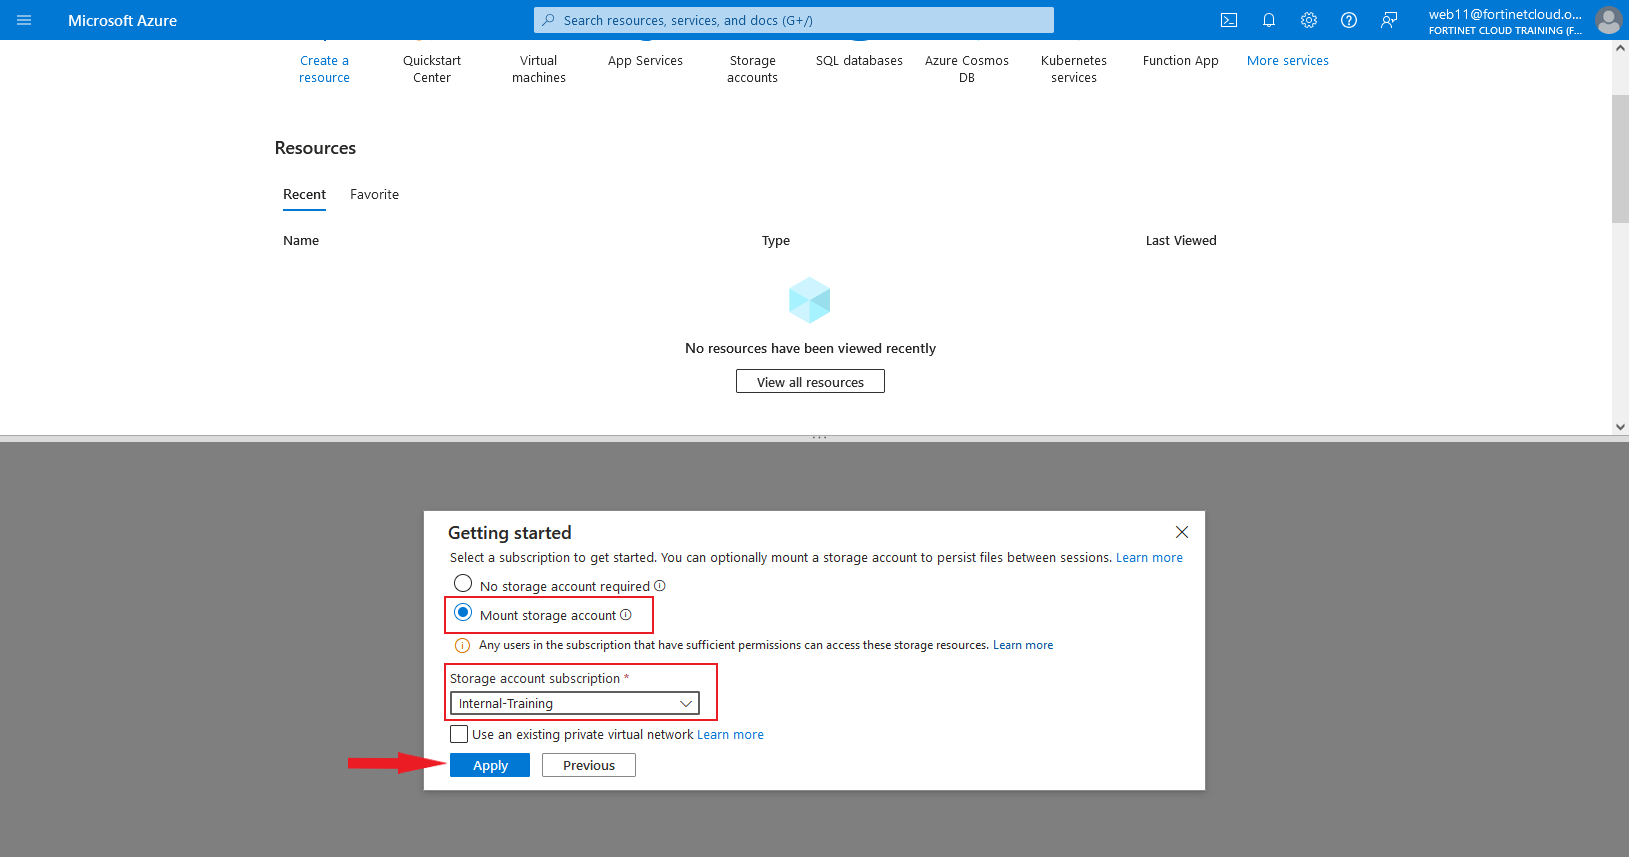
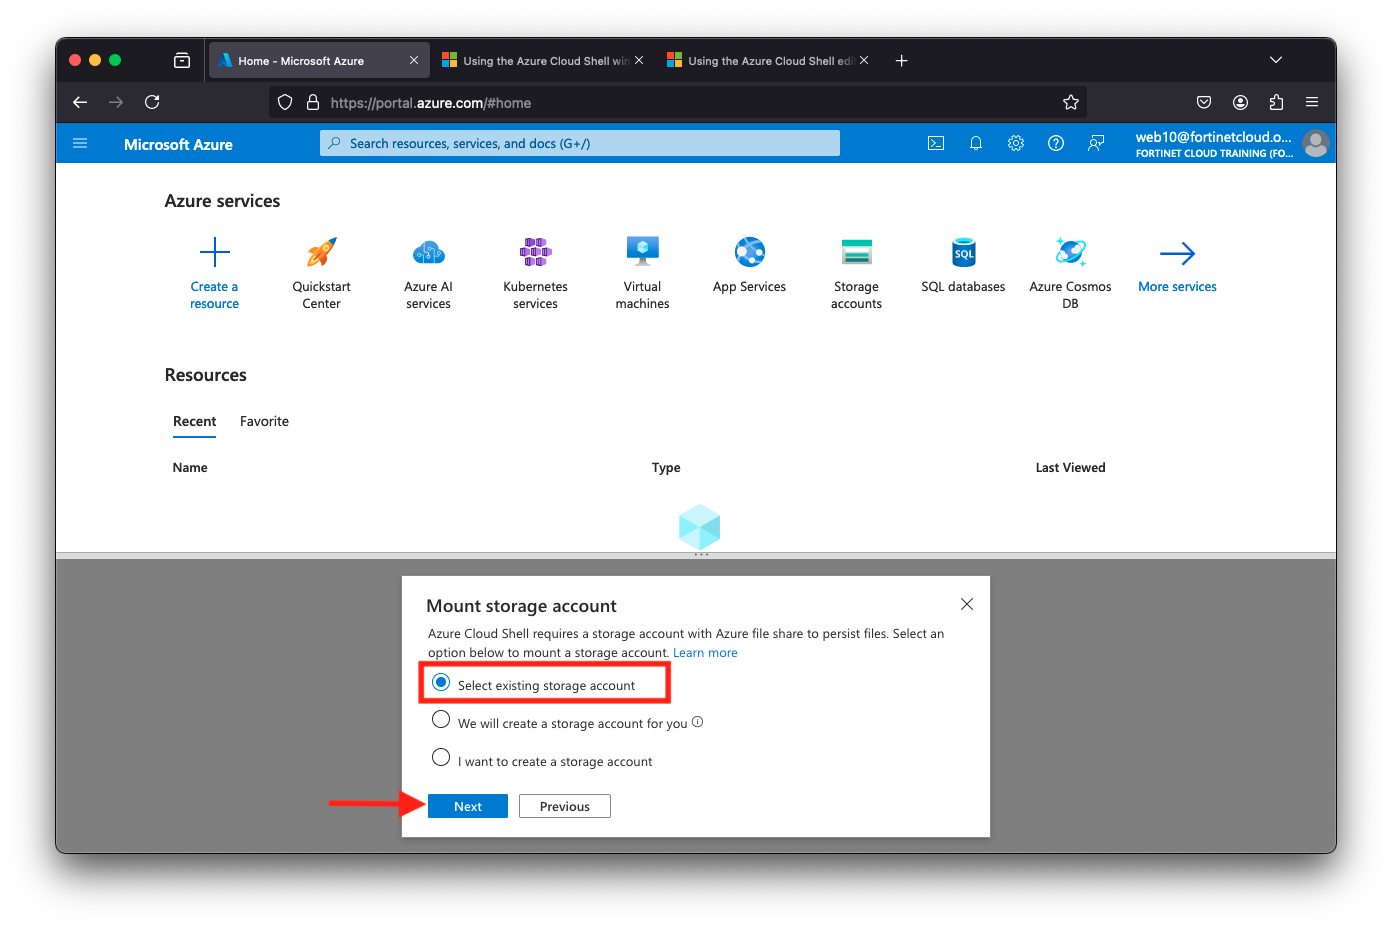
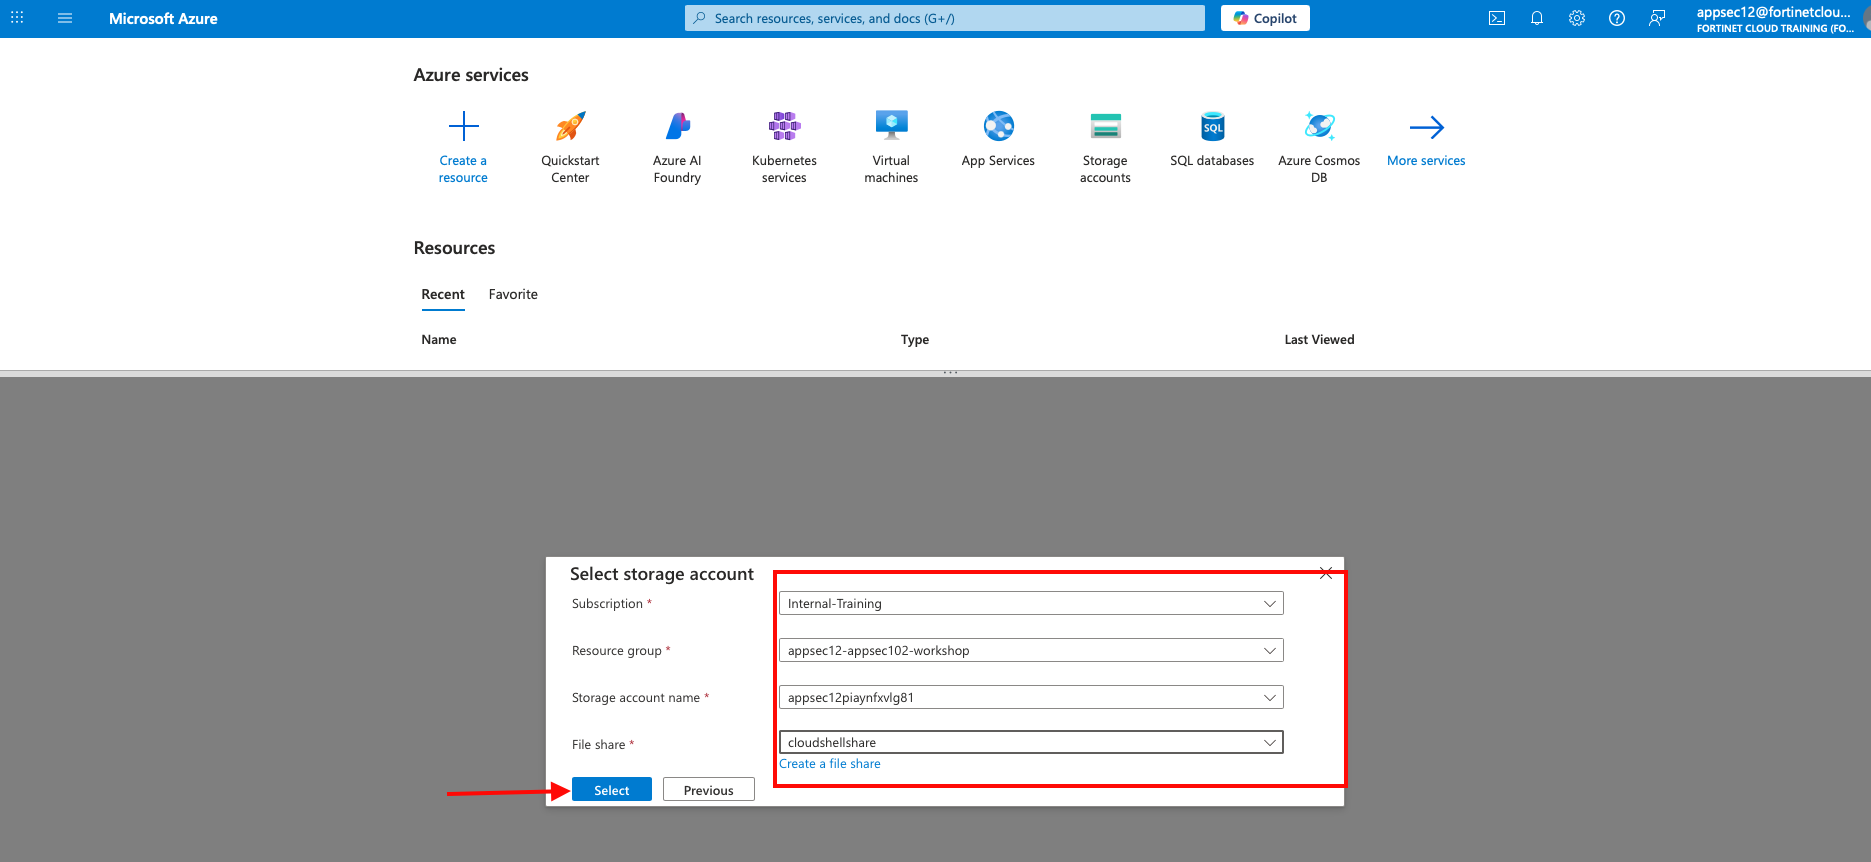
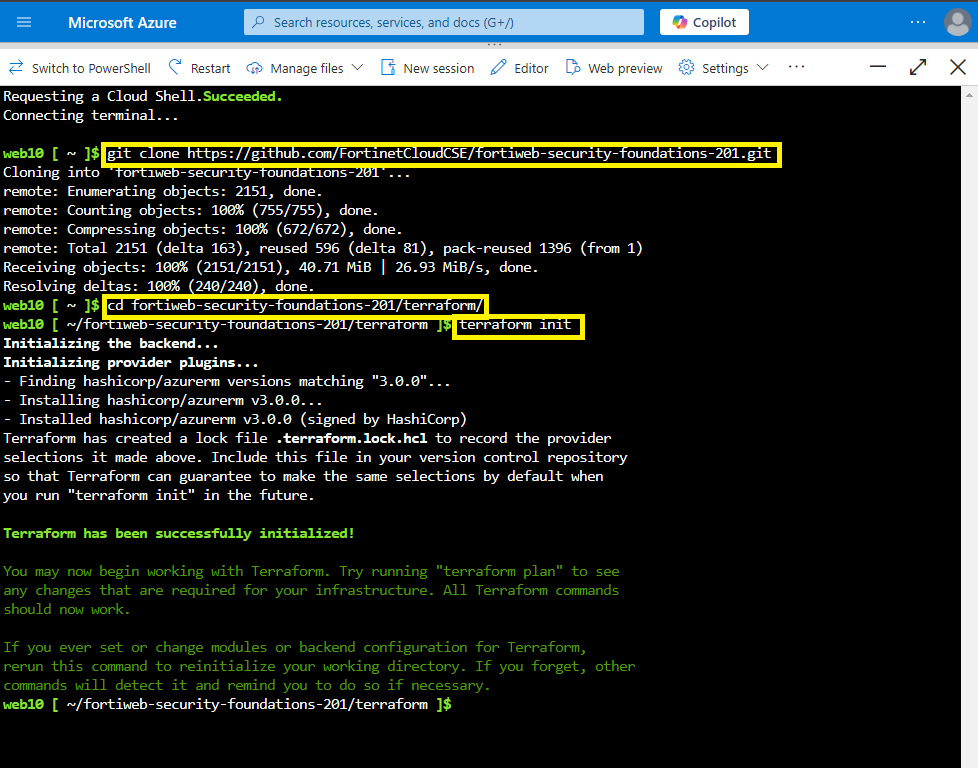
Setup Azure Cloud Shell
Run Terraform
Verify Terraform
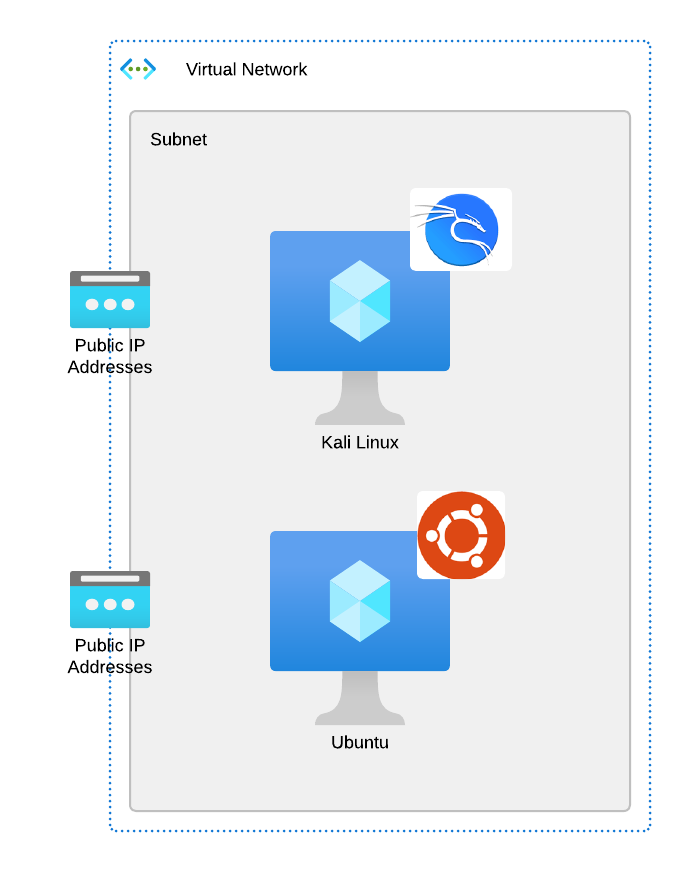
Student Setup Diagram
Each Student will have their own environment for the lab. The following diagram provides an overview of the Student environment.
Subsections of Ch 1: Getting Started
Task 1: Setup Azure Cloudshell
Goal
Login to Azure
Task
Create an Azure account and login.
Verify task completion
You will receive an email
Info
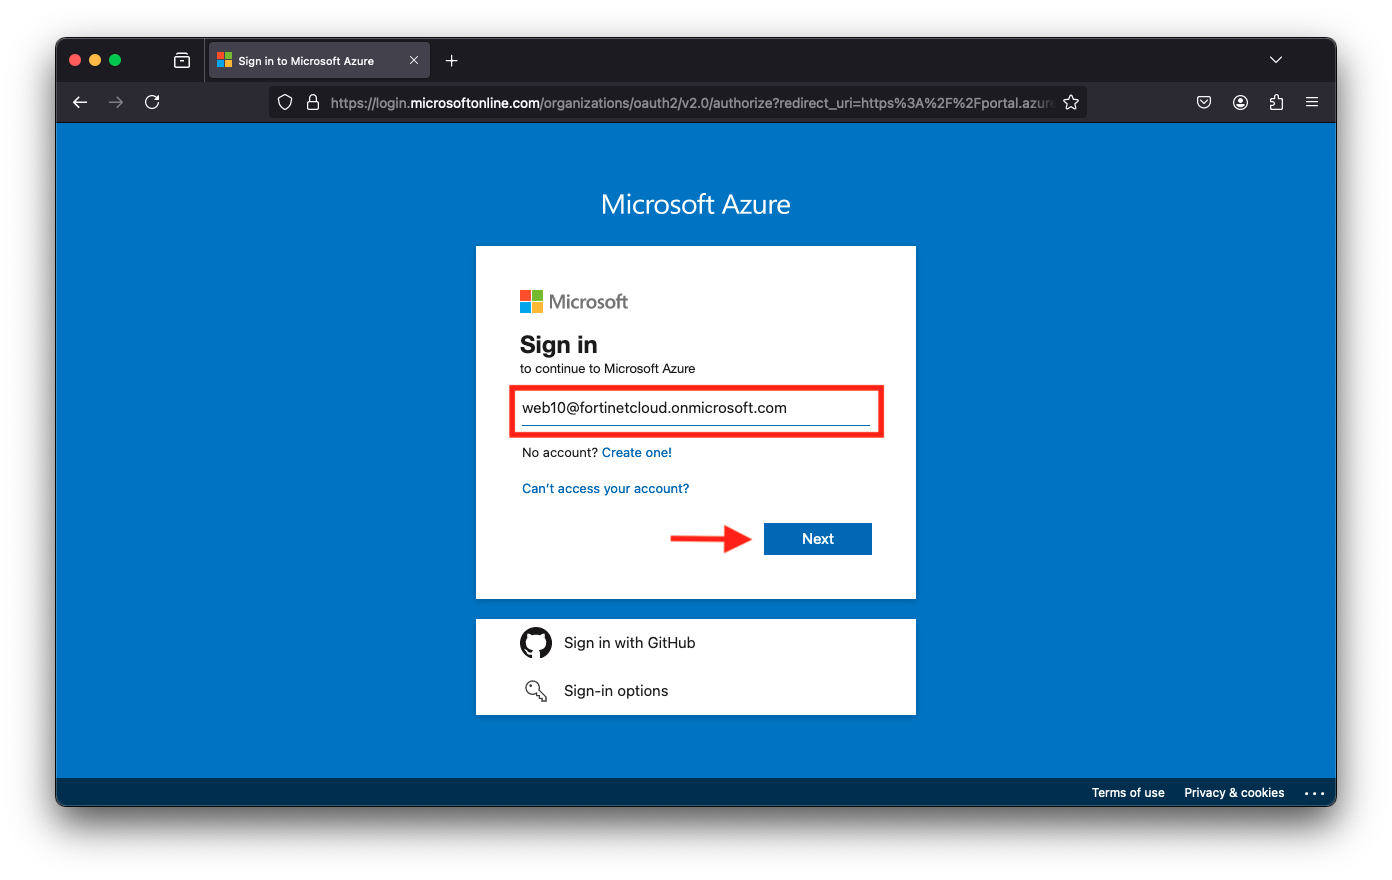
The below document references “student number” for a couple of the steps. This is the first portion of the Username you received in the initial email with your Azure credentials. For example if your username is web10@fortinetcloud.onmicrosoft.com then your student number would be web10. The same applies for a username of appsec10@fortinetcloud.onmicrosoft.com the student number would be appsec10
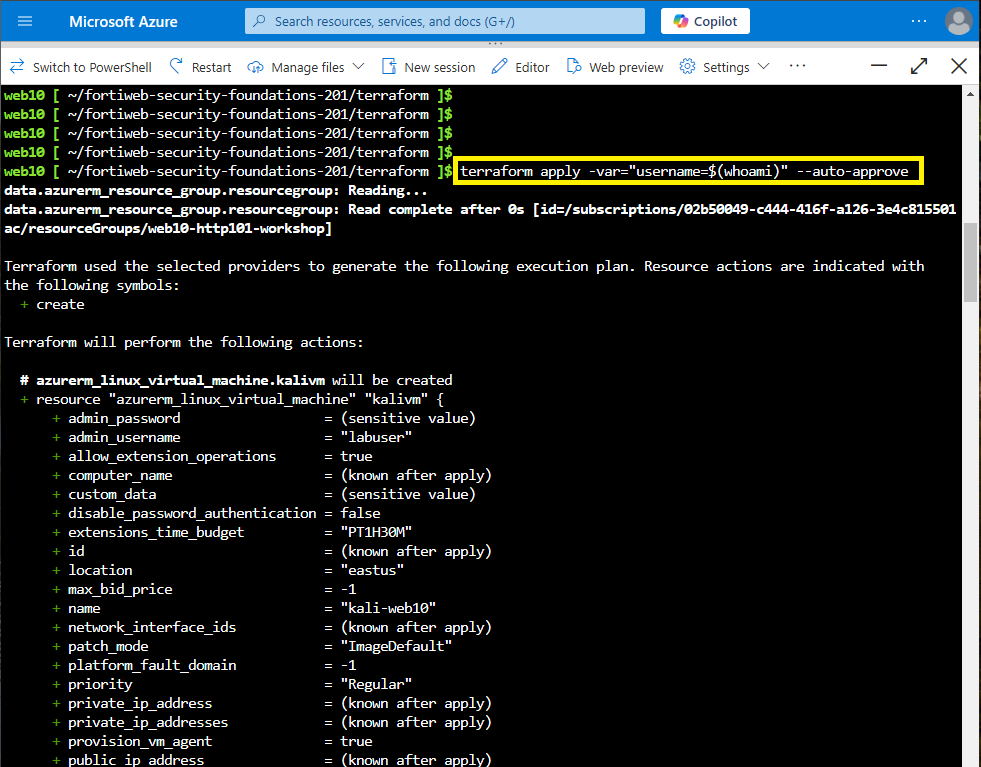
You can manually specify your username (found in your Azure Account email) in the command If your Workshop Azure account login is web31@ftntxxxxx.onmicrosoft.com, your username is web31, and the command to enter is:
Terraform deployment takes at least 10-15 min to complete.
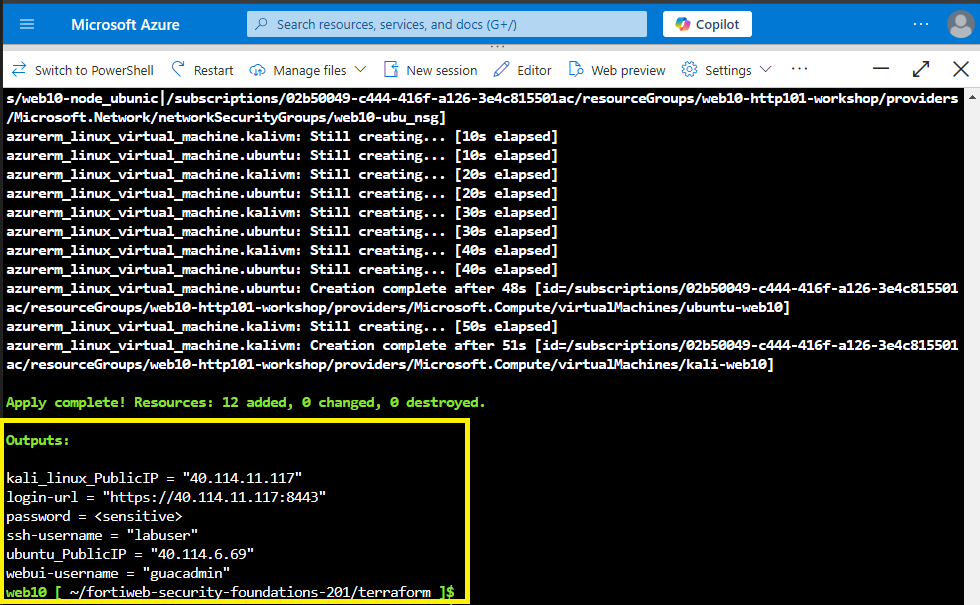
Once Terraform is complete you should see the output. Please copy the output to notepad.
To print the node VM’s login password, you can run this command
terraform output -raw password
Task 3: Start Kali RDP
Goal
Start Kali RDP
Task
Navigate to Kali Linux and Juice Shop servers
Verify task completion
You should be able to access both Kali and Juice Shop. All commands in step 4 should complete successfully.
Log in to your student environment
Prereqs
Internet Access
Web Browser
Any modern browser will work. Some people have had issues with Safari. If that happens, please try Firefox or Chrome. Your student environment includes a client and server with all required software.
Start Kali RDP
For this lab, we will only need to interact with the Kali linux device. We will use guacamole to create an RDP session in your browser.
In your browser window, type in the url below, substituting your Kali server IP.
Warning
Kali Linux takes about 20 minutes to fully deploy, so you may get a connection refused error. Please be patient and the login prompt will eventually appear. Even after Kali is reachable via HTTPS, some of the initial packages may still be downloading.
Warning
Depending on your browser, you will likely need to accept the self-signed certificate warnings.
https://<kali-IP>:8443
Accept all warnings and proceed to the site.
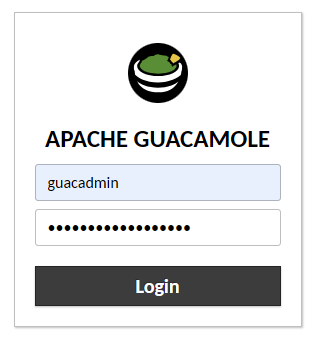
You will be prompted to log in to Apache Guacamole.
Enter guacadmin for Username and enter S3cur3P4ssw0rd123!
Click Login
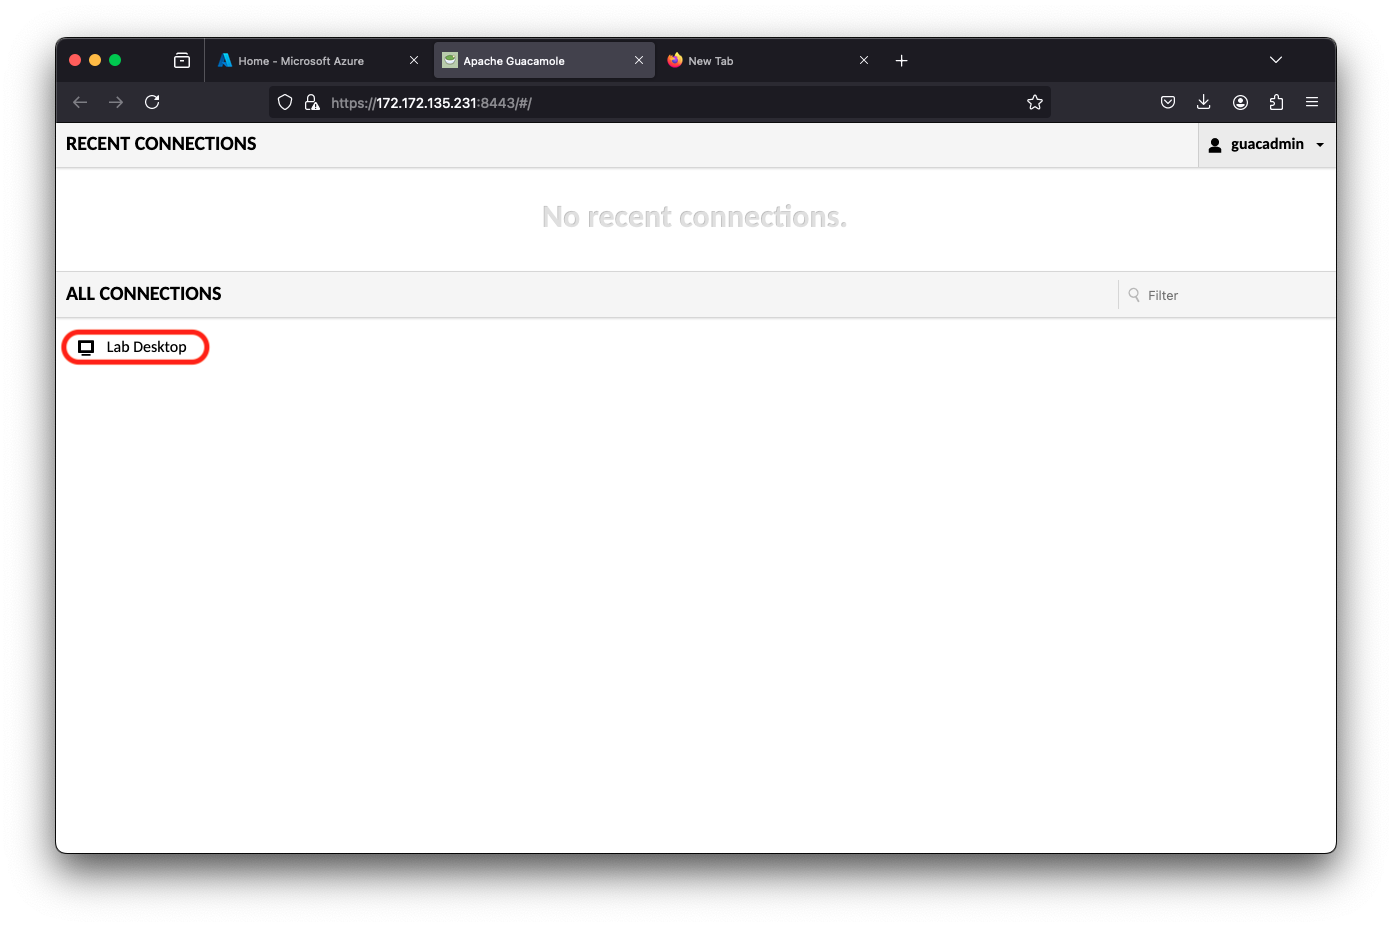
The Guacamole home page will have a list of connections. Click on the connection labeled Lab Desktop
Note the icons at the top left of the home screen. We will be using these during the lab.
Paste text into Kali Desktop
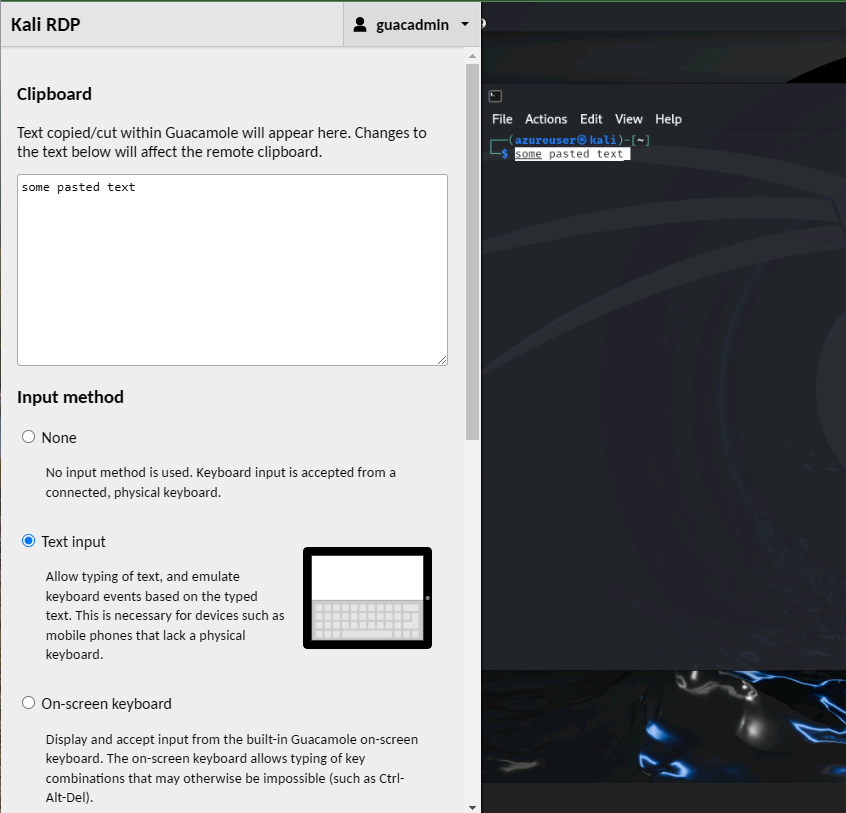
There are portions of this lab that will require large amounts of text to be entered on the Kali desktop. To accomplish this:
You will need to open (and close) the Guacamole menu by typing ctrl+alt+shift for Windows or ctrl+command+shift for MAC.
Paste your text into the window, and select Text input as the Input method.
Right-click on the desktop where you want to past and click “paste” or “paste from clipboard” depending on which option is available.
Task 4: Check Juice Shop
Goal
Verify that Juice Shop is working
Task
Navigate to the public IP associated with Ubuntu
Verify task completion
You should see the Juice Shop Home Page
Start Kali RDP
From your Terraform Outputs in Task 2 you should have seen gotten the Public IP address of Ubuntu.
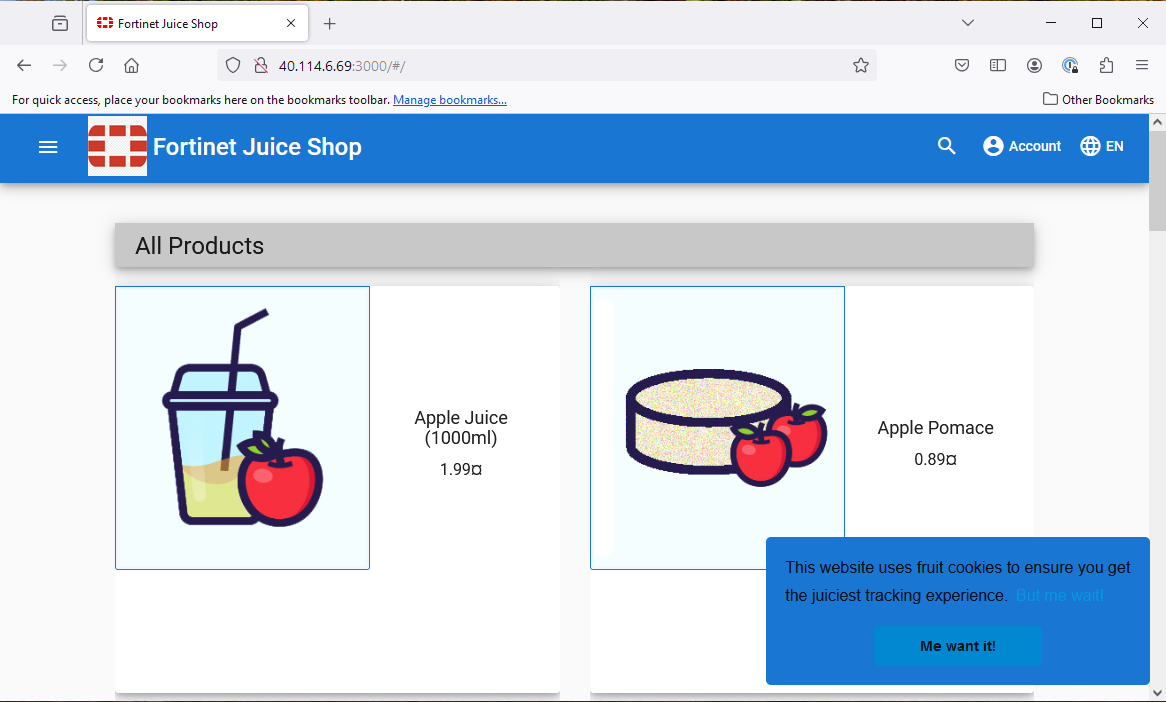
By default, Juice shop listens on port 3000. In your favorite browser, type http://<ubuntu-ip>:3000
You should see a screen like below:
Warning
Depending on your browser, you might have to acknowledge a warning about the lack of encryption.
You can now proceed to the next module
Ch 2: Protect Application
Log Into FortiAppSec Cloud
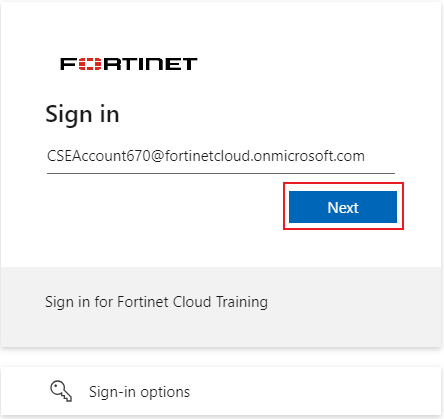
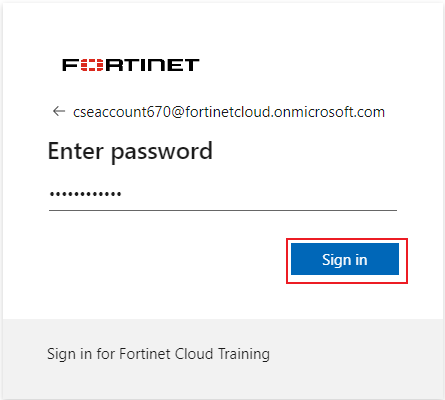
Using an Incognito browser, navigate to the below URL:
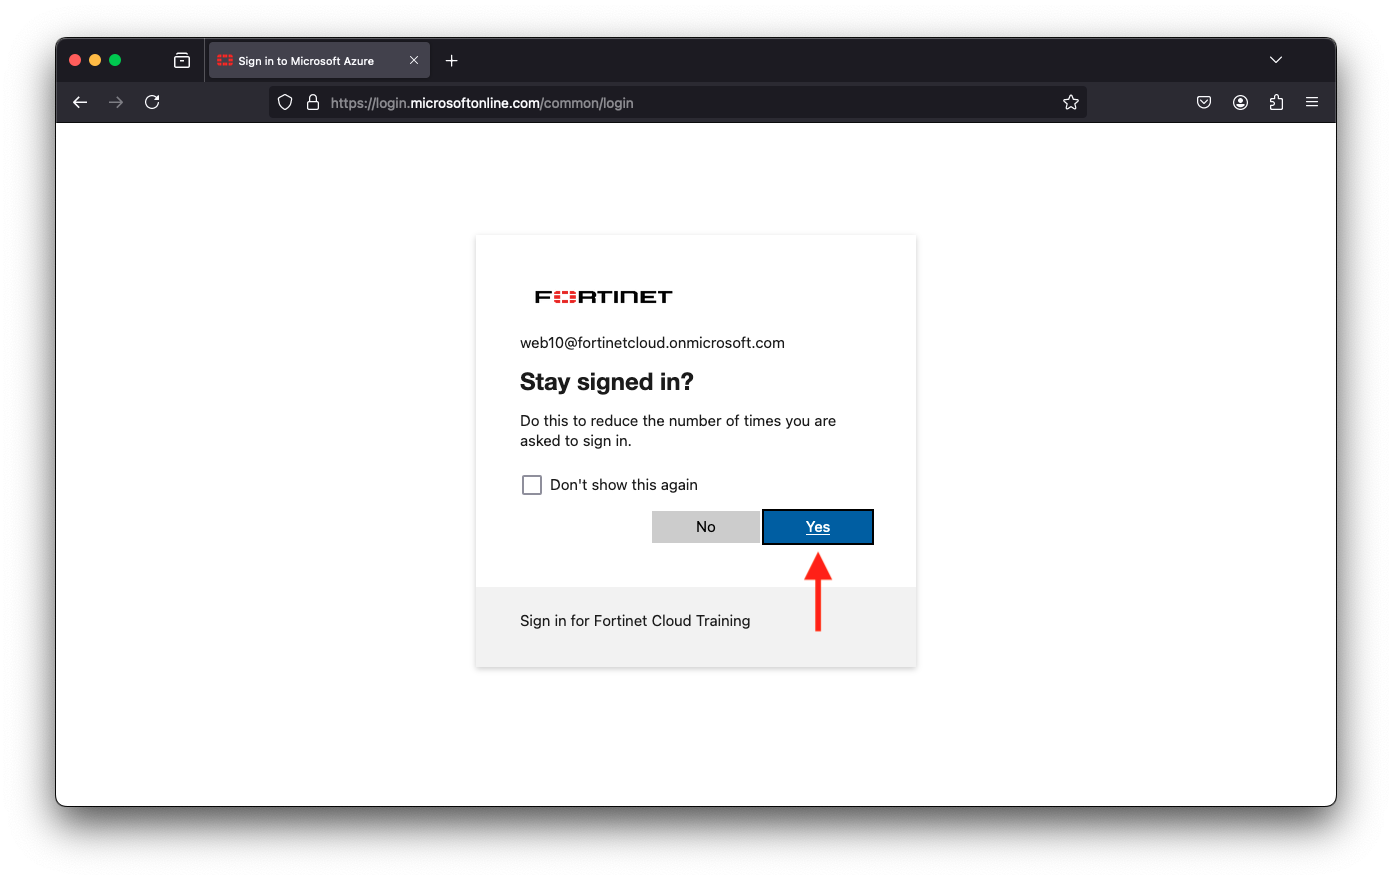
For the next step, choose Yes. You do want to stay logged in.
Info
Sometimes if you wait too long to input your password, you will get SAML login portal error “Error: SAML response with InResponseTo is too late for previous request” If this happens just click the small blue “Login” link.
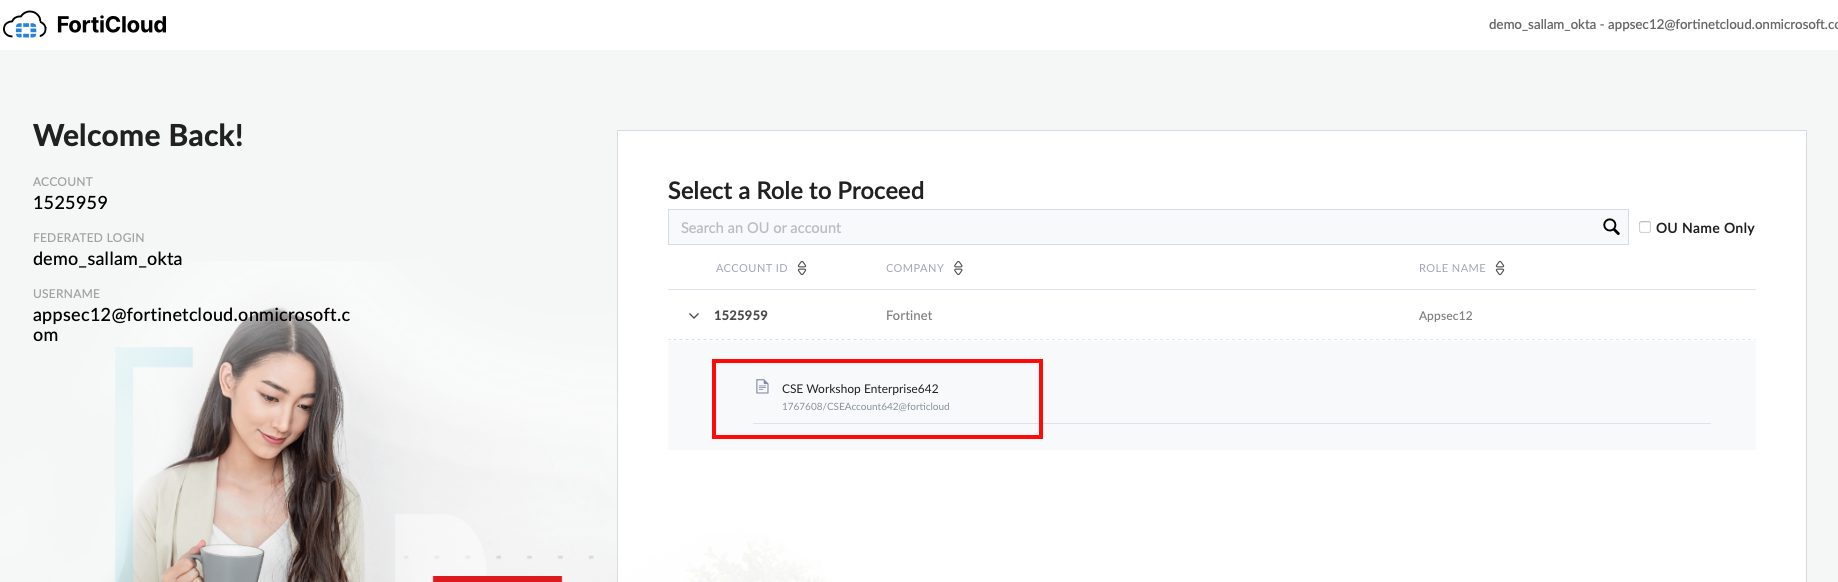
On the FortiCloud Dashboard, you will be prompted to select a role, select CSE Workshop role as shown below
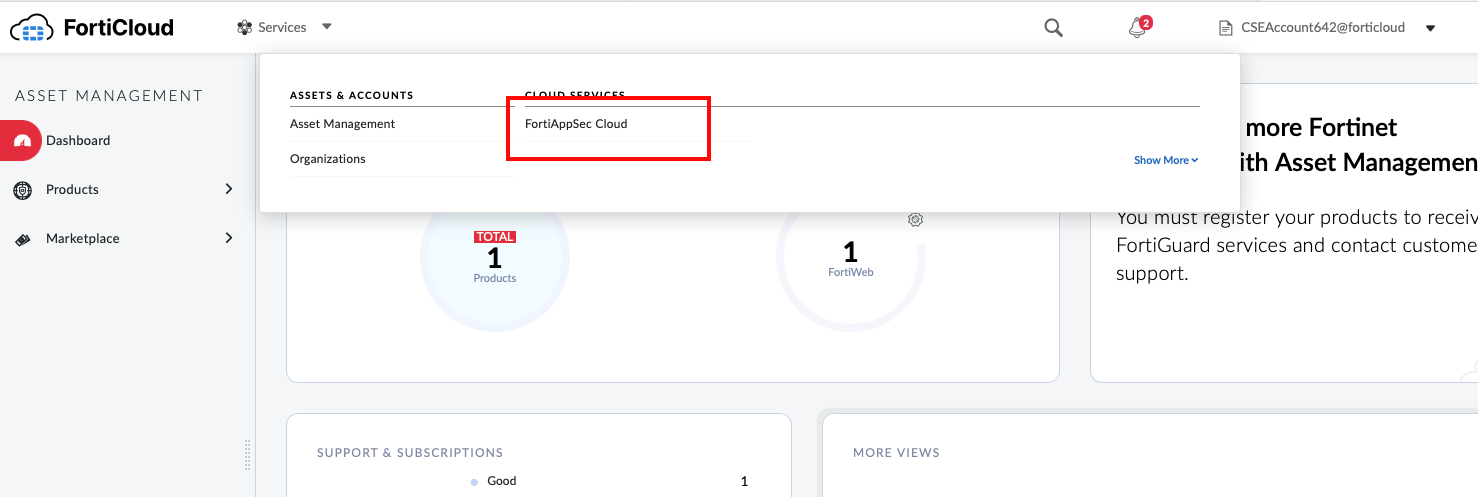
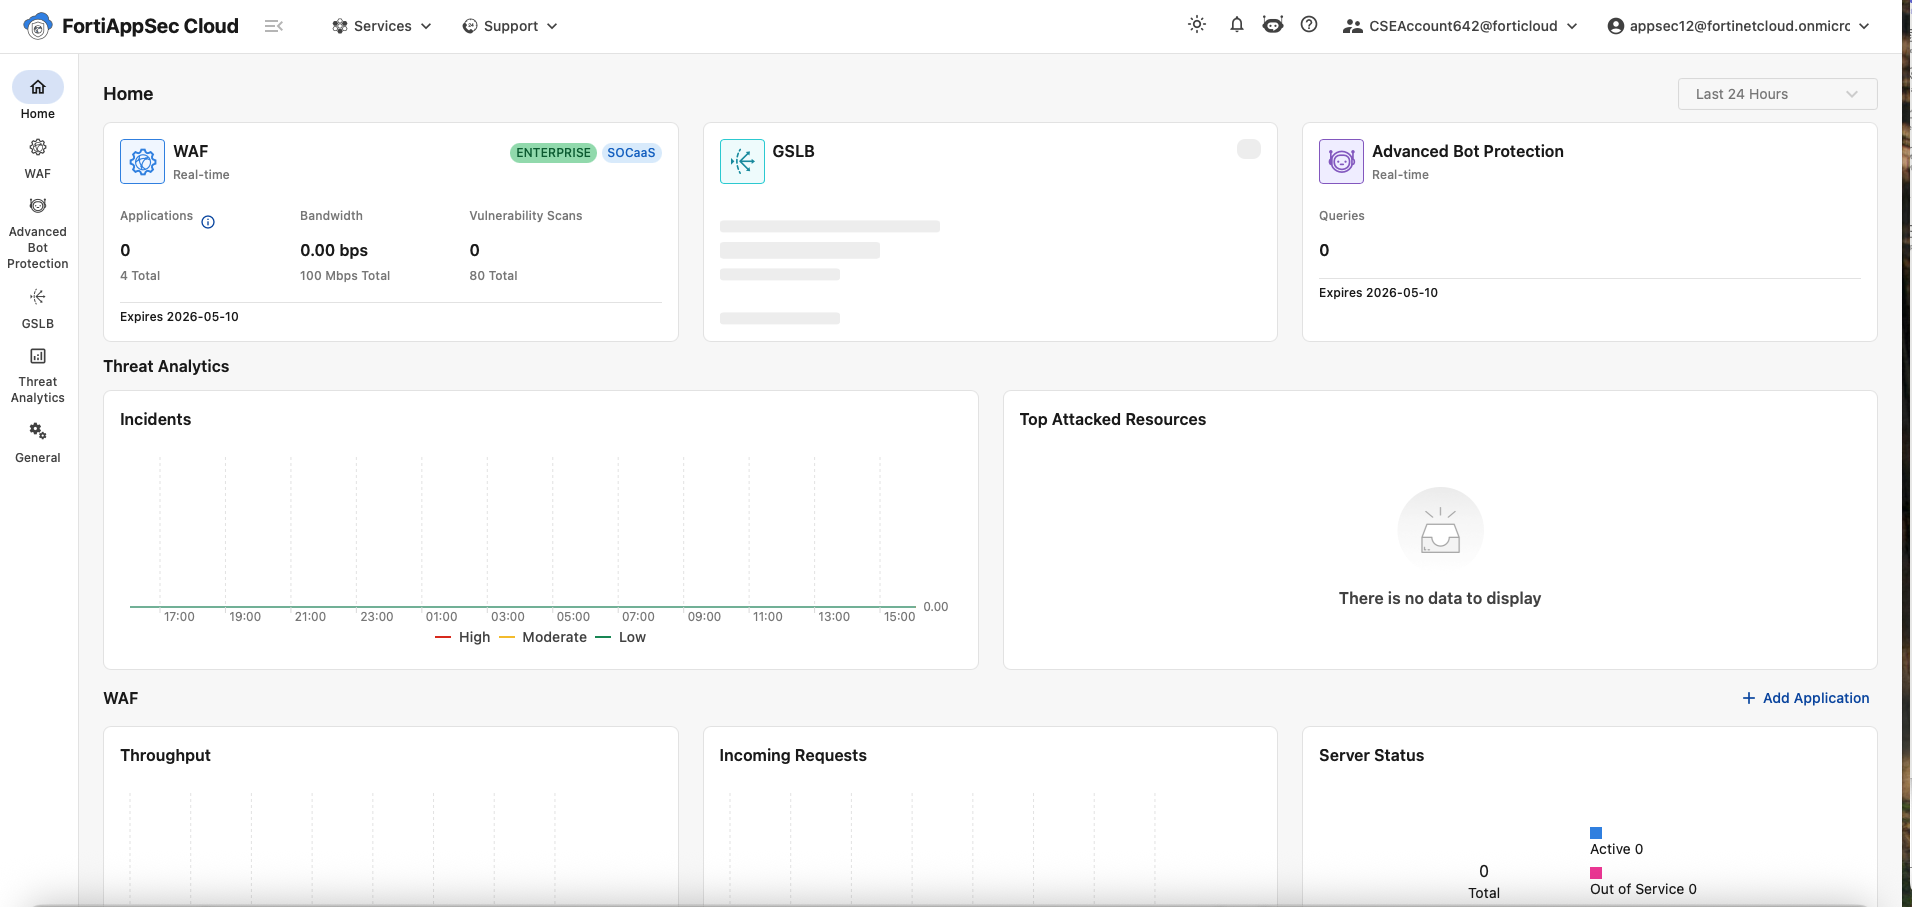
This will take you to the FortiCloud Premium Dashboard. At the top of the screen select Services > FortiAppsec Cloud
Info
Any warnings mentioning “Failed to get data.” can be safely ignored.
Subsections of Ch 2: Protect Application
Task 1: Onboard Application
Goal
Start protecting Juice Shop Application with FortiAppSec Cloud
Task
Onboard Application in FortiAppSec GUI
Verify task completion
Your Application will show up in the Application list.
Add Application
Click on the WAF icon in the left menu bar, open the Applications view, and then click + ADD APPLICATION.
.
and then click, + ADD APPLICATION
.
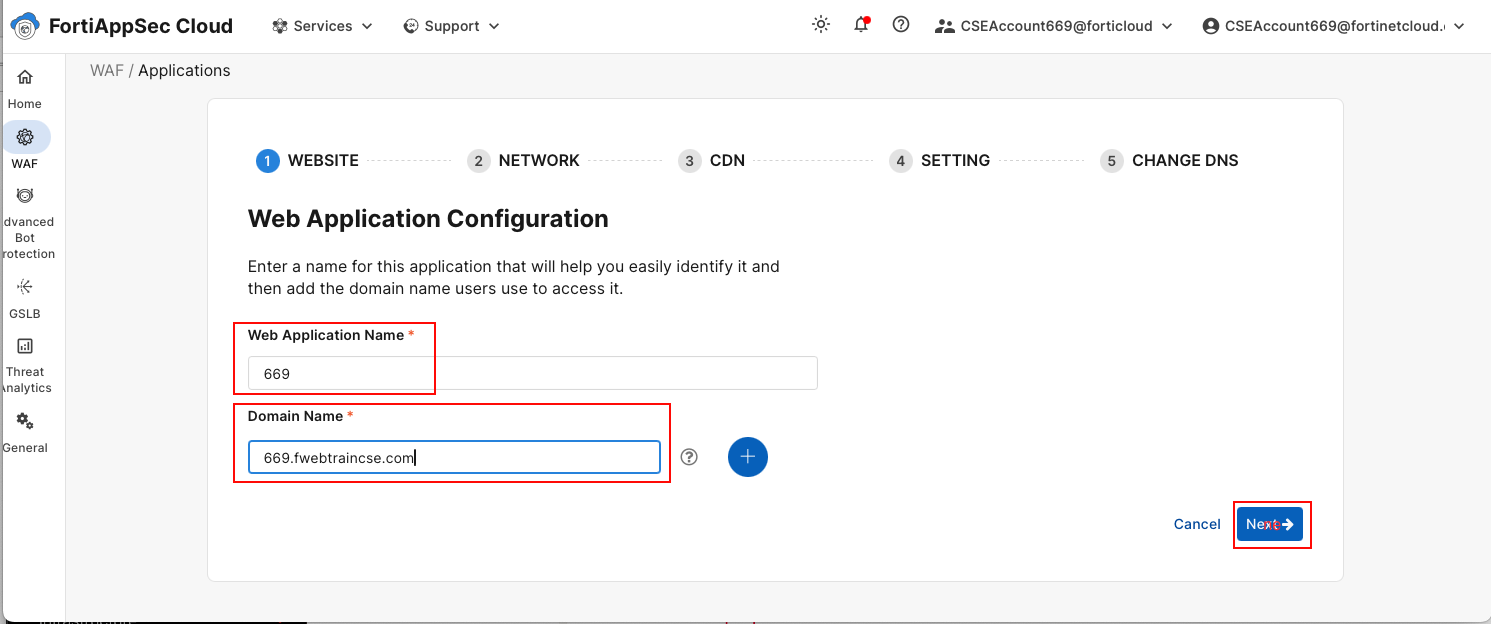
Tab 1: “WEBSITE”
In Web Application Name enter your FortiAppSec Cloud StudentID number which you used to login to FortiAppSec Cloud (found at the top right corner of the FortiAppSec Cloud Screen).
For Domain Name use <studentId>.fwebtraincse.com and then select next
Info
The warning “Failed to look up for .fwebtraincse.com” can be safely ignored
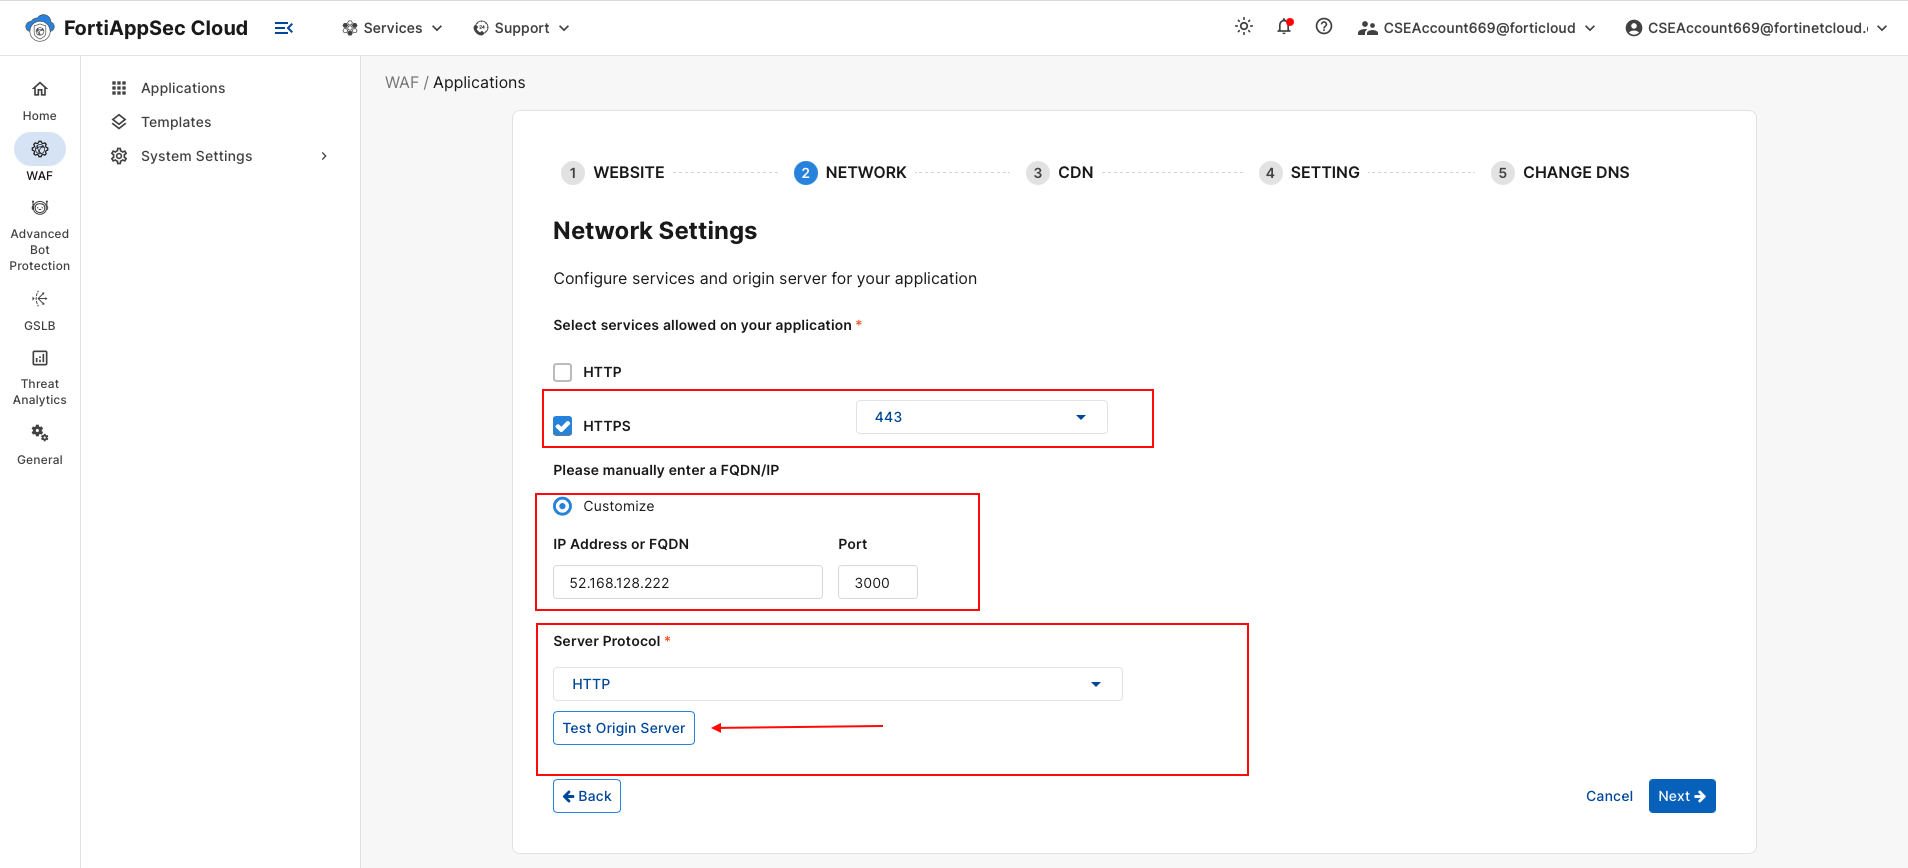
Tab 2: Network,
Clear the “HTTP” as we want to force users to interact with FortiAppSec using only HTTPS.
For IP Address or FQDN enter the JuiceShop Public IP (which is the Ubuntu VM Public IP from your Terraform Output)
For Port enter “3000”
Select HTTP for Server Protocol. This is Juice Shop and it is NOT secure
Click on Test Origin Server You should see a green box pop up that says “Test successful”
Choose Next
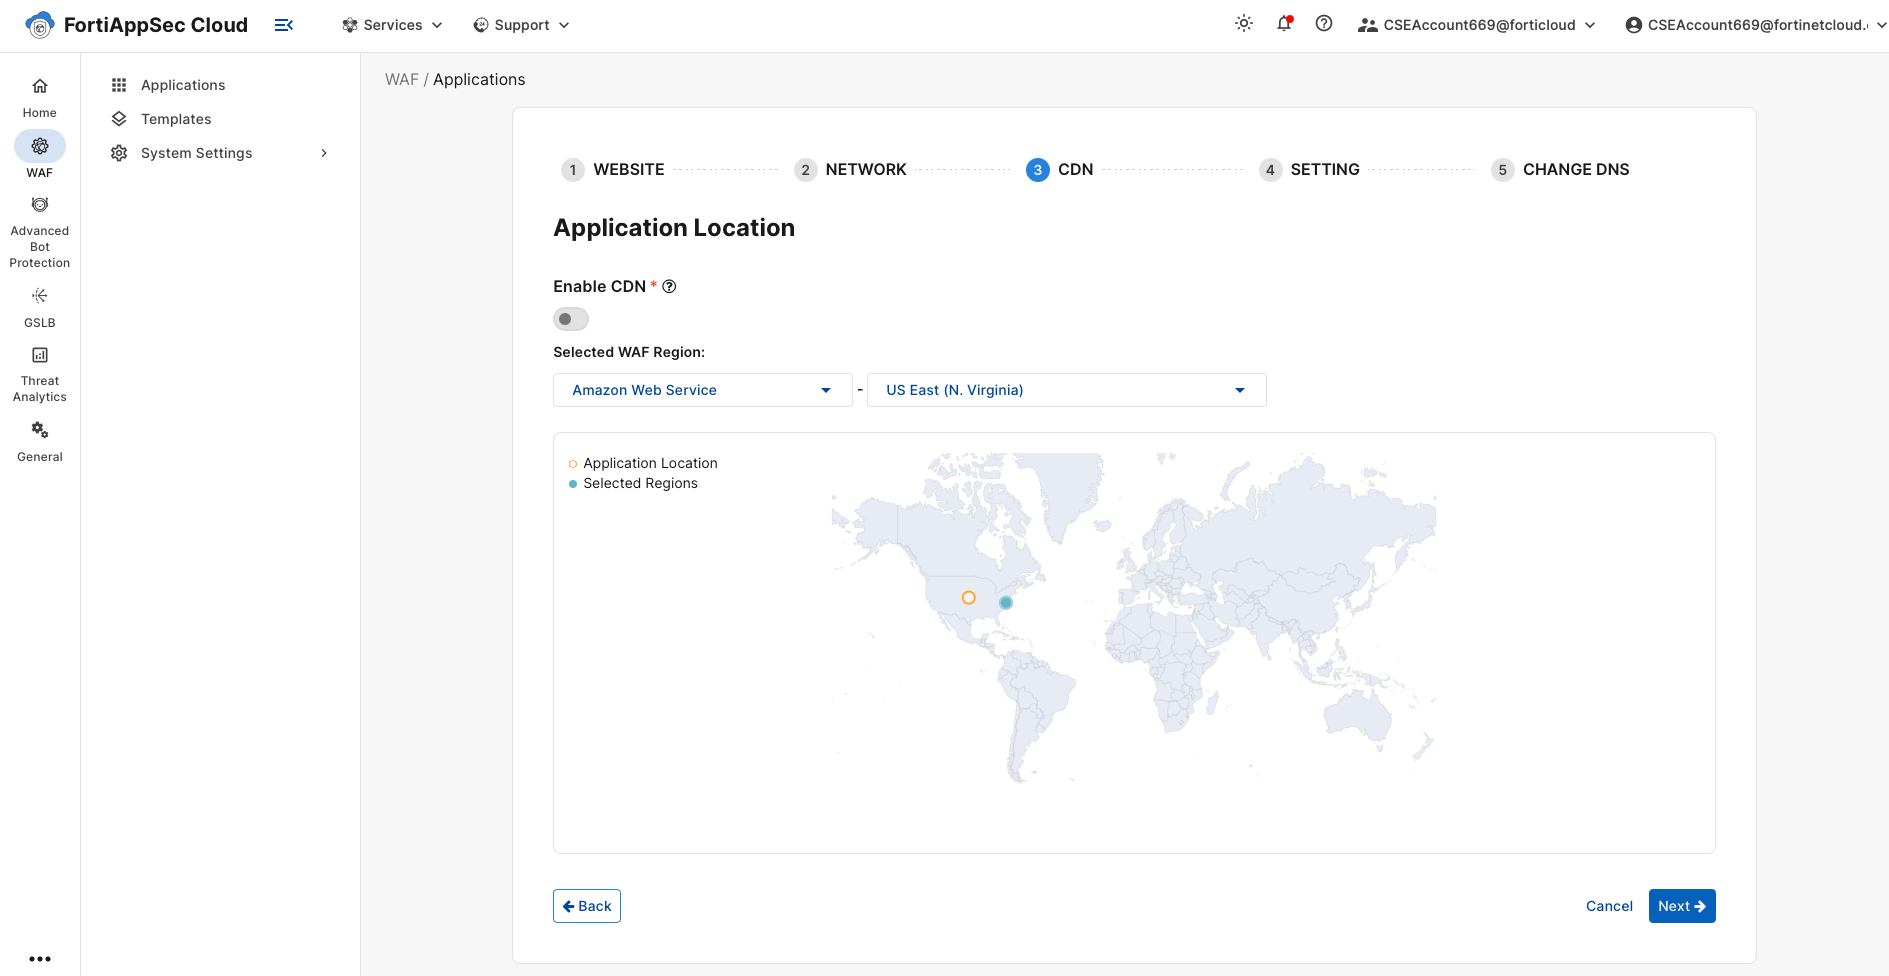
Tab 3: CDN
No Changes. You will notice the Selected WAF Region shows the Platform “AWS” and the Region. In your lab it may show a different platform and region
Info
FortiAppSec Cloud automatically chooses the platform and region based on the IP Address of the application. There is no user intervention required.
Select Next
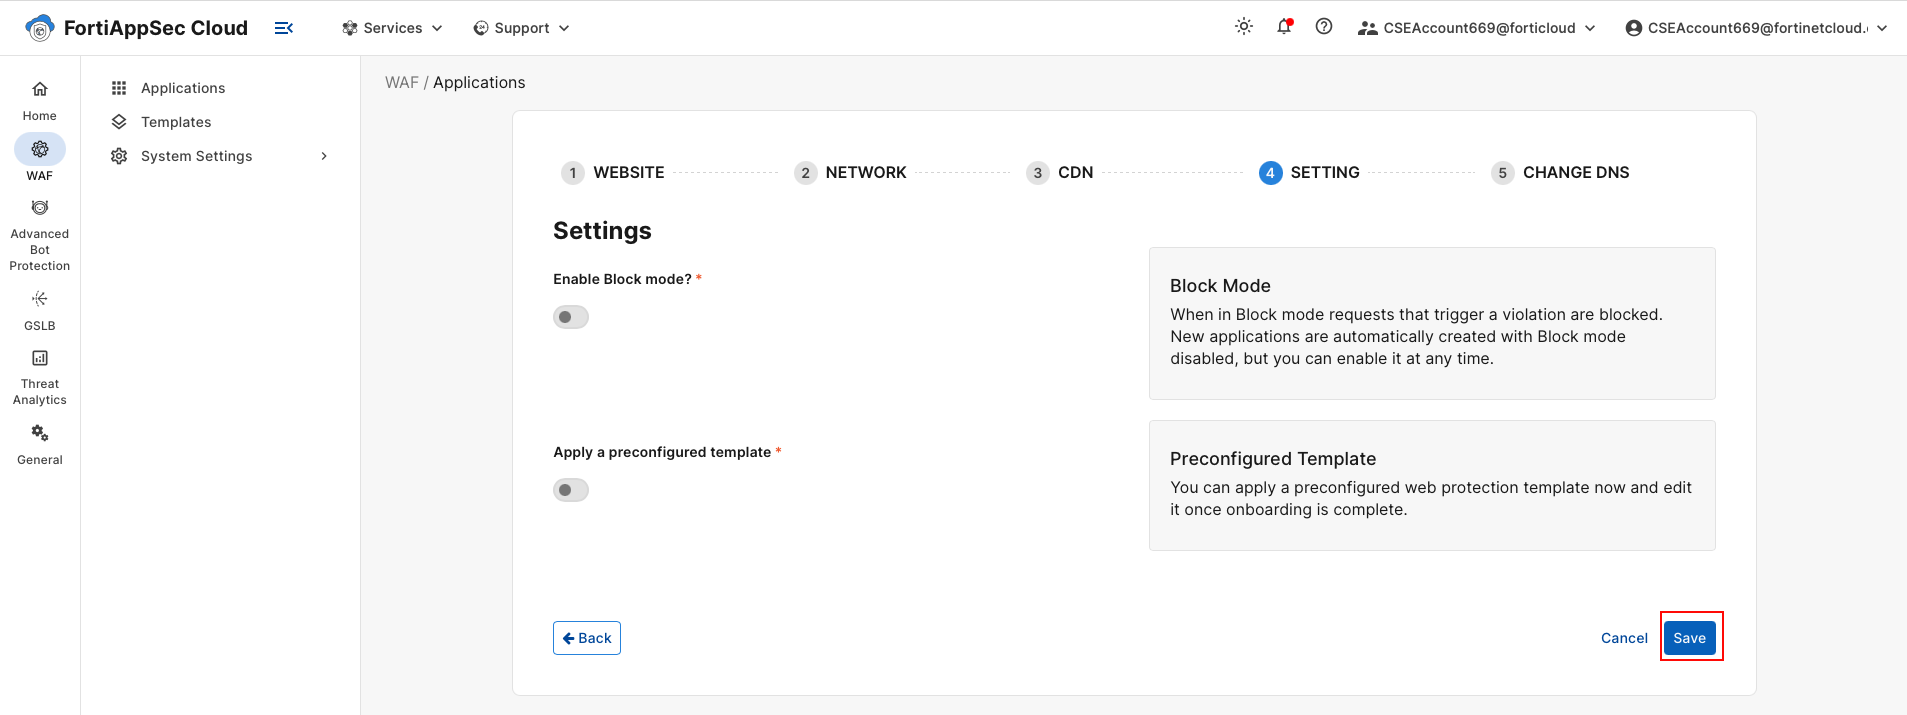
Tab 4: “SETTING”
DO NOT enable Block Mode
Select Save
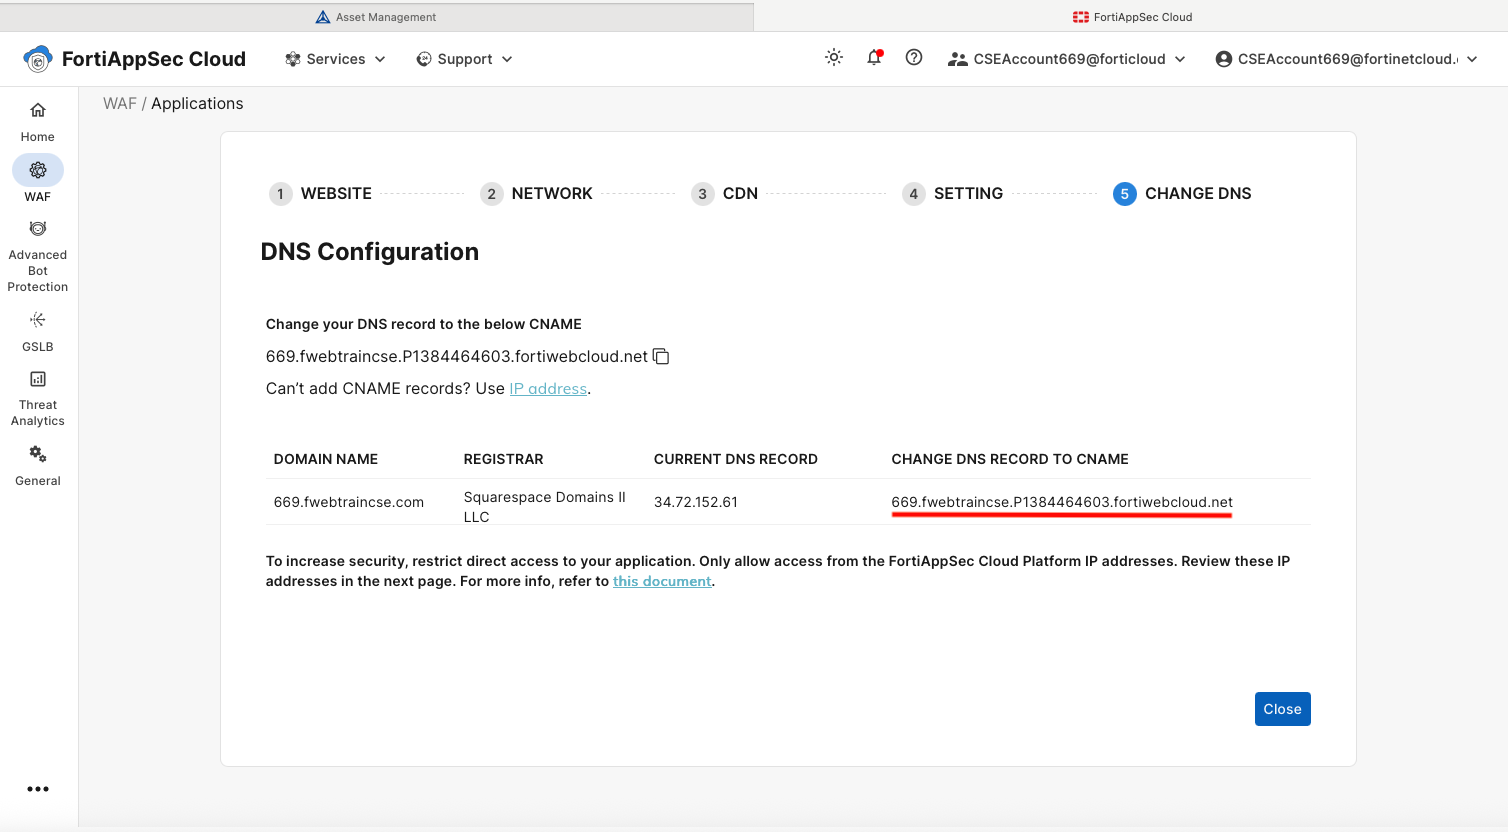
Tab 5: “CHANGE DNS”
We are presented with very important information regarding DNS settings which need to be changed in order to direct traffic to FortiAppSec Cloud. In this lab, we will not be doing this, as sometimes it can take a while for the DNS settings to propagate.
Warning
Take Note of the IPv4 addresses and CNAME for use in a later step. Before you close!
Select Close
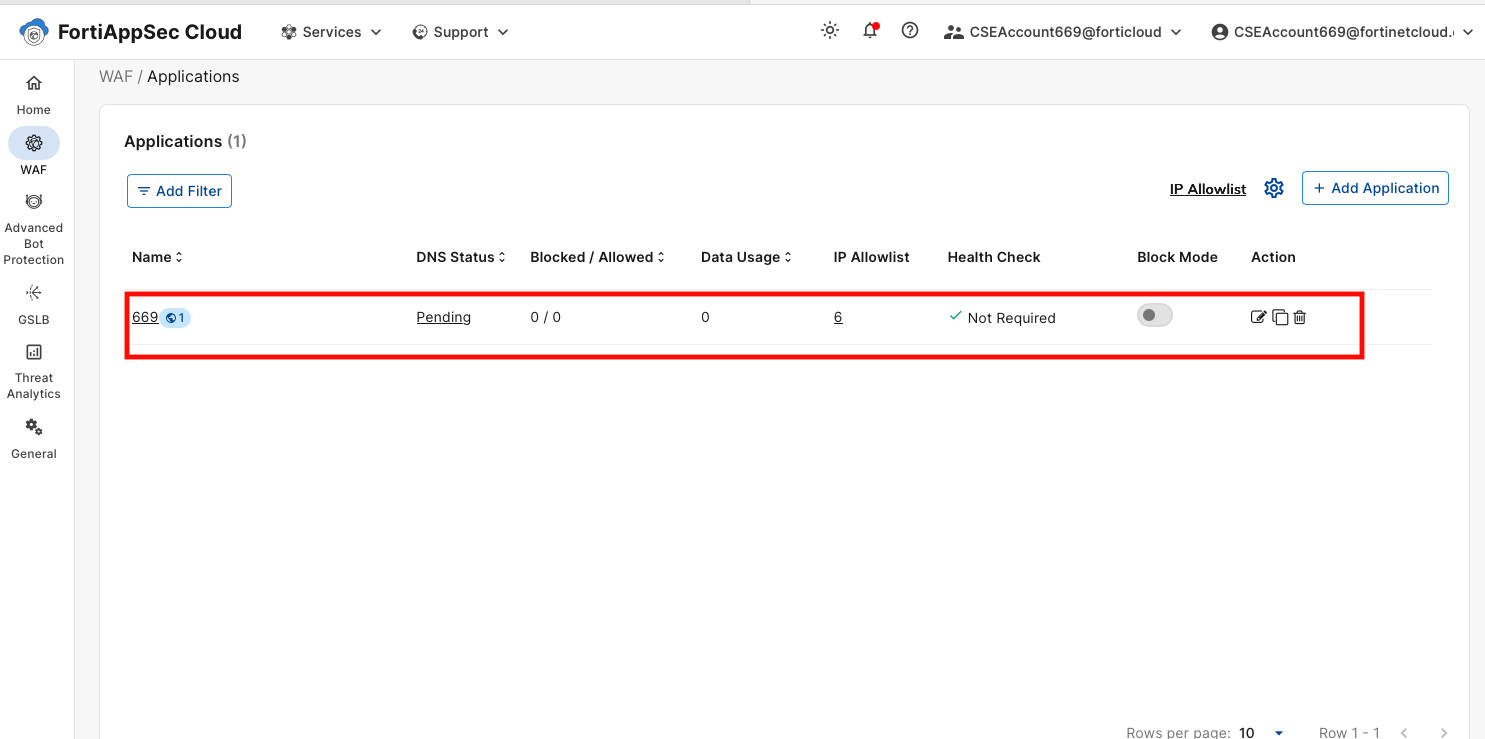
You should now see your Application listed in FortiAppSec Cloud. Note that the DNS Status is set to Update Pending This is expected, and we will ignore it.
Note
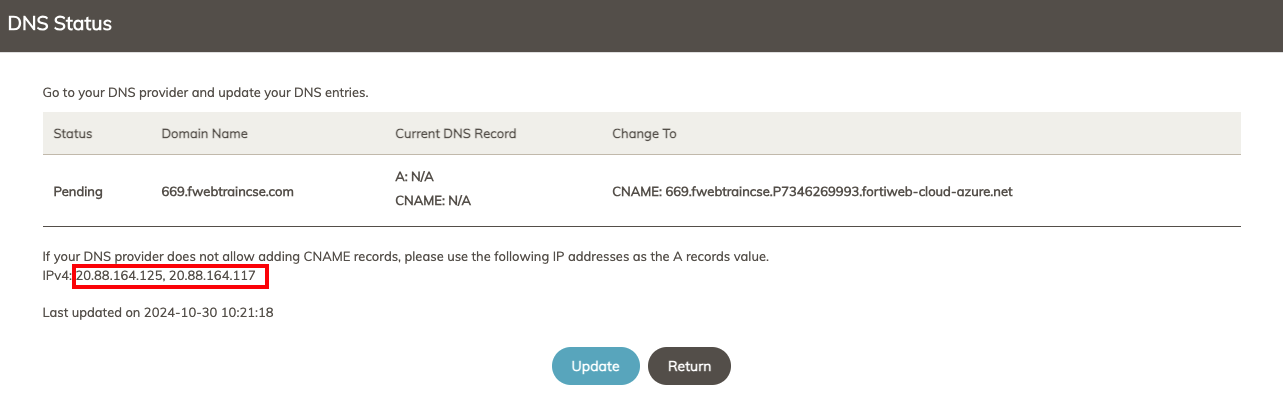
If you need to recover the application IPs or CNAME later, you can click on the app’s DNS status Update Pending to show DNS status & retrieve the IPs
Update Application DNS
Use the Form Provided below to update DNS records
Example
After a few minutes you should get DNS CNAME record created successfully message.
Task 2: Secure Cloud Infrastructure
Goal
Learn how to lock down Access in Azure
Task
Modify Azure NSG in terraform to only allow traffic from FortiAppSec Cloud
Verify task completion
You should no longer be able to reach Juice Shop directly from your desktop.
This lab was originally bootstrapped with an ingress firewall rule which allows all ports and protocols from all sources (0.0.0.0/0). This is not a best practice. It is recommended, to only allow necessary ports and/or sources. Now that we have onboarded our application, we want to ensure that the only device that can communicate with our application is FortiAppSec Cloud.
Task 1: Modify Azure Network Firewall Rules
In the FortiAppSec Cloud UI, Copy the IPs which FortiAppSec Cloud will use to communicate with your application. From the FortiAppSec Cloud Applications page, select Allow IP List from the top of the page. This will open a dialog showing Management and Scrubbing Center Addresses. Click on Copy to Clipboard. Paste these IPs into a text document and then click Return
In Azure cloud shell, verify you’re in the terraform folder or navigate to it by typing cd ~/fortiweb-security-foundations-201/terraform/
Make a copy of our ubuntu.tf file so that we can come back to it later if needed.
at the prompt, type cp ubuntu.tf ubuntu.tf.bak
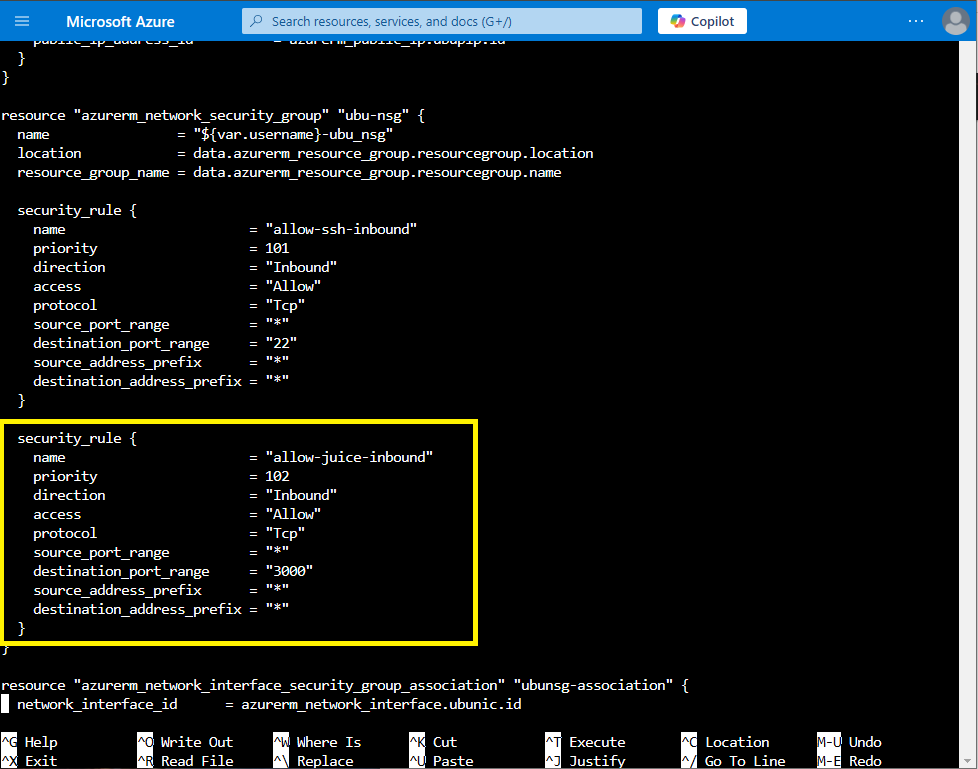
Use nano to open and edit the ubuntu terraform file nano ubuntu.tf
Info
In order to Navigate within nano, use the up, down, left and right arrow keys. Use backspace to delete and type in the text you want to replace it with. When you are ready to save type ctrl+o then enter (to save to the same filename). Then type ctrl+x to exit.
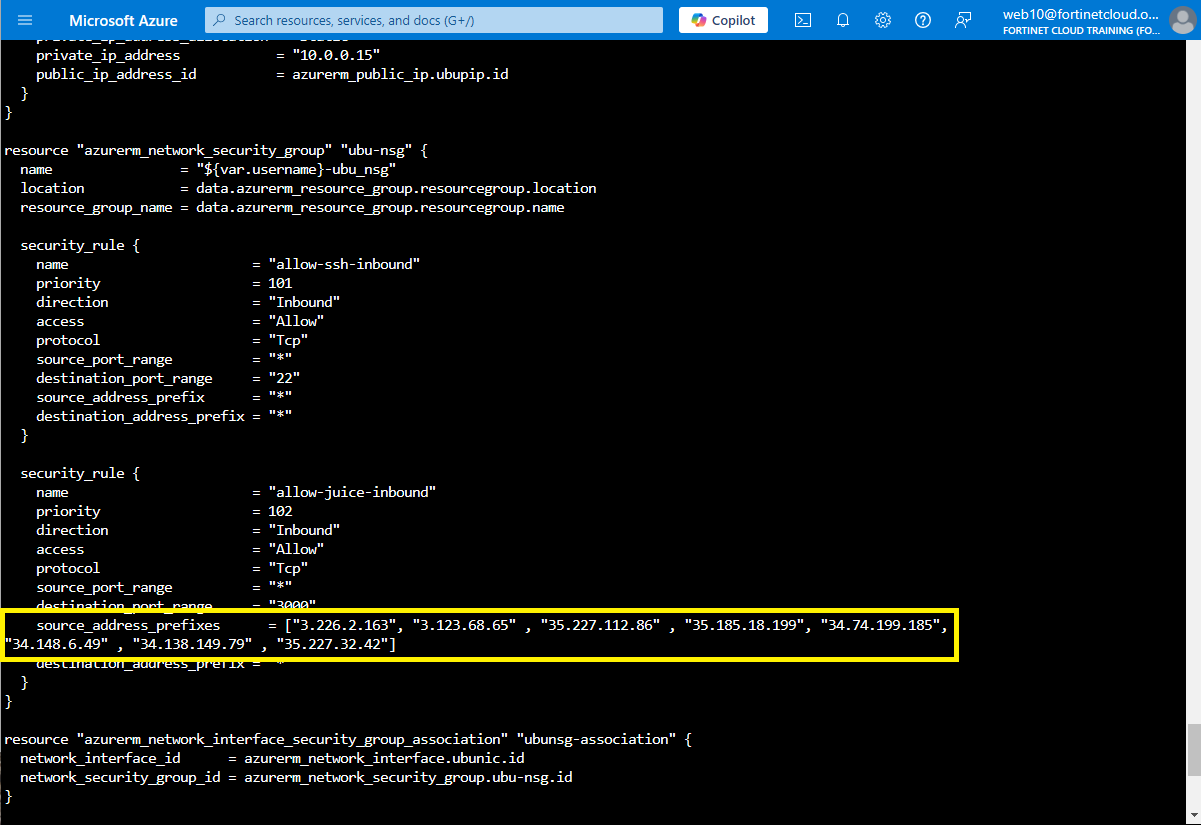
Navigate to the security rule named allow-juice-inbound. Note currently, the rule allows all source addresses.
We are going to modify the source_address_prefix entry and replace it with source_address_prefixes as well as the list of FortiWeb Cloud IPs captured in the step one above making sure to add the extra quotes around each IPs. The VScode search and replace RegEx ((?:(?:25[0-5]|2[0-4][0-9]|[01]?[0-9][0-9]?)\.){3}(?:25[0-5]|2[0-4][0-9]|[01]?[0-9][0-9]?)) replaced by "$1" is very useful for this task.
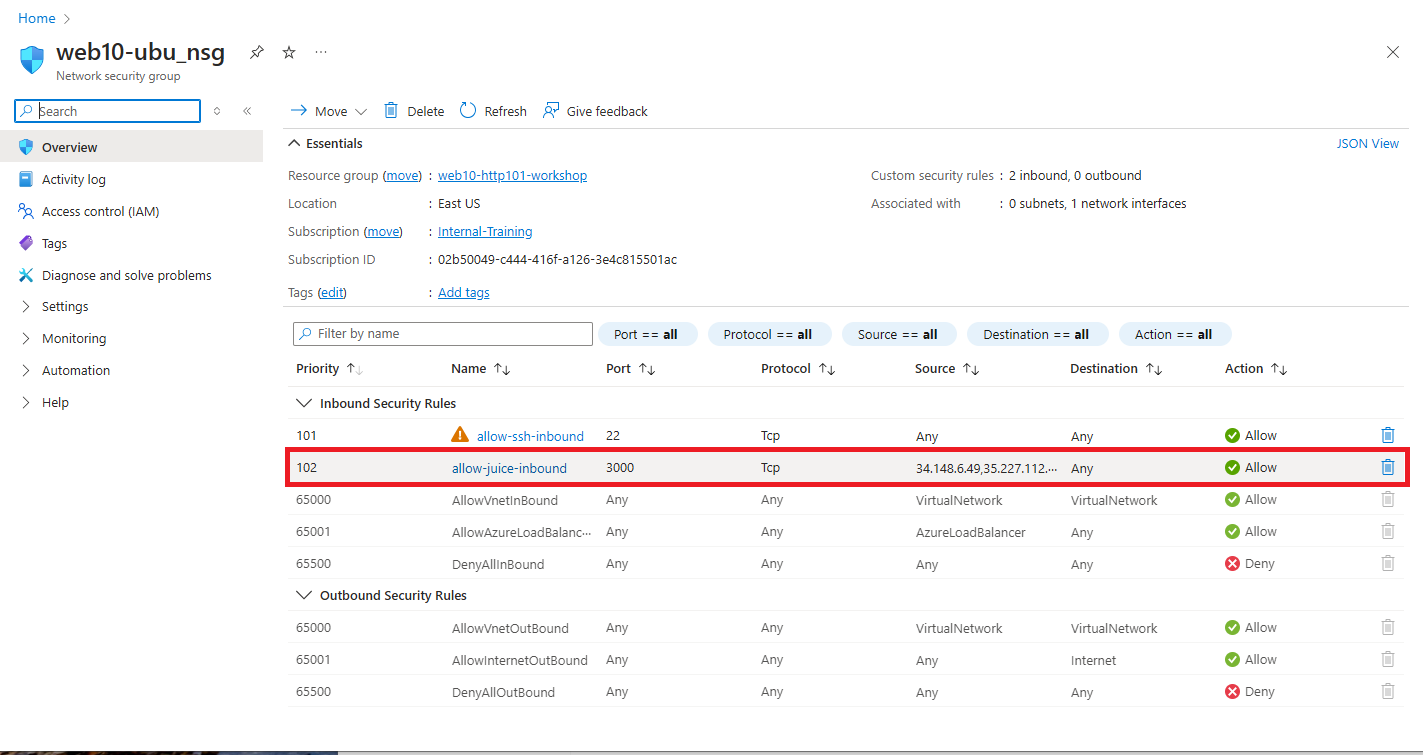
You can verify this change in the Azure Portal as well.
From the home screen in Azure, search in the top middle bar for ubu_nsg
You will find a Network Security Group with a name corresponding to your Azure Account ID like web10-ubu_nsg. Click to view it
You should be able to see the updated security rule.
Now try to navigate to the Juice Shop Application from your laptop by typing http://<ubuntu ip>:3000 in your favorite browser.
You should NOT be able to access Juice Shop Directly.
Application Protection Review
Review
In this module, we onboarded our application into FortiAppSec Cloud using the GUI. We also used the built-in Azure Network Security Group (NSG) in our Azure Environment to lock down access to the origin server such that only traffic from FortiAppSec Cloud will be accepted.
Application Protection Quiz
Ch 3: Simple Attack
According to the Open Worldwide Application Security Project (OWASP):
Info
A SQL injection attack consists of insertion or “injection” of a SQL query via the input data from the client to the application. A successful SQL injection exploit can read sensitive data from the database, modify database data (Insert/Update/Delete), execute administration operations on the database (such as shutdown the DBMS), recover the content of a given file present on the DBMS file system and in some cases issue commands to the operating system. SQL injection attacks are a type of injection attack, in which SQL commands are injected into data-plane input in order to affect the execution of predefined SQL commands.
You should see that the SQLi attack is accepted by Juice Shop.
Log into Kali linux: https://{{Kali IP}}:8443
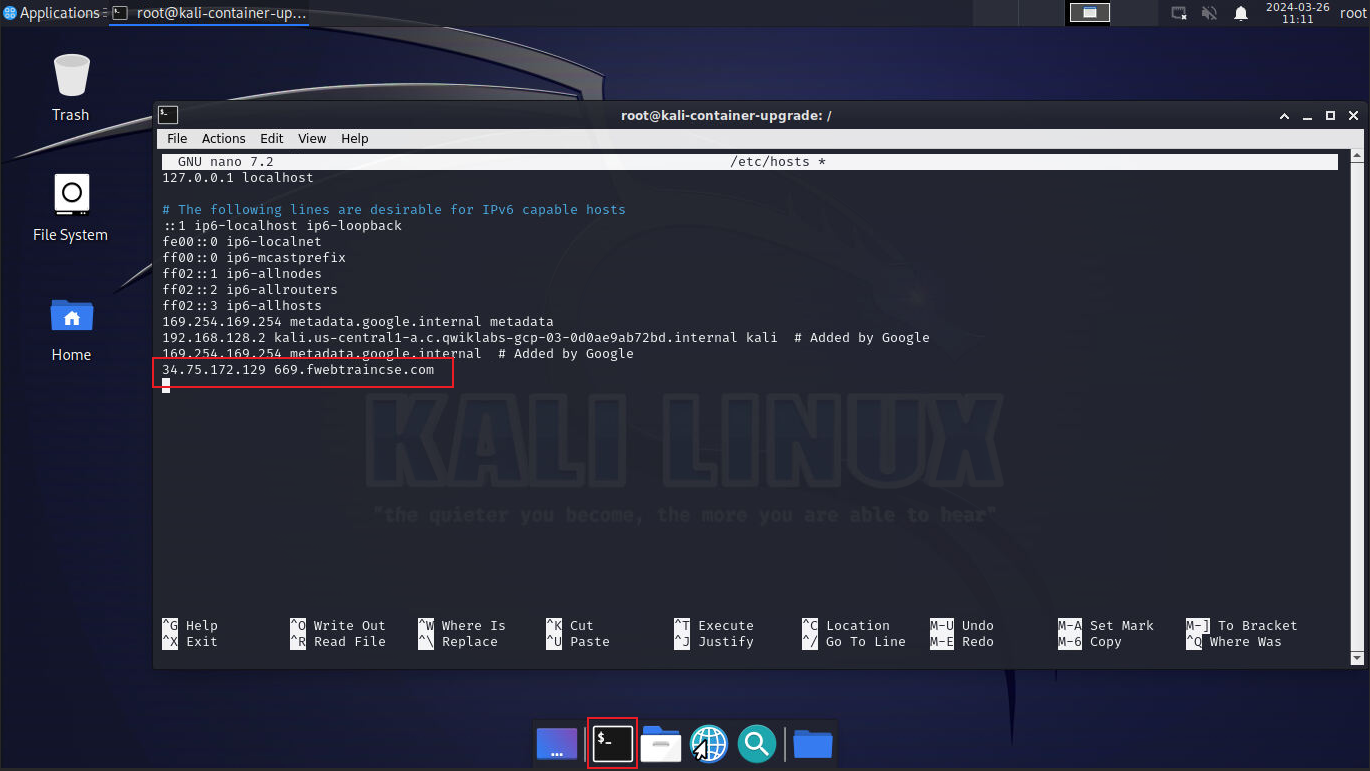
To avoid any DNS problems during this workshop, we’ll create a static hosts file entry on the Kali Box to resolve our FortiAppSec Cloud protected application
Open the terminal emulator by clicking on the terminal icon located at the top left Kali Home screen. At the prompt, type:
sudo nano /etc/hosts
When the host file opens, add the following 2 lines to the bottom of the file, and save it.
Be sure to substitute your FortiAppSec Student ID in the fields
To save the entries use: ctrl+o then enter (to save to the same filename).
To exit Nano: type ctrl+x
<replace this value with IP address you have from FortiAppSec> <FortiAppSecStudentID>.fwebtraincse.com
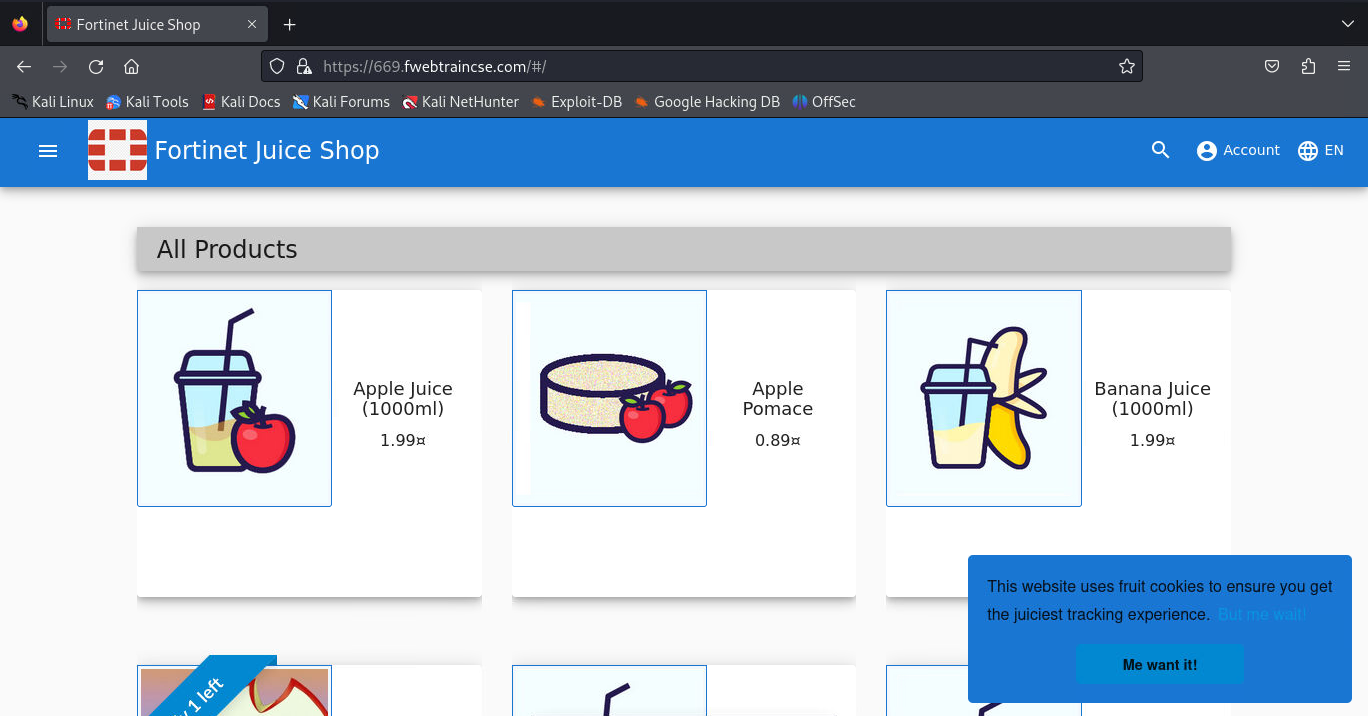
Navigate to the Firefox browser (located at the top of Kali desktop) and enter our FortiAppSec Cloud Protected Juice Shop URL into the navigation bar https://<FortiAppSecStudentID>.fwebtraincse.com. Accept warnings and proceed to the application
Let’s perform a very simple SQLi attack. To perform a SQLi attack append ?name=' OR 'x'='x to your URL. Be sure that you use YOUR NUMBER.
For example (be sure to use your studentId)
https://669.fwebtraincse.com/?name=' OR 'x'='x
Info
The attack will go through, and you will see the Juice Shop Home page
Task 2: Enable FortiAppSec Cloud Block Mode
Goal
Block SQLi attack
Task
Enable block mode in FortiAppSec Cloud
Verify task completion
You should see a block page in your browser
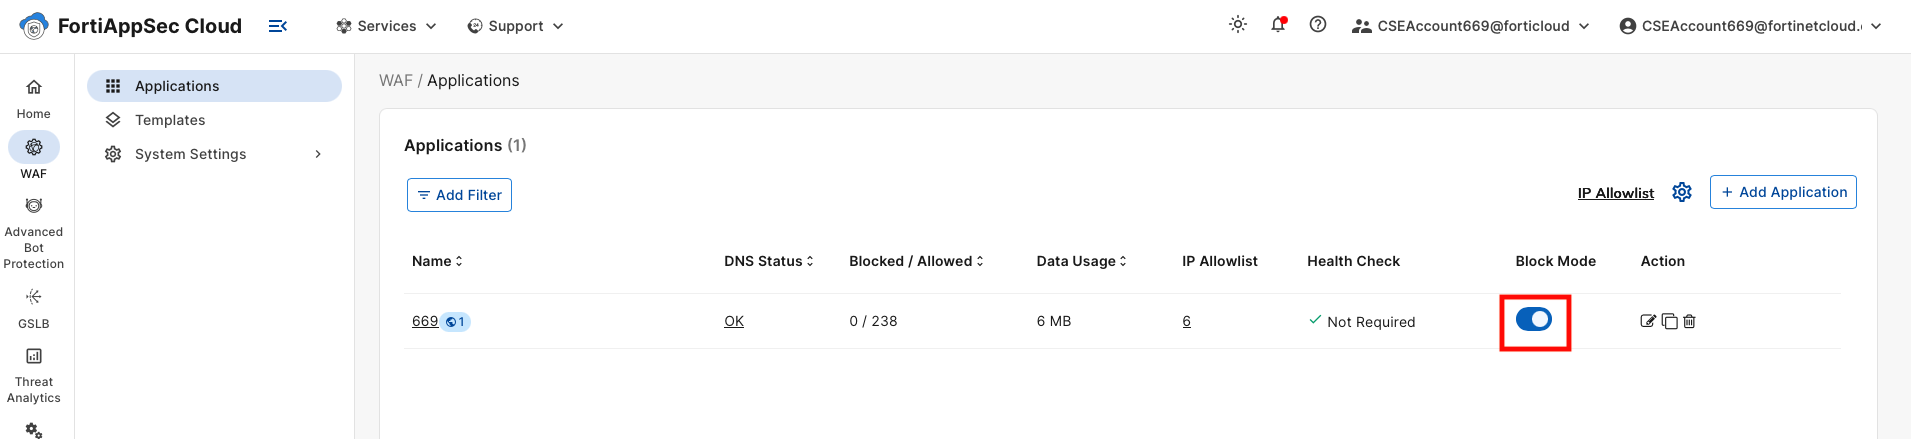
Enable Block Mode on FortiAppSec Cloud
On the Applications page enable block mode by clicking on the Block Mode button
Warning
It can take two to three minutes for changes to take effect in FortiAppSec Cloud
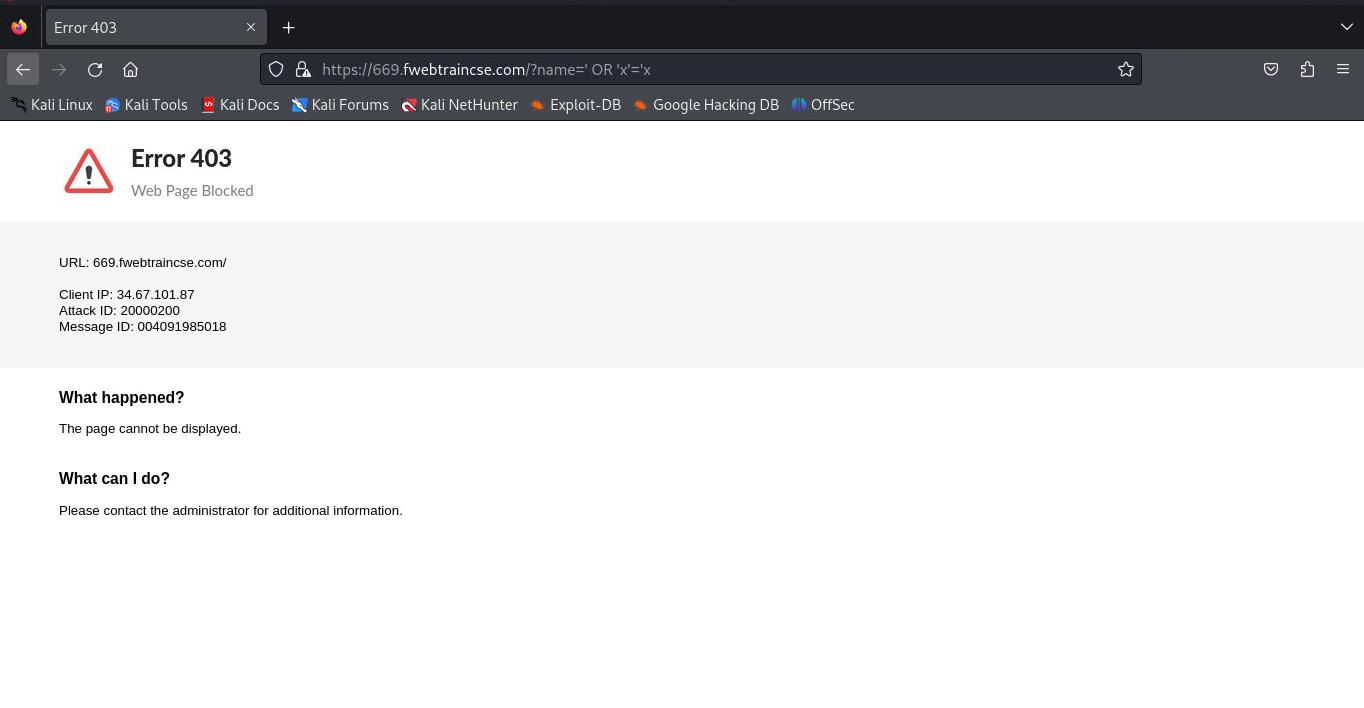
Repeat the same step to perform SQLi attack in the browser.
For example (be sure to use your studentId)
https://669.fwebtraincse.com/?name=' OR 'x'='x
Info
You will see that FortiAppSec now blocks the SQLi attack.
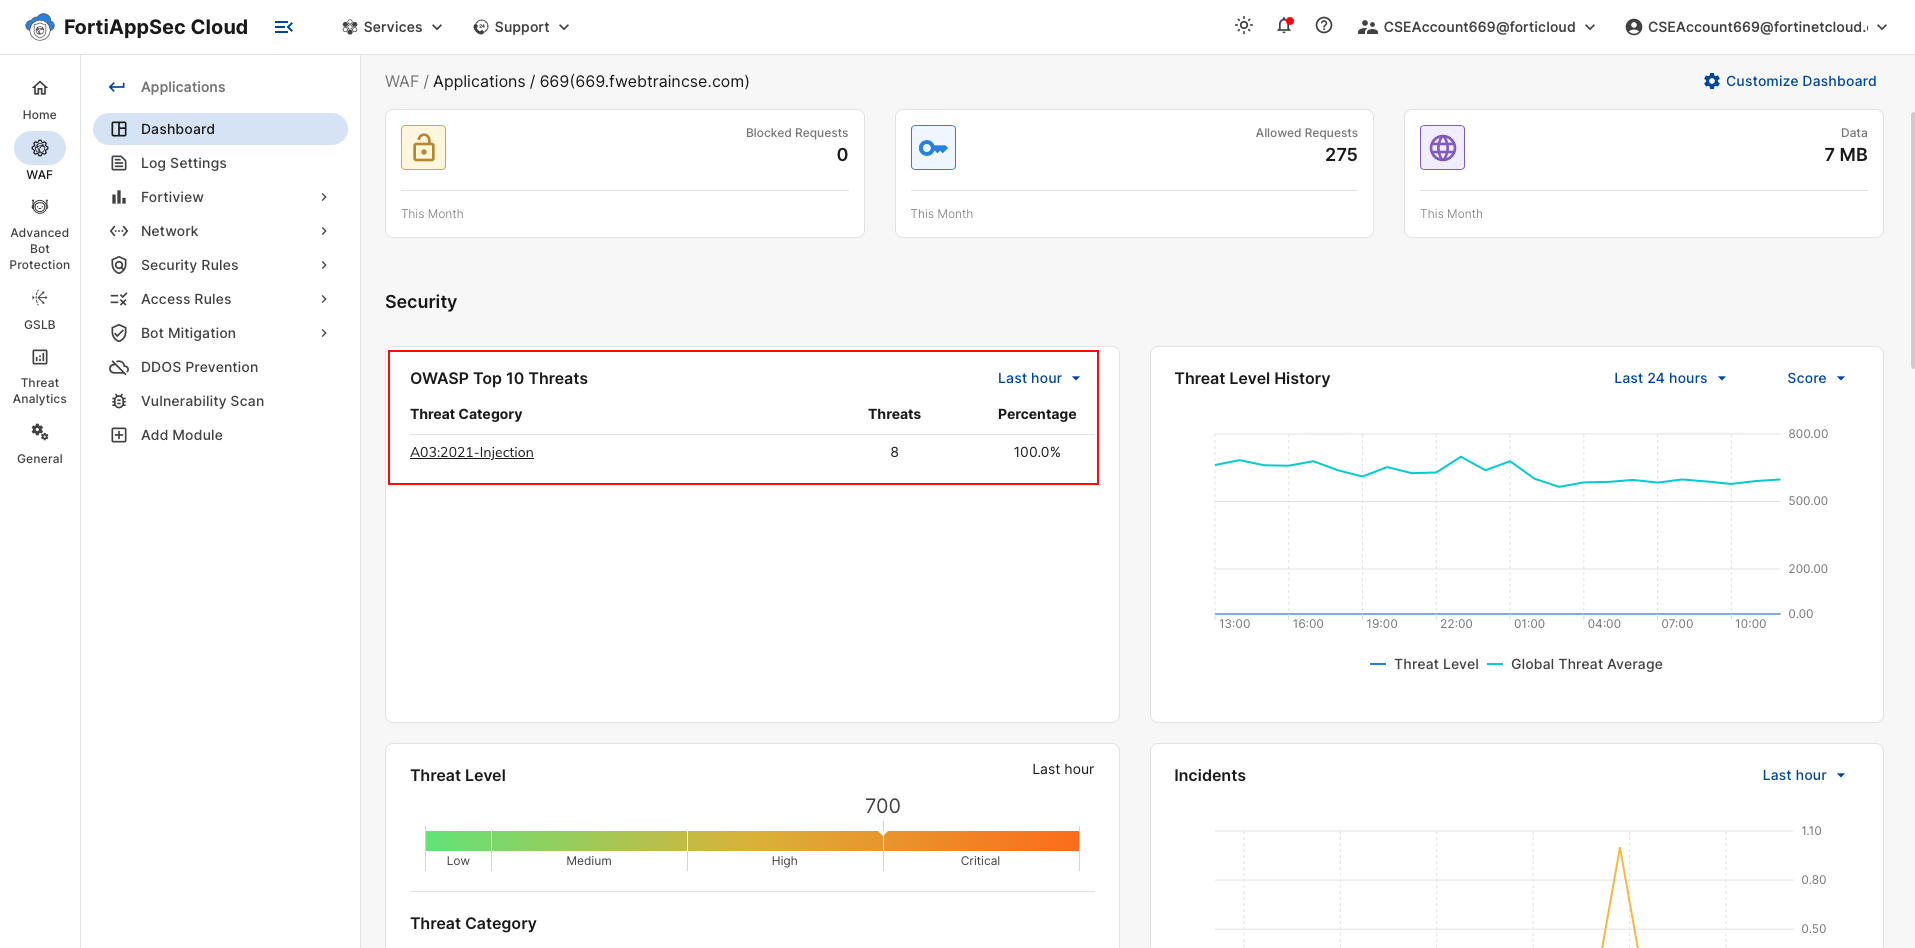
Now clicking on the Application Name in FortiAppSec Cloud to navigate to our application page.
This should take you to the Application Dashboard.
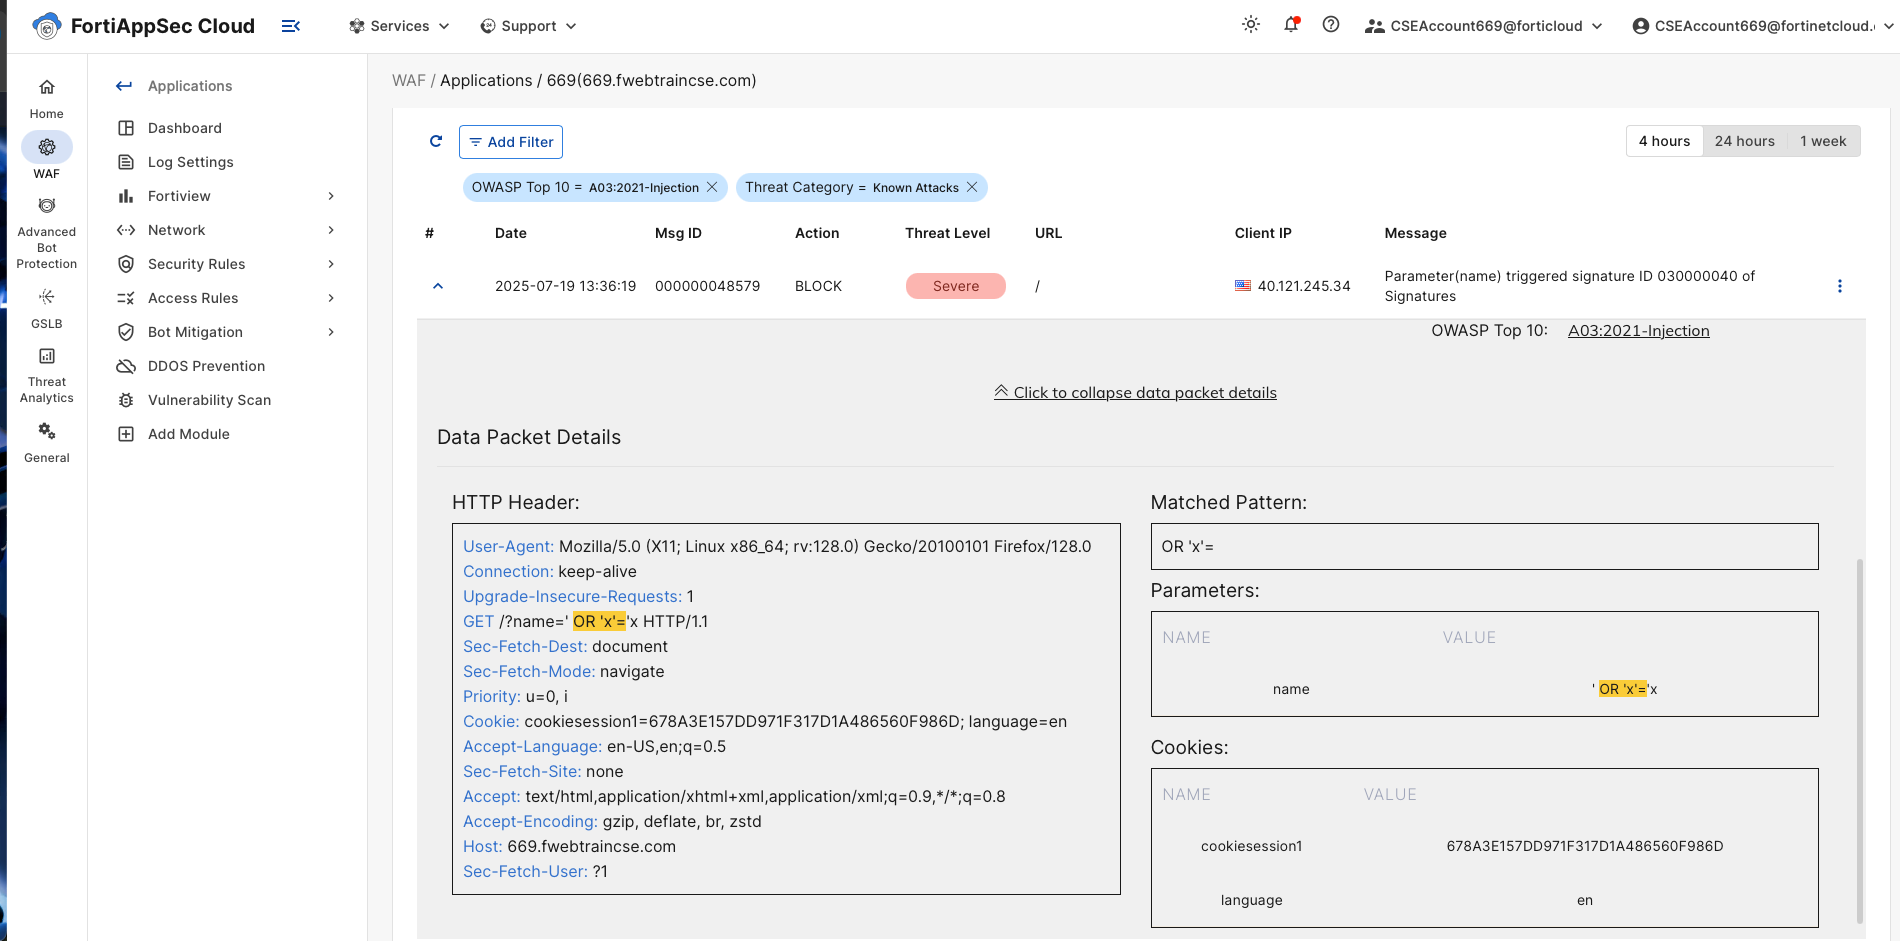
You should see a Threat listed in the OWASP Top 10 Threats box called A03:2021-Injection. Click on it.
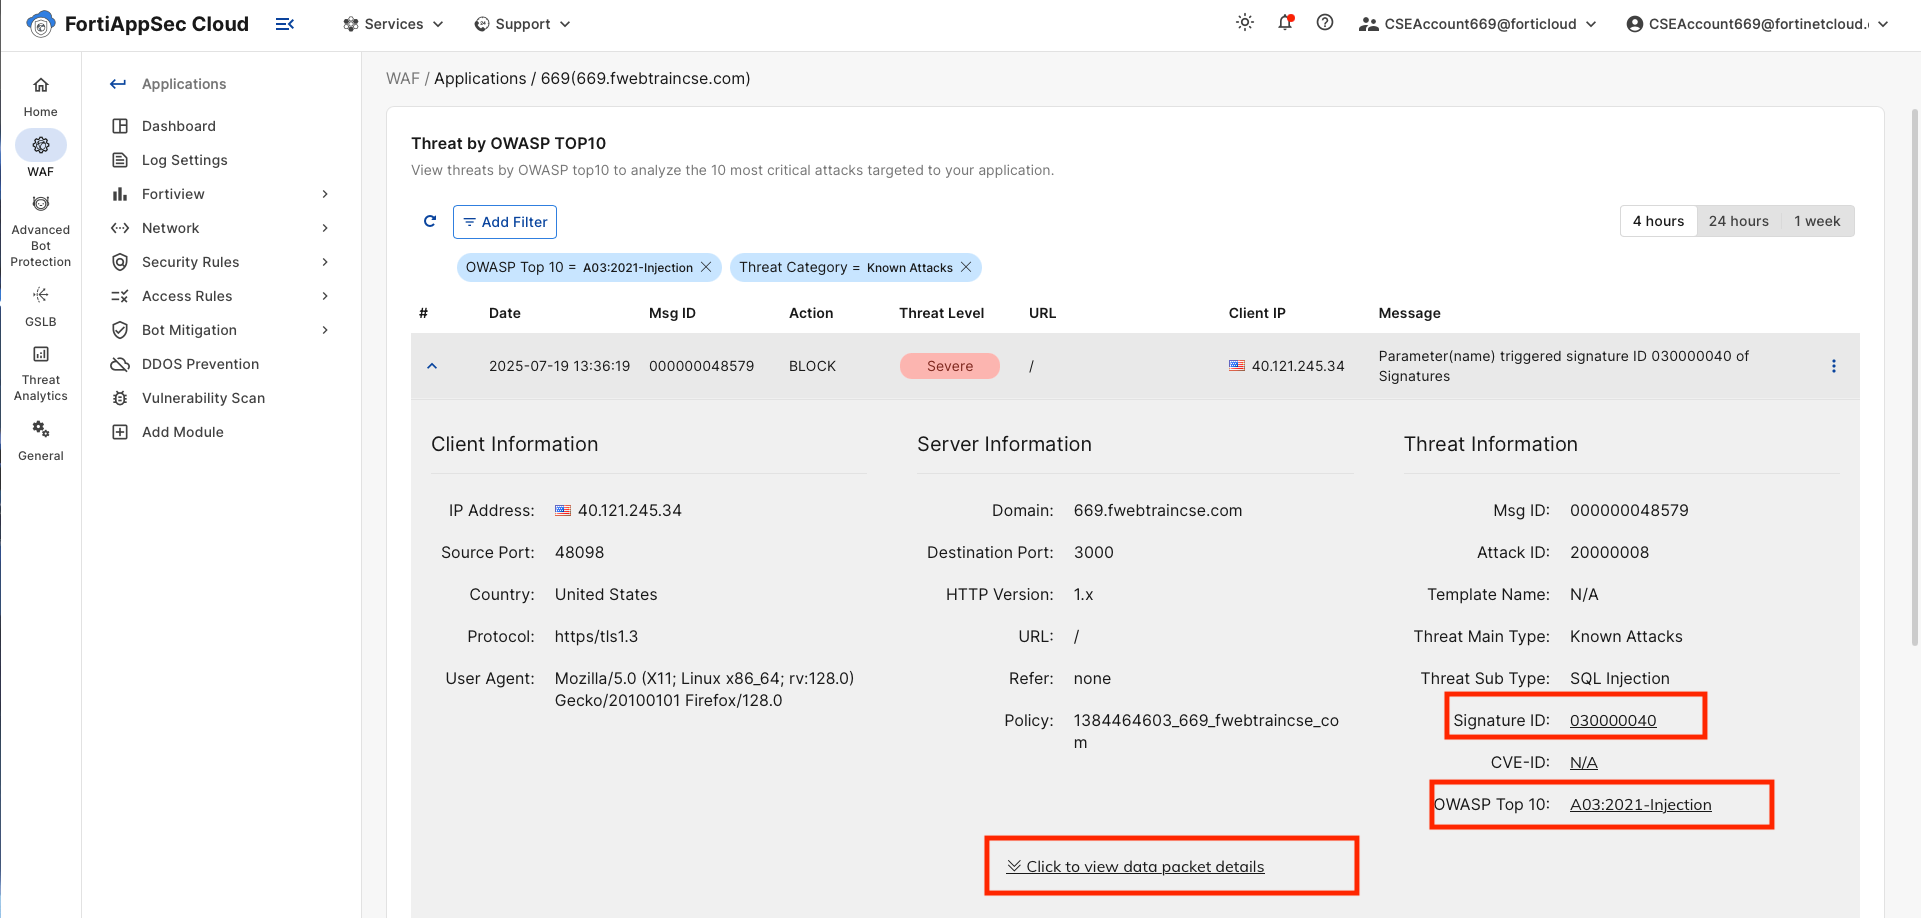
Navigate through some of the tabs.
On the Threats tab, click on the Threat.
In this case Known Attacks.
This will take you to a list showing dates when this type of attack was encountered.
If you click on the Arrow next to the date, more information about that incident can be seen.
Spend some time clicking around on the Clickable links in this output.
There is a lot of information available from here, including a link to the OWASP Top 10 site describing this attack as well as HTTP header information and matched patterns.Injection-detected
Task 3: Explore FortiAppSec Options
Goal
Explore FortiAppSec Cloud Security Features
Task
Navigate through the FortiAppSec Cloud GUI menu
Verify task completion
You should have a better idea of what security features are available with FortiAppSec Cloud.
FortiAppSec Cloud Options
Details
If you lose access to the FortiAppSec Console, open an Incognito browser and use the link below to log back in:
In the previous task, we simply turned on Block Mode in FortiAppSec Cloud. This enabled the default, minimum security configuration. Take a moment now to click through some of the menu options on the left to see what Features are enabled by default. We will also look at how to enable new features.
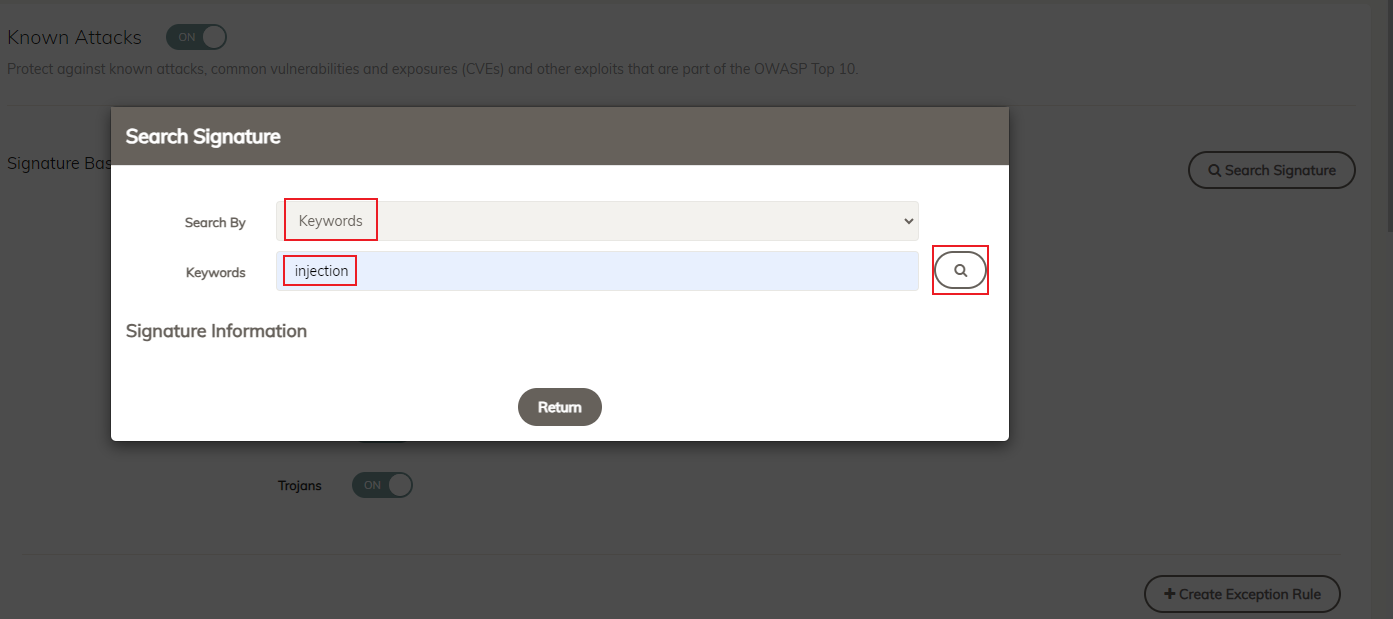
Navigate to Security Rules on the left menu and click on Known Attacks to see what features are turned on. The first category is Signature Based Detection. Click the Search Signature button on the right and search for the injection Keyword.
On the left menu, click through the available menus for Access Rules, Bot Mitigation and DDOS Prevention
Vulnerability Scan is an add-on paid service that can be added to FortiAppSec Cloud, which will scan your protected Applications for OWASP Top 10 vulnerabilities.
Info
More information can be found in the docs at:
https://docs.fortinet.com/document/fortiappsec-cloud/latest/user-guide/898181/vulnerability-scan
Next Click on + Add Modules. This is where we can activate additional security features. These features are all covered under the FortiAppSec Advanced license, which is billed based on the number of websites protected and the average Mbps throughput in aggregate for all protected sites.
In this module, we performed a very simple SQL injection attack an highlighted how FortiAppSec Cloud protects applications from them
SQLi Review Quiz
Ch 4: Web Attacks!
Now that we have done a simple SQL injection attack, let’s take a deeper dive into one of the tools that an actual hacker (or Red Team) might actually use to attack an application.
Subsections of Ch 4: Web Attacks!
Task 1: Find Vulnerability with Burp Suite
Goal
Find vulnerability with Burp Suite
Task
Activate Burp Suite and use it to scan Juice Shop
Verify task completion
You will see a Server Response, indicating an SQLITE error.
Burp Suite gives us a quick and easy way to query targeted sites.
Open a terminal window from your Kali desktop, and type:
burpsuite
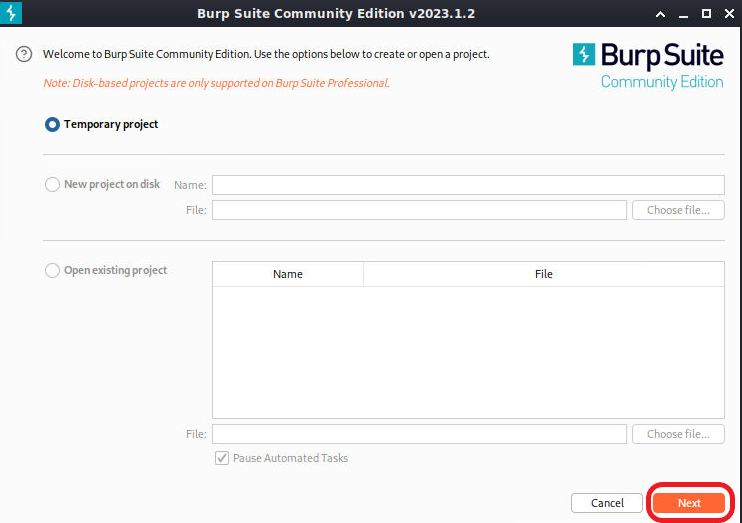
Burp Suite will pop up. Accept all warnings and EULAs. Leave Temporary Project selected and click Next
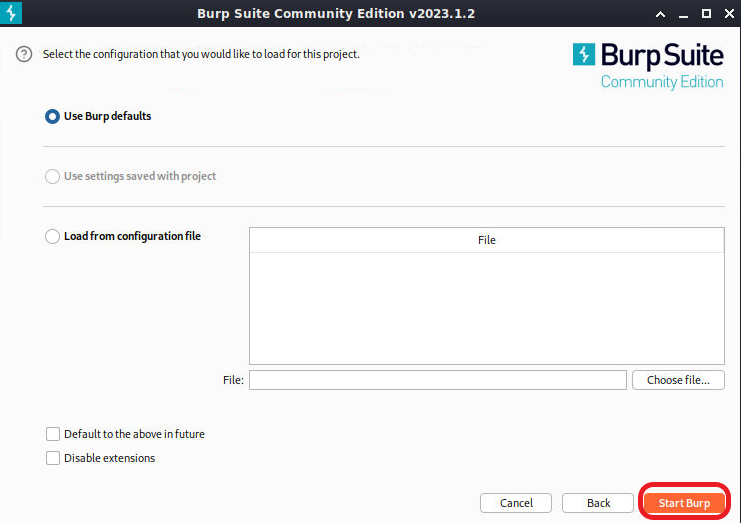
Leave “Use Burp defaults” selected and click Start Burp.
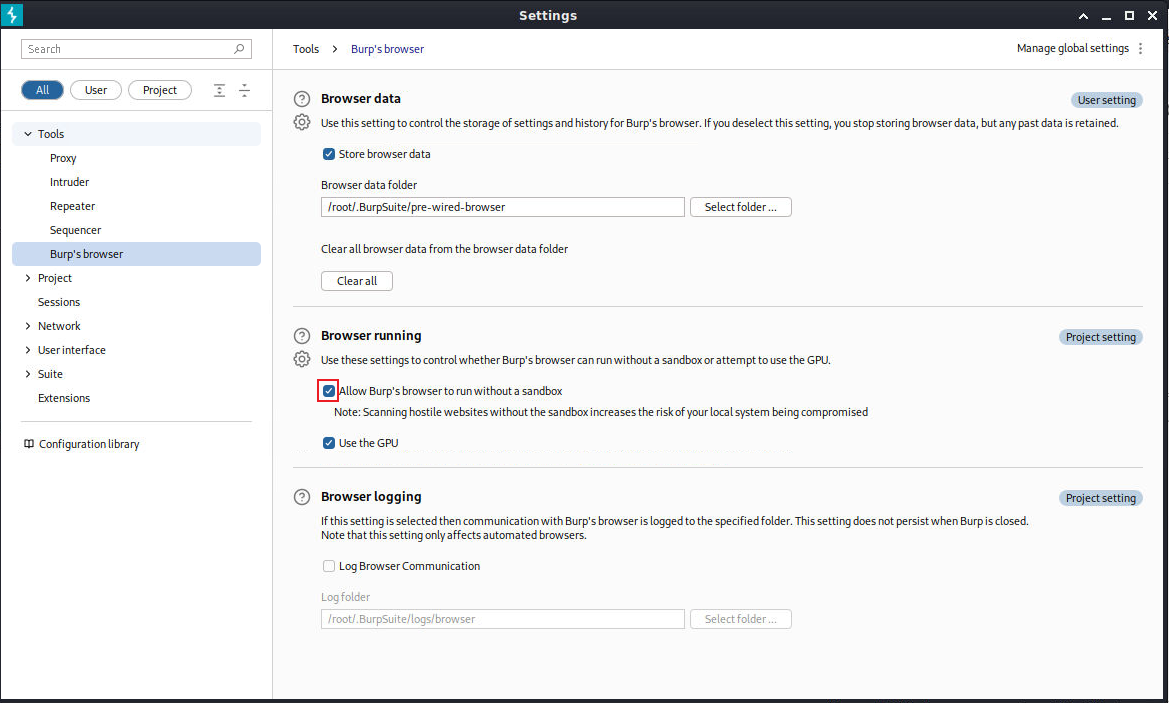
Accept the warning that Burp Suite is out of date and then select settings at the top right of the screen.
In the settings menu, select Burp’s browser. Under Browser running check the box for “Allow Burp’s browser without a sandbox”
Note
Once the button is clicked, just close the settings menu. There is no need to save.
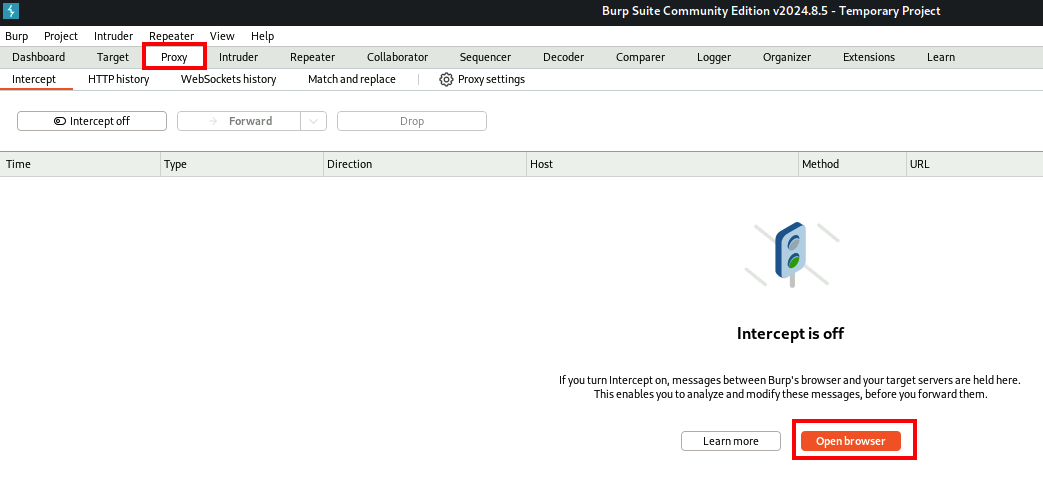
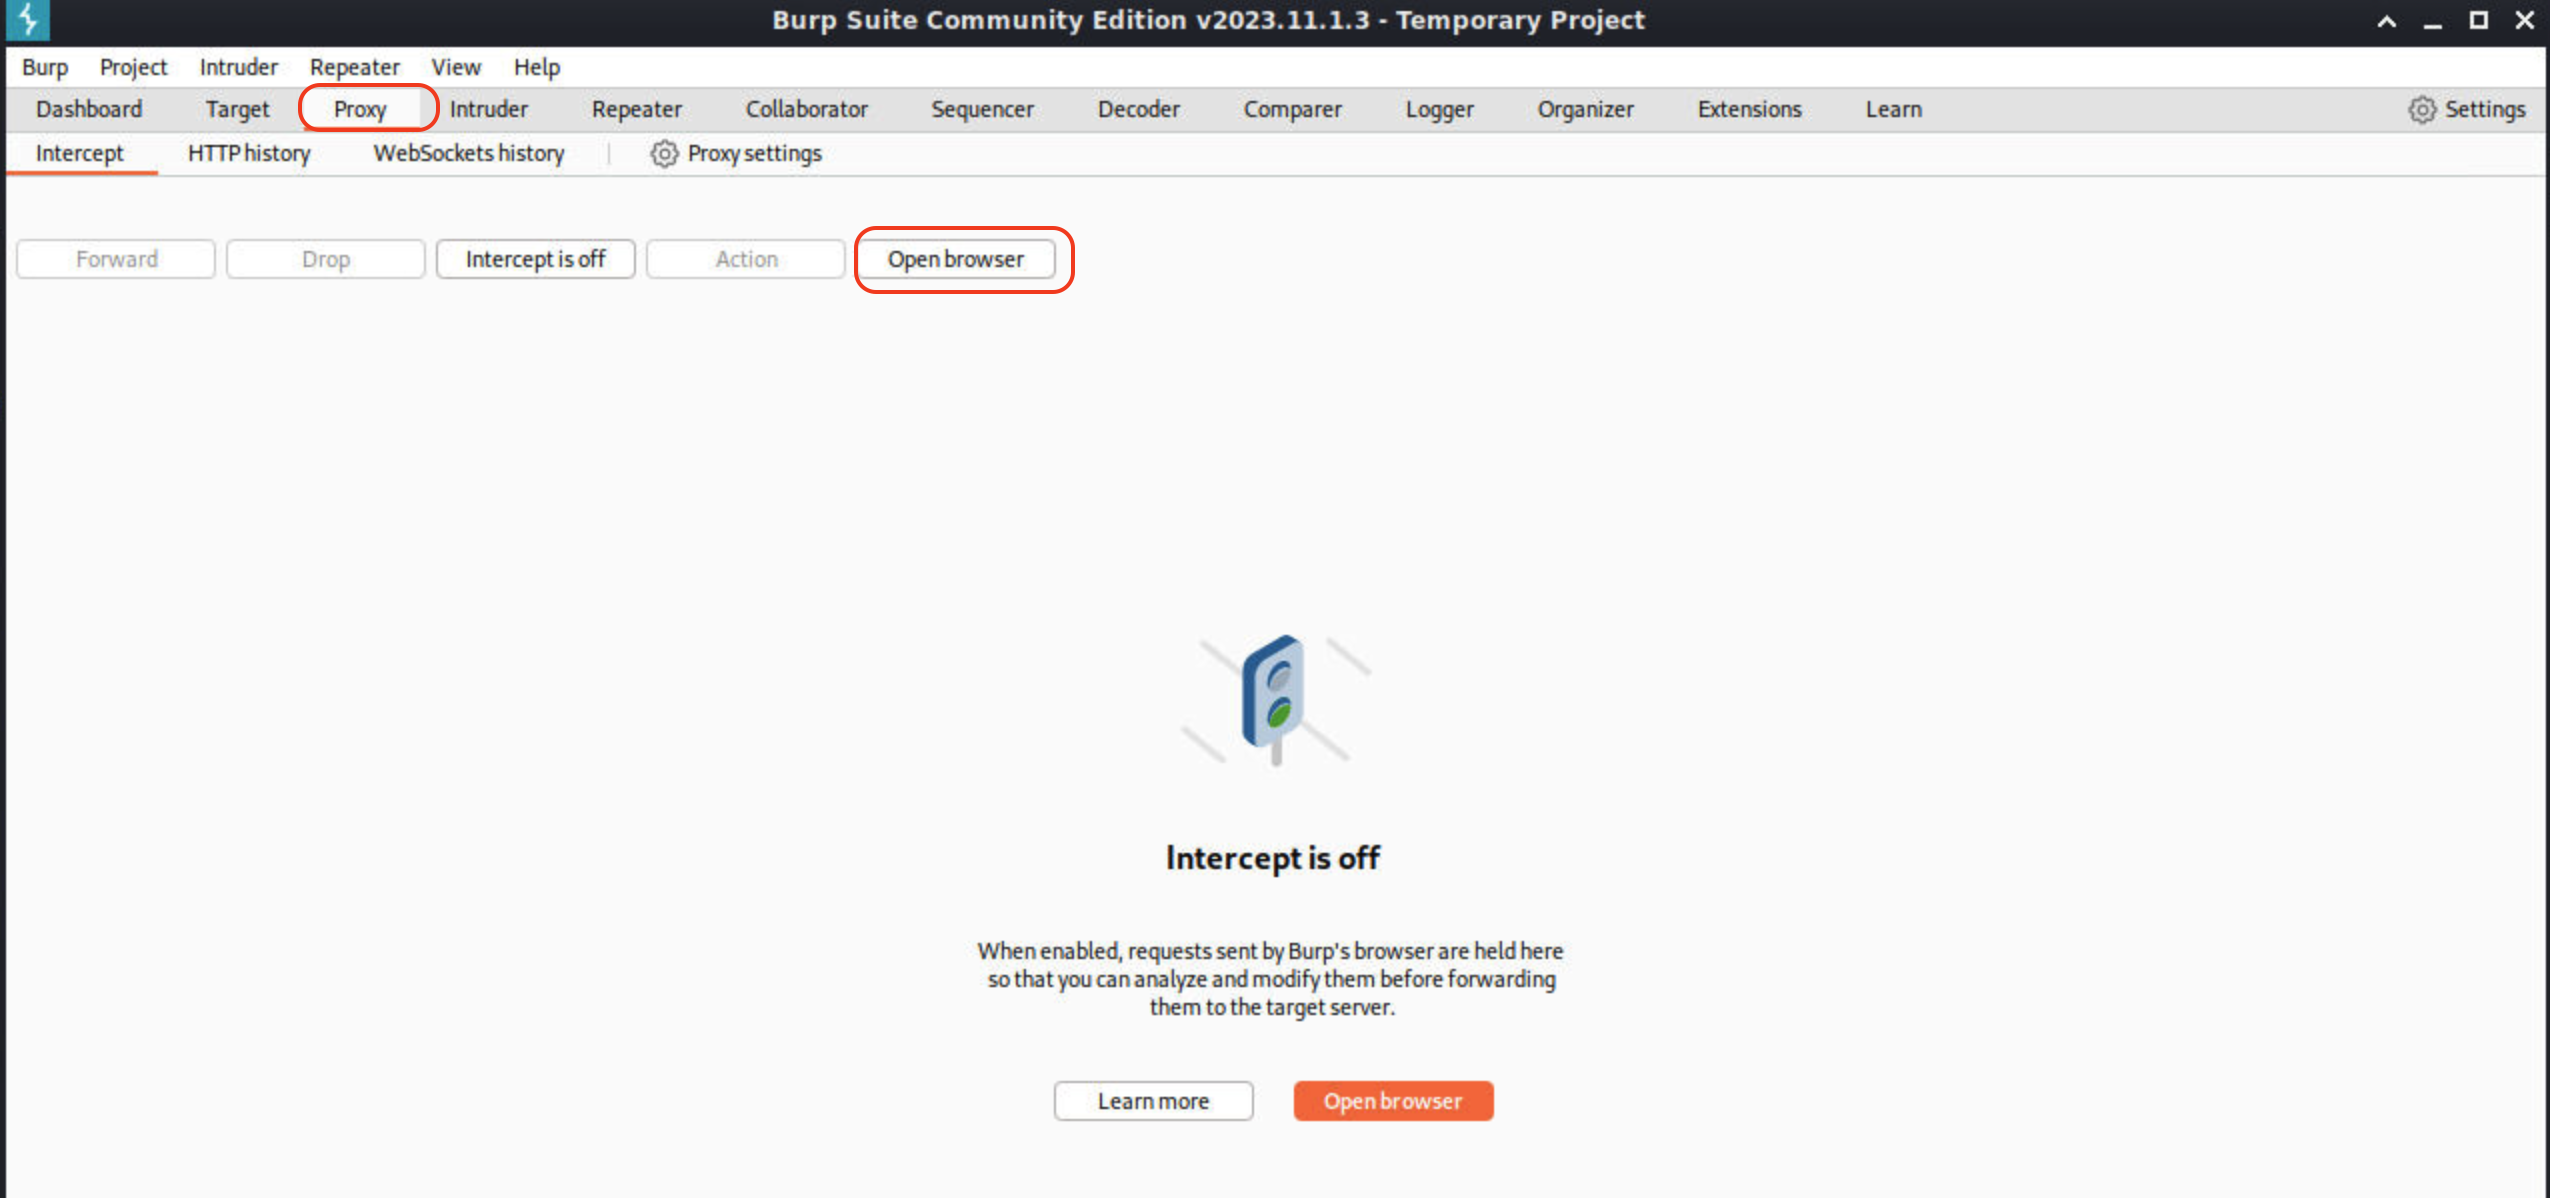
Click on the Proxy tab at the top of the Burp Suite screen. This will bring you to the Intercept screen. Click on Open Browser.
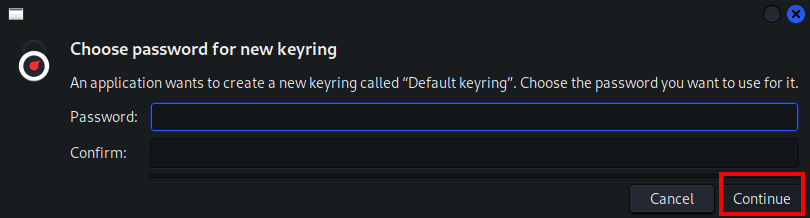
Click Continue and then continue to NOT use a password for Burpsuite password encryption
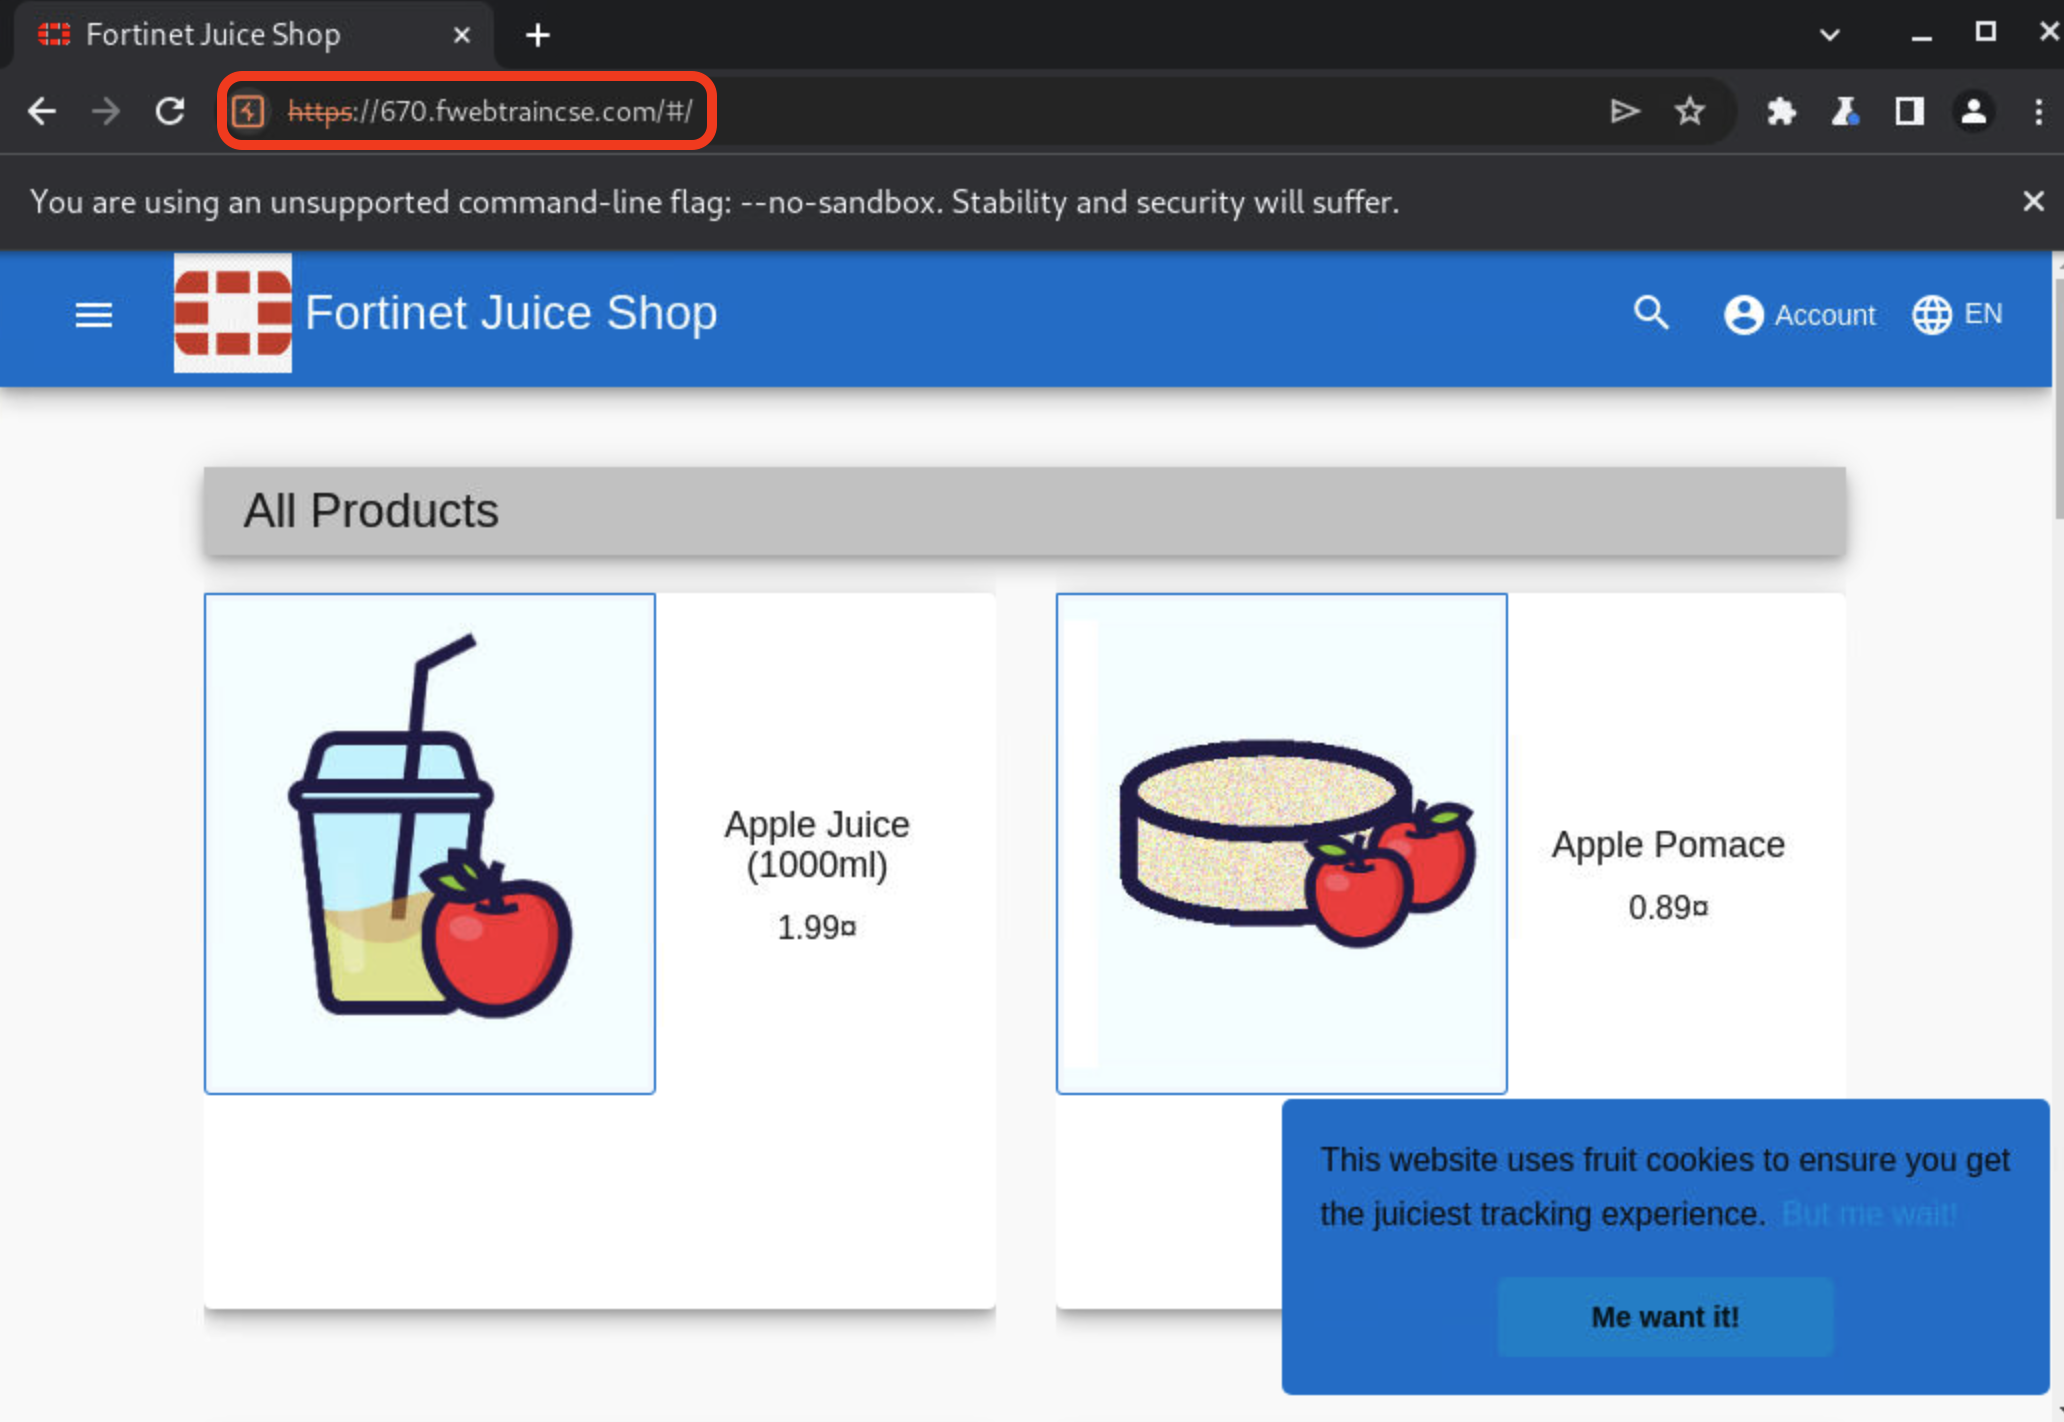
In the browser URL bar, input https://<FortiAppSecStudentID>.fwebtraincse.com and hit enter. This will bring you to the juice shop home page.
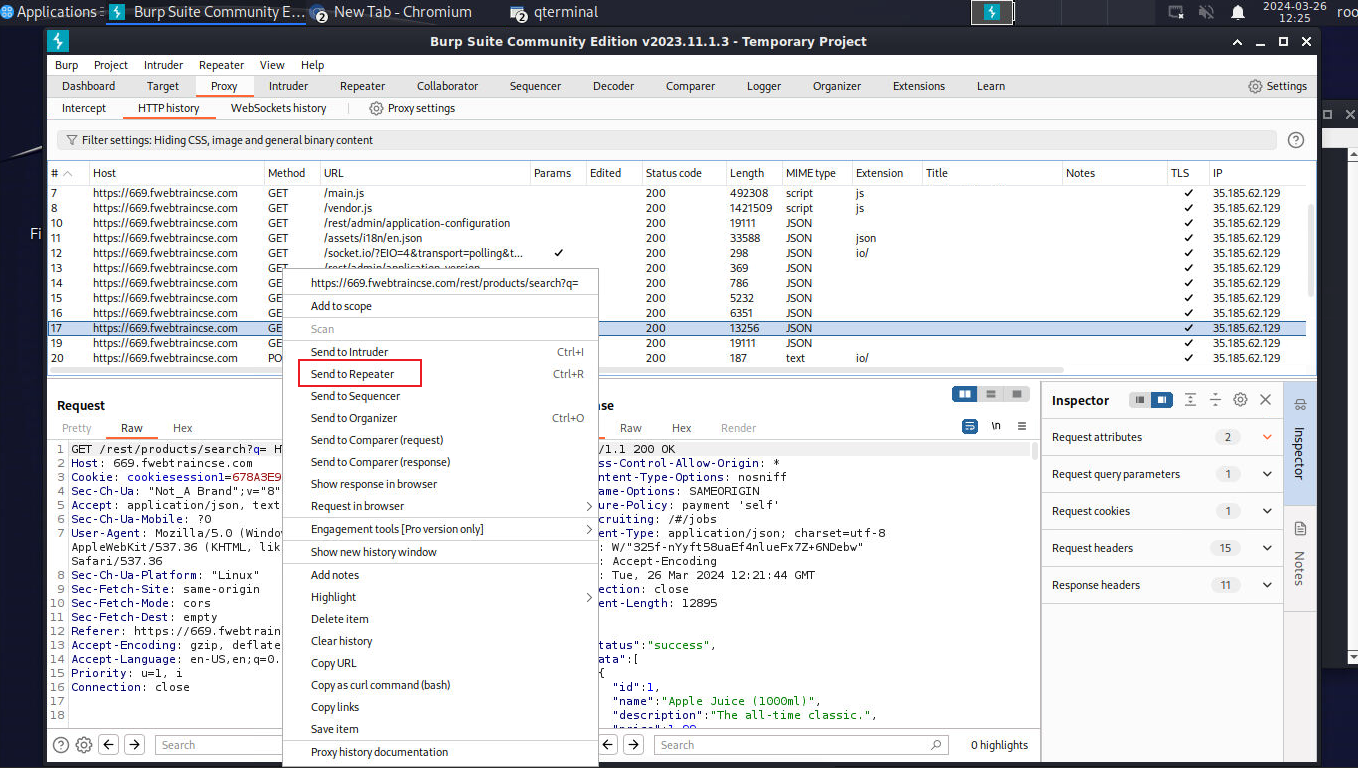
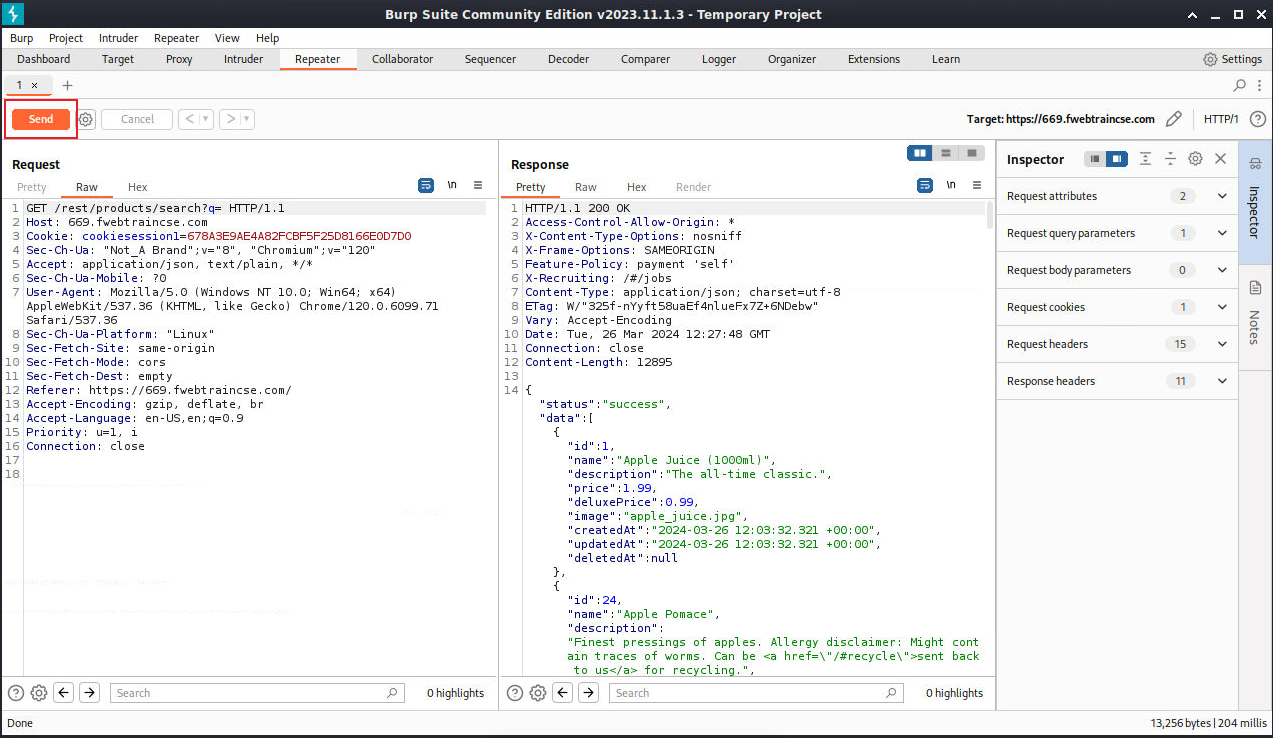
Minimize the browser and go back to the Burpsuite console and click on the HTTP History tab under Proxy.
Scroll down the list until you find a URL labeled "/rest/products/search?q=.
Select this line and right click. Then click on Send to Repeater.
This will allow us to manipulate the requests in order to do a little nefarious recon.
At the top of Burp Suite, Click on the Repeater Tab.
You will see the request we just sent.
Now click on the Send Button. This will populate the Response area.
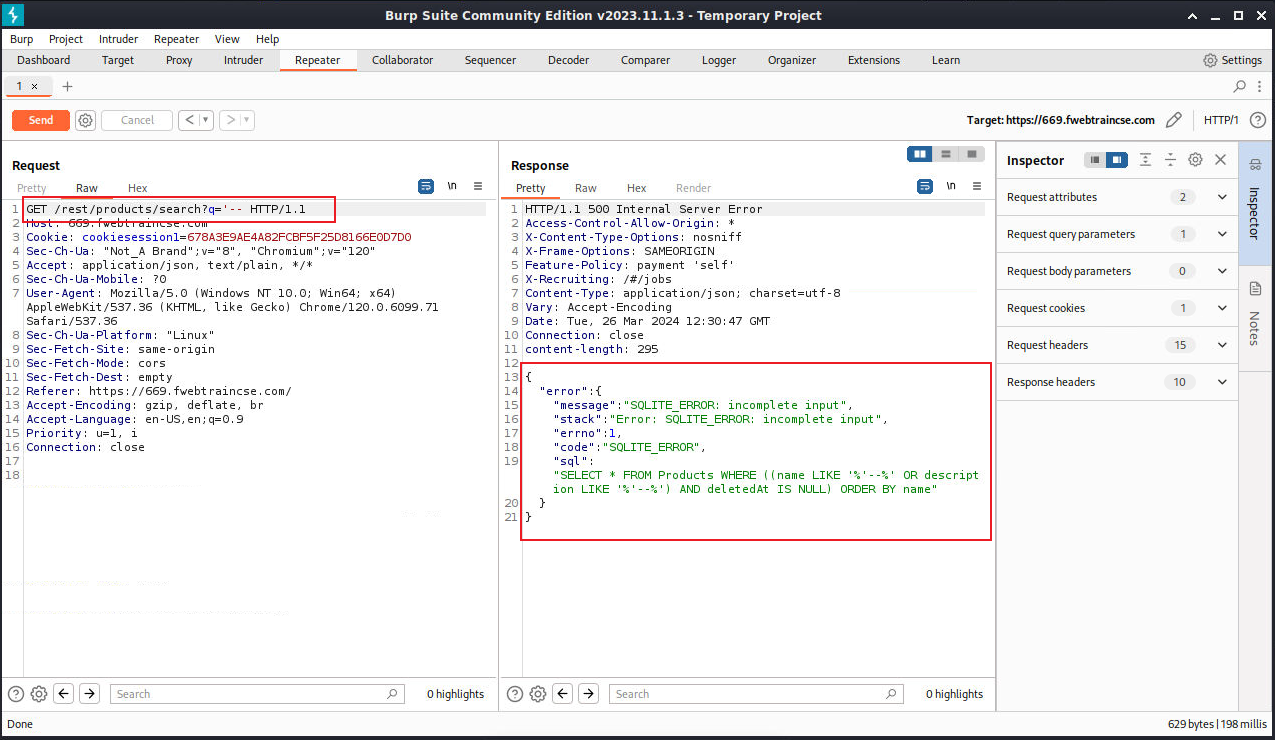
Now we are going to modify our query a bit. We will intentionally send an incomplete input in order to generate an error.
Click on the First line in the Raw request and append '-- to the end of the GET request.
The GET should now look like /rest/products/search?q='---. Click Send.
We will now see an error in the Response section.
This error tells us that the database is SQLITE and uncovers a vulnerability.
Info
It's worth mentioning that the standard signature based Web Protection Profile did not catch this attempt.
- If Machine Learning were enabled, this would not have succeeded.
  - Instead, it would have been identified as an anomaly and then passed to the threat engine where it would have been identified as an SQL Injection attempt.
  - We are not using ML in this lab, ML will be discussed in section 6
Task 2: Use SQLMAP to find vulnerability
Goal
Use SQLMAP to find Vulnerability
Task
Activate SQLMAP and scan Juice Shop
Verify task completion
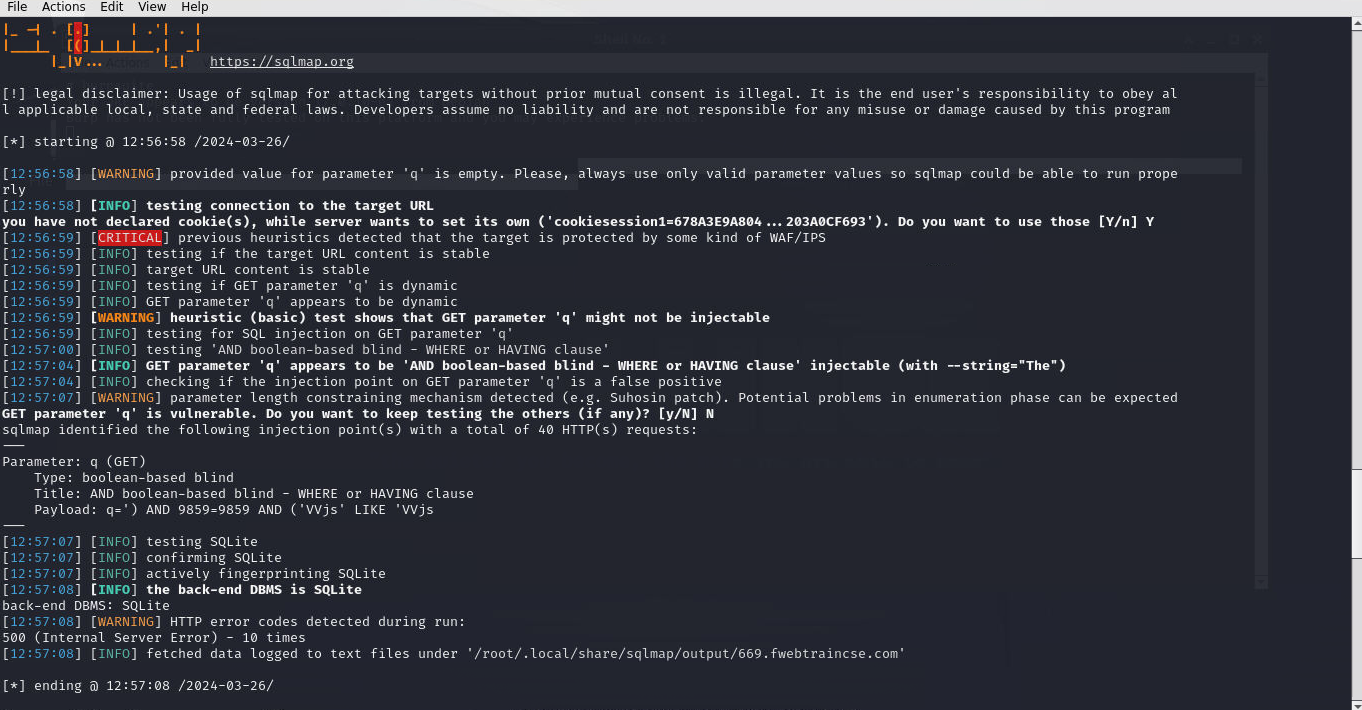
After FortiAppSec block mode is disabled, SQLMAP should identify that get parameter ‘q’ is vulnerable
Now that we know what the Database type is, we can use sqlmap to see if we can get some “Juicy” information (pun intended). You could just run SQLMAP initially to find the vulnerability, but It would take much longer without an idea of what you were looking for.
Open a new terminal on Kali, and take a look at the SQLmap help page.
It’s helpful to use bash shell here, as we will want to be able to use the up arrow in order to scroll though historical commands
bash
sqlmap -h
Warning
Answer yes to install SQLMap, and accept all defaults to restart services
Now we will attempt to discover what type of SQL injection vulnerabilities exist.
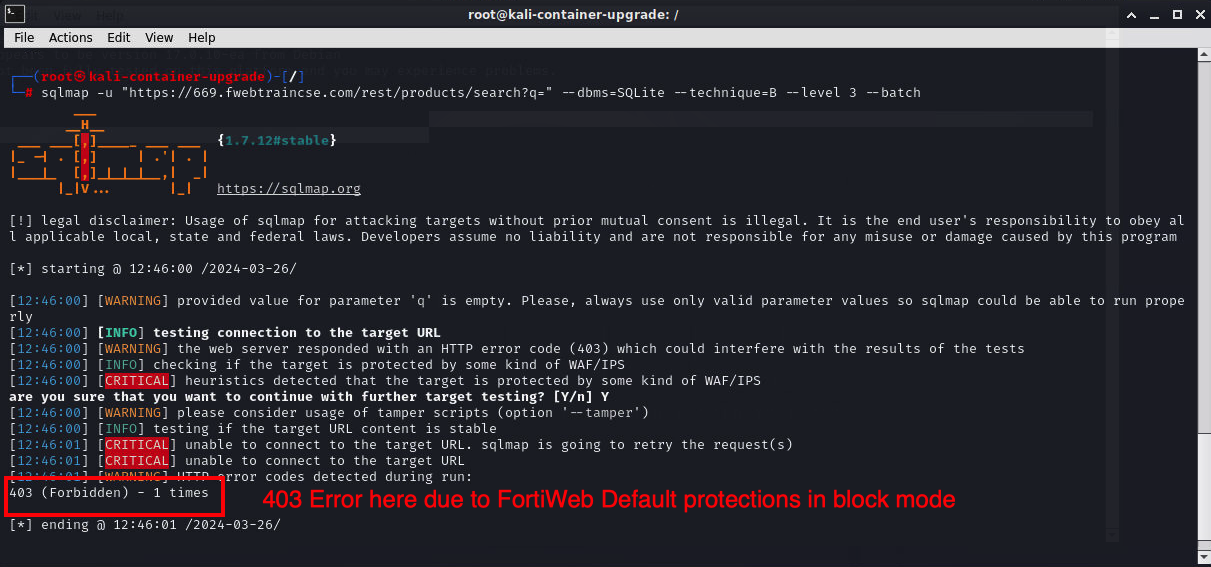
Since we know that the database runs on sqlite we can shorten the scan time by giving sqlmap that information.
Input the first line below at the terminal, substituting your URL. Make sure to change in the URL below to your student number
This attempt will fail with an HTTP 403 error , due to the default protections offered by FortiAppSec.
As a best practice, FortiAppSec ML protections in production environments prevent reconnaissance with tools like sqlmap
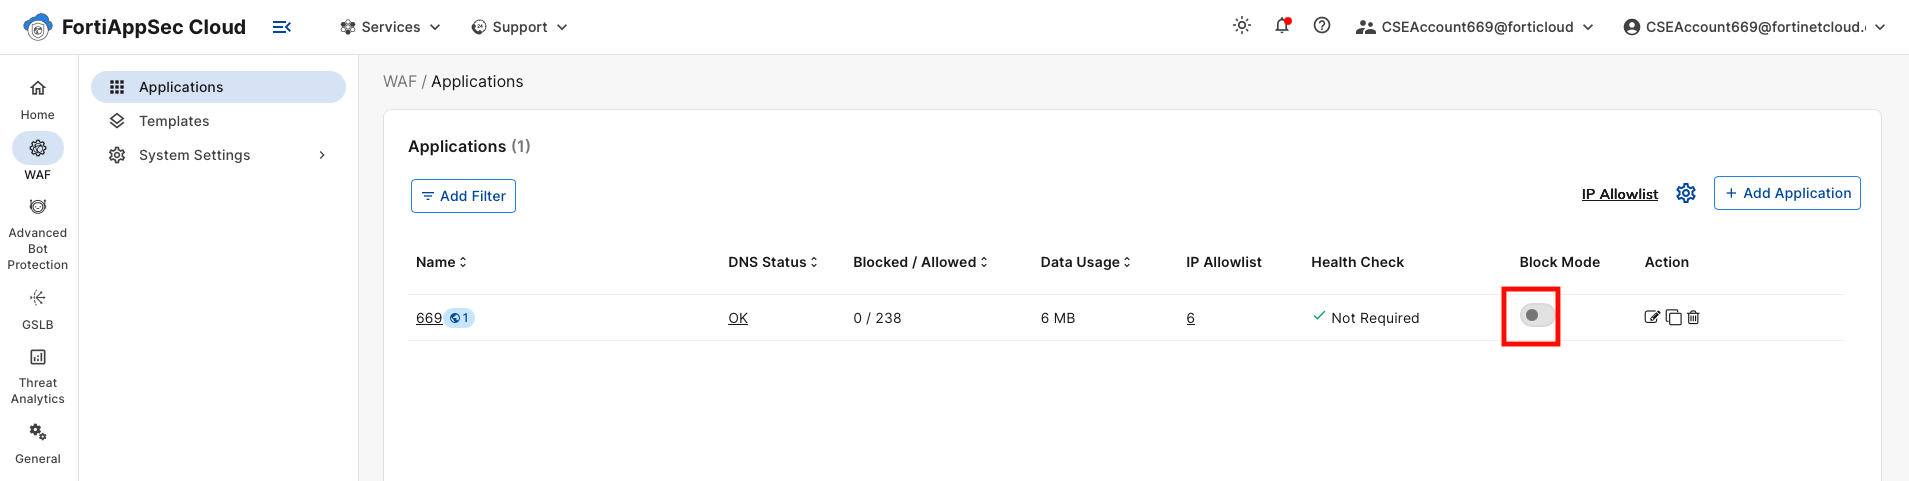
Disable Block Mode on your application in FortiAppSec Cloud. Wait 2 to 3 minutes before continuing for the change to make effect.
Re-run the sqlmap attempt. You will see that some vulnerabilities were found.
Warning
Please re-enable block mode for your application before moving forward.
Task 3: CSRF attack
Goal
Use Burp Suite to Perform CSRF attack
Task
Burp Suite will modify a user password, using Cross Site Request Forgery, then block it with FortiAppSec Cloud
Verify task completion
The CSRF password change should go through initially, but be blocked after enabling CSRF protection on FortiAppSec Cloud
A Cross-Site Request Forgery (CSRF) attack is a type of security exploit where an attacker tricks a user into performing actions on a web application without their consent. This can happen when a malicious website, email, or other online resource causes the user’s web browser to perform an unwanted action on a different site where the user is authenticated.
Let’s generate a CSRF attack with Burp Suite.
Repeat Step 1-5 from Task 1 to open Burp Suite. if Burp Suite is already running in the background just click to go back to at by clicking on the top left corner of Kali linux.
On the proxy tab, Click on Open Browser (this is Chrome in this lab and not Firefox)
Type the FQDN allocated: https://<studentId>.fwebtraincse.com into the browser.
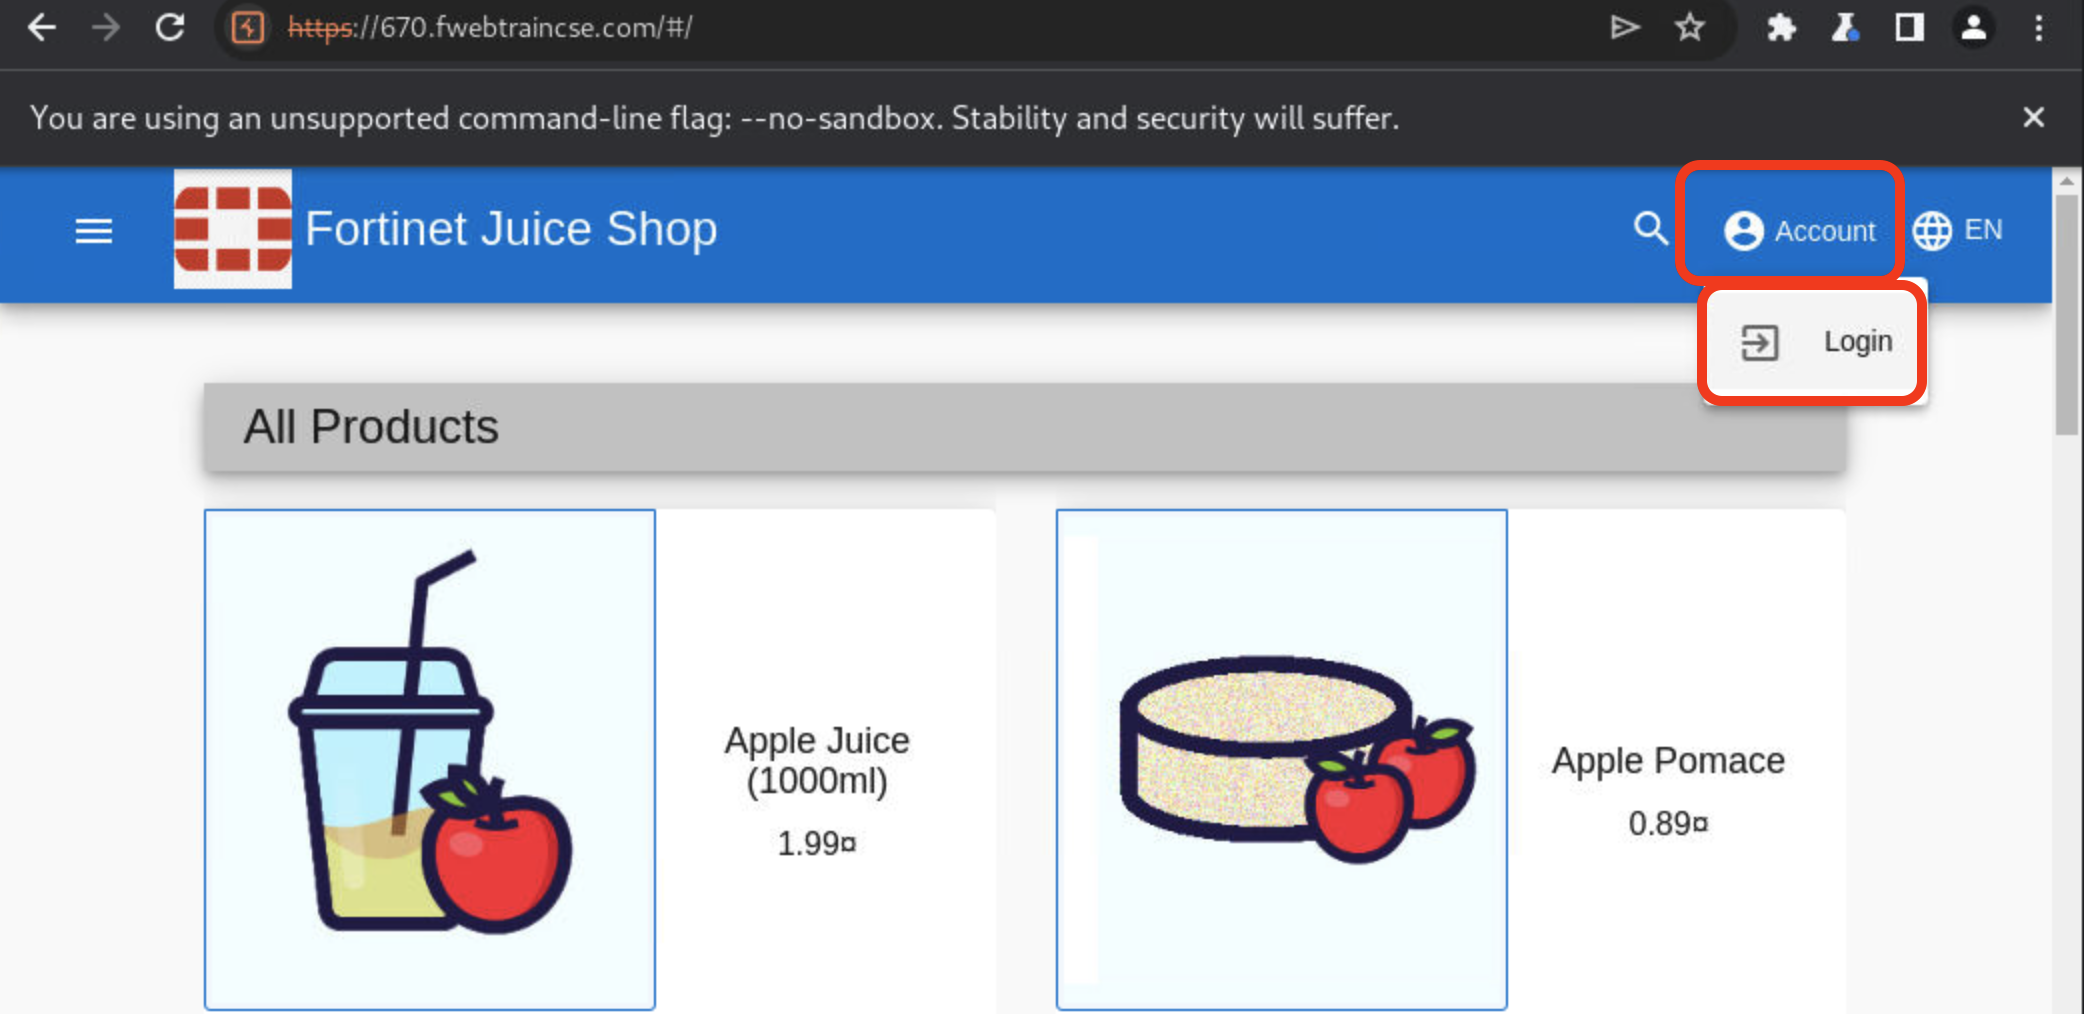
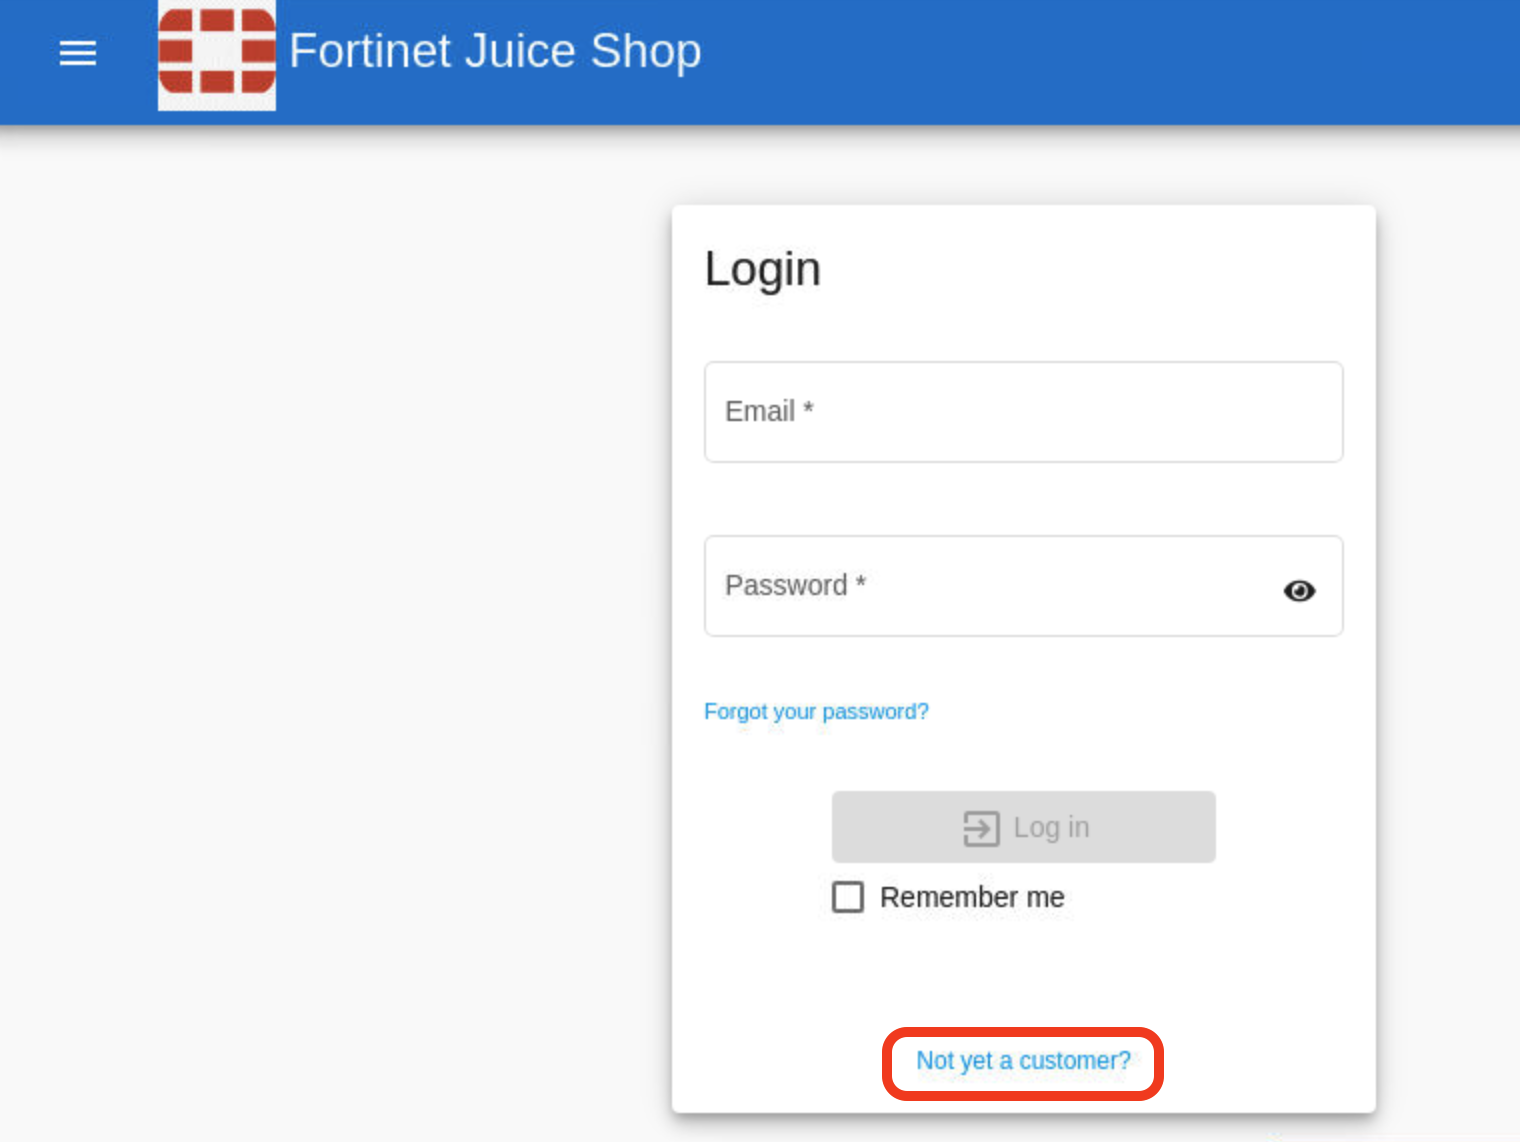
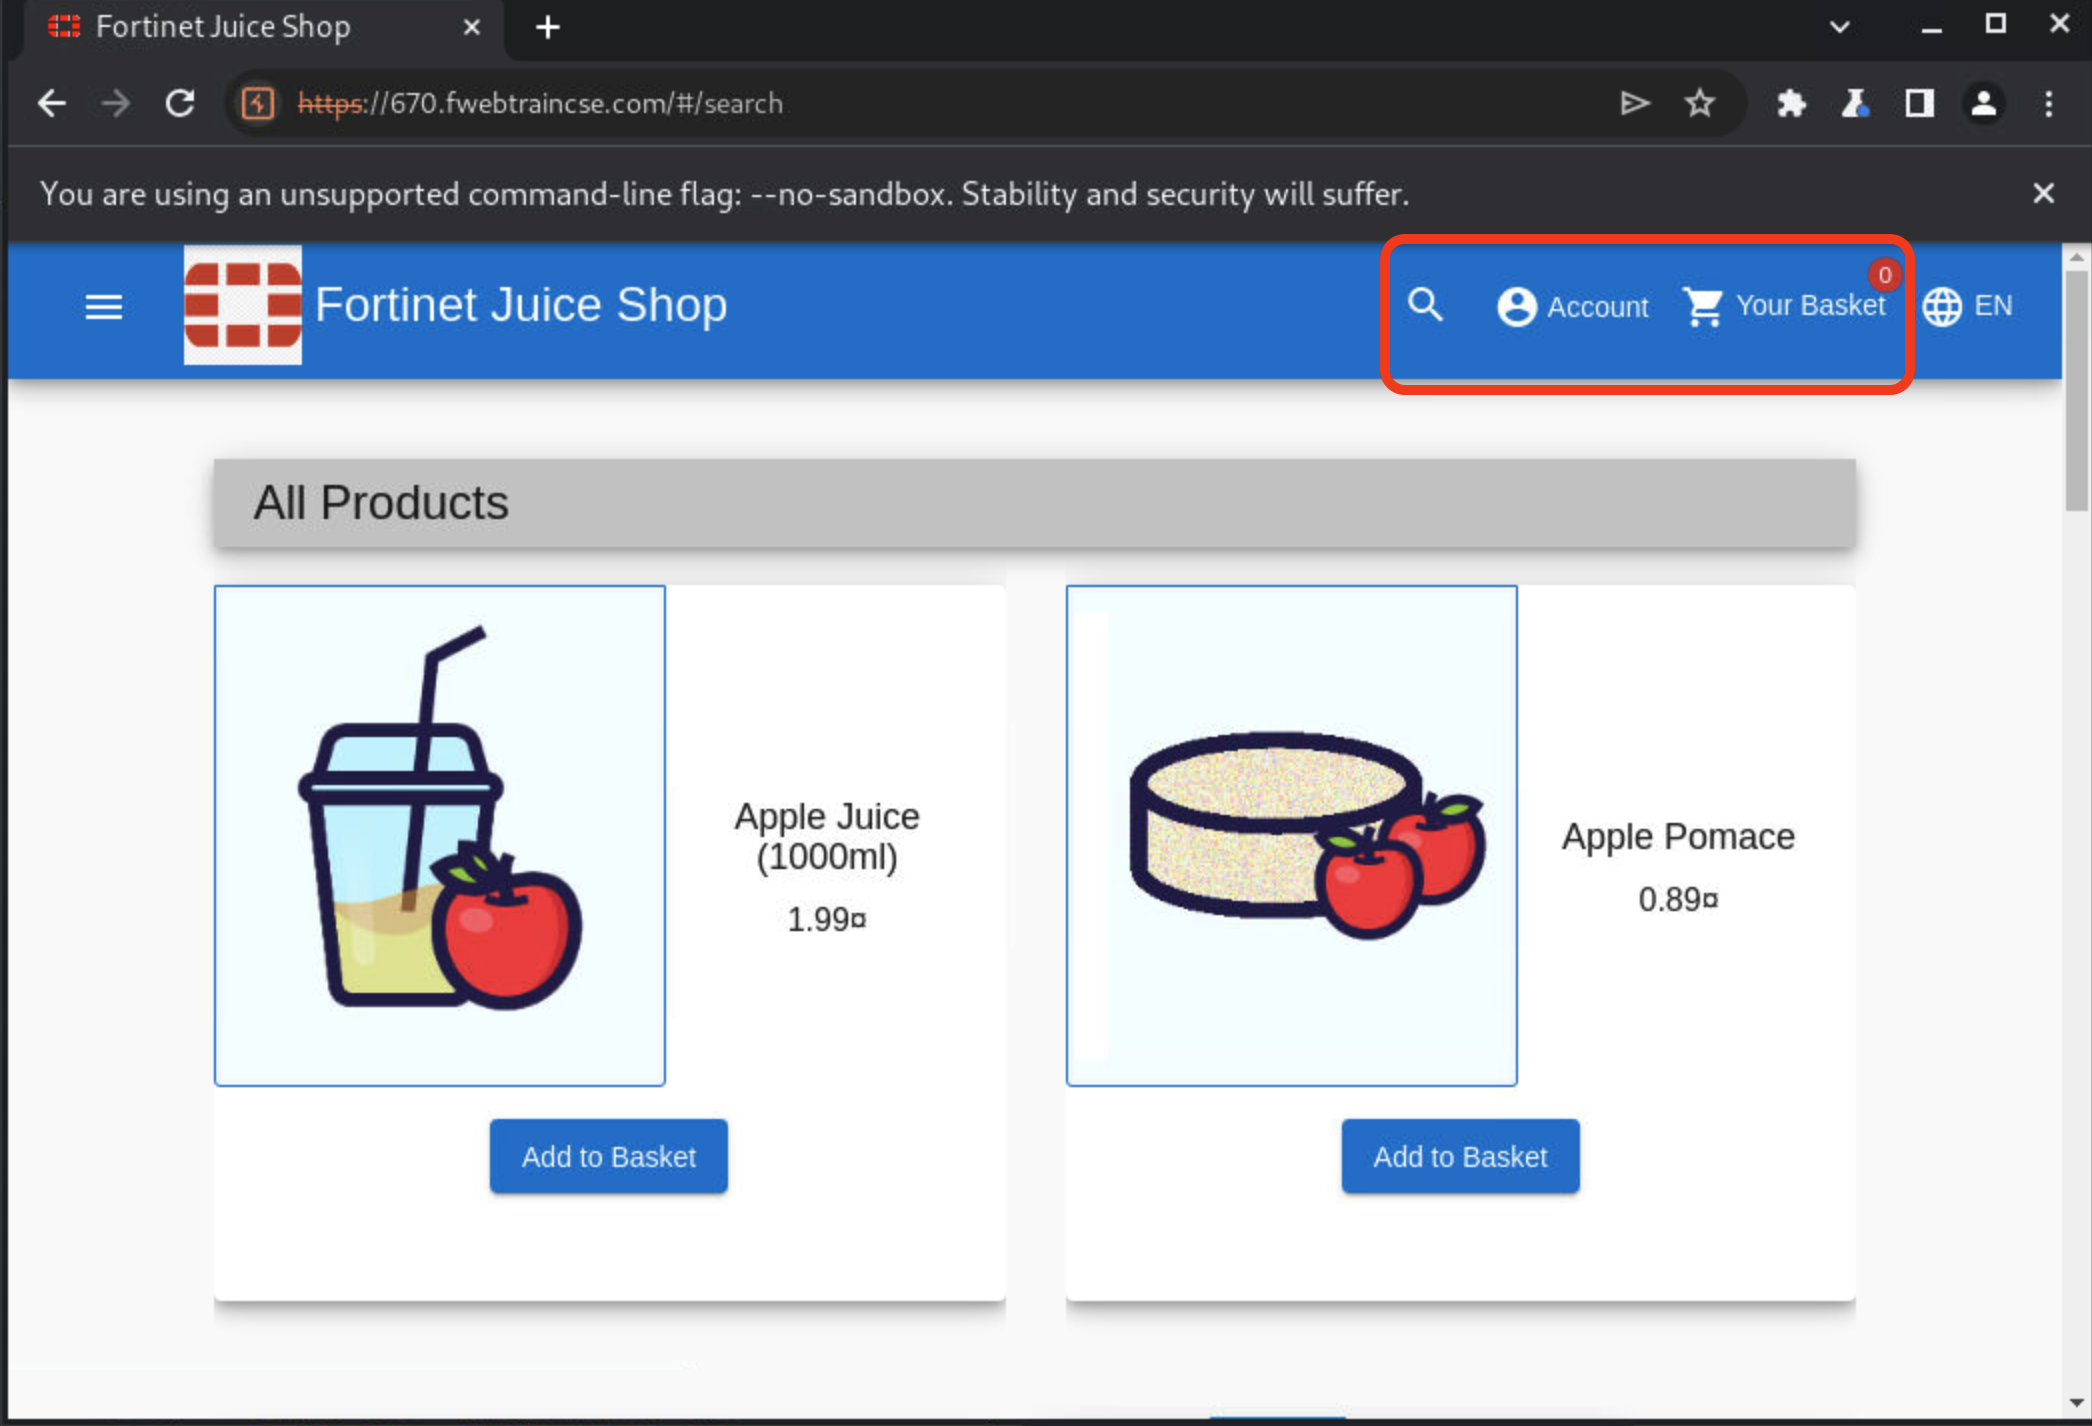
Once the Juiceshop app loads, click on Account > Login.
Note
If you don’t see Account in top right bar, you may have to expand the browser window
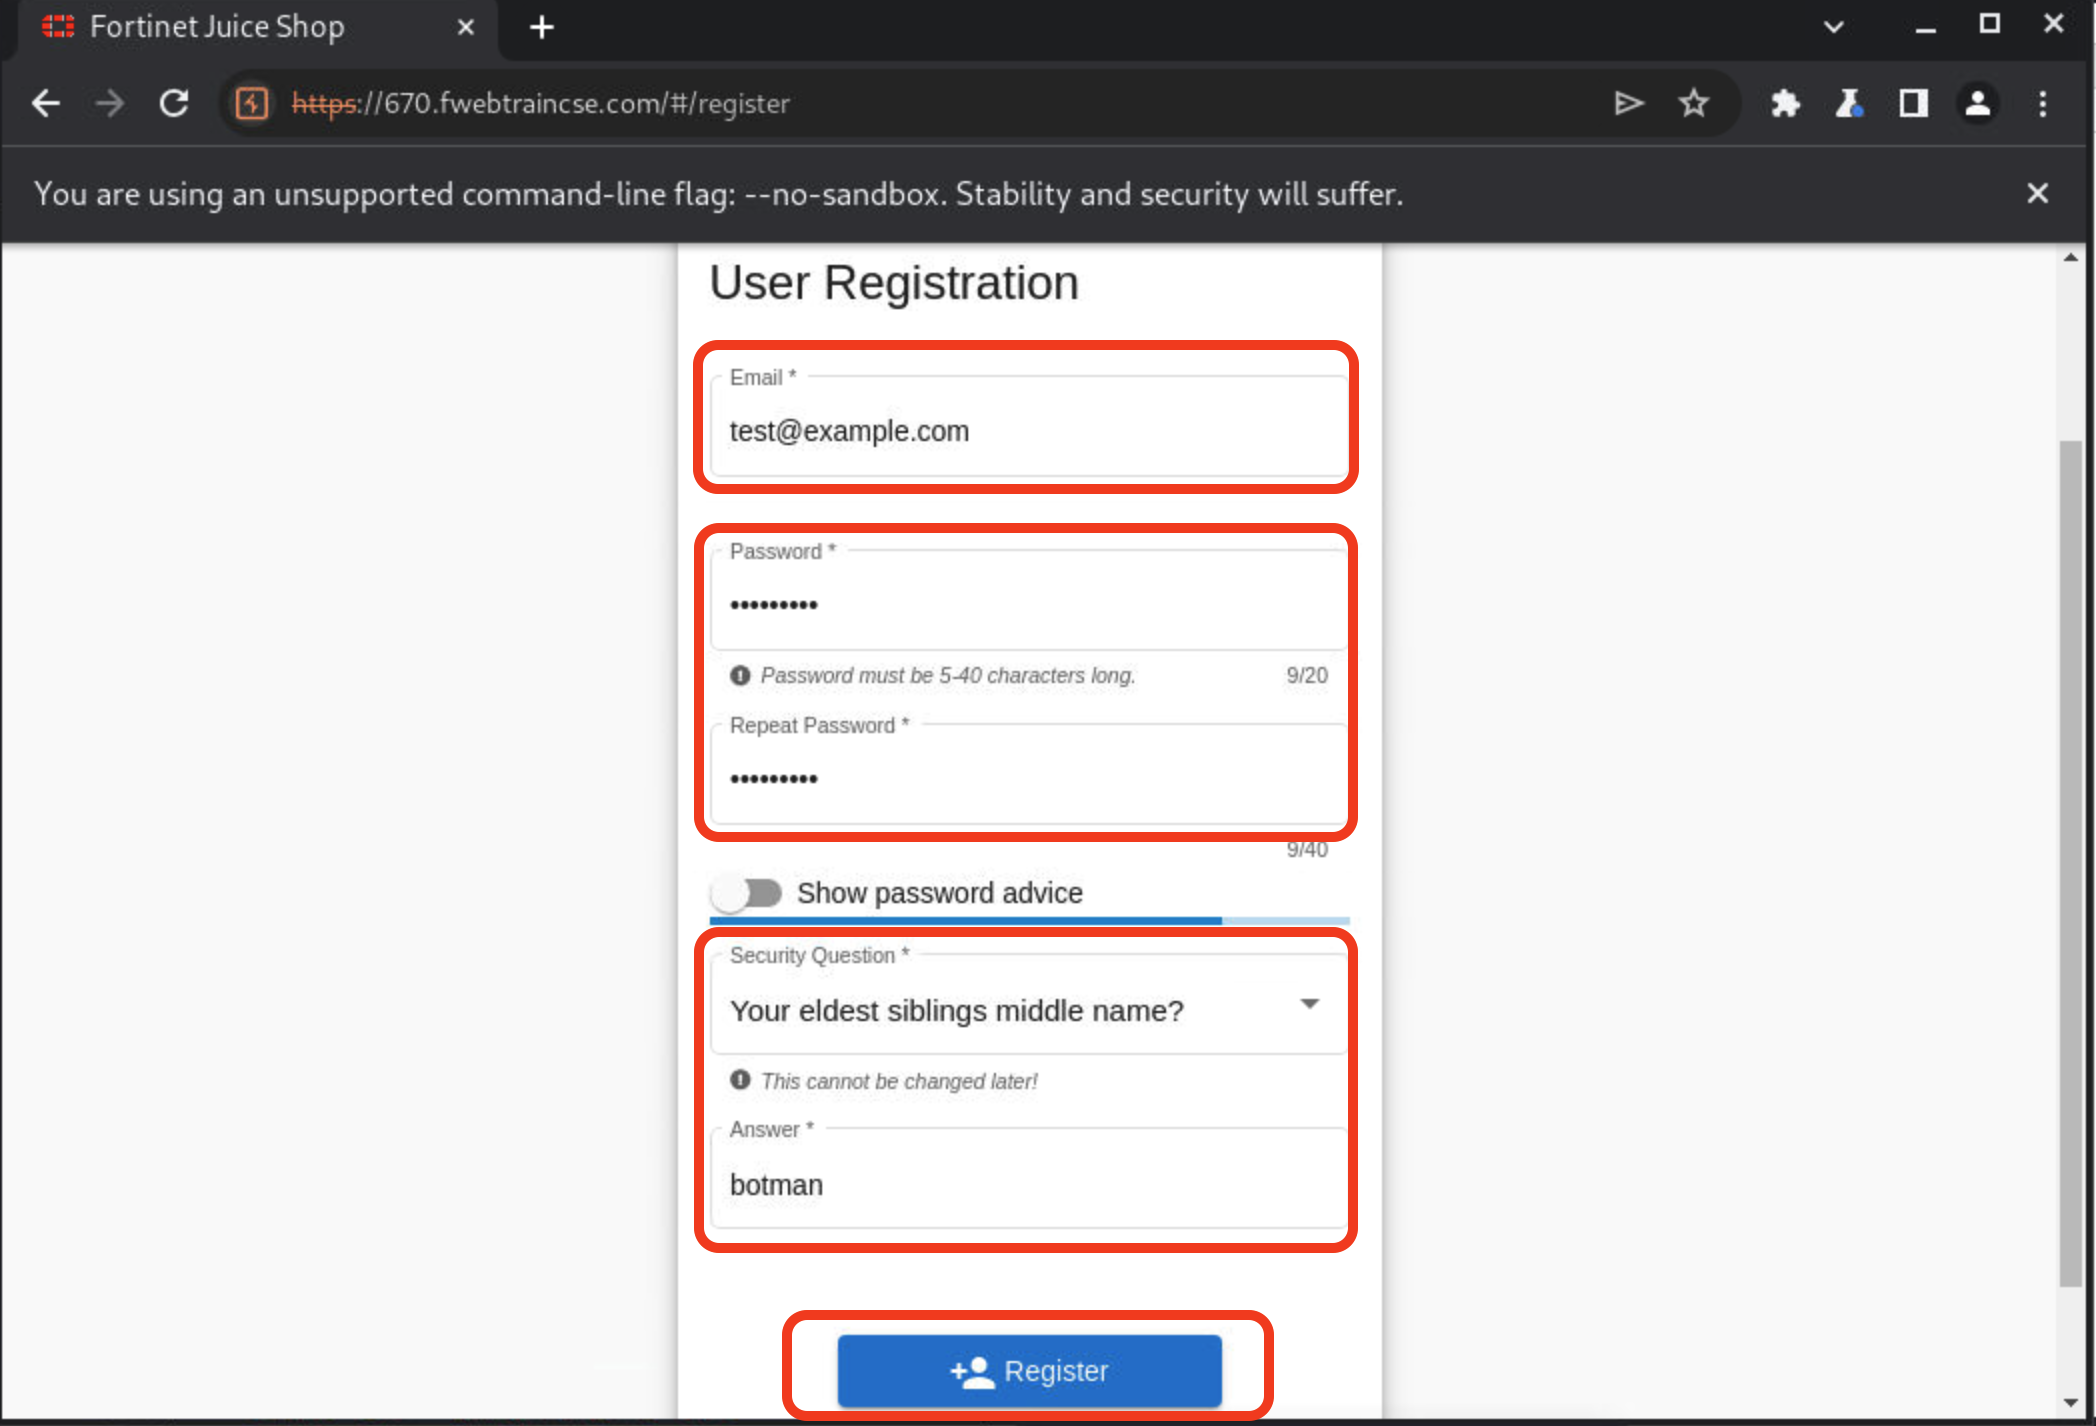
Create a user login by clicking on Not Yet a customer? at the bottom.
Make sure to use the same email and credentials as below just so we won’t forget.
email: test@example.com
password: test1234$
Repeat Password: test1234$
Security Question: Select Your eldest sibling’s middle name from dropdown.
Answer: botman
Click on register
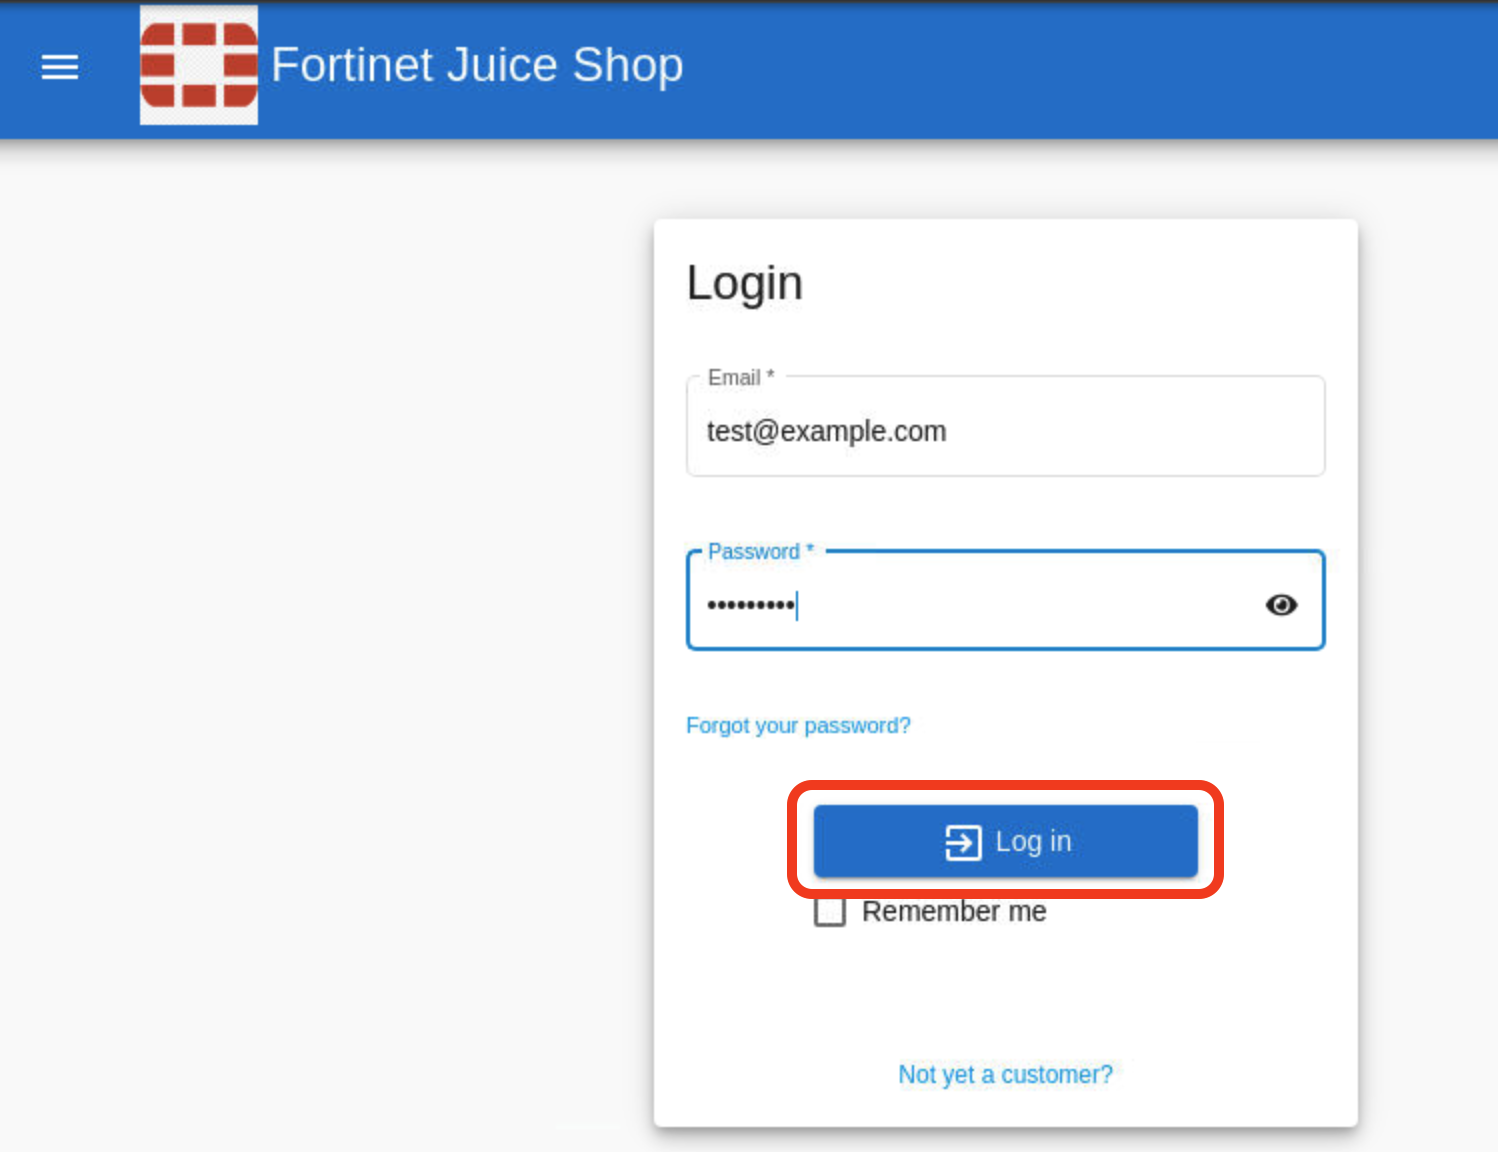
Login using the credentials above.
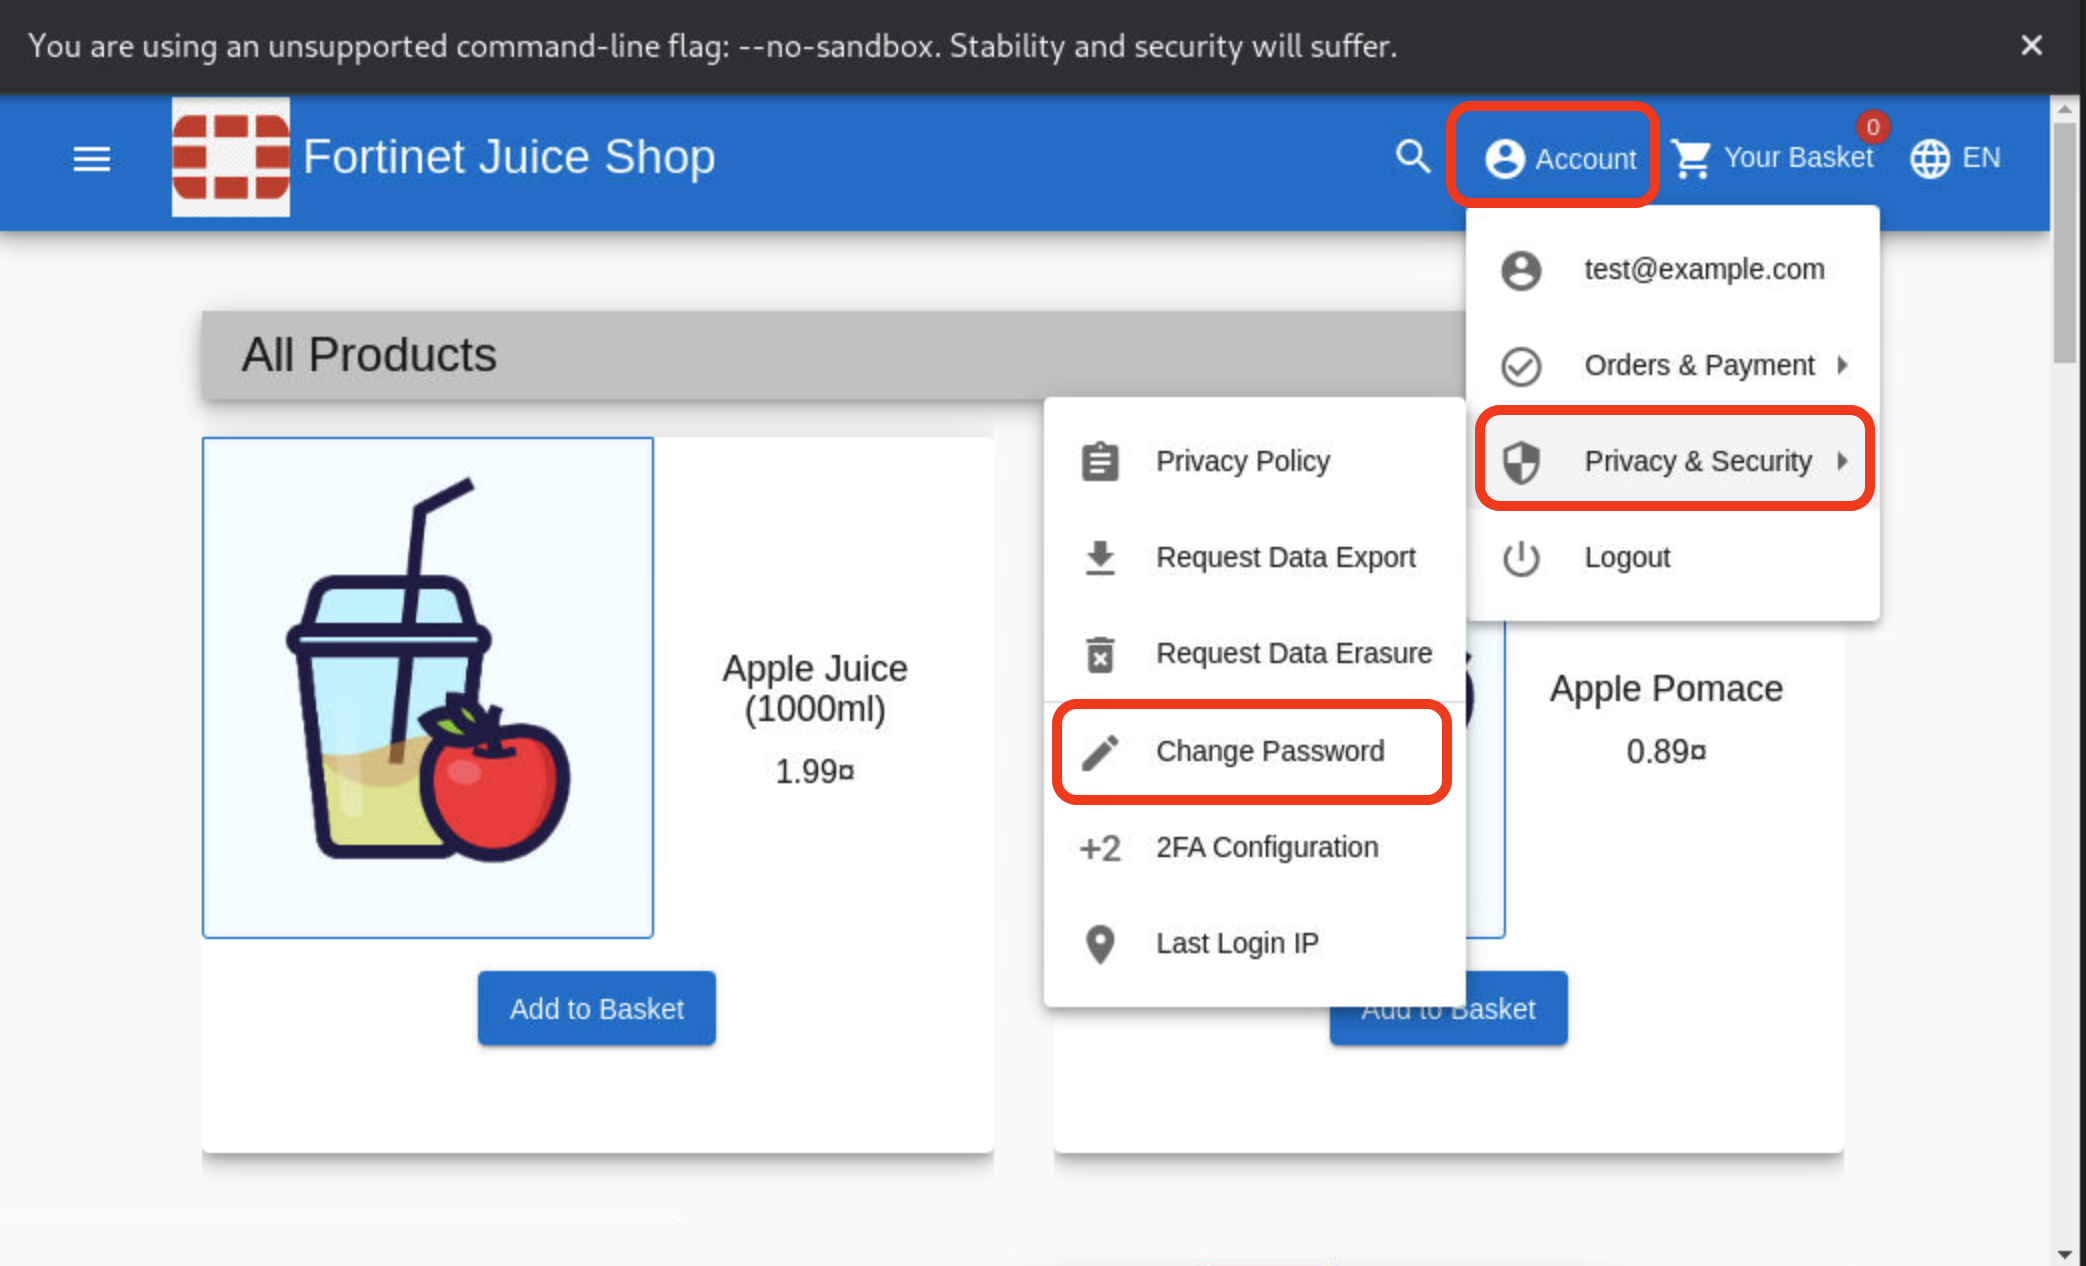
Once logged in clik on Account > Privacy and Security > Change Password.
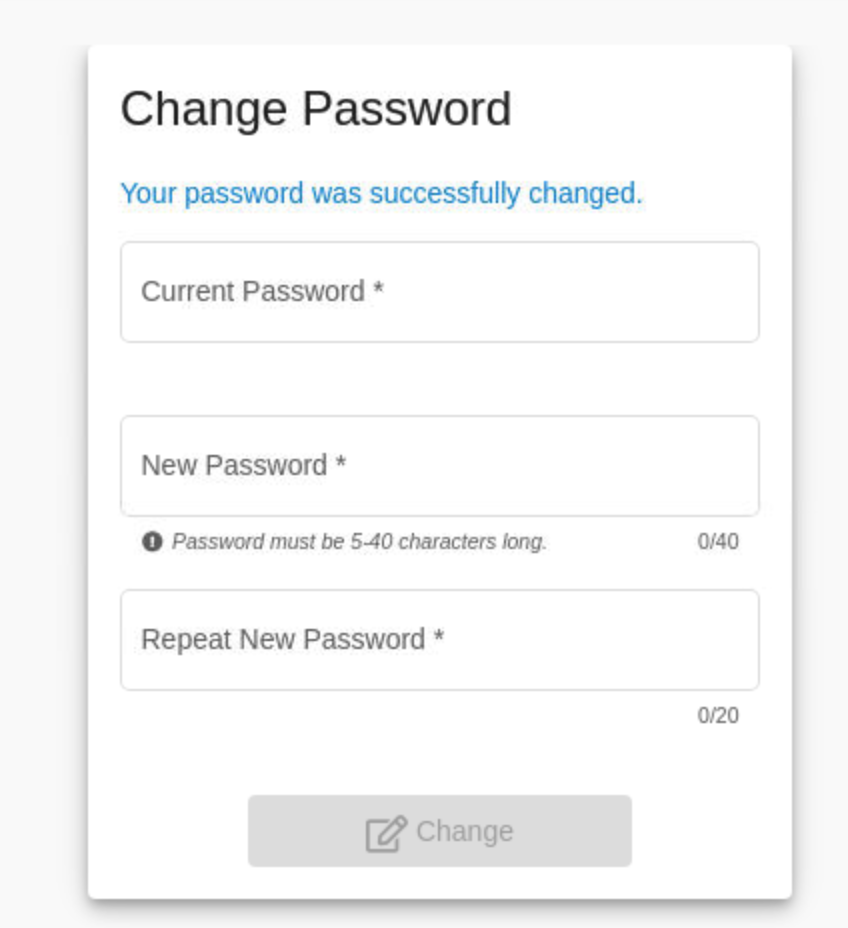
Current password: test1234$
New Password: password1234$
Repeat New Password: password1234$
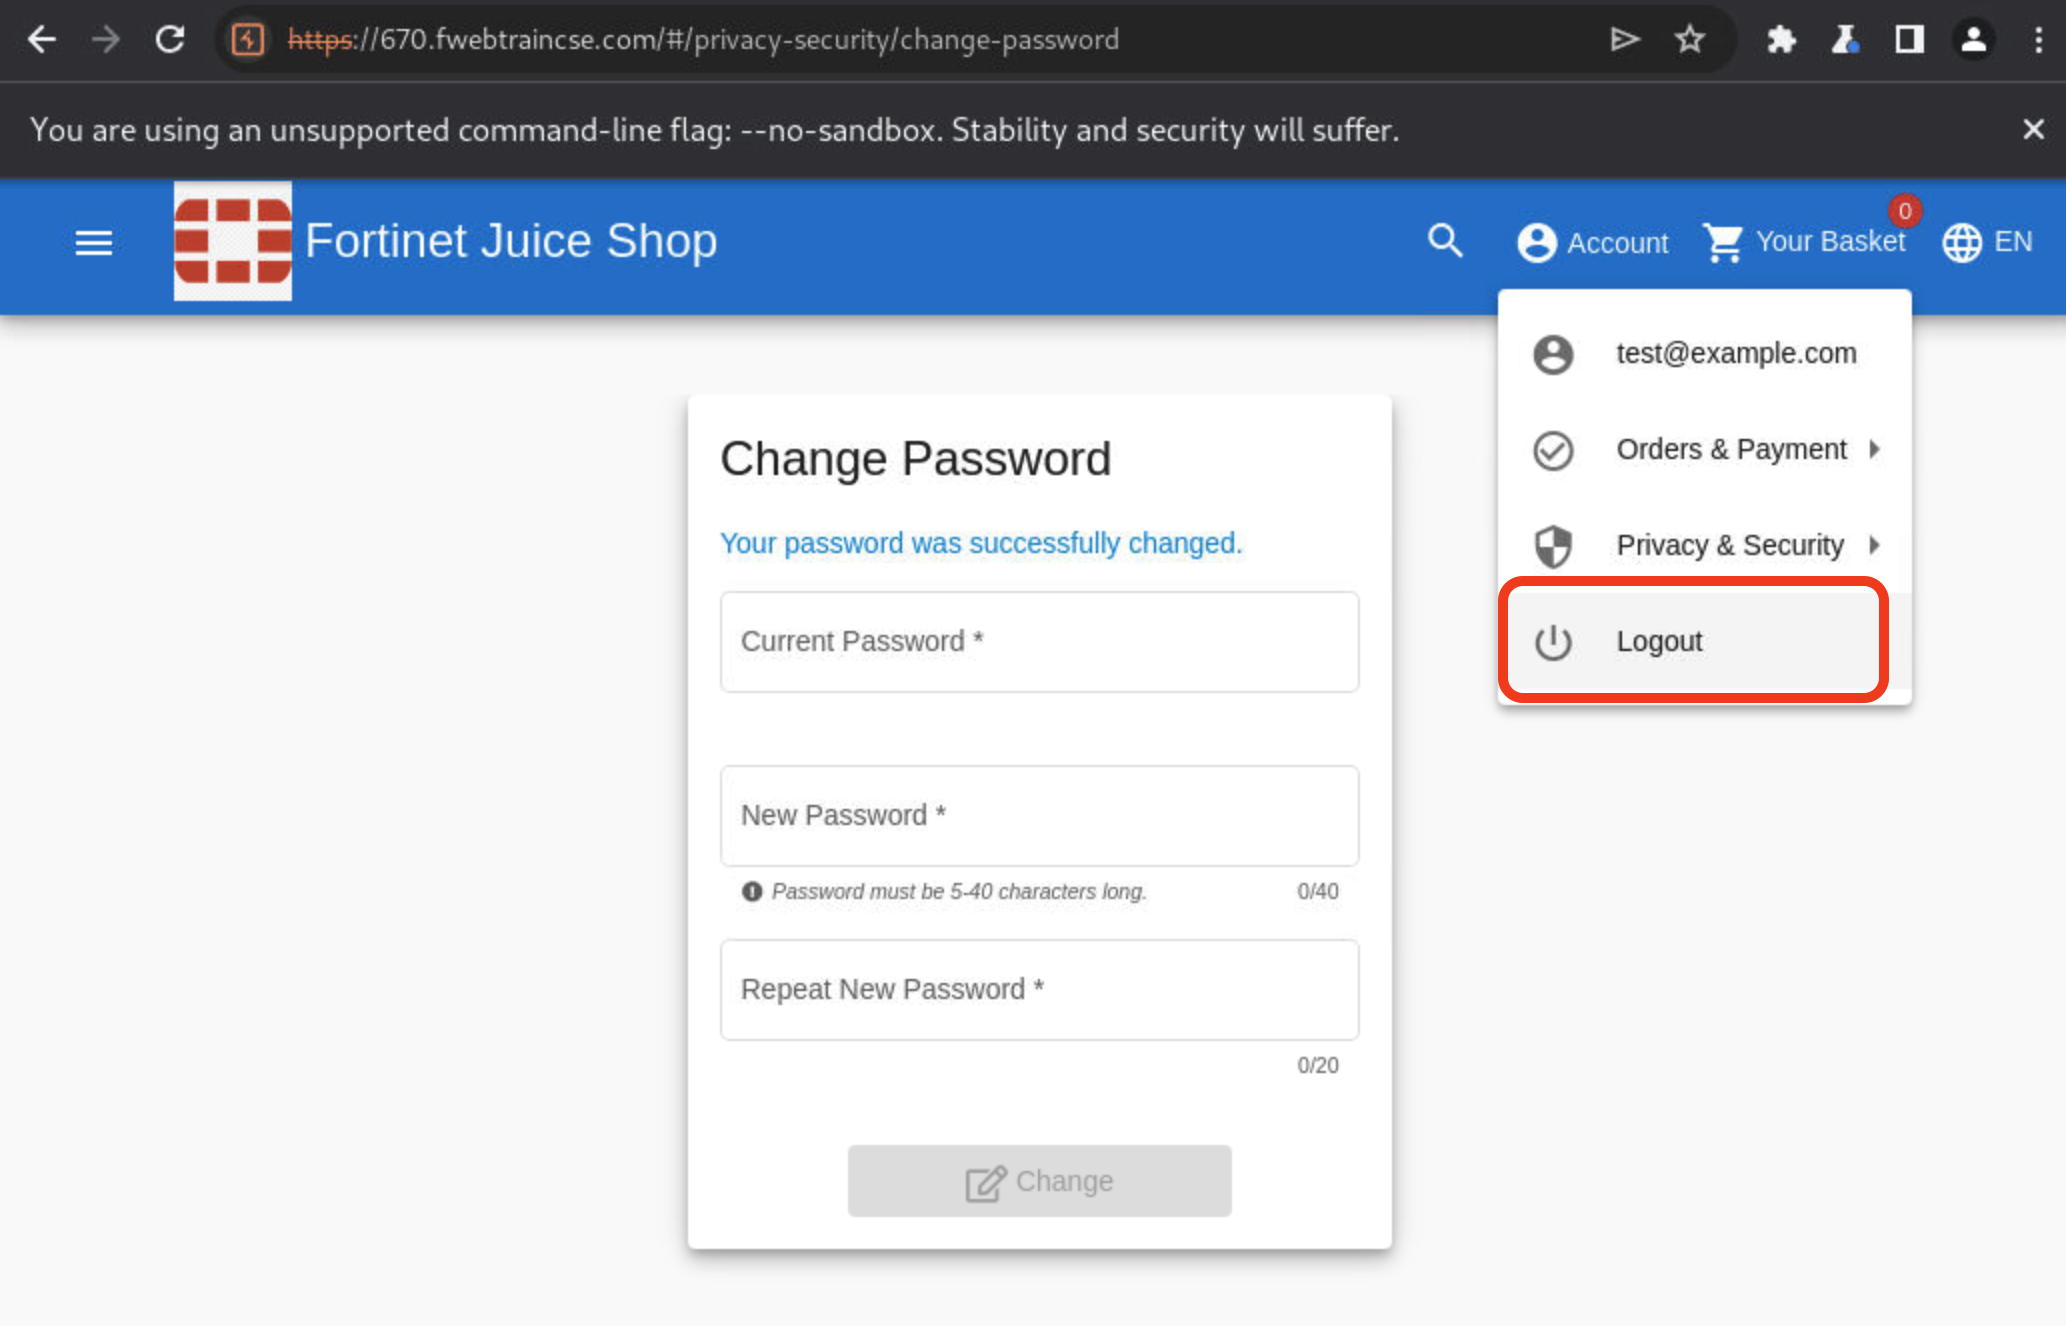
Click Change
Once changed we can see your password was successfully changed dialog.
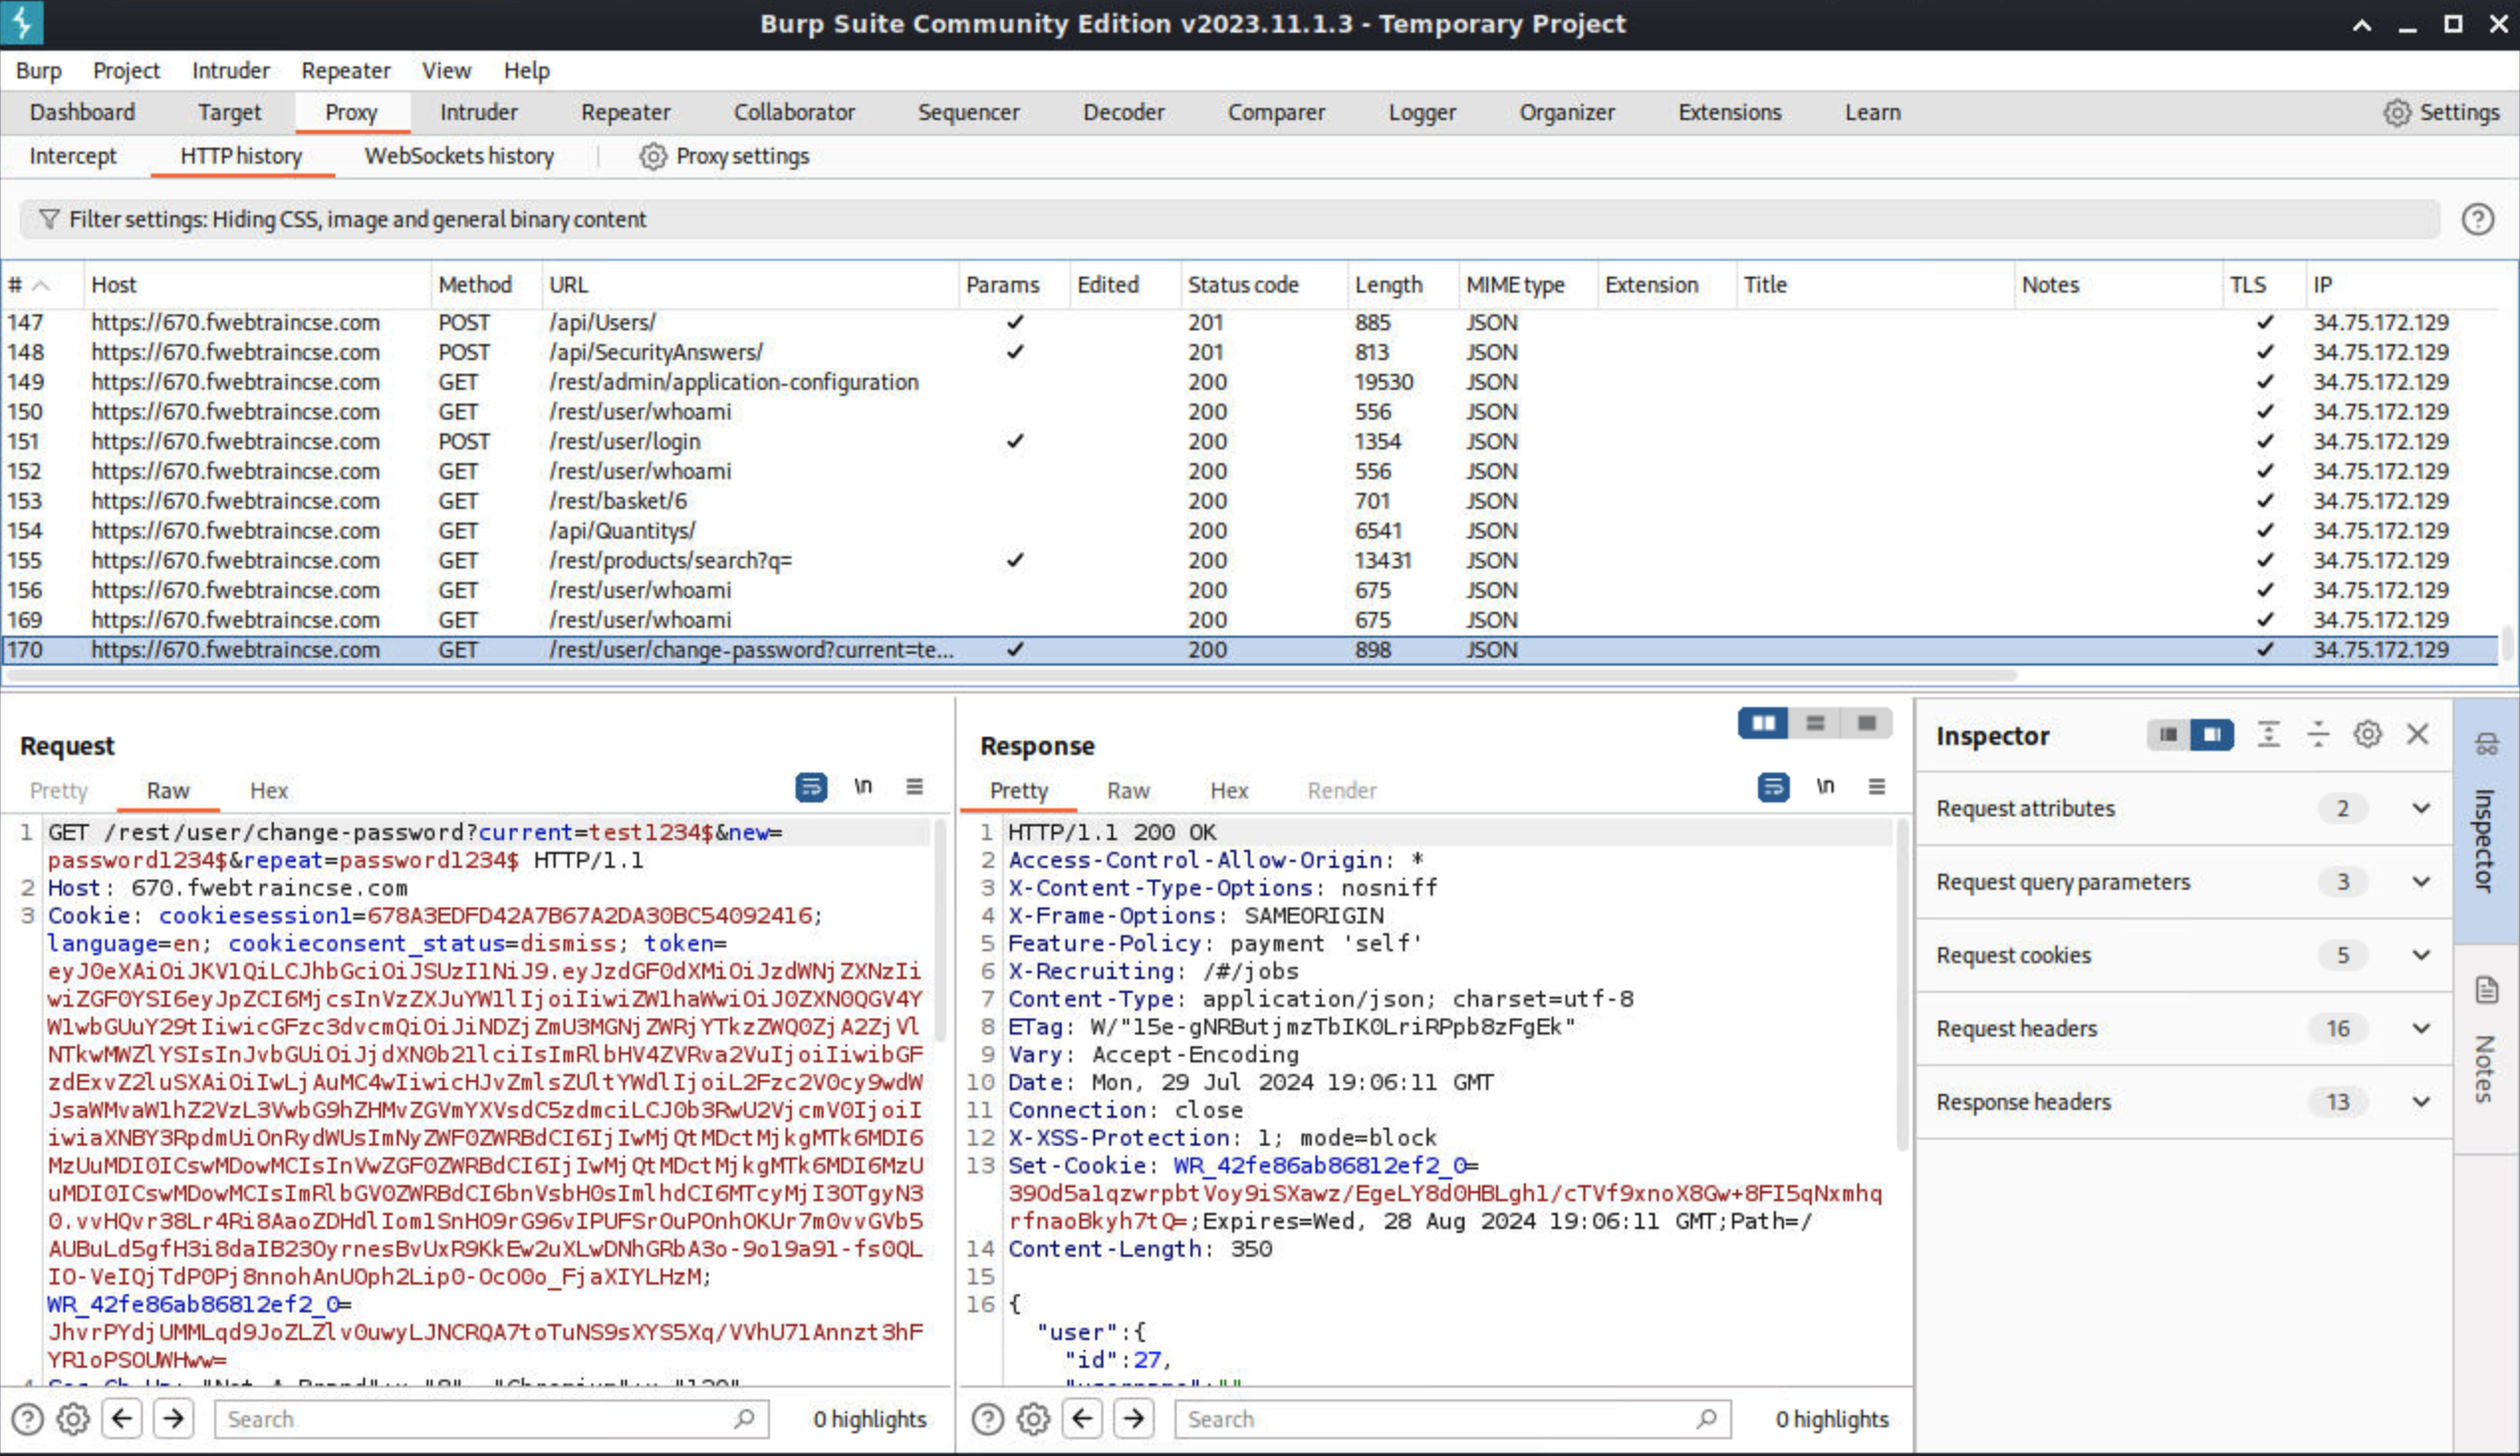
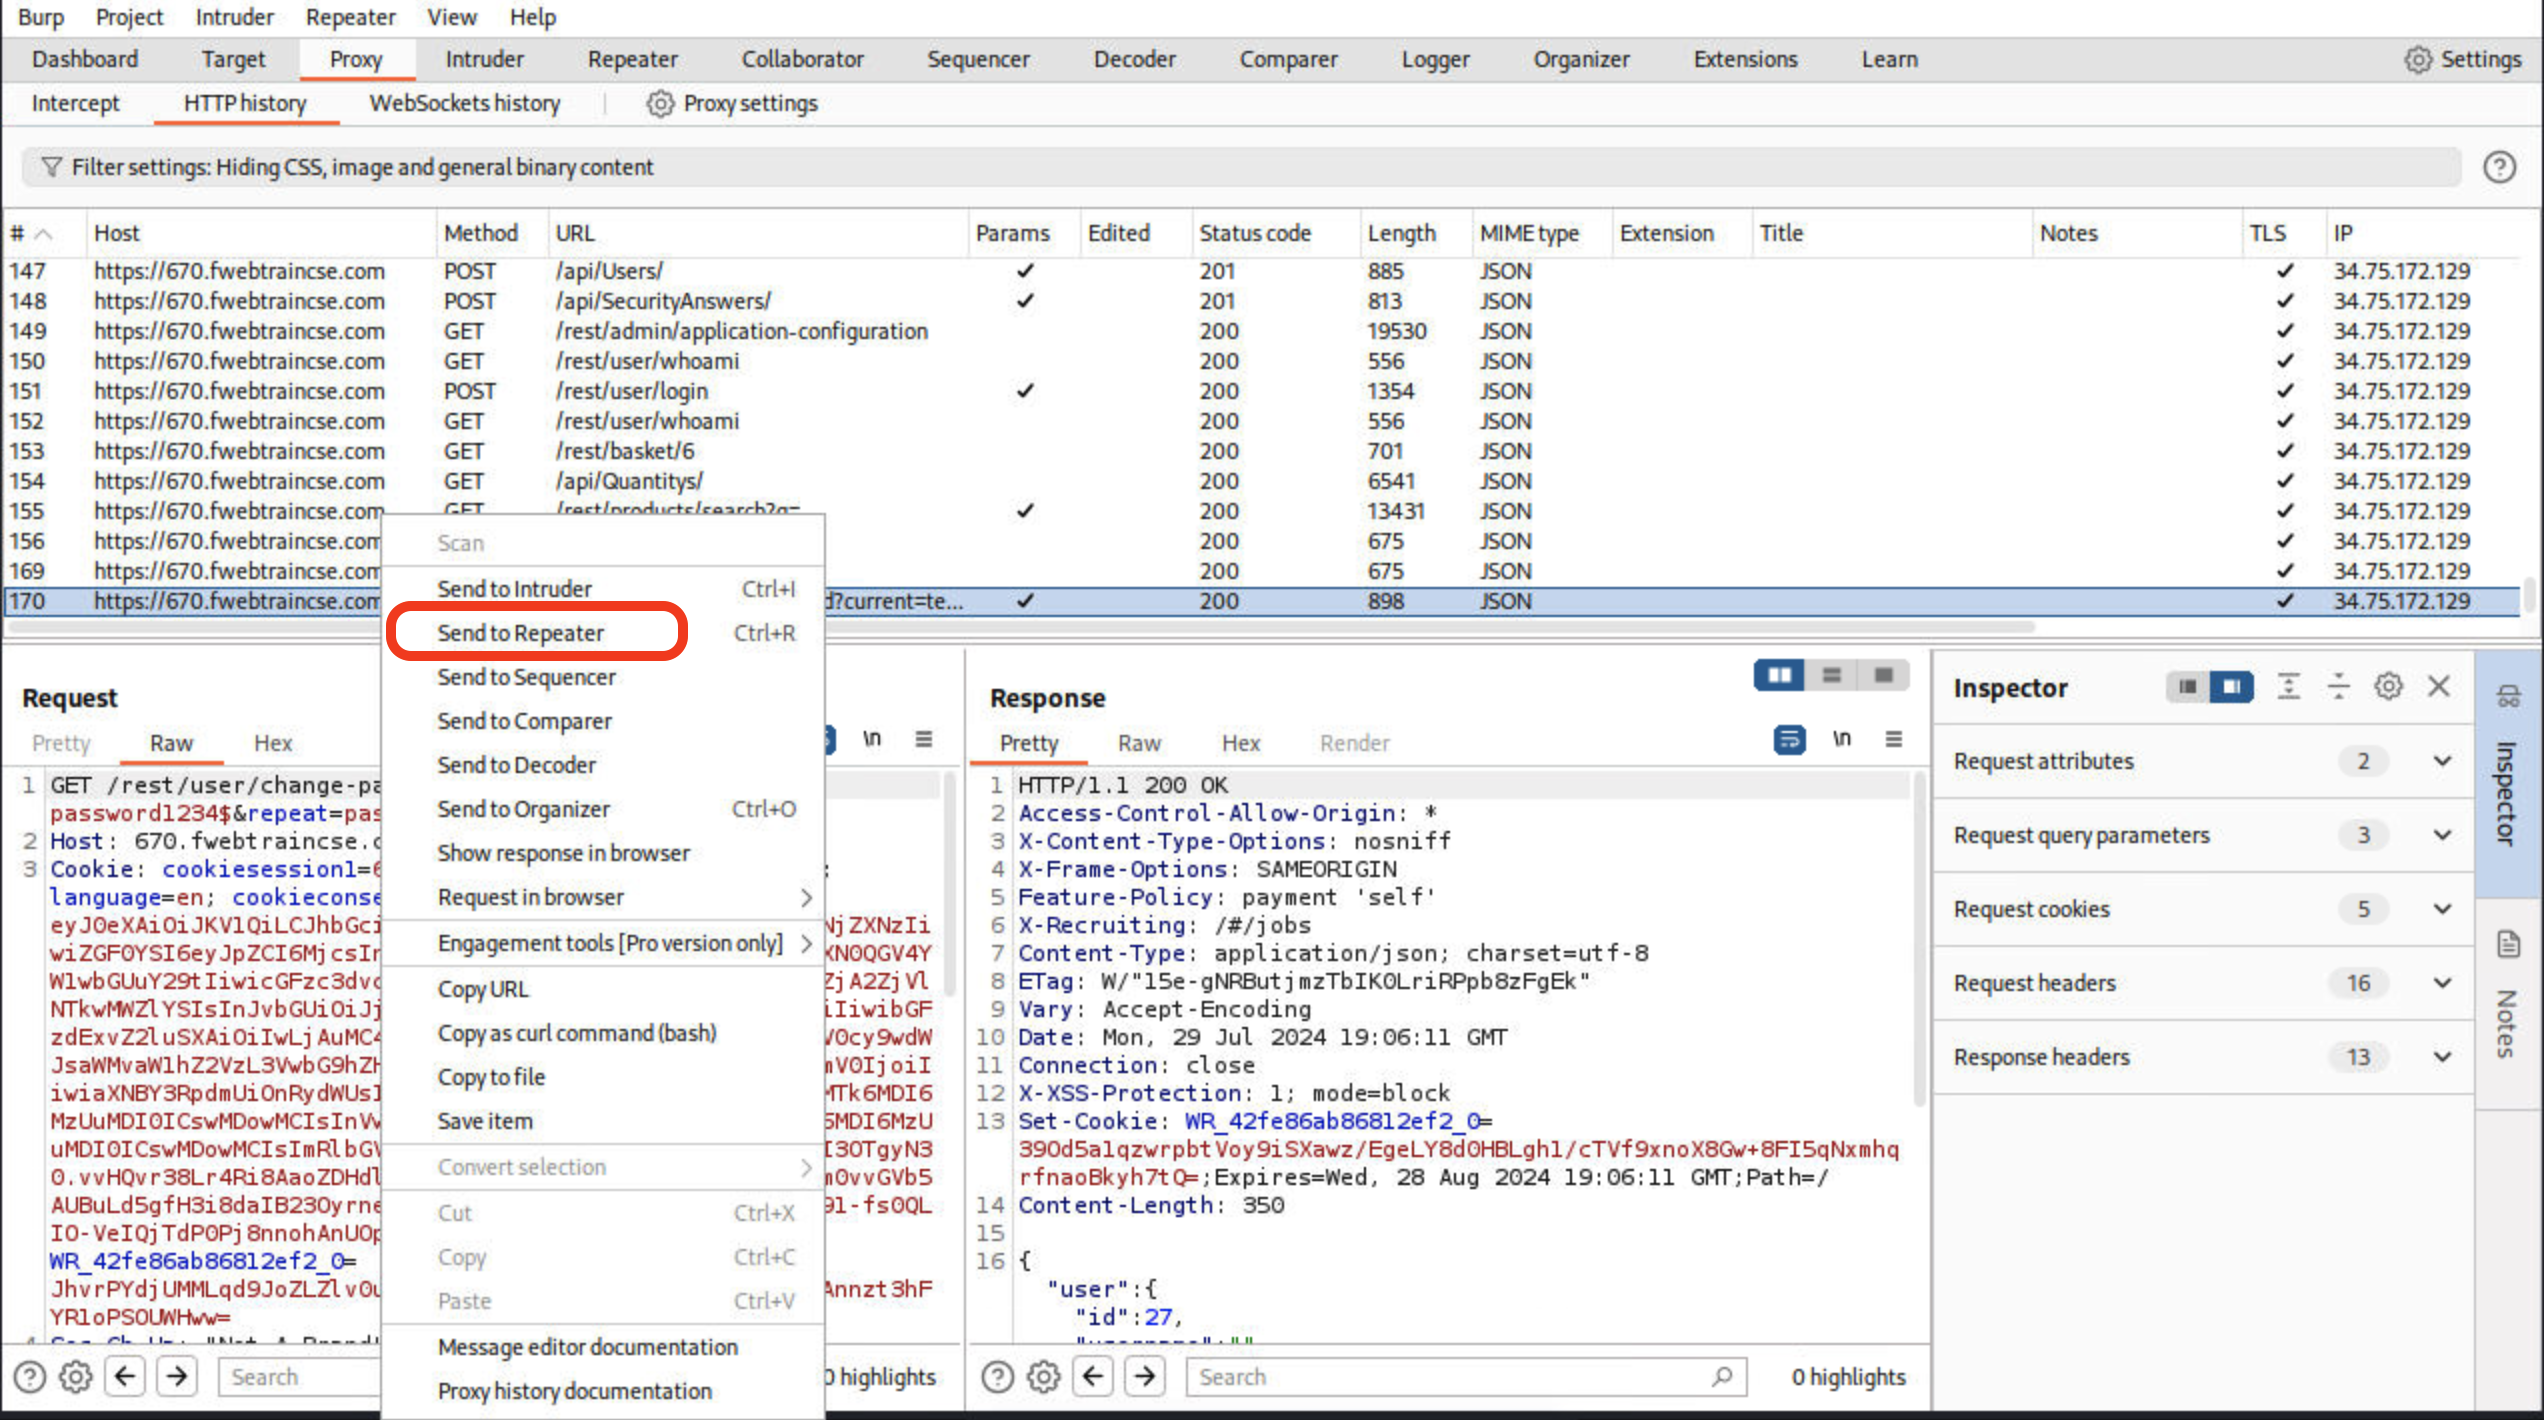
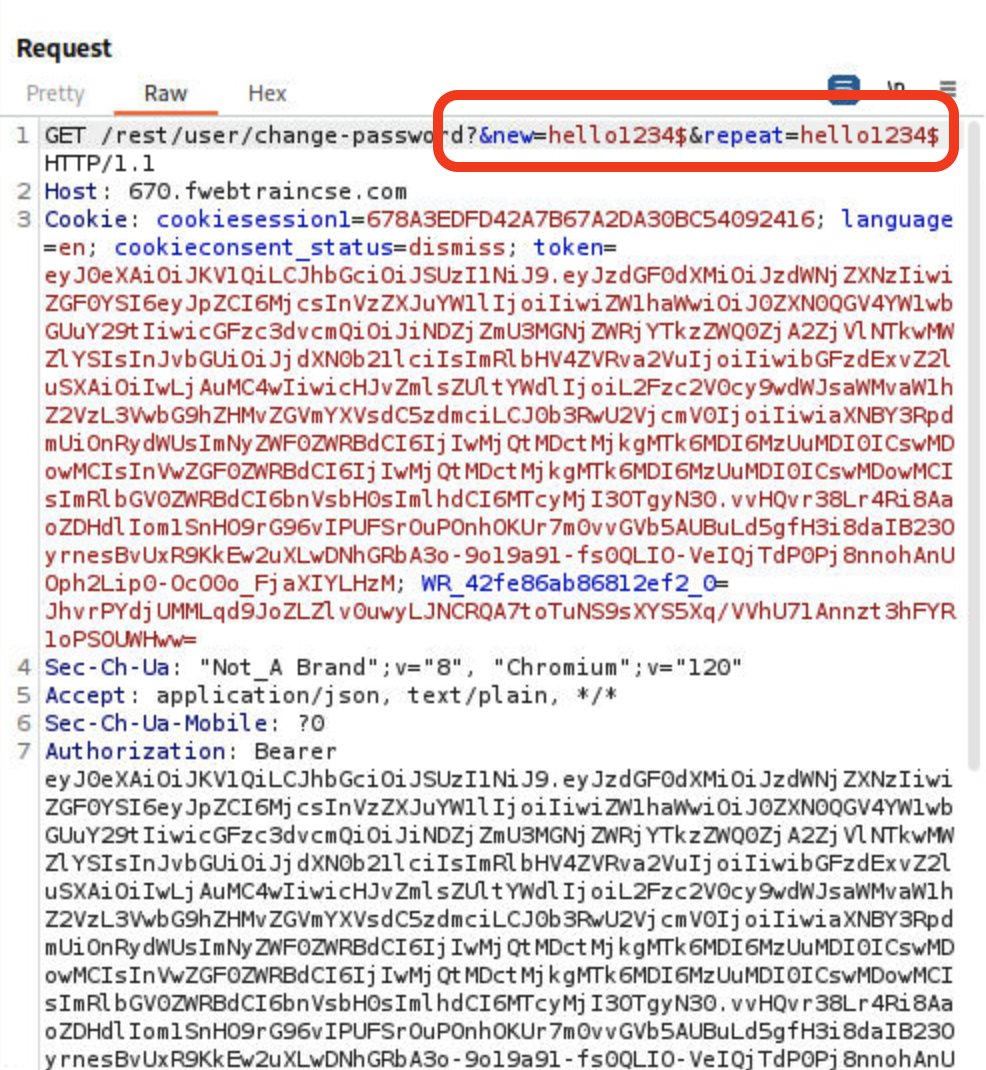
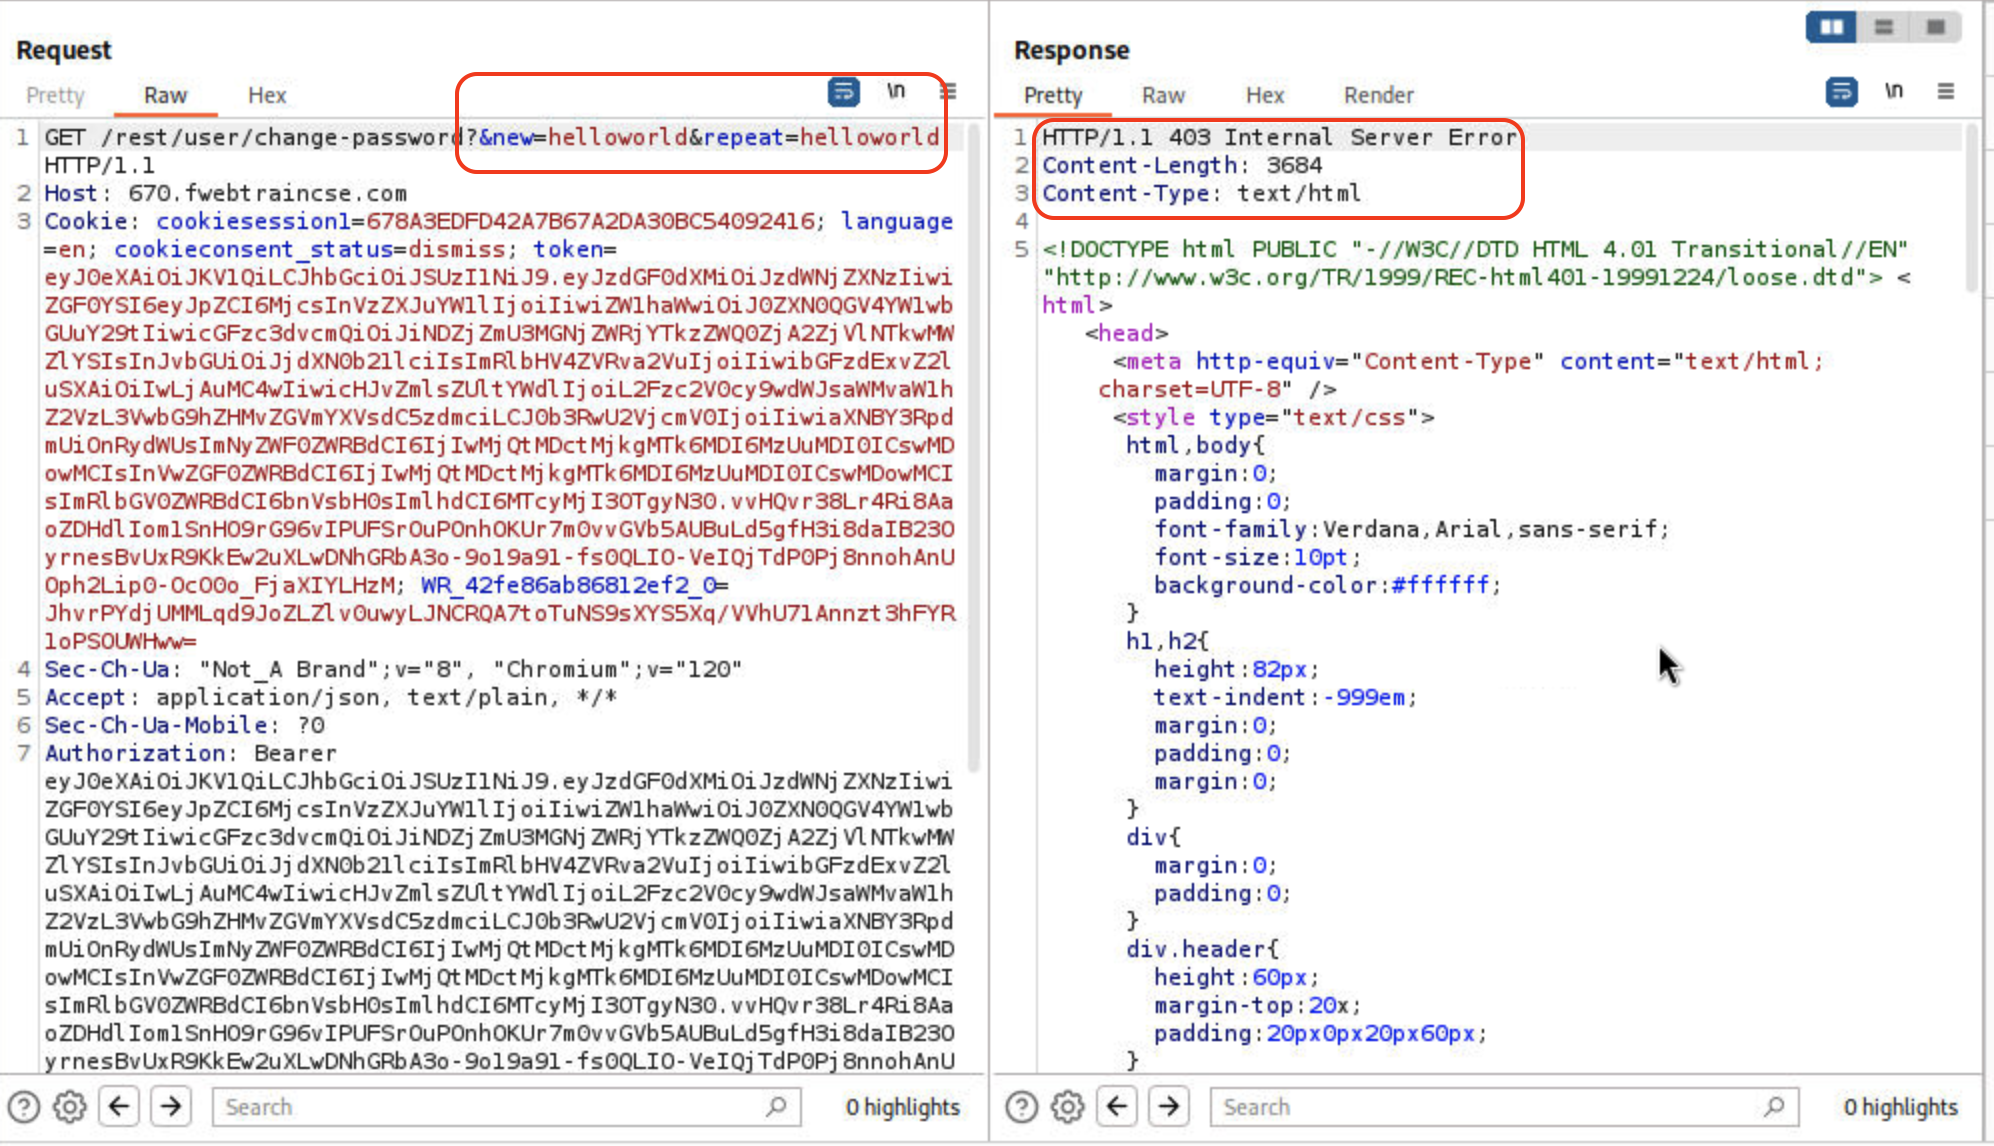
Go back to Burpsuite > Proxy > HTTP History and Scroll down to the end to see the last HTTP call made which is the /rest/user/change-password. Right-click on the change-password GET call and select send to repeater.
Click on the Repeater tab to see the change password request. The Raw request shows the current password and new password we updated.
Execute a Cross Site Request Forgery password change attack!
Remove the current password field from the request
Update the request to reflect only new and repeat password using: hello1234$
Your request should look like below:
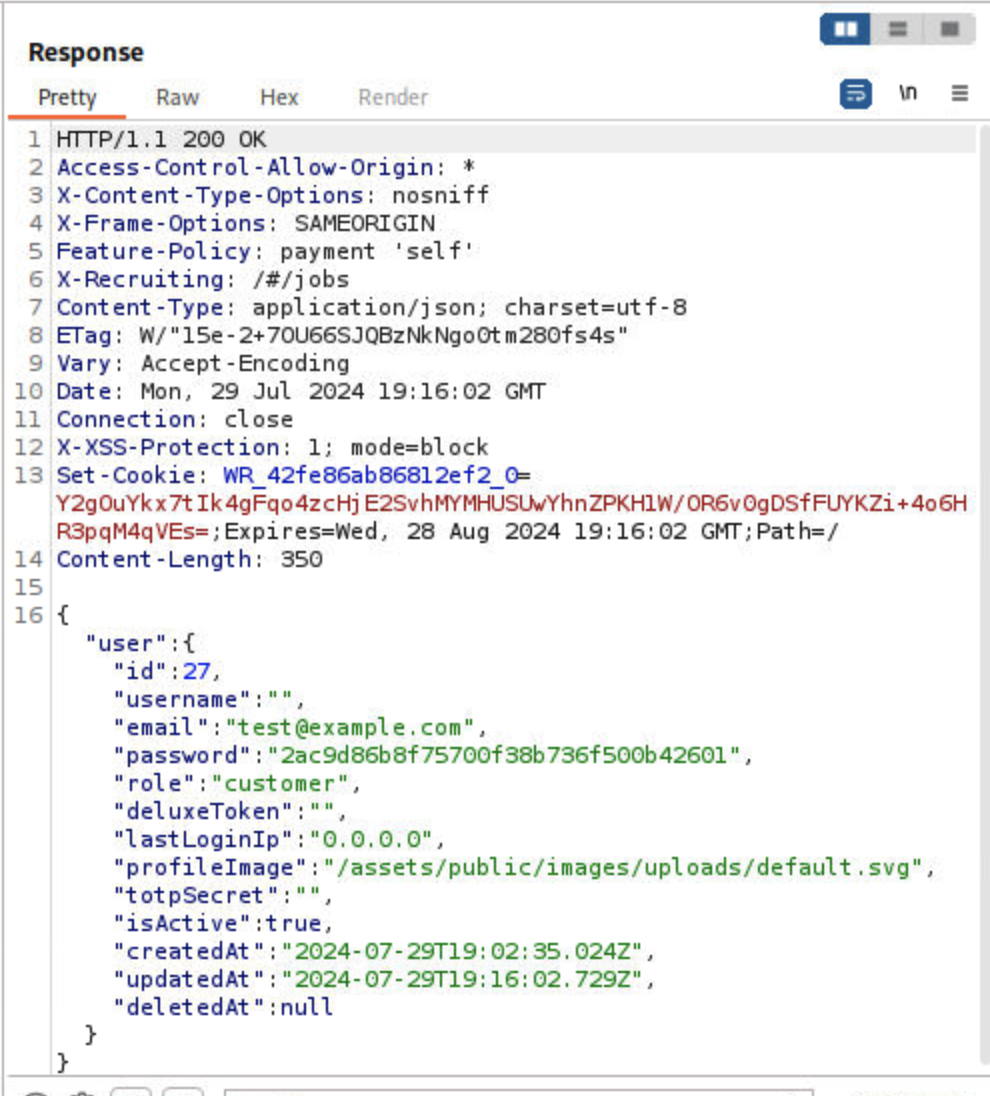
Click Send after the request is updated.
Response is a 200 OK meaning that call is successful.
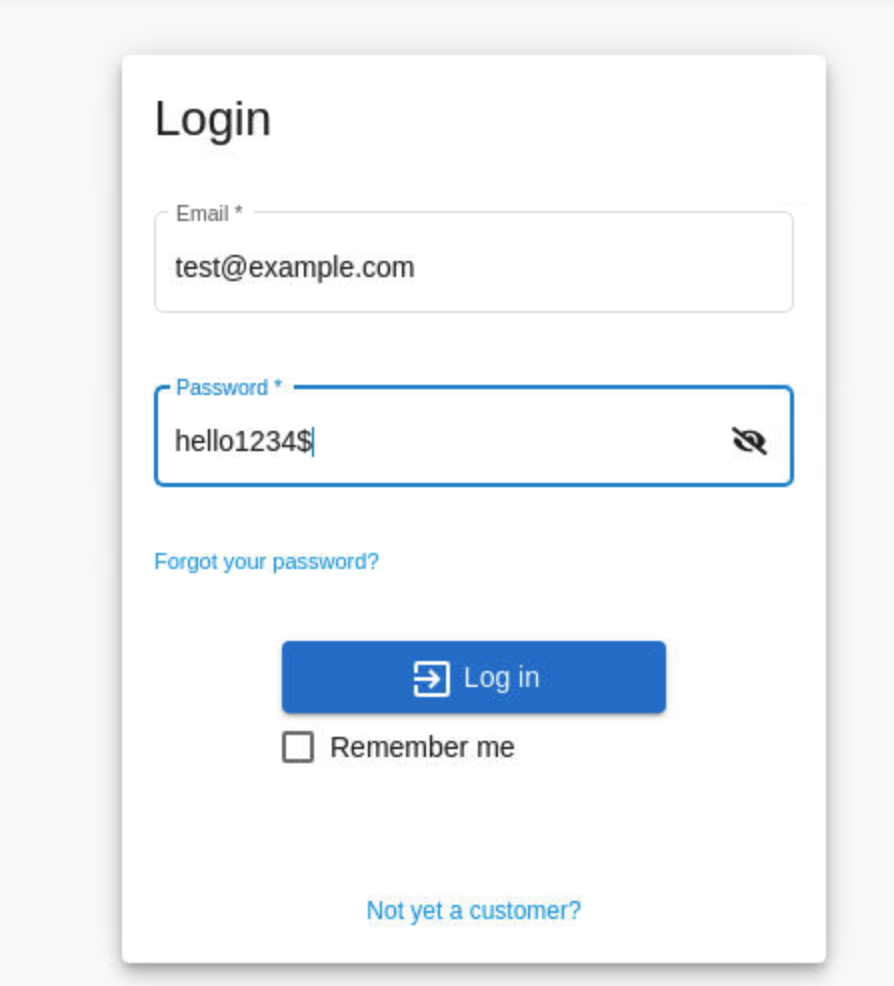
Verify by going back to juiceshop, account login. Logout if already logged in.
Account > login
email: test@example.com
password: hello1234$
Click Log In
As we can see with successfully login using the new credentials, our CSRF attack was successful!
Now login to FortiAppSec Cloud
Be sure to click on your allocated application.
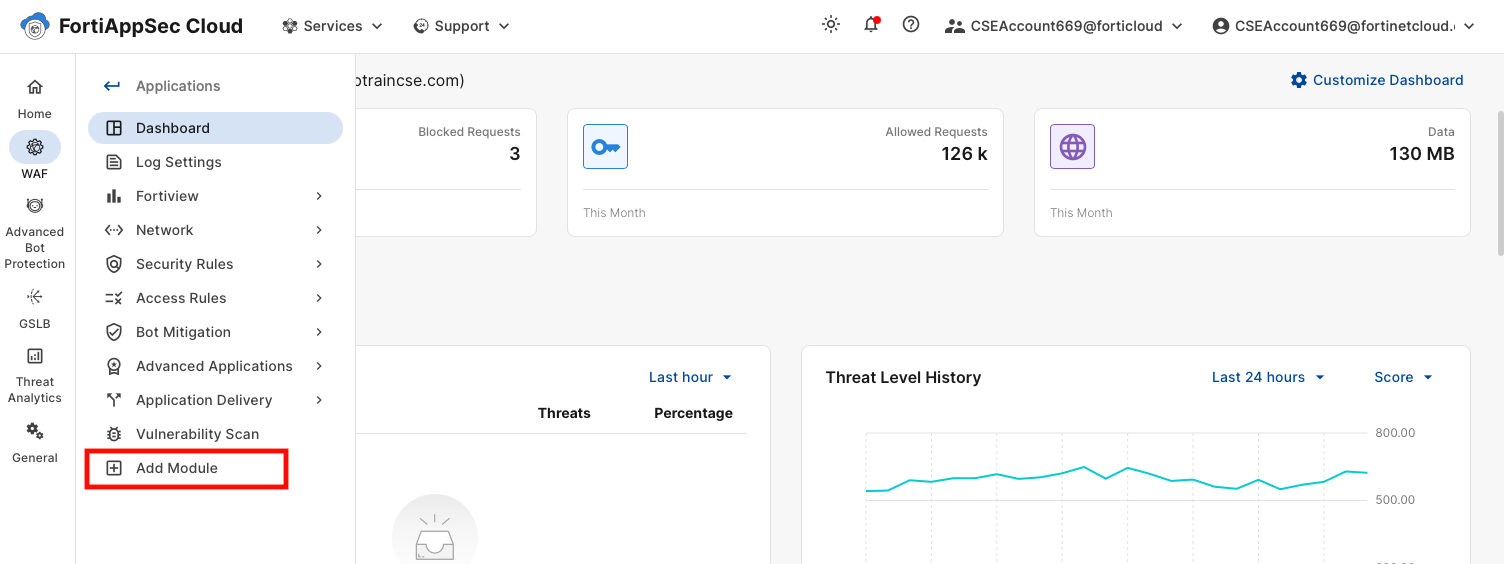
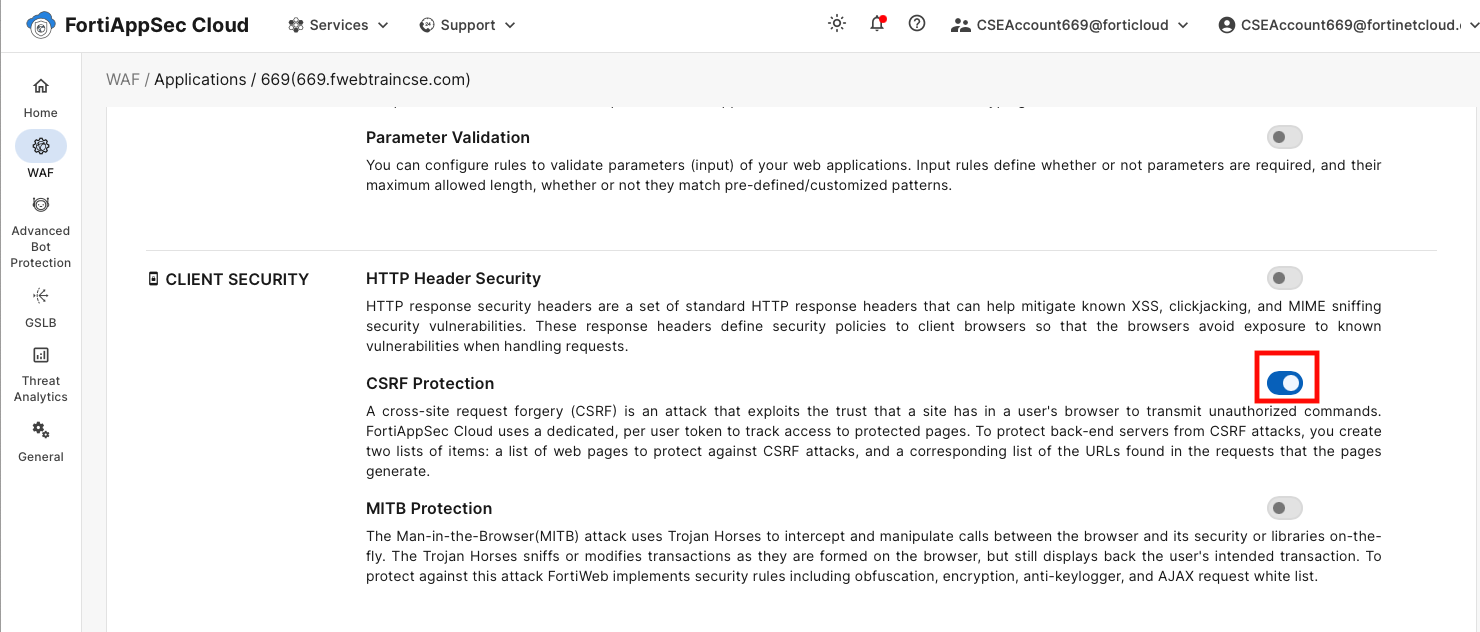
Scroll down to Waf->Add modules at the bottom. Add CSRF protection under Client Security Module and click OK
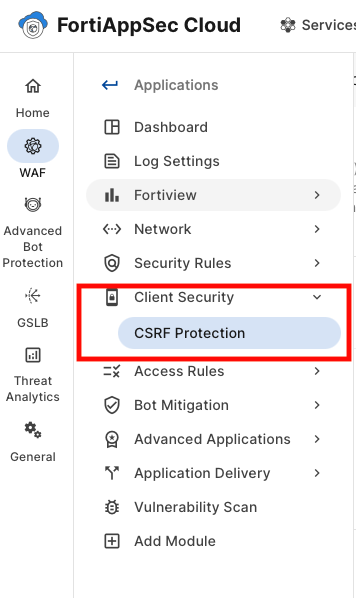
In the Application View > WAF > Client Security > Click on CSRF Protection.
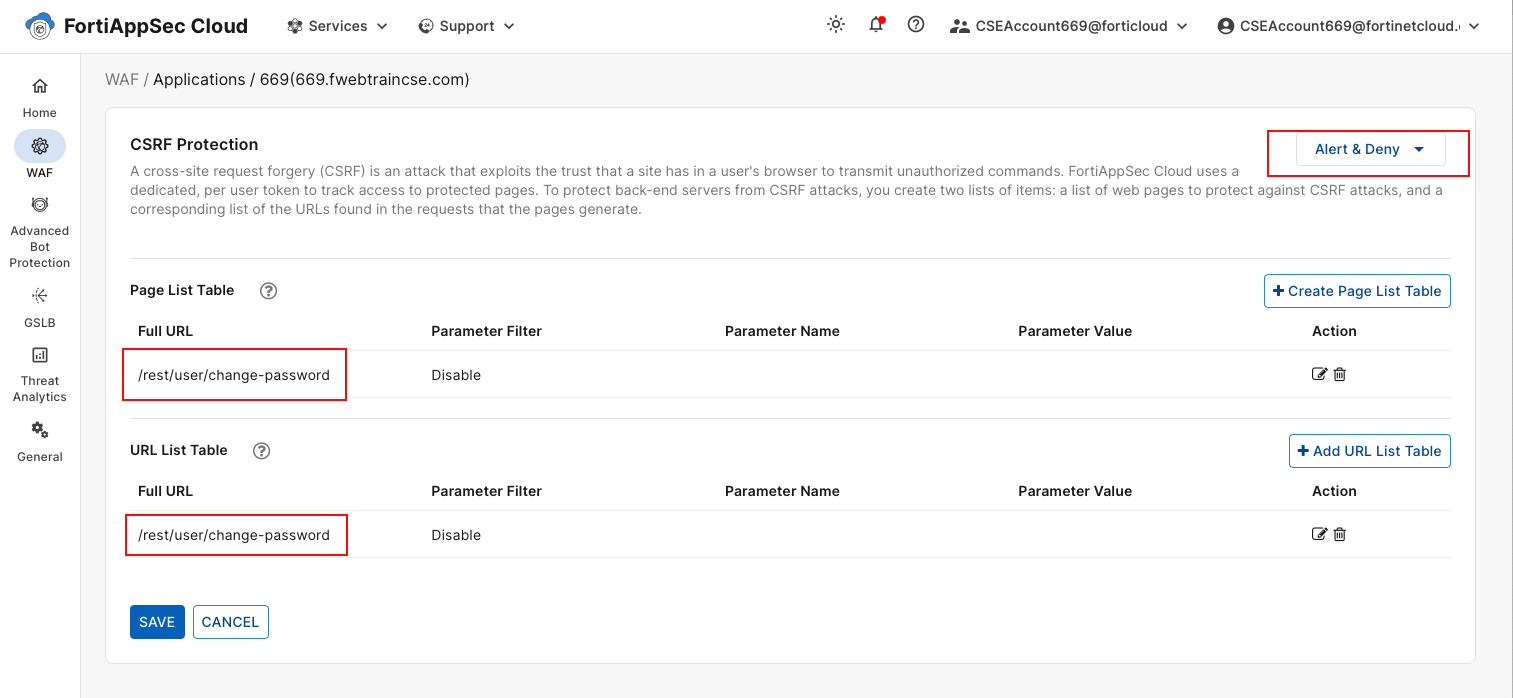
On both Page List Table AND URL List Table, Add the URL /rest/user/change-password
Update the Action to Alert and Deny and click Save. the Module takes ~3 minutes to be in effect.
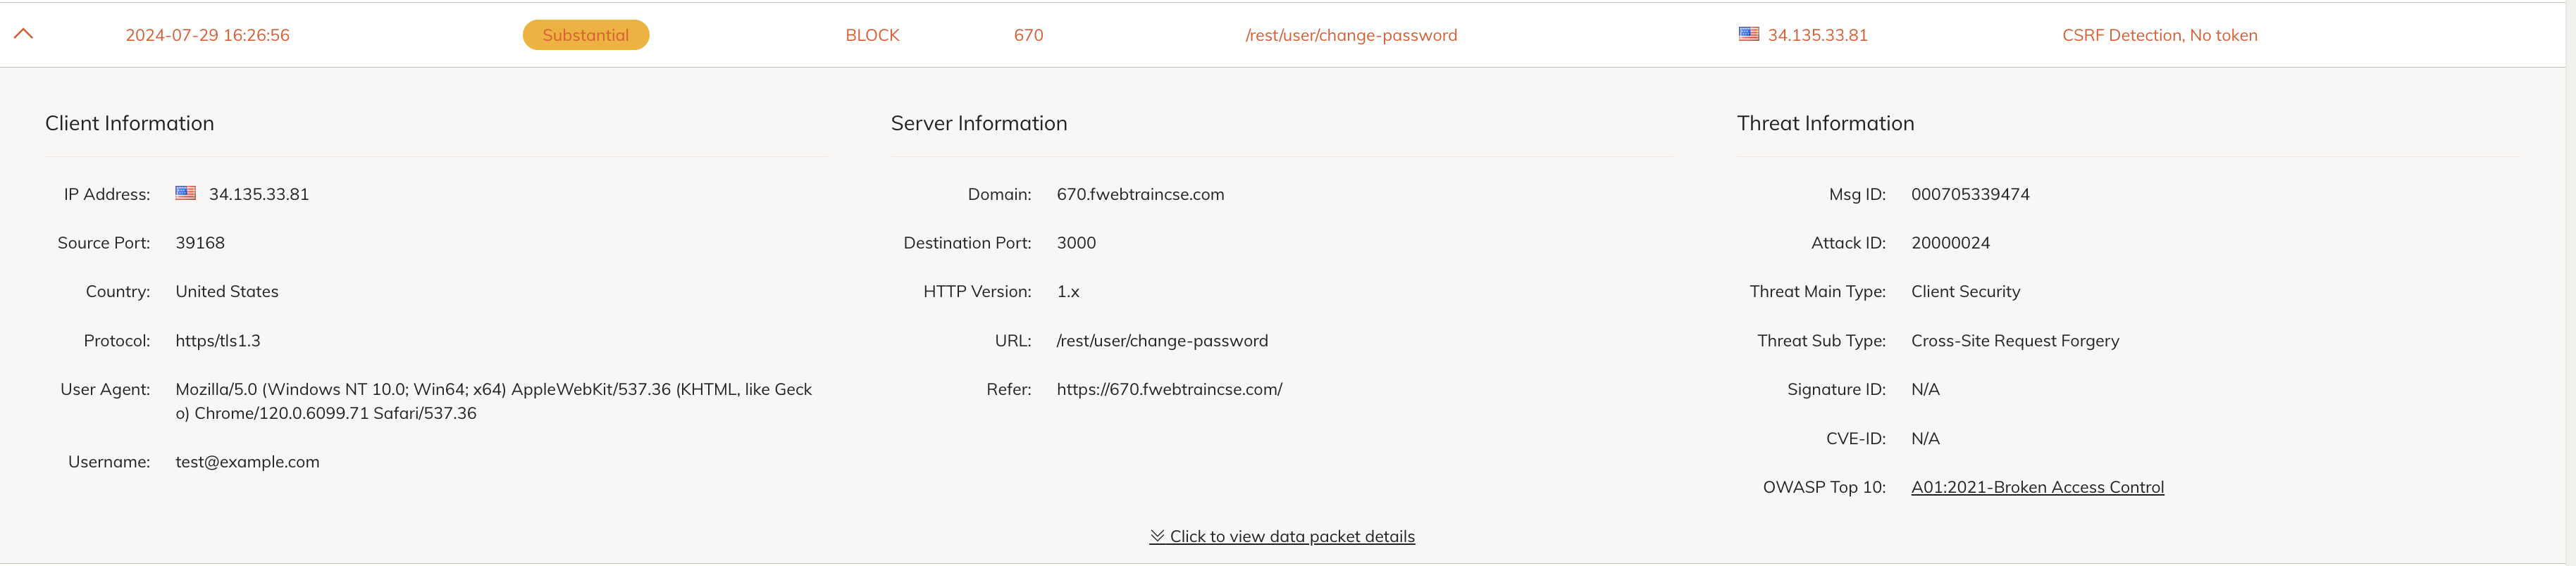
Once done, repeat the attack again with Password of your choice, and you should see a block message.
On FortiAppSec cloud, Threat Analytics > Attack Logs > There is a CSRF attack log.
Additional Attacks Review
Review
In this module, we used Burp Suite and SQLMap to both discover and exploit vulnerabilities in Juice Shop.
Application Protection Quiz
Ch 5: API Protection
API Protection is one of the fastest growing WAF use cases. This section will introduce you to API Gateway as well as API Schema Validation.
Subsections of Ch 5: API Protection
Task 1: Call API with Postman
Goal
Call Juice Shop API with Postman
Task
Configure Postman and GET information about Apple Juice from the product page
Verify task completion
The Postman Request should successfully return data for the Apple Juice product
Open postman by opening a new terminal (not bash) and type postman at the prompt. This should start the postman application.
Warning
If Postman doesn’t open, it’s likely due to the terminal still using Bash. To exit bash, simply type exit
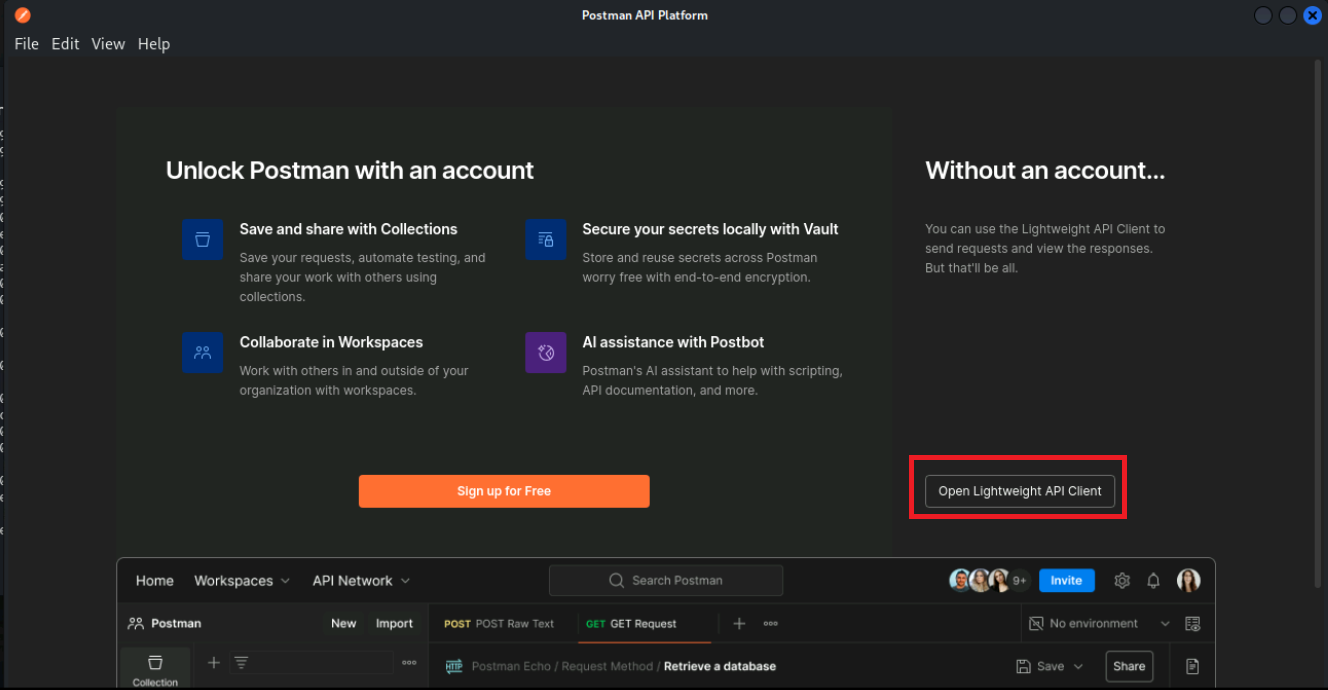
When postman opens, select Continue without an account
Now select Open Lightweight API Client
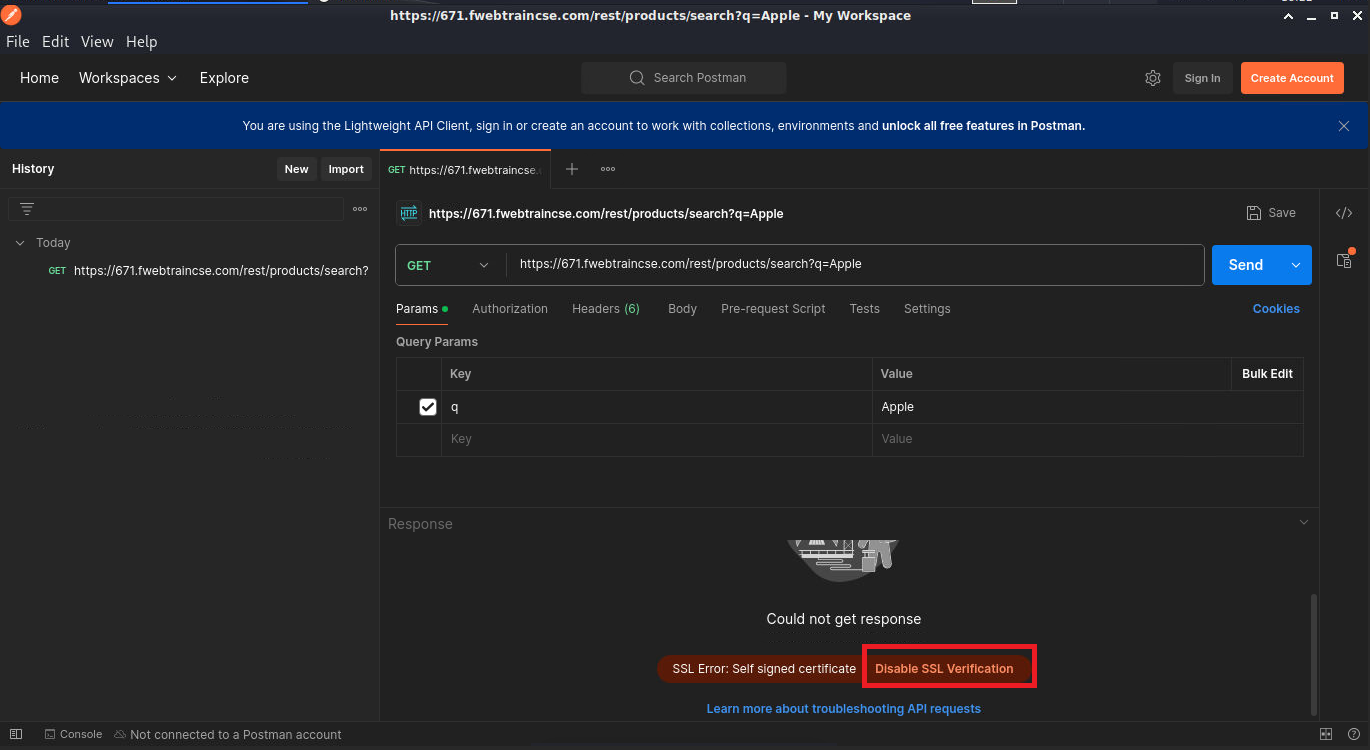
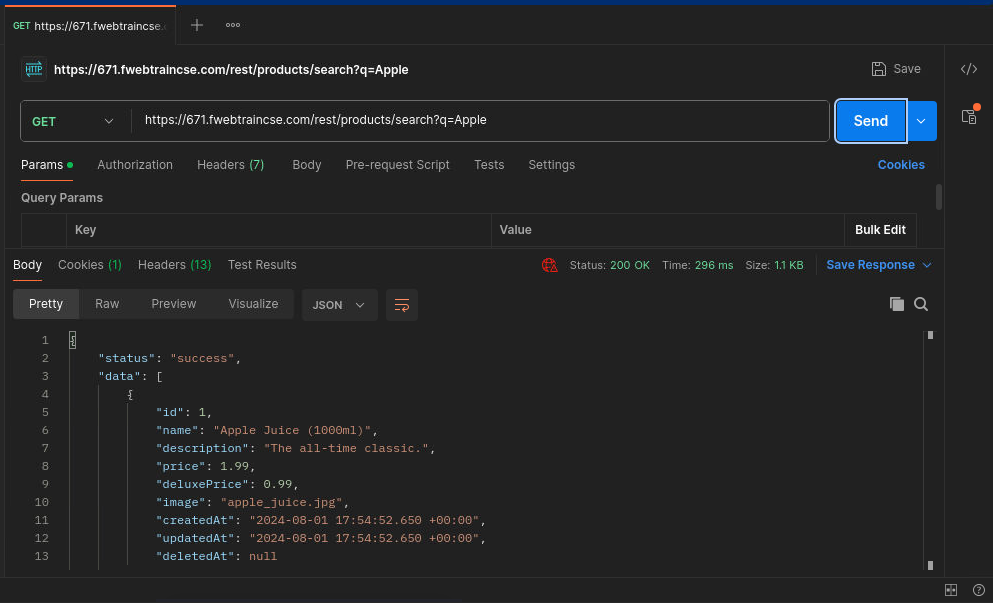
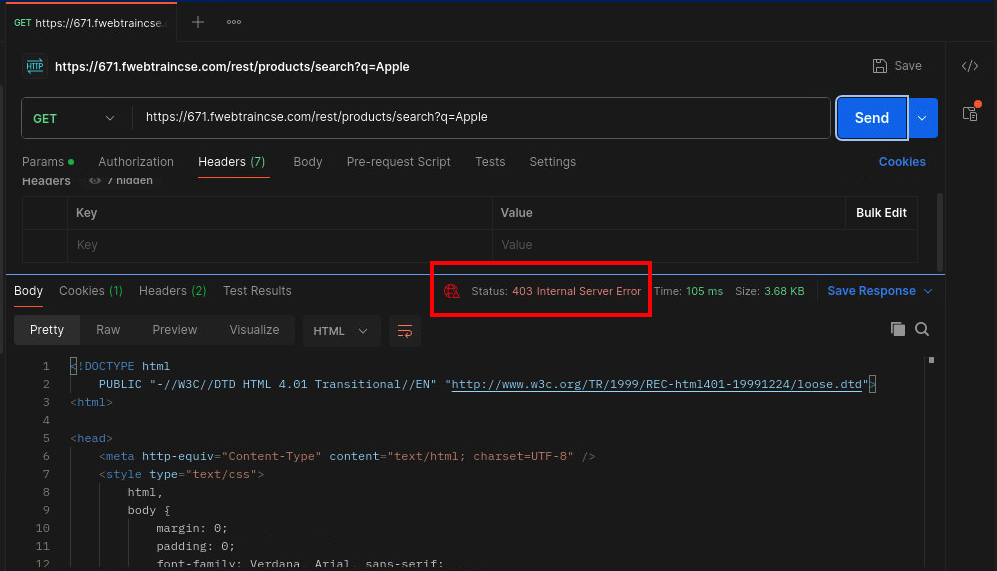
Now, let’s make an HTTP GET API call to search for Apple Juice. Use the following URL, ensuring you replace your studentID.
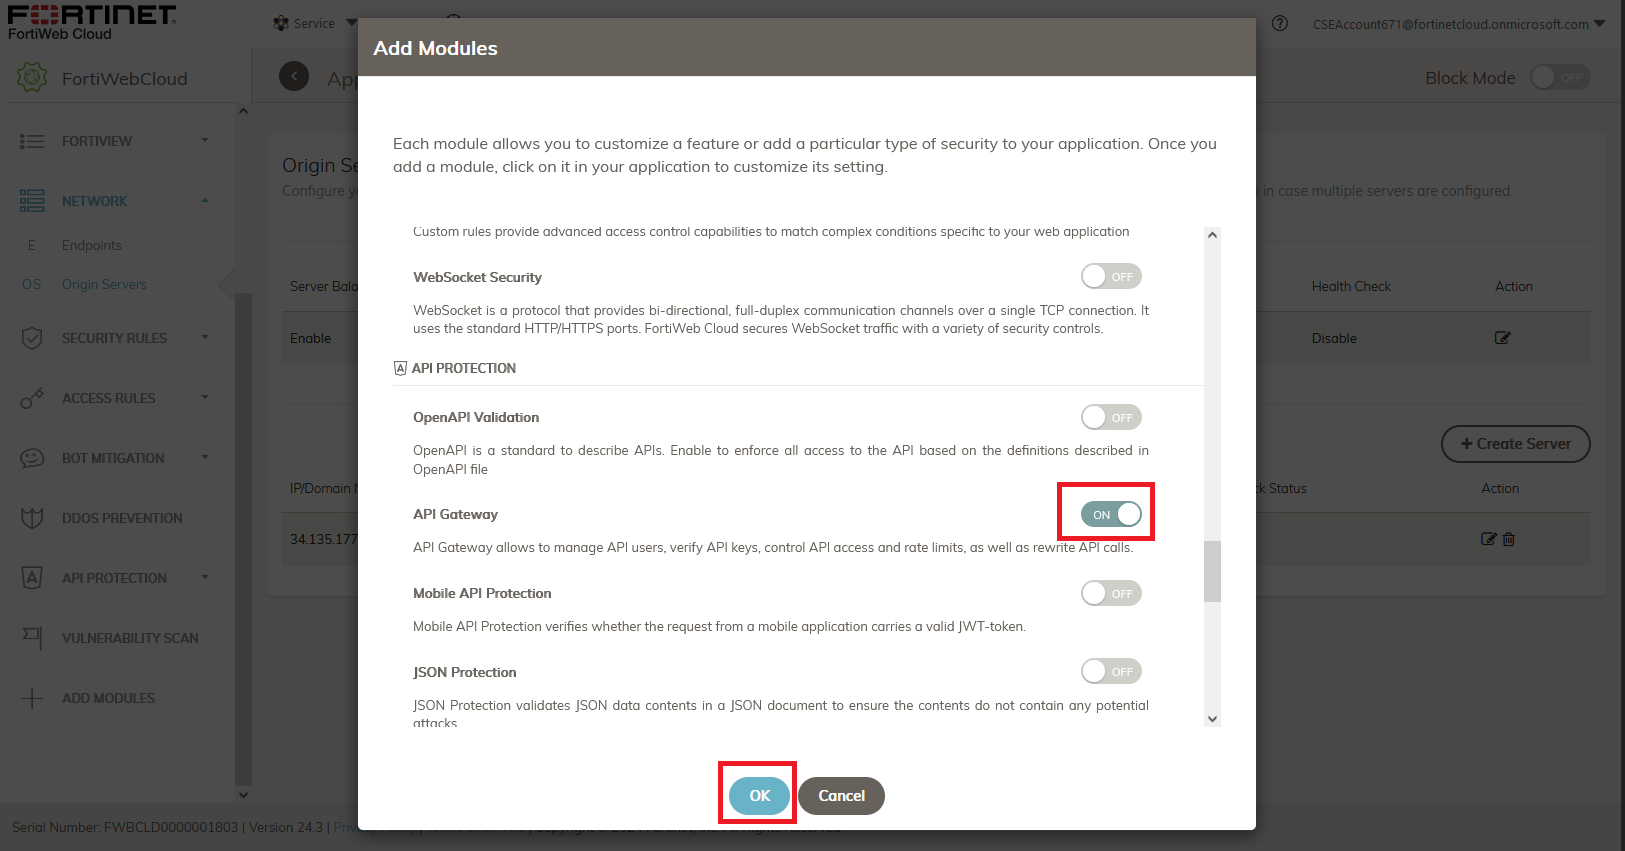
From the FortiAppSec Cloud Console select your application and in the left pane, select Waf >ADD MODULES. Scroll down and turn on API Gateway under API Protection then Click OK.
Now API PROTECTION should show up on the left side of the screen. Under API PROTECTION, select API Gateway
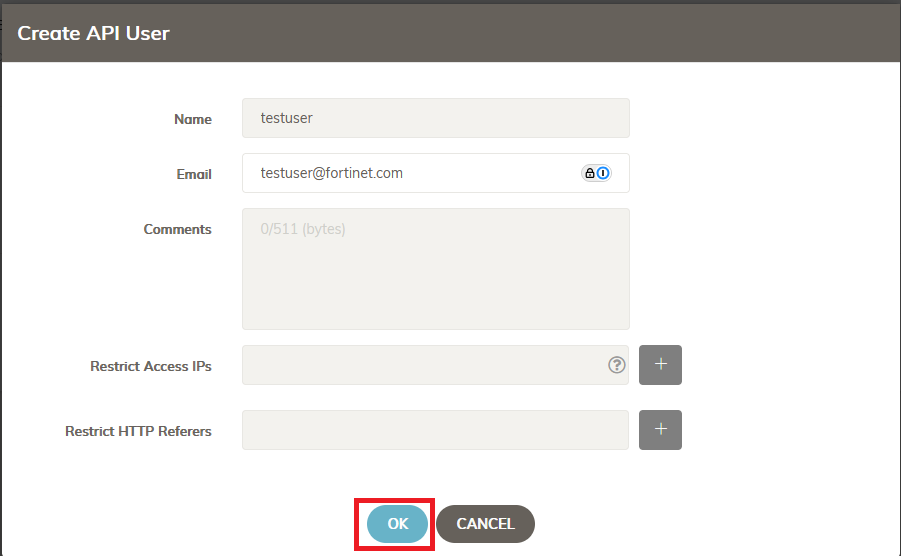
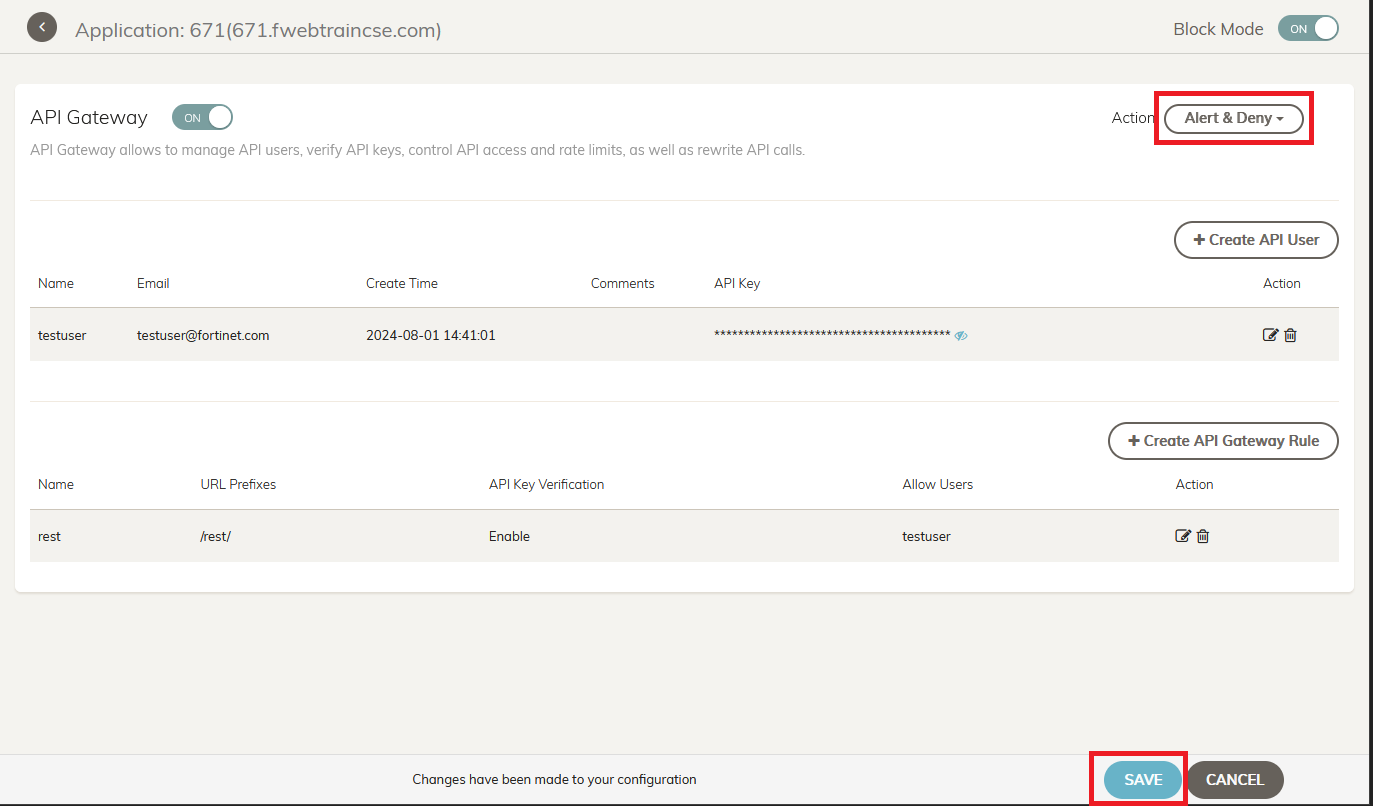
Click to Create an API User. Add testuser as Name and testuser@fortinet.com as Email address Then Click OK
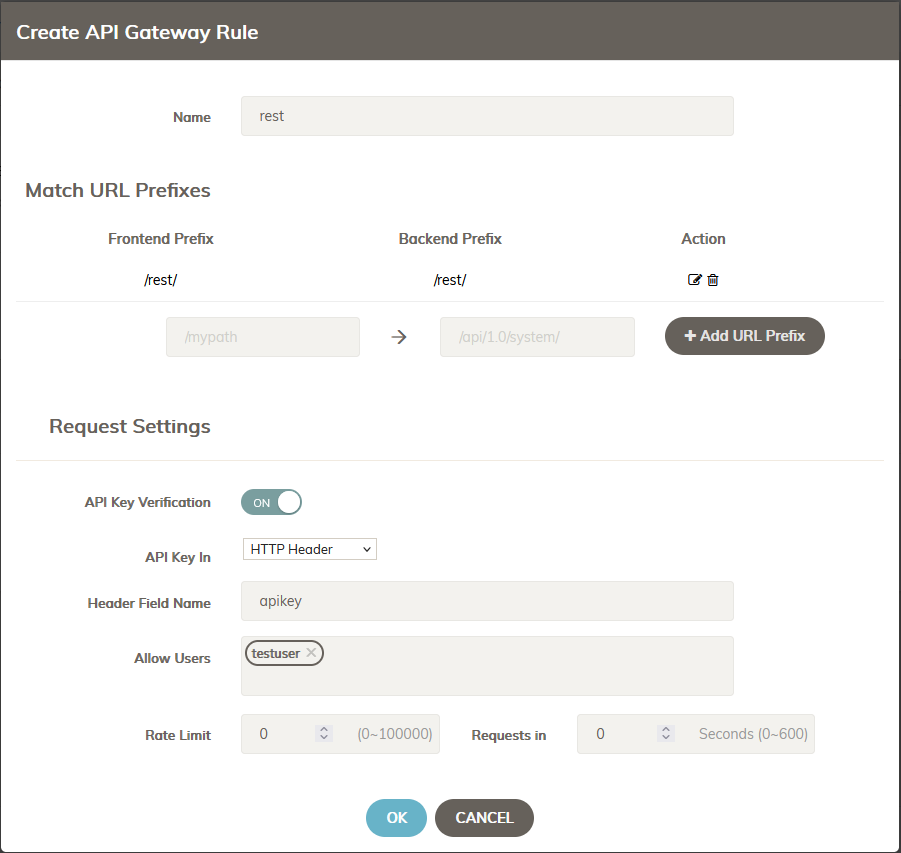
Next click Create API Gateway Rule.
Name: choose a name such as rest
For both “Frontend” and “Backend”, enter /rest/ then click Add URL Prefix
turn on API Key Verification
choose HTTP Header for API Key In
for Header Field Name enter apikey
for Allow Users, select the user you created in step 3
leave the Rate limits at default
select OK
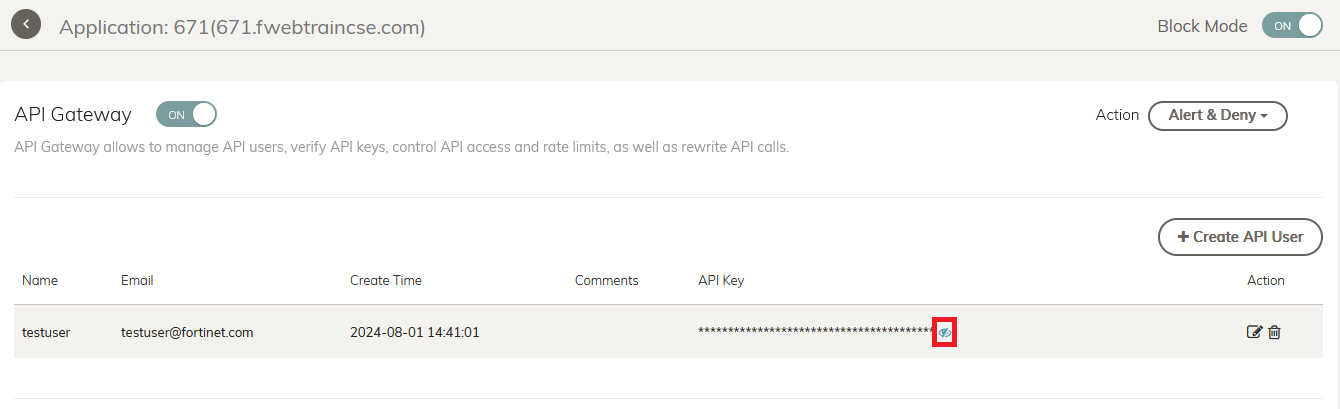
You will need to click Save at the bottom right. Now you should have an API key. Click on the eye icon to display the key. Copy it and put it into a note pad.
Ensure that the action is set to Alert & Deny and then click Save
Test API gateway
Back on Kali Desktop, In Postman, click Send again to re-test your api call. It should return status 403 and return a long error page ending with “Please contact the administrator…”
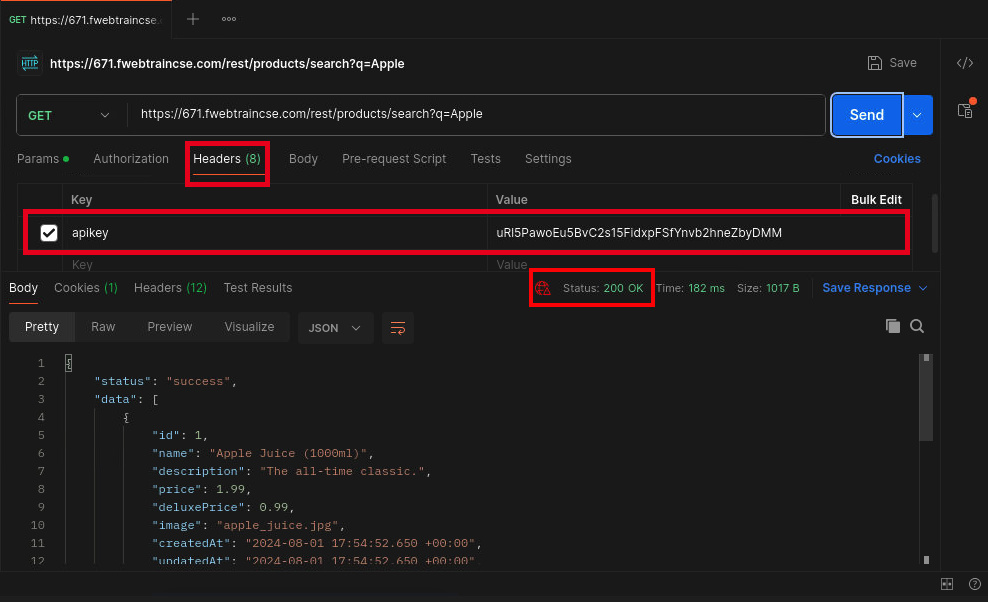
Now, let’s add a key
select Headers under the URL bar.
enter apikey for Key
enter the previously copied key for Value
click the empty box next to apikey to send this header
click Send
You should see code 200 and returned data.
Task 3: Schema Protection
Goal
Enable and Test API Schema Protection
Task
Enable OpenAPI validation in FortiAppSec Cloud and then use postman to submit a modified request
Verify task completion
If successful, modified schema request should be blocked by FFortiAppSec
Open API Validation/Schema protection
In this task, we will explore the open API/Swagger based schema protection with FortiWFortiAppSec Cloud. Swagger, now known as the OpenAPI Specification (OAS), is a framework for API development that allows developers to design, build, document, and consume RESTful web services.
FortiAppSec can validate incoming requests against your OpenAPI schema to ensure they conform to the defined structure and data types. This helps prevent injection attacks and other malicious activities.
Download the juiceshop schema file to your local machine by clicking on URL below.
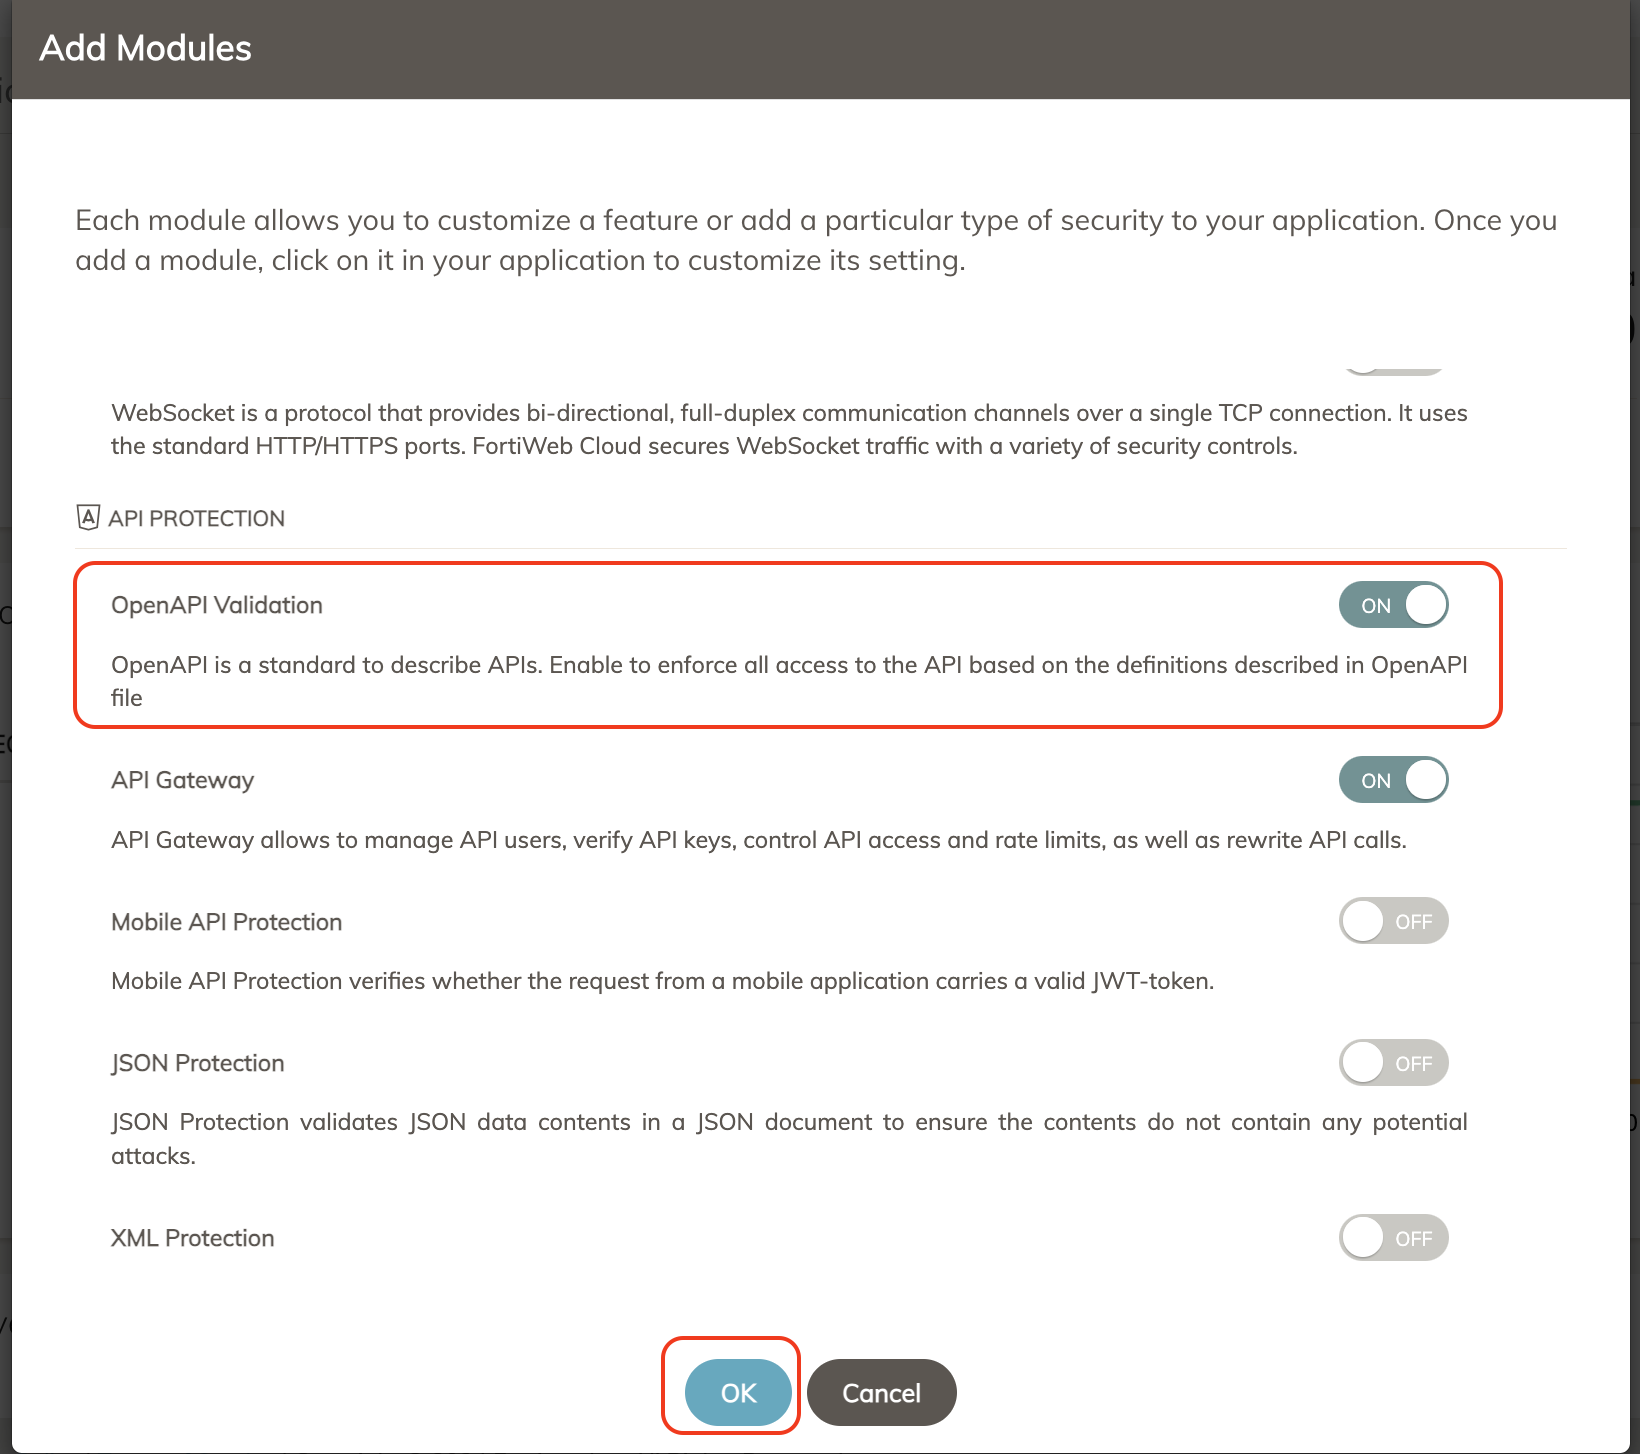
From the FortiAppSec Cloud Console left pane, select ADD MODULES. Scroll down and turn on under API Protection to add OPEN API VALIDATION. Click OK
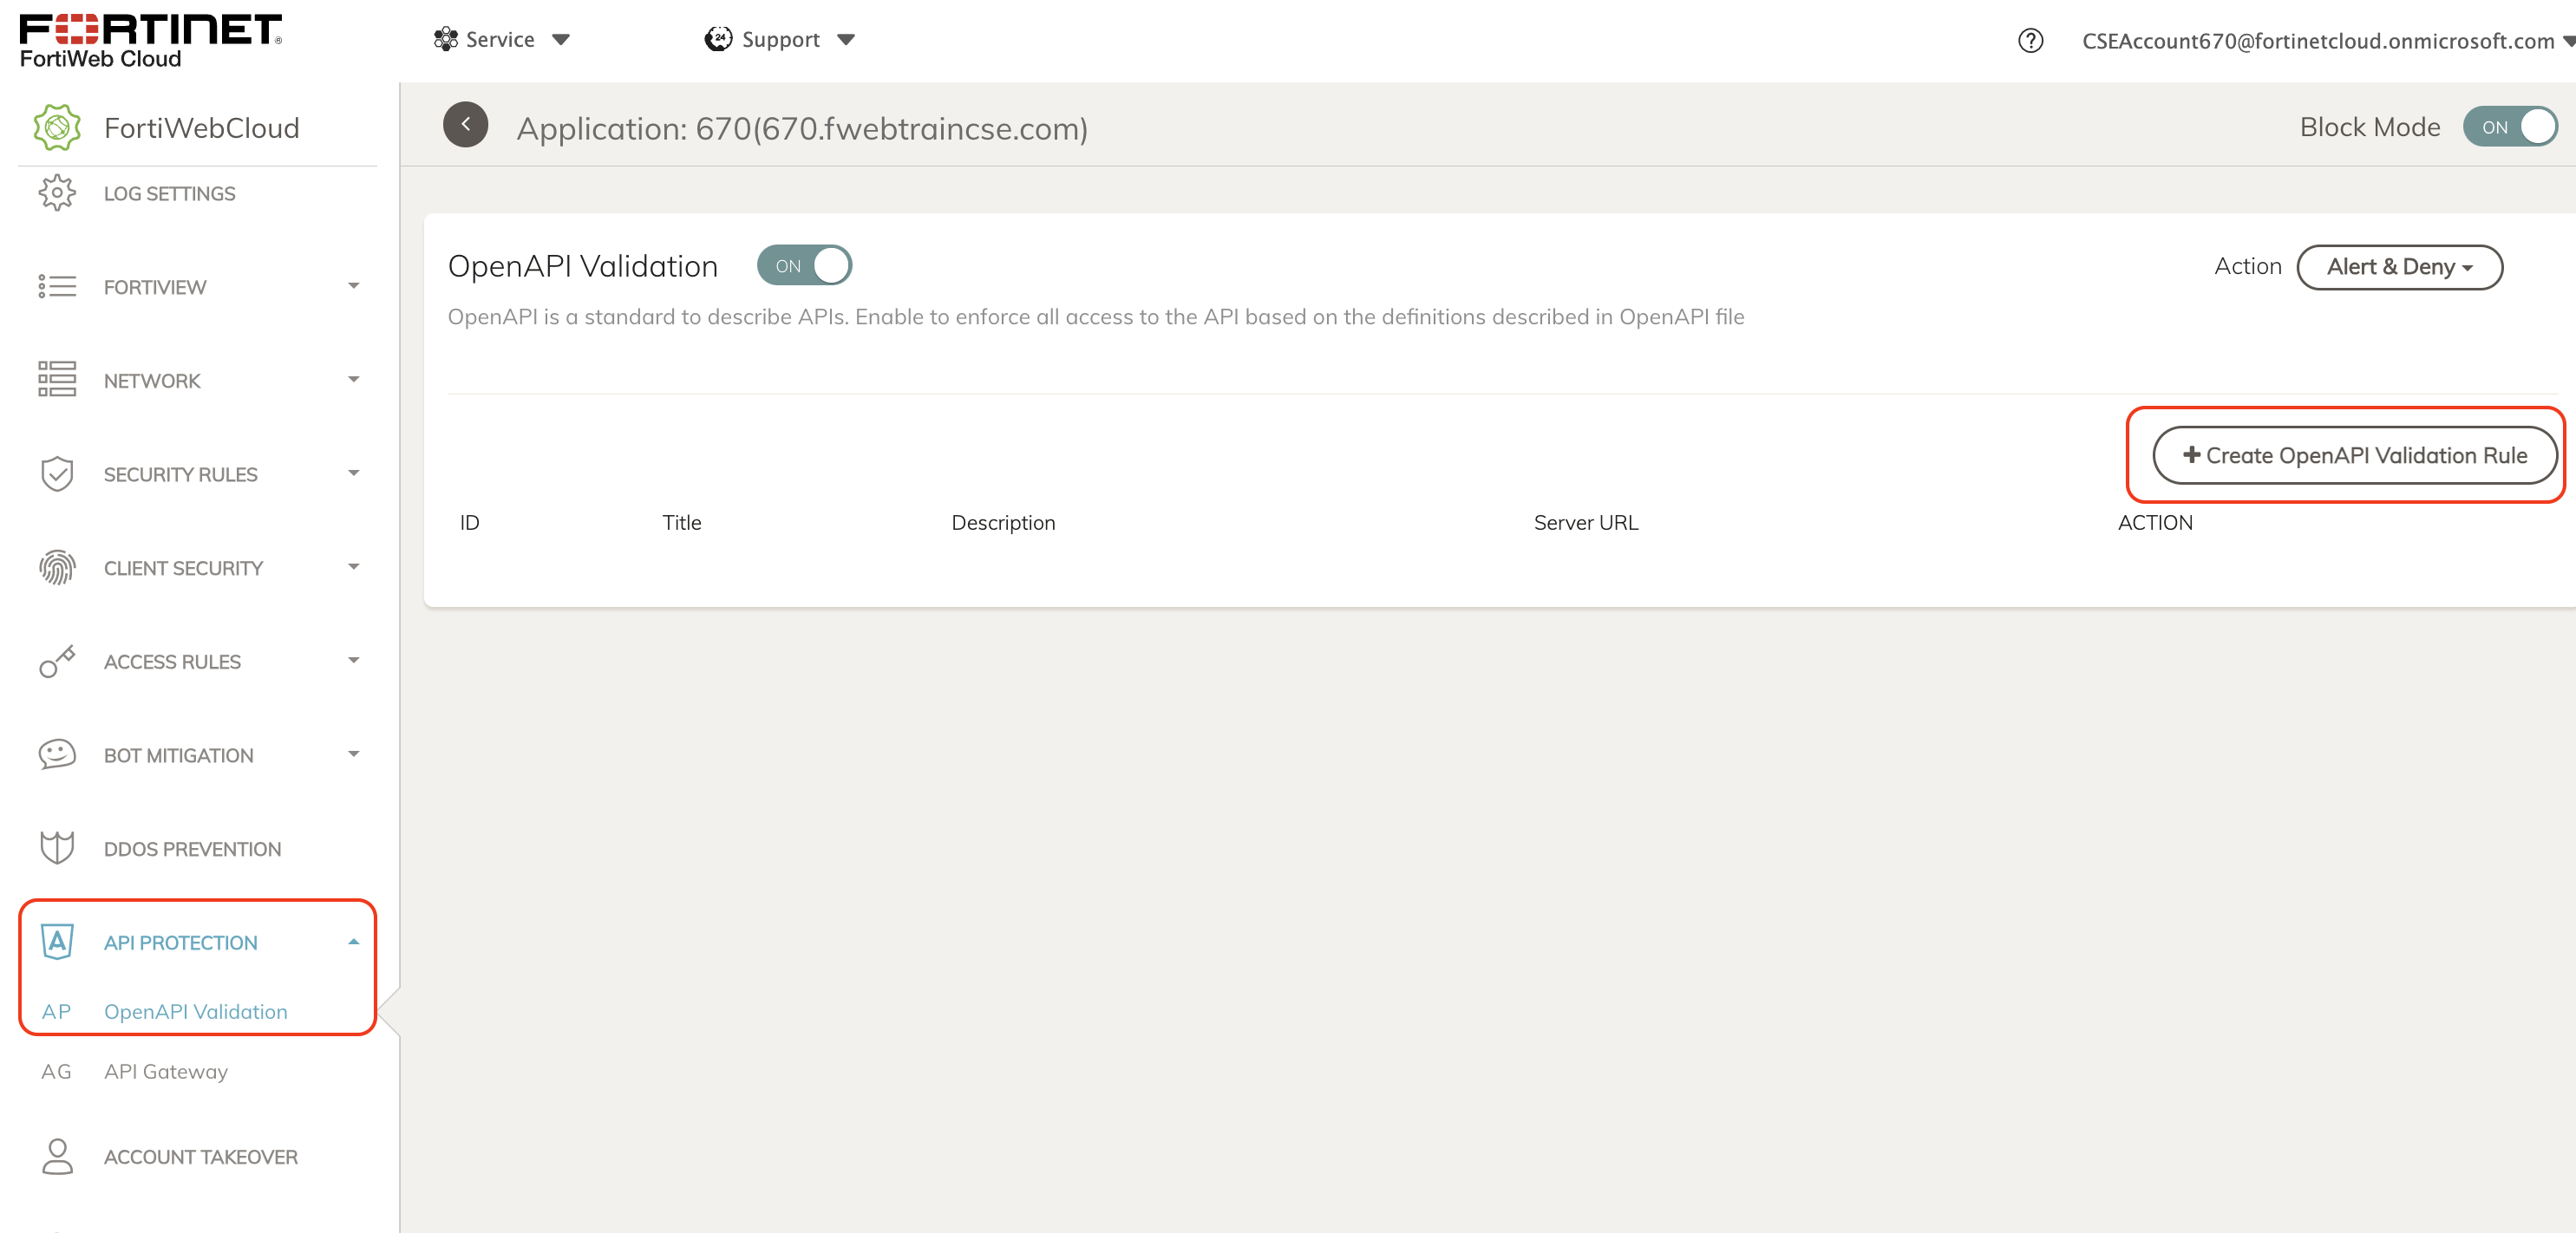
In the API protection module, click on Open API validation > Create OpenAPI Validation Rule.
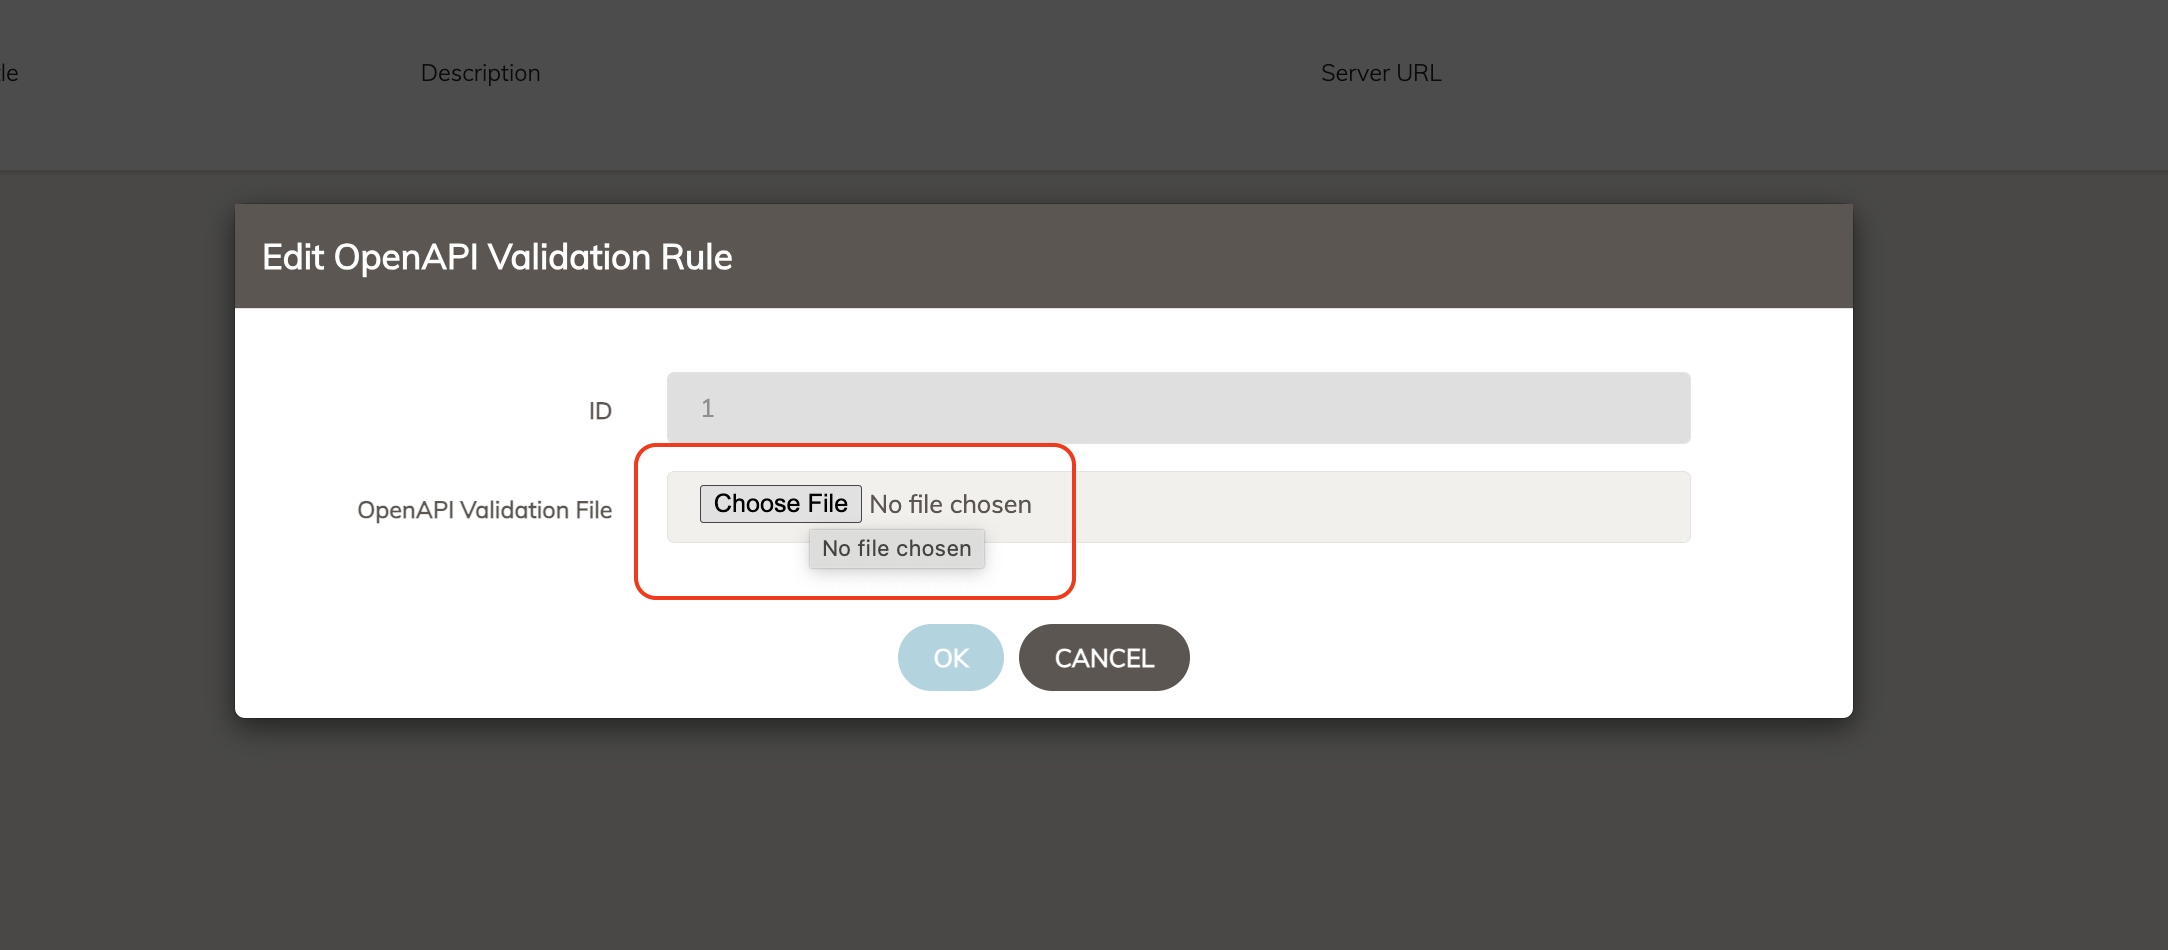
Click on “choose file” to upload the file downloaded in Step 1, Click OK.
Warning
On some systems (macOS), the file may download with a .yml extension, giving you an error upon attempting to upload. In this case, simply rename the file with .yaml extension before uploading to FortiAppSec OpenAPI Validation rule
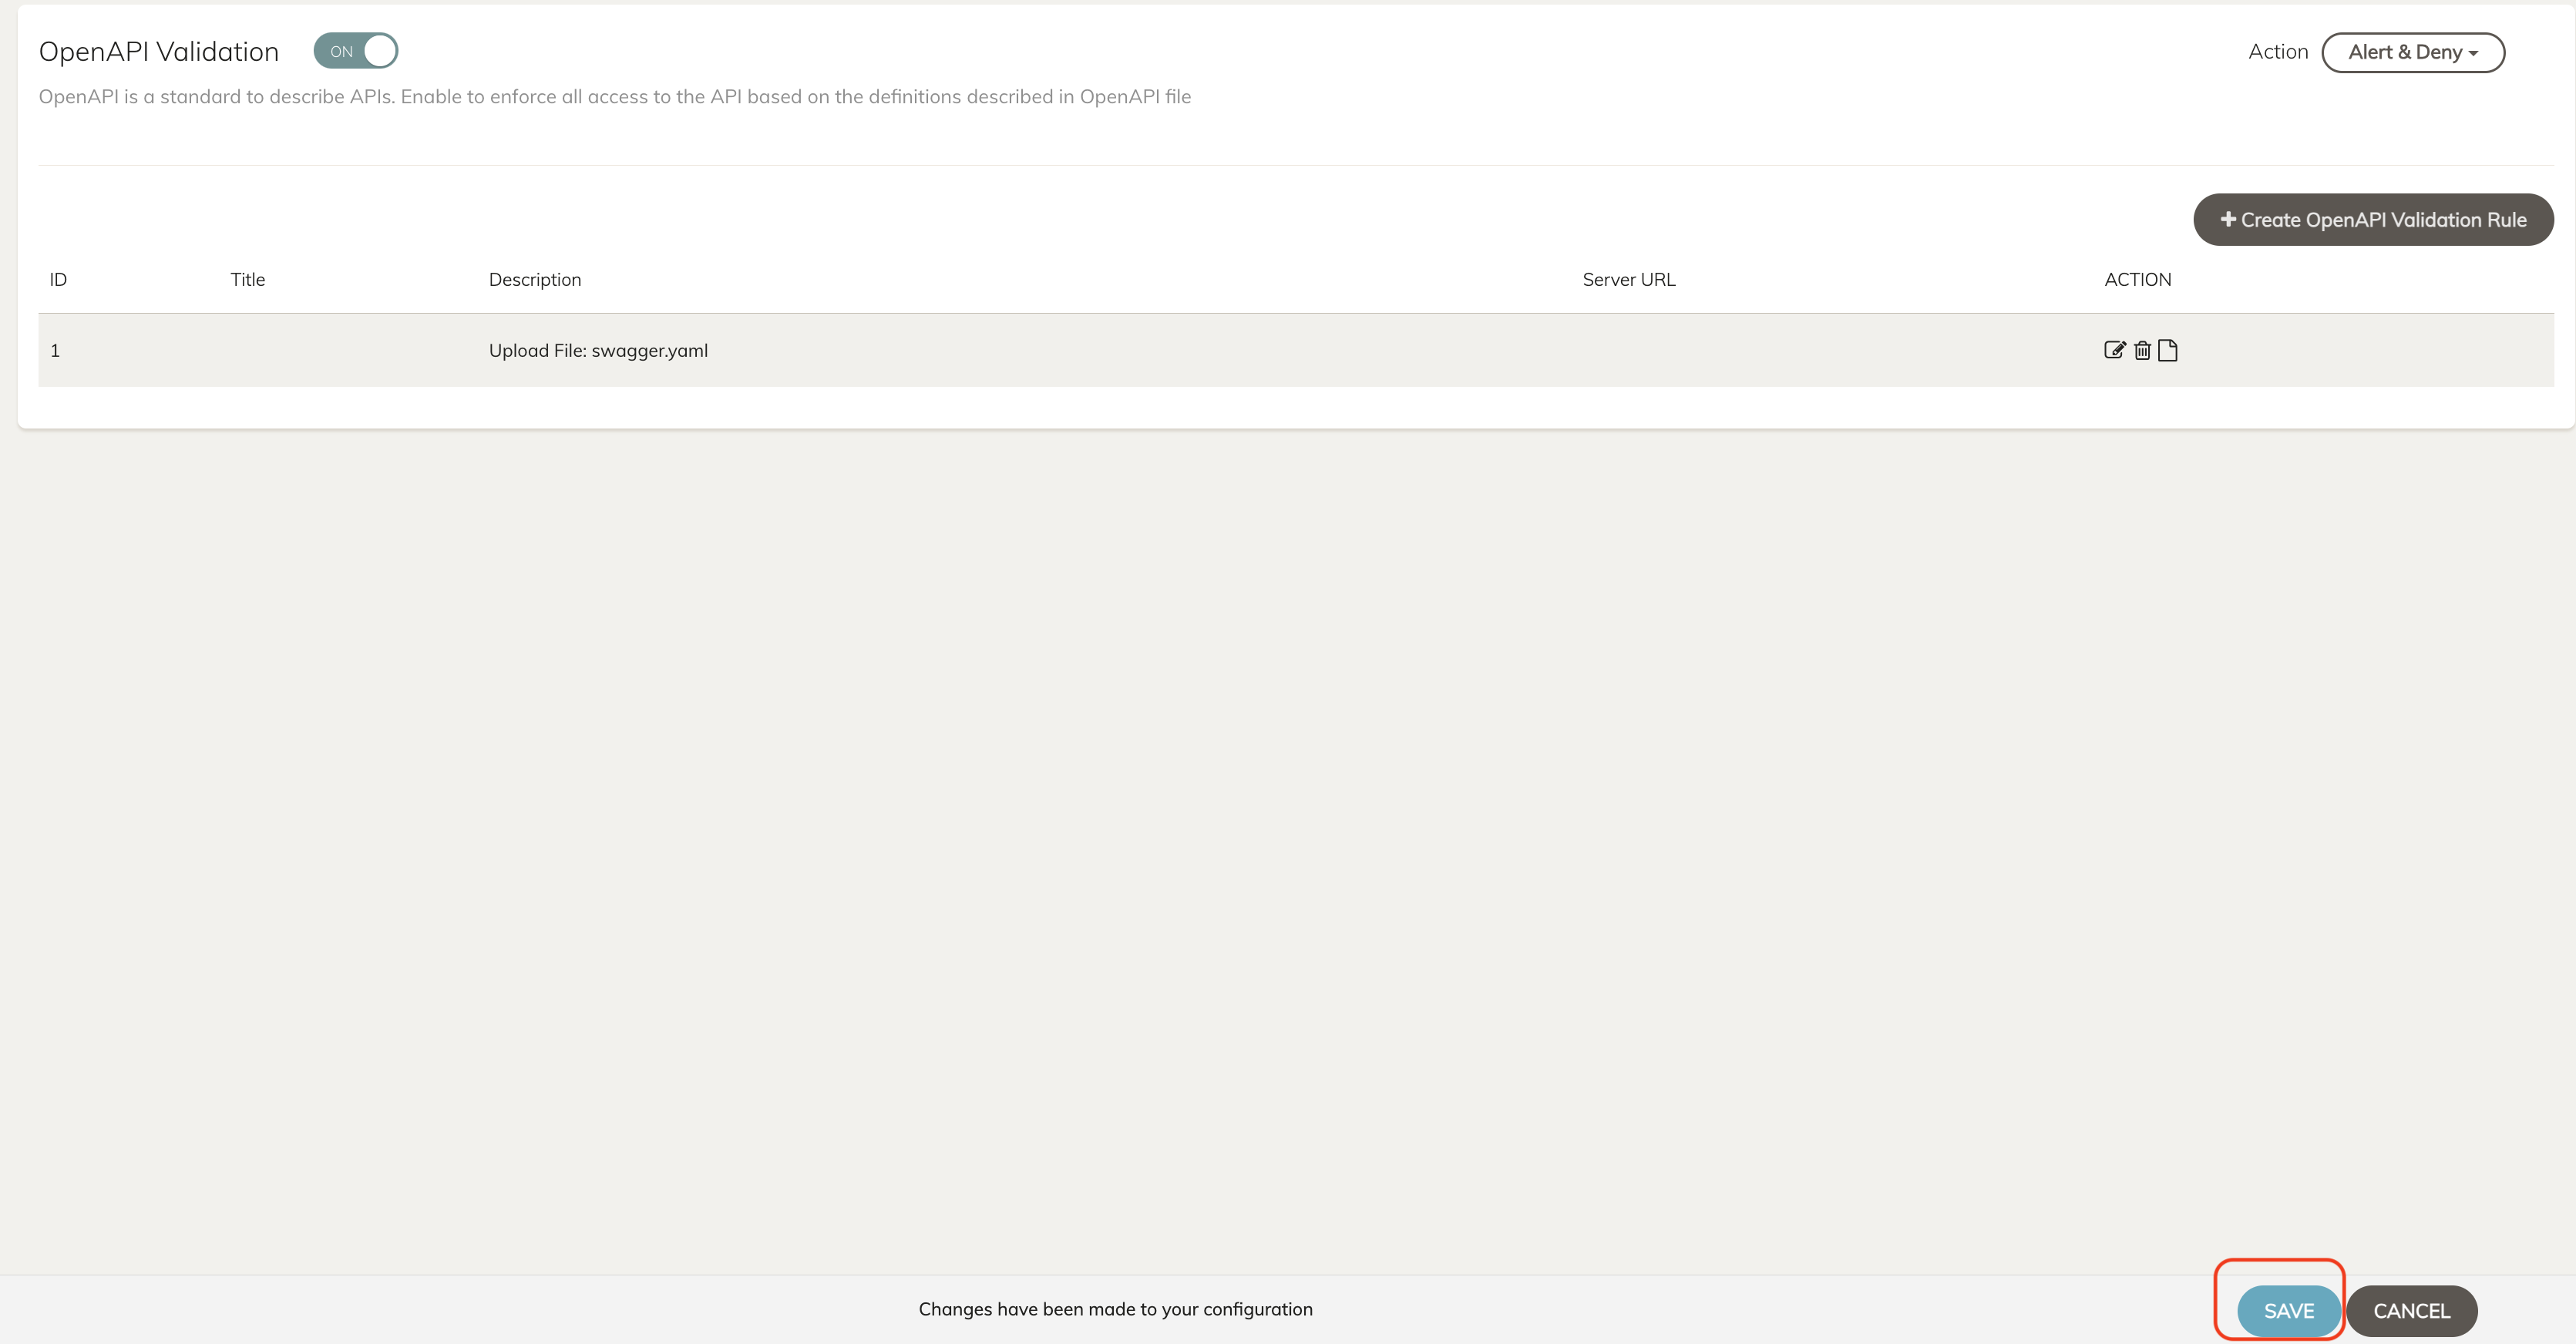
Don’t forget to Click SAVE at the bottom.
Warning
If for some reason you are logged out when you click save here, you will need to log back in using this link https://customersso1.fortinet.com/saml-idp/proxy/demo_sallam_okta/login\ and the credentials received in the original email. You will need to repeat steps 1 through 5.
Back to Postman in Kali Desktop
We will send a POST request to the URL we have documented in Schema.
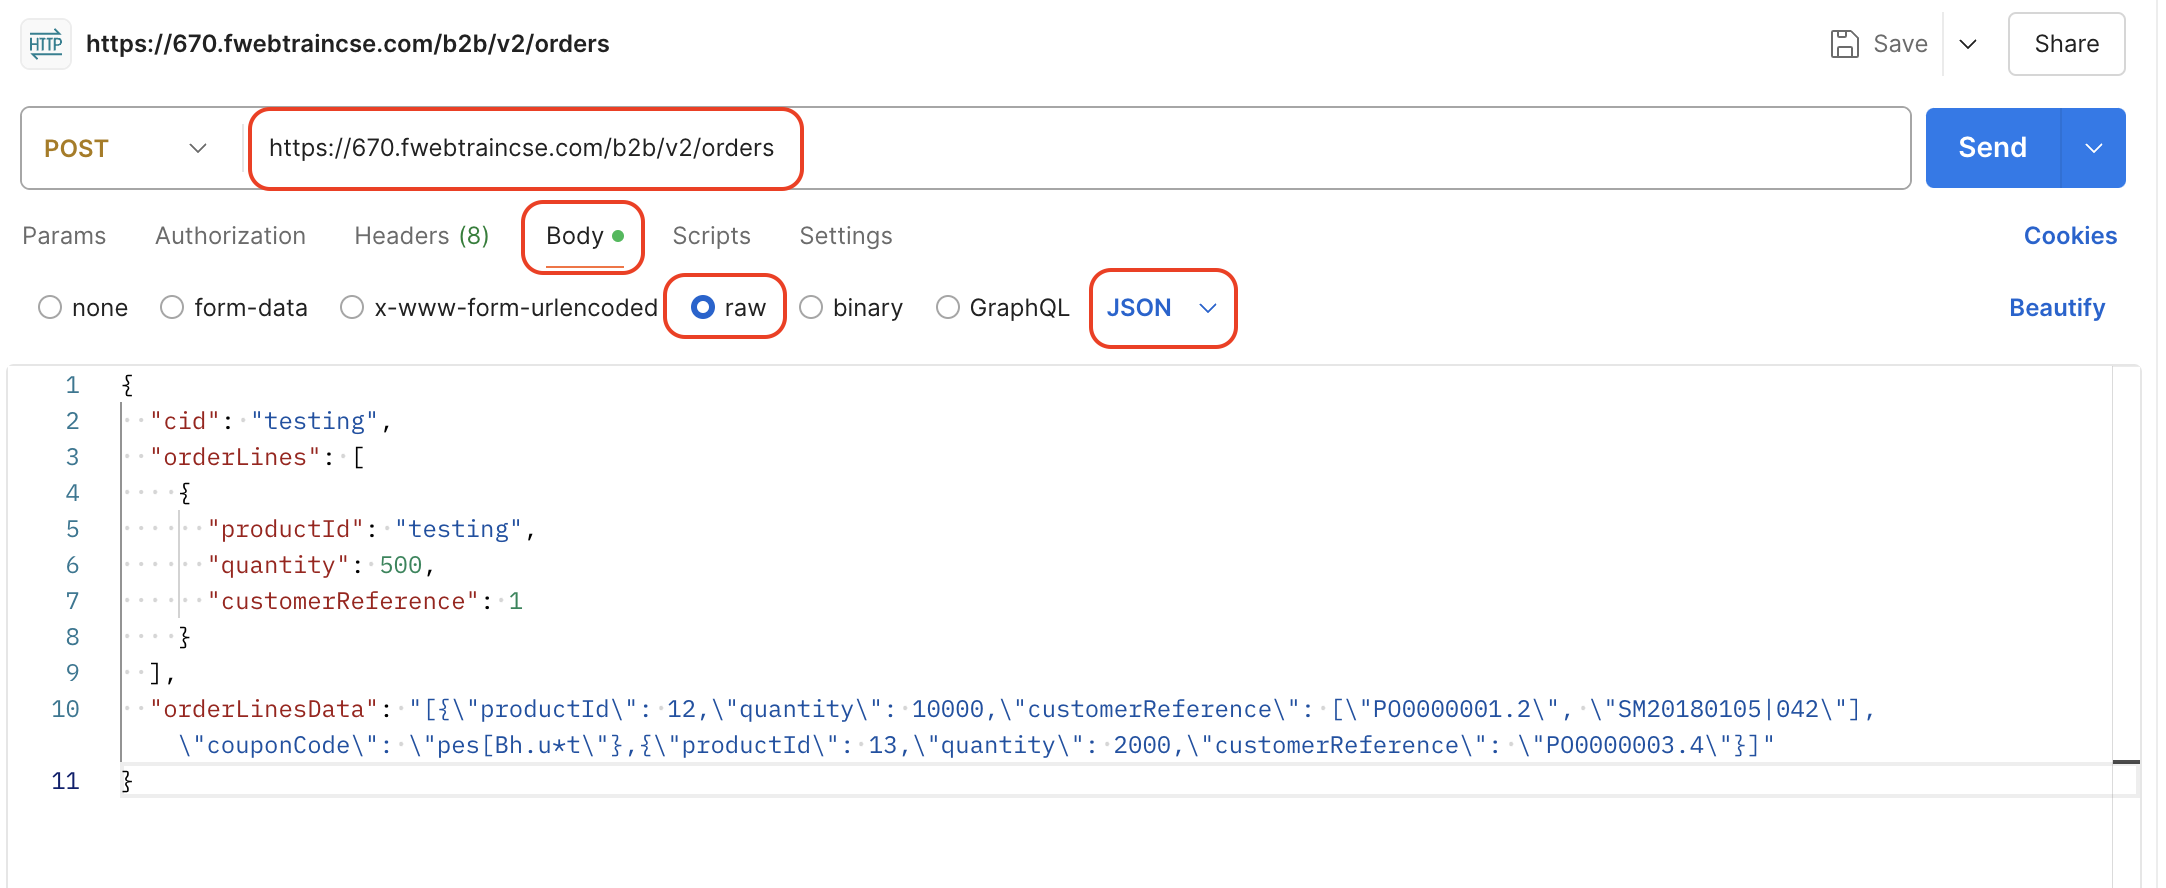
Create a new request with the + button in the top bar.
Change “GET” to “POST”, for URL use: https://<FortiAppSecStudentID>.fwebtraincse.com/b2b/v2/orders
Be sure to replace your Student ID in the URL!
To enter Request body, Click on Body > Raw > JSON and paste the following:
Note: The schema for Product ID is changed from Integer to String in this task. However the FortiAppSec cloud Juiceshop schema we previously uploaded has this value defined as Integer.
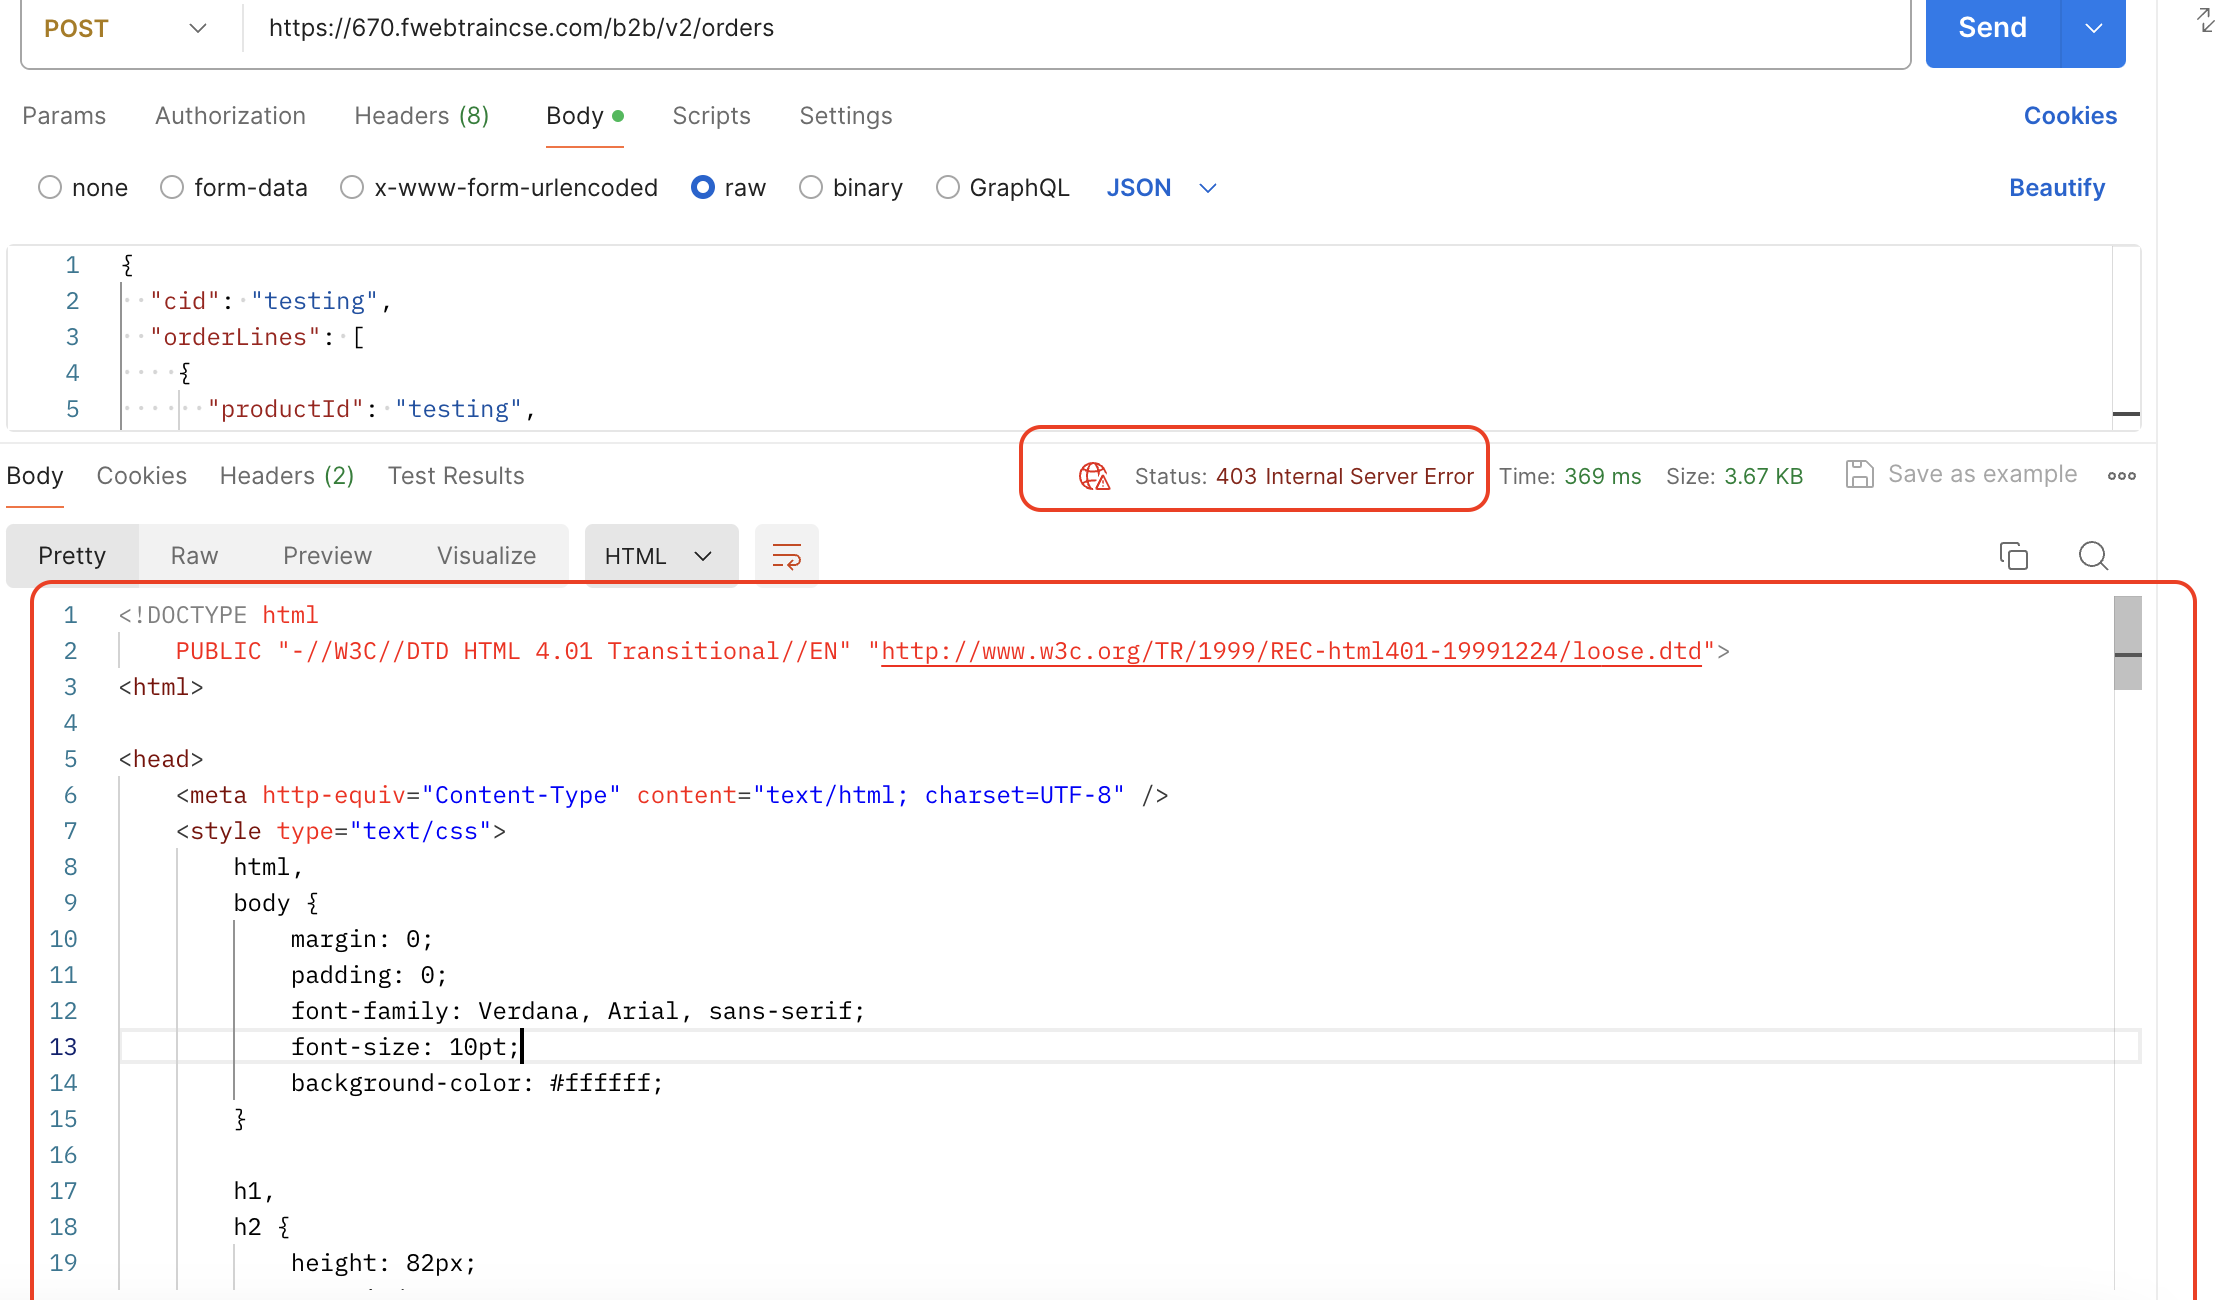
Click on “SEND”
We will see “403 internal server error” with a FortiAppSec cloud block message in HTML.
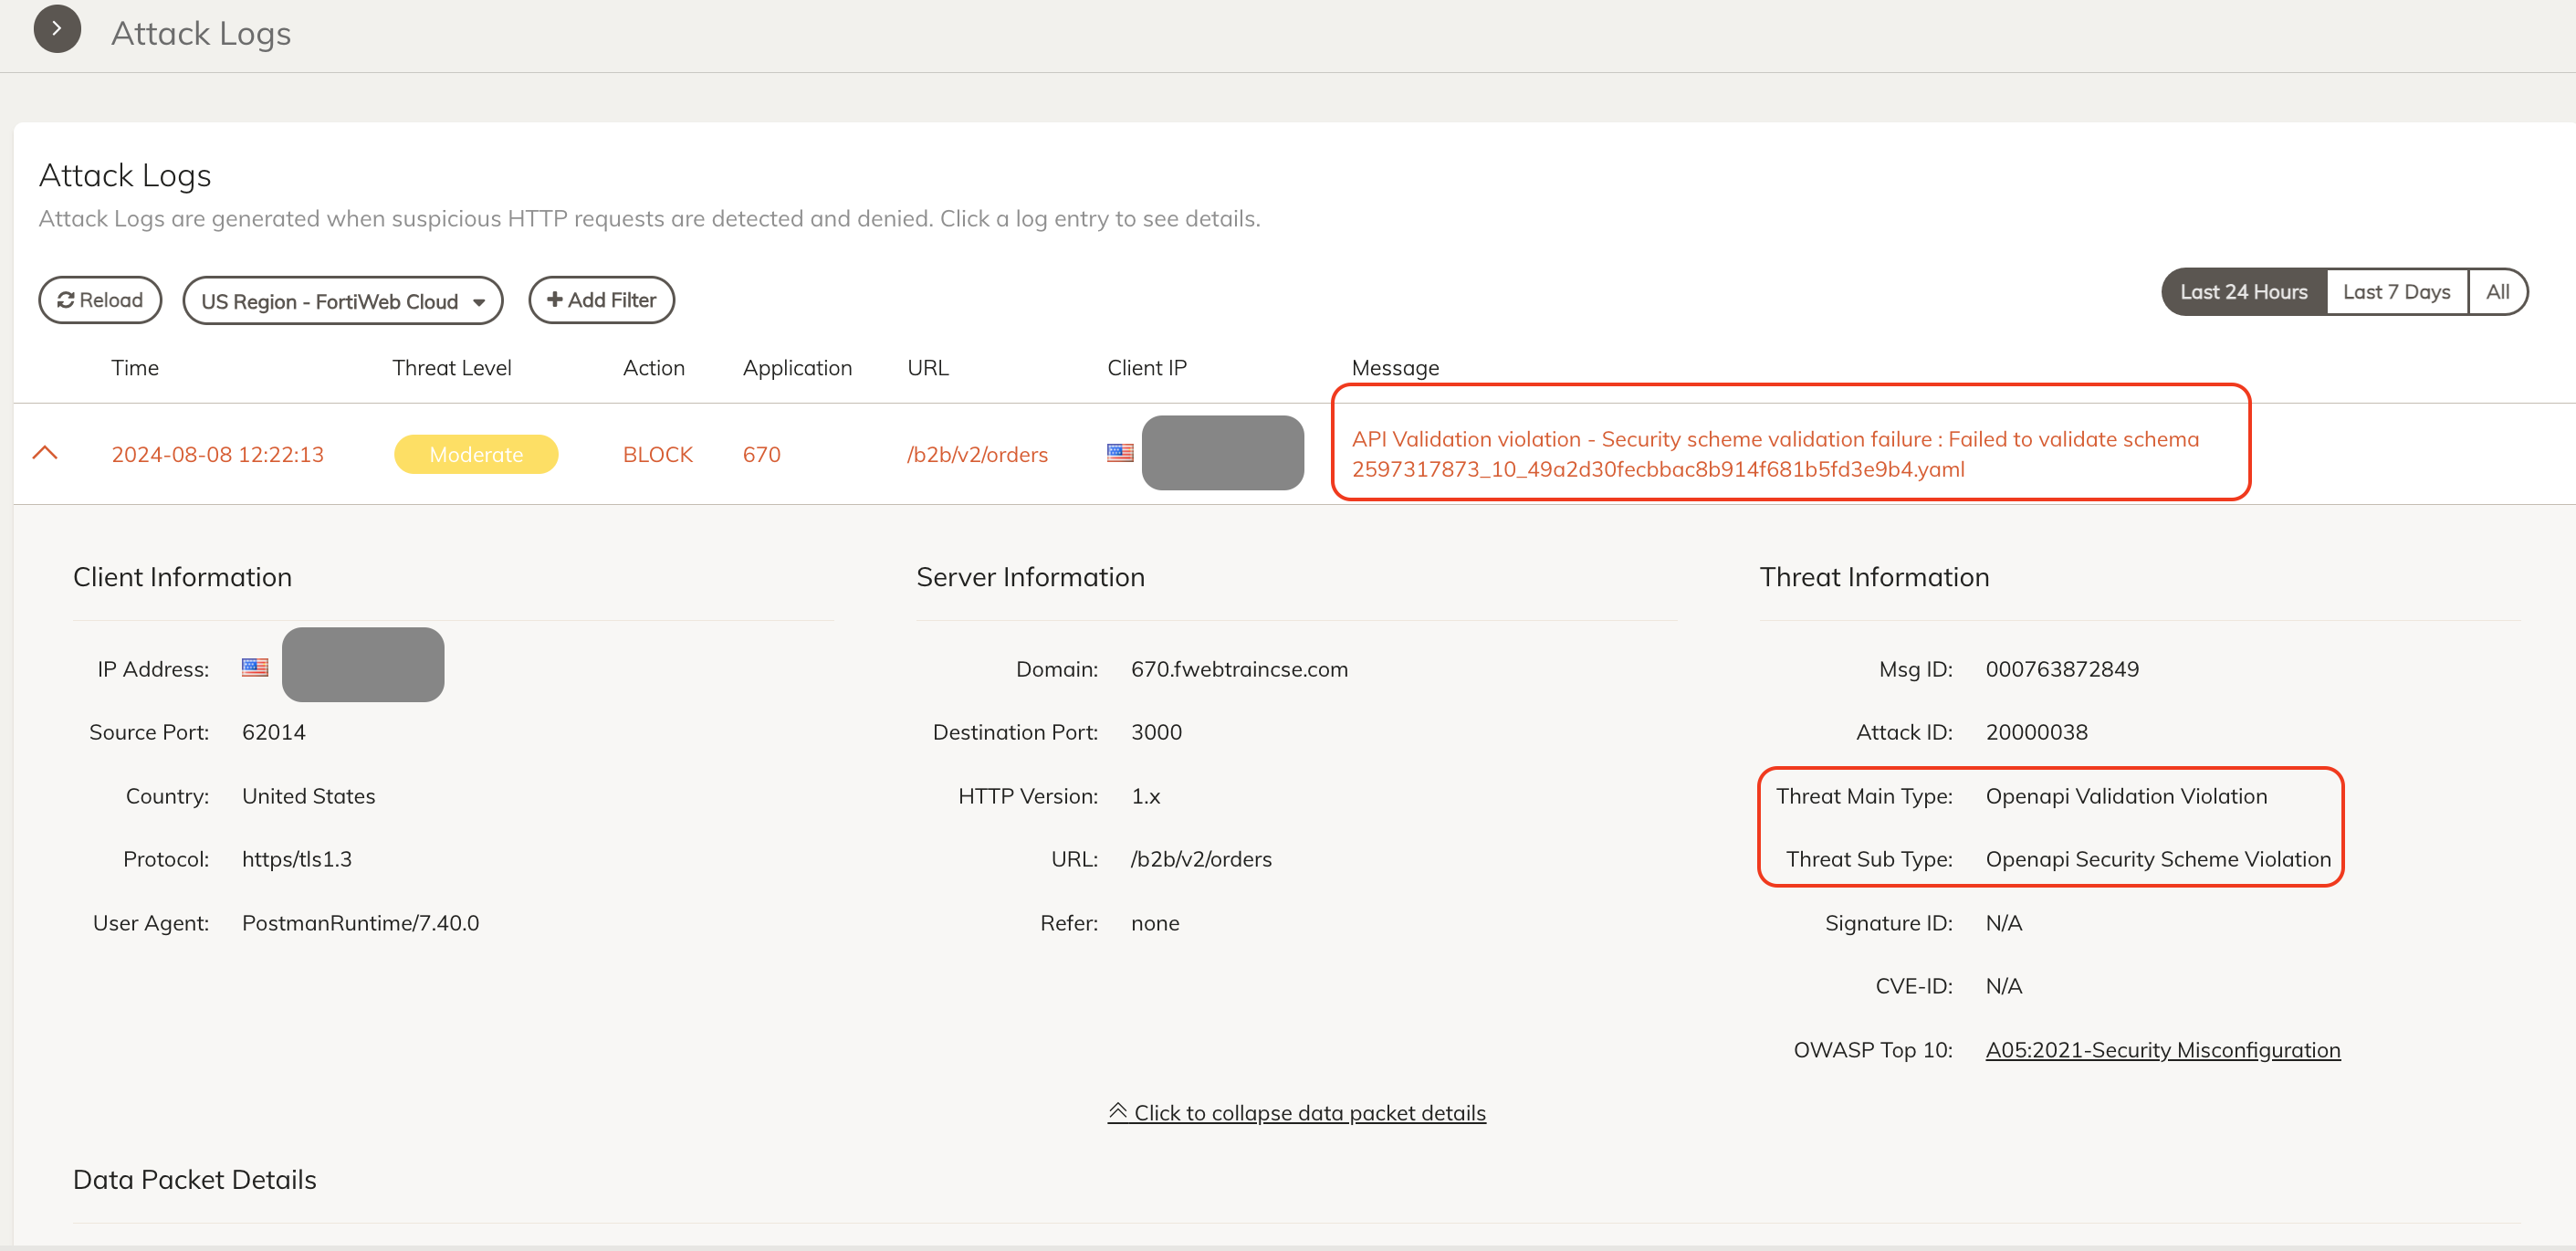
In FortiAppSec Cloud on the left hand side of the screen go to Threat Analytics > Attack log > we can see a log generated for this block request to show the reason for block is Open API schema Violation.
API Protection Review
Review
In this module, used Postman to test FortiAppSec Cloud’s API Gateway and schema validation features.
API Protection Quiz
Ch 6: Machine Learning
In this section we will enable machine learning for Anomaly Detection and we will run attacks to show how the Anomaly Detection module makes positive security model deployment easy!
Subsections of Ch 6: Machine Learning
Positive security model and machine learning
The positive security model, also known as whitelisting, operates on the principle of allowing only known good behavior while blocking everything else. In this approach, the system defines a set of explicitly permitted actions—such as valid URLs, parameters, and methods—and denies all other actions by default. This contrasts with the negative security model, which focuses on blocking known bad behavior.
Positive security models are effective at preventing both known and unknown attacks because they explicitly define what is allowed, reducing the attack surface and providing strong protection against unauthorized access or malicious activity. However, maintaining and updating whitelists can be challenging, especially in dynamic environments where applications and usage patterns change frequently.
To address these challenges, FortiAppSec uses machine learning for anomaly detection. Its anomaly detection model monitors URLs, parameters, and HTTP methods of HTTP and/or HTTPS sessions targeting your web applications, building mathematical models to detect abnormal traffic behavior.
Two Layers of Machine Learning in FortiAppSec
FortiAppSec employs two layers of machine learning to detect malicious attacks:
First Layer: Hidden Markov Model (HMM)
Monitors application access.
Collects data to build mathematical models for every parameter and HTTP method.
Evaluates each request against the learned model to detect anomalies.
Second Layer: Threat Model Verification
If the first layer flags a request as anomalous, the second layer determines if it is a true attack or a benign anomaly.
Uses pre-built, pre-trained threat models for categories like SQL Injection, Cross-site Scripting (XSS), etc.
Models are trained using thousands of attack samples and continuously updated via the FortiAppSec Security Service.
The FortiGuard team analyzes new threats and retrains relevant models, which are then pushed to all FortiAppSec installations similarly to signature updates.
How FortiAppSec Builds Its Anomaly Detection Model
FortiAppSec constructs its machine learning model by evaluating domain-specific parameters based on extensive samples of legitimate requests.
Sampling Criteria
A request is treated as a sample if all of the following are true:
The response code is 200 or 302.
The response Content-Type is text or html.
The request includes parameters in the URL or body.
Pattern Generalization
When a valid sample is collected, FortiAppSec generalizes it into a pattern. For example:
"abcd_123@abc.com" and "abcdefgecdf_12345678@efg.com" → generalized to → "A_N@A.A"
The model is built on patterns, not raw values.
Model Lifecycle
Initial Model: Created after collecting 400 samples. Actively used to detect anomalies while more data is collected.
Model Promotion: Once 1200 samples are collected, the system evaluates the stability of the patterns:
Stable Patterns: If few new patterns are seen, the model is promoted to a standard model.
Unstable Patterns: If many new patterns are still emerging, sample collection continues until stability is achieved.
Standard Model: More accurate and reliable. Continuously updated as application behavior evolves (e.g., new URLs or parameter changes). Outdated patterns are discarded, and new patterns are introduced to keep the model current.
By leveraging this multi-layered machine learning approach, FortiAppSec provides robust protection against both known and emerging web application threats.
Configure and Test the Anomaly Detection Module
Enabling Anomaly Detection in FortiAppSec
In this section, we will enable the Anomaly Detection module, which uses machine learning to block zero-day threats and other sophisticated attacks. This module builds a behavioral model by analyzing legitimate traffic patterns, allowing it to detect anomalies and unknown attack types.
To train the model, we will use a tool that generates a sufficient number of legitimate requests. Note: The tool may take approximately 30 minutes to complete its run.
Step 1: Enable the Anomaly Detection Module
From the FortiAppSec Cloud Console, select your application.
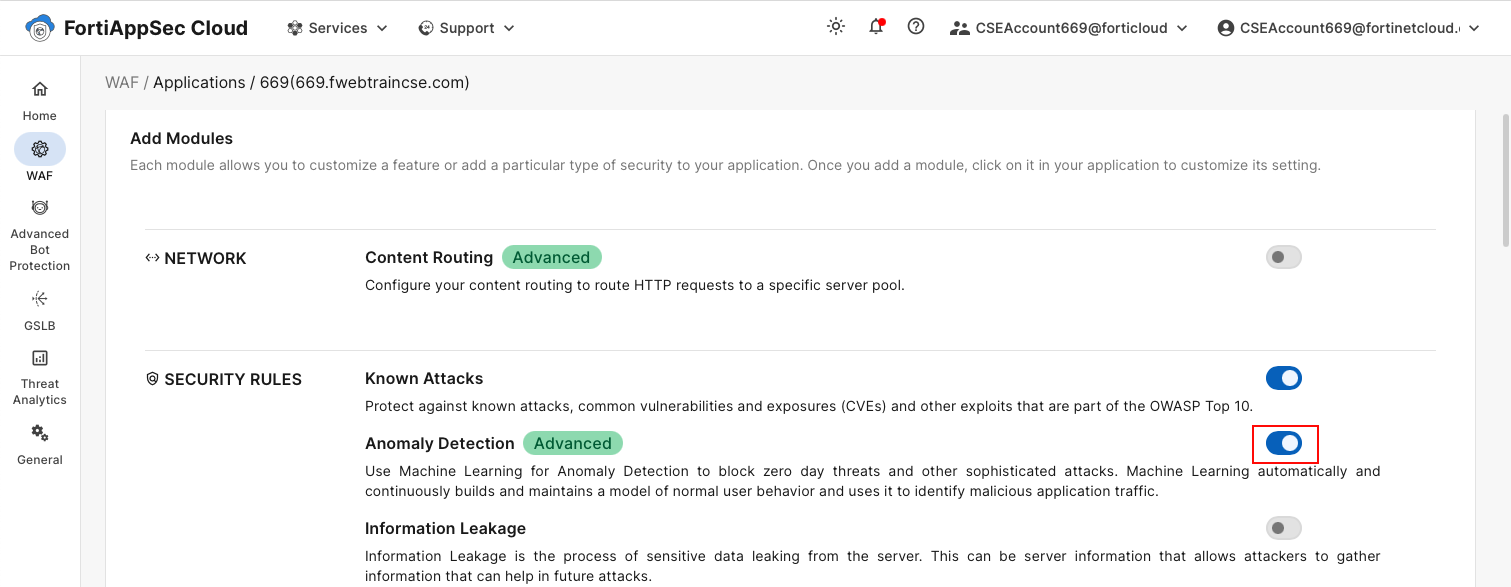
In the left navigation pane, go to WAF > Add Modules.
Scroll down to the Security Rules section.
Toggle Anomaly Detection to On. Click OK.
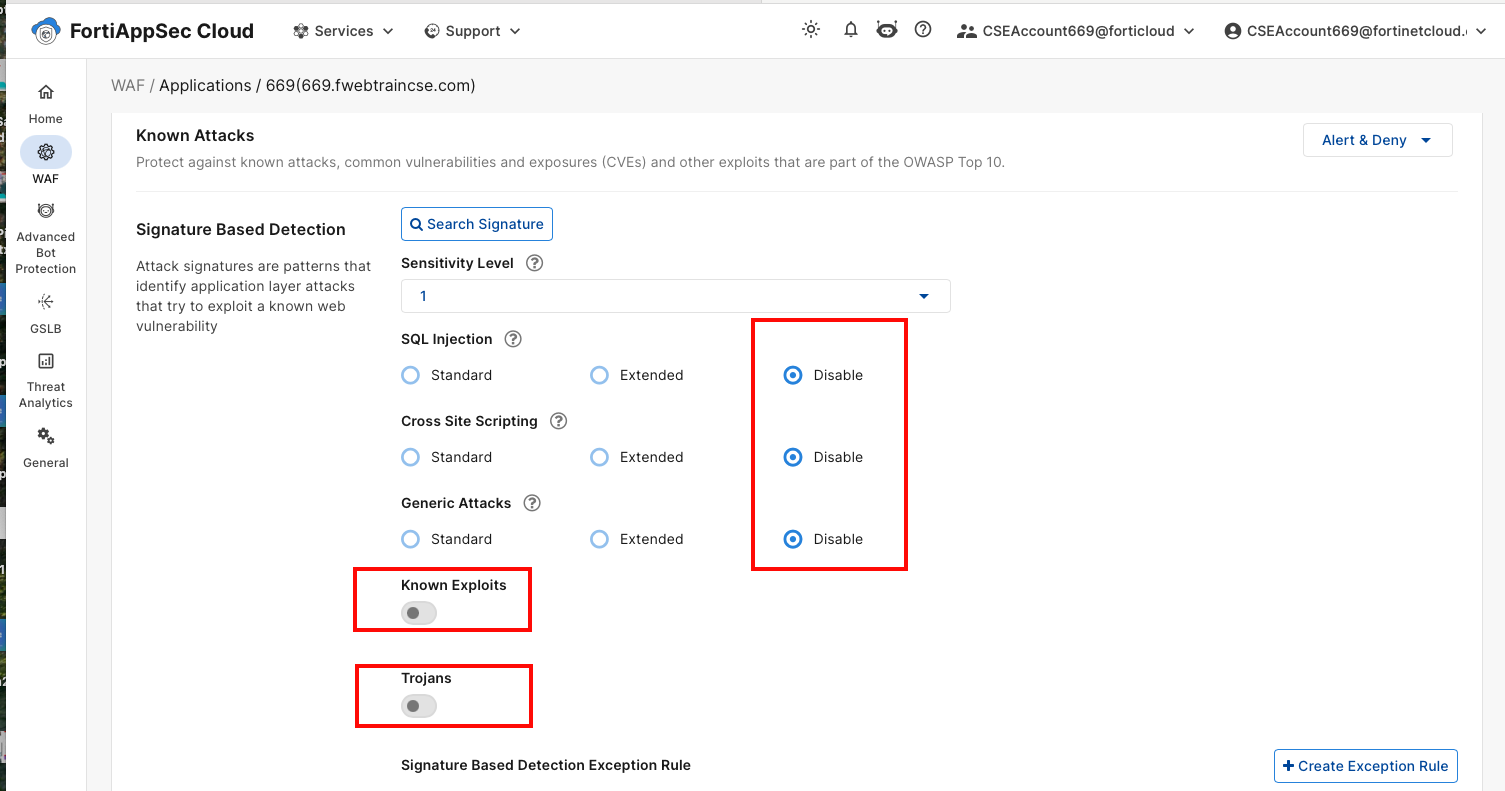
In a production environment, both known attack detection (signature-based) and anomaly detection are used together. For this demonstration, we will disable signature-based detection.
From the FortiAppSec Cloud Console, select your application.
In the left navigation pane, go to WAF > Security Rules > Known Attacks.
In the Signature-Based Detection pane, disable the following by toggling each option:
SQL Injection
Cross-Site Scripting
Generic Attacks
Known Exploits
Trojans
Click Save.
Step 2: Run the Tool to Generate Legitimate Traffic
To build the anomaly detection model, you need to generate enough legitimate requests.
Open a terminal window from your Kali desktop. Run:
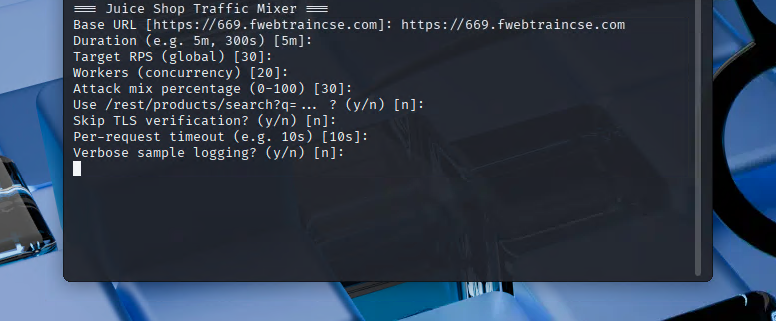
ml-mix
When prompted, enter the URL:
https://<FortiAppSecStudentID>.fwebtraincse.com
Use the following values for the remaining options:
Duration: 30M
Target RPS: 30
Workers: 20
Attack mix percentage: 0 (We are building the model only with legitimate traffic.)
Use /rest/products/search? q= … : n
Skip TLS verification: n
Per- request timeout : 10s
Verbose sample logging: y
Details
⚠️ Note: The process may take up to 30 minutes. Keep the terminal open. You will see periodic progress updates.
While the tool is running, log into the FortiAppSec Cloud Console to monitor the model-building process.
Step 3: Review the Anomaly detection module on FortiAppSec Cloud
Details
If you lose access to the FortiAppSec Console, open an Incognito browser and use the link below to log back in:
From the FortiAppSec Cloud Console, select your application.
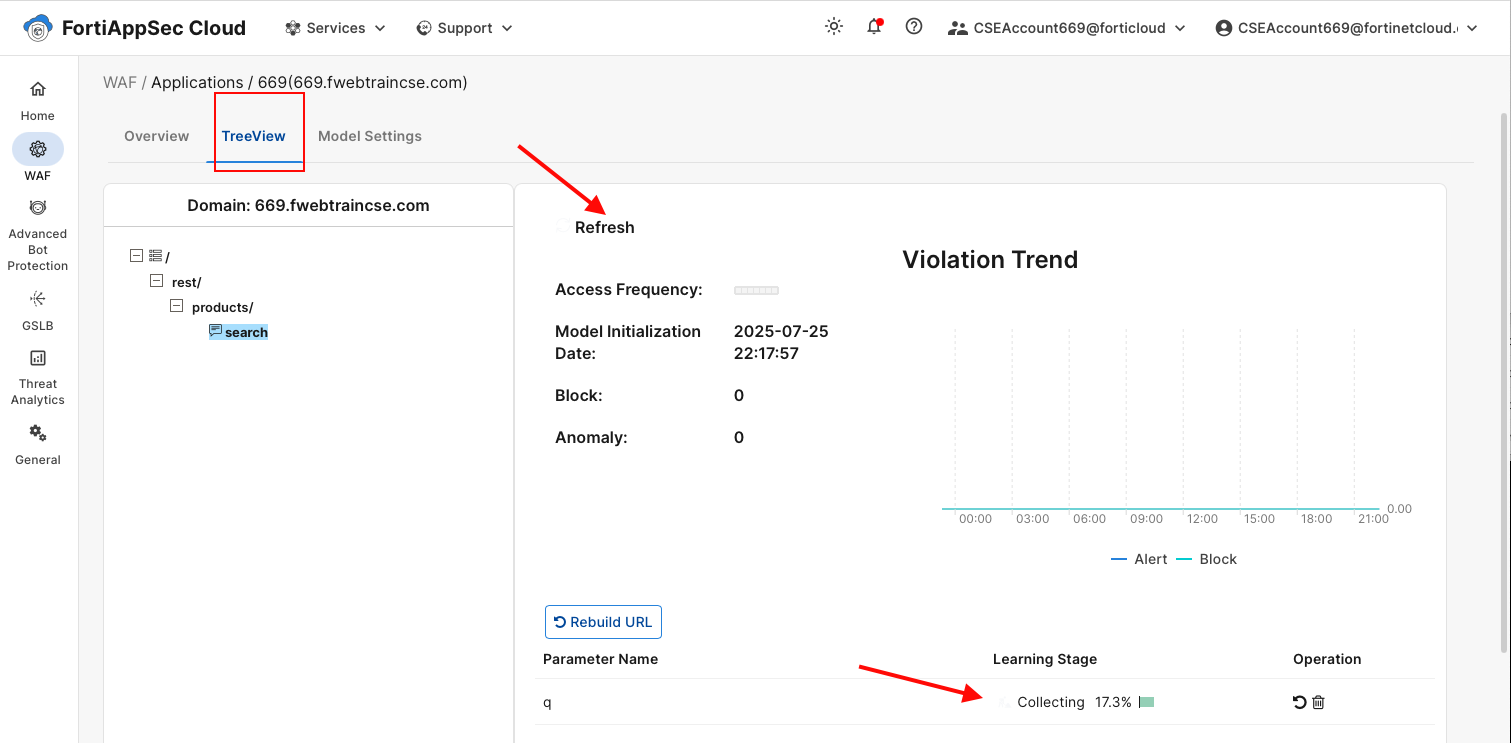
In the left navigation pane, select Waf > Security Rules > Anomaly Detection
Click on the TreeView tab and drill down to the search parameter field. You will see the stages: Collecting, Building, and Running.
Warning
Building the model can take up to 30 minutes. In some cases we have found we needed to run the tool for a second time. When the tool finishes running you will get a completion message. Please do not delete once it is built. we will need it for the next exercise
When the model reaches the Running stage, you are ready to proceed with launching attacks.
Step 4: Launch Attacks
To test the model, we will run the same tool again but this time include attack traffic (SQL Injection, Command Injection, and XSS) along with legitimate requests.
1. Open a terminal window from your Kali desktop.
Run:
ml-mix
When prompted, enter the URL:
https://<FortiAppSecStudentID>.fwebtraincse.com
Accept the default values for the remaining options:
Duration: 5m ( we do not need to run the tool as long this time , just enough to trigger some log entries)
Target 30
Workers: 20
Attack mix percentage: 30 ( this time we will add about 30% attack traffic to our mix)
Use /rest/products/search? q= … : n
Skip TLS verification: n
Per- request timeout : 10s
Verbose sample logging: n
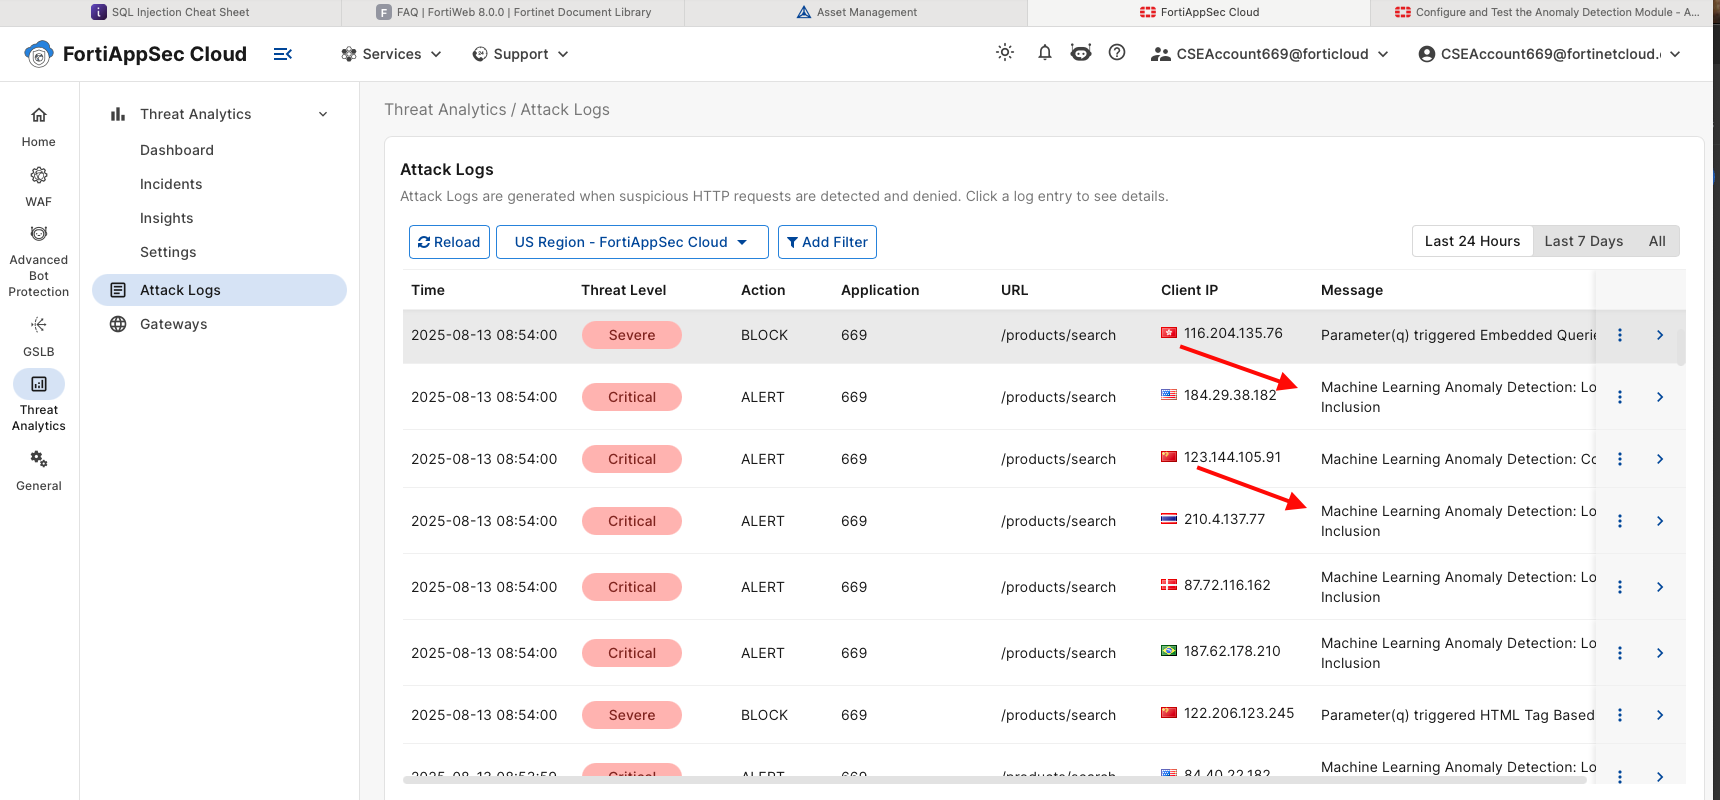
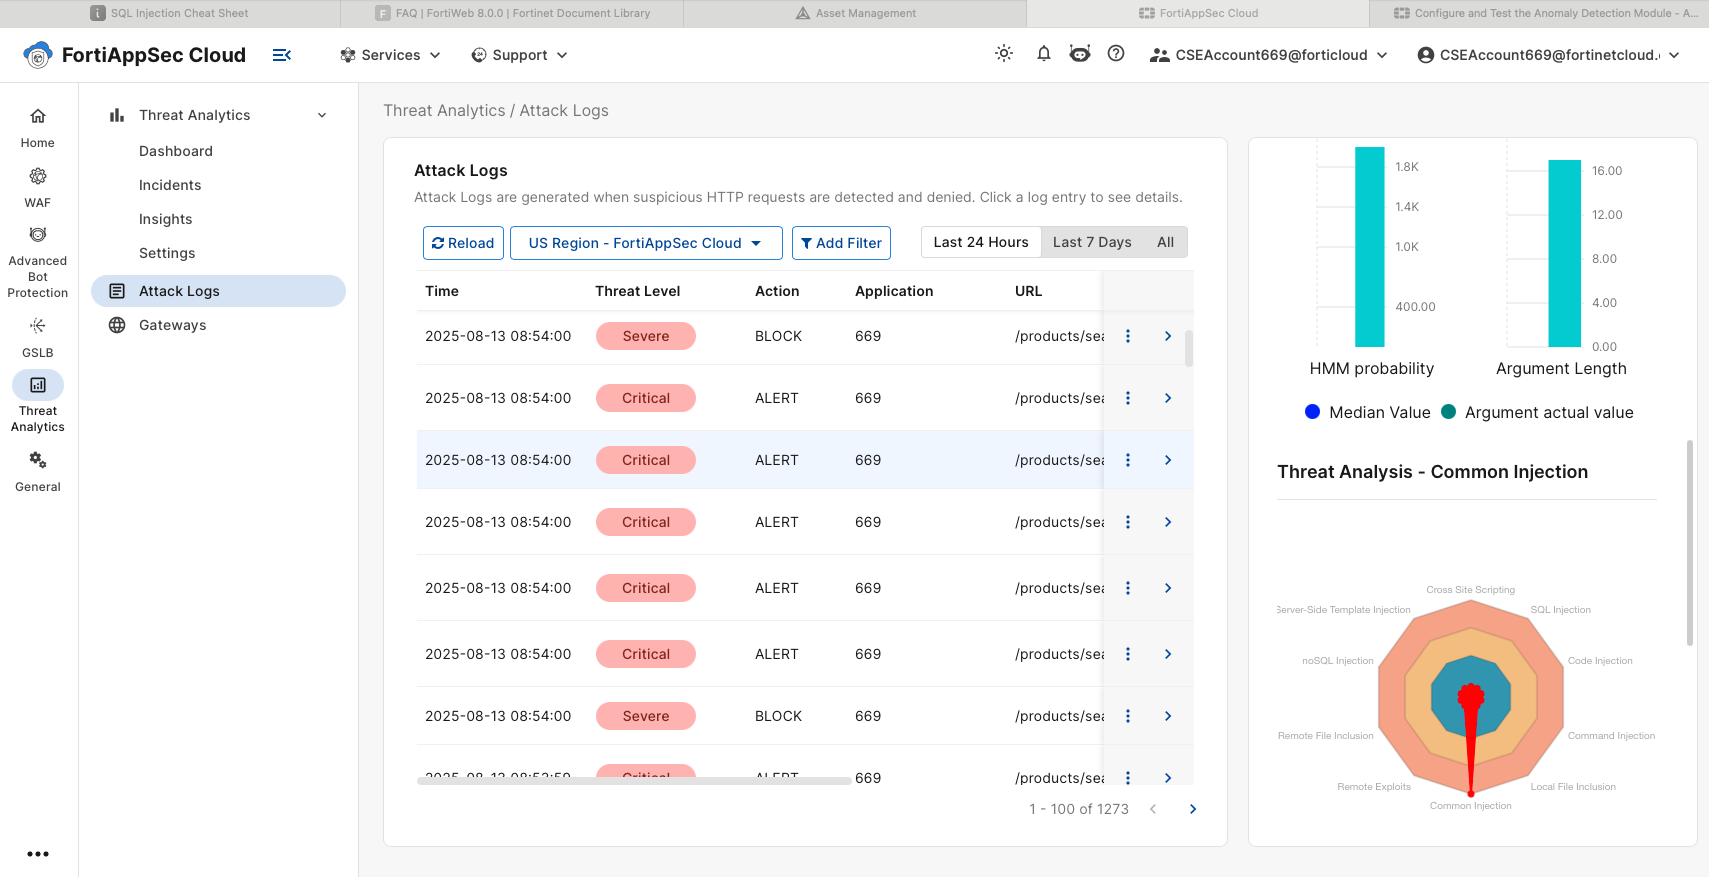
While the tool is running, log into the FortiAppSec Cloud Console and check the logs to confirm attacks are being detected and mitigated.
Drill down on the log entries and review the details.
Machine Learning Review
Review
By the end of this exercise, you should observe the following:
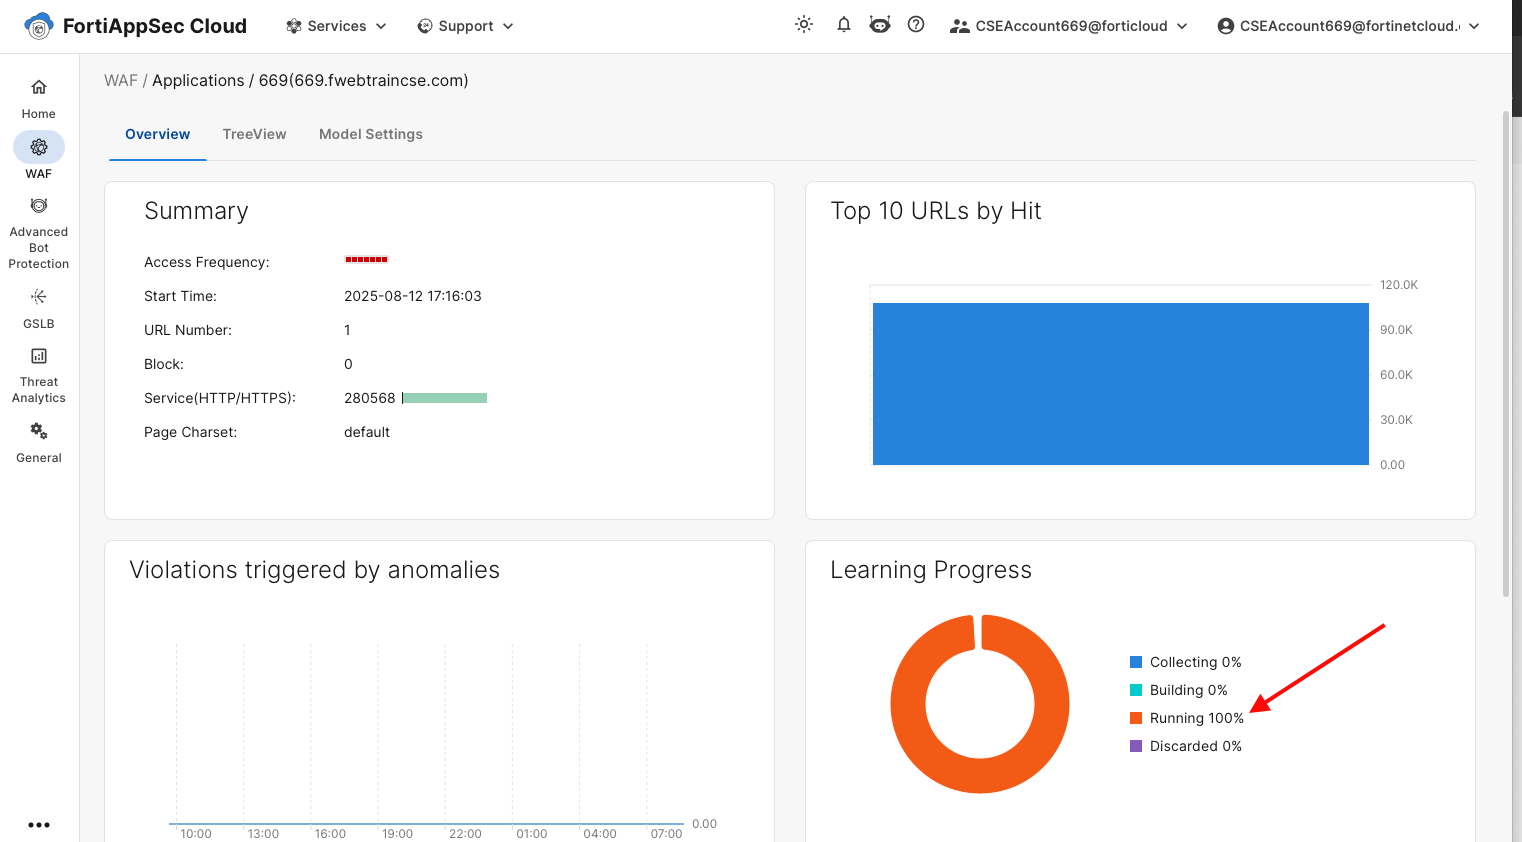
Anomaly Detection Model Status
The model progresses through Collecting, Building, and Running stages.
Status shows Running before you begin launching attacks.
Traffic Visibility
Legitimate traffic appears in the Threat Analytics dashboard as normal traffic with no detections.
When running ml-mix, with attack mix 30%, both legitimate and malicious requests appear in logs.
Attack Detection
Malicious requests (SQL Injection, Command Injection, XSS) are detected and flagged in the Attack Logs.
Log details show attack type, source IP, and parameter field targeted.
Mitigation Actions
Depending on policy, malicious traffic is either blocked or alerted.
Blocked events show the relevant action in log details.
Section Quiz
Ch 7: Bot Protection
Bot mitigation is a key part of protecting your applications from automated threats. FortiAppSec Cloud offers several security modules, including machine learning, to help identify and stop bot traffic. By analyzing both application and user behavior, you can fine-tune these bot detection modules to better protect against malicious activity. This approach keeps legitimate users moving through your apps without disruption, while still blocking bad actors.
In the next steps, we’ll configure the available bot mitigation modules and then test them by sending bot-like traffic using the provided script.
Subsections of Ch 7: Bot Protection
Task 1: Summary of Bot Mitigation Modules
Goal
Review Bot Mitigation Modules available in FortiAppsec Cloud.
Task
Read the summary provided below. If you need additional information please ask instructor.
Verify task completion
N/A
FortiAppSec Cloud offers multiple bot mitigation techniques, each targeting different aspects of automated threat detection and prevention.
1. Biometric-Based Detection
Monitors browser interactions such as mouse movements, screen touches, and scroll actions within a set timeframe. This helps confirm that requests are coming from a real human rather than an automated process.
2. Threshold-Based Detection
Lets you define detection rules for suspicious behaviors based on occurrence, time period, severity, and trigger policy. Common use cases include:
Crawler Detection – Identifies excessive crawling behavior that may signal automated indexing or scraping.
Vulnerability Scanning – Detects automated scans looking for application or infrastructure weaknesses.
Slow Attack Detection – Flags slow-rate requests designed to evade detection or overwhelm servers.
Content Scraping Detection – Recognizes automated scraping of web content for unauthorized use.
Illegal User Scan Detection – Catches scanning activity aimed at finding and exploiting vulnerabilities.
3. Bot Deception
Inserts hidden links into HTML response pages. Legitimate users never see or click these links, but automated bots often will. Requests to these hidden resources are strong indicators of bot activity.
4. Known Bots
Protects websites, mobile apps, and APIs from both harmful and legitimate bots—covering DoS bots, spam bots, crawlers, and more—without blocking critical automated traffic. Includes two predefined rules, plus the ability to create custom ones tailored to your needs. Once a Known Bot rule is triggered, its traffic can bypass additional scans.
5. Machine Learning (ML)-Based Bot Detection
Uses AI-driven detection alongside signature and threshold rules to identify sophisticated bots that might otherwise slip through. The model analyzes user behaviors across 13 dimensions, such as request frequency, HTTP version compliance, and resource access patterns.
How It Works
FortiAppSec Cloud uses the Support Vector Machine (SVM) algorithm to:
Learn traffic profiles of legitimate clients.
Compare new client behavior to known patterns.
Flag anomalies as potential bot traffic.
The process runs in three phases:
Phase 1 – Sample Collection
Captures behavioral data (samples) during visits.
Splits into 75% training data and 25% testing data.
Phase 2 – Model Building
Analyzes training samples to create behavior profiles.
Adjusts SVM parameters to remove outliers and refine accuracy.
Selects the best model based on accuracy, cross-validation, and test results.
Phase 3 – Model Running
Compares incoming traffic to established profiles.
Flags significant deviations as anomalies.
Triggers actions like alerts or blocking for repeated anomalies.
Runs bot confirmation checks to reduce false positives.
Updates the model automatically if legitimate traffic patterns change.
By combining these techniques—biometric tracking, threshold rules, deception, known bot filtering, and ML-based detection—FortiAppSec Cloud delivers a layered and adaptive defense against automated threats.
Task 2: Configuring Bot Mitigation Modules
Goal
Setup Bot Mitigation using FortiAppSec Cloud
Task
Enable and Configure all the Bot Mitigation Modules on FortiAppSec CLoud
Verify task completion
If successful, Simulated Bot Traffic will be flagged and blocked on FortiAppSec CLoud
Enable Bot Mitigation Modules
Details
If you lose access to the FortiAppSec Console, open an Incognito browser and use the link below to log back in:
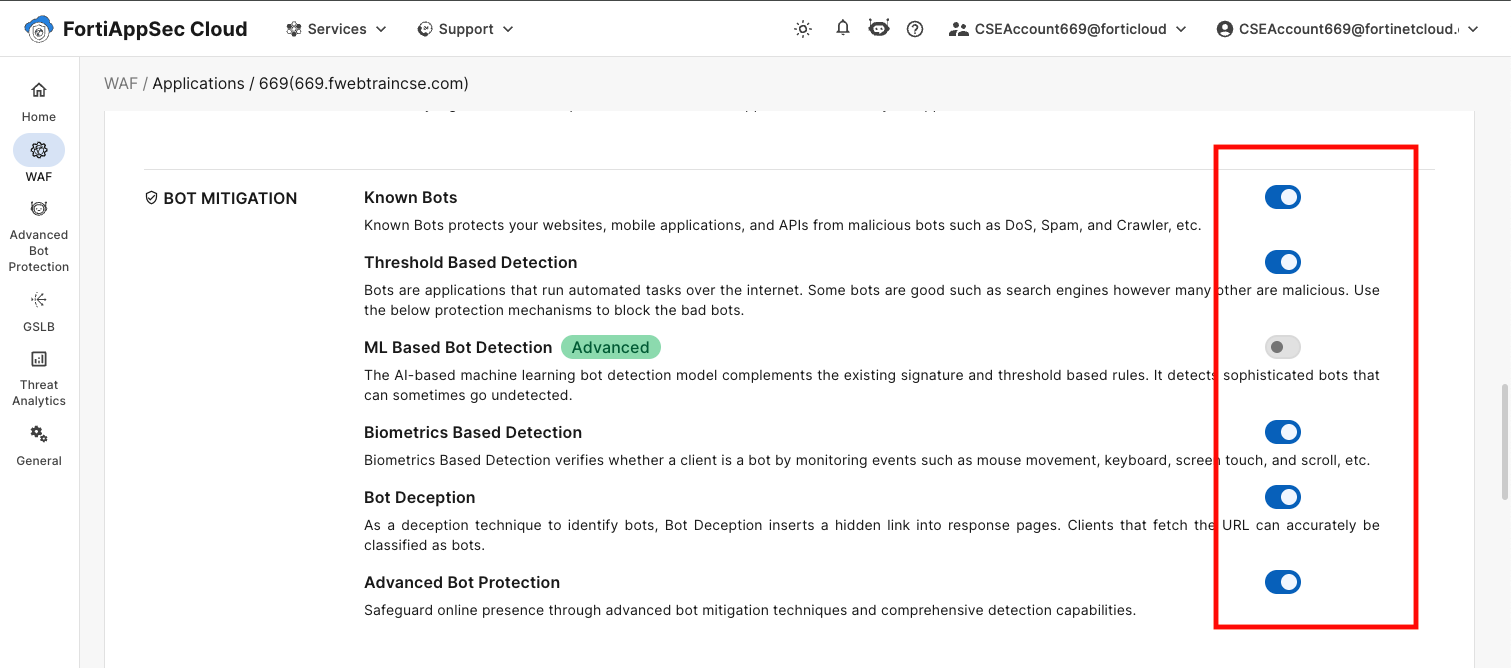
From the FortiAppSec Cloud Console select your application and in the left pane, select Waf >ADD MODULES. Scroll down and turn on Known Bots, Threshold Based Detection, Biometric Based Detection and Bot Deception under Bot Mitigation.
Now the Bot Mitigation tools we need to configure should show up on the left side of the screen.
Configure Known Bots Module
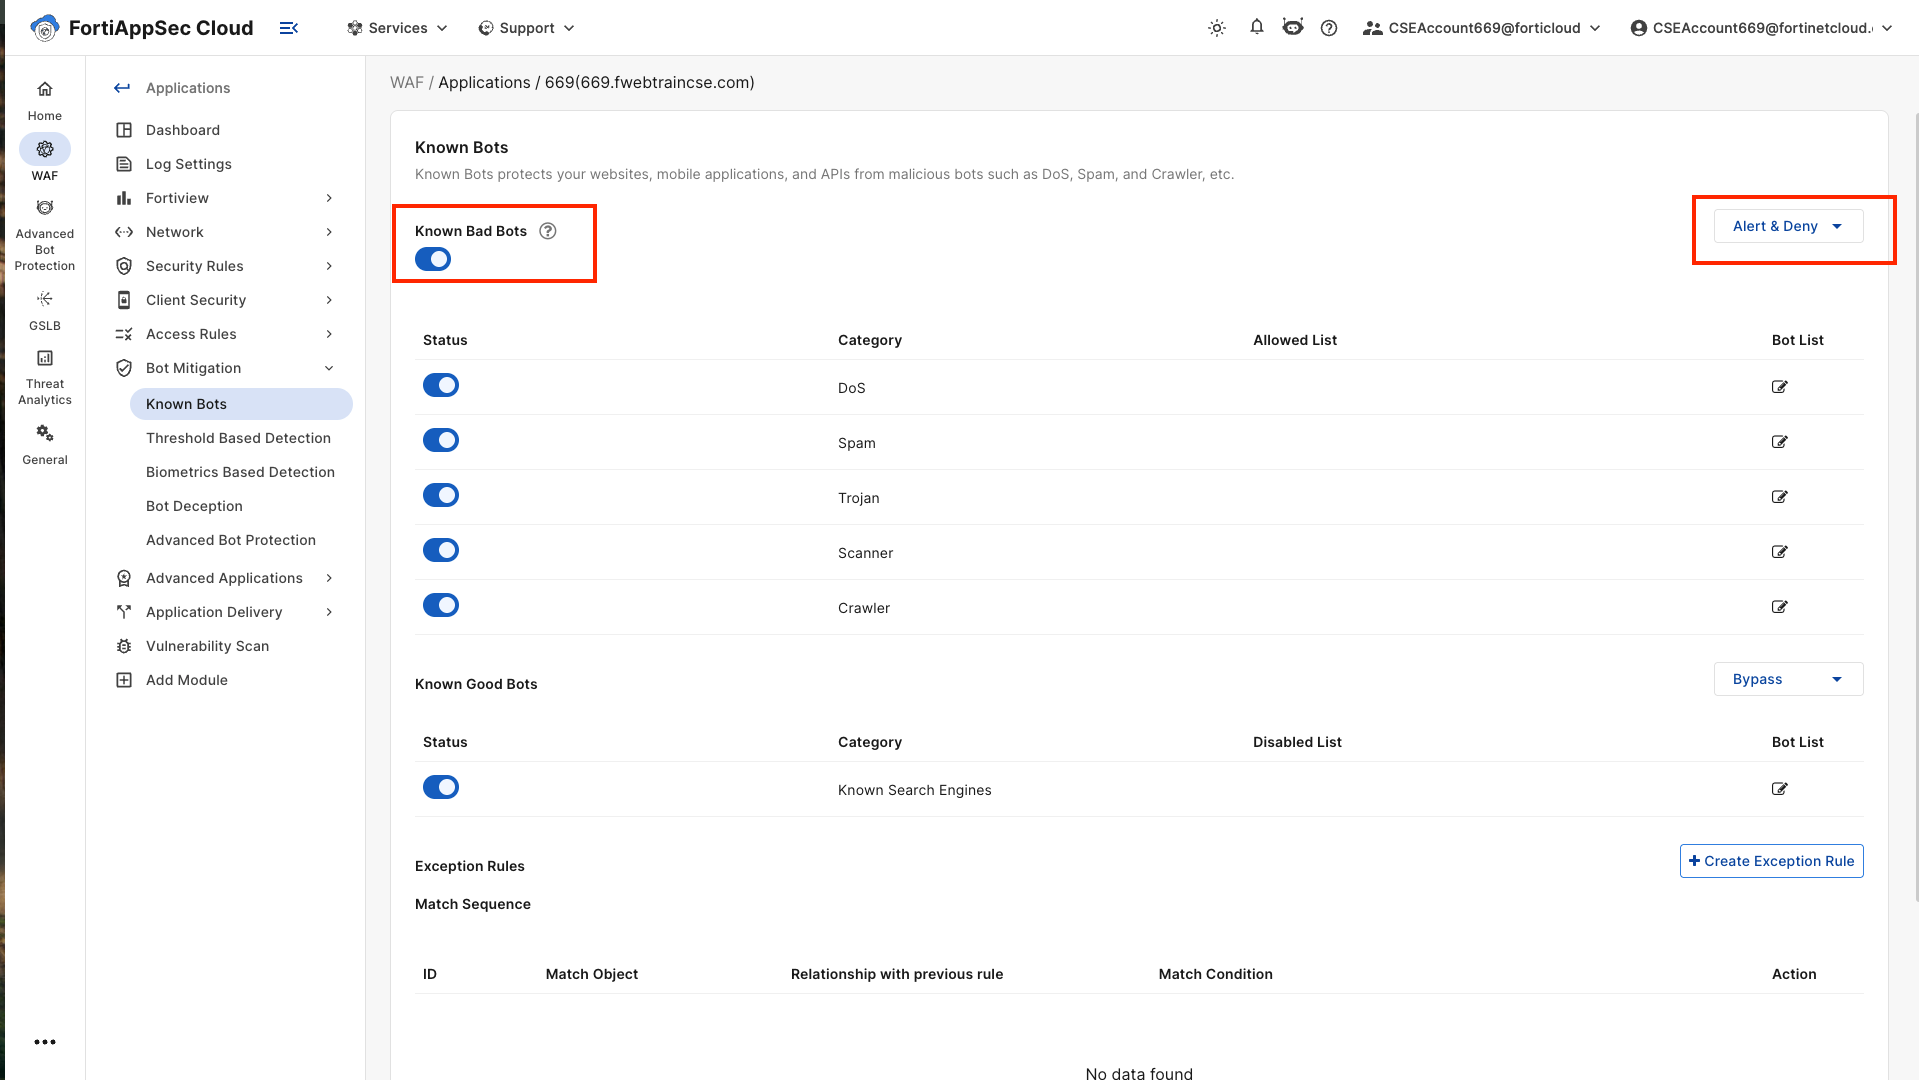
Under Bot Mitigation , select Known Bots
Change the value in the Action box to Alert and Deny , enable the known Bad Bots toggle switch Then Click Save
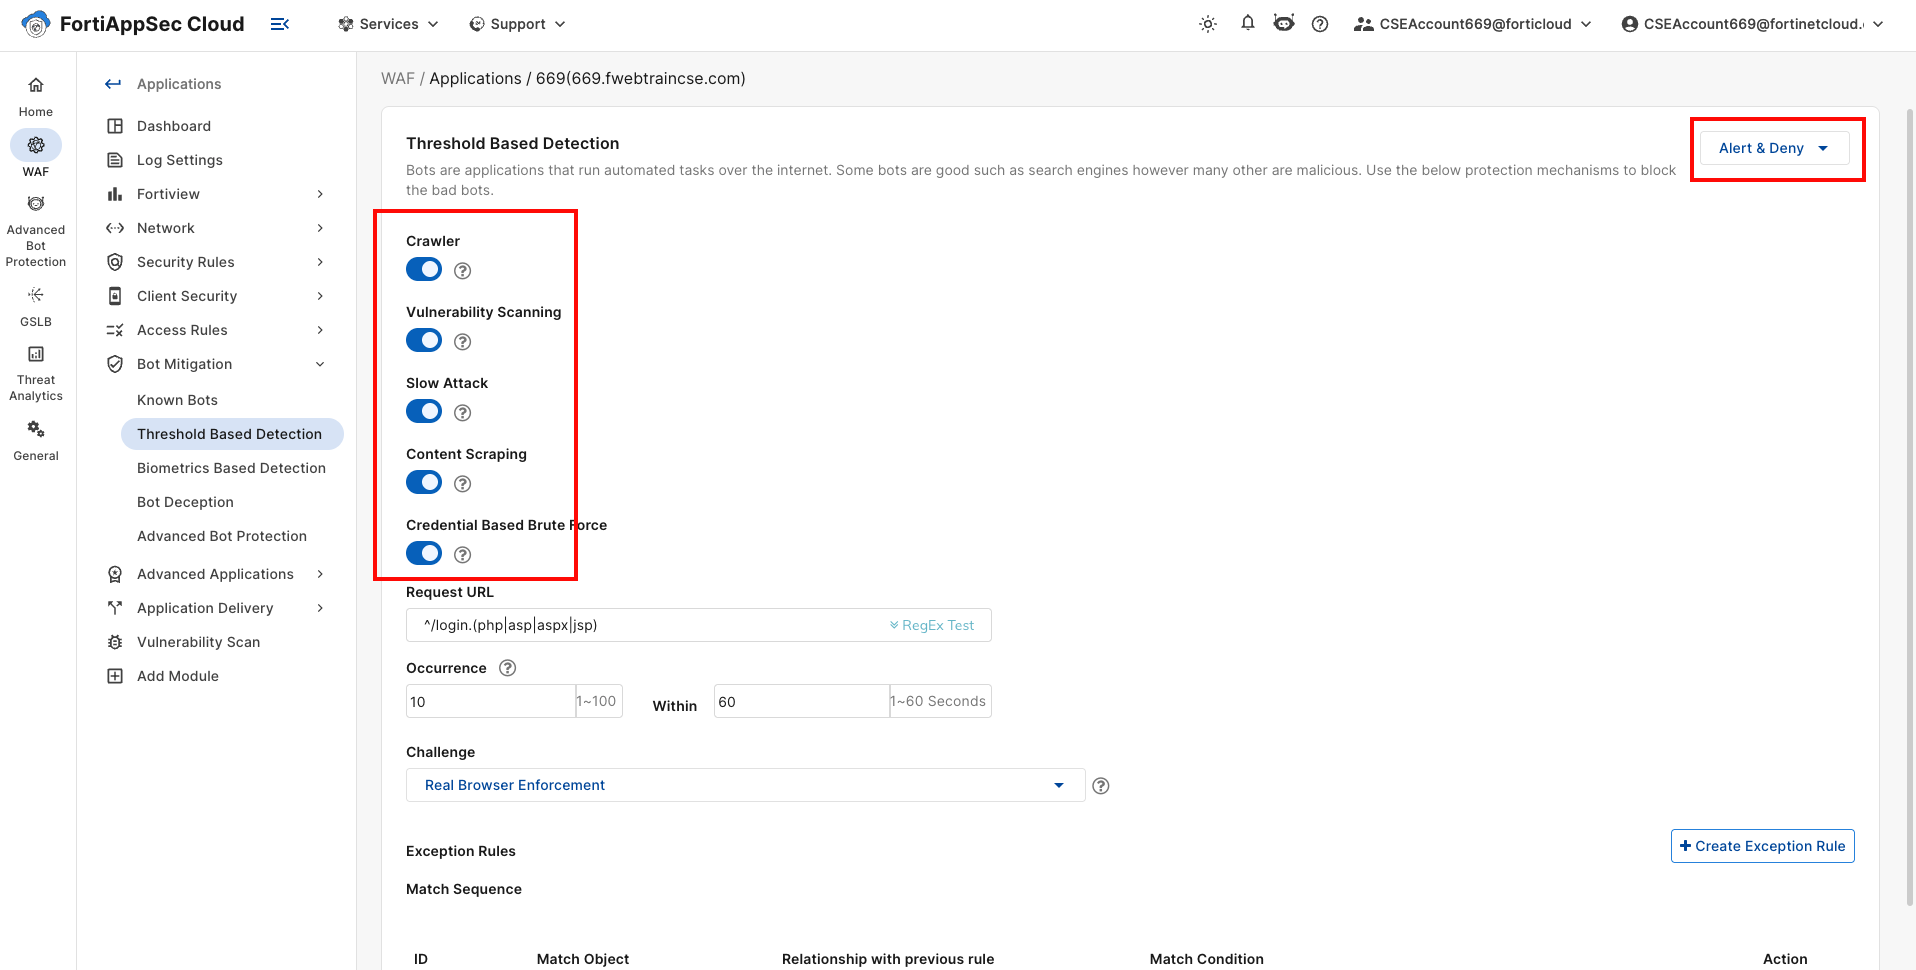
Configure Threshold Based Detection Module
Under Bot Mitigation , select Threshold Based Detection
Change the value in the Action box to Alert and Deny , enable the Crawler, Vulnerability Scanning, Slow Attack,Content Scraping,Credential Based Brute Force toggle switch. Then Click Save
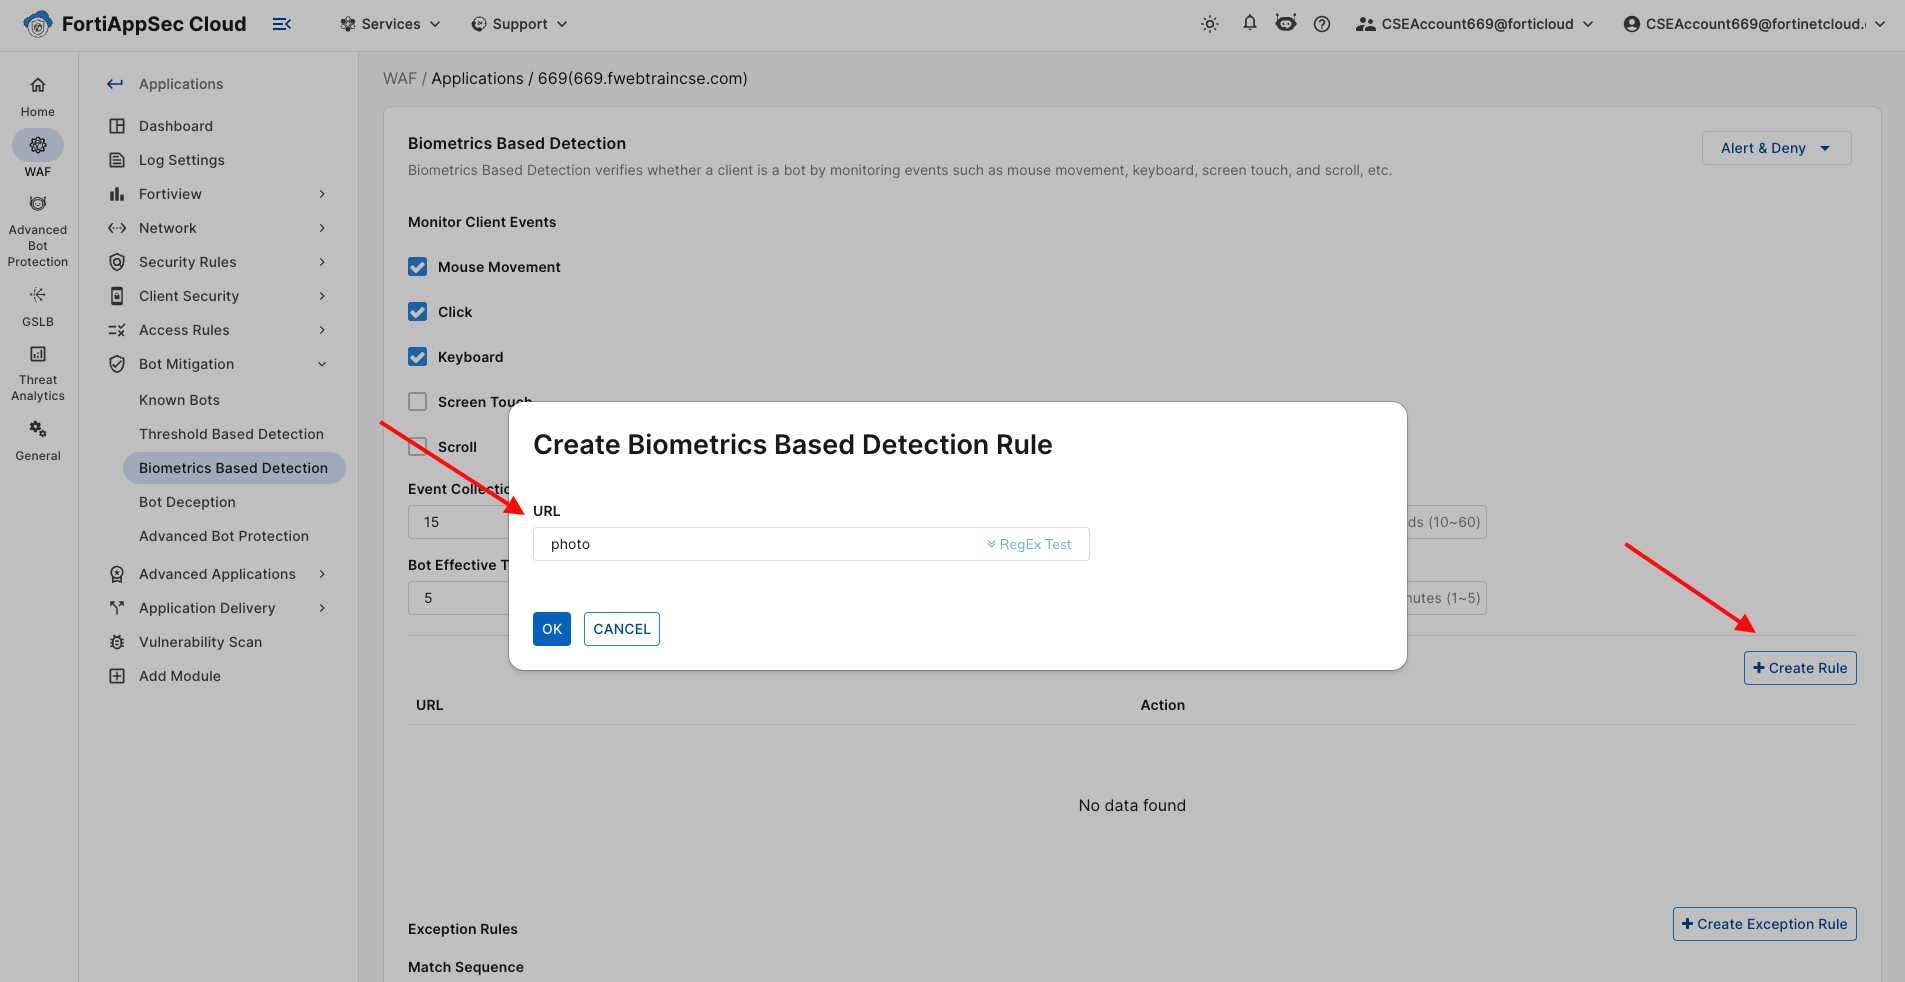
Configure Biometrics Based Detection
Under Bot Mitigation , select Biometrics Based Detection
click on Create Rule, type in photo in the URL box, Click OK to continue. Then Click Save
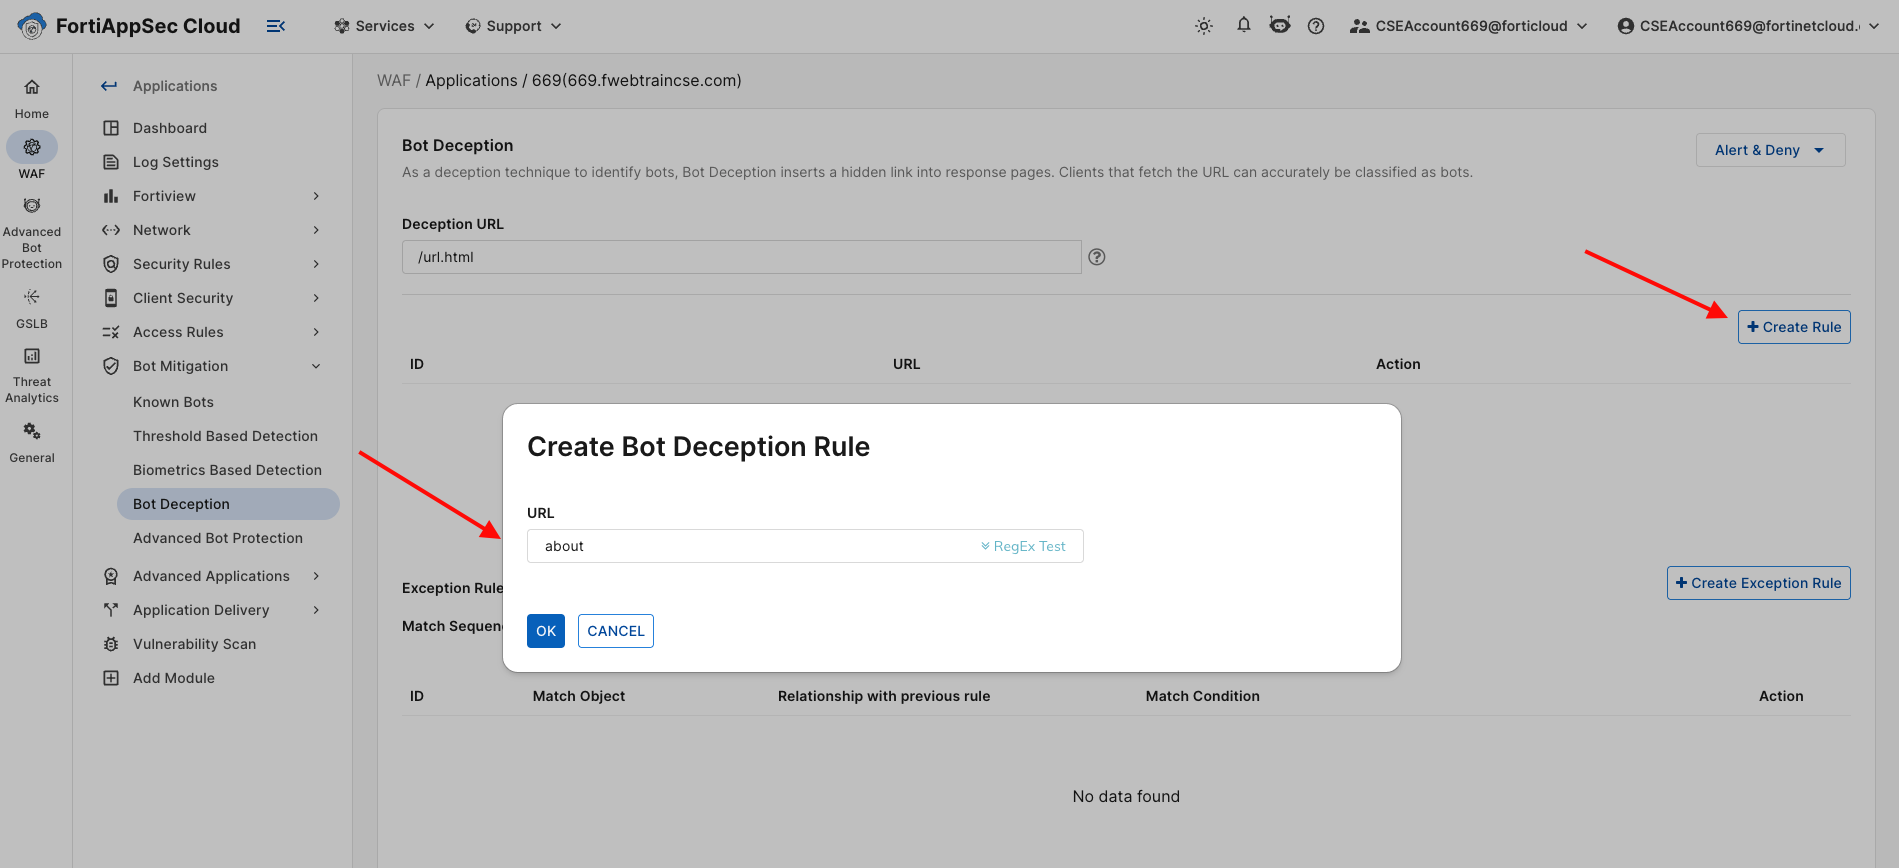
Configure Bot Deception
Under Bot Mitigation , select Bot Deception
click on Create Rule, type in about in the URL box, Click OK to continue. Then Click Save
Task 3: Simulate Bot Traffic
Goal
Run traffic to test the FortiAppSec Cloud configuration
Task
Use the provided script to simulate bot traffic
Verify task completion
If successful, simulated bot traffic will be flagged and blocked in FortiAppSec Cloud
Use the provided tool to send traffic to your application
We’ve provided a tool called bots that will simulate a mix of bot and legitimate traffic.
Log into Kali Linux: https://{{Kali IP}}:8443
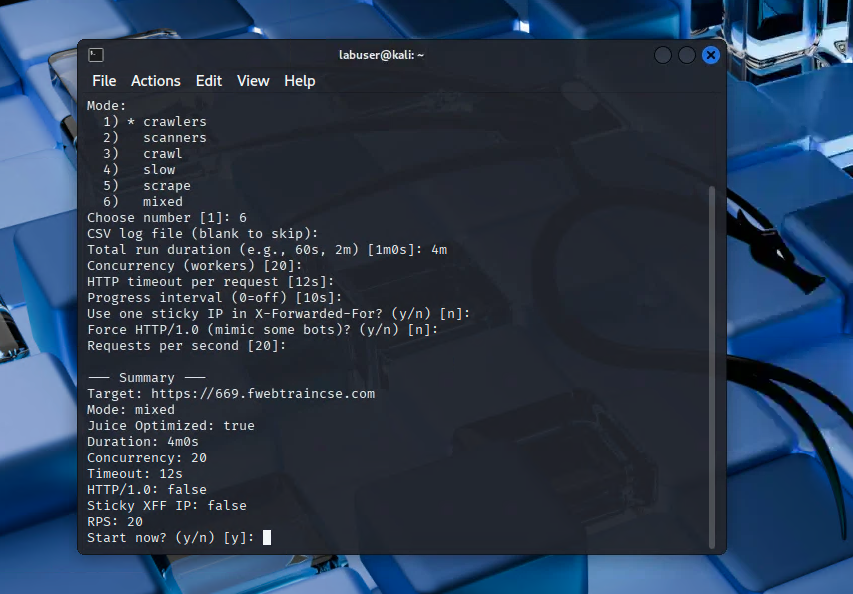
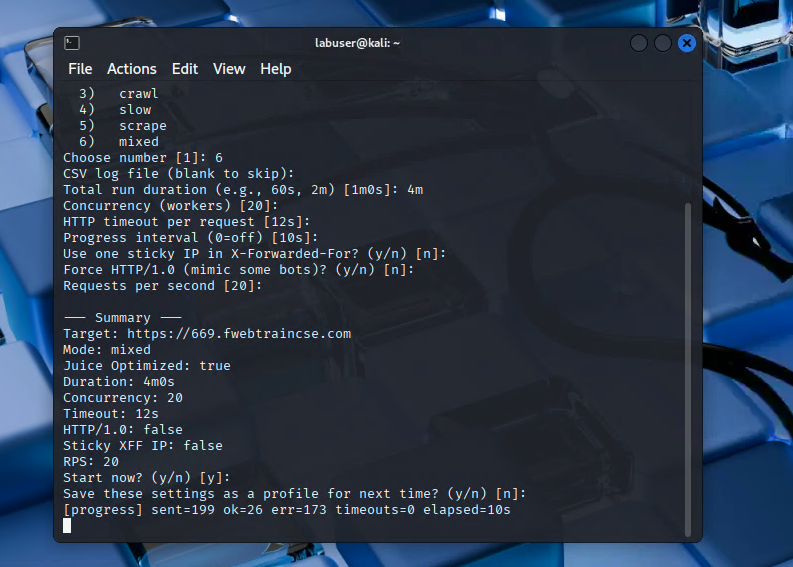
Open the terminal emulator by clicking the black box icon at the top of the Kali home screen. At the prompt, type: ./bots
You will be prompted with the following menu: ( notice most of the values are default values)
Once the tool starts running, you’ll see progress updates approximately every 10 seconds.
The bots tool will send traffic to your application protected by FortiAppSec.
Wait about 4 minutes, then start checking the dashboard and log files in FortiAppSec.
Details
If you lose access to the FortiAppSec Console, open an Incognito browser and use the link below to log back in:
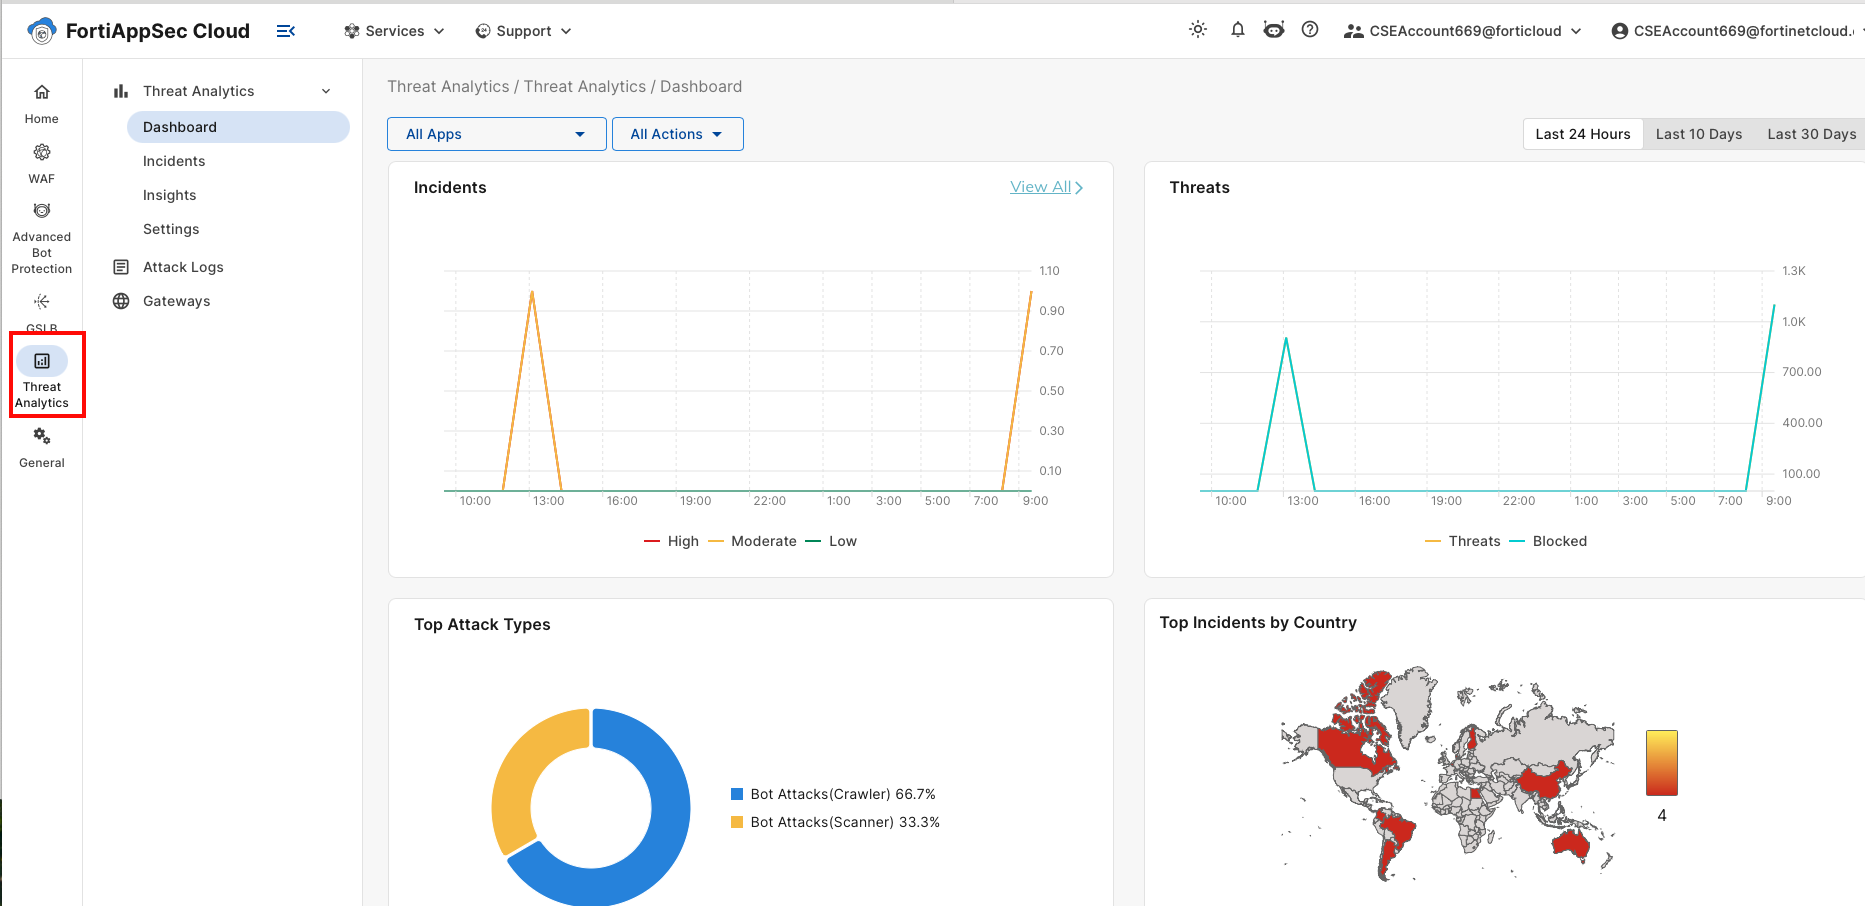
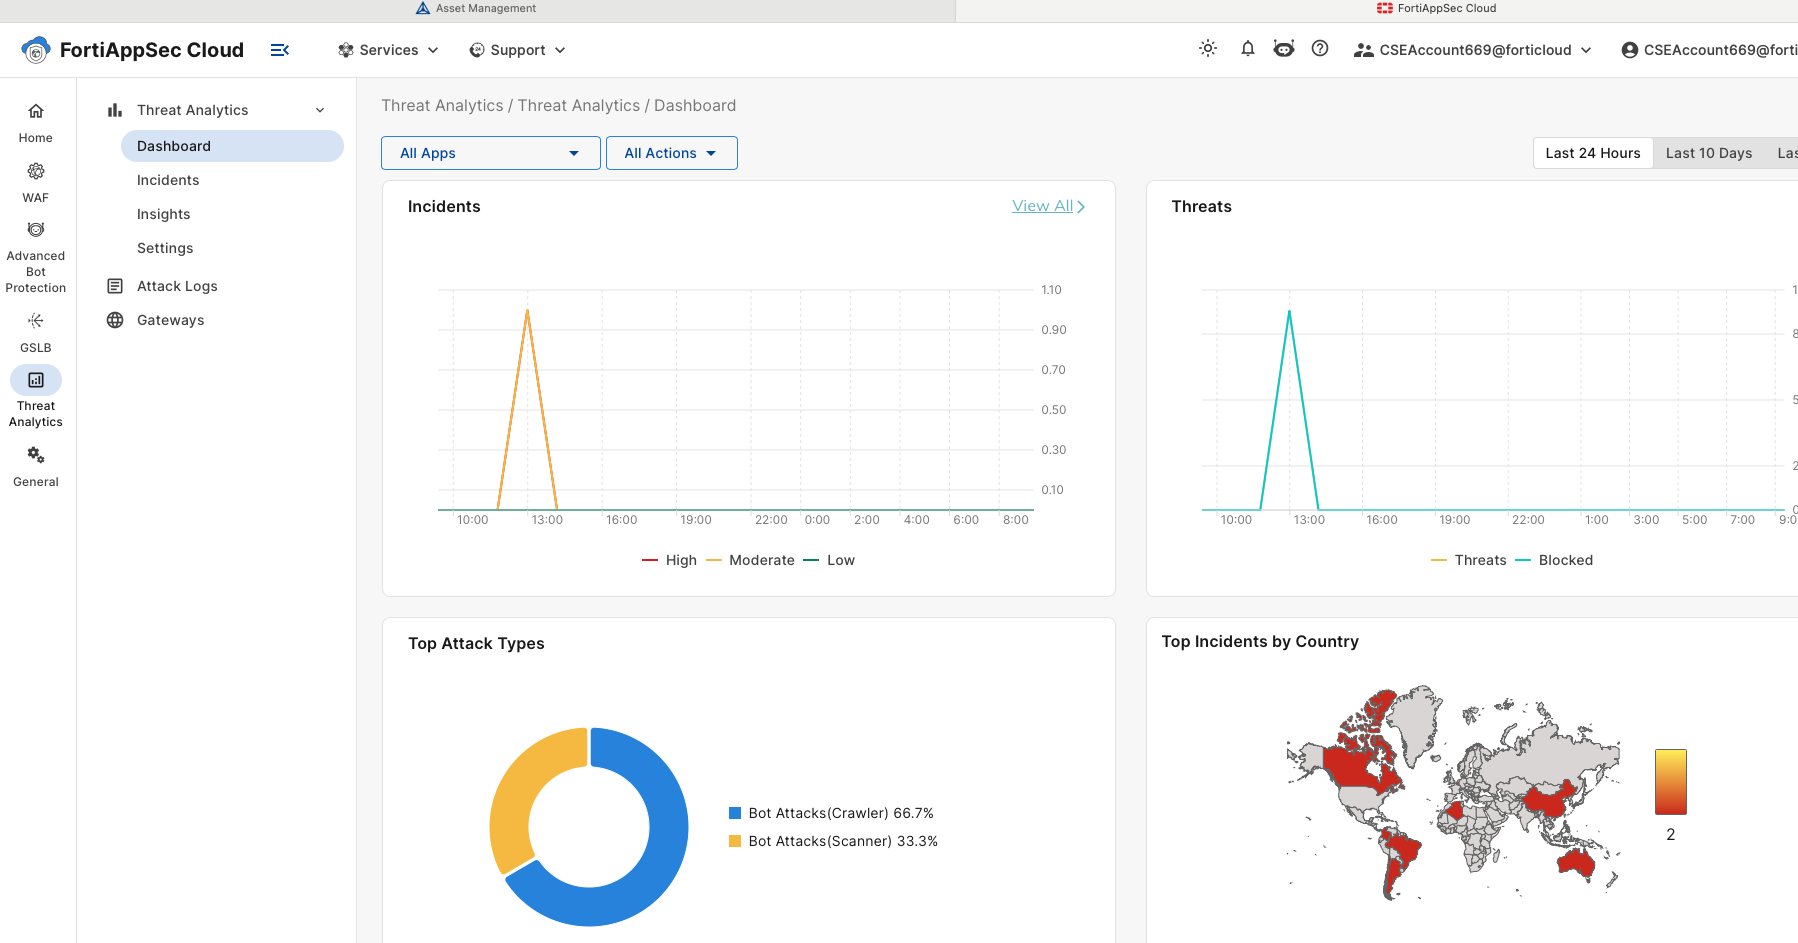
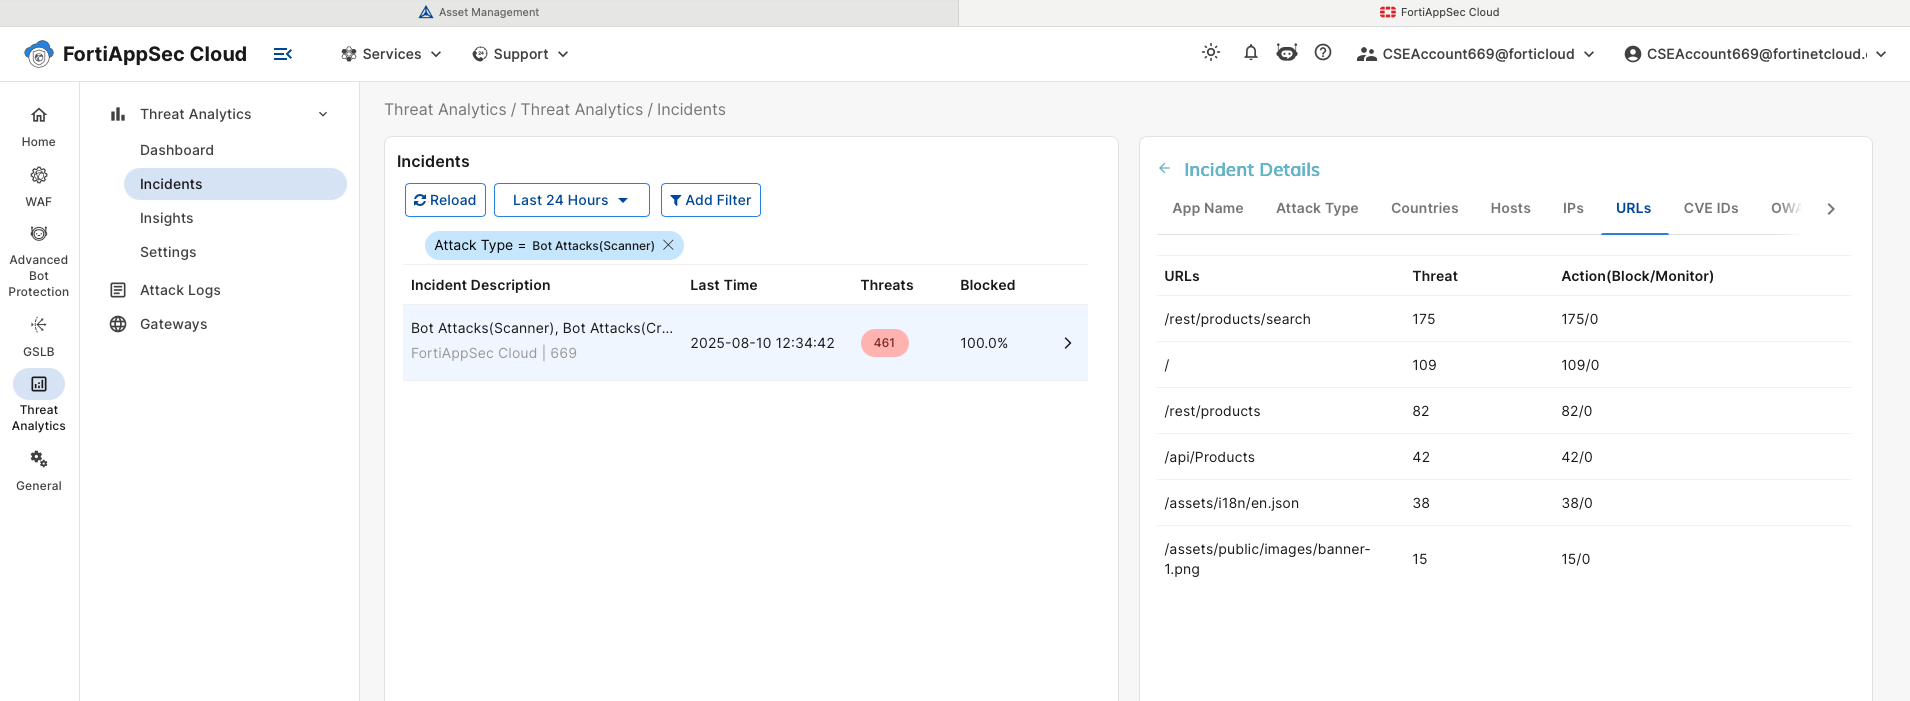
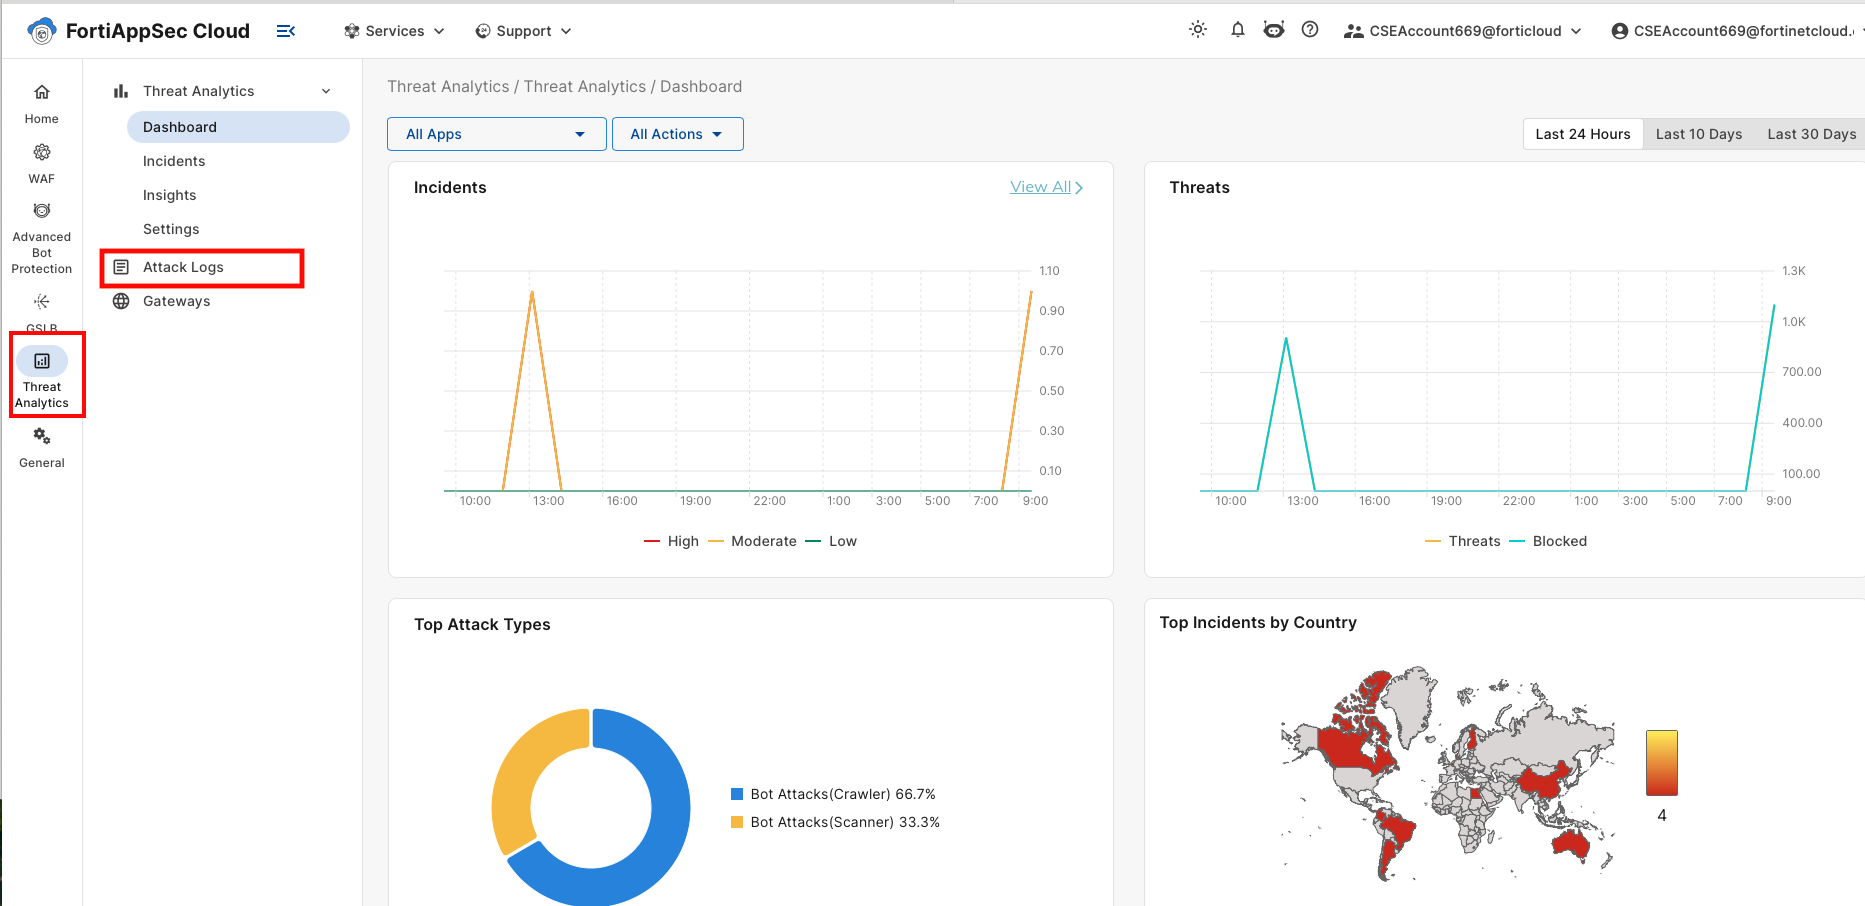
There are multiple ways to review the logs. We’ll start with the “big picture” view using incidents on the dashboard.
From the FortiAppSec Cloud Console, select *** Threat Analytics*** from the left-hand menu.
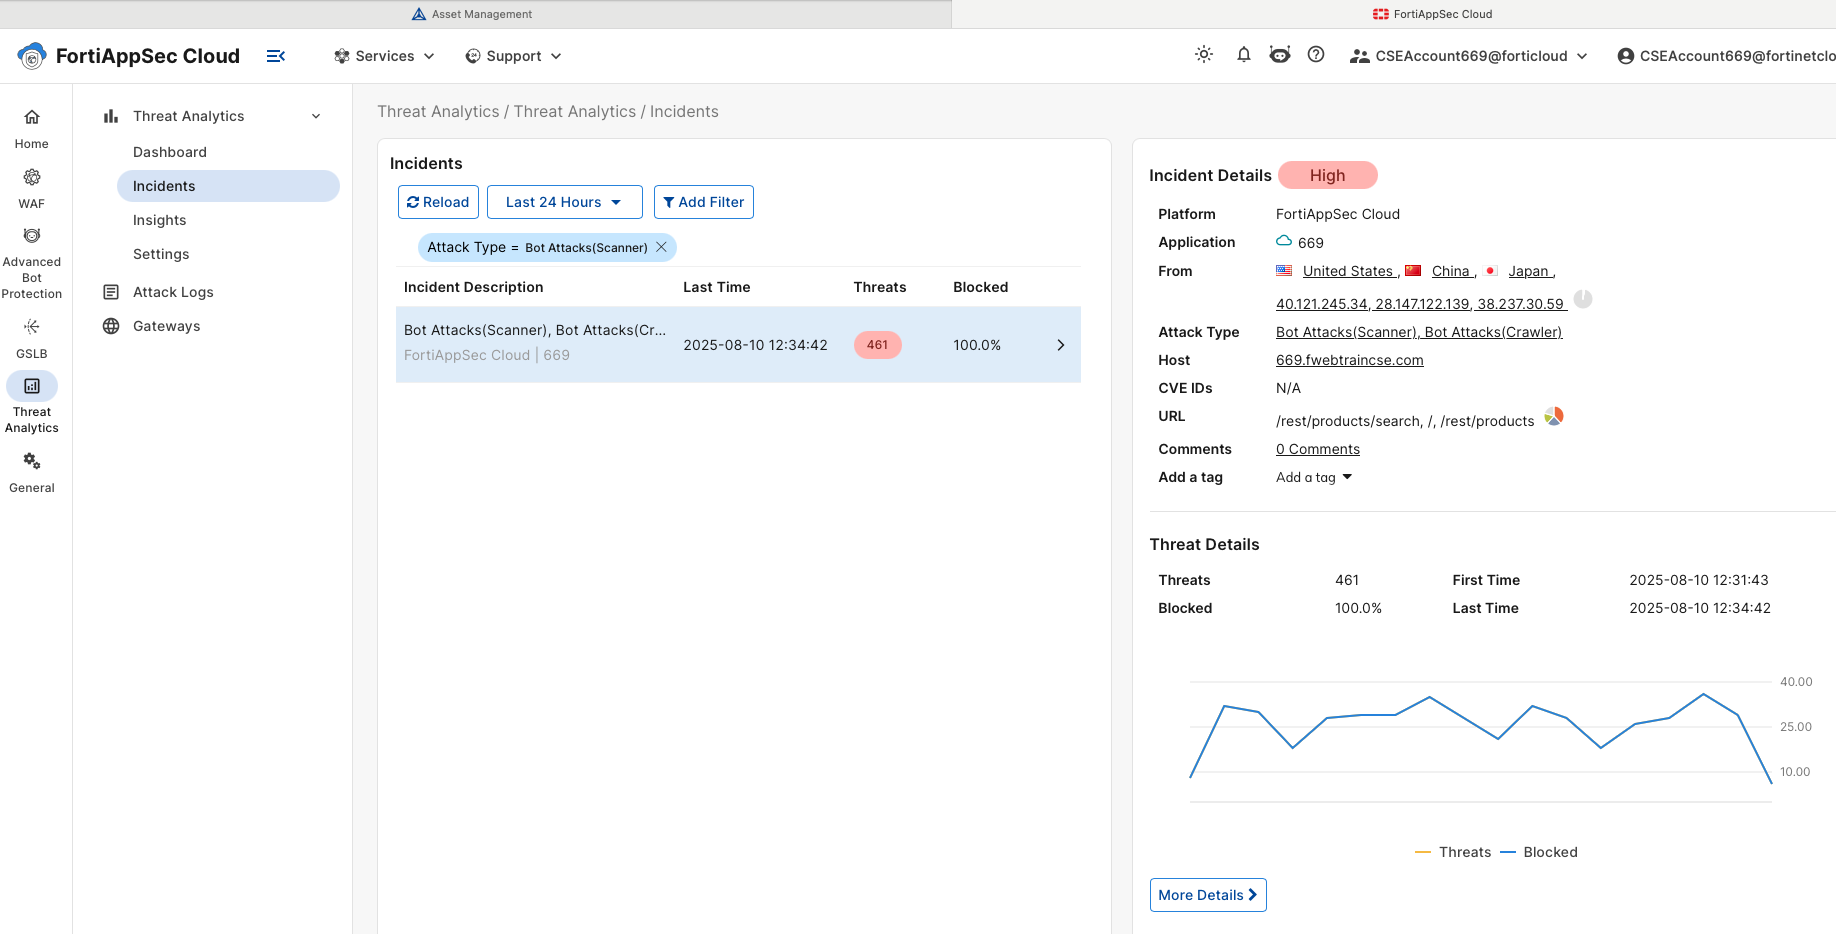
In the Top Attack Types pane click on Bot Attacks (scanner) to view incident details.
Several drill-down options will show source IP, source country, URL attacked, and more.
You’re encouraged to explore these options.
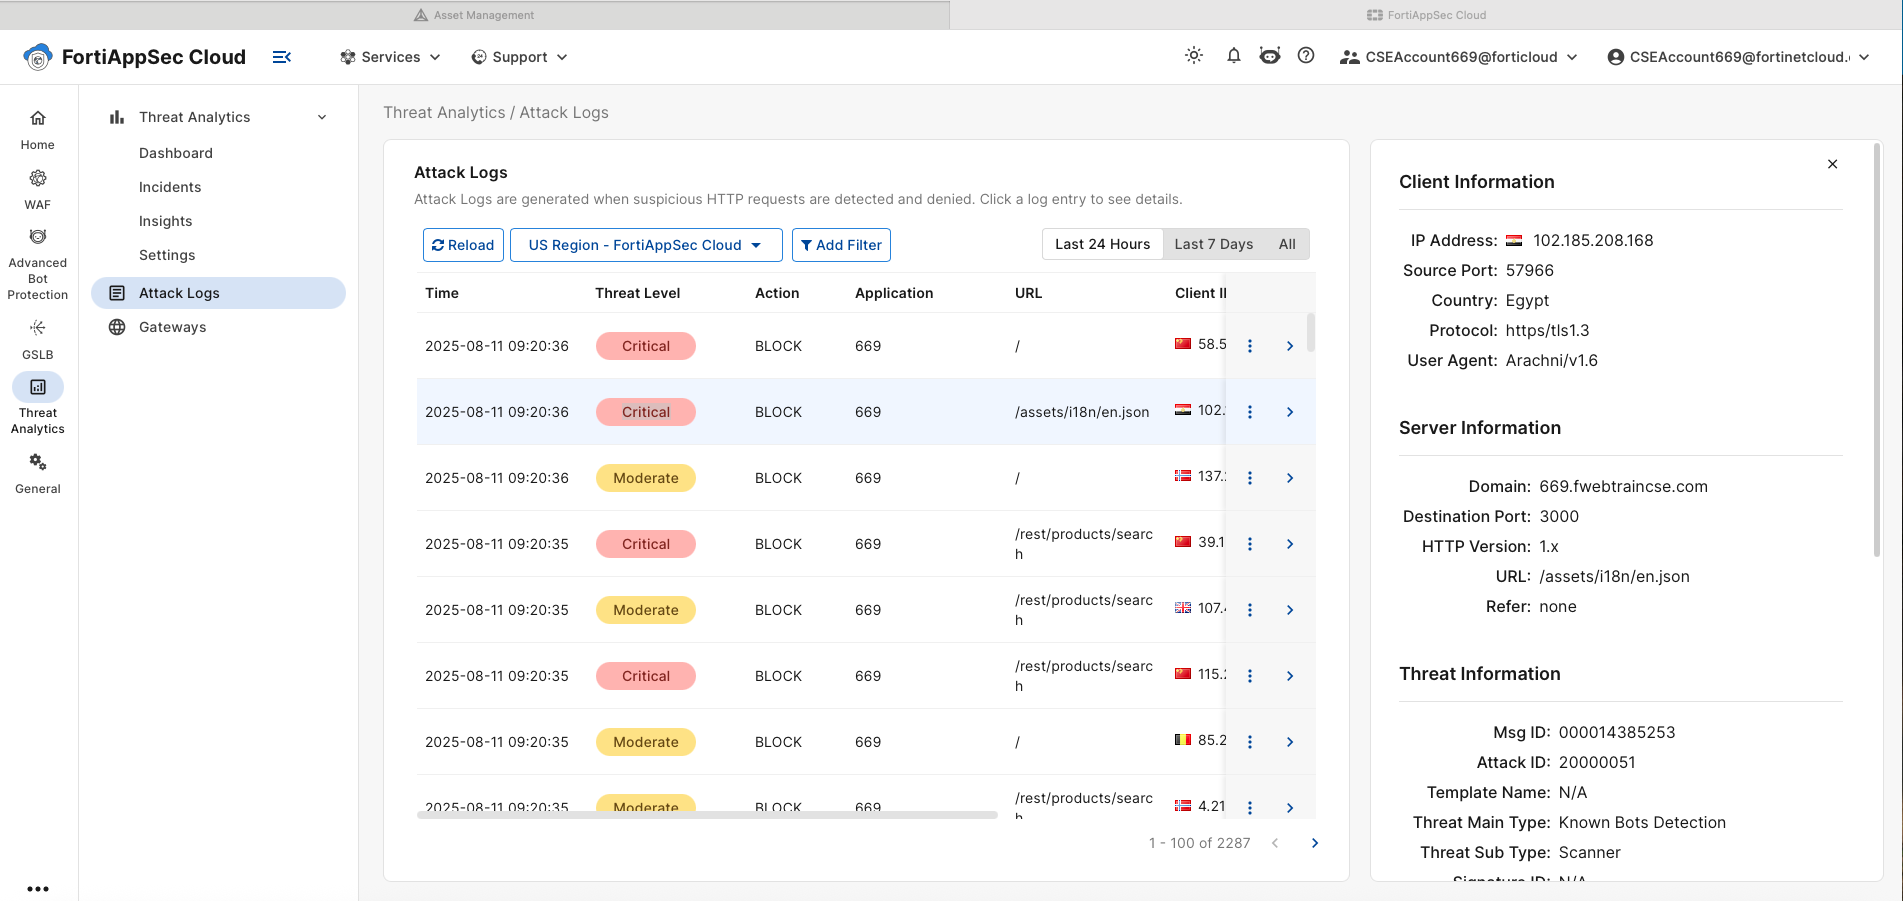
Under Threat Analytics, click on Attack Logs to view individual log entries with detailed information.
we can now look at individual log entries. Logs can be Filtered by Application, URL, Source Country etc. Logs can also be filters by time period.
please click on any log entry and investigate the detailed information provided.
Bot Mitigation Review
Review
In this module, we performed a simple bot attack to demonstrate the capabilities of the FortiAppSec solution. FortiAppSec Cloud also offers additional bot mitigation features powered by machine learning, which we will cover in a later chapter.
The provided bots tool includes many options for delivering different types of bot attacks. You can run additional simulations to see how FortiAppSec Cloud can detect and mitigate these attacks.
Section Quiz
Ch 8: In Closing
Please follow the instructions in Task 1 to delete your application. Don’t forget to complete the survey form before you leave.
Subsections of Ch 8: In Closing
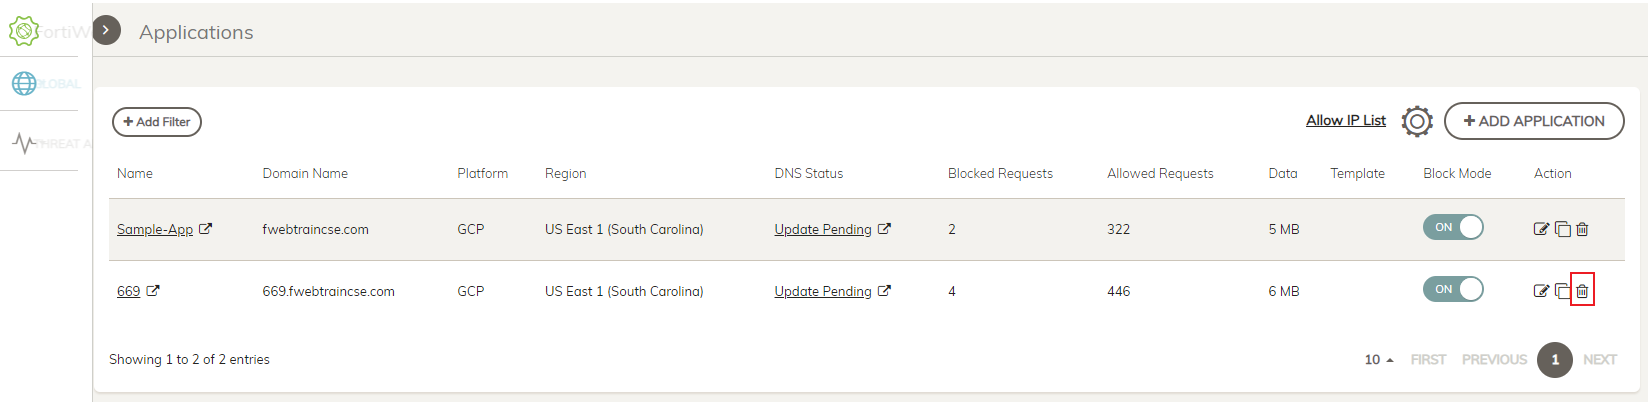
Task 1: Delete Your App
You are almost done! Please take a moment to delete only Your Application using the trashcan Icon on the right side of the application listing.
Please use the below link to log out of FortiCloud