Task 3 - Configure FortiGate BGP Session
| Goal | Complete Fortigate peering setup |
| Task | Log into Fortigates 1 and 2 and configure BGP for NCC Peering connections |
| Verify task completion | You should have two established BGP connections in each FortiGate for their respective NCC Cloud Router Peers |
Configure FortiGates
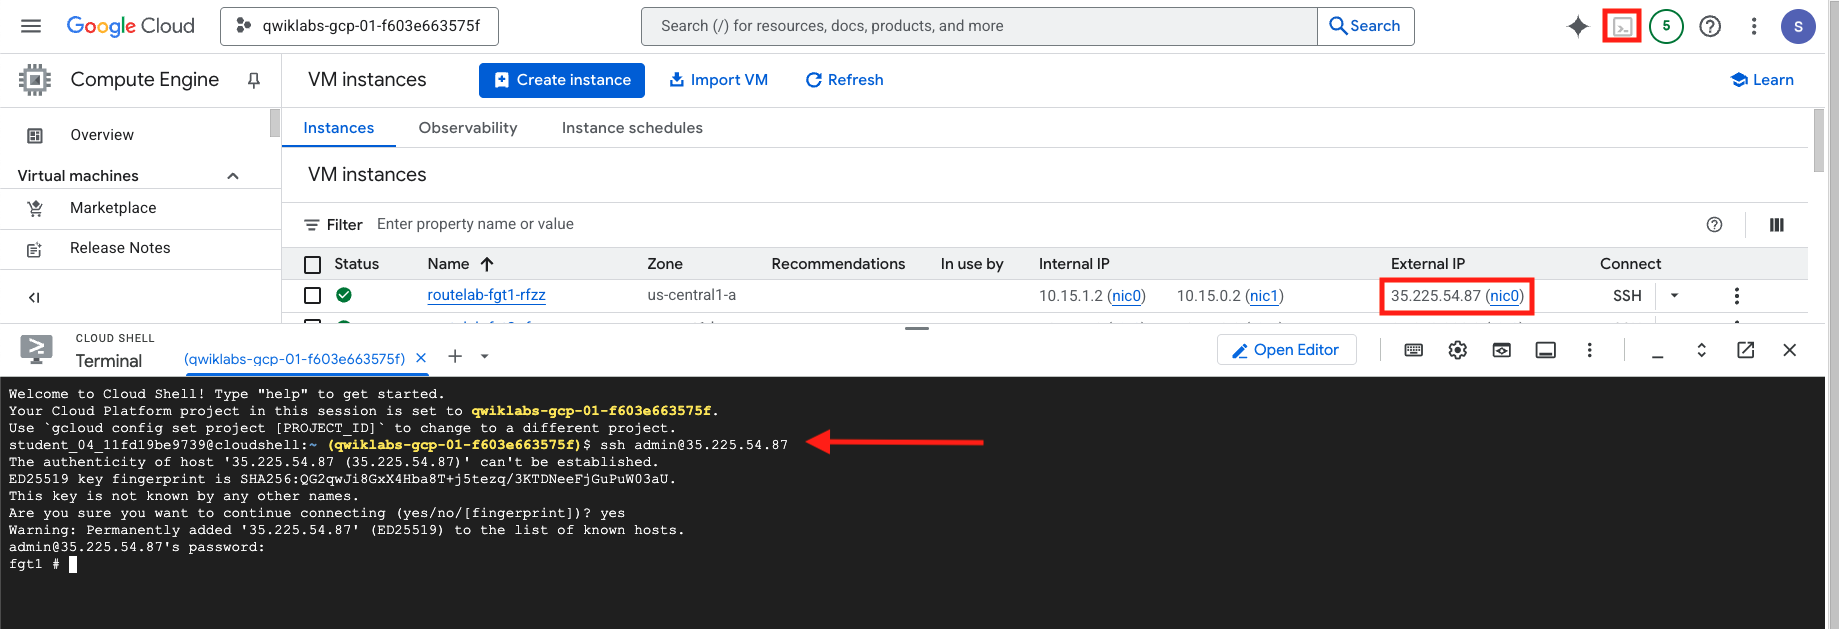
- Log into FortiGate 1 CLI:
Info
The public IP of all FortiGates can be found in the studend resources section on the left side of the qwiklabs page where you started the lab. See the GCP Console section of Chapter 1 (Setup). You can also see the External IP of each instance in the GCP Console under Compute Engine > VM instances
If you have a favorite ssh application like putty (windows) or terminal (mac), ssh using
ssh admin@<fortigate public ip>password will beFortinet1234$If not, go to the GCP Console and open a Cloud Shell terminal and issue the ssh command from there.
- Copy the below configuration and paste it into the CLI
Warning
Ensure that the router-id used in the fortigate matches the IP address for port2. This is usually .2, but is dynamically assigned by GCP
You can get the internal ip address of port 2 from the fortigate CLI using the
get sys int physical port2command.FortiGate 1 (US Central) BGP Configuration:
config router route-map
   edit nexthop1
      config rule
            edit 1
               set set-ip-nexthop 10.15.0.252
               unset set-ip-prefsrc
            next
      end
   next
   edit nexthop2
      config rule
            edit 1
               set set-ip-nexthop 10.15.0.253
               unset set-ip-prefsrc
            next
      end
   next
end

config router bgp
   set as 65200
   set router-id 10.15.0.2
   config neighbor
      edit 10.15.0.252
            set capability-default-originate enable
            set ebgp-enforce-multihop enable
            set soft-reconfiguration enable
            set remote-as 65100
            set route-map-in nexthop1
      next
      edit 10.15.0.253
            set capability-default-originate enable
            set ebgp-enforce-multihop enable
            set soft-reconfiguration enable
            set remote-as 65100
            set route-map-in nexthop2
      next
   end
end
Confirm that the BGP peers have established by typing
get router info bgp summaryIt should look similar to below:VRF 0 BGP router identifier 10.15.0.2, local AS number 65200 BGP table version is 1 1 BGP AS-PATH entries 0 BGP community entries Neighbor V AS MsgRcvd MsgSent TblVer InQ OutQ Up/Down State/PfxRcd 10.15.0.252 4 65100 4 2 0 0 0 00:00:02 2 10.15.0.253 4 65100 4 2 0 0 0 00:00:02 2 Total number of neighbors 2Look at received-routes using the commang
get router info bgp neighbor <neighbor ip> received-routesYou should see that we have recieved the CIDR block for the NCC Subnets in both us-central1 and us-east1fgt1 # get router info bgp neighbor 10.15.0.252 received-routes VRF 0 BGP table version is 1, local router ID is 10.15.0.2 Status codes: s suppressed, d damped, h history, * valid, > best, i - internal Origin codes: i - IGP, e - EGP, ? - incomplete Network Next Hop Metric LocPrf Weight RouteTag Path *> 10.15.0.0/24 10.15.0.1 100 0 0 65100 ? <-/-> *> 10.16.0.0/24 10.15.0.1 333 0 0 65100 ? <-/-> Total number of prefixes 2Confirm that the remote route is installed into the route table in the CLI with the command
get router info routing-table allfgt1 # get router info routing-table all Codes: K - kernel, C - connected, S - static, R - RIP, B - BGP O - OSPF, IA - OSPF inter area N1 - OSPF NSSA external type 1, N2 - OSPF NSSA external type 2 E1 - OSPF external type 1, E2 - OSPF external type 2 i - IS-IS, L1 - IS-IS level-1, L2 - IS-IS level-2, ia - IS-IS inter area V - BGP VPNv4 * - candidate default Routing table for VRF=0 S* 0.0.0.0/0 [10/0] via 10.15.1.1, port1, [1/0] S 10.15.0.0/24 [10/0] via 10.15.0.1, port2, [1/0] C 10.15.0.2/32 is directly connected, port2 C 10.15.1.2/32 is directly connected, port1 B 10.16.0.0/24 [20/333] via 10.15.0.252 (recursive via 10.15.0.1, port2), 00:07:10, [1/0] <--- S 35.191.0.0/16 [10/0] via 10.15.0.1, port2, [1/0] S 130.211.0.0/22 [10/0] via 10.15.0.1, port2, [1/0]Repeat steps 1-5 for FortiGate 2
FortiGate 2 (US East) BGP Configuration:
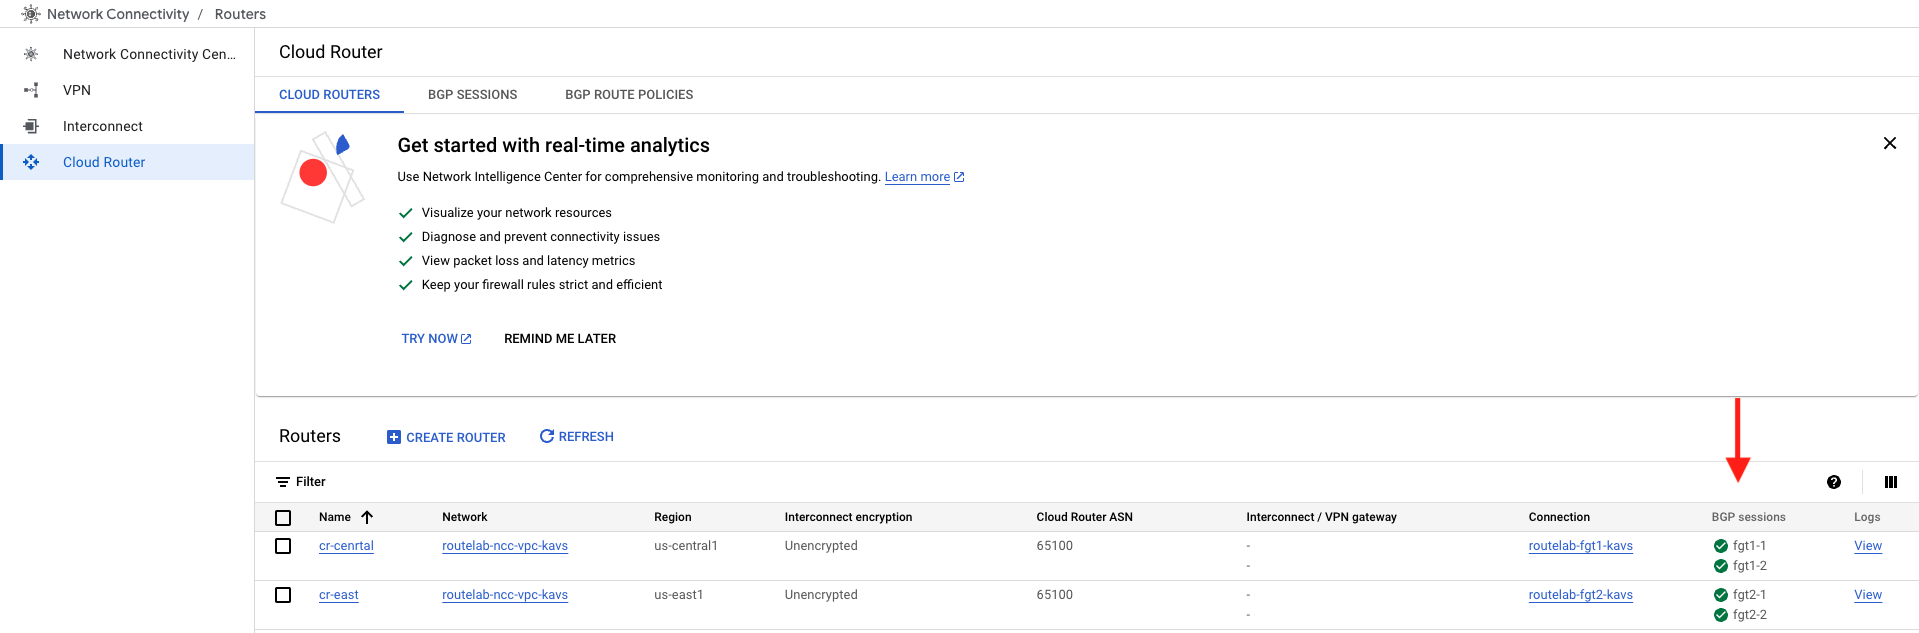
config router route-map
   edit nexthop1
      config rule
            edit 1
               set set-ip-nexthop 10.16.0.252
               unset set-ip-prefsrc
            next
      end
   next
   edit nexthop2
      config rule
            edit 1
               set set-ip-nexthop 10.16.0.253
               unset set-ip-prefsrc
            next
      end
   next
end

config router bgp
   set as 65200
   set router-id 10.16.0.2
   config neighbor
      edit 10.16.0.252
            set capability-default-originate enable
            set ebgp-enforce-multihop enable
            set soft-reconfiguration enable
            set remote-as 65100
            set route-map-in nexthop1
      next
      edit 10.16.0.253
            set capability-default-originate enable
            set ebgp-enforce-multihop enable
            set soft-reconfiguration enable
            set remote-as 65100
            set route-map-in nexthop2
      next
   end
end
Confirm BGP sessions in GCP by navigating to Cloud Router You should see two cloud routers and 4 BGP sessions (all green).
Discussion
In this final configuration step, we completed the BGP peering from the FortiGate side. We logged into each FortiGate appliance and applied the necessary BGP configuration to establish a connection with the GCP Cloud Routers. By verifying the BGP session status and the received routes on both the FortiGates and in the GCP console, we have now confirmed that our secure transit network is fully operational and ready to dynamically exchange routing information.
Chapter Summary
Congratulations on completing this chapter! You have successfully built a robust and secure transit network foundation using GCP’s Network Connectivity Center and FortiGate NVAs.
- Task 1: Create NCC Hub: We started by creating a central NCC Hub and attaching our regional FortiGates as spokes, establishing the core hub-and-spoke topology.
- Task 2: Configure Spokes: We then configured the GCP side of the connection by creating Cloud Routers for each spoke and defining the parameters for the BGP sessions.
- Task 3: Configure FortiGate BGP: Finally, we configured the FortiGate appliances to peer with the GCP Cloud Routers, enabling dynamic route exchange between your VPCs and the security appliances.
Your network is now ready for the next steps, where we will build an IPsec overlay and configure security policies.