Task 1 - Install Kubernetes
Use kubeadm to install kubernetes
use azure shell as kubenetes client
To use Azure Cloud Shell as a Kubernetes client, ensure you have completed your Terraform deployment in Azure Cloud Shell. Azure Cloud Shell comes with kubectl pre-installed, facilitating Kubernetes operations.
Navigate to your project directory where your Kubernetes workshop materials are located:
cd $HOME/k8s-101-workshopCreate a script for later use
echo 'ssh_worker_function() {
    cd $HOME/k8s-101-workshop/terraform/
    nodename=$(terraform output -json | jq -r .linuxvm_worker_FQDN.value)
    username=$(terraform output -json | jq -r .linuxvm_username.value)
    ssh -o "StrictHostKeyChecking=no" $username@$nodename
}
alias ssh_worker="ssh_worker_function"' >> $HOME/.bashrc

echo 'ssh_master_function() {
    cd $HOME/k8s-101-workshop/terraform/
    nodename=$(terraform output -json | jq -r .linuxvm_master_FQDN.value)
    username=$(terraform output -json | jq -r .linuxvm_username.value)
    export fqdn=${nodename}
    ssh -o "StrictHostKeyChecking=no"  -t $username@$nodename "export fqdn=${fqdn}; exec bash"
}
alias ssh_master="ssh_master_function"' >> $HOME/.bashrc

alias k='kubectl' >> $HOME/.bashrc
source $HOME/.bashrc
Generate ssh-key for master and worker node
- delete existing kubeconfig
rm -f ~/.kube/config- delete ssh knowhost
rm -f /home/$(whoami)/.ssh/known_hosts- get the password for VM which will be needed when use ssh-copy-id to copy ssh key into the master node. Make sure to copy the password to a notepad. You will need this to login to Master node in next steps.
cd $HOME/k8s-101-workshop/terraform/
vmpassword=$(terraform output -json | jq -r .linuxvm_password.value)
echo $vmpassword- generate ssh-key
[ ! -f ~/.ssh/id_rsa ] && ssh-keygen -q -N "" -f ~/.ssh/id_rsa- copy ssh-key to master node, enter password when prompted.
cd $HOME/k8s-101-workshop/terraform/
nodename=$(terraform output -json | jq -r .linuxvm_master_FQDN.value)
username=$(terraform output -json | jq -r .linuxvm_username.value)
ssh-copy-id -f -o 'StrictHostKeyChecking=no' $username@$nodename- copy ssh-key to worker node, enter password when prompted.
cd $HOME/k8s-101-workshop/terraform/
nodename=$(terraform output -json | jq -r .linuxvm_worker_FQDN.value)
username=$(terraform output -json | jq -r .linuxvm_username.value)
ssh-copy-id -f  -o 'StrictHostKeyChecking=no' $username@$nodename
Install kubernetes master node:
- ssh into master node to run kubernetes master installation script this step take around 4 minutes
cd $HOME/k8s-101-workshop/terraform/
nodename=$(terraform output -json | jq -r .linuxvm_master_FQDN.value)
username=$(terraform output -json | jq -r .linuxvm_username.value)
sed -i "s/localhost/$nodename/g" $HOME/k8s-101-workshop/scripts/install_kubeadm_masternode.sh
ssh -o 'StrictHostKeyChecking=no' $username@$nodename sudo kubeadm reset -f
ssh -o 'StrictHostKeyChecking=no' $username@$nodename < $HOME/k8s-101-workshop/scripts/install_kubeadm_masternode.sh
Install kubernetes worker node :
- ssh into worker node to run kubernetes worker installation script this step take around 3 minutes
cd $HOME/k8s-101-workshop/terraform/
nodename=$(terraform output -json | jq -r .linuxvm_worker_FQDN.value)
username=$(terraform output -json | jq -r .linuxvm_username.value)
ssh -o 'StrictHostKeyChecking=no' $username@$nodename sudo kubeadm reset -f
ssh -o 'StrictHostKeyChecking=no' $username@$nodename < $HOME/k8s-101-workshop/scripts/install_kubeadm_workernode.sh
Join worker node to cluster
cd $HOME/k8s-101-workshop/terraform/
nodename=$(terraform output -json | jq -r .linuxvm_master_FQDN.value)
username=$(terraform output -json | jq -r .linuxvm_username.value)
scp -o 'StrictHostKeyChecking=no' $username@$nodename:workloadtojoin.sh .
nodename=$(terraform output -json | jq -r .linuxvm_worker_FQDN.value)
username=$(terraform output -json | jq -r .linuxvm_username.value)
ssh -o 'StrictHostKeyChecking=no' $username@$nodename < ./workloadtojoin.sh
Prepare access kubernetes from azure shell
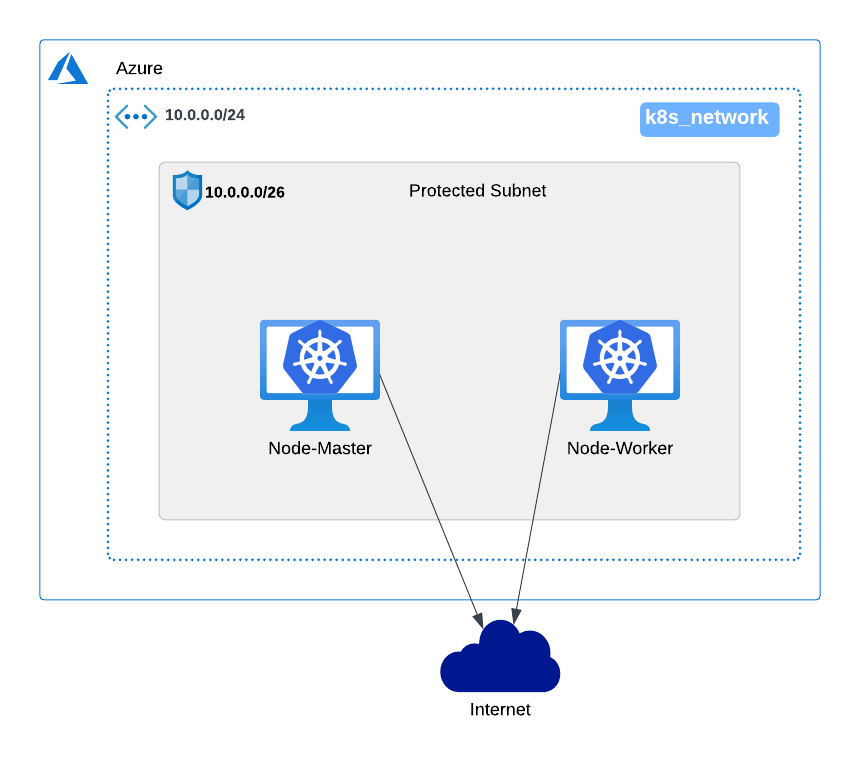
- To use Kubernetes from Azure Shell, copy your kubectl configuration. Because Azure Shell is external to your Azure VM VPC, you must use the Kubernetes master node’s public IP for access. Follow these steps:
cd $HOME/k8s-101-workshop/terraform/
nodename=$(terraform output -json | jq -r .linuxvm_master_FQDN.value)
username=$(terraform output -json | jq -r .linuxvm_username.value)
rm -rf $HOME/.kube/
mkdir -p ~/.kube/
scp -o 'StrictHostKeyChecking=no' $username@$nodename:~/.kube/config $HOME/.kube
sed -i "s|server: https://[0-9]\{1,3\}\.[0-9]\{1,3\}\.[0-9]\{1,3\}\.[0-9]\{1,3\}:6443|server: https://$nodename:6443|" $HOME/.kube/config
Verify the installation
- From your Azure shell, watch the node getting “Ready”. it will take a while to get worker node become “Ready”.
watch kubectl get nodeexpected outcome
NAME          STATUS   ROLES           AGE   VERSION
node-worker   Ready    <none>          14m   v1.27.1
nodemaster    Ready    control-plane   18m   v1.27.1
Summary
This chapter focuses on installing a Kubernetes cluster using a kubeadm based installation script. we created a Kubernetes cluster with one master node and one worker node. We can continue to deploy and scalling application.
We do not delve into the details of the script used for installing the Kubernetes master and worker nodes. If you wish to understand more about what the installation script entails, please refer to step by step installation guide.
Review Questions
- What is the kube-API FQDN name in kubeconfig ?
- What is the version of this Kubernetes server ?
- What is the container runtime name and version ?
- Describe general step to add a new VM as worker node in this cluster
IN CASE YOU RUNNING INTO PROBLEM
you can re-install kubernetes or remove VM node then create again to starting over.
Re-Install Kubernetes
Warning
If you wish to start over and completely remove Kubernetes from all master and worker nodes, execute the following command on each node.This step is ideal if you're seeking a clean slate for experimenting further or if any part of the setup did not go as planned:
ssh into master worker and worker node with alias ssh_master and ssh_worker
then on master or worker node , run sudo kubeadm reset -f.
Note: This action will reset your Kubernetes cluster, removing all configurations, deployments, and associated data. It’s a critical step, so proceed with caution.
if you are satisfied with your current Kubernetes setup and ready to move on to the next task, you can skip this step. This flexibility allows you to either delve deeper into Kubernetes functionalities or reset your environment for additional testing and learning opportunities.
Starting Over
Warning
if you want delete VM completely and try again, use terraform script below.
- delete VM
cd $HOME/k8s-101-workshop/terraform/ && terraform destroy -var="username=$(whoami)" --auto-approve
- create VM again
cd $HOME/k8s-101-workshop/terraform/ && terraform apply -var="username=$(whoami)" --auto-approve