Task 3 - Introduction to Kubernetes Security
Objective
Learn how to use RBAC to control access to the Kubernetes Cluster.
What is RBAC
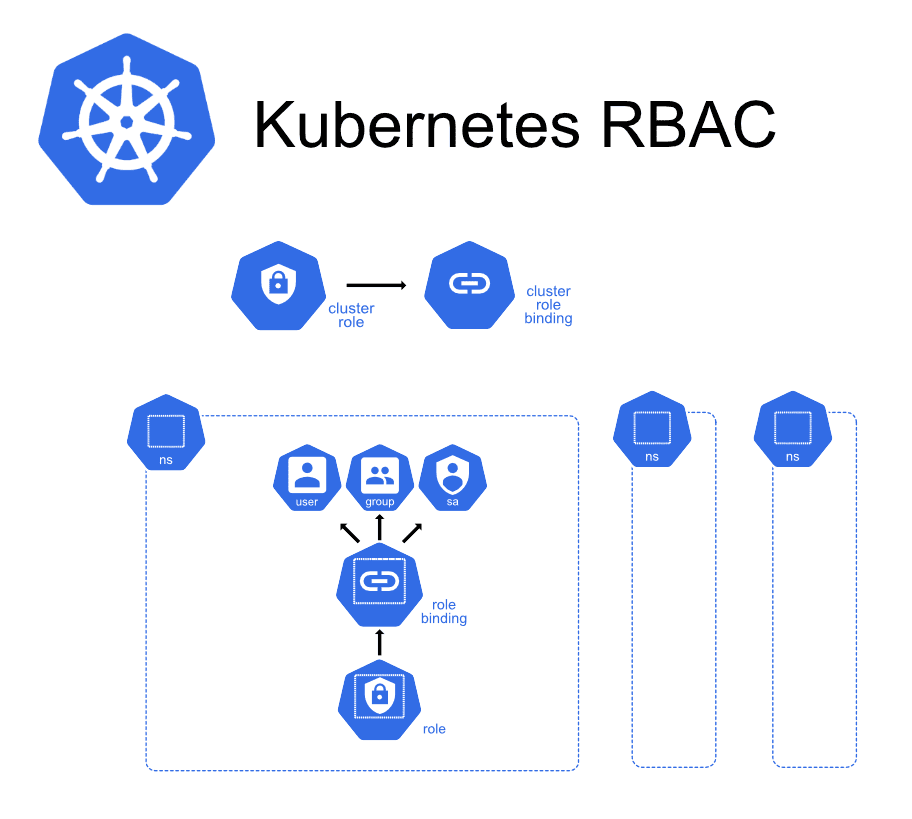
Kubernetes RBAC (Role-Based Access Control) is an authorization mechanism that regulates interactions with resources within a cluster. It operates by defining roles with specific permissions and binding these roles to users or service accounts. This approach ensures that only authorized entities can perform actions on resources such as pods, deployments, or secrets. By adhering to the principle of least privilege, RBAC allows each user or application access only to the permissions necessary for their tasks. It’s important to note that RBAC deals exclusively with authorization and not with authentication; it assumes that the identity of users or service accounts has been verified prior to enforcing access controls.
Below let’s walk through how to define a role with limited permission and apply to an user for access Kubernetes Cluster
Task 1: Create Read-Only User for Access Cluster
Create a New User Account for Developers to Access the Kubernetes Cluster, the user only has read-only permission
Create a Certificate for the User
Generate a Certificate Signing Request (CSR):
CSRKubernetes uses the group “system:authenticated” as a predefined label, which is trusted by external clients to dictate group membership. Kubernetes itself does not validate which group a user belongs to. This step involves generating a private key and a CSR using OpenSSL.
openssl genrsa -out newuser.key 2048
openssl req -new -key newuser.key -out newuser.csr -subj "/CN=tecworkshop/O=Devops"
Create a YAML file for the CSR object in Kubernetes. This object includes the base64-encoded CSR data.
cat << EOF | tee csrfortecworkshop.yaml
apiVersion: certificates.k8s.io/v1
kind: CertificateSigningRequest
metadata:
  name: tecworkshop
spec:
  groups:
    - system:authenticated
  request: $(cat newuser.csr | base64 | tr -d "\n")
  signerName: kubernetes.io/kube-apiserver-client
  usages:
    - client auth
EOF
kubectl create -f csrfortecworkshop.yaml
Initially, the CSR will be in a pending state.
kubectl get csr tecworkshopYou should see Condition as Pending
NAME          AGE   SIGNERNAME                            REQUESTOR           REQUESTEDDURATION   CONDITION
tecworkshop   18s   kubernetes.io/kube-apiserver-client   kubernetes-admin    <none>              Pending
Approve the CSR:
ApproveApprove the CSR to issue the certificate.
kubectl certificate approve tecworkshopVerify the CSR has been approved and issued:
kubectl get csr tecworkshopYou should see Condition as Approved, Issued
NAME          AGE   SIGNERNAME                            REQUESTOR           REQUESTEDDURATION   CONDITION
tecworkshop   66s   kubernetes.io/kube-apiserver-client   kubernetes-admin    <none>              Approved,Issued
Save the Certificate to a File:
Save CertExtract and decode the certificate.
kubectl get csr tecworkshop -o jsonpath='{.status.certificate}' | base64 --decode > newuser.crtOptionally, View Certificate Details:
openssl x509 -in newuser.crt -text -nooutSet Credentials for the New User:
Configure kubectl to use the new user’s credentials.
kubectl config set-credentials tecworkshop --client-certificate=newuser.crt --client-key=newuser.keyCreate a New Context for the New User:
Set up a context that specifies the new user and cluster.
  adminContext=$(kubectl config current-context)
  adminCluster=$(kubectl config current-context | cut -d '@' -f 2)
  kubectl config set-context tecworkshop-context --cluster=$adminCluster --user=tecworkshop
Switch to the New Context:
Use the new context to interact with the cluster as the new user.
kubectl config use-context tecworkshop-contextAttempt to retrieve pods; it should fail due to lack of permissions.
kubectl get podsYou should see an error:
Error from server (Forbidden): pods is forbidden: User "tecworkshop" cannot list resource "pods" in API group "" in the namespace "default"
Task 2: Authorize the User to List All Pods in All Namespaces
Use RBAC to grant the new user permission to list all pods across all namespaces.
- Switch to an Admin Context:
You need sufficient permissions to create roles and role bindings.
kubectl config use-context $adminContext- Define a ClusterRole:
Create a ClusterRole that allows reading pods across all namespaces.
kubectl create clusterrole readpods --verb=get,list,watch --resource=pods- Bind the ClusterRole to the New User:
Create a ClusterRoleBinding to assign the role to the new user.
kubectl create clusterrolebinding readpodsbinding --clusterrole=readpods --user=tecworkshop- Switch Back to the New User Context:
kubectl config use-context tecworkshop-context- Verify Permissions:
Now, the new user should be able to list pods in all namespaces.
kubectl get pod -AOr, check specific permissions:
kubectl auth can-i get pods -AYou should be able to view all pods and have yes to specific permissions
yesSwitch back to admin user
make sure switch back to admin user for full control the k8s cluster
kubectl config use-context $adminContextSummary
Above, we have detailed the process for granting human users the least privilege necessary to access the Kubernetes cluster. In the next chapter, we will explore how to restrict a POD or container by using a service account with the least privilege necessary for accessing the cluster.
This ensures that not only are human users operating under the principle of least privilege, but automated processes and applications within your cluster are also adhering to strict access controls, enhancing the overall security posture of your Kubernetes environment.
Clean up
kubectl config use-context $adminContext
kubectl config delete-context tecworkshop-context
kubectl config delete-user tecworkshop