Fortinet XPerts 2024

Welcome to the Kubernetes 201 Workshop!

This is a continuation of the K8s 101 workshop. This workshop will help you understand the role of cFOS in Kubernetes security, focusing on ingress and egress protection.

Chapters 2, 3, 4, 5, and 6 extend the previous K8s 101 workshop, focusing on concepts used in cFOS use cases. Even if you are already familiar with these topics, you can benefit from reviewing Chapters 2 through 6.

if you already familar with k8s concept, you only want learn cFOS ingress and egress use case, then you can take Chapter 1 then go directly to Chapter 7 and 9.

Chapter 1

Get your Kubernetes cluster ready.

after completed setup azure cloudShell then set variable first then choose one of the following options:

Chapter 2

Brief overview of Kubernetes security and Fortinet solutions.

Chapter 3

Role-Based Access Control (RBAC).

  • Role & ClusterRole
  • Role & ClusterRole for cFOS
  • Best Practices

Chapter 4

RoleBinding and ClusterRoleBinding.

  • RoleBinding
  • ClusterRoleBinding
  • Use Cases

Chapter 5

ConfigMap and Secret management.

  • Overview
  • ConfigMap and Secret
  • Storage

Chapter 6

Kubernetes Network Basics.

  • What is CNI
  • Basics of Kubernetes Networking
  • The Challenge of Having Only a Single Interface for Pods

Chapter 7

cFOS ingress use case.

  • Application without cFOS protection
  • Application with cFOS protection

Chapter 8

Introduction to Multus CNI.

  • What is Multus
  • Installation of Multus CNI

Chapter 9

cFOS egress use case:

  • Egress to the internet
  • Pod-to-pod traffic protection
Version:
Last updated: Thu, May 22, 2025 22:26:19 UTC
Copyright© 2025 Fortinet, Inc. All rights reserved. Fortinet®, FortiGate®, FortiCare® and FortiGuard®, and certain other marks are registered trademarks of Fortinet, Inc., and other Fortinet names herein may also be registered and/or common law trademarks of Fortinet. All other product or company names may be trademarks of their respective owners. Performance and other metrics contained herein were attained in internal lab tests under ideal conditions, and actual performance and other results may vary. Network variables, different network environments and other conditions may affect performance results. Nothing herein represents any binding commitment by Fortinet, and Fortinet disclaims all warranties, whether express or implied, except to the extent Fortinet enters a binding written contract, signed by Fortinet’s General Counsel, with a purchaser that expressly warrants that the identified product will perform according to certain expressly-identified performance metrics and, in such event, only the specific performance metrics expressly identified in such binding written contract shall be binding on Fortinet. For absolute clarity, any such warranty will be limited to performance in the same ideal conditions as in Fortinet’s internal lab tests. Fortinet disclaims in full any covenants, representations, and guarantees pursuant hereto, whether express or implied. Fortinet reserves the right to change, modify, transfer, or otherwise revise this publication without notice, and the most current version of the publication shall be applicable.

Subsections of Fortinet XPerts 2024

Chapter 1 - Quickstart

Provisioning the Azure environment (40min)

Provision your Azure Environment, enter your Email address and click Provision

Warning

After submitting, this page will return with a blank email address box and no other indications. Provisioning can take several minutes. \*\*\* __PLEASE DO NOT SUBMIT MULTIPLE TIMES__ \*\*\*

When provisioning is complete, one of the following will happen.

  • You will receive an email with Azure environment credentials. Use those credentials for this environment, even if you have your own.
  • You will receive and email indicating that there are no environments available to utilize. In this case please try again at a later date.
  • You will receive an email indicating that the supplied email address is from an unsupported domain.
  • No email received due to an unexpected error. You can try again or notify the Azure CSE team.

Tasks

  • Setup Azure Cloud Shell
  • Get Kubernetes Ready
  • Get Familiar with cFOS

Subsections of Chapter 1 - Quickstart

Task 1 - Setup Azure CloudShell

1. Setup your AzureCloud Shell

  • Login to Azure Cloud Portal https://portal.azure.com/ with the provided login/password

    cloudshell1 cloudshell1 cloudshell2 cloudshell2

  • Click the link “Skip for now (14 days until this is required)” do not click the “Next” button

    cloudshell3 cloudshell3

  • Click the “Next” button

    cloudshell4 cloudshell4

  • Click on Cloud Shell icon on the Top Right side of the portal

    cloudshell5 cloudshell5

  • Select Bash

    cloudshell6 cloudshell6

  • Click on Mount Storage Account

    cloudshell7 cloudshell7

  • Select

    • Storage Account Subscription - Internal-Training
    • Apply
  • Click Select existing Storage account, Click Next

    cloudshell8 cloudshell8

  • in Select Storage account Step,

    • Subscription: Internal-Training
    • Resource Group: Select the Resource group from the drop down: K8sXX-K8s101-workshop
    • Storage Account: Use existing storage account from dropdown.
    • File share: Use cloudshellshare
    • Click Select

    cloudshell9 cloudshell9

Warning

Please make sure to use the existing ones. you wont be able to create any Resource Group or Storage account

  • After 1-2 minutes, You should now have access to Azure Cloud Shell console

    cloudshell10 cloudshell10

Task 2 - Get Kubernetes Ready

In this chapter, we will:

  • Retrieve the script from GitHub
  • Prepare the Kubernetes environment
  • Set necessary variables

Clone script from github

cd $HOME
git clone https://github.com/FortinetCloudCSE/k8s-201-workshop.git
cd $HOME/k8s-201-workshop
git pull
cd $HOME

Get K8S Ready

You have multiple options for setting up Kubernetes:

  1. If you are using the K8s-101 workshop environment, you can continue in the K8s-101 environment and choose Option 1.
  2. If you are on the K8s-201 environment, choose Option 2 or Option 3 to start from K8s-201 directly.

Start Here

START HERE

setup some variable (Mandatory step)

owner="tecworkshop"
alias k="kubectl"
currentUser=$(az account show --query user.name -o tsv)
resourceGroupName=$(az group list --query "[?contains(name, '$(whoami)') && contains(name, 'workshop')].name" -o tsv)
location=$(az group show --name $resourceGroupName --query location -o tsv)
scriptDir="$HOME"
svcname=$(whoami)-$owner
cfosimage="fortinetwandy.azurecr.io/cfos:255"
cfosnamespace="cfostest"

cat << EOF | tee > $HOME/variable.sh
#!/bin/bash -x
owner="tecworkshop"
alias k="kubectl"
currentUser=$(az account show --query user.name -o tsv)
resourceGroupName=$(az group list --query "[?contains(name, '$(whoami)') && contains(name, 'workshop')].name" -o tsv)
location=$(az group show --name $resourceGroupName --query location -o tsv)
scriptDir="$HOME"
svcname=$(whoami)-$owner
cfosimage="fortinetwandy.azurecr.io/cfos:255"
cfosnamespace="cfostest"
EOF
echo location=$location >> $HOME/variable.sh
echo owner=$owner >> $HOME/variable.sh
echo scriptDir=$scriptDir >> $HOME/variable.sh
echo cfosimage=$cfosimage >> $HOME/variable.sh
echo resourceGroupName=$resourceGroupName >> $HOME/variable.sh
chmod +x $HOME/variable.sh
line='if [ -f "$HOME/variable.sh" ]; then source $HOME/variable.sh ; fi'
grep -qxF "$line" ~/.bashrc || echo "$line" >> ~/.bashrc
source $HOME/variable.sh
$HOME/variable.sh
if [ -f $HOME/.ssh/known_hosts ]; then
grep -qxF "$vm_name" "$HOME/.ssh/known_hosts"  && ssh-keygen -R "$vm_name"
fi
echo ResourceGroup  = $resourceGroupName
echo Location = $location
echo ScriptDir = $scriptDir
echo cFOS docker image = $cfosimage
echo cFOS NameSpace = $cfosnamespace
 ResourceGroup = k8s54-k8s101-workshop
 Location = eastus
 ScriptDir = /home/k8s54
 cFOS docker image = fortinetwandy.azurecr.io/cfos:255
 cFOS NameSpace = cfostest
Option 1: Continue from K8S-101 Session…

Option 1: Continue from K8S-101 Session

If you are continuing from the K8s-101-workshop, you should already have Kubernetes installed. Hence continue with Option1. if you dont have lab from K8s-101-workshop you can pick from Option2 or Option 3.

check your k8s

MetalLB install

If this K8S is self-managed, you might not have MetalLB installed, and you need to install it.

install metallb

kubectl apply -f https://raw.githubusercontent.com/metallb/metallb/v0.14.3/config/manifests/metallb-native.yaml
kubectl rollout status deployment controller -n metallb-system

local_ip=$(kubectl get node -o wide | grep 'control-plane' | awk '{print $6}')
cat <<EOF | tee metallbippool.yaml
apiVersion: metallb.io/v1beta1
kind: IPAddressPool
metadata:
  name: first-pool
  namespace: metallb-system
spec:
  addresses:
  - $local_ip/32
---
apiVersion: metallb.io/v1beta1
kind: L2Advertisement
metadata:
  name: example
  namespace: metallb-system
EOF
kubectl apply -f metallbippool.yaml 
kubectl get node -o wide

Both nodes should be in the Ready status.

NAME          STATUS   ROLES           AGE     VERSION   INTERNAL-IP   EXTERNAL-IP   OS-IMAGE             KERNEL-VERSION     CONTAINER-RUNTIME
node-worker   Ready    <none>          4m24s   v1.26.1   10.0.0.4      <none>        Ubuntu 22.04.4 LTS   6.5.0-1022-azure   cri-o://1.25.4
nodemaster    Ready    control-plane   9m30s   v1.26.1   10.0.0.5      <none>        Ubuntu 22.04.4 LTS   6.5.0-1022-azure   cri-o://1.25.4
Option 2: Create Self-managed K8S…

Option 2: Create Self-managed K8S

If you are in the K8s-201 workshop, you can create a self-managed Kubernetes cluster, which will take around 10 minutes. If you prefer to use AKS instead of a self-managed cluster, proceed to Option 3.

The Self managed cluster is where you wont use Azure based Kubernetes Service but build Kubernetes from scratch on Linux vM’s hosted in Azure.

The self-managed Kubernetes cluster uses Calico as the CNI, which is the most common CNI in self-managed environments. Refer to the K8s Network section for more information about Kubernetes networking.

Self Managed K8S
scriptDir="$HOME"
cd $HOME/k8s-201-workshop/scripts/cfos/egress
./create_kubeadm_k8s_on_ubuntu22.sh
cd $scriptDir
svcname=$(kubectl config view -o json | jq .clusters[0].cluster.server | cut -d "." -f 1 | cut -d "/" -f 3)
echo $svcname
kubectl get node -o wide
NAME                        STATUS   ROLES           AGE     VERSION   INTERNAL-IP   EXTERNAL-IP   OS-IMAGE             KERNEL-VERSION     CONTAINER-RUNTIME
k8strainingmasterk8s511     Ready    control-plane   4m23s   v1.26.1   10.0.0.4      <none>        Ubuntu 22.04.4 LTS   6.5.0-1022-azure   cri-o://1.25.4
k8strainingworker-k8s51-1   Ready    <none>          102s    v1.26.1   10.0.0.5      <none>        Ubuntu 22.04.4 LTS   6.5.0-1022-azure   cri-o://1.25.4

You can ssh into both master node and worker node via domain name

Get Public IPs
az network public-ip list -o table
Name                               ResourceGroup          Location    Zones    Address        IdleTimeoutInMinutes    ProvisioningState
---------------------------------  ---------------------  ----------  -------  -------------  ----------------------  -------------------
k8strainingmaster-k8s51-1PublicIP  k8s51-k8s101-workshop  eastus               52.224.219.58  4                       Succeeded
k8strainingworker-k8s51-1PublicIP  k8s51-k8s101-workshop  eastus               40.71.204.87   4                       Succeeded

Check Calico Configuration on Self-Managed k8s

cFOS Egress use case relies on CNI to route traffic from application container to cFOS, therefore, it is important to understand the CNI you are used in your k8s cluster.

The Calico configuration used in self-managed Kubernetes runs in overlay mode , calico routes traffic using VXLAN for all traffic originating from a Calico enabled host, to all Calico networked containers and VMs within the IP pool. This setup means that pods do not share a subnet with the VNET, providing ample address space for the pods. Additionally, because cFOS requires IP forwarding, it is necessary to enable IP forwarding when configuring Calico.

Below you can find details on IP pools, encapsulation, container IP forwarding, and other related configurations.

Check Calico Config
kubectl get installation default -o jsonpath="{.spec}" | jq .
{
  "calicoNetwork": {
    "bgp": "Disabled",
    "containerIPForwarding": "Enabled",
    "hostPorts": "Enabled",
    "ipPools": [
      {
        "blockSize": 24,
        "cidr": "10.224.0.0/16",
        "disableBGPExport": false,
        "encapsulation": "VXLAN",
        "natOutgoing": "Enabled",
        "nodeSelector": "all()"
      }
    ],
    "linuxDataplane": "Iptables",
    "multiInterfaceMode": "None",
    "nodeAddressAutodetectionV4": {
      "firstFound": true
    }
  },
  "cni": {
    "ipam": {
      "type": "Calico"
    },
    "type": "Calico"
  },
  "controlPlaneReplicas": 2,
  "flexVolumePath": "/usr/libexec/kubernetes/kubelet-plugins/volume/exec/",
  "kubeletVolumePluginPath": "/var/lib/kubelet",
  "nodeUpdateStrategy": {
    "rollingUpdate": {
      "maxUnavailable": 1
    },
    "type": "RollingUpdate"
  },
  "nonPrivileged": "Disabled",
  "variant": "Calico"
}
  • ssh into master node via domain name
masternodename="k8strainingmaster"-$(whoami)-1.${location}.cloudapp.azure.com
ssh ubuntu@$masternodename
  • ssh into worker node via domain name
workernodename="k8strainingworker-$(whoami)-1.${location}.cloudapp.azure.com"
ssh ubuntu@$workernodename

or create a jumphost ssh client pod

nodeip=$(kubectl get node -o jsonpath='{.items[0].status.addresses[0].address}')
echo $nodeip 
 
cat << EOF | tee sshclient.yaml 
apiVersion: v1
kind: Pod
metadata:
  name: ssh-jump-host
  labels:
    app: ssh-jump-host
spec:
  containers:
  - name: ssh-client
    image: alpine
    command: ["/bin/sh"]
    args: ["-c", "apk add --no-cache openssh && apk add --no-cache curl && tail -f /dev/null"]
    stdin: true
    tty: true
EOF

kubectl apply -f sshclient.yaml
echo wait for pod ready, use Ctr-c to break
kubectl get pod  ssh-jump-host -w

then copy ssh key into jumphost client pod

kubectl exec -it ssh-jump-host -- sh -c "mkdir -p ~/.ssh"
kubectl cp ~/.ssh/id_rsa default/ssh-jump-host:/root/.ssh/id_rsa
kubectl exec -it ssh-jump-host -- sh -c 'chmod 600 /root/.ssh/id_rsa'

and then use

kubectl exec -it ssh-jump-host -- ssh ubuntu@$masternodename ssh into master node.

or

kubectl exec -it ssh-jump-host -- ssh ubuntu@$workernodename ssh into worker node.

After you ssh into node. you can use cat /etc/cni/net.d/10-calico.conflist to check CNI configuration.

Option 3: Create AKS …

Option 3: Create AKS

If you prefer AKS(Azure Kubernetes Service), use this option. This option will deploy an AKS cluster along with Kubernetes already installed. Use the script below to create a single-node cluster.

AKS K8s Deployment
#!/bin/bash -x
owner="tecworkshop"
alias k="kubectl"
currentUser=$(az account show --query user.name -o tsv)
#resourceGroupName=$(az group list --query "[?tags.UserPrincipalName=='$currentUser'].name" -o tsv)
resourceGroupName=$(az group list --query "[?contains(name, '$(whoami)') && contains(name, 'workshop')].name" -o tsv)
location=$(az group show --name $resourceGroupName --query location -o tsv)
scriptDir="$HOME"
svcname=$(whoami)-$owner
cfosimage="fortinetwandy.azurecr.io/cfos:255"
cfosnamespace="cfostest"
echo "Using resource group $resourceGroupName in location $location"

cat << EOF | tee > $HOME/variable.sh
#!/bin/bash -x
alias k="kubectl"
scriptDir="$HOME"
aksVnetName="AKS-VNET"
aksClusterName=$(whoami)-aks-cluster
rsakeyname="id_rsa_tecworkshop"
remoteResourceGroup="MC"_${resourceGroupName}_$(whoami)-aks-cluster_${location} 
EOF
echo location=$location >> $HOME/variable.sh
echo owner=$owner >> $HOME/variable.sh
echo resourceGroupName=$resourceGroupName >> $HOME/variable.sh
echo cfosimage=$cfosimage >> $HOME/variable.sh
echo scriptDir=$scriptDir >> $HOME/variable.sh
echo cfosnamespace=$cfosnamespace >> $HOME/variable.sh

chmod +x $HOME/variable.sh
line='if [ -f "$HOME/variable.sh" ]; then source $HOME/variable.sh ; fi'
grep -qxF "$line" ~/.bashrc || echo "$line" >> ~/.bashrc
source $HOME/variable.sh
$HOME/variable.sh

az network vnet create -g $resourceGroupName  --name  $aksVnetName --location $location  --subnet-name aksSubnet --subnet-prefix 10.224.0.0/24 --address-prefix 10.224.0.0/16

aksSubnetId=$(az network vnet subnet show \
  --resource-group $resourceGroupName \
  --vnet-name $aksVnetName \
  --name aksSubnet \
  --query id -o tsv)
echo $aksSubnetId


[ ! -f ~/.ssh/$rsakeyname ] && ssh-keygen -t rsa -b 4096 -q -N "" -f ~/.ssh/$rsakeyname

az aks create \
    --name ${aksClusterName} \
    --node-count 1 \
    --vm-set-type VirtualMachineScaleSets \
    --network-plugin azure \
    --location $location \
    --service-cidr  10.96.0.0/16 \
    --dns-service-ip 10.96.0.10 \
    --nodepool-name worker \
    --resource-group $resourceGroupName \
    --kubernetes-version 1.28.9 \
    --vnet-subnet-id $aksSubnetId \
    --ssh-key-value ~/.ssh/${rsakeyname}.pub
az aks get-credentials -g  $resourceGroupName -n ${aksClusterName} --overwrite-existing
kubectl get node -o wide

You will only see a single worker node because this is a managed Kubernetes cluster (AKS), and the master nodes are hidden from you. Additionally, you may notice that the container runtime is containerd, which differs from self-managed Kubernetes clusters where the container runtime is typically cri-o.

NAME                             STATUS   ROLES   AGE   VERSION   INTERNAL-IP   EXTERNAL-IP   OS-IMAGE             KERNEL-VERSION      CONTAINER-RUNTIME
aks-worker-39339143-vmss000000   Ready    agent   47m   v1.28.9   10.224.0.4    <none>        Ubuntu 22.04.4 LTS   5.15.0-1066-azure   containerd://1.7.15-1

ssh into your worker node.

If your k8s node does not have public ip assigned, you can SSH via internal IP with jumphost container.

For self-managed Kubernetes clusters, you can SSH into both the master and worker nodes. However, for AKS (Azure Kubernetes Service), you can only SSH into the worker nodes. Below is an example of how to SSH into an AKS worker node with internal ip.

You can SSH into a worker node via a public IP or through an internal IP using a jump host. The script below demonstrates how to SSH into a worker node using a jump host pod.

Login to Cluster Worker Node
nodeip=$(kubectl get node -o jsonpath='{.items[0].status.addresses[0].address}')
echo $nodeip 
 
cat << EOF | tee sshclient.yaml 
apiVersion: v1
kind: Pod
metadata:
  name: ssh-jump-host
  labels:
    app: ssh-jump-host
spec:
  containers:
  - name: ssh-client
    image: alpine
    command: ["/bin/sh"]
    args: ["-c", "apk add --no-cache openssh && apk add --no-cache curl && tail -f /dev/null"]
    stdin: true
    tty: true
EOF

kubectl apply -f sshclient.yaml
echo wait for pod ready, use Ctr-c to break
kubectl get pod  ssh-jump-host -w

after pod show running then shell into to use ssh

Once You see Status as Running, you can press CTRL+c to end the wait command, and proceed

kubectl exec -it ssh-jump-host -- sh -c "mkdir -p ~/.ssh"
kubectl cp ~/.ssh/id_rsa_tecworkshop default/ssh-jump-host:/root/.ssh/id_rsa
kubectl exec -it ssh-jump-host -- sh -c 'chmod 600 /root/.ssh/id_rsa'
kubectl exec -it po/ssh-jump-host -- ssh azureuser@$nodeip

You’ll see a CLI prompt for the worker node

azureuser@aks-worker-32004615-vmss000000:~$ 
  • Useful Worker Node Commands
    • sudo crictl version check runtime version
    • journalctl -f -u containerd check containerd log
    • sudo cat /etc/cni/net.d/10-azure.conflist check cni config etc.,
    • journalctl -f -u kubelet check kubelet log
  • Type exit to exit from worker node back to azure shell.
    • you can also use:
      • CTRL+c+d

Summary

Your preferred Kubernetes setup is now ready, and you are prepared to move on to the next task.

Task 3 - Get Familiar with cFOS

In this chapter, we will:

  • Clone the scripts from GitHub
  • Create a cFOS image pull Secret
  • Create a cFOS license ConfigMap
  • Deploy cFOS using a Deployment
  • Config cFOS with cli command

If you are not familiar with Kubernetes Secrets and ConfigMaps, refer to ConfigMap and Secret in cFOS for more details.

When deploying cFOS, concepts such as Role and ClusterRole will be required. To better understand RBAC, Role, and ClusterRole, refer to K8s Role and RoleBinding

For more information about cFOS, check the cFOS overview and cFOS role in K8s.

Create namespae

cfosnamespace="cfostest"
kubectl create namespace $cfosnamespace

Create Image Pull Secret for Kubernetes

Use the script below to create a Kubernetes secret for pulling the cFOS image from Azure Container Registry (ACR). You will need an access token from ACR to create the secret.

Tip

If you have your own cFOS image hosted on another registry, you can use that. Just ensure that the secret is named “cfosimagepullsecret”.

Get the ACR access username and token…

Get your ACR sever, access token for pull cFOS image and test it

ACR Access Server,User,Token

Paste your ACR Server, UserName, Token below:

defaultServer="fortinetwandy.azurecr.io"

echo -n "Enter the login server (default is $defaultServer): "
read -r loginServer
loginServer=${loginServer:-$defaultServer}

echo "Using login server: $loginServer"

echo -n "Paste your UserName for acr server $loginServer: "
read -r userName
echo "$userName"

echo -n "Paste your accessToken for acr server $loginServer: "
read -rs accessToken
echo  # This adds a newline after the hidden input

# Echo a masked version of the token for confirmation
echo "Access token received (masked): ${accessToken:0:4}****${accessToken: -4}"

if you client has docker login command avaiable, you can verify it, otherwise, skip this.

docker login $loginServer -u $userName -p $accessToken
WARNING! Using --password via the CLI is insecure. Use --password-stdin.
Login Succeeded
Create Image pull Secret with Token …

Create k8s secret with accessToken and save a copy of yaml file for later use.

K8s Secret
filename="cfosimagepullsecret.yaml"
echo $accessToken
echo $loginServer 
kubectl create namespace $cfosnamespace
kubectl create secret -n $cfosnamespace docker-registry cfosimagepullsecret \
    --docker-server=$loginServer \
    --docker-username=$userName \
    --docker-password=$accessToken \
    --docker-email=wandy@example.com
kubectl get secret cfosimagepullsecret -n $cfosnamespace -o yaml | tee $filename
sed -i '/namespace:/d' $filename
kubectl get secret -n $cfosnamespace
NAME                  TYPE                             DATA   AGE
cfosimagepullsecret   kubernetes.io/dockerconfigjson   1      38m

you can also verify the username and password for acr from your secret object

kubectl get secret -n $cfosnamespace cfosimagepullsecret -o jsonpath="{.data.\.dockerconfigjson}" | base64 --decode | jq -r '.auths."fortinetwandy.azurecr.io".auth' | base64 --decode

Create cFOS configmap license

cFOS requires a license to be functional. Once your license is activated, download the license file and then upload it to Azure Cloud Shell.

Important: Do not change or modify the license file.

imageuploadlicensefile imageuploadlicensefile

  • After upload, your .lic license file will be located in $HOME
  • replace your .lic license file name in the script below to create a ConfigMap for the cFOS license
  • Once the cFOS container boots up, it will automatically retrieve the ConfigMap to apply the license.
License

Paste your license filename to use it in configmap

read -p "Paste your cFOS License Filename:|  " licFilename
echo $
cd $HOME
cfoslicfilename=$licFilename
[ ! -f $cfoslicfilename ] && read -p "Input your cfos license file name :|  " cfoslicfilename
$scriptDir/k8s-201-workshop/scripts/cfos/generatecfoslicensefromvmlicense.sh $cfoslicfilename
kubectl apply -f cfos_license.yaml -n $cfosnamespace
Tip

You should see the following result:

cfos_license.yaml created.
configmap/fos-license created
If not, please use below script instead
echo get your cFOS license file ready.
cat <<EOF | tee cfos_license.yaml
apiVersion: v1
kind: ConfigMap
metadata:
    name: fos-license
    labels:
        app: fos
        category: license
data:
    license: |+
EOF
cd $HOME
cfoslicfilename="<<INSERT YOUR .LIC FILENAME HERE>>"
[ ! -f $cfoslicfilename ] && read -p "Input your cfos license file name :|  " cfoslicfilename
while read -r line; do printf "      %s\n" "$line"; done < $cfoslicfilename >> cfos_license.yaml
kubectl create -f cfos_license.yaml -n $cfosnamespace

check license configmap

Check License

Use following command to check whether license is correct

kubectl get cm fos-license -o yaml -n $cfosnamespace
diff -s -b <(k get cm fos-license -n $cfosnamespace -o jsonpath='{.data}' | jq -r .license |  sed '${/^$/d}' ) $cfoslicfilename
Files /dev/fd/63 and CFOSVLTMxxxxxx.lic are identical

Bring up cFOS

Enter the following YAML manifest to deploy a cFOS Deployment. This deployment includes annotations to work around the cFOS mount permission issue. It also features an initContainers section to ensure cFOS gets DNS configuration from Kubernetes. The number of replicas is set to 1.

  • The file Task1_1_create_cfos_serviceaccount.yaml includes a ServiceAccount configured with the necessary permissions to read ConfigMaps and Secrets from Kubernetes. This setup involves Kubernetes RBAC (Role-Based Access Control), which includes creating a Role and a Role Binding. For more details, refer to K8S RBAC.
  • The field “securityContext” has linux priviledge defined for cFOS container. check K8s Security for more detail.
  • The field “volumes” about how to create storage for cFOS,the example below cFOS will not persist the data into storage.
kubectl create namespace $cfosnamespace
kubectl apply -f $scriptDir/k8s-201-workshop/scripts/cfos/Task1_1_create_cfos_serviceaccount.yaml  -n $cfosnamespace

k8sdnsip=$(k get svc kube-dns -n kube-system -o jsonpath='{.spec.clusterIP}')
cat << EOF | tee > cfos7210250-deployment.yaml
---
apiVersion: apps/v1
kind: Deployment
metadata:
  name: cfos7210250-deployment
  labels:
    app: cfos
spec:
  replicas: 1
  selector:
    matchLabels:
      app: cfos
  template:
    metadata:
      annotations:
        container.apparmor.security.beta.kubernetes.io/cfos7210250-container: unconfined
      labels:
        app: cfos
    spec:
      initContainers:
      - name: init-myservice
        image: busybox
        command:
        - sh
        - -c
        - |
          echo "nameserver $k8sdnsip" > /mnt/resolv.conf
          echo "search default.svc.cluster.local svc.cluster.local cluster.local" >> /mnt/resolv.conf;
        volumeMounts:
        - name: resolv-conf
          mountPath: /mnt
      serviceAccountName: cfos-serviceaccount
      containers:
      - name: cfos7210250-container
        image: $cfosimage
        securityContext:
          privileged: false
          capabilities:
            add: ["NET_ADMIN","SYS_ADMIN","NET_RAW"]
        ports:
        - containerPort: 443
        volumeMounts:
        - mountPath: /data
          name: data-volume
        - mountPath: /etc/resolv.conf
          name: resolv-conf
          subPath: resolv.conf
      volumes:
      - name: data-volume
        emptyDir: {}
      - name: resolv-conf
        emptyDir: {}
      dnsPolicy: ClusterFirst
EOF
kubectl apply -f cfos7210250-deployment.yaml -n $cfosnamespace
kubectl rollout status deployment cfos7210250-deployment -n $cfosnamespace &

Config cFOS

By default, cFOS does not have an SSH server installed, so you cannot SSH into cFOS for configuration. Instead, you need to use kubectl exec to access the cFOS shell for configuration. Another way to configure cFOS is by using a ConfigMap or the REST API.

For CLI configuration, the cli parser is “/bin/cli”, the default username is “admin” with no password.

To use kubectl exec to access the cFOS shell, you need to know the cFOS pod name first. You can use kubectl get pod -n $cfosnamespace to display the pod name, then use kubectl exec -it po/<cFOS podname> -n cfostest -- /bin/cli to access the cFOS shell:

Access into cFOS
podname=$(kubectl get pod -n $cfosnamespace -l app=cfos -o jsonpath='{.items[*].metadata.name}')
kubectl exec -it po/$podname -n $cfosnamespace -- /bin/cli
  • Username admin
  • Password:
  • Try a command: diagnose sys license
cFOS # diagnose sys license
Version: cFOS v7.2.1 build0255
Serial-Number: 
System time: Fri Jun 28 2024 12:46:41 GMT+0000 (UTC)

Type exit to quit cFOS cli.

  • cFOS package update

cFOS can keep updated with FortiGuard services. use below command to trigger package updates for all FortiGuard services.

cFOS update

after login cFOS , at cFOS # prompt, type

execute update-now
2024/07/03 02:52:21 everything is up-to-date
2024/07/03 02:52:21 what to do next? stop
2024/07/03 02:52:21 created botnet ip db v7.3756
2024/07/03 02:52:21 DB updates notified!

Q&A

  1. How much CPU/memory does cFOS consume in the cluster?
Click for Answer…
 kubectl top pod -n $cfosnamespace
  1. How quickly does cFOS become fully functional from the moment it is created?
Click for Answer…
"The time for cFOS to become fully functional varies and involves several steps:
Downloading the cFOS image
Booting up the system
Applying the license
For a new installation, the process typically takes 1-3 minutes, depending on network connectivity speed and system resources." 

Cleanup

kubectl delete -f $scriptDir/k8s-201-workshop/scripts/cfos/Task1_1_create_cfos_serviceaccount.yaml  -n $cfosnamespace
kubectl delete namespace $cfosnamespace

do not delete cfosimagepullsecret.yaml and cfos_license.yaml, we will need this later.

What to do Next

if you want learn how to use cFOS for ingress protection , go directly to Chapter 7.

if you want learn how to use cFOS for egress protection , go directly to Chapter 8 and Chapter 9

if you want learn cFOS role in k8s security , check out Chapter 2.

if you want understand more about what is RBAC in k8s, check out Chapter 3 and Chapter4 .

if you want understand more about configmap, secret and how cFOS use configmap and secret, check out Chapter 5.

if you want undertsand what is k8s network and multus in general, check out Chapter 6 and Chapter 8.

Chapter 2 - K8s Security

Subsections of Chapter 2 - K8s Security

Task 1 - Introduction to Kubernetes Security

Objective

This document provides an overview of security measures and strategies to protect workloads in Kubernetes, covering different phases of application lifecycle management.

Scope of Kubernetes Security

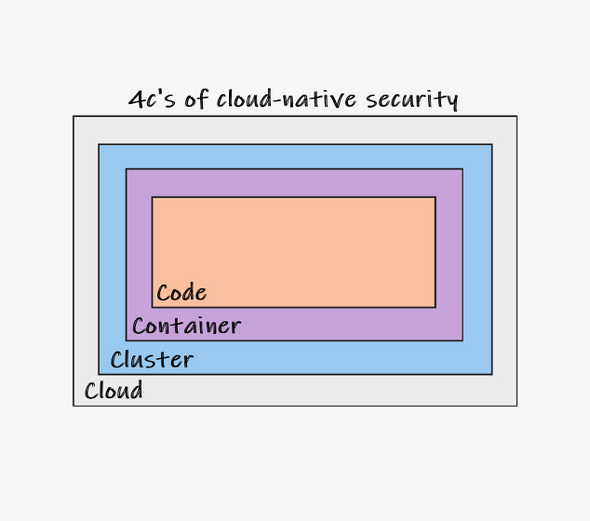
Applications running on Kubernetes include Cloud, Kubernetes Clusters, Containers, and Code (4C). Each layer of the Cloud Native security model builds upon the next outermost layer. The Code layer benefits from strong base (Cloud, Cluster, Container) security layers.

4C 4C

Securing workloads in Kubernetes involves multiple layers of the technology stack, from application development to runtime enforcement.

Application Development Phase

  • Shift-left Approach: Focus on software supply chain security by checking the application code and dependencies before building application containers.

Tools: Fortinet Product FortiDevSec is build for this purpose

Application Deployment Phase

  • Script Scanning: Scan deployment scripts like Terraform and CloudFormation, Secret, IAM etc to ensure they follow the principle of least privilege and comply with enterprise compliance requirements.
  • Configuration Checks: Evaluate Kubernetes configurations against best practices and compliance standards, such as CIS benchmarks.
  • Container Scanning: Scan container images for known vulnerabilities (CVEs).

Tools: Fortinet Product FortiDevSec , FortiCSPM are build for this purpose

Application Runtime Phase

  • Configuration Drift: Continuously monitor for shifts in Kubernetes configurations, such as changes in application permissions or policies.
  • Workload Protection: Implement measures to protect running workloads from threats through prevention, detection, and enforcement at both the Kubernetes API server level and at the Node/Container level or enforce via Networking Policy and container firewall.

Tools: Fortinet Product FortiCSPM can provide posture managment like Config Shift. Fortinet Product Fortiweb and FortiADC can provide application security to secure API traffic or other layer 4-7 malicious traffic coming into application POD Fortinet Product [cFOS] can provide Network Security to secure traffic enter or leaving application POD. Fortinet Product FortiXDR can provide Node/Container level protection by continusly detect abnormal activites at Node/Container level.

Runtime Workload Protection

Prevention/Protection via Network Security

  • Actively stop unwanted traffic from entering or leaving Pods.
  • Includes network security enhancements via deploy container based firewall like cFOS and CNI based Kubernetes network policies.

Prevention/Protection via Application Security

  • Actively stop API or Layer 4-7 traffic entering Application Pods. For example, malicious API traffic via Kubernetes load balancer service entering application POD, malicious TCP/UDP/SCTP traffic from external entering into application Pod etc., the attack is embedded in the traffic payload.

Prevention with Detection

  • Control Plane Monitoring: Use Kubernetes API audit logs to detect unusual API access.
  • Runtime Monitoring: Employ Linux agents or agentless technology to detect unusual container syscalls, such as privilege escalation.

Kubernetes API Level Security

RBAC:
  • RBAC Provides authorization control to Kubernetes resources by granting authenticated users minimal necessary permissions. We will talk about RBAC in next chapter.
Admission Control:
  • Controls access at the Kubernetes API level. Built-in controllers include:

    • Pod Security Policy
    • Pod Security Admission (Pod Security Standards)
  • Kubernetes offers integration capabilities with external tools like OPA and Kyverno for detailed Pod security control.

As of Kubernetes 1.21, PodSecurityPolicy (PSP) has been deprecated and is fully removed in Kubernetes 1.25 replaced by PSA. PSA can be used to evaluate the security settings of pod and container configurations to determine if they meet compliance requirements and enterprise security policies based on predefined policy levels."

Pod Security Contexts and Container SecurityContext
  • PodSecurityContext or securityContext defines privileges for individual Pods or containers, allowing specific permissions like file access or running in privileged mode.

    • pod.spec.containers.allowPrivilegeEscalation

      AllowPrivilegeEscalation controls whether a process can gain more privileges than its parent process.

    • pod.spec.containers.privileged

      Run container in privileged mode. Processes in privileged containers are essentially equivalent to root on the host.

For most containers, these two options shall be set to false. Other options like runAsUser and runAsGroup can specify a user and group ID for running the container. Applications like firewalls will require running as the root user.

Decide the SecurityContext for cFOS application

Containers, by default, inherit Linux capabilities from the container runtime, such as CRI-O or containerd. For instance, the CRI-O runtime typically grants most common Linux capabilities. Below are the capabilities provided by default in version cri1.25.4:

"CAP_CHOWN",
"CAP_DAC_OVERRIDE",
"CAP_FSETID",
"CAP_FOWNER",
"CAP_SETGID",
"CAP_SETUID",
"CAP_SETPCAP",
"CAP_NET_BIND_SERVICE",
"CAP_KILL"

However, some network applications like cFOS may require additional privileges to be fully functional. For example, the capability CAP_NET_RAW is not included in the default list. Without CAP_NET_RAW, functions like ping cannot be executed inside the cFOS container.

Here is the brief purpose of mentioned capabilites

NET_RAW:

  • Use RAW and PACKET sockets
  • Bind to any address for transparent proxying
  • This capability allows the program to craft IP packets from scratch, which includes sending and receiving ICMP packets (used in tools like ping).

NET_ADMIN:

  • Grants a process extensive capabilities over network configuration and operations, such as NAT, iptables, etc.

SYS_ADMIN:

  • It might be necessary for some advanced operations, such as configuring system-wide logging settings or manipulating system logs.
Task: Fix cFOS boot permission issue
  • deploy imagepullsecret, serviceaccount
cFOS boot permissions

If you do not have valid cfosimagepullsecret.yaml, check Create imagepullsecret

cd $HOME
kubectl create namespace cfostest
kubectl apply -f cfosimagepullsecret.yaml -n cfostest
kubectl create -f $scriptDir/k8s-201-workshop/scripts/cfos/Task1_1_create_cfos_serviceaccount.yaml  -n cfostest
cfosimage="fortinetwandy.azurecr.io/cfos:255"
cat << EOF | tee > cfos7210250-deployment.yaml 
apiVersion: apps/v1
kind: Deployment
metadata:
  name: cfos7210250-deployment
  labels:
    app: cfos
spec:
  replicas: 1
  selector:
    matchLabels:
      app: cfos
  template:
    metadata:
      labels:
        app: cfos
    spec:
      serviceAccountName: cfos-serviceaccount
      securityContext:
        runAsUser: 0
      containers:
      - name: cfos7210250-container
        image: $cfosimage
        securityContext:
          allowPrivilegeEscalation: false
          privileged: false
          capabilities:
            add: ["NET_RAW"]
        ports:
        - containerPort: 80
        volumeMounts:
        - mountPath: /data
          name: data-volume
      volumes:
      - name: data-volume
        emptyDir: {}
EOF
kubectl apply -f cfos7210250-deployment.yaml -n cfostest 
kubectl rollout status deployment cfos7210250-deployment -n cfostest

Verify cFOS container is able to execute some command

cmd="iptables -t nat -L -v"
podname=$(kubectl get pod -n cfostest -l app=cfos -o jsonpath='{.items[*].metadata.name}')
kubectl exec -it po/$podname -n cfostest -- $cmd

You will see error message below which indicate that the container does not have permission to run cmd

iptables v1.8.7 (legacy): can't initialize iptables table `nat': Permission denied (you must be root)
  • Try to solve the permission issue by adjust the securityContext Setting.
Hints
Tip

add linux capabilites to [“NET_ADMIN”,“NET_RAW”] then check log again

Info

In above cFOS yaml, runAsUser=0, AllowPriviledgeEscalation=false, priviledged=false can be removed as they are the default setting for securityContent in current version of AKS or self-managed k8s.

Answer

sed -i 's/add: \["NET_RAW"\]/add: ["NET_RAW","NET_ADMIN"]/' cfos7210250-deployment.yaml
kubectl replace -f cfos7210250-deployment.yaml -n cfostest
kubectl rollout status deployment cfos7210250-deployment -n cfostest

Check again with below command after new pod created

cmd="iptables -t nat -L -v"
podname=$(kubectl get pod -n cfostest -l app=cfos -o jsonpath='{.items[*].metadata.name}')
kubectl exec -it po/$podname -n cfostest -- $cmd

You should see now command is now successful

Chain PREROUTING (policy ACCEPT)
target     prot opt source               destination         

Chain INPUT (policy ACCEPT)
target     prot opt source               destination         

Chain OUTPUT (policy ACCEPT)
target     prot opt source               destination         

Chain POSTROUTING (policy ACCEPT)
target     prot opt source               destination  

Prevention/Protection via Network Security

Actively stop unwanted traffic from entering or leaving Pods. Includes network security enhancements and Kubernetes network policies.

  • Network Policies and Container Firewalls

cFOS is the Next Generation Layer 7 Firewall which is our key foucs in this workshop. the use case of cFOS include

  • Control both ingress and egress traffic within Kubernetes. Default policies allow unrestricted traffic flow, which can be restricted using network policies based on tags.
  • Kubernetes network policies support basic Layer 3-4 filtering. For Layer 7 visibility, deploying a Next-Generation Firewall (NGFW) capable of deep packet inspection alongside applications in Kubernetes can provide enhanced security.

In this workshop, We will walk through using cFOS to protect:

  • Ingress traffic to Pod - North Bound

    • Layer 4 traffic to Pod
    • Layer 7 traffic to Pod
  • Egress traffic from Pod to Cluster External traffic(with Multus) - South Bound

    • POD traffic to Internet
    • POD traffic to Enterprise internal application , such as Database in the same VPC
  • Egress traffic from Pod to Cluster External traffic(with Multus) - South Bound

    • POD traffic to Internet
    • POD traffic to Enterprise internal, such as Database in the same VPC
  • Pod to Pod traffic - East-West (with Multus)

    • Pod to Pod via Pod IP address

Clean up

Delete cFOS deployment, but keep cfosimagepullsecret and serivce account, we will need this later

kubectl delete namespace cfostest
kubectl delete -f $scriptDir/k8s-201-workshop/scripts/cfos/Task1_1_create_cfos_serviceaccount.yaml  -n cfostest

Q&A

  • Does cFOS require run with priviledged: true ?

Task 2 - Authentication, Authorization, and Admission Control

Objective

Understand the differences between Kubernetes Authentication, Authorization, and Admission Control.

Kubernetes Authentication, Authorization, and Admission Control

Kubernetes security involves three primary processes: Authentication, Authorization, and Admission Control. These processes ensure that only verified users can perform actions they are permitted to perform within the cluster, and that those actions are validated by Kubernetes before they are executed.

3A 3A

Authentication

Authentication in Kubernetes confirms the identity of a user or process. It’s about answering “who are you?” Kubernetes supports several authentication methods:

  • Client Certificates
  • Bearer Tokens
  • Basic Authentication
  • External Identity Providers such as OIDC or LDAP

Common Use Cases for Authentication

  • Client Certificates: Used in environments where certificates are managed through a corporate PKI.
  • Bearer Tokens: Common in automated processes or scripts that interact with the Kubernetes API.
  • OIDC: Used in organizations with existing identity solutions like Active Directory or Google Accounts for user authentication.

Authorization

Authorization in Kubernetes determines what authenticated users are allowed to do. It answers “what can you do?” There are several authorization methods in Kubernetes:

  • Role-Based Access Control (RBAC)
  • Attribute-Based Access Control (ABAC)
  • Node Authorization
  • Webhook

Common Use Cases for Each Authorization Method

RBAC (Role-Based Access Control)

  • Use Case: The most common authorization method, used to finely tune permissions at a granular level based on the roles assigned to users or groups.
  • Example: Granting a developer read-only access to Pods in a specific namespace.

ABAC (Attribute-Based Access Control)

  • Use Case: Used in environments requiring complex access control decisions based on attributes of the user, resource, or environment.
  • Example: Allowing access to a resource based on the department attribute of the user and the sensitivity attribute of the resource.

Node Authorization

  • Use Case: Specific to controlling what actions a Kubernetes node can perform, primarily in secure or multi-tenant environments.
  • Example: Restricting nodes to only read Secrets and ConfigMaps referenced by the Pods running on them.

Webhook

  • Use Case: Used when integrating Kubernetes with external authorization systems for complex security environments.
  • Example: Integrating with an external policy engine that evaluates whether a particular action should be allowed based on external data not available within Kubernetes.

Admission Control

Admission Control in Kubernetes is a process that intercepts requests to the Kubernetes API before they are persisted to ensure that they meet specific criteria set by the administrator. Admission Controllers are plugins that govern and enforce how the cluster is used.

Admission controllers are not enabled by default. They must be explicitly configured and enabled when starting the Kubernetes API server. The admission control process is specified through the –enable-admission-plugins flag on the API server.

Common Admission Controllers

Pod Security Policies (PSP)

  • Use Case: Ensures that Pods meet security requirements by denying the creation of Pods that do not adhere to defined policies.
  • Example: Restricting the use of privileged containers or the host network.

ResourceQuota

  • Use Case: Enforces limits on the aggregate resource consumption per namespace.
  • Example: Preventing any one namespace from using more than a certain amount of CPU or memory resources.

LimitRanger

  • Use Case: Enforces defaults and limits on the sizes of resources like Pods, containers, and PersistentVolumeClaims.
  • Example: Ensuring that every Pod has a memory request and limit to avoid resource exhaustion.

Summary

Authentication, authorization, and admission control are foundational to Kubernetes security, ensuring only authenticated and authorized actions that meet the cluster’s policy requirements are performed within the cluster.

Task 1 Investigate your k8s environment

K8s investigation
  • Who are you?
kubectl config view --minify -o jsonpath='{.users[0].name}'
  • Which cluster are you connected to?
kubectl config current-context
  • What can you do?

For example, check whether you have permission to read configmaps in the kube-system namespace:

kubectl auth can-i list configmaps -n kube-system

Check whether you are allowed to do anything in all namespaces:

kubectl auth can-i '*' '*' -A
  • How do you authenticate to your cluster?
kubectl config view
Expected result
apiVersion: v1
clusters:
- cluster:
    certificate-authority-data: DATA+OMITTED
    server: https://k8strainingmaster1.westus.cloudapp.azure.com:6443
  name: kubernetes
contexts:
- context:
    cluster: kubernetes
    user: kubernetes-admin
  name: kubernetes-admin@kubernetes
current-context: kubernetes-admin@kubernetes
kind: Config
preferences: {}
users:
- name: kubernetes-admin
  user:
    client-certificate-data: DATA+OMITTED
    client-key-data: DATA+OMITTED

The user “kubernetes-admin” uses a certificate and key to authenticate itself to the Kubernetes API.

apiVersion: v1
clusters:
- cluster:
    certificate-authority-data: DATA+OMITTED
    server: https://k8s51-aks--k8s51-k8s101-wor-02b500-zf9ekyl6.hcp.eastus.azmk8s.io:443
  name: k8s51-aks-cluster
contexts:
- context:
    cluster: k8s51-aks-cluster
    user: clusterUser_k8s51-k8s101-workshop_k8s51-aks-cluster
  name: k8s51-aks-cluster
current-context: k8s51-aks-cluster
kind: Config
preferences: {}
users:
- name: clusterUser_k8s51-k8s101-workshop_k8s51-aks-cluster
  user:
    client-certificate-data: DATA+OMITTED
    client-key-data: DATA+OMITTED
    token: REDACTED

The user “clusterUser_k8s51-k8s101-workshop_k8s51-aks-cluster” uses a certificate and key to authenticate itself to the Kubernetes API.

Task 3 - Introduction to Kubernetes Security

Objective

Learn how to use RBAC to control access to the Kubernetes Cluster.

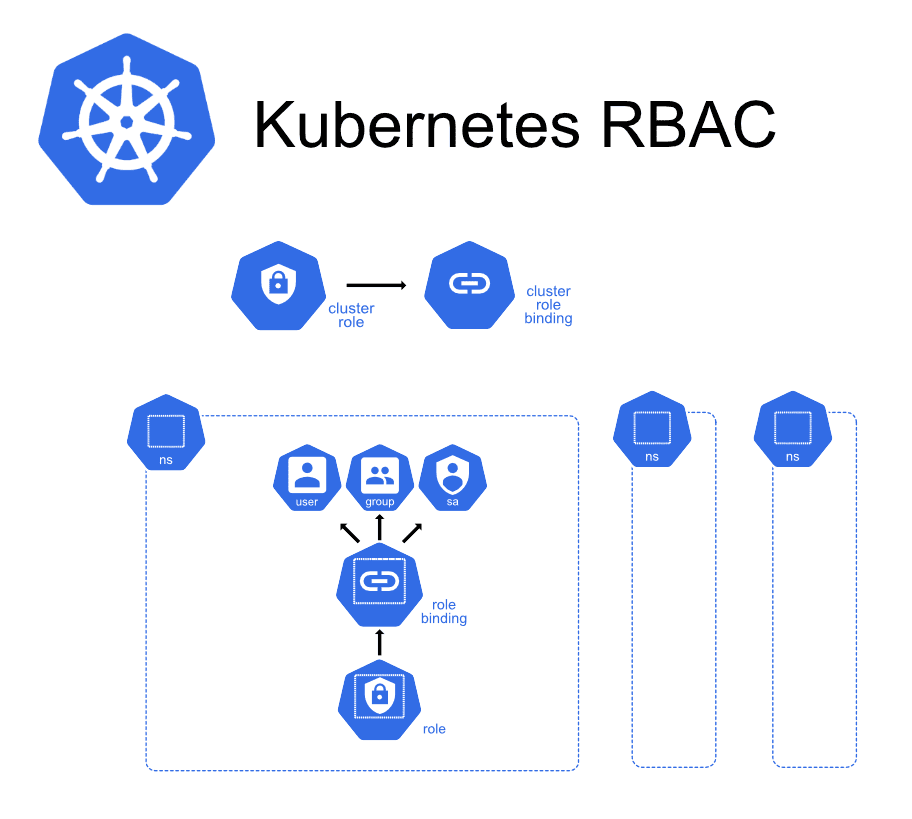
What is RBAC

Kubernetes RBAC (Role-Based Access Control) is an authorization mechanism that regulates interactions with resources within a cluster. It operates by defining roles with specific permissions and binding these roles to users or service accounts. This approach ensures that only authorized entities can perform actions on resources such as pods, deployments, or secrets. By adhering to the principle of least privilege, RBAC allows each user or application access only to the permissions necessary for their tasks. It’s important to note that RBAC deals exclusively with authorization and not with authentication; it assumes that the identity of users or service accounts has been verified prior to enforcing access controls.

RBAC RBAC

Below let’s walk through how to define a role with limited permission and apply to an user for access Kubernetes Cluster

Task 1: Create Read-Only User for Access Cluster

Create a New User Account for Developers to Access the Kubernetes Cluster, the user only has read-only permission

Create a Certificate for the User

  • Generate a Certificate Signing Request (CSR):

    CSR

    Kubernetes uses the group “system:authenticated” as a predefined label, which is trusted by external clients to dictate group membership. Kubernetes itself does not validate which group a user belongs to. This step involves generating a private key and a CSR using OpenSSL.

    openssl genrsa -out newuser.key 2048
    openssl req -new -key newuser.key -out newuser.csr -subj "/CN=tecworkshop/O=Devops"

    Create a YAML file for the CSR object in Kubernetes. This object includes the base64-encoded CSR data.

    cat << EOF | tee csrfortecworkshop.yaml
    apiVersion: certificates.k8s.io/v1
    kind: CertificateSigningRequest
    metadata:
      name: tecworkshop
    spec:
      groups:
        - system:authenticated
      request: $(cat newuser.csr | base64 | tr -d "\n")
      signerName: kubernetes.io/kube-apiserver-client
      usages:
        - client auth
    EOF
    kubectl create -f csrfortecworkshop.yaml

    Initially, the CSR will be in a pending state.

      kubectl get csr tecworkshop

    You should see Condition as Pending

    NAME          AGE   SIGNERNAME                            REQUESTOR           REQUESTEDDURATION   CONDITION
    tecworkshop   18s   kubernetes.io/kube-apiserver-client   kubernetes-admin    <none>              Pending

  • Approve the CSR:

    Approve

    Approve the CSR to issue the certificate.

    kubectl certificate approve tecworkshop

    Verify the CSR has been approved and issued:

    kubectl get csr tecworkshop

    You should see Condition as Approved, Issued

    NAME          AGE   SIGNERNAME                            REQUESTOR           REQUESTEDDURATION   CONDITION
    tecworkshop   66s   kubernetes.io/kube-apiserver-client   kubernetes-admin    <none>              Approved,Issued

  • Save the Certificate to a File:

    Save Cert

    Extract and decode the certificate.

    kubectl get csr tecworkshop -o jsonpath='{.status.certificate}' | base64 --decode > newuser.crt

    Optionally, View Certificate Details:

    openssl x509 -in newuser.crt -text -noout

    Set Credentials for the New User:

    Configure kubectl to use the new user’s credentials.

    kubectl config set-credentials tecworkshop --client-certificate=newuser.crt --client-key=newuser.key

    Create a New Context for the New User:

    Set up a context that specifies the new user and cluster.

      adminContext=$(kubectl config current-context)
      adminCluster=$(kubectl config current-context | cut -d '@' -f 2)
      kubectl config set-context tecworkshop-context --cluster=$adminCluster --user=tecworkshop

    Switch to the New Context:

    Use the new context to interact with the cluster as the new user.

    kubectl config use-context tecworkshop-context

    Attempt to retrieve pods; it should fail due to lack of permissions.

    kubectl get pods

    You should see an error:

    Error from server (Forbidden): pods is forbidden: User "tecworkshop" cannot list resource "pods" in API group "" in the namespace "default"

Task 2: Authorize the User to List All Pods in All Namespaces

Use RBAC to grant the new user permission to list all pods across all namespaces.

RBAC
  • Switch to an Admin Context:

You need sufficient permissions to create roles and role bindings.

kubectl config use-context $adminContext
  • Define a ClusterRole:

Create a ClusterRole that allows reading pods across all namespaces.

kubectl create clusterrole readpods --verb=get,list,watch --resource=pods
  • Bind the ClusterRole to the New User:

Create a ClusterRoleBinding to assign the role to the new user.

kubectl create clusterrolebinding readpodsbinding --clusterrole=readpods --user=tecworkshop
  • Switch Back to the New User Context:
kubectl config use-context tecworkshop-context
  • Verify Permissions:

Now, the new user should be able to list pods in all namespaces.

kubectl get pod -A

Or, check specific permissions:

kubectl auth can-i get pods -A

You should be able to view all pods and have yes to specific permissions

yes

Switch back to admin user

make sure switch back to admin user for full control the k8s cluster

kubectl config use-context $adminContext

Summary

Above, we have detailed the process for granting human users the least privilege necessary to access the Kubernetes cluster. In the next chapter, we will explore how to restrict a POD or container by using a service account with the least privilege necessary for accessing the cluster.

This ensures that not only are human users operating under the principle of least privilege, but automated processes and applications within your cluster are also adhering to strict access controls, enhancing the overall security posture of your Kubernetes environment.

Clean up

kubectl config use-context $adminContext
kubectl config delete-context tecworkshop-context
kubectl config delete-user tecworkshop

Chapter 3 - Managing Role Based Access Control (RBAC)

Subsections of Chapter 3 - Managing Role Based Access Control (RBAC)

Task 1 - Understanding Roles and ClusterRoles

Objective

Learn about RBAC Roles and ClusterRoles in Kubernetes.

In the previous chapter, we learned how to use RBAC to grant users permission to access Kubernetes. In this chapter, let’s dive into more detail about Roles and ClusterRoles.

Core Concepts of Kubernetes RBAC:

  • Role: A Role is crucial when a Pod needs to access Kubernetes API resources such as ConfigMaps or Secrets within a specific namespace. It defines permissions that are limited to one namespace, enhancing security by restricting access scope.

  • ClusterRole: Defines rules that represent a set of permissions across the entire cluster. It can also be used to grant access to non-namespaced resources like nodes.

  • RoleBinding: Grants the permissions defined in a Role to a user or set of users within a specific namespace.

  • ClusterRoleBinding: Grants the permissions defined in a ClusterRole to a user or set of users cluster-wide.

  • Rules: Both Roles and ClusterRoles contain rules that define a set of permissions. A rule specifies a set of actions (verbs) that can be performed on a group of resources. Verbs include actions like get, watch, create, delete, etc., and resources might be pods, services, etc.

  • Subjects: These are users, groups, or service accounts that are granted access based on their role.

  • API Groups: Kubernetes organizes APIs into groups to streamline extensions and upgrades, categorizing resources to help manage the API’s evolution. Within these groups, verbs define permissible actions on the resources. These verbs are specified in Roles and ClusterRoles to grant precise control over resource access and manipulation.

  • Service Account: Service Accounts are used by Pods to authenticate against the Kubernetes API, ensuring that API calls are securely identified and appropriately authorized based on the assigned roles and permissions.

Pre-defined RBAC Default Roles

Kubernetes comes with some default RBAC roles and clusterroles which are required for bootstrapping the cluster. For example, the role “system:controller:bootstrap-signer” grants the permission to Kubernetes nodes to bootstrap themselves. It automatically approves and signs certain CSRs used for node bootstrapping.

  • pre-defined role system:controller:bootstrap-signer

this role is namespaced. it only grant permission to resource in namespace kube-system

roles
kubectl get role system:controller:bootstrap-signer -n kube-system -o yaml
apiVersion: rbac.authorization.k8s.io/v1
kind: Role
metadata:
  annotations:
    rbac.authorization.kubernetes.io/autoupdate: "true"
  creationTimestamp: "2024-03-22T05:51:03Z"
  labels:
    kubernetes.io/bootstrapping: rbac-defaults
  name: system:controller:bootstrap-signer
  namespace: kube-system
  resourceVersion: "179"
  uid: b8180d72-f23d-4950-acb4-2c7a51cdb961
rules:
- apiGroups:
  - ""
  resources:
  - secrets
  verbs:
  - get
  - list
  - watch

To see which RoleBindings are associated with this role:

kubectl get rolebinding -n kube-system system:controller:bootstrap-signer -o yaml
  • pre-definded Clusterrole

Another example is the cluster-admin ClusterRole, which grants full administrative privileges across the entire cluster. This role allows nearly unrestricted access to all resources in the cluster, making it suitable for highly privileged users who need to manage and configure any aspect of the cluster.

this clusterrole is cluster wide. it can apply to entire cluster with clusterrolebinding.

rolebinding
kubectl get clusterrole cluster-admin -o yaml
apiVersion: rbac.authorization.k8s.io/v1
kind: ClusterRoleBinding
metadata:
  annotations:
    rbac.authorization.kubernetes.io/autoupdate: "true"
  creationTimestamp: "2024-03-22T05:51:03Z"
  labels:
    kubernetes.io/bootstrapping: rbac-defaults
  name: cluster-admin
  resourceVersion: "135"
  uid: 471a5843-4f14-4cbb-ac61-02afb2a701fd
roleRef:
  apiGroup: rbac.authorization.k8s.io
  kind: ClusterRole
  name: cluster-admin
subjects:
- apiGroup: rbac.authorization.k8s.io
  kind: Group
  name: system:masters

The clusterrole “cluster-admin” is bound to the group “system:masters” cluster-wide, providing all permissions to all resources in the cluster.

kubectl get clusterrolebinding cluster-admin -o yaml

You can find Clusterrole “cluster-admin” bound to subject user group -“system:masters” with clusterrolebinding

apiVersion: rbac.authorization.k8s.io/v1
kind: ClusterRoleBinding
metadata:
  annotations:
    rbac.authorization.kubernetes.io/autoupdate: "true"
  creationTimestamp: "2024-05-13T00:00:45Z"
  labels:
    kubernetes.io/bootstrapping: rbac-defaults
  name: cluster-admin
  resourceVersion: "136"
  uid: f5753f58-e17c-4ca6-9ff0-cd39eda5f654
roleRef:
  apiGroup: rbac.authorization.k8s.io
  kind: ClusterRole
  name: cluster-admin
subjects:
- apiGroup: rbac.authorization.k8s.io
  kind: Group
  name: system:masters

Task: List all RBAC Default Roles and ClusterRoles

Take a look at what are the default role and clusterole pre-defined for a default cluster.

default role/clusterrole come with a label “kubernetes.io/bootstrapping=rbac-defaults”. you can use this label to filter the default role/clusterrole.

  • List all default ClusterRoles:
kubectl get clusterrole -l kubernetes.io/bootstrapping=rbac-defaults
  • List all default Roles:
kubectl get role -l kubernetes.io/bootstrapping=rbac-defaults -A

Task 2 - Creating and Managing Roles and ClusterRoles for cFOS

Objective

Create Roles and ClusterRoles for the cFOS application.

Core Concepts

  • Role for ConfigMaps: cFOS needs to interact with the Kubernetes API to read ConfigMaps for configurations such as IPSEC, Firewall VIP, Policy config, and License.
  • Role for Secrets: cFOS needs to interact with the Kubernetes API to read secrets, such as those used for pulling images,ipsec shared key etc.,

Create a ClusterRole for cFOS to Read ConfigMaps

cFOS pods require permission to read Kubernetes resources such as ConfigMaps. This includes permissions to watch, list, and read the ConfigMaps.

Define Rule for Role

A rule should define the least permission on an API resource:

  • resources: List of Kubernetes API resources, such as configmaps.
  • apiGroups: Lists which include the API group to which the resource belongs.
  • verbs: The permissions on resources.
rules:
- apiGroups:
  - ""
  resources:
  - configmaps
  verbs:
  - get
  - list
  - watch
Info

"" indicates the API group is the “CORE” API group.

Decide to Use ClusterRole or Role

For cFOS, either a ClusterRole or a Role can be used as cFOS only requires minimal permissions.

kind: ClusterRole

Task 1 - Create a clusterrole for cFOS

You can use kubectl create command or use a yaml file. Use one of these options and then check the output!

Options for Creating Cluster Role
kubectl create clusterrole configmap-reader --verb=get,list,watch --resource=configmaps 
cat << EOF | tee cfosConfigMapsClusterRole.yaml
apiVersion: rbac.authorization.k8s.io/v1
kind: ClusterRole
metadata:
  name: configmap-reader
rules:
- apiGroups: [""]
  resources: ["configmaps"]
  verbs: ["get", "watch", "list"]
EOF
kubectl create -f cfosConfigMapsClusterRole.yaml 
kubectl get clusterrole configmap-reader
NAME               CREATED AT
configmap-reader   2024-05-05T08:11:35Z
Check resource detail
kubectl describe clusterrole configmap-reader
Name:         configmap-reader
Labels:       <none>
Annotations:  <none>
PolicyRule:
  Resources   Non-Resource URLs  Resource Names  Verbs
  ---------   -----------------  --------------  -----
  configmaps  []                 []              [get list watch]

The empty list [] under “Non-Resource URLs” and “Resource Names” means the configmaps can read any configmaps.

Task 2 - Create a Role for cFOS to Read Secrets

cFOS pods require using imagePullSecret to pull containers from an image repository. A “role” or “ClusterRole” is required to read the “secret.”

Create a ClusterRole for cFOS to Read Secrets

Use one of these options and then check the commands

Options for Create ClusterRole for cFOS
kubectl create clusterrole secrets-reader --verb=get,list,watch --resource=secrets --resource-name=cfosimagepullsecret,someothername
Info

–resource-name is optional, only needed if you want clusterrole only able to read the secret with specific resource name.

cat << EOF | tee cfosSecretClusterRole.yaml
apiVersion: rbac.authorization.k8s.io/v1
kind: ClusterRole
metadata:
   name: secrets-reader
rules:
- apiGroups: [""]
  resources: ["secrets"]
  resourceNames: ["cfosimagepullsecret","someothername"]
  verbs: ["get", "watch", "list"]
EOF
kubectl create -f cfosSecretClusterRole.yaml
kubectl describe clusterrole secrets-reader
Name:         secrets-reader
Labels:       <none>
Annotations:  <none>
PolicyRule:
  Resources  Non-Resource URLs  Resource Names         Verbs
  ---------  -----------------  --------------         -----
  secrets    []                 [cfosimagepullsecret]  [get watch list]
  secrets    []                 [someothername]        [get watch list]

Summary

We defined two ClusterRoles for cFOS in this chapter. In the next chapter, we will explore how to bind these ClusterRoles to the serviceAccount of cFOS.

Clean up

kubectl delete clusterrole configmap-reader
kubectl delete clusterrole secrets-reader

Task 3 - Best practices for assigning permissions

Objective

Understand Best Practices for Assigning Permissions

Best Practices for Assigning Permissions in Kubernetes

Assigning permissions in Kubernetes through Roles and ClusterRoles is crucial for maintaining secure and efficient access control. Adhering to best practices ensures that permissions are granted appropriately and securely.

Principle of Least Privilege

  • Description: Always grant only the minimum necessary permissions that users or services need to perform their tasks.
  • Impact: Minimizes potential security risks by limiting the capabilities of users or automated processes.

Use Specific Roles for Namespace-Specific Permissions

  • Role: Create a Role when you need to assign permissions that are limited to a specific namespace.
  • Example: Assign a Role to a user that only needs to manage Pods and Services within a single namespace.

Use ClusterRoles for Cluster-Wide and Cross-Namespace Permissions

  • ClusterRole: Utilize ClusterRoles to assign permissions that span across multiple namespaces or the entire cluster.
  • Example: A ClusterRole may allow reading Nodes and PersistentVolumes, which are cluster-scoped resources.

Carefully Manage RoleBindings and ClusterRoleBindings

  • RoleBindings: Use RoleBindings to grant the permissions defined in a Role or ClusterRole within a specific namespace.
  • ClusterRoleBindings: Use ClusterRoleBindings to apply the permissions across the entire cluster.
  • Impact: Ensures that permissions are appropriately scoped to either a namespace or the entire cluster.

Regularly Audit Permissions

  • Periodic Reviews: Regularly review and audit permissions to ensure they align with current operational requirements and security policies.
  • Tools: Use Kubernetes auditing tools or third-party solutions to monitor and log access and changes to RBAC settings.

Separate Sensitive Workloads

  • Namespaces: Use namespaces to isolate sensitive workloads and apply specific security policies through RBAC.
  • Impact: Enhances security by preventing unauthorized access across different operational environments.

Avoid Over-Permissioning Default Service Accounts

  • Service Accounts: Modify default service accounts to restrict permissions, or create specific service accounts for applications that need specific permissions.
  • Example: Disable the default service account token auto-mounting if not needed by the application.

Utilize Advanced RBAC Features and Tools

  • Conditional RBAC: Explore using conditional RBAC for dynamic permission scenarios based on request context.
  • Third-Party Tools: Consider tools like OPA (Open Policy Agent) for more complex policy enforcement beyond what Kubernetes native RBAC offers.

Summary

Following these best practices helps to secure Kubernetes environments by ensuring that permissions are carefully managed and aligned with the least privilege principle. Regular audits and careful planning of RBAC settings play crucial roles in maintaining operational security and efficiency.

Chapter 4 - RoleBindings and ClusterRoleBindings

Subsections of Chapter 4 - RoleBindings and ClusterRoleBindings

Task 1 - Difference between RoleBindings and ClusterRoleBindings

Objective

Understand the difference between RoleBindings and ClusterRoleBindings.

Introduction

In Kubernetes, RoleBindings and ClusterRoleBindings are critical for linking roles with users, groups, or service accounts, granting them the necessary permissions to perform actions within the cluster.

RoleBinding

A RoleBinding grants permissions defined in a Role or ClusterRole within the confines of a specific namespace. This means that even if a ClusterRole is referenced by a RoleBinding, it only applies within that particular namespace.

ClusterRoleBinding

In contrast, a ClusterRoleBinding applies a ClusterRole across all namespaces within the cluster, including cluster-scoped resources. This broad application makes ClusterRoleBindings crucial for administrative tasks that span multiple namespaces.

Key Differences and Usage

  • Scope:

    • RoleBinding: Limited to a single namespace.
    • ClusterRoleBinding: Applies across all namespaces.
  • Usage:

    • RoleBinding: Often used when the permissions need to be namespace-specific.
    • ClusterRoleBinding: Used when permissions need to be cluster-wide, such as for system administrators or certain automated tasks.
  • Flexibility and Policy Management:

    • Reusability: ClusterRoles are reusable across multiple namespaces with just additional RoleBindings, avoiding duplication.
    • Policy Management: ClusterRoles allow for centralized role definitions, simplifying the management and enforcement of policies across multiple namespaces.

Common Practices

  • ClusterRole with RoleBinding: Useful for applying a set of permissions uniformly across multiple namespaces without granting cluster-wide access. This approach adheres to the principle of least privilege by restricting access to resources within specific namespaces.

  • ClusterRole with ClusterRoleBinding: Typically used for roles that require broad access across the entire cluster, which is common in roles designed for cluster administrators or core system components.

Example

Below is an example of how to create a ClusterRole and bind it with a RoleBinding to apply it to a specific namespace:

kubectl create namespace my-namespace
# Create a ClusterRole
kubectl create clusterrole pod-reader --verb=get,list --resource=pods

# Bind the ClusterRole within a specific namespace
kubectl create rolebinding pod-reader-binding --clusterrole=pod-reader --serviceaccount=default:my-service-account --namespace=my-namespace

This setup allows the service account in ‘my-namespace’ to read pods in that namespace using permissions defined in a ClusterRole, demonstrating the flexibility and power of combining ClusterRoles with RoleBindings for fine-grained access control within specific areas of your cluster.

Task 2 - Creating and managing RoleBindings and ClusterRoleBindings

Object

Create and Manage RoleBinding and ClusterRoleBinding

Create ServiceAccount

K8s cluster internal application like cFOS will use serviceAccount with a JWT token to talk to k8s API. the Role or ClusterRole is bound to serviceAccount which in turn assocated with cFOS Pod.

ServiceAccounts are namespaced resources; if no namespace is supplied, they default to the “default” namespace.

Task 1: Create a serviceAccount for cFOS and bind to ClusterRole

serviceAccount
  • use kubectl create cli
kubectl create namespace cfostest
kubectl create serviceaccount cfos-serviceaccount -n cfostest 
kubectl create clusterrole configmap-reader --verb=get,list,watch --resource=configmaps 
kubectl create clusterrole secrets-reader --verb=get,list,watch --resource=secrets 

Add an imagePullSecret to this service account so a POD using this service account also include a image pull secret to pull container images:

cd $HOME
kubectl apply -f cfosimagepullsecret.yaml -n cfostest
kubectl get sa -n cfostest 

Patch serviceaccount with imagePullSecrets

kubectl patch serviceaccount cfos-serviceaccount -n cfostest \
  -p '{"imagePullSecrets": [{"name": "cfosimagepullsecret"}]}'

Or use YAML manifest

cat << EOF | tee cfos-serviceaccount.yaml
apiVersion: v1
kind: ServiceAccount
metadata:
  name: cfos-serviceaccount
  namespace: cfostest 
imagePullSecrets:
- name: cfosimagepullsecret
EOF
kubectl create -f cfos-serviceaccount.yaml 
kubectl describe sa cfos-serviceaccount -n cfostest

Expected Result:

Name:                cfos-serviceaccount
Namespace:           cfostest
Labels:              <none>
Annotations:         <none>
Image pull secrets:  cfosimagepullsecret
Mountable secrets:   <none>
Tokens:              <none>
Events:              <none>

Bind ClusterRole to ServiceAccount

Bind previously created ClusterRoles “configmap-reader” and “secrets-reader” to the service account in the namespace cfostest.

One one of these methods to create a clusterRole

Choose kubectl create cli

kubectl create rolebinding cfosrolebinding-configmap-reader --clusterrole=configmap-reader --serviceaccount=cfostest:cfos-serviceaccount -n cfostest
kubectl create rolebinding cfosrolebinding-secrets-reader --clusterrole=secrets-reader --serviceaccount=cfostest:cfos-serviceaccount -n cfostest

Or use yaml manifest

cat << EOF | tee cfosrolebinding.yaml
---
apiVersion: rbac.authorization.k8s.io/v1
kind: RoleBinding
metadata:
  name: cfosrolebinding-configmap-reader
  namespace: cfostest
roleRef:
  apiGroup: rbac.authorization.k8s.io
  kind: ClusterRole
  name: configmap-reader
subjects:
- kind: ServiceAccount
  name: cfos-serviceaccount
---
apiVersion: rbac.authorization.k8s.io/v1
kind: RoleBinding
metadata:
  name: cfosrolebinding-secrets-reader
  namespace: cfostest
roleRef:
  apiGroup: rbac.authorization.k8s.io
  kind: ClusterRole
  name: secrets-reader
subjects:
- kind: ServiceAccount
  name: cfos-serviceaccount
EOF
kubectl create -f cfosrolebinding.yaml -n cfostest
kubectl describe rolebinding cfosrolebinding-configmap-reader -n cfostest
kubectl describe rolebinding cfosrolebinding-secrets-reader -n cfostest
Name:         cfosrolebinding-configmap-reader
Labels:       <none>
Annotations:  <none>
Role:
  Kind:  ClusterRole
  Name:  configmap-reader
Subjects:
  Kind            Name                 Namespace
  ----            ----                 ---------
  ServiceAccount  cfos-serviceaccount  cfostest
Name:         cfosrolebinding-secrets-reader
Labels:       <none>
Annotations:  <none>
Role:
  Kind:  ClusterRole
  Name:  secrets-reader
Subjects:
  Kind            Name                 Namespace
  ----            ----                 ---------
  ServiceAccount  cfos-serviceaccount  cfostest

Check service account permission

Use kubectl auth can-i to check if a service account has the required permissions in a namespace.

kubectl auth can-i get configmaps --as=system:serviceaccount:cfostest:cfos-serviceaccount -n cfostest
kubectl auth can-i get secrets --as=system:serviceaccount:cfostest:cfos-serviceaccount -n cfostest

Both commands should return “yes”.

Check service account with kubectl pod

Apply Service Account
cat << EOF | kubectl -n cfostest apply -f - 
apiVersion: v1
kind: Pod
metadata:
  name: kubectl
  labels: 
    app: kubectl
spec:
  serviceAccountName: cfos-serviceaccount
  containers:
  - name: kubectl
    image: bitnami/kubectl
    command:
    - "sleep"
    - "infinity"
EOF
kubectl exec -it po/kubectl -n cfostest  -- kubectl get cm
kubectl exec -it po/kubectl -n cfostest  -- kubectl get secret

both command show able to list cm and secret in namespace cfostest

NAME               DATA   AGE
kube-root-ca.crt   1      3m32s
NAME                  TYPE                             DATA   AGE
cfosimagepullsecret   kubernetes.io/dockerconfigjson   1      3m25s

Task 2 - Create cFOS Deployment and with serviceaccount

  • Using kubectl with a YAML file
cFOS Deployment
cat << EOF | tee cfosPOD.yaml 
---
apiVersion: v1
kind: Pod
metadata:
  name: cfos-pod
spec:
  serviceAccountName: cfos-serviceaccount
  containers:
    - name: cfos-container
      image: $cfosimage
      securityContext:
        capabilities:
          add:
            - NET_ADMIN
            - NET_RAW
      volumeMounts:
      - mountPath: /data
        name: data-volume
  volumes:
  - name: data-volume
    emptyDir: {}
EOF
kubectl apply -f cfosPOD.yaml -n cfostest

After deployment, you can use:

kubectl describe po/cfos-pod -n cfostest | grep 'Service Account:'
Service Account: cfos-serviceaccount

clean up

kubectl delete namespace cfostest
kubectl delete clusterrole configmap-reader
kubectl delete clusterrole secrets-reader

Task 3 - Use cases and scenarios

Object

Understand the use case of Rolebinding and ClusterRoleBinding

Examples of Using Roles and ClusterRoles with Bindings in Kubernetes

Understanding when to use Role, ClusterRole, RoleBinding, and ClusterRoleBinding is crucial for proper access control within a Kubernetes environment. Here are some practical examples of each:

Namespace-Specific Permissions with Role and RoleBinding

Use Case: Managing Pods within a Single Namespace

  • Scenario: You want to grant a user permissions to only create and delete Pods within the development namespace.
  • Why Choose Role and RoleBinding:
    • Role: Defines permissions within a specific namespace.
    • RoleBinding: Applies those permissions to specific users within the same namespace.

Example:

kind: Role
apiVersion: rbac.authorization.k8s.io/v1
metadata:
  namespace: development
  name: pod-manager
rules:
- apiGroups: [""]
  resources: ["pods"]
  verbs: ["create", "delete"]

---

kind: RoleBinding
apiVersion: rbac.authorization.k8s.io/v1
metadata:
  name: pod-manager-binding
  namespace: development
subjects:
- kind: User
  name: "dev-user"
roleRef:
  kind: Role
  name: pod-manager
  apiGroup: rbac.authorization.k8s.io

Cluster-Wide Permissions with ClusterRole and ClusterRoleBinding

Use Case: Reading Secrets Across All Namespaces

  • Scenario: A monitoring tool needs to read Secrets across all namespaces to gather configuration information.
  • Why Choose ClusterRole and ClusterRoleBinding:
    • ClusterRole: Appropriate for defining permissions that span multiple namespaces.
    • ClusterRoleBinding: Applies permissions across the entire cluster.

Example:

kind: ClusterRole
apiVersion: rbac.authorization.k8s.io/v1
metadata:
  name: secret-reader
rules:
- apiGroups: [""]
  resources: ["secrets"]
  verbs: ["get", "list", "watch"]

---

kind: ClusterRoleBinding
apiVersion: rbac.authorization.k8s.io/v1
metadata:
  name: secret-reader-binding
subjects:
- kind: ServiceAccount
  name: monitoring-service-account
  namespace: monitoring
roleRef:
  kind: ClusterRole
  name: secret-reader
  apiGroup: rbac.authorization.k8s.io

Scoped ClusterRole with RoleBinding

Use Case: Limiting a Cluster-Wide Role to a Specific Namespace

  • Scenario: You want to allow a CI/CD tool to manage Deployments and StatefulSets, but only within the staging namespace.
  • Why Choose ClusterRole with RoleBinding:
    • ClusterRole: Defined once and can be used across multiple scenarios.
    • RoleBinding: Limits the broad permissions of a ClusterRole to a specific namespace, enhancing security without duplicating role definitions.

Example:

kind: ClusterRole
apiVersion: rbac.authorization.k8s.io/v1
metadata:
  name: deployment-manager
rules:
- apiGroups: ["apps", "extensions"]
  resources: ["deployments", "statefulsets"]
  verbs: ["get", "list", "create", "update", "delete"]

---

kind: RoleBinding
apiVersion: rbac.authorization.k8s.io/v1
metadata:
  name: deployment-manager-binding
  namespace: staging
subjects:
- kind: ServiceAccount
  name: cicd-tool
  namespace: cicd
roleRef:
  kind: ClusterRole
  name: deployment-manager
  apiGroup: rbac.authorization.k8s.io

Summary

Choosing between Role and ClusterRole largely depends on the scope of access required. RoleBinding helps limit broader permissions defined in ClusterRole to specific namespaces, thereby providing flexibility and enhancing security through precise access control.

Chapter 5 - Configmaps and Secrets

Subsections of Chapter 5 - Configmaps and Secrets

Task 1 - Access External Data

Overview of how POD access external data

Containers running in a Kubernetes pod can access external data in various ways, each catering to different needs such as configuration, secrets, and runtime variables. Here are the most common methods:

Environment Variables

Environment variables are a fundamental way to pass configuration data to the container. They can be set in a Pod definition and can derive from various sources:

  • Directly in Pod Spec: Defined directly within the pod’s YAML configuration.
  • From ConfigMaps: Extract specific data from ConfigMaps and expose them as environment variables.
  • From Secrets: Similar to ConfigMaps, but used for sensitive data.

ConfigMaps

ConfigMaps allow you to decouple configuration artifacts from image content to keep containerized applications portable. The data stored in ConfigMaps can be consumed by containers in a pod in several ways:

  • Environment Variables: As mentioned, loading individual properties into environment variables.
  • Volume Mounts: Mounting the entire ConfigMap as a volume. This makes all data in the ConfigMap available to the container as files in a directory.

Secrets

Secrets are used to store and manage sensitive information such as passwords, OAuth tokens, and ssh keys. They can be mounted into pods similar to ConfigMaps but are designed to be more secure.

  • Environment Variables: Injecting secrets into environment variables.
  • Volume Mounts: Mounting secrets as files within the container, allowing applications to read secret data directly from the filesystem.

Persistent Volumes (PVs)

Persistent Volumes are used for managing storage in the cluster and can be mounted into a pod to allow containers to read and write persistent data.

  • PersistentVolumeClaims: Containers use a PersistentVolumeClaim (PVC) to mount a PersistentVolume at a specified mount point. This volume lives beyond the lifecycle of an individual pod.

Volumes

Apart from ConfigMaps and Secrets, Kubernetes supports several other types of volumes that can be used to load data into a container:

  • HostPath: Mounts a file or directory from the host node’s filesystem into your pod.
  • NFS: A network file system (NFS) volume allows an existing NFS (Network File System) share to be mounted into your pod.
  • Cloud Provider Specific Storage: Such as AWS Elastic Block Store, Google Compute Engine persistent storage, Azure File Storage, etc.

Downward API

The Downward API allows containers to access information about the pod, including fields such as the pod’s name, namespace, and annotations, and expose this information either through environment variables or files. By using the Downward API, applications can remain loosely coupled from Kubernetes APIs while still leveraging the dynamic configuration capabilities of the platform

Service Account Token

A Kubernetes Service Account can be used to access the Kubernetes API. The credentials of the service account (token) can automatically be placed into the pod at a well-known location (/var/run/secrets/kubernetes.io/serviceaccount), or can be accessed through environment variables, allowing the container to interact with the Kubernetes API.

cFOS will use this JWT token to authenticate itself with kubernetes API to perform action like read configMap etc.,

External Data Sources

Containers can also access external data via APIs or web services during runtime. This can be any external source accessible over the network, which the container can access using its networking capabilities.

These methods provide versatile options for passing data to containers, ensuring that Kubernetes can manage both stateless and stateful applications effectively.

Below is a configuration sample that allow cFOS to use external url to get a file as dstaddr in firewall policy

cFOS external data sources
cat << EOF | tee cm_external_resource.yaml 
apiVersion: v1
kind: ConfigMap
metadata:
  name: cm-externalresource
  labels:
      app: fos
      category: config
data:
  type: partial
  config: |-
    config system external-resource
      edit "External-resource-files"
        set type address
        set resource "http://10.104.3.130/resources/urls"
        set refresh-rate 2
        set interface "eth0"
      next
    end
    config firewall policy
       edit 10
        set srcintf "eth0"
        set dstintf "eth0"
        set srcaddr "all"
        set dstaddr "External-resource-files"
        set action deny
       next
    end
EOF
kubectl apply -f cm_external_resource.yaml

after apply above yaml manifest, check the configuration.

kubectl describe cm cm-externalresource

If you have cFOS container running, cFOS will read this configmap and config itself accordingly.

Name:         cm-externalresource
Namespace:    default
Labels:       app=fos
              category=config
Annotations:  <none>

Data
====
config:
----
config system external-resource
  edit "External-resource-files"
    set type address
    set resource "http://10.104.3.130/resources/urls"
    set refresh-rate 2
    set interface "eth0"
  next
end
config firewall policy
   edit 10
    set srcintf "eth0"
    set dstintf "eth0"
    set srcaddr "all"
    set dstaddr "External-resource-files"
    set action deny
   next
end
type:
----
partial

BinaryData
====

Events:  <none>

Clean up

cat << EOF | kubectl apply -f - 
apiVersion: v1
data:
  config: |2
  type: full
kind: ConfigMap
metadata:
  labels:
    app: fos
    category: config
  name: cm-full-empty
EOF
kubectl delete cm cm-externalresource
kubectl delete cm cm-full-empty

the kubectl delete cm cm-externalresource will delete cm-externalresource configmap from k8s, but this will not delete config on cFOS. so we create a empty config with type “full” to reset cFOS config to factory default. this will remove all configuration which include cm-externalresource from cFOS

Task 2 - Creating and Managing ConfigMaps and Secrets

Objective

Learn how cFOS can use ConfigMaps and Secrets to Config itself

Access External Data with ConfigMap

cFOS can continusely watch the Add/Del/Update of the ConfigMap in K8s, then use configMap data to config cFOS.

ConfigMap holds configuration data for pods to consume. configuration data can be binary or text data , both is a map of string. cnofigmap data can be set to “immutable” to prevent the change.

cFOS has build in feature can read the configMap from k8s via k8s API. when cFOS POD serviceaccount configured with a permission to read configMaps, cFOS can read configMap as it’s configuration such as license data , firewall policy related config etc.,

Task: Create a configMap for cFOS to import license

  • First we create CFOS without license
cd $HOME
kubectl create namespace cfostest
kubectl apply -f cfosimagepullsecret.yaml -n cfostest
kubectl apply -f $scriptDir/k8s-201-workshop/scripts/cfos/Task1_1_create_cfos_serviceaccount.yaml  -n cfostest

k8sdnsip=$(k get svc kube-dns -n kube-system -o jsonpath='{.spec.clusterIP}')
cat << EOF | tee > cfos7210250-deployment.yaml
---
apiVersion: apps/v1
kind: Deployment
metadata:
  name: cfos7210250-deployment
  labels:
    app: cfos
spec:
  replicas: 1
  selector:
    matchLabels:
      app: cfos
  template:
    metadata:
      annotations:
        container.apparmor.security.beta.kubernetes.io/cfos7210250-container: unconfined
      labels:
        app: cfos
    spec:
      initContainers:
      - name: init-myservice
        image: busybox
        command:
        - sh
        - -c
        - |
          echo "nameserver $k8sdnsip" > /mnt/resolv.conf
          echo "search default.svc.cluster.local svc.cluster.local cluster.local" >> /mnt/resolv.conf;
        volumeMounts:
        - name: resolv-conf
          mountPath: /mnt
      serviceAccountName: cfos-serviceaccount
      containers:
      - name: cfos7210250-container
        image: $cfosimage
        securityContext:
          privileged: false
          capabilities:
            add: ["NET_ADMIN","SYS_ADMIN","NET_RAW"]
        ports:
        - containerPort: 80
        volumeMounts:
        - mountPath: /data
          name: data-volume
        - mountPath: /etc/resolv.conf
          name: resolv-conf
          subPath: resolv.conf
      volumes:
      - name: data-volume
        emptyDir: {}
      - name: resolv-conf
        emptyDir: {}
      dnsPolicy: ClusterFirst
EOF
kubectl apply -f cfos7210250-deployment.yaml -n cfostest
kubectl rollout status deployment cfos7210250-deployment -n cfostest
  • Check cFOS running in restricted mode due to no license applied
kubectl logs --tail=100 -n cfostest -l app=cfos | grep license
  • Create a configmap file for cfos license
Tip

labels “app: fos” and “category: config” are required. Especially category is used to distinguish from other ConfigMaps such as license. cFOS only read those configMaps with label “app: fos”.

cat <<EOF | tee cfos_license.yaml
apiVersion: v1
kind: ConfigMap
metadata:
    name: cfos-license
    labels:
        app: fos
        category: license
data:
    license: |+
EOF

now you created a configmap with an empty cFOS license.

Tip

| (Pipe): This is a block indicator used for literal style, where line breaks and leading spaces are preserved. It’s commonly used to define multi-line strings.

The |+ ensures that all the line breaks within the license text

category: license indicate this is a license

  • Add your license

get your license file, then append the content to yaml file, replace “CFOSVLTM24000016.lic” with your actual file name

licfile="CFOSVLTM24000016.lic"
while read -r line; do printf "      %s\n" "$line"; done < $licfile >> cfos_license.yaml
  • Apply the resource
kubectl create -f cfos_license.yaml -n cfostest  

cFOS will “watch” ConfigMap has with label= “app: fos”, then import the license into cFOS.

  • Check cFOS log
kubectl logs -f  -l app=cfos -n cfostest
  • Check whether license applied from cFOS cli
podname=$(kubectl get pod -n cfostest -l app=cfos -o jsonpath='{.items[*].metadata.name}')
kubectl exec -it po/$podname -n cfostest -- /bin/cli

input username “admin”, the default password has not been setup, just press enter key. then issue command

diag sys license

you shall see output like

cFOS # diagnose sys license
Status: Valid license
SN: CFOSVLTM240000**
Valid From: 2024-05-23
Valid To: 2024-07-25

use exit to exit the cFOS command parser

  • Troubleshooting license apply issue

In case you hit license issue, shell into cFOS, run execute update-now to check more detail

Task 2 - Use cFOS ConfigMap for Firewall VIP config

cat << EOF | tee fosconfigmapfirewallvip.yaml
apiVersion: v1
kind: ConfigMap
metadata:
  name: foscfgvip
  labels:
      app: fos
      category: config
data:
  type: partial
  config: |-
    config firewall vip
           edit "test"
               set extip "10.244.166.15"
               set mappedip "10.244.166.18"
               set extintf eth0
               set portforward enable
               set extport "8888"
               set mappedport "80"
           next
       end
EOF
kubectl create -f fosconfigmapfirewallvip.yaml -n cfostest

use show firewall vip from cFOS cli to check the cFOS vip configuration, cFOS configuration can contains one or more CLI commands. There are two types configurations: partial and full. For a partial configuration, it will be applied on top of current configuration in cFOS. Multiple partial configurations are accepted, so a bigger configuration can be splitted into small ones and apply them one by one. For full configuration, the active configuration will be wiped out and the new configuration will be fully restored.

Tip

type: partial indicates this is a partial configuration

category: config indicates this is a configuation

  • Check Result

Check cFOS container log with kubectl logs -f -l app=cfos -n cfostest . you can find

2024-05-14_10:57:18.63416 INFO: 2024/05/14 10:57:18 received a new fos configmap
2024-05-14_10:57:18.63417 INFO: 2024/05/14 10:57:18 configmap name: foscfgvip, labels: map[app:fos category:config]
2024-05-14_10:57:18.63417 INFO: 2024/05/14 10:57:18 got a fos config
2024-05-14_10:57:18.63417 INFO: 2024/05/14 10:57:18 applying a partial fos config...
2024-05-14_10:57:19.42525 INFO: 2024/05/14 10:57:19 fos config is applied successfully.
  • Delete ConfigMap

Take special care: delete a ConfigMap will not delete configuration on the running cFOS, but you can create a ConfigMap with delete command to delete the configuration.

  • use kubectl delete cm <configMap Name> to delete configmap.
  • Create ConfigMap for cFOS to delete a Firewall Config
cat << EOF | kubectl create -n cfostest -f - 
apiVersion: v1
kind: ConfigMap
metadata:
  name: foscfgvip-del
  labels:
      app: fos
      category: config
data:
  type: partial
  config: |-
    config firewall vip
           del "test"
    end
EOF

Above will delete the configuration from cFOS.

  • Update ConfigMap

Update a Configmap will also update the configuration on cFOS

  • cFOS configMap with data type: full

if data: type is set to full

cFOS will use this configuration to replace all current configuration. cFOS will be reloaded then load this function.

cat << EOF | kubectl -n cfostest apply -f - 

apiVersion: v1
data:
  config: |
  type: full
kind: ConfigMap
metadata:
  labels:
    app: fos
    category: config
  name: cm-full-empty
EOF

Expected Result

kubectl logs -f -l app=cfos -n cfostest
2024-05-14_12:22:58.24465 INFO: 2024/05/14 12:22:58 received a new fos configmap
2024-05-14_12:22:58.24466 INFO: 2024/05/14 12:22:58 configmap name: cm-full-empty, labels: map[app:fos category:config]
2024-05-14_12:22:58.24466 INFO: 2024/05/14 12:22:58 got a fos config
2024-05-14_12:22:58.24493 INFO: 2024/05/14 12:22:58 applying a full fos config...

then cFOS will be reloaded with this empty configuraiton, effectively, this is reset cFOS back to the factory default.

Access External Data with Secrets

Kubernetes Secrets are objects that store sensitive data such as passwords, OAuth tokens, SSH keys, etc. The primary purpose of using secrets is to protect sensitive configuration from being exposed in your application code or script. Secrets provide a mechanism to supply containerized applications with confidential data while keeping the deployment manifests or source code non-confidential.

Benefits of Using Secrets

  • Security: Secrets keep sensitive data out of your application code and Pod definitions. Management: Simplifies sensitive data management as updates to secrets do not require image rebuilds or application redeployments.
  • Flexibility: Can be mounted as data volumes or exposed as environment variables to be used by a container in a Pod. Also, they can be used by the Kubernetes system itself for things like accessing a private image registry.

How to Create Secrets

  • use KubeCTL or YAML file
    kubectl create secret generic ipsec-shared-key --from-literal=ipsec-shared-pass=12345678 -n cfostest

    use kubectl get secret ipsec-shared-key -o yaml -n cfostest can check the secret just created.

    the password “12345678” encoded with base64 and saved in k8s. you can still see the original password with

    kubectl get secret ipsec-shared-key -o json -n cfostest | jq -r '.data["ipsec-shared-pass"]' | base64 -d
    cat << EOF | kubectl apply -n cfostest -f - 
    apiVersion: v1
    kind: Secret
    metadata:
      name: ipsec-shared-key
    data:
      ipsec-shared-pass: $(echo 12345678 | base64)
    type: Opaque
    EOF

    The type field helps Kubernetes software and developers know how to treat the contents of the secret. The type Opaque is one of several predefined types that Kubernetes supports for secrets.

    Info

    Opaque: This is the default type for a secret. It indicates that the secret contains arbitrary data that isn’t structured in any predefined way specific to Kubernetes. This type is used when you are storing secret data that doesn’t fit into any of the other types of secrets that Kubernetes understands (like docker-registry or tls). the other options for type are : “kubernetes.io/service-account-token:”, “kubernetes.io/dockerconfigjson”,“kubernetes.io/tls” etc., when we create secret for store docker login secret, we have to use type: kubernetes.io/dockerconfigjson.

Consuming Secrets in a Pod

  • Environment Variables

Secret can be passed into POD as environment variables.

  • Mount Secret as Volume

  • ImagePullSecrets

Secret can be used in field “ImagePullSecrets” in serviceaccount or POD manifest for example. you can define a secriceaccount to include an ImagePullSecrets. or you can use secret in Pod or “Deployment” manifest for pod to pull image with secret.

  • As port of ConfigMap

Secret can be part of the ConfigMap for configuration purpose. for example, we can embeded secret in configMap for cFOS.

  • Use external secret management system

for example, HashiCorp Vault, AWS Secrets Manager, or Azure Key Vault . These systems can dynamically inject secrets into your applications, often using a sidecar container or a mutating webhook to provide secrets to the application securely.

Task 1 - use secret in configMap

  • create secret with key to include the shared password
kubectl create secret generic ipsec-psks --from-literal=psk1="12345678"
  • create a clustersvc for cfos ipsec

create a clusterIP svc for cfos to get an ip for ipsec

kubectl apply -f $scriptDir/k8s-201-workshop/scripts/cfos/02_clusterip_cfos.yaml -n cfostest
  • use secret in configmap data
cat << EOF | kubectl apply -n cfostest -f - 
apiVersion: v1
data:
  type: partial
  config: |-
    config vpn ipsec phase1-interface
        edit "test-p1"
           set interface "eth0"
           set remote-gw 10.96.17.42
           set peertype any
           set proposal aes128-sha256 aes256-sha256 aes128gcm-prfsha256 aes256gcm-prfsha384 chacha20poly1305-prfsha256
           set psksecret {{ipsec-psks:psk1}}
           set auto-negotiate disable
         next
     end
    config vpn ipsec phase2-interface
        edit "test-p2"
            set phase1name "test-p1"
            set proposal aes128-sha1 aes256-sha1 aes128-sha256 aes256-sha256 aes128gcm aes256gcm chacha20poly1305
            set dhgrp 14 15 5
            set src-subnet 10.4.96.0 255.255.240.0
            set dst-subnet 10.0.4.0 255.255.255.0
        next
    end
kind: ConfigMap
metadata:
  labels:
    app: fos
    category: config
  name: cm-ipsecvpn
EOF

in above configmap. inside the configuration. the line set psksecret {{ipsec-psks:psk1}} is reference to a secret. the secret name is “ipsec-psks”, the key is psk1. the actual psksecret “12345678” is saved inside the key “psk1” of secret “ipsec-psks”.

k8s configmap does not support use secret in config data. it is up to cFOS application to parse secret. In above, it is cFOS responsibility to substitute {{ipsec-psks:psk1}} with actual k8s secret ipsec-psks.

use

podname=$(kubectl get pod -n cfostest -l app=cfos -o jsonpath='{.items[*].metadata.name}')
kubectl exec -it po/$podname -n cfostest -- /bin/cli

then use show vpn ipsec phase1-interface and show vpn ipsec phase2-interface from cFOS cli to check cFOS configuration.

Summary

cFOS has build-in support for read data from k8s configMaps and Secrets , which enable multiple cFOS container in one cluster to share the configuration data.

clean up

kubectl delete -f cfos7210250-deployment.yaml -n cfostest
kubectl delete svc ipsec -n cfostest
kubectl delete clusterrole configmap-reader
kubectl delete clusterrole secrets-reader
kubectl delete cm cm-full-empty -n cfostest 
kubectl delete cm cm-full-empty -n cfostest
kubectl delete cm foscfgvip -n cfostest 
kubectl delete cm foscfgvip-del -n cfostest 
kubectl delete cm cm-ipsecvpn -n cfostest

Task 3 - Creating and Managing Storage

Use external data

Application like cFOS may persist the data such as license, configuration data, log etc to storage that outside of the POD. for example, cFOS container will like to mount /data to other Volume.

to do that, we have to create a “Volume” attached to POD for container to mount

  1. field spec.template.spec.containers.volmeMounts will try to mount /data directory in cfos to Volume /data-volume
  2. field spec.template.spec.volumens define the volume with name “data-volume” and it’s actual storage location is on host directory /cfosdata
apiVersion: apps/v1
kind: DaemonSet
metadata:
  name: cfos-deployment
spec:
  selector:
    matchLabels:
      app: cfos
  template:
    metadata:
      labels:
        app: cfos
    spec:
      containers:
      - name: cfos
        image: $cfosimage
        securityContext:
          capabilities:
            add: ["NET_ADMIN", "SYS_ADMIN", "NET_RAW"]
        volumeMounts:
        - mountPath: /data
          name: data-volume
      volumes:
      - name: data-volume
        hostPath:
          path: /cfosdata
          type: DirectoryOrCreate 

Volume Types

  • PVC (Persistent Volume Claims)

Persistent Volume Claims are a way of letting users consume abstract storage resources, while allowing administrators to manage the provisioning of storage and its underlying details in a flexible manner. PVCs are used in scenarios where persistent storage is needed for stateful applications, such as databases, key-value stores, and file storage.

  • emptyDir

An emptyDir volume is created when a Pod is assigned to a Node, and it exists as long as that Pod is running on that Node. The data in an emptyDir volume is deleted when the Pod is removed.

  • nfs (Network File System)

An nfs volume allows an existing NFS (Network File System) share to be mounted into a Pod. NFS volumes are often used in environments where data needs to be quickly and easily shared between Pods.

  • awsElasticBlockStore, gcePersistentDisk, and azureDisk

These volumes allow you to integrate Kubernetes Pods with cloud provider-specific storage solutions, like AWS EBS, GCE Persistent Disks, and Azure Disk.

  • hostPath

A path directly on host node.

Example 1 - config cfos deployment to use PVC

  • Create cFos license, imagePullSecret and serviceAccount
scriptDir=$HOME
kubectl create namespace cfostest
kubectl apply -f cfosimagepullsecret.yaml -n cfostest
kubectl apply -f $scriptDir/k8s-201-workshop/scripts/cfos/Task1_1_create_cfos_serviceaccount.yaml  -n cfostest
  • create PVC with required capacity
cat << EOF | kubectl apply -n cfostest -f - 
apiVersion: v1
kind: PersistentVolumeClaim
metadata:
  name: cfosdata
spec:
  accessModes:
    - ReadWriteOnce
  resources:
    requests:
      storage: 1Gi
EOF
  • create cfos Deployment with pvc
cat << EOF | kubectl apply -n cfostest -f - 
apiVersion: apps/v1
kind: Deployment
metadata:
  name: cfos7210250-deployment
  labels:
    app: cfos
spec:
  replicas: 1
  selector:
    matchLabels:
      app: cfos
  template:
    metadata:
      annotations:
        container.apparmor.security.beta.kubernetes.io/cfos7210250-container: unconfined
      labels:
        app: cfos
    spec:
      serviceAccountName: cfos-serviceaccount
      containers:
      - name: cfos7210250-container
        image: $cfosimage
        securityContext:
          capabilities:
              add: ["NET_ADMIN","SYS_ADMIN","NET_RAW"]
        ports:
        - containerPort: 80
        volumeMounts:
        - mountPath: /data
          name: data-volume
      volumes:
      - name: data-volume
        persistentVolumeClaim:
          claimName: cfosdata

EOF
  • delete cfosDeployment

with PVC used in deployment, even you deleted cFOS deployment, the data on /data is persistent , if you create deployment and mout /data to same PVC again. the data include license , configuration etc are still exist.

kubectl delete deployment cfos7210250-deployment -n cfostest 

Example 2 - config cfos deployment to use emptyDir

With this configuration, the /data lifecycle share POD lifecycle. when POD gone, the data will also gone. If using this configuration, make sure cFOS use configmap for all the configuration, and send all log to remote syslog server to prevent loss of the log.

to use emptyDir, just change spec.template.spec.volmumens to “emptyDir”

cat << EOF | kubectl apply -n cfostest -f - 
apiVersion: apps/v1
kind: Deployment
metadata:
  name: cfos7210250-deployment
  labels:
    app: cfos
spec:
  replicas: 1
  selector:
    matchLabels:
      app: cfos
  template:
    metadata:
      annotations:
        container.apparmor.security.beta.kubernetes.io/cfos7210250-container: unconfined
      labels:
        app: cfos
    spec:
      serviceAccountName: cfos-serviceaccount
      containers:
      - name: cfos7210250-container
        image: $cfosimage
        securityContext:
          capabilities:
              add: ["NET_ADMIN","SYS_ADMIN","NET_RAW"]
        ports:
        - containerPort: 80
        volumeMounts:
        - mountPath: /data
          name: data-volume
      volumes:
      - name: data-volume
        emptyDir: {}

EOF

clean up

kubectl delete namespace cfostest
kubectl delete clusterrole configmap-reader
kubectl delete clusterrole secrets-reader

Chapter 6 - Kubernetes Networking Basics

Subsections of Chapter 6 - Kubernetes Networking Basics

Task 1 - Review of Kubernetes Default Networking

What is CNI?

The Container Network Interface (CNI) is a standard that defines how network interfaces are managed in Linux containers. It’s widely used in container orchestration systems, like Kubernetes, to provide networking for pods and their containers. CNI allows for a plug-and-play approach to network connectivity, supporting a range of networking tasks from basic connectivity to more advanced network configurations.

Here are some of the major CNI plugins widely used across the industry:

  • Calico
  • Flannel
  • Weave Net
  • Cilium
  • Canal

for managed k8s like AKS, because it ususally require integrate with VNET, so azure has it’s own CNI which is “azure-vnet” cni.

all these CNI from managed k8s allow POD use subnet from VNET/VPC address space.

normally, the cni configuration can be found from each node “/etc/cni/net.d” directory.

for example on AKS worker node.

azureuser@aks-worker-36032082-vmss000000:~$ sudo cat /etc/cni/net.d/10-azure.conflist 
{
   "cniVersion":"0.3.0",
   "name":"azure",
   "plugins":[
      {
         "type":"azure-vnet",
         "mode":"transparent",
         "ipsToRouteViaHost":["169.254.20.10"],
         "ipam":{
            "type":"azure-vnet-ipam"
         }
      },
      {
         "type":"portmap",
         "capabilities":{
            "portMappings":true
         },
         "snat":true
      }
   ]
}

Above you can find the CNI plugin is “azure-vnet”. which means POD will use VNET subnet address space.

Kubernetes networking basics

Networking is a central part of Kubernetes, but it can be challenging to understand exactly how it is expected to work. There are 4 distinct networking problems to address:

  1. Highly-coupled container-to-container communications: this is solved by Pods and localhost communications.
  2. Pod-to-Pod communications: this is the primary focus of this document.
  3. Pod-to-Service communications: this is covered by Services.
  4. External-to-Service communications: this is also covered by Services.

Kubernetes is all about sharing machines among applications. Typically, sharing machines requires ensuring that two applications do not try to use the same ports. Coordinating ports across multiple developers is very difficult to do at scale and exposes users to cluster-level issues outside of their control.

Kubernetes IP address ranges

Kubernetes clusters require to allocate non-overlapping IP addresses for Pods, Services and Nodes, from a range of available addresses configured in the following components:

  1. The network plugin is configured to assign IP addresses to Pods.
  2. The kube-apiserver is configured to assign IP addresses to Services.
  3. The kubelet or the cloud-controller-manager is configured to assign IP addresses to Nodes.

1. Container-to-Container Networking

Within a pod, containers share the same IP address and port space, which means they can communicate with each other using localhost. This type of networking is the simplest in Kubernetes and is intended for tightly coupled application components that need to communicate frequently and quickly.

Benefits: Efficient communication due to shared network namespace; no need for IP management per container. Use case: Inter-process communication within a pod, such as between a web server and a local cache or database.

2. Pod-to-Pod Networking

Pod-to-pod communication occurs between pods across the same or different nodes within the Kubernetes cluster. Each pod is assigned a unique IP address, irrespective of which node it resides on. This setup is enabled through a flat network model that allows direct IP routing without NAT between pods.

Implementation: Typically handled by a CNI (Container Network Interface) plugin that configures the underlying network to allow seamless pod-to-pod communication. Common plugins include Calico, Weave, and Flannel.

Challenges: Ensuring network policies are in place to control access and traffic between pods for security purposes.

imagepod imagepod

3. Pod-to-Service Networking

Kubernetes services are abstractions that define a logical set of pods and a policy by which to access them. Services provide stable IP addresses and DNS names to which pods can send requests. Behind the scenes, a service routes traffic to pod endpoints based on labels and selectors.

Benefits: Provides a reliable and stable interface for intra-cluster service communication, handling the load balancing across multiple pods.

Implementation: Uses kube-proxy, which runs on every node, to route traffic or manage IP tables to direct traffic to the appropriate backend pods.

imagesvc imagesvc

4. External-to-Service Networking

  • External-to-service communication is handled through services exposed to the outside of the cluster. This can be achieved in several ways:

  • NodePort: Exposes the service on a static port on the node’s IP. External traffic is routed to this port and then forwarded to the appropriate service.

  • LoadBalancer: Integrates with external cloud load balancers, providing a public IP that is mapped to the service.

  • Ingress: Manages external access to the services via HTTP/HTTPS, providing advanced routing capabilities, SSL termination, and name-based virtual hosting.

Benefits: Allows external users and systems to interact with applications running within the cluster in a controlled and secure manner.

Challenges: Requires careful configuration to ensure security, such as setting up appropriate firewall rules and security groups.

imageinternet imageinternet

These different networking types together create a flexible and powerful system for managing both internal and external communications in a Kubernetes environment. The design ensures that applications are scalable, maintainable, and accessible, which is crucial for modern cloud-native applications.

Task 2 - Challenges of Single network interface

Using a single network interface in Kubernetes clusters can present several challenges that impact network performance, security, and scalability. Here are some key challenges:

  1. Network Performance and Bandwidth Congestion: A single network interface can become a bottleneck as all traffic, including intra-cluster communication, ingress, and egress, passes through it. This can lead to network congestion and reduced performance. Latency: High traffic volumes can increase latency, affecting the responsiveness of applications and services.

  2. Scalability Limited Capacity: As the number of pods and services increases, the single network interface may not handle the growing network load efficiently, limiting the cluster’s scalability. Resource Contention: Pods and services might compete for network resources, leading to performance degradation.

  3. Security Single Point of Failure: Relying on a single network interface makes the cluster vulnerable to network failures. If the interface goes down, the entire network communication within the cluster can be disrupted. Limited Isolation: It is harder to implement network policies and isolate traffic between different services and namespaces, increasing the risk of security breaches and unauthorized access.

  4. Network Policies and Isolation Complexity in Implementing Policies: Enforcing network policies to control traffic flow between pods and services can be more complex with a single network interface, especially in multi-tenant environments. Namespace Isolation: Achieving proper network isolation between different namespaces or projects can be challenging without separate interfaces.

  5. High Availability and Redundancy Lack of Redundancy: A single network interface setup lacks redundancy. If the interface or its associated hardware fails, it can lead to a complete network outage in the cluster. Failover Capabilities: Implementing failover mechanisms is more difficult without multiple interfaces, making the network less resilient.

  6. Traffic Management Difficulty in Traffic Shaping and QoS: Managing traffic shaping, quality of service (QoS), and prioritizing critical traffic can be difficult with a single interface handling all types of traffic. Ingress/Egress Traffic: Balancing ingress and egress traffic on the same interface can lead to inefficiencies and potential collisions.

  7. Monitoring and Troubleshooting Limited Monitoring Capabilities: Monitoring network traffic and diagnosing issues can be more challenging with a single interface, as it may be harder to distinguish between different types of traffic. Troubleshooting: Identifying the root cause of network issues can be more complex without segregated traffic paths. Solutions and Best Practices Multiple Network Interfaces: Use multiple network interfaces to separate different types of traffic, such as management, storage, and application traffic. Network Plugins: Utilize advanced network plugins (e.g., Calico, Cilium) that offer better network policy enforcement and isolation. Network Segmentation: Implement network segmentation to isolate traffic and enhance security. Load Balancers: Use external load balancers to distribute traffic effectively and provide redundancy. Monitoring Tools: Employ robust monitoring and observability tools to gain better insights into network performance and issues.

By addressing these challenges through thoughtful network design and best practices, Kubernetes clusters can achieve better performance, security, and scalability.

Chapter 7 - Ingress Traffic

Subsections of Chapter 7 - Ingress Traffic

Task 1 - Overview of Ingress in Kubernetes

cFOS overview

Container FortiOS, the operating system that powers Fortinet’s security appliance as a container, can be integrated with Kubernetes to enhance the security of inbound traffic to your containers. This integration helps ensure that only legitimate and authorized traffic reaches your Kubernetes services while providing robust security features such as intrusion prevention, application control, and advanced threat protection.

Deploying FortiOS as a containerized solution within a Kubernetes environment offers several advantages that enhance security, flexibility, and manageability. Here are some of the key benefits:

  1. Enhanced Security Advanced Threat Protection: FortiOS containers provide comprehensive security features, including firewall, intrusion prevention system (IPS), antivirus, and web filtering, offering robust protection against a wide range of threats. SSL/TLS Inspection: Containerized FortiOS can perform SSL/TLS termination and inspection, decrypting traffic to detect hidden threats while offloading this resource-intensive task from application services. Granular Policy Control: Allows the implementation of detailed security policies at the container level, ensuring that only legitimate traffic reaches your Kubernetes services.

  2. Scalability and Flexibility Scalable Security: FortiOS containers can scale with your Kubernetes environment, ensuring that security capabilities grow with your application demands. This is particularly useful for dynamic, microservices-based architectures. Deployment Flexibility: Containerized FortiOS can be deployed in any Kubernetes environment, whether on-premises or in the cloud, providing consistent security across different infrastructures.

  3. Integration with Kubernetes Ecosystem Native Kubernetes Integration: FortiOS containers integrate seamlessly with Kubernetes, leveraging Kubernetes features like services, deployments, and ingress controllers to provide security at various layers. Automation and Orchestration: Security policies and configurations can be managed and automated using Kubernetes-native tools and CI/CD pipelines, ensuring that security is integrated into the DevOps workflow.

  4. Operational Efficiency Centralized Management: Using FortiManager and FortiAnalyzer, administrators can centrally manage multiple FortiOS containers, simplifying configuration, monitoring, and reporting across large deployments. Consistency and Standardization: Containerized deployments ensure consistent security policies and practices across different environments, reducing the risk of misconfigurations and security gaps.

  5. Cost-Effectiveness Optimized Resource Utilization: Containerized FortiOS can share resources with other containers in the Kubernetes environment, optimizing resource usage and potentially reducing infrastructure costs. Elastic Scaling: The ability to scale security resources up or down based on demand helps manage costs more effectively, ensuring you pay only for the resources you need.

  6. Improved Performance Low Latency Security: By placing FortiOS containers close to the applications they protect within the same Kubernetes cluster, you can achieve lower latency for security processing compared to external or centralized security appliances. Distributed Security: Security processing can be distributed across multiple nodes, enhancing performance and resilience compared to traditional, centralized security architectures.

Task 2 - Configuring and Securing Ingress

Purpose

In this chapter, we will use cFOS to provide ingress protection for a target application(goweb). The target application is a web server that allows users to upload files. Without cFOS protection, users can upload malicious files. However, with cFOS, uploaded files are scanned, and malicious files are blocked.

We use a load balancer with a public IP to handle ingress traffic from the internet to the target application. We can also use an internal IP or even the cFOS cluster IP to secure traffic from within the Kubernetes cluster or other pods to the target application. Without cFOS, incoming traffic goes directly to the backend application. With cFOS in the middle, the load balancer directs the traffic to cFOS first. cFOS then uses a Firewall VIP to redirect the traffic to the backend application, performing deep inspection along the way.

Unprotected Application (NO cFOS protection)

Let’s create an application and exposed by loadBalancer directly.

Unprotected App
#!/bin/bash -x
cd $HOME
gowebimage="public.ecr.aws/t8s9q7q9/andy2024public:fileuploadserverx86v1.1"
#gowebimage="interbeing/myfmg:fileuploadserverx86"
kubectl create namespace mytest
kubectl create deployment goweb --image=$gowebimage  --namespace mytest
kubectl expose  deployment goweb --target-port=80  --port=80  --namespace mytest
svcname=$(kubectl config view -o json | jq .clusters[0].cluster.server | cut -d "." -f 1 | cut -d "/" -f 3)
metallbip=$(kubectl get ipaddresspool -n metallb-system -o jsonpath='{.items[*].spec.addresses[0]}' 2>/dev/null | cut -d '/' -f 1)
if [ -n "$metallbip" ]; then
   metallbannotation="metallb.universe.tf/loadBalancerIPs: $metallbip"
fi

echo use pool ipaddress $metallbip for svc 

cat << EOF | tee > gowebsvc.yaml 
apiVersion: v1
kind: Service
metadata:
  name: gowebsvc
  annotations:
    $metallbannotation
    service.beta.kubernetes.io/azure-dns-label-name: $svcname
spec:
  sessionAffinity: ClientIP
  ports:
  - port: 8888
    name: goweb-1
    targetPort: 80
    protocol: TCP
  selector:
    app: goweb
  type: LoadBalancer

EOF
kubectl apply -f gowebsvc.yaml --namespace mytest
  • Review gowebsvc.yaml and check the svc created by k8s with cli like kubectl get svc -n mytest

for example, on self-managed k8s, you will see

NAME       TYPE           CLUSTER-IP    EXTERNAL-IP   PORT(S)          AGE
goweb      ClusterIP      10.99.120.6   <none>        80/TCP           2m31s
gowebsvc   LoadBalancer   10.108.22.4   10.0.0.4      8888:31981/TCP   2m30s

now, the goweb application is ready for you to upload file

Let’s upload a virus file to goweb

  • download eicar_com.zip from eicar.org website
wget -c https://secure.eicar.org/eicar_com.zip
cp eicar_com.zip $scriptDir/k8s-201-workshop/scripts/cfos/ingress_demo/
  • send file to application
curl -v -F "file=@$scriptDir/k8s-201-workshop/scripts/cfos/ingress_demo/eicar_com.zip" http://$svcname.$location.cloudapp.azure.com:8888/upload

result

* Host k8strainingmaster-k8s51-1.eastus.cloudapp.azure.com:8888 was resolved.
* IPv6: (none)
* IPv4: 52.224.164.53
*   Trying 52.224.164.53:8888...
* Connected to k8strainingmaster-k8s51-1.eastus.cloudapp.azure.com (52.224.164.53) port 8888
> POST /upload HTTP/1.1
> Host: k8strainingmaster-k8s51-1.eastus.cloudapp.azure.com:8888
> User-Agent: curl/8.5.0
> Accept: */*
> Content-Length: 401
> Content-Type: multipart/form-data; boundary=------------------------OBqcPObBBZvOi9WnnBwJlX
> 
* We are completely uploaded and fine
< HTTP/1.1 200 OK
< Date: Tue, 02 Jul 2024 06:27:26 GMT
< Content-Length: 0
< 
* Connection #0 to host k8strainingmaster-k8s51-1.eastus.cloudapp.azure.com left intact

you will see “We are completely uploaded and fine”.

see below diagram for more detail.

traffic diagram without use cFOS

direct direct

This procedure demonstrates running an application without protection is dangerous. The application is exposed to various security challenges, including the risk of users uploading malicious files.

If you are on a self-managed Kubernetes cluster with MetalLB as the load balancer and only have one IP in the pool, you will need to delete the service in the mytest namespace to free up the IP for other services.

kubectl delete namespace mytest

Application protected by cFOS

traffic diagram after use cFOS in the middle

With cFOS in the middle, it functions as a reverse proxy. Instead of exposing the application to the internet, we expose cFOS to the internet. cFOS then redirects or proxies traffic to the backend application, ensuring that the traffic passes cFOS security policy checks. cFOS is able to inspect traffic even it’s encrypted with SSL.

proxyed proxyed

Create cFOS deployment
cfosnamespace="cfosingress"
kubectl create namespace $cfosnamespace
  • Create cFOS license ConfigMap and image pull secret

You should already have created the cFOS license and cFOS image pull secret YAML files in Chapter 1: Create Secret and cFOS License. Since we are going to use a different namespace for ingress protection, you can apply the same YAML files to the new namespace.

cd $HOME
kubectl apply -f cfosimagepullsecret.yaml  -n $cfosnamespace
kubectl apply -f cfos_license.yaml  -n $cfosnamespace
  • Create a service account for cFOS

The cFOS container will require privileges to read ConfigMaps and Secrets from Kubernetes. To achieve this, we need to create a Role with the necessary permissions. We will then create a ServiceAccount that includes the required Role for cFOS.

kubectl create -f $scriptDir/k8s-201-workshop/scripts/cfos/ingress_demo/01_create_cfos_account.yaml -n $cfosnamespace

output:

clusterrole.rbac.authorization.k8s.io/configmap-reader configured
rolebinding.rbac.authorization.k8s.io/read-configmaps configured
clusterrole.rbac.authorization.k8s.io/secrets-reader configured
rolebinding.rbac.authorization.k8s.io/read-secrets configured
  • Create cFOS deployment

To run the cFOS deployment, copy/paste code below. This will create a deployment that utilizes the previously deployed Secret and ConfigMap.

k8sdnsip=$(k get svc kube-dns -n kube-system -o jsonpath='{.spec.clusterIP}')
cat << EOF | tee > cfos7210250-deployment.yaml
---
apiVersion: apps/v1
kind: Deployment
metadata:
  name: cfos7210250-deployment
  labels:
    app: cfos
spec:
  replicas: 1
  selector:
    matchLabels:
      app: cfos
  template:
    metadata:
      annotations:
        container.apparmor.security.beta.kubernetes.io/cfos7210250-container: unconfined
      labels:
        app: cfos
    spec:
      initContainers:
      - name: init-myservice
        image: busybox
        command:
        - sh
        - -c
        - |
          echo "nameserver $k8sdnsip" > /mnt/resolv.conf
          echo "search default.svc.cluster.local svc.cluster.local cluster.local" >> /mnt/resolv.conf;
        volumeMounts:
        - name: resolv-conf
          mountPath: /mnt
      serviceAccountName: cfos-serviceaccount
      containers:
      - name: cfos7210250-container
        image: $cfosimage
        securityContext:
          privileged: false
          capabilities:
            add: ["NET_ADMIN","SYS_ADMIN","NET_RAW"]
        ports:
        - containerPort: 443
        volumeMounts:
        - mountPath: /data
          name: data-volume
        - mountPath: /etc/resolv.conf
          name: resolv-conf
          subPath: resolv.conf
      volumes:
      - name: data-volume
        emptyDir: {}
      - name: resolv-conf
        emptyDir: {}
      dnsPolicy: ClusterFirst
EOF
kubectl apply -f cfos7210250-deployment.yaml -n $cfosnamespace

check result with

kubectl get pod -n $cfosnamespace

result

NAME                                    READY   STATUS    RESTARTS   AGE
cfos7210250-deployment-8b6d4b8b-ljjf5   1/1     Running   0          3m13s

if you see POD is in “ErrImagePull” instead Running, check your imagepullsecret.

Create backend application and service

Let’s create a file upload server application and an Nginx application, and expose them with ClusterIP services. The goweb and Nginx applications can be in any namespace; here, we will use the default namespace.

Backend App
gowebimage="public.ecr.aws/t8s9q7q9/andy2024public:fileuploadserverx86v1.1"
kubectl create deployment goweb --image=$gowebimage
kubectl expose  deployment goweb --target-port=80  --port=80 
kubectl create deployment nginx --image=nginx 
kubectl expose deployment nginx --target-port=80 --port=80 

check result with kubectl get svc goweb, kubectl get svc nginx, kubectl get ep goweb, kubectl get ep nginx

Here, goweb and nginx are deployed in the default namespace, while cFOS is deployed in a different namespace. This setup is normal in Kubernetes, as all namespaces within the same cluster can communicate with each other.

result

kubectl get svc
NAME         TYPE        CLUSTER-IP      EXTERNAL-IP   PORT(S)   AGE
goweb        ClusterIP   10.96.131.201   <none>        80/TCP    13m
nginx        ClusterIP   10.96.200.35    <none>        80/TCP    13m

and

kubectl get ep
NAME         ENDPOINTS           AGE
goweb        10.224.0.13:80      15m
kubernetes   20.121.91.175:443   153m
nginx        10.224.0.28:80      15m

Check whether cFOS can reach backend application

cFOS can use execute telnet command to check backend application

check below example, if you see Connected to then cFOS can reach goweb

k8s51 [ ~ ]$ 
kubectl get svc  goweb
NAME         TYPE        CLUSTER-IP       EXTERNAL-IP   PORT(S)   AGE
goweb        ClusterIP   10.102.150.225   <none>        80/TCP    4m17s

then shell into cFOS with below commands

podname=$(kubectl get pod -n $cfosnamespace -l app=cfos -o jsonpath='{.items[*].metadata.name}')
kubectl exec -it po/$podname -n $cfosnamespace -- /bin/cli
Defaulted container "cfos7210250-container" out of: cfos7210250-container, init-myservice (init)
# /bin/cli
User: admin
Password: 
cFOS # execute telnet 10.102.150.225 80

Connected to 10.102.150.225
^C
Console escape. Commands are:

 l      go to line mode
 c      go to character mode
 z      suspend telnet
 e      exit telnet
cFOS # execute telnet goweb.default.svc.cluster.local 80

Connected to goweb.default.svc.cluster.local
^C
Console escape. Commands are:

 l      go to line mode
 c      go to character mode
 z      suspend telnet
 e      exit telnet

you can also try with below script, use Ctrl-c to exit

podname=$(kubectl get pod -l app=cfos -n cfosingress -o jsonpath="{.items[0].metadata.name}")
kubectl exec -it po/$podname -n $cfosnamespace -- sh -c '/bin/busybox telnet goweb.default.svc.cluster.local 80'

]

Create headless svc for cFOS

Since the cFOS POD IP changes each time a pod is re-created, we will create a headless service. This will allow us to use the DNS of the service in the VIP configuration. In Kubernetes, the DNS notation follows this format: <servicename>.<namespace>.svc.cluster.local., you might also noticed the service config “clusterIP: None”

cat << EOF | tee headlessservice.yaml
apiVersion: v1
kind: Service
metadata:
  name: cfostest-headless
spec:
  clusterIP: None
  selector:
    app: cfos
  ports:
    - protocol: TCP
      port: 443
      targetPort: 443
EOF
kubectl apply -f headlessservice.yaml -n $cfosnamespace

check result

kubectl get svc cfostest-headless -n $cfosnamespace

result

kubectl get svc cfostest-headless -n $cfosnamespace
NAME                TYPE        CLUSTER-IP   EXTERNAL-IP   PORT(S)   AGE
cfostest-headless   ClusterIP   None         <none>        443/TCP   46s

The cfostest-headless is a headless service, so there is no CLUSTER-IP assigned. When we use the DNS name to reach it, DNS will resolve it to the backend application’s IP. For example:

podname=$(kubectl get pod -n $cfosnamespace -l app=cfos -o jsonpath='{.items[*].metadata.name}')
kubectl exec -it po/$podname -n $cfosnamespace -- ip address 
kubectl exec -it po/$podname -n $cfosnamespace -- ping -c 3 cfostest-headless.$cfosnamespace.svc.cluster.local

result

Defaulted container "cfos7210250-container" out of: cfos7210250-container, init-myservice (init)
PING cfostest-headless.$cfosnamespace.svc.cluster.local (10.224.0.26): 56 data bytes
64 bytes from 10.224.0.26: seq=0 ttl=64 time=0.050 ms
64 bytes from 10.224.0.26: seq=1 ttl=64 time=0.066 ms

You will find that the IP address 10.224.0.26 is actually the cFOS interface IP. Therefore, we can use cfostest-headless.$cfosnamespace.svc.cluster.local instead of 10.224.0.26 in the cFOS VIP configuration. You might see an IP address other than 10.224.0.26, but it should match the pod interface IP.

Config cFOS

Config cFOS
  • Create configmap to enable cFOS rest api on port 8080
cat << EOF | tee rest8080.yaml
apiVersion: v1
kind: ConfigMap
metadata:
  name: restapi
  labels:
      app: fos
      category: config
data:
  type: partial
  config: |- 
     config system global
       set admin-port 8080
       set admin-server-cert "Device"
     end
EOF
kubectl apply -f rest8080.yaml -n $cfosnamespace
  • config VIP configmap for backend application

A few things need to be configured:

extip

The extip in the firewall VIP configuration can use either the cFOS pod IP or the headless service DNS name. Since the cFOS pod IP is not persistent and will change if the cFOS container restarts, it is better to use the DNS name instead. This DNS name is the headless service created for cFOS. When using the headless service DNS name, it will be resolved to the actual interface IP.

mappedip

This can be the Nginx/Goweb pod IP or ClusterIP. Since you may have multiple pods for Nginx/Goweb, it is better to use the ClusterIP. You can get the Nginx/Goweb ClusterIP via kubectl get svc -l app=nginx and kubectl get svc -l app=goweb

or you script below to get clusterip for nginx/goweb

nginxclusterip=$(kubectl get svc -l app=nginx  -o jsonpath='{.items[*].spec.clusterIP}')
echo $nginxclusterip
gowebclusterip=$(kubectl get svc -l app=goweb  -o jsonpath='{.items[*].spec.clusterIP}')
echo $gowebclusterip
  • Create vip configmap
cat << EOF | tee cfosconfigmapfirewallvip.yaml
apiVersion: v1
kind: ConfigMap
metadata:
  name: cfosconfigvip
  labels:
      app: fos
      category: config
data:
  type: partial
  config: |-
    config firewall vip
           edit "nginx"
            set extip "cfostest-headless.$cfosnamespace.svc.cluster.local"
            set mappedip $nginxclusterip
            set extintf "eth0"
            set portforward enable
            set extport "8005"
            set mappedport "80"
           next
           edit "goweb"
            set extip "cfostest-headless.$cfosnamespace.svc.cluster.local"
            set mappedip $gowebclusterip
            set extintf "eth0"
            set portforward enable
            set extport "8000"
            set mappedport "80"
           next
       end
EOF
kubectl create -f cfosconfigmapfirewallvip.yaml -n $cfosnamespace

check VIP configuration on cFOS

Once configured, from cFOS shell , you shall able to find below nat role from iptables -t nat -L -v

podname=$(kubectl get pod -n $cfosnamespace -l app=cfos -o jsonpath='{.items[*].metadata.name}')
echo $podname 
kubectl exec -it po/$podname -n $cfosnamespace -- iptables -t nat -L -v

result

Chain fcn_dnat (1 references)
 pkts bytes target     prot opt in     out     source               destination         
    0     0 DNAT       tcp  --  eth0   any     anywhere             cfos7210250-deployment-76c8d56d75-7npvf  tcp dpt:8005 to:10.96.166.251:80
    0     0 DNAT       tcp  --  eth0   any     anywhere             cfos7210250-deployment-76c8d56d75-7npvf  tcp dpt:8000 to:10.96.20.122:80
  • Create cFOS firewall policy configmap

Create Firewall policy configmap to allow the inbound traffic to both VIP’s.

cat << EOF | tee cfosconfigmapfirewallpolicy.yaml
apiVersion: v1
kind: ConfigMap
metadata:
  name: cfosconfigpolicy
  labels:
      app: fos
      category: config
data:
  type: partial
  config: |-
    config firewall policy
           edit 1
            set name "nginx"
            set srcintf "eth0"
            set dstintf "eth0"
            set srcaddr "all"
            set dstaddr "nginx"
            set nat enable
           next
           edit 2
            set name "goweb"
            set srcintf "eth0"
            set dstintf "eth0"
            set srcaddr "all"
            set dstaddr "goweb"
            set utm-status enable
            set av-profile default
            set nat enable
           next
       end
EOF
kubectl create -f cfosconfigmapfirewallpolicy.yaml -n $cfosnamespace

Once Firewall policy is configured, you can find additional nat rule from iptables -t nat -L -v

podname=$(kubectl get pod -n $cfosnamespace -l app=cfos -o jsonpath='{.items[*].metadata.name}')
echo $podname 
kubectl exec -it po/$podname -n $cfosnamespace -- iptables -t nat -L -v

result:

Chain fcn_nat (1 references)
 pkts bytes target     prot opt in     out     source               destination         
    0     0 MASQUERADE  tcp  --  any    any     anywhere             nginx.default.svc.cluster.local  ctorigdst cfos7210250-deployment-76c8d56d75-7npvf ctorigdstport 8005 connmark match  0x10000/0xff0000
    0     0 MASQUERADE  tcp  --  any    any     anywhere             goweb.default.svc.cluster.local  ctorigdst cfos7210250-deployment-76c8d56d75-7npvf ctorigdstport 8000 connmark match  0x10000/0xff0000

Chain fcn_prenat (1 references)
 pkts bytes target     prot opt in     out     source               destination         
    0     0 CONNMARK   all  --  eth0   any     anywhere             anywhere             state NEW CONNMARK xset 0x10000/0xff0000
  • expose cFOS VIP to external via Load Balancer

Now exit out of container to expose the cFOS service through azure LB or metalla if you on self-managed k8s

cd $HOME
svcname=$(kubectl config view -o json | jq .clusters[0].cluster.server | cut -d "." -f 1 | cut -d "/" -f 3)
metallbip=$(kubectl get ipaddresspool -n metallb-system -o jsonpath='{.items[*].spec.addresses[0]}' | cut -d '/' -f 1)
if [ ! -z "$metallbip" ] ; then 
   metallbannotation="metallb.universe.tf/loadBalancerIPs: $metallbip"
fi

echo use pool ipaddress $metallbip for svc 

cat << EOF | tee > 03_single.yaml 
apiVersion: v1
kind: Service
metadata:
  name: cfos7210250-service
  annotations:
    $metallbannotation
    service.beta.kubernetes.io/azure-dns-label-name: $svcname
spec:
  sessionAffinity: ClientIP
  ports:
  - port: 8080
    name: cfos-restapi
    targetPort: 8080
  - port: 8000
    name: cfos-goweb-default-1
    targetPort: 8000
    protocol: TCP
  - port: 8005
    name: cfos-nginx-default-1
    targetPort: 8005
    protocol: TCP
  selector:
    app: cfos
  type: LoadBalancer

EOF
kubectl apply -f 03_single.yaml  -n $cfosnamespace
sleep 5
kubectl get svc cfos7210250-service  -n $cfosnamespace

it will take a few seconds to get the loadbalancer IP address. use kubectl get svc -n $cfosnamespace to check the external ip.

meanwhile, azure also created dns name for external ip.

  • Verify the result

If we now curl on the Loadbalance IP we should see the following responses:

svcip=$(k get svc -n $cfosnamespace -o jsonpath='{.items[0].status.loadBalancer.ingress[0].ip}')
echo $svcip
#curl  http://$svcip:8080

if the svcip is internal ip for example, if you on self-managed k8s, the ip is internal 10.0.0.x, you can not access it directly from azure shell. you can use a jumphost pod.

  • create jumphost pod
cat << EOF | tee sshclient.yaml 
apiVersion: v1
kind: Pod
metadata:
  name: ssh-jump-host
  labels:
    app: ssh-jump-host
spec:
  containers:
  - name: ssh-client
    image: alpine
    command: ["/bin/sh"]
    args: ["-c", "apk add --no-cache openssh && apk add --no-cache curl && tail -f /dev/null"]
    stdin: true
    tty: true
EOF

kubectl apply -f sshclient.yaml
kubectl exec -it po/ssh-jump-host -- curl http://$svcip:8080

or use dns name

curl http://$svcname.$location.cloudapp.azure.com:8080

or use clusterip dns name or ip

cfossvcclusterip=$(kubectl get svc cfos7210250-service -n $cfosnamespace  -o jsonpath='{.spec.clusterIP}')
kubectl exec -it po/ssh-jump-host -- curl http://$cfossvcclusterip:8080

or via cfos clusterip dns name

kubectl exec -it po/ssh-jump-host -- curl http://cfos7210250-service.$cfosnamespace.svc.cluster.local:8080

result

welcome to the REST API server

Port 8080 is the cFOS REST API port and has nothing to do with the VIP. However, it can be used to verify whether the load balancer can reach cFOS.

The above verification confirms that traffic from the internet, internal network, or other pods can all reach the cFOS API. Now, let’s continue to verify the traffic to the application behind cFOS.

  • Verify ingress to backend application
curl http://$svcname.$location.cloudapp.azure.com:8000

you shall see output

<html><body><form enctype="multipart/form-data" action="/upload" method="post">
<input type="file" name="myFile" />
<input type="submit" value="Upload" />
</form></body></html>

and

curl http://$svcname.$location.cloudapp.azure.com:8005

or on the browser, try http://$svcname.$location.cloudapp.azure.com:8000 or http://$svcname.$location.cloudapp.azure.com:8005

image1 image1

image2 image2

image3 image3

you can also verify the iptables from cfos shell with command iptables -t nat -L -v

podname=$(kubectl get pod -n $cfosnamespace -l app=cfos -o jsonpath='{.items[*].metadata.name}')
echo $podname 
kubectl exec -it po/$podname -n $cfosnamespace -- iptables -t nat -L -v

result

Chain PREROUTING (policy ACCEPT 23 packets, 1220 bytes)
 pkts bytes target     prot opt in     out     source               destination         
   66  3480 fcn_prenat  all  --  any    any     anywhere             anywhere            
   66  3480 fcn_dnat   all  --  any    any     anywhere             anywhere            

Chain INPUT (policy ACCEPT 23 packets, 1220 bytes)
 pkts bytes target     prot opt in     out     source               destination         

Chain OUTPUT (policy ACCEPT 2 packets, 143 bytes)
 pkts bytes target     prot opt in     out     source               destination         

Chain POSTROUTING (policy ACCEPT 2 packets, 143 bytes)
 pkts bytes target     prot opt in     out     source               destination         
   76  5643 fcn_nat    all  --  any    any     anywhere             anywhere            

Chain fcn_dnat (1 references)
 pkts bytes target     prot opt in     out     source               destination         
   21  1100 DNAT       tcp  --  eth0   any     anywhere             cfos7210250-deployment-76c8d56d75-7npvf  tcp dpt:8005 to:10.96.166.251:80
   22  1160 DNAT       tcp  --  eth0   any     anywhere             cfos7210250-deployment-76c8d56d75-7npvf  tcp dpt:8000 to:10.96.20.122:80

Chain fcn_nat (1 references)
 pkts bytes target     prot opt in     out     source               destination         
   21  1100 MASQUERADE  tcp  --  any    any     anywhere             nginx.default.svc.cluster.local  ctorigdst cfos7210250-deployment-76c8d56d75-7npvf ctorigdstport 8005 connmark match  0x10000/0xff0000
   22  1160 MASQUERADE  tcp  --  any    any     anywhere             goweb.default.svc.cluster.local  ctorigdst cfos7210250-deployment-76c8d56d75-7npvf ctorigdstport 8000 connmark match  0x10000/0xff0000

Chain fcn_prenat (1 references)
 pkts bytes target     prot opt in     out     source               destination         
   66  3480 CONNMARK   all  --  eth0   any     anywhere             anywhere             state NEW CONNMARK xset 0x10000/0xff0000

In the chains fcn_nat and fcn_dnat, the packets and bytes show non-zero numbers, indicating that the ingress is working as expected.

Test cFOS security feature

ATTACK!!!
  • upload malicious file

Try uploading the ecira file from eicar website. you should not see a successful upload.

use below script to upload a virus test file eicar_com.zip to backend application. you shall expect this is blocked by cFOS.

curl -F "file=@$scriptDir/k8s-201-workshop/scripts/cfos/ingress_demo/eicar_com.zip" http://$svcname.$location.cloudapp.azure.com:8000/upload
cd $HOME

Here is example of result

curl -F "file=@$scriptDir/k8s-201-workshop/scripts/cfos/ingress_demo/eicar_com.zip" http://$svcname.$location.cloudapp.azure.com:8000/upload | grep  "High Security" -A 10
  % Total    % Received % Xferd  Average Speed   Time    Time     Time  Current
                                 Dload  Upload   Total   Spent    Left  Speed
100  5544  100  5143  100   401   553k  44158 --:--:-- --:--:-- --:--:--  676k
        <title>High Security Alert</title>
    </head>
    <body><div class="message-container">
    <div class="logo"></div>
    <h1>High Security Alert</h1>
    <p>You are not permitted to transfer the file "eicar_com.zip" because it is infected with the virus "EICAR_TEST_FILE".</p>
    <table><tbody>
        <tr>
            <td>URL</td>
            <td>http://k8strainingmaster-k8s51-1.eastus.cloudapp.azure.com/upload</td>
        </tr>
        <tr>
            <td>Quarantined File Name</td>
            <td>31db20d1.eicar_com.zip</td>
        </tr>

you can compare with previous result application without cFOS protection where we can successfully upload virus file.

  • Check log from cFOS
podname=$(kubectl get pod -n $cfosnamespace -l app=cfos -o jsonpath='{.items[*].metadata.name}')
echo $podname 
kubectl exec -it po/$podname -n $cfosnamespace -- /bin/cli

Once logged in, run the log filter:

execute log filter device 1
execute log filter category 2
execute log  display

You should see an entry for eicar file being blocked.

cFOS # execute log filter device 1
cFOS # execute log filter category 2
cFOS # execute log  display
date=2024-05-22 time=20:04:37 eventtime=1716408277 tz="+0000" logid="0211008192" type="utm" subtype="virus" eventtype="infected" level="warning" policyid=2 msg="File is infected." action="blocked" service="HTTP" sessionid=2 srcip=10.244.153.0 dstip=10.107.22.193 srcport=20535 dstport=80 srcintf="eth0" dstintf="eth0" proto=6 direction="outgoing" filename="eicar.com" checksum="6851cf3c" quarskip="No-skip" virus="EICAR_TEST_FILE" dtype="Virus" ref="http://www.fortinet.com/ve?vn=EICAR_TEST_FILE" virusid=2172 url="http://20.83.183.25/upload" profile="default" agent="Chrome/125.0.0.0" analyticscksum="275a021bbfb6489e54d471899f7db9d1663fc695ec2fe2a2c4538aabf651fd0f" analyticssubmit="false"

date=2024-05-22 time=20:04:37 eventtime=1716408277 tz="+0000" logid="0211008192" type="utm" subtype="virus" eventtype="infected" level="warning" policyid=2 msg="File is infected." action="blocked" service="HTTP" sessionid=1 srcip=10.244.153.0 dstip=10.107.22.193 srcport=26108 dstport=80 srcintf="eth0" dstintf="eth0" proto=6 direction="outgoing" filename="eicar.com" checksum="6851cf3c" quarskip="No-skip" virus="EICAR_TEST_FILE" dtype="Virus" ref="http://www.fortinet.com/ve?vn=EICAR_TEST_FILE" virusid=2172 url="http://20.83.183.25/upload" profile="default" agent="Chrome/125.0.0.0" analyticscksum="275a021bbfb6489e54d471899f7db9d1663fc695ec2fe2a2c4538aabf651fd0f" analyticssubmit="false"


date=2024-05-22 time=20:04:49 eventtime=1716408289 tz="+0000" logid="0211008192" type="utm" subtype="virus" eventtype="infected" level="warning" policyid=2 msg="File is infected." action="blocked" service="HTTP" sessionid=7 srcip=10.244.153.0 dstip=10.107.22.193 srcport=38707 dstport=80 srcintf="eth0" dstintf="eth0" proto=6 direction="outgoing" filename="eicar.com" checksum="6851cf3c" quarskip="No-skip" virus="EICAR_TEST_FILE" dtype="Virus" ref="http://www.fortinet.com/ve?vn=EICAR_TEST_FILE" virusid=2172 url="http://20.83.183.25/upload" profile="default" agent="Chrome/125.0.0.0" analyticscksum="275a021bbfb6489e54d471899f7db9d1663fc695ec2fe2a2c4538aabf651fd0f" analyticssubmit="false"

you can also run the below commands to see the AV log.

podname=$(kubectl get pod -n $cfosnamespace -l app=cfos -o jsonpath='{.items[*].metadata.name}')
echo $podname 
kubectl exec -it po/$podname -n $cfosnamespace -- tail /var/log/log/virus.0
  • clean up
kubectl delete namespace $cfosnamespace
kubectl delete -f $scriptDir/k8s-201-workshop/scripts/cfos/ingress_demo/01_create_cfos_account.yaml -n $cfosnamespace

Q&A

  1. Please describe how to use cFOS ingress protection to secure east-west traffic
Click for Answer…
1. Create a ClusterIP service or an internal Service Load Balancer (SLB) for the target application within the cluster.
2. Configure ingress protection vip/polcies  for that service using cFOS.
3. Define and apply appropriate firewall policies to filter and control traffic to the service.
  1. if not using cFOS to protect ingress traffic to goweb, what are other viable solutions ?
    Click for Answer…
    Fortiweb with ingress controller

Chapter 8 - Multus

Subsections of Chapter 8 - Multus

Task 1 - What is Multus

What is Multus?

Multus is an open-source Container Network Interface (CNI) plugin for Kubernetes that enables attaching multiple network interfaces to pods. This capability significantly enhances networking flexibility and functionality in Kubernetes environments. Here’s a more detailed look at what Multus is and how it functions:

Core Features of Multus:

  • Multiple Network Interfaces: Multus allows each pod in a Kubernetes cluster to have more than one network interface. This is in contrast to the default Kubernetes networking model, which typically assigns only one network interface per pod.

  • Network Customization: With Multus, users can configure each additional network interface using different CNI plugins. This flexibility allows for a tailored networking setup that can meet specific needs, whether for performance, security, or compliance reasons.

  • Integration with Major CNI Plugins: Multus works as a “meta-plugin”, meaning it acts as a wrapper that can manage other CNI plugins like Flannel, Calico, Weave, etc. It doesn’t replace these plugins but instead allows them to be used concurrently.

  • Advanced Networking Capabilities: By enabling multiple network interfaces, Multus supports advanced networking features such as Software Defined Networking (SDN), Network Function Virtualization (NFV), and more. It can also handle sophisticated networking technologies like SR-IOV, DPDK (Data Plane Development Kit), and VLANs.

How Multus Works:

Primary Interface: The primary network interface of a pod is typically handled by the default Kubernetes CNI plugin, which is responsible for the standard pod-to-pod communication across the cluster.

Secondary Interfaces: Multus manages additional interfaces. These can be configured to connect to different physical networks, virtual networks, or to provide specialized networking functions that are separate from the default Kubernetes networking.

Benefits of Using Multus:

  • Enhanced Network Configuration: Provides the ability to use multiple networking configurations within a single cluster, improving performance and enabling more complex networking scenarios.

  • Isolation and Security: Allows for traffic isolation between different network interfaces, enhancing security and reducing the risk of cross-network interference.

  • Flexibility and Scalability: Offers the flexibility to meet various application needs, from high throughput to network function virtualization, making it easier to scale applications as needed.

Multus is particularly useful in environments where advanced networking configurations are necessary, such as in telecommunications, large enterprise deployments, and applications that require high network performance and security.

imagemultus imagemultus

Task 2 - Installing Multus

Deploying and Configuring Multus

Step 1: Install Multus CNI

The most common way to install Multus is via a Kubernetes manifest file, which sets up Multus as a DaemonSet. This ensures that Multus runs on all nodes in the cluster.

  • Download the latest Multus configuration file:

    You can find the latest configuration on the Multus GitHub repository (Multus CNI on GitHub). Typically, you would use the multus.yaml from the repo. This YAML file contains the configuration for the Multus DaemonSet along with the necessary ClusterRole, ClusterRoleBinding, and ServiceAccount.

kubectl apply -f https://raw.githubusercontent.com/k8snetworkplumbingwg/multus-cni/master/deployments/multus-daemonset-thick.yml
kubectl rollout status ds/kube-multus-ds -n kube-system

output:

kubectl rollout status ds/kube-multus-ds -n kube-system
customresourcedefinition.apiextensions.k8s.io/network-attachment-definitions.k8s.cni.cncf.io created
clusterrole.rbac.authorization.k8s.io/multus created
clusterrolebinding.rbac.authorization.k8s.io/multus created
serviceaccount/multus created
configmap/multus-daemon-config created
daemonset.apps/kube-multus-ds created
Waiting for daemon set "kube-multus-ds" rollout to finish: 0 of 1 updated pods are available...
daemon set "kube-multus-ds" successfully rolled out
kubectl get pod -n kube-system -l app=multus

result

NAME                   READY   STATUS    RESTARTS   AGE
kube-multus-ds-qlmrf   1/1     Running   0          88s

You may further validate the download by looking at the /etc/cni/net.d/ directory and ensure that the auto-generated /etc/cni/net.d/00-multus.conf exists corresponding to the alphabetically first configuration file.

refer how ssh into worker node for detail.

once you are in worker node, you can use sudo cat /etc/cni/net.d/00-multus.conf to check the multus default configuration. below you can find multus CNI is simply proxy to request to azure CNI config which is 10-azure.conflist

azureuser@aks-worker-27647061-vmss000000:~$ sudo cat /etc/cni/net.d/00-multus.conf  | jq .
{
  "capabilities": {
    "portMappings": true
  },
  "cniVersion": "0.3.1",
  "logLevel": "verbose",
  "logToStderr": true,
  "name": "multus-cni-network",
  "clusterNetwork": "/host/etc/cni/net.d/10-azure.conflist",
  "type": "multus-shim"
}

Step 2: Creating additional interfaces

The first thing we’ll do is create configurations for each of the additional interfaces that we attach to pods. We’ll do this by creating Custom Resources. Part of the quickstart installation creates a “CRD” – a custom resource definition that is the home where we keep these custom resources – we’ll store our configurations for each interface in these.

CNI Configurations:

Each configuration we’ll add is a CNI configuration. If you’re not familiar with them, let’s break them down quickly. Here’s an example CNI configuration:

{
"cniVersion": "0.3.0",
"type": "loopback",
"additional": "information"
}

CNI configurations are JSON, and we have a structure here that has a few things we’re interested in:

  • cniVersion: Tells each CNI plugin which version is being used and can give the plugin information if it’s using a too late (or too early) version.
  • type: This tells CNI which binary to call on disk. Each CNI plugin is a binary that’s called. Typically, these binaries are stored in /opt/cni/bin on each node, and CNI executes this binary. In this case we’ve specified the loopback binary (which create a loopback-type network interface). If this is your first time installing Multus, you might want to verify that the plugins that are in the “type” field are actually on disk in the /opt/cni/bin directory.
  • additional: This field is put here as an example, each CNI plugin can specify whatever configuration parameters they’d like in JSON. These are specific to the binary you’re calling in the type field.

Step 3: Storing a configuration as a Custom Resource

So, we want to create an additional interface. Let’s create a macvlan interface for pods to use. We’ll create a custom resource that defines the CNI configuration for interfaces.

Note in the following command that there’s a kind: NetworkAttachmentDefinition. This is our fancy name for our configuration – it’s a custom extension of Kubernetes that defines how we attach networks to our pods.

Secondarily, note the config field. You’ll see that this is a CNI configuration just like we explained earlier.

Lastly but very importantly, note under metadata the name field – here’s where we give this configuration a name, and it’s how we tell pods to use this configuration. The name here is macvlan-conf – as we’re creating a configuration for macvlan.

Custom Resource

Here’s the command to create this example configuration:

cat <<EOF | kubectl create -f -
apiVersion: "k8s.cni.cncf.io/v1"
kind: NetworkAttachmentDefinition
metadata:
  name: macvlan-conf
spec:
  config: '{
      "cniVersion": "0.3.0",
      "type": "macvlan",
      "master": "eth0",
      "mode": "bridge",
      "ipam": {
        "type": "host-local",
        "subnet": "192.168.1.0/24",
        "rangeStart": "192.168.1.200",
        "rangeEnd": "192.168.1.216",
        "routes": [
          { "dst": "0.0.0.0/0" }
        ],
        "gateway": "192.168.1.100"
      }
    }'
EOF

kubectl get network-attachment-definitions

Output:

NAME            AGE
macvlan-conf    5d23h

For more detail:

kubectl describe network-attachment-definitions macvlan-conf

Expected Output:

sallam@master1:~$kubectl describe network-attachment-definitions macvlan-conf
Name:         macvlan-conf
Namespace:    default
Labels:       <none>
Annotations:  <none>
API Version:  k8s.cni.cncf.io/v1
Kind:         NetworkAttachmentDefinition
Metadata:
  Creation Timestamp:  2024-05-07T20:00:32Z
  Generation:          1
  Managed Fields:
    API Version:  k8s.cni.cncf.io/v1
    Fields Type:  FieldsV1
    fieldsV1:
      f:metadata:
        f:annotations:
          .:
          f:kubectl.kubernetes.io/last-applied-configuration:
      f:spec:
        .:
        f:config:
    Manager:         kubectl-client-side-apply
    Operation:       Update
    Time:            2024-05-07T20:00:32Z
  Resource Version:  1992658
  UID:               44920096-0def-4da5-aac6-f313abbc67dd
Spec:
  Config:  { "cniVersion": "0.3.0", "type": "macvlan", "master": "eth0", "mode": "bridge", "ipam": { "type": "host-local", "subnet": "192.168.1.0/24", "rangeStart": "192.168.1.200", "rangeEnd": "192.168.1.216", "routes": [ { "dst": "0.0.0.0/0" } ], "gateway": "192.168.1.100" } }
Events:    <none>

Step 4: Creating a pod that attaches an additional interface

We’re going to create a pod. This will look familiar as any pod you might have created before, but, we’ll have a special annotations field – in this case we’ll have an annotation called k8s.v1.cni.cncf.io/networks. This field takes a comma delimited list of the names of your NetworkAttachmentDefinitions as we created above. Note in the command below that we have the annotation of k8s.v1.cni.cncf.io/networks: macvlan-conf where macvlan-conf is the name we used above when we created our configuration.

Let’s go ahead and create a pod (that just sleeps for a really long time) with this command:

cat <<EOF | kubectl create -f -
apiVersion: v1
kind: Pod
metadata:
  name: samplepod
  annotations:
    k8s.v1.cni.cncf.io/networks: macvlan-conf
spec:
  containers:
  - name: samplepod
    command: ["/bin/ash", "-c", "trap : TERM INT; sleep infinity & wait"]
    image: alpine
EOF

We can inspect the pod with kubectl exec -it samplepod -- ip a

output:

sallam@sallam-master1:~$ kubectl exec -it samplepod -- ip a
1: lo: <LOOPBACK,UP,LOWER_UP> mtu 65536 qdisc noqueue state UNKNOWN qlen 1000
    link/loopback 00:00:00:00:00:00 brd 00:00:00:00:00:00
    inet 127.0.0.1/8 scope host lo
       valid_lft forever preferred_lft forever
    inet6 ::1/128 scope host 
       valid_lft forever preferred_lft forever
3: eth0@if17: <BROADCAST,MULTICAST,UP,LOWER_UP> mtu 1450 qdisc noqueue state UP 
    link/ether 0e:dc:b3:0e:ad:d1 brd ff:ff:ff:ff:ff:ff link-netnsid 0
    inet 10.244.145.150/32 scope global eth0
       valid_lft forever preferred_lft forever
    inet6 fe80::cdc:b3ff:fe0e:add1/64 scope link tentative 
       valid_lft forever preferred_lft forever
4: net1@if2: <BROADCAST,MULTICAST,UP,LOWER_UP> mtu 1500 qdisc noqueue state UNKNOWN 
    link/ether ae:d5:3e:3b:cf:10 brd ff:ff:ff:ff:ff:ff link-netnsid 0
    inet 192.168.1.204/24 brd 192.168.1.255 scope global net1
       valid_lft forever preferred_lft forever
    inet6 fe80::acd5:3eff:fe3b:cf10/64 scope link tentative 
       valid_lft forever preferred_lft forever

kubectl delete pod samplepod

Step 5: What if I want more interfaces?

You can add more interfaces to a pod by creating more custom resources and then referring to them in pod’s annotation. You can also reuse configurations, so for example, to attach two macvlan interfaces to a pod, you could create a pod like so:

cat <<EOF | kubectl create -f -
apiVersion: v1
kind: Pod
metadata:
  name: samplepod
  annotations:
    k8s.v1.cni.cncf.io/networks: macvlan-conf,macvlan-conf
spec:
  containers:
  - name: samplepod
    command: ["/bin/ash", "-c", "trap : TERM INT; sleep infinity & wait"]
    image: alpine
EOF

Now inspect the pod with kubectl exec -it samplepod -- ip a

output:

1: lo: <LOOPBACK,UP,LOWER_UP> mtu 65536 qdisc noqueue state UNKNOWN qlen 1000
    link/loopback 00:00:00:00:00:00 brd 00:00:00:00:00:00
    inet 127.0.0.1/8 scope host lo
       valid_lft forever preferred_lft forever
    inet6 ::1/128 scope host 
       valid_lft forever preferred_lft forever
3: eth0@if19: <BROADCAST,MULTICAST,UP,LOWER_UP,M-DOWN> mtu 1450 qdisc noqueue state UP 
    link/ether fa:ba:01:2d:d0:f9 brd ff:ff:ff:ff:ff:ff
    inet 10.244.145.152/32 scope global eth0
       valid_lft forever preferred_lft forever
    inet6 fe80::f8ba:1ff:fe2d:d0f9/64 scope link 
       valid_lft forever preferred_lft forever
4: net1@if2: <BROADCAST,MULTICAST,UP,LOWER_UP,M-DOWN> mtu 1500 qdisc noqueue state UP 
    link/ether b6:01:1e:61:fa:06 brd ff:ff:ff:ff:ff:ff
    inet 192.168.1.215/24 brd 192.168.1.255 scope global net1
       valid_lft forever preferred_lft forever
    inet6 fe80::b401:1eff:fe61:fa06/64 scope link 
       valid_lft forever preferred_lft forever
5: net2@if2: <BROADCAST,MULTICAST,UP,LOWER_UP,M-DOWN> mtu 1500 qdisc noqueue state UP 
    link/ether 72:06:b3:1d:a4:1a brd ff:ff:ff:ff:ff:ff
    inet 192.168.1.216/24 brd 192.168.1.255 scope global net2
       valid_lft forever preferred_lft forever
    inet6 fe80::7006:b3ff:fe1d:a41a/64 scope link 
       valid_lft forever preferred_lft forever

Note that the annotation now reads k8s.v1.cni.cncf.io/networks: macvlan-conf,macvlan-conf. Where we have the same configuration used twice, separated by a comma.

If you were to create another custom resource with the name foo you could use that such as: k8s.v1.cni.cncf.io/networks: foo,macvlan-conf, and use any number of attachments.

kubectl delete pod samplepod
kubectl delete net-attach-def macvlan-conf

Chapter 9 - Egress Traffic

Subsections of Chapter 9 - Egress Traffic

Task 1 - Configuring and Securing Egress

Why egress security with cFOS

Pod egress security is essential for protecting networks and data from potential threats originating from outgoing traffic in Kubernetes clusters.

Here are some reasons why pod egress security is crucial:

  • Prevent data exfiltration: Without proper egress security controls, a malicious actor could potentially use an application running in a pod to exfiltrate sensitive data from the cluster.
  • Control outgoing traffic: By restricting egress traffic from pods to specific IP addresses or domains, organizations can prevent unauthorized communication with external entities and control access to external resources.
  • Comply with regulatory requirements: Many regulations require organizations to implement controls around outgoing traffic to ensure compliance with data privacy and security regulations. Implementing pod egress security controls can help organizations meet these requirements.
  • Prevent malware infections: A pod compromised by malware could use egress traffic to communicate with external command and control servers, leading to further infections and data exfiltration. Egress security controls can help prevent these types of attacks.

In summary, implementing pod egress security controls is a vital part of securing Kubernetes clusters and ensuring the integrity, confidentiality, and availability of organizational data. In this use case, applications can route traffic through a dedicated network created by Multus to the cFOS pod. The cFOS pod inspects packets for IPS attacks, URL filtering, DNS filtering, and performs deep packet inspection for SSL encrypted traffic.

the most common use case for egress security will be

To stop malicious traffic from application POD to reach destination which is outside of Cluster, such as

  • Internet
  • VM such as Database VM in your VPC.

Lab Diagram

Note

In this chapter, we are going to config cFOS to inspect traffic from two application pod to specfic destination ip addres in internet.

the application pod will use dedicated NIC (NET1) to reach cFOS. the NET1 NIC is inserted by NAD (Net-ATTACH-DEF), two application attach to same NAD or attach to different NAD depends on whether they are using same subnet or different subnet. in this chapter, two application POD use different NAD to attach to cFOS, therefore, cFOS also require attach to two NAD.

imageegress imageegress

To configure egress with a containerized FortiOS using Multus CNI in Kubernetes, and ensure that the route for outbound traffic goes through cFOS, you need to follow these general steps:

Key Configurations:

  • on cFOS
  1. add extra NIC into cFOS to receive traffic from application pod
  2. apply security profile on incoming traffic from application
  • on Application POD

You have two ways to config static route on application POD

Option 1.

  1. add specific static route on application pod to make interested destination to cFOS for inspection
  2. the default route remain unchanged.

Option 2.

  1. change default route to cFOS
  2. add specific route on application pod to make traffic to in-cluster destination bypass cFOS.

For Option 1, we need add specifc static route in secondary CNI, this is done by create a net-attach-def for application POD.

For Option 2, we need modify K8s Default CNI to make this happen. this is not always feasible as it depends on what CNI used for default CNI.

In this workshop, we use Option 1.

Before continue, ensure you have installed multus CNI.

Create application deployment with NAD

  • Create namespace for application
kubectl create namespace app-1
  • Create net-attach-def for app-1

this NAD define a subnet and IPAM pool for NIC to get ip address. it also defined a few static route with default gateway point to cFOS

below the content under spec.config is the cni json formatted configuration, the json config is different per different cni. for above example below, the macvlan CNI will parse the config based on the config. also beware that the config section is json formated context which will not be parsed by NetworkAttachmentDefinition, therefore, if you have syntax error in this section. when you do kubectl apply , you will not see error messages.

  • Type: macvlan specifies the network plugin.
  • Mode: bridge sets the operation mode of the plugin.
  • Master: eth0 is the host network interface used by the plugin.
  • IPAM: Manages IP allocation, specifies subnet, range, routes, and gateway configurations. host-local means ip allocation is local to this worker node only. it is not cluster wide. if you want use cluster wide ipam, use other ipam like whereabouts
cat << EOF | tee > nad_10_1_200_1_1_1_1.yaml 
apiVersion: "k8s.cni.cncf.io/v1"
kind: NetworkAttachmentDefinition
metadata:
  name: nadapplication200
spec:
  config: '{
      "cniVersion": "0.3.0",
      "type": "macvlan",
      "master": "eth0",
      "mode": "bridge",
      "ipam": {
        "type": "host-local",
        "subnet": "10.1.200.0/24",
        "rangeStart": "10.1.200.20",
        "rangeEnd": "10.1.200.100",
        "routes": [
         { "dst": "1.1.1.1/32", "gw": "10.1.200.252"},
         { "dst": "34.117.0.0/16", "gw": "10.1.200.252"},
         { "dst": "44.228.249.3/32", "gw": "10.1.200.252"},
         { "dst": "10.1.100.0/24", "gw": "10.1.200.252"} 
        ],
        "gateway": "10.1.200.252"
      }
    }'
EOF
kubectl apply -f nad_10_1_200_1_1_1_1.yaml -n app-1

check with kubectl get net-attach-def -n app-1

kubectl get net-attach-def -n app-1 -o jsonpath="{.items[0].spec.config}" | jq .

output

{
  "cniVersion": "0.3.0",
  "type": "macvlan",
  "master": "eth0",
  "mode": "bridge",
  "ipam": {
    "type": "host-local",
    "subnet": "10.1.200.0/24",
    "rangeStart": "10.1.200.20",
    "rangeEnd": "10.1.200.100",
    "routes": [
      {
        "dst": "1.1.1.1/32",
        "gw": "10.1.200.252"
      },
      {
        "dst": "34.117.0.0/16",
        "gw": "10.1.200.252"
      },
      {
        "dst": "44.228.249.3",
        "gw": "10.1.200.252"
      },
      {
        "dst": "10.1.100.0/24",
        "gw": "10.1.200.252"
      }
    ],
    "gateway": "10.1.200.252"
  }
}

you can use kubectl logs -f -l app=multus -n kube-system to check the log for how detail about net-attach-log creationg etc.,

  • create application deployment when create application, we will use annotation to associate application with NAD we just created
cat << EOF | tee > demo_application_nad_200.yaml 
apiVersion: v1
kind: Pod
metadata:
  name: diag200
  labels: 
    app: diag
  annotations:
    k8s.v1.cni.cncf.io/networks: '[ { "name": "nadapplication200" } ]'
spec:
  containers:
  - name: praqma
    image: praqma/network-multitool
    args: 
      - /bin/sh
      - -c 
      - /usr/sbin/nginx -g "daemon off;"
    securityContext:
      capabilities:
        add: ["NET_ADMIN","SYS_ADMIN","NET_RAW"]
    volumeMounts:
    - name: host-root
      mountPath: /host
  volumes:
  - name: host-root
    hostPath:
      path: /
      type: Directory
EOF
kubectl apply -f demo_application_nad_200.yaml -n app-1

use command kubectl describe po/diag200 -n app-1 to check the application shall get second NIC

for example

kubectl get po/diag200 -n app-1 -o jsonpath='{.metadata.annotations}'  | jq -r '.["k8s.v1.cni.cncf.io/network-status"]'

result

[{
    "name": "azure", <<<or k8s-pod-network if you are on self-managed k8s
    "ips": [
        "10.224.0.8"
    ],
    "default": true,
    "dns": {
        "nameservers": [
            "168.63.129.16"
        ]
    },
    "gateway": [
        "10.224.0.1"
    ]
},{
    "name": "app-1/nadapplication200",
    "interface": "net1",
    "ips": [
        "10.1.200.21"
    ],
    "mac": "6a:d7:a6:da:0a:a6",
    "dns": {}
}]

above you will find this application pod has two NIC, the first one is from azure CNI with ip 10.224.0.8 which is default gateway, the second interface is net1 with ip 10.1.200.21

  • create another namespace
kubectl create namespace app-2
  • create nad for app-2
cat << EOF | tee > nad_10_1_100_1_1_1_1.yaml 
apiVersion: "k8s.cni.cncf.io/v1"
kind: NetworkAttachmentDefinition
metadata:
  name: nadapplication100
spec:
  config: '{
      "cniVersion": "0.3.0",
      "type": "macvlan",
      "master": "eth0",
      "mode": "bridge",
      "ipam": {
        "type": "host-local",
        "subnet": "10.1.100.0/24",
        "rangeStart": "10.1.100.20",
        "rangeEnd": "10.1.100.100",
        "routes": [
         { "dst": "1.1.1.1/32", "gw": "10.1.100.252"},
         { "dst": "34.117.0.0/16", "gw": "10.1.100.252"},
         { "dst": "44.228.249.3/32", "gw": "10.1.100.252"},
         { "dst": "10.1.200.0/24", "gw": "10.1.100.252"} 
        ],
        "gateway": "10.1.100.252"
      }
    }'
EOF
kubectl apply -f nad_10_1_100_1_1_1_1.yaml  -n app-2
  • create application deployment in app-2 namespace
cat << EOF | tee demo_application_nad_100.yaml
apiVersion: v1
kind: Pod
metadata:
  name: diag100
  labels: 
    app: diag
  annotations:
    k8s.v1.cni.cncf.io/networks: '[ { "name": "nadapplication100" } ]'
spec:
  containers:
  - name: praqma
    image: praqma/network-multitool
    args: 
      - /bin/sh
      - -c 
      - /usr/sbin/nginx -g "daemon off;"
    securityContext:
      capabilities:
        add: ["NET_ADMIN","SYS_ADMIN","NET_RAW"]
    volumeMounts:
    - name: host-root
      mountPath: /host
  volumes:
  - name: host-root
    hostPath:
      path: /
      type: Directory
EOF
kubectl apply -f demo_application_nad_100.yaml -n app-2

Create CFOS DaemonSet nad NAD

Creating NAD for cFOS

In this workshop, we will create two Network Attachment Definitions (NADs) for cFOS, each connecting to applications in different namespaces. Specifically:

  • One NAD will connect to the application in namespace app-1.
  • Another NAD will connect to the application in namespace app-2.

We aim to have app-1 and app-2 on different subnets, necessitating separate NADs for each.

NADs to be Created:

  1. NAD cfosdefaultcni6:

    • Subnet: 10.1.200.0/24
  2. NAD cfosdefaultcni6100:

    • Subnet: 10.1.100.0/24

In these NADs, we will restrict the available IP address to a single one. This ensures that cFOS always receives the same IP address. Since cFOS is deployed as a DaemonSet, which means only one POD per worker node, deploying multiple nodes with the same NAD file will result in each cFOS POD on different nodes having the same IP address.

  • NAD cfosdefaultcni6
kubectl create namespace cfosegress
cat << EOF | tee > nad_10_1_200_252_cfos.yaml 
apiVersion: "k8s.cni.cncf.io/v1"
kind: NetworkAttachmentDefinition
metadata:
  name: cfosdefaultcni6
spec:
  config: '{
      "cniVersion": "0.3.0",
      "type": "macvlan",
      "master": "eth0",
      "mode": "bridge",
      "ipam": {
        "type": "host-local",
        "subnet": "10.1.200.0/24",
        "rangeStart": "10.1.200.252",
        "rangeEnd": "10.1.200.252",
        "gateway": "10.1.200.1"
      }
    }'
EOF
kubectl apply -f nad_10_1_200_252_cfos.yaml -n cfosegress
  • NAD cfosdefaultcni6100
cat << EOF | tee > nad_10_1_100_252_cfos.yaml  
apiVersion: "k8s.cni.cncf.io/v1"
kind: NetworkAttachmentDefinition
metadata:
  name: cfosdefaultcni6100
spec:
  config: '{
      "cniVersion": "0.3.0",
      "type": "macvlan",
      "master": "eth0",
      "mode": "bridge",
      "ipam": {
        "type": "host-local",
        "subnet": "10.1.100.0/24",
        "rangeStart": "10.1.100.252",
        "rangeEnd": "10.1.100.252",
        "gateway": "10.1.100.1"
      }
    }'
EOF
kubectl apply -f nad_10_1_100_252_cfos.yaml -n cfosegress

check

kubectl get net-attach-def -n cfosegress

result

NAME                 AGE
cfosdefaultcni6      27m
cfosdefaultcni6100   27m

For more detail, you can use kubectl get net-attach-def -n cfosegress -o yaml If you want to know detail of each field, use kubectl explain net-attach-def

  • Create cFOS DaemonSet

We are creating DaemonSet instead deployment as each worker node require deployment one cFOS container. the DaemonSet mean cFOS POD always use replicas=1, each k8s worker node will have one cFOS.

application which has route point to cFOS will always use cFOS on same worker node.

  • Create cFOS license configmap and image pull secret

you shall already have cFOS license and cFOS image pull secret yaml file created in Chapter 1, since we are going to use different namespace for ingress protection. you can apply same yaml file to different namespace.

cd $HOME
kubectl apply -f cfosimagepullsecret.yaml  -n cfosegress
kubectl apply -f cfos_license.yaml  -n cfosegress
  • create serviceaccount for cFOS
kubectl apply -f $scriptDir/k8s-201-workshop/scripts/cfos/ingress_demo/01_create_cfos_account.yaml -n cfosegress
  • deploy cFOS DS*

the cFOS will be associated with two NAD, as it will connect to two different subnets. this is done by add annotation in the spec.

k8sdnsip=$(k get svc kube-dns -n kube-system -o jsonpath='{.spec.clusterIP}')
cat << EOF | tee > 02_create_cfos_ds.yaml
---
apiVersion: apps/v1
kind: DaemonSet
metadata:
  name: fos-multus-deployment
  labels:
    app: cfos
spec:
  selector:
    matchLabels:
      app: cfos
  template:
    metadata:
      annotations:
        container.apparmor.security.beta.kubernetes.io/cfos7210250-container: unconfined
        k8s.v1.cni.cncf.io/networks: '[ { "name": "cfosdefaultcni6",  "ips": [ "10.1.200.252/32" ], "mac": "CA:FE:C0:FF:00:02"  }, { "name": "cfosdefaultcni6100",  "ips": [ "10.1.100.252/32" ], "mac": "CA:FE:C0:FF:01:00" } ]'
      labels:
        app: cfos
    spec:
      initContainers:
      - name: init-myservice
        image: busybox
        command:
        - sh
        - -c
        - |
          echo "nameserver $k8sdnsip" > /mnt/resolv.conf
          echo "search default.svc.cluster.local svc.cluster.local cluster.local" >> /mnt/resolv.conf;
        volumeMounts:
        - name: resolv-conf
          mountPath: /mnt
      serviceAccountName: cfos-serviceaccount
      containers:
      - name: cfos7210250-container
        image: $cfosimage
        securityContext:
          privileged: false
          capabilities:
            add: ["NET_ADMIN","SYS_ADMIN","NET_RAW"]
        ports:
        - containerPort: 443
        volumeMounts:
        - mountPath: /data
          name: data-volume
        - mountPath: /etc/resolv.conf
          name: resolv-conf
          subPath: resolv.conf
      volumes:
      - name: data-volume
        emptyDir: {}
      - name: resolv-conf
        emptyDir: {}
      dnsPolicy: ClusterFirst
EOF
kubectl apply -f 02_create_cfos_ds.yaml -n cfosegress
kubectl rollout status daemonset fos-multus-deployment -n cfosegress

check

shell into cFOS, to check the ip address

podname=$(kubectl get pod -n cfosegress -l app=cfos -o jsonpath='{.items[*].metadata.name}')
kubectl exec -it po/$podname -n cfosegress -- ip address

from cFOS cli, you can find cFOS show two interfaces.

kubectl exec -it po/$podname -n cfosegress -- /bin/cli

type show system interface after login

Defaulted container “cfos7210250-container” out of: cfos7210250-container, init-myservice (init)

User: admin
Password: 
cFOS # show system interface 
config system interface
    edit "net1"
        set ip 10.1.200.252 255.255.255.0
        set macaddr ca:fe:c0:ff:00:02
        config ipv6
            set ip6-address fe80::c8fe:c0ff:feff:2/64
        end
    next
    edit "net2"
        set ip 10.1.100.252 255.255.255.0
        set macaddr ca:fe:c0:ff:01:00
        config ipv6
            set ip6-address fe80::c8fe:c0ff:feff:100/64
        end
    next
    edit "eth0"
        set ip 10.224.0.6 255.255.255.0
        set macaddr 1e:79:6d:1b:51:a8
        config ipv6
            set ip6-address fe80::1c79:6dff:fe1b:51a8/64
        end
    next
    edit "any"
    next
end

cFOS will use route tabl 231 for handle traffic.

kubectl exec -it po/$podname -n cfosegress -- ip route show table 231

result

Defaulted container "cfos7210250-container" out of: cfos7210250-container, init-myservice (init)
default via 169.254.1.1 dev eth0 proto static metric 100 
10.1.100.0/24 dev net2 proto kernel scope link src 10.1.100.252 metric 100 
10.1.200.0/24 dev net1 proto kernel scope link src 10.1.200.252 metric 100 
169.254.1.1 dev eth0 proto static scope link metric 100 

you can find the cFOS default route is default CNI assigned interface which is eth0.

Config CFOS

cFOS Config
  • create firewall policy configmap

The firewall policy allow traffic from net1 and net2 with destination to internet and inspected with utm profiles.

cat << EOF | tee > net1net2cmtointernetfirewallpolicy.yaml
apiVersion: v1
kind: ConfigMap
metadata:
  name: net1net2
  labels:
      app: fos
      category: config
data:
  type: partial
  config: |-
    config firewall policy
        edit 100
            set utm-status enable
            set name "net1tointernet"
            set srcintf "net1"
            set dstintf "eth0"
            set srcaddr "all"
            set dstaddr "all"
            set service "ALL"
            set ssl-ssh-profile "deep-inspection"
            set av-profile "default"
            set ips-sensor "high_security"
            set application-list "default"
            set nat enable
            set logtraffic all
        next
    end
    config firewall policy
        edit 101
            set utm-status enable
            set name "net2tointernet"
            set srcintf "net2"
            set dstintf "eth0"
            set srcaddr "all"
            set dstaddr "all"
            set service "ALL"
            set ssl-ssh-profile "deep-inspection"
            set av-profile "default"
            set ips-sensor "high_security"
            set application-list "default"
            set nat enable
            set logtraffic all
        next
    end
EOF
kubectl apply -f net1net2cmtointernetfirewallpolicy.yaml -n cfosegress
  • Send regular traffic from app-1 namespace pod

this traffic will be send to cFOS to reach internet. the destination ipinfo.io will be resolve into ip address in subnet 34.117.186.0/24 which already added into application pod to send to cFOS.

kubectl exec -it po/diag200 -n app-1 -- curl ipinfo.io

you shall see output

{
  "ip": "52.179.92.240",
  "city": "Ashburn",
  "region": "Virginia",
  "country": "US",
  "loc": "39.0437,-77.4875",
  "org": "AS8075 Microsoft Corporation",
  "postal": "20147",
  "timezone": "America/New_York",
  "readme": "https://ipinfo.io/missingauth"
}

you can try do sniff on cFOS to check the packet detail

  • Send malicous traffic
kubectl exec -it po/diag200 -n app-1 -- curl --max-time 5 -H "User-Agent: () { :; }; /bin/ls" http://www.vulnweb.com

it’s expected that you wont get response as it droped by cFOS. as this traffic will be blocked by cFOS because it will be marked as malicious by cFOS IPS profile.

  • do same on app-2
kubectl exec -it po/diag100 -n app-2 -- curl --max-time 5 -H "User-Agent: () { :; }; /bin/ls" http://www.vulnweb.com
  • Check Result
podname=$(kubectl get pod -n cfosegress -l app=cfos -o jsonpath='{.items[*].metadata.name}')
kubectl exec -it po/$podname -n cfosegress -- tail -f /data/var/log/log/ips.0

expected output

date=2024-06-27 time=08:09:14 eventtime=1719475754 tz="+0000" logid="0419016384" type="utm" subtype="ips" eventtype="signature" level="alert" severity="critical" srcip=10.1.200.20 dstip=34.117.186.192 srcintf="net1" dstintf="eth0" sessionid=3 action="dropped" proto=6 service="HTTP" policyid=100 attack="Bash.Function.Definitions.Remote.Code.Execution" srcport=60598 dstport=80 hostname="ipinfo.io" url="/" direction="outgoing" attackid=39294 profile="high_security" incidentserialno=157286403 msg="applications3: Bash.Function.Definitions.Remote.Code.Execution"
date=2024-06-27 time=08:15:50 eventtime=1719476150 tz="+0000" logid="0419016384" type="utm" subtype="ips" eventtype="signature" level="alert" severity="critical" srcip=10.1.200.20 dstip=34.117.186.192 srcintf="net1" dstintf="eth0" sessionid=5 action="dropped" proto=6 service="HTTP" policyid=100 attack="Bash.Function.Definitions.Remote.Code.Execution" srcport=41864 dstport=80 hostname="ipinfo.io" url="/" direction="outgoing" attackid=39294 profile="high_security" incidentserialno=157286406 msg="applications3: Bash.Function.Definitions.Remote.Code.Execution"
date=2024-06-27 time=08:16:09 eventtime=1719476169 tz="+0000" logid="0419016384" type="utm" subtype="ips" eventtype="signature" level="alert" severity="critical" srcip=10.1.100.20 dstip=34.117.186.192 srcintf="net1" dstintf="eth0" sessionid=7 action="dropped" proto=6 service="HTTP" policyid=100 attack="Bash.Function.Definitions.Remote.Code.Execution" srcport=39216 dstport=80 hostname="ipinfo.io" url="/" direction="outgoing" attackid=39294 profile="high_security" incidentserialno=157286409 msg="applications3: Bash.Function.Definitions.Remote.Code.Execution"

Q&A

  1. In cFOS egress use case, what is the purpose of use multus CNI ?

Click for Answer…
Steer traffic from protected POD to cFOS  
2. config cFOS add web filter feature to block traffic to www.casino.org

Answer:

Click for Answer…
1. Modify NAD for application to insert route to www.casino.org
2. Modify cFOS in firewall policy to add web filter profile 
3. send traffic from application pod
4. check web filter log

Next

Do not delete environment, we will use same for next Task Secure POD to POD east-west traffic

Task 2 - Securing pod to pod traffic

East-West traffic in the context of container-based environments, particularly with Kubernetes, refers to the data flow between different nodes or pods within the same data center or network. This type of traffic is crucial for the performance and security of microservices architectures, where multiple services need to communicate with each other frequently.

Microservices break down applications into smaller, independent services, which increases the amount of East-West traffic. Each service might be running in different containers that need to communicate with each other.

imagespod imagespod

continue from previous Task Egress with cFOS

  • create firewall policy for east-west traffic

The firewall policy allow traffic from net1 to net2 inspected by firewall policy

cat << EOF  | tee > net1net2cmfirewallpolicy.yaml
apiVersion: v1
kind: ConfigMap
metadata:
  name: net1net2
  labels:
      app: fos
      category: config
data:
  type: partial
  config: |-
    config firewall policy
      edit 10
        set utm-status enable
        set srcintf "net1"
        set dstintf "net2"
        set srcaddr "all"
        set dstaddr "all"
        set service "ALL"
        set ssl-ssh-profile "deep-inspection"
        set av-profile "default"
        set webfilter-profile "default"
        set ips-sensor "high_security"
        set logtraffic all
       next
    end
    config firewall policy
      edit 11
        set utm-status enable
        set srcintf "net2"
        set dstintf "net1"
        set srcaddr "all"
        set dstaddr "all"
        set service "ALL"
        set ssl-ssh-profile "deep-inspection"
        set av-profile "default"
        set webfilter-profile "default"
        set ips-sensor "high_security"
        set logtraffic all
       next
    end
EOF
kubectl apply -f net1net2cmfirewallpolicy.yaml  -n cfosegress
  • get ip from diag100 and diag200
diag200ip=$(k get po/diag200 -n app-1 -o jsonpath='{.metadata.annotations}' | jq -r '.["k8s.v1.cni.cncf.io/network-status"]' | jq -r '.[1].ips[0]')
echo $diag200ip
diag100ip=$(k get po/diag100 -n app-2 -o jsonpath='{.metadata.annotations}' | jq -r '.["k8s.v1.cni.cncf.io/network-status"]' | jq -r '.[1].ips[0]')
echo $diag100ip
  • check connectivity between diag100 to diag200
k exec -it po/diag100 -n app-2 -- ping -c 5  $diag200ip
k exec -it po/diag200 -n app-1 -- ping -c 5 $diag100ip
  • Send malicious traffic
k exec -it po/diag100 -n app-2 -- curl --max-time 5 -H "User-Agent: () { :; }; /bin/ls" http://$diag200ip
k exec -it po/diag200 -n app-1 -- curl --max-time 5 -H "User-Agent: () { :; }; /bin/ls" http://$diag100ip
  • Check Result
podname=$(kubectl get pod -n cfosegress -l app=cfos -o jsonpath='{.items[*].metadata.name}')
kubectl exec -it po/$podname -n cfosegress -- tail -f /data/var/log/log/ips.0

expected output

kubectl exec -it po/$podname -n cfosegress -- tail -f /data/var/log/log/ips.0
Defaulted container "cfos7210250-container" out of: cfos7210250-container, init-myservice (init)
date=2024-06-27 time=09:18:00 eventtime=1719479880 tz="+0000" logid="0419016384" type="utm" subtype="ips" eventtype="signature" level="alert" severity="critical" srcip=10.1.200.22 dstip=34.117.186.192 srcintf="net1" dstintf="eth0" sessionid=2 action="dropped" proto=6 service="HTTP" policyid=100 attack="Bash.Function.Definitions.Remote.Code.Execution" srcport=33352 dstport=80 hostname="ipinfo.io" url="/" direction="outgoing" attackid=39294 profile="high_security" incidentserialno=265289730 msg="applications3: Bash.Function.Definitions.Remote.Code.Execution"
date=2024-06-27 time=09:37:35 eventtime=1719481055 tz="+0000" logid="0419016384" type="utm" subtype="ips" eventtype="signature" level="alert" severity="critical" srcip=10.1.100.22 dstip=10.1.200.22 srcintf="net2" dstintf="net1" sessionid=10 action="dropped" proto=6 service="HTTP" policyid=11 attack="Bash.Function.Definitions.Remote.Code.Execution" srcport=46952 dstport=80 hostname="10.1.200.22" url="/" direction="outgoing" attackid=39294 profile="high_security" incidentserialno=265289733 msg="applications3: Bash.Function.Definitions.Remote.Code.Execution"
date=2024-06-27 time=09:37:41 eventtime=1719481061 tz="+0000" logid="0419016384" type="utm" subtype="ips" eventtype="signature" level="alert" severity="critical" srcip=10.1.200.22 dstip=10.1.100.22 srcintf="net1" dstintf="net2" sessionid=11 action="dropped" proto=6 service="HTTP" policyid=10 attack="Bash.Function.Definitions.Remote.Code.Execution" srcport=40358 dstport=80 hostname="10.1.100.22" url="/" direction="outgoing" attackid=39294 profile="high_security" incidentserialno=265289734 msg="applications3: Bash.Function.Definitions.Remote.Code.Execution"
  • clean up
kubectl delete namespace app-1
kubectl delete namespace app-2
kubectl delete namespace cfosegress
  • delete all resource
rg=$(az group list --query "[?contains(name, '$(whoami)') && contains(name, 'workshop')].name" -o tsv)
vmNames=$(az vm list -g $rg --query "[].name" -o tsv)
for vmName in $vmNames; do 
   az vm delete --name $vmName -g $rg --yes
done

diskNames=$(az disk list --resource-group "$rg" --query "[].name" -o tsv)
  for diskName in $diskNames; do
    az disk delete --name "$diskName" --resource-group $rg --yes
  done

nics=$(az network nic list -g $rg -o tsv)
for nic in $nics; do
    az network nic delete --name $nic -g $rg
done

publicIps=$(az network public-ip list -g $rg -o tsv)
for publicIp in $publicIps; do 
    az network public-ip delete --name $publicIp -g $rg
done

vnets=$(az network vnet list -g $rg -o tsv)
for vnet in $vnets; do
   az network vnet delete --name $vnet -g $rg
done


nsgs=$(az network nsg list -g $rg -o tsv) 
for nsg in $nsgs; do
    az network nsg delete --name $nsg -g $rg 
done


az aks delete -n $(whoami)-aks-cluster -g $rg