Company ABC has Kubernetes workloads running in Azure Kubernetes Service (AKS) and is looking to enhance their security posture by integrating FortiWeb, a web application firewall (WAF). Given the highly ephemeral nature of Kubernetes environments, they require a solution that ensures automatic updates from the Kubernetes cluster to FortiWeb, maintaining real-time protection.
To achieve this, Company ABC plans to implement the FortiWeb Kubernetes Ingress Controller. This controller will facilitate seamless communication between the Kubernetes cluster and the FortiWeb WAF deployed in Azure, ensuring that any changes within the Kubernetes environment are promptly reflected in the WAF’s configuration. This setup will help protect their applications while maintaining the agility and scalability provided by Kubernetes.
Learning Objectives:
Deploy AKS cluster
Deploy FortiWeb VM in Azure
Learn about Routing, Load balancing, Types of Ingress
Install and Setup Ingress controller
Set up Web application protection polcy to do TLS based Ingress on FortiWeb
Generate Attack and Set up URL rewriting on FortiWeb
Troubleshooting tips
Lab Architecture
One Arm mode North South inspection
Two Arm mode North South Inspection
Subsections of Fortinet XPerts 2024
Ch 1 - Getting Started
Provisioning the Azure environment (40min)
Provision your Azure Environment, enter your Email address and click Provision
Warning
After submitting, this page will return with a blank email address box and no other indications.
Provisioning can take several minutes.
\*\*\* __PLEASE DO NOT SUBMIT MULTIPLE TIMES__ \*\*\*
When provisioning is complete, one of the following will happen.
You will receive an email with Azure environment credentials. Use those credentials for this environment, even if you have your own.
You will receive and email indicating that there are no environments available to utilize. In this case please try again at a later date.
You will receive an email indicating that the supplied email address is from an unsupported domain.
No email received due to an unexpected error. You can try again or notify the Azure CSE team.
Click the link “Skip for now (14 days until this is required)” do not click the “Next” button
Click the “Next” button
Click on Cloud Shell icon on the Top Right side of the portal
Select Bash
Click on Mount Storage Account
Select
Storage Account Subscription - Internal-Training
Apply
Click Select existing Storage account, Click Next
in Select Storage account Step,
Subscription: Internal-Training
Resource Group: Select the Resource group from the drop down: K8sXX-K8s101-workshop
Storage Account: Use existing storage account from dropdown.
File share: Use cloudshellshare
Click Select
Warning
Please make sure to use the existing ones. you wont be able to create any Resource Group or Storage account
After 1-2 minutes, You should now have access to Azure Cloud Shell console
Ch 2 - Intro FortiWeb
Subsections of Ch 2: Intro to FortiWeb
Introduction to FortiWeb and its functionalities
What is FortiWeb
FortiWeb is a web application firewall (WAF) that protects hosted web applications from attacks targeting known and unknown exploits. Using multi-layered and correlated detection methods, FortiWeb defends applications from known vulnerabilities and zero-day threats. The Web Application Security Service from FortiGuard Labs utilizes information based on the latest application vulnerabilities, bots, suspicious URL and data patterns, and specialized heuristic detection engines to keep your applications safe.
FortiWeb also offers a machine-learning function that enables it to automatically detect malicious web traffic. In addition to detecting known attacks, the feature can detect potential unknown zero-day attacks to provide real-time protection for web servers.
Configurable Features
FortiWeb allows you to configure these features:
Vulnerability scanning and patching
IP reputation, web application attack signatures, credential stuffing defense, anti-virus, and FortiWeb Cloud Sandbox powered by FortiGuard
Real-time attack insights and reporting with advanced visual analytics tools
Integration with FortiGate and FortiSandbox for ATP detection
Behavioral attack detection
Advanced false positive and negative detection avoidance
FortiWeb hardware and virtual machine platforms are available for medium and large enterprises, as well as for service providers.
Benefits
FortiWeb is designed specifically to protect web servers. It provides specialized application layer threat detection and protection for HTTP and HTTPS services, including:
Apache Tomcat
nginx
Microsoft IIS
JBoss
IBM Lotus Domino
Microsoft SharePoint
Microsoft Outlook Web App (OWA)
RPC and ActiveSync for Microsoft Exchange Server
Joomla
WordPress
FortiWeb’s integrated web-specific vulnerability scanner drastically reduces challenges associated with protecting regulated and confidential data by detecting your exposure to the latest threats, especially the OWASP Top 10.
FortiWeb’s HTTP firewall and denial-of-service (DoS) attack-prevention protects your web applications from attack. Using advanced techniques to provide bidirectional protection against sophisticated threats like SQL injection and cross-site scripting (XSS) attacks, FortiWeb also helps you defend against threats like identity theft, financial fraud, and corporate espionage.
FortiWeb provides the tools you need to monitor and enforce government regulations, industry best practices, and internal security policies, including firewalling and patching requirements from PCI DSS.
Features
FortiWeb’s application-aware firewall and load balancing engine can:
Secure HTTP/HTTPS applications.
Prevent and reverse defacement.
Improve application stability.
Monitor servers for downtime & connection load.
Reduce response times.
Accelerate SSL/TLS.*
Accelerate compression.
Rewrite content on the fly.
*On VM models, acceleration is due to offloading the cryptography burden from the back-end server. On hardware models, cryptography is also hardware-accelerated via ASIC chips.
FortiWeb significantly reduces deployment costs by consolidating WAF, hardware acceleration, load balancing, and vulnerability scanning in a single platform with no per-user pricing. These features:
Reduce the total resources required to protect your regulated, Internet-facing data.
Ease the challenges associated with policy enforcement and regulatory compliance.
Introduction to Kubernetes Ingress Controllers and FortiWeb Integration
Overview of Ingress Controller
An Ingress Controller is a component in Kubernetes that manages the routing of external HTTP and HTTPS traffic to services within a Kubernetes cluster. It listens for Ingress resources created by users and configures the load balancer accordingly. Essentially, it acts as an entry point for external traffic, routing requests to the appropriate services based on the defined rules.
Why Ingress Controller is Needed
Centralized Traffic Management: It centralizes the traffic management, allowing for easy routing rules setup.
Load Balancing: Distributes incoming traffic across multiple pods, ensuring high availability and reliability.
SSL Termination: Manages SSL/TLS termination, providing secure connections to the services.
Path-Based Routing: Allows for routing traffic to different services based on the request path.
Name-Based Virtual Hosting: Supports routing based on the hostname, enabling multiple applications to run on the same IP address.
FortiWeb Ingress Controller Overview
The FortiWeb Ingress Controller fulfills Kubernetes Ingress resources and allows you to manage FortiWeb objects from Kubernetes. It is deployed in a container within a pod in a Kubernetes cluster.
The major functionalities of FortiWeb Ingress Controller include:
List and Watch Ingress Resources: Manages Ingress-related resources such as Ingress, Service, Node, and Secret.
Convert Ingress Resources to FortiWeb Objects: Converts resources to FortiWeb objects, such as virtual servers, content routing, real server pools, and more.
Handle Events for Ingress Resources: Automatically implements corresponding actions on FortiWeb for Add/Update/Delete events.
Key Strengths of FortiWeb Ingress Controller
Integration of WAF and Ingress Controller Features
Web Application Firewall (WAF) Capabilities: Includes WAF capabilities, providing protection against common web vulnerabilities such as SQL injection, cross-site scripting (XSS), and other OWASP top 10 threats.
Comprehensive Security: Ensures that the traffic routed to the applications is secure, mitigating various web-based attacks at the ingress point itself.
Multi-Layered Protection: Uses multi-layered and correlated detection methods to defend applications from known vulnerabilities and zero-day threats.
Embedded Machine Learning (ML) Capabilities
Adaptive Security: The embedded ML capability allows FortiWeb to adapt and improve its threat detection over time. It can analyze traffic patterns and identify anomalies indicative of potential attacks.
Zero-Day Threat Protection: ML can detect and respond to zero-day threats by identifying suspicious behaviors that signify a new, previously unknown threat.
Real-Time Threat Mitigation: Offers real-time threat mitigation by continuously learning and adapting to new threat vectors, providing an extra layer of security for applications deployed in Kubernetes.
Additional Features of FortiWeb Ingress Controller
Health Check: Ensures that the services are running correctly and efficiently.
Traffic Log Management: Manages and logs traffic for monitoring and analysis.
FortiView: Provides visibility into the traffic and security events, facilitating the management of Kubernetes ingress resources.
Importance of ML in Addressing Zero-Day Threats
Proactive Defense: ML-based systems can predict and identify new attack patterns that have not yet been cataloged in traditional databases.
Dynamic Adaptation: Unlike static rule-based systems, ML systems evolve with the data they process, enhancing their capability to spot and mitigate new types of attacks.
Behavioral Analysis: ML algorithms can analyze the behavior of users and traffic patterns to detect anomalies that could signify a zero-day threat.
In summary, the FortiWeb Ingress Controller’s integration of WAF and ingress features, coupled with its embedded ML capabilities, provides a robust solution for securing Kubernetes applications. The ML capabilities are particularly crucial for detecting and mitigating zero-day threats, ensuring that applications remain protected against evolving security challenges.
Deployment Models of Ingress Controllers
Most Ingress Controllers, such as NGINX or Kong, are deployed inside Kubernetes as a Kubernetes Deployment. They run in containers within the cluster, managing ingress traffic internally.
In contrast, the FortiWeb Ingress Controller operates differently. It is backed by a FortiWeb VM or physical appliance, with a light agent deployed in Kubernetes. This agent uses APIs to communicate with the external FortiWeb VM or appliance.
Benefits of FortiWeb Ingress Controller
Benefits
Enhanced Security:
Dedicated Hardware: Using a physical appliance or VM provides dedicated resources for security operations, potentially enhancing performance and security.
Advanced WAF Features: FortiWeb appliances come with sophisticated Web Application Firewall capabilities that might surpass those available in container-based solutions.
Resource Efficiency:
Offloading Workload: By offloading security processing to an external appliance, it reduces the resource consumption within the Kubernetes cluster, freeing up resources for other workloads.
Scalability:
Independent Scaling: The FortiWeb appliance can be scaled independently of the Kubernetes cluster. This allows for flexible resource allocation based on traffic and security needs without affecting the cluster’s performance.
Install and Setup FortiWeb Ingress Controller
Network Diagram
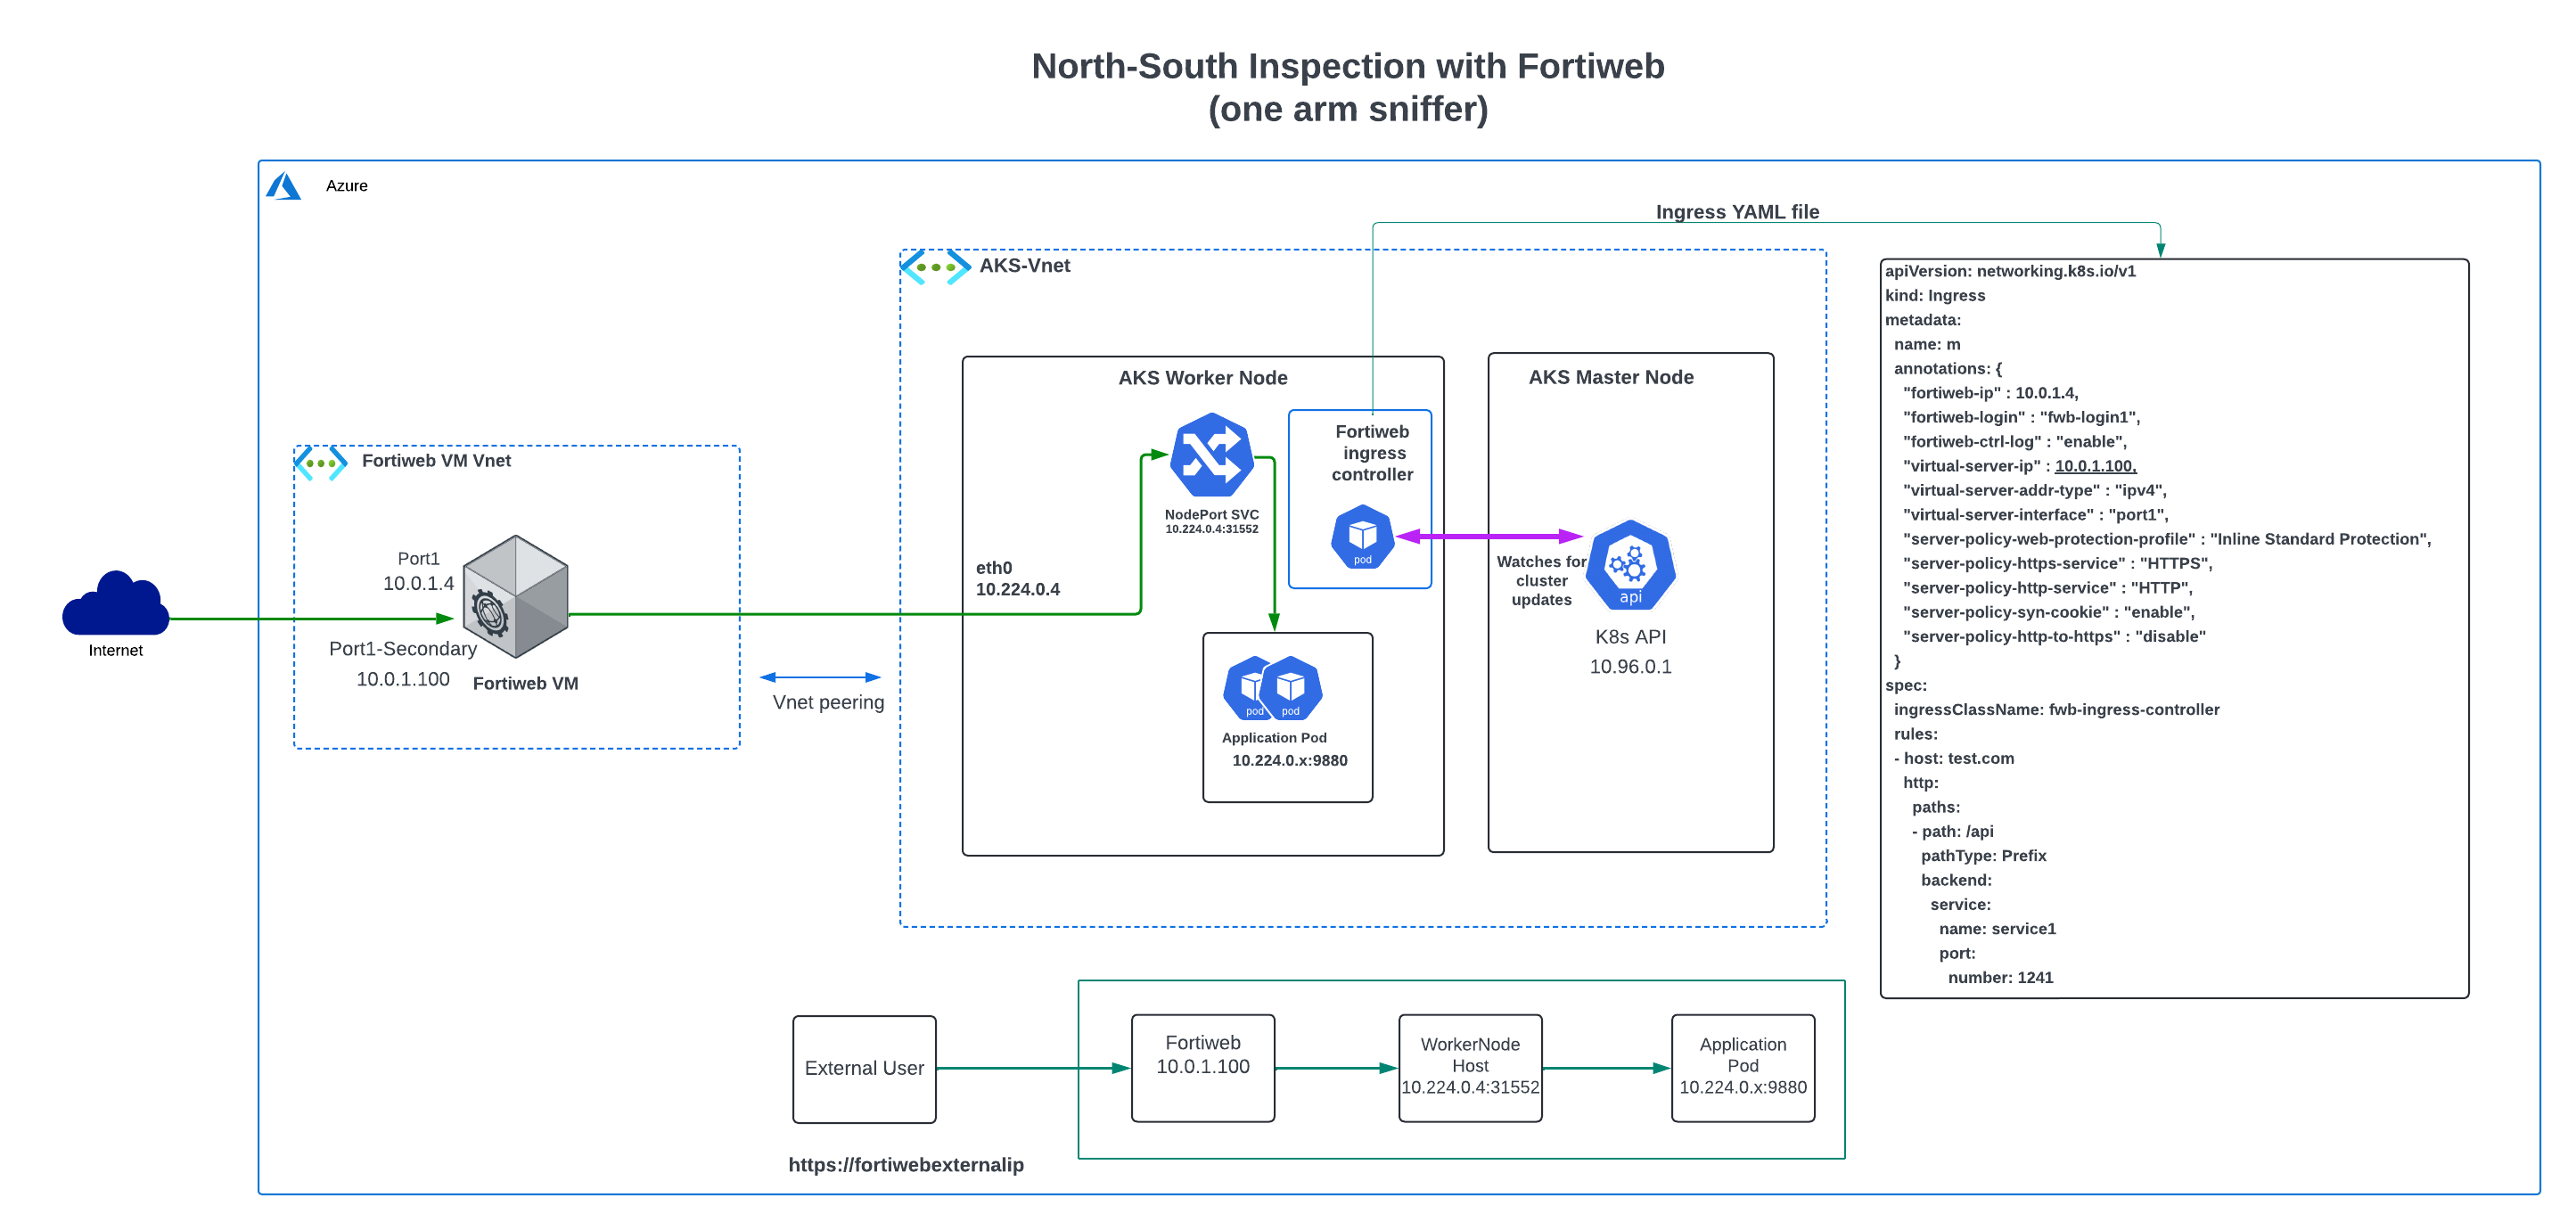
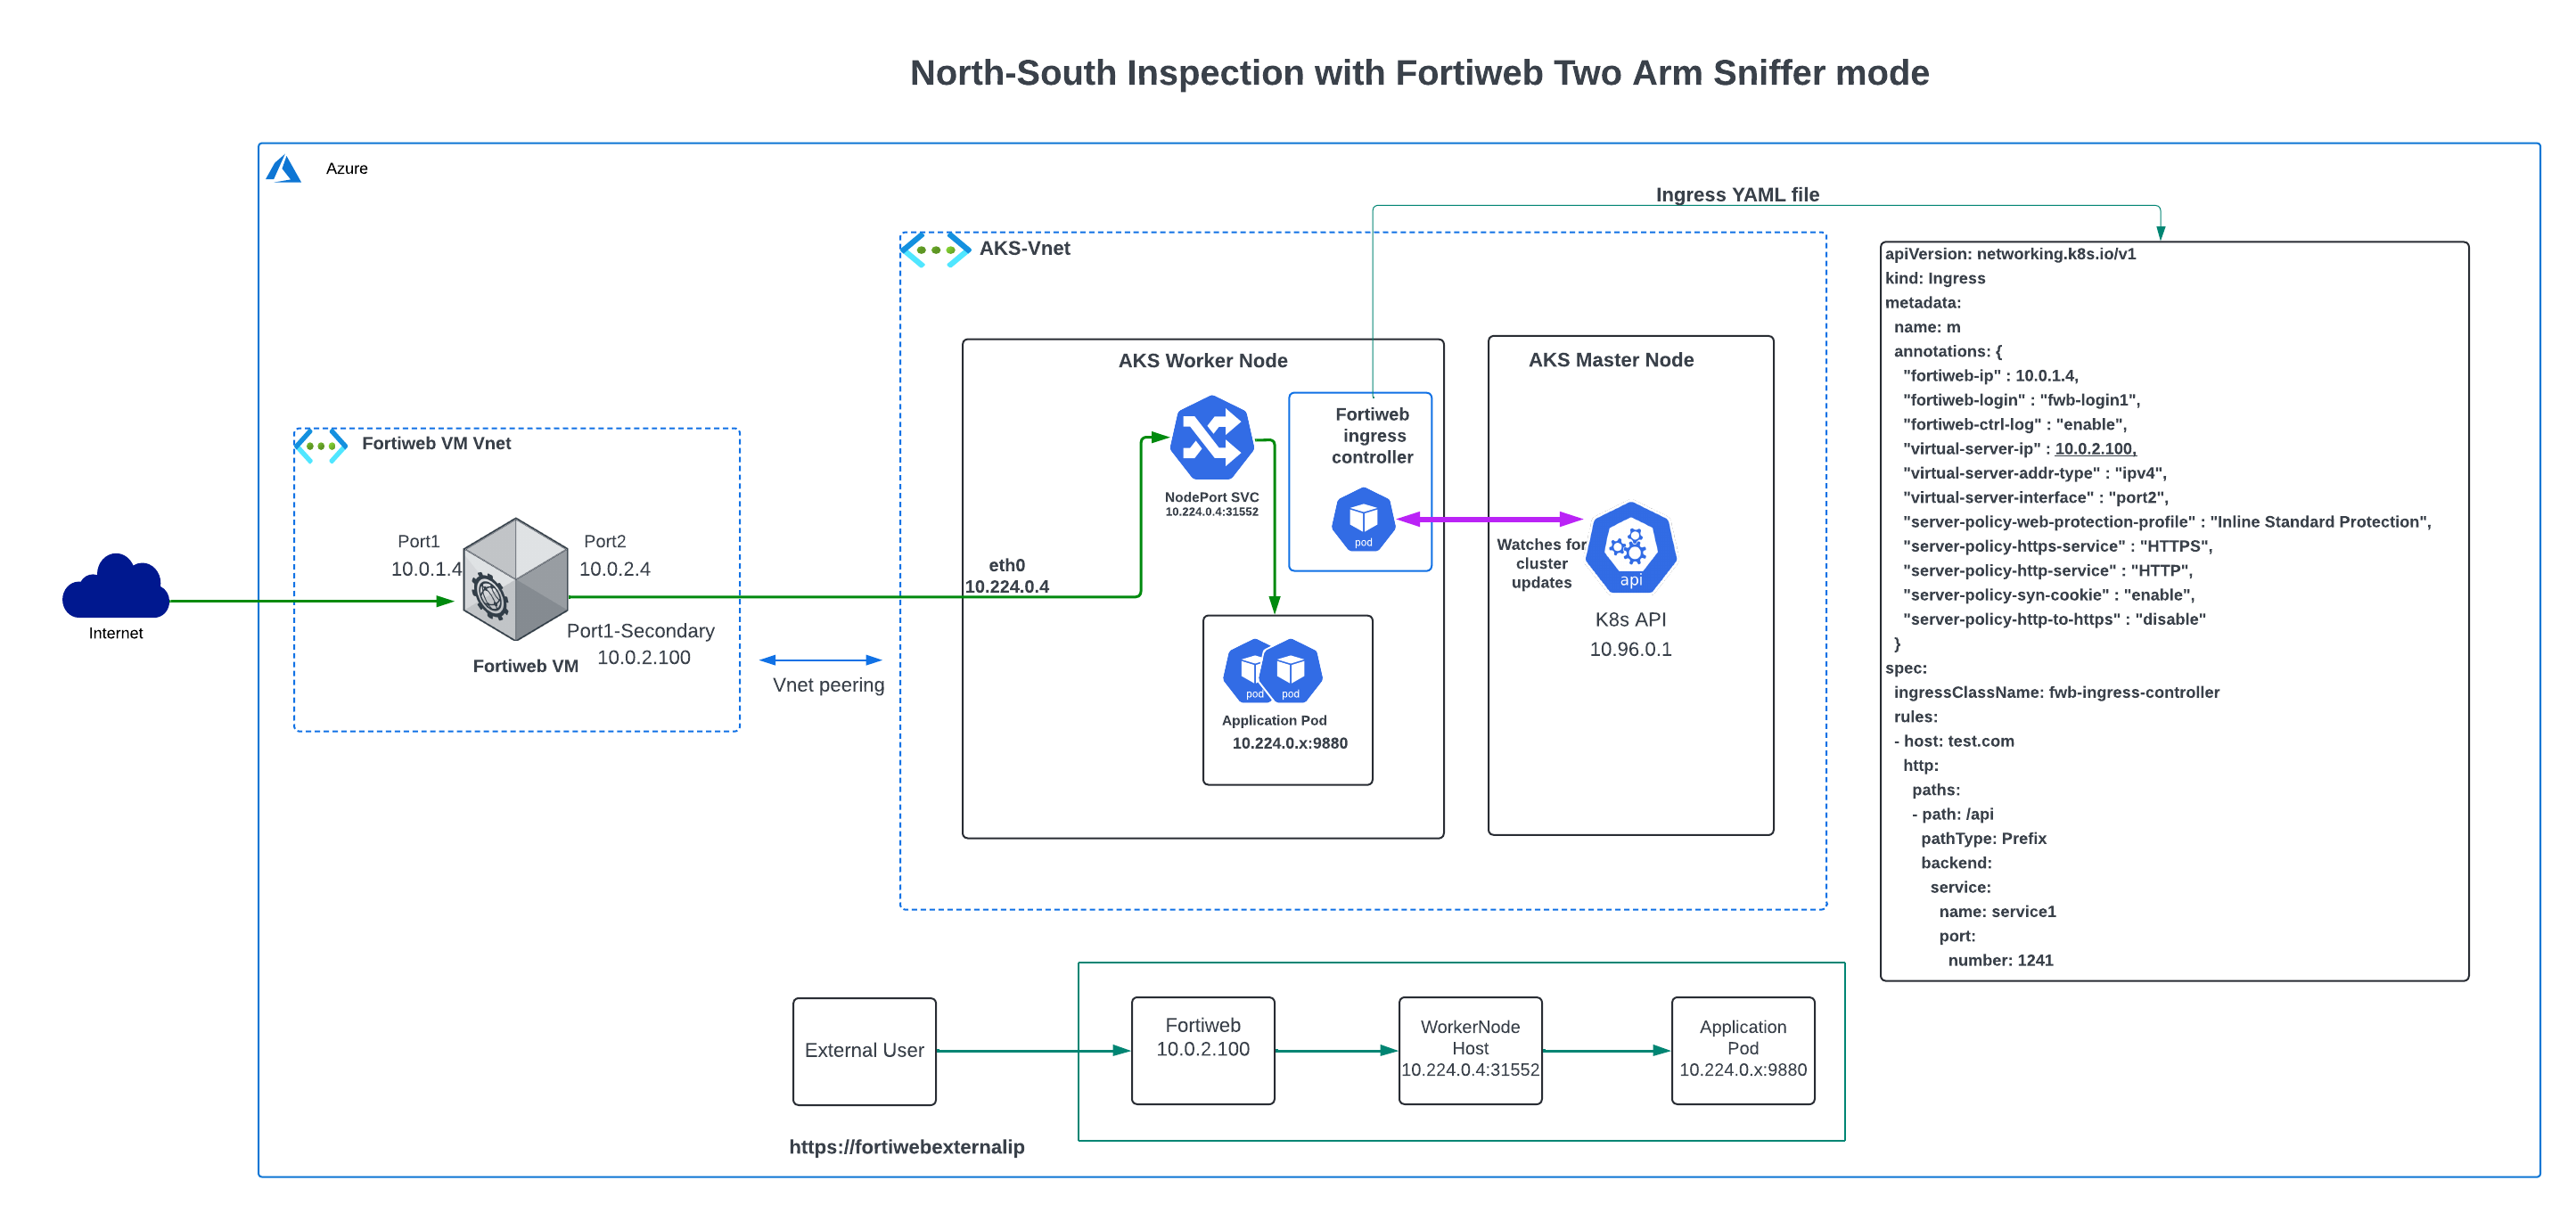
In this chapter, we are going to create a lab setup as illustrated in the network diagram below.
FortiWeb can be configured with two ports: port1 for incoming traffic and port2 for proxy traffic to the backend application. This is called the twoarms mode here.
FortiWeb TwoLegs Mode
FortiWeb can also be configured with a single port, where port1 handles both incoming traffic and proxy traffic to the backend application. This is called the one-arm mode.
FortiWeb OneArm Mode
Note
In this workshop, please use default onearm mode.
1. Prepare Environment Variables
read -p "Enter deploy mode (twoarms/onearm) [onearm]: " fortiwebdeploymode
fortiwebdeploymode=${fortiwebdeploymode:-onearm}echo$fortiwebdeploymodeif["$fortiwebdeploymode"=="twoarms"]; thensecondaryIp="10.0.2.100"elsesecondaryIp="10.0.1.100"fiowner="tecworkshop"currentUser=$(az account show --query user.name -o tsv)resourceGroupName=$(az group list --query "[?contains(name, '$(whoami)') && contains(name, 'workshop')].name" -o tsv)#resourceGroupName=$(az group list --query "[?tags.UserPrincipalName=='$currentUser'].name" -o tsv)if[ -z "$resourceGroupName"]; thenresourceGroupName=$owner-$(whoami)-"fortiweb-"$location-$(date -I) az group create --name $resourceGroupName --tags UserPrincipalName=$currentUser --location $locationresourceGroupName=$resourceGroupNamefilocation=$(az group show --name $resourceGroupName --query location -o tsv)echo"Using resource group $resourceGroupName in location $location"cat << EOF | tee > $HOME/variable.sh
#!/bin/bash -x
vnetName="fortiweb-VNET"
aksVnetName="AKS-VNET"
imageName="fortinet:fortinet_fortiweb-vm_v5:fortinet_fw-vm:latest"
fortiwebUsername="azureuser"
fortiwebPassword='Welcome.123456!'
fortiwebvmdnslabel="$(whoami)fortiwebvm7"
aksClusterName=$(whoami)-aks-cluster
rsakeyname="id_rsa_tecworkshop"
vm_name="$(whoami)fortiwebvm7.${location}.cloudapp.azure.com"
fortiwebvmdnslabelport2="$(whoami)px2"
svcdnsname="$(whoami)px2.${location}.cloudapp.azure.com"
remoteResourceGroup="MC"_${resourceGroupName}_$(whoami)-aks-cluster_${location}
nicName1="NIC1"
nicName2="NIC2"
alias k=kubectl
EOFechofortiwebdeploymode=$fortiwebdeploymode >> $HOME/variable.sh
echosecondaryIp=$secondaryIp >> $HOME/variable.sh
echolocation=$location >> $HOME/variable.sh
echoowner=$owner >> $HOME/variable.sh
echoresourceGroupName=$resourceGroupName >> $HOME/variable.sh
chmod +x $HOME/variable.sh
line='if [ -f "$HOME/variable.sh" ]; then source $HOME/variable.sh ; fi'grep -qxF "$line" ~/.bashrc ||echo"$line" >> ~/.bashrc
source$HOME/variable.sh
$HOME/variable.sh
if[ -f $HOME/.ssh/known_hosts ]; thengrep -qxF "$vm_name""$HOME/.ssh/known_hosts"&& ssh-keygen -R "$vm_name"fi
2. Create Kubernetes Cluster
We can use either managed K8s like AKS, EKS or self-managed k8s like kubeadm etc., in this workshop, let’s use AKS.
We will create aks VNET and fortiweb VNET in same resourceGroup, in reality, you can also create them in different resourceGroup.
3. Prepare to deploy fortiweb VM in dedicated VNET
In this workshop, We are going to deploy fortiweb VM in it’s own VNET, fortiweb will use twoarms or onearm deployment model, below lists the components going to be deployed
VNET : 10.0.0.0/16
Subnet1: 10.0.1.0/24
Subnet2: 10.0.2.0/24 when fortiweb in twoarms mode
NSG : allow all traffic
NIC1 with Public IP for SSH access and Management, in Subnet1
NIC2 for internal traffic, in Subnet2, when fortiweb in twoarms mode
this publicip serve for mgmt purpose, we can use this ip for SSH and WebGUI to fortiweb VM via IP address or DNS name
the fortiweb factory default configuration only have SSH service and WebGUI service enabled on Port1. so this Public IP will be associated to fortiweb VM Port1.
ssh -o "StrictHostKeyChecking=no" azureuser@$vm_name -i $HOME/.ssh/$rsakeyname"get system status"
5. Create VNET Peering
Because AKS and fortiweb are in different VNETs, they are isolated from each other. We are going to use VNET Peering to connect fortiweb VM with AKS workernode. To do that, we need to get both vnetIds to create peering.
MyfortiwebVM # PING 10.224.0.4 (10.224.0.4): 56 data bytes
64 bytes from 10.224.0.4: icmp_seq=1 ttl=64 time=2.5 ms
64 bytes from 10.224.0.4: icmp_seq=2 ttl=64 time=1.1 ms
64 bytes from 10.224.0.4: icmp_seq=3 ttl=64 time=1.2 ms
64 bytes from 10.224.0.4: icmp_seq=4 ttl=64 time=1.2 ms
64 bytes from 10.224.0.4: icmp_seq=5 ttl=64 time=15.0 ms
7. Config fortiweb VM
FortiWeb requires some basic configuration to work with ingress Controller
config list:
enable HTTPS API access on TCP port 443
enable traffic log
config static route
static route to AKS vnet subnet via Port1
default route to internet via Port2 when use fortiweb in twoarms mode
static route to your client IP (your azure shell) via Port1
This ensures your client session (your azure shell) can SSH into fortiweb via Port1 public ip.
##get your azure shell client ipmyclientip=$(curl -s https://api.ipify.org)echo$myclientipcat << EOF | tee > basiconfig.txt
config system global
set admin-sport 443
end
config log traffic-log
set status enable
end
EOFcat << EOF | tee > interfaceport2config.txt
config system interface
edit "port2"
set type physical
set allowaccess ping ssh snmp http https FWB-manager
set mode dhcp
next
end
EOFcat << EOF | tee > staticrouteconfigtwoarms.txt
config router static
edit 10
set dst 10.224.0.0/16
set gateway 10.0.1.1
set device port1
next
edit 2000
set dst 0.0.0.0/0
set gateway 10.0.2.1
set device port2
next
edit 1000
set dst $myclientip
set gateway 10.0.1.1
set device port1
next
end
EOFcat << EOF | tee > staticrouteconfigonearm.txt
config router static
edit 10
set dst 10.224.0.0/16
set gateway 10.0.1.1
set device port1
next
EOFssh -o "StrictHostKeyChecking=no" azureuser@$vm_name -i ~/.ssh/$rsakeyname < basiconfig.txt
if["$fortiwebdeploymode"=="twoarms"]; thenssh -o "StrictHostKeyChecking=no" azureuser@$vm_name -i ~/.ssh/$rsakeyname < interfaceport2config.txt
ssh -o "StrictHostKeyChecking=no" azureuser@$vm_name -i ~/.ssh/$rsakeyname < staticrouteconfigtwoarms.txt
elsessh -o "StrictHostKeyChecking=no" azureuser@$vm_name -i ~/.ssh/$rsakeyname < staticrouteconfigonearm.txt
fi
Verify the fortiweb Configuration
you can ssh into fortiweb to check configuration like static route etc.,
ssh -o "StrictHostKeyChecking=no" azureuser@$vm_name -i ~/.ssh/$rsakeyname show router static
8. SSH into fortiweb via internal ip
You may lose connectivity to fortiweb Public IP via SSH if your client ip subnet is not in fortiweb static route config. In this case, you can use fortiweb internal IP for ssh. We can create an ssh client pod to connect to fortiweb via internal IP.
Helm is a package manager for Kubernetes that simplifies the deployment and management of applications within Kubernetes clusters. It uses charts, which are pre-configured packages of Kubernetes resources. Helm also uses Helm repositories, which are collections of charts that can be shared and accessed by others, facilitating the distribution and collaboration of Kubernetes applications.
If you use the Azure Cloud Shell, the Helm CLI (Helm v3.6.3 or later ) is already installed. For installation instructions on your local platform, see Installing Helm https://helm.sh/docs/intro/install/
NAME       ENDPOINTS          AGE
service1   10.224.0.22:9876   14s
NAME       ENDPOINTS          AGE
service2   10.224.0.19:9876   6s
11. Create ingress rule with yaml file
FortiWeb ingress controller is the default ingress controller, it will read and parse the ingress rule. the ingress controller will also read annotation from yaml file for some configuration parameters like fortiweb login ip and secrets etc.,
We will tell fortiweb ingress controller use fortiweb port1 ip for API access, and create VIP on fortiweb Port2, the VIP address is on same subnet with Port2 with last octet set to .100.
Use the script below to get fortiweb Port1 and Port2 IP address , then create yaml file with these IP address
the fortiweb Ingress controller require username and password to access fortiweb VM, therefore, we need to create a secret for fortiweb Ingress controller, the secret save username/password in base64 encoded strings which is more secure then plain text.
Ingress Controller will read ingress object, then use the annotations to config fortiweb use API.
“fwb-login1” is the secret that keep fortiweb VM username and password
“virtual-server-ip” is the VIP to be configured on fortiweb
In spec, we also define a rules with host set to port2 public ip dns name.
if request url is /generate, the traffic will be redirect to service1
if request url is /info , the traffic will be redirect to service2
Now you have 04_minimal-ingress.yaml file created.
you can go ahead to deploy this yaml file directly, but if you want monitor the activities of fortiweb Ingress Controller after apply this yaml file, you can do
Since fortiweb VM is outside of cluster, fortiweb will use AKS nodePort to reach backend application. Therefore the backend application has exposed via NodePort Svc , the client pod shall able to reach backend application via nodePort. So does fortiweb VM.
MyfortiwebVM # % Total % Received % Xferd Average Speed Time Time Time Current Dload Upload Total Spent Left Speed
00000000--:--:----:--:----:--:--0* Trying 10.224.0.10:30890...* Connected to 10.224.0.10 (10.224.0.10) port 30890> GET /info HTTP/1.1> Host: 10.224.0.10:30890> User-Agent: curl/8.4.0> Accept: */*>< HTTP/1.1200 OK
< Content-Type: application/json
< Date: Tue, 25 Jun 202401:59:56 GMT
< Content-Length: 20<{ [20 bytes data]
100201002000HTTP/1.1200 OK
Content-Type: application/json
Date: Tue, 25 Jun 202401:59:56 GMT
Content-Length: 20{"version":"0.6.0"}
53330--:--:----:--:----:--:--6666* Connection #0 to host 10.224.0.10 left intact
14. Create secondary ip and associate with public ip
This is to create an IP to use as VIP on fortiweb and associate with a public ip for external access, when run fortiweb with twoarms mode the secondary ip is on NIC2 , when in onearm mode, the secondary ip is on NIC1.
if["$fortiwebdeploymode"=="twoarms"]; thenvipnicname="NIC2"elsevipnicname="NIC1"fiaz network public-ip create \
--resource-group $resourceGroupName\
--name FWBPublicIPPort2 \
--allocation-method Static \
--sku Standard \
--dns-name $fortiwebvmdnslabelport2# Add a secondary IP configuration to NIC2az network nic ip-config create \
--resource-group $resourceGroupName\
--nic-name $vipnicname\
--name ipconfigSecondary \
--private-ip-address $secondaryIp\
--public-ip-address FWBPublicIPPort2
Verify the secondary IP address
az network nic show \
--resource-group $resourceGroupName\
--name $vipnicname\
--query "ipConfigurations[]"\
--output table
Verify connectivity to fortiweb VIP
FortiWeb has VIP configured which it’s an alias of NIC2 interface(in twoarms mode) or NIC1 (in onearm mode). from client pod, you shall able to ping it.
Reach ingress rule via fortiweb reverse proxy on VIP
Because fortiweb has configured with reverseProxy on VIP with ingress rule. client pod shall able to access url via fortiweb.
We have add “Host: $svcdnsname” in HTTP request Host header, as this is required in the ingress rule definition.
the target application is gemini AI client. so we can send request data with your “prompt”.
Only run this step if you want to start over the deployment, if not please continue to next section.
delete all resource
if you want startover again, you can delete all resource then redo the installation
resources=$(az resource list -g $resourceGroupName --query "[].{name:name, type:type}" -o tsv)az resource list -g $resourceGroupName -o table
echo delete aks cluster
az aks delete --name $aksClusterName -g $resourceGroupNameecho delete fortiweb vm
az vm delete --name MyfortiwebVM -g $resourceGroupNameecho delete nic
az network nic delete --name NIC1 -g $resourceGroupNameaz network nic delete --name NIC2 -g $resourceGroupNameecho delete public ip
az network public-ip delete --name FWBPublicIP -g $resourceGroupNameaz network public-ip delete --name FWBPublicIPPort2 -g $resourceGroupNameecho delete fortiwebvm disk
disks=$(az disk list -g $resourceGroupName --query "[].name" -o tsv)for disk in $disks; doaz disk delete --name $disk --resource-group $resourceGroupNamedoneecho delete NSG
az network nsg delete --name MyNSG --resource-group $resourceGroupNameecho delete vnet
az network vnet delete --name $vnetName -g $resourceGroupNameaz network vnet delete --name $aksVnetName -g $resourceGroupNameaz resource list -g $resourceGroupName -o table
rm ~/.kube/config
ssh-keygen -R $vm_name
Ch 3 - Configuring FortiWeb
Subsections of Ch 3: Configuration
routing and load balancing
Basic configuration settings for routing and load balancing
FortiWeb is Fortinet’s web application firewall (WAF) that provides protection against web-based threats and allows for the management of web traffic. Here’s a basic overview on how to configure routing and load balancing on FortiWeb:
Routing Configuration
Static routes direct traffic exiting the FortiWeb appliance based upon the packet’s destination—you can specify through which network interface a packet leaves and the IP address of a next-hop router that is reachable from that network interface.
Routers are aware of which IP addresses are reachable through various network pathways and can forward those packets along pathways capable of reaching the packets’ ultimate destinations. Your FortiWeb itself does not need to know the full route, as long as the routers can pass along the packet.
You must configure FortiWeb with at least one static route that points to a router, often a router that is the gateway to the Internet or intrinsic router of Azure if its public cloud hosted VM. You may need to configure multiple static routes if you have multiple gateway routers (e.g. each of which should receive packets destined for a different subset of IP addresses), redundant routers (e.g. redundant Internet/ISP links), or other special routing cases.
However, often you will only need to configure one route: a default route.
For example, if a web server is directly attached to one physical port on the FortiWeb, but all other destinations, such as connecting clients, are located in different VNETS in Azure, you might need to add a route to the destination vnet with the gateway IP of Port you would like to use. In this lab’s case it will be the Azure intrinsic gateway IP of Port1.
Round Robin: Distributes new TCP connections to the next pool member, regardless of weight, response time, traffic load, or number of existing connections. FortiWeb avoids unresponsive servers.
Suppose you have three servers in your pool: Server1, Server2, and Server3. New TCP connections are distributed in the following order: Server1, then Server2, then Server3, and it repeats in this cycle.
Weighted Round Robin: Distributes new TCP connections using the round-robin method, except that members with a higher weight value receive a larger percentage of connections.
If Server1 has a weight of 3, Server2 a weight of 1, and Server3 a weight of 2, the distribution of connections might look like: Server1, Server1, Server1, Server2, Server3, Server3, and then it repeats. Server1 gets more connections due to its higher weight.
Least Connection: Distributes new TCP connections to the member with the fewest number of existing, fully-formed TCP connections. If there are multiple servers with the same least number of connections, FortiWeb will take turns and avoid always selecting the same member to distribute new connections.
If Server1 has 10 connections, Server2 has 5 connections, and Server3 has 5 connections, the next new connection will be sent to either Server2 or Server3, whichever has fewer active connections.
URI Hash: Distributes new TCP connections using a hash algorithm based on the URI found in the HTTP header, excluding hostname.
A hash function is applied to the URI in the HTTP header (excluding the hostname). Suppose the URI “/api/data” consistently hashes to Server1, then all requests to “/api/data” will always be directed to Server1.
Full URI Hash: Distributes new TCP connections using a hash algorithm based on the full URI string found in the HTTP header. The full URI string includes the hostname and path.
Similar to URI Hash, but the hash function is applied to the entire URI, including the hostname. For instance, requests to “http://example.com/api/data" might hash to Server2.
Host Hash: Distributes new TCP connections using a hash algorithm based on the hostname in the HTTP Request header Host field.
This method applies a hash to the hostname found in the HTTP request’s Host field. If requests come with “host1.example.com”, and the hash points to Server3, all requests to “host1.example.com” will be directed to Server3.
Host Domain Hash: Distributes new TCP connections using a hash algorithm based on the domain name in the HTTP Request header Host field.
A hash function is applied to the domain name in the Host field. For example, requests to any subdomain of “example.com” might consistently hash to Server1 based on the domain name.
Source IP Hash: Distributes new TCP connections using a hash algorithm based on the source IP address of the request.
A hash function is applied to the source IP address of incoming requests. If the IP address 192.168.1.100 hashes to Server2, all requests from this IP will be directed to Server2.
Least Response Time: Distributes incoming traffic to the back-end servers by multiplying average response time by the number of concurrent connections. Servers with the lowest value will get the traffic. In this way the client can connect to the most efficient back-end server.
Suppose the average response times are 20 ms for Server1, 30 ms for Server2, and 15 ms for Server3, with all having similar connection numbers. The next connection will be directed to Server3 due to its lowest response time.
Probabilistic Weighted Least Response Time: For the Least Response Time, in extreme cases there might be a server consistently has relatively low response time compared to others, which causes most of traffic to be distributed to one server. As a solution to this case, Probabilistic Weighted Least Response Time distributes traffic based on least response time as well as probabilities. The least response time server is most likely to receive traffic, while the rest servers still have chance to process some of the traffic.
Using the previous example, if Server3 begins to receive a disproportionate amount of traffic, reducing its performance, this method might adjust probabilities such that Server1 and Server2 start to receive more connections to balance the load, even though Server3 still has the best average response time.
K8s ingress types
Kubernetes Ingress is a vital component for managing access to applications running within a Kubernetes cluster from outside the cluster. It provides routing rules to manage external users’ access to the services inside the cluster. Here’s a breakdown of different types of Kubernetes Ingress configurations:
1. Minimal Ingress
Minimal Ingress is the most straightforward type of Ingress. It’s used primarily when you have a single service that needs to be exposed externally. The configuration directs all incoming traffic on the specified host to a single backend service.
This Ingress directs all traffic that does not match any other rule to the single-service at port 80.
Useful for simple applications or initial development stages when complex routing rules are not needed.
2. Simple fanout:
A fanout configuration routes traffic to multiple services based on the URL path. for example, Used when hosting multiple services or APIs from the same IP address, directing users to different services based on the path.
Traffic to fanout.example.com/blog is directed to blog-service.
Traffic to fanout.example.com/shop is directed to shop-service.
Each service handles different parts of the application, allowing for modular and scalable design.
3. Ingress with Default backend
This Ingress configuration includes both specific rules and a default backend to handle unmatched requests. for example,
To manage traffic to specific services while ensuring that all other requests are caught by a default backend.
Traffic to secure.example.com is handled with TLS, using the certificates stored in the Kubernetes secret example-tls.
5. ingress wildcard host
This configuration uses a wildcard host to match requests to any subdomain of a specified domain.
Typical Use Case:
Useful for organizations that have different environments for their app (like development, staging, and production) under different subdomains.
Explanation:
All traffic that does not fit other specified rules is directed to default-service on port 80.
Security and WAF policies
Setting up basic security features and WAF policies
FortiWeb is a web application firewall (WAF) from Fortinet that offers comprehensive security features designed to protect web applications from various attacks and vulnerabilities. Here are some of the basic security features provided by FortiWeb:
Web Application Firewall (WAF)
FortiWeb provides strong protection against common web attacks and vulnerabilities such as SQL injection, cross-site scripting (XSS), and cross-site request forgery (CSRF), among others. It uses both signature-based and behavior-based detection methods to identify threats.
DDoS Protection
FortiWeb offers Distributed Denial of Service (DDoS) attack protection to help safeguard your applications from volumetric attacks that aim to overwhelm the system with traffic, rendering the application non-responsive.
OWASP Top 10 Protection
FortiWeb is designed to protect against the vulnerabilities listed in the OWASP Top 10, which are the most critical security risks to web applications. This includes injection flaws, broken authentication, sensitive data exposure, and more.
Bot Mitigation
FortiWeb includes features to detect and block malicious bots that can perform credential stuffing, scraping, and other automated attacks that can undermine the security and performance of your applications.
SSL/TLS Encryption
FortiWeb supports SSL/TLS encryption to secure data in transit between clients and servers. It also provides SSL offloading to help improve the performance of your web servers by handling the encryption and decryption processes.
API Protection
With increasing use of APIs in modern applications, FortiWeb provides specialized protections for API-based services, including JSON and XML protection. It ensures that APIs are not exploited to gain unauthorized access or to compromise data.
Advanced Threat Protection
FortiWeb integrates with FortiSandbox to offer advanced threat protection, allowing it to analyze files and web content in a safe and isolated environment to detect new malware and zero-day exploits.
Machine Learning Capabilities
FortiWeb uses machine learning to dynamically and automatically identify normal behavior and detect anomalies. This helps in protecting against sophisticated threats and reduces false positives without extensive manual intervention.
Rate Limiting
To prevent abuse and ensure service availability, FortiWeb allows administrators to set rate limits on incoming requests, thus protecting against brute force attacks and other abusive behaviors by limiting how often a user can repeat actions.
IP Reputation and Geo-IP Based Filtering
FortiWeb leverages IP reputation services and Geo-IP based filtering to block traffic from known malicious sources or specific geographic regions, adding an additional layer of security.
These features collectively provide robust protection for web applications, ensuring they remain secure from a wide range of cyber threats while maintaining performance and accessibility. FortiWeb’s comprehensive security measures make it an effective solution for businesses looking to safeguard their online operations.
Lets create a protection profile to use for the TLS based ingress application.
Login with username and password from above output.
On FortiWeb > Policy > Web protection profile > click on “inline extended protection” and click clone at the top and give it a name: ingress tls profile. This profile name will be used later in the Ingress definition file.
Open the cloned protection profile to see there are few modules enabled already. We will update these protection profiles as we perform attacks in the next chapter.
Now lets create the TLS based ingress.
To create TLS based ingress we need to first generate certificate.
We will tell FortiWeb ingress controller use FortiWeb port1 ip for API access, and create VIP on FortiWeb Port1 secondary IP, the VIP address is on same subnet with Port1 with last octet set to .100.
use below script to get FortiWeb Port1 and Port1 Secondary IP address , then create yaml file with these IP address
Now lets add another path in ingress controller config to get to Juicehsop. Since its already deployed in the previous chapter, lets just update the 08_tls-ingress.yaml file and apply the config.
This is will update and generate the 08_tls-ingress.yaml file
Now lets run
kubectl apply -f 08_tls-ingress.yaml
output:
ingress.networking.k8s.io/m configured.
the ingress controller will now have two paths. we can check by running:
kubectl get ingress
output:
srija [ ~/k8s-202-workshop/scripts/labEnv ]$ kubectl get ingress
NAME   CLASS                    HOSTS                                ADDRESS    PORTS     AGE
m      fwb-ingress-controller   srijapx2.westus.cloudapp.azure.com   10.0.1.5   80, 443   158m
The first attack will be a SQLi attack. Please use Chrome browser to best follow the insrtuctions.
FortiWeb ingress TLS protection profile already has Extended protection enabled for Signature based protection, so we can just continue to do an attack.
Proceed with the Attack!
SLQi
To get the Juiceshop hostname, on FortiWeb > Server Objects > Server > HTTP Content Routing > click on one of the content routing policy.
Copy the hostname and enter it into your Chrome browser, followed by ‘/’ prefix.
Right-click on the browser page and click on Inspect to get to Chrome’s Developer Settings.
Click on the Network tab in the inspect module.
While viewing the network settings, In the Juiceshop search tab, search for “banana” or “apple” and hit enter.
You will see a search?q= request in the network tab.
Click on that request to see more information about headers, cookies etc.
Notice the backend Request URL, status code, Request method etc. This request URL is the backend URL to the express API of the juiceshop app and this is how attackers inject malicious input to extract data from DB.
Copy this URL and paste into a browser. do not hit enter yet
Now instead of the actual search phrase, lets replace it with the SQli payload and paste it in the browser
On FortiWeb > Log and report > Log access > Attack . we should see attack log triggered for SQLi attack.
Repeat the same attack with another payload.
<script>$('input').value="';DELETE FROM USERS;--";$('form').submit()</script>
example:
"https://srijapx2.westus.cloudapp.azure.com/rest/products/search?q=<script>$('input').value="';DELETE FROM USERS;--";$('form').submit()</script>"
We will see block page again but find out from the attack log what attack this is.
Q & A
What attack was triggered in step 6?
Click for Answer…
SQLi
How are signatures helping to block these OWASP TOP 10 attacks?
Click for Answer…
Signatures detect patterns of malicious SQL statements, command injection attempts, and other injection payloads.
Example: Detecting ‘UNION SELECT’ or ’exec xp_’ in requests.
URL rewriting
Lets also explore URL rewriting with FortiWeb. FortiWeb supports several URL rewriting capabilities which can be very important and useful in production applications.
Key uses of URL rewriting on FortiWeb:
SEO Optimization: Improves search engine rankings by transforming dynamic URLs into static, keyword-rich URLs that are easier for search engines to index.
User-Friendly URLs: Creates readable and memorable URLs, enhancing the user experience and making it easier for users to navigate the website.
Hiding Internal URL Structures: Conceals the internal structure and parameters of web applications, adding an extra layer of security and preventing exposure of sensitive details.
Security Enhancement: Makes it harder for attackers to guess the structure of the web application, reducing the risk of attacks such as parameter tampering or direct access to sensitive endpoints.
Redirection Management: Manages redirects efficiently, ensuring that users and search engines are directed to the correct pages even after the website structure changes or pages are moved.
Consistent URL Structure: Ensures uniformity in URL formatting across the website, which aids in site maintenance and improves the overall user experience.
Attack1 - Rewriting Policy:
Lets create a rewriting policy to rewrite from Service1 to Juiceshop application.
(FQDN can be found by running echo $fortiwebvmdnslabelport2 in Azure shell.)
HTTP URL: /info
Replacement location: https:///
Click OK.
Finally it looks like below:
Lets create a URL rewriting policy by giving a name.
click create new and select the Rule we have create in previous step from the drop down.
Finally it looks like below:
Now lets Navigate to Policy > Web protection profile > Edit the ingress tls profile, scroll down to URL rewriting and click on drop down to add the rewrite policy created in Step 2.
Click OK.
Now when we input https:///info in the browser, it will now redirect to juiceshop application automatically.
Attack 1 - DOS protection/Rate limiting:
DoS rate limiting
To create a DOS rate limiting policy on FortiWeb > DOS protection > HTTP Access limit > Create new
Set the HTTP Request Limit/Sec on Standalone iP to 2, Action to Alert and Deny.
Create a DOS protection policy. on FortiWeb DOS Protection > DoS protection policy > Create new
Give it a name, “enable HTTP DOS prevention”
select the HTTP Access limit policy create in previous step.
Click OK.
Now lets go back to Web protection profile, edit the TLS ingress profile and update the DOS protection policy to the policy just created.
Paste the following code into your Azure Cloudshell, which creates and executes a sumple python script to send 100 HTTP GET requests to your FortiWeb VM FQDN.
exportfortiwebvmdnslabelport2=$fortiwebvmdnslabelport2exportlocation=$locationurl="https://${fortiwebvmdnslabelport2}"echo"Sending requests to: $url"# Loop to run 100 GET requestsfor i in {1..100}do# Make the GET request and capture the outputoutput=$(curl -s -k -w "\nHTTP Status: %{http_code}""$url")# Check if curl command was successfulif[$? -eq 0]; then# Print the outputecho"Request $i output:"echo"$output"echo"------------------------"elseecho"Request $i failed"fi# Add a small delay between requests sleep 0.1
doneecho"All 100 requests completed."
output:
We will see first few request suceeded , then later request failed due to server blocked it.
Check FortiWeb’s atatck log to see an entry for DOS protection attack in Log and Report > Log access > Attack.
Ch 5 - Troubleshooting
Subsections of Ch 5: Troubleshooting
Attack and traffic log
Attack logs and traffic logs are critical components of a comprehensive cybersecurity strategy. Here’s how they can be beneficial:
Attack Logs
Incident Detection and Response: Attack logs provide detailed information about potential security incidents. By analyzing these logs, security teams can identify attack vectors, understand the methods used by attackers, and respond more effectively to mitigate threats.
Forensic Analysis: In the event of a security breach, attack logs are invaluable for forensic purposes. They help trace the steps taken by the attacker, determine the scope of the breach, and identify compromised data.
Compliance and Reporting: Many regulatory requirements mandate that organizations must monitor and log access to sensitive data. Attack logs help in demonstrating compliance with these regulations by providing an audit trail of security events.
Trend Analysis and Threat Intelligence: Over time, attack logs can reveal patterns and trends in security threats. This information can be used to enhance threat intelligence, improve security postures, and proactively defend against future attacks.
Attack log in enabled by default on FortiWeb. To enable or diable attack log:
Navigate to Log Settings: Look for the “Log & Report” menu, then find the “log config” > “Other log settings”
To view attacks logs: In the “Log & Report” menu > Log Access > Attack
Traffic Logs
Network Monitoring and Management: Traffic logs record data about the flow of traffic through the network. This data is essential for network performance monitoring, troubleshooting network issues, and ensuring network resources are optimally utilized.
Security Analysis: By examining traffic logs, organizations can detect anomalies in network traffic that may indicate malicious activity, such as unusual data flows or spikes in traffic to sensitive resources.
Policy Enforcement: Traffic logs help verify that network usage policies and security controls are being followed. For instance, logs can show whether any prohibited services or applications are being accessed.
Bandwidth Management: Traffic logs provide insights into bandwidth usage patterns. This information can be used to optimize bandwidth allocation, improve user experience, and reduce costs by identifying unnecessary or excessive usage.
User and Entity Behavior Analytics (UEBA): By analyzing traffic logs, organizations can build profiles of normal user and system behavior. Deviations from these profiles may indicate potential security or operational issues.
Overall, both attack logs and traffic logs serve as essential tools for maintaining security, ensuring compliance, and optimizing network performance. They provide the visibility needed to manage, secure, and audit information systems effectively.
To enable traffic log this has be done at policy level from the CLI.
Click on CLI of FortiWeb.
run the below commands in the CLI:
   config server-policy policy
   edit <policy to enable traffic log>
   set tlog enable
   next
   end
for example:
config server-policy policy
edit default_m
set tlog enablenext
end
To view Traffic logs: In the “Log & Report” menu > Log Access > Traffic.
Troubleshooting
Diagnosing Network Connectivity Issues
One of your first tests when configuring a new policy should be to determine whether allowed traffic is flowing to
your web servers.
Is there a server policy applied to the web server or servers FortiWeb was installed to protect? If it is
operating in Reverse Proxy mode, FortiWeb will not allow any traffic to reach a protected web server unless
there is a matching server policy that permits it.
If your network utilizes secure connections (HTTPS) and there is no traffic flow, is there a problem with your
certificate?
If you run a test attack from a browser aimed at your website, does it show up in the attack log?
To verify, configure FortiWeb to detect the attack, then craft a proof-of-concept that will trigger the attack sensor.
For example, to see whether directory traversal attacks are being logged and/or blocked, you could use your
web browser to go to:
http://www.example.com/login?user=../../../../
Under normal circumstances, you should see a new attack log entry in the attack log console widget of the
system dashboard.
use TCPDUMP equivalent command on FortiWeb diagnose network sniffer 4 0 -a
example: diagnose network sniffer any “port 8443” 4 0 -a
To ping a device from the FortiWeb CLI:
Log in to the CLI via either SSH, Telnet, or you can ping from the FortiWeb appliance in the CLI Console
accessed from the web UI.
If you want to adjust the behavior of execute ping, first use the execute ping options command.
Enter the command:
execute ping <destination_ipv4>
where <destination_ipv4> is the IP address of the device that you want to verify that the appliance can
connect to, such as 192.168.1.5.
If the appliance can reach the host via ICMP, output similar to the following appears:
PING 192.0.2.96 (192.0.2.96): 56 data bytes
64 bytes from 192.0.2.96: icmp_seq=0ttl=253time=6.5 ms
64 bytes from 192.0.2.96: icmp_seq=1ttl=253time=7.4 ms
64 bytes from 192.0.2.96: icmp_seq=2ttl=253time=6.0 ms
64 bytes from 192.0.2.96: icmp_seq=3ttl=253time=5.5 ms
64 bytes from 192.0.2.96: icmp_seq=4ttl=253time=7.3 ms
--- 192.0.2.96 ping statistics ---
5 packets transmitted, 5 packets received, 0% packet loss
round-trip min/avg/max = 5.5/6.5/7.4 ms
EOF
If the appliance cannot reach the host via ICMP, output similar to the following appears:
“100% packet loss” and “Timeout” indicates that the host is not reachable.
For kubernetes ingress controller:
From the cluster check the ingress controller pod logs in namepsace to see if there are any errors.
kubectl get pods -n FortiWebingress
output:
NAME                                          READY   STATUS    RESTARTS   AGE
first-release-fwb-k8s-ctrl-59db65cddc-g4298   1/1     Running   0          2d15h
EOF
Kubectl logs first-release-fwb-k8s-ctrl-59db65cddc-g4298 -n FortiWebingress (Replace with your pod name and namespace)
output:
Do POST url https://10.0.1.4:443/api/v2.0/cmdb/server-policy/vserver/vip-list?mkey=default_m
default/m: Response status code: 500 URL https://10.0.1.4:443/api/v2.0/cmdb/server-policy/vserver/vip-list?mkey=default_m Resp {"results": {"errcode": -5,
"message": "A duplicate entry has already existed."}}REQ BODY '{"data":{"status":"enable","use-interface-ip":"disable","vip":"default_m"}}'Do POST url https://10.0.1.4:443/api/v2.0/cmdb/server-policy/policy
default/m: Response status code: 500 URL https://10.0.1.4:443/api/v2.0/cmdb/server-policy/policy Resp {"results": {"errcode": -5,
"message": "A duplicate entry has already existed."}}REQ BODY '{"data":{"case-sensitive":"disable","certificate":"","certificate-type":"disable","client-certificate-forwarding":"disable","client-certificate-forwarding-cert-header":"X-Client-Cert","
.
.
.
EOF
Finetuning
Optimizing the performance of a FortiWeb Web Application Firewall (WAF) is crucial for maintaining the security of your web applications without sacrificing user experience due to latency or downtime. Here are some best practices specifically tailored for tuning and optimizing FortiWeb:
Understand Traffic Patterns
Analyze Traffic: Regularly analyze your web traffic patterns to understand peak usage times, common requests, and potential security threats. This will help you configure FortiWeb more effectively.
Monitor Performance: Utilize FortiWeb’s built-in monitoring tools to keep an eye on the system’s health, resource usage, and performance metrics.
Optimize Security Policies
Tailor Rules and Policies: Customize the security rules and policies to fit the specific needs and threats of your applications. Avoid using default policies which may not be optimized for your particular environment.
Prioritize Rules: Arrange firewall rules by frequency and priority. Place the most commonly matched rules at the top to minimize the processing time.
Use Caching and Compression
Enable Caching: Use FortiWeb’s caching capabilities to store static content, reducing the load on your servers and speeding up response times for end-users.
Implement Compression: Enable HTTP compression to reduce the size of the data transmitted over the network, improving load times and reducing bandwidth usage.
SSL/TLS Optimization
Offload SSL: Utilize SSL offloading to handle the SSL/TLS decryption process, relieving your backend servers from this computationally intensive task and improving overall response times.
Manage Certificates: Keep your SSL/TLS certificates up to date and use strong cipher suites to ensure optimal security and performance.
Configure Connection Settings
Connection Pooling: Use connection pooling to manage and reuse connections effectively, reducing the overhead associated with establishing new connections.
Timeout Settings: Adjust timeout settings appropriately to avoid unnecessary resource utilization, ensuring that idle or stuck sessions are cleared promptly.
Scalability and High Availability
Load Balancing: Deploy FortiWeb in a load-balanced environment to distribute traffic evenly across multiple instances, enhancing both performance and availability.
High Availability Setup: Configure high availability (HA) for FortiWeb to ensure there is no single point of failure, improving the resilience of your web security infrastructure.
Regular Updates and Maintenance
Firmware Updates: Regularly update the FortiWeb firmware to the latest version to benefit from performance improvements, new features, and security patches.
Configuration Audits: Periodically review and audit the configuration settings to remove any obsolete or unnecessary rules that could degrade performance.
Advanced Features and Fine-Tuning
Threat Intelligence Integration: Integrate with FortiGuard services for updated threat intelligence, which helps in proactive defense mechanisms by adjusting policies based on the latest threat landscape.
By following these best practices, you can ensure that your FortiWeb appliance is not only securing your web applications effectively but also operating at optimal efficiency and providing a seamless experience for your users.